
24580 - Deep fryer RUSSELL HOBBS - Free user manual and instructions
Find the device manual for free 24580 RUSSELL HOBBS in PDF.

| Product Type | Deep Fryer |
| Brand | Russell Hobbs |
| Model | 24580 |
| Temperature Range | 80°C to 190°C |
| Timer | 1 to 60 minutes, 1-minute increments |
| Oil Capacity | Between MIN and MAX marks on the bowl interior |
| Basket | Removable, with handle release button |
| Lid | Removable, with viewing window |
| Control Panel | Removable for easy cleaning |
| Filters | Two washable filters in a removable compartment |
| Safety Features | Thermal safety cut-out with manual reset |
| Power Supply | Standard household outlet (details not specified in manual) |
| Cleaning | Wash basket in warm soapy water; wipe body with damp cloth; clean filters |
| Intended Use | Household use only |
| Warranty | 2 years (extendable to 3 by online registration) |
Frequently Asked Questions - 24580 RUSSELL HOBBS
User questions about 24580 RUSSELL HOBBS
0 question about this device. Answer the ones you know or ask your own.
Ask a new question about this device
Download the instructions for your Deep fryer in PDF format for free! Find your manual 24580 - RUSSELL HOBBS and take your electronic device back in hand. On this page are published all the documents necessary for the use of your device. 24580 by RUSSELL HOBBS.
USER MANUAL 24580 RUSSELL HOBBS
natural_image
Black and white photo of a Russell Hobbs air fryer with digital display and control buttons (no visible text or symbols on the device itself)24580
www.russellhobbs.com
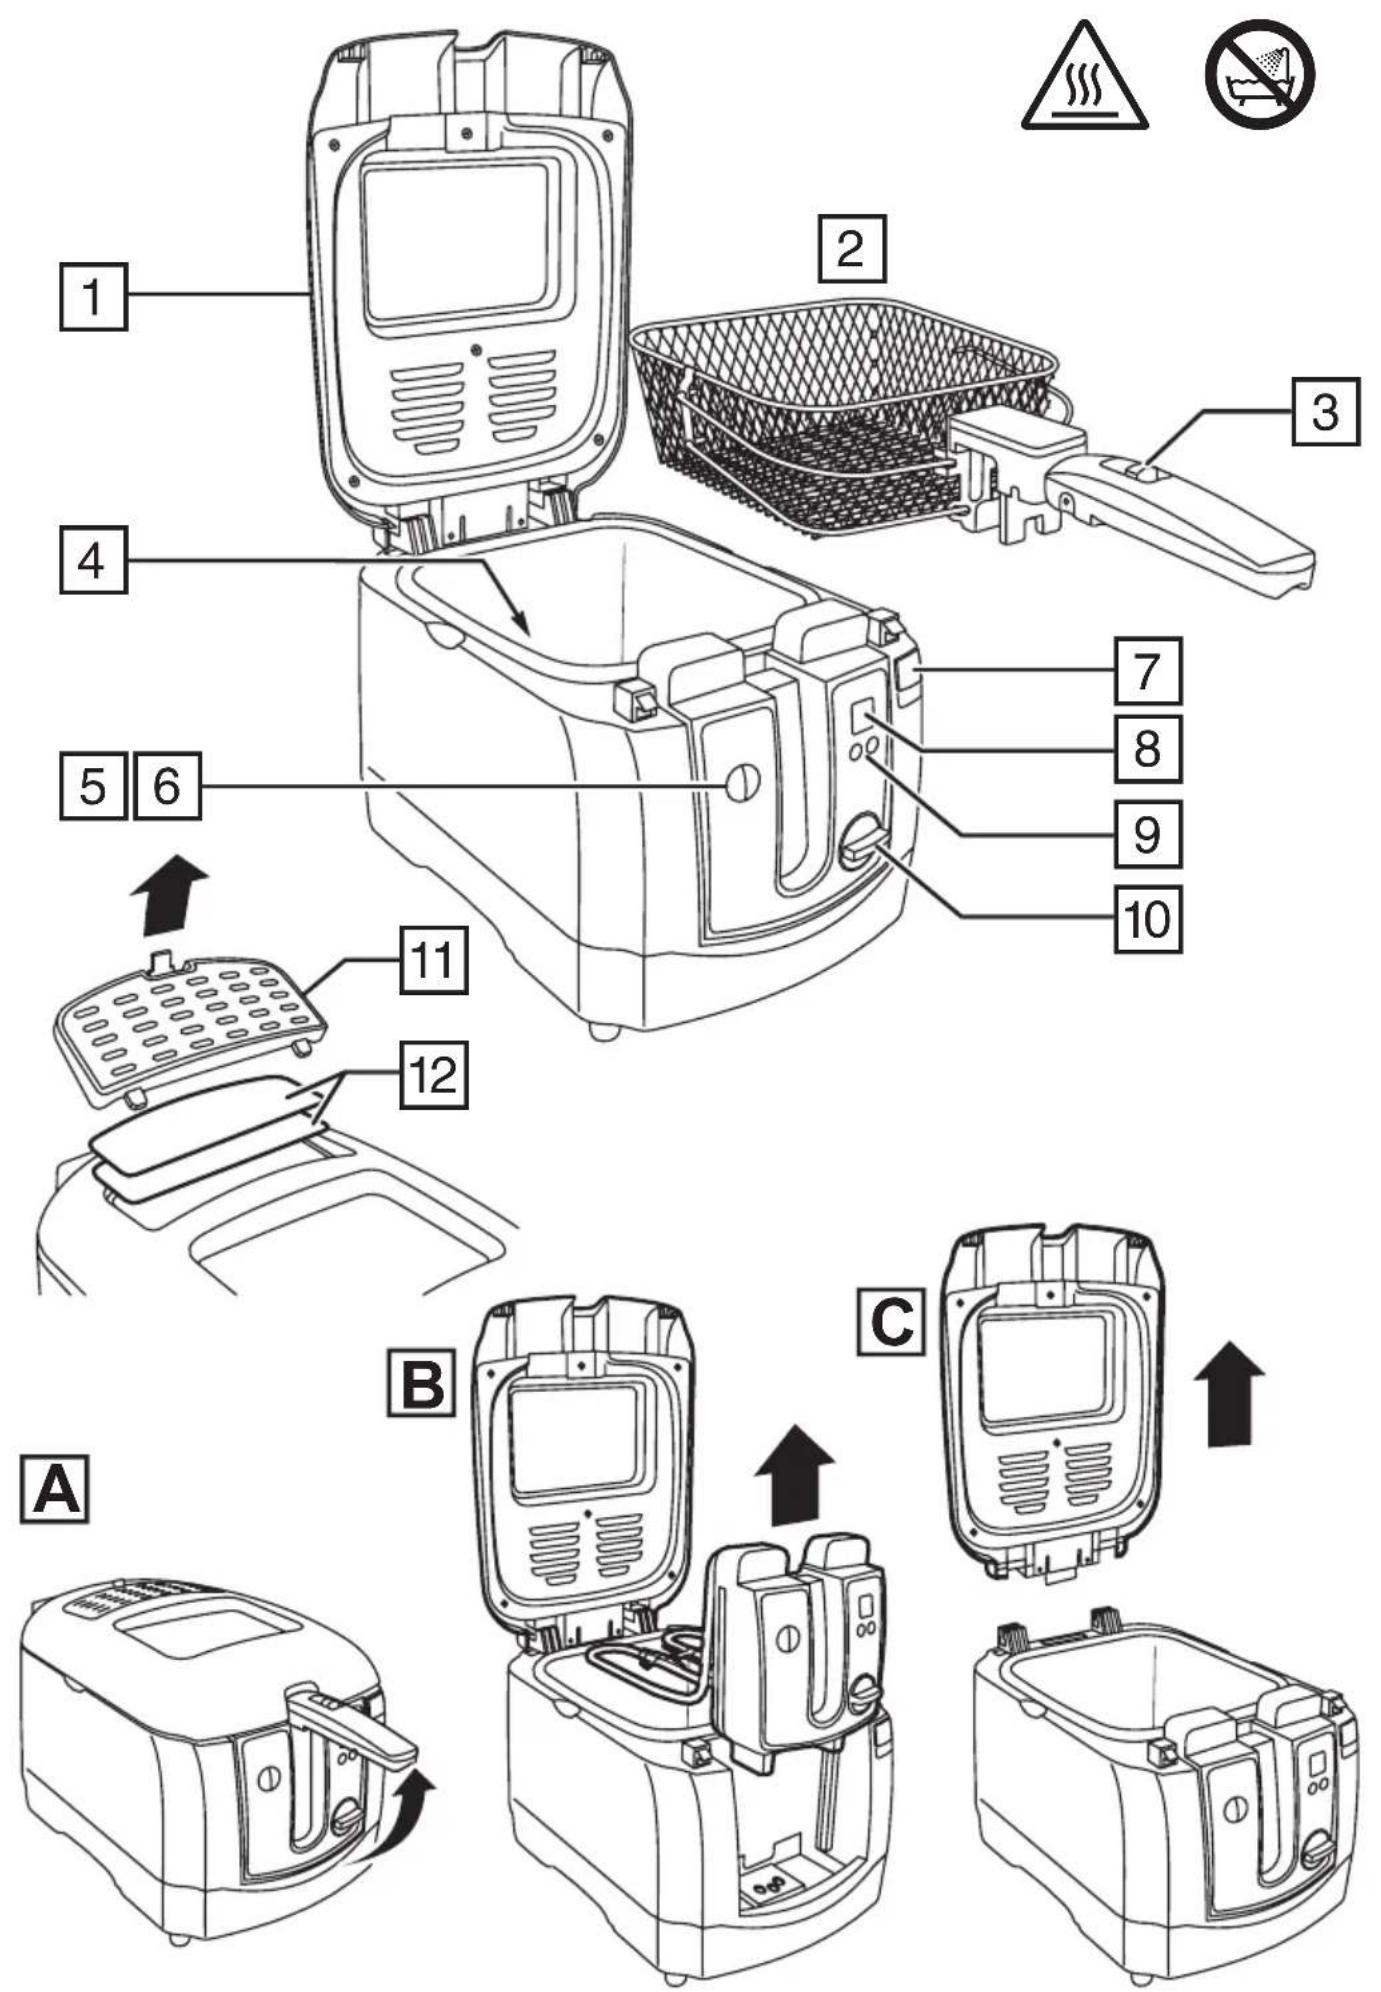
Read the instructions, keep them safe, pass them on if you pass the appliance on. Remove all packaging before use.
IMPORTANT SAFEGUARDS
Follow basic safety precautions, including:
This appliance shall not be used by children from 0 year to 8 years. This appliance can be used by children aged from 8 years and above if they are continuously supervised. This appliance can be used by people with reduced physical, sensory or mental capabilities or lack of experience and knowledge if they have been given supervision or instruction concerning use of the appliance in a safe way and understand the hazards involved. Keep the product and its cord out of reach of children aged less than 8 years. Cleaning and user maintenance must not be done by children. This product must be positioned on a stable surface with the handles positioned to avoid the spillage of hot liquids.
⚠️ Surfaces of the product are liable to get hot during use.
Never operate the product by means of an external timer or separate remote-control system.
Do not use this appliance near bathtubs, showers, basins or other vessels containing water.
If the supply cord is damaged, it must be replaced by the manufacturer, its service agent or similarly qualified persons in order to avoid a hazard.
- Don't lean or reach over the fryer while the oil is hot.
- Don't carry or pass anything through the space over or near the fryer – if anything drops into the fryer, hot oil will splash out.
- Don't try to move or carry the fryer if it contains hot oil. Let it cool down fully first.
- Don't leave the fryer unattended while plugged in.
- Don't use the fryer without first filling, with good quality cooking oil between the MIN and MAX marks inside the bowl. If the oil level is below the MIN mark, you may damage the fryer. If above the MAX mark, hot oil may escape, causing damage and injury.
- Don't put the fryer under cupboards, shelves, or anything that might be damaged by heat or steam. Keep it clear of combustible materials like curtains, or drapes.
- Never let the power cord hang over the edge of a work top, touch hot surfaces or become knotted, trapped or pinched.
- Don't put anything on top of the fryer while it's in use.
- Unplug the fryer when not in use, before moving and before cleaning, let it cool down fully before cleaning or storing away.
- Don't use accessories or attachments unless we supply them.
- Don't use the fryer for anything other than heating cooking oil for deep frying.
- Don't use the fryer if it's damaged or malfunctions.
HOUSEHOLD USE ONLY
PARTS
- Lid
- Basket
- Basket handle release button
- MIN/MAX marks
- Power light (red)
- Thermostat light (green)
- Lid button
- Timer display
- Timer buttons
- Temperature control
- Filter compartment lid
- Filters
BEFORE USING FOR THE FIRST TIME
Clean the fryer, to remove manufacturing dust, etc. see CLEANING.
PREPARATION
- Sit the fryer on a stable, level, heat-resistant surface, at least 75cm above the floor, with at least 5cm space all round it.
- Keep it away from cupboards, curtains, anything combustible, and anything that might be damaged by heat or steam.
- Position the fryer so the basket handle, when in the raised position, doesn't extend beyond the edge of the work surface where it might be caught or knocked accidentally.
- Line a colander with paper towel, to drain the food after frying.
- When using your fryer, always use oven gloves. They don't just protect your hands from heat, they protect them from drips and splashes too.
FILLING
- Stand back, and press the lid button ☐, to open the lid.
- If the bowl is empty, fill with good quality liquid cooking oil, to between the MIN and MAX marks. If it already contains oil, check the level, and top up as necessary.
- Don't use solid cooking oil, fat, butter, margarine, or olive oil. Olive oil generally contains too much water, and can be too smoky. Buy a good quality liquid cooking oil suitable for deep frying, like sunflower or corn oil.
- Don't mix oils of different types, as they'll have different temperature characteristics.
USING YOUR FRYER
- Turn the temperature control to the temperature you need. The range is 80^ C to 190^ C.
- Put the plug into a wall socket (switch the socket on, if it's switchable). The power light will come on.
- The thermostat light will come on to show that the fryer is heating up. The light will go out when the correct temperature is reached, then cycle on and off as the thermostat works to maintain the temperature.
- When the thermostat light goes out, you can start frying.
Prepare the food
- Cut food into uniformly sized pieces.
- Coat wet food (e.g. fish, fruit) with flour, crumbs, batter, etc.
- Don't try to defrost food in the fryer. Any food other than pre-cooked, quick-frozen foods (e.g. frozen chips, scampi in breadcrumbs, chicken pieces in batter) must be fully defrosted before putting into the fryer.
- When frying pre-packed or pre-cooked frozen foods, follow the instructions on the packet.
-
When frying raw vegetables (e.g. chips), dry them with paper towel or a tea towel.
-
Lift up the basket handle until it clicks (Fig A). This will raise the basket out of the oil.
- Put the prepared food pieces in the basket. Try not to put more than two layers of food in the basket. If you need to fry more, do it in batches.
- Press the basket handle release button and slowly lower the handle. This will lower the basket into the oil.
- The oil will foam as it comes into contact with water from the food. As long as the foam doesn't threaten to overflow the bowl, this shouldn't be a cause for alarm.
- If the foam threatens to overflow the bowl, raise the handle to lift the basket out of the oil. See HINTS AND TIPS for possible solutions.
- Close the lid.
Setting the timer
IMPORTANT: The timer doesn't switch the fryer on or off. Use it as a reminder—you don't have to set the timer in order to use your fryer.
- Press the + button. The display will flash.
- Press the + button until the number of minutes you want to fry is shown on the display. To decrease the time, use the - button.
- The timer can be set between 1 and 60 minutes in one minute increments.
- Once the display shows the time you want, stop pressing the + button. After a short time, the display will stop flashing, beep once, and then start to count down.
- The display will count down in minutes until it reaches the last minute when it will then count down in seconds.
- When it reaches zero, the timer will beep. To stop the beep, press either the + or - button.
Frying the food
- Stay in the kitchen and keep an eye on the frying process.
- Don't lean or reach over the fryer while the oil is hot.
- Wait till the food has cooked then unplug the fryer from the wall socket (switch the socket off first, if it's switchable).
- Lift up the basket handle until it clicks to raise the basket out of the oil.
- Stand back, and press the lid button ☐ to open the lid. Beware of escaping steam.
- Put on an oven glove, then use the handle to lift the basket straight up out of its mounts on the front of the fryer.
- Empty the food into the lined colander to drain before serving.
- Refit the empty basket onto the fryer. Align the tab in front of the handle with the slot in the front of the fryer, and slide the basket down into its mounts on the front of the fryer.
- If you've finished, leave the dryer to cool down before cleaning.
- If you want to fry another batch of food, check the oil level and top up as necessary.
COATINGS AND BATTERS
Coat all foods, except those high in starch, like potatoes and doughnuts. The coating protects the food, helps prevent juices leaking into the oil and gives a crisp tasty result. Generally, coatings won't stick to frozen foods.
Seasoned flour
Thicker coatings don't stick well to wet/damp foods, so coat them first in seasoned flour. Use on its own to coat small whole oily fish like whitebait.
Egg and breadcrumbs
Popular on fish, chicken, and scotch eggs, it gives an attractive, crisp, crunchy exterior. Ideal for foods that are to be served cold, as it stays crisp for hours.
-
Coat in seasoned flour, to dry the food. Dip in beaten egg, then breadcrumbs, repeat till fully coated. Press well, then shake off any excess.
-
Fresh breadcrumbs give a rough appearance. Make dry breadcrumbs or raspings by baking scraps of bread till golden, then crush or process to a fine crumb.
Basic batter
• 100g self raising flour
- cold water
- pinch of salt
Just before it's needed, mix the salt and flour with enough water to form a smooth cream that will coat the back of a spoon.
Basic fritter batter
• 100g self-raising flour
- pinch of salt
- 5ml (1tsp) cooking oil
- cold water
Sift the flour and salt into a bowl. Stir in the oil. Just before it's needed, stir in enough water to form a smooth batter.
Fritter batter with egg white
- 100g plain flour
• 15ml (1tbsp) cooking oil
- 1 egg, separated
- pinch of salt
• 150ml liquid (cold water, milk, beer)
Sift the flour and salt into a bowl. Stir in the egg yolk, then the liquid. Beat in the oil. Just before it's needed, whisk the egg white and fold into the batter.
Crispy Chinese batter
- 75g cornflour
- 5ml (1tsp) cooking oil
- 1 large egg
- good pinch of salt
• 10ml (2tsp) baking powder
- cold water
Mix the egg, cornflour, salt, oil, and enough cold water to form a creamy base on which to add either egg and breadcrumbs or batter. It holds the other coatings on the food.
FRYING TIMES
Use these times purely as a guide. Check that food is cooked through before serving. If in doubt, cook it a bit more. Chips and other vegetables should be crisp. Cook meat, poultry, and any derivatives (mince, burgers, etc.) till the juices run clear. Cook fish till the flesh is opaque throughout.
Chips (french fries)
- Use a chipping potato, like King Edward, Cara, Maris Piper, Romano or Desirée.
- Peel, cut, rinse, drain, and dry thoroughly. Don't put more than two layers of chips in the basket at a time. For best results, fry in two stages:
Stage 1: Fry for 5-10 minutes (depending on quantity) at 170^ C. When the chips reach pale gold, and the outside is firm, lift the basket out of the oil, and let the chips drain and cool
Stage 2: Fry for 2-4 minutes at 190^ C. When golden brown and crisp, remove from the oil, and drain in a colander lined with paper towel.
Frozen chips (french fries)
Follow the directions on the package.
Other vegetables
Many vegetables may be deep fried – onion rings, mushrooms, cauliflower florets. They can be fried from fresh or frozen, and should be coated.
frozen food (small pieces in batter, breadcrumbs, etc.)
- Frozen food cools oil quickly, so fry a single layer at a time..
- Keep the pieces apart, or they'll stick together.
- Shake off excess ice or water before adding the food to the oil.
- Use the highest temperature setting, and lower the basket slowly into the oil, to reduce foaming.
- For pre-packed food, follow the instructions on the package.
Fish – frozen
You may fry pre-coated fish – follow the directions on the package.
| Type Temperature (°C) Time (mins) | ||
| Plaice 190 5 - 6 | ||
| Fillets 170 10 - 15 | ||
| Goujons 190 3 | ||
| Scampi 170 3 - 5 | ||
| Fish cakes - small 170 3 | ||
| Fish cakes - medium/large 170 4 - 5 | ||
| Whitebait | 190 2 - 3 |
Fish – fresh
Fish has a high water content. Dry with paper towel, and coat before frying. Use whole, or cut into fillets, cutlets or goujons.
| Type Temperature (°C) Time (mins) | ||
| Fillets, goujons, scampi, fish cakes | 190 3 - 4 | |
| Whitebait | 190 | 1 - 2 |
Meat
Only deep fry fresh/thawed meat. Coat in egg and breadcrumbs or batter. For frozen meat products, follow directions on the package.
| Type Temperature (°C) Time (mins) | ||
| Goujons 190 3 | ||
| Chops/cutlets - small/large | 170 | 10/15 |
| Scotch eggs | 170 | 10 |
| Rissoles, meat balls | 190 6 | |
| Weiner schnitzel (depending on thickness) | 170 | 3-8 |
Poultry
Only deep fry fresh or thawed poultry. Coat in egg and breadcrumbs or batter. Remove the skin for better results. Allow time for poultry to cook to the centre. A crisp golden exterior doesn't necessarily denote this, so test before serving. For frozen poultry product, follow directions on the package.
| Type Temperature (°C) Time (mins) | ||
| Goujons 170 4 | ||
| Drumsticks | 170 14 - 15 | |
| Croquettes | 190 | 2 - 3 |
| Chicken in breadcrumbs - small | 170 | 15 - 20 |
| Chicken in breadcrumbs - large | 170 | 20 - 30 |
Bread, cakes, fritters
| Type Temperature (°C) Time (mins) | ||
| Ring doughnuts 190 2 | ||
| Pineapple, banana or applee fritters 190 2 - 3 | ||
| Croutons (diced bread) 190 1 |
HINTS AND TIPS
- Adding food to the oil reduces the temperature of the oil.
- If you add a little food, the temperature will recover quickly, and the food will be cooked properly.
- When you put food into the oil, you should see bubbles given off. This is steam, formed when the moisture inside the food heats up.
- The steam coming out of the food prevents oil from soaking into the food and the food cooks uniformly – firm and crisp.
- If you add too much food, the temperature will not recover and your food will absorb oil.
- If the oil foams and threatens to overflow, there's too much food in the basket (take some out), the food is too moist (dry the food with paper towel and try again), or the oil is old or contaminated (replace it).
- Every time oil is heated, it deteriorates.
- Every time food is put into it, moisture, particles of food and fat, flour and spices from coatings, water from frozen foods, cause further deterioration.
- Particles blacken, burn, and stick to the next batch of food, altering its look and taste. Filtering the oil can alleviate this a little.
- Pre-cooked and oven chips have a coating of oil from the pre-cooking process. This will thicken and discolour the oil in your fryer.
- If you fry coated foods often, it's worth keeping two lots of oil, one for coated foods and one for "oil-friendly" foods. Keep them in separate, labelled containers.
- Even filtered oil will be past its best after 10 to 12 uses. It may look OK, but it'll already have affected the quality and taste of your food.
- As a rough guide, if you notice a marked improvement in flavour after changing the oil, you should have changed it earlier.
- Don't top up oil that's past its best. You're just wasting new oil.
CARE AND MAINTENANCE
- Unplug the fryer, and leave it to cool down fully.
- If you intend to move the fryer without emptying it, take care, it'll be heavy.
- Don't put the fryer in water or any other liquid.
- Don't put the fryer in a dishwasher.
- Don't use harsh or abrasive cleaning agents or solvents.
- Cover the work surface generously with paper towel (at least three layers thick).
- You'll need a suitable container for the used cooking oil. If the container doesn't have a wide opening, use a funnel.
- If you want to filter the oil at the same time, support a fine sieve over a wide necked container, or fit the funnel with a filter paper.
-
The control panel is removable for easy cleaning. To remove it, pull it straight upwards out of the two slots (Fig B). Do not imerse the control panel in liquid.
-
The lid is removable for easy cleaning. Open the lid, and lift it straight upwards and out of its mounts (Fig C). To refit the lid, lower it into its mounts on the rear of the fryer body.
- Use the handle to lift the basket straight up out of its mounts on the front of the fryer.
Emptying the bowl
- The bowl can be lifted out of the fryer body for easy emptying/cleaning. Remove the control panel first.
- If you're using a funnel, fit it to the oil container.
- Pour the oil from the side or rear of the bowl into the container or funnel.
- If you're filtering at the same time, you'll need to pour the oil a little at a time, waiting till the last lot has filtered through before adding the next lot.
CLEANING
To avoid the build up of jelly-like deposits, it's best to clean the deep fryer after every few uses. If you leave it too long, solid layers of oil will build up.
- Wash the basket in warm soapy water, rinse thoroughly and leave to air dry.
- Wipe all other surfaces with a damp cloth.
- With use, the basket and bowl will discolour. This is inevitable, harmless, and won't affect the operation of the fryer.
Cleaning the filters
- Press the tab on the filter compartment lid and remove the lid.
- Remove the two filters.
- Wash the filters in warm soapy water. Allow them to air dry thoroughly then refit them.
THERMAL SAFETY CUT-OUT
The cut-out operates to protect the element from overheating. If the fryer stops working:
- Switch off, unplug, and let the fryer cool down.
- Check the oil level.
- If the oil level is below the MIN mark, reset the thermal safety cut-out.
- If the oil level isn't too low, and the thermal safety cut-out has operated for some other reason, ring Customer Service Department.
To reset the thermal safety cut-out
- Switch off, unplug, and let the fryer cool down.
- Find the reset button access hole on the back of the control panel. The hole is marked RESET. You might find it easier to lift out the control panel first.
- Inside the hole you'll see a round button.
- Use something like a cocktail stick to press the button. This will reset the cut-out.
- Top up the oil, plug the fryer in and switch on.
- It should now work – if it doesn't, ring Customer Service.
RECYCLING
To avoid environmental and health problems due to hazardous substances, appliances and rechargeable and non-rechargeable batteries marked with one of these symbols must not be disposed of with unsorted municipal waste. Always dispose of electrical and electronic products and, where applicable, rechargeable and non-rechargeable batteries, at an appropriate official recycling/collection point.
SERVICE
If you ring Customer Service, please have the Model Number to hand, as we won't be able to help you without it. It's on the rating plate (usually underneath the product).
The product isn't user-serviceable. If it's not working, read the instructions, check the plug fuse and main fuse/circuit breaker. If it's still not working, consult your retailer.
If that doesn't solve the problem – ring Customer Service – they may be able to offer technical advice.
If they advise you to return the product to us, pack it carefully, include a note with your name, address, day phone number, and what's wrong. If under guarantee, say where and when purchased, and include proof of purchase (till receipt). Send it to:
Customer Service
Spectrum Brands (UK) Ltd
Fir Street, Failsworth, Manchester M35 0HS
email: support@russellhobbs.com
telephone: 0345 658 9700 (local rate number)
Please note: If you have purchased the product within the last 6 months, please contact the retailer in the first instance to deal with any matters relating to warranty.
GUARANTEE
Defects affecting product functionality appearing within the guarantee period will be corrected by replacement or repair at our option provided the product is used and maintained in accordance with the instructions. Your statutory rights are not affected.
Guarantee period = 2 years from first retail purchase.
To claim an extra 1 year guarantee, register your product online within 28 days of purchase.
Register at: www.russellhobbs.co.uk/productregister/
Consumables are guaranteed only for their recommended lifecycle. Replacement/Spare parts* are excluded and are only covered by a 1 year warranty.
* Examples include filters, removable grill plates, drip trays/crumb trays etc.

ONLINE
www.russellhobbs.com for more products

REGISTER ONLINE
Register online for an EXTRA year guarantee*.
Visit www.russellhobbs.co.uk/productregister/
*You must register within 28 days of purchase.