
Airakles 10031942 - Food processor Klarstein - Free user manual and instructions
Find the device manual for free Airakles 10031942 Klarstein in PDF.


User questions about Airakles 10031942 Klarstein
0 question about this device. Answer the ones you know or ask your own.
Ask a new question about this device
Download the instructions for your Food processor in PDF format for free! Find your manual Airakles 10031942 - Klarstein and take your electronic device back in hand. On this page are published all the documents necessary for the use of your device. Airakles 10031942 by Klarstein.
USER MANUAL Airakles 10031942 Klarstein
bar
| Category | Value | |---|---| | Bar 1 | 0.0 | | Bar 2 | 0.0 | | Bar 3 | 0.0 | | Bar 4 | 0.0 |natural_image
Simple line drawing of a right-angle bracket with a checkmark (no text or symbols)Richtig:
natural_image
Simple line drawing of a staircase with an X symbol below (no text or labels)Falsch:
natural_image
Simple line drawing of a right-angle bracket with a small cross symbol below (no text or labels)Falsch:
text_image
Diagram illustrating a food preparation step: adding granular material into a blender with steps 1 and 2 indicated.text_image
Diagram showing a blender being opened into a 2D printer, with labeled parts and step indicator.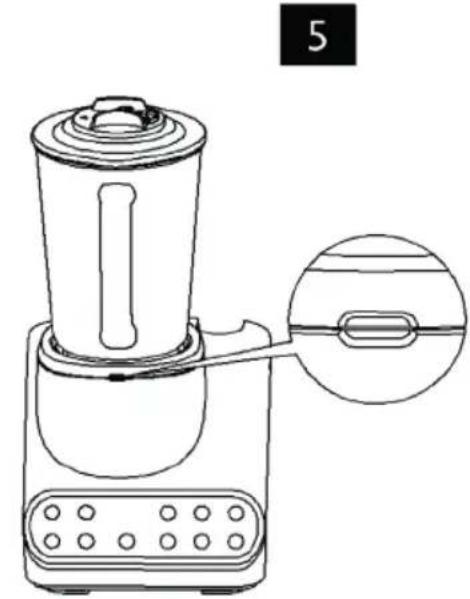
natural_image
Line drawing of a kitchen blender with an inset close-up showing the handle (no text or symbols)text_image
Diagram showing a device being connected to a pump, with arrows indicating the process and label '7' in the top right corner.natural_image
Line drawing of a blender with a lid and spool, showing internal components (no text or symbols)natural_image
Line drawing of a mechanical device with a cable and plug, no text or symbols presentnatural_image
Symbol of a trash bin with crossed lines indicating no waste, and a solid black rectangle below (no text or labels)Congratulations on purchasing this equipment. Please read this manual carefully and take care of the following hints on installation and use to avoid technical damages. Any failure caused by ignoring the items and cautions mentioned in the operation and installation instructions are not covered by our warranty and any liability.
CONTENTS
Technical Data 17
Safety Instructions 18
Device Description 19
Assembly 20
Operation 24
Table for Maximum Filling 27
Troubleshooting 28
Disposal Considerations 29
TECHNICAL DATA
| Item number 10031942 | 10031943 |
| Power supply 220-240 V~ 50/60 Hz | |
| Power consumption 1300 W | |
| Capacity Jar 1.5 litres | Small Container 800 ml |
SAFETY INSTRUCTIONS
- Check if the voltage indicated on the appliance corresponds to the local mains voltage before you connect the appliance.
- To avoid a hazardous situation due to inadvertent resetting of the thermal cut-out, never connect this appliance to a timer switch.
- Do not use the appliance if the mains cord, the plug or other parts are damaged.
- If the power cord is damaged, you must have it replaced by supplier, or a service centre or similarly qualified persons in order to avoid a hazard.
- Never reach into the blender glass jug with your fingers or an object or open the glass jug lid while the appliance is plugged in or operating. The cutting edges of the blade unit are very sharp.
- This appliance is not intended for use by persons (including children) with reduced physical, sensory or mental capabilities, or lack of experience and knowledge, unless they have been given supervision or instruction concerning use of the appliance by a person responsible for their safety.
• Children should be supervised to ensure that they do not play with the appliance. - Never let the appliance operate unattended.
- Never use the glass jug to switch the appliance on and off.
- Do not touch the cutting edges of the blade units when you handle or clean them. They are very sharp and you can easily cut your fingers on them
- If the blade unit gets stuck, unplug the appliance before you remove the ingredients that block the blade unit.
- Never immerse the motor unit in water or any other liquid, nor rinse it under the tap. Only use a moist cloth to clean the motor unit.
- Always unplug the appliance before you assemble, disassemble or make adjustments to any of the parts.
• Food and liquid temperature cannot exceed 40 °C - Do not exceed the maximum level (1.5L) indicated on the glass jug and the volume mark in this manual.
- Never operate the blender with out food or liquid in the glass jar.
- Never operate the blender for more than 1 minute without interruption.
SAFETY FEATURES -- Thermal cut-out
-
The appliance is equipped with a thermal cut-out that automatically cut off the power supply to the appliance if it is overheating.
• If the appliance suddenly stops running: -
Remove the plug from the wall socket.
- Let the appliance cool down for 30 minutes.
- Put the plug in the wall socket.
- Switch on the appliance again.
DEVICE DESCRIPTION
EN
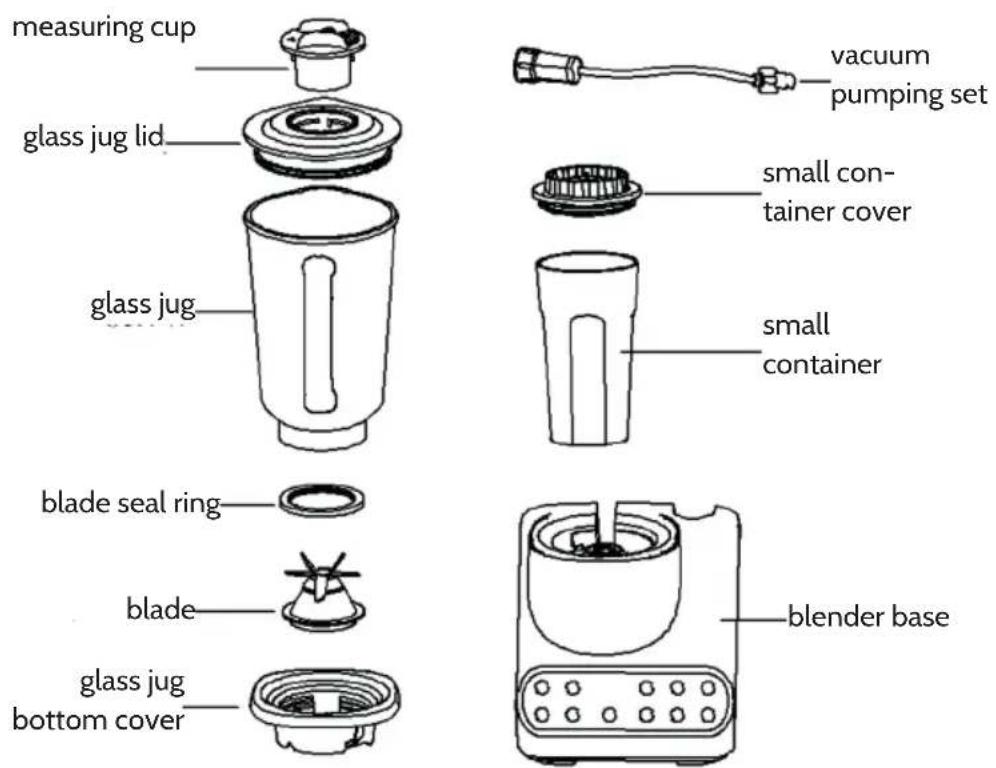
ASSEMBLY
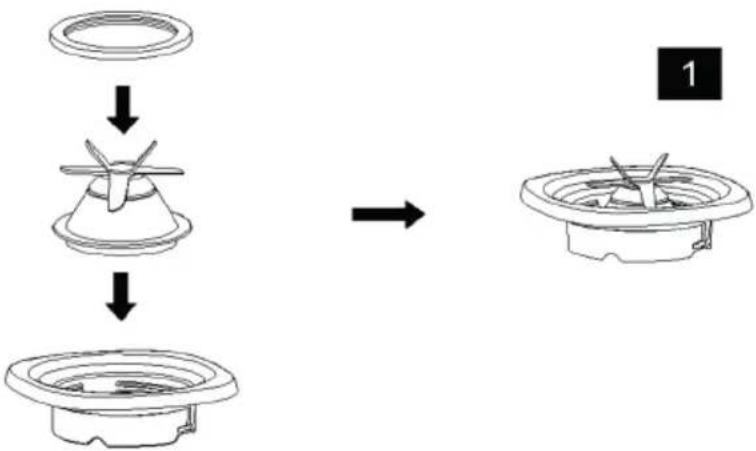
- Put the blade seal ring on the blade correctly, the seal ring should wrap the blade outside circle edge, then put the blade with seal ring into the glass jug bottom cover, as blow pic. 1
flowchart
graph TD
    A["Ring opening"] --> B["Conical component"]
    B --> C["Final assembly with parts and fixtures"]
    style A fill:#f9f,stroke:#333
    style B fill:#ccf,stroke:#333
    style C fill:#cfc,stroke:#333
Correct insertion
natural_image
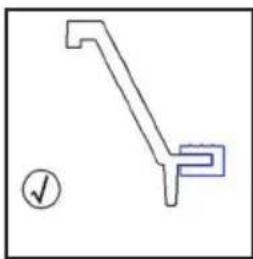
Simple line drawing of a right-angle bracket with a checkmark (no text or symbols)Correct
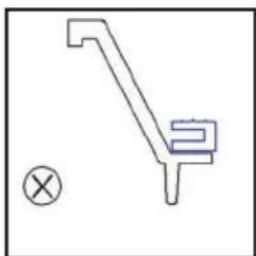
The silicon ring of the blade should be got stuck on the edge of the blade outside circle, and the smooth surface is under the edge..
natural_image
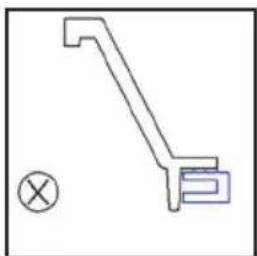
Simple line drawing of a staircase with an X symbol below (no text or labels)Wrong
The blade seal ring is above the blade.
natural_image
Simple line drawing of a bracket with a cross symbol (no text or labels)Wrong
The blade seal ring is under the blade.
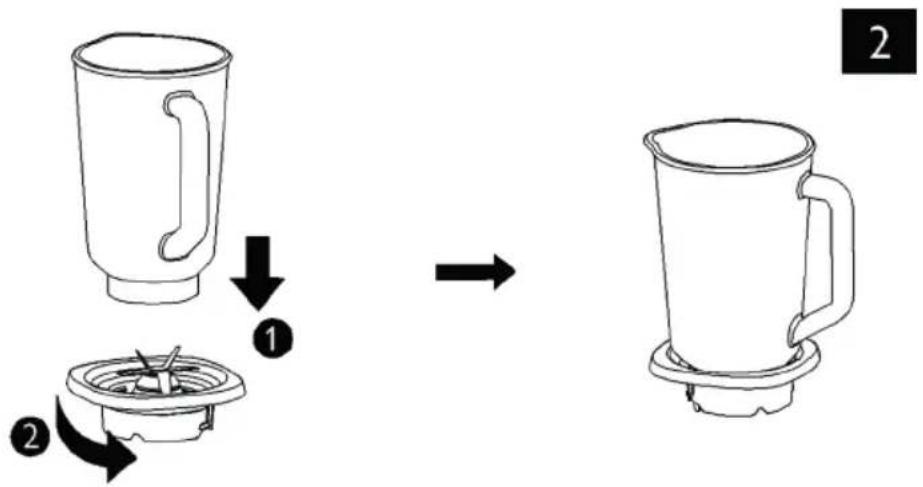
- Put the glass jug on the glass jug cover with blade, then turn the glass jug cover anticlockwise until the glass jug cover locked thoroughly like below pic. 2.
flowchart
graph TD
    A["Sh�ener with lid"] -->|Step 1| B["Shelter with lid and fan"]
    B -->|Step 2| C["Shutter with lid and fan"]
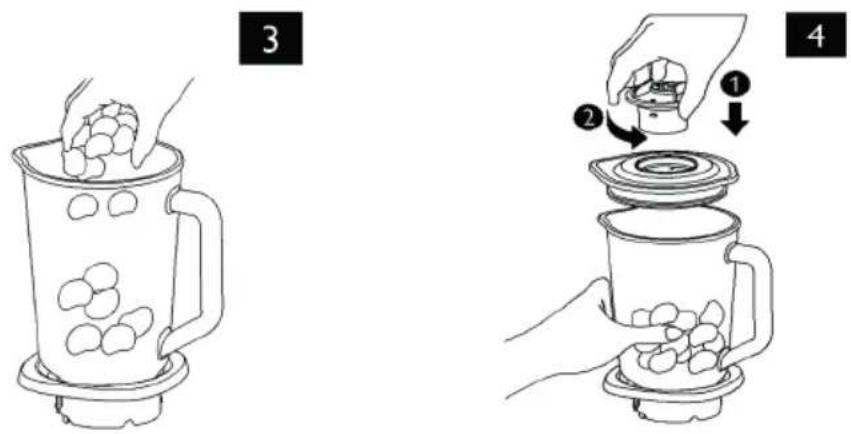
- Put food material into glass jug, like pic. 3.
- Put glass jug lid over the jug with the "▲" on the lid aligning with the jug outlet. Then cover the jug lid with the measuring cup. The raised part of the measuring cup aligned at the lid notches with the "▲" on measuring cup aligning with the "Open" marking. Turn the measuring cup anticlockwise thoroughly to the "Lock" mark, like pic.4.
text_image
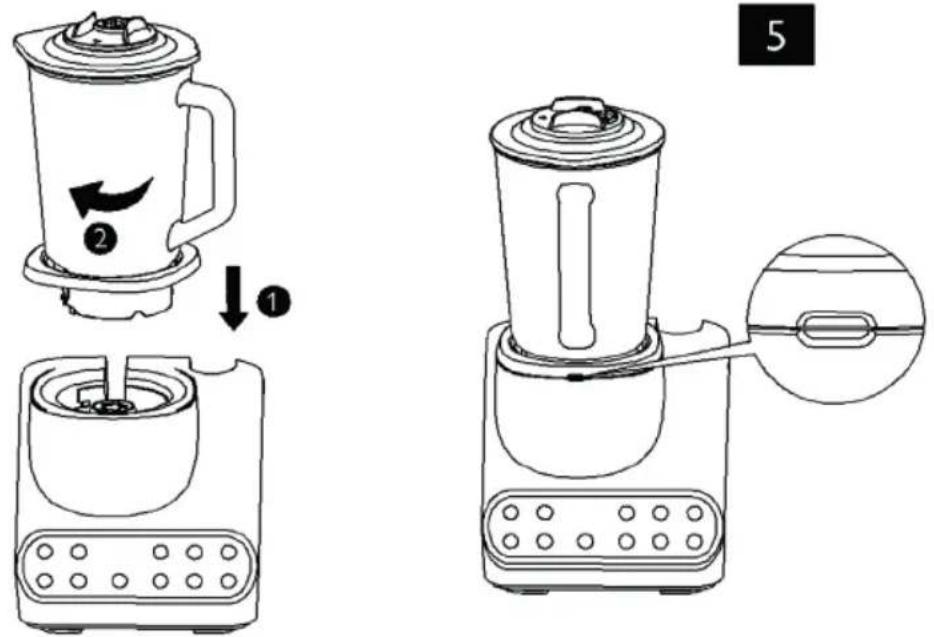
Illustration showing a cooking step with a steamer and a lid, labeled with steps 1 and 2.- Put the glass jug with food on blender base then turn clockwise thoroughly unit a click sound heard -- the handle of the glass jug have to be in the centre position, the recess of the glass jug cover match with the base recess, the blender installed correct, see below Pic.5.
- Usage of vacuum pumping set
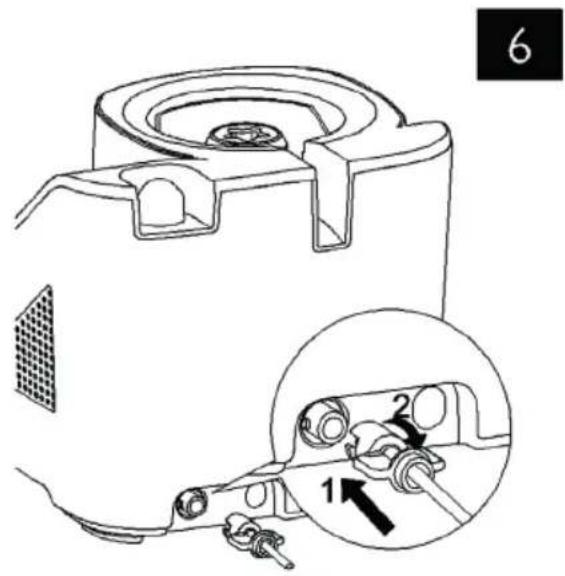
a. Insert the extraction valve to the air exhaust chunk, then turn clockwise thoroughly such as Pic.6. b. Put the vacuum pumping tank on glass jug lid / small container cover air valve then press tightly lid/cover with some strength such as Pic.7.
text_image
Technical diagram of a mechanical device with labeled parts and an inset showing a close-up view of the component.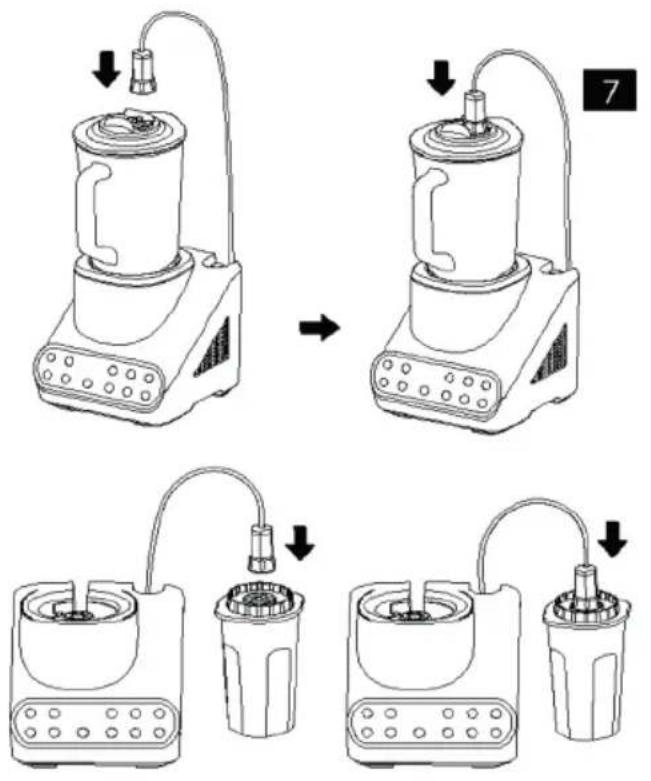
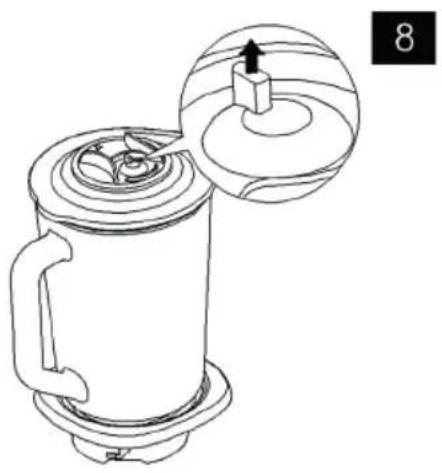
c. If need to open the lid / cover, please pull out the vent valve, let air runs in first, then open lid / cover, as below Pic.8
natural_image
Line drawing of a portable kitchen with a lid and handle, showing a mechanical component (no text or symbols)Notice: if the tank does not stick to the lid / cover automatically, or the control panel shows "EO" in set working period, it means the product vacuum pumping set is leaking air, and leakproofness is not good. Please stop working, and check if all the vacuum pumping set parts are installed well and sealed, then repeat above step a. and step b.
OPERATION
- Clean all parts except the base and vacuum pumping set before first use.
- Do not fill the glass jug exceed the MAX indication, all the food/liquid temperature and volume.
- Please follow below image indication to assemble and disassemble product.
- Clean and preserve in time after every use.
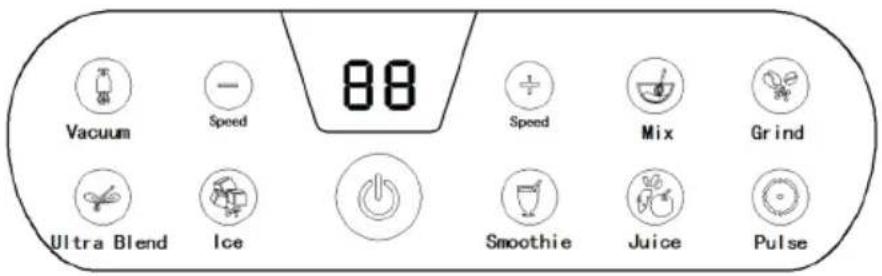
Control panel
text_image
88 Vacuum Speed Speed Mix Grind Ultra Blend Ice Smoothie Juice Pulse | Start/ Stop button: after choose the function, press "Start/ Stop" button to start the blender. During working, can press " Start/ Stop" button stop the blender. |
 | Speed increase/ reduce button: the blender have " 1,2,3,4,5" total 5 speed gears, speed 5 is the highest. By touching the buttons each time can increase/ reduce the speed, and user can choose the speed base on their favour.Remark: 1.on the Standby model, press " Speed increase/ reduce button" then press " Start/ Stop button" –this is DIY function, working time is 1 minute; 2. Under other working status, press "Speed increase/ reduce button" can change the function speed. |
 | |
 | Vacuum button: vacuum function can be used in vacuum blending and vacuum storage.Vacuum blending is to vacuumize the glass jug which with food inside, then to blend the food – this will make the food taste more soft.Vacuum storage is to put the blended food in the small container, then vacuumize it. |
 | Mix button: use for making sauce. |
 | Grind button: use for making chilli sauce, garlic, onion, meat, presoaked seed/grain (such as lotus seed, rice ect. solid material). |
 | Ultra blend button: Use for blending with highest speed. |
 | Ice button: For ice crush only.. |
 | Smoothie button: Suitable for fruit or vegetable with ice. |
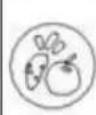 | Juice button: Suit for fruit or vegetable. |
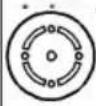 | Pulse button: press and hold this button still, blender will rotate at the highest speed, suitable for vegetable juice, carrot juice. Release the button, blender will back to the original working condition. |
Important notice:
- If still haven't finished blending after 1 minute, please press Start/Stop button, wait for 1 minute and rework again.
- Except crushing ice and grainy nut fruits, when other blending functions need to add water inside, the water amount should reach to MOQ 500ml when there is food inside the glass jar. If the blender is overheating, please let it cool down before use again.
- Cut solid food into small pieces (1-2 cm) before putting in the glass jug, and do not put too much solid food. If many solid food need to be processed, please process in several times.
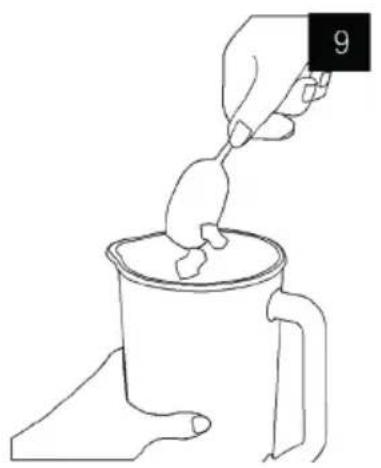
- If have food pasted on the glass jug wall, please turn off the power first, then use spatula/spoon to scrape the food down such as Pic.9.
- You can turn on the measuring cup and pour liquid material (such as oil) into the glass jug when blender is working. See Pic. 10.
• Power cord can be inserted and hid in the base by hand, see Pic. 11
EN
natural_image
Line drawing of a hand pouring liquid from a spoon into a mug (no text or symbols)
natural_image
Line drawing of a hand pouring liquid into a container (no text or symbols)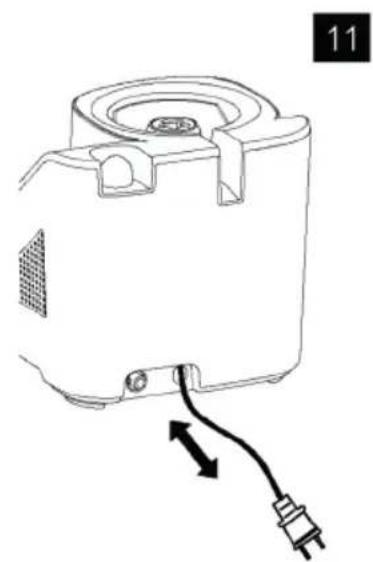
natural_image
Line drawing of a mechanical device with a cable and labeled component (no text or symbols)TABLE FOR MAXIMUM FILLING
| Ingredient Volume | |
| Fruit 50 g | |
| Vegetable 120 g | |
| Vegetable juice 150 g vegetables + water (appropriate) | |
| Milk shake 200 g fruit + 500 ml milk | |
| Ice cube Max. 12 pieces | |
| Soupe 750 ml water | |
| Presoaked seed and grain, such as lotus seed and rice, etc.. | 20-80 g |
| Chilli sauce (red pepper, garlic, shallot, etc.). | 20-80 g |
| Garlic 20-250 g | |
| Onion 20-150 g | |
| Meat 30-80 g |
EN
TROUBLESHOOTING
| Problems Reasons | Solutions | |
| Blender cannot work | This product has a save lock, if the glass jug is not put on the base appropriately, the blender cannot work | Pull out the plug, check the glass jug if install appropriately |
| This product has overheating protection system, if the blender is too hot, the system will cut the power automatically. | Pull out the plug, let the blender cool down 30 minutes, then plug in the power again, press the function buttons to see if the blender still works. | |
| Blade blocked Too much food in the glass jug. | Pull out the plug, pour out some food material and restart again.. | |
| Motor has bad smell in several uses at the beginning | It is normal If after used for many times, blender still have bad smell, you should check if you over put the food inside, and over the max working time.. | |
| Machine noise heavy, bad, smell, burning hot, smoking | Too much food in the glass jug | Pull out the plug, pour outcome food, and process with small amounts. |
| Machine overworking without stop. | DO NOT let the blender continuously working more than 1 minute. | |
| Blender leakage | The seal ring is not correctly put on the blade, or the blade is not correctly installed or locked on the glass jug. | Pull out the plug, put the seal ring correctly on the blade, and correctly installed the blade on the glass jug |
| The raw material in the glass jug over the MAX indication | Pull out the plug, pour out some food, and process with small amounts. | |
DISPOSAL CONSIDERATIONS
natural_image
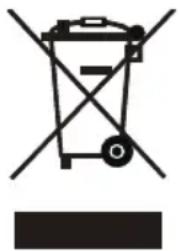
Symbol of a trash bin with crossed lines and a blank rectangular block below (no text or labels)According to the European waste regulation 2012/19/EU this symbol on the product or on its packaging indicates that this product may not be treated as household waste. Instead it should be taken to the appropriate collection point for the recycling of electrical and electronic equipment. By ensuring this product is disposed of correctly, you will help prevent potential negative consequences for the environment and human health, which could otherwise be caused by inappropriate waste handling of this product. For more detailed information about recycling of this product, please contact your local council or your household waste disposal service.

Declaration of Conformity
Producer: Chal-Tec GmbH, Wallstraße 16, 10179 Berlin, Germany
This product is conform to the following European Directives:
2011/65/EU (RoHS)
2014/30/EU (EMC)
2014/35/EU (LVD)
EN

bar
| Category | Value | |---|---| | Bar 1 | 100 | | Bar 2 | 100 |KLARSTEIN NIEIJSRAK TEIN NIEIJSRAK KLAR KLARSTEIN NIEIJSRAK TEIN NIEIJSRAK KLAR KLARSTEIN NIEIJSRAK TEIN NIEIJSRAK KLAR KLARSTEIN NIEIJSRAK