Strada HM - Electric bike Victesse - Free user manual and instructions
Find the device manual for free Strada HM Victesse in PDF.


| Product Type | Electric Bike |
| Motor Location | Front wheel (freewheel motor) |
| Battery Type | Lithium-ion |
| Battery Voltage | 36V (typical) |
| Charging Time | 4-6 hours (full charge) |
| Display Options | Left-handlebar integrated or central display with left control |
| Pedal Assist Modes | 1-9 levels |
| Walk Assist Speed | 6 km/h |
| Maximum Assisted Speed | 25 km/h (legal limit) |
| Wheel Diameter | 700C (default) |
| Gears | 3, 7, or 8 speed (twist shifter) |
| Handlebar Adjustment | Tool-free or Allen wrench adjustable |
| Saddle Adjustment | Quick-release lever or Allen wrench |
| Lighting | Front and rear lights; rear battery-powered, front switched via display |
| Battery Charge Indicator | 4 LEDs on battery, plus display battery meter |
| Error Code Display | Yes, codes 0-9 defined |
| Monthly Maintenance | Inspect headset, tires, pedals, brakes, spokes, lighting, wheels, seat post, handlebar stem |
| Annual Maintenance | Service at local center |
| Cleaning | Garden hose and cloth; no pressure washer |
| Weight | Approximately 22 kg (estimated) |
Frequently Asked Questions - Strada HM Victesse
User questions about Strada HM Victesse
0 question about this device. Answer the ones you know or ask your own.
Ask a new question about this device
Download the instructions for your Electric bike in PDF format for free! Find your manual Strada HM - Victesse and take your electronic device back in hand. On this page are published all the documents necessary for the use of your device. Strada HM by Victesse.
USER MANUAL Strada HM Victesse
EN | USERMANUAL | 21
Innehåll
Grattis till din nya Victesse....2
natural_image
Technical line drawing of a cylindrical mechanical component with internal channels and mounting holes (no text or symbols)Bild 2: Batteriport; under lock
- BMS/Battery monitoring system
text_image
1x Pă 2x AvBild 7: Baklampa
natural_image
Close-up of a transparent plastic light bulb with a mesh cover and a metal hook attached (no text or symbols visible)Bild 8: Framlampa
natural_image
Technical line drawing of a cylindrical mechanical component with internal components and mounting holes (no text or symbols)natural_image
Top-down schematic of a vehicle or road intersection with directional arrows indicating flow or movement (no text or symbols)natural_image
Close-up of a hand using a power tool to cut a metal component (no text or symbols visible)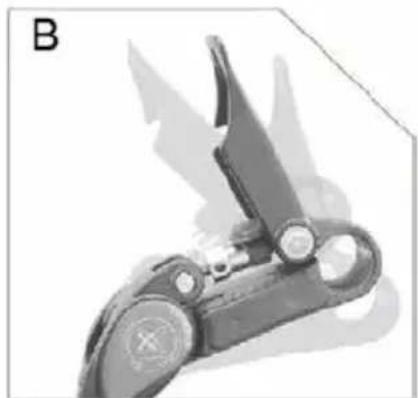
natural_image
Close-up of a mechanical device with a triangular handle and circular base (no visible text or symbols)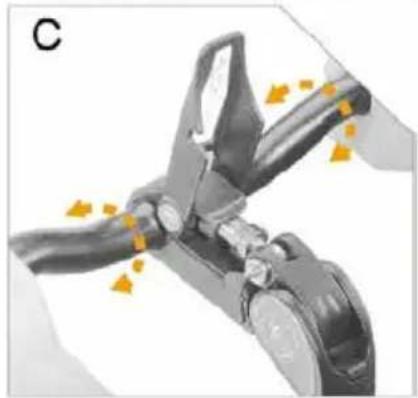
natural_image
Mechanical component diagram showing a lever mechanism with yellow directional arrows indicating motion (no text or symbols)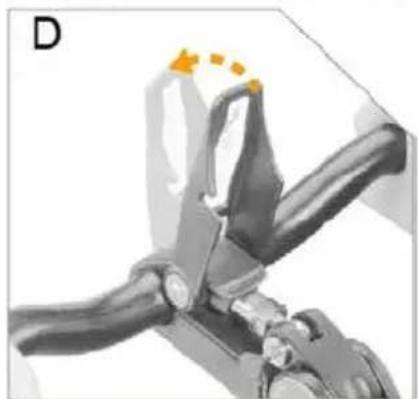
natural_image
Close-up of a mechanical clamp or tool with a yellow-orange highlight on the handle (no text or symbols visible)Bild 13: Styrstam
Congratulations on the purchase of your new Victesse 22
Use of the battery 23
Operating computer and reading display....24
Central display with control on the left side of the handlebar 28
Error code 31
Lighting....32
Gears 34
Adjusting the handlebar 35
Adjusting the saddle....37
Maintenance/cleaning....38
Congratulations on the purchase of your new Victesse
Thank you and congratulations for choosing a Victesse bike! Victesse bicycles are built with the greatest care and are only assembled with the best parts. We also offer at-home service, so we feel certain you will have a wonderful experience with your Victesse bike.
This guide will help you get acquainted with all the features of your Victesse bike and includes tips to help you keep your bike in perfect condition.
There is one tip we would like to share with you right away, as it has been shown to make e-bikes last longer: always start off in a low assist mode and low gear (i.e. a gear in which you pedal faster). As your speed increases, you can shift to a higher gear and higher assist mode. This provides a gentle, gradual start. You will ride more safely and smoothly, and this minimizes stress on the battery and motor. This will help to increase the life of your bike.
Happy cycling!
Use of the battery
Carefully insert the battery into the battery slot
Turn on the battery with the key: turn the key to the horizontal "on" position
- Always remove the key from the battery during use, because the key is not locked in the "on" position
- The battery itself is locked in the "on" position
Removing battery from the bicycle
Turn the key to "off" to turn off the battery
To release the battery lock, with the key in the "push" position push the key in gently and turn it to "unlock". Remove the key from the lock. You can now remove the battery from the battery slot by pulling the battery out the back of the carrier rack.

text_image
IGNITION ON OFF PUSH UNLOCKFig. 1: Battery
Placing battery in the bicycle
You can slide the battery into the battery slot under the carrier rack. As soon as you hear a click the battery is installed properly.
Charging
The battery must be charged with the supplied charger. The battery can remain in the bicycle while charging, but it can also be taken out of the bicycle. Charging is done with regular household power. In some cases you will have to turn on the battery before the battery can be charged. The charging port is located under the cover (shown in red in figure 2).

natural_image
Technical line drawing of a cylindrical mechanical component with internal ribs and mounting holes (no text or symbols)Fig. 2: Battery port (under cover)
It usually takes about 4-6 hours to fully charge the battery from 0% to 100%. Sometimes it can take longer, such as when the battery is new or the place where it is being charged is below 15 °C (59 °F). Room temperature (around 21 °C/70 °F) is a good ambient temperature for the battery during charging.
There is a LED on the charger. The light is red when the battery is charging and changes to green when the battery is fully charged. The charger then stops charging, so there is no need to immediately unplug the charger.
▶ Note: When the 4 LEDs on the battery are lit, this does not necessarily mean that the battery is fully charged. You can only be sure the battery is fully charged once the light on the charger is green..
It is advisable to run the battery down to the 5 to 10% charge level and then fully recharge it the first 3 times.
About the battery
The 4 LEDs indicate the approximate battery status. Each LED represents about 25% of the full battery charge.
- If only one LED is on, it is recommended that you charge the battery.
- The 5-block display on the handlebar shows the status with more precision.
Do not place the battery in direct sunlight.
Charge the battery every 2 months when not in use.
The battery can be charged at any time. It does not harm the battery to charge it when it is at, say, 50% or 75%. We do recommend, however, that the battery be discharged almost completely and then fully recharged every now and then.
Do not drain the battery completely.
In very cold temperatures the battery will operate less efficiently than at temperatures of around 10-20 °C (50-68 °F), and this may reduce the action radius by as much as 30%. This also applies to charging: the charging process will take longer.
Operating computer and reading display
There are 2 displays available for the Victesse models with front-wheel motor: a display with integrated control on the left side of the handlebar, and a centrally located display on the handlebar with control on the left side of the handlebar.
Display on the left side of the handlebar
Once the battery is turned on, the computer can be turned on with the Mode M button on the control panel by holding it for 2-3 seconds.
Turning on
- Lock the battery and turn on the electrical system by turning the key all the way to the right ("on").
- Turn on the display by pressing the Mode M button for 3 seconds.
- Use the speed adjuster to select the desired amount of pedal assistance by pressing the MINUS and PLUS + buttons.
- As soon as you pedal, the assist will turn on.
- You interrupt the assist by stopping pedaling or squeezing the brakes.
What the screen shows
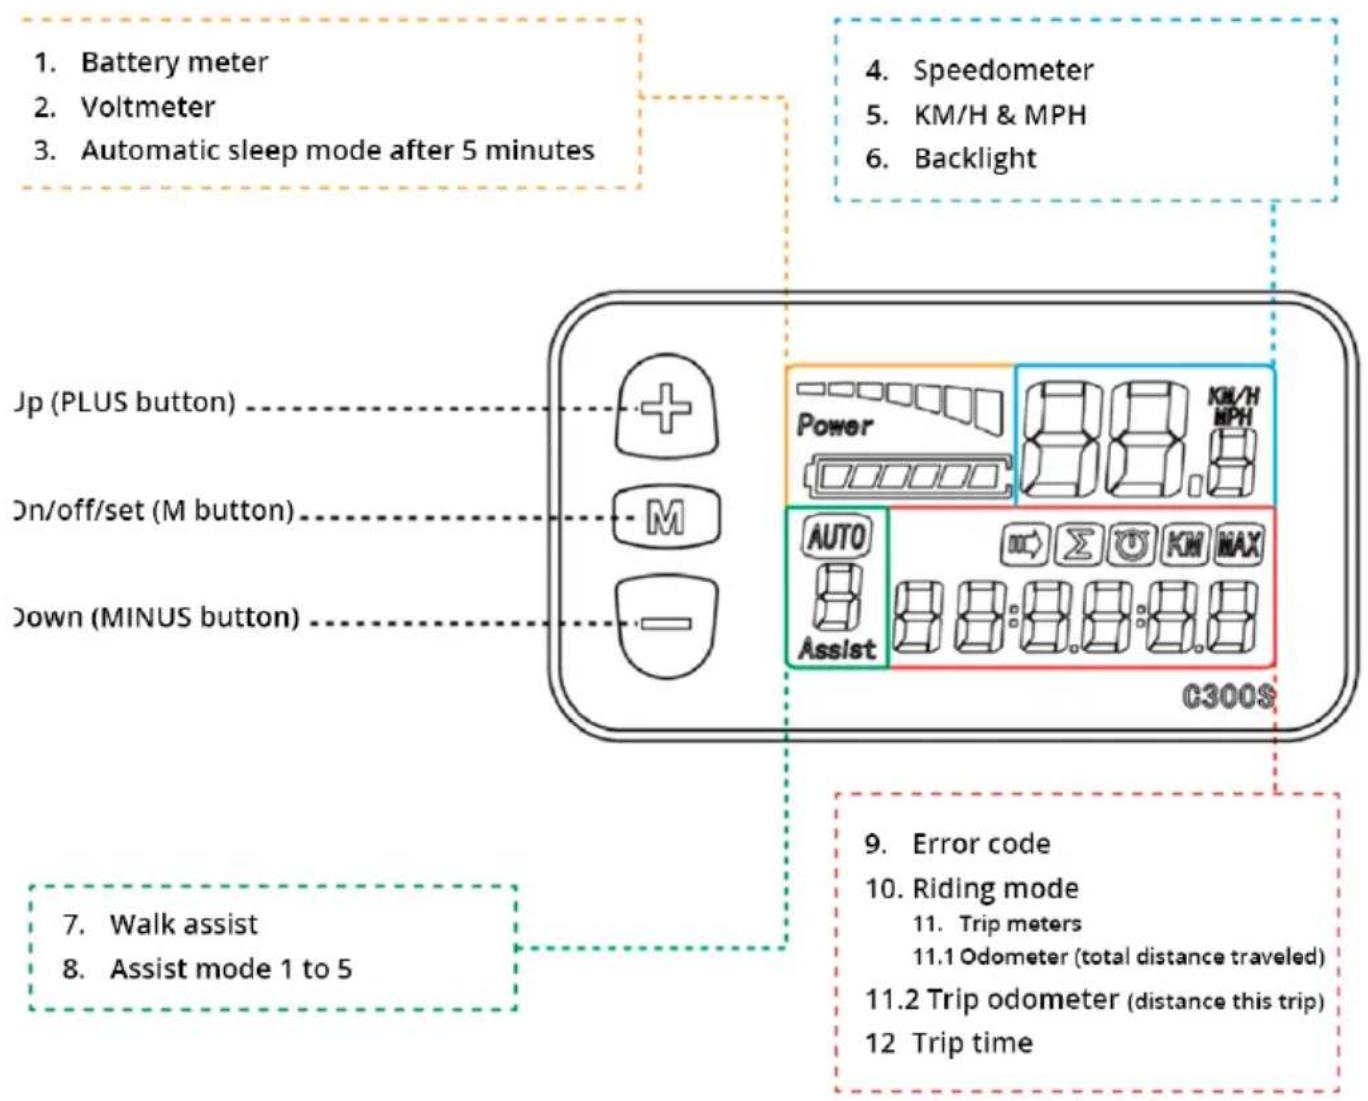
text_image
1. Battery meter 2. Voltmeter 3. Automatic sleep mode after 5 minutes 4. Speedometer 5. KM/H & MPH 6. Backlight Jp (PLUS button) ...... On/off/set (M button)...... Down (MINUS button) ...... C300$ 9. Error code 10. Riding mode 11. Trip meters 11.1 Odometer (total distance traveled) 11.2 Trip odometer (distance this trip) 12. Trip time 7. Walk assist 8. Assist mode 1 to 5Fig. 3: Display
▶ BMS (battery monitoring system)
Battery level – An outline in the shape of a battery, filled with blocks. Each block inside the outline represents approximately 15% of the battery's capacity. When the battery is almost discharged, the battery-shaped outline will blink.
Current voltage output
▶ Speedometer
Current speed in km/h (or mph).
▶ Assist mode (PAS [pedal assistance])
Assist mode (PAS [pedal assistance])
Assist mode - 1 to 9
Switch to a higher or lower assist mode with the MINUS - and PLUS + buttons.
Walk assist
When Walk assist is active, the "6 km" icon is shown. This is activated by pressing the MINUS button for a few seconds. When you release the MINUS button again, the self-drive function stops.
▶ Important! Never use the self-drive function while riding the bike!
Statistics
This section shows a number of things. These can be consulted by briefly pressing MODE M.
ODO: Odometer – The total distance traveled (cannot be reset to 0).
Trip 1: Measures the distance you have biked so far. This is reset automatically at 500 km, but can be reset manually in menu 1).
Trip 2: Shows the last traveled distance from the previous session for 30 seconds. This is reset automatically and begins measuring the current session after the reset.
Time: Measures how long you have been biking. This is reset automatically when the display is turned off.
These items can also be displayed as a slide show. This is active when the icon is displayed.

Additional settings
Press and hold MINUS ☐ and PLUS + buttons at the same time for 3 seconds. The display now shows the option menu.
The following settings are available:
- Reset trip meter
- Set maximum speed
- Set wheel diameter
- Set km/h or mph
- Setting riding mode
Pressing the MODE M button takes you to the next setting. Pressing the MINUS - and PLUS + buttons at the same time again closes the settings menu.
1: Reset trip meter
Press the MINUS button to reset the trip meter to zero.
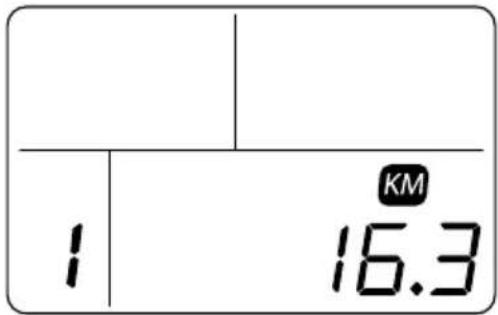
text_image
1 KM 16.32: Set maximum speed
Reduce the maximum speed by pressing the MINUS button. Increase by pressing the PLUS button.

text_image
250 2 KMDutch law states that an e-bike may only provide assistance up to 25 km/h. If you ride the bike above this speed, the assistance stops. You can continue biking, but you will no longer have any assistance. At speeds above 25 km/h the bike does not resist your pedaling to prevent you from biking above 25 km/h. Because a freewheel motor is installed in this model, it then feels like you are riding a bike without pedal assist.
▶ Note: This menu is only intended for reducing the maximum speed and does not allow you to increase the maximum speed. If you try to increase the maximum speed of the e-bike, you do so at your own risk and responsibility.
3: Set wheel diameter
Adjust the diameter of the wheel with the MINUS - and PLUS + buttons.
▶ Note: Standard setting: 700C. This must not be changed, because otherwise the computer will no longer function properly.
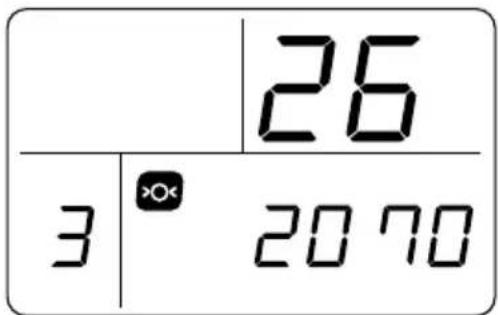
text_image
26 3 20 704: Instellen km/h of mp/h
Use the MINUS ● or PLUS + buttons to select the desired riding mode (3 choices: 1 = eco, 2 = normal, 3 = power).
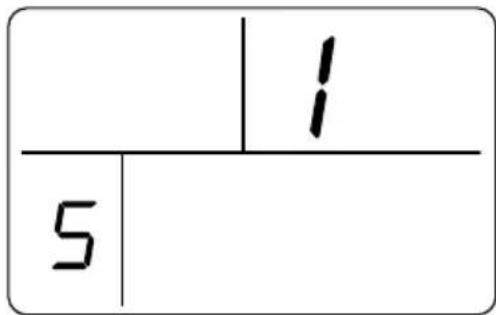
text_image
1 5If you want to turn off the computer and/or pedal assist:
Press the MODE M button on the control panel on the left side of the handlebar for 2 seconds. As soon as the screen is off, the bike no longer provides pedal assist.
If you want the screen on, without pedal assist, then set the assist mode to 0. The computer will then continue to measure distances and speeds as usual.
▶ Note: The display automatically turns off after 5 minutes at a speed of 0 km/h.
Central display with control on the left side of the handlebar
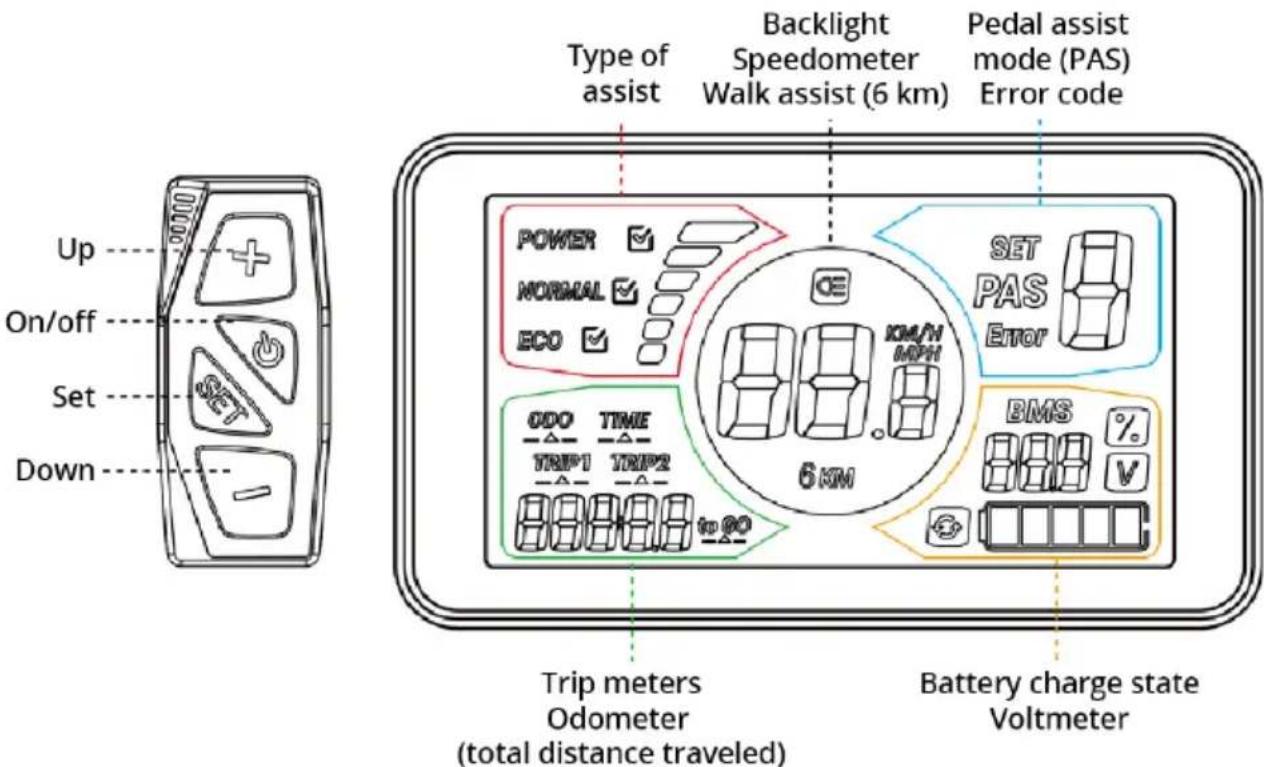
Once the battery is turned on, the computer can be turned on with the On/off button on the control panel.
text_image
Up On/off Set Down Type of assist Backlight Speedometer Walk assist (6 km) Pedal assist mode (PAS) Error code POWER NORMAL ECO SET PAS ERROR ODO TIME TRIP1 TRIP2 6 KM to 90 Trip meters Odometer (total distance traveled) Battery charge state VoltmeterFig. 4: Control panel + display
What does the screen show?
- Type of assist
a. Power
b. Normal
c. Eco
- Speed/backlight
a. Backlight (icon shown when enabled)
b. Speedometer (km/h by default)
c. Walk assist (icon shown when enabled)
- Assistance/Error info/Settings
a. Assist mode
b. Error code
c. Setting number
- Kilometer counters
a. Total distance
b. Trip meters
c. Timer (not configured)
- BMS (battery monitoring system)
a. Battery level – An outline in the shape of a battery, filled with blocks. Each block represents about 20% of the battery's capacity. When the battery is almost discharged, the battery icon on the screen will blink.
b. Voltmeter
Setting pedal assist

The assist mode - 1 to 9: minimum assistance to maximum assistance. You can switch to a higher or lower assist mode with the + and - buttons.

Lighting setting
Press the on/off button one time to turn on. Press the on/off button again to turn off. When the lighting is on, the display backlight is also on. When the lighting is active, the lighting icon is shown.


Fig. 5: Button for turning on lighting and backlight
Additional settings
Press plus/minus for 3 seconds on "Set" to open the option menu. Set takes you to the next setting; use + and - to change the settings.
Setting 0: set type of assist (eco/normal/power)
Setting 1: Reset "trip 1" to 0 with the minus button
Setting 2: maximum speed. However, the controller determines the maximum speed (25 km/h, as established by law), so you cannot increase the maximum speed. This menu can only be used to reduce the maximum speed.
Setting 3: wheel diameter. This must be set to 700C. If this setting is changed, the computer system cannot function properly. This means that speedometer will also not work. If you change the default setting, you do so at your own risk and responsibility.
Setting 4: Speedometer display unit (miles or kilometers per hour).
Exiting the option menu; Press Set for 3 seconds to exit the menu.
About the odometer
The odometer at the bottom left of the display shows a number of things. These can be consulted by briefly pressing Set.
ODO: Odometer – The total distance traveled (cannot be reset to 0).
Trip 1: Measures the distance you have biked so far. This is reset automatically at 500 km (can be reset manually in Setting 1; see above).
Trip 2: Shows the last traveled distance from the previous session for 30 seconds. This is reset automatically and begins measuring the current session after the reset.
Time: Measures how long you have been biking. This is reset automatically when the display is turned off.
Walk assist
The motor provides "walk assist." This means that when you walk, the motor pushes the bike slightly so it is easy to walk alongside the bike. When the Minus button is held, the motor "pushes" the bike alongside you, up to 6 km/h. The "6 km" icon is shown on the display (see fig. 5).
Fig. 6: Walk assist active.
If you want to turn off the computer and/or pedal assist:
Press the Mode button on the control panel on the left side of the handlebar for 3 seconds. As soon as the screen is off, the bike no longer provides pedal assist. Because the bike has a freewheel motor, it is no harder to pedal than a bike without pedal assist.
If you want the screen on, without pedal assist, then set the assist mode to 0. The computer will then continue to measure distances and speeds as usual.
▶ Note: The display automatically turns off after 5 minutes at a speed of 0 km/h.
Speed limitation + freewheel motor
Dutch law states that an e-bike may only provide assistance up to 25 km/h. If you ride the bike above this speed, the assistance stops. You can continue biking, but you will no longer have any assistance.
At speeds above 25 km/h the bike does not resist your pedaling to prevent you from biking above 25 km/h. Because a freewheel motor is installed in this model, it then feels like you are riding a bike without pedal assist.
▶ Note: If you try to increase the maximum speed of the e-bike, you do so at your own risk and responsibility.
Error code
If the display shows an error code, first restart the computer by removing the battery from the e-bike. Sometimes the computer system can recalibrate itself and correct the problem automatically. Also try to determine whether the e-bike has been damaged (fallen, has stood in the hot sun, collision) or whether cables are loose.
Error code Definition
0 Normal
1 Short circuit in the system / incorrect voltage
2 Fault in the pedal sensor
3 Problem with supply of power to the motor
4 Defect in the motor housing
5 Brake problem
6 Low voltage > battery discharged
7 Motor problem (shuts off)
8 Communication error - controller
9 Communication error – display
Lighting
Turning on and off:
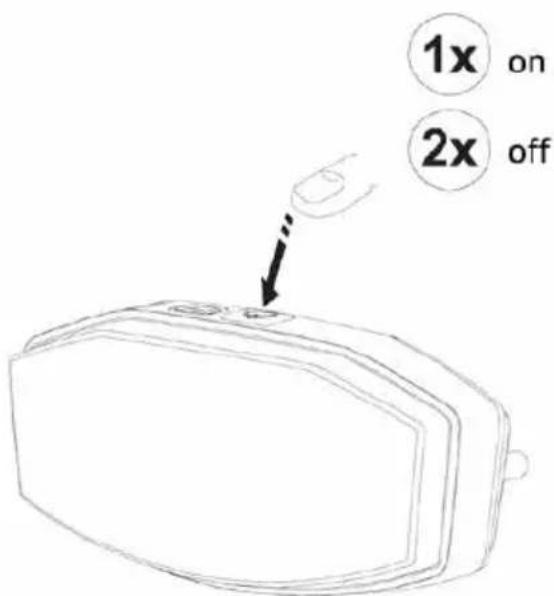
Rear lamp: Press the on/off button on top of the lamp. Press the on/off button again to turn off the lamp.
text_image
1x on 2x offFig. 7: Rear lamp
Operation of backlight for display on left side of the handlebar
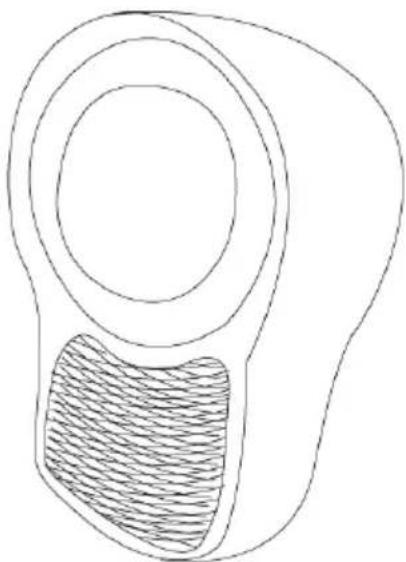
Front lamp: Press the PLUS + button for 3 seconds to turn on the front lamp. Press the PLUS + button for 3 seconds again to turn the front lamp off.
natural_image
Line drawing of a mechanical component with concentric circular layers and a shaded rectangular base (no text or symbols)Fig. 8: Front lamp
▶ Note: The front lamp is switched on and off with the display backlight.
- Turn the front lamp on by pressing the on/off button. Once activated, an icon appears on the display. This indicates that only the front lamp is switched on.
- Turn the front lamp off by pressing the on/off button again.
▶ Note: The backlight is switched on with the front lamp of the bicycle.
Battery replacement
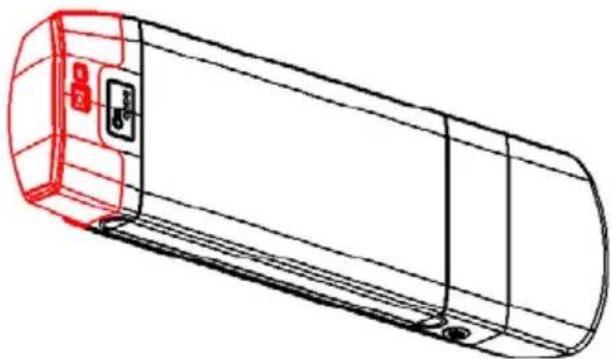
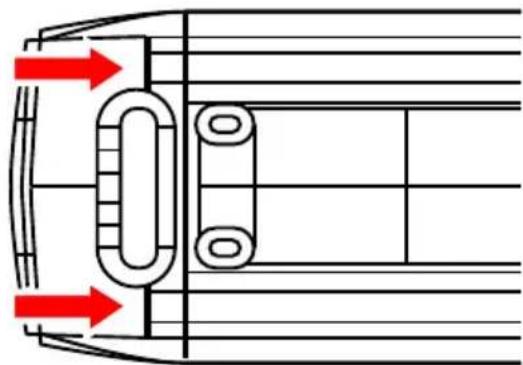
Rear lamp: Unscrew the lamp section from the battery. You can simply use a Phillips head screwdriver. The lamp requires AA batteries.
natural_image
Technical line drawing of a cylindrical mechanical component with internal structure and mounting holes (no text or symbols)Fig. 9: The entire red section must be removed from the battery pack.
natural_image
Top-down schematic of a vehicle showing airflow direction arrows and structural components (no text or labels)Fig. 10: The red arrows indicate where the screws are located.
Gear
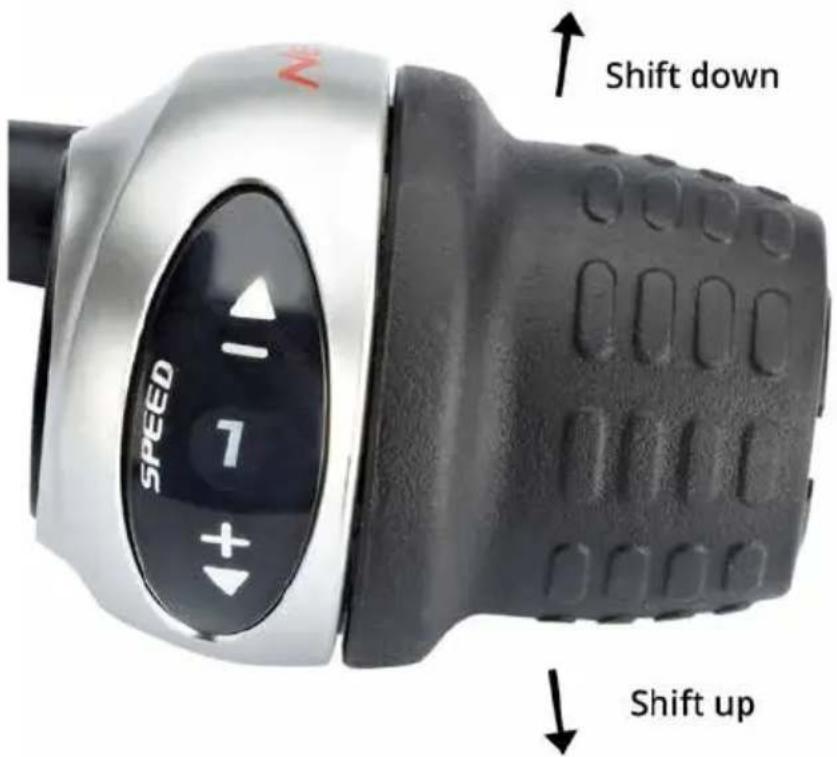
The bike has 3, 7, or 8 gear. The control for this is on the right handle.
Downshifting: Turning the twist handle away from you shifts to a lower gear.
Upshifting: Turning the twist handle toward you shifts to a higher gear.
text_image
SHIFT down SPEED 1 + - + - Shift upFig. 12: Gear
Adjusting the handlebar
Victesse bikes are all equipped with an adjustable handlebar stem. Some models have a stem that can be adjusted by hand, and other models have a stem that can only be adjusted only with tools (Allen wrench).
Handlebar adjustment with manually adjustable stem
You can adjust the position of the handlebar yourself, without the need for tools. The stem allows you to twist the handlebar toward or away from you.
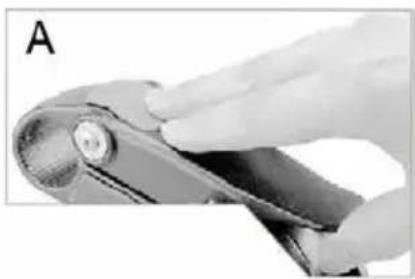
- Push the slider on the handlebar up and hold it in this position (A).
- Then lift the large lever up until the handlebar is loose in the stem; you can now release the gray slider (B).
- Decide how you want the handlebar positioned (C).
- Once you have set the correct handlebar-to-saddle distance, you can tighten the stem slightly to hold the handlebar in position (D).
- Make sure the handlebar is centered in the stem, and push the big lever down. As soon as the black lever clicks under the dark gray slider, it locks again (A).
▶ Note: To be able to ride safely, the handlebar must be fully locked.
natural_image
Close-up of a hand holding a metal tool, labeled 'A' in the top-left corner (no other text or symbols visible)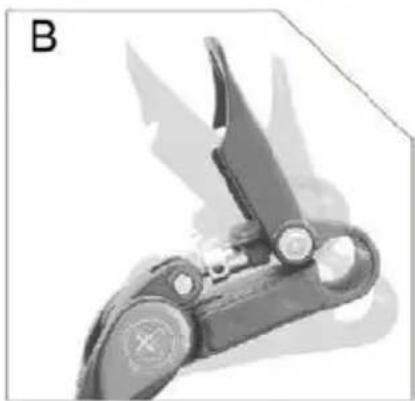
natural_image
Close-up of a mechanical tool or clamp with a pointed tip and circular base (no visible text or symbols)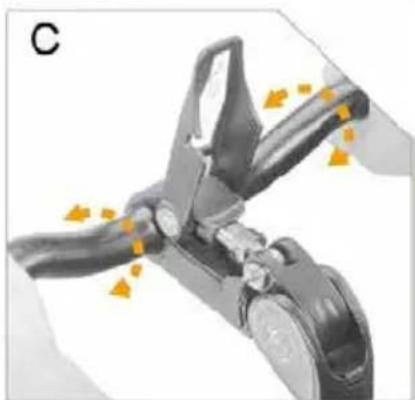
natural_image
Mechanical clamp or tool assembly with yellow directional arrows indicating motion (no text or symbols)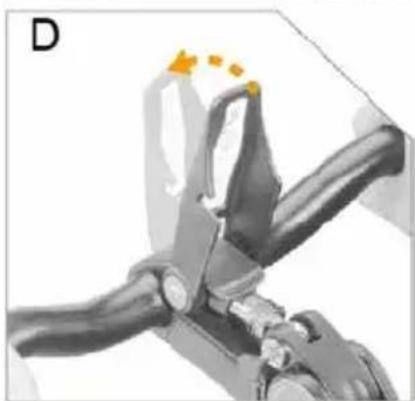
natural_image
Mechanical clamp or tool assembly with orange highlight on a joint (no text or symbols visible)Fig. 13: Handlebar stem
Handlebar adjustment with tool-adjustable stem
You can use an Allen wrench to adjust (1) the position of the handlebar and (2) the distance.
1. Handlebar position
a Loosen the socket-head screw (1) with an Allen wrench.
b. Move the handlebar to the desired position.
c. Make sure the handlebar stays in the center of the stem (there are marks on the handlebar).
d. Re-tighten the stem firmly.
2. Handlebar distance
a. Use an Allen wrench to loosen the socket-head screw (2) in the hole inside the circle on the stem.
b. Position the handlebar at the desired angle.
c. Re-tighten the tensioner firmly.
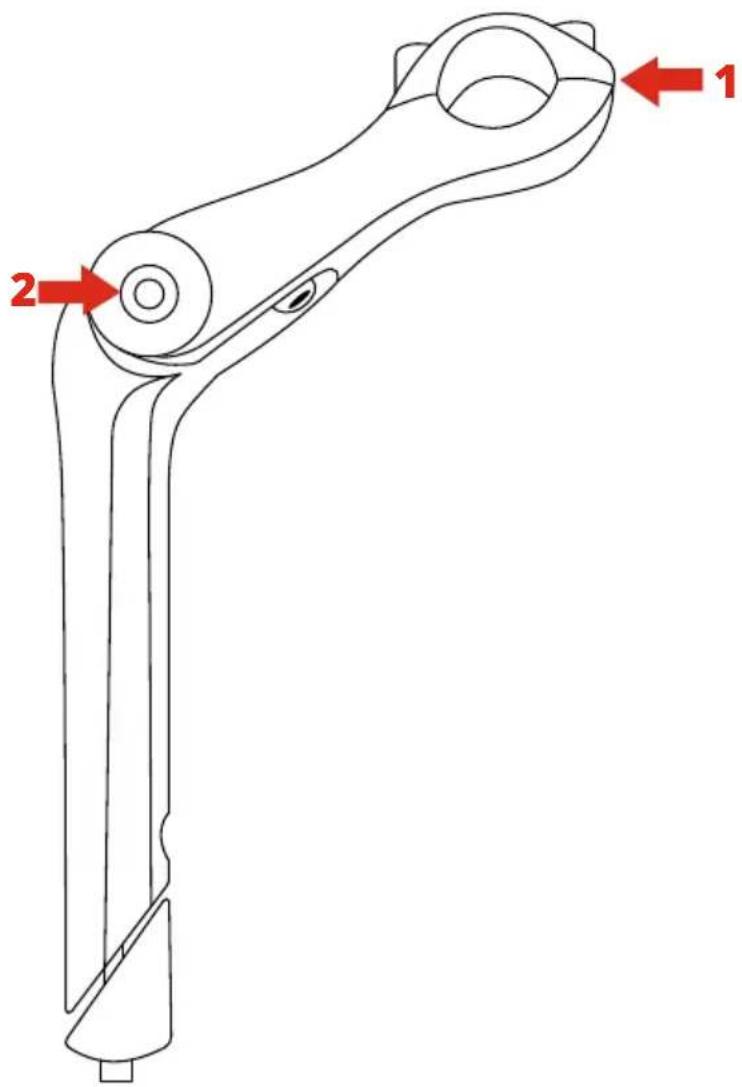
text_image
1 2Fig. 13: Stem
▶ Note: Only adjust your handlebar using the specified socket-head screws; do not loosen any other bolts. Adjust your handlebar with care. To be able to ride safely, the handlebar must be firmly clamped in the stem. Otherwise your handlebar may rotate while you are cycling. If you adjust the handlebar yourself, you are responsible for doing so correctly.
▶ Note: If you tighten the socket-head screw too tightly, you may damage the stem. See the mini-instructions on the handlebar itself for the maximum torque specification.
Adjusting the saddle
You can set the height of the saddle yourself. As a rule, the saddle should be even with your hip when you are standing beside the bicycle.
Some Victesse models use a clamp that can be loosened or tightened with an Allen wrench. Never use too much force, because this can damage the clamp.
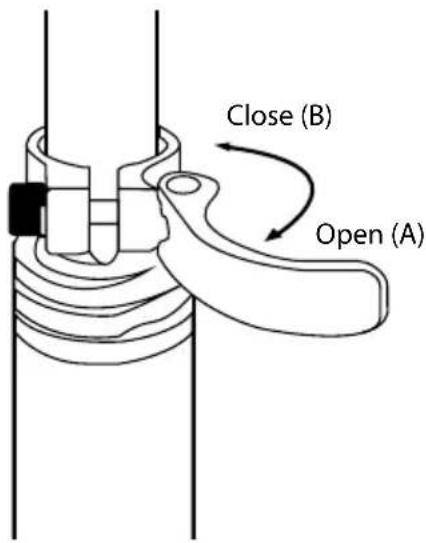
Other Victesse models use a clamp with a quick-release lever.
Push the quick-release lever (the silver-gray handle) under the saddle away from the frame. The saddle is now "loose" in the frame (A).
- Set it at the desired height.
- Press the quick-release lever back so the saddle is locked again (B).
Fig. 14: Quick-release lever
▶ Note: The saddle must not be adjusted higher than the maximum indicated by the safety mark on the seat post.
text_image
Close (B) Open (A)Maintenance/cleaning
It is wise to do what you can to keep your bike in top condition between visits to your local service center. The recommended/required frequency of maintenance/inspection varies per component.
Monthly
Inspections
- Headset (under the handlebar): No play?
- Tires:
i. Are the reflective sidewalls on the front and rear tires still clean?
ii. Are the tires filled to the correct pressure and in good condition?
- Pedals + Cranks: Are the pedals securely attached to the cranks, and are the cranks securely attached to the spindle?
- Brakes: Are the front and rear brakes in perfect working condition?
- Spokes: Are they still firmly attached, and does the wheel turn true?
- Lighting: Does it work properly?
- Wheels: Are the quick-release levers and the threaded caps firmly attached to the skewer rods?
- Seat pin and handlebar stem: Are they securely attached to the frame, and is the safety mark not visible?
Annually
Take your bike to your local service center for scheduled maintenance once a year.
Cleaning
Clean the bike regularly. Tips:
- Spray the bike with a garden hose and rub the bicycle with a dry cloth.
- Use liquid soap in lukewarm or hot water.
▶ Note: Do not use a pressure washer. The water jet is too powerful and can remove essential grease
- Protect the painted surfaces with liquid car wax after cleaning.
- Lightly polish the chromed surfaces.