
EC1745 - Iron Hanseatic - Free user manual and instructions
Find the device manual for free EC1745 Hanseatic in PDF.


| Type | Steam Iron |
| Model | EC1745 |
| Brand | Hanseatic |
| Power Consumption | 1500-1900 W |
| Supply Voltage | 220-240 V~, 50/60 Hz |
| Protection Class | I |
| Weight | approx. 950 g |
| Heat Settings | 4 (including MAX) |
| Steam Settings | Continuous steam, vertical steam shot, spray shot |
| Drip Protection | Yes |
| Self-Cleaning Function | Yes |
| Spray Function | Yes |
| Dry Ironing | Yes |
| Water Tank Capacity | Not specified (fill to MAX mark) |
| Cord Length | Not specified |
| Soleplate Material | Not specified |
| Accessories | Measuring cup |
| Auto Shut-Off | Not specified |
| Color | Not specified |
| Dimensions | Not specified |
| Order Number | 848853 |
Frequently Asked Questions - EC1745 Hanseatic
User questions about EC1745 Hanseatic
0 question about this device. Answer the ones you know or ask your own.
Ask a new question about this device
Download the instructions for your Iron in PDF format for free! Find your manual EC1745 - Hanseatic and take your electronic device back in hand. On this page are published all the documents necessary for the use of your device. EC1745 by Hanseatic.
USER MANUAL EC1745 Hanseatic
natural_image
Illustration of a Hanseatic air iron with control knobs and a cord, no text or symbols present.Gebrauchsanleitung
natural_image
Illustration of a steam iron and a cup with a power plug, no text or symbols presentLieferumfang
natural_image
Illustration of a hand pouring liquid into a portable electric iron (no text or symbols)natural_image
Illustration of a Hanseatic iron iron with control buttons and a cord, no text or symbols present.User manual
Manual/version:
93528/20210419
Article no.: 848853
Reproduction, even of
excerpts, is not per- mitted!
Steam iron
Table of contents
Explanation of terms/
symbols....EN-3
Safety .....EN-4
Intended use.....EN-4
Safety notices .....EN-4
Delivery ..... EN-11
Package contents ..... EN-11
Check the delivery ..... EN-11
Appliance parts .....EN-12
Operation .....EN-13
Preparation....EN-13
Filling the water tank . . . EN-13
Switching on .....EN-13
Removing manufacturing residue .....EN-14
Adjusting the heat setting....EN-14
Dry ironing .....EN-15
Steam ironing .....EN-16
Using the spray shot feature .....EN-17
Using the vertical steam shot feature . . . . .EN-18
Switching off .....EN-18
Tips for ironing correctly . .EN-19
Basic tips .....EN-19
Fabrics and temperatures....EN-20
Ironing inside-out or right-side-out .....EN-20
Blouses and shirts .....EN-21
Trousers .....EN-21
Cleaning and
maintenance....EN-22
Cleaning the appliance .EN-22
Self-cleaning .....EN-23
Troubleshooting table . . . . EN-24
Service .....EN-26
General customer service ..... EN-26
Spare parts . . . . . . . . .EN-26
Environmental protecti-
on/disposal .....EN-27
Our contribution to the protection of the ozone layer . . . . . . . . . . EN-27
Waste prevention ..... EN-27
Disposing of old electrical devices in an environmentally- friendly manner .....EN-28
Datasheet ..... EN-28
Explanation of terms/symbols

Please read through the safety instructions and user manual carefully before using the appliance.
This is the only way you can use all the functions reliably and reliably.
Be absolutely sure to also observe the national regulations in your country, which are also valid in addition to the regulations specified in this user manual.
Keep all safety notices and instructions for future reference Give all safety notices and instructions to the next user of the appliance.

NOTICE
This symbol warns against possible damage to property.

This symbol refers to useful additional information.
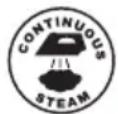
Continuous steam emission
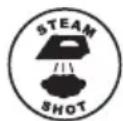
Vertical steam shot
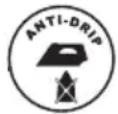
Drip protection feature
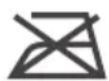
Textiles with this symbol may not be ironed.
The following symbols can be found in this user manual.

WARNING
This symbol indicates a hazard with a medium level of risk which, if not avoided, could result in death or serious injury.

CAUTION
This symbol indicates a hazard with a low level of risk which, if not avoided, could result in minor or moderate injury.
Safety
Intended use
The appliance is intended for ironing items of clothing and fabrics and textiles.
It is designed for private domestic use and is not suitable for commercial or multi-use (e.g.: use by several families in an apartment building).
No technical changes made to the device.
Use the appliance exclusively as described in this user manual. Any other use is deemed improper and may result in damage to property or even personal injury.
The manufacturer accepts no liability for damage caused by improper use.
Safety notices
In this chapter you will find gene-trac safety notices which you must always observe for your own protection and that of third parties. Please also observe the warning m- notices in the individual chapters on operation, cleaning, etc.
Risks for certain groups of people

CAUTION
Danger to children and people with impaired physical, sensory or mental abilities!
■ This appliance may be used by children aged 8 years and over as well as persons with impaired physical, sensory or mental capacities or those lacking experience and knowledge if they are supervised or have been instructed in how to safely use the appliance, and have understood the risks associated with operating it.
■ During switching on and cooling, the iron and supply cord must be kept out of the reach of children under the age of 8.
Additional precautionary measures apply to children of all ages.
■ Do not allow children to play with the packaging film. They may get caught in it or suffocate.
■ Prevent children from pulling small parts from the device or taking them out of the accessory bag and putting them in their mouths. There is a risk of choking/suffocation.
■ Children should not be allowed to play with the appliance nor should they have access to the appliance when left unattended.
■ Cleaning and maintenance may not be performed by children without supervision.
Risks when handling household electrical appliances

WARNING!
Risk of electric shock!
Touching live parts may result in severe injury or death.
■ Only use the appliance indoors. Do not use in wet rooms or in the rain.
■ Do not start up or continue to use the appliance if it is visibly damaged, e.g. the supply cord is defective or makes unusual sounds.
In these cases, you should pull the mains plug out of the socket or switch off/unscrew the fuse and have the appliance repaired (see chapter “Service”).
■ Check the appliance regularly for damage.
■ The appliance corresponds to protection class I and may only be connected to a plug with a protective conductor that has been
properly installed. Ensure that the voltage is correct when connecting it. More detailed information about this can be found on the type plate.
■ We recommend using a pulsating-sensitive RCD (residual current device).
- Keep the appliance, the mains plug and the mains cord away from open fl a-mes and hot surfaces. The insulation of the mains cord can melt.
■ Do not kink or pinch the mains cord or lay it over sharp edges.
■ Never pull the mains plug out of the socket by the mains cord, always hold the mains plug itself.
■ Never touch the mains plug with wet hands.
■ Never immerse the mains cord or plug in water or any other liquids.
■ In the event of a fault, as well as before cleaning or maintenance, disconnect
the mains plug from the socket and/or switch off or unscrew the fuse.
■ Do not put any objects in or through the housing openings and also make sure that children cannot insert any objects through them.
■ Never clean the appliance with a high-pressure cleaner or steam cleaner.
■ This appliance contains electrical and mechanical parts which are essential for protection against potential sources of danger. Only parts corresponding to the original appliance specifications may be used for repairs.
■ Investigations and repairs to the appliance may only be carried out by authorised specialists, such as our service department.
■ Unauthorised repairs to the appliance can cause property damage and personal injury, and invalidate liabili-
ty and warranty claims. Ne- ver try to repair a defective or suspected defective ap- pliance yourself.
■ If the supply cord is damaged, it must be replaced by the manufacturer, its service agent or qualified expert in order to avoid a hazard.
CAUTION!
Fire hazard!
Improper handling of the appliance can lead to fi re.
■ Connect the appliance only to a properly installed and earthed electric socket. Do not connect to a multi-socket extension cable or a multi-socket plug.
■ Do not operate the appliance with an external timer or a separate remote control system.
! NOTICE
Improper handling of the appliance may result in damage or explosions.
■ Do not use sharp objects to unpack the appliance.
When cleaning, please note:
■ Never use soap or any harsh, granular, soda-based, acid-based, solvent-based or abrasive cleaners. All-purpose cleaners with a neutral pH are recommended.
■ The surfaces can be damaged by unsuitable cleaning agents. Use care products only on the outer surfaces.
■ Use only soft cloths for cleaning.
■ Ensure that water does not enter the electrical components.
Risks when handling a steam iron

WARNING!
Risk of electric shock!
■ Always pull the mains plug out of the socket,
- when you are not using the appliance,
– before you refill or drain water,
– before you clean the appliance,
- if a malfunction occurs,
- if there is a storm with thunder and lightning.
■ The iron must not be used if it has been dropped and shows visible signs of damage or is leaking.
Risk of short circuit!
Any water that has seeped into the appliance may cause a short circuit or electrocution. It is then possible that you could injure yourself if you come into contact with the appliance.
■ Do not open or leave the water tank inlet open during operation.

CAUTION
Risk of burns!
The appliance will become very hot during operation. Touching hot components may cause serious burns!
■ Do not leave the appliance unsupervised and keep out of reach of children when plugged in and/or still hot.
■ Always remain attentive when ironing.
■ Make sure that there is no risk of other persons, especially children, or pets burning themselves on the appliance.
■ The appliance may only be used with the stand provided.
■ Always place the appliance upright on the stand.
■ Do not iron textiles while they are being worn.
■ Always iron on a solid, stable base and place the appliance on a solid, stable base to avoid the risk of falling.
■ If the iron is placed on the stand, make sure that the surface underneath the stand is stable.
■ Allow the appliance to cool completely before cleaning it or storing it away.
Risk of scalding!
Risk of burns through contact with hot steam.
■ Never turn the hot appliance so the hot soleplate is facing upwards, otherwise hot water may escape.
■ Do not use hot steam on clothing while it is being worn!
■ Avoid direct contact with the hot steam.
■ Do not point the steam at other persons or animals.
Fire hazard!
Flammable objects placed close to the appliance may ignite easily!
■ Do not place temperature-sensitive, flammable or combustible objects on or next to the appliance! If the appliance is switched on unintentionally they may deform or ignite.
- Keep flammable liquids and vapours away from the appliance.
■ Do not cover the appliance with blankets, cloths or similar, as these objects may become hot and catch fire.
Health hazard!
The water in the water tank is not suitable for drinking; it may be contaminated. Drinking the water may cause illness.
■ Never drink the water from the tank.

NOTICE
Risk of damage!
An incorrect ironing temperature may damage textiles.
■ Do not exceed the appliance heat setting specified on the textile care label sewn onto the textile.
■ Use an intermediate layer when using the steam function with fi ne synthetic fi -bre fabrics.
Misuse may damage the appliance.
■ Only fi ll the water tank with water. Never fi ll with other liquids e.g. descaling agent.
■ Do not iron over metal objects such as buttons, zips etc. Otherwise the soleplate could be scratched.
■ Switch-off the appliance before pulling the mains plug from the socket. Otherwise sparks may be produced.
Delivery
natural_image
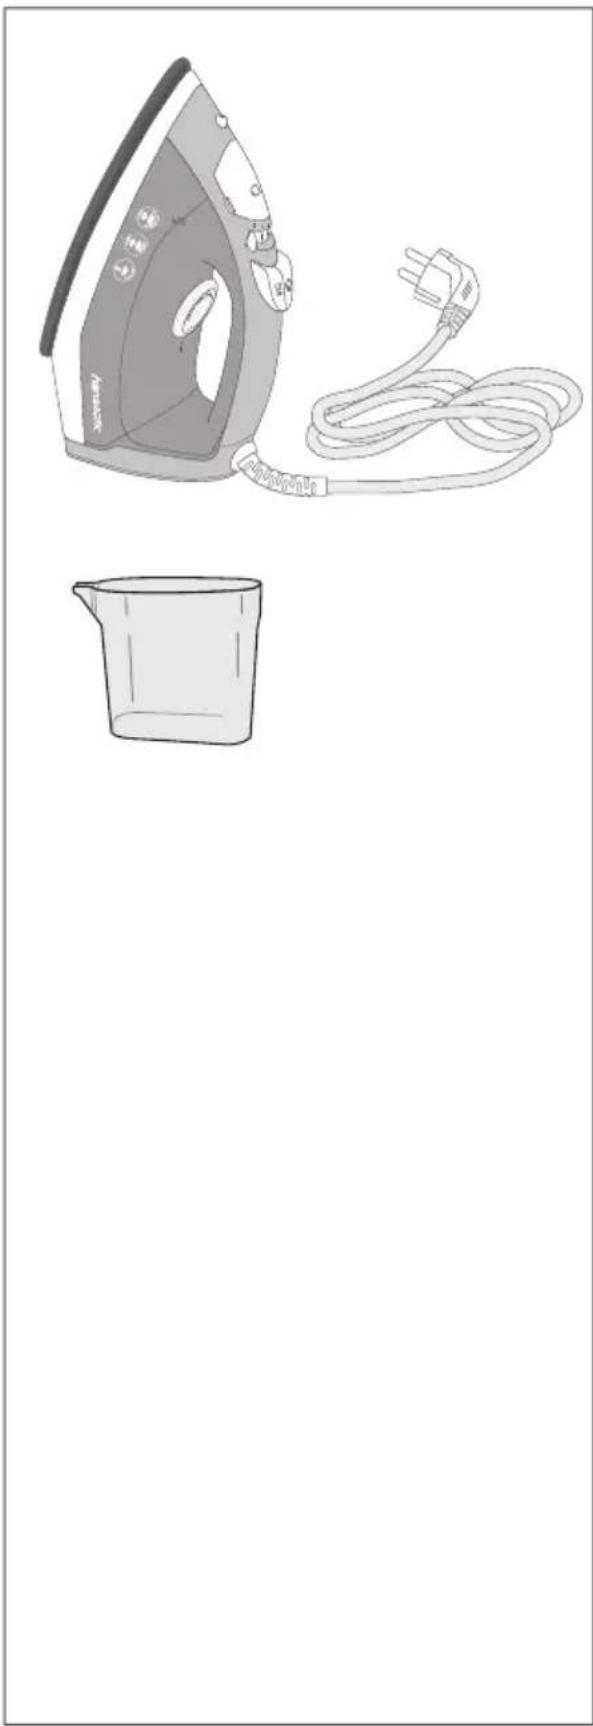
Line drawing of a steam iron and a cup with a power plug, no text or symbols presentPackage contents
- Steam iron
- Measuring cup
Check the delivery
- Move the appliance to a suitable place and unpack it.
- Check that the delivery is complete.
- Check whether the appliance was damaged during transit.
- If the delivery is incomplete or the appliance has been damaged during transport, please contact our Service department (see page EN-26).

WARNING!
Do not operate the appliance if it has visible damage.
Appliance parts
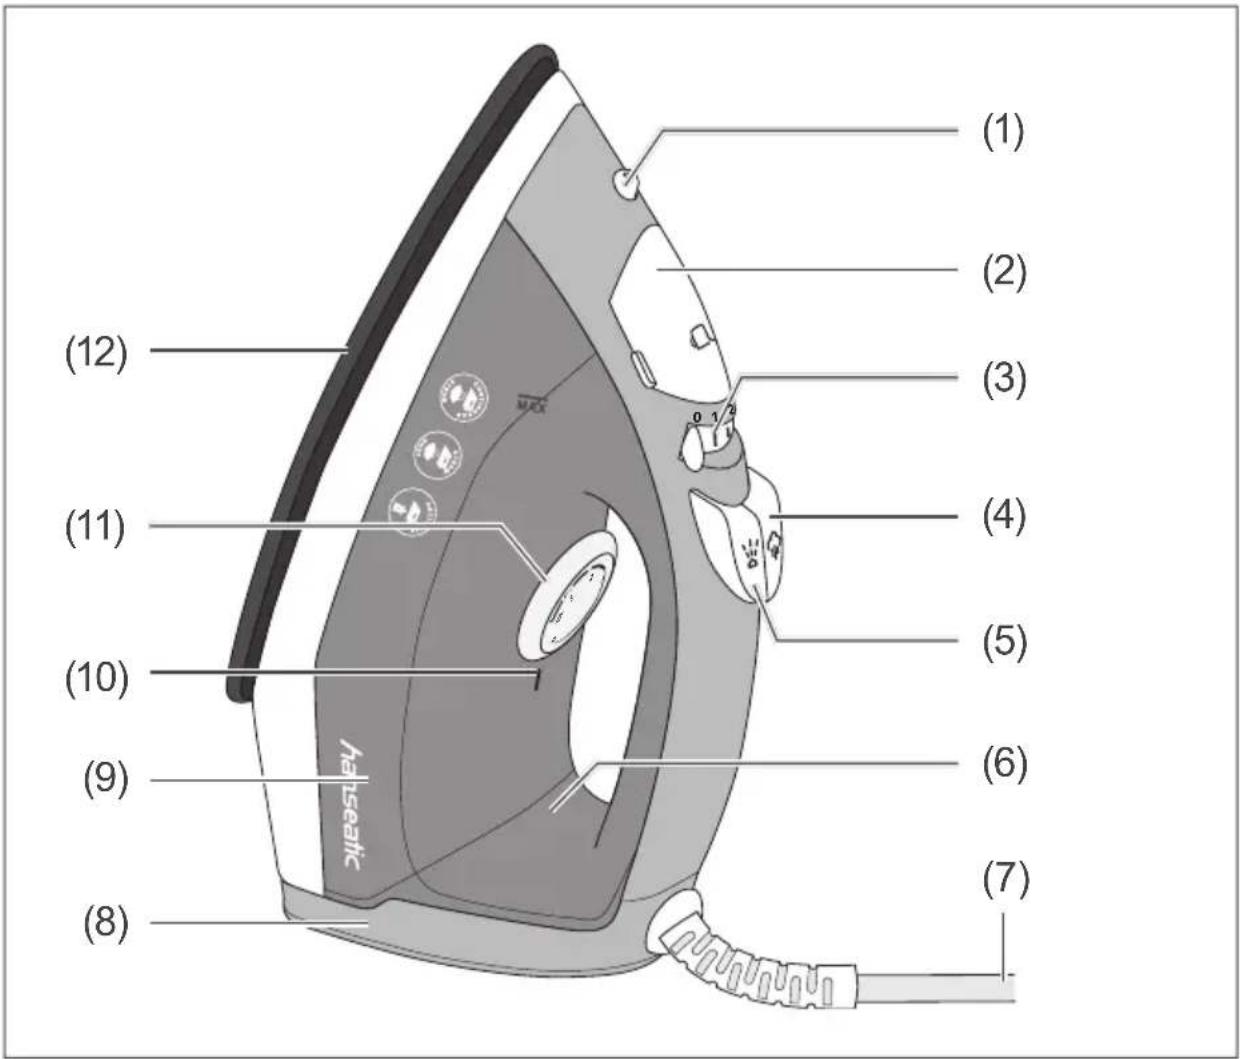
(1) Spray outlet
(2) Water tank cap
(3) Steam regulator
(4) Steam shot button
(5) Spray shot button
(6) Indicator light
(7) Mains cord
(8) Stand
(9) Water tank
(10) Heat setting mark
(11) Temperature control dial
(12) Soleplate
Operation

WARNING
Observe the safety notices each time before using the appliance!
Preparation
- Remove all packaging, film, polystyrene, etc. before first use.
- Make sure that the soleplate (12) is clean and dry.
- Place the appliance on a stable and level surface.
Filling the water tank

WARNING
Risk of short circuit!
Any water that has seeped into the appliance may cause a short circuit or electrocution. It is then possible that you could injure yourself if you come into contact with the appliance.
■ Pull the mains plug from the socket before filling the water tank.
■ Do not open or leave the water tank inlet open during operation.
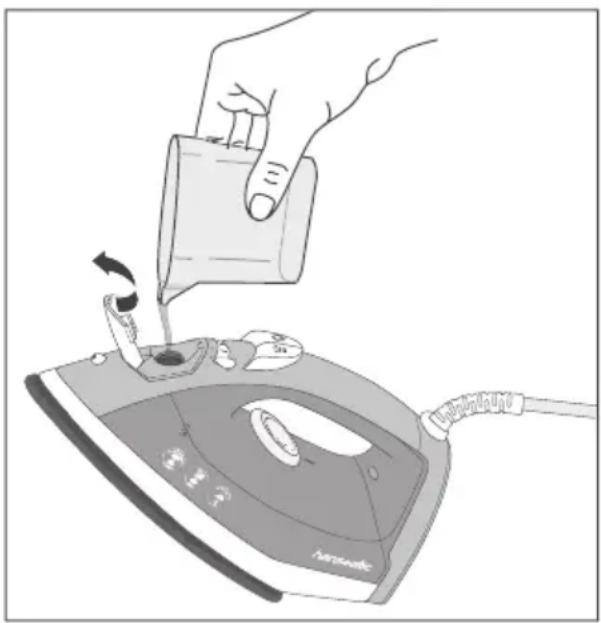
- Open the water tank cap (2).
natural_image
Illustration of a hand pouring liquid into a portable air conditioner (no text or symbols)- Fill the water tank (9) up to the MAX mark with clean, cold tap water. Never exceed the mark.
- Close the water tank cap.
Switching on
- Insert the mains plug into a properly installed socket. The indicator light (6) turns on.
Removing manufacturing residue
Before using the appliance to iron your garments, you should iron a dispensable textile to remove manufacturing residues from the appliance.
- Place the appliance on the stand (8).
- Make sure that the steam regulator (3) is set to 0.
-
To switch the appliance on, insert the mains plug into a properly installed socket. The indicator light (6) turns on.
-
Turn the temperature control dial (11) to the highest setting MAX.
Once the highest temperature even 2 heat settings. setting is reached, the indicator light will go out.
- Iron the textile for a few minutes to iron out any manufacturing residue from the soleplate (12).
The appliance may develop an odour during initial use. odour will disappear shortly.
Adjusting the heat setting
! NOTICE
An incorrect ironing temperature may damage textiles.
■ Do not set the appliance temperature any higher than indicated on the care label sewn onto the textile. The appliance has 4 heat settings that are suitable for different textiles. You can also set the temperature control dial so that the heat setting mark (10) is positioned bet-
ween 2 heat settings.
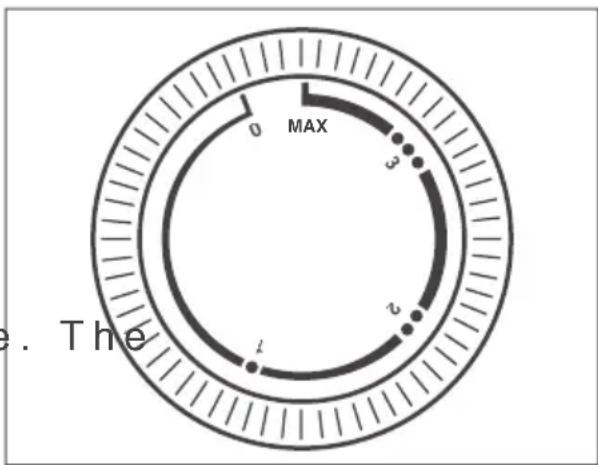
- Adjust a heat setting by turning the temperature control dial (11).
| Heat setting | Textiles Steam Steam shot Spray shot Self-clean | |||
| 0 to ● | Silk, acetate, acrylic, nylon, polyester, rayon | - | - | √ |
| ●● | Wool | √ | - | √ |
| ●●● to MAX | Cotton, linen | √ | √ | |
The heat setting mark As the appliance heats up shows which heat setting is faster than it cools down, you selected. When the appliance should always iron garments re-increases in temperature, the in-quiring a low heat setting first.
you select a higher temperature, the indicator turns on to indicate that the appliance is increasing in temperature.
Dry ironing

CAUTION
Risk of burns!
Risk of burns due to contact with the hot soleplate.
■ Avoid to contact with the hot soleplate.
■ Do not use appliance on clothing while it is being worn!
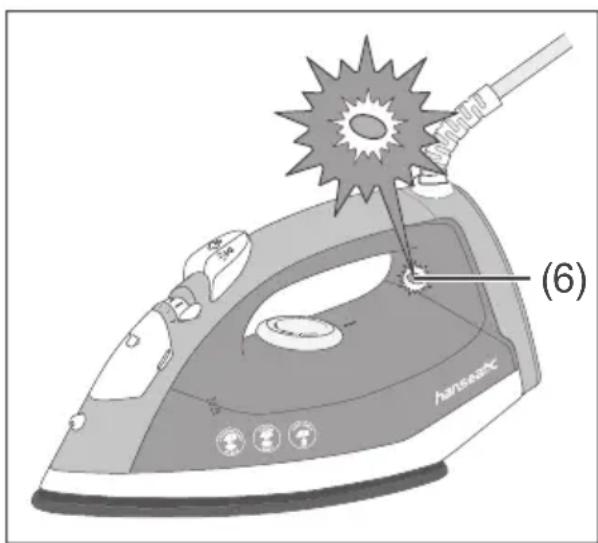
- Place the appliance on the stand (8).
- Make sure that there is no water in the water tank (9).
- Make sure that the steam regulator (3) is set to 0.
-
To switch the appliance on, insert the mains plug into a properly installed socket. The indicator light (6) turns on.
-
Turn the temperature control dial (11) to the desired setting.
Once the temperature is reached, the indicator light will go out and you can start dry ironing.
Steam ironing

CAUTION
Risk of scalding!
Risk of burns through contact with hot steam.
■ Never turn the hot appliance so the hot soleplate is facing upwards, otherwise hot water may escape.
■ Do not use hot steam on clothing while it is being worn!
■ Avoid direct contact with the hot steam.
■ Do not point the steam at other persons or animals.
■ Avoid to contact with the hot soleplate.
- Place the appliance on the stand (8).
- Make sure that there is enough water in the water tank (9).
- Make sure that the steam regulator (3) is set to 0.
- To switch the appliance on, insert the mains plug into a properly installed socket.
The indicator light (6) turns on. - Turn the temperature control dial (11) to the desired setting.
Once the highest temperature is reached, the indicator light go out. - Set the steam regulator to the desired steam setting.
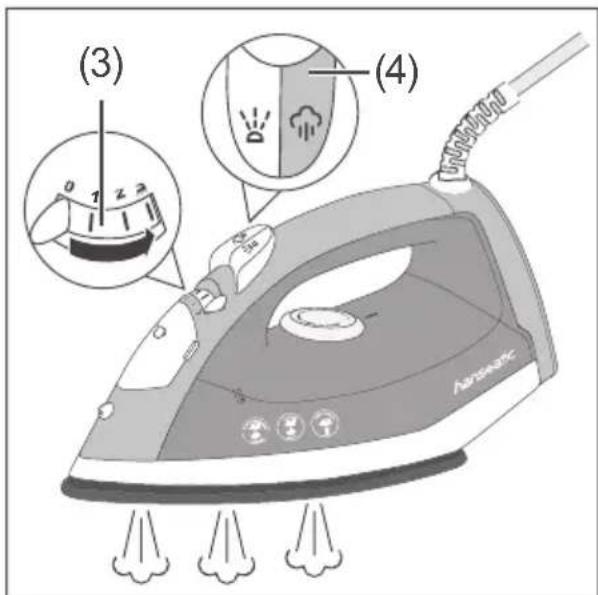
- To iron the textile with steam, press the steam shot button (4) while ironing.
The steam will be emitted from the holes in the soleplate (12).
The appliance is equipped with a drip protection feature. If you steam iron for a long time, the temperature of the soleplate will drop and steam and water droplets will no longer automatically escape from the holes in the soleplate. You can still use bursts of steam.
The appliance will reheat to the selected heat setting.
Using the spray shot feature
If necessary, you can moisten textiles with one shot of spray to iron out creases more easily.
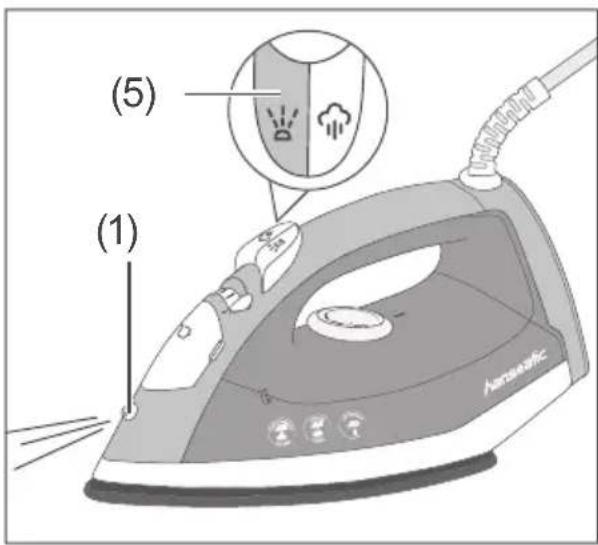
- To moisten the textile, press the spray shot button (5) several times. Atomised water will be emitted from the spray outlet (1).
Using the vertical steam shot feature
You can create bursts of steam when you hold the appliance in an upright position. This is a great way to remove creases from hanging clothes or curtains.
- Turn the temperature control dial (11) to the desired setting.
- Once the highest temperature is reached, the indicator light (6) will go out.
- Hold the appliance in an up-right position.
- Set the steam regulator (3) to the desired steam setting.
- Press the steam shot button (4).
Switching off
- Place the appliance on the stand (8).
- Set the steam regulator (3) and the temperature control dial (11) to 0.
- To switch the appliance off, pull the mains plug out of the socket.
- Allow the appliance to cool off completely.
Tips for ironing correctly
Basic tips
- Take the laundry off the clothes line while it is still damp or set your clothes dryer to “iron dry”.
- Smooth down the laundry and iron it quickly.
- Do not set the appliance temperature any higher than indicated on the care label sewn onto the textile. Check whether the ning temperature is suitable testing the iron on a concealed part of the garment. This ensures you do not immediately ruin the garment if the temperature setting is too high.
- As the appliance warms up faster than it cools down, should always start by ironing garments to be ironed at temperature setting 1.
- For blouses, shirts, trousers and dresses, iron the hard-to-reach areas on both sides first:
- button placket,
- c u f f s ,
- collar,
- pockets.
– Always iron the large areas last.
- Iron evenly and not too quickly. Hectic strokes when ironing will push the fabric together some-et what and may produce more new wrinkles than the wrinkles d you have ironed out.
- Do not hold the appliance still in one place. Keep the appliance constantly moving across the garment.
Hang the ironed garments on a clothes hanger or clothes line before you hang them in the closet. Laundry that has just been ironed wrinkles easily and should therefore cool off.
- Never iron directly over metal appliqués, buttons or zips on the clothing. You may damage the soleplate.
Fabrics and temperatures
- Always observe the information on the care labels of the textiles to be ironed. Certain materials such as fabrics containing synthetic fibres, silk and wool may not be ironed at all or only at low temperatures.
- If a garment is composed of different textiles, always use lowest corresponding temperature level.
- Keep in mind that the sensitivity of some textiles may be altered by chemical modifications such as a finish or impregnation.
- Iron wool garments with steam. We recommend using the maximum temperature setting and placing a towel underneath and on top of the garment to prevent direct contact with the iron.
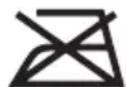
Textiles with this symbol may not be ironed.
Ironing inside-out or right-side-out
- If you would like a shiny textile surface (e.g. table cloths), iron the textile right-side-out. If you do not want a shiny surface, iron the textile inside-out.
- Ironing textiles such as silk will quickly produce a shiny effect. To avoid this effect, you should always iron them inside-out.
- Only iron dark and sensitive fabrics inside-out. Or place a towel between the soleplate and the section of fabric to be ironed.
- Particularly with velvet and corduroy, always place a towel between the soleplate and textile as direct ironing will produce shiny areas.
- Appliqués and embroidery look especially good if you begin by ironing these right-side-out on a soft surface and then inside-out.
Blouses and shirts
Wide ironing boards are ideal for ironing blouses and shirts.
– Iron in the following sequence:
- yoke and collar inside-out,
- yoke and collar right-side-out,
- button facing and buttonhole facing inside-out.
– cuffs inside-out first,
- cuffs right-side-out,
– front of the sleeves,
– back of the sleeves,
- front,
- b a c k .
- For the front:
Lay the garment on the ironing board so that the tip of the ironing board is up against yoke. Iron across the entire length of the first half and then the second half of the front.
– A sleeve board is very helpful when ironing blouses and shirts.
This will help you to also smooth hard-to-reach areas.
- Then hang the garment on a clothes hanger to let it dry off.
Trousers
– Iron trouser pockets and the waistband, first inside-out and then right-side-out.
– Pull the top part of the trousers over the ironing board and iron from both sides.
- If the trousers are supposed to have a crease, place the left trouser leg on the ironing board so that both side seams are directly on top of one another. In the process, pay attention to existing creases.
- First iron the inside of the trouser leg, then the outside.
- Repeat the steps with the right trouser leg.
- Hang the trousers on a clothes hanger to dry them off.
- Use shots of steam to smooth any new wrinkles that are created.
Cleaning and maintenance
Cleaning the appliance

WARNING
Risk of burns!
The appliance will become hot during operation. If you touch parts which are hot, you could burn yourself on them!
■ Before cleaning, pull the mains plug out of the socket.
■ Allow the appliance to cool completely before cleaning.

NOTICE
Cleaning the appliance incorrectly may cause damage! Hard objects may scratch the soleplate.
■ Do not use any solvent-based, abrasive or scouring cleaners or cleaning utensils (scouring pads, etc.). These could scratch the surfaces.
■ Do not fill the water tank with vinegar or chemical detergents.
■ Do not use a steam cleaner or high-pressure cleaner to clean the appliance.
■ Thoroughly dry all parts after cleaning.
- Set the steam regulator (3) and the temperature controller (11) to 0.
- Before cleaning, pull the mains plug out of the socket.
- Open the water tank cap (2).
- Empty the water tank (9).
- Close the water tank cap.
- Allow the appliance to cool off completely.
- Wipe the appliance with a damp cloth.
- Then allow the appliance to dry completely.
Self-cleaning
Depending on the hardness of the water and the frequency of use, the self-cleaning feature of the appliance must be carried out regularly.
- Open the water tank cap (2).
- Add water to the water tank (9).
- Close the water tank cap.
- Place the appliance on the stand (8).
- Insert the mains plug into a properly installed socket. The indicator light (6) turns on.
- Turn the temperature control dial (11) to the highest setting MAX.
- Once the highest temperature setting is reached, the indicator light will go out.
- Hold the appliance over a sink.
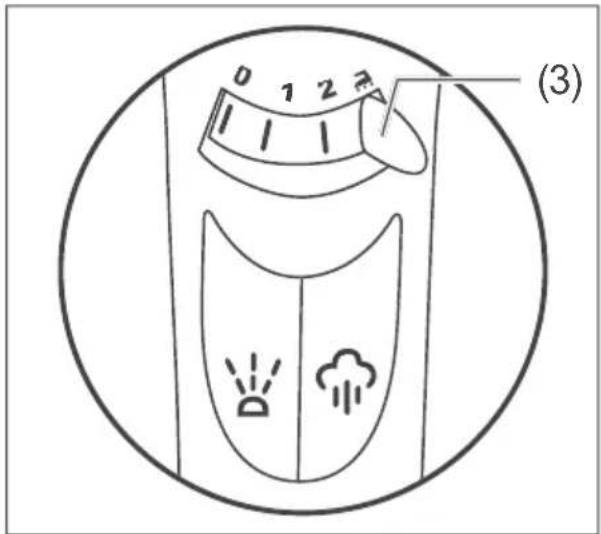
- Set the steam regulator (3) to
Steam and boiling water will be emitted from the holes in the soleplate (12). Dirt is rinsed out. - Once the water tank is empty, set the steam regulator to 0.
- Disconnect the mains plug from the socket.
- Allow the appliance to cool off completely.
Troubleshooting table
Malfunctions can occur in all electrical appliances. This does not necessarily mean there is a defect in the appliance. For this reason, check the tables to see if you can correct the malfunction.

WARNING
Risk of electric shock in case of improper repair!
Never try to repair a defective or suspected defective appliance yourself. You can put your own and future users' lives in danger. Only authorised specialists are allowed to carry out this repair work.
| Problem Possible cause Solutions, tips | |
| The mains plug is connected but the soleplate (12) is cold. | The socket has no power. |
| The temperature is set to the lowest setting. | |
| No steam is emitted from the soleplate. | Not enough water in the water tank. |
| The temperature is set too low. | |
| The steam shot button (4) is not working. | Not enough water in the water tank. |
| The temperature is set too low. | |
| The function is being used for the first time. | |
| The spray button (5) is not working. | Not enough water in the water tank. |
| The function is being used for the first time. | |
| The ironing result is poor. | The heat setting is incorrect. |
| The garment has discoloured. | The temperature setting was too high. |
| Limescale/impurities are escaping from the holes on the soleplate. | You have filled the water tank with very hard water. |
Service
Please note!
You are responsible for the condition of the appliance and its proper use in the household.
Damage resulting from non-compliance with this manual cannot be recognised.
In order for us to help you quickly, please tell us:
| Name of appliance Model Order number | ||
| hanseatic Steam iron EC1745 848853 |
General customer service
Please contact your mail order company's product advice centre if you have questions, complaints or accessory orders.
Spare parts
Customers in Germany
– Please contact the company Hermes Fulfilment GmbH:
Tel. +49 (0) 57 32 99 66 00
Monday–Thursday 8 a.m.–3 p.m., Friday 8 a.m.–2 p.m.
Customers in Austria
- Please contact your mail order company's customer service centre or product advice centre.
Environmental protection/disposal
Our contribution to the protection of the ozone layer

Our packaging is made of environmentally-friendly, recyclable materials:
– Outer packaging made of cardboard
– Moulded parts made of foamed, CFC-free polystyrene (PS)
- Films and bags made of them.
lyethylene (PE)
– Tension bands made of polypropylene (PP)
- Saving energy also protects against excessive global warming. Your new appliance uses little energy due to its environmentally friendly insulation and technology.
Waste prevention
According to the provisions of Directive 2008/98/EC, waste prevention measures always take priority over waste management.
For electrical and electronic devices, waste prevention measures include extending the lifespan of defective devices through repair and reselling used working appliances instead of disposing of them.
Please help us reduce waste and contact our customer service if your product is faulty.
More information can be found in the brochure ‘Waste Prevention Programme - of the German Government with the Involvement of the Federal Länder’.
If you would like to dispose of the packaging, please dispose of it in an environmentally friendly way.
Disposing of old electrical devices in an environmentally-friendly manner
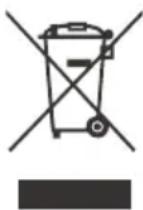
Electrical appliances contain harmful substances as w valuable resources.
Every consumer is therefore required by law to dispose of old electrical appliances at an au-
thorised collection or return point. They will thus be made available for environmentally-sound, resource-saving recycling.
You can dispose of old electrical appliances free of charge at your local recycling centre.
Contact your dealer directly for more information about this topic.
Datasheet
| Manufacturer | hanseatic |
| Name of appliance Steam iron | |
| Model EC1745 | |
| Output in W 1500–1900 | |
| Supply voltage in V~ 50/60 Hz 220–240 | |
| Protection class I | |
| Weight in g approx. 950 | |
| Order number 848853 |
- Lieferumfang
- Steam iron
- Table of contents
- Explanation of terms/symbols
- NOTICE
- WARNING
- CAUTION
- Safety
- Intended use
- Safety notices
- Risks for certain groups of people
- WARNING!
- CAUTION!
- Fire hazard!
- ! NOTICE
- Risks when handling a steam iron
- Risk of electric shock!
- Risk of short circuit!
- Risk of burns!
- Delivery
- Package contents
- Check the delivery
- Appliance parts
- Operation
- Preparation
- Filling the water tank
- Switching on
- Removing manufacturing residue
- Adjusting the heat setting
- Dry ironing
- Steam ironing
- Using the spray shot feature
- Using the vertical steam shot feature
- Switching off
- Tips for ironing correctly
- Basic tips
- Fabrics and temperatures
- Ironing inside-out or right-side-out
- Blouses and shirts
- Trousers
- Cleaning and maintenance
- Cleaning the appliance
- Self-cleaning
- Troubleshooting table
- Service
- Please note!
- General customer service
- Spare parts
- Customers in Germany
- Customers in Austria
- Environmental protection/disposal
- Our contribution to the protection of the ozone layer
- Waste prevention
- Disposing of old electrical devices in an environmentally-friendly manner
Brand : Hanseatic
Model : EC1745
Category : Iron