Element BTE - Hearing aid Unitron - Free user manual and instructions
Find the device manual for free Element BTE Unitron in PDF.


User questions about Element BTE Unitron
0 question about this device. Answer the ones you know or ask your own.
Ask a new question about this device
Download the instructions for your Hearing aid in PDF format for free! Find your manual Element BTE - Unitron and take your electronic device back in hand. On this page are published all the documents necessary for the use of your device. Element BTE by Unitron.
USER MANUAL Element BTE Unitron
natural_image
Blue spiral ear icon with registered trademark symbol (no text or numbers)Element ^TM
BTE Guide
Table of Contents
Your Element™ Hearing Instruments ....1
Practical Solutions to Everyday Problems ....2
Getting the Most Out of Your Element™ Hearing Instruments....3
Using the Element™ BTE Guide......4
Putting Your Element™ Hearing Instruments on Your Ears ....5
Turning Your Element™ Hearing Instruments On and Off ....6
Feedback-Free Listening 7
Replacing the Battery 8
Operating Instructions ....10
Assistive Listening Devices ....15
Caring for Your Element™ Hearing Instruments......17
Cleaning Your Element™ Hearing Instruments .....18
Warnings 21
Troubleshooting Guide 23
Warning to Hearing Instrument Dispensers .....26
Your Element™ Hearing Instruments
Hearing Healthcare Professional:
Telephone:
Model:
Serial Number:
Replacement Batteries: Size 13 Size 10
Warranty:
Use Automatic Program for (if applicable)
1: Quiet
2: Group/Party Noise
Use Manual Program 1 for: ____
Use Manual Program 2 for: ____
Use Manual Program 3 for: ____
Date of Purchase: ____
Practical Solutions to Everyday Problems
Congratulations on choosing your new Element™ BTE (Behind-the-Ear) hearing instruments. For over 40 years, Unitron Hearing has been committed to making life better for people with hearing loss. This means a commitment to developing high-quality hearing solutions that incorporate special features to solve the everyday problems and concerns you have with hearing loss and hearing instruments.
Element includes real problem solving innovations, high-value advanced features, and delivers exceptional sound quality in everyday listening environments. Your Element hearing instrument may include an automatic program that reads your listening environment and automatically determines a sound destination that is most effective for optimal listening as your listening needs change throughout the day. Three additional manual programs give you added flexibility to meet your particular listening needs. Element’s sophisticated adaptive features offer you the latest in digital technology so your hearing instruments adapt without the need for manual adjustments or fiddling by you.
Getting the Most Out of Your Element™ Hearing Instruments
Adjusting to your new hearing instruments will take some time. In the beginning it is important that you do not use the hearing instruments for longer than is comfortable. Depending on your previous experience with hearing instruments, a few hours a day may be enough and then you can increase wearing time gradually. Once you have become accustomed to your hearing devices, you should wear them all day every day since infrequent use will not permit you to adapt to your hearing devices and enjoy their full benefits. The quicker you get used to the everyday sounds around you, the less you will notice that you are wearing hearing instruments.
Using the Element™ BTE Guide
Refer to the table of contents for a complete listing of the topics covered in this guide.
There are different styles of BTEs available. The diagrams below identify some of the components on your hearing devices. Have your hearing healthcare professional place a check beside the diagram that best describes your BTE style.
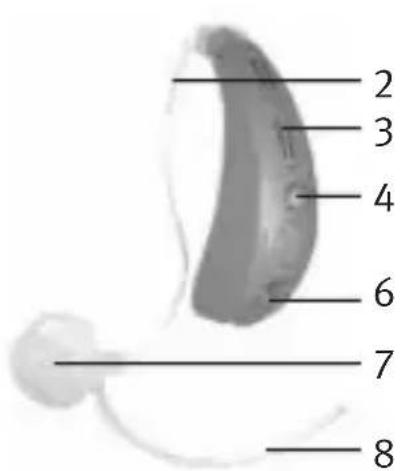
text_image
2 3 4 6 7 8□ BTE with Slim Tube
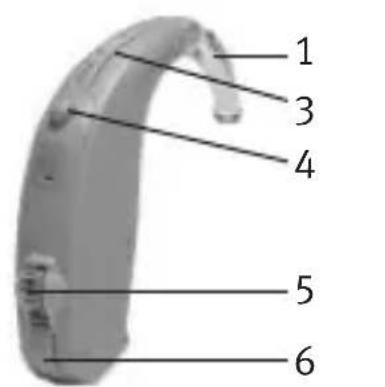
text_image
1 3 4 5 6□ BTE with Volume Control
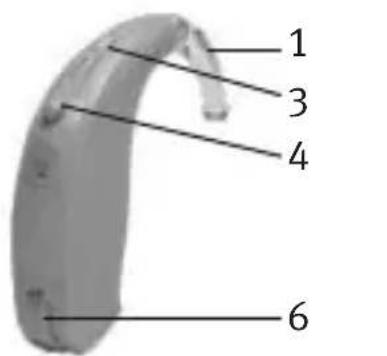
text_image
1 3 4 6□ BTE without Volume Control
Legend
1 Earhook
2 Slim Tube
3 Microphone and
Microphone Shield
4 Program Button
5 Volume Control
6 Battery Door/On & Off Switch
7 Dome
8 Retention Piece
Putting Your Element™ Hearing Instruments on Your Ears
BTEs with Slim Tubes
- Hold the slim tube where it attaches to the dome and gently push the dome into your ear canal. The slim tube should lie flush against your head and not stick out.
- Place the hearing instrument over the top of your ear.
- Place the retention piece in your ear so it rests at the bottom of the opening of your ear canal.
- Repeat steps 1-3 for your other ear if you wear two hearing devices.
BTEs with Earhooks
- Carefully insert the earmold in your ear. The earmold should fit into your ear snugly and comfortably.
- Place the hearing instrument over the top of your ear.
- Repeat steps 1-2 for your other ear if you wear two hearing devices.
Turning Your Element™ Hearing Instruments On and Off
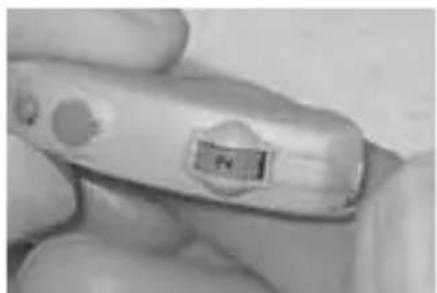
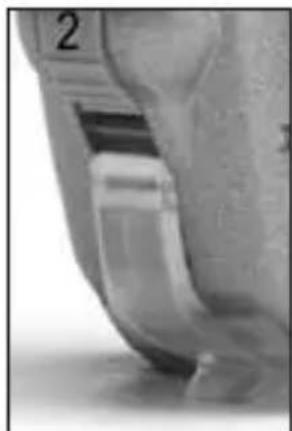
Your hearing instruments have a three-position battery door that acts as an off/on switch and that allows access to the battery compartment.
To turn the hearing instrument on, close the battery door fully. Note: If the start up delay is activated, your hearing instruments will not turn on for 10-15 seconds after closing the battery door.
To turn the hearing instrument off, partially open the battery door. This position allows excess moisture to vent away from the battery compartment.
To replace the hearing instrument battery, fully open the battery door for access to the battery compartment.
natural_image
Close-up of a hand holding a small electronic device with a labeled sensor (no visible text or symbols)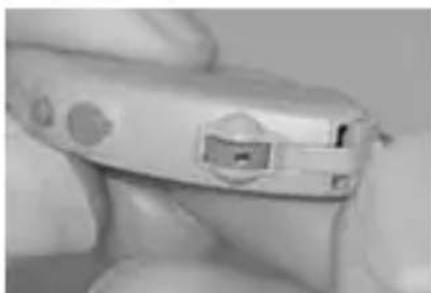
natural_image
Close-up of a handheld electronic device with a small display and control buttons (no visible text or symbols)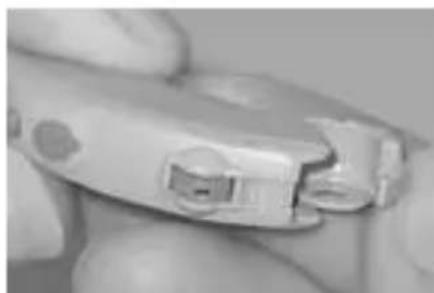
natural_image
Close-up of a hand holding a small metallic tool or plunger (no visible text or symbols)on off open
natural_image
Close-up of a metallic object with a curved edge and a number '2' on the top (no visible text or symbols)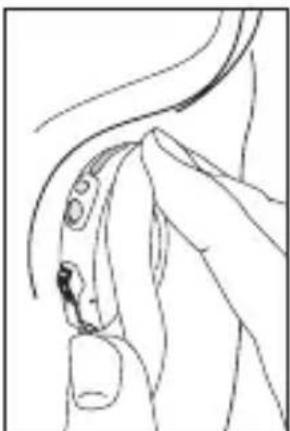
natural_image
Line drawing of a hand holding a small object, possibly a device or tool, with no visible text or symbols.Note: When turning your hearing instrument on and off, grasp the top and bottom of the instrument with your index finger and thumb. Use your thumb to open and close the battery door.
Feedback-Free Listening
Your Element hearing instruments have an optional start up delay that can be activated by your hearing healthcare professional. If the start up delay is activated, your hearing instruments will not turn on for 10-15 seconds even if the battery door is closed fully. The hearing devices return to the start up delay position each time you turn your hearing devices on. This allows you to insert your hearing devices without experiencing whistling.
If you wear hearing devices now, you may have experienced whistling from your hearing devices when you talk, chew, use the telephone or hug someone. Element's feedback technology dramatically reduces this uncomfortable whistling before you or anyone else can perceive it.
Replacing the Battery
- Gently swing out the battery compartment door with your fingernail.
- Grasp the battery with your thumb and index finger and remove.
- Insert the new battery into the battery compartment with the plus (+) sign on the battery facing the same way as the plus (+) sign on the edge of the battery door. This will ensure that the battery door closes properly.
Note: If the battery is inserted incorrectly, the door will not close.
- Close the battery compartment door.
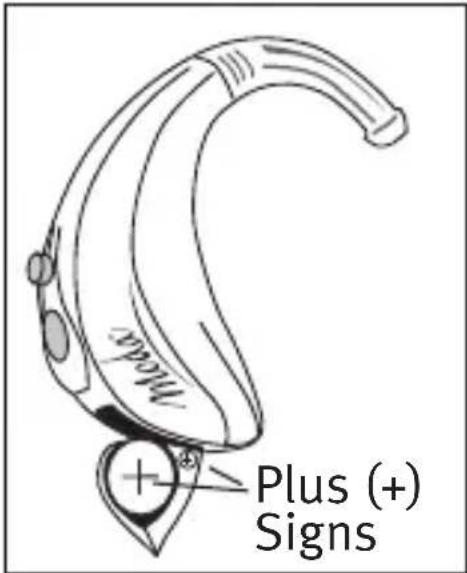
text_image
Mode Plus (+) Signs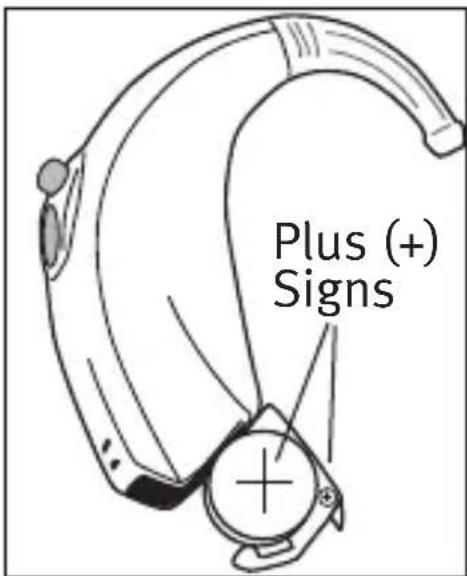
text_image
Plus (+) SignsLow Battery Warning
When you hear one long beep, your hearing devices are warning you that their batteries are low. You will hear the warning approximately every 30 minutes until you change the batteries or the batteries die. After the first warning, you may experience some reduction in sound quality. This is normal and can be remedied by inserting fresh batteries in the hearing devices. If you prefer, your hearing healthcare professional can change the pitch and loudness of the low battery beep or turn it off entirely.
Caring for Batteries
• Always discard batteries carefully.
- To prolong battery life, remember to turn your hearing devices off when not in use.
- Remove the batteries and keep the battery door open while hearing devices are not in use. This will allow internal moisture to evaporate.
Battery Warnings
- Never leave hearing devices or batteries where small children and pets can reach them.
- Never put hearing devices or batteries in your mouth. If a hearing device or battery is swallowed, call a physician immediately.
Operating Instructions
Changing Programs on Your Element™ Hearing Instruments
Your Element hearing instruments may have an automatic program and up to three additional manual programs. Element's automatic program will satisfy most of your listening needs by adjusting to different listening environments without requiring manual adjustments. Up to three additional manual programs can be individually tailored by your hearing healthcare professional to meet your particular listening needs.
Your hearing devices are equipped with a push-button for switching between programs. Each time you push the program button, you will move to a new program. Your hearing devices beep to indicate which program you are in (i.e. one beep for program 1, two beeps for program 2, etc.) If you prefer, your hearing healthcare professional can adjust the pitch and loudness of the program beep or turn it off entirely.
Adjusting the Volume
The volume on your hearing devices may adjust automatically in response to the loud or quiet sounds around you. If you have a manual volume control, you can further adjust the volume on your hearing devices. The manual volume control is numbered one to four. One indicates that the volume is at the minimum level and
four indicates that the volume is at the maximum level. Rotate the volume control upward to increase the volume or downward to decrease the volume. Note that your volume control may be disabled by your hearing healthcare professional and, therefore, could be inactive.
Before changing the volume on your hearing devices, secure the device on your ear with your index finger and thumb. Then using your thumb, rotate the volume control up or down.
Setting Your Ideal Volume
Element hearing instruments with manual volume control have an ideal volume indicator. A single beep indicates when the volume control has reached its ideal level for your particular hearing loss, as pre-set by your hearing healthcare professional.
Listening in Windy Environments
Element's wind noise manager will engage automatically based on whether wind conditions are moderate or high. When the wind noise manager is engaged, sounds such as speech, may become quieter because the wind noise manager is working to reduce the loud noise produced by wind. When you are no longer in a windy environment, the wind noise manager will not be active and desirable sounds, such as speech, will once again become louder.
Listening in Quiet and Noisy Environments
Your Element hearing instruments have a directional microphone system to meet your listening needs in different environments. The directional system focuses on sounds in front of you (i.e., speech) while reducing sounds from the sides or behind you (i.e., noise). Your Element may have an advanced directional microphone system that adjusts automatically to changing noise levels and tracks moving noise sources. Your hearing healthcare professional can tell you how your directional system has been customized for you and which listening programs have the directional microphones activated.
In addition, Element contains technology that identifies and minimizes sudden impulse sounds that many hearing instrument wearers find irritatingly loud such as slamming doors or clattering dishes. This technology is designed to increase listening comfort in adverse listening situations without impacting sound quality or your ability to understand conversations.
Replacing the Microphone Protectors
Your Element hearing instruments have a shield to protect the microphones from dirt and debris. Debris on the microphone protector reduces the sound quality of the instrument. You should have the microphone protectors replaced by your hearing healthcare professional approximately every three months to ensure optimal sound quality.
Using Element™ with the Telephone
Element has the ability, depending on hearing loss, vent size and style of hearing instrument to provide feedback-free phone use without program changes. For many wearers this means, when the phone rings, all you have to do is pick up the telephone and hold it to your ear normally. In some situations when using a cell phone, you may experience digital interference that sounds like static, buzzing or beeping. If you experience interference, increase the distance between your hearing instrument and the phone receiver.
Easy-t for the Telephone or Cell/Mobile Phone
Element can also come equipped with an optional easy-t (automatic telephone switch) that can help you listen on the telephone. Easy-t automatically switches your hearing instrument into a telephone listening mode with hearing instrument compatible phones. You will hear a short melody to indicate you are in the telephone (easy-t) program. If your phone is hearing instrument compatible, it will have a magnetic coil and the easy-t will activate automatically when the telephone is held to the ear. Once the telephone is removed from the ear, the hearing instrument will switch back to the normal listening mode. Since the location and strength of the magnetic coil varies among phone manufacturers, it may be necessary to move the telephone receiver slightly to find the best reception. If the hearing instrument does not switch to
the telephone program automatically when the telephone receiver is placed in proximity, the magnet for easy-t hearing instruments should be attached to the telephone receiver. The magnet is designed to strengthen the magnetic field at the ear piece of hearing instrument compatible telephones.
To affix the easy-t magnet:
- Clean the telephone receiver.
- Hold the magnet near the “listening end” of your telephone receiver and release it (Figure 1). The magnet will flip to the appropriate side and seek the optimal position on the telephone receiver.
- Place the double-sided tape in this optimal position on the telephone receiver (Figure 2) and attach the magnet to the tape (Figure 3).

natural_image
Line drawing of a hand inserting a small circular component into a device (no text or symbols)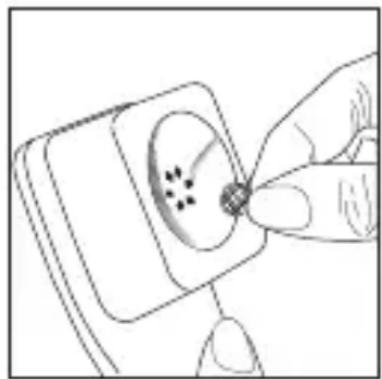
natural_image
Line drawing of a hand inserting a small object into a device (no text or symbols)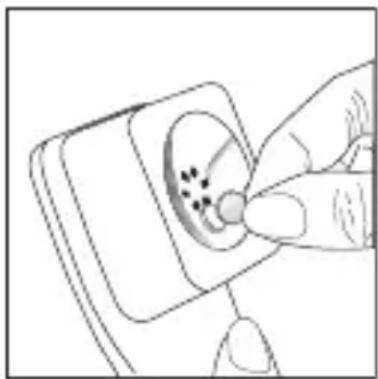
natural_image
Line drawing of a hand inserting a small circular component into a device (no text or symbols)Figure 1 Figure 2 Figure 3
Warnings
- Be sure the magnet is securely affixed to the telephone.
- Keep loose magnets out of reach of children and pets.
-
If the magnet falls into your ear, contact your hearing healthcare professional.
-
If the magnet is swallowed, contact your physician immediately.
- The magnet may affect some medical devices or electronic systems. Always keep the magnet (or the telephone equipped with the magnet) at least 30 cm (12") away from pacemakers, credit cards, floppy disks or other magnetically sensitive devices.
- Too high distortion during dialing or phoning may mean that the phone handset is stressed by the magnet. To avoid any damage, please move the magnet to another place on the telephone receiver.
Assistive Listening Devices
Listening in Public Places
Element's optional telecoil can also help you listen in public places equipped with telecoil compatible assistive listening devices such as a loop system. If your hearing instruments do not operate when the telecoil is on, the loop system may not be operating or you may be in a “dead” spot. Try positioning yourself in a different part of the looped area or return your hearing instruments to the microphone position and sit as close to the speaker as possible.
Connecting to External Audio Sources
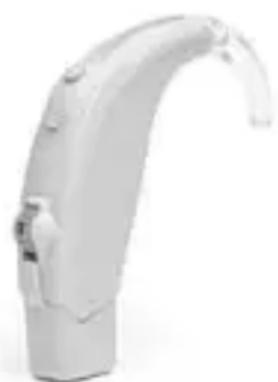
Your Element hearing instruments may feature optional direct audio input (DAI) to
natural_image
White medical or electronic device component with curved arm and handle (no visible text or symbols)connect to other audio sources such as a stereo or television. You will need to purchase the direct audio input system and a connector cord from your hearing healthcare professional before you can connect to external audio sources.
DAI can also be used to fit your hearing instruments with an assistive listening device, such as a FM system, which you may purchase to improve listening in difficult situations.
Note: If your hearing instruments are the small BTE style that requires size 10 batteries (Moda), your hearing instruments are not compatible with direct audio input, MicroLink MLx or an FM system. However, hearing instruments that use size 13 batteries are compatible. Refer to your battery package for the size of your hearing instrument batteries or consult with your hearing healthcare professional for more information.
Listening Over Distance
Your Element hearing instruments may be compatible with Phonak's MicroLink™ Receiver Module, a wireless FM system that improves listening over distance. The MLx FM receiver module connects to the direct audio input system and is powered by the hearing instrument battery.
Using FM and Infrared Systems
Some FM systems consist of a teleloop worn around the neck, which is connected to the FM receiver worn on a belt
or in a shirt pocket. To listen through the FM system, select the telecoil program and turn on the FM receiver. To keep the signal clear, you may need to adjust the volume control on your hearing instruments, as well as on the FM receiver.
With some infrared systems you may need to remove your hearing instruments and wear the system's headset receiver. If the volume on the infrared receiver is not loud enough, use your hearing instruments instead.
See also “Connecting to External Audio Sources.”
Caring for Your Element™ Hearing Instruments
- Open the battery door when not in use.
- Always remove your hearing devices when using hair care products. The hearing devices can become clogged and cease to function properly.
- Protect your hearing devices from excessive heat (hair dryer, vehicle glove box or dashboard) and moisture (bath or shower). Do not immerse the hearing devices in water.
-
If your hearing devices do become wet, do not attempt to dry them in an oven or microwave. Do not adjust any controls. Open the battery doors immediately, and allow your hearing devices to dry naturally for 24 hours.
-
Regular use of a dehumidifier, such as a Dri-Aid kit, can help prevent corrosion. See your hearing healthcare professional for more information.
- Do not drop your hearing devices or knock them against hard surfaces.
Cleaning Your Element™ Hearing Instruments
Ear wax is natural and common. Ensuring your hearing devices and earmolds are free of ear wax is an important step in your daily cleaning and maintenance routine.
- Never use alcohol to clean your hearing devices or earmolds.
- Do not use sharp tools to dislodge ear wax. Sticking household items into your hearing devices or earmolds can seriously damage them.
Cleaning the Earmolds
If your Element hearing devices have earhooks (see “Using the Element BTE Guide”), your hearing healthcare professional fit you with customized earmolds. Earmolds send amplified sound from the hearing devices into the ears. They must fit into your ears snugly and comfortably. If amplified sound leaks out of your ear, you may hear whistling.
Always ensure earmolds are clean and free of ear wax
and moisture. Do not use alcohol to clean your earmolds. If the earmolds become plugged, clear the opening with a wax loop or pipe cleaner. If your physician prescribes eardrops, clean any moisture that may get into the earmolds or tubing to prevent plugging.
If the earmolds require further cleaning, disconnect the plastic tube from the hook of the hearing devices. Wash only the earmolds in warm water with a mild soap. Rinse them with cool water and allow them to dry overnight. Make sure the earmold tubes are dry before reconnecting them to each hook on your hearing devices.
Cleaning the Slim Tubes and Domes
If your hearing instruments have slim tubes (see “Using the Element BTE Guide”), you need to ensure that the tubes and domes are free of ear wax and moisture. You should have the slim tubes and domes replaced by your hearing healthcare professional approximately every three to six months or when they become stiff or brittle. Clean the domes daily with a damp cloth. You should also clean the slim tubes periodically, with the cleaning pin provided, when you begin to notice debris in and around the tubes.
To clean the slim tubes and domes:
-
Hold the slim tube in one hand and the hearing instrument in the other hand.
-
Gently turn the hearing instrument until it detaches from the slim tube.
-
Use a damp cloth to clean the outside of the slim tube and the dome.
- Using the black cleaning pin provided in the kit, gently insert the cleaning pin where the slim tube attaches to the hearing instrument and push the pin all the way through the tube and out through the dome.
Note: The slim tubes and domes should never be rinsed or submerged in water as water drops may become lodged in the tube, block sound or damage the electrical components of the hearing instrument.
- Once the slim tube has been cleaned, reattach it by gently turning the hearing instrument onto the slim tube.
Warnings
• Hearing devices should only be used as directed by your physician or hearing healthcare professional.
- Hearing devices will not restore normal hearing and will not prevent or improve a hearing impairment resulting from organic conditions.
- Do not use your hearing devices in explosion hazard areas.
- Allergic reactions to hearing devices are unlikely. However, if you experience itching, redness, soreness, inflammation or a burning sensation in or around your ears, inform your hearing healthcare professional and contact your physician.
- In the unlikely case that any parts remain in the ear canal after the removal of the hearing instrument, contact a physician immediately.
- Remove your hearing devices for CT and MRI scans or for other electromagnetic procedures.
- Only plug the DAI cables into devices that produce safe voltages of less than 3 volts.
- Special care should be exercised in wearing hearing devices when maximum sound pressure levels exceed 132 decibels. There may be a risk of impairing your remaining hearing. Speak with your hearing healthcare professional to ensure the maximum
output of your hearing devices is suitable for your particular hearing loss.
Note to hearing healthcare professional
- Domes should never be fitted on patients with perforated eardrums, exposed middle ear cavities, or surgically altered ear canals. In the case of such a condition, we recommend to use a customized ear mold.
Precautions
- The use of hearing devices is only part of hearing rehabilitation; auditory training and lip reading instruction may be required as well.
- In most cases, infrequent use of hearing devices does not provide full benefit. Once you have become accustomed to your hearing devices, wear your hearing devices everyday all day.
- Your hearing devices use the most modern components to provide the best possible sound quality in every listening situation. However, communication devices such as digital cell phones can create interference (a buzzing sound) in hearing devices. If you experience interference from a cell phone being used close by, you can minimize this interference in a number of ways. Switch your hearing devices to another program, turn your head in a
different direction or locate the cell phone and move away from it.
Labeling
The serial number and year of manufacture are located inside the battery door.
Troubleshooting Guide
CAUSE POSSIBLE REMEDY
No sound
| Not turned onLow/dead batteryPoor battery contactBattery upside downEarmolds/slim tubes blocked with ear waxPlugged microphone protector | Turn onReplace batteryConsult your hearing healthcare professionalInsert battery plus (+) side upClean earmolds. See “Cleaning the Earmolds”. Use cleaning pin to dislodge ear wax in slim tubes. See “Cleaning the Slim Tubes and Domes”. Consult your hearing healthcare professional.Consult your hearing healthcare professional |
Not loud enough
| Low volumeLow batteryEarmolds/slim tubes not inserted properlyChange in hearingEarmolds/slim tubes blocked with ear waxPlugged microphone protector | Turn up volume; see hearing healthcare professional for models without a manual volume control or if problem persists.Replace batterySee “Cleaning the Earmolds” or “Cleaning the Slim Tubes and Domes” or “Putting Your Element Hearing Instruments on Your Ears”. Reinsert carefully.Consult your hearing healthcare professionalClean earmolds. See “Cleaning the Earmolds”. Use cleaning pin to dislodge ear wax in slim tubes. See “Cleaning the Slim Tubes & Domes”. Consult your hearing healthcare professional.Consult your hearing healthcare professional |
| CAUSE POSSIBLE REMEDY | |
| Intermittent | |
| Low batteryDirty battery contact | Replace batteryConsult your hearing healthcare professional |
| One long beep | |
| Low battery | Replace battery |
| Whistling | |
| Earmolds/slim tubes not inserted properlyHand/clothing near earPoorly fitting earmolds/ slim tubes | Remove and reinsert carefullyRemove hand/clothing from earConsult your hearing healthcare professional |
| Not clear, distorted | |
| Poorly fitting earmolds/ slim tubesEarmolds/slim tubes blocked with ear waxLow batteryPlugged microphone protector | Consult your hearing healthcare professionalClean earmolds. See “Cleaning the Earmolds”. Use cleaning pin to dislodge ear wax in slim tubes. See “Cleaning the Slim Tubes & Domes”. Consult your hearing healthcare professional.Replace batteryConsult your hearing healthcare professional |
| CAUSE POSSIBLE REMEDY | |
| Earmolds/slim tubes falling out of ear | |
| ·Poorly fitting earmolds/ slim tubes ·Earmolds/slim tubes not inserted properly | ·Consult your hearing healthcare professional ·See “Cleaning the Earmolds” or “Cleaning the Slim Tubes and Domes” or “Putting Your Element Hearing Instruments on Your Ears”. Reinsert carefully. |
| “Motorboating” | |
| ·Low battery ·Dirty battery contact | ·Replace battery ·Consult your hearing healthcare professional |
| Weak on the telephone | |
| ·Telephone not positioned properly | ·Move telephone receiver around ear for clearer signal. See “Using Element with the Telephone” and “Easy-t for the Telephone or Cell/Mobile Phone”. ·Consult your hearing healthcare professional |
| ·Hearing instrument requires adjustment | |
For any problems not listed in the guide, contact your hearing healthcare professional. If you do not have a hearing healthcare professional, please contact the nearest office listed on the back page of this booklet.
Warning to Hearing Instrument Dispensers
A hearing instrument dispenser should advise a prospective hearing device user to consult promptly with a licensed physician (preferably an ear specialist) before dispensing a hearing device if the hearing device dispenser determines through inquiry, actual observation, or review of any other available information concerning the prospective user, that the prospective user has any of the following conditions: (i) Visible congenital or traumatic deformity of the ear. (ii) History of active drainage from the ear within the previous 90 days. (iii) History of sudden or rapidly progressive hearing loss within the previous 90 days. (iv) Acute or chronic dizziness. (v) Unilateral hearing loss of sudden or recent onset within the previous 90 days. (vi) Audiometric air-bone gap equal to or greater than 15 decibels at 500 hertz (Hz), 1,000 Hz, and 2,000 Hz. (vii) Visible evidence of significant cerumen accumulation or a foreign body in the ear canal. (viii) Pain or discomfort in the ear. Special care should be exercised in selecting and fitting a hearing device whose maximum sound pressure level exceeds 132 decibels because there may be risk of impairing the remaining hearing of the hearing device user. [This provision is required only for those hearing devices with a maximum sound pressure capability greater than 132 decibels (dB).]
Important Notice for Prospective Hearing Instrument Users
Good health practice requires that a person with a hearing loss have a medical evaluation by a licensed physician (preferably a physician who specializes in diseases of the ear) before purchasing a hearing device.
Licensed physicians who specialize in diseases of the ear are often referred to as otolaryngologists, otologists or otorhinolaryngologists. The purpose of medical evaluation is to assure that all medically treatable conditions that may affect hearing are identified and treated before the hearing device is purchased.
Following the medical evaluation, the physician will give you a written statement that states that your hearing loss has been medically evaluated and that you may be considered a candidate for a hearing device. The physician will refer you to an audiologist or a hearing device dispenser, as appropriate, for a hearing device evaluation. The audiologist or hearing device dispenser will conduct a hearing device evaluation to assess your ability to hear with and without a hearing device. The hearing device evaluation will enable the audiologist or dispenser to select and fit a hearing device to your individual needs. If you have reservations about your ability to adapt to amplification, you should inquire about the availability of a trial-rental or purchase-option program. Many hearing device dispensers now offer
programs that permit you to wear a hearing device for a period of time for a nominal fee after which you may decide if you want to purchase the hearing device.
Federal law restricts the sale of hearing devices to those individuals who have obtained a medical evaluation from a licensed physician. Federal law permits a fully informed adult to sign a waiver statement declining the medical evaluation for religious or personal beliefs that preclude consultation with a physician. The exercise of such a waiver is not in your best health interest and its use is strongly discouraged.
Children With Hearing Loss
In addition to seeing a physician for a medical evaluation, a child with a hearing loss should be directed to an audiologist for evaluation and rehabilitation since hearing loss may cause problems in language development and the educational and social growth of a child. An audiologist is qualified by training and experience to assist in the evaluation and rehabilitation of a child with a hearing loss.
UNITRON HEARING DISTRIBUTORS
CORPORATE OFFICE/INTERNATIONAL
20 Beasley Drive, P.O. Box 9017, Kitchener, ON N2G 4X1 Canada
AUSTRALIA
Level 2, Norwest Quay, 21 Solent Circuit, Baulkham Hills, NSW, NSW 2153
BELGIUM
Baron de Vironlaan, 60 b-1700 Dilbeek
CANADA
20 Beasley Drive, P.O. Box 9017, Kitchener, ON N2G 4X1
CHINA
No. 200 Suhong Road, Export Processing Zone 4D, Suzhou Industrial Park 215021
DENMARK
Nitivej 10, DK-2000 Frederiksberg
EUROPEAN REPRESENTATIVE
Daimlerstrasse 22, 70736 Fellbach-Oeffingen, Germany
FRANCE
5, rue Maryse Bastié - BP 15 69671 Bron Cedex, France
NETHERLANDS
Archimedesbaan 19, P.O. Box 1214, 3430 BE Nieuwegein
New Zealand
10/215 Rosedale Rd., M277 Private Bag, 300987, Albany, Auckland
NORWAY
Brugata 14 0186 Oslo, Norway
SOUTH AFRICA
First Floor – Selborne House, Fourways Golf Park, Roos Street, Fourways, Johannesburg
SPAIN
Urb. El Palmeral Bl. IX, 17-27 Alicate, Spain -- 03008
SWEDEN
St. George House, Cygnet Court, Centre Park, Warrington, Cheshire WA1 1PD
U.S.A.
Suite A, 2300 Berkshire Lane North, Plymouth, MN 55441
MANUFACTURER
UNITRON HEARING LTD.
20 Beasley Drive, P.O. Box 9017, Kitchener, ON N2G 4X1 Canada

text_image
unitron hearing®www.unitronhearing.com
DISTRIBUTOR