
Sports TT17004F - Watch ORIENT - Free user manual and instructions
Find the device manual for free Sports TT17004F ORIENT in PDF.


User questions about Sports TT17004F ORIENT
0 question about this device. Answer the ones you know or ask your own.
Ask a new question about this device
Download the instructions for your Watch in PDF format for free! Find your manual Sports TT17004F - ORIENT and take your electronic device back in hand. On this page are published all the documents necessary for the use of your device. Sports TT17004F by ORIENT.
USER MANUAL Sports TT17004F ORIENT
ANALOGUE QUARTZ WATCH 1/20 sec. CHRONOGRAPH
INSTRUCTION MANUAL
Thank you for choosing our product. To ensure prolonged use and optimum performance, please read this instruction manual carefully and familiarize your-self with the terms of the guarantee.
Please keep this Instruction Manual handy for future reference.
◆ SAFETY PRECAUTIONS
Make absolutely sure to observe the demarcated contents indicated below to prevent any possible physical danger and property damage to you as well as other people concerned.
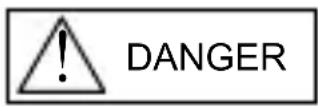
... A demarcation with this symbol represents the contents assuming imminent danger for death or serious injury when the product is used in any manner different from given instructions.
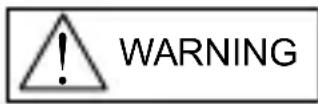
... A demarcation with this symbol represents the contents assuming possibility for death or serious injury when the product is used in any manner different from given instructions.
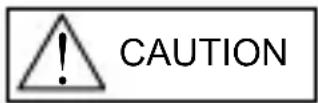
... A demarcation with this symbol represents the contents assuming possibility of causing human injury or material damage only when a product is used in any manner different from given instructions.
◆ IN HANDLING THE WATCH
(1) Water-resistance
| Type\Conditions of use | Underwater operation of crown and operation of crown with drops of water on it | Exposure to small amounts of water (face-washing, rain, etc.) | Water sports (swimming, etc.), frequent contact with water (car-washing, etc.) | Skin diving (air tanks are not used) | Scuba diving (air tanks are used) | Mixed-gas Diving (using helium gas) | ||
| Non water resistant | Without WATER RESISTANT (WATER RESIST) | × × | × × | × × | ||||
| Water resistant watches | Water resistant for daily life | WATER RESISTANT (WATER RESIST) | × | ○ | × × | × × | ||
| Reinforced water resistance for daily life I | WATER RESISTANT (WATER RESIST) 50m (5bar) | × | ○ | ○ | × × | × | ||
| Reinforced water resistance for daily life II | WATER RESISTANT (WATER RESIST) 100m (10bar) 200m (20bar) | × | ○ | ○ | × | × | × | |
| Diver's watches | Diver's watch for Air Diving | AIR DIVER'S 100m / 150m 200m | × | ○ | ○ | ○ | × | |
| Diver's watch for Mixed-gas Diving | He-GAS DIVER'S 200m / 300m /... | × | ○ | ○ | ○ | ○ | ||
* It is recommended that you use the watch correctly following the above-mentioned scope of usage after ascertaining water resistance precautions marked on the dial or caseback.
CAUTION
① A watch with water resistance for daily life 30m (3 bar) can be used during face-washing, etc. but cannot be used in an environment in which it will be submerged in water.
② A watch with reinforced water resistance for daily life I 50m (5 bar) can be used while swimming, etc. but cannot be used during any type of diving including skin diving.
③ A watch with reinforced water resistance for daily life II 100m or 200m (10 or 20 bar) can be used while skin diving, but cannot be used while scuba diving using oxygen tanks or saturation diving using helium gas, etc.
④ Keep the crown pushed in at all times (in the normal position) while using the watch. If the crown is the screwed-down type, check that it is securely screwed down.
⑤ Do not operate the crown underwater, or while the watch is wet. Water may enter the interior of the watch and defeat the water resistance.
⑥ If your watch is non-water resistant, beware of splashes of water (during face washing, rain, etc.) and sweat. If the watch becomes wet from water or sweat, wipe the moisture off with a dry, soft cloth.
⑦ Even with a water resistant watch for everyday use, avoid directing strong jets of mains water onto the watch. Water pressure above the limit can apply, which may defeat the water resistance.
⑧ With a water resistant watch for everyday use, rinse sea water off the case after exposure, then wipe it thoroughly to avoid corrosion and other effects.
⑨ The interior of the watch contains some amount of moisture, which may cause fogging on the inside of the glass when the outside air is cooler than the internal temperature of the watch. If the fogging is temporary it causes no harm inside the watch, but if prolonged, or if water enters the watch, consult your place of purchase and do not leave the problem untreated.
(2) Handling the Battery
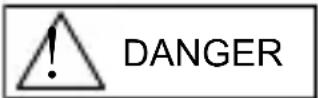
① If a button battery or coin battery is ingested, it may cause chemical burns or perforation of mucous membrane even in a short period of time, and in the worst-case scenario, may result in death. Never leave button batteries or coin batteries within the reach of infants or young children.
If a button battery or coin battery is ingested, or there is a possibility that one was ingested, it must be removed at once. Please treat as an emergency situation and contact a doctor immediately.
② Do not remove the battery from the watch. Contact the place of purchase of the watch or your nearest ORIENT authorized service center for assistance when wanting to remove the battery.
③ The battery used in this watch is not a rechargeable battery, so it cannot be recharged and used again. Do not attempt to charge the battery as doing so could cause it to overheat or explode.
④ A skin rash or other symptom may develop if leaking battery fluid comes into contact with skin. Do not leave depleted batteries sitting around for long periods of time.
(3) Replacing the Battery
① Depleted batteries that are left sitting in the watch for long periods of time may begin to leak battery acid, which could lead to malfunction. Be sure to replace depleted batteries as soon as possible.
② Replace the watch battery only with the specified battery type.
③ Battery replacement requires special-purpose tools, techniques, etc. Reversing the polarities when inserting the battery may cause the battery to overheat or explode. Contact the place of purchase or your nearest ORIENT authorized service center for assistance when wanting to replace the battery.
④ The watch comes equipped with a battery end of life indicator.
If the small second hand begins to advance two tick marks for every movement, it means that the battery is nearing the end of its life and will need to be replaced.
Contact the place of purchase or your nearest ORIENT authorized service center immediately for assistance with battery replacement.
⑤ Steps to be taken after the battery is replaced
After you have the battery replaced, be sure to set the time and set the stopwatch hands to the "0" position.
(Refer to ◆ SETTING THE TIME AND ADJUSTING THE STOPWATCH HAND POSITION (Hands for time display and stopwatch hands) for more information.)
(4) Shock
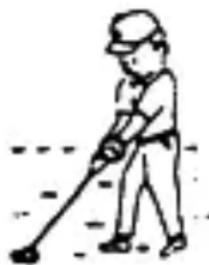
① Be sure not to carry the watch when you engage in strenuous sports, whereas playing such light sports as golf, etc., will not adversely influence the watch.
② Avoid a violent shock such as dropping the watch on the floor.
natural_image
Simple line drawing of a person using a tool to clean or dig (no text or symbols)(5) Magnetism
① If the watch is left at a location with strong magnetism for an extended period of time, the components may be magnetized, resulting in malfunction. Be careful.
② The watch may temporarily speed up or slow down when exposed to magnetism. Precision is restored when placed away from magnetism. In such a case, reset the time.
(6) Vibration
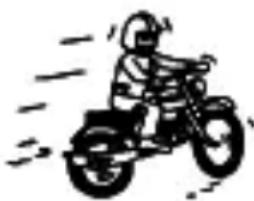
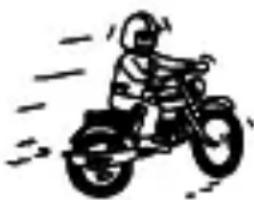
The watch may lose precision if subjected to strong vibrations such as from riding motorcycles, using jackhammers, chain saws, etc.
natural_image
Cartoon illustration of a person riding a three-wheeled motorcycle with motion lines (no text or symbols)(7) Temperature
In the environment below and above the normal temperatures <5^ 35^> , the watch may malfunction and stop.
Do not use the watch at high temperatures, such as in a sauna. The watch may heat and cause burns.
(8) Chemicals, Gases, etc.
Utmost caution must be exercised when coming into contact with gases, mercury, chemicals (paint thinner, gasoline, various solvents, detergents containing such components, adhesives, paint, drugs, perfumes, cosmetics, etc.), and so forth. Such may cause discoloration of the watchcase, watchband, and dial face. Discoloration, deformation, and damage to various resin-based component parts may also occur.
(9) About accessory parts
Do not attempt to disassemble or modify the watch.
Store the bracelet/strap pin and other small parts out of the reach of children.
If any small parts are swallowed, immediately contact a doctor.
(10) Allergic reactions
If you develop a skin rash or your skin becomes abnormally irritated due to contact with the watch or strap, stop wearing the watch immediately and consult a doctor.
(11) About "luminous light"
Some models have luminous light on the hands and dial.
The luminous light is a safe paint that stores sunlight and artificial light without using any radioactive material, and emits that light in a dark setting. As the paint discharges the stored light, it will become dimmer
over time. The amount of light emitted and the time that light is emitted depends on various factors when the light is stored, such as the shape of the glass, the thickness of the paint, surrounding brightness level, the distance from the watch to the light source, and the light absorption level. Please note that when not enough light energy is stored, the watch may emit weak light or emit light for only a short time.
(12) Water resistant watchband
Some models employ leather and nylon bands on which a special treatment to resist perspiration and water absorption have been applied. Please understand that the water resisting effect of this watchband can be lost depending on the period and conditions of use.
◆ FEATURES
(1) This is an analog crystal oscillator watch.
(2) The current time is indicated by the hour, minute, and small second hands.
(3) The watch also comes with a calendar function (date) and stopwatch function (measures up to 12 hours in 1/20 sec. increments) in addition to the time display.
(4) The stopwatch function also records split times (the amount of time that elapses from when the stopwatch is started until a certain point, while the watch continues to record total time elapsed).
(5) When the battery life begins to run out, the small second hand starts to move in 2-sec. intervals to warn that the battery is getting low. (Battery End Of Life indicator)
◆ SPECIFICATIONS
(1) Crystal oscillator frequency: 32,768 Hz (Hz = Oscillations per second)
(2) Wrist-worn accuracy: Mean monthly rate: ±20sec.
(at normal temperature <5°C \~ 35°C>)
(3) Operating temperature range: -5^ +50^
(4) Drive system: Step motor (4 pieces)
(5) Display system:
[Time function]
Hour and minute hands with a small second hand that moves at one-second intervals.
[Stopwatch function]
Stopwatch 1/20 second hand turns a full circle in a second at 1/20 second intervals.
Stopwatch minute hand turns a full circle in 60 minutes at one-minute intervals.
Stopwatch second hand turns a full circle in 60 seconds at 1/5 sec. intervals.
Stopwatch hour hand turns a full circle in 12 hours while moving correspondingly with the stopwatch minute hand.
(6) Additional function: Reset switch, accumulated elapsed time counter, split time function, battery end of life indicator
(7) Battery: SR927SW ; 1 piece
(8) Battery life: Approx. 3 years if the stopwatch is used for less than 2 hours a day.
(9) IC (Integrated Circuit): C-MOS-1C ; 1 piece
* The above specifications are subject to change without notice for improvement.
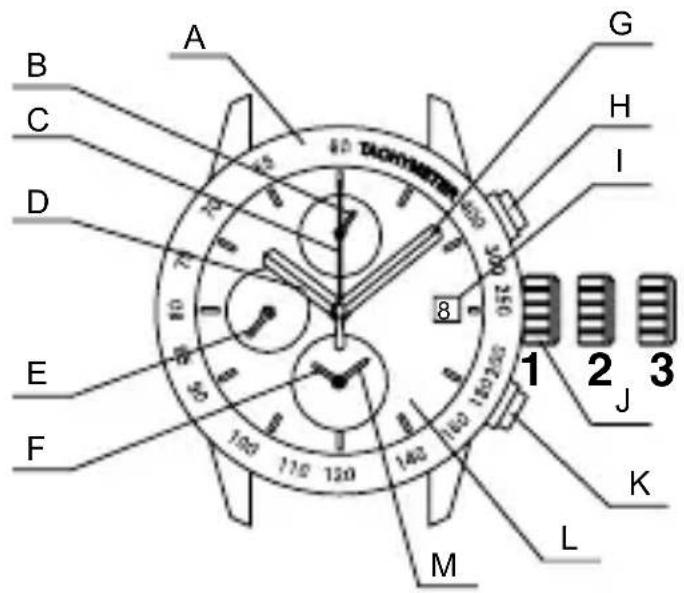
◆ NAMES AND FUNCTIONS OF INDIVIDUAL COMPONENT PARTS
A : Tachymeter scale
B : Stopwatch 1/20 second hand
C : Stopwatch second hand
D : Hour hand
E : Small second hand
F : Stopwatch hour hand
G: Minute hand
H : Button Ⓐ
I:Date
J : Crown
K:Button Ⓑ
L : Dial
M : Stopwatch minute hand
text_image
A B C D E F G H I J K L M 1 2 3 40 TACHMeyer- Normal position
- First click : Date setting
- Second click : Time setting and adjusting the stopwatch hand position
* Some models may not come with tachymeter scales.
* The position of the date indicator may vary on some models.
◆ MODELS WITH SCREWED-DOWN CROWN
Depending on the model, you may not be able to pull the crown out without unscrewing it (models with screwed-down crown).
Operate this type of watch as follows:
(1) Before setting the date and time, first turn the crown to the left to loosen the screw lock.
(2) After setting the date and time, turn the crown to the right while pressing in, until it stops turning to securely tighten the screw.
◆ MODELS WITH A SCREWED-DOWN BUTTON RING
Some models may have a configuration that allows the button ring (ring on the outer periphery) to be locked (fixed) into place by being screwed down.
Use the following operating method for this type of watch.
(1) When wanting to use the buttons, first turn the button ring to the left, and then loosen it until the screw stops.
* The buttons may not be able to be used if the button ring cannot be loosened enough. Do not turn it more forcefully than necessary.
(2) After finishing using the buttons, turn the button ring to the right, and firmly tighten it until the screw stops.
* Do not tighten it more forcefully than necessary.
◆ SETTING THE TIME AND ADJUSTING THE STOPWATCH HAND POSITION (Hands for time display and stopwatch hands)
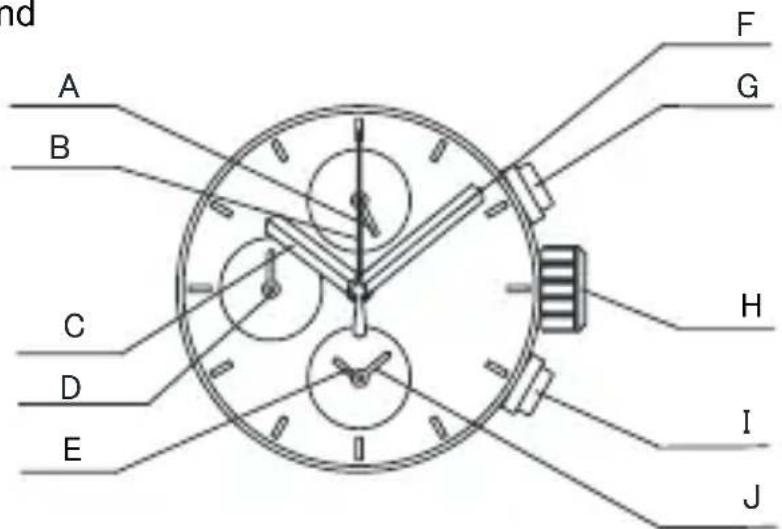
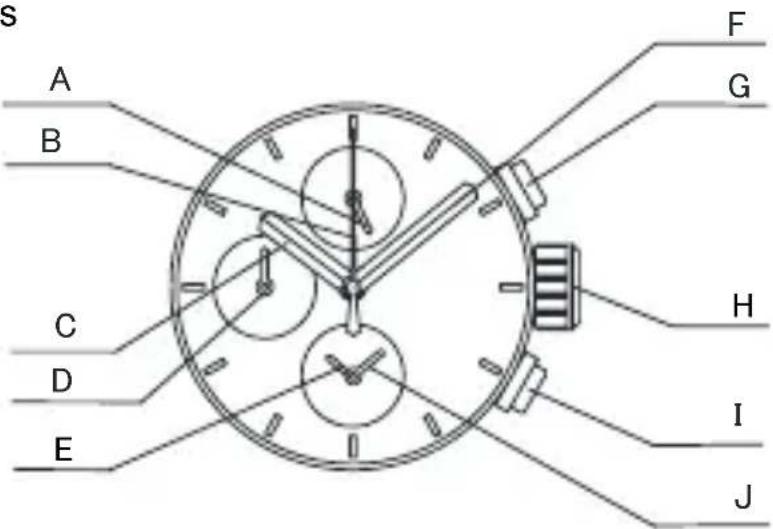
This watch allows you to both set the time and set the stopwatch hands to the "0" position with the crown at the second click position. Once the crown is pulled out to the second click, check the following two items, and if necessary, make adjustments, and then push the crown back in.
(1) Time of the basic watch
(2) "0" position of the 4 stopwatch hands
A:Stopwatch 1/20 second hand
B:Stopwatch second hand
C : Hour hand
D : Small second hand
E : Stopwatch hour hand
F : Minute hand
G:Button A
H : Crown
I:Button B
J : Stopwatch minute hand
text_image
nd A B C D E F G H I J■ How to set the time
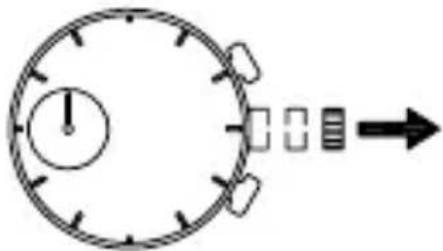
(1) Pull out the crown to the second click when the small second hand is at the 12 o'clock position.
The small second hand stops on the spot.
text_image
Diagram showing a stopwatch with an exclamation mark and a rightward arrow, indicating a time or sequence.* If the stopwatch is measuring, the stopwatch hands are automatically reset to "0" position.
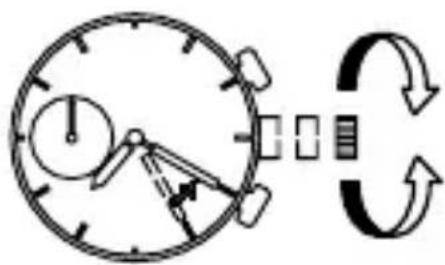
(2) Turn the crown to set the hour and minute hands to the current time.
text_image
Diagram showing a clock with directional arrows and a circular arrow indicating rotation or synchronization.After setting the time, also set the stopwatch hands to the "0" position.
It is recommended that the hands be set to the time a few minutes ahead of the current time, taking into consideration the time required to push the crown back in when all the adjustments are completed.
* When setting the hour hand, check that AM/PM is correctly set. The date changes around midnight.
* When setting the minute hand, first advance it 4 to 5 minutes ahead of the current time, and then, turn it back to the exact minute.
(3) Reset the four stopwatch hands to "0" position.
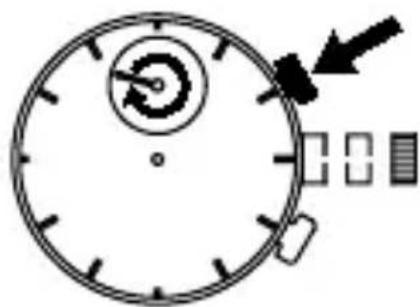
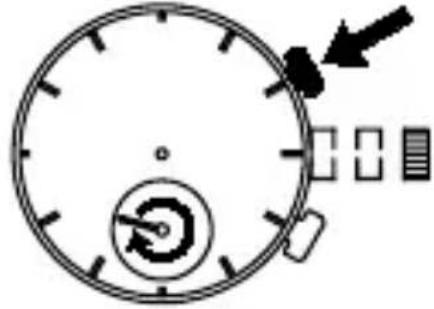
Press button Ⓐ for 2 seconds. The stopwatch 1/20 second hands turn.
Press button Ⓑ and adjust the stopwatch 1/20 second hands to the "0" position.
It moves quickly if button Ⓑ is kept pressed
Press Ⓐ for 2sec.
natural_image
Simple stopwatch with no visible text, numbers, or symbols on the face (pure diagram)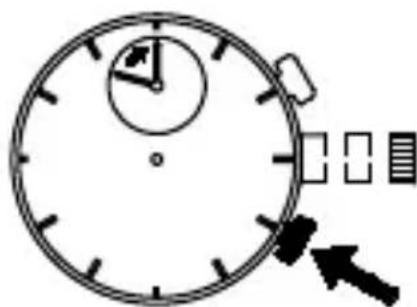
natural_image
Simple line drawing of a stopwatch with an arrow pointing to it (no text or symbols)B
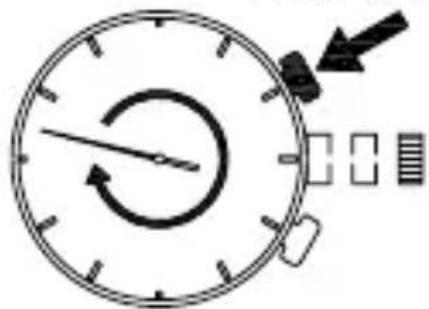
Press button Ⓐ for 2 seconds. The stopwatch second hand turns a full circle.
Press button Ⓑ to reset the selected stopwatch second hand to "0" position.
It moves quickly if button Ⓑ is kept pressed.
Press Ⓐ for 2sec.
natural_image
Simple stopwatch icon with no text or symbols, showing a circular dial and directional arrow (no readable text)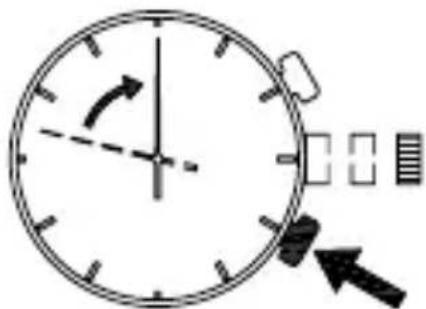
text_image
Diagram of a clock with directional arrow and measurement indicators, showing time measurement setupB
Press button full circle. ① for 2 seconds. The stopwatch hour and minute hands turn a Press button position. ② and adjust the stopwatch hour and minute hands to the “0”
If you continue to press button Ⓑ, the hour and minute hands will move quickly. Press Ⓐ for 2sec.
natural_image
Simple line drawing of a stopwatch with no text or symbols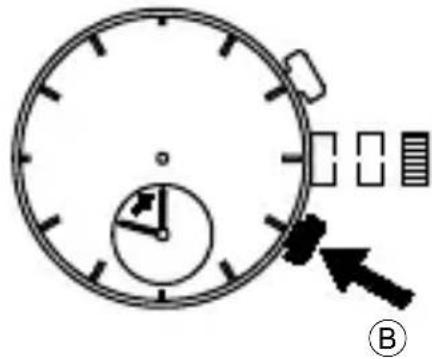
text_image
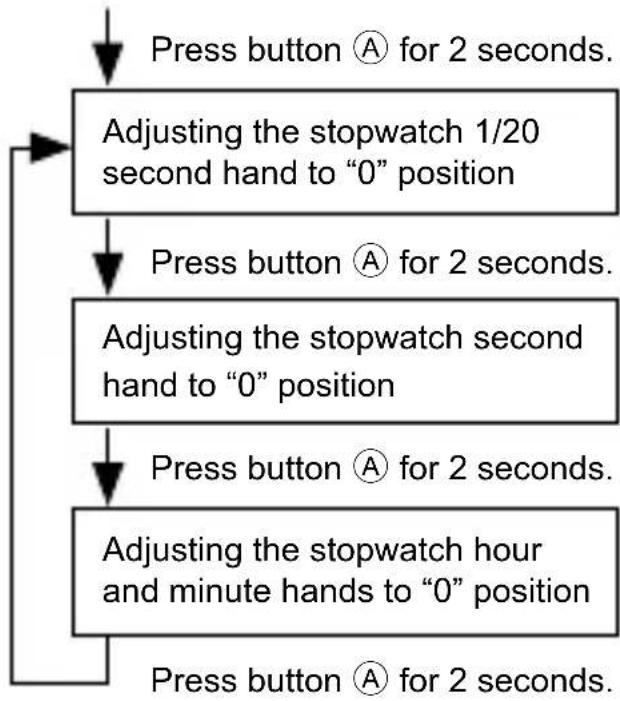
Diagram of a stopwatch with directional arrows and a labeled section B, likely illustrating time or measurement.(4) You can redo adjustments that have already been made by completing the steps in the order given.
flowchart
graph TD
    A["Press button Ⓐ for 2 seconds."] --> B["Adjusting the stopwatch 1/20 second hand to "0" position"]
    B --> C["Press button Ⓐ for 2 seconds."]
    C --> D["Adjusting the stopwatch second hand to "0" position"]
    D --> E["Press button Ⓐ for 2 seconds."]
    E --> F["Adjusting the stopwatch hour and minute hands to "0" position"]
    F --> G["Press button Ⓐ for 2 seconds."]
The stopwatch 1/20 second hand turns a full circle to indicate that it is ready for adjustment. Press button Ⓑ to reset it to "0" position.
The stopwatch second hand turns a full circle to indicate that it is ready for adjustment. Press button Ⓑ to reset it to "0" position.
The stopwatch hour and minute hands turn a full circle to indicate that they are ready for adjustment. Press button Ⓑ to reset it to "0" position.
* Adjustments can be redone any number of times.
(5) After all the adjustments are completed, push the crown back in to the normal position.
text_image
ENGLISH◆ HOW TO SET THE DATE
* Do not set the date during the period from 9:00 p.m. to 1:00 a.m., as the date on the watch switches over during this time.
Setting the date during this time period may cause the date to fail to change even after the day switches over and may cause the watch to malfunction.
* When setting the date, move the hour hand to a time outside of this period before proceeding.
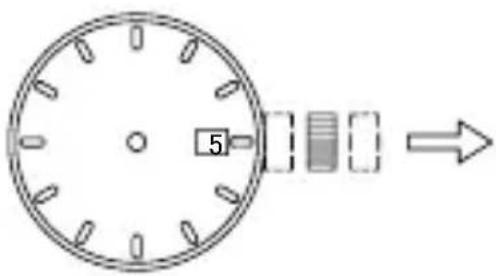
(1) Pull out the crown to the first click.
* The crown on this watch can be pulled out to either of two clicks.
(2) Turn the crown clockwise to set the date.
text_image
5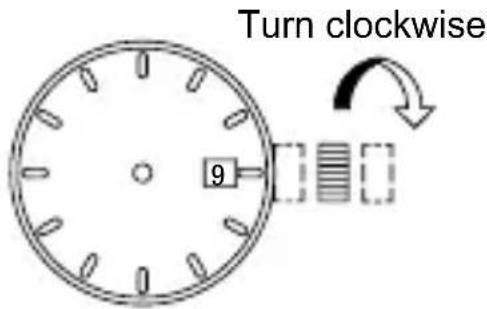
text_image
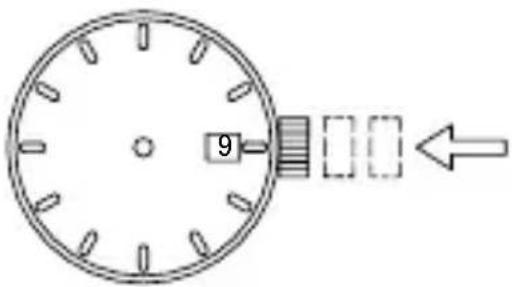
Turn clockwise 9(3) After all the adjustments are completed, push the crown back in to the normal position.
* The position of the crown or date indicator may vary on some models.
* About date correction at month's end:
Date correction is necessary for months with 30 days or less. In this case, set the date to the [1st day] on the first day of the next month.
text_image
9◆ HOW TO USE THE STOPWATCH
- The stopwatch can measure up to 12 hours in 1/20 second increments. After 12 hours, it will automatically stop.
- The time measured is indicated by the four stopwatch hands that move independently of the hands for time display.
- After the stopwatch is started, the stopwatch 1/20 second hand moves for about 10 minutes and automatically stops at "0" position. When split time is measured or the measurement is stopped, it moves to indicate the elapsed 1/20 seconds.
- Split time measurement is available.
[How to read the stopwatch hands]
The time measured is indicated by the four stopwatch hands (stopwatch 1/20 second, second, minute and hour hands).
- If the stopwatch hands do not return to "0" position when the stopwatch is reset, follow the procedure in "♦ SETTING THE TIME AND ADJUSTING THE STOPWATCH HAND POSITION" to reset them.
- In that case, be sure to adjust the hands for time display to the current time.
[Notes on the movement of the stopwatch 1/20 second hand]
- After the stopwatch is started, the stopwatch 1/20 second hand moves for about 10 minutes and automatically stops at "0" position.
- When split time is measured or the measurement is stopped, if moves to indicate the elapsed 1/20 seconds.
- After split time is released or the measurement is restarted, it moves for about 10 minutes and stops automatically.
- In the same manner, if the stopwatch is stopped and restarted repeatedly or split time is measured and released repeatedly, it moves for about 10 minutes and stops automatically.
■ How to reset the stopwatch
- When the stopwatch hands are counting:
(1) Press button Ⓐ to stop the stopwatch.
(2) Press button Ⓑ to reset the stopwatch.
- When the stopwatch hands are stopped:
One of the following three stopwatch operations has occurred. Reset the stopwatch accordingly.
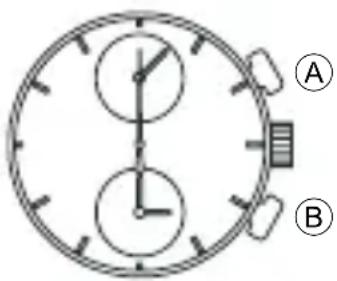
text_image
A B[The stopwatch was stopped in “Standard measurement” or “Accumulated elapsed time measurement.”]
(1) Press button Ⓑ to reset the stopwatch.
[Split time was measured and remains displayed “Split time measurement.”]
(1) Press button Ⓑ. The split time is released and the stopwatch hands move quickly to indicate the measurement in progress.
(2) Press button Ⓐ to stop the stopwatch.
(3) Press button Ⓑ to reset the stopwatch.
[The time of the 2nd competitor was measured in “Measurement of two competitors.”]
(1) Press button Ⓑ. The stopwatch hands move quickly and stop.
(2) Press button Ⓑ to reset the stopwatch.
■ Standard measurement

flowchart
graph LR
    A["Button A Start"] --> B["Button A Stop"]
    B --> C["Button B Reset"]
■ Accumulated elapsed time measurement
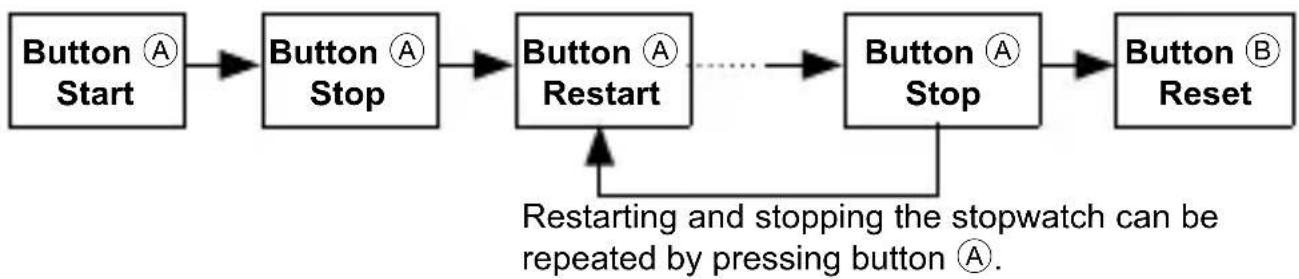
flowchart
graph LR
    A["Button Start"] --> B["Button Stop"]
    B --> C["Button Restart"]
    C -.-> D["Button Stop"]
    D --> E["Button Reset"]
    F["Restarting and stopping the stopwatch can be repeated by pressing button Ⓐ."] --> D
■ Split (intermediate) time measurement
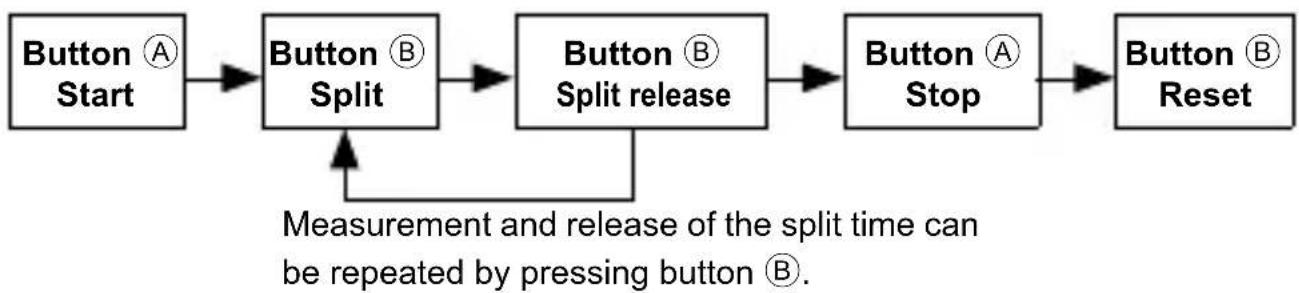
flowchart
graph LR
    A["Button Start"] --> B["Button Split"]
    B --> C["Button Split release"]
    C --> D["Button Stop"]
    D --> E["Button Reset"]
    F["Measurement and release of the split time can be repeated by pressing button Ⓑ."] --> C
■ Measurement of two competitors
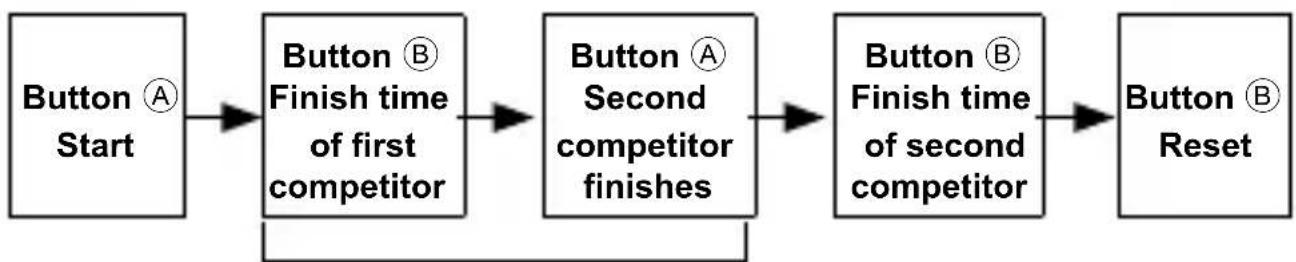
flowchart
graph LR
    A["Button Start"] --> B["Button Finish time of first competitor"]
    B --> C["Button Second competitor finishes"]
    C --> D["Button Finish time of second competitor"]
    D --> E["Button Reset"]
The hands indicate the first competitor's time while the measurements are being taken.
◆ HOW TO USE THE TACHYMETER
Some models may come with a tachymeter scale printed around the bezel or dial. Check your watch to see if it comes with a tachymeter scale, and follow the steps listed below to use it, if it does have one.
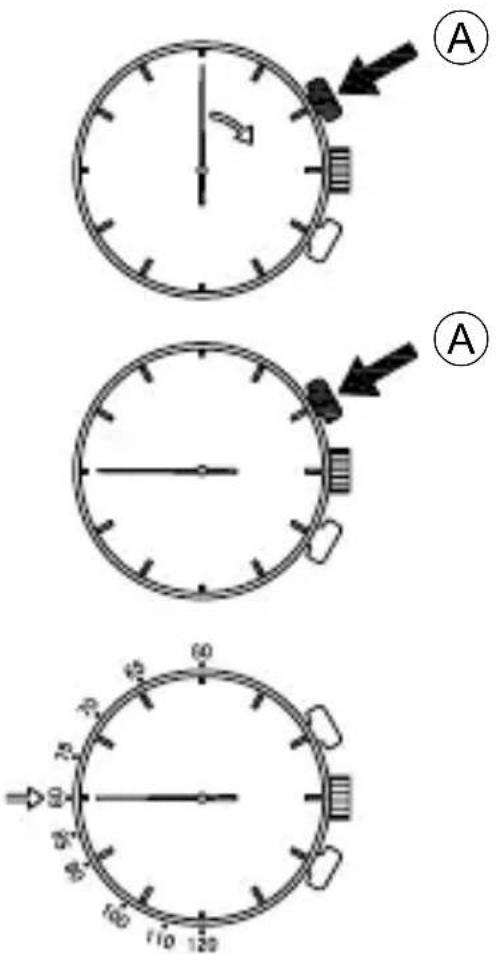
A tachymeter is a function that enables users to determine average speed based on a measurement of the amount of time it takes to travel a certain distance (1 km). The tachymeter can also be used to determine the rate of production per unit of time (per hour). (measuring range: maximum 60 seconds)
(1) Press button Ⓐ at the start point or when a product begins to be made.
(2) Press button Ⓐ again once 1 km have been passed or the product is completed.
(3) Read the numeral on the tachymeter scale at which the stopwatch second hand is pointing.
(In this case, the hand is pointing at 80 on the tachymeter scale, which would give an average speed of 80 km/hr. or a rate of production of 80 units/hr.)
text_image
Three analog clocks labeled A, showing different hand positions and scale markings* The measurement time of the tachymeter is 1 minute or less. Please note that if the measurement time exceeds 1 minute, the average speed or the rate of production per hour cannot be read.
◆ USING THE ROTATING ORIENTATION RING
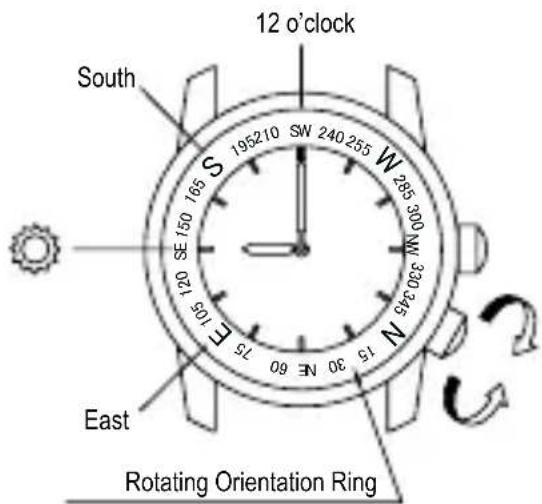
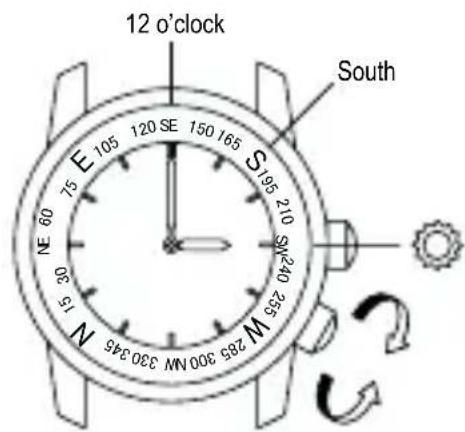
Turning the crown will rotate the rotating orientation ring. If you point the hour hand in the direction of the sun while keeping the watch horizontal, the direction between the hour hand and twelve o'clock will face south.
(1) In the morning, with twelve o'clock as the origin, "the position midway between twelve o'clock and the hour hand counterclockwise from twelve o'clock" will point toward south. Refer to FIG. 1.
(2) In the afternoon, with twelve o'clock as the origin, "the position midway between twelve o'clock and the hour hand clockwise from twelve o'clock" will point toward south. Refer to FIG. 2.
The orientation ring is labeled with indications for north, south, east, and west (N, S, E, and W) as well as numbers for degrees of angles to allow directions to be known quickly.
text_image
12 o'clock South SW 240 255 N 285 300 N 320 345 S 1952 10 SE 150 0.71 1.1 1.5 1.75 30 NE 60 E 105 150 SE 10.5 SE 150 SE 150 SE 150 SE 150 SE 150 SE 150 SE 150 SE 150 SE 150 SE 150 SE 150 SE 150 SE 150 SE 150 SE 150 SE 150 SE 150 SE 150 SE 150 SE 150 SE 15 Rotating Orientation RingFIG. 1
text_image
12 o'clock South N 60 75 105 120 SE 150 165 S 195 210 SW 240 255 N 300 330 345 M 285FIG. 2
* The position of the inner ring crown and details of the date indicator may vary depending on the model.
◆ HOW TO USE THE ROTATING INDICATOR BEZEL
Please notice that some models come with a rotating indicator bezel, which should be used properly.
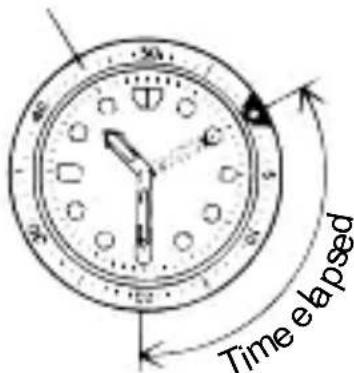
Turn the bezel by pointing the ▽ mark to the minute hand.
While certain time goes by, you can measure the elapsed time from the distance between minute hand and figures on the rotating indicator bezel.
You can also set the ▽ mark as a desired time to remind you how long time is still remain for an appointment.
You cannot turn the bezel reversely since it comes with a protection mechanism for preventing wrong operation by force or shock. Figures on the bezel could also help you to read the current time easily.
Rotating indicator bezel
text_image
Time elapsedThe above shows that 20 minutes have elapsed from 10:10.
* Depending on design, anti-reversely and 1 minute "click" sound mechanism on rotating indicator ring does not apply to some models.
DEUTSCH
ANALOGE QUARZUHR 1/20 Sek. CHRONOGRAPH
BEDIENUNGSANLEITUNG
natural_image
Simple line drawing of a person using a tool to dig or walk (no text or symbols)(6) Vibration
natural_image
Cartoon illustration of a person riding a three-wheeled motorcycle with motion lines indicating speed (no text or symbols)(7) Temperatur
text_image
A B C D E F G H I J■ Stellen der Uhr
natural_image
Simple line drawing of a stopwatch with an arrow pointing right (no text or symbols)text_image
Diagram showing a clock with hand gestures and a circular arrow indicating rotation or synchronization.natural_image
Simple stopwatch with no visible text, numbers, or symbols on the face (pure technical drawing)
natural_image
Simple line drawing of a stopwatch with an arrow pointing to it (no text or symbols)B
text_image
Diagram of a stopwatch with directional arrows and a timer, indicating speed or refresh function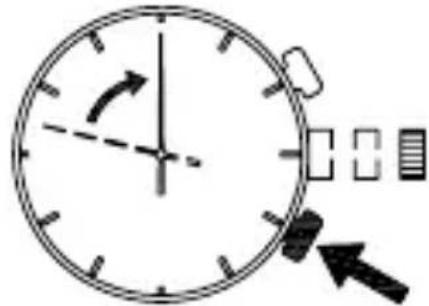
text_image
Diagram showing a clock face with directional arrows and a partial view of a timer or icon, likely indicating time measurement or navigation.B
natural_image
Simple clock face with hour and minute hands, no visible text or symbols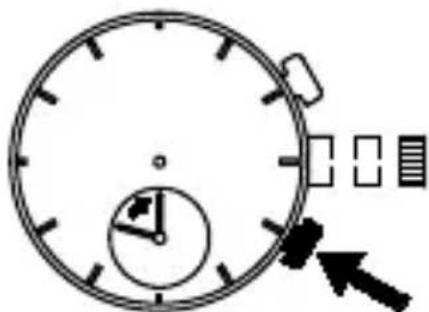
natural_image
Simple line drawing of a stopwatch with an arrow pointing to it (no text or symbols)B
natural_image
Simple line drawing of a clock face with an arrow pointing left (no text or symbols)text_image
Diagram showing three analog clocks with labeled arrows and scale markings, likely illustrating a time measurement or dial adjustment.natural_image
Simple line drawing of a person using a golf club to brush (no text or symbols)natural_image
Cartoon illustration of a person riding a three-wheeled motorcycle with motion lines indicating speed (no text or symbols)(7) Temperatura
text_image
A B C D E F G H I J K L M 1 2 3 80 TACHMeyertext_image
A B C D E F G H I Jtext_image
Diagram showing a clock with hour and minute hands, connected to a circular arrow indicating rotation or cycle.natural_image
Simple line drawing of a stopwatch with no text or symbols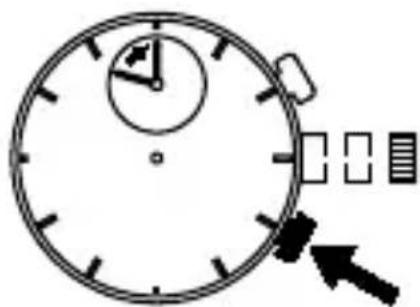
natural_image
Simple line drawing of a stopwatch with an arrow pointing to it (no text or symbols)B
natural_image
Simple stopwatch icon with no text or symbols, showing a circular dial and directional arrow (no readable text)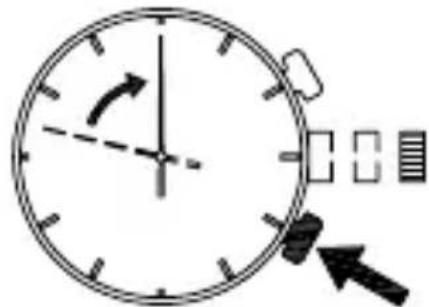
natural_image
Simple line drawing of a clock face with an arrow indicating clockwise motion (no text or symbols)B
natural_image
Simple line drawing of a stopwatch with an arrow pointing to it, no text or symbols present.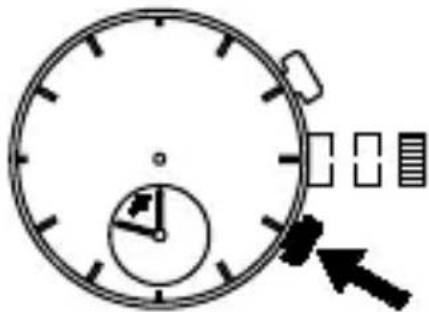
natural_image
Simple line drawing of a stopwatch with an arrow pointing to it (no text or symbols)B
natural_image
Simple line drawing of a clock face with an arrow pointing to the left side (no text or symbols)◆ COME IMPOSTARE LA DATA
ATTENZIONE
text_image
Diagram showing three analog clocks with labeled arrows and scale markings, likely illustrating a dial or timer system.natural_image
Simple line drawing of a person using a golf club to dig (no text or symbols)(6) Vibraciones
natural_image
Simple line drawing of a person riding a three-wheeled motorcycle with motion lines indicating speed (no text or symbols)(7) Temperaturas
J : Stopwatch minute hand
text_image
S A B C D E F G H I Jtext_image
Diagram showing a stopwatch with an arrow pointing right, indicating time measurement or navigationtext_image
Diagram showing a clock with directional arrows and a circular arrow indicating rotation or synchronization.text_image
Diagram of a stopwatch with directional arrows and a numeric display, likely indicating speed or time measurement.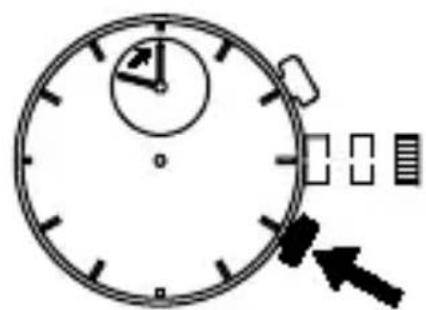
natural_image
Simple line drawing of a stopwatch with an arrow pointing to it (no text or symbols)B
natural_image
Simple stopwatch icon with no text or symbols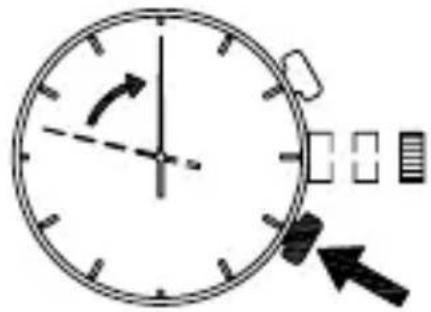
text_image
Diagram of a clock face with directional arrows and a partial view showing a grid of square units.B
natural_image
Simple line drawing of a stopwatch with an arrow pointing to it, no text or symbols present.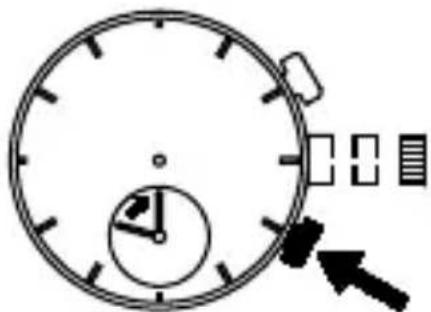
natural_image
Simple line drawing of a stopwatch with an arrow pointing to it (no text or symbols)B
natural_image
Simple line drawing of a clock face with an arrow pointing to the left side (no text or symbols)♦ AJUSTE DE LA FECHA
text_image
5 Cine basistext_image
Three analog clocks with arrows pointing to specific time intervals, labeled A and 60.natural_image
Simple line drawing of a person using a golf club to brush (no text or symbols)(7) Температура
natural_image
Cartoon illustration of a person riding a three-wheeled motorcycle with motion lines (no text or symbols)text_image
A B C D E F G H I Jnatural_image
Simple line drawing of a stopwatch with an exclamation mark and directional arrow (no text or symbols)text_image
Diagram showing a clock with directional arrows and a circular arrow indicating rotation or synchronization.natural_image
Simple stopwatch with arrow pointing to the top dial (no text or symbols)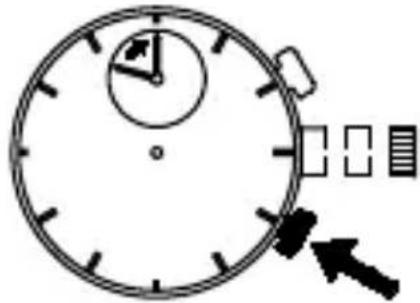
text_image
Diagram of a stopwatch with directional arrows and a timer, indicating time measurement or navigationB
text_image
Diagram of a stopwatch with directional arrows and a timer, showing time measurement interface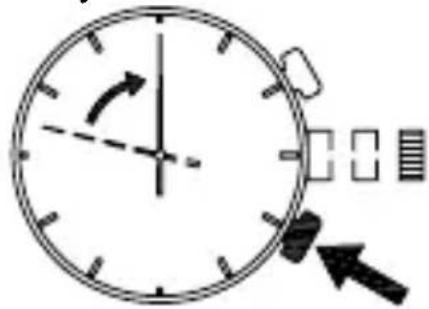
text_image
Diagram of a clock face with directional arrows and measurement indicators, likely illustrating time or speed adjustment.B
text_image
Diagram of a stopwatch with directional arrows and a circular dial indicator showing speed, time, and color.
text_image
Diagram of a stopwatch with an arrow pointing to it, labeled with circled number Bnatural_image
Simple line drawing of a clock face with an arrow pointing to the left (no text or symbols)◆ УСТАНОВКА ДАТЫ
ВНИМАНИЕ
text_image
Diagram showing three analog clocks with labeled arrows and scale markings, likely illustrating a time measurement or dial adjustment.text_image
Diagram of an analog clock face with a hand pointing to the left side, labeled with letter A and arrow.natural_image
Simple line drawing of a clock face with an arrow pointing to the left (no text or symbols)text_image
Diagram of a stopwatch with directional arrows and a labeled section B, likely illustrating time or timer behavior.flowchart
graph TD
    A[" Islamic Request"] --> B[" pressing request to the app"]
    B --> C[" pressing request to the app"]
    C --> D[" pressing request to the app"]
    D --> E[" pressing request to the app"]
    E --> F[" pressing request to the app"]
    F --> G[" pressing request to the app"]
    G --> H[" pressing request to the app"]
    H --> I[" pressing request to the app"]
    I --> J[" pressing request to the app"]
    J --> K[" pressing request to the app"]
    K --> L[" pressing request to the app"]
    L --> M[" pressing request to the app"]
    M --> N[" pressing request to the app"]
    N --> O[" pressing request to the app"]
    O --> P[" pressing request to the app"]
    P --> Q[" pressing request to the app"]
    Q --> R[" pressing request to the app"]
    R --> S[" pressing request to the app"]
    S --> T[" pressing request to the app"]
    T --> U[" pressing request to the app"]
    U --> V[" pressing request to the app"]
    V --> W[" pressing request to the app"]
    W --> X[" pressing request to the app"]
    X --> Y[" pressing request to the app"]
    Y --> Z[" pressing request to the app"]
    Z --> AA[" pressing request to the app"]
    AA --> AB[" pressing request to the app"]
    AB --> AC[" pressing request to the app"]
    AC --> AD[" pressing request to the app"]
    AD --> AE[" pressing request to the app"]
    AE --> AF[" pressing request to the app"]
    AF --> AG[" pressing request to the app"]
    AG --> AH[" pressing request to the app"]
    AH --> AI[" pressing request to the app"]
    AI --> AJ[" pressing request to the app"]
    AJ --> AK[" pressing request to the app"]
    AK --> AL[" pressing request to the app"]
    AL --> AM[" pressing request to the app"]
    AM --> AN[" pressing request to the app"]
    AN --> AO[" pressing request to the app"]
    AO --> AP[" pressing request to the app"]
    AP --> AQ[" pressing request to the app"]
    AQ --> AR[" pressing request to the app"]
    AR --> AS[" pressing request to the app"]
    AS --> AT[" pressing request to the app"]
    AT --> AU[" pressing request to the app"]
    AU --> AV[" pressing request to the app"]
    AV --> AW[" pressing request to the app"]
    AW --> AX[" pressing request to the app"]
    AX --> AY[" pressing request to the app"]
text_image
Diagram of a stopwatch with an arrow pointing to it, showing time and progress indicators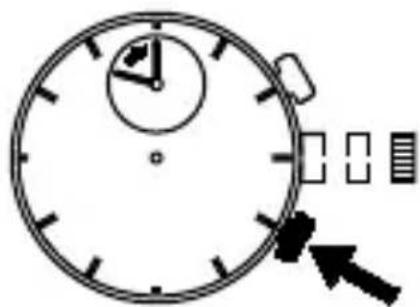
natural_image
Simple line drawing of a stopwatch with an arrow pointing to it (no text or symbols)B
text_image
Diagram of a stopwatch with directional arrows and a timer, indicating speed or refresh function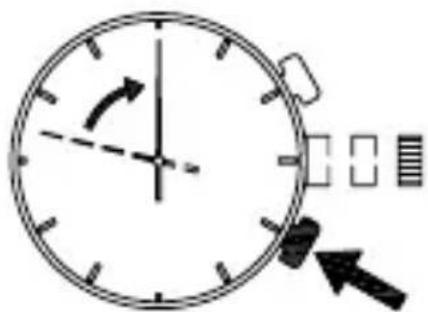
text_image
Diagram of a clock face with directional arrows and a partial view showing a segmented object, likely illustrating time or movement.B
flowchart
graph LR
    A["1 minute"] --> B["3 seconds"]
    B --> C["Rightward arrow"]