WQP8-J7636E - Dishwasher Hanseatic - Free user manual and instructions
Find the device manual for free WQP8-J7636E Hanseatic in PDF.


| Product Type | Freestanding Dishwasher |
| Model | WQP8-J7636E |
| Brand | Hanseatic |
| Dimensions (H × W × D) | 84.5 cm × 44.8 cm × 60.0 cm |
| Weight (unloaded) | 40 kg |
| Place Settings | 10 |
| Energy Efficiency Class | A++ |
| Drying Efficiency Class | A |
| Noise Level | 44 dB(A) re 1 pW |
| Power Supply | 220-240 V~, 50 Hz, 10 A |
| Rated Power | 1760-2100 W |
| Water Pressure Range | 0.4-10 bar |
| Water Consumption (ECO) | 8.0 L per cycle |
| Energy Consumption (ECO) | 0.741 kWh per cycle |
| Programme Duration (ECO) | 195 minutes |
| Programmes | ECO, Intensive, Normal, Glass, 90-min, Short, Pre-rinse |
| Additional Options | Intensive cleaning, Extra dry, Spray arm selection, Delayed start (1-24 h) |
| Safety Features | Child lock (button lock), Water stop system |
| Indicators | Add salt, Add rinse aid, Tap open, Button lock, Programme display, Remaining time |
| Rack System | Cutlery drawer, Upper rack with fold-down cup rack (height adjustable), Lower rack with foldable spikes |
| Installation Type | Freestanding or under worktop |
| Water Connection | Cold water only, ¾ inch thread, inlet hose length not specified |
| Outlet Hose Length (max) | 1000 mm above floor |
| Maintenance | Clean filters weekly, clean spray arms as needed, use descaling products periodically |
Frequently Asked Questions - WQP8-J7636E Hanseatic
User questions about WQP8-J7636E Hanseatic
0 question about this device. Answer the ones you know or ask your own.
Ask a new question about this device
Download the instructions for your Dishwasher in PDF format for free! Find your manual WQP8-J7636E - Hanseatic and take your electronic device back in hand. On this page are published all the documents necessary for the use of your device. WQP8-J7636E by Hanseatic.
USER MANUAL WQP8-J7636E Hanseatic
natural_image
Line drawing of a Panasonic washing machine (no text or symbols on the device body)Gebrauchsanleitung
Standgeschirrspüler
Inhaltsverzeichnis

text_image
(19) (20) (21)text_image
(24) RINSE AID OPENtext_image
(24) RINSE AID OPEN 25 15text_image
(24) RINSE AID OPENtext_image
(24) RINSE AID OPEN 25 15natural_image
Exterior view of a metal grate or rack structure with grid pattern (no text or symbols visible)text_image
Diagram of a multi-compartment storage unit with numbered components, likely illustrating a mechanical or electrical system layout.1 = Tassen, 2 = Untertassen, 3 = Gläser, 4 = große Schale, 5 = mittelgroße Schale, 6 = Servierschüssel
natural_image
Technical line drawing of a mechanical assembly with a hand operating a tool, showing internal components and a magnified inset highlighting the mechanism (no text or symbols present)text_image
(1) 8:88 (6) P + - (13)text_image
(15) (9) 8:88text_image
ECO 8:88 (6) P + - (12)text_image
8:88 (6) P + - (11)text_image
(6) 8:88 P + - (11)(13)text_image
38 P + | - ▶II (11)text_image
8:88 (4) P + | - (12)natural_image
Technical diagram of a mechanical assembly with a bracket and base plate, showing no text or symbols.natural_image
Diagram of a mechanical assembly with a lid and base, showing mounting hardware and a lightning bolt symbol (no text or labels)natural_image
Simple line drawing of a cabinet or support structure with two hanging arrows and label (C), no text or symbols present.text_image
static 8:8 (18)natural_image
Line drawing of a Panasonic washing machine (no text or symbols on the device body)User manual
Freestanding dishwasher
Table of contents

Please read through the safety notices and user manual carefully before using the appliance.
This is the only way you can use all the functions reliably and reliably. Be sure to also observe the national regulations in your country, which are valid in addition to the regulations specified in this user manual.
Keep all safety notices and instructions for future reference. Pass all safety notices and instructions on to the subsequent user of the product.

You will find information on „Installation, connection and commissioning“ on page EN-23.
Delivery.... EN-3
Package contents ..... EN-3
Checking package contents ..... EN-3
Controls and appliance parts ..... EN-4
Safety EN-6
Intended use..... EN-6
Explanation of terms ..... EN-6
Safety notices.... EN-6
Dishwasher detergents, rinse
aids and dishwasher salts ..... EN-10
Add dishwasher detergent ..... EN-10
Use multitabs ...... EN-10
Adding rinse aid ....EN-11
Adding dishwasher salt ..... EN-12
Loading the dishwasher ..... EN-13
Unsuitable dishes ..... EN-13
Cutlery drawer.... EN-13
Upper dish rack EN-14
Changing the height of the upper dish rack.... EN-14
Lower dish rack EN-15
Dishwasher programme table ..... EN-16
Dishwasher operation ..... EN-17
Preparation.... EN-17
Selecting the dishwasher
programme ..... EN-17
Intensive cleaning ..... EN-17
Starting the dishwashing programme.... EN-18
Unloading the dishwasher ..... EN-19
Changing the dishwasher programme ..... EN-19
Adding dishes EN-20
Button lock / child lock ..... EN-20
Care and maintenance ..... EN-21
Cleaning the front of the appliance and the door seal ..... EN-21
Cleaning the filters ..... EN-21
Cleaning the spraying arm ..... EN-22
Complete cleaning ..... EN-22
Protection against frost damage . . EN-22
Installation, connection and commissioning .... EN-23
Choose a suitable location ..... EN-23
Setup EN-23
Having the outlet hose connected . EN-24
Connecting the inlet hose ..... EN-24
Connecting the dishwasher to the electricity ..... EN-25
Substructure ..... EN-25
Degree of water hardness ..... EN-27
Test run.... EN-27
Troubleshooting table ..... EN-28
Problems with operation ..... EN-28
The dishwashing results are not satisfactory.... EN-29
Error indicators EN-30
Service EN-31
Advice, order and complaint ..... EN-31
Repairs and spare parts ..... EN-31
Environmental protection ..... EN-32
Disposing of old electrical devices in an environmentally friendly manner.... EN-32
Packaging EN-32
Technical specifications ..... EN-32
Product fiche concerning
Regulation (EU) No 1060/20109 ... EN-33
Delivery
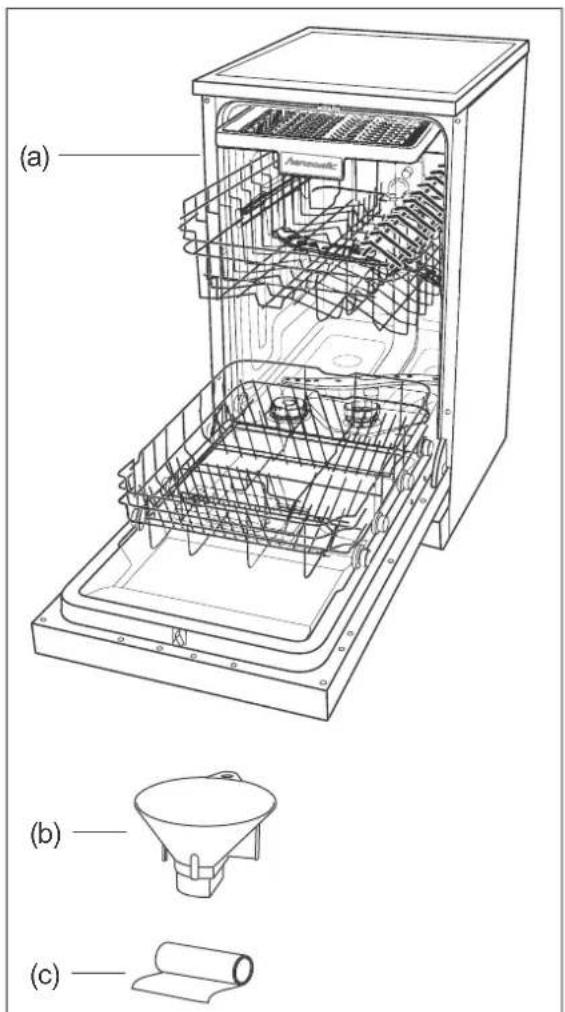
Package contents
(a) 1× Freestanding dishwasher WQP8-J7636E
(b) 1× Filling funnel for dishwasher salt
(c) 1× Film to protect the worktop from condensation
1 Short manual
Checking package contents
- Move the appliance to a suitable place and unpack it (see page EN-23).
- Remove all parts of the packaging, plastic profiles, tape and foam padding.
- Check that the delivery is complete.
- Check whether the appliance was damaged during transit.
- If the delivery is incomplete or the appliance has been damaged during transport, please contact our Service Centre (see page EN-31).

WARNING!
Never use a damaged appliance.
Controls and appliance parts
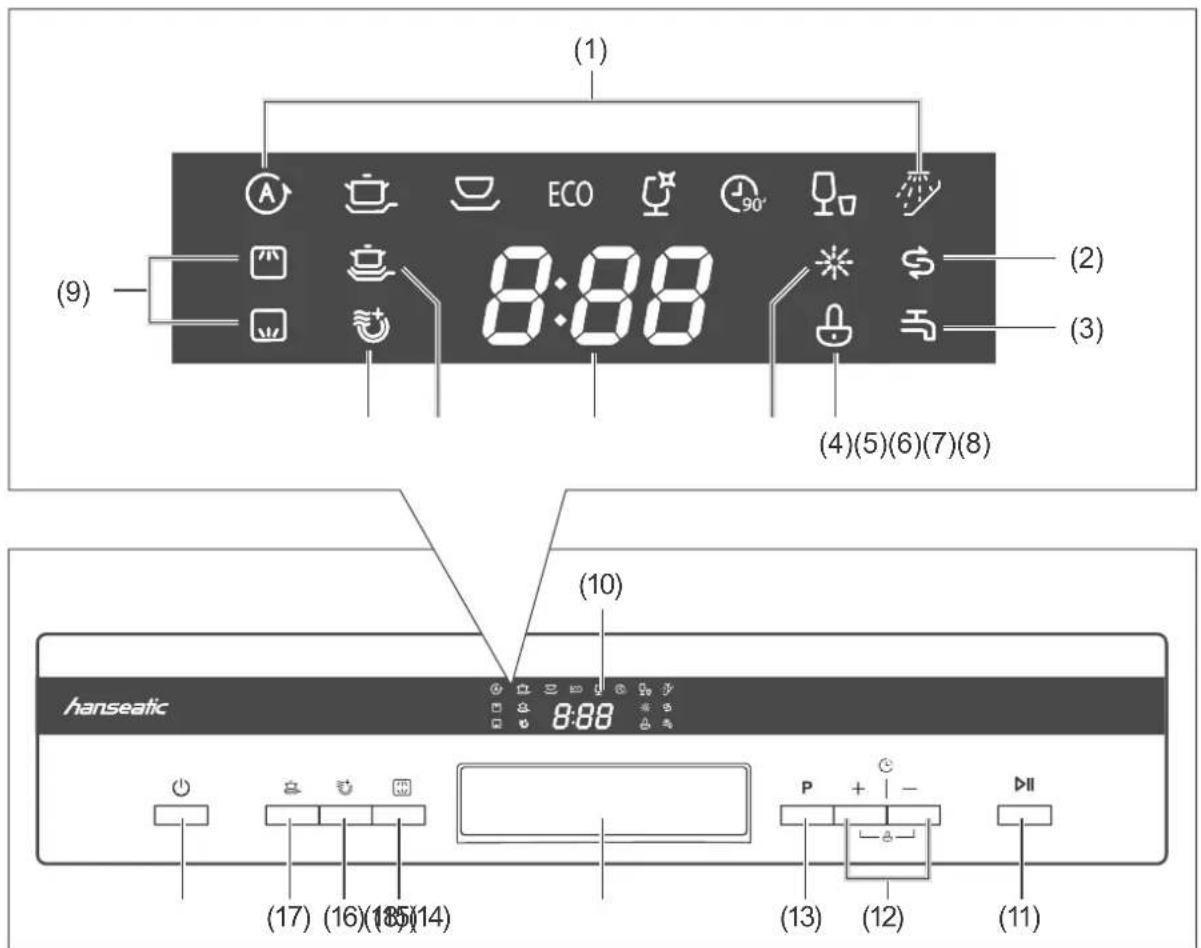
text_image
(1) (2) (3) (4)(5)(6)(7)(8) (9) (10) hanseatic 8:88 (17) (16)(18)(14) (13) (12) (11)(1) Ⓐ to "Programme" display reading
(2) ⚪, “Add dishwasher salt” display reading
(3) “Open tap” display reading
(4) 🔊, "Button lock/child lock" display reading
(5) ✱, "Add rinse aid" display reading
(6) 8:88, "Remaining duration/start-delay duration" display reading
(7) “Intensive cleaning” display reading
(8) 📋, “Extra dry” display reading
(9) and spraying arm(s) display reading
(10) Display [Display reading (1) to (9)]
(11) ▶I"Start/Pause" button
(12) 🔒 Delayed start button / ⏻ Button lock
(13) P "Programme selection" button
(14) Door handle
(15) ☐, "Select spraying arm" button
(16) 📋, "Extra-dry option" button
(17) “Intensive cleaning option” button
(18) ⏻, "On/Off" button
text_image
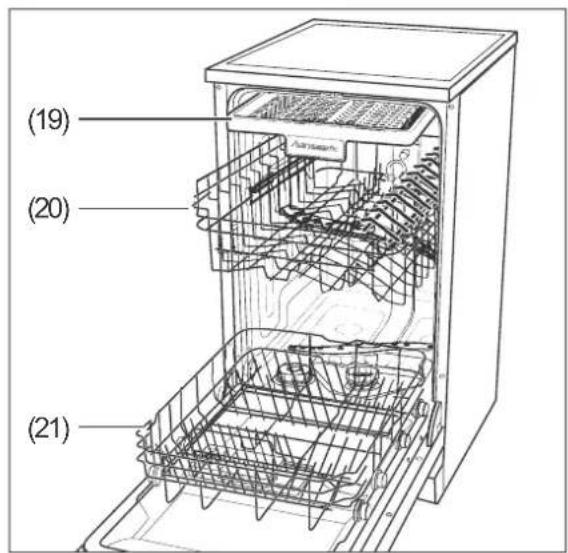
(19) (20) (21)(19) Cutlery drawer
(20) Upper dish rack with spraying arm
(21) Lower dish rack
text_image
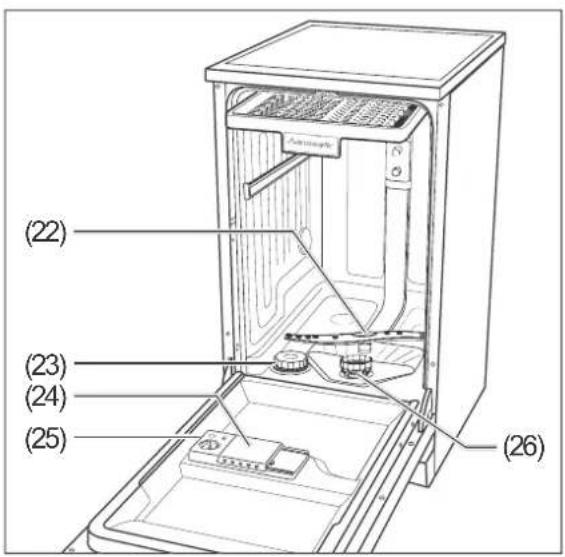
(22) (23) (24) (25) (26)(22) Lower spraying arm
(23) Dishwasher salt container
(24) Dishwasher detergent dispenser
(25) Dishwasher rinse aid dispenser
(26) Filter

text_image
(27) (28) (29) (30)(27) Cover plate
(28) Outlet hose
(29) Mains cord with plug
(30) Inlet hose
(31) Adjustable feet, 4 × (under the appliance, no illustration)
Safety
Intended use
This dishwasher is designed exclusively for washing ordinary household quantities of dishes, and is intended solely for domestic use.
Only use the dishwasher as described in this user manual. Any other use is deemed improper and may result in damage to property or even personal injury. The manufacturer accepts no liability for damage caused by improper use.
Explanation of terms
The following symbols can be found in this user manual.

WARNING!
This symbol indicates a hazard with a medium level of risk which, if not avoided, could result in death or serious injury.

CAUTION!
This symbol indicates a hazard with a low level of risk which, if not avoided, could result in minor or moderate injury.
NOTICE
This symbol warns against possible damage to property.

This symbol refers to useful additional information.
Safety notices

In this chapter you will find general safety instructions which you must always observe for your own protection and that of third parties. Please also pay attention to the warnings in individual chapters on installation and operation, etc.
Risks in handling household electrical appliances
Risk of electric shock!
Touching live parts may result in severe injury or death.
■ Only use the appliance indoors. Do not use in wet rooms or in the rain.
■ Do not operate or continue to operate the appliance if
– it shows visible signs of damage, e.g. the power cord is defective.
- it starts smoking or there is a smell of burning.
- it makes unfamiliar noises.
In this case, you should pull the mains cord out of the socket or switch off/unscrew the fuse and have the appliance repaired (see „Service“ on page EN-31).
■ The appliance corresponds to protection class I and may only be connected to a plug with a protective conductor that has been installed properly. Ensure that the voltage is correct when connecting it. You can find more detailed information about this on the nameplate.
■ If the mains plug is no longer accessible after installation, an all-pole disconnecting device complying with overvoltage category III must be con-
nected into the house wiring with a contact gap of at least 3 mm; this includes fuses, circuit breakers and covers.
■ We recommend using a pulse-sensitive residual-current device (RCD).
■ Do not operate the appliance with an external timer or a separate remote control system.
- Keep the appliance, the mains plug and the mains cord away from open flames and hot surfaces.
■ Do not kink or pinch the mains cord or lay it over sharp edges.
■ If the mains cord of the appliance is damaged, it must be replaced by the manufacturer, through customer service or by a qualified specialist.
■ Do not put any objects in or through the housing openings and also make sure that children cannot insert any objects through them.
■ Never pull the mains plug out of the socket by the mains cord, always hold the mains plug itself.
■ Never touch the mains plug with wet hands.
■ Never immerse the mains cord or mains plug in water or any other liquids.
■ In the event of a fault, as well as before cleaning or maintenance, pull out the mains plug/switch off or unscrew the fuse.
■ Investigations and repairs to the appliance may only be carried out by authorised specialists, such as our service department (see „Service“ on page EN-31).
Unauthorised repairs to the appliance can cause property damage and personal injury, and invalidate
liability and warranty claims. Never try to repair a defective or suspected defective appliance yourself.
■ Only parts corresponding to the original appliance specifications may be used for repairs. This appliance contains electrical and mechanical parts which are essential for protection against potential sources of danger.
■ Never clean the appliance with a high-pressure cleaner or steam cleaner.
■ Check the appliance regularly for damage.
Fire hazard!
Improper handling of the appliance can lead to fire.
■ Only connect the appliance to a properly installed and earthed electric socket. Do not connect to a multi-socket extension cable or a multi-socket plug.
Risk of injury!
The appliance is heavy and bulky. Improper handling of the appliance may result in injury.
- Seek the help of another person during transport, installation and assembly.
■ Remove all obstacles on the transport route and from the installation location, e.g. open doors and clear away objects lying on the floor.
■ Do not use the open door as a step, seat or for support. Make sure that children and pets do not stand or sit on the open door.
Risks to children
Risk of suffocation!
■ Do not allow children to play with the packaging fi Im. Children could become caught in it and suffocate.
■ Prevent children from pulling small parts from the device or taking them out of the accessory bag and putting them in their mouths.
Risks for certain groups of people
Dangers for children and people with limited physical, sensory or mental capacity!
■ This appliance can be used by children aged eight years and above and by persons with reduced physical, sensory or mental abilities, or who lack experience and/or knowledge, if they are supervised or have been instructed in the safe use and understand the dangers associated with its use.
■ Children must not be allowed to play with the appliance.
■ Cleaning and maintenance must not be carried out by children unless they are supervised.
Risks when dealing with dishwashers
Danger of explosion!
Solvents can create an explosive mixture.
■ Never put solvents into the appliance.
Risk of poisoning!
Dishwasher detergents, rinse aid and dishwasher salt can be damaging to the health.
- Keep these products out of the reach of children and pets.
■ Never use the water inside the appliance as drinking water.
Risk of injury!
Knives and other pointed or sharpedged objects can cause injuries.
■ Always place pointed and sharp-edged objects with the pointed or sharp edge pointing downwards in the cutlery basket.
■ Ensure that children do not load such objects which may cause injury into the appliance.
- Load the appliance in such a way that no objects which may cause injury fall out of the dish racks when the appliance is next opened and the dish racks are removed.
Risk of scalding!
The hot washing-up water will cause the dishes and the interior of the appliance to heat up and hot steam is emitted. Touching them can therefore cause scalding.
■ Only hold the door by the handle when opening the door. Maintain a safe distance from the appliance in order to avoid steam which may escape.
- Do not touch the dishes, cutlery or the inside of the appliance immediately after the dishwashing programme has finished.
Trip hazard!
An open dishwasher door can quickly become a trip hazard.
■ Close the door after every use.
■ Only leave the door slightly open to cool down.
Damage to property
Improper handling of the appliance may result in damage.
■ Never leave the appliance unsupervised for an extended period when the tap is on.
■ During storms or when going on holiday, always withdraw the mains plug from the socket and close the water tap.
■ If there is a risk of frost, loosen the inlet hose and allow the water to run off.
■ Only use regenerating salt which is suitable for dishwashers.
■ Only add dishwasher salt immediately before the next main dishwashing cycle, as dishwasher salt which has overflowed can damage the seals and filters of the appliance.
- Immediately remove any spilt dishwasher salt with a damp towel, as otherwise the stainless steel surfaces can be affected.
■ Ensure that the dishwashing detergent and rinse aid are suitable for the appliance.
■ Wipe away rinse aid which has over-flowed immediately as otherwise it can lead to excessive foaming which can compromise the results delivered by the dishwasher.
■ Do not overload the appliance.
■ Position the upper dish rack at the highest setting if very tall dishes are in the lower dish rack, as otherwise the upper spraying arm will be blocked.
The seals of the door are sensitive to oil and grease.
■ Do not apply grease to the door seals.
■ Wipe away grease and oil which has dripped onto the edge of the open dishwasher door.
The door seals can be damaged by unsuitable cleaning agents.
■ Do not use harsh, aggressive, solvent-based or abrasive cleaners.
The appliance is designed for a water pressure of 0.4 to 10 bar (0.04 to 1.00 MPa, 40 to 100 N/cm ^2 ).
■ If the water pressure is higher than this, install a pressure reducer. If in doubt, enquire about the water pressure with the water supply company.
■ Never connect the appliance to the water tap or the mixing arm of a water heater (continuous flow heater, pressure-free boiler etc.).
■ Ensure that the inlet hose is not kinked and is carefully connected.
■ Do not cut through the inlet hose. It contains electrical components. If the inlet hose is damaged, have it repaired by a specialist.
■ Do not use old or previously installed inlet or outlet hoses.
■ The outlet hose must be of a minimum diameter of 40 mm so that the water can be pumped away unhindered.
■ Do not attach the outlet hose yourself, have it installed by a specialist plumber. Have the outlet hose checked regularly for damage or kinks.
Dishwasher detergents, rinse aids and dishwasher salts

WARNING!
Risk of poisoning!
Dishwasher detergents, rinse aid and dishwasher salt can be damaging to the health.
- Keep these products out of the reach of children and pets.
■ Never use the water inside the appliance as drinking water.
Add dishwasher detergent
Only use dishwasher detergent which is intended specifically for dishwashers.
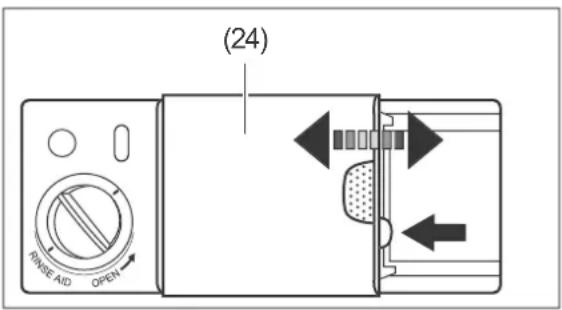
text_image
(24) PULSE AID OPEN- Push the blue fastener of the compartment for dishwasher detergent/multi-tabs (24) to one side.
The cover will move to one side and the compartment will become visible.
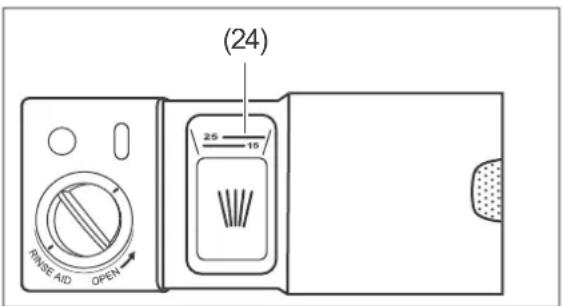
text_image
(24) RANGE AID OPEN 25 19- Pour the dishwasher detergent into the detergent dispenser (24).
- Push the cover of the compartment closed so that the closure clicks into place once again.
Use multitabs
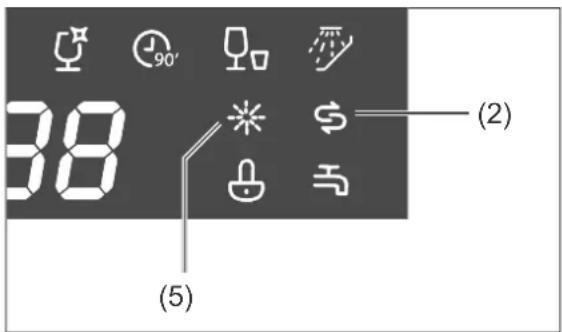
text_image
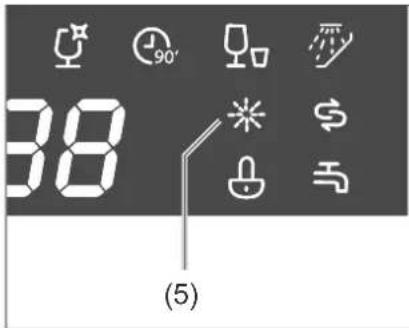
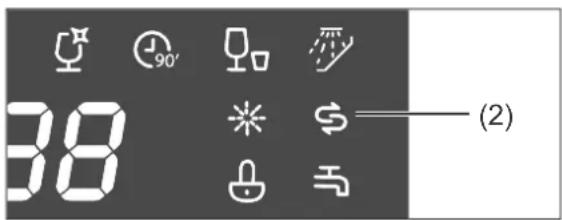
38 (5) (2)Many multitabs already contain dishwasher detergent, dishwasher salt and rinse aid, meaning that you do not need to use these three products separately. In this case, you can ignore the display readings saying 'Add rinse aid'※ (5) and 'Add dishwasher salts(2).
If your water is in the
- “soft” to “medium” hardness range, multi-tabs will deliver good results.
- “hard” range, we would recommend that you do not use multitabs and instead use dishwasher detergent, dishwasher salt and rinse aid individually.

To determine and adjust the water hardness see page EN-27.
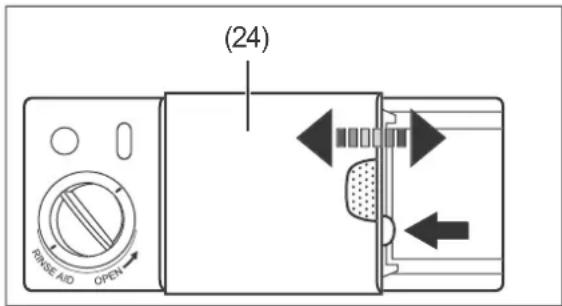
text_image
(24) RINSE AID OPEN- Push the blue fastener of the compartment for dishwasher detergent/multi-tabs (24) to one side.
The cover will move to one side and the compartment will become visible.
text_image
(24) RINSE AID OPEN 25 15-
Place a multitab in the compartment.
-
Push the cover of the compartment closed so that the closure clicks into place once again.
Adding rinse aid
! NOTICE
Risk of damage!
Using an excessive amount of rinse aid can lead to increased foaming and can compromise the rinsing results.
■ Wipe away rinse aid which has over-flowed immediately.
■ Take note of the markings for the maximum fi ll quantities ("max") in the rinse aid chamber.
Using unsuitable substances can cause damage to the dishwasher.
■ Only put rinse aids which are suitable for dishwashers into the rinse aid chamber.
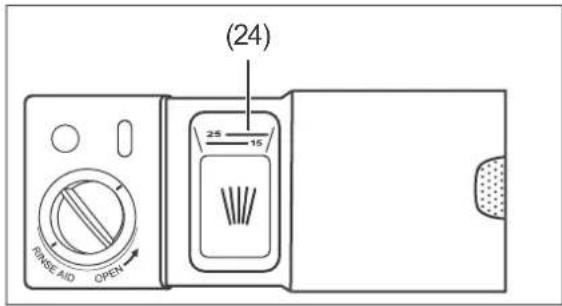
You do not need to add rinse aid to the dishwasher detergent compartment,
- if you are only using multitabs which already contain rinse aid.
- if the water hardness in your area is in the 0 - 5^ range.
text_image
38 (5)Prior to the first use, and when the display reading "Add rinse aid" lights up, add *(5) rinse aid.
As rinse aid is automatically dispensed during operation, it ensures that the dishes are spot-free and accelerates the drying process.
text_image
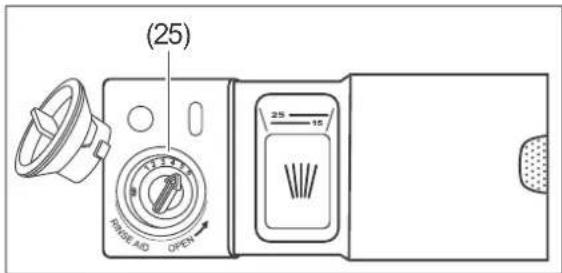
(25) RANGE AIR OPEN 25 15- Turn the cover of the dishwasher salt compartment (25) a quarter turn in an anti-clockwise direction and remove it.
- Fill the water tank to the "max" mark in the opening. The adjacent display window will then turn black.
- Wipe away any rinse aid which has spilt immediately so that you don't compromise the rinsing results and to avoid increased foaming.
- We would recommend that you do not change the dosage that was set by the factory initially. Only correct the dosage if you are not satisfied with the rinsing results (see next page).
- Replace the cover on the opening of the compartment and turn it in a clockwise direction.
Amending the rinse aid dosage
If the dishes are
– dull and stained, increase the dosage by turning the arrow on the rinse aid dispenser (25) to a higher value.
- sticky and smeared, decrease the dosage by turning the arrow on the rinse aid dispenser (25) to a lower value.
Adding dishwasher salt
! NOTICE
Risk of damage!
You may damage the dishwasher, its stainless steel surface, its seals and fi liters by using dishwasher salt in an improper manner.
■ Only use regenerating salt which is suitable for dishwashers.
■ Always wipe away split dishwasher salt immediately with a damp cloth.
■ Immediately after adding the dishwasher salt, launch a dishwashing programme.

You do not need to add dishwasher salt to the dishwasher salt dispenser
- if you are only using multitabs which already contain dishwasher salt,
- if the water hardness in your area is in the 0 - 5^ range.
text_image
38 (2)Add dishwasher salt:
– prior to using the dishwasher for the first time,
- when the "add dishwasher salt" display\$ (2) lights up.
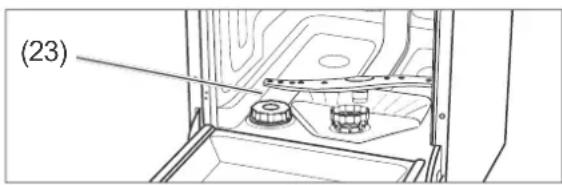
natural_image
Technical line drawing of a mechanical assembly with labeled component (23), no readable text or symbols present- Remove the lower dish rack.
- Turn the cover of the dishwasher salt compartment (23) in an anti-clockwise direction and remove it.
- Upon first use: Add 1.5 l water to the dishwasher salt compartment so that the dishwasher salt does not clump.
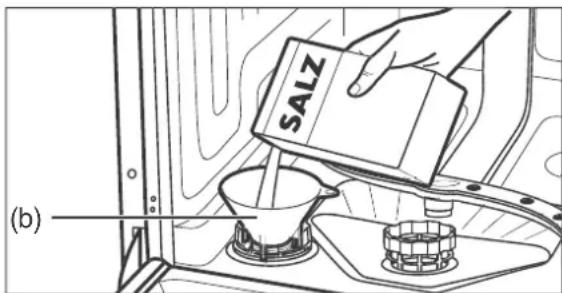
text_image
SALZ (b)- Place the supplied filling funnel (b) on the compartment opening.
- Add dishwasher salt up to the edge of the compartment. Water may run out during the process; this is not a problem.
- Stir the dishwasher salt using the end of a spoon or similar.
- Turn the cover of the dishwasher salt compartment in a clockwise direction up to the stop point.
- Replace the lower dish rack.
- Launch a dishwashing programme straight away or carry out a test run immediately upon first use (see page EN-27).
Loading the dishwasher
NOTICE
Risk of damage!
Long objects which protrude from the dish racks may block the spraying arms or damage the seals. The dishes are not sufficiently cleaned.
■ Ensure that long objects are positioned only horizontally in the dish racks.
■ Place dishes in the dish racks in such a way that none of the objects can slip out of the dishwasher when it is next opened or slip out of the dish racks during operation.
■ Use the height adjustment function for the upper dish rack.
- Remove large and stuck-on scraps of food from the dishes so that the sieve and filter do not become blocked.
- Soak dishes with dried-on or burnt-on foods in water before placing them in the dishwasher.
- Position the dishes with the opening to the bottom so that the water can run off (e.g. for glasses).
Unsuitable dishes
The following dishes and crockery are unsuitable for cleaning using a dishwasher as this will damage them.
– Delicate glasses: may become matt and milky
- Decorations on dishes/glasses/cutlery: may fade.
– Silver: may tarnish.
- Anodised aluminium: may discolour.
– Tin: may turn matt.
– Wood: may warp and tear
- Horn/heat-sensitive plastic: may become deformed.
– Glued items of cutlery: may come apart.
- Handmade items: may be damaged.
– Electrical components of kitchen appliances such as mixers: may cause an electric shock.
- Observe the instructions in user manuals and data sheets.
Cutlery drawer
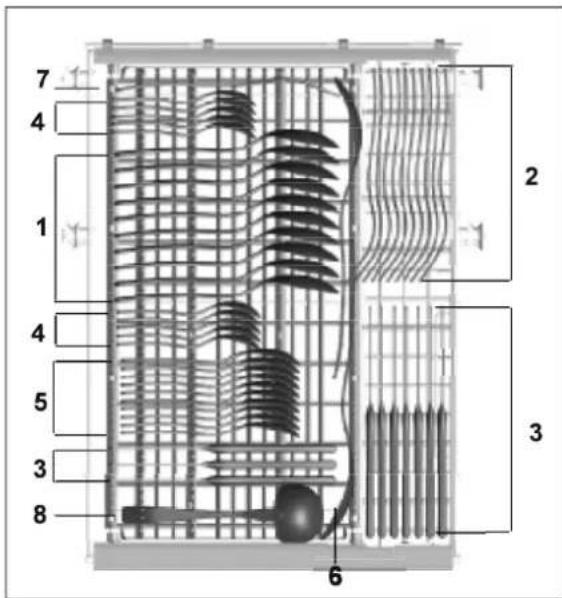
text_image
7 4 1 4 5 3 8 2 3 61 = soup spoons, 2 = forks, 3 = knives, 4 = teaspoons, 5 = dessert spoons, 6 = serving spoons, 7 = serving forks, 8 = sauce ladles
- Leave space in between individual items of cutlery.
- Put long utensils in the middle.
- Lay out cutlery in such a way that the water can drip away easily.
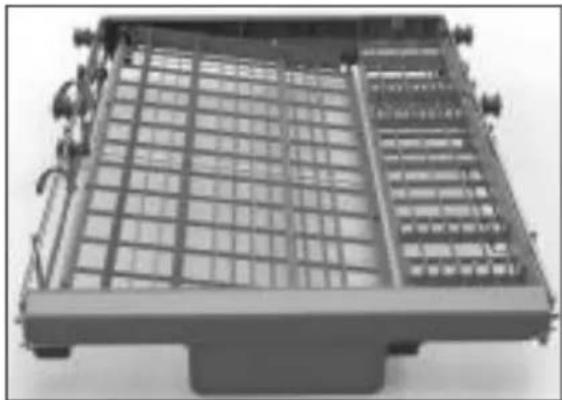
natural_image
Exterior view of a metal grate or rack structure with grid pattern (no text or symbols visible)The left-hand, larger part of the cutlery drawer can be raised at the side so that cutlery can drip dry more easily.
Upper dish rack
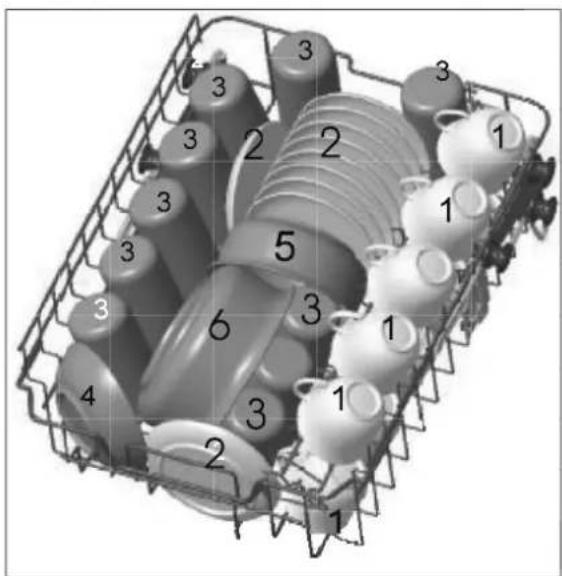
text_image
Diagram of a multi-layered electrical or mechanical device with numbered components, likely for assembly or manufacturing purposes.1 = cups, 2 = saucers, 3 = glasses, 4 = large bowl, 5 = medium bowl, 6 = serving bowl
The upper dish rack is intended for small and medium-sized dishes such as glasses, coffee and tea cups, sauce boats, saucers, dessert plates, etc.
The dish rack has a fold-out cup rack for additional loading space.
Changing the height of the upper dish rack
If there are larger dishes in the lower dish rack, this can impede the upper spraying arm. Position the upper dish rack at the top in order to prevent this.
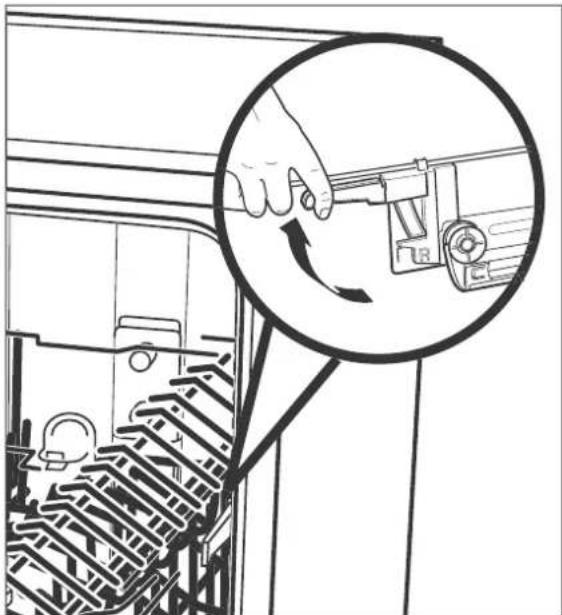
natural_image
Technical line drawing of a mechanical assembly with a hand operating a component, showing internal components and a magnified circular detail (no text or symbols)- Pull the empty upper dish rack right out.
- Pull the coloured lever up on both sides and hold it securely.
- Raise the dish rack up onto the desired level and/or lower it and release the lever.
Lower dish rack
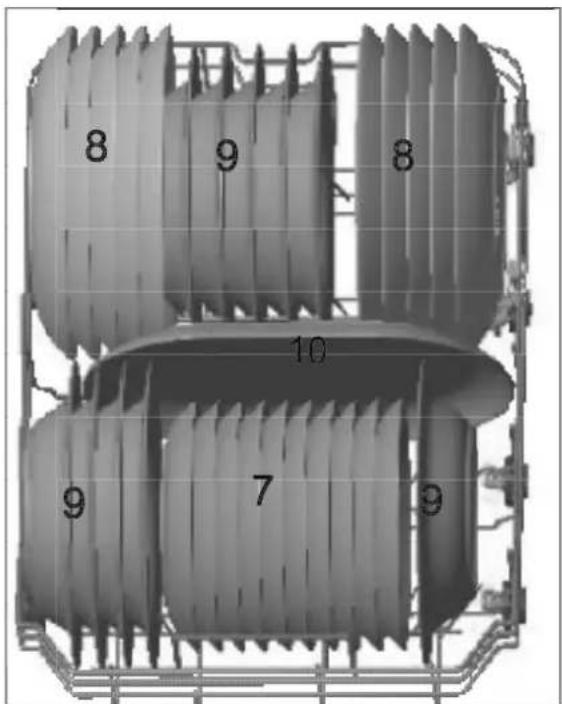
text_image
8 9 8 10 9 7 97 = dessert plates, 8 = flat dinner plates, 9 = soup plates, 10 = serving platter
The lower dish rack is intended for large dishes such as plates, bowls, saucepans and frying pans.

If you wish to put saucepans and frying pans in the dish rack instead of plates you can fold down the spikes at the back.
Dishwasher programme table
Select the desired dishwasher programme using this table.
| Programme overview | Programme sequence 1) | Quantity of dishwasher detergent in [g] 2) | Washing/rinsing temperature in [°C] | Duration in [minutes] | Consumption 3) | |||||
| Dishwasher programme | Application | Pre-rinse | Rinse | Rinse | Dry | Water [l] | Current [kWh] | |||
| Automatic programme: For slightly to heavily soiled dishes with or without dried-on food scraps | ● | ● | ●● | ● | 3/22 | 45/65 | 150 | 9.5-13.0 | 0.90-1.30 | |
| Intensive: For heavily soiled dishes, and moderately soiled saucepans and frying pans. | ● | ● | ●●● | ● | 3/22 | 60/70 | 170 | 15.5 | 1.40 | |
| Normal: Moderately soiled dishes, saucepans and glasses, and lightly soiled frying pans. | ● | ● | ●● | ● | 3/22 | 55/65 | 180 | 12.0 | 1.10 | |
| ECO 4) | Standard programme ECO: For moderately soiled every day dishes. | ● | ● | ● | ● | 3/22 | 45/65 | 195 | 8.0 | 0.74 |
| Glass: For lightly soiled dishes and glasses. | ● | ● | ●● | ● | 3/22 | 40/60 | 125 | 12.0 | 0.75 | |
| 90-minute programme: For lightly soiled dishes – Note: The dishes remain slightly damp. | ● | ●● | ● | 25 | 65/65 | 90 | 11.5 | 1.15 | ||
| Short programme: For slightly soiled glasses and cups as well as dishes without dried-on food scraps - Note: As the dishwashing programme does not have a drying cycle, the dishes will remain damp. | ● | ●● | — | 20 | 45/55 | 30 | 10.0 | 0.70 | ||
| Pre-rinse: Rough pre-rinse, if the main rinse cycle is only to be launched later. | ● | 15 | 3.5 | 0.02 | ||||||
1) • = Number of cycles.
2 Put 3 g of dishwasher detergent into the pre-wash compartment and 22 g into the main wash compartment.
3) The values apply to laboratory conditions; they may vary in day-to-day use.
^4 ECO= standard programme in accordance with DIN EN 50242 with rinse setting: 6, setting for the degree of hardness: H3
Dishwasher operation
Preparation
Requirements:
- You have read chapter „Safety“ on page EN-6 and understand all the safety notices.
-
The appliance is set up and connected as described in chapter „Installation, connection and commissioning“ on page EN-23.
– Dishwasher detergents, rinse aids and dishwasher salts and multitabs are added. -
Open the tap completely.
- Close the dishwasher door.
- Press the ⏻ button (18) to switch on the dishwasher.
You will hear a signal tone and all LEDs will illuminate briefly.
After a short time, the programme display reading ECO (1) will show.
Selecting the dishwasher programme

It is recommended that you carry out a test run before the first dishwasher cycle in order to remove residues from the manufacturing process and in order to ensure that the device functions perfectly. Carry out this test run when the dishwasher is empty and without any dishwasher detergent.
- Select the suitable dishwashing programme based on the "dishwasher programme table", see page EN-16.
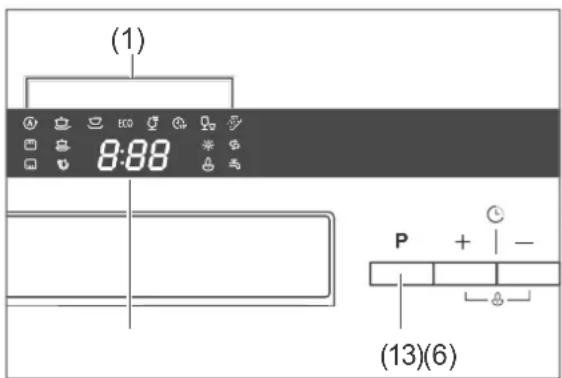
text_image
(1) 8:88 P + - (13)(6)- Press the P (13) button as often as required until the display shows the desired programme symbol (1) and the programme duration (6).
- For the washing programme,
- if you wish to make further adjustments, continue with „Additional options“.
– launch it, continue with „Starting the dishwashing programme“ on page EN-18.
Additional options
You can combine the various dishwashing programmes with additional options. The additional options must be selected before starting the wash programme.
Intensive cleaning
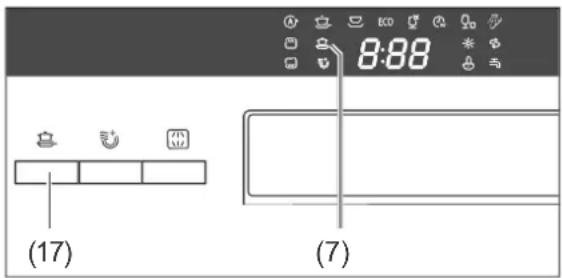
text_image
(17) (7)This option allows you to further improve the cleaning results.
This option is not available with the programmes Ⓐ, ▽ and ▼.
- To switch the option
-on, press the button (17).
In the display, the symbol ⚙ (7) will light up.
– off, press the button again. The symbol will disappear in the display.
Extra dry
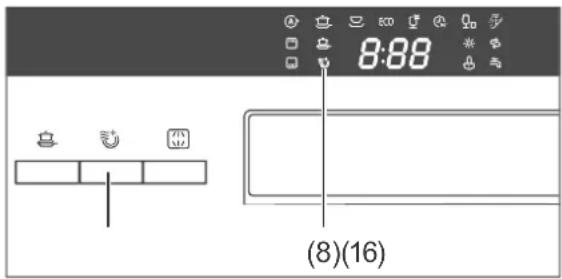
text_image
8:88 (8)(16)This option produces an improved drying result.
This option is not available with the programmes Ⓐ, ▼ and .
- To switch the option
- on, press the button (16). The symbol (8) will appear in the display.
– off, press the button again. The symbol will disappear in the display.
Selecting the spraying arm(s)
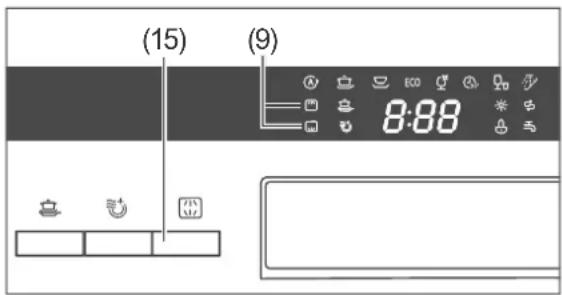
text_image
(15) (9) 8:88If only one of the two dish racks is loaded, you should deactivate the spraying arm which you do not require.
- Upper dish rack loaded
– Lower dish rack loaded
- Press the button (15) as many times as necessary until only the symbol for the spraying arm you require lights up.
Delayed start
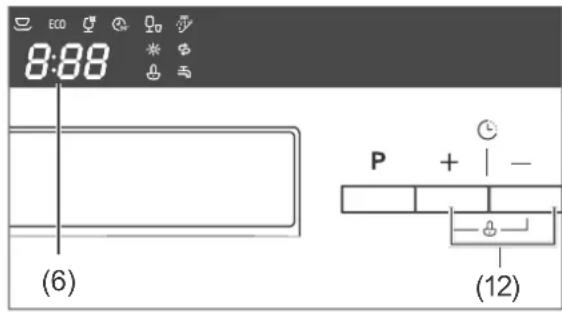
text_image
8:88 (6) P + | - (12)The wash cycle normally starts as soon as you press the button "Start/Pause" ▶II (11).
If you want the cycle to begin later, you can specify this. The start time can be delayed by between 1 and 24 hours.
- Press the plus or minus button
(12) as often as required until the display (10) shows the desired start delay (H:00, H:01 to H:24).
Starting the dishwashing programme
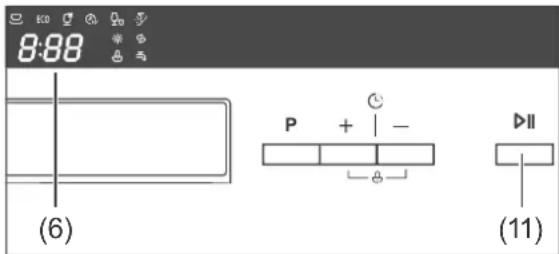
text_image
8:88 (6) P + - II (11)- Start the programme with the button ▶II (11).
If you
– have not set up a delayed start, the programme cycle will start after a few seconds.
– have set up a delayed start, the display will initially still show the start-delay duration (6); the dots between H and the number of hours will flash. The programme will start as usual after the delay period has finished.
During the programme the display will show the time remaining (6); the dots between hour and minute numbers will flash.
At the end of the programme duration, an acoustic signal will sound 8 times and the display will show END.
- Switch the dishwasher off using the button (18).
- Turn the tap off.
- Wait a little while before unloading the dishwasher.
Unloading the dishwasher

CAUTION!
Risk of scalding!
If you open the dishwasher door, hot steam will come out.
- Keep a sufficient distance to the door and do not hold your body or upper body directly above the opened door.
■ Make sure that children do not open the door if the programme has only finished a short time ago.
■ Only open the door slightly to allow the steam to escape more easily.
■ Allow the dishes to cool before unloading the dishwasher.
Trip hazard!
An open dishwasher door can quickly become a trip hazard.
■ Close the door after every use.
■ Only leave the door slightly open to cool down.

NOTICE
Risk of damage!
■ Make sure that children and pets do not stand on the open door.
Once the programme has ended and the dishes have cooled off, you can remove the dishes.
- When unloading the dishwasher, start with the lower rack and then unload the upper rack. This will prevent water dripping onto the lower layer of dishes from the top layer of dishes.
- Leave the dishwasher door slightly open so that the inside of the dishwasher can also cool off and dry out.
Changing the dishwasher programme

CAUTION!
Risk of scalding!
If you open the dishwasher door, hot steam will come out.
- Keep a sufficient distance to the door and do not hold your body or upper body directly above the opened door.
- Keep children and pets away from the appliance when opening the door.
■ Make sure that children do not open the door during operation.
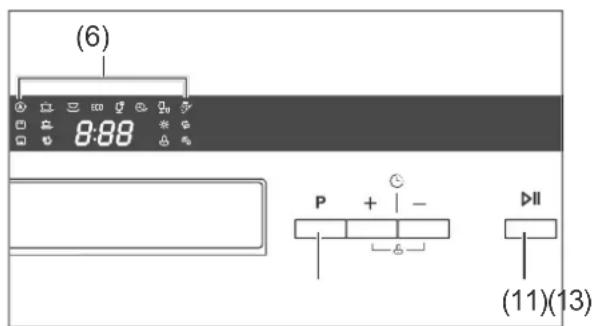
text_image
(6) 8:88 P + - (11)(13)You can interrupt an active dishwasher programme at any point and start a new one. However, do not forget to add extra dishwasher detergent if the programme has already been running for a longer period and the cover of the dishwasher detergent compartment is already open.
- Press the button ▶(11) in order to interrupt the dishwashing programme. The remaining duration display (6) will remain permanently illuminated.
- If required, add extra dishwasher detergent.
- Only press on the P (13) button until the programme symbols (1) go out and the remaining duration display (6) is set to "zero".
- Select the new programme with the P (13) button.
- Select any additional options required as described on the previous pages.
- Start the programme.
Adding dishes

CAUTION!
Risk of scalding!
If you open the dishwasher door, hot steam will come out.
- Keep a sufficient distance to the door and do not hold your body or upper body directly above the opened door.
- Keep children and pets away from the appliance when opening the door.
■ Make sure that children do not open the door during operation.
You can add more dishes even if the dishwasher programme is already running. In this case, the current dishwashing programme should only have been running for a short time, as only then can the additional dishes be cleaned.
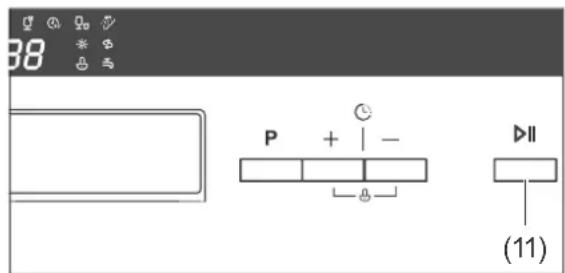
text_image
38 P + | - (11)- Press the button ▶(11) in order to interrupt the dishwashing programme.
The LED to the right of the programme symbol will become a solid light. - Open the dishwasher door slightly and wait until the spraying arm has come to a standstill and the steam has dispersed.
- Slowly open the door all the way.
- Add the dishes.
- Close the door.
- Press the button once again ▶(11).
After approximately 10 seconds of inactivity, the appliance will continue.

A signal tone will sound at regular intervals while the wash programme is paused.
Button lock / child lock
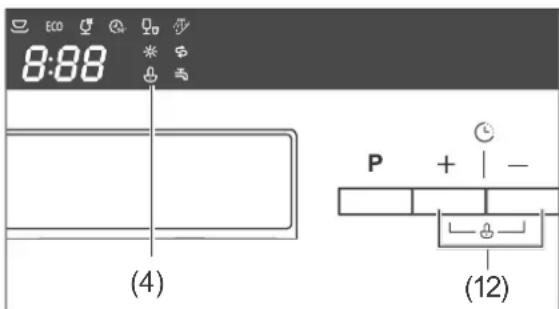
text_image
8:88 (4) P + | - (12)The dishwasher buttons can be locked, e.g. for childproofing purposes.
• To switch the button lock
- on, press the plus and minus button ⏻/💡 (12) and hold them pressed in until the lock symbol (4) appears in the display. The buttons are locked.
- off, press both buttons again and hold in until the lock symbol in the display goes out. The buttons are unlocked.
Care and maintenance
Cleaning the front of the appliance and the door seal

WARNING!
Risk of electric shock!
Improper use of this appliance may lead to electric shocks.
■ Prior to cleaning, switch off the appliance, pull out the mains plug and switch off the fuse.
■ Never spray the device with a water jet (high-pressure cleaner).

NOTICE
Risk of damage!
The seals of the door are sensitive to oil and grease. The door seals can be damaged by unsuitable cleaning agents.
■ Do not use harsh, aggressive, solvent-based or abrasive cleaners.
■ Do not grease the door seals.
If water gets into the lock, the lock and the electric components in the door may become damaged.
■ Use a damp cloth to clean the inner edges of the door.
■ Do not use any cleaning sprays.
-
Wipe the front of the appliance with a damp cloth and some all-purpose cleaning product and wipe it off with a dry towel.
-
Clean the door seal and the inside of the door regularly with a damp cloth.
Cleaning the filters

NOTICE
Risk of damage!
Using the appliance without the filters or with improperly fitted filters can cause the dishwashing performance to be impeded or may damage the device.
■ Prior to launching a dishwashing programme, always ensure that the filters have been correctly installed in the appliance.
■ Clean the filters at least once a week.
■ Clean the fi Iters with care; do not bend them.
■ If you replace the filters, always use genuine replacement parts.
text_image
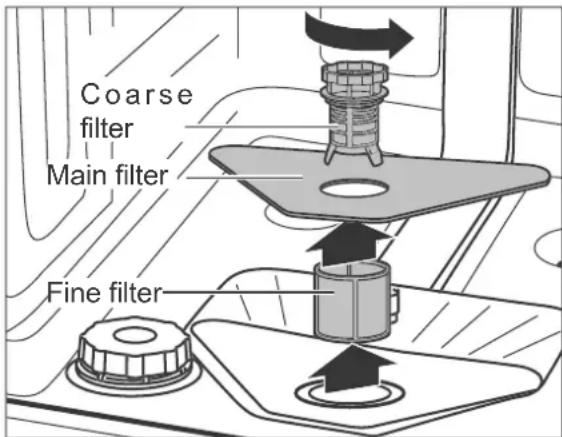
Coarse filter Main filter Fine filterRemove any food scraps out of the coarse filter, the main filter and the fine filter.
- Empty the lower dish rack and remove it.
- Turn the coarse filter in an anti-clockwise direction and remove the filters in an upward direction.
- Clean the filters carefully under running water.
- Replace the filters and turn the coarse filter in a clockwise direction up to the stop point.
Cleaning the spraying arm
The nozzles in the spraying arm may calcify or become dirty due to food scraps. Check the nozzles regularly and clean them if required.
- Empty both racks and remove the lower rack.
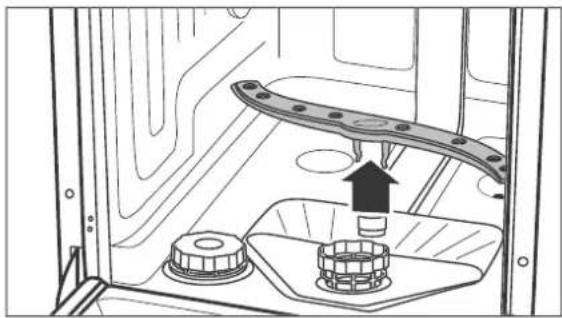
natural_image
Technical diagram of a mechanical assembly with a central component and mounting base (no text or symbols)- Pull the lower wash arm up and off.
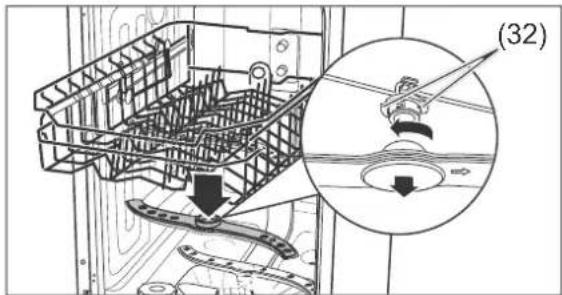
text_image
(32)-
The upper spraying arm is affixed using a bayonet closure. To remove the spraying arm, hold the two serrated bayonet grips (32) still and turn the spraying arm clockwise.
-
Clean the nozzles under running water.
-
Affix the spraying arm again after cleaning.
The spraying arm must be firmly affixed and must be able to rotate freely.
Complete cleaning
In well-stocked supermarkets and drugstores, you will find special dishwasher cleaning products. Cleaning the appliance using these products takes place when the dishwasher is empty and is very intensive. You should clean the dishwasher in this way from time to time. When doing so, please note the manufacturer instructions on the packaging.
Protection against frost damage
Position the dishwasher in a room which is protected from frost, if possible. If this is not possible, protect the dishwasher against frost as follows. You will need a shallow dish or a pan, and a sponge.
-
Disconnect the mains plug from the socket or switch off the fuse.
-
Close the tap and unscrew the inlet hose (30).
-
Let the water from the inlet hose flow completely into the dish.
-
Remove the (26) filters.
-
Remove the water from the sump floor with the help of a sponge.
Installation, connection and commissioning
Choose a suitable location
CAUTION!
Risk of injury!
The appliance is heavy and bulky. Improper handling of the appliance may result in injury.
- Seek the help of another person during transport, installation and assembly.
■ If a trolley is used to move the appliance, the appliance must be moved as shown on the packaging.
■ Only lift the appliance as shown on the packaging.
■ Remove all obstacles on the transport route and from the installation location, e.g. open doors and clear away objects lying on the floor.
The planned location must fulfil the following prerequisites:
– The location must be a dry and frost-safe room with a firm ground.
– In order to install the connection pipes, the dishwasher must be positioned near to a washing/dishwashing basin.
Setup
You can position the dishwasher in two manners:
– as a freestanding appliance in the room. The space required for this corresponds to the appliance measurements cited in the following diagram.
- built under a worktop. In this case, you must take the required recess dimensions into consideration.
Continue with 'Connect outlet hose'.
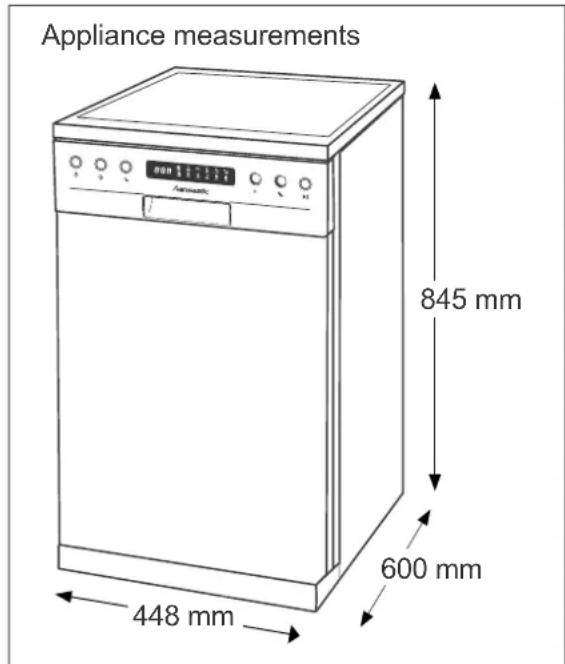
text_image
Appliance measurements 845 mm 600 mm 448 mm- If you have not already done so, remove cardboard, polystyrene and adhesive strips from the inside of the dishwasher.
- Place the dishwasher in the desired position.
text_image
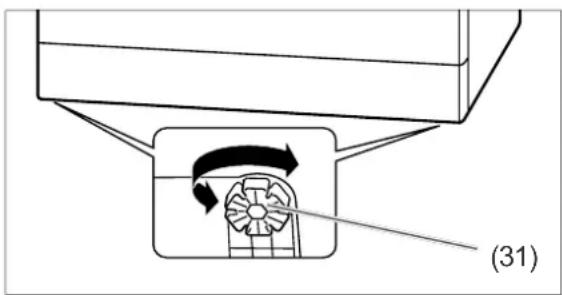
(31)- In order to compensate for uneven floor surfaces and set up the dishwasher on a level horizontal base, you can screw the four adjustable feet(31) in or out. The adjustable feet have slots all around their circumference. Insert a screwdriver and use it to turn the adjustable foot. Use a spirit level to align the dishwasher.
Having the outlet hose connected
! NOTICE
Malfunction!
Failing to connect the appliance correctly may cause malfunctions during operation.
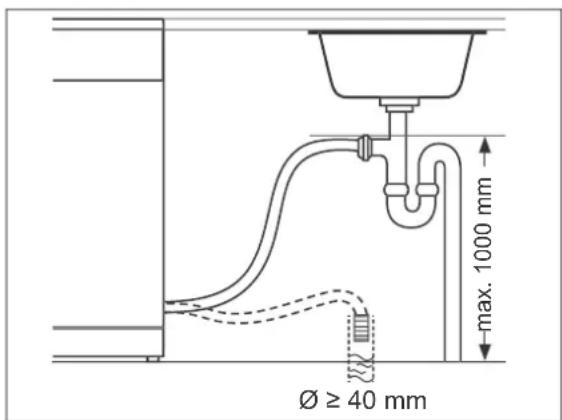
■ Make sure that the waste water can drain freely at any time. To that end, the outlet pipe must have a minimum diameter of 40 mm.
■ Ensure that there are no kinks or damage to the outlet hose.
■ Make sure that the end of the hose is not submerged in the pumped water.
■ Do not extend the outlet hose or replace with another drainage pipe.
text_image
max. 1000 mm Ø ≥ 40 mmYou can connect the outlet of the waste water hose in two different ways:
- Connection to a floor drain.
– Direct connection to the odour seal (siphon) of your washing/dishwashing basin.
Specific technical measures are required for this. For this reason, only plumbing experts or members of our service team may connect the outlet hose (see page EN-31). - The outlet hose must be a maximum of 1000mm above the floor.
Connecting the inlet hose
! NOTICE
Risk of damage!
The dishwasher is designed for a water pressure of 0.4 to 10 bar (0.04 to 1.0 MPa, 40 to 100 N/cm ^2 ). Water must always be able to run freely into the dishwasher, otherwise this can damage the appliance.
■ If the water pressure is higher than this, install a pressure reducer. If in doubt, enquire about the water pressure with the water supply company.
■ Never connect the appliance to the water tap or the mixing arm of a water heater (continuous flow heater, pressure-free boiler etc.).
■ Ensure that the inlet hose is not kinked and is carefully connected.
■ Do not cut through the inlet hose. It contains electrical components. If the inlet hose is damaged, have it repaired by a specialist ("Service" see page EN-31).
■ Do not use old or previously installed inlet or outlet hoses.
text_image
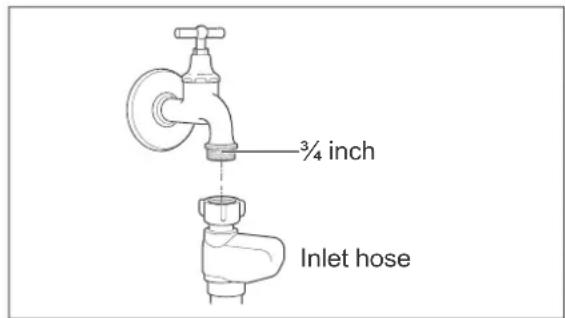
¾ inch Inlet hoseFor water supply, you need a water tap with a 34 inch screw connector.
-
Screw the safety valve's lock nut to the tap hand-tight.
-
Check that the connection to the water tap is sealed. Turn on the water tap slowly and ensure that no water is escaping. Then close the valve again.
Connecting the dishwasher to the electricity

WARNING!
Risk of electric shock!
Faulty electrical installation or excessive mains voltage may result in an electric shock.
■ Prior to connecting the dishwasher, ensure that you have page EN-6 taken note of all the safety instructions and adhered to them.
Fire hazard!
■ Never use multi-socket adapters, multi-socket strips, travel adapters or the like.
Depending on the recess into which the dishwasher will be installed, the dishwasher must either be connected before or after installation.
- For the electrical connection of the dishwasher, a professional must install an earthed power socket with its own fuse of a sufficient size (220–240 V\~ / 50 Hz / 10 A).
- The plug must be installed in such a way that the recess into which the dishwasher will be fitted is deep enough even when the plug is plugged in.
- Do not use a multi-socket extension cable, multi-socket plug, travel adapter, extension cable or similar.
- We recommend using a pulse-sensitive residual current device (RCD).
- Connect the mains plug to the socket.
Substructure
If you are installing your dishwasher as a free-standing appliance, continue with „Degree of water hardness“ on page EN-27.

NOTICE
Risk of damage!
Selecting the wrong screws can damage the worktop.
■ Select the correct screws with the appropriate screw length.
■ Use the enclosed screws.
Requirements:
- Only install the dishwasher underneath a continuous worktop which is joined to the units adjacent to the dishwasher.
-
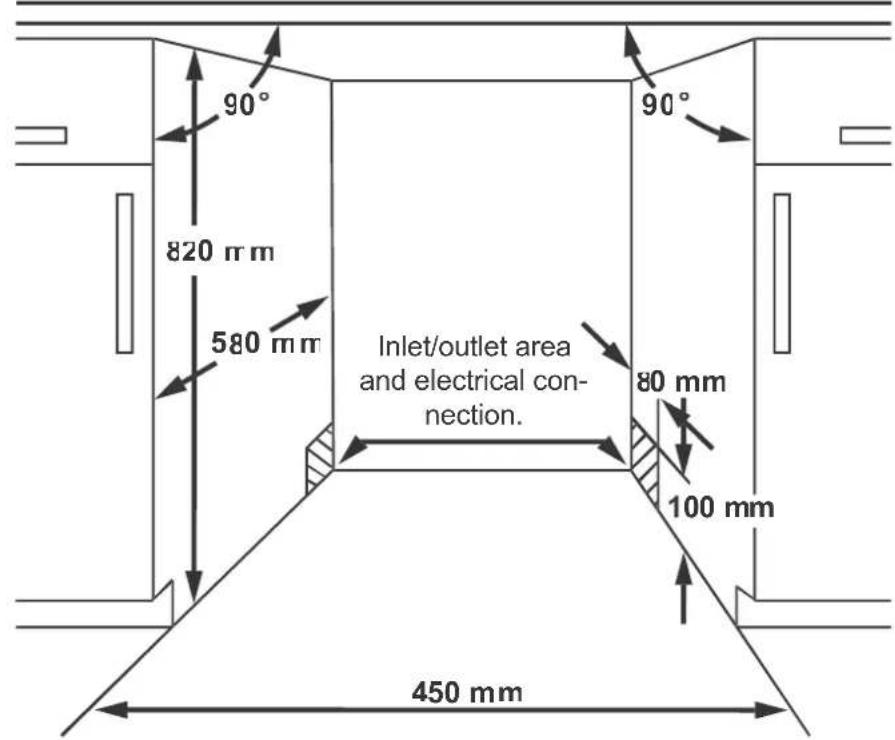
Maintain sufficient distance from the walls and adjacent appliances. The recess dimensions must at least correspond to the details in the diagram above, 'recess dimensions'.
-
If you have not already done so, remove cardboard, polystyrene and adhesive strips from the inside of the dishwasher.
natural_image
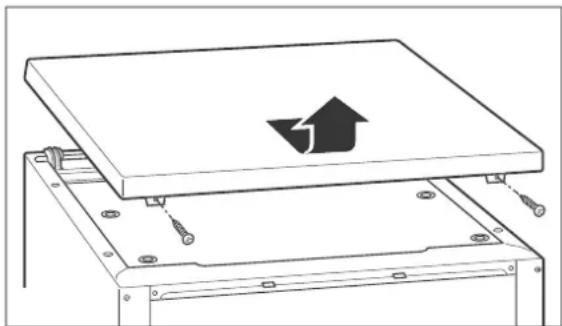
Diagram of a mechanical assembly with a slide and screw base, no text or symbols present- Loosen both screws on the reverse side of the covering panel and remove them.
Recess dimensions
text_image
90° 820 mm 580 mm Inlet/outlet area and electrical con- nection. 80 mm 100 mm 450 mm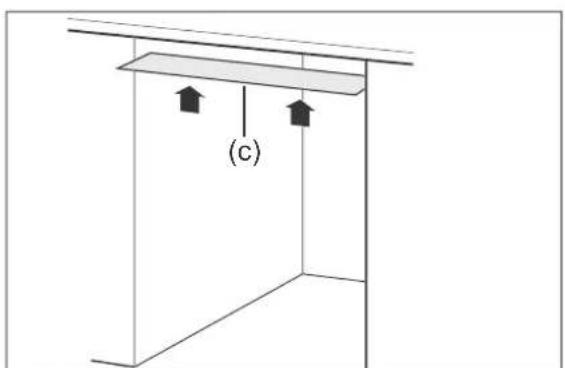
natural_image
Simple line drawing of a cabinet or support structure with two hanging items and a label (C) at the bottom (no text or symbols on the diagram itself)-
Affix the condensation protection film supplied (c) to the underside of the work-top. In this way, you will avoid damage to the work surface as a result of hot steam which may be emitted from the dishwasher if the dishwasher door is left open.
-
Place the dishwasher in the desired position.

text_image
(31)- In order to compensate for uneven floor surfaces and set up the dishwasher on a level horizontal base, you can screw the four adjustable feet (31) in or out. The adjustable feet have slots all around their circumference. Insert a screwdriver and use it to turn the adjustable foot. Use a spirit level to align the dishwasher.
Degree of water hardness
Determining water hardness
In order to determine the water hardness, you can check on the
- website of your water provider.
– telephone your water supplier.
– purchase the relevant test strip at a pharmacy.
| Water hardness in your household in °dH | Water hardness in the dishwasher |
| 0-5 H1 | |
| 6-11 H2 | |
| 12-17 H3 | |
| 18-22 H4 | |
| 23-34 H5 | |
| 35-55 H6 |
- Determine the relevant setting from the table above.
- Close the dishwasher door.
text_image
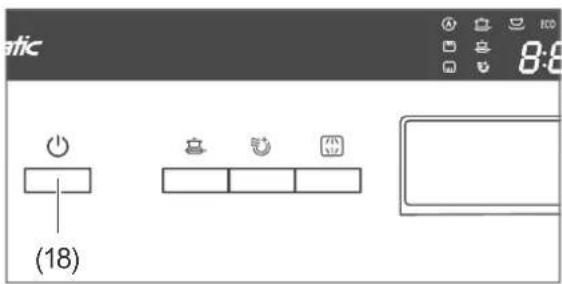
8:8 (18)- If the dishwasher is switched on, switch it off with the button Ⓐ(18).
Setting the water hardness
Do not allow more than 1 minute to elapse between the following steps, otherwise the setting process will be interrupted.
- Switch on the dishwasher using the ⏻ button (18).
text_image
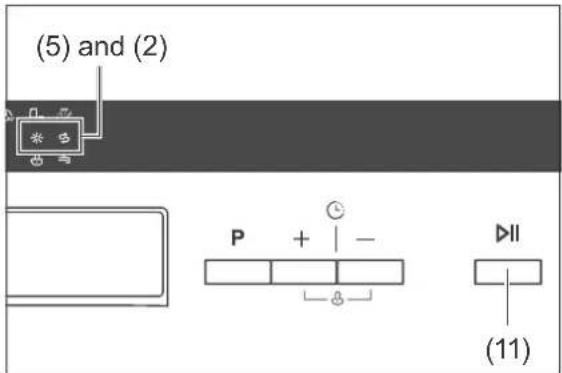
(5) and (2) P + - (11)- Press and hold the button ▶(1) until the ✘(5) and (2) displays flash alternately.
- Press the button ▶II(11) as often as required until the desired setting is displayed.
- Around 5 seconds after you push it for the last time, the dishwasher will automatically revert to the normal display. The hardness level setting is saved.
Test run
It is recommended that you carry out a test run before the first dishwasher cycle in order to remove residues from the manufacturing process and in order to ensure that the device functions perfectly.
If no water escapes during the test run and if there are no unusual noises, the appliance is ready to use.
Carry out this test run when the dishwasher is empty and without any dishwasher detergent.
See chapter „Dishwasher operation“ on page EN-17 for the procedure.
Troubleshooting table
Malfunctions can occur in all electrical appliances. This does not necessarily mean there is a defect in the appliance. For this reason, please check the tables to see if you can correct the malfunction.

WARNING!
Risk of electric shock in case of improper repair!
Conducting improper repairs to the dishwasher puts the person carrying out the repairs and the user in danger.
■ Only authorised specialists may repair the dishwasher. If in doubt, contact our service team for this (see page EN-31).
■ Only carry out the actions which are described in this user manual.
- Never repair defective dishwashers – or dishwashers which you presume to be defective – yourself. You can endanger yourself and subsequent users.

NOTICE
Risk of damage!
Improper handling of the dishwasher can lead to property damage and to damage to the dishwasher.
■ If water overflows, close the water supply immediately and do this before contacting the service team (see page EN-31).
■ If the water has overflowed, remove any water standing in the dishwasher before restarting a programme.
Problems with operation
| Problem Possible cause | Solution | |
| The dishwasher cannot be switched on. | The mains plug has not been inserted into a socket. | Connect the mains plug to the socket. |
| There is no voltage being supplied through the socket. | Check the fuse. Check the socket by connecting another device. | |
| The selected dishwasher programme will not start or it stops. | The dishwasher's door is not closed properly. | Close the dishwasher door. |
| The water tap is not properly on. | Turn the water tap on completely. | |
| The inlet hose is defective. Contact our service team (see page EN-31). | ||
| There is a risk of overflowing. The electrical water stop system has been activated. | ||
| The ⚙ LED (2) is illu-minated although dish-washer salt has been added. | The dishwasher salt is clumpy. | Stir the dishwasher salt using the end of a spoon or similar. |
| The water is not running or it is running only very slowly. | There is a kink in the inlet hose. | Arrange the inlet hose properly so that it is not kinked (see „Connecting the inlet hose“ on page EN-24). |
| The water tap is not properly on. | Turn the water tap on completely. | |
| The water is not running off or only very slowly. | The filters are blocked. Clean | the filters (see „Cleaning the filters“ on page EN-21). |
| The outlet hose is kinked, has been extended or is hanging too high up/too low. | Lay out the outlet hose in the proper manner (see page EN-24). | |
| The dishwasher is not watertight. | The door seal is defective. Have the door seal replaced (see „Service“ on page EN-31). | |
| The outlet hose or the inlet hose is defective. | Have the defective hose replaced (see „Service“ on page EN-31). | |
| The dishwasher can be switched on/off, but not cannot be operated. | The dishwasher can only be operated when the door is closed. | Close the door. |
| The dishwasher cannot be operated. | The buttons are locked. Unlock the buttons (see „Button lock / child lock“ on page EN-20). | |
The dishwashing results are not satisfactory
| Problem Possible cause | Solution | |
| There are residues or streaks on the dishes. | The rinse aid is incorrectly dosed. | Adjust the dispensed dose (see „Adding rinse aid“ on page EN-11). |
| There is no dishwasher salt. | Add dishwasher salt (see „Adding dishwasher salt“ on page EN-12). | |
| The dishwasher salt is clumpy. | Stir the dishwasher salt using the end of a spoon or similar. | |
| The dishes are not completely clean. | There are food scraps which are encrusted onto the dishes. | Soak dirty dishes prior to washing the dishes. |
| The dishes have not been stacked optimally. | Stack the dishes in such a way that all parts can be reached by the water jets (see „Loading the dishwasher“ on page EN-13). | |
| You have selected the incorrect dishwashing programme. | Select the correct dishwashing programme (see „Dishwasher programme table“ on page EN-16). | |
| The dishwasher detergent is incorrectly dosed. | Use the correct dosage of dishwasher detergent (see „Dishwasher programme table“ on page EN-16). | |
| The water pressure is too low. | Turn the water tap on completely. | |
| The spraying arm can not rotate unhindered. | Ensure that no dishes are impeding the motion of the spraying arm. | |
| The nozzles on the spraying arm are blocked/calcified. | Clean the nozzles (see „Cleaning the spraying arm“ on page EN-22). |
Error indicators
| Code Solution | |
| E1: It takes too long for the water to fill up. | Turn the water tap on completely. |
| Arrange the inlet hose properly so that it is not kinked (see „Connecting the inlet hose“ on page EN-24). | |
| Ensure that the water pressure is correct. See „Technical specifications“ on page EN-32. | |
| E3: The heating element is defective. | Have the appliance checked and repaired. |
| E4: Water overflow Switch | off the tap. Find the gap in the seal (or have someone find it) and repair the leak (or have it repaired). |
| E8:Internal fault Have the | appliance checked and repaired. |
Service
In order for us to help you quickly, please tell us:
| Name of appliance Order number | |
| Freestanding dishwasher ANOBEAM636E | 609 123 |
Advice, order and complaint
Please contact your mail order company's customer service centre if
– the delivery is incomplete,
– the appliance is damaged during transport,
– you have questions about your appliance,
- a malfunction cannot be rectified using the troubleshooting table,
– you would like to order further accessories.
Repairs and spare parts
Customers in Germany
- Please contact our technical service: Telephone 0 18 06 18 05 00 (landline 20 cents/call, mobile max 60 cents/call)
Customers in Austria
- Please contact your mail order company's customer service centre or product advice centre.
Please note:
You are responsible for the condition of the appliance and its proper use in the household. If you call out for customer service due to an operating error, you will incur charges, even during the guarantee/warranty period. Damage resulting from non-compliance with this manual unfortunately cannot be recognised.
Environmental protection
Disposing of old electrical devices in an environmentally friendly manner

Electrical appliances contain harmful substances as well as valuable resources.
Every consumer is therefore required by law to dispose of old electrical appliances at an authorised collection or return point. They will thus be made available for environmentally-sound, resource-saving recycling.
You can dispose of old electrical appliances free of charge at your local recycling centre.
Please contact your dealer directly for more information about this topic.
Packaging

Our packaging is made from environmentally friendly, recyclable materials:
– Outer packaging made of cardboard
– Moulded parts made of foamed, CFC-free polystyrene (PS)
– Films and bags made of polyethylene (PE)
– Tension bands made of polypropylene (PP)
- Saving energy also protects against excessive global warming. Your new appliance uses little energy due to its modern technology.
Please dispose of packaging in an environmentally friendly manner.
Technical specifications
| Item number | 609123 |
| Name of appliance | Freestanding dishwasher |
| Model | WQP8-J7636E |
| Supply voltage / frequency / fuse | 220 - 240 V, 50 Hz, 10 A |
| Rated power 17 | 60 - 2100 W |
| Device measurements (Height × Width × Depth with connections) | 84,5 cm × 44,8 cm × 60,0 cm |
| Unloaded weight | 40 kg |
| Depth of flow | max. 100 cm |
| Water pressure | 0,4 - 10 bar |
Product fiche concerning Regulation (EU) No 1060/20109
| Trade mark | hanseatic |
| Model identifier | 609123 / WQP8-J7636E |
| Rated capacity, in standard place settings for the standard cleaning cycle | 10 |
| Energy efficiency class on a scale from A+++ (most efficient) to D (least efficient) | A++ |
| Energy consumption 211 kWh peryear, based on 280 standard cleaning cycles using cold water fill and the consumption of the low power modes. Actual energy consumption will depend on how the appliance is used. | |
| Energy consumption of the standard cleaning cycle | 0,741 kWh |
| Power consumption in off-mode | 0,45 W |
| Power consumption in left-on mode | 0,49 W |
| Water consumption 224 0 l per year, based on 280 standard cleaning cycles. Actual water consumption will depend on how the appliance is used. | |
| Drying efficiency class on a scale from G (least efficient) to A (most efficient) | A |
| The standard programme (ECO) is the standard cleaning cycle to which the information in the label and the fiche relates, that this programme is suitable to clean normally soiled tableware and that it is the most efficient programme in terms of combined energy and water consumption. | |
| Programme time for the standard cleaning cycle | 195 min |
| Duration of the left-on mode | 30 min |
| Airborne acoustical noise emissions | 44 dB(A) re 1 pW |
| Built-in appliance | nc |
The values indicated above have been measured under standardised laboratory conditions pursuant to EN 50242.