
DF260166F - Dishwasher GAGGENAU - Free user manual and instructions
Find the device manual for free DF260166F GAGGENAU in PDF.


| Product Type | Dishwasher |
| Brand | Gaggenau |
| Model | DF260166F |
| Capacity | 12–15 place settings |
| Appliance Height | 815 mm or 865 mm (adjustable) |
| Weight | Up to 60 kg |
| Voltage | 220–240 V, 50/60 Hz |
| Connected Load | 2000–2400 W |
| Fuse Rating | 10/16 A (UK 13 A) |
| Water Pressure | 0.05–1 MPa (0.5–10 bar) |
| Water Connection | Cold water or hot water up to 60 °C |
| Programmes | Auto 65-75°, Auto 45-65°, Eco 50°, Auto 35-45°, Silence 50°, Glass 40°, 65°, 45°, PreRinse, Machine Care |
| Additional Functions | Power, Half Load, Hygiene, IntensiveZone, extraDry, Energy Save, Holiday |
| Smart Features | Home Connect (Wi-Fi), Remote Start, Energy Manager, Software Update, Remote Diagnosis |
| Sensor Technology | AquaSensor (turbidity), Sensor setting (3 levels) |
| Drying System | Eco drying (automatic door opening), extraDry option |
| Display | Top display window, optional Front display, Remaining time projection, infoLight |
| Interior Light | Emotion Light (switchable) |
| Child Safety | Child-proof lock (door lock and electronic lock) |
| Water Protection | Aqua-Stop system |
| Maintenance | Self-cleaning interior, Machine Care programme, cleanable filters and spray arms |
| Spare Parts | Original spare parts available through customer service |
| Installation | Built-under or integrated, free-standing possible with anti-tip securing |
Frequently Asked Questions - DF260166F GAGGENAU
User questions about DF260166F GAGGENAU
0 question about this device. Answer the ones you know or ask your own.
Ask a new question about this device
Download the instructions for your Dishwasher in PDF format for free! Find your manual DF260166F - GAGGENAU and take your electronic device back in hand. On this page are published all the documents necessary for the use of your device. DF260166F by GAGGENAU.
USER MANUAL DF260166F GAGGENAU
Safety instructions 5
Before you switch ON the appliance 5
Delivery 5
Installation 5
In daily use 7
Damage 7
Disposal 7
Door lock 8
Environmental protection 9
Packaging 9
Old appliances 9
Getting to know your appliance 10
Eco drying 10
Control panel 10
Appliance interior 10
Info button 10
Time setting 10
Switching on the appliance for the first time 11
Settings 12
Home Connect 14
Setting up the App 14
Setting up Home Connect 14
WLAN 14
Network login 14
Connect to app 15
Remote start button 15
WLAN without a connection to the
Home Connect server 15
Energy manager 16
Software update 17
Remote diagnosis 17
Declaration of Conformity 17
Water softening system / special salt 18
Water hardness table 18
Adjusting the water softening system 18
Using special salt 19
Detergent with a salt component 19
Switching off water softening system 19
Rinse aid 19
Setting amount of rinse aid 20
Switching off rinse aid refill indicator 20
Utensils 20
Not suitable 20
Glass and utensil damage 20
Loading the dishwasher 20
Upper basket 21
Lower basket 21
Cutlery basket 21
Cutlery drawer 22
Etagere 22
Folding spikes 22
Small items holder 23
Knife rack 23
Baking sheet spray head 23
Gastronorm insert 24
Unloading the dishwasher 24
Adjusting the height of the basket 24
Removing/installing cutlery drawer 25
Removing/installing upper basket 26
Removing/installing lower basket 27
Detergent 28
Adding detergent 28
Combination detergent 29
Overview of programmes 30
Programme selection 31
Information for test institutes 31
Additional functions 32
Power 32
Half load 32
Hygiene 32
IntensiveZone 32
extraDry 32
Energy Save 32
Holiday 32
Operating the appliance 33
Programme data 33
Changing the settings 33
AquaSensor 33
Time display 33
Sensor setting 33
extraDry 33
Eco forecast 33
Auto Power Off 34
Emotion Light 34
Front display 34
Remaining time projection 34
infoLight 34
Changing start programme 34
Tone volume 34
Button volume 34
Child-proof lock 35
Eco drying 35
Greeting 35
Factory setting 35
Switching the appliance on 35
Time preselection 35
Programme end 36
Switching off the appliance 36
Interrupting the programme 36
Terminating the programme 36
Changing the programme 36
Cleaning and maintenance 37
Overall status of the dishwasher 37
Machine Care 37
Special salt and rinse aid 37
Filters 38
Spray arms 38
Fault, what to do? 39
Error message 39
Waste water pump 39
Fault table 40
Customer service 46
Installation and connection 46
Contents of package 46
Safety instructions 46
Delivery 46
Technical specifications 47
Installation 47
Drainage connection 47
Drinking water connection 47
Warm water connection 48
Electrical connection 48
Removal 48
Transporting 49
Protection against frost
(Emptying the appliance) 49
Intended use
- This appliance is intended for use in the home and domestic environments.
- Use the dishwasher only in the home and only for its designated purpose: for washing domestic dishes.
- This appliance is intended for use up to a maximum altitude of 4000 metres above sea level.
Safety instructions
This appliance may be used by children over the age of 8 years old and by persons with reduced physical, sensory or mental capabilities or by persons with a lack of experience or knowledge if they are supervised or are instructed by a person responsible for their safety how to use the appliance safely and have understood the associated hazards.
Children must not play with, on, or around the appliance. Children must not clean the appliance or carry out general maintenance unless they are at least 8 years old and are being supervised.
Keep children below the age of 8 years old at a safe distance from the appliance and power cable.
Before you switch ON the appliance
Please read the instructions for use and installation carefully. They contain important information on how to install, use and maintain the appliance.
Retain all documents for later use or for the subsequent owner.
You can download the instructions for use from our website free of charge. The relevant Internet address can be found overleaf on these instructions for use.
Delivery
- Check the packaging and dishwasher immediately for damage caused in transit. Do not switch on a damaged appliance, but contact your supplier.
- Please dispose of the packaging material in an environmentally friendly manner.
- Do not let children play with packaging and its parts. There is a risk of suffocation from collapsible boxes and film.
Installation
- Following installation, ensure that the back of the dishwasher is not freely accessible (protection against contact due to hot surface).
- Install and connect the appliance according to the installation and assembly instructions.
- Prior to installation, disconnect the dishwasher from the power supply.
- Ensure that the protective conductor system of the domestic supply has been correctly installed.
- The electrical connection conditions must correspond with the specifications on the dishwasher rating plate 33.
- If the power cord of this appliance is damaged, it must be replaced with a particular power cord.
To prevent injury, the power cord may be purchased from customer service only.
- If the dishwasher is installed in a high-sided unit, the unit must be secured properly.
- If the dishwasher is installed below or above other domestic appliances, follow the information for installation in combination with a dishwasher in the installation instructions for the particular appliances.
- Also follow the installation instructions for the dishwasher to ensure that all appliances are operated safely.
- If there is no information or if the installation instructions do not include the appropriate information, contact the manufacturer of these appliances to ensure that the dishwasher can be installed above or below these appliances.
- If you cannot obtain any information from the manufacturer, you must not install the dishwasher above or below these appliances.
-
If you install a microwave oven above the dishwasher, the microwave oven may be damaged.
-
Install built-under or integratable appliances only under continuous worktops which have been screwed to adjacent cupboards to ensure stability.
- Do not install the appliance near heat sources (radiators, heat storage tanks, cookers or other appliances which generate heat) and do not install under a hob.
- Please note that the insulation material of the dishwasher power cord may melt next to heat sources (e.g. heating / hot water installations) or hot appliance parts. Make sure that the power cord of the dishwasher never comes into contact with heat sources or hot appliance parts.
- After installing the appliance, ensure that the plug is easily accessible. "Electrical connection" on page 48
- For some models:
The plastic housing on the water connection contains an electric valve. The supply hose contains electrical connection cables. Do not cut through the supply hose. Do not immerse the plastic housing in water.
In daily use
Read and observe the safety information and instructions for use on the packaging for cleaning and rinsing agents.
Ensure that you follow the safety instructions, even when operating the appliance via the Home Connect app, which are out of sight when you are away from home. Follow the instructions in the app.
Damage
- The appliance may be repaired and opened up by a technician only. To do this, disconnect the appliance from the power supply. Pull out the mains plug or switch off the fuse. Turn off the tap.
- If the appliance is damaged, especially the control panel (cracks, holes, broken buttons), or the door function is impaired, stop operating the appliance. Pull out the mains plug or switch off the fuse. Turn off tap, call customer service.
Disposal
- Make redundant appliances unusable to prevent subsequent accidents.
- Dispose of the appliance in an environmentally friendly manner.
⚠ Warning – Risk of injury!
- To prevent injuries, e.g. caused by stumbling, open the dishwasher only briefly in order to load and unload the dishwasher.
- Knives and other utensils with sharp points must be placed with the points downwards in the cutlery basket*28 or horizontally on the knife shelf* or in the cutlery drawer*21.
- Do not lean or sit on the open door.
- In the case of free-standing appliances, ensure that the baskets are not overloaded. The appliance could tip.
- If the appliance is not in a cavity and a side panel is accessible, the door hinge area must be covered at the side for reasons of safety (risk of injury). The covers are available as optional accessories from customer service or specialist outlets.
* depending on the features of your dishwasher
⚠ Warning – Risk of explosion!
Do not add any solvents to the rinsing compartment. Danger of explosion!
⚠ Warning – Risk of scalding!
Open the door carefully when the programme is still running. There is a risk of hot water spraying out of the appliance.
Warning - Risk to children!
• If fitted, use the childproof lock.
- Do not allow children to play with or operate the appliance.
- Keep children away from detergents and rinse aid. These may cause chemical burns in the mouth, throat and eyes or asphyxiation.
- Keep children away from open dishwasher. There may be small parts in the dishwasher which children could swallow and the water inside the dishwasher is not drinking water as it may contain detergent residue.
- Ensure that children do not place fingers in the tablet collecting tray 24. Small fingers could become caught in the slots.
- When opening and closing the door on an eye-level appliance, ensure that children do not become jammed or crushed between the appliance door and the cupboard door below.
- Children could become locked in the appliance (danger of suffocation) or get into another dangerous situation.
Redundant appliances: Pull out the mains plug, sever and dispose of the power cord. Destroy the door lock so that the door can no longer be closed.
Childproof lock (door lock) \*
The child-proof lock (door lock) protects children from potential hazards which the dishwasher poses.
Warning – Risk of suffocation!
Children may become locked in the dishwasher and suffocate. Always completely close the appliance door when leaving the dishwasher.
Activate the child-proof lock (door lock) as follows:
-
Pull the catch of the child-proof lock towards yourself (1).
-
Close the door (2).
The child-proof lock is activated.
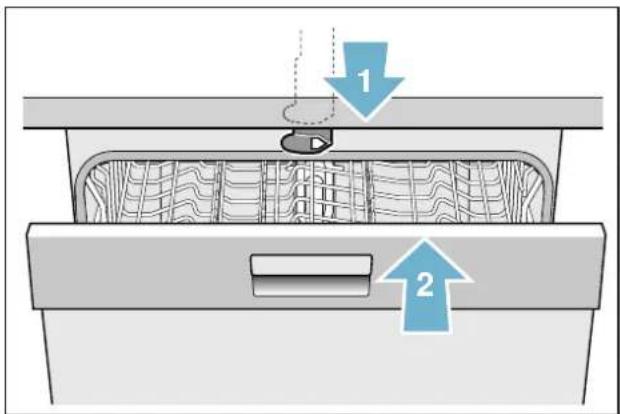
text_image
Diagram showing a device with labeled parts and directional arrows, likely illustrating a process or assembly.Open the door with activated child-proof lock (door lock) as follows:
- Press the catch of the child-proof lock to the right (1).
2.Open the door (2).
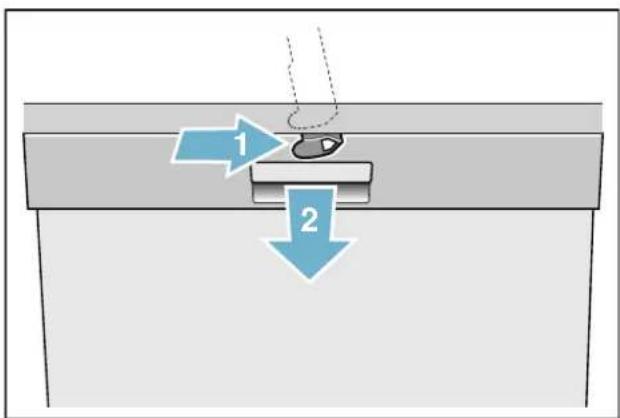
text_image
Diagram showing two blue arrows labeled 1 and 2 pointing to a mechanical component or assembly, with dashed lines indicating motion or force.Deactivate the child-proof lock (door lock) as follows:
- Press the catch of the child-proof lock to the right (1).
- Press the catch of the child-proof lock backwards (2).
The childproof lock is deactivated.
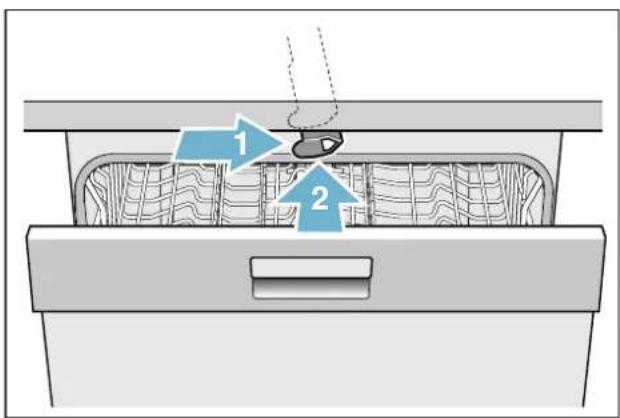
text_image
Diagram showing a device with labeled parts, including component 1 and component 2 in a container.* depending on the features of your dishwasher
Environmental protection
Both the packaging of new appliances and the old appliances themselves contain valuable raw materials and recyclable materials.
Please dispose of the individual parts separated according to type.
Please ask your dealer or inquire at your local authority about current means of disposal.
Packaging
All plastic parts of the appliance are identified with internationally standardised abbreviations (e.g. PS polystyrene). Therefore, plastic waste can be sorted out when the appliance is being disposed of.
Please follow the safety instructions under "Delivery" → Page 5.
Old appliances
Please follow the safety instructions under "Disposal of your appliance" → Page 7.

This appliance has been identified in accordance with the European Directive 2012/19/EU on Waste Electrical and Electronic Equipment (WEEE). The directive provides a framework for the collection and recycling of old appliances, which is valid across the EU.
Getting to know your appliance
Diagrams of the control panel and the interior of the appliance can be found at the front of the manual. Individual positions are referred to in the text.
Eco drying
Your dishwasher features the Eco drying function. If you have selected the Eco 50° programme, the door opens automatically when the programme ends. You can switch Eco drying on or off.
Control panel
1 On/off switch
2 Programme buttons **
3 Info button i
4 Display window at top
5 Rinse aid refill indicator
6 Salt refill indicator
7 WLAN display
8 Selection buttons
9 Time preselection
10 Remote start button
11 Additional functions/programme buttons **
12 START button
13 Front display *
14 Door opener
15 Remote start display *
16 < > button
* depending on the features of your dishwasher
** number depending on the features of your dishwasher
Appliance interior
20 Interior light *
21 Cutlery drawer *
22 Top basket
23 Upper spray arm
24 Tablet collecting tray
25 Lower spray arm
26 Dispenser for special salt
27 Filters
28 Cutlery basket *
29 Bottom basket
30 Dispenser for rinse aid
31 Detergent dispenser
32 Lock for detergent dispenser
33 Rating plate
* depending on the features of your dishwasher
Info button i Setup 3 sec.
The Info button i can be used to display additional programme information.
-
Press the Info button i 3.
-
Press the programme button.
Information on the selected programme is indicated on the display window at the top 4.
- To leave, press Info button i 3.
Time setting
When the appliance is switched on the for the first time, the time starts at 12:00 o'clock.
Set the time as follows:
- Open the door.
2.Switch on ON/OFF switch 1.
- Press Info button ⓘ 3 for 3 seconds until the following text is indicated on the display window at the top 4:
Scroll with <>
Set with - +
Leave with Setup 3 sec.
-
Keep pressing button > 16 until the time setting is indicated on the display window at the top 4.
-
Make the setting with setting buttons + - 8. If the selection buttons + - 8 are held down, the set values are changed in 10-minute steps.
-
Press and hold the Info button i 3 for 3 seconds.
The chosen setting has now been stored.
Note: If the appliance was disconnected from the power supply for a prolonged period, the time starts at 12:00 o'clock. Set the time.
Switching on the appliance for the first time
When the dishwasher is switched on for the first time, you are taken directly to the settings for switching on the appliance for the first time. The following text is indicated on the display window at the top 4:
Scroll with <>
Set with - +
Leave with Setup 3 sec.
The required settings for switching on the appliance for the first time are listed in the table below.
Change the setting as follows:
- Keep pressing button > 16 until the required setting is displayed.
- Make the setting with setting buttons + - 8.
- Press and hold the Info button 3 for 3 seconds.
The chosen setting has now been stored.
| Settings | Factory setting Infotext |
| Switching on the appliance for the first time | by pressing Info button i |
| Language Deutsch Language selection. | |
| Time format 24h 12h or 24h. | |
| Time setting 12:00 Set the current time. | |
| Water hardness °E 16 - 20 medium Setting water hardness. When using Multitabs, select the lowest setting. | |
| Rinse aid disp. Setting 5 Amount of rinse aid affects drying. When using Multitabs, select setting 0. | |
| Water connection * Cold water Connection to hot water (40-60°C) or cold water (<40°C) possible. | |
| * depending on the features of your dishwasher | |
Settings
The dishwasher has been preset with certain settings for your convenience. You can change this factory setting.
Change the setting as follows:
-
Open the door.
-
Switch on ON/OFF switch 1.
-
Press Info button 1 for 3 seconds until the following text is indicated on the display window at the top 4:
Scroll with < >
Set with - +
Leave with Setup 3 sec.
- Keep pressing button > 16 until the required setting is displayed.
- Make the setting with setting buttons + - 8.
- Press and hold the Info button i 3 for 3 seconds.
The chosen setting has now been stored.
You have the option of resetting all changed settings back to the original factory settings.
Note: When you reset your dishwasher to the factory settings, you are taken directly to the settings for switching on the appliance for the first time.
| Setting Factory setting Infotext | by pressing Info button i | |
| Time setting 12:00 Set the current time. | ||
| Time format 24h 12h or 24h. | ||
| Time display Time Show end of programme with display "Finish in" or "Finish at". | ||
| Language Deutsch Language selection. | ||
| Water hardness °E 16 - 20 medium Setting water hardness. When using Multitabs, select the lowest setting. | ||
| Rinse aid disp. Level 5 | Amount of rinse aid affects drying. When using Multitabs, select setting 0. | |
| Sensor setting | Standard | Adjustment of soiling detection for optimum cleaning result. |
| Extra dry | Off | Improved drying for glasses and plasticware. |
| Water connection * | Cold water | Connection to hot water (40-60°C) or cold water (<40°C) possible. |
| Eco forecast | Off | Show the water and energy consumption. |
| Auto Power Off | after 1 min. | Appliance automatically switches off at end of rinsing process. |
| Emotion Light * | On | Interior light. |
| Front display * | On | The front display can be selected. |
| Remaining time proj. * | On | While programme is running, status information is projected onto floor. |
| Infolight * | On | Light is projected to signal an active cleaning cycle. |
| * depending on the features of your dishwasher | ||
| Setting | Factory setting | Infotext by pressing Info button i |
| Start programme Eco 50°C When switching on, the last selected | programme appears. | |
| Tone volume * Level 2 Volume of signal at end of programme. | ||
| Button volume Level 2 Volume when using buttons. | ||
| Child-proof lock * Off Activated child-proof lock impedes opening | of door. | |
| WLAN Off Switch wireless network connection on/off. | ||
| Network login Manual/Automatic Test WPS function on router. | No WPS function: ManualWPS function: Automatic | |
| Connect to App Start with + Connect dom. appliance to mobile terminal | device. | |
| Energy manager * | Connect with + | Connect dom. appliance to energy manager of home system. |
| Eco drying * | On | Door opens automatically at the end of the programme. |
| Greeting | On | When switching on the appliance, the brand logo can be deselected. |
| Factory setting | Reset | Resetting to the factory setting. |
| * depending on the features of your dishwasher | ||
Notes
- The "Network login" menu option is not available unless Wi-Fi has been switched on.
- The "Connect to App" menu option is not available unless there is a connection to the home network.
- The "Energy manager" * menu option is not available unless there is a connection to the home network and the appliance is connected to the app.
Home Connect
The availability of the Home Connect function depends on the availability of Home Connect services in your country. Home Connect services are not available in every country. You can find more information here at www.home-connect.com.
This dishwasher is Wi-Fi capable and can be remotely controlled via a mobile device.
Note: Wi-Fi is a registered trade mark of the Wi-Fi Alliance.
If your dishwasher does not connect to the home network, you can also operate the dishwasher manually by pressing the buttons.
Setting up the App
To be able to operate the appliance via Home Connect, the Home Connect App must be installed on your mobile terminal device.
Observe the supplied Home Connect documents.
Follow the steps specified by the App to make the settings.
Setting up Home Connect
You can set your dishwasher by pressing the remote start button 📞10 or proceed as follows:
- Open the door.
2.Switch on ON/OFF switch 1. - Press the Info button 3 for 3 seconds until the following text is indicated on the display window at the top 4:
Scroll with < > Set with - + Leave with Setup 3 sec. - Keep pressing the button > 16 until the required setting is indicated on the display window at the top 4.
- Make the setting with + - 8 setting buttons.
- Press the Info button i 3 for 3 seconds.
The selected setting has now been stored in your dishwasher.
WLAN

In the WLAN menu you can activate the wireless network connection with "on" and deactivate it with "off".
Note: Remote control of the appliance requires a stable wireless network connection.
Network login
In the "Network login" menu you can select between "Automatic/WPS" and "Manual" to connect the dishwasher to your home network. To do this, test the WPS function on your router.
Observe the Home Connect documents supplied.
Automatic: Connect to the home network using the WPS function of your router. During connection press the WPS button on the router.
Manual: Connect your mobile device to the network (SSID) "HomeConnect", password (Key): "HomeConnect". The network settings are then manually entered using the Home Connect app to connect to your home network.
Following successful connection, the following text is indicated on the display window at the top 4: "Network login successful".
Note: The "Network login" menu item is not available unless you have activated WLAN.
Connect to app
The “Connect to app” setting establishes the link between the dishwasher, the app and your user account. To start connection, press the setting button + 8.
Following successful connection, the following text is indicated on the display window at the top 4: "Connection to app successful".
Observe the Home Connect documents supplied.
Note: The "Connect to app" menu option is not available unless there is a connection to the home network.
About data protection:
When your Home Connect dishwasher is connected for the first time to a WLAN network, which is connected to the Internet, your Home Connect dishwasher transmits the following categories of data to the Home Connect server (initial registration):
- Unique appliance identification (consisting of appliance codes as well as the MAC address of the installed Wi-Fi communication module).
- Security certificate of the Wi-Fi communication module (to ensure a secure IT connection).
- The current software and hardware version of your dishwasher.
- Status of any previous resetting to factory settings.
This initial registration prepares the Home Connect functions for use and is activated the first time you use these Home Connect functions. Please ensure that the Home Connect functions can be used only in conjunction with the Home Connect App. Information on data protection can be accessed in the Home Connect app.
Remote start button

If the dishwasher is connected to the home network, you can activate the dishwasher's remote control. To do this, press the remote start button ⓤ 10.
If the dishwasher has still not logged into Home Connect, access the Home Connect settings by pressing the remote start button 📞 10.
Observe the Home Connect documents supplied.
Notes
- To remotely control the dishwasher, the remote start button ⓤ 10 must be activated.
- The remote start button 📞 10 goes out when the login process is complete.
- Opening the door deactivates remote control.
- If the display WLAN 7 is flashing, there is no network connection.
WLAN without a connection to the Home Connect server
You can use the Home Connect app to disconnect from the Home Connect server. The dishwasher is then locally connected to your mobile device without however any connection to the Home Connect server.
Notes
- If there is no connection to the Home Connect server, this is displayed in the app.
- If you did not deactivate the connection to the Home Connect server, check your Internet connection.
Energy manager
With the energy manager ⚙, your dishwasher automatically starts during a time period you select with the cheapest power supply offered at the time by your alternative energy source (for example, photovoltaic system).
If the energy manager ⚙ is unable to start the dishwasher remotely (for example, due to insufficient supply of power from the photovoltaic system), it will start the dishwasher at the latest time possible using a conventional power supply.
Note: The "Energy manager" menu option is not available unless there is a connection to the home network and the dishwasher is connected to the app.
Setting up energy manager 📋:
To start connection, press the setting button + 8 in the "Energy manager" menu.
Connect your dishwasher to the energy manager of the home system within the next 2 minutes. Also activate connection on the energy manager of your home system.(Observe the instruction manual of your energy manager manufacturer.)
Following successful connection, the following text is indicated on the display window at the top 4: "Energy management login successful".
If connection is unsuccessful, repeat the process.
Further information and system requirements for using the energy manager can be found at www.home-connect.com.
Activating energy manager 🔊:
To start the energy manager ⚙️, you must select time preselection 9 (time period) and activate the remote start button ⚗; 10.
Once you have activated the remote start button 📞 10, you can use the Home Connect app to perform time preselection 9.
You can also activate the energy manager 📋 manually using the buttons on the dishwasher:
- Open the door.
- Switch on ON/OFF switch 1.
- Select programme 2.
- Press time preselection button 9.
- Keep pressing the setting buttons + - 8 until the time period displayed corresponds to your requirements.
- Press START button 12.
This activates time preselection.
- Activate the remote start button 📞 10.
Following successful activation, "Flex" is indicated on the display window at the top 4. The energy manager now has access to the dishwasher and can start it during the time period selected.
Notes
- Where the energy manager ⚙️ starts the programme earlier, the time display “Finish in” / “Finish at” will be updated.
- To activate the energy manager ⚙, you must have set it up beforehand.
Deactivating energy manager 🔊:
To disconnect, press the setting button + 8 in the "Energy manager" menu.
The energy manager is deactivated at the end of this process. A new energy manager can now be connected.
Note: The setting "Disconnect with +" is available only when the dishwasher is connected to the energy manager of the home system.
Software update \*
You can update your dishwasher software using the software update function (for example optimisation, troubleshooting, safety-relevant updates). The prerequisites are that you are a registered Home Connect user, have installed the app on your mobile device and are connected to the Home Connect server.
As soon as a software update is available, you will be informed via the Home Connect app and will be able to start downloading the software update using the app. The following text is indicated on the display window at the top 4: "Install software update?".
You can opt to install it on your dishwasher using the setting button + 8 or do this later on. If you are within your local network, you can also start installation using the Home Connect app.
Following successful installation, the following text is indicated on the display window at the top 4: "Installation finished".
Notes
- You can continue to operate your dishwasher when downloading the software update.
- During installation you cannot operate your dishwasher.
- Installation may take a few minutes. Some buttons flash during this process.
- Depending on the personal settings in the app, a software update can also be set to download automatically.
- We recommend that you install security updates as soon as possible.
* depending on the features of your dishwasher
Remote diagnosis

Customer service can use remote diagnosis ⚙ to access your appliance if you contact them. The following text is indicated on the display window at the top 4: "Allow customer service?". You can confirm customer service access using the setting button + 8 or refuse using the setting button - 8.
Note: You can switch off remote diagnosis 📋 using the ON/OFF switch 1 or deactivate customer service access in the Home Connect app.
Declaration of Conformity CE
Gaggenau Hausgeräte GmbH hereby declares that the appliance which features Home Connect is in accordance with the basic requirements and the other relevant provisions of the directive 2014/53/EU.
A detailed RED Declaration of Conformity can be found online at www.gaggenau.com on the product page for appliance in the additional documents.
2.4 GHz band: max. 100 mW
5 GHz band: max. 100 mW

BE BG CZ DK DE EE IE EL
ES FR HR IT CY LV LT LU
HU MT NL AT PL PT RO SI
SK FI SE UK NO CH TR
5 GHz Wi-Fi: for indoor use only
Water softening system / special salt
To ensure good rinsing results, the dishwasher requires soft water, i.e. water which is low in lime, otherwise limescale will be deposited on the utensils and interior container. Tap water above 7^ dH (1.2 mmol/l) must be softened. The water is softened with special salt (regeneration salt) in the water softening system of the dishwasher. The setting and therefore the required amount of salt depends on the degree of hardness of your tap water (see following water hardness table).
Water hardness table
| Water hardness value °E | Hardness range | mmol/l | Set value on the machine |
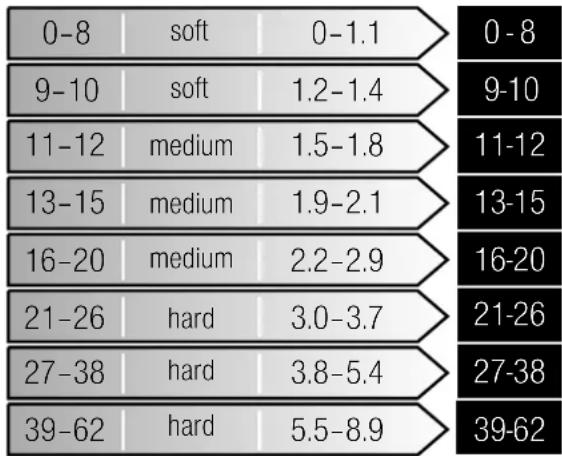 | |||
Adjusting the water softening system
The amount of salt dispensed can be set from 0 to 62°E. Salt is not required at the set value 0-8.
Set the softening system as follows:
- Ask your local water utility company for the water hardness value of the tap water.
- Required setting can be found in the water hardness table.
- Open the door.
- Switch on ON/OFF switch 1.
- Press Info button 3 for 3 seconds until the following text is indicated on the display window at the top 4:
Scroll with <>
Set with - +
Leave with Setup 3 sec.
- Keep pressing button > 16 until the water hardness is indicated on the display window at the top 4.
- Make the setting with setting buttons + - 8.
- Press and hold the Info button i for 3 seconds.
The chosen setting has now been stored.
Using special salt
As soon as the low salt indicator 6 is lit on the control panel or is requested on the front display * 13, salt should be topped up. Always refill with special salt immediately before switching on the appliance. This ensures that overrun special salt solution is immediately washed out and does not corrode the rinsing tank.
Caution!
Detergent will destroy the water softening system! Never pour detergent into the salt dispenser.
Top up the salt as follows:
-
Undo the screw plug on the dispenser 26.
-
Fill the dispenser with water (required only when switching on the appliance for the first time).
-
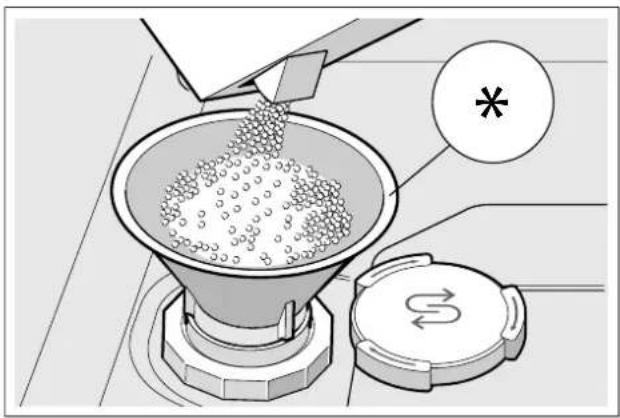
Add salt as illustrated (do not use table salt or tablets).
The water is displaced and runs out.
natural_image
Illustration of a cooking process with a funnel pouring granular material into a pan, and a lid showing a wavy arrow (no text or symbols)* depending on the features of your dishwasher
Using detergents with salt component
If combined detergents with a salt component are used, special salt can usually be omitted up to a water hardness of 21^ dH ( 37^ fH, 26^ Clarke, 3.7 mmol/l). If the water hardness is over 21^ dH, salt must be used.
Switching off low salt indicator / water softening system
If the use of combined detergents with a salt component impairs the low salt indicator 6 on the control panel or the text on the display window at the top 4 (enough salt for x rinse cycles), the displays can be switched off.
Proceed as described under "Setting water softening system" and set the value to 0-8. The water softening system and salt refill indicator are now switched off.
Rinse aid
As soon as the low rinse-aid indicator 5 is lit on the control panel or is requested on the front display * 13, rinse-aid should be topped up. The rinse aid is required for stain-free utensils and clear glasses. Use only rinse aid for domestic dishwashers. Combined detergents with rinse-aid component may be used up to a water hardness of 21^ dH (37° fH, 26° Clarke, 3.7 mmol/l) only. If the water hardness is over 21^ dH, rinse-aid must be used.
* depending on the features of your dishwasher
Top up the rinse-aid as follows:
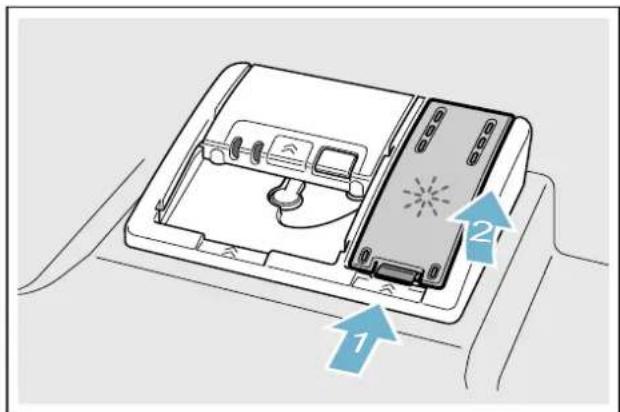
- Open dispenser 30; press lug on the lid (1) and lift (2).
text_image
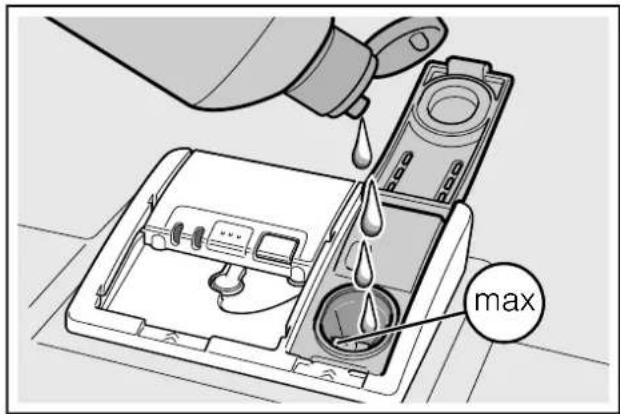
Diagram of a device with labeled parts, showing components and directional arrows- Add rinse-aid up to the max. mark.
text_image
max- Close the lid.
Lid "clicks" into position.
- Remove overflowed rinse aid with a cloth.
This prevents excessive frothing during the next rinse cycle.
Setting amount of rinse aid
The amount of rinse aid to be dispensed can be set from 0 to 6. Set the amount of rinse aid to be dispensed to 5 to obtain a very good drying result. Do not change the amount of rinse aid unless there are streaks or water stains on the utensils. Set a lower level to avoid streaks. Set a higher level to avoid water stains.
Set the amount of rinse aid as follows:
- Open the door.
2.Switch on ON/OFF switch 1.
- Press Info button 1 3 for 3 seconds until the following text is indicated on the display window at the top 4:
Scroll with <>
Set with - +
Leave with Setup 3 sec.
- Keep pressing button > 16 until the rinse aid dispenser is indicated on the display window at the top 4.
- Make the setting with setting buttons + - 8.
- Press and hold the Info button 3 for 3 seconds.
The chosen setting has now been stored.
Switching off rinse aid refill indicator
If the use of combined detergents with a rinse-aid component impairs the low rinse-aid indicator 5 on the control panel or the text on the front display * 13 (enough rinse aid for x rinse cycles), the displays can be switched off.
Proceed as described under "Setting amount of rinse aid" and select setting 0.
* depending on the features of your dishwasher
Utensils
Not suitable
• Cutlery and utensils made of wood.
- Delicate decorative glasses, craft and antique utensils. These decors are not dishwasher-proof.
- Plastic parts not resistant to heat.
• Copper and tin utensils.
- Utensils which are soiled with ash, wax, lubricating grease or ink.
Aluminium and silver parts have a tendency to discolour and fade during the wash cycle. Even some types of glass (e.g. crystal glass objects) may turn cloudy after many wash cycles.
Glass and utensil damage
Causes:
• Glass type and glass production process.
• Chemical composition of the detergent.
• Water temperature of the wash programme.
Recommendation:
- Use only glasses and porcelain which the manufacturer designates as dishwasher-proof.
- Use a detergent which protects utensils.
• Take glass and cutlery out of the dishwasher as soon as possible after the programme ends.
Loading the dishwasher
- Remove large food remnants. It is not necessary to prerinse utensils under running water.
-
Place the utensils so that
-
they are secure and cannot tip over.
- all utensils with their openings face down.
- parts with curves or indentations are at an angle, thereby allowing water to drain.
- does not obstruct rotation of the two spray arms 23 and 25.
Very small utensils should not be washed in the machine, as they may fall out of the baskets.
Upper basket
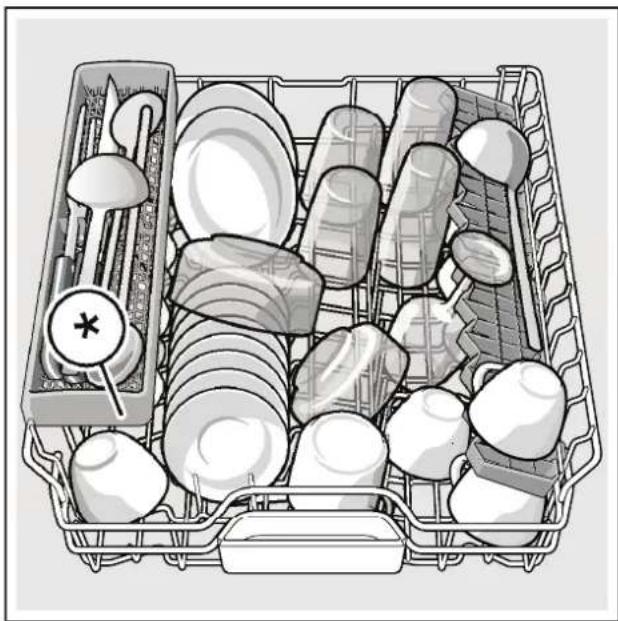
Arrange cups and glasses in the upper basket 22.
natural_image
Illustration of a multi-tiered kitchen appliance basket with cutlery and utensils (no text or symbols)* depending on the features of your dishwasher
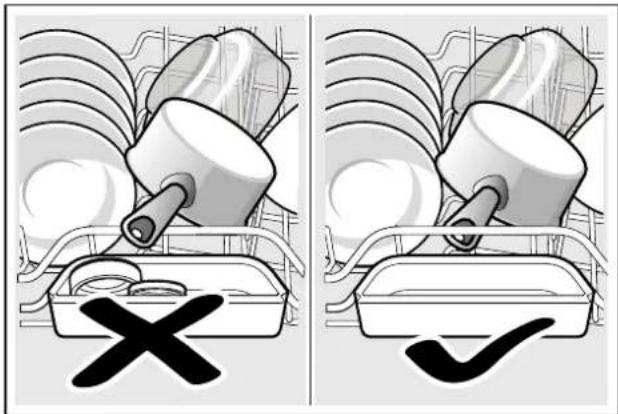
Note: Utensils must not be placed above the tablet collecting tray 24. These may block the lid of the detergent dispenser and prevent it from opening fully.
natural_image
Two-panel illustration showing a container with a cross mark and a tray holding a pencil, both without any text or symbols.Lower basket
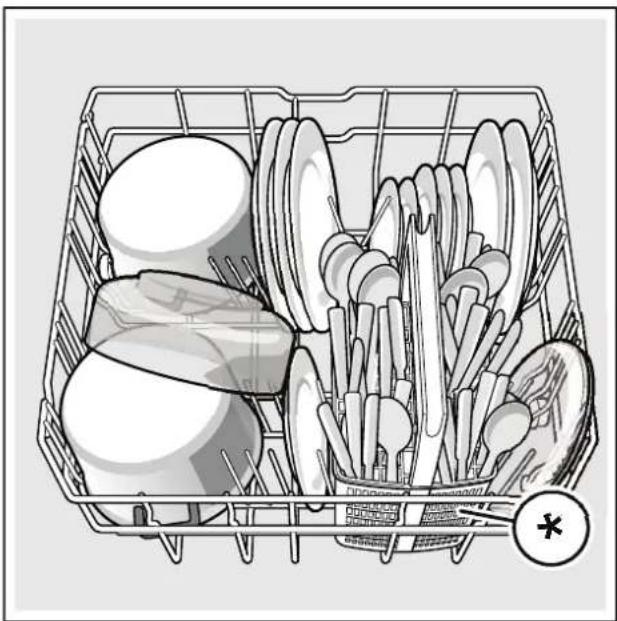
Arrange pots and plates in the lower basket 29.
natural_image
Illustration of a shopping basket filled with various kitchen utensils (no text or symbols)* depending on the features of your dishwasher
Tip: Heavily soiled utensils (pans) should be placed in the lower basket. The more powerful spray jet provides a better dishwashing result.
Tip: Other examples, such as the best way of loading your dishwasher, can be found on our homepage. These can be downloaded free of charge. The corresponding Internet address can be found on the back page of these instructions for use.
Cutlery basket \*
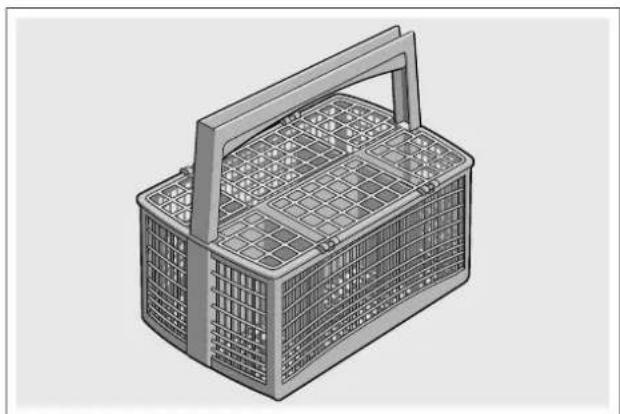
Place cutlery, always unsorted with the tips face down, in the cutlery basket *.
To prevent injuries, place long, pointed implements and knives on the knife shelf *.
natural_image
3D rendering of a wire basket with handle and grid pattern (no text or symbols)* depending on the features of your dishwasher
Cutlery drawer \*
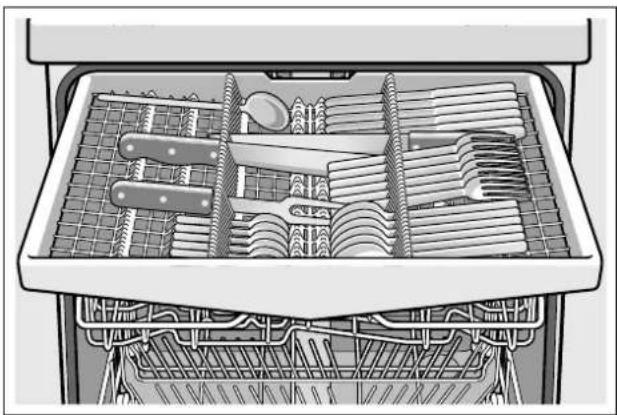
Arrange the cutlery in the cutlery drawer 21 as illustrated. Separately arranged utensils are easier to remove after washing.
You can take out the cutlery drawer.
natural_image
Interior view of a kitchen appliance drawer with open compartments containing cutlery and utensils (no text or symbols visible)Depending on the features of your dishwasher, you can fold down the side shelves to provide more room for taller items of cutlery. The front rows of prongs can be folded down to provide room for wider handles.
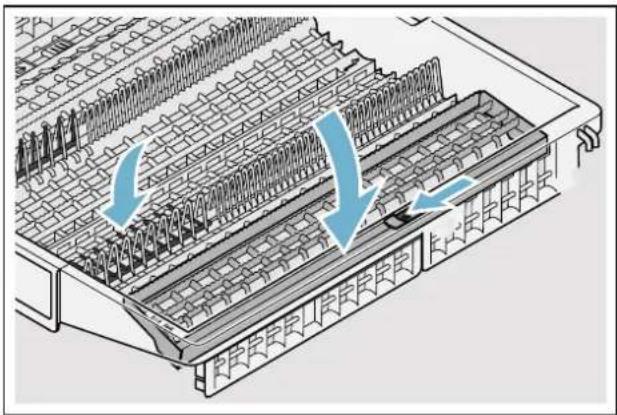
natural_image
Technical diagram of a mechanical assembly with internal grid structure and directional arrows (no text or symbols)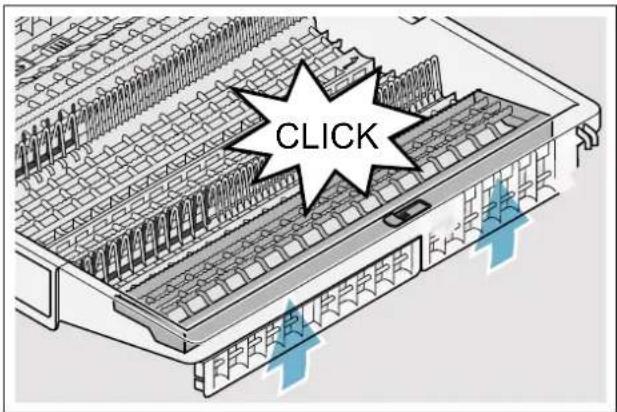
text_image
CLICK* depending on the features of your dishwasher
Etagere \*
The etagere and the space underneath can be used for small cups and glasses or for larger items of cutlery, such as wooden spoons or serving cutlery. If you do not require the etagere, it can be folded up.
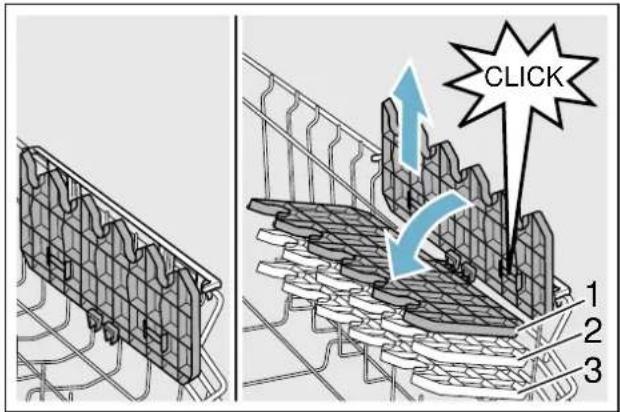
text_image
CLICK 1 2 3* Depending on the features of your dishwasher, you can adjust the etagere 3 times the height.
Adjust the height of the etagere as follows:
-
Position the etagere vertically and pull upwards.
-
Push etagere at a slight angle downwards to the required height (1, 2, or 3).
3.Engage etagere.
Etagere "clicks" into position.
Folding spikes \*
* Depending on the features of your dishwasher, the spikes can be folded down. This facilitates arrangement of pots, bowls and glasses.
Fold down the spikes as follows:
- Press lever forwards (1).
2.Fold down spikes (2).
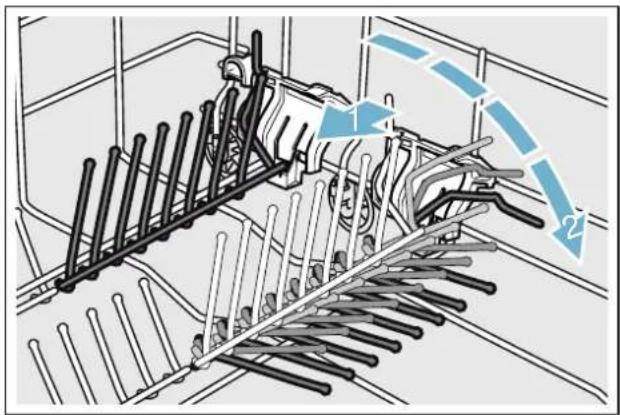
natural_image
Technical diagram of a mechanical assembly with rods and gears, showing motion indicators (no text or symbols)Small items holder \*
* Depending on the features of your dishwasher, the upper basket is fitted with small items holders. The small items holders can be used to securely attach light plastic parts.
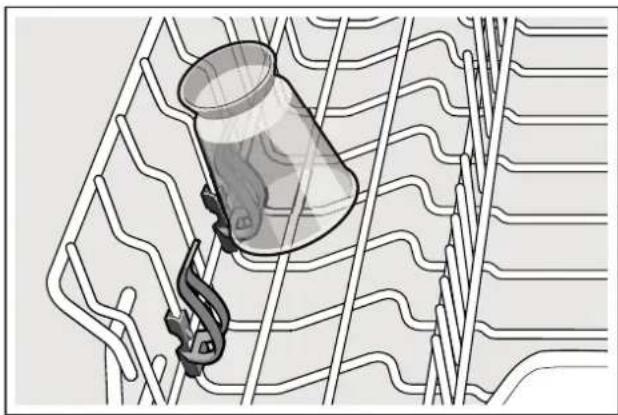
natural_image
Diagram of a container being lifted by a hook into a grid-patterned structure (no text or symbols)Knife rack \*
* Depending on the features of your dishwasher, the upper basket is fitted with a knife shelf. Long knives and other utensils can be placed in the knife shelf.
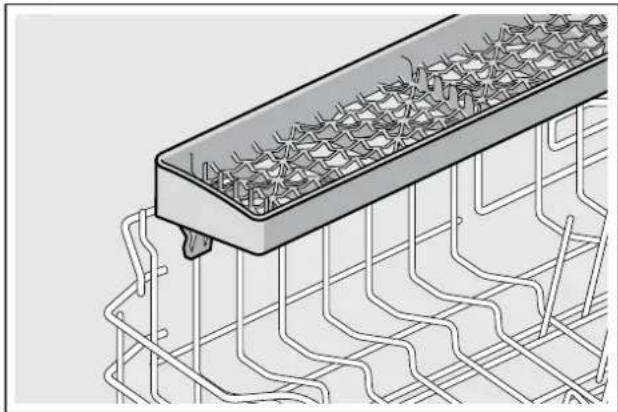
natural_image
Technical line drawing of a microchip or connector assembly with internal wiring (no text or symbols)Baking sheet spray head \*
* depending on the features of your dishwasher
Large trays or grilles as well as large plates (gourmet plates, pasta plates, dinner plates) can be cleaned with this spray head.
Insert the spray head as follows:
-
Remove → "Removing/installing upper basket" on page 26 upper basket [22].
-
Insert spray head as illustrated and turn to the right. Spray head is engaged.
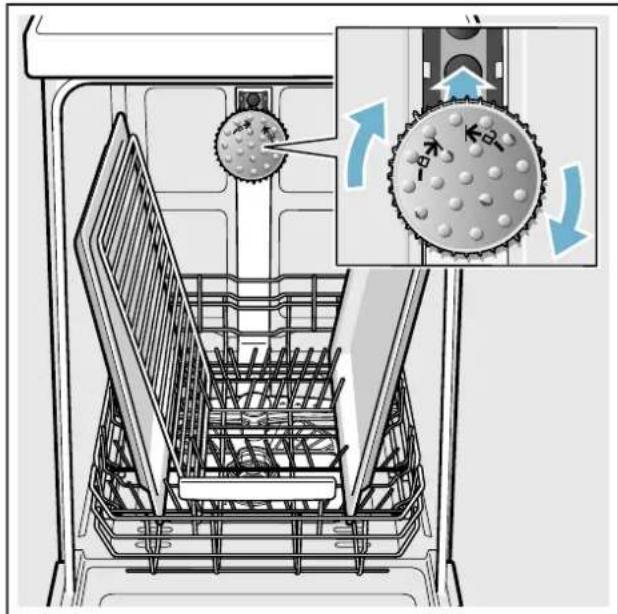
text_image
Diagram illustrating a cleaning or cleaning process with labeled components and directional arrows indicating movement or flow.To ensure that the spray jet can reach all parts, arrange the baking sheets as illustrated (max. 2 baking sheets and 2 grilles).
Note: Ensure that the dishwasher is always operated with upper basket 22 or baking tray spray head.
Gastronorm insert \*
Helps you stack several Gastronorm drawers, trays or similar large flat utensils at an angle in the bottom basket.
You can remove the insert if required.
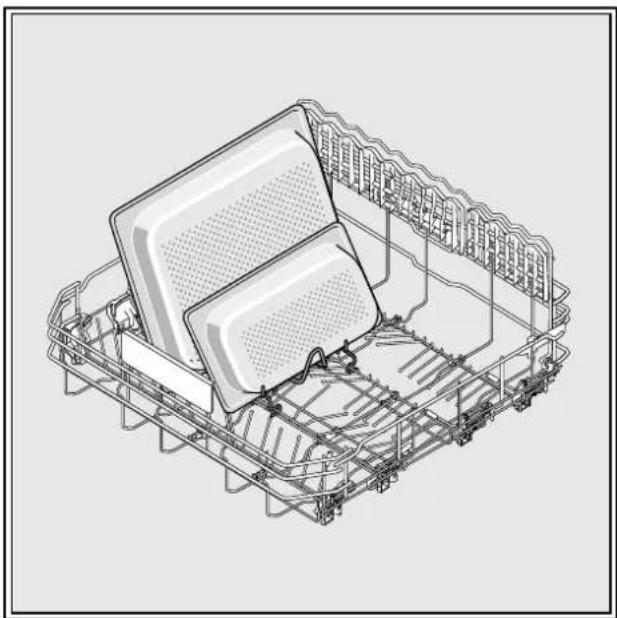
natural_image
Isometric line drawing of a mechanical device with internal components and structural framework (no text or symbols)* depending on the features of your dishwasher
Unloading the dishwasher
To prevent water from dripping off the upper basket onto the utensils in the lower basket, it is recommended to empty the appliance from the bottom up.
Tip: Hot utensils are sensitive to shock! Therefore, when the programme ends, leave the utensils to cool down in the dishwasher until they can be handled.
Note: When the programme ends, water droplets can still be seen inside the appliance. This does not affect the drying of the utensils.
Adjusting the height of the basket \*
* depending on the features of your dishwasher
If required, the height of the upper basket 22 can be adjusted to create more space for taller utensils either in the upper or lower basket.
Appliance height 81.5 cm
| With cutlery basket Upper | Lower | |
| basket | basket | |
| Setting 1 max. ø 22 cm 31 cm | ||
| Setting 2 max. ø 24.5 cm 27.5 cm | ||
| Setting 3 max. ø 27 cm 25 cm | ||
| With cutlery drawer Upper | Lower | |
| basket | basket | |
| Setting 1 max. ø 16 cm 31 cm | ||
| Setting 2 max. ø 18.5 cm 27.5 cm | ||
| Setting 3 max. ø 21 cm 25 cm | ||
Appliance height 86.5 cm
| With cutlery basket Upper | Lower | |
| basket | basket | |
| Setting 1 max. ø 24 cm 34 cm | ||
| Setting 2 max. ø 26.5 cm 30.5 cm | ||
| Setting 3 max. ø 29 cm 28 cm | ||
| With cutlery drawer Upper | Lower | |
| basket | basket | |
| Setting 1 max. ø 18 cm 34 cm | ||
| Setting 2 max. ø 20.5 cm 30.5 cm | ||
| Setting 3 max. ø 23 cm 28 cm | ||
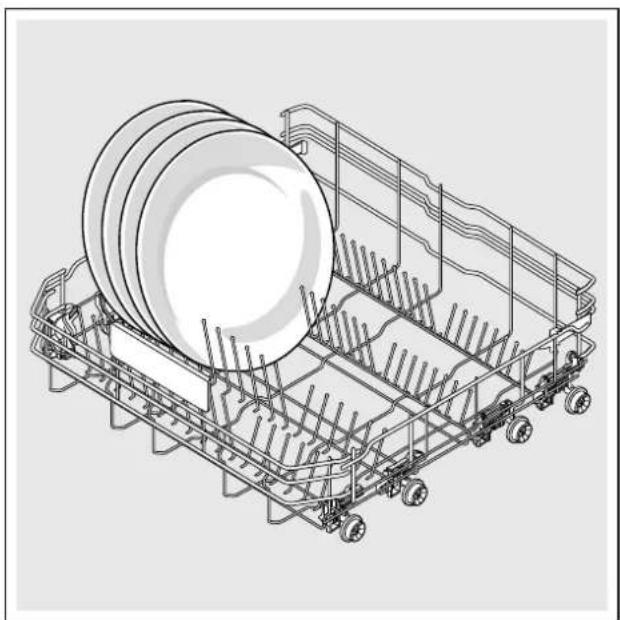
Arrange large plates up to a diameter of 31/34* cm in the lower basket 29 as illustrated.
natural_image
Technical line drawing of a multi-wheeled storage tray with rollers and metal frame (no text or symbols)* depending on the features of your dishwasher
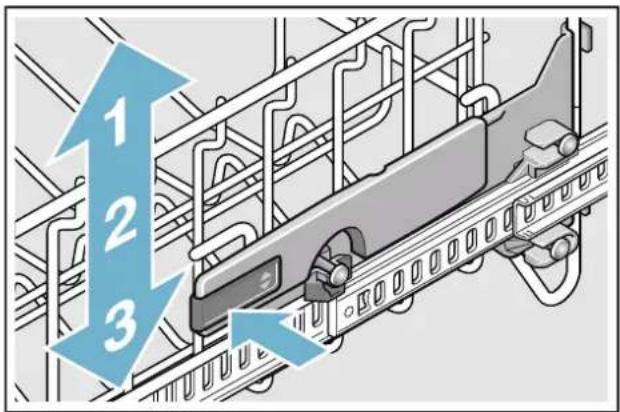
Upper basket with side levers
- Pull out upper basket 22.
2.Hold the sides of the basket along the upper edge. This prevents it from suddenly dropping. - To lower the upper basket; press in both levers on the left and right on the outside of the basket. The upper basket lowers.
text_image
1 2 3- To lift the upper basket; grip the sides of the upper basket along the upper edge and lift.
- Ensure that both sides of the upper basket are at the same height.
6.Push in upper basket.
Removing/installing cutlery drawer

natural_image
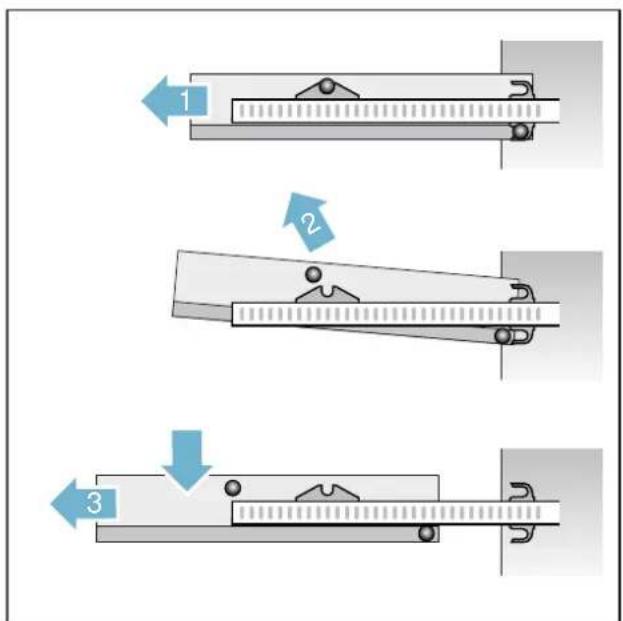
Diagram of a kitchen appliance showing internal components and a blue arrow indicating a flow or movement (no text or symbols present)Removing cutlery drawer 21:
- Pull out cutlery drawer all the way (1).
- Lift front of the cutlery drawer out of the catch (2).
- Pull out cutlery drawer forwards and lower (3).
text_image
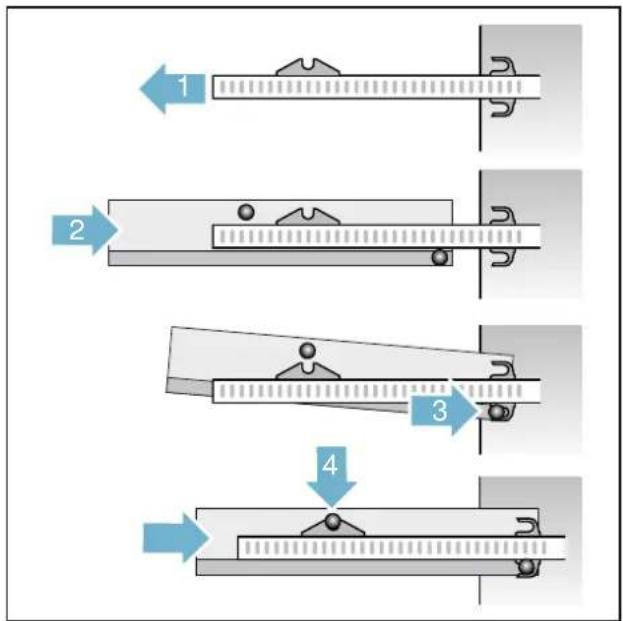
Diagram illustrating three sequential mechanical or electrical process steps with labeled arrows 1, 2, and 3 indicating sequence.Installing cutlery drawer 21:
- Pull out cutlery drawer rails all the way (1).
- Insert cutlery drawer (2). In doing so, note the position of the detent pins (as illustrated in Step 2).
- Lift cutlery drawer slightly and insert rear detent pins into the lower locking hooks on the rails (3).
- Lower cutlery drawer and press the front detent pins into the notch (4). Cutlery drawer "clicks" into position.
5.Push in cutlery drawer.
flowchart
graph TD
    A["Step 1: Sliding on horizontal bar"] --> B["Step 2: Rotation on horizontal bar"]
    B --> C["Step 3: Pulling on horizontal bar"]
    C --> D["Step 4: Cut off horizontal bar"]
Removing/installing upper basket
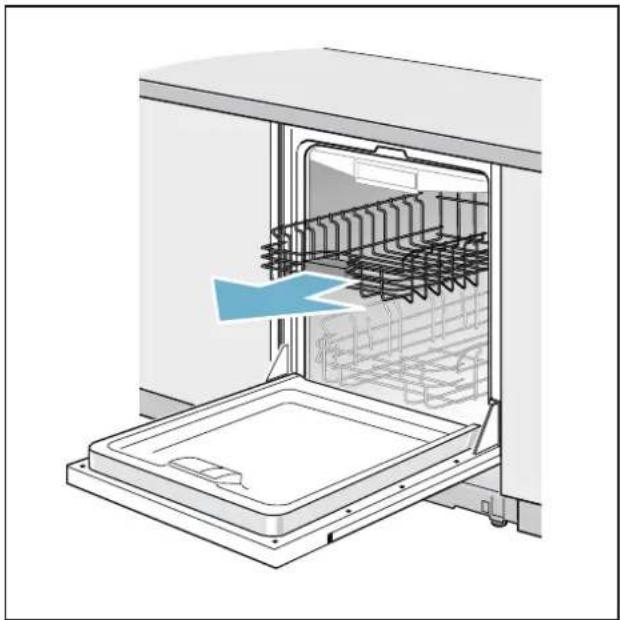
natural_image
Diagram of a kitchen appliance showing internal components and a blue arrow indicating a flow or movement (no text or symbols present)Removing upper basket 22:
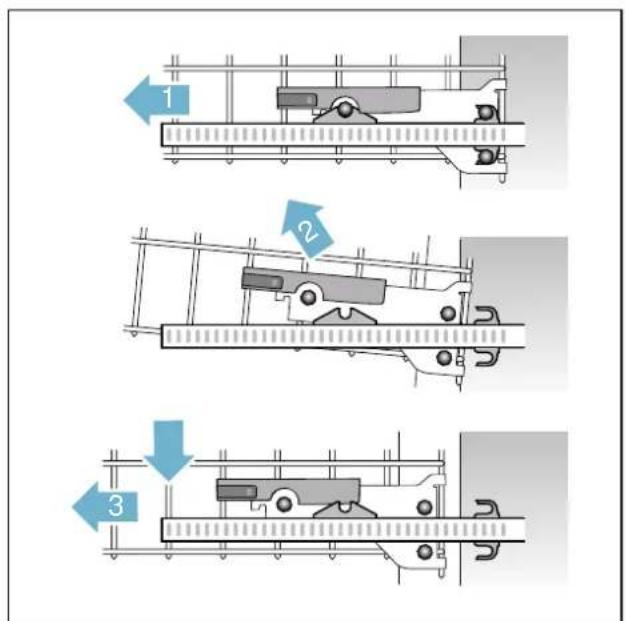
- Pull out upper basket all the way (1).
- Lift front of the upper basket out of the catch (2).
- Pull out upper basket forwards and lower (3).
text_image
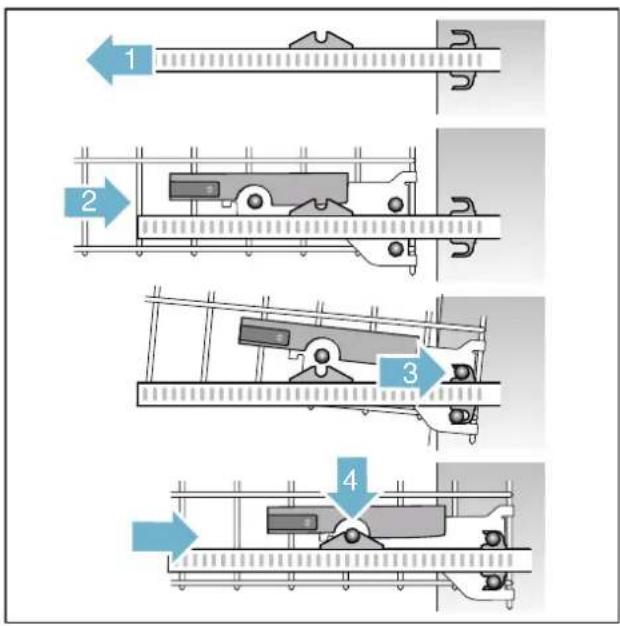
1 2 3Installing upper basket 22:
- Pull out upper basket rails all the way (1).
- Insert upper basket (2). In doing so, note the position of the detent pins (as illustrated in Step 2).
- Lift upper basket slightly and insert rear detent pins into the locking hooks (3).
- Lower upper basket and press into the front notch (4). Upper basket "clicks" into position.
5.Push in upper basket.
flowchart
graph TD
    A["1: Ramp"] --> B["2: Pickup Truck"]
    B --> C["3: Turnover Bus"]
    C --> D["4: Exit Bus"]
Removing/installing lower basket
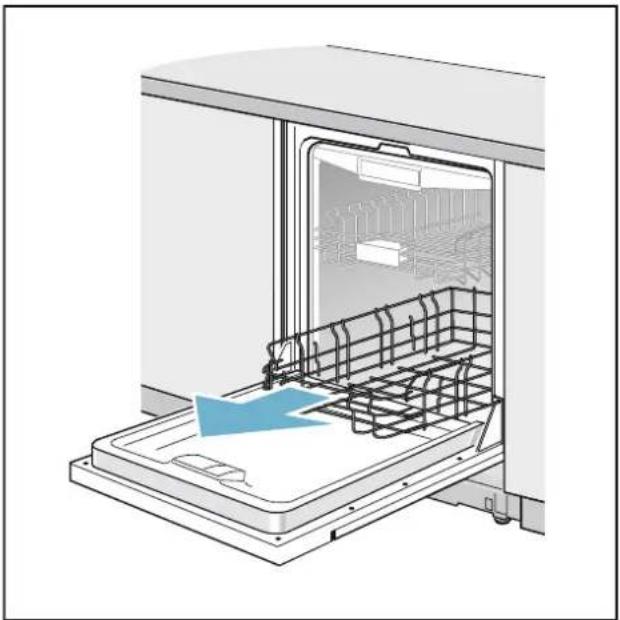
natural_image
Diagram of a kitchen appliance showing the interior space with a blue arrow indicating a component or process (no text or symbols present)Removing lower basket 29:
- Pull out lower basket all the way (1).
- Lift lower basket first out of the front and then out of the rear holders (2).
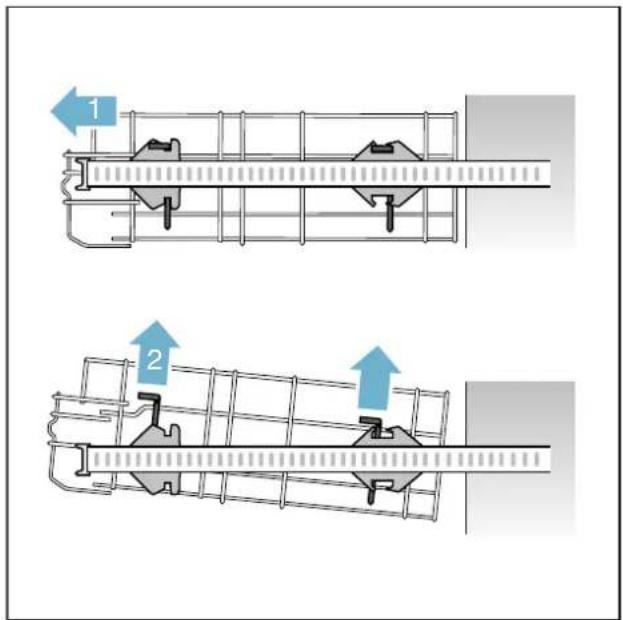
text_image
Technical diagram showing two mechanical assembly steps with labeled arrows 1 and 2 indicating process flow.Installing lower basket 29:
- Pull out lower basket rails all the way (1).
- Insert lower basket into the rear holders (2).
- Lower lower basket at the front and place in the front holders (3).
4.Push in lower basket.
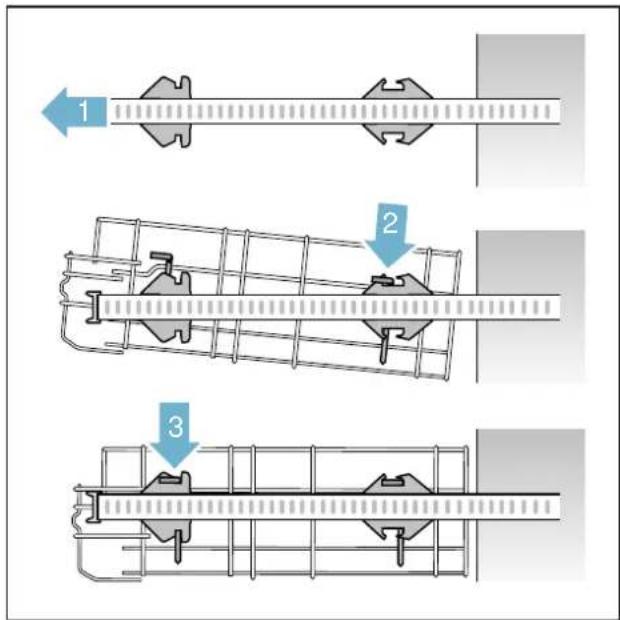
text_image
1 2 3Detergent
You can use tablets as well as powder or liquid detergents for dishwashers, but never use washing-up liquid. The dosage can be individually adjusted with powder or a liquid detergent according to the degree of soiling. Tablets contain an adequately large amount of active ingredients for all cleaning tasks. Modern, powerful detergents predominantly use a low-alkaline formulation with enzymes. Enzymes break down starch and remove protein. To remove coloured stains (e.g. tea, ketchup), oxygen-based bleaching agents are generally used.
Note: To ensure a good washing result, always follow the instructions on the detergent packaging! If you have further questions, we recommend that you contact the detergent manufacturers' helpline.
Warning – Risk of injury and damage due to non-observance of the safety instructions for detergent and rinse-aid products!
Always follow the safety instructions for detergent products and rinse-aid products.
Adding detergent
- If the detergent dispenser 31 is still closed, actuate locking bar 32 to open it.
- Pour detergent into the dry detergent dispenser 31 only (insert tablet flat, not on its edge).
- Dosage: see manufacturer's instructions on the packaging. Use graduated detergent dispenser.
Usually 20 ml–25 ml are adequate for normal soiling. If using tablets, one tablet is adequate.
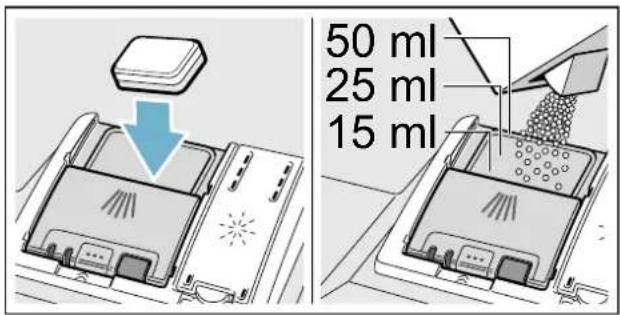
text_image
50 ml 25 ml 15 ml- Close cover on the detergent dispenser. Cover "clicks" into position.
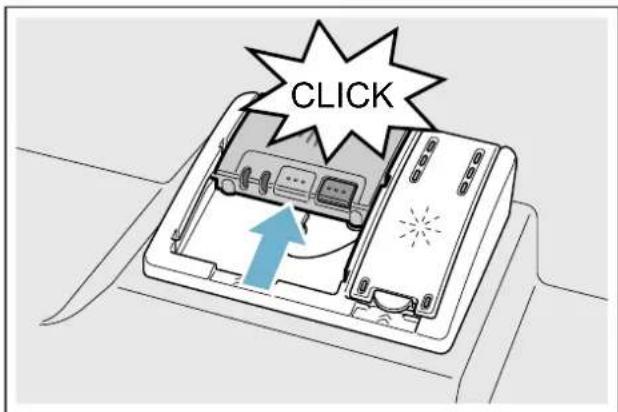
text_image
CLICKThe detergent dispenser opens automatically at the optimum time depending on the programme. The powder or liquid detergent is distributed in the appliance and is dissolved, the tablet falls into the tablet collecting tray where it dissolves in doses.
Tip: If the utensils are only lightly soiled, slightly less than the indicated amount of detergent is usually adequate.
Suitable detergents and care products can be purchased online via our website or via customer service (see back page).
Combination detergent
Apart from conventional detergents (Solo), a number of products are offered with additional functions. These products contain not only the detergent but also rinse-aid and salt replacement substances (3in1) and, depending on the combination (4in1, 5in1, ...), additional components such as glass protection or stainless steel cleaner. Combination detergents function only up to a specific degree of hardness (usually 21^ ). Over this limit salt and rinse-aid must be added.
As soon as combined detergents are used, the rinse programme is adjusted automatically to ensure the best possible rinsing and drying result.
Notes
- If you want to add more utensils after the programme has started, do not use the tablet collecting tray 24 as a handle for the upper basket. The tablet could already be there and you will touch the partially dissolved tablet.
- Do not place small parts for washing in the tablet collecting tray 24; this prevents the tablet from dissolving evenly.
- You will obtain optimum rinsing and drying results by using solo detergents and applying salt and rinse aid separately.
- If programmes are short, tablets may not have full cleaning effect due to different dissolving properties and there may even be undissolved detergent residue. It is recommended to use washing powder for these programmes.
- The dosing of a tablet is adequate for the "Intensive" programme (for some models). When using washing powder, you can apply some of this cleaning agent to the inside of the appliance's door.
- Even if the rinse-aid and/or salt refill indicator is lit, the rinse programme will run correctly with combined detergents.
- If using detergents in a water-soluble protective cover: Take hold of the cover with dry hands only and put the detergent into an absolutely dry detergent dispenser only, otherwise the detergent may stick.
- If you switch from combined detergents to solo detergents, ensure that the water softening system and amount of rinse aid have been set to the correct value.
- Biological/eco detergents: Detergent products identified as "Bio" or "Eco" (to protect the environment) usually use lower quantities of active agents or completely dispense with certain substances. The cleaning effect of such products may occasionally be restricted.
Overview of programmes
The max. possible number of programmes is illustrated in this overview. The corresponding programmes and their arrangement can be found on the fascia.
| Type of dishes | Type of soiling | Programme | Possible additional options | Programme sequence |
| pots and pans, non-fragile dishes and cutlery | stubborn burned or dried-on food remains containing starch or protein | Auto 65-75° | all | Sensor-controlled:Is optimised according to the soiling with the aid of sensors. |
| mixed dishes and cutlery | part-dried, common household food remains | Auto 45-65° | all | Sensor-controlled:Is optimised according to the soiling with the aid of sensors. |
| mixed dishes and cutlery | part-dried, common household food remains | Eco 50° | all | Most economical programme:PreRinseCleaning 50°Intermediate rinseFinal rinse 66°DryingEco dryingDoor opens automatically. |
| sensitive dishes and cutlery, temperature-sensitive plastics and glasses | lightly adhering fresh food remains | Auto 35-45° | IntensiveZonePowerHalfLoadExtra DryEnergy SavingHoliday | Sensor-controlled:Sensors optimise the wash cycle according to the soiling. |
| mixed dishes and cutlery | part-dried, common household food remains | Silence 50° | IntensiveZoneHalfLoadHygieneExtra DryHoliday | Reduced noise:PreRinseCleaning 50°Intermediate rinseFinal rinse 63°Drying |
| sensitive dishes and cutlery, temperature-sensitive plastics and glasses | lightly adhering fresh food remains | Glass 40° | IntensiveZonePowerHalfLoadExtra DryHoliday | Particularly gentle:PreRinseCleaning 40°Intermediate rinseFinal rinse 60°Drying |
| mixed dishes and cutlery | part-dried, common household food remains | 65° | Extra DryHoliday | Time-optimised:Cleaning 65°Intermediate rinseFinal rinse 70°Drying |
| sensitive dishes and cutlery, temperature-sensitive plastics and glasses | lightly adhering fresh food remains | lick 45° | Extra DryHoliday | Time-optimised:Cleaning 45°Intermediate rinseFinal rinse 55° |


| Type of dishes | Type of soiling Programme Possible additional | options | Programme sequence | |
| all types of load | cold rinse suitable, intermediate cleaning |  | Holiday | Cold rinse suitable |
| PreRinse | PreRinse | |||
| - - |  | Holiday Machine Care 70° | ||
| Machine Care | ||||
Programme selection
You can select a suitable programme according to the type of utensils and type of soiling.
Information for test institutes
Test institutes receive the information for comparability tests (e.g. according to EN60436).
These are the conditions for conducting the tests, however these are not the results or consumption values.
Request by e-mail to:
dishwasher@test-appliances.com
The product number (E no.) and the production number
(FD) are required which you can find on the rating plate
33 on the appliance door.
Additional functions
* Depending on the features of your dishwasher, you can select different additional functions 11.
>>Power \*
The "Power" function can reduce the run time by approx. 20% to 66% depending on the rinse programme selected. To obtain optimum cleaning and drying results with a reduced run time, water and energy consumption are increased.
^1/2 Half load \*
If you have only a few items to wash (e.g. glasses, cups, plates), you can switch to "half load". This will save water, energy and time. It is recommended to put a little less detergent in the detergent dispenser than for a full load.
Hygiene \*
The temperature is increased during the cleaning process. This improves the hygiene status. This additional option is ideal e.g. for cleaning cutting boards or baby bottles.
IntensiveZone \*
Perfect for a mixed load. You can wash very soiled pots and pans in the lower basket together with normally soiled utensils in the upper basket. The spray pressure in the lower basket is intensified, the rinsing temperature is increased slightly.
extraDry^+
An increased temperature during the final rinse and an extended drying phase ensure that even plastic parts dry better. There is a slight increase in the energy consumption.
Energy Save \*
The "Energy Save" function can be used to reduce water and energy consumption. The run time is extended for optimum cleaning and drying results.
Holiday \*
To prevent odours from developing while you are away and reduce moisture in the dishwasher, select "Holiday" mode. In "Holiday" mode, the dishwasher door opens automatically after 120 minutes, at the end of the programme. Shortly after the door opens, the dishwasher turns itself off completely. "Holiday" mode may be selected together with other extra functions.
Notes
- When Eco Drying is activated, the dishwasher door opens at the end of the programme. The dishwasher turns itself off completely after 120 minutes.
- Note that the water inlet valve should be closed if you will be away for several weeks (see Aqua stop warranty terms on back).
Operating the appliance
Programme data
The programme data (consumption values) can be found in the summary of instructions. They refer to normal conditions and the water hardness set value °E 16 - 20 medium. Different influencing factors such as water temperature or line pressure may result in deviations.
Changing the settings
The dishwasher has been preset with certain settings for your convenience. You can change these factory settings.
Change the setting as follows:
- Open the door.
2.Switch on ON/OFF switch 1. - Press Info button i 3 for 3 seconds until the following text is indicated on the display window at the top 4:
Scroll with <>
Set with - +
Leave with Setup 3 sec.
- Keep pressing button >16 until the required setting is indicated on the display window at the top 4.
- Make the setting with setting buttons + -8.
- Press and hold the Info button i 3 for 3 seconds.
The chosen setting has now been stored.
Tip: If you change several settings, first make all changes in succession. Now press the Info button i 3 for 3 seconds. This saves all set values in the appliance.
AquaSensor \*
* depending on the features of your dishwasher
The Aqua sensor is an optical measuring device (light barrier) which measures the turbidity of the rinsing water.
The AquaSensor is used according to the programme. If the AquaSensor is active, "clean" rinsing water can be transferred to the next rinse bath and water consumption can be reduced by 3–6 litres. If the turbidity is greater, the water is drained and is replaced with fresh water. In the automatic programmes the temperature and running time can also be adjusted to the degree of soiling.
Time display
The running time is determined during the programme by the water temperature, the number of utensils as well as the degree of soiling and may vary (depending on the selected programme). You can change the time display in time or hours/minutes so that the remaining running time of the rinsing programme appears in the display window "Ready at" (for example 15:20 hours) or "Ready in" (for example 3:25).
Sensor setting
The programme sequence is optimised in Auto programmes with the aid of sensors. The sensors adjust the programme strength of Auto programmes depending on the amount and type of soiling. You can adjust the sensitivity of the sensors in 3 stages.
Standard: This setting is ideal for a mixed load and heavily soiled utensils, but also saves energy and water.
Sensitive: This setting adjusts the programme strength for the effective removal of food remnants, even if the amount of soiling is low. The energy and water consumption is adjusted accordingly.
Very sensitive: This setting adjusts the programme strength for difficult conditions of use, for example firmly dried on food remnants. This setting is recommended if using biological or eco detergents which contain lower amounts of active agents. The energy and water consumption is adjusted accordingly.
extraDry
The final rinse uses a higher temperature which improves the drying result. The running time may increase slightly. (Caution if utensils are delicate!) You can switch the extraDry function on or off.
Note: When ExtraDry function is switched on, Eco drying is deactivated.
Eco forecast
When Eco forecast is activated, the average water and energy consumption of the selected programme is briefly displayed on the display window at the top 4.
AutoPowerOff
(Switching off automatically after the end of the programme)
To save energy, the dishwasher is switched off 1 minute after the programme ends. You can also change this setting.
Possible settings are:
• off: The appliance does not switch off automatically.
- After one minute: The appliance switches off after 1 minute.
- After two hours: The appliance switches off after 2 hours.
Notes
- Note that for the settings "After one minute" and "After two hours", the interior lighting 20 is switched off. To activate the interior lighting, press the ON/OFF switch 1.
- If the setting "After one minute" is selected but Holiday mode is also activated, the dishwasher turns itself off after two hours.
Emotion Light \*
* Depending on the features of your dishwasher
You can switch the Emotion Light 20 on or off.
Notes
- Depending on the setting of the automatic switch-off function, the interior lighting is either switched on or off.
- Note that the interior lighting is automatically switched off after 1 hour when it is switched on and the door is open.
Front display \*
* depending on the features of your dishwasher
You can switch the front display 13 on or off (additional programme information).
Remaining time projection
(Optical display while the programme is running) \*
* depending on the features of your dishwasher
While programme is running, an optical display (additional programme information) is indicated on the floor under the appliance door. If the base panel is pulled forwards or if the appliance is installed at eye-level with flush furniture front, the display is not visible.
You can switch the optical display on or off.
Infolight \*
* depending on the features of your dishwasher
While the programme is running, a light spot shines on the floor under the appliance door. Do not open the appliance door until the light point is no longer visible on the floor. If the appliance door is not completely closed, the light spot flashes *. If the appliance is installed at eye-level, with flush furniture front, the light point is not visible. You can switch the Infolight on or off.
Changing start programme
You can change the "Start programme" setting.
Tone volume\*
* depending on the configuration of your specific dishwasher
The end of the programme is indicated by a buzzer. You can also change this setting.
Note: When Eco drying is switched on, the end of the programme is not indicated by an acoustic signal.
Button volume
When you are operating the dishwasher, a signal sounds whenever a button is pressed. You can control the volume of the signal. If you do not like the button volume, you can switch it off.
Child-proof lock \*
* depending on the features of your dishwasher
The dishwasher features an electronic child-proof lock. The child-proof lock protects children from potential hazards which the dishwasher poses.
You can switch the child-proof lock on or off. When the child-proof lock is on, it is difficult to open the door.
Eco drying
If you have selected the Eco 50° programme, the door opens automatically when the programme ends. This ensures a particularly economical drying result. You can switch Eco drying on or off.
Notes
- Eco drying is activated only in conjunction with the Eco 50° programme.
-
Eco drying is deactivated when
-
ExtraDry is switched on.
- the Eco 50^ programme has been selected in conjunction with one or more additional functions.
- the electronic child-proof lock * has been switched on.
* depending on the features of your dishwasher
Greeting
When you switch on the dishwasher, the brand logo appears. You can switch off the brand logo.
Factory setting
You can reset all settings to the factory setting.
Switching the appliance on
- Turn on tap fully.
2.Open the door.
3.Switch on ON/OFF switch 1.
The Eco 50° programme has been preset for environmentally friendly operation whenever the appliance starts. This programme remains selected if no other programme button 2 is pressed.
-
Press START button 12.
-
Close the door.
Programme sequence starts.
Note:
For ecological reasons the Eco 50° programme is preset whenever the appliance starts. This conserves environmental resources and not least saves you money. The Eco 50° programme is a particularly environmentally friendly programme. According to EU regulation 1016/2010 it is the “Standard programme” which is the most efficient standard cleaning cycle for cleaning normally soiled utensils in terms of the combined energy and water consumption for cleaning these types of utensils.
Time preselection
You can delay the start of the programme by up to 24 hours. Depending on the setting of the time display, the end of programme is indicated with "Finish in" (for example 3h 25m) or "Finish at" (for example 15:20 hours).
- Open the door.
2.Switch on ON/OFF switch 1. - Selects programme 2.
- Press time preselection button 9.
- Keep pressing the setting buttons + -8 until the displayed time corresponds with your requirements.
- Press START button 12, timer programming is activated.
- To delete the time preselection, press START button 12 for approx. 3 seconds.
Time preselection was terminated.
- Close the door.
Programme end
* The programme has ended when "Finished" is indicated on the display window at the top 4 and on the front display * 13.
* The end of the programme is displayed on the floor – provided the optical display is switched on and is visible.
* depending on the features of your dishwasher
Switching off the appliance
Short time after the end of the programme:
- Open the door.
- Switch off ON/OFF switch 1.
- Turn off tap (does not apply to appliances with Aqua-Stop).
- Remove the utensils when they have cooled down.
About the Eco drying function:
When Eco drying is activated in the Eco 50° programme, the door opens automatically when the programme ends. This ensures the best possible drying result. Low amounts of steam may occur. If you install the appliance under a worktop, fit the supplied steam protection film * (follow the procedures in the installation instructions). The steam protection film protects sensitive fitted furniture and worktops from damage by water vapour. Before opening the appliance, leave it to cool down for a while in the remaining programmes when the programme ends.
* depending on the features of your dishwasher
Interrupting the programme
Caution!
Expansion (overpressure) may cause the appliance door to jump open and/or water to escape! If the door was opened on an appliance which has a hot water connection or is heated, always leave the door ajar for several minutes and then close.
- Open the door.
- Switch off ON/OFF switch 1.
The LEDs go out. The programme is saved.
- To continue the programme, switch on the ON/OFF switch 1 again.
- Close the door.
Terminating the programme (Reset)
- Open the door.
- Press the START button 12 and hold for 3 seconds
The display window at the top 4 and the front display * 13 show: "Program was terminated". - Close the door.
The programme sequence lasts approx. 1 min. The display window at the top 4 shows: "Finished".
4.Open the door. - Switch off ON/OFF switch 1.
- Close the door.
* depending on the features of your dishwasher
Changing the programme
When the START button 12 has been pressed, the programme cannot be changed. The only way a programme can be changed is by Cancel programme (Reset).
Cleaning and maintenance
A regular inspection and maintenance of your machine will help to prevent faults. This saves time and prevents problems.
Overall status of the dishwasher
*The interior of your dishwasher is predominantly self-cleaning. In order to remove deposits, your dishwasher automatically changes the running of the programme (such as by increasing the cleaning temperature) at certain intervals. This will lead to higher consumption values when running this programme.
*Depending on the features of your dishwasher
If you should find deposits in the interior of the dishwasher in spite of this, remove these deposits as follows:
- Fill the detergent dispenser 31 with detergent.
- Select the programme with the highest temperature.
- Start the programme without dishes.
⚠ Warning – Health hazard due to detergents containing chlorine!
Always use chlorine-free detergents.
Notes
- Only clean the appliance with special detergents/appliance cleaners which are suitable for use with dishwashers.
- Regularly wipe the door seals using a damp cloth and a little washing-up liquid. This will keep the door seal clean and hygienic.
- Leave the door open slightly if the appliance will not be used for a while. This will prevent an unpleasant odour from developing.
- Never clean the dishwasher using a steam cleaner. The manufacturer is not liable for any consequential damage.
- Wipe the front of the dishwasher and the control panel regularly using a damp cloth and a little washing-up liquid.
- Do not use sponges with a rough surface or abrasive detergents. These could scratch the surface.
- For dishwashers with a stainless steel front, avoid using sponge cloths, or rinse these thoroughly several times before using them for the first time. This will prevent corrosion.
Machine Care

Machine Care used in combination with commercially available machine cleaning detergent is a suitable programme for cleaning your dishwasher. Deposits such as grease and limescale can cause your dishwasher to malfunction. In order to avoid such faults and to reduce the development of odours, we recommend cleaning the dishwasher at regular intervals.
* As soon as the Machine Care display lights up in the control panel, or you are advised to do so on the front display, run the Machine cleaning programme Machine Care without loading any tableware. After you have run the Machine Care the display in the control panel will go out.
If your dishwasher does not have a reminder function, follow the instructions for use on the machine cleaning detergents.
Notes
- Remove any coarse soiling in the interior using a damp cloth.
- Run the programme without dishes, and in combination with a machine cleaning detergent.
- Use a special machine cleaning detergent, and not dishwasher detergent.
- Observe the safety instructions and the instructions for use on the machine cleaning detergent packaging.
- *After three rinse cycles, the display in the control panel will go out automatically, even if you have not run the Machine cleaning cycle programme.
* depending on the features of your dishwasher
Special salt and rinse aid
Top up the salt and/or rinse aid as soon as the refill indicators on the fascia 6 and 5 are lit or there is a prompt on the front display * 13.
* depending on the features of your dishwasher
Filters
The filters 27 keep large foreign objects in the rinsing water away from the pump. These foreign objects may occasionally block the filters.
The filter system consists of
- a coarse filter
- a flat fine filter
-
a microfilter
-
After each washing cycle check the filters for residue.
- Unscrew filter cylinder as illustrated and take out filter system.
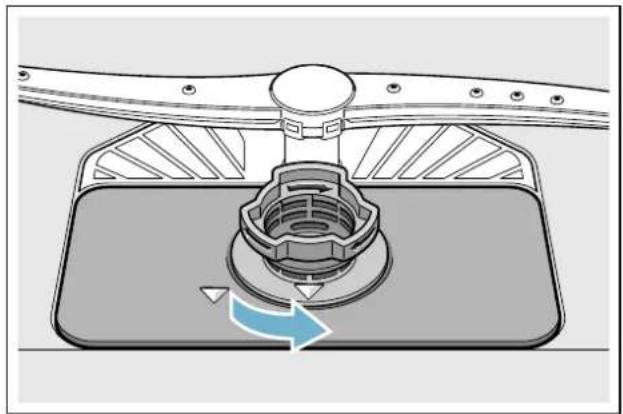
natural_image
Diagram of a mechanical component with a rotating arrow indicating rotation (no text or symbols)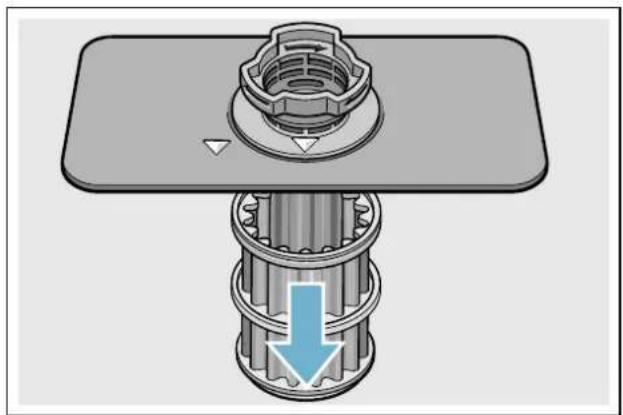
natural_image
Mechanical assembly diagram showing a bolted joint with a blue arrow indicating force or motion (no text or symbols present)- Remove any residue and clean filters under running water.
- Re-install filter system in reverse sequence and ensure that the arrow marks are opposite each other after closing the filter system.
Spray arms
Limescale and contaminants in the rinsing water may block nozzles and bearings on the spray arms 23 and 25.
- Check outlet nozzles on the spray arms for blockages.
- Unscrew the upper spray arm 23 (1) and remove downwards (2).
- Remove the lower spray arm 25 upwards.
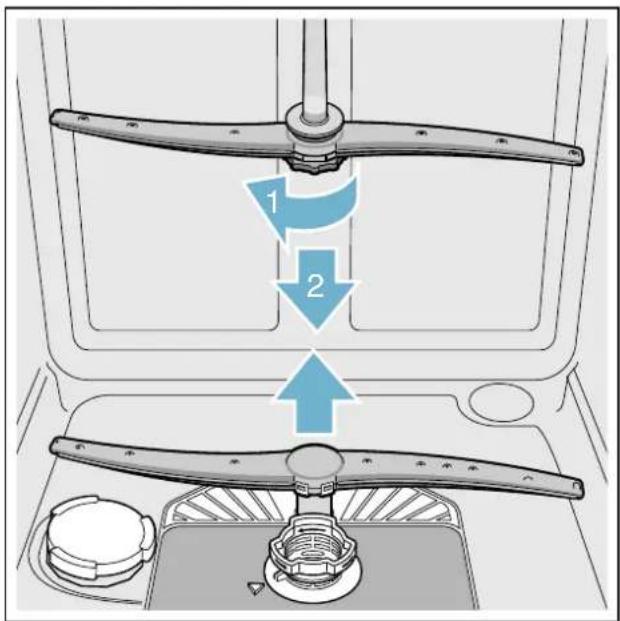
text_image
Diagram showing a kitchen appliance with two blades and directional arrows indicating rotation or movement.- Clean spray arms under running water.
- Re-engage or screw on spray arms.
Fault, what to do?
Experience has shown that you can rectify most faults which occur in daily operation yourself. This ensures that the appliance is quickly available to you again. In the following overview you can find possible causes of malfunctions and helpful information for rectifying them.
Note: If the appliance stops during dishwashing or does not start for no obvious reason, first run the Abort programme function (Reset).
Warning – Improper repairs or use of non-original spare parts may cause considerable damage and put the user at considerable risk!
Always have repairs carried out by technicians. If a component has to be replaced, always use original spare parts.
Error message
Some faults are indicated at the top of the display window 4 and on the front display * 13 and possible remedies are offered (for example Filter system soiled (E22) ->Clean filters).
* depending on the features of your dishwasher
Waste water pump
Large food remnants or foreign objects which were not captured by the filters may block the waste water pump. The rinsing water will then be above the filter.
Warning - Danger of cutting!
Sharp and pointed objects or glass fragments may block the waste water pump.
Always carefully remove foreign objects.
Clean the waste water pump as follows:
-
Disconnect the dishwasher from the power supply.
-
Take out top basket 22 and bottom basket 29.
-
Remove the filters 27.
-
Scoop out water, use a sponge if required.
-
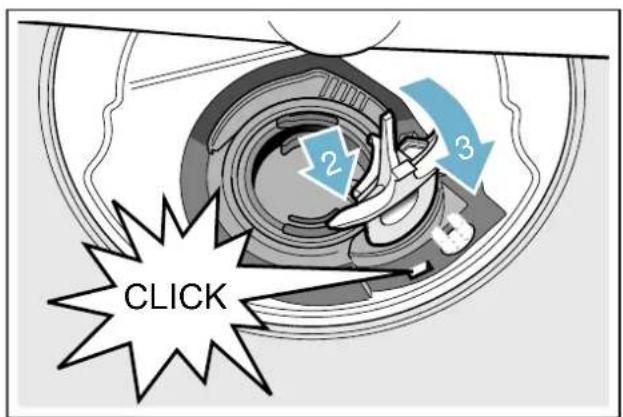
Prise off the pump cover (as shown) using a spoon. Grip the pump cover by the crosspiece and lift diagonally inwards (1). Remove cover completely.
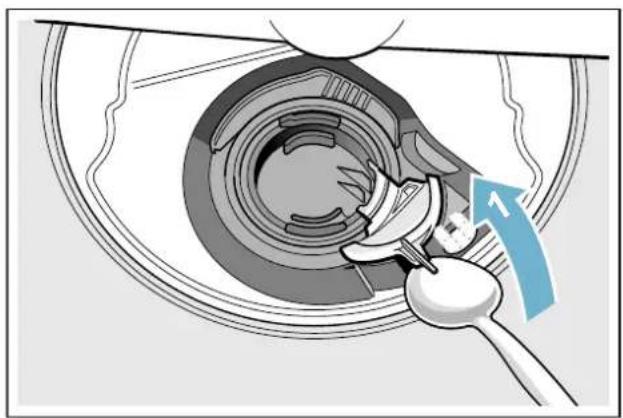
natural_image
Mechanical assembly diagram showing a gear or cam mechanism with a tool inserted, no visible text or symbols-
Check impeller wheel and remove any foreign objects.
-
Place pump cover in the original position (2) and press down until it engages (3).
text_image
2 3 CLICK-
Install filters.
-
Re-insert baskets.
Fault table
| Fault Cause Remedial action | ||
| Error code E: 18 is lit. | Supply hose kinked. | Install supply hose without kinks. |
| Tap turned off. Turn on the tap. | ||
| Tap jammed or calcified. Turn on the tap. | ||
| Flow rate must be min. 10 l/min. when water supply is open. | ||
| Filter in the water supply blocked. Switch off the appliance and pull out the mains plug. Turn off the tap. Unscrew water connection. | ||
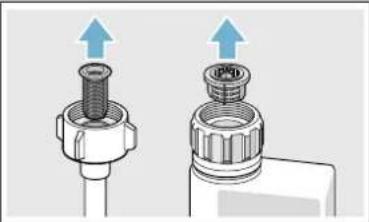 | ||
| Clean filter in the supply hose. Screw water connection on again. Check for leaks. Reconnect power supply. Switch on the appliance. | ||
| Error code E:07 is lit. | Intake opening (on right inside of appliance) covered by utensils. | Arrange utensils so that the intake opening is not obstructed. |
| Error code E: 12 is lit. | Heating element calcified or soiled. | Clean appliance with dishwasher cleaning agent or descaler. Operate the dishwasher with water softening system and check the setting. |
| Fault code E: 14 is lit. | Water protection system activated. | Turn off tap. |
| Fault code E: 15 is lit. | Call customer service and mention the fault code. | |
| Fault code E: 16 is lit. | Constant water inflow. | |
| Error code E:22 is lit. | Filters [27] are soiled or blocked. | Clean filters. |
| Error code E:24 is lit. | Waste-water hose kinked or blocked. | Install hose without kinks, remove any residue. |
| Siphon connection still sealed. Check connection to siphon and open if required. | ||
| Cover on the waste water pump loose. | Lock cover correctly. | |
| Error code E:25 is lit. | Waste water pump blocked or cover on the waste water pump is not locked in position. | Clean pump and lock cover correctly. |
| Error code E:27 is lit. | Mains voltage too low. | Not an appliance fault, have the mains voltage and electrical installation checked. |
| A different error code is indicated on the digital display.(E:01 to E:30) | A technical fault has probably occurred. | Switch off the appliance with the ON/OFF switch [1]. After a short time restart the appliance.If the problem recurs, turn off the tap and pull out the mains plug.Call customer service and mention the error code. |
| Home network is not loading. | WLAN is not active on the router. | Check the wireless network connection of your router. |
| WLAN display flashes. | Connection to the home network is not available. | Activate the wireless network on your router. |
| * depending on the configuration of your specific dishwasher | ||
| Fault Cause Remedial action | |||
| Home Connect cannot be implemented correctly. | Possible setting errors or a technical fault. | Observe the supplied documents and support information for Home Connect. | |
| Energy manager does not connect to the energy manager of the home system.* | Connection to the energy manager of the home system is not available. | Refer to the instructions for use from the energy manager manufacturer for your home system. | |
| Refill indicator for salt 6 and/or rinse-aid 5 is lit. | No rinse aid. Refill rinse aid. | ||
| No salt. Refill with special salt. | |||
| Sensor does not detect salt tablets. Use different special salt. | |||
| Refill indicator for salt 6 and/or rinse-aid 5 is not lit. | Refill indicator switched off. Activation/deactivation (see chapter "Water softening system/Special salt" or "Rinse aid"). | ||
| There is still enough special salt/ rinse aid available. | Check refill indicator, levels. | ||
| The Machine Care display lights up.* | Machine Care is recommended. Run the Machine Care programme using a special dishwasher cleaning agent and without loading any utensils.The display will go out automatically after three wash cycles whether or not the Machine Care programme is carried out. | ||
| Water is left in the appliance at the end of the programme. | Filter system or area under the filters 27 is blocked. | Clean filters and area underneath. | |
| Program has not ended yet. Wait until programme ends or reset. | |||
| Utensils not dry. No or too little rinse aid in the dispenser. | Refill rinse aid. | ||
| Programme selected without drying. Select programme with drying. | |||
| Water collecting in depressions on the utensils and cutlery. | Arrange utensils in a sloping position, arrange affected utensils as sloping as possible. | ||
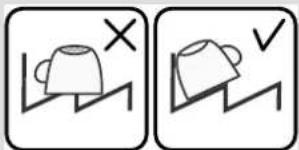 | |||
| The combined detergent used has a poor drying performance. | Use different combination detergent with better drying performance. Use of rinse aid also increases the drying performance. | ||
| ExtraDry to increase drying not activated. | Activate ExtraDry. | ||
| Utensils were removed too early or drying process had not ended yet. | Wait until program ends or wait until 30 min after program ends before removing utensils. | ||
| The eco rinse aid used has a limited drying performance. | Use a proprietary rinse aid. Eco products may have limited effectiveness. | ||
| Door does not open automatically at the end of the Eco 50° programme. Door gap is not set correctly. | Set the door correctly with the aid of the installation instructions so that the door gap is min. 70 mm - 100 mm. | ||
| Plastic utensils not dry. | Special properties of plastic. | Plastic has a lower heat storage capacity and therefore dries less well. | |
| Cutlery not dry. Cutlery not arranged properly in the cutlery basket. | Separate cutlery if possible, prevent contact points. | ||
| Cutlery not arranged properly in the cutlery drawer. | Arrange cutlery properly and separate if possible. | ||
| * depending on the configuration of your specific dishwasher | |||
| Fault Cause Remedial action | ||||
| Appliance interior wet after rinse cycle. | No appliance fault. On account of the "Condensation drying" principle, water droplets are physically induced and required in the container. The humidity in the air condenses on the inner walls of the dishwasher, drains and is pumped out. | |||
| Food remnants on the utensils. | Utensils placed too closely together, utensils basket overfilled. | Arrange utensils with adequate clearance between them ensuring that the spray jets can reach the surface of the utensils. Prevent contact points. | ||
| Spray arm rotation obstructed. Arrange utensils so that the spray arm can rotate without obstruction. | ||||
| Spray arm nozzles are blocked. Clean the spray arm nozzles. | ||||
| Filters [27] dirty. Clean filters. | ||||
| Filters [27] inserted incorrectly and/or not engaged. | Insert and engage filters correctly. | |||
| Rinse programme too weak. Select a more intensive rinse programme. Increase sensitivity of the sensors. → "Sensor setting" on page 33 | ||||
| Utensils precleaned too intensely; sensors therefore decide on weak programme sequence. Stubborn soiling cannot be completely removed. | Do not prerinse utensils. Remove only large food remnants. Increase sensitivity of the sensors. → "Sensor setting" on page 33 Recommended programme Eco 50° or Intensive. | |||
| Tall narrow receptacles in corner areas are not rinsed adequately. | Do not place hollow receptacles too obliquely and do not place in the corner area. | |||
| Top basket [22] on right and left not set to same height. | Set top basket to same height using side levers. | |||
| Detergent residue. | Detergent dispenser cover [31] blocked by utensils and therefore does not open fully. | Utensils must not be placed above the tablet collecting tray [24]. These may block the lid of the detergent dispenser and prevent it from opening fully. → "Upper basket" on page 21 Do not place utensils or fragrance dispenser in the tablet collecting tray. | ||
| Detergent dispenser cover [31] blocked by the tablet. | Tablet must be inserted flat and not upright. | |||
| Tablets used in the quick or short programme. Dissolving time of the detergent is not reached in the selected short programme. | Dissolving time of tablets too long for a quick or short programme. Use a detergent powder or select a more intensive programme. | |||
| Washing effect and dissolving performance are reduced after a prolonged storage time or detergent is very lumpy. | Change detergent. | |||
| Water stains on plastic parts. | Droplet formation on plastic surface is physically unavoidable. After drying, water stains are visible. | Use a more intensive programme (more water changes). Arrange utensils in a sloping position. Use rinse aid. If required, increase softening setting. | ||
| Washable or water-soluble coatings in the container or on the door. | Detergent substances are deposited. These coatings cannot usually be removed with chemicals (appliance cleaner, ...). | Change detergent brand. Clean appliance mechanically. | ||
| If there is a "white coating" on the container floor, the water softening system has been set marginally. | Increase softening setting and change detergent if required. | |||
| Salt dispenser cover [26] not closed. | Close salt dispenser cover correctly. | |||
| Only for glasses: Initial glass corrosion - can only apparently be wiped off. | See "Glass and utensil damage" → Page 20. | |||
| White, stubborn coatings; limescale on the utensils, container or door. | Detergent substances are deposited. These coatings cannot usually be removed with chemicals (appliance cleaner, ...). | Change detergent brand. Clean appliance mechanically. | ||
| Hardness range incorrectly set or water hardness greater than 8.9 mmol/l. | Set water softening system according to instructions for use or top up salt. | |||
| 3in1 detergent or bio/eco detergent not effective enough. | Set water softening system according to instructions for use or use separate detergents (proprietary detergent, salt, rinse aid). | |||
| Underdosing of detergent. Increase detergent dosage or change detergent. | ||||
| Too weak rinse programme selected. Select a more intensive rinse programme. | ||||
| Tea or lipstick residue on the utensils. | Too low rinsing temperature. Select programme with higher washing temperature. | |||
| Too little or unsuitable detergent. Use suitable detergent at correct dosage. | ||||
| Utensils precleaned too intensely; sensors therefore decide on weak programme sequence. Stubborn soiling cannot be completely removed. | Do not prerinse utensils. Remove only large food remnants. Increase sensitivity of the sensors. → "Sensor setting" on page 33 Recommended programme Eco 50° | |||
| Coloured (blue, yellow, brown), difficult to remove to non-removable coatings in the appliance or on stainless steel utensils. | Film formation consisting of ingredients from vegetables (e.g. cabbage, celery, potatoes, noodles, ...) or the tap water (e.g. manganese). | Can be partly removed with machine cleaner or by mechanical cleaning. Coatings are harmless. | ||
| Film formation caused by metallic components on silver or aluminium utensils. | Can be partly removed with machine cleaner or by mechanical cleaning. | |||
| Coloured (yellow, orange, brown), easily removable deposits inside the appliance (mainly in the floor area). | Film formation consisting of ingredients from food remnants and substances from the tap water (limescale), "soapy". | Check function of the water softening system (refill with salt) or, if using combined detergents (tablets), activate water softening system. | ||
| Discolouration of the plastic parts inside the appliance. | Plastic parts inside the appliance may become discoloured during the service life of the dishwasher. | Discolouration is normal and will not impair the function of the dishwasher. | ||
| Plastic parts discoloured. Too low rinsing temperature. Select programme with higher washing temperature. | ||||
| Utensils precleaned too intensely; sensors therefore decide on weak programme sequence. Stubborn soiling cannot be completely removed. | Do not prerinse utensils. Remove only large food remnants. Increase sensitivity of the sensors. → "Sensor setting" on page 33 Recommended programme Eco 50° | |||
| * depending on the configuration of your specific dishwasher | ||||
| Removable streaks on glasses, glasses with metallic appearance and cutlery. | Too much rinse aid. Set rinse aid amount to lower setting. | |||
| No rinse aid added or setting too low. Add rinse aid and check dosage (recommended setting 4-5). | ||||
| Detergent residue in the final rinse programme section. Detergent dispenser cover blocked by utensils (cover does not open fully). | Detergent dispenser cover must not be obstructed by utensils.Do not place utensils or fragrance dispenser in the tablet collecting tray. | |||
| Utensils precleaned too intensely; sensors therefore decide on weak programme sequence. Stubborn soiling cannot be completely removed. | Do not prerinse utensils. Remove only large food remnants.Increase sensitivity of the sensors.→ "Sensor setting" on page 33Recommended programme Eco 50° | |||
| Initial or existing, irreversible clouding of glass. | Glasses not dishwasher-proof, only suitable for dishwasher. | Use dishwasher-proof glasses.Avoid long steam phase (standing time after wash cycle ends).Use wash cycle at lower temperature.Set water softening system according to the water hardness (if required one setting lower).Use detergent with glass protection component. | ||
| Rust spots on the cutlery. Cutlery | not adequately rust-resistant.Knife blades are frequently more severely affected. | Use rust-resistant cutlery. | ||
| Cutlery will also rust if rusting parts are rinsed at the same time (pan handles, damaged utensil baskets, etc.). | Do not wash rusting parts. | |||
| Salt content in the rinsing water too high, as salt dispenser lock not fastened firmly or salt was spilled while being refilled. | Fasten salt dispenser lock firmly or remove spilled salt. | |||
| Appliance cannot be switched on or operated. | Malfunction. Disconnect appliance from the power supply; pull out the mains plug or switch off the fuse. Wait at least 5 seconds, then connect the appliance to the power supply. | |||
| Software update installing. * Wait until installation is complete. | ||||
| Appliance does not start. The mains fuse has tripped. Check mains fuse. | ||||
| Programme starts automatically. You did not wait until programme ended. | Perform reset. | |||
| * depending on the configuration of your specific dishwasher | ||||
| Fault | Cause | Remedial action | ||
| Door does not open automatically at the end of the Eco 50° programme. | Eco drying deactivated. Activate Eco drying. | |||
| The child-proof lock is activated. Deactivate the child-proof lock. | ||||
| Eco 50° programme not selected. Select Eco 50° programme. | ||||
| Additional functions selected. Deselect additional functions. | ||||
| ExtraDry is switched on. Switch off ExtraDry. | ||||
| Door is not set correctly. Set the door correctly with the aid of the installation instructions so that the door gap is min. 70 mm - 100 mm. | ||||
| Wrong screws used to adjust the door gap. If excessively long screws are screwed in, they may deactivate Eco drying. | To adjust the door gap, use screws which have a max. size of ø 4X30 (included in the product package, see installation instructions). | |||
| Door and door seal dirty. Clean door and door seal with a damp cloth and a little washing-up liquid. | ||||
| Safety device switches the Eco drying function off. A technical fault has probably occurred. | Call the after-sales service. | |||
| The door is difficult to open. Child-proof lock is activated. Deactivate the child-proof lock. | ||||
| Door cannot be closed. Door lock has been activated. Close door with increased force. | ||||
| Cover on the detergent dispenser cannot be closed. | Detergent dispenser or cover guide blocked by sticky detergent residue. | Remove detergent residue. | ||
| Detergent residue in the detergent dispenser [31] or in the tablet collecting tray [24]. | Spray arms blocked by utensils, therefore detergent is not rinsed out. | Ensure that the spray arms can rotate freely. | ||
| The detergent dispenser was damp when filled. | Pour detergent into the dry detergent dispenser only. | |||
| Appliance stops in the programme or programme is interrupted. | Door not closed properly. Close the door. | |||
| Do not place utensils or fragrance dispenser in the tablet collecting tray. Top basket presses against the door and prevents door from being closed securely. | Check whether rear panel is being pressed in, e.g. by socket or by hose holder which has not been removed. | |||
| Power and/or water supply interrupted. | Restore power and/or water supply. | |||
| Filling valves making striking noises. | Depends on domestic installation, as appliance is not defective. No effect on appliance function. | No remedial action possible. | ||
| Knocking or rattling noise. Spray arm strikes the utensils, utensils not positioned correctly. | Position utensils so that the spray arms do not strike the utensils. | |||
| Unusual foam formation. Handwash liquid in the rinse aid dispenser. | Immediately refill rinse aid dispenser with rinse aid. | |||
* depending on the configuration of your specific dishwasher
Customer service
If you are unable to rectify the fault, please contact your customer service. We will always find an appropriate solution in order to avoid unnecessary visits by engineers. Contact information for your nearest customer service can be found on the back of these instructions for use or on the enclosed customer service list. When calling, please state the appliance number (E-Nr. = 1) and the production number (FD = 2) which can be found on the rating plate 33 on the appliance door.
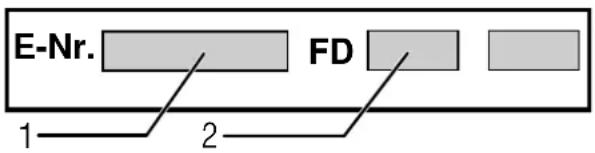
Trust the expertise of the manufacturer. Contact us for assistance. You can therefore be sure that the repair is carried out by trained service technicians who carry original spare parts for your domestic appliances.
Please note that customer service employees would never ask for your Home Connect password.
Installation and connection
The dishwasher must be connected correctly, otherwise it will not function properly.
The specifications for the inlet and outlet as well as the electrical connected loads must correspond with the required criteria as specified in the following paragraphs or in the installation instructions.
Install the appliance in the correct sequence:
- Checking appliance on delivery
- Installation
- Drainage connection
- Drinking water connection
- Electrical connection
Contents of package
If you have any complaints, contact the dealer from whom you purchased the appliance or our customer services.
- Dishwasher
• Instructions for use
• Installation instructions - Quick reference guide *
- Warranty *
• Installation materials - Steam guard plate *
- Steam protection film *
- Rubber apron *
- Power cord
* depending on the features of your dishwasher
Safety instructions
Please follow the safety instructions under → "Installation" on page 5.
Delivery
Your dishwasher has been checked thoroughly in the factory to ensure that it is in working order. This may cause small water stains. These will disappear after the first wash cycle.
Technical specifications
• Weight:
up to 60 kg
• Voltage:
220–240 V, 50 Hz or 60 Hz
- Connected load:
2000 - 2400 W.
- Fuse:
10/16 A (UK 13 A).
• Power input:
Off mode (Po) 0.50 W.
Left-on mode (PI) 0.50 W.
Networked standby
mode 2.00 W.
Time in left-on mode (TI) 0 min.
Time in networked standby mode 2 min.
According to regulations (EU) nos. 1016/2010, 1059/2010, 1275/2008 and 801/2013.
Additional functions and settings may increase the power input and times.
• Water pressure:
at least 0.05 MPa (0.5 bar), maximum 1 MPa (10 bar). At a higher water pressure: connect pressure-reducing valve ahead.
- Inlet rate:
minimum 10 litres/minute
• Water temperature:
cold water.
Hot water:
Maximum temperature 60 °C.
• Capacity:
12–15 place settings (depending on the features of your dishwasher).
Installation
The required installation dimensions can be found in the installation instructions. Level the appliance with the aid of the height-adjustable feet. Ensure that the appliance is situated securely on the floor.
- A built-under or integrated appliance which is installed subsequently as a free-standing appliance must be secured to prevent it from overturning, e.g. by screwing it to the wall or by installing it under a continuous worktop which is screwed to adjacent cupboards.
- The appliance can easily be installed in a fitted kitchen between wooden and plastic walls.
Drainage connection
-
The required work sequence can be found in the installation instructions. If required, fit a siphon with an drainage connection.
-
Connect the waste-water hose to the drainage connection of the siphon with the enclosed parts.
Ensure that the drainage hose is not kinked, crushed or twisted and that there is no cover plate in the drainage to prevent the waste water from flowing out!
Drinking water connection
- Fasten the drinking water connection to the tap according to the installation instructions using the enclosed parts.
Ensure that the drinking water connection is not kinked, crushed or twisted.
- When replacing the appliance, always use a new water supply hose.
Water pressure:
at least 0.05 MPa (0.5 bar), maximum 1 MPa (10 bar). At a higher water pressure: connect pressure-reducing valve ahead.
Inlet rate:
minimum 10 litres/minute
Water temperature:
cold water.
Hot water:
Maximum temperature 60 °C.
Warm water connection \*
* depending on the features of your dishwasher
The dishwasher can be connected to cold or hot water up to max. 60 °C. Connection to hot water is recommended if the hot water can be supplied by energetically favourable means and from a suitable installation, e.g. solar heating system with circulation line. This will save energy and time. The "Hot water" setting allows you to adjust your dishwasher optimally to operation with hot water. It is recommended to have a water temperature (temperature of the incoming water) of at least 40 °C and no more than 60 °C. It is not recommended to connect the appliance to hot water if the water is supplied from an electric boiler.
To change the setting:
- Open the door.
2.Switch on ON/OFF switch 1. - Press Info button 1 for 3 seconds until the following text is indicated on the display window at the top 4:
Scroll with <>
Set with - +
Leave with Setup 3 sec.
- Keep pressing the button > 16 until water connection appears of the display window at the top 4.
- Make the setting with setting buttons + -8.
- Press and hold the Info button 3 for 3 seconds. The chosen setting has now been stored.
Electrical connection
- Connect the appliance to an alternating current only, ranging from 220 V to 240 V and 50 Hz or 60 Hz via a correctly installed socket with protective earth conductor. See rating plate for required fusing 33.
- The socket must be near the appliance and freely accessible following installation.
If the plug is not freely accessible, an allpole disconnector with a contact opening of at least 3 mm must be fitted on the installation side to satisfy the relevant safety instructions.
- The connection may be modified by technicians only.
- A power cord extension may be purchased from customer service only.
- Use only a residual current operated circuit-breaker which features the symbol 📄. Only this extension guarantees compliance with the currently valid regulations.
- The appliance features a water damage protection system. Please note the system will function only when the power supply is connected.
Removal
Also observe the sequence of worksteps here.
- Disconnect the appliance from the power supply.
- Turn off the tap.
- Undo the waste water and drinking water connection.
- Loosen fastening screws for the furniture parts.
- If fitted, remove the base panel.
- Pull out the appliance, carefully pulling the hose behind.
Transporting
Empty the dishwasher and secure loose parts.
Drain the appliance according to the following steps:
- Turn on the tap.
2.Open the door.
3.Switch on ON/OFF switch 1. - Select programme with the highest temperature.
The estimated programme duration is indicated on the display window at the top 4.
- Press START button 12.
- Close the door.
Programme sequence starts.
- Open the door after approx. 4 minutes.
- Press START button 12 until "Program was terminated"/"Ready in one minute." is indicated at the top of the display window 4.
- Close the door.
- Open the door after approx. 1 minute.
The display window at the top 4 indicates; "Finished".
- Switch off ON/OFF switch 1.
- Turn off the tap, disconnect supply hose and drain water.
Note: Transport appliance upright only. This prevents residual water from running into the machine control and damaging the programme sequence.
Protection against frost
If the appliance is in a room where there is a risk of frost (e.g. holiday home), empty the appliance completely (see Transportation).
AQUA-STOP guarantee
en
(does not apply to appliances without Aqua-Stop)
In addition to warranty claims against the seller based on the purchase contract
and in addition to our appliance warranty we will pay damages under the following conditions:
- If our Aqua-Stop system is defective and causes water damage, we will make good the damage for private users.
To ensure water damage protection, the appliance must be connected to the power supply. - This liability guarantee is valid for the service life of the appliance.
- A prerequisite for the warranty claim is that the appliance has been correctly installed and connected with Aqua-Stop according to our instructions. This also includes the correct installation of the Aqua-Stop extension (original accessory).
Our warranty does not extend to defective feed lines or fittings up to the Aqua-Stop connection on the tap. - If your appliance is fitted with Aqua-Stop, you can leave your appliance unattended during operation and leave the tap turned on afterwards. The tap should only be turned off if you are absent from home for a prolonged period, e.g. several weeks holiday.
To book an engineer visit and product advice
GB 0844 892 8988
Calls from a BT landline will be charged at up to 3 pence per minute.
A call set-up free of up to 6 pence may apply.
IE 01450 2655
0.03 € per minute at peak. Off peak 0.0088 € per minute.
US 877 442 4436
toll-free
Please find the contact data of all countries in the enclosed customer service list.
Internet: www.gaggenau.com