Navy Seal Chronograph 3581.EY - Watch Luminox - Free user manual and instructions
Find the device manual for free Navy Seal Chronograph 3581.EY Luminox in PDF.


User questions about Navy Seal Chronograph 3581.EY Luminox
0 question about this device. Answer the ones you know or ask your own.
Ask a new question about this device
Download the instructions for your Watch in PDF format for free! Find your manual Navy Seal Chronograph 3581.EY - Luminox and take your electronic device back in hand. On this page are published all the documents necessary for the use of your device. Navy Seal Chronograph 3581.EY by Luminox.
USER MANUAL Navy Seal Chronograph 3581.EY Luminox
Constant Glow for up to 25 Years
Adjusting the chronograph hands to zero position
Example:
One or several chronograph hands are not in their correct zero positions and have to be II adjusted (e.g. following a battery change).
1
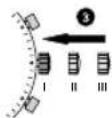
Pull out the crown to position III (all 4 chronograph hands are in their correct or incorrect zero position).
2
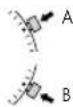
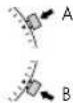
Keep push-buttons A and B depressed simultaneously for at least 2 seconds (the centre stop-second rotates by 360^ → corrective mode is activated).
↓

↓
Adjusting the centre stop second
Single step A 1 x short Continuous A long
。
Adjusting the next hand B
Adjusting the _10 second counter hand (position 6h)
-
Single step A 1 x short Continuous A long
-
Adjusting the next hand B
•
Adjusting the minute counter hand and the hour counter hand (mechanical coupled)
[Non-Text]
Single step A 1 x short Continuous A long
3
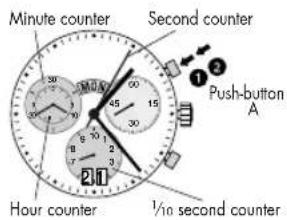
Returning the crown to position I Termination of the chronograph hands adjustment (can be carried out at any time).
text_image
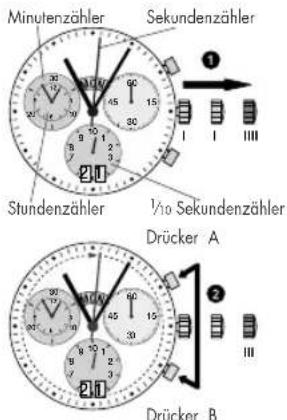
Minute counter Second counter Push-button A Hour counter 1/10 second counter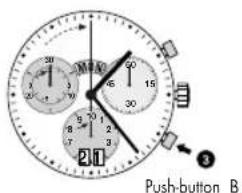
text_image
Push-button BChronograph: Basic function (Start / Stop / Reset)
Example:
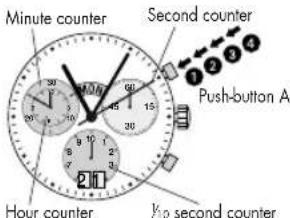
1 Start: Press push-button A.
2 Stop: to stop the timing, press push-button A once more and read the 4 chronograph counters: 4h / 20 min / 5 sec //10 sec
3 Zero positioning:
Press push-button B. (The 4 chronograph hands will be reset to their zero positions).
text_image
Minute counter Second counter Push-button A Hour counter No second counter
text_image
2:30 12:00 5:00 12:30 6:00 13:00 8:00 14:00 9:00 15:00 16:00 17:00 18:00 19:00 20:00 21:00 22:00 23:00 24:00 25:00 26:00 27:00 28:00 29:00 30:00 31:00 32:00 33:00 34:00 35:00 36:00 37:00 38:00 39:00 40:00 41:00 42:00 43:00 44:00 45:00 46:00 47:00 48:00 49:00 50:00 51:00 52:00 53:00 54:00 55:00 56:00 57:00 58:00 59:00 60:00 61:00 62:00 63:00 64:00 65:00 66:00 67:00 68:00 69:00 70:00 71:00 72:00 73:00 74:00 75:00 76:00 77:00 78:00 79:00 80:00 81:00 82:00 83:00 84:00 85:00 86:00 87:00 88:00 89:00 90:00 91:00 92:00 93:00 94:00 95:00 96:00 97:00 98:00 99:00 12hChronograph: Accumulated timing
Example:
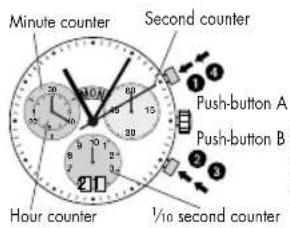
1 Start: (start timing)
② Stop: (e.g. 15min 5 sec following ①)

3 Resta
(e.g. 10min 5 sec following 3) = 25 min 10 sec [The accumulated measured time is shown]
5 Reset:
nograph hands are returned to positions.
Please note:
* Following ④, the accumulation of the timing can be continued by pressing push-button A (Restart / Stop, Restart / Stop, ...)
text_image
Minute counter Second counter Push-button A Push-button B Hour counter 1/10 second counter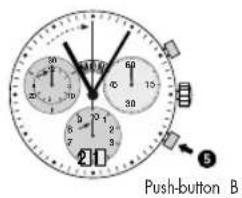
text_image
20:00 60 15 30 20 10 7 5 3 Push-button BChronograph: Intermediate or interval timing
Example:
1 Start: (start timing)
- Display interval: e.g. 10 minutes 10 seconds (timing continues in the background)
* Making up the measured time: (the 4 chronograph hands are quickly advanced to the ongoing measured time)
4 Stop: (Final time is displayed)
5 Reset:
The 4 chronograph displays are returned to their zero position.
Please note:
* Following ③, further intervals or intermediates can be displayed by pressing push-button B (display interval / make up measured time, ...)
text_image
30 o'clock 12:00 15:00 18:00 21:00 24:00 27:00 30:00 31:00 ① ②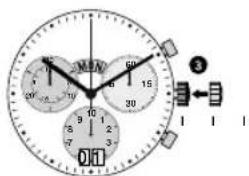
text_image
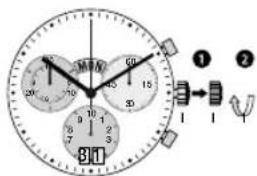
MIN 12:00 15:00 18:00 20:00 30:00 35:00 40:00 45:00 50:00 55:00 60:00 65:00 70:00 75:00 80:00 85:00 90:00 95:00 100:00 105:00 110:00 115:00 120:00 125:00 130:00 135:00 140:00 145:00 150:00 155:00 160:00 165:00 170:00 175:00 180:00 185:00 190:00 195:00 200:00 205:00 210:00 215:00 220:00 225:00 230:00 235:00 240:00 245:00 250:00 255:00 260:00 265:00 270:00 275:00 280:00 285:00 290:00 295:00 300:00 305:00 310:00 315:00 320:00 325:00 330:00 335:00 340:00 345:00 350:00 355:00 360:00 365:00 370:00 375:00 380:00 385:00 390:00 395:00 400:00 405:00 410:00 415:00 420:00 425:00 430:00 435:00 440:00 445:00 450:00 455:00 460:00 465:00 470:00 475:00 480:00 485:00 490:00 495:00 500:00Setting the date (quick mode)
1 Pull out the crown to position II (the watch continues to run).
2 Turn the crown until the correct date □ appears.
3 Push the crown back into position I.
Please note:
During the date changing phase between 9 PM and 12 PM; the date must be set to the date of the following day.
An extreme acceleration in setting the date with quick mode can induce a false date indication. The synchronization is re-established by setting the date from 01 till 31 (crown in position II).
text_image
Crown Date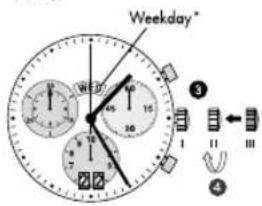
text_image
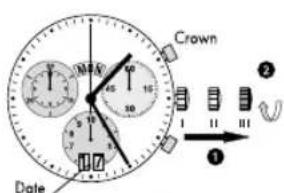
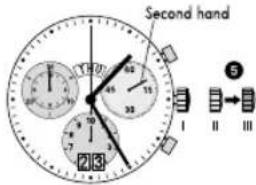
Weekday* W 10 15 30 45 7 8 9 10 11 12 13 14 15 16 17 18 19 20 21 22 23 24 ③ ④Setting the date, weekday and time\* \*Depending on model
Example:
- Date / time on the watch:
- Present date / time:

01:25/
20:30/THU
① Pull out the crown to position III (the watch stops).
② Turn the crown until yesterday's weekday 📋 appears.
3 Push the crown to position II
Turn the crown until yesterday's date appears 22.
text_image
Second hand 5 11 13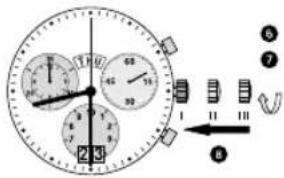
text_image
Analog clock face with analog dials and a hand gesture diagram showing time, seconds, and hour markers.↓
①* Pull out the crown to position III (the watch stops).
Turn the crown until the correct date 23 and weekday 📋 appears.
7** Continue to turn the crown until the correct time 8:30 PM appears.
6 Push the crown back into position I.
Please note
* To set your watch to the exact second, please refer to the chapter entitled setting the times.
** Please observe the AM/PM clock rhythm.
The setting of the weekday can be accelerated by turning the crown backwards (4.5 h) after a week day change, followed by turning the crown in forward direction.
text_image
2:10 Drickertext_image
Analog stopwatch with dual dials and a directional arrow indicating time measurement↓
text_image
Diagram of a clock face with time and duration markings, showing two dials and a directional arrow indicating movement.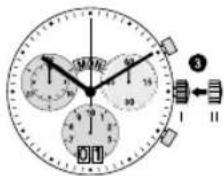
text_image
0:12 15 30 45 60 75 90 105 120 135 150 165 180 195 210 225 240 255 270 285 300 315 330 345 360 375 390 405 420 435 450 465 480 495 510 525 540 555 570 585 600 615 630 645 660 675 690 705 720 735 750 765 780 795 810 825 840 855 870 885 900 915 930 945 960 975 990 1015日付の設定(クイックモード)
text_image
Analog clock face with dual dials and a numbered diagram showing hand positions and a separate view of the clock.日付、曜日、時間の調整
*モデルによること
例:
text_image
Analog stopwatch with dual dials and a hand-drawn diagram showing clock, time, and directional arrows.↓
text_image
Diagram of a clock face with numbered hands and directional arrows indicating movement or sequence↓
The watch is equipped with a screw-in crown. The crown must be screwed in order to guarantee the water resistance. The crown may only be unscrewed and screwed down by hand.