BIC7-GK IX-2 H - Cooker PKM - Free user manual and instructions
Find the device manual for free BIC7-GK IX-2 H PKM in PDF.


User questions about BIC7-GK IX-2 H PKM
0 question about this device. Answer the ones you know or ask your own.
Ask a new question about this device
Download the instructions for your Cooker in PDF format for free! Find your manual BIC7-GK IX-2 H - PKM and take your electronic device back in hand. On this page are published all the documents necessary for the use of your device. BIC7-GK IX-2 H by PKM.
USER MANUAL BIC7-GK IX-2 H PKM
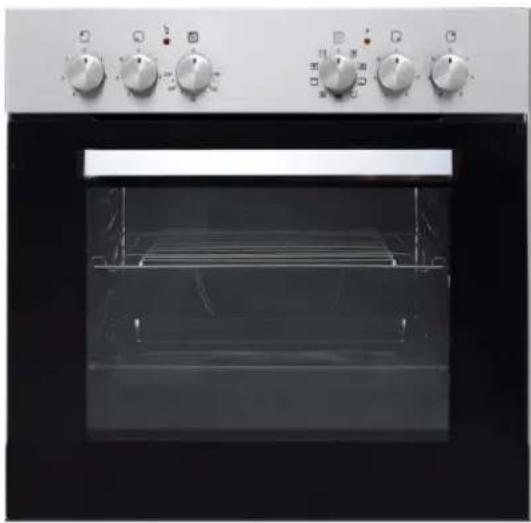
Built-In Oven and Ceramic Hob
BIC7 GK-IX-2H
natural_image
Front view of a stainless steel oven with dual control knobs and open door (no visible text or symbols)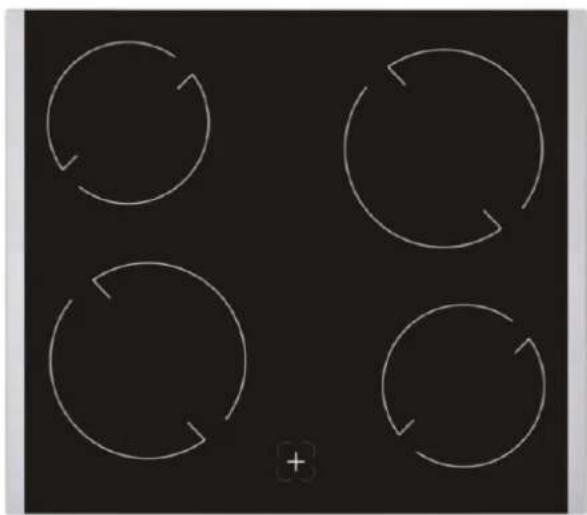
natural_image
Four white circular arrows arranged in a 2x2 grid on a black background, with a small plus symbol in the bottom-right corner (no text or labels)www.pkm-online.de English language on p. 27 ff.
natural_image
Line drawing of an oven with open door and side outlets, showing internal structure without any text or symbolsAbb. 2

natural_image
Technical line drawing of a mechanical device housing with ventilation slots and mounting brackets (no text or symbols)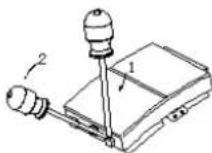
text_image
Diagram of a device with labeled components including lights, wires, and indicatorsnatural_image
Close-up of a hand holding a transparent plastic sheet, with a white arrow pointing downward (no text or symbols)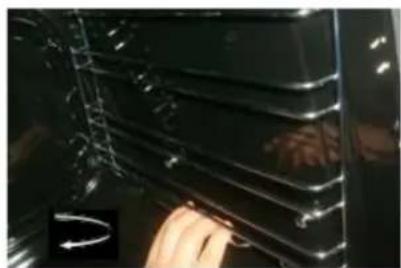
natural_image
Close-up of a hand pressing down on a black car's side panel (no visible text or symbols)natural_image
Close-up of hands holding a metallic object with wires, no visible text or symbols
natural_image
Line drawing of an oven with a close-up inset showing the exterior wall and door (no text or symbols)natural_image
Diagram of a mechanical component with two red arrows indicating upward motion, no text or symbols present
Problembehandlung
Dear customer! We would like to thank you for purchasing a product from our wide range of domestic appliances. Read the complete instruction manual before you operate the appliance for the first time. Retain this instruction manual in a safe place for future reference. If you transfer the appliance to a third party, also hand over this instruction manual.
INDEX
| 1. | Safety instructions | 28 | 2. | Installation | 32 |
| 3. | Main components | 38 | 4. | Operation | 39 |
| 5. | Cleaning and maintenance | 43 | 6. | Technical data | 46 |
| 7. | Waste management | 47 | 8. | Guarantee conditions | 48 |
EU - Declaration of Conformity
★ The products, which are described in this instruction manual, comply with the harmonized regulations.
★ The relevant documents can be requested from the final retailer by the competent authorities.
The figures in this instruction manual may differ in some details from the current design of your appliance. Nevertheless follow the instructions in such a case. Delivery without content.
i Any modifications, which do not influence the functions of the appliance. shall remain reserved by the manufacturer. Please dispose of the packing with respect to your current local and municipal regulations.
The appliance you have purchased may be an enhanced version of the unit this manual was printed for. Nevertheless, the functions and operating conditions are identical. This manual is therefore still valid.
i Technical modifications as well as misprints shall remain reserved.
i Read the safety instructions carefully before you operate the appliance for the first time. All information included in those pages serve for the protection of the operator. If you ignore the safety instructions, you will endanger your health and life.
⚠️ DANGER! indicates a hazardous situation which, if ignored, will result in death or serious injury.
⚠ WARNING! indicates a hazardous situation which, if ignored, could result in death or serious injury.
CAUTION! indicates a hazardous situation which, if not avoided, may result in minor or moderate injury.
NOTICE! indicates possible damage to the appliance.
Store this manual in a safe place so you can use it whenever it is needed. Strictly observe the instructions to avoid damage to persons and property.
Check the technical periphery of the appliance! Do all wires and connections to the appliance work properly? Or are they time-worn and do not match the technical requirements of the appliance? A check-up of existing and newly made connections must be done by an authorized professional. All connections and energy-leading components (incl. wires inside a wall) must be checked by a qualified professional. All modifications to the electrical mains to enable the installation of the appliance must be performed by a qualified professional.
i The appliance is intended for private use only.
i The appliance is intended for cooking in a private household only.
i The appliance is intended for indoor-use only.
i The appliance is not intended to be operated for commercial purposes, during camping and in public transport.
Operate the appliance in accordance with its intended use only.
Do not allow anybody who is not familiar with this instruction manual to operate the appliance.
This appliance may be operated by children aged from 8 years and above as well as by persons with reduced physical, sensory and mental capabilities or lack of experience and knowledge if they are supervised or have been instructe concerning the safe use of the appliance and do comprehend the hazards involved. Children must not play with the appliance. Cleaning and user-maintenance must not be carried out by children unless they are supervised.
DANGER!
- The appliance must be connected to the mains by a qualified professional, who is familiar with and adheres to the local requirements and supplementary regulations of your electricity supplier
- All electrical work must be carried out by a qualified professional. Do not modify the energy supply. The connection must be carried out in accordance with the current local and legal regulations
- Do not connect the appliance to the mains if the appliance itself or the power cord or the plug are visibly damaged.
- Never try to repair the appliance yourself. If the appliance does not operate properly, please contact the shop you purchased the appliance at. Original spare parts should be used only.
- When the power cord is damaged, it must be replaced by the manufacturer or an authorized aftersales service or a qualified professional only.
WARNING!
- Disconnect the appliance from the mains before you clean or maintain it.
- The appliance must always be grounded and protected corresponding to the requirements of your local energy supplier. The main current circuit must be equipped with a safety shut-down device.
- All modifications to the electrical mains to enable the installation of the appliance must be performed by a qualified professional.
- In case of an event caused by a technical malfunction, disconnect the appliance from the mains. Report the malfunction to your service centre so it can be repaired.
- If the glass-ceramic is cracked or damaged in any way, switch off the appliance immediately and disconnect it from the mains (fuse box). Risk of electric shock.
- Do not use the appliance if it has got a malfunction. Any malfunction must be repaired by a qualified professional.
- Do not carry out any modifications to your appliance.
- Do not repair the appliance yourself. Repairs carried out by unauthorized persons can cause serious damage. Always contact the nearest service centre. Only original spare-parts should be used for repairs.
- Unattended cooking with fat or oil can be dangerous and may result in fire. NEVER try to extinguish a fire with water, but switch off the appliance and then cover flame e.g. with a lid or a fire blanket
-
The room the appliance is installed in must be dry and well-ventilated. When the appliance is installed, an easy access to all control elements is required.
-
The veneering of cabinets has to be fixed with a heat-resistant glue, that is able to withstand a temperature of 100^ C.
- Adjacent furniture or housing and all materials used for installation must be able to resist a temperature of min. 85C above the ambient temperature of the room the appliance is installed in during operation.
- Any damage caused by the appliance when being installed not observing the temperature limits in § 11 and 12 or by placing adjacent cabinet materials nearer than 4 mm to the appliance, will be the liability of the owner.
- Do not install the appliance in rooms or at areas which contain flammable substances as petrol, gas or paint. This warning also refers to the vapour these substances release.
- Cooker-hoods should be installed according to their manufacturers' instructions.
- Do not heat your rooms or dry your washing by use of the appliance.
- Do not install the appliance near to curtains or upholstered furniture. RISK OF FIRE!
- Do not store any objects in the oven. RISK OF FIRE!
- Household equipment and connection leads must not touch the hot oven or the hob as the insulation material is usually not heat-resistant.
- Never use a steam cleaner to clean the appliance. The steam will cause serious damage to the electric components of the appliance. Risk of electrical shock!
- The accessible parts of the oven become hot during operation, so keep children away from the operating appliance.
- Keep children away from the appliance. Touching the appliance while it is operating can cause serious burns.
- Children must not play with the appliance.
- Always supervise children if they are near the appliance.
CAUTION!
- The appliance becomes hot while operating. Do not touch the hot components inside the oven.
- Do not use any aggressive, abrasive and acrid detergents or sharp-edged items to clean the door of the oven. Otherwise you may scratch the surface and damage the glass.
- Do not put any cookware or backing trays directly on the base inside the oven. Do not cover the base inside the oven with aluminium foil.
-
The hob should be clean at every time. Soiled hotplates do not transfer the heat correctly.
-
Protect the hob against corrosion.
- Switch off soiled hotplates.
- Switch off the complete hob if any damage or malfunction occurs.
- Do not leave pans with prepared dishes based on fats and oils unattended on a operating hotplate; hot fat can spontaneously catch fire.
- Keep the door of the oven always closed if you use one of the oven-functions.
- Do not put any cookware directly on the base inside the oven. Use the trays.
- The interior parts of the oven become extremely hot. Do not touch any parts inside the oven if you handle your cookware.
- Be careful if you open the door. Do not get in contact with the hot parts of the oven or the steam, which will escape the oven.
- Always use oven-gloves.
- This appliance complies with the current European safety legislation. We do wish to emphasize that this compliance does not negate the fact that the surfaces of the appliance will become hot while operating and will retain and emit heat even if it has stopped operating.
NOTICE
- When you move the appliance, hold it at its base and lift it carefully. Keep the appliance in an upright position.
- Never use the door for moving the appliance as you will damage the hinges.
- The appliance must be transported and installed by at least two persons.
- When you unpack the appliance, you should take note of the position of every part of the interior accessories in case you have to repack and transport it at a later point of time.
- Do not operate the appliance unless all components are installed properly.
- Do not stand or lean on the base, the drawers, the doors etc of the appliance.
- The air vents of the appliance or its built-in structure (if the appliance is suitable for being built-in) must be completely open, unblocked and free of any kind of dirt.
- Do not put any cookware with a weight of more than 25 kg on the hob.
- Do not put any heavy items onto the open door of the oven. Do not put any cookware with a weight of more than 15 kg on the door of the oven. Do not lean against the open door of the oven as you will damage the hinges.

Unpacking and positioning
- Unpack the appliance carefully. Dispose of the packaging as described in chapter waste management.
- Completely remove the transport-protection. Be very careful and do not use any aggressive or abrasive detergents to remove residuals of the transport-protection.
- Check that the appliance and the power cord are not visible damaged.
- Do not install the appliance in a place where it may come in contact with water or rain; otherwise the insulation of the electrical system will be damaged.
- Install the appliance on a level, dry and solid floor. Check the correct installation with a bubble level.
- The nameplate is situated inside the appliance or at the back.

Installation of the hob
Make an installation-opening with the dimensions given on the drawing (fig. 1).
Fix the supplied sealing tape on the corresponding place of the hob.
▶ Check the seal for perfect fit and overall cover. Insert the electric hob in the opening and align it correctly.
Using a standard screwdriver, tighten the tension clamps evenly starting at the centre and moving diagonal, until the built-in rim is tight on the worktop.
The hob must be vented properly. Air inlet and air outlet must not be blocked.

Fig. 1
Min. safety distance between hob and a cupboard above = 76 cm.
A: Air inlet
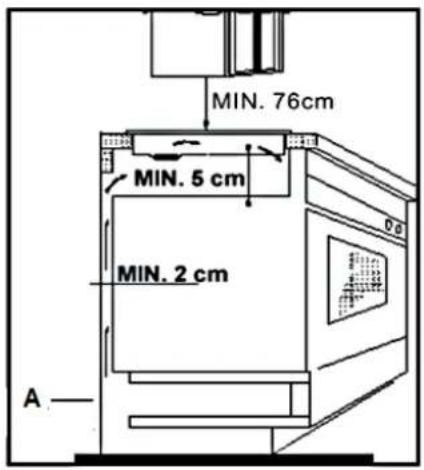
text_image
MIN. 76cm MIN. 5 cm MIN. 2 cm A
Installation of the oven
DANGER!
The appliance must be connected to the mains by a qualified professional, who is familiar with and adheres to the local requirements and supplementary regulations of your electricity supplier.
All electrical work must be carried out by a qualified professional. Do not modify the energy supply. The connection must be carried out in accordance with the current local and legal regulations
-
Provide an opening meeting the dimensions on the drawing.
-
Place the hob in the built-in opening.
-
Place the oven near the relevant built-in opening.
-
Connect the oven to the mains.
-
Partially insert the oven into the opening and connect the oven to the hob. The connectors at the end of the group of wires coming out of the hob should be inserted into the appropriate sockets of the control panel of the oven according to their colour, i.e. a black connector should be inserted into a socket marked with the same colour.
-
The grounding wire of the hob must be connected with the ground clamp of the oven.
-
Complete the installation of the appliance and fix the oven with 4 screws (fig. 2, right side).

natural_image
Line drawing of an oven with control panel and door, showing internal structure without any text or symbolsFig. 2

Electrical connection
Instructions for the installer (qualified professional)
The cooker is manufactured to work with three-phase alternating current (400V3N\~50Hz). Remember that the connection wire should match the connection type and the power rating of the cooker. The connection cable must be secured in a strain-relief clamp. The ground wire must be connected to the marked clamp of the terminal. The electric supply of the appliance must be equipped with an emergency switch with a distance between the contacts of at least 3 mm which disconnects the entire appliance from the mains in a case of emergency. Read the information on the rating label and the connection diagram before connecting the appliance to the mains.
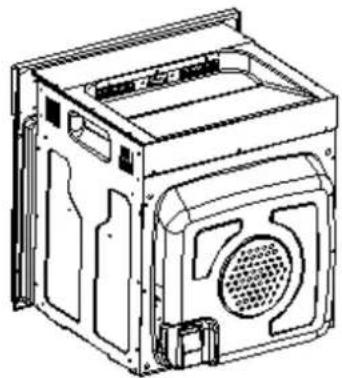
natural_image
Technical line drawing of a mechanical housing or enclosure with internal components (no text or symbols)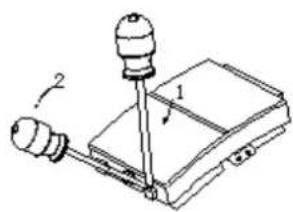
natural_image
Technical line drawing of a mechanical device with two components and a lever (no text or symbols)Move a screwdriver (1) slightly downwards (2) to open the box.

Connection diagram
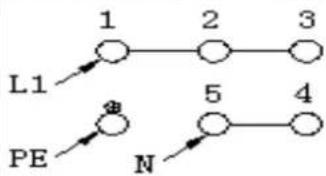
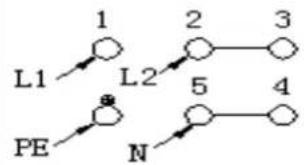
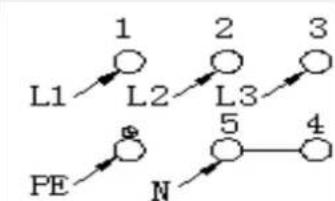
Voltage heating elements 230V. Any kind of connection: the safety wire must be connected to the ☑PE terminal.
1 For 230 V earthed one-phase connection, bridges connect 1-2-3 terminals and 4-5 terminals Protective ground to
2 For 400/230V earthed two-phase connection, bridges connect 2-3 terminals and 4-5 terminals
Protective ground to
3 For 400-230V earthed three-phase connection, bridges connect 4-5 terminals, phases in succession 1,2 and 3, Neutral to 4-5
Protective ground to
$$ \mathrm{L} 1 = \mathrm{R}, \mathrm{L} 2 = \mathrm{S}, \mathrm{L} 3 = \mathrm{T} $$
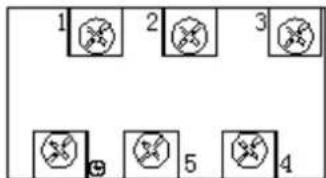
text_image
1 2 3 5 4Recommended type of connection lead.
flowchart
graph TD
    L1["1"] --> 2["2"]
    PE["PE"] --> 5["5"]
    2 --> 3["3"]
    5 --> 4["4"]
    5 --> N["N"]
H05VV-F3G4
flowchart
graph TD
    L1 --> 1
    L1 --> PE
    PE --> N
    L2 --> 2
    L2 --> 5
    2 --> 3
    5 --> 4
    N --> 4
H05VV-F4G2,5
flowchart
graph TD
    L1 --> 1
    L2 --> 1
    L2 --> 2
    L3 --> 2
    L3 --> 3
    PE --> 5
    PE --> N
    5 --> 4
H05VV-F5G1,5
$$ \mathrm{N} = \text { Earth } $$
$$ \mathrm{PE} = \text { earth wire terminal } $$
-
Check that the technical data of your energy supply meet the values on the nameplate.
-
Your domestic circuit must be equipped with an automatic circuit breaker.
-
Do not attempt to repair the appliance yourself. Repairs carried out by
unauthorized persons can cause serious damage. Always contact the nearest service centre. Original spare parts should be used only..

Electrical connection - hob
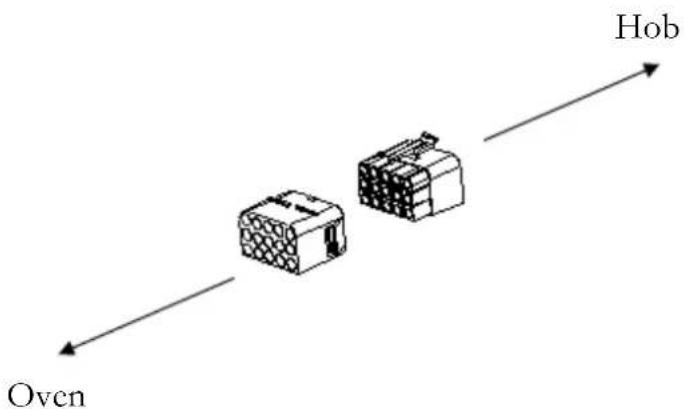
The hop works with a voltage of 230V AC. The electrical connection gets the power from the oven. Carry out the connection properly and as described on the drawing below.
text_image
Hob Oven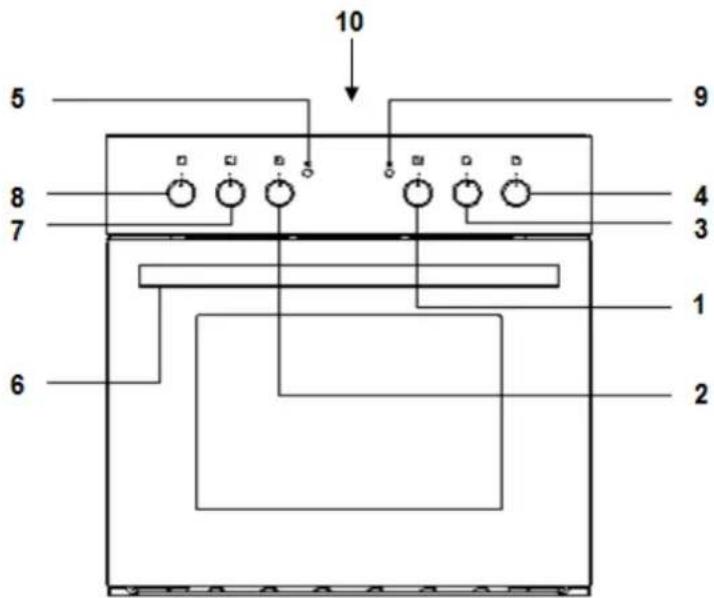
text_image
10 5 8 7 6 9 4 3 1 21 Oven-function selection knob
2 Oven-temperature control knob
3 Cooking zone control knob /front right
4 Cooking zone control knob /back right
5 Oven operation indicator lamp /red
6 Oven door handle
7 Cooking zone control knob /front left
8 Cooking zone control knob /back right
9 Hob operation indicator lamp /green
10 High temperature indicator lamp /on the glass-ceramic panel
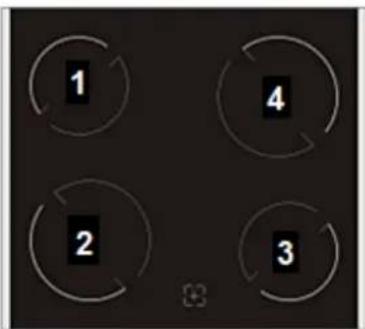
flowchart
graph TD
    A["1"] --> B["2"]
    B --> C["3"]
    C --> D["4"]
    D --> A
1∅140mm, 1200W
2 ∅180mm, 1800W
3 ∅140mm, 1200W
4 ∅180mm, 1800W

Before the first use
-
Remove all packaging material.
-
Clean the oven inside from all protective agents.
-
Take out the supplied accessories and clean them with warm water and washing-up liquid.
-
Switch on the room ventilation or open a window.
-
Let the oven operate (250°C) for 30 minutes. Clean the oven afterwards.
NOTICE!
Clean the oven with warm water and washing-up liquid only.

Hob
text_image
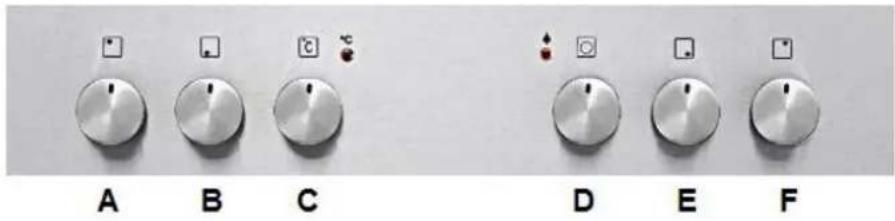
A B C D E FA Cooking zone back/left. Turn clockwise/anticlockwise to switch on.
B Cooking zone front/left. Turn clockwise/anticlockwise to switch on.
C Temperature control/oven from 50° to 250° C.
D Oven functions.
E Cooking zone front/right. Turn clockwise/anticlockwise to switch on.
F Cooking zone back/right. Turn clockwise/anticlockwise to switch on.
Keep the cooking zones clean; otherwise the energy is not transferred completely.
Protect the cooking zones from corrosion.
Switch off the cooking zones immediately after operation.
→ Oven
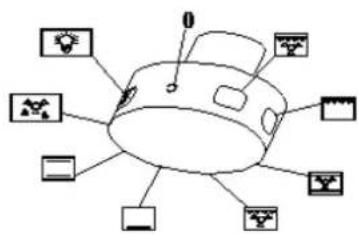
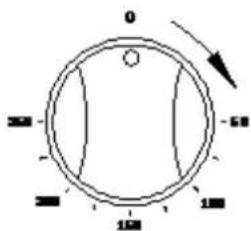
The oven can be warmed up using the bottom and top heaters. The operation of the oven is controlled by the oven function knob .To set function you should turn the knob to the desired position.
text_image
Diagram of a vehicle or car with labeled components including lights, cars, and sensorsTo select a temperature, use the temperature regulator knob to set the desired temperature. You can set the temperature within a range of 50-250°C.
The oven can be switched off by setting both of these knobs to position "0".
text_image
0 50 150 100 300 50Two signal lights (red and orange) indicate that the oven is operating.
The red light indicates that the oven is heating.
When the red light goes off the oven has reached the temperature you preset.
If a recipe recommends to place dishes in a warmed-up oven, place the dishes in the oven after the red light has gone off for the first time.
While the oven is used, the red light will go off and on temporarily to maintain the preset temperature.
The orange light indicates that the oven is operating.
The orange light is also on, when the interior light of the oven is switched on.

Functions of the oven
50-250°C

You can select a temperature from 50-250°C.
Switches on the internal light, e.g. when cleaning the oven.
Bottom and top heat.
Bottom and top heat and fan. When the temperature control is set to 0, just the fan operates and you can cool down food or the inside of the oven.
Grill and top heat. All grill components are on. Top heat is on.

Defrost. You can defrost frozen food. Defrosting time depends on size and weight of the food.
Grill and fan and top heat.. Accelerates grilling.
Grill and fan. Suitable four chicken or roasts.
Bottom heat only. Suitable for additional baking.

Eco Modus : Upper/Lower Heat, Maximum Power restricted

Grilling
- Select a function marked with the grilling-pictogram.
- Temperature for Grilling and Intensive-Grilling: 250^0 C; temperature for Grill and fan: 200^0 C.
- When you grill your food on a grillage, also insert a drip tray to keep the appliance clean.
- Always keep the door of the oven closed while grilling.
- Turn your food over after half of the grilling-time.
- Spread your food with a little bit of oil before grilling.
- NOTICE! Do not use aluminium foil for grilling. Do not wrap your food in aluminium foil and do not cover the grillage with aluminium foil. The aluminium foil will reflect the heat of the grill so the appliance may be damaged.

Helpful hints
We recommend to use the supplied baking tray provided with your appliance.
It is also possible to bake in cake tins and trays bought somewhere else. For baking it is better to use black trays which conduct heat better and shorten the baking time.
▶ Shapes and trays with bright or shiny surfaces are not recommended when using the conventional heating method (top and bottom heaters). The use of such tins can result in under-cooking the base of cakes.
Before you take a cake out of the oven, check that it is ready using a wooden stick (when the cake is ready the stick should come out dry and clean after having been inserted in the cake).
When switching off the oven leave the cake inside for about 5 minutes.
Cook meat with a weight of more than 1 kg in the oven. Cook smaller pieces of food on the hob.
Use oven-proof cookware only. Check that their handles also are oven-proof.
When you cook meat on a grillage, insert a drip tray with a small amount of water in the oven (minimum rack height).
→ Turn over meat at least once.
→ Never pour cold water on the meat.

Saving of energy
Use proper cookware for cooking. Cookware with thick, flat bases can save up to 1/3 of electric energy. Remember to cover your cookware if possible; otherwise you will use four times as much energy!
Match the size of the cookware to the surface of the heating plate.
A cookware should never be smaller than a heating plate.
Ensure that the heating plates and the cookware are clean.
Soils prevent heat-transfer. Repeatedly burnt-on spillages can often be removed by products, which will damage the environment, only.
Do not uncover the cookware too often (a watched pot-content will never boil!).
Do not open the oven door unnecessarily often.
Switch off the oven in good time and make use of the residual heat.
For long cooking times, switch off the heating zones 5 to 10 minutes before you will finish cooking. This saves up to 20% of energy.
Only use the oven when cooking larger dishes.
Meat of up to 1kg can be cooked more economically in a pan on the hob.
Make use of the residual heat of the oven.
If the cooking time takes longer than 40 minutes switch off the oven 10 minutes before.
→ Make sure the oven door is closed properly.
Heat can escape through spillages on the door seals. Clean up any spillages immediately.
Do not install the cooker near of refrigerators/freezers. Otherwise the energy consumption increases unnecessarily.
WARNING!
Switch off the appliance and let it cool down before cleaning. Disconnect the appliance from the mains before maintenance.
Hob
Use a damp cloth and a mild detergent.
Remove fat with warm water or a special detergent for ceramic glass.
Do not use any abrasive detergents.
Do not use any organic detergents ( lemon juice, vinegar etc.)
Detergent
→ Never use abrasive or aggressive detergents.
Never use solvents.
Oven
→ Clean the oven after use.
Switch on the internal light while cleaning.
Clean the interior with warm water and a little bit of washing-liquid. Use sponge or a soft cloth. Never use abrasive or aggressive detergents.
Dry after cleaning.
Clean the outside of the oven with warm soapy water. Use a sponge or a soft cloth. Never use abrasive or aggressive detergents.
If you use a special oven-detergent, check that the detergent is suitable for your appliance (instructions on the packaging of the detergent).
Any damage that is caused to the appliance by a cleaning product will not be fixed free of charge, even if the guarantee period of the appliance is still valid.

Never use a steam cleaner.
Oven-door
Clean the door very carefully. Do not use any abrasive detergents; otherwise you may damage or brake the glass. Use wash-up liquid and warm water.

Replacing of the illuminant
-
Switch off the appliance and disconnect it from the mains
-
Remove the cover. Clean the cover and wipe it dry.
-
Remove the illuminant and replace it by a new one of the same kind and power:
Heat-proof illuminant for ovens (300°C), 230V/25W, E 14 thread.
- Install the cover.

Removing of the guides
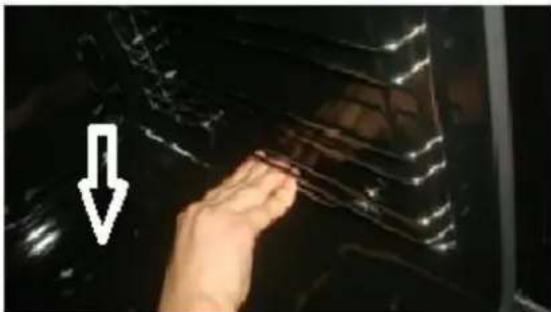
- . Press the bottom of the guide until it turns unlocked.
natural_image
Close-up of a hand holding a transparent plastic bag, with a white arrow pointing downward (no text or symbols visible)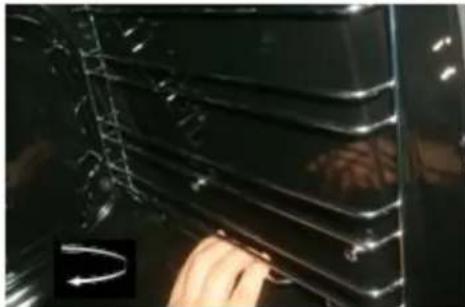
natural_image
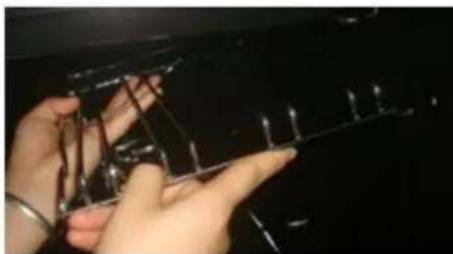
Close-up of a hand cleaning or adjusting a car's side panel with visible mesh lines and a small inset image showing airflow direction (no text or symbols)- Hold the guide vertically to remove it from the oven.
natural_image
Close-up of hands holding a small metallic object against a dark background (no visible text or symbols)
Removing of the door
-
Open the door and push the safety catch upwards.
-
Close the door slightly.
-
Lift the door and pull it towards your direction.
-
To reassemble proceed in reverse order.
-
Check that the groove of the hinge bracket is positioned properly in its guide.
-
After reassembling the door close the safety catch carefully.
-
If the safety catch is not closed properly you will damage the hinges when closing the door.

natural_image
Line drawing of an oven with a close-up inset showing the exterior wall and door (no text or symbols)
Removing of the glass panel
-
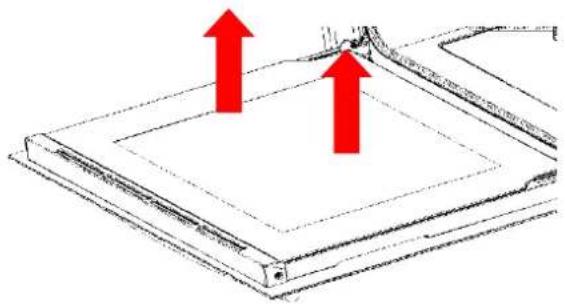
Using one hand to pressed the outer glass, the other hand to pull up the inner glass, lift up the inner glass then pull out the glass.
-
After cleaning, insert the inner glass into the glass groove
-
Both right and left sides need put down alignment to card slot and push the glass to its place.
natural_image
Diagram of a mechanical component with two red arrows indicating upward motion (no text or symbols)
Trouble shooting
Periodical controls:
Carry out periodic inspections of the control elements and cooking units of the cooker. After the guarantee has expired you should provide a technical inspection of the cooker carried out at a service centre at least once every two years.
All malfunctions should be repaired immediately.
Emergency measures:
- Switch off the entire appliance.
- Disconnect the appliance from the mains (fuse box of your household power supply).
- Contact your aftersales service.
Check the schedule below before you contact your aftersales service.
MALFUNCTION
POSSIBLE CAUSES
MEASURES
Appliance does not work at all.
The appliance is not supplied with energy.
→ Check the relevant fuse in the fuse box of your household power supply.
Internal light does not work.
The illuminant is loose or damaged.
→ Tighten or replace the illuminant.
6
TECHNICAL DATA
6
| Model | Built-in oven and hob |
| Control panel | Stainless steel |
| Material hob | Ceramic glass |
| Diameter/power cooking zones | 2*140mm (1200W), 2*180mm (1800W) |
| Residual heat indicator | yes |
| Oven functions | Bottom heat, Top and bottom heat, Defrost, Grill, Grill and fan, Top heat and grill and fan, Top heat and bottom heat and fan, ECO |
| Oven door/ Glass sheets | black glass / 3 |
| Body cooling | yes |
| Handle/buttons | Aluminium |
| Energy efficiency category | |
| Noise emission | < 52 dB(Λ) |
| Max. power | 8.30 kW |
| Voltage/ Frequency | 220-240V / 50Hz |
| Energy consumption / conventional operation | 0.75 kW/h |
| Energy consumption / fan | 0.87 kW/h |
| Net volume oven | 68.00 Litres |
| Racks | 1 |
| Drip tray/ grillage | 1 / 1 |
| Power cord in cm | - |
| Dimensions oven H * W * D | 59,50*59,50*55,00 cm |
| Packaging oven H * W * D | 66,00*65,50*64,00 cm |
| Weight oven net/gross | 32,50 kg/35,00 kg |
| Dimensions hob H * W * D | 5,00*58,00*51,00 cm |
| Packaging hob | 14,00*63,00*55,50 |
| Weight hob net/gross | 7,50 Kg/9,00 Kg |
7
WASTE MANAGEMENT
7
-
While unpacking, the packaging materials (polythene bags, polystyrene pieces, etc.) should be kept away from children. CHOKING HAZARD!
-
Do not depose of the appliance together with normal domestic waste. Waste separation is obligatory so the single components of the appliance can be recycled. Use your municipal waste collection points.
-
Used appliances do not represent unusable waste but contain valuable raw materials when recycled properly.
-
If electric appliances are disposed of at landfills, substances which are dangerous to one's health may get into the ground water. Such substances will become part of the food chain and cause damage to your health.
-
Before you dispose of an old appliance, render it inoperative. Unplug the appliance and cut off the entire power cord. Dispose of the power cord and the plug immediately.
-
Remove the door completely so children are not able to get into the appliance as this endangers their lives!
-
The materials of the appliance are recyclable and labelled with relevant information. When recycling materials or other parts from used appliances you make a significant contribution to the protection of our environment.
-
Dispose of any paper and cardboard into the corresponding containers.
-
Dispose of any plastics into the corresponding containers.
-
If suitable containers are not available at your residential area, dispose of these materials at a suitable municipal collection point for waste-recycling.
-
Receive more detailed information from your retailer or your municipal facilities.
Materials marked with this symbol are recyclable.
Please contact your local authorities to receive further information.
This appliance was made and checked according to the most modern production methods. This appliance includes a 24-month guarantee for the consumer given by the manufacturer, dated from the day of purchase, referring to its flawless material-components and its faultless fabrication.
The consumer is accredited with both the dues of the guarantee given by the manufacturer and the vendor's guarantees. These are not restricted to the manufacturer's guarantee.
The guarantee is valid without prejudice to stringent legal liability regulations, e.g. the product liability law, in the case of malice and of wanton negligence in view of harm of life, body or health by PKM or its agents.
The right on the guarantee is not granted, when the purchase is made in the course of a commercial activity.
The guarantee claim has to be verified by the vendee by submitting a proof of purchase including the date of purchase and/or the date of delivery. This has to be reported to us or in the Federal Republic of Germany to the shop you purchased the appliance at. This report has to be made immediately after the detection and within 24 months after the delivery to the first ultimate vendee.
The guarantee for our appliances is valid under the following conditions:
Defects of the appliance which are verifiably caused by material or fabrication deficiency will be rectified free of charge by the shop you purchased the appliance at. When the defect appears within 6 months we suppose that there is a material or fabrication deficiency.
Within the guarantee we will repair deficient components free of charge using components of our own choice or they will be replaced by flawless components. Appliances, which can, due to their dimensions, be reasonably transported by an automobile, should be given over or submitted to the shop you purchased the appliance at.
If the repair work is refused by us or if the repair work finally fails, the old appliance, if requested, will be replaced by an appliance of the same kind, quality and type within the period of guarantee. If the old appliance is no longer produced at the time the defect occurred, PKM will be entitled to deliver a similar appliance. The exchange of the appliance principally takes place in the shop the first vendee bought the appliance in unless the appliance is too large to be transported by the vendee.
The guarantee does not establish any entitlement to withdraw from the purchase
contract or for a price reduction.
Replaced components or exchanged appliances demise to us as our property.
The guarantee claim does not cover:
- fragile components as plastic, glass or bulbs;
- minor modifications of the PKM-products concerning their authorized condition if they do not influence the utility value of the product;
- damage caused by handling errors or false operation;
- damage caused by aggressive environmental conditions, chemicals, detergents;
- damage caused by non-professional installation and haulage;
- damage caused by non common household use;
- damages which have been caused outside the appliance by a PKM-product unless a liability is forced by legal regulations.
The validity of the guarantee will be terminated if:
- the prescriptions of the installation and operation of the appliance are not observed.
- the appliance is repaired by a non-professional.
- the appliance is damaged by the vendor, the installer or a third party.
- the installation or the start-up is performed inappropriately.
- the maintenance is inadequately or incorrectly performed.
- the appliance is not used for its intended purpose.
- the appliance is damaged by force majeur or natural disasters, including, but with not being limited to fires or explosions.
The guarantee claims neither extend the guarantee period nor initiate a new guarantee period. The guarantee period for installed replacement parts ends with the guarantee.
Provided that a product-related malfunction is not covered by this guarantee the vendee has to bear the cost, when the appliance is checked, including any labour costs that may arise.
If the holder of the guarantee has requested repair work, then the holder of the guarantee must be informed about the non-intervention of the guarantee and possible costs, that may arise, and thereafter he must bear all costs for spare parts and wages.
The geographical scope of the guarantee is limited with respect to appliances, which are purchased and used in Germany, Austria, Belgium, Luxembourg and the Netherlands.

August 2018
Aftersales service information on the leaflet inside this instruction manual.
Subject to alterations / Updated March 2019