
F12G6NDN2H - Washing machine LG - Free user manual and instructions
Find the device manual for free F12G6NDN2H LG in PDF.


| Product Type | Freestanding Washing Machine |
| Model | F12G6NDN2H |
| Brand | LG |
| Wash Capacity | 6 kg |
| Dimensions (W x D x H) | 600 mm x 440 mm x 850 mm |
| Product Weight | 60 kg |
| Power Supply | 220 - 240 V~, 50 Hz |
| Permissible Water Pressure | 0.1 - 1.0 MPa (1.0 - 10.0 kgf/cm²) |
| Energy Efficiency Class | A+++ |
| Spin Speed | Up to 1200 rpm (model variant: 1000 rpm) |
| Programmes | Cotton, Cotton Large, Easy Care, Mix, Baby Care, Skin Care, Duvet, Sports Wear, Delicate, Wool, Quick 30, Intensive 60, Rinse+Spin |
| Options | Time Delay, Medic Rinse, Pre Wash, Intensive, Crease Care, Child Lock, Beep On/Off |
| Smart Function | Smart Diagnosis™ via phone |
| Display | LED with estimated time remaining and status |
| Tub Clean | Special programme to clean drum interior |
| Safety Features | Child Lock, Door Lock, Overfill protection, Motor overload protection |
| Water Connection | Cold water inlet (hot water optional, max 65°C) |
| Drain Hose Length | Maximum vertical height: 100 cm |
| Noise Level (Wash/Spin) | 55 dB(A) / 74 dB(A) |
| Annual Energy Consumption | 150 kWh/year (based on 220 cycles) |
| Annual Water Consumption | 9500 L/year |
| Spin Drying Efficiency Class | B |
| Accessories Included | Cold supply hose, spanner, anti-slip sheets (optional), transit bolts |
Frequently Asked Questions - F12G6NDN2H LG
User questions about F12G6NDN2H LG
0 question about this device. Answer the ones you know or ask your own.
Ask a new question about this device
Download the instructions for your Washing machine in PDF format for free! Find your manual F12G6NDN2H - LG and take your electronic device back in hand. On this page are published all the documents necessary for the use of your device. F12G6NDN2H by LG.
USER MANUAL F12G6NDN2H LG
RELEASING THIS DRAWING WITHOUT PERMISSION LG Electronics SHOULD BE ACCUSED ACCORDING TO THE LAWS AND COMPANY RULES.
| WORK\SEC. | PRINTING DEGREE | MATERIAL AND PRINTING DESCRIPTION | LG MODEL | SUFFIX | LANGUAGE | PAGE | REMARK | |||
| BRAND | MODEL | P/NO. | ||||||||
| 01 | LG | F12G6NDN2H | MFL69515321 | 1 | OFFSET WHITE 80 g | F H/1 *Q8/Q7 N DIN(W)0~0(H) | A++QCDGA++QWDG | ENGLISHGERMANSLOVLNIAFFRENCHITALIAN | 220 | Mega TouchWashing Machine |

<< NOTES >>
- Material, printing and exterior size are refer to work tables.
- Printing, text size and line are based on LG design film.
- Exterier size on the drawing is cutting line.
- Before product controlled by criteria sample.
- The part should not contain prohibited substances(Pb,Cd,Hg,Cr+6,PBB,PBDE) and details should comply with LG standard of LG(83)-A-5501-34
| DR COMPLETED | |
| ILLUSTRATOR |
| △ | |||||
| △ | |||||
| △ | |||||
| △ | |||||
| APPROVED |
| TRIG. | UNIT SCAL#m | N/S | TITLE | MANUAL,OWNER'SDRUM-EXPORT|1/1 | ||
| MODELING | REVIEWED | RESIGNED APPROVED | ||||
| A/Wasacry 27.06.2016 | M.Grack Shortwell 27.06.2016 | N.Cm 27.06.2016 27.06.2016 | ||||
| LGEWRLG Electronics Inc. | RELATED DWG. | CWG.No. | MFL69515321 | |||
OWNER'S MANUAL
WASHING MACHINE

Before beginning installation, read these instructions carefully. This will simplify installation and ensure that the product is installed correctly and safely. Leave these instructions near the product after installation for future reference.
EN ENGLISH DE GERMAN
SL SLOVENIAN
FR FRENCH
IT ITALIAN
F H/1 2 G6/G7 N D(N)(W)(0\~9)(H)
F H/1 0 G6/G7 N D(N)(W)(0\~9)(H)
MFL69515321
Rev.00_27062016
TABLE OF CONTENTS
This manual may contain images or content different from the model you purchased. This manual is subject to revision by the manufacturer.
SAFETY INSTRUCTIONS ....03
Important Safety Instructions....04
Disposal of Your Old Appliance 07
INSTALLATION....08
Parts 08
Accessories 08
Specifications 09
Installation Place Requirements....10
Unpacking and Removing Transit Bolts....11
Using Anti-Slip Sheets (Optional)....12
Wooden Floors (Suspended Floors)....12
Leveling the Appliance....13
Connecting the Supply Hose....13
Installing the Drain Hose ....16
Electrical Connections (In the UK Only)....16
OPERATION ....17
Using the Washing Machine....17
Sorting Laundry....18
Adding Cleaning Products....19
Control Panel....21
Programme Table 22
Option Programme 26
SMART FUNCTION ......28
Using the Smart Diagnosis™ Function ......28
MAINTENANCE....29
Cleaning Your Washing Machine....29
Cleaning the Water Inlet Filter 29
Cleaning the Drain Pump Filter ....30
Cleaning the Dispenser Drawer....31
Tub Clean (Optional) 31
Caution on Freezing During Winter 32
TROUBLESHOOTING....34
Diagnosing Problems ....34
Error Messages....37
WARRANTY....39
OPERATING DATA 42
SAFETY INSTRUCTIONS
EN
The following safety guidelines are intended to prevent unforeseen risks or damage from unsafe or incorrect operation of the product.
The guidelines are separated into ‘WARNING’ and ‘CAUTION’ as described below.
This symbol is displayed to the indicate matters and operations that can cause risk. Read the part with this symbol carefully and follow the instructions in order to avoid risk.
⚠ WARNING - This indicates that the failure to follow the instructions can cause serious injury or death.
CAUTION - This indicates that the failure to follow the instructions can cause the minor injury or damage the product.
WARNING
To reduce the risk of fire, electric shock, or injury to persons when using your product, basic safety precautions should be followed, including the following:
Children in the Household
This appliance is not intended for use by persons (including children) with reduced physical, sensory or mental capabilities, or lack of experience and knowledge, unless they have been given supervision or instruction concerning use of the appliance by a person responsible for their safety. Children should be supervised to ensure that they do not play with the appliance.
For Use in Europe:
This appliance can be used by children aged from 8 years and above and persons with reduced physical, sensory or mental capabilities or lack of experience and knowledge if they have been given supervision or instruction concerning use of the appliance in a safe way and understand the hazards involved. Children shall not play with the appliance. Cleaning and user maintenance shall not be made by children without supervision.
Children of less than 3 years should be kept away unless continuously supervised.
Important Safety Instructions

WARNING
To reduce the risk of fire, electric shock, or injury to persons when using your product, basic safety precautions should be followed, including the following:
Installation
- Never attempt to operate this appliance if it is damaged, malfunctioning, partially disassembled, or has missing or broken parts, including a damaged cord or plug.
- This appliance should only be transported by two or more people holding the appliance securely.
- Do not install the appliance in a damp and dusty place. Do not install or store the appliance in any outdoor area, or any area that is subject to weathering conditions such as direct sunlight, wind, rain, or temperatures below freezing.
- Tighten the drain hose to avoid separation.
- If the power cord is damaged or the hole of the socket outlet is loose, do not use the power cord and contact an authorized service centre.
- This appliance must not be installed behind a lockable door, a sliding door or a door with a hinge on the opposite side to that of the appliance, in such a way that a full opening of the appliance door is restricted.
- Do not plug multiple socket outlets, an extension power cable or adapter with this appliance.
- This appliance must be grounded. In the event of malfunction or breakdown, grounding will reduce the risk of electric shock by providing a path of least resistance for electric current.
- This appliance is equipped with a power cord having an equipment-grounding conductor and a grounding power plug. The power plug must be plugged into an appropriate socket outlet that is installed and grounded in accordance with all local codes and ordinances.
- Improper connection of the equipment-grounding conductor can result in risk of electric shock. Check with a qualified electrician or service personnel if you are in doubt as to whether the appliance is properly grounded.
- Do not modify the power cord provided with the appliance. If it does not fit the outlet, have a proper outlet installed by a qualified electrician.
Operation
- Do not use a sharp object like drill or pin to press or separate an operation unit.
- Do not repair or replace any part of the appliance. All repairs and servicing must be performed by qualified service personnel unless specifically recommended in this Owner's Manual. Use only authorized factory parts.
- Keep the area underneath and around your appliances free of combustible materials such as lint, paper, rags, chemicals, etc.
- Do not put animals, such as pets into the appliance.
- Do not leave the appliance door open. Children may hang on the door or crawl inside the appliance, causing damage or injury.
- Use new hose or hose-set supplied with the appliance. Reusing old hoses can cause a water leak and subsequent property damage.
- Never reach into this appliance while it is operating. Wait until the drum has completely stopped.
- Do not put in, wash or dry articles that have been cleaned in, washed in, soaked in, or spotted with combustible or explosive substances (such as wax, oil, paint, gasoline, degreasers, drycleaning solvents, kerosene, vegetable oil, cooking oil, etc.). Improper use can cause fire or an explosion.
- In case of flood, disconnect the power plug and contact the LG Electronics customer information centre.
- Do not push down on the door excessively, when the appliance door is open.
- Do not touch the door during steam or drying programmes.
- Do not use flammable gas and combustible substances (benzene, gasoline, thinner, petroleum, alcohol, etc.) near the appliance.
- If the drain hose or supply hose is frozen during winter, use it only after thawing.
- Keep all washing detergents, softener and bleach away from children.
- Do not touch the power plug or the appliance controls with wet hands.
- When pulling out the power plug from an outlet, hold the power plug, not the cable.
- Do not bend the power cable excessively or place a heavy object on it.
-
Do not wash rugs, mats, shoes or pet blankets, or any other items other than clothes or sheets, in this machine.
-
This appliance must only be used for domestic household purposes and should not be used in mobile applications.
- If there is a gas leakage (isobutane, propane, natural gas, etc.), do not touch the appliance or power plug and ventilate the area immediately.
Maintenance
- Securely plug the power plug in the socket outlet after completely removing any moisture and dust.
- Disconnect the power cord before cleaning the appliance.
- Never unplug the appliance by pulling on the power cable. Always grip the power plug firmly and pull straight out from the socket outlet.
- Do not spray the water inside or outside the appliance to clean it.
Disposal
- Before discarding an old appliance, unplug it. Cut off the cable directly behind the appliance to prevent misuse.
- Dispose of all packaging materials (such as plastic bags and styrofoam) away from children. The packaging material can cause suffocatoions.
- Remove the door before disposing of or discarding this appliance to avoid the danger of children or small animals getting trapped inside.
Disposal of Your Old Appliance

- This crossed-out wheeled bin symbol indicates that waste electrical and electronic products (WEEE) should be disposed of separately from the municipal waste stream.
- Old electrical products can contain hazardous substances so correct disposal of your old appliance will help prevent potential negative consequences for the environment and human health. Your old appliance may contain reusable parts that could be used to repair other products, and other valuable materials that can be recycled to conserve limited resources.
- You can take your appliance either to the shop where you purchased the product, or contact your local government waste office for details of your nearest authorised WEEE collection point. For the most up to date information for your country please see www.lg.com/global/recycling.
INSTALLATION
EN
Parts

① Transit bolts
2 Power plug
3 Drawer
4 Control panel
5 Drum
6 Door
⑦ Drain hose
8 Drain plug
9 Drain pump filter
10 Cover cap
(Location may vary depending on products)
11 Adjustable feet
Accessories

Cold supply hose (1EA)
(Option: Hot (1EA))

Spanner Anti-slip sheets

(Optional)
Specifications
| Model | F H/1 2 G6/G7 N D(N)(W)(0~9)(H)F H/1 0 G6/G7 N D(N)(W)(0~9)(H) |
| Wash Capacity 6 kg | |
| Power Supply 220 - 240 V~, 50 Hz | |
| Size 600 mm (W) x 440 mm (D) x 850 mm (H) | |
| Product Weight 60 kg | |
| Permissible Water pressure 0.1 - 1.0 MPa (1.0 - 10.0 kgf / cm2) | |
- Appearance and specifications may change without notice to improve the quality of the product.
• The external hot water supply MUST NOT exceed 65°C
- No further backflow protection required for connection to the water supply.
EN
Installation Place Requirements Location

Level Floor : Allowable slope under the entire appliance is 1°.
Power Outlet : Must be within 1.5 meters of either side of the location of the appliance.
- Do not overload the outlet with more than one appliance.
Additional Clearance : For the wall, 10 cm: rear
/2 cm: right & left side
- Do not place or store laundry products on top of the appliance at any time.
• These products may damage the finish or controls.

WARNING
- The plug must be plugged into an appropriate outlet that is properly installed and grounded in accordance with all local codes and ordinances.
Positioning
• Install the appliance on a flat hard floor.
- Make sure that air circulation around the appliance is not impeded by carpets, rugs, etc.
- Never try to correct any unevenness in the floor with pieces of wood, cardboard or similar materials under the appliance.
- If it is impossible to avoid positioning the appliance next to a gas cooker or coal burning stove, an insulation (85x60 cm) covered with aluminum foil on the side facing the cooker or stove must be inserted between the two appliances.
- Do not install your appliance in rooms where freezing temperatures may occur. Frozen hoses may burst under pressure. The reliability of the electronic control unit may be impaired at temperatures below freezing point.
- Ensure that when the appliance is installed, it is easily accessible for an engineer in the event of a breakdown.
- With the appliance installed, adjust all four feet using the transit bolt spanner provided to ensure the appliance is stable, and a clearance of approximately 20 mm is left between the top of the appliance and the underside of any work-top.
- If the appliance is delivered in winter and temperatures are below freezing, place the appliance at room temperature for a few hours before putting it into operation.

WARNING
- This equipment is not designed for maritime use or for use in mobile installations such as caravans, aircraft etc.
Electrical Connection
- Do not use an extension cord or double adapter.
- Always unplug the appliance and turn off the water supply after use.
- Connect the appliance to an earthed socket in accordance with the current wiring regulations.
- The appliance must be positioned so that the plug is easily accessible.
- Repairs to the appliance must only be carried out by qualified personnel. Repairs carried out by inexperienced persons may cause injury or serious malfunctioning. Contact your local service centre.
Unpacking and Removing Transit Bolts
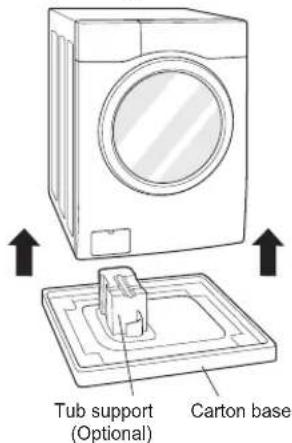
1 Lift the appliance off the foam base.
- After removing the carton and shipping material, lift the appliance off the foam base. Make sure the tub support comes off with the base and is not stuck to the bottom of the appliance.
- If you must lay the appliance down to remove the carton base, always protect the side of the appliance and lay it carefully on its side. Do not lay the appliance on its front or back.
2 Remove the bolt assemblies.
- Starting with the bottom two transit bolts, use the spanner (included) to fully loosen all transit bolts by turning them counterclockwise. Remove the bolt assemblies by wiggling them slightly while pulling them out.

3 Install the hole caps.
- Locate the hole caps included in the accessory pack and install them in the shipping bolt holes.

NOTE
- Save the bolt assemblies for future use. To prevent damage to internal components, Do not transport the washing machine without reinstalling the transit bolts.
- Failure to remove transit bolts and retainers may cause severe vibration and noise, which can lead to permanent damage to the washing machine. The cord is secured to the back of the washing machine with a shipping bolt to help prevent operation with transit bolts in place.
Using Anti-Slip Sheets (Optional)
If you install the appliance on a slippery surface, it may move because of excessive vibration. Incorrect leveling may cause malfunction through noise and vibration. If this occurs, install the anti-slip sheets under the leveling feet and adjust the level.
1 Clean the floor to attach the anti-slip sheets.
- Use a dry rag to remove and clean foreign objects and moisture. If moisture remains, the anti-slip sheets may slip.
2 Adjust the level after placing the appliance in the installation area.
3 Place the adhesive side of the anti-slip sheets on the floor.
- It is most effective to install the anti-slip sheets under the front legs. If it is difficult to place the pads under the front legs, place them under the back legs.

4 Ensure the appliance is level.
- Push or rock the top edges of the appliance gently to make sure that the appliance does not rock. If the appliance rocks, level the appliance again.
NOTE
- You can obtain anti-slip sheets from the LG Service Centre.
Wooden Floors (Suspended Floors)
- Wooden floors are particularly susceptible to vibration. - To reduce vibration we recommend you place rubber cups at least 15 mm thick under each foot of the appliance, secured to at least two floor beams with screws.
Rubber cup


- If possible install the appliance in one of the corners of the room, where the floor is more stable. - Fit the rubber cups to reduce vibration.
NOTE
- Proper placement and leveling of the washing machine will ensure long, regular, and reliable operation.
- The washing machine must be 100% horizontal and stand firmly in position.
- It must not 'Seesaw' across corners under the load.
- The installation surface must be clean, free from floor wax and other lubricant coatings.
- Do not let the feet of the washing machine get wet. Failure to do so may cause vibration or noise.
- You can obtain rubber cups from the LG Service Centre.
Leveling the Appliance
If the floor is uneven, turn the adjustable feet as required (Do not insert pieces of wood etc. under the feet). Make sure that all four feet are stable and resting on the floor and then check that the appliance is perfectly level (Use a spirit level).
- Once the appliance is level, tighten the lock nuts up towards the base of the appliance. All lock nuts must be tightened.
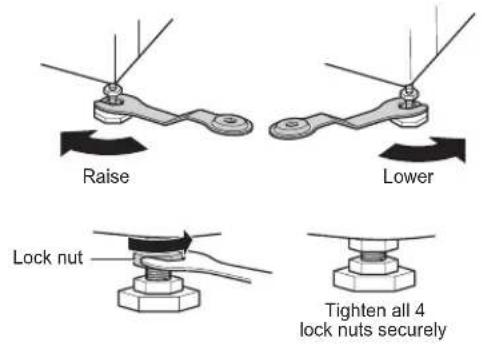
Diagonal Check
- When pushing down the edges of the top plate diagonally, the appliance should not move up and down at all (Check both directions). If the appliance rocks when pushing the machine top plate diagonally, adjust the feet again.
NOTE
- Timber or suspended type flooring may contribute to excessive vibration and unbalance.
- If the washing machine is installed on a raised platform, it must be securely fastened in order to eliminate the risk of falling off.
Connecting the Supply Hose
- Water supply pressure must be between 0.1 MPa and 1.0 MPa (1.0–10.0 kgf/cm ^2 ).
- Do not strip or crossthread when connecting supply hose to the valve.
- If the water supply pressure is more than 1.0 MPa, a decompression device should be installed.
- Periodically check the condition of the hose and replace the hose if necessary.
Checking the Rubber Seal on the Supply Hose
Two rubber seals are supplied with the water supply hoses.
They are used for preventing water leaks. Make sure the connection to taps is sufficiently tight.


EN
Connecting Hose to Water Tap
Connecting Screw-Type Hose to Tap with Thread
Screw the hose connector onto the water supply tap.

natural_image
Illustration of a faucet with a valve and pipe, showing fluid flow direction (no text or symbols)Connecting Screw-Type Hose to Tap Without Thread
1 Loose the four fixing screws.

2 Remove the guide plate if the tap is too large to fit the adapter.

3 Push the adapter onto the end of the tap so that the rubber seal forms a watertight connection. Tighten the four fixing screws.

4 Push the supply hose vertically upwards so that the rubber seal within the hose can adhere completely to the tap and then tighten it by screwing it to the right.
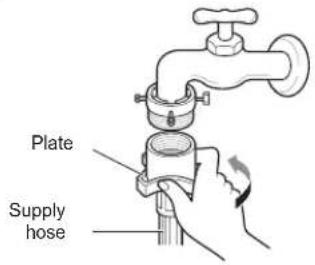
Connecting One Touch Type Hose to Tap Without Thread
1 Unscrew the adapter ring plate and loose the four fixing screws.
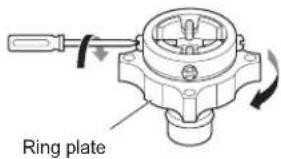
2 Remove the guide plate if the tap is too large to fit the adapter.
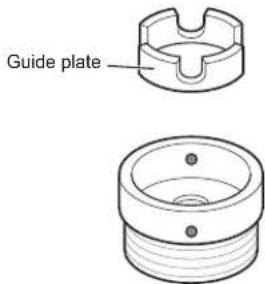
3 Push the adapter onto the end of the tap so that the rubber seal forms a watertight connection.
Tighten the four fixing screws and the adapter ring plate.
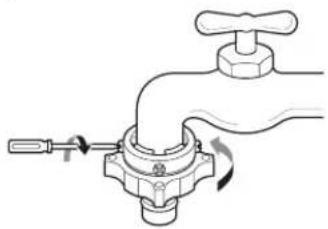
natural_image
Illustration of a hand valve with a wrench and rotating arrow (no text or symbols)4 Pull the connector latch plate down, push the supply hose onto the adapter, and release the connector latch plate. Make sure the adapter locks into place.
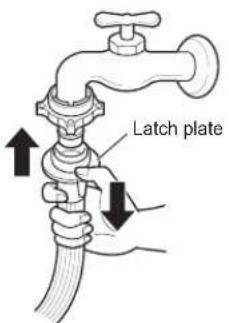
NOTE
- After connecting the supply hose to the water tap, turn on the water tap to flush out foreign substances (dirt, sand, sawdust, and etc.) in the water lines. Let the water drain into a bucket, and check the water temperature.
Connecting Hose to Appliance
Attach the cold water line to the cold water supply on the back of the washer.

NOTE
- After completing connection, if water leaks from the hose, repeat the same steps.
Use the most conventional type of tap for the water supply. In case the tap is square or too big, remove the guide plate before inserting the tap into the adaptor.
Using the Horizontal Tap
Horizontal tap
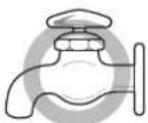
Extension tap

Square tap

Installing the Drain Hose
- The drain hose should not be placed higher than 100 cm above the floor. Water in the appliance may not drain or may drain slowly.
- Securing the drain hose correctly will protect the floor from damage due to water leakage.
- If the drain hose is too long, do not force it back into the appliance. This will cause abnormal noise.

- When installing the drain hose to a sink, secure it tightly with string.
- Securing the drain hose correctly will protect the floor from damage due to water leakage.

natural_image
Line drawing of a kitchen sink with faucet and chain (no text or symbols)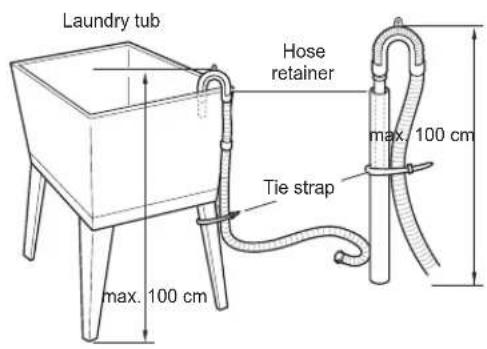
Electrical Connections (In the UK Only)
The wires in the mains lead are coloured in accordance with the following code:
Green and Yellow: Earth
Blue: Neutral
Brown: Live
This appliance must be earthed.

As the colours of the wires in the mains lead of this apparatus may not correspond with the coloured markings identifying the terminals in your plug, proceed as follows:
The green and yellow wire must be connected to the terminal in the plug which is marked with the letter E or by the earth symbol ( ± ) or coloured Green or Green and Yellow.
The blue wire must be connected to the terminal which is marked with the letter N or coloured Black.
The brown wire must be connected to the terminal which is marked with the letter L or coloured Red.
If a 13 amp (BS 1363) plug is used, fit a 13 amp BS 1362 fuse.
OPERATION
EN
Using the Washing Machine
Before the first wash, select a washing programme, allow the washing machine to wash without clothing. This will remove residue and water from the drum that may have been left during manufacturing.
1 Sort laundry and load items.
- Sort laundry by fabric type, soil level, colour and load size as needed. Open the door and load items into the washing machine.

2 Add cleaning products and/or detergent and softener.
- Add the proper amount of detergent to the detergent dispenser drawer. If desired, add bleach or fabric softener to the appropriate areas of the dispenser.

3 Turn on the washing machine.
- Press the Power button to turn on the washing machine.

natural_image
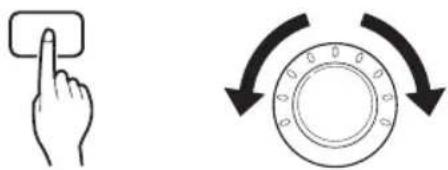
Two hand icons pointing at circular buttons with a power button (no text or symbols)4 Choose the desired washing cycle.
- Press the cycle button repeatedly or turn the cycle selector knob until the desired cycle is selected.


natural_image
Diagram of a circular mechanical component with two curved arrows indicating rotational motion (no text or symbols)5 Begin cycle.
- Press the Start/Pause button to begin the cycle. The washing machine will agitate briefly without water to measure the weight of the load. If the Start/Pause button is not pressed within 5 minutes, the washing machine will shut off and all settings will be lost.

6 End of cycle.
- When the cycle is finished, a melody will sound. Immediately remove your clothing from the washing machine to reduce wrinkling. Check around the door seal when removing the load for small items that may be caught in the seal.
Sorting Laundry
1 Look for a care label on your clothes.
- This will tell you about the fabric content of your garment and how it should be washed.
- Symbols on the care labels.

Wash temperature

Normal machine wash

Permanent press

Delicate

Hand wash

Do not wash
2 Sorting laundry.
- To get the best results, sort clothes into loads that can be washed with the same wash cycle.
- Different fabrics need to be washed at varying temperatures and spin speeds.
-
Always sort dark colours from pale colours and whites. Wash separately as dye and lint transfer can occur causing discolouration of white and pale garments. If possible, do not wash heavily soiled items with lightly soiled ones.
-
Soil (Heavy, Normal, Light):
Separate clothes according to amount of soil. - Colour (White, Lights, Darks):
Separate white fabrics from coloured fabrics. - Lint (Lint producers, Collectors):
Wash lint producers and lint collectors separately.
3 Caring before loading.
- Combine large and small items in a load. Load large items first.
- Large items should not be more than half the total wash load. Do not wash single items. This may cause an unbalanced load. Add one or two similar items.
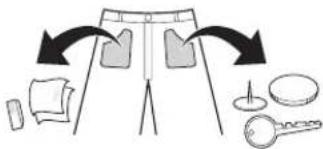
- Check all pockets to make sure that they are empty. Items such as nails, hair clips, matches, pens, coins and keys can damage both your washing machine and your clothes.
- Close zippers, hooks and strings to make sure that these items don't snag on other clothes.
- Pre-treat dirt and stains by brushing a small amount of detergent dissolved water onto stains to help lift dirt.
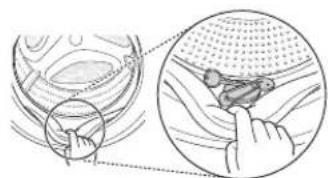
- Check the folds of the flexible gasket (gray) and remove any small articles.
CAUTION
- Check inside the drum and remove any items from a previous wash.

- Remove any clothing or items from the flexible gasket to prevent clothing and gasket damage.
natural_image
Medical illustration showing a hand holding a tool near a textured surface, with an inset close-up of the tool (no text or symbols present)Adding Cleaning Products
Detergent Dosage
- Detergent should be used according to the instruction of the detergent manufacturer and selected according to type, colour, soiling of the fabric and washing temperature.
- If too much detergent is used, too many suds can occur and this will result in poor washing results or cause heavy load to the motor.
- If you wish to use liquid detergent follow the guidelines provided by the detergent manufacturer.
- You can pour liquid detergent directly into the main detergent drawer if you are starting the cycle immediately.
- Do not use liquid detergent if you are using Time delay, or if you have selected Pre Wash, as the liquid may harden.
- If too many suds occur, reduce the detergent amount.
- Detergent usage may need to be adjusted for water temperature, water hardness, size and soil level of the load. For best results, avoid oversuding.
- Refer to the label of the clothes, before choosing the detergent and water temperature.
- When using the washing machine, use designated detergent for each type of clothing only:
– General powdered detergents for all types of fabric
– Powdered detergents for delicate fabric
– Liquid detergents for all types of fabric or designated detergents only for wool
- For better washing performance and whitening, use detergent with the general powdered bleach.
- Detergent is flushed from the dispenser at the beginning of the cycle.
NOTE
- Do not let the detergent harden. Doing so may lead to blockages, poor rinse performance or odour.
Full load : According to manufacturer's recommendation.
• Part load : 3/4 of the normal amount
• Minimum load : 1/2 of full load
Adding Detergent and Fabric Softener
Adding Detergent
- Main wash only → ∪
- Pre wash+Main wash → ∪ · ∪
NOTE
- Too much detergent, bleach or softener may cause an overflow.
- Be sure to use the appropriate amount of detergent.
Adding Fabric Softener
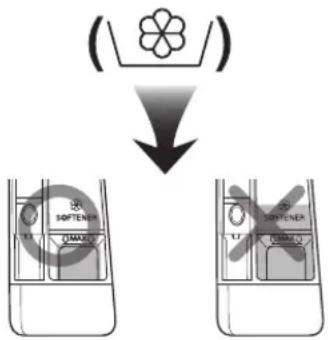
- Do not exceed the maximum fill line. Overfilling can cause early dispensing of the fabric softener, which may stain clothes. Close the dispenser drawer slowly.
EN
- Do not leave the fabric softener in the detergent drawer for more than 2 days (Fabric softener may harden).
- Softener will automatically be added during the last rinse cycle.
- Do not open the drawer when water is being supplied.
- Solvents (benzene, etc.) must not be used.
NOTE
- Do not pour fabric softener directly on the clothes.
Adding Water Softener
- A water softener, such as anti-limescale (e.g. Calgon) can be used to cut down on the use of detergent in extremely hard water areas. Dispense according to the amount specified on the packaging. First add detergent and then the water softener.
- Use the quantity of detergent required for soft water.

natural_image
Line drawing of a hand pressing down on a device component (no text or symbols visible)Using Tablet
1 Open the door and put tablets into the drum.

natural_image
Diagram showing a washing machine with a lid removed and a magnified inset, alongside two circular objects (no text or symbols)2 Load the laundry into the drum and close the door.

natural_image
Diagram showing a washing machine with a close-up of its lid and a separate T-shirt, illustrating the process (no text or symbols present)Control Panel

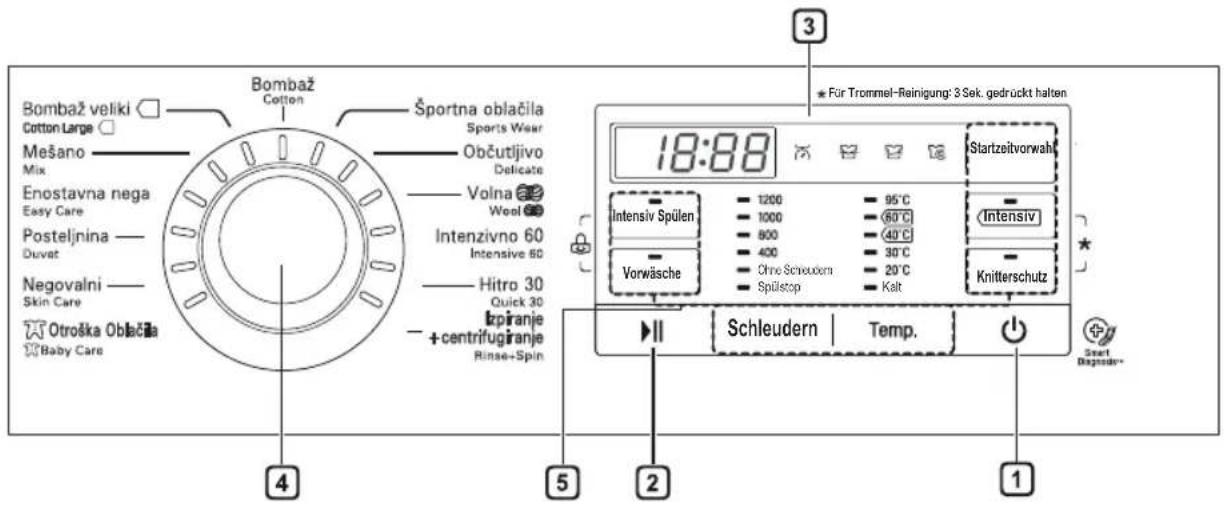
- Press the Power button to turn the washing machine on.
2 Start/Pause Button
- This Start/Pause button is used to start the wash cycle or pause the wash cycle.
- If a temporary stop of the wash cycle is needed, press the Start/Pause button.
3 Display
- The display shows the settings, estimated time remaining, options, and status messages. When the product is turned on, the default settings in the display will illuminate.
- The display shows estimate time remaining. While the size of the load is being calculated automatically, blinking □ or 'Detecting' appears.
4 Programme Knob
- Programmes are available according to laundry type.
- Lamp will light up to indicate the selected programme.
5 Options
- This allows you to select an additional programme and will light when selected.
- Use these buttons to select the desired programme options for the selected cycle.
Programme Table
Washing Programme
| Programme Description Fabric Type Proper Temp. | Maximum Load | |||
| Cotton (Koch-/Buntwäsche) | Provides better performance by combining various drum motions. | Coloured fast garments (shirts, nightdresses, pajamas, etc) and normally soiled cotton load (underwear). | 40 °C(Cold to 95 °C) | Rating |
| Cotton Large (Baumwolle+) | Provides optimised washing performance for large amount of laundry with less energy consumption. | 60 °C(Cold to 60 °C) | ||
| Easy Care Suitable for casual shirts that do not need ironing after washing. | Polyamide, acrylic, polyester | 40 °C(Cold to 60 °C) | 3.0 kg | |
| Mix (Mix) | Enables various fabrics to be washed simultaneously. | Various kind of fabrics except special garments (silk/delicate, sports wear, dark clothes, wool, duvet/curtains). | 40 °C(Cold to 40 °C) | |
| Baby Care Remove solid and protein stain and provide better rinse performance | Lightly soiled baby wear | 60 °C(60 °C to 95 °C) | 4.0 kg | |
| Skin Care (Skin Care) | Remove efficiently detergent residue in clothes | Fabrics which will be in direct contact with the skin, e.g. underwear, nappies, towelling, bed linen, pillow and mattress covers | 40 °C(Cold to 60 °C) | Rating |
| Duvet For large items such as bed cover, pillows, sofa covers, etc. | Cotton bedding except special garments (delicates, wool, silk, etc.) with filling: duvets, pillows, blankets, sofa covers with light filling. | 40 °C(Cold to 40 °C) | 1 single size | |
| Sports Wear Suitable for sports wear such as jogging clothes and running wear. Sympatex. | 2.0 kg | |||
EN
| Programme Description Fabric Type Proper Temp. | Maximum Load | |||
| Delicate (Feinwäsche) | For delicate clothes such as underwear, blouse, etc. | Delicate, easily damaged laundry. | 20 °C (Cold to 40 °C) | 2.0 kg |
| Wool (Wolle) | Enables to wash wool fabrics. (Please use detergent for machine washable woolens). | Machine washable woolens with pure new wool only. | 40 °C (Cold to 40 °C) | |
| Quick 30 (Kurz 30) | Provides fast washing time for small loads and lightly soiled clothes. | Colored laundry which is lightly soiled fast. | 20 °C (Cold to 40 °C) | |
| Intensive 60 (Intensiv 60) | Within 60mins provide better washing performance and energy efficiency. | Cotton and mix fabrics. (Special programme within 60 mins for normally soiled laundry). | 60 °C (Cold to 60 °C) | 4.0 kg |
| Rinse+Spin (Spülen + Schleudern) | Use for laundry that need rinsing only or to add rinse-added fabric softener to laundry. | Normal fabrics which can be washable. | - Rating | |
- Water Temperature: Select the appropriate water temperature for chosen wash cycle. Always follow garment manufacturer's care label or instructions when washing.
- Set program at "Baumwolle+ 40°C + Intensiv (Half Load)", "Baumwolle+ 60°C + Intensiv (Half Load)", "Baumwolle+ 60°C + Intensiv (Full Load)" option for test in conformity with EN60456 and Regulation 1015/2010.
- Standard 60°C cotton program : Baumwolle+ □ + 60 °C + Intensiv (Full Load)
- Standard 60°C cotton program : Baumwolle+ □ + 60 °C + Intensiv (Half Load)
- Standard 40°C cotton program : Baumwolle+ □ + 40 °C + Intensiv (Half Load)
- The test results depend on water pressure, water hardness, water inlet temperature, room temperature, type and amount of load, degree of soiling utilized detergent, fluctuations in the main electricity supply and chosen additional options.
NOTE
• Neutral detergent is recommended.
Extra Options
| Programme Time | Delay Medic Rinse (Startzeitvorwahl) | Pre Wash Intensive Crease Care (Intensiv Spülen) | (Vorwäsche) | (Intensiv) | (Knitterschutz) |
| Cotton (Koch-/Buntwäsche) | ● ● ● ● | ● | |||
| Cotton Large (Baumwolle+) | ● ● ● ● | ● | |||
| Easy Care (Pflegeleicht) | ● ● ● ● | ● | |||
| Mix (Mix) | ● ● ● ● | ● | |||
| Baby Care (Babybekleidung) | ● ● ** | ● ** ● ● | |||
| Skin Care (Skin Care) | ● ● ● ● | ● | |||
| Duvet (Bettdecken) | ● ● ● | ||||
| Sports Wear (Sportswear) | ● ● ● | ||||
| Delicate (Feinwäsche) | ● ● ● | ||||
| Wool (Wolle) | ● | ● | |||
| Quick 30 (Kurz 30) | ● ● ● | ||||
| Intensive 60 (Intensiv 60) | ● ● * ● | ||||
| Rinse+Spin (Spülen + Schleudern) | ● | ● |
- *: This option is automatically included in the cycle and can not be deleted.
- **: This option is automatically included in the cycle and can be deleted.
Operating Data
| Programme | Max RPM | |
| 1200 | 1000 | |
| Cotton (Koch-/Buntwäsche) | 1200 | 1000 |
| Cotton Large (Baumwolle+) | 1200 | 1000 |
| Easy Care (Pflegeleicht) | 800 | 800 |
| Mix (Mix) | 1200 | 1000 |
| Baby Care (Babybekleidung) | 800 | 800 |
| Skin Care (Skin Care) | 1200 | 1000 |
| Duvet (Bettdecken) | 800 | 800 |
| Sports Wear (Sportswear) | 800 | 800 |
| Delicate (Feinwäsche) | 800 | 800 |
| Wool (Wolle) | 800 | 800 |
| Quick 30 (Kurz 30) | 1200 | 1000 |
| Intensive 60 (Intensiv 60) | 1200 | 1000 |
| Rinse+Spin (Spülen + Schleudern) | 1200 | 1000 |
NOTE
• Information of main washing programmes at half load.
| Program | Time in minutes | Remaining moisture content | Water in Liter | Energy in kWh | |
| 6 kg | 1200 rpm | 1000 rpm | 6 kg 6 kg | ||
| Cotton (40 °C)(Koch-/ Buntwäsche 40 °C) | 96 53 % | 53% | 60 | 0,56 | |
| Cotton Large (60 °C)(Baumwolle+ 60 °C) | 116 53 % | 53% | 48 | 0,84 | |
EN
Option Programme
Time Delay (Startzeitvorwahl)
You can set a time delay so that the washing machine will start automatically and finish after a specified time interval.
1 Press the Power button.
2 Select a washing programme.
3 Press the Startzeitvorwahl button to set time required.
4 Press the Start/Pause button.
NOTE
- The delay time is the time to the end of the programme, not the start. The actual running time may vary due to water temperature, wash load and other factors.
- To cancel the Time Delay function, the power button should be pressed.
- Avoid using liquid detergent for this option.
If you want to prevent creasing, the Crease Care programme is recommended.
1 Press the Power button.
2 Select a washing programme.
3 Press the Knitterschutz button.
4 Press the Start/Pause button.
Medic Rinse (Intensiv Spülen)
For best results or for cleaner rinsing. This allows the final rinse to be heated to 40 degrees.
1 Press the Power button.
2 Select a washing programme.
3 Press the Intensiv Spülen button and set time required.
4 Press the Start/Pause button.
If the laundry is heavily soiled, the Pre Wash programme is recommended.
1 Press the Power button.
2 Select a washing programme.
3 Press the Vorwäsche button.
4 Press the Start/Pause button.
Intensive (Intensiv)
If the laundry is normal and heavily soiled, Intensiv option is effective.
1 Press the Power button.
2 Select a cycle.
3 Press the Intensiv button.
4 Press the Start/Pause button.
Temp.(Temp.)
The Temp. button selects the wash and rinse temperature combination for the selected programme. Press this button until the desired setting is lit. All rinses use cold tap water.
- Select the water temperature suitable for the type of load you are washing. Follow the garment fabric care labels for best results.
Rinse
Rinse Hold (Spülen)
The programme is paused until start button is pressed again when rinse is finished.
Spin (Schleudern)
- Spin speed level can be selected by pressing the Schleudern button repeatedly.
- Spin Only
1 Press the Power button.
2 Press the Schleudern button to select RPM.
3 Press the Start/Pause button.
NOTE
- When you select No Spin, it will still rotate for a short time to drain quickly.
Use this option to disable the controls. This feature can prevent children from changing cycles or operating the appliance
Locking the Control Panel
1 Press and hold the Intensiv Spülen and Vorwäsche button for three seconds.
2 A beeper will sound, and will appear on the display.
When the Child Lock is set, all buttons are locked except the Power button.
NOTE
- Turning off the power will not reset the child lock function. You must deactivate child lock before you can access any other functions.
Unlocking the Control Panel
Press and hold the Intensiv Spülen and Vorwäsche button for three seconds.
- A beeper will sound and the remaining time for the current programme will reappear on the display.
Beep On / Off
1 Press the Power button.
2 Press the Start/Pause button.
3 Press and hold the Startzeitvorwahl and Knitterschutz button simultaneously for 3 seconds to set the Beep on/off function.
NOTE
- Once the Beep on/off function is set, the setting is memorized even after the power is turned off.
- If you want to turn the Beeper off, simply repeat this process.
SMART FUNCTION
EN
Using the Smart Diagnosis™ Function
Use this function if you need an accurate diagnosis by an LG Electronics service centre when the product malfunctions or fails. Use this function only to contact the service representative, not during normal operation.
1 Press the Power button to turn on the washing machine. Do not press any other buttons or turn the programme selector knob.
2 When instructed to do so by the call centre, place the mouthpiece of your phone close to the Power button.

3 Press and hold the Temp. button for three seconds, while holding the phone mouthpiece to the icon or Power button.
4 The display is turned off and keep the phone in place until the tone transmission has finished.
- For best results, do not move the phone while the tones are being transmitted.
- If the call centre agent is not able to get an accurate recording of the data, you may be asked to try again.

5 Once the tones have stopped, resume your conversation with the call centre agent, who will then be able to assist you using the information transmitted for analysis.
NOTE
- The Smart Diagnosis™ function depends on the local call quality.
- The communication performance will improve and you can receive better service if you use the home phone.
- If the Smart Diagnosis™ data transfer is poor due to poor call quality, you may not receive the best Smart Diagnosis™ service.
EU Conformity Notice
CE
Hereby, LG Electronics European Shared Service Center B.V., declares that this Washing machine is compliant with the essential requirements and other relevant provisions of Directive 1999/5/EC. The complete Declaration of Conformity may be requested through the following postal address:
LG Electronics European Shared Service Center B.V. Krijgsman 1
1186 DM Amstelveen
The Netherlands
or can be requested at our dedicated DoC website:
http://www.lg.com/global/support/cedoc/cedoc#
MAINTENANCE
EN

WARNING
- Unplug the washing machine before cleaning to avoid the risk of electric shock. Failure to follow this warning may result in serious injury, fire, electric shock, or death.
- Never use harsh chemicals, abrasive cleaners, or solvents to clean the washing machine. They may damage the finish.
Cleaning Your Washing Machine
Care After Wash
- After the cycle is finished, wipe the door and the inside of the door seal to remove any moisture.
- Leave the door open to dry the drum interior.
- Wipe the body of the washing machine with a dry cloth to remove any moisture.

natural_image
Illustration of a mechanical device with a circular component and hands holding a handle (no text or symbols)Cleaning the Exterior
Proper care of your washing machine can extend its life.
Door:
- Wash with a damp cloth on the outside and inside and then dry with a soft cloth.
Exterior:
- Immediately wipe off any spills.
- Wipe with a damp cloth.
- Do not press the surface or the display with sharp objects.
Cleaning the Interior
- Use a towel or soft cloth to wipe around the washing machine door opening and door glass.
- Always remove items from the washing machine as soon as the cycle is complete. Leaving damp items in the washing machine can cause wrinkling, colour transfer, and odour.
- Run the Tub Clean programme once a month (or more often if needed) to remove detergent buildup and other residue.
Cleaning the Water Inlet Filter
- Turn off the supply taps to the machine if the washing machine is to be left for any length of time (e.g. holiday), especially if there is no floor drain (gully) in the immediate vicinity.
- E icon will be displayed on the control panel when water is not entering the detergent drawer.
- If water is very hard or contains traces of lime deposit, the water inlet filter may become clogged. It is therefore a good idea to clean it occasionally.
1 Turn off the water tap and unscrew the water supply hose.
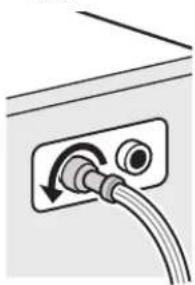
natural_image
Simple line drawing of a cable inserted into a device with a circular component, no text or symbols present.2 Clean the filter using a hard bristle brush.
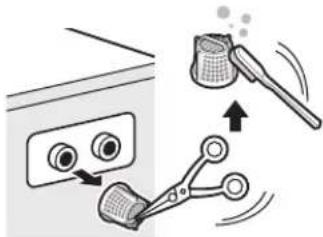
EN
Cleaning the Drain Pump Filter
- The drain filter collects threads and small objects left in the laundry. Check regularly that the filter is clean to ensure smooth running of your washing machine.
- Allow the water to cool down before cleaning the drain pump, carrying out emergency emptying, or opening the door in an emergency.
1 Open the cover cap and pull out the hose.

natural_image
Illustration of a hand holding a clipboard with arrows indicating direction (no text or symbols)2 Unplug the drain plug and open the filter by turning it to the left.
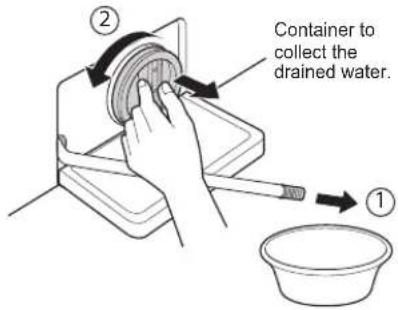
3 Remove any extraneous matter from the pump filter.

4 After cleaning, turn the pump filter and insert the drain plug.
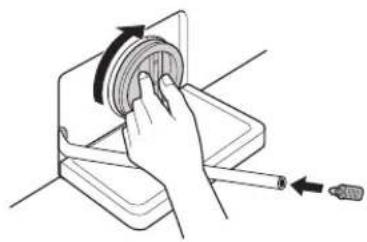
natural_image
Hand holding a circular object with an arrow indicating rotation, next to a tool (no text or symbols)5 Close the cover cap.

natural_image
Illustration of a hand pressing down on a laptop keyboard with arrows indicating press or scroll (no text or symbols)CAUTION
- First drain using the drain hose and then open the pump filter to remove any threads or objects.
- Be careful when draining, as the water may be hot.
Cleaning the Dispenser Drawer
Detergent and fabric softener may build up in the dispenser drawer. Remove the drawer and inserts and check for buildup once or twice a month.
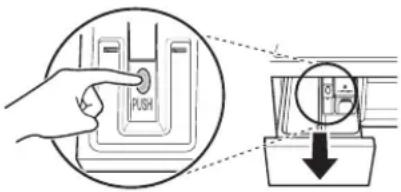
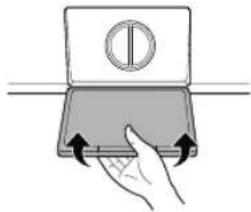
1 Remove the detergent dispenser drawer by pulling it straight out until it stops.
- Press down hard on the disengage button and remove the drawer.
2 Remove the inserts from the drawer.
- Rinse the inserts and the drawer with warm water to remove buildup from laundry products. Use only water to clean the dispenser drawer. Dry the inserts and drawer with a soft cloth or towel.
3 To clean the drawer opening, use a cloth or small, non-metal brush to clean the recess. - Remove all residue from the upper and lower parts of the recess.
4 Wipe any moisture off the recess with a soft cloth or towel.
5 Return the inserts to the proper compartments and refit the drawer.
Tub Clean (Optional)
Tub Clean is a special programme to clean the inside of the washing machine.
A higher water level is used in this programme at higher spin speed. Perform this programme regularly.
1 Remove any clothing or items from the washing machine and close the door.
2 Open the dispenser drawer and add anti-limescale (e.g. Calgon) to the main wash compartment.
- For tablets put into the drum.
3 Close the dispenser drawer slowly.
4 Power on and then press and hold Intensive and Crease Care button for 3 seconds. Then tcl will be displayed on the display.
5 Press the Start/Pause button to start.
6 After the programme is complete, leave the door open to allow the washing machine door opening, flexible gasket and door glass to dry.
CAUTION
- If there is a child, be careful not to leave the door open for too long.
NOTE
- Do not add any detergent to the detergent compartments. Excessive suds may generate and leak from the washing machine.
EN
Caution on Freezing During Winter
- When frozen, the product does not operate normally. Make sure to install the product where it will not freeze during winter.
- In case the product must be installed outside on a porch or in other outdoor conditions, make sure to check the following.
How to Keep the Product from Freezing
- After washing, remove water remaining inside the pump completely with the opening hose plug used for removal of residual water. When the water is removed completely, close the hose plug used for removal of residual water and cover cap.

- Hang down drain hose to pull out water inside the hose completely.


CAUTION
- When the drain hose is installed in a curved shape, the inner hose may freeze.
- After closing the tap, disconnect the cold supply hose from the tap, and remove water while keeping the hose facing downwards.

Check for Freezing
- If water does not drain when opening the hose plug used for removal of residual water, check the drainage unit.

- Turn the power on, choose a washing programme, and press the Start/Pause button.

- When F F is shown in display window while the product is in operation, check water supply unit and drainage unit (Some models do not have an alarm function that indicates freezing).
NOTE
- Check that water is coming into the detergent drawer while rinsing, and water is draining through the drain hose while spinning.
EN
How to Handle Freezing
- Make sure to empty the drum, pour warm water of 50–60 °C up to the rubber part inside the drum, close the door, and wait for 1–2 hours.


CAUTION
- When the drain hose is installed in a curved shape, the inner hose may freeze.
- Open the cover cap and hose plug used for removal of residual water to extract water completely.
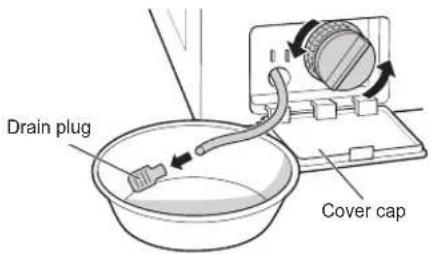
NOTE
- If water does not drain, this means the ice is not melted completely. Wait more.
- When water is removed completely from the drum, close the hose plug used for removal of residual water, choose a washing programme, and press the Start/Pause button.

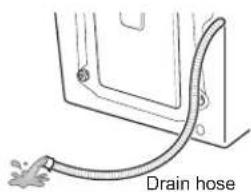
NOTE
- Check that water is coming into the detergent drawer while rinsing, and water is draining through the drain hose while spinning.
- When water supply problems occur, take the following measures.
- Turn off the tap, and thaw out the tap and both connection areas of supply hose of the product using a hot water cloth.
- Take out supply hose and immerse in warm water below 50–60 °C.

TROUBLESHOOTING
EN
- Your washing machine is equipped with an automatic error-monitoring system to detect and diagnose problems at an early stage. If your washing machine does not function properly or does not function at all, check the following before you call for service:
Diagnosing Problems
| Symptoms Reason Solution | ||
| Rattling and clanking noise | Foreign objects such as coins or safety pins may be in drum or pump. | ·Check all pockets to make sure that they are empty. Items such as clips, matches, pens, coins, and keys can damage both your washer and your clothes.·Close zippers, hooks, and drawstrings to prevent these items from snagging or tangling on other clothes. |
| Thumping sound | Heavy wash loads may produce a thumping sound. This is usually normal. | ·If sound continues, washing machine is probably out of balance. Stop and redistribute wash load. |
| Vibrating noise | Have all the transit bolts and tub support been removed?Are all the feet resting firmly on the ground? | ·If not removed during installation, refer to Installation guide for removing transit bolts.·Check that the appliance is perfectly level (Use a spirit level). |
| Water leaks | Supply hoses or drain hose are loose at tap or washing machine.House drain pipes are clogged. | ·Check and tighten hose connections.·Unclog drain pipe. Contact plumber if necessary. |
| Oversudsing | Too much detergent or unsuitable detergent may cause excessive foaming which may result in water leaks. | ·Make sure that the suggested amount of detergent is used per the manufacturer's recommendations. |
EN
| Symptoms Reason Solution | ||
| Water does not enter washing machine or it enters slowly | Water supply is not adequate in that location. | Check another tap in the house. |
| Water supply tap is not completely open. | Fully open tap. | |
| Water supply hose(s) are kinked. | Straighten hose. | |
| The filter of the supply hose(s) clogged. | Check the filter of the supply hose. | |
| Water in the washing machine does not drain or drains slowly | Drain hose is kinked or clogged. | Clean and straighten the drain hose. |
| The drain filter is clogged. | Clean the drain filter. | |
| Washing machine does not start | Electrical power cord may not be plugged in or connection may be loose. | Make sure plug fits tightly in wall outlet. |
| House fuse blown, circuit breaker tripped,or a power outage has occurred. | Reset circuit breaker or replace fuse. Do not increase fuse capacity. If problem is a circuit overload, have it corrected by a qualified electrician. | |
| Water supply tap is not turned on. | Turn on water supply tap. | |
| Washing machine will not spin | Check that the door is firmly shut. | Close the door and press the Start/Pause button. After pressing the Start/Pause button, it may take a few moments before the washing machine begins to spin. The door must be locked before spin can be achieved. Add 1 or 2 similar items to help balance the load. Rearrange load to allow proper spinning. |
EN
| Symptoms Reason Solution | ||
| Door does not open | Once washing machine has started, the door cannot be opened for safety reasons. | ·Check if the ‘Door Lock’ icon is illuminated. You can safely open the door after the ‘Door Lock’ icon turns off. |
| Wash cycle time delayed | If an imbalance is detected or if the suds removing programme is on, the wash time will increase. | ·This is normal. The time remaining shown in the display is only an estimate. Actual time may vary. |
| Fabric softener overflow | Too much softener may cause an overflow. | ·Follow softener guidelines to ensure appropriate amount is used. Do not exceed the maximum fill line. |
| Softeners dispensed too early | Too much softener may cause an premature dispensing. | ·Follow the guidelines provided by the detergent manufacturer.·Close the dispenser drawer slowly. Do not open the drawer during the wash cycle. |
| Dry problem Check water supply tap. | ·Do not overload. Check that the washing machine is draining properly to extract adequate water from the load. Clothes load is too small to tumble properly. Add a few towels.·Turn off water supply tap. | |
Error Messages
| Symptoms Reason Solution | |||
 | IE | Water supply is not adequate in area.Water supply taps are not completely open.Water supply hose(s) are kinked.The filter of the supply hose(s) are clogged.If water leakage occurred in Aqua stop supply hose indicatorA will become red. May vary depending on the model. May vary depending on the model. | Check another tap in the house.Fully open tap.Straighten hose(s).Check the filter of the supply hose.Use the new Aqua stop supply hose. |
  | UE | Load is too small.Load is out of balance.The appliance has an imbalance detection and correction system.If individual heavy articles are loaded (e.g. bath mat, bath robe, etc.) this system may stop spinning or even interrupt the spin cycle altogether.If the laundry is still too wet at the end of the cycle, add smaller articles of laundry to balance the load and repeat the spin cycle.Drain hose is kinked or clogged.The drain filter is clogged. | Add 1 or 2 similar items to help balance the load.Add 1 or 2 similar items to help balance the load.Rearrange load to allow proper spinning.Rearrange load to allow proper spinning.Clean and straighten the drain hose.Clean the drain filter. |
 | 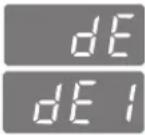  | Ensure door is not open. | Close the door completely.If dE, dE is not released, call for service. |
 |  | Control error. | Unplug the power plug and call for service. |
 |  | Water overfills due to the faulty water valve. | Close the water tap.Unplug the power plug.Call for service. |
 |  | Malfunction of water level sensor. | Close the water tap.Unplug the power plug.Call for service. |
 |  | Over load in motor. | Allow the washing machine to stand for 30 minutes to allow the motor to cool, then restart the cycle. |
 |  | Water leaks. | Call for service. |
 | Does not dry | Call for service. | |
WARRANTY
EN
This limited warranty does not cover:
- Service trips to deliver, pick up, or install or repair the product; instruction to the customer on operation of the product; repair or replacement of fuses or correction of wiring or plumbing, or correction of unauthorized repairs/installation.
- Failure of the product to perform during power failures and interruptions or inadequate electrical service.
- Damage caused by leaky or broken water pipes, frozen water pipes, restricted drain lines, inadequate or interrupted water supply or inadequate supply of air.
- Damage resulting from operating the Product in a corrosive atmosphere or contrary to the instructions outlined in the Product's owner's manual.
- Damage to the Product caused by accidents, pests and vermin, lightning, wind, fire, floods, or acts of God.
- Damage or failure caused by unauthorized modification or alteration, or if it is used for other than the intended purpose, or any water leakage where the product was not properly installed.
- Damage or failure caused by incorrect electrical current, voltage, or plumbing codes, commercial or industrial use, or use of accessories, components, or consumable cleaning products that are not approved by LG.
- Damage caused by transportation and handling, including scratches, dents, chips, and/or other damage to the finish of your product, unless such damage results from defects in materials or workmanship.
- Damage or missing items to any display, open box, discounted, or refurbished Product.
- Products with original serial numbers that have been removed, altered, or cannot be readily determined. Model and Serial numbers, along with original retail sales receipt, are required for warranty validation.
- Increases in utility costs and additional utility expenses.
- Repairs when your Product is used in other than normal and usual household use or contrary to the instructions outlined in the Product's owner's manual.
- Costs associated with removal of your Product from your home for repairs.
- The removal and reinstallation of the Product if it is installed in an inaccessible location or is not installed in accordance with published installation instructions, including LG's owner's and installation manuals.
- Damage resulting from misuse, abuse, improper installation, repair, or maintenance. Improper repair includes use of parts not approved or specified by LG.
EN
| Strange vibration or noise caused by not removing transit bolts or tub support. | → |  Tub support Carton base Tub support Carton base |  | Remove the transit bolts & tub support. |
| Leakage caused by dirt (hair, lint) on gasket and door glass. | → | 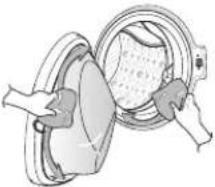 | Clean the gasket & door glass. | |
| Not draining caused by clogging of pump filter. | → | [W643: 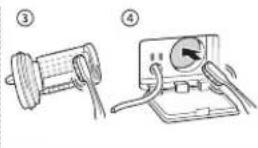 | Clean the pump filter. | |
| Water is not coming because water inlet valve filters are clogged or water supply hoses are kinked. | → |  | Clean the inlet valve filter or reinstall the water supply hoses. | |
| Water is not coming because too much detergent use. | → |  | Clean the detergent disperser drawer. | |
| Laundry is hot or warm after finished washing because the supply hoses are installed in reverse. | → |  | Reinstall the supply hoses. | |
| Water is not supplied because the water tap is not turned on. | → | Water tap ——  | Turn on the water tap. | |
EN
| Leakage caused by improper installation of drain hose or clogged drain hose. | → | 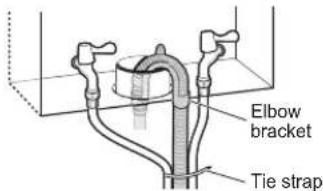 | Reinstall the drain hose. |
| Leakage caused by improper installation of water supply hose or using other brand supply hoses. | → |  | Reinstall the supply hose. |
| No power problem caused by loose connection of power cord or electrical outlet problem. | → |  | Reconnect the power cord or change the electrical outlet. |
| Service trips to deliver, pick up, install the product or for instruction on product use. The removal and reinstallation of the Product. | → |  | The warranty covers manufacturing defects only. Service resulting from improper Installation is not covered. |
| If all screws are not installed properly, it may cause excessive vibration (Pedestal model only). | → |  | Install 4 screws at each corner (Total 16EA). |
| Water hammering (banging) noise when washing machine is filling with water. | → | High-pressurewater 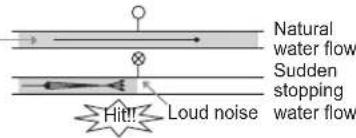 | Adjust the water pressure by turning down the water valve or water tap in the home. |
OPERATING DATA
EN
| Product fiche_Commission Delegated Regulation(EU) No 1061/2010 | |||
| Supplier's trade mark LG | |||
| Supplier's model identifier | F H/1 2 G6/G7N D(N)(W)(0~9)(H) | F H/1 0 G6/G7N D(N)(W)(0~9)(H) | |
| Rated capacity kg | 6 | 6 | |
| Energy efficiency class | A+++ | A+++ | |
| Awarded an "EU Ecolabel award" under Regulation (EC) No 66/2010 | No | No | |
| Weighted annual energy consumption (AEC) in kWh per year based on 220 standard washing cycles for cotton programmes at 60 °C and 40 °C at full and partial load, and the consumption of the low-power modes. Actual energy consumption will depend on how the appliance is used. | 150 | 150 | kWh/year |
| The energy consumption | |||
| the standard 60 °C cotton programme at full load kWh | 0.80 | 0.80 | |
| the standard 60 °C cotton programme at partial load kWh | 0.64 | 0.64 | |
| the standard 40 °C cotton programme at partial load. kWh | 0.60 | 0.60 | |
| Weighted power consumption of the off-mode and of the left-on mode. W | 0.45 | ||
| Weighted annual water consumption (AWC) in litres per year based on 220 standard washing cycles for cotton programmes at 60 °C and 40 °C at full and partial load. Actual water consumption will depend on how the appliance is used. | 9500 | 9500 | litres/year |
| Spin-drying efficiency class on a scale from G (least efficient) to A (most efficient). | B | B | |
| Maximum spin speed attained for the standard 60 °C cotton programme at full load or the standard 40 °C cotton programme at partial load, whichever is the lower, and remaining moisture content attained for the standard 60 °C cotton programme at full load or the standard 40 °C cotton programme at partial load, whichever is the greater. | 1200 | 1000 | rpm |
| 53 | 53 | % | |
| Standard washing programmes to which the information in the label and the fiche relates, that these programmes are suitable to clean normally soiled cotton laundry and that they are the most efficient programmes in terms of combined energy and water consumption; | "Cotton Large 60 °C/40 °C + Intensiv" | ||
| The programme time | |||
| the standard 60 °C cotton programme at full load min. | 238 | 238 | |
| the standard 60 °C cotton programme at partial load min. | 222 | 222 | |
| the standard 40 °C cotton programme at partial load. min. | 222 | 222 | |
| The duration of the left-on mode (TI) min. | 10 | 10 | |
| Airborne acoustical noise emissions expressed in dB(A) re 1 pW and rounded to the nearest integer during the washing and spinning phases for the standard 60 °C cotton programme at full load | 55 | 55 | dB(A) |
| 74 | 74 | ||
| Free-Standing | |||
Memo
Memo
BEDIENUNGSANLEITUNG
Waschmaschine

F H/1 0 G6/G7 N D(N)(W)(0\~9)(H)
INHALT
natural_image
Illustration of a faucet with a valve and pipe connection, showing fluid flow direction (no text or symbols)natural_image
Simple line drawing of a hand holding a faucet with a valve, no text or symbols presentnatural_image
Illustration of a hand valve with a wrench and rotating arrow (no text or symbols)Quadratischer Hahn
natural_image
Line drawing of a kitchen sink with faucet and chain handle (no text or symbols)
natural_image
Two hand icons pointing at circular buttons with a plus sign, no text or symbols presentnatural_image
Line drawing of a hand opening a refrigerator with a control panel (no text or symbols)natural_image
Illustration of a washing machine with a close-up of its lid and a magnified view showing the inner chamber, next to three coin-like objects (no text or symbols)Bedienfeld

LG Electronics European Shared Service Center B.V.
Krijgsman 1
1186 DM Amstelveen
The Netherlands
natural_image
Illustration of a mechanical device with hands operating it, showing internal components (no text or symbols)natural_image
Simple line drawing of a cable being inserted into a socket (no text or symbols)natural_image
Illustration of a hand holding a folder with a ruler and arrow indicating rotation (no text or symbols)natural_image
Hand operating a mechanical device with a rotating wheel and tool (no text or symbols visible)natural_image
Illustration of a hand pressing down on a laptop keyboard with directional arrows (no text or symbols)ACHTUNG
natural_image
Line drawing of a laboratory apparatus with a labeled component (no text or symbols on the diagram itself)
F H/1 0 G6/G7 N D(N)(W)(0\~9)(H)
VSEBINSKO KAZALO
natural_image
Line drawing of a washing machine with an attached electrical switch (no text or symbols)natural_image
Diagram of a faucet with a valve and pipe, showing fluid flow direction (no text or symbols)Povezovanje vijačne cevi na pipo brez navoja
natural_image
Illustration of a hand holding a faucet with a valve and handle (no text or symbols)natural_image
Illustration of a hand valve with a wrench and rotating arrow (no text or symbols)natural_image
Illustration of a hand holding a faucet with a no-smoking symbol (no text or labels)Kvadratna pipa

SL
natural_image
Line drawing of a kitchen sink with faucet and chain handle (no text or symbols)
DELOVANJE
SL
Uporaba pralnega stroja
natural_image
Line drawing of a refrigerator with a cup labeled 'Intubular' (no other text or symbols)natural_image
Two hand icons pointing at circular buttons with a 'I' and 'O' button (no text or symbols)4 Izberite želeni pralni cikel.
- Večkrat pritisnite gumb cikel ali obračajte gumb za izbiro cikla, dokler ne izberete želenega cikla.
natural_image
Hand pressing a button next to a circular dial with arrows indicating clockwise rotation (no text or symbols)5 Cikel se začne.
natural_image
Line drawing of a hand inserting a device into a container (no text or symbols)Uporaba tablet
1 Odprite vrata in vstavite tablete v boben.

natural_image
Illustration of a washing machine with a circular component being removed, showing a blue arrow pointing to the interior (no text or symbols present)2 V boben vstavite perilo in zaprite vrata.

Nadzorna plošča
1 Gumb za vklop
- Pritisnite gumb Klop, da vklopite pralni stroj.
② Gumb Start/Pavza
LG Electronics European Shared Service Center B. V. Krijgsman 1 1186 DM Amstelveen The Netherlands
natural_image
Illustration of a mechanical component with hands operating it, no visible text or symbolsČiščenje zunanjosti
natural_image
Simple line drawing of a cable inserted into a device with a circular component, no text or symbols present.SL
natural_image
Illustration of a hand holding a clipboard with a ruler, showing a downward arrow (no text or symbols)2 Izvlecite odtočni zamašek in odprite filter tako, da ga zavrtite v levo.

natural_image
Diagram showing a mechanical component being cut with a magnified inset illustrating internal components (no text or symbols)natural_image
Hand holding a circular object with an arrow indicating rotation, next to a tool (no text or symbols)5 Zaprite vrhnji pokrovček.

natural_image
Illustration of a hand pressing down on a laptop keyboard with directional arrows (no text or symbols)POZOR
2 Odstranite vstavke iz predala.
F H/1 0 G6/G7 N D(N)(W)(0\~9)(H)
TABLE DES MATIÈRES
FONCTIONS SMART....29
natural_image
Diagram of a faucet with a valve and pipe fitting, showing fluid flow direction (no text or symbols)FR
natural_image
Illustration of a faucet with a valve and handle, showing a rotating valve mechanism (no text or symbols)natural_image
Line drawing of a kitchen sink with faucet and handle (no text or symbols)
natural_image
Two hand icons pointing at circular buttons with a plus sign, no text or symbols presentFR
natural_image
Line drawing of a hand inserting a component into a container (no text or symbols)natural_image
Illustration of a washing machine with a magnifying glass and a black arrow pointing to it, next to two circular objects (no text or symbols)FR
Panneau de commande

LG Electronics European Shared Service Center B.V.
Krijgsman
1 1186 DM Amstelveen
PAYS-BAS
natural_image
Simple diagram of a cable being inserted into a socket with a circular component, no text or symbols presentFR
natural_image
Illustration of a hand holding a folder with a tool, showing a downward arrow indicating compression or disassembly (no text or symbols present)natural_image
Hand holding a circular object with an arrow indicating rotation, next to a mechanical component (no text or symbols)5 Fermez la trappe.
natural_image
Illustration of a hand pressing down on a laptop keyboard with directional arrows (no text or symbols)ATTENTION
F H/1 0 G6/G7 N D(N)(W)(0\~9)(H)
INDICE
natural_image
Diagram of a faucet with a valve and pipe, showing fluid flow direction (no text or symbols)natural_image
Simple line drawing of a hand holding a faucet with a valve (no text or symbols)natural_image
Illustration of a hand valve with a wrench and rotating valve (no text or symbols)natural_image
Illustration of a hand holding a faucet with a no-smoking symbol (no text or labels)Rubinetto quadrato

natural_image
Line drawing of a kitchen sink with a faucet and measuring tape (no text or symbols)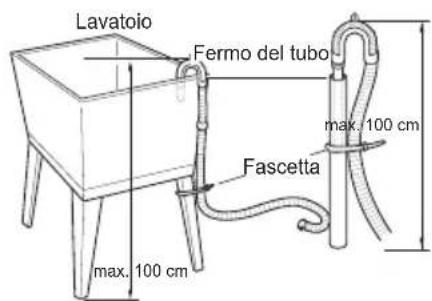
natural_image
Two hand icons pointing at circular buttons with a plus sign, no text or symbols presentnatural_image
Simple line drawing of a hand pressing a button and rotating a circular dial with three curved arrows (no text or symbols)5 Avvio del ciclo.
natural_image
Two-panel diagram showing anatomical or structural views of a biological structure, possibly a embryo or organ, with no visible text or symbols.natural_image
Illustration of a hand holding a tool interacting with a textured surface, shown in two views: top view (no text or symbols)natural_image
Line drawing of a hand placing a component into a container with internal compartments (no text or symbols)natural_image
Illustration of a washing machine with a circular component and a magnifying glass, showing a blue arrow pointing to the interior (no text or symbols)natural_image
Illustration of a washing machine with a magnifying glass and arrow pointing to a T-shirt (no text or symbols)natural_image
Illustration of a mechanical assembly with hands operating a circular component (no text or symbols visible)natural_image
Simple line drawing of a cable inserted into a socket with a circular component, no text or symbols presentnatural_image
Illustration of a hand holding a folder with a scroll, showing a hand holding a pen and a scroll (no text or symbols present)natural_image
Hand operating a mechanical device with a rotating wheel and tool (no text or symbols visible)natural_image
Illustration of a hand pressing down on a laptop keyboard with directional arrows (no text or symbols)ATTENZIONE
- << NOTES >>
- OWNER'S MANUAL
- WASHING MACHINE
- TABLE OF CONTENTS
- SAFETY INSTRUCTIONS ....03
- INSTALLATION....08
- OPERATION ....17
- SMART FUNCTION ......28
- MAINTENANCE....29
- TROUBLESHOOTING....34
- WARRANTY....39
- OPERATING DATA 42
- SAFETY INSTRUCTIONS
- WARNING
- Children in the Household
- For Use in Europe:
- Important Safety Instructions
- Installation
- Operation
- Maintenance
- Disposal
- Disposal of Your Old Appliance
- EN
- Installation Place Requirements Location
- Positioning
- Electrical Connection
- Unpacking and Removing Transit Bolts
- NOTE
- Using Anti-Slip Sheets (Optional)
- Wooden Floors (Suspended Floors)
- Leveling the Appliance
- Diagonal Check
- Connecting the Supply Hose
- Checking the Rubber Seal on the Supply Hose
- Connecting Hose to Water Tap
- Connecting Screw-Type Hose to Tap with Thread
- Connecting Screw-Type Hose to Tap Without Thread
- Connecting One Touch Type Hose to Tap Without Thread
- Connecting Hose to Appliance
- Using the Horizontal Tap
- Installing the Drain Hose
- Electrical Connections (In the UK Only)
- Using the Washing Machine
- Sort laundry and load items.
- Add cleaning products and/or detergent and softener.
- Turn on the washing machine.
- Choose the desired washing cycle.
- Begin cycle.
- End of cycle.
- Sorting Laundry
- CAUTION
- Adding Cleaning Products
- Detergent Dosage
- Adding Detergent and Fabric Softener
- Adding Detergent
- Adding Fabric Softener
- Adding Water Softener
- Using Tablet
- Control Panel
- Start/Pause Button
- Display
- Programme Knob
- Options
- Programme Table
- Option Programme
- Time Delay (Startzeitvorwahl)
- Medic Rinse (Intensiv Spülen)
- Intensive (Intensiv)
- Temp.(Temp.)
- Rinse
- Rinse Hold (Spülen)
- Spin (Schleudern)
- Locking the Control Panel
- Unlocking the Control Panel
- Beep On / Off
- SMART FUNCTION
- Using the Smart Diagnosis™ Function
- EU Conformity Notice
- CE
- Cleaning Your Washing Machine
- Care After Wash
- Cleaning the Exterior
- Door:
- Exterior:
- Cleaning the Interior
- Cleaning the Water Inlet Filter
- Cleaning the Drain Pump Filter
- Cleaning the Dispenser Drawer
- Tub Clean (Optional)
- Caution on Freezing During Winter
- How to Keep the Product from Freezing
- Check for Freezing
- How to Handle Freezing
- TROUBLESHOOTING
- WARRANTY
- OPERATING DATA
- BEDIENUNGSANLEITUNG
- Waschmaschine
- INHALT
- Bedienfeld
- ACHTUNG
- VSEBINSKO KAZALO
- Povezovanje vijačne cevi na pipo brez navoja
- Kvadratna pipa
- DELOVANJE
- Uporaba pralnega stroja
- Uporaba tablet
- Nadzorna plošča
- Gumb za vklop
- ② Gumb Start/Pavza
- Čiščenje zunanjosti
- POZOR
- TABLE DES MATIÈRES
- FONCTIONS SMART....29
- FR
- Panneau de commande
- ATTENTION
- INDICE
- Rubinetto quadrato
- ATTENZIONE
Brand : LG
Model : F12G6NDN2H
Category : Washing machine