
SMT-3233 - Monitor Hanwha - Free user manual and instructions
Find the device manual for free SMT-3233 Hanwha in PDF.


| Product Type | Security LED Monitor |
| Brand | Hanwha |
| Model | SMT-3233 |
| Screen Size | 32 inches (81.28 cm) |
| Display Resolution | 1920 x 1080 (Full HD) |
| Brightness | 350 cd/m² |
| Contrast Ratio | 1200:1 (typical) |
| Aspect Ratio | 16:9 |
| Viewing Angle | 178° (H) / 178° (V) |
| Display Colors | 16.7 million |
| Response Time | 8 ms (G to G) |
| Panel Life | 30,000 hours |
| Video System | NTSC / PAL |
| Input Interfaces | VGA (D-Sub), DVI, HDMI, AV (CVBS via CAM IN/OUT), USB |
| Audio Input | 3.5 mm mini jack |
| Audio Output | 3.5 mm mini jack, Built-in speakers (2 x 2W) |
| Power Supply | AC 100-240 V, 50/60 Hz |
| Power Consumption | 49 W (typical) |
| Dimensions (W x H x D without stand) | 727.7 x 433.2 x 48.8 mm |
| VESA Mounting | 100 x 100 mm |
| Cabinet Color | Black |
| Anti-theft Lock | Yes (Kensington lock compatible) |
| Remote Control | Included with batteries |
| Language Support | English, French, German, Spanish, Russian, Arabic, Chinese, Dutch |
| Safety Certifications | FCC Class A |
Frequently Asked Questions - SMT-3233 Hanwha
User questions about SMT-3233 Hanwha
0 question about this device. Answer the ones you know or ask your own.
Ask a new question about this device
Download the instructions for your Monitor in PDF format for free! Find your manual SMT-3233 - Hanwha and take your electronic device back in hand. On this page are published all the documents necessary for the use of your device. SMT-3233 by Hanwha.
USER MANUAL SMT-3233 Hanwha
Security LED Monitor User Manual
Copyright
©2018 Henuhe TechwinCo, Ltd. All rights reserved.
Trademark
each or trademarks here is registered, the name of this product and other trademarks mentioned in this manual are the registered trademark of their respective company.
Restriction
Copyright of this document is reserved. Under no circumstances, this document shall be reproduced, distributed or changed partially or fully, with your own legal authority.
Disclaimer
Hanwha Technolines the best to be by the integrity and correctness of the contents in this document, but no formal queries shall be provided like the contents and the working process is not an entirely on the use of any necessary. Hanwha Technolines should change the contents of this document without prior action.
- Design and specifications are subject to change without prior notice.
IMPORTANT SAFETY INSTRUCTIONS
Read these operating instructions carefully before using the unit.
Follow all the safety instructions listed below.
Keep these operating instructions handy for future reference.
1) Read these instructions.
2) Keep these instructions.
3) Heed all warnings.
4) Follow all instructions.
5) Do not use this apparatus near water.
6) Clean the contaminated area on the product surface with a soft, dry cloth or a damp cloth. (Do not use a detergent or cosmetic products that contain alcohol, solvents or surfactants or oil constituents as they may deform or cause damage to the product.)
7) Do not block any ventilation openings, Install in accordance with the manufacturer's instructions.
8) Do not install near any heat sources such as radiators, heat registers, stoves, or other apparatus (including amplifiers) that produce heat.
9) Do not defeat the safety purpose of the polarized or grounding-type plug. A polarized plug has two blades with one wider than the other. A grounding type plug has two blades and a third grounding prong. The wide blade or the third prong are provided for your safety. If the provided plug does not fit into your outlet, consult an electrician for replacement of the obsolete outlet.
10) Protect the power cord from being walked on or pinched particularly at plugs, convenience receptacles, and the point where they exit from the apparatus.
11) Only use attachments/accessories specified by the manufacturer.
12) Use only with the cart, stand, tripod, bracket, or table specified by the manufacturer, or sold with the apparatus. When a cart is used, use caution when moving the cart/ apparatus combination to avoid injury from tip-over.
13) Unplug this apparatus during lightning storms or when unused for long periods of time.
14) Refer all servicing to qualified service personnel. Servicing is required when the apparatus has been damaged in any way, such as power-supply cord or plug is damaged, liquid has been spilled or objects have fallen into the apparatus, the apparatus has been exposed to rain or moisture, does not operate normally, or has been dropped.
Standards Approvals

- Any changes or modifications in construction of this device which are not expressly approved by the party responsible for compliance could void the user's authority to operate the equipment.
This device complies with part 15 of the FCC Rules. Operation is subject to the following two conditions: (1) This device may not cause harmful interference, and (2) this device must accept any interference received, including interference that may cause undesired operation.
This equipment has been tested and found to comply with the limits for a Class A digital device, pursuant to part 15 of the FCC Rules. These limits are designed to provide reasonable protection against harmful interference when the equipment is operated in a commercial environment.
This equipment generates, uses, and can radiate radio frequency energy and, if not installed and used in accordance with the instruction manual, may cause harmful interference to radio communications. Operation of this equipment in a residential area is likely to cause harmful interference in which case the user will be required to connect the interference at his own expense.
BEFORE START
You have to keep in mind the following notices:
• Hanwha Techwin retains the copyright on this manual.
• This manual cannot be copied without Hanwha Tochwin's prior written approval.
- We are not liable for any or all losses to the product incurred by your use of non-standard product or violation of instructions mentioned in this manual.
- Contact the retailer for troubleshooting help.
overview
SAFETY INSTRUCTIONS
| Power | ||
| Do not use a damaged power cord or plug or a damaged or loose power outlet.Otherwise, this may result in electric shock or fire. | Do not touch the power plug with wet hands when removing or plugging the plug into the outlet.Otherwise, this may result in electric shock | Make sure to connect the power cord to a grounded power outlet.Otherwise, it may result in electric shock or personal injury. |
| Ensure that the power plug is plugged into the power outlet firmly and correctly.Otherwise, this may result in fire. | Do not forcefully bend or pull the power plug and do not place any heavy material on it.Otherwise, this may result in fire. | Do not connect multiple appliances to the same power outlet.Otherwise, this may cause fire due to overheating. |
| Do not disconnect the power cord while using the product.Otherwise, this may result in damage to the product due to electric shock. | To disconnect the apparatus from the mains, the plug must be pulled out from the mains socket, therefore the mains plug shall be readily operable.Otherwise, this may cause electric shock or fire. | Use only the power cord provided by our company. Do not use the provided power cord of another product.Otherwise, this may result in fire or electric shock. |
| Connect the power plug to a wall outlet that can be easily reached.When a problem occurs with the product, you must unplug the power plug to cut the power off completely. You cannot cut the power off completely using only the power button on the product. | ||
| Installation | ||
| Ensure that at least two persons lift and move the product.Otherwise, it may be dropped and cause personal injury, and/or damage the product. | When installing the product in a cabinet or rack, make sure that the front end of the bottom of the product does not project out.Otherwise, it may fall or cause personal injury.Use a cabinet or rack of a size appropriate to the product. | Do not place candles, mosquito repellant, cigarettes and any heating appliances near the product.Otherwise, this may result in fire. |
| Keep heating appliances as far away from the power cord or the product as possible.Otherwise, this may result in electric shock or fire. | Do not install it in a badly ventilated location such as a bookcase or closet.Otherwise, this may result in fire due to an increase in the internal temperature. | When putting the product down, make sure to put it down softly.Otherwise, this may result in damage to the screen display. |
| Do not place the front of the product on the floor. · Otherwise, this may result in damage to the screen display. | Ensure that an authorized installation company installs the wall mount. · Otherwise, it may fail and cause personal injury. · Make sure to install the specified wall mount. | Install your product in a well ventilated location. Ensure that there is a clearance of more than 4 inches (10 cm) from the wall. · Otherwise, it may result in fire due to an increase in the internal temperature. |
| Ensure that the packaging vinyl is kept away from children. · Otherwise, it may result in serous harm (suffocation) if children play with it. | If the height of your monitor is adjustable, do not place any object or part of your body on the stand when lowering it. · This may cause damage to the product or the person carrying it. | |
| Clean | ||
| Do not spray cleaner directly onto the surface of the product. · Otherwise, it may result in the discoloration and distortion of the structure and the screen surface may peel off. | When cleaning the power plug pins or dusting the power outlet, clean it with a dry cloth. · Otherwise, it may result in fire. | When cleaning the product, make sure to disconnect the power cord. · Otherwise, it may result in electric shock or fire. |
| When cleaning the product, disconnect the power cord and clean it with a soft, dry cloth. · [Do not use chemicals such as wax, benzene, alcohol, thinnor, mosquito repellant, lubricant, or cleaner.] These may change the appearance of the product surface and peel of the indication labels on the product. | Since the product housing is easily scratched, make sure to use the specified cloth only. | When cleaning the product, do not spray water directly onto the main body of the product. · Ensure that water does not enter the product and that it is not wet. · Otherwise, this may result in electric shock, fire or a malfunction. |
| Others | ||
| The product is a high voltage product. Do not disassemble, repair or modify the product yourself.• Otherwise, this may result in electric shock or fire. If the product needs to be repamol, contact a Service Center. | If there is a strange smell or a strange sound or smoke is coming from the product, disconnect the power plug immediately and contact a Service Center.• Otherwise, this may result in electric shock or fire. | Do not place this product in a location exposed to moisture, dust, smoke, water, or in a car.• Otherwise, this may result in electric shock or fire. |
| When you drop the product or the case is broken, turn the power off and disconnect the power cord. Contact a Service Center.• Otherwise, this may result in electric shock or fire. | If thunderior lightning is occurring, do not touch the power cord or antenna cable.• Otherwise, this may result in electric shock or fire. | Do not try to move the monitor by pulling only the wire or the signal cable.• Otherwise, it may fall and result in electric shock, damage to the product or fire due to damage to the cable. |
| Do not lift or move the product back and forwards or right and left while only holding the power cord or signal cables.• Otherwise, it may fall and result in electric shock, damage to the product or fire due to damage to the cable. | Make sure that the ventilating opening is not blocked by a table or curtain.• Otherwise, it may result in fire due to an increase in the internal temperature. | Do not place any containers containing water, vases, flower pots, medicines as well as any metal on the product.• If water or a foreign material enters the product, disconnect the power cord and contact a Service Center.• This may result in a product malfunction, electric shock or fire. |
| Do not use or keep combustible spray or flammable material near the product.• Otherwise, this may result in an explosion or fire. | Do not insert any metal, such as chopsticks, coins, pins and steel, or flammable objects, such as matches or paper, inside the product (through the ventilating openings, input and output terminals, etc).• If water or foreign material enters the product, disconnect the power cord and contact a Service Center.• Otherwise, this may result in electric shock or fire. | When using a fixed screen for a long time, an afterimage or stain may occur.• If you are not going to use the product for an extended period of time, set it to sleep mode. |
| When using headphones or earphones, do not turn the volume too high.• Having the sound too loud may damage your hearing. | To avoid eyestrain, do not sit too close to the product. | Do not install it in an unstable location such as an unstable rack or uneven surface or a location exposed to vibrations.• Otherwise, it may fall and cause personal injury and/or damage the product• If you use the product in a location exposed to vibrations, it may damage the product and result in fire. |
| When moving the product, turn the power off and disconnect the power plug, antenna cable, and all the cables connected to the product.· Otherwise, it may result in electric shock or fire. | Ensure that children do not hang onto the product or climb up onto the product.· The product may fall and cause personal injury or death. | If you do not use the product for a long period of time, disconnect the power cord from the power outlet.· Otherwise, this may result in overloading or fire due to dust, and may result in fire due to electric shock or leakage. |
| Do not place any heavy items or toys or confectionery, such as cockles etc, that may attract the attention of children and to the product.· Your children may hang onto the product causing it to fall and this may result in personal injury or death. | Be careful that children do not place the battery in their mouths when removed from the remote control. Place the battery in a location that children or infants cannot reach.· It children have had the battery in their mouths, consult your doctor immediately. | When replacing the battery, insert it with the right polarity (n, -).· Otherwise, the battery may become damaged or it may cause fire, personal injury or damage due to leakage of the internal liquid. |
| Use only the specified standardized batteries, and do not use a new battery and a used battery at the same time.· Otherwise, the batteries may be damaged or cause fire, personal injury or damage due to a leakage of the internal liquid. | The batteries (and rechargeable batteries) are not ordinary refuse and must be returned for recycling purposes. The customer is responsible for returning the used or rechargeable batteries for recycling.· The customer can return used or rechargeable batteries to a nearby public recycling center or to a store selling the same type of the battery or rechargeable battery. | Do not place the product in a location exposed to direct sunlight or near any heat such as a fire or heater.· This may reduce the lifetime of the product, and may result in fire. |
| Do not drop any objects onto the product or cause any impact to the product.· Otherwise, this may result in electric shock or fire. | Do not use a humidifier near the product.· Otherwise, this may result in electric shock or fire. | When there is a gas leak, do not touch the product or the power plug; ventilate immediately.· If a spark occurs, it may cause an explosion or fire. |
| If the product has been turned on for a long time, the display panel becomes hot. Do not touch it. | Keep the small accessories in a location out of the reach of children. | Be careful when adjusting the angle of the product or the height of the stand.· This may result in personal injury as your hand or fingers may become caught.· Also. If you tilt the product too far, it may fall and cause personal injury. |
| Do not install the product in a location low enough for children to reach.· Otherwise, it may fall and result in personal injury.· Since the front part of the product is heavy, install the product on a level and stable surface. | Do not put any heavy objects on the product.· This may result in personal injury and/or damage to the product. |
overview
contentS
overview

3 Important Safety Instructions
3 Before Start
4 Safety Instructions
7 Features
8 Names and functions of each part
inStaLLation

10 Before Installing the Product
10 Installing Wall Mount Parts
connectinG with other device

11 Things to check before connection
11 Connecting with external devices
menu SettinGS

13 Screen (OSD) menu settings
13 Video settings
14 Audio settings
14 System settings
14 Setting button lock
appendix

15 Specification
16 Product Overview
17 Troubleshooting
FEATURES
- User-friendly UI
• Supports a range of resolutions - High-quality video output using HDMI
• Surveillance-only AV-compatible monitor - Built-in speaker
Package Contents
Please unwrap the product, and place the product on a flat place or in the place to be installed. Please check the following contents are included in addition to the main unit.
- Accessory category and quantity may differ depending on sales region.
- Stand is not provided; please purchase a stand and install it separately.
SMT-3233/SMT-4033

NAMES AND FUNCTIONS OF EACH PART
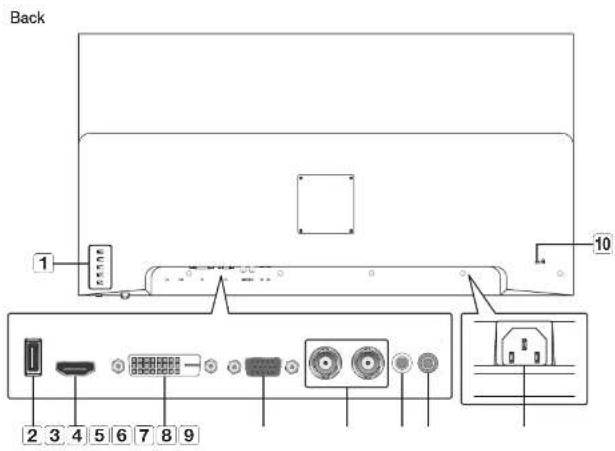
| Name Description of functions | ||
| 1 | Panel key | This is used to turn over the product, or to access the menu. |
| 2 | USB | Used to connect a USB type device (Supports USB 2.0) *Use USB 2.0 compatible products when upgrading. |
| 3 | HDMI | HDMI input terminal |
| 4 | DVI | DVI input terminal |
| 5 | VGA | VGA input terminal |
| 6 | CAM IN/OUT | Used to connect with composite video using EAC cable. |
| 7 | AUDIO IN | Used to input sound using the sound cable. |
| 8 | AUDIO OUT | Used to send sound to headphones or external speakers. |
| 9 | Power | Terminal to connect power. |
| 10 | Anti-theft lock | This device can be used safely in public places. |
Buttons
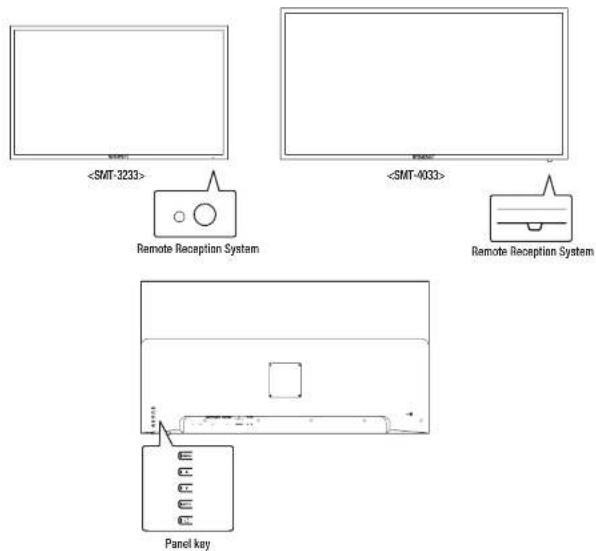
| Button Description of functions | |
| When the button is pressed while the product is on, the menu screen appears.■ Press the panel key again to exit the screen adjustment menu. | |
| - Press the button while the menu screen is displayed to move the menu or adjust the value.- if you press the button while the menu screen is not displayed, the external input menu appears. | |
| - Press the button while the menu screen is displayed to move the menu or adjust the value.- if you press the button while the menu screen is not displayed, the volume control menu appears. | |
| - if you press the button while the menu screen is displayed, the selection function is enabled.- if you press the button while the menu screen is not displayed, the screen is automatically adjusted. (Only available in AV mode) | |
| Turns the power to the product on/off. | |
| Press the button with the remote control pointed toward the remote control receiver to operate it.■ If another display is used with this product in the same space where the remote control is being used, if may cause a malfunction due to interference of the remote control frequency. | |
| Use the remote control within a range of 7 - 10m and 30° left/right from the product receiver.■ Remove used batteries and keep them out of the reach of children.■ Do not combine new and used batteries. When replacing the batteries, please replace both of them at once.■ Remove the batteries if you do not intend to use the remote control for an extended period of time. | |
Anti-theft Lock
The locking device shape and locking method depend on the manufacturer. Please refer to the user guide provided with your anti-theft locking device for details.
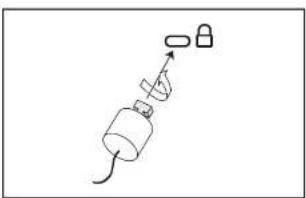
- The following images are for reference only. Real-life applications may differ.
To lock an anti-theft locking device
- Fix the cable of your anti-theft locking device to a heavy object such as a desk.
- Put one end of the cable through the loop on the other end.
- Insert the locking device into the anti-theft lock slot at the back of the product.
-
Lock the locking device.
-
An anti-theft locking device can be purchased separately.
- Refer to the instruction manual supplied with the lock for detailed information on how to use it.
- You can purchase a lock at most stores specializing in electronics, or via the Internet.
natural_image
Simple line drawing of a mechanical device with a handle and base, no text or symbols presentREMOTE CONTROL
If another display is used with this product in the same space where the remote control is being used, it may cause a malfunction due to interference of the remote control frequency.
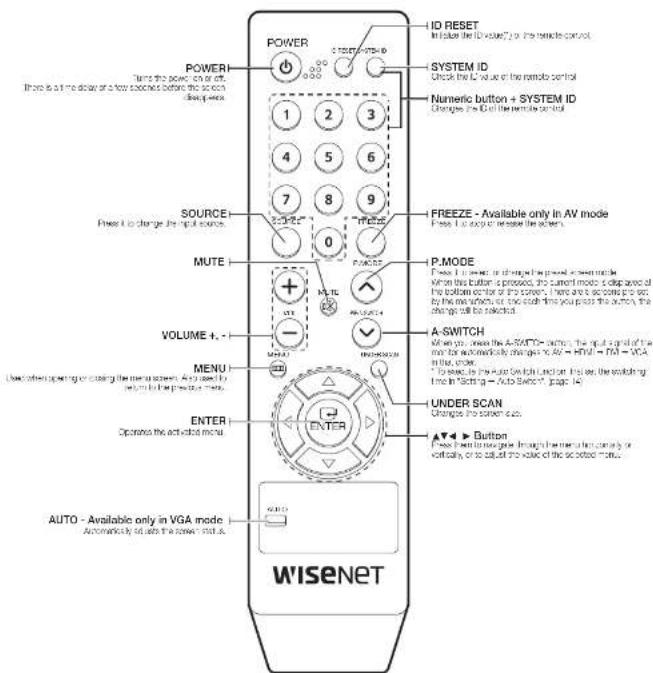
Changing the Remote Control ID
To use the remote, the Remote control ID and Monitor ID should be matched.
- Press the [SYSTEM ID] button of the remote control and check the ID displayed on the monitor screen. The factory ID for the remote control is '1'.
- While holding down a number (0 - 9) button on the remote control, press the SYSTEM ID button.
- When ID input is done, press the [SYSTEM ID] button of the remote control again to check the setting.
installation
Please take note of the followings before using this product.
• Do not use the product outdoor.
- Do not spill water or liquid in the connection part of the product.
• Do not impose the system to excessive shock or force.
- Do not pull out the power plug forcefully.
• Do not disassemble the product on your own.
- Do not exceed the rated input/output range.
• Use a certified power cord only.
• For the product with an input ground, use a grounded power plug.
BEFORE INSTALLING THE PRODUCT
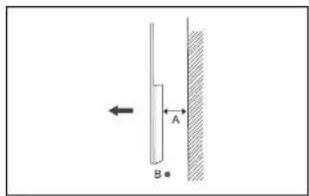
Ventilation requirement
Vertical wall mount condition
A. Minimum 40 mm
B. Ambient temperature Measuring point <35°C
INSTALLING WALL MOUNT PARTS
Installing Wall Mount Kits
The wall mount kit (sold separately) allows you to hang the product on a wall.
For more information on wall mounting, refer to the owner's manual supplied with the wall mount parts. When installing the wall mount, seek the help of a technician.
Hanwha Techwin is not responsible for any damage to the product or injury to the user or others caused by any accident due to a user's attempt to install the product.
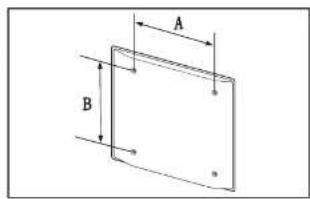
Wall Mount Kit Specifications (VESA)
- Install the wall mount kit on a solid wall perpendicular to the box.
- Please refer to the nearest store when installing on other materials.
- Installing on an inclined wall may cause the product to fall, which can result in serious injury.
- When you purchase our wall mount kit, you will find a detailed installation guide and all parts required for assembly.
- Do not use screws that are longer than the standard dimensions or that do not conform to the VESA standard screw specifications. Using screws that are too long may damage the inside of the product.
- For wall mount parts that do not conform to the VESA standard screw specifications, the screw length may vary depending on the wall mount specifications.
- Do not over-tighten the screws. The product may be damaged, or may fall, resulting in injury. Hanwha Techwin is not responsible for any damage to the product or injury to the user or others caused by any accident due to a user's attempt to install the product.
- Hanwha Tochwin is not responsible for damage to the product or injury to the user caused by using non-compliant or non-VESA wall mount parts, or by the customer not following the product installation instructions.
- When hanging on a wall, two people should always lift the product.
- The standard dimensions of the wall mount kit are shown in the table below. [Unit: mm]
| Model name | VESA dimensions (A * B) | Standard screws | Quantity |
| SMT-3233 | 100 × 100 M8 / L14 16.4 | ||
| SMT-4033 |
Do not install the wall mount kit with the product turned on. This may lead to injury due to electric shock.
connecting with other device
THINGS TO CHECK BEFORE CONNECTION
Check before connecting
- When connecting, refer to the instruction manual of the product to be connected. The number and position of external devices may differ depending on the product.
- Do not connect the power until all connections are complete. Connecting the power supply during connection may damage the product.
- Connect the left (white) and right (red) audio jacks correctly.
- Check the type of terminal behind the product you want to connect.
CONNECTING WITH EXTERNAL DEVICES
- Connect the power cable after all cables have been connected. Disconnect the power cable before connecting external devices
- You can connect the product to external devices in various ways. Select the correct connection method for your external devices.
■ Connections may vary depending on the product.
- After connecting the external device, select the connected external device by pressing the [SOURCE] button on the remote control.
AV cable connection method
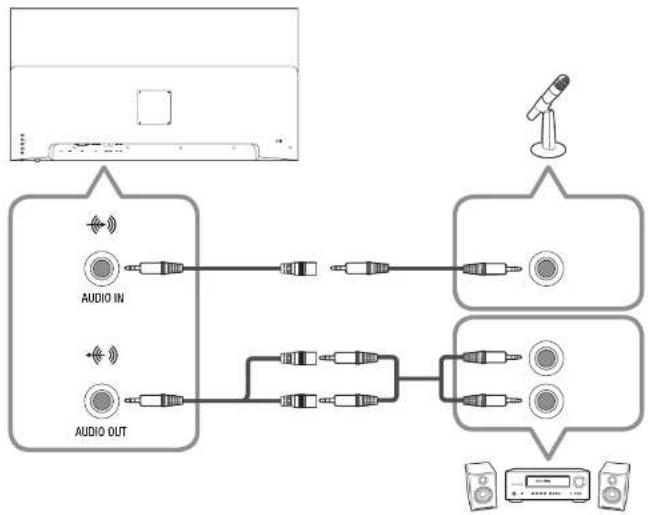
flowchart
graph TD
    A["Input"] --> B["Audio IN"]
    A --> C["Audio OUT"]
    B --> D["Signal Link"]
    C --> D
    D --> E["Output"]
    F["Microphone"] --> G["Display"]
    G --> H["Monitor"]

VGA (D-SUB) cable connection method
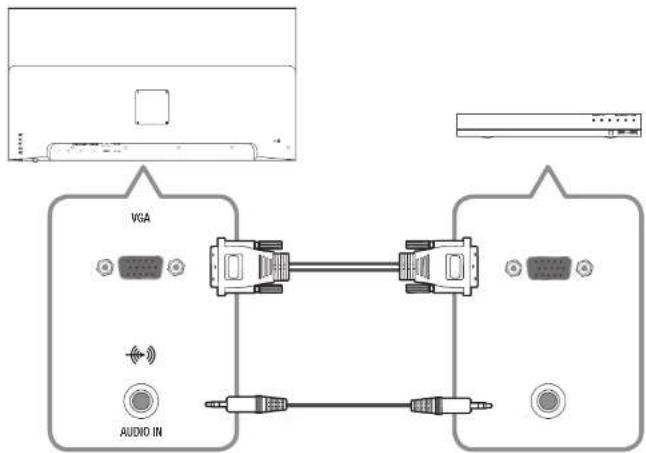
English 11
connecting with other device
DVI cable connection method
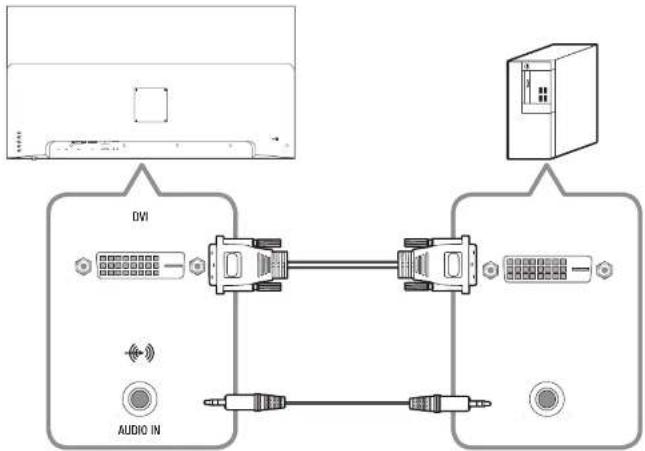
HDMI cable connection method
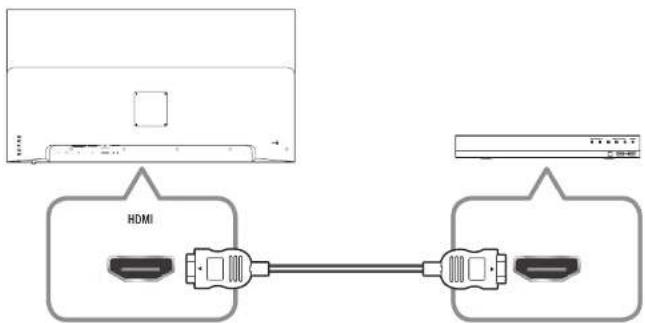
12_ connecting with other device
menu settings
The screen adjustment menu can be set.
SCREEN (OSD) MENU SETTINGS
Selecting external input menu
Selects the input video signal.
[SOURCE] → ▲/▼ → [ENTER]
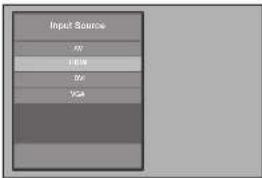
- AV: Select when connected to AV equipment.
• HDMI : Select when connected to an HDMI component.
• DVI : Select when connected to digital video equipment. - VGA : Select when connected to a VGA device.
- If the selected input signal and external input are different, the screen may appear abnormal.
Selecting OSD menu
To select the OSD menu, press the buttons in the following order.
- Press the [MENU] button to display the main menu.
- Press the ▲/▼ buttons to select the main menu, and then press the [ENTER] button.
- Press the ▲/▼ buttons to select the sub-menu, and then press the [ENTER] button.
- Press the ▲/▼ buttons to select your desired menu, and then press the [ENTER] button. (For the adjustment menu, press the ◀/▶ buttons to adjust the adjustment value.)
- Press the [MENU] button to exit.
To return to the previous screen, press the [MENU] button.
- If you do not press any buttons for a certain period of time, the OSD menu screen will disappear.
- You can set the time from Off to 1 minute in System Setting - Manu Timeout.
■The image displayed will differ depending on the model.
VIDEO SETTINGS
Sets the screen brightness, color, etc.
[MENU] → ▲/▼ →
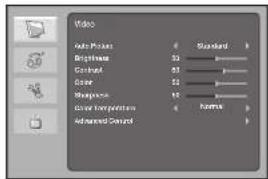
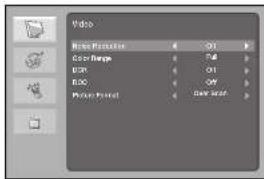
- Auto Picture: Sets the desired picture mode (Standard / Movie / Eco / Personal / Vivid).
- Brightness: Adjusts the brightness of the screen.
- Contrast: Adjusts the middle brightness of the screen.
• Color: Adjusts the color of the screen. - Sharpness: Adjusts the sharpness of the screen.
- Color Temperature: Adjusts the temperature of the color (red/green/blue) on the screen.
- Advanced Control :
- Noise Reduction: Adjusts noise reduction (Off/Low/Middle/High).
- Color Range : Sets the color range (Full/Limit), (Only available in HDMI mode)
- DCR (Dynamic Contrast Ratio) : Sets whether or not to adjust the contrast ratio.
- DCC (Dynamic Color Contrast) : Sets the gamma correction.
- Picture Format : Adjusts the screen size.
(AV-16:9/Zoom1/Zoom2/4:3, HDMI-Just Scan/Over Scan, [W]-16:9/4:3, VGA-16:9/4:3]
- Auto Config; Automatically adjusts the aspect ratio of the screen.
(Only available in VGA mode) - Auto Color: Automatically adjusts the brightness and color of the image. (Only available in VGA mode)
menu settings
AUDIO SETTINGS
Sets the audio.
[MENU] → ▲/▼ →
- Sound Mode: Sets the desired sound mode (Standard/Music/Speech/Personal).
• Balance: Adjusts the sound balance of the left and right channels. - Bass: Adjusts the low frequency range of the sound.
- Treble; Adjust is the high frequency range of the sound.
• Virtual Surround: Sets whether to use virtual surround sound. - Auto Volume: Automatically controls output volume to prevent inconvenience to the user caused by sudden sound changes, and prevents power amp burn-out.
SYSTEM SETTINGS
Configures the system.
[MENU] → ▲/▼ →
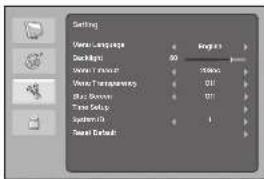
- Menu Language: Select the screen language. The initial value is set to
. - Backlight; Adjusts the screen backlight.
14_menu settings
- Menu Timeout: The menu screen disappears if the screen does not change for a certain period of time.
- Menu Transparency: Sets the transparency of the menu screen.
- Blue Screen: If there is no incoming signal or the received signal strength is very weak, the noise-distorted screen will be replaced by a blue screen.
- Color System: Sets the frequency format of the input signal. *This function can be used only in AV mode.
- Time Setup
- Auto Switch : Sets the auto screen switching time.
ANTI-BURN-IN: Prevents an afterimage from appearing on the monitor screen by not allowing a static image to be displayed for an excessively long time.
- System ID: Sets the system ID of the monitor.
- Reset Default: Returns screen settings to their state when the product was purchased.
SETTING BUTTON LOCK
Sets the button lock so children cannot press the button.
[MENU] ▲/▼
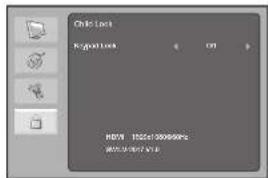
- Keypad Lock: Enables or disables the button lock.
appendix
Specification
| Items | Description | ||
| SMT-3233 SMT-4033 | |||
| Display | Screen Size 32" 40" | ||
| Resolution (HxV) 1,000 x 1,000 | |||
| Brightness 350cd' | m2 | ||
| Contrast Ratio 1200.1 5000:1 | |||
| Aspect Ratio 16:9 | |||
| Viewing Angle (H/V) 178°178 | |||
| Display Color 16.7 million | |||
| Response Time 8ms(G to C) | 9.5ms(C to G) | ||
| Video System | NTSD/PAL | ||
| Panel Life | 30,000 hours | ||
| Filter Type | 3D combiller | ||
| Interface | |||
| Video | Connector | VGA, DVI, HDMI, AV | VGA, DVI, HDMI, AV/CVBS, THROUGH OUT |
| RGB/DVI | Connector | Analog D-sub(5 pin), DM-D | |
| Input Signal | 0.7Vp-p±5% | ||
| Available Format | 640 x 480@60Hz/72 Hz/75 Hz (VGA), 800 x 600@5Hz/60 Hz/72 Hz/75 Hz (VGA), 1.024 x 768@60Hz/70Hz/75Hz (XGA), 1.132 x 867@75Hz, 1.280 x 720@60Hz, 1.280 x 800@60Hz, 1.280 x 1.024@60Hz/75Hz (XGA), 1.360 x 769@60Hz, 1.440 x 900 @60Hz, 1.600 x 900 @60Hz, 1.660 x 1.050@60Hz, 1.920 x 1.080@60Hz | ||
| HDMI | Connector | HDMI | |
| Available Format | 640 x 480@60Hz, 720 x 480@60Hz, 720 x 576p@5CHZ, 1.280 x 720p@5CHZ/60Hz, 1.920 x 1.380@60Hz, 1.920 x 1.580p@60Hz | ||
| Items | Description | ||
| SMT-3233 SMT-4033 | |||
| Audio | Connector | 3.5mm Mini Phone Jack | |
| Output Signal | Loop through Inc. over(PC only), Speakers: 2x2W | ||
| Application Support | Female control | ||
| On Screen Display (OSD) | Functions | VESA1TM DPM Corpatitive | |
| Language | Chinese(Simplified), English, French, German, Spanish, Dutch, Russian, Arabic | ||
| General | |||
| Electrical | Input Voltage / Current | AC 100 - 240V(50/60Hz) | |
| Power Consumption | 49W | 55W | |
| Environmental | Operating Temperature / Humidity | 0 ~ +40°C (+32°F ~ +104°F)/10% ~ 80% (non-condensing) | |
| Storage Temperature / Humidity | -20 ~ +45°C (-4°F ~ +113°F)/5% ~ 95% (non-condensing) | ||
| Mechanical | Dimensions without Stand | 727.7 x 433.2 x 48.8mm | 900.7 x 516.9 x 47.8mm |
| Bezel Size | 14.5/25mm(Top/Bottom) | 13.56/17.66mm(Top/Bottom) | |
| Cabinet Color | Black | ||
| VESA Mounts Interface | 100 x 100mm | ||
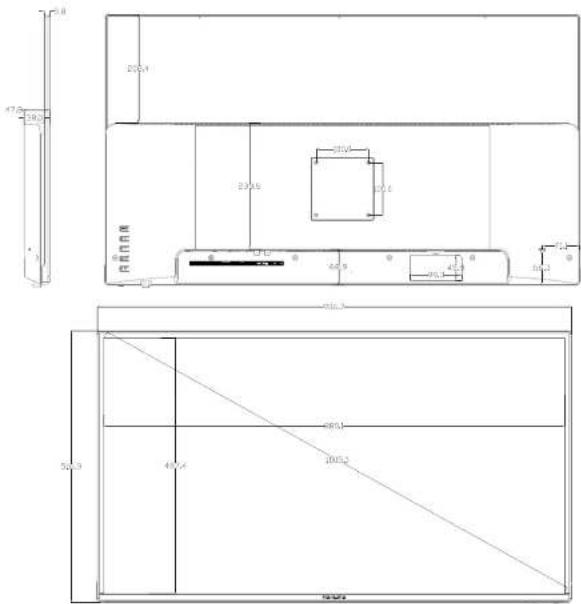
| Accessory (Not Included) | Sand | ||
appendix
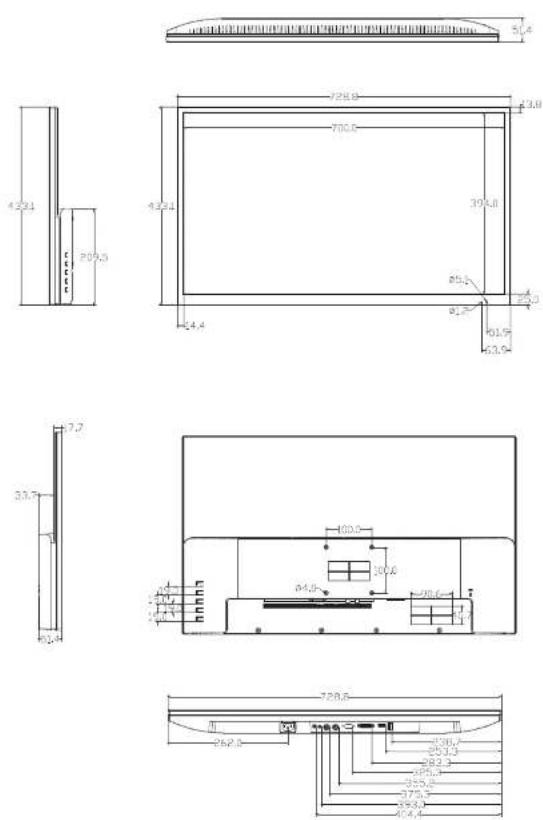
product overview
- Smt-3233
- Smt-4033
unit: mm (inches)
16_ appendix
trouBLeShootingG
| Problems and Symptoms Troubleshooting | |
| The screen appears and disappears repeatedly. | • Check the cable connection between the product and the external device, and check the locking status of the connection device. |
| If you connect an external device with an HDMI or HDMI-DVI cable, there will be margins on the top, bottom, left and right sides of the product screen. | • Those margins do not indicate a proclom with the product. Press the UNDER SCANJ button on the remote control or change the Picture Format of the video setting. |
| The screen will not switch on. • Confirm that the power cable is properly connected. | |
| A "NO SIGNAL" message appears on the screen. | • Confirm that the cable is properly connected to the product. • Confirm that the power to the product is turned on. |
| The screen seems to be flowing down. • Check the cable connected to the product. | |
| The screen is too bright. The screen is too dark. • Adjust the brightness and contrast. | |
| The product spontaneously turns itself off. | • Confirm that the power cable is firmly connected to the product and to the power outlet. |
| The image on the screen appears strange. | • Video compression in scenes with fast transitions, such as sports or action movies, can cause screen distortion. • Low signal level or poor quality may cause screen distortion. This is not a product issue. • Cellular phones within a 1 meter radius may cause interference with analog/digital products. |
| The brightness and color are strange. | • Adjust the screen options (Screen mode / Color depth / Brightness / Sharpness) using the screen menu. • Reset the screen with the default screen settings. |
| I can see a dotted line on the edge of the screen. | • If the screen is the original size, try changing it to 16:9. |
| Problems and Symptoms Troubleshooting | |
| I can see lines (rod, green, bruc) on the screen. | This occurs due to a fault in the DATA SOURCE DRIVER IC of the monitor. Contact Ianthwa Techwin Service Center to solve the problem. |
| The screen is unstable and stops. | Screen pauses may occur when the resolution is different from the recommended resolution, or when the signal is unstable. To solve this problem, change the resolution of the external device to the recommended resolution. |
| The image is not displayed on the full screen. | Try adjusting the screen size option of the product or external device. |
| I cannot hear any sound. | Check the connection of the audio cable or adjust the volume.Check the volume. |
| The sound is too quiet. | Try adjusting the volume. |
| The image appears but no sound plays. | When using external devicesMake sure that the audio cable is properly connected to the audio input terminal of the product.Check the audio output options of the external device.(For example, if HDMI is connected to the monitor, you may need to change the audio options of the cable box to HDMI.)If the product is connected using a DW to HDMI cable, you will need a separate audio cable.If there is a headphone jack on the product, confirm that nothing is connected to the headphone jack.Re-connect the device's power cable and reboot the connected device. |
| I can hear a strange noise from the speaker. | Check the cable connections. Make sure that the video cable is not connected to the audio input.If the cable is connected, check the signal strength.Sound may be distorted due to a low signal level. |
appendix
| Problems and Symptoms. Troubleshooting | |
| Even when I change the sound mode, the monitor sound remains the same. | The sound settings of the main speakers are independent of the product's internal speakers. In other words, the sound settings of the external device do not affect the internal speaker sound. |
| The remote control does not work. | Confirm that the / alignment of the batteries is correctCheck whether the batteries are dead.Makes sure it is blackout.Make sure the power cable is connected.Make sure that the special fluorescent and neon sign light is on nearby. |
| The product smells of plastic. This is a normal smell and still disappear over time | |
| The monitor is fitted to the side. | Separate the stand from the product and reassamable it. |
| Audio or video is intermittently interrupted. | Check the cable connection and try again.If you use cables that are too stiff or too thick, you may lose your audio or video connection.Make sure the cable is flexible enough to last a long time. When mounting the product on a wall, it is recommended to connect a 90 degree bent cable. |
| When connected with a DVI HDMI cable in HDMI mode, the speaker does not sound. | The connection via the DVI cable does not transmit any audio data. Therefore, you must connect the audio cable to the appropriate input jack for audio playback. |
| I cannot hear any sound in HDMI mode. | If you connect an external device that supports some lower versions of HDMI to a product that supports the latest HDMI standard, the colors displayed on the screen may not be normal, or the audio or video may not play, if this happens, connect both the HDMI cable and a separate audio cable. |

Hanwha Techwin cares for the environment at all product manufacturing stages, and is taking measures to provide customers with more environmentally friendly products.
The Eco mark represents Harwha Tochwin's devotion to creating environmentally friendly products, and indicates that the product satisfies the EU PoHS Directive.
Correct Disposal of This Product (Waste Electrical & Electronic Equipment)
Applicative in the European Union and other European countries with separate collection systems
This working on the product, accessories or literature indicates that the product and its electronic accessories (e.g. charger, heater, USB cable) should not be disposed of with other household waste at the one of their working life, to prevent possible harm to the environment, or human health from uncontrolled waste disposal presses separate these items from other types of waste and recycle them responsibly to promote the sustainable reuse of material resources.
Household users should contact either the retailer where they purchased this product, or their local government office, for details of where and how they can take these items for environmentally safe recycling.
Business users should contact their supplier and check the terms and conditions of the purchase contract. This product and its electronic accessories should not be mixed with other commercial acquisitions or disposal.

Correct disposal of batteries in this product
Applicable in the European Union and other European countries with separate battery return systems.
This morning on the bakery, manual or packaging indicates that the batteries in this product should be disposed of with other household waste in the end of their working life. Where market, the chemical symbols Hg. Color Prin indicate that the bakery contains mercury, potassium or lead above the reference levels in FC Directive 2036-66. It batteries are not properly disposed of, these substances can cause harm to human health or the environment.
to protect natural resources and to promote material reuse, please separate batteries from other types of waste and recycle them through your local, free battery return system.
Head Office
6, Pangyo-ro 319 beon-gil, Bundang-gu, Seongnam-si,
Gyeonggi-do, 463-400 Rep. of KOREA
Tel: +82.70.7147.8753 Fax: +82.31.8018.3740
www.hanwha-security.com
Hanwha Techwin America
500 Frank W. Burr Blvd. Suite 43 Teaneck, NJ 07666
Toll Free +1.877.213.1222 Direct +1.201.325.6920
Fax +1.201.373.0124
www.hanwha-security.com
Hanwha Techwin Europe
Heriot House, Heriot Road, Chertsey, Surrey, KT16 9DT, United Kingdom
Tel +44.1932.57.8100 Fax +44.1932.57.8101
www.hanwha-security.eu

Hanwha
Techwin



- Security LED Monitor User Manual
- Copyright
- Trademark
- Restriction
- Disclaimer
- IMPORTANT SAFETY INSTRUCTIONS
- Standards Approvals
- BEFORE START
- overview
- contentS
- inStaLLation
- connectinG with other device
- menu SettinGS
- appendix
- FEATURES
- Package Contents
- NAMES AND FUNCTIONS OF EACH PART
- Anti-theft Lock
- To lock an anti-theft locking device
- REMOTE CONTROL
- Changing the Remote Control ID
- BEFORE INSTALLING THE PRODUCT
- Ventilation requirement
- Vertical wall mount condition
- INSTALLING WALL MOUNT PARTS
- Installing Wall Mount Kits
- Wall Mount Kit Specifications (VESA)
- THINGS TO CHECK BEFORE CONNECTION
- Check before connecting
- CONNECTING WITH EXTERNAL DEVICES
- SCREEN (OSD) MENU SETTINGS
- Selecting external input menu
- Selecting OSD menu
- VIDEO SETTINGS
- AUDIO SETTINGS
- SYSTEM SETTINGS
- SETTING BUTTON LOCK
- product overview
- Correct Disposal of This Product (Waste Electrical & Electronic Equipment)
- Correct disposal of batteries in this product
- Head Office
- Hanwha Techwin America
- Hanwha Techwin Europe
Brand : Hanwha
Model : SMT-3233
Category : Monitor