50242 - Label printer Qoltec - Free user manual and instructions
Find the device manual for free 50242 Qoltec in PDF.


| Product Type | Thermal Label Printer |
| Brand | Qoltec |
| Model | 50242 |
| Print Method | Direct Thermal |
| Resolution | 203 dpi |
| Print Speed | Up to 127 mm/s (5 inches/s) |
| Print Width | 16 – 82 mm |
| Media Types | Thermal paper roll, label paper, sticker paper, fan-fold |
| Media Width | 16 mm – 82 mm |
| Media Core Diameter | Min. 25 mm |
| Max Media Diameter | 80 mm (outer) |
| Memory | DRAM 2M / 4M, Flash 2M / 4M (depending on model) |
| Interfaces | Parallel, RS-232, USB, LAN |
| Bar Codes Supported | CODE128, EAN128, ITF, CODE39, EAN13, EAN8, CODABAR, POSTNET, UPC-A, UPC-E, CPOST, MSI, PLESSEY, ITF14, EAN14 and more |
| Fonts | Internal fonts 0-8; Simplified Chinese, Traditional Chinese, Korean; enlargement 1-10x; rotation 0°, 90°, 180°, 270° |
| Graphics | PCX, BMP downloadable to Flash/DRAM |
| Paper Sensing | Gap sensor, paper presence sensor |
| Power Input | 24 VDC, 2.5 A |
| Operating Temperature | 5 – 45 °C |
| Storage Temperature | -40 – 55 °C |
| Operating Humidity | 20 – 80% RH |
| Storage Humidity | ≤93% RH (40°C) |
| Dimensions (L x W x H) | 214.5 x 134 x 147 mm / 220 x 148 x 150 mm (depending on model) |
| Weight | 1.5 kg / 1.44 kg |
| Cleaning | Clean print head and platen roller with 100% ethanol; use cotton swab or lint-free cloth |
| Safety Features | Overheat protection, do not touch thermal head during/after use, avoid contact with cutter |
| Included in Box | Printer, power adapter, data cable, user manual |
Frequently Asked Questions - 50242 Qoltec
User questions about 50242 Qoltec
0 question about this device. Answer the ones you know or ask your own.
Ask a new question about this device
Download the instructions for your Label printer in PDF format for free! Find your manual 50242 - Qoltec and take your electronic device back in hand. On this page are published all the documents necessary for the use of your device. 50242 by Qoltec.
USER MANUAL 50242 Qoltec
1.1 Safety warnings....3
1.2 Safety notice....3
- General information .... 3
2.1 Introduction....3
2.2 Main features 4
-
Printer parts....4
-
Paper roll installation....5
- Specification 8
5.1 Specification table 8
- Setting up the printer 9
6.1 Unpacking....9
6.2 Power cable connection....9
6.3 Data cable connection 9
6.4 Media installation....9
- Power on utilities....10
7.1 Self-test 10
7.2 Gap sensor calibration....10
7.3 Dump mode....11
7.4 Skip AUTO.BAS 11
7.5 Printer initialization 11
- Indicators and buttons....11
8.1 Indicators 12
8.2 Buttons....12
- Maintenance....12
9.1 Printer cleaning....12
1. Introduction
Thank you for choosing out thermal label printer. This product has high printing quality and performance at economic price. Thermal printer is easy in use and has powerful functions.

CAUTION, NOTE

CAUTION: CAUTIONS MUST BE OBEYED TO AVOID MINOR INJURY TO YOURSELF, DAMAGE TO EQUIPMENT, OR LOSS OF DATA.

NOTE: IMPORTANT INFORMATION AND TIPS FOR PRINTERS OPERATION.
1.1 Safety warnings
Please read the below warnings and notes carefully before using the printer.
CAUTION: DO NOT TOUCH THE THERMAL HEAD AND ITS SURROUNDINGS DURING USE OR

IMMEDIATELY AFTER USE. AFTER PRINTING, THE THERMAL HEAD AND ITS SURROUNDINGS CAN BE VERY HOT.

CAUTION: DO NOT TOUCH THE PRINTER HEAD AND PLUG-IN PARTS TO AVOID DAMAGE OF THE THERMAL HEAD.

CAUTION: DO NOT TOUCH THE PAPER TEAR-OFF KNIFE TO AVOID GETTING HARM.
1.2 Safety notice
- Do not damage the thermal head by touching it with your fingers or any hard object.
- Do not touch the cutter blade.
- Do not bend the power cord excessively or place any heavy objects onto it.
- Do not use printer when it is out of order. This may cause a fire or/and electrocution.
• Always hold the plug, not the cord when connecting or disconnecting the plug. - Keep the desiccant out of children's reach.
• Use only approved accessories and do not try to disassemble, repair or remodel it by yourself.
• Install the printer on the stable surface. Choose firm, flat surface to avoid vibration. - Do not let water or other foreign objects into inside of the printer.
- Do not connect a telephone line into peripheral drive connector.
• We recommend to unplug the printer from the power outlet if no use it for long period.
2. General information
2.1 Introduction
Thermal label printer is designed for real-time batch label printing, which is applicable in the field of transportation, logistics, post, retail sale etc. The printer can be connected to other equipment with various interface cards, such as: parallel, serial, USB and LAN. It supports different paper media, including thermal paper roll, thermal label paper and sticker paper.
The printer provides direct thermal printing at selectable printing speed of 2.0, 3.0, 4.0 and 5.0 inches per second. It accepts roll feed, die-cut and fan-fold labels. All common bar code formants are available.
Font and bar codes can be printed in 4 directions and in 1 to 10 times enlargement size. High performance and efficiency of label printing save your time.
2.2 Main features
• Support thermal paper roll, thermal label paper and sticker paper.
• Support printing media width from 16 mm to 82 mm.
• Auto paper adjusting function.
• Auto temperature control for durable printing.
• Module design for different application.
3. Printer parts
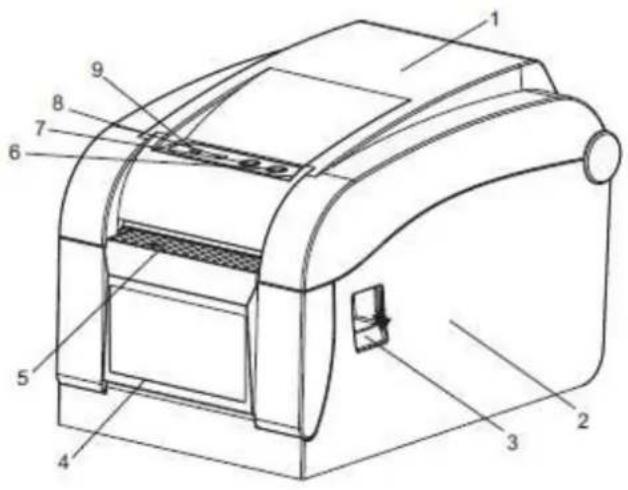
text_image
Technical diagram of a 3D printer with numbered parts for identification| 1 – top cover 2 – base housing 3 – top cover open button | |
| 4 – backing paper opening 5 – label opening 6 – feed button | |
| 7 – pause button 8 – error indicator 9 – online/power indicator |
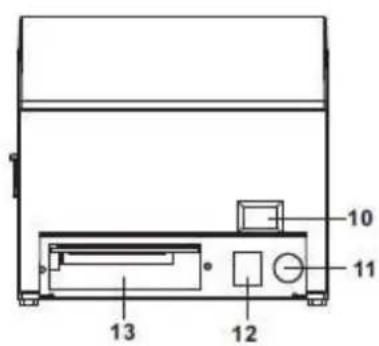
text_image
10 11 12 13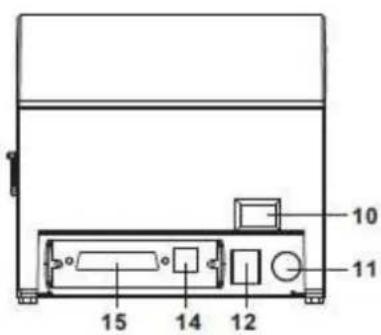
text_image
10 11 15 14 12| 10 - power switch 11 - power jack 12 - cashdrawer jack | |
| 13 - parallel interface 14 - USB interface 15 - serial interface |
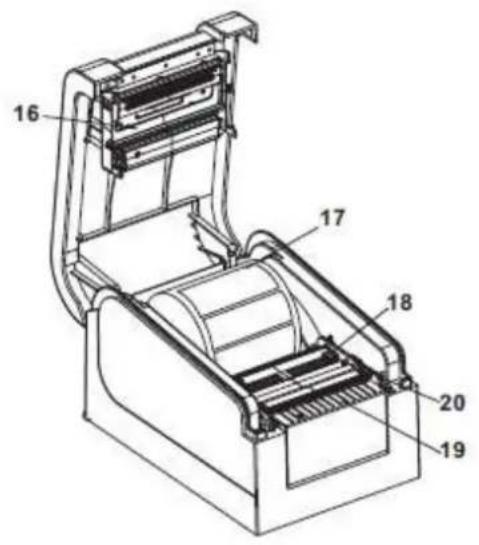
text_image
16 17 18 20 19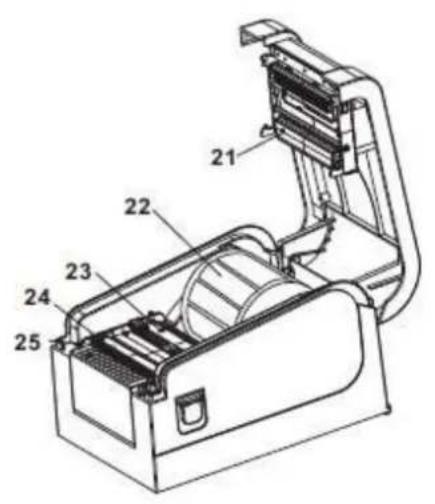
text_image
Technical diagram of a device with numbered components for identification| 16 – printer head 17 – paper roll 18 – label guide | 19 – paper presence | sensor | 20 – peel-off roller lever |
| 21 – light transmission sensor light source | 22 – paper roll spindle 23 – light transmission sensor receiver | 24 – peel-off spindle 25 | – peel off roller |
4. Paper roll installation
- Insert the paper roll spindle into a paper roll, and place the paper roll into the printer. Fixing tab on the paper roll spindle should be inside the internal paper roll mount. Adjust the paper roll spindle with the paper roll mount.
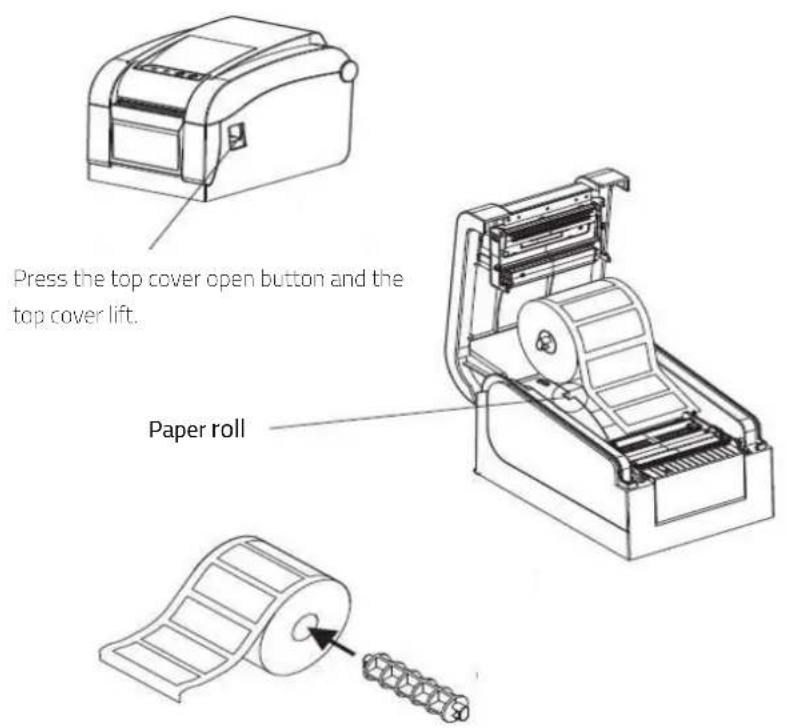
text_image
Press the top cover open button and the top cover lift. Paper roll(2) Insert the paper roll spindle into the paper roll and adjust the spindle position to make it in the center of the paper roll.
(3) Place the paper roll into the internal paper roll mount. Please make sure that the paper printing side face up as shown in the below picture
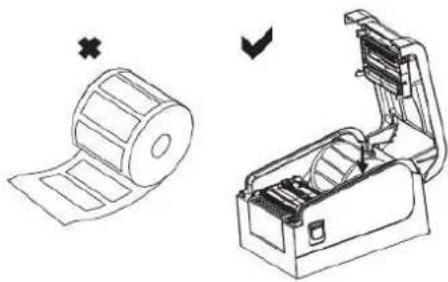
natural_image
Diagram showing a rolled paper strip being cut off into an open mechanical device (no text or symbols present)- Loading label for peel-off mode
(1) Thread the label through the label guides and move the label guides to adjust the fitness paper width. In addition to the outer label paper roll, can be passed through the gap at the back side of printer.
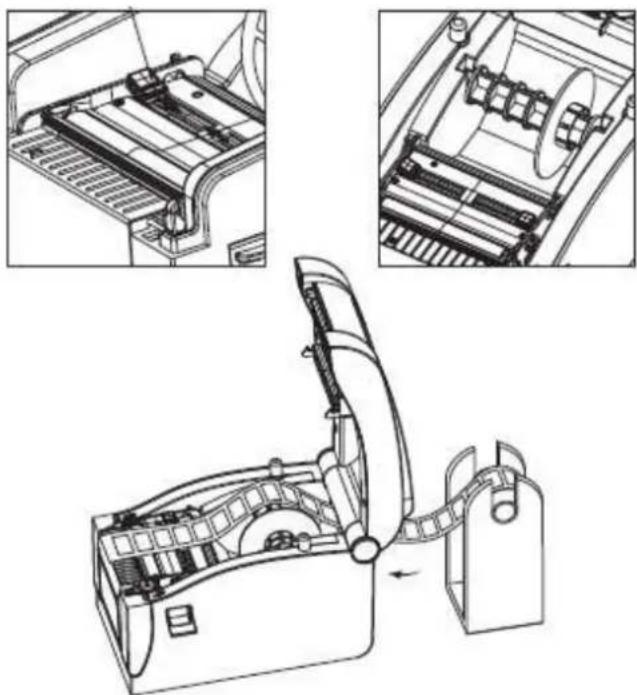
natural_image
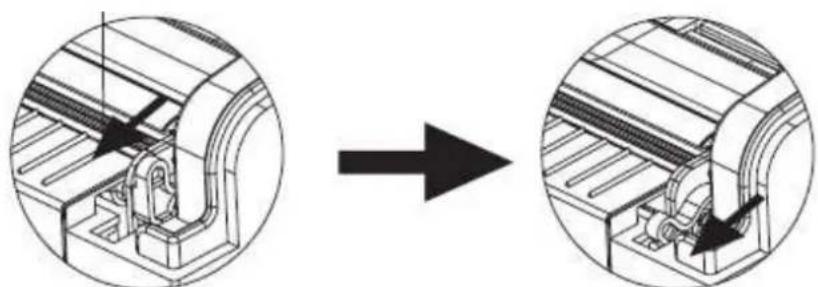
Technical line drawing of a mechanical device with three views: top view showing internal components, middle view showing internal structure, and bottom view showing assembly (no text or symbols present)(2) Pull down the peel-off roller lever to unlock the peel-off roller.
natural_image
Technical diagram showing a mechanical assembly before and after transformation, with no visible text or symbols.Lever stands, the peel-off roller is locked
Lever down, the peel-off roller is unlocked
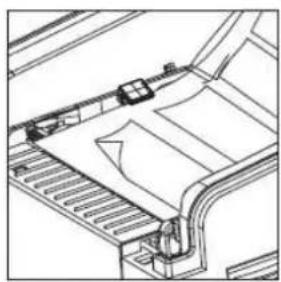
(3) Split the label paper and backing paper manually and keep the label paper in the label opening. Thread the backing paper in front of the peel-off spindle and into the peel-off part.
natural_image
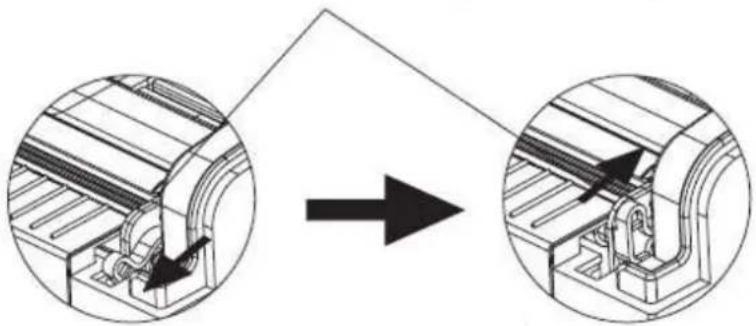
Technical line drawing of a mechanical assembly or assembly with no visible text or symbols(4) Pull up the peel-off lever and the peel-off roller presses on the backing paper. Close the top cover
natural_image
Diagram showing a mechanical assembly transformation from a cylindrical component to a stepped component, with no visible text or symbols.Lever down, the peel-off roller is unlocked
Lever stands, the peel-off roller is locked, and the backing paper is in the peel-off part

Note:
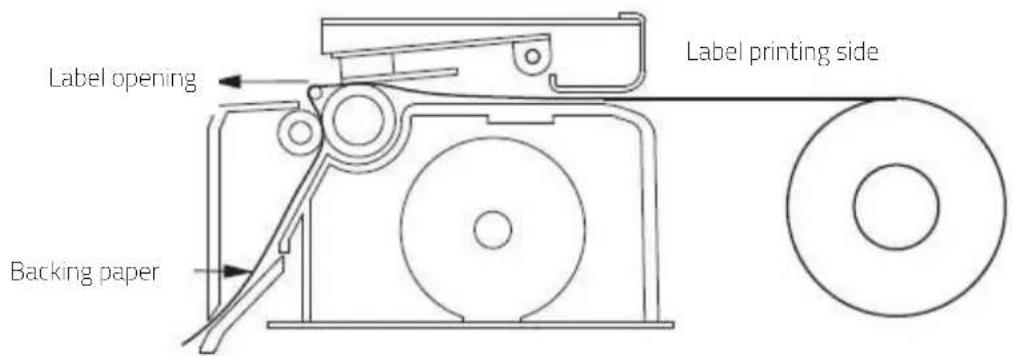
If the peel-off function fails, please check:
- The printing media is installed correctly.
- The backing paper is in front of the peel-off spindle.
- The peel-off roller presses on the backing paper.
- The peel-off roller lever stands.
Please refer to the picture below:
text_image
Label opening Label printing side Backing paper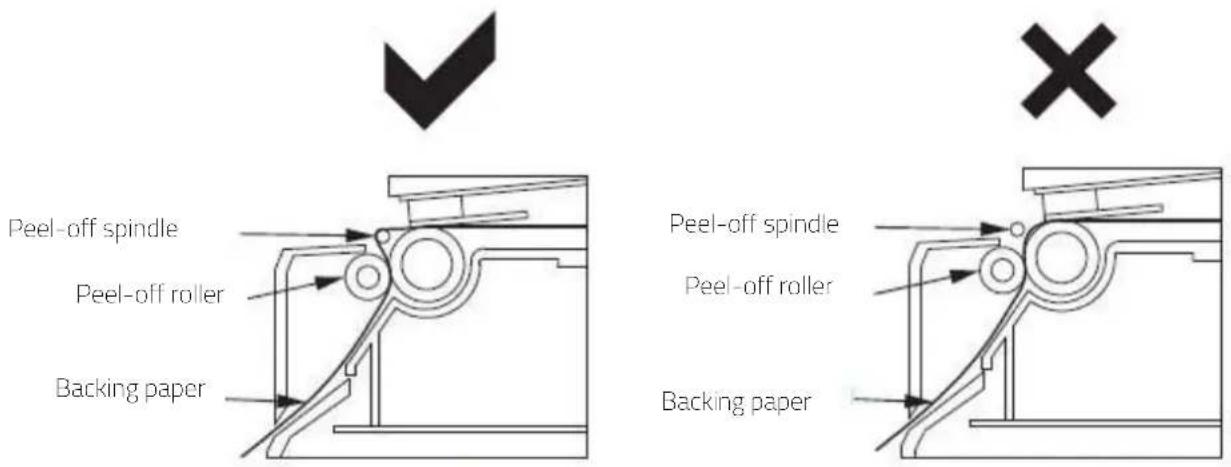
text_image
Peel-off spindle Peel-off roller Backing paper Peel-off spindle Peel-off roller Backing paper5. Specification
5.1 Specification table
| Parameter | ||
| Printing method Direct thermal | ||
| Resolution 203 dpi | ||
| Print width 16 - 82 mm | ||
| Print speed Max. 127mm/s | Min. 50.8mm/s | ||
| Memory | Dram: 2M | Flash: 2M (XP-330B)Dram: 4M | Flash: 4M (XP-350B) | |
| Printer head temperature sensor | Thermal sensitive resistance | |
| Printer head position sensor Micro switch | ||
| Paper direction sensor Photoelectricity sensor | ||
| Interface | Parallel | RS-232 | USB | LANRS-232 + USB + LAN | |
| Bar codeFontGraphics | Bar code | CODE128 | EAN128 | ITF | CODE39 | EAN13 |EAN13+2 | EAN13+5 | EAN8 | EAN8+2 |EAN8+5 | CODABAR | POSTNET | UPC-A |UPCA+2 | UPCA+5 | UPC-E | UPCE+2 | UPC-E+5 | CPOST | MSI | MSIC | PLESSEY | ITF14 |EAN14 |
| Internal font | From 0 to 8Simplified Chinese, traditional Chinese and Korean | |
| Enlargement & rotation | 1 to 10 times enlargement in both directions 0^ , 90^ , 180^ , 270^ rotation | |
| Graphics | Mono PCX and BMP files can be downloaded intoFLASH and DRAM | |
| Media | Media type Continuous, sticker, fan-fold etc. | |
| Media width 16 mm ~ 82 mm | ||
| Media diameter Max. 80 mm or outer label paper roll | ||
| Media core diameter Min. 25 mm | ||
| Paper off mode Tear off and peel off | ||
| Power Input 24VDC | 2.5A | |
| Environment condition | Work 5~45 | °C | 20 - 80%RH |
| Storage -40 ~ 55 | °C, ≤93%RH (40°C) | |
| Physical dimension | Diameter (L x W x H) | 214.50 x 134 x 147 mm220 x 148 x 150 mm |
| Weight | 1.5 kg1.44 kg | |
The printer supports both continuous and non-continuous paper:
a) Continuous type: paper roll
b) Non-continuous type:
- Label roll,
- Sticker paper.
6. Setting up the printer
6.1 Unpacking
Please unpack the printer package and inspect the parts according to the packing list. If any parts are missing or damaged, please contact the customer service of your reseller or distributor.
6.2 Power cable connection
- Make sure that printer power switch is in OFF position.
- The printer power jack is a 3-pin socket and for 24V DC power input. Please plug the DC cord connector into the printer's power jack properly.

CAUTION:
- Avoid pulling the power cord, otherwise any damages may cause a fire or electrocution.
- Avoid placing the power cord around other overheated equipment to prevent power cord melting, which may cause a fire or electrocution.
6.3 Data cable connection
- Make sure that the printer power switch is in OFF position.
- Plug the data cable connector into the printer's interface properly.
- Plug the other end of data cable with the host computer.

CAUTION:
- Please do not plug the data cable when the printer power is ON.
6.4 Media installation
To install the sticker paper and label roll, please refer to chapter 4 "Paper roll installation".
7. Power on utilities
There are five power-on utilities to set up and test printer hardware. These utilities are activated by pressing FEED button and PAUSE button.
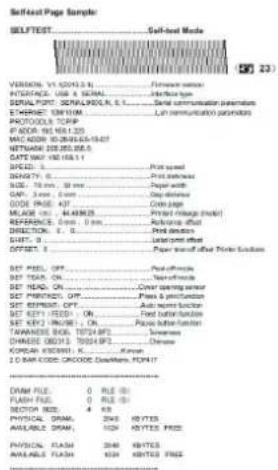
7.1 Self-test
To start the printer self-test, please follow the below steps:
- Turn off the printer power.
- Make sure that the paper roll is installed correctly and the printer top cover is closed.
- Press the FEED button and turn on the printer power simultaneously. When the self-test paper comes out, release the FEED button.
text_image
Self-test Page Sample SELFTEST Self-test Mode VERSION: V1 52013.2 N. INTERFACE: USB & SERIAL SERIAL POINT: SETNPLR20.0, S. E:\WINDOWS\CHW101\M PROTOCOLS: TCRP IF ADDR: 161.161.20 MAC ADDR: 16.269.845-16.607 NETMAX: 200.265.855.5 GATE WAY: 161.161.1 SIZE: 0 SINHITY: 0 SIZE: 70 mm, 30 mm GAP: 3 mm, 0 mm PAGE: PASE 17 MLAGE: 00 - 44.49928 REFERENCE: DSS, 0 mm DIRECTION: 0 - 0 mm RIGHT: 0 OFFSET: 0 SET PASE, OFF: SET HEAD, ON: SET HEAD, ON: SET PRACTICE, OFF: SET EPPERT, OFF: SET EKEY, FREE, ON: SET KER2 (KORE), ON: TAWARESE BOLI, TBT34 MPZ: DHYMEB OXO13, 70034 MPZ: KORAN 6326991. K. 12 RAM CODE: CROODE GLOOMES, FDPRT TYPE: 0 RUM SIZE: 0 RUM WIDTH: 0 RUM FLIGHT: 0 RUM RADIUS: 4.58" RUM PLANT: 24KB MILES RUM ASSEMBLATION: 10KB MILES PREC RUM PLANT: 24KB MILES PREC RUM FLIGHT: 10KB MILES PREC7.2 Gap sensor calibration
Gap sensor sensitivity should be calibrated at the following conditions:
- A brand new printer.
- Label stock changed.
- Printer initialization.
This function is to reset the label gap sensor sensitivity when the printer is turned on. User needs to start the calibration of the gap sensor sensitivity after loading a different type of label roll or when the printer has been initialized.
Please follow the steps below to calibrate the gap sensor:
- Turn off the printer power.
- Make sure the label roll is installed correctly and the printer top cover is closed.
- Press and hold on the PAUSE button, then turn on the printer power. The printer will automatically calibrate the gap sensor sensitivity and save the gap length into DRAM. Then release the PAUSE button.
7.3 Dump mode
Please follow the steps below:
- Turn off the printer power.
- Make sure the label roll is installed correctly and the printer top cover is closed.
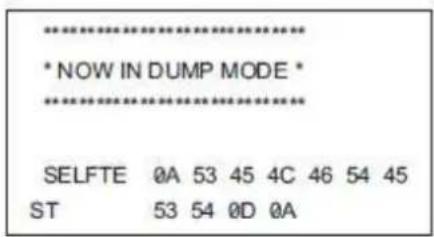
- Press and hold on the PAUSE button and FEED button, then turn on the printer power. When the POWER indicator (blue light) and ERROR indicator (red light) light simultaneously, release both buttons. The printer is changed to dump mode and is printing as below chart:
text_image
********************************************************************** * NOW IN DUMP MODE * ********************************************************************** SELFTE 0A 53 45 4C 46 54 45 ST 53 54 0D 0A7.4 Skip AUTO.BAS
User can download an auto execution file (AUTO.BAS) to flash memory. Printer will run the AUTO.BAS program immediately when turning on printer power. The AUTO.BAS program can be interrupted by the power-on utility.
Please follow the steps below to skip the AUTO.BAS:
- Turn off the printer.
- Press and hold on the PAUSE button, then turn on the printer power. When the POWER indicator (blue light) dims and ERROR indicator (red light) light, release both buttons. The printer skips running the AUTO.BAS program. Then the POWER indicator lights.
7.5 Printer initialization
Printer initialization is used to clear DRAM and restore printer settings to defaults. Please do the gap sensor sensitivity calibration after the printer initialization.
Please follow the steps below to initialize the printer:
- Turn off the printer power.
- Press and hold on the PAUSE button and FEED button, then turn on the printer power. When the POWER indicator (blue light) lights and ERROR indicator (red light) dims, release both buttons. The printer DRAM is cleared and printer settings are restored to defaults.
8. Indicators and buttons
The printer has:
- Two indicators:
a) POWER indicator in blue light b) ERROR indicator in red light - Two buttons:
a) PAUSE b) FEED
8.1 Indicators
| Item | Indicators status Descriptions | |
| 1 | POWER indicator is ONERROR indicator is OFF | Printer is powered on and in normal mode |
| 2 | POWER indicator flashes slowly (640ms)ERROR indicator is OFF | Printer is paused |
| 3 | POWER indicator flashes fast (160ms)ERROR indicator is OFF | Printed label is peeled-off but not taken off |
| 4 | POWER indicator is OFFERROR indicator flashes slowly (640ms) | Paper cover is opened |
| 5 | POWER indicator is OFFERROR indicator flashes slowly (640ms) | Paper shortage or gap sensor calibrated error |
| 6 | POWER indicator flashes fast (160ms)ERROR indicator flashes fast (160ms) | Printer overheated protection is activated. After 1 minute, the printer will check again the temperature of printer head. If the temperature is right, printer resumes working. |
8.2 Buttons
| Item | Function Description | |
| 1 | Feed | Press the FEDD button when POWER indicator is on and ERROR indicator is off. It feeds the label to the beginning of the next label. |
| 2 | Pause Press the feed button during printing to suspend it | |
| 3 | Self-test | Turn off the printer powerMake sure that the paper roll is installed correctly and the printer top cover is closed.Press the FEED button and turn on the printer power simultaneously. When the self-test paper comes out, release the FEED button. |
| 4 | Gap sensor calibration | Turn off the printer power.Make sure that the paper roll is installed correctly and the printer top cover is closed.Press and hold on the PAUSE button, then turn on the printer power. The printer will automatically calibrate the gap sensor sensitivity and save the gap length into DRAM. After that release the PAUSE button. |
| 5 | Dump mode | Turn off the printer power.Make sure that the paper roll is installed correctly and the printer top cover is closed.Press and hold on the PAUSE button and the FEED button, then turn on the printer power.When the POWER indicator (blue light) and ERROR indicator (red light) light simultaneously, release both buttons. The printer is changed to dump mode. |
9. Maintenance
9.1 Printer cleaning
To ensure the best printing quality, please proceed this maintenance section to keep your printer in good condition and to extend its life.
Please use one of the following material to clean the printer:
- Cotton swab
- Lint-free cloth
• Vacuum / blower brush - 100% ethanol
The cleaning process is described below
| Printer Part Method | |
| Printer head 1. | Turn off the printer power before cleaning the printer head.2. Allow the printer head to cool for at least one minute.3. Use a cotton swab and 100% ethanol to clean the printer head surface. |
| Platen roller 1. | Turn off the printer power.2. Rotate the platen roller and use cotton swab or lint-free cloth to wipe it thoroughly with 100% ethanol. |
| Exterior Wipe | it with water dampened cloth. |
| Interior Use | a vacuum cleaner or blower brush to remove the dust. |
Note:
• Always turn off the printer before cleaning the printer.
- Do not touch printer head by hand. Tweezers is not allowed to be used for cleaning, otherwise the printer head, platen roller or sensor may be damaged.
- Please use 100% ethanol. DO NOT use medical ethanol, gasoline or acetone, which may damage the printer head and platen roller.
- Do the sensor calibration after cleaning the sensors.
• Only turn on the printer and resume printing job after ethanol is volatilized.