
MultiPad PMP3170B - Tablet PRESTIGIO - Free user manual and instructions
Find the device manual for free MultiPad PMP3170B PRESTIGIO in PDF.

| Product Type | Tablet |
| Brand | Prestigio |
| Model | MultiPad PMP3170B |
| Operating System | Android 4.0 (Ice Cream Sandwich) |
| Processor | ARM Cortex A5 at 1.0GHz |
| RAM | 512MB DDR3 |
| Display | 7" TFT LCD, Capacitive multi-touch, 800 x 480 pixels |
| Storage Capacity | 4GB flash memory (approx. 2.0GB user accessible), micro SDHC up to 32GB |
| Battery | 3000 mAh Li-Pol, charging time approx. 4 hours |
| Dimensions (L x W x H) | 191.8 x 123 x 9.5 mm (approx.) |
| Weight | 295 g (approx.) |
| Connectivity | WiFi 802.11 b/g/n, USB 2.0, USB Host, HDMI, Earphone jack |
| Camera | Built-in camera |
| Microphone | Built-in microphone |
| Card Slot | Micro SD/SDHC (supports up to 32GB) |
| Power Input | AC adapter, DC port |
| Operating Temperature | 0°C ~ +50°C |
| Storage Temperature | -10°C ~ +60°C |
| Humidity | 0% ~ 90% non-condensed |
| Cleaning | Use a soft, dry cloth. Do not use harsh chemicals. |
| Safety | Keep away from water, use only provided charger, do not disassemble. |
Frequently Asked Questions - MultiPad PMP3170B PRESTIGIO
User questions about MultiPad PMP3170B PRESTIGIO
0 question about this device. Answer the ones you know or ask your own.
Ask a new question about this device
Download the instructions for your Tablet in PDF format for free! Find your manual MultiPad PMP3170B - PRESTIGIO and take your electronic device back in hand. On this page are published all the documents necessary for the use of your device. MultiPad PMP3170B by PRESTIGIO.
USER MANUAL MultiPad PMP3170B PRESTIGIO
- Prestigio MultiPad 2. AC Adapter
- Legal and Safety Notices 4. USB Cable
-
Quick Start Guide
-
Warranty Card
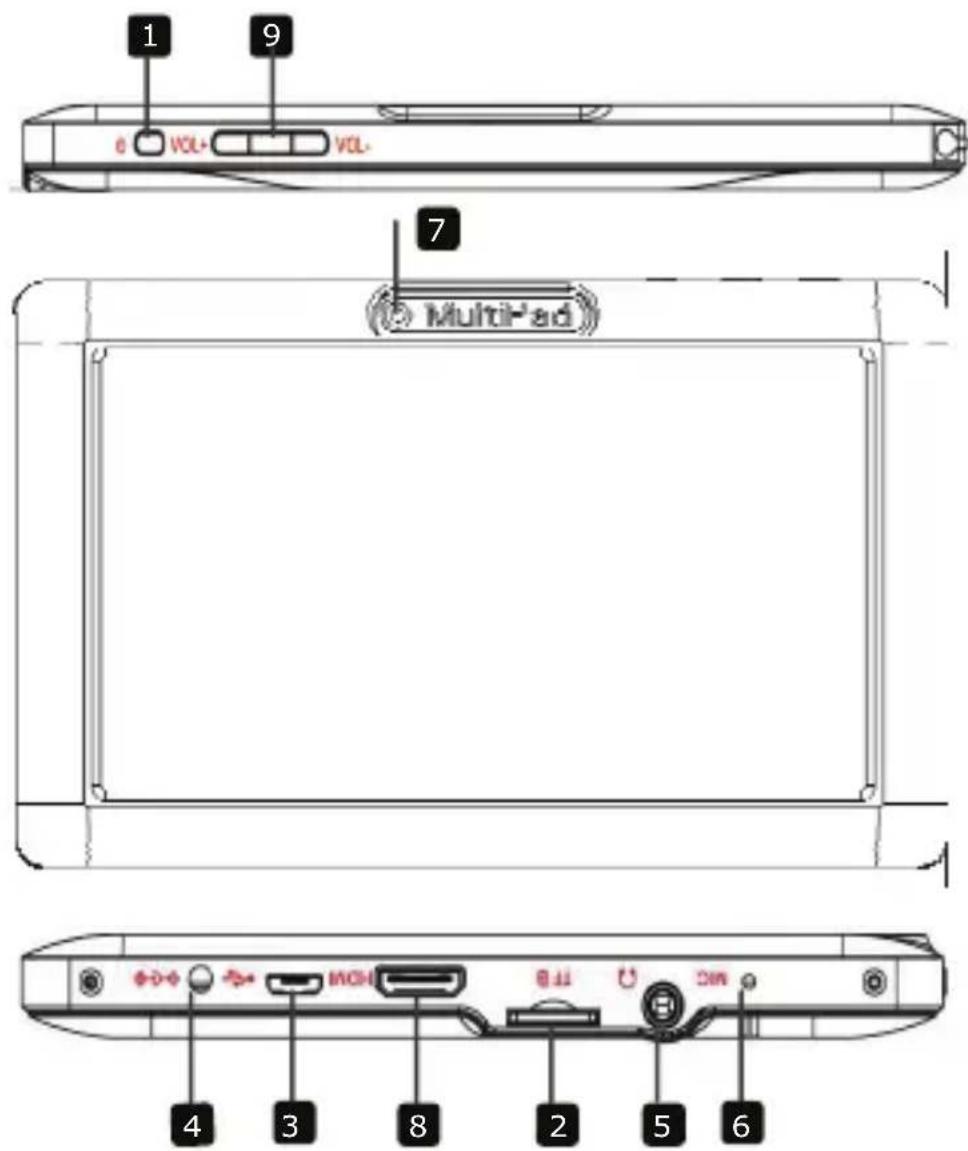
2. Device Overview

Prestigio
Quick Start Guide
Prestigio MultiPad
PMP3170B
1 Power Turn on/off the device; Suspend/Activate the device
2 Micro SD Card Slot Insert Micro SD card.
3 USB port USB connection.
4 DC port AC adaptor connection.
5 Earphone Jack Earphones connection.
6 Built-in Microphone Record sounds.
7 Camera Take photos.
8 HDMI port HDMI cable connection
9 Vol + \ Vol - Button Adjust the volume level.
Getting Started
3. Charging
- Insert the connector of adaptor to the DC port of the device and connect the power adapter to the wall socket for charging.
- Normally it takes approximately 4 hours to fully charge the device. Operating the device while charging with the AC adapter may extend the time of full charging.
4. Power on/Power off
- To turn on the device, press and hold the Power Button until you see the start-up screen then release. It will automatically enter the Home screen. If it is first time to use it, it will enter Prestigio Wizard screen. please follow the on-screen instructions
- Press the Power Button once to enter sleep mode and press it again to awake the device.
- Press and hold the Power Button, and then tap on OK to power off the device.
5. Inserting a Memory Card
● The device supports micro SD/SDHC cards.
- To insert a Micro SD card, place the card connector towards the front side of the device and the printing side of the card towards the rear side of the device.
- To remove the micro SD card, gently press the edge of the card to release the safety lock and pull the card out of the slot.
Notice:
When you are reading the file from micro SD card, please don't remove it, or the device could fail to operate correctly.
6. Connecting to Wi-Fi
- In the Home menu press the icon and select Settings icon to access the list of options. Select Wireless & networks.
- If the Wi-Fi is off, tap on the Wi-Fi line to turn it on.
- The device will scan for available Wi-Fi networks and display them at the right of the screen.
- Tap on the network you want to connect to. Then tap inside the Wireless password field to make the virtual keyboard appear. Enter the required network information, tap on Enter, and then tap on Connect.
- Your device will now attempt to establish a connection to the Wi-Fi access point with the network parameters you entered.
7. Transferring content from PC
- Connect the device to your PC/Notebook via USB cable.
- Select the content you want to transfer from your PC/Notebook.
- Drag the content from the PC/Notebook to the device.
- Please do not disconnect the USB cable during loading. It may cause malfunction of the device and files.
- Left click on 📋 to disconnect the device and PC/Notebook safely.
Technical Specifications
| Processor High performance ARM Cortex A5 at 1.0GHz | |
| RAM 512MB DDR3 | |
| OS Android 4.0 (Ice Cream Sandwich) | |
| Display 7" TFT LCD, Capacitive multi-touch | |
| Resolution 800 x 480 pixels | |
| Storage capacity 4 GB flash memory (about 2.0GB are accessible by user), Memory card slot supports micro SDHC card up to 32 GB | |
| Interfaces USB 2.0, Micro SD (micro SDHC compatible), USB Host | |
| Communications WiFi (802.11 b/g/n) | |
| Battery 3000 mAh Li-Pol battery | |
| Dimensions 191.8 x 123 x 9.5mm (L x W x H) (appro.) | |
| Weight 295 g (appro.) | |
| Storage Temperature -10°C ~ +60°C | |
| Operation | |
| Temperature 0°C ~ +50°C | |
| Operation Relative Humidity 0% ~ 90% Non-Condensed | |
| Storage Relative Humidity 0% ~ 90% Non-Condensed | |
| Disclaimer |
As the Prestigio products are constantly updated and improved, your device's software may have a slightly different appearance or modified functionality than presented in this Quick Start Guide.

Prestigio


Prestigio
إيل الإبدء الإسريع
Prestigio MultiPad جهاز
PMP3170B

Prestigio
Trumpasis vadovas
„Prestigio MultiPad“
PMP3170B

As the Prestigio products are constantly updated and improved, your device's software may have a slightly different appearance or modified functionality than presented in this Quick Start Guide.
6. Connecting to Wi-Fi
1 Ström Slå på/av enheten; Pausa/aktivera enheten#

Prestigio
Стислий посібник
Prestigio MultiPad
PMP3170B
Brand : PRESTIGIO
Model : MultiPad PMP3170B
Category : Tablet