CintiQ DTU-1631 - Tablet WACOM - Free user manual and instructions
Find the device manual for free CintiQ DTU-1631 WACOM in PDF.


| Product Type | Interactive Pen Display |
| Model | Cintiq DTU-1631 |
| Brand | Wacom |
| Screen Size | 15.6 inches |
| Resolution | 1920 x 1080 (Full HD) |
| Pressure Levels | 2048 |
| Pen Technology | Battery-Free EMR |
| Dimensions (W x H x D) | 16.7 x 12.2 x 0.7 in (424 x 310 x 17 mm) |
| Active Area | 13.6 x 7.6 in (345 x 194 mm) |
| Weight | 4.8 lbs (2.2 kg) |
| Connectivity | DVI, USB 2.0, AC Adapter |
| Power Source | 100-240V AC Adapter (included) |
| Power Consumption | 30W (typical) |
| Operating System Support | Windows 7/8/10, macOS 10.8 or later |
| Pen Included | Wacom Pro Pen (model LP-170) |
| Pen Buttons | 2 side switches |
| ExpressKeys | 8 programmable keys |
| Display Type | IPS LCD with anti-glare coating |
| Color Gamut | 72% NTSC |
| Brightness | 250 cd/m² |
| Contrast Ratio | 600:1 |
| Viewing Angle | 170° horizontal / 170° vertical |
| Maintenance | Clean with a soft, lint-free cloth; avoid abrasive cleaners |
| Safety Precautions | Do not expose to moisture; use only provided AC adapter |
| Spare Parts / Repairability | Replacement pens, cables, and AC adapters available from Wacom |
Frequently Asked Questions - CintiQ DTU-1631 WACOM
User questions about CintiQ DTU-1631 WACOM
0 question about this device. Answer the ones you know or ask your own.
Ask a new question about this device
Download the instructions for your Tablet in PDF format for free! Find your manual CintiQ DTU-1631 - WACOM and take your electronic device back in hand. On this page are published all the documents necessary for the use of your device. CintiQ DTU-1631 by WACOM.
USER MANUAL CintiQ DTU-1631 WACOM
Customizing the pen display
Using the Radial Menu
Application-specific settings
Troubleshooting

natural_image
Abstract 3D illustration of six colored spheres arranged radially around a central point (no text or symbols)Interactive pen display
User's Manual
Version 2.0, Rev A2510
Copyright © Wacom Co., Ltd., 2010
All rights reserved. No part of this manual may be reproduced except for your express personal use.
Wacom reserves the right to revise this publication without obligation to provide notification of such changes.
Wacom does its best to provide current and accurate information in this manual. However, Wacom reserves the right to change any specifications and product configurations at its discretion, without prior notice and without obligation to include such changes in this manual.
The above year indicates when this manual was prepared. However, the date of release to the users of the “manual” is simultaneous with the introduction into the market of the applicable Wacom product.
DuoSwitch is a trademark, and Wacom is a registered trademark of Wacom Co., Ltd.
Adobe and Reader are either registered trademarks or trademarks of Adobe systems Incorporated in the United States and/or other countries. Microsoft, Windows, and Vista are either registered trademarks or trademarks of Microsoft Corporation in the United States and/or other countries. Apple, the Apple logo, and Macintosh are trademarks of Apple Computer, Inc., registered in the U.S. and other countries.
Any additional company and product names mentioned in this documentation may be trademarked and/or registered as trademarks. Mention of third-party products is for informational purposes only and constitutes neither an endorsement nor a recommendation. Wacom assumes no responsibility with regard to the performance or use of these products.
TABLE OF CONTENTS
About the manual 5
Navigating the manual 6
YOUR INTERACTIVE PEN DISPLAY 7
Pen display features 8
Front view 8
Rear view 9
Adjusting display incline 10
Pen features 11
INSTALLATION 12
System requirements 12
Step 1: Display installation 13
Step 2: Pen tablet installation 17
USB cable installation 17
Software installation 18
WORKING WITH THE INTERACTIVE PEN DISPLAY 19
Ergonomics 19
Using the pen 20
Holding the pen 20
Positioning 20
Clicking 21
Dragging 21
Using the side switch 22
Working with pressure sensitivity 22
Erasing 22
Working with multiple monitors 22
Adjusting the display 23
Factory presets, auto-sync, and user settings 23
On Screen Display (OSD) settings 23
Power saving 26
CUSTOMIZING 27
Opening the control panel 27
Control panel overview 28
Calibrating the pen display 30
Adjusting pitch and phase (VGA only) 31
Customizing the pen 32
Adjusting tip feel and double-click 32
Adjusting eraser feel 33
Advanced tip and eraser pressure settings 34
Customizing pen buttons 35
Button functions 36
Using and customizing the Radial Menu 40
Working with Display Toggle 41
Application-specific settings 42
Creating an application-specific setting 43
Changing application-specific settings 44
Removing application-specific settings 44
TROUBLESHOOTING 45
Testing the interactive pen display 46
Testing your pen 47
Display troubleshooting 48
General display problems 48
VGA problems 50
Pen tablet troubleshooting 51
General problems 51
Windows-specific problems 54
Macintosh-specific problems 55
Technical support options 57
Obtaining driver downloads 58
APPENDIX 59
Caring for the interactive pen display 59
Replacing the pen tip 60
Using an alternate mount or stand 61
Uninstalling the interactive pen display 62
Managing preferences 63
Installing multiple tablets 64
Pen and digital ink capabilities in Windows 65
About the Windows Tablet PC Input Panel 66

Product specifications 67
Model DTU-2231 interactive pen display 67
General specifications, DTU-2231 67
Display, DTU-2231 68
Tablet, DTU-2231 69
Power adapter, DTU-2231 69
Model DTU-1631 interactive pen display 70
General specifications, DTU-1631 70
Display, DTU-1631 71
Tablet, DTU-1631 72
Power adapter, DTU-1631 72
Pen (model UP-817E) 72
Pen (model UP-818E) 72
Product information 73
Ordering parts and accessories 73
Available parts and accessories 73
Radio and television interference 74
FCC notice 74
Industry Canada (Canada only) 75
CE declaration 75
Precautions 76
Physical location 76
Environment 76
Usage 77
Handling 77
Warranty
(Worldwide, Except for Europe,
Africa and Middle East) 79
Limited Warranty 79
Warranty Service in the U.S.A. and Canada 80
Warranty Service Outside of the U.S.A. and Canada 80
Licence warranty conditions
(Europe, Africa and Middle East) 81
Software Licence Agreement 81
Limited Warranty 82
GLOSSARY 84
INDEX 86
ABOUT THE MANUAL
This document provides quick access to information about your interactive pen display. Click on a navigation button or highlighted word to move through the document. The information is common to Windows and Macintosh computers and Windows screen captures are shown, unless otherwise noted.
If you are new to electronic documentation, read navigating the manual.
- Go directly to contents or index topics by clicking on them.
- SMALL CAPITAL LETTERS identify the names of keyboard keys, dialog boxes, and control panel options.
- You can use your viewer zoom-in tool to increase the size of the page on your display screen.
- The following information is not included with this product: information about your specific computer hardware or operating system, or information about your application software. Your best source for this information is the set of manuals and discs that came with your hardware, operating system, or application.
- Many applications have built-in support for pen display features (such as pressure sensitivity). Visit Wacom's web site to find a listing of applications that support these features (see product information).
- For information on how best to use pen display features within a specific application, see the instructions in that application's manuals.
Wacom's philosophy is to continually improve all of its products. As a result, engineering changes and improvements are made from time to time. Therefore, some changes, modifications, and improvements may not be covered in this document.
NAVIGATING THE MANUAL
Use the navigation controls to move through the manual:

Go to front page.
Contents
Go to table of contents.
Index
Go to index.

Go back to previous view.


Page back, or page forward.
topic
Go to topic.

Topic continued.
Adobe® Reader® provides additional tools for using and printing the manual. See the Adobe Reader help for more information.
YOUR INTERACTIVE PEN DISPLAY
This manual describes the installation and use of your interactive pen display.
The Wacom Tablet control panel enables you to customize your pen and pen display settings. To learn more, see customizing.
Pen display features
Adjusting display incline
Pen features
The following information is not included with this product: information about your specific computer hardware or operating system, or information about your application software. Your best source for this information is the set of manuals and discs that came with your hardware, operating system, or application.
Note: Not all product models are available in all regions.
PEN DISPLAY FEATURES
Familiarize yourself with the features and components of your product.
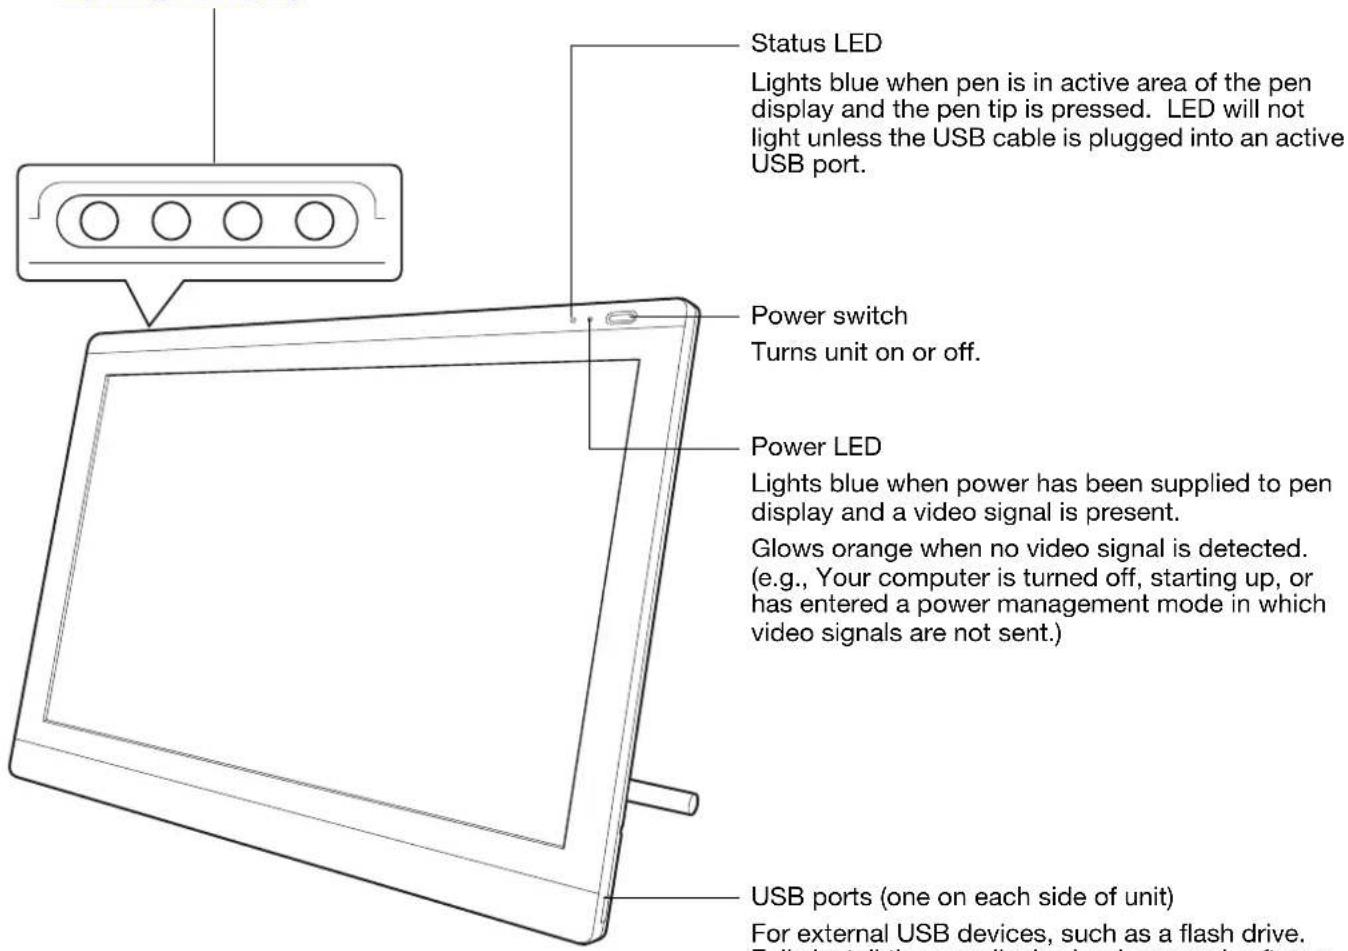
FRONT VIEW
On Screen Display (OSD) controls
Use to adjust the display settings.
See adjusting the display.
text_image
Status LED Lights blue when pen is in active area of the pen display and the pen tip is pressed. LED will not light unless the USB cable is plugged into an active USB port. Power switch Turns unit on or off. Power LED Lights blue when power has been supplied to pen display and a video signal is present. Glows orange when no video signal is detected. (e.g., Your computer is turned off, starting up, or has entered a power management mode in which video signals are not sent.) USB ports (one on each side of unit) For external USB devices, such as a flash drive.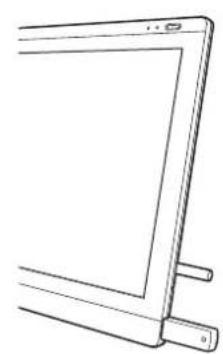
natural_image
Line drawing of a flat-screen monitor with a handle and control knob (no text or symbols)REAR VIEW
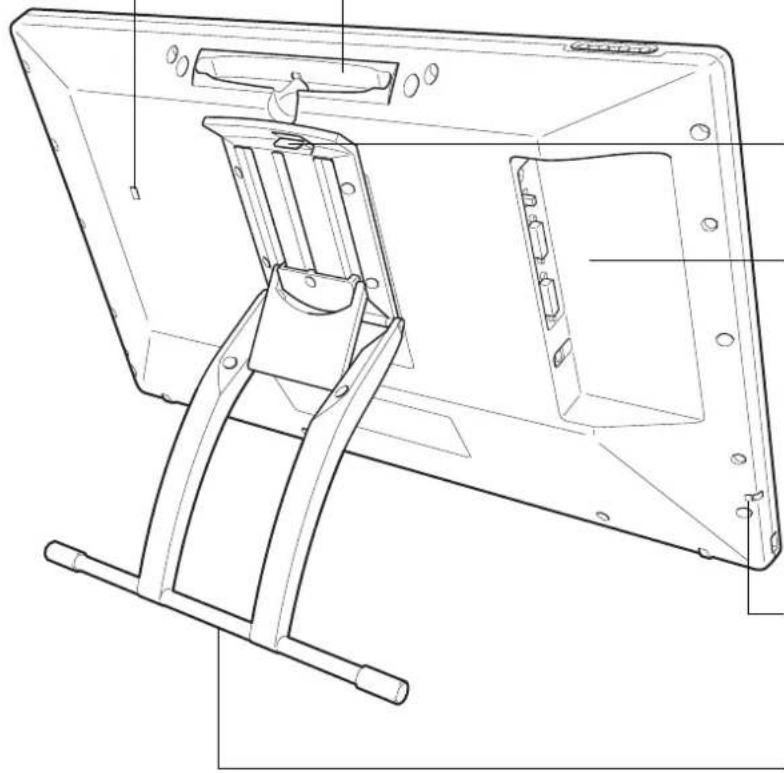
Security slot
Allows easy attachment of a security cable.
Pen storage compartment
Store by inserting one end of the pen into either side of the compartment. Then gently press other end of pen into the compartment. Take care not to damage the pen nib.
Remove by pressing in on either end of the pen to eject opposite end from the compartment. Grasp pen and remove.
natural_image
Technical line drawing of a computer monitor frame with mounting bracket (no text or symbols)Stand adjustment lever
Connection panel
- Power connector
- DVI/VGA (digital/analog) switch. Be sure to set for the video connection you will be using. Applies to the input and output video connections.
• DVI-I out connector
• DVI-I in connector - USB connector
Pen tether attachment point
If using a pen tether, connect it to an attachment point located on either side of unit.
Display stand
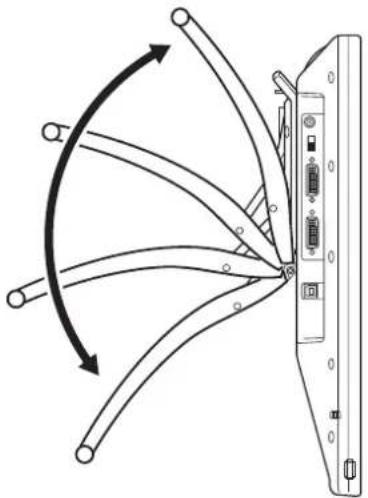
Adjusts the tilt angle of the unit. See adjusting display incline.
Important: Do not lift the unit by the stand; this may damage the stand mechanism. When lifting or moving the pen display, always do so by grasping the main body casing.
Always store the interactive pen display on a stable surface or in its original packing carton when not in use. Be sure to adjust the stand to the low tilt position before packaging. If you do not close the stand, the notched mechanism may be damaged during transportation and storage.
ADJUSTING DISPLAY INCLINE
- To open the display stand, pull up on the adjustment lever and swing stand out to desired incline. Release lever to lock the stand in place.
- To close the stand, pull up on the adjustment lever and gently move stand back into closed position until the latch catches. Release lever to lock the stand in place.

Caution
Avoid catching your finger in the gap of the movable portion of the stand.
natural_image
Diagram of a device with curved wires and arrows indicating rotation or connection, no text or symbols present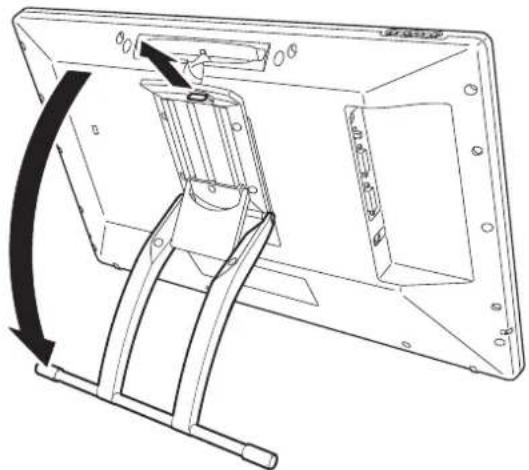
natural_image
Technical line drawing of a mechanical assembly with no visible text or symbolsPEN FEATURES
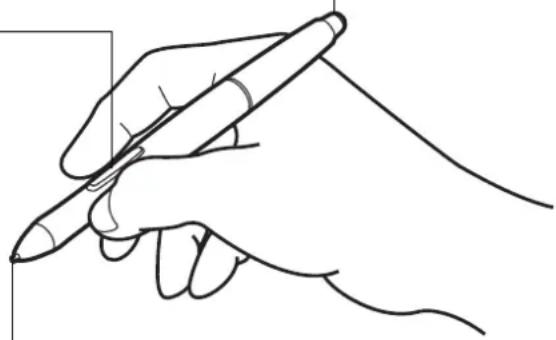
Eraser: When brought within proximity of the pen display (5 mm (0.2 inch)), the tablet portion of the display reports the pen location. Pressure information is reported as you press down on the eraser. By default, the eraser function is set to ERASE.
Some pens may be configured with a pen tether connection point.
DuoSwitch (side switch): Be sure the programmable switch is in a convenient location where you can toggle it with your thumb or forefinger but not accidentally press it while using the pen. You can use the switch whenever the pen tip is within proximity of the display screen surface; you do not need to touch the pen tip to the display surface.
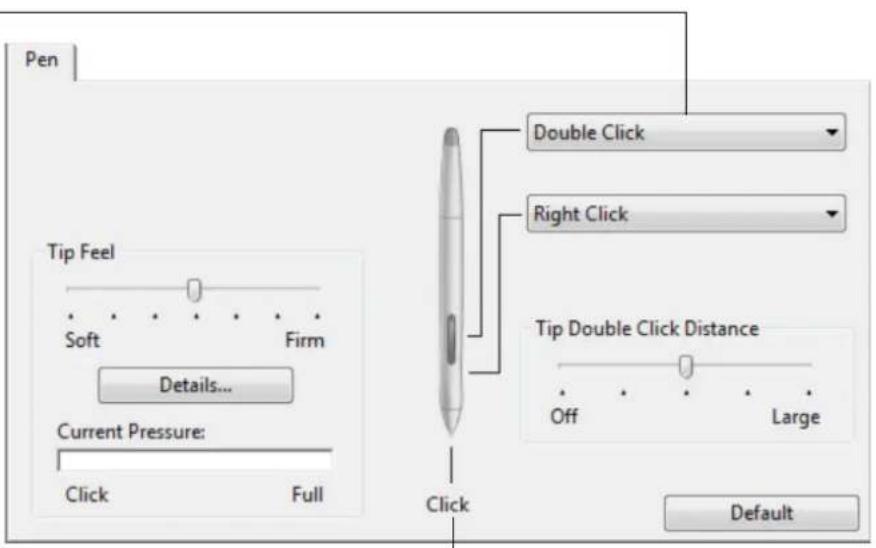
Toggle the switch in either direction to activate the button functions. By default, the upper switch is set to DOUBLE CLICK and the lower switch is set to RIGHT CLICK.
Pen tip (replaceable nib): The pen is activated as soon as it is brought within proximity (5 mm (0.2 inch)) of the pen display screen. This allows you to position the screen cursor without touching the pen tip to the display screen.
When pressure is applied to the pen tip, the pen simulates a primary mouse button click. Tip click pressure can be adjusted in the Wacom Tablet control panel.
natural_image
Line drawing of a hand holding a pen, no text or symbols presentNotes:
When not in use, place the pen in the pen storage compartment or lay it flat on your desk. To maintain the sensitivity of your pen, do not store the pen in a container where it will rest on its tip. Some product configurations may come with a pen that has no DuoSwitch or eraser. In that case, you can ignore all explanations within this guide regarding the side switch or eraser.
Important: Use only a pen specified for use with your pen display. Other pens may not function properly. Also, the pen tip is specifically designed for use with the pen display. If your pen display has a coated surface, the tips on other pens could damage the pen display screen.
INSTALLATION
The computer treats the interactive pen display as two separate devices (the display and the pen tablet). Therefore, the installation process is completed in two stages:
- First install as a display.
- Then install as a pen tablet.
Both stages require hardware and software installations and adjustments. Carefully follow ALL instructions.
Important: You MUST install the Wacom driver software for correct pen-on-screen functionality.
System requirements
Step 1: Display installation
Step 2: Pen tablet installation
SYSTEM REQUIREMENTS
Make sure your computer meets the following minimum system requirements:
- P C . W i n ™dXPc(32vands64 Bit)., DV/Vor VGA connector, available USB port, and CD-ROM drive.
- Macintosh. OS X, v10.4 or greater. DVI or VGA connector, or Apple Mini DisplayPort to Dual-Link DVI adapter, available USB port, and CD-ROM drive.
The pen display supports both digital (DVI) and analog (VGA) video signals. If updating your video card, first complete the video card installation before connecting the pen display. If you have another display that is compatible with your video card, you can use that display to verify the video card is operating correctly.
Although you can connect the pen display to either a DVI or VGA video card, connecting to a DVI video card generally results in optimum performance.
Notes:
You may be able to set up the pen display as a mirrored, extended, or independent display. When working with more than one monitor, the pen display will map to the monitors based upon how your system is configured. By default, if you are in mirror mode, the pen display will map to the entire space on each monitor. See your hardware and operating system documentation for details on configuring your system for use with multiple monitors.
A Display Toggle function is available for use with multiple monitor systems. This enables you to toggle the screen cursor between the pen display and your other monitors.
The pen display can be used alone or with another display. You may connect a second device, such as a monitor or LCD projector, to the DVI-I OUT port. When using this port, the second device will mirror the image on the pen display. Complete the pen display installation before connecting another device to the unit.
STEP 1: DISPLAY INSTALLATION
In this step, the interactive pen display is installed as a monitor on your system.
Important: Do not connect the USB data cable until instructed to do so. Never connect or disconnect the video or power cables while your computer or pen display are powered on. This can damage the display or video card.
- Turn off your computer.
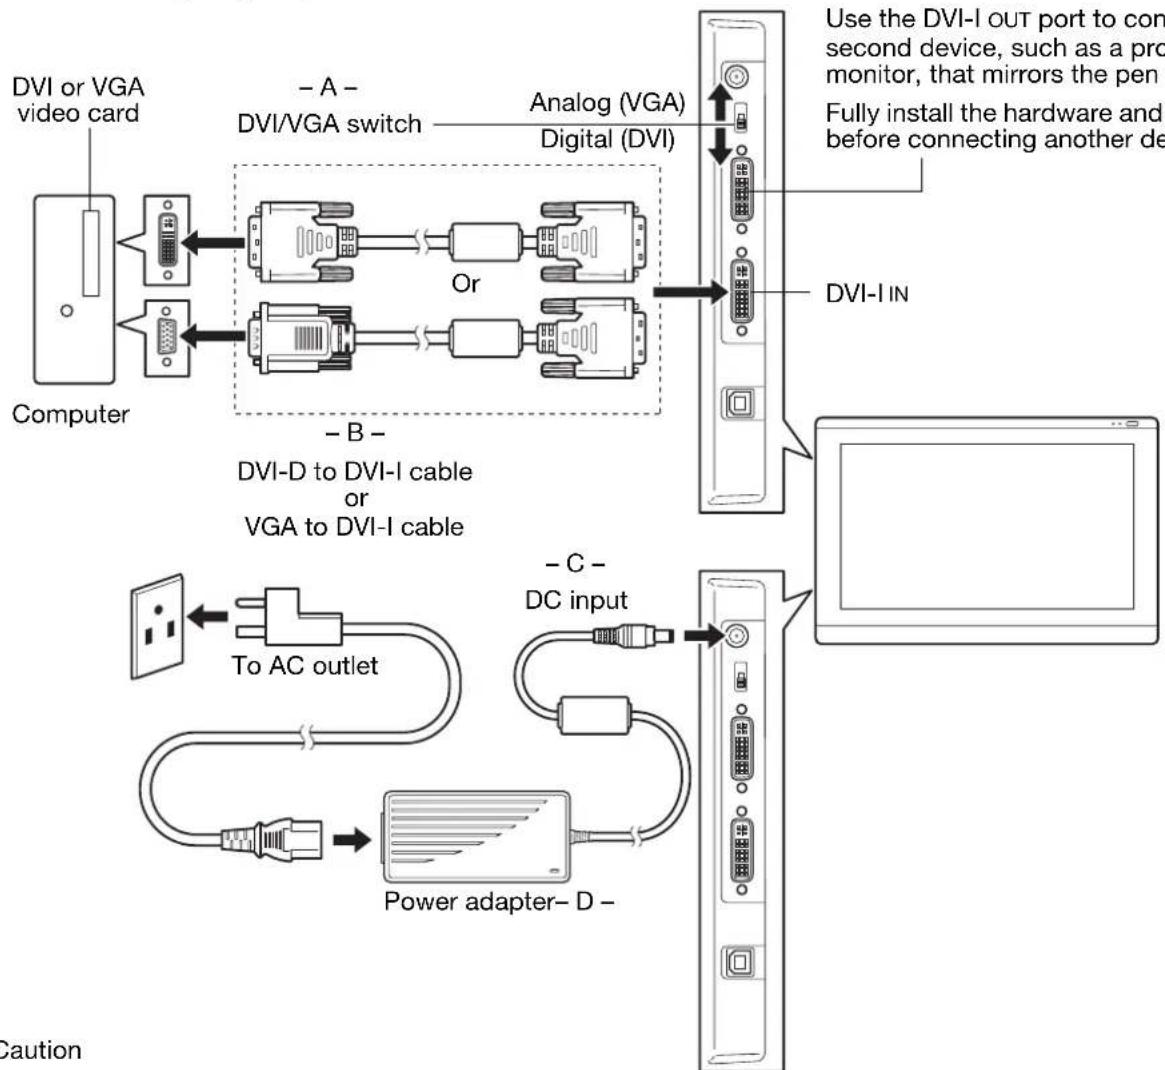
- If your computer has only one video connector, unplug your previous monitor or add a second video card. Determine if your computer has a digital (DVI) or analog (VGA) connector and set the DVI/VGA switch for the video connection you are using. See -A- in the connection diagram.
- Making sure to tighten the connector thumbscrews, follow the below instructions for your video connector. See -B- in the connection diagram.
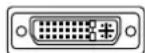
DVI-I connector
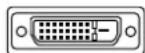
DVI-D connector
For DVI operation, connect the supplied DVI-D to DVI-I video cable between the DVI-I IN connector located on the pen display unit and the DVI connector on your video card.
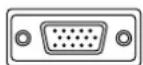
VGA connector
For VGA operation, connect the supplied VGA to DVI-I cable between the DVI IN connector located on the pen display unit and the VGA connector on your video card.
If connecting to a Mac Mini DisplayPort, you will need to obtain an appropriate adapter. For best results the Apple Mini DisplayPort to Dual-Link DVI Adapter is recommended. Adapters can be purchased at various retail outlets and through the online Apple Store.
Connect the adapter between the pen display DVI cable and your Macintosh.
- Connect the power adapter to the pen display. See -C - in the connection diagram.
- Connect the adapter power cable and plug into an AC outlet. See -D - in the connection diagram.
- Turn on the pen display. The power LED will light orange.

LCD monitor cabling diagram
flowchart
graph TD
    A["Computer"] --> B["DVI or VGA video card"]
    B --> C["Analog (VGA) Digital (DVI)"]
    C --> D["DVI-I IN"]
    D --> E["Use the DVI-I out port to connect second device, such as a pro monitor, that mirrors the pen. Fully install the hardware and before connecting another device"]
    C --> F["Or"]
    F --> G["DVI-D to DVI-I cable or VGA to DVI-I cable"]
    G --> H["To AC outlet"]
    H --> I["Power adapter- D-"]
    I --> J["DC input"]
    J --> K["Caution"]
Use the DVI-I OUT port to connect a second device, such as a projector or monitor, that mirrors the pen display. Fully install the hardware and software before connecting another device.

Caution
Make sure your video card has a DVI or VGA connector, and that you correctly set the DVI/VGA switch for the video connector you are using.
Only use a power adapter specified for use with your pen display; use of an improper power adapter may damage the unit.
Make sure the display refresh rate does not exceed the maximum vertical frequency that your interactive pen display can support. See the product specifications for details.

7. Next, turn on your computer.
For Windows: The interactive pen display will automatically install as a default monitor. (Some models may not include a color profile.) To identify the unit as a pen display and install the color calibration profile:
A) Open the system CONTROL PANEL folder.
- For Windows 7 and Vista, under A PPEARANCE AND PERSONALIZATION select ADJUST SCREEN RESOLUTION.
- For Windows XP, open the D ISPLAY PROPERTIES control panel and select the SETTINGS tab.
If you have more than one monitor, click IDENTIFY MONITORS to determine which display corresponds to the pen display. Select the number corresponding to the pen display.
B) Click ADVANCED SETTINGS....
C) Select the MONITOR tab and click PROPERTIES.
D) Select the DRIVER tab and click UPDATE DRIVER.... An update driver dialog or Wizard will appear.
E) Insert the Installation CD. If the Wacom Tablet installation menu displays, close it.
Windows 7 and Vista:
- Select B ROWSE MY COMPUTER FOR DRIVER SOFTWARE.
- Enter the drive letter for the Installation CD and click N EXT.
- After installation is complete, close any open control panel windows.
Windows XP:
- The Wizard will ask if Windows can search for software. Choose N O, NOT THIS TIME and click NEXT.
- Select I INSTALL FROM A LIST OR SPECIFIC LOCATION (ADVANCED), and click NEXT.
- Select D ON'T SEARCH. I WILL CHOOSE THE DRIVER TO INSTALL and click NEXT.
- Select the pen display option and click H AVE DISK.... Enter the letter of your CD-ROM drive (e.g., E:), and click OK.
- Follow the prompts. (If the H ARDWARE INSTALLATION dialog box displays, click CONTINUE ANYWAY.) After installation is complete, click FINISH and close any open control panel windows.
For Macintosh, a color profile is added to your color management system during the driver software installation process. (Some models may not include a color profile.) To activate this color profile for use with the pen display, you may need to select the pen display profile in the system's ColorSync Utility control panel. For details, see the color management information in your operating system and application documentation.

- As necessary, configure the display control panel settings for the proper size and color resolution.
See the product specifications for details about the maximum (native) resolution and other resolution sizes that can be used with your pen display. The display size and color resolution may be constrained by the capabilities of your video card.
Windows: If you are using the pen display as a secondary display, you may first need to enable the unit in your display properties control panel.
To fine-tune the display, see adjusting the display. If using analog (VGA) mode, see also adjusting pitch and phase (VGA only).
- After the LCD monitor portion of the installation is working to your satisfaction, move on to step 2: pen tablet installation.
For troubleshooting tips, see troubleshooting.
Notes:
Each interactive pen display LCD panel is produced under very stringent quality standards.
Production techniques cannot guarantee an absolutely perfect display, and some panels may exhibit a certain number of pixels that show an incorrect color. See the product specifications for more information.
If an image has fine striping (such as screen stripes), it may appear to flicker or display a moiré pattern.
Do not apply excessive pressure on the display screen surface, it may cause the appearance of a moiré or pooling pattern. If this occurs, use less pressure on the display screen when working with the pen.
When a still image is displayed for a long period of time, an after-image may remain for a short time. To prevent this, use a screen saver or other power management feature.
To extend the life of the pen display backlight, set your computer's power management to turn off the display when it is not in use for extended periods of time.
STEP 2: PEN TABLET INSTALLATION
In this step, the interactive pen display is installed as a pen tablet.
USB cable installation
Software installation
USB CABLE INSTALLATION
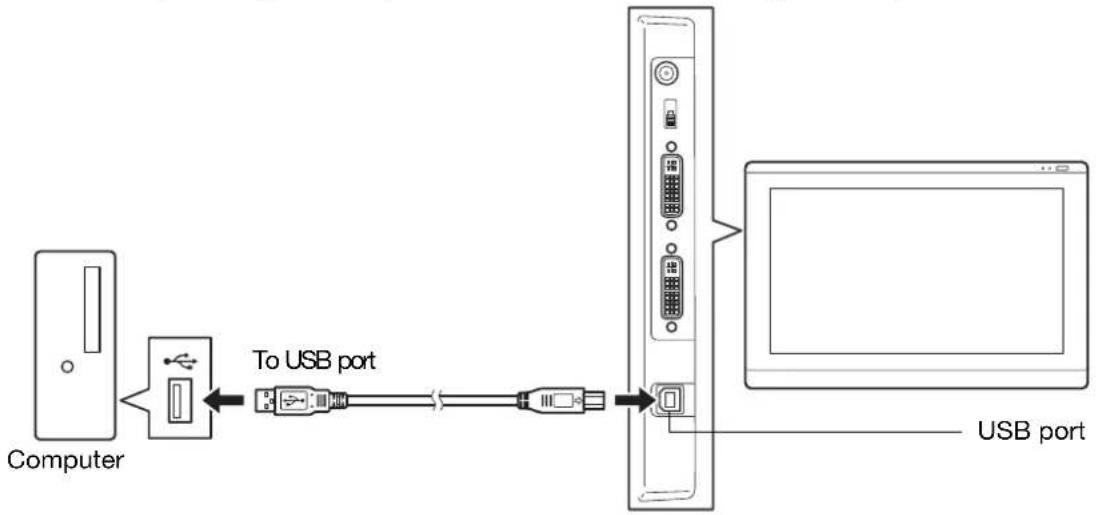
Plug the square end of the USB cable into the USB port of the interactive pen display. Plug the other end into an available USB port on your computer or USB hub attached to your computer.
flowchart
graph LR
    A["Computer"] -->|To USB port| B["USB port"]
    B --> C["USB port"]
Next, move on to the software installation.
SOFTWARE INSTALLATION
Important: You MUST install the Wacom driver software for correct pen-on-screen functionality.
Save your work and close all open applications. Temporarily disable any virus protection programs.
- Insert the Installation CD into your computer's CD-ROM drive. If the software installer menu does not automatically display, double-click on the INSTALL icon located on the CD. (You can also download and install the latest software driver, when available, from the Wacom web site for your region.)
- C I NISTALL TABLET and follow the prompts to install the driver software.
- Reactivate your virus protection program.
- After completing the software installation, make sure you can use your pen on the interactive pen display to move the screen cursor.
When you place the pen tip on the display screen, the screen cursor should immediately jump to a corresponding position approximately beneath the pen tip. Lift the pen tip and place it on the display screen surface in a different location. The screen cursor should again jump to the new position. This is known as absolute positioning, and enables you to position the screen cursor without having to drag your pen across the display screen surface.
- Be sure to check the Read Me file for updated information. If you have trouble installing the pen display, see troubleshooting
Notes:
Driver installation automatically activates the new pen input functions available within Microsoft Windows 7, Vista, and Office 2007 or later (except for Windows 7 Starter and Home Basic, and Windows Vista Home Basic). Visit the Wacom web site at www.wacom.com/vista for additional information on using your Wacom pen in Windows.
User-specific preferences are supported. After logging in, each user can customize their personal settings in the Wacom Tablet control panel. Switching to another user will automatically load the settings for that user.
To uninstall the software driver, see uninstalling the interactive pen display.
If the pen display does not respond properly or you lose cursor control, the pen display preferences may be corrupted. You can delete the current preference settings and return the pen display to its factory default condition. See managing preferences.
Next, see calibrating the pen display to precisely align the screen cursor to the pen tip.
WORKING WITH THE INTERACTIVE PEN DISPLAY
As you work with the pen display you can rest your hand lightly on the display screen, just as if it were a sheet of paper.
Because the pen display surface will be a little higher than your desk, consider adjusting the height of your desk or chair to assure comfortable use of the device.
Ergonomics
Using the pen
Working with multiple monitors
Adjusting the display
ERGONOMICS
To minimize fatigue, comfortably organize your work area. Position your pen display, the pen, and your keyboard for easy access without unnecessary reaching. The pen display and any other displays should be positioned so you can view them comfortably with a minimum of eyestrain.
• Take short breaks between tasks to stretch and relax your muscles.
- Use a gentle grip when working with the pen.
• Alternate tasks throughout the day.
- Change your position if you feel any discomfort due to your work position.
- Maintain a good posture at all times. Minimize awkward postures and repetitive movements that cause discomfort.
Note regarding RSI: Wacom makes no representation, promise or guarantee that Wacom products will cure or prevent, in whole or in part, mouse-induced repetitive stress symptoms, injuries or conditions. Individual results may vary. Always obtain competent medical advice to determine the most appropriate treatment for your specific situation.
Tips:
Be careful that you do not pull the cables out of their connections by accidentally moving the pen display too far from the computer.
The pen tether can be used to ensure your pen stays with your pen display. Simply loop one end of the tether through the tether hole located on the pen (if so equipped), and the other end of the tether through the tether connection point located on either side of the pen display.
The pen display can also be mounted to articulated arms or other third-party stands meeting the VESA specification for display stands. For details, see using an alternate mount or stand.
USING THE PEN
The pen is cordless, battery-free, and senses the amount of pressure you apply to the tip.
Holding the pen
Positioning
Clicking
Dragging
Using the side switch
Working with pressure sensitivity
Erasing
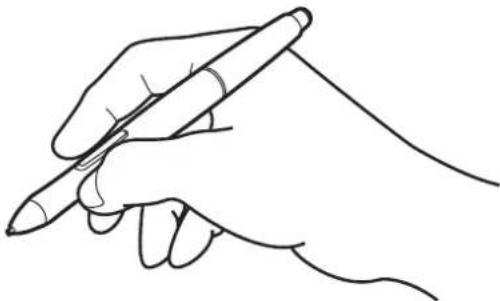
HOLDING THE PEN
Hold the pen like you would a normal pen or pencil. As you work with the interactive pen display you can rest your hand lightly on the display screen. You can tilt the pen in any way that feels most comfortable.
natural_image
Line drawing of a hand holding a pen, no text or symbols presentFor information on changing the pen settings, see customizing.
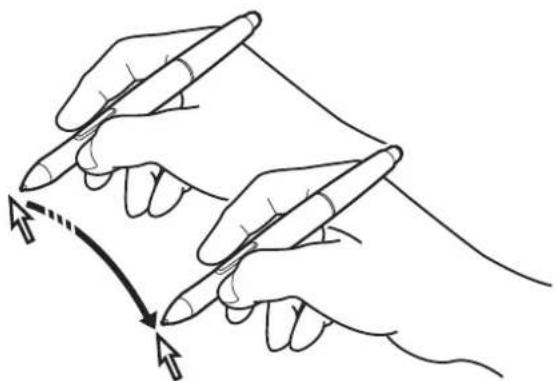
POSITIONING
To position the screen cursor, move the pen slightly above the pen display screen without touching the screen surface. Press the pen tip on the display screen to make a selection.
Note: Calibrating the pen display ensures correct alignment of the screen cursor with the pen tip. If the screen cursor does not jump to a position near the pen tip when you place the pen on the display screen, then the pen display software driver may not be installed or is not loading. Install the driver software if necessary. Otherwise, see troubleshooting.
natural_image
Line drawing of two hands holding pens with arrows indicating movement or writing (no text or symbols)CLICKING
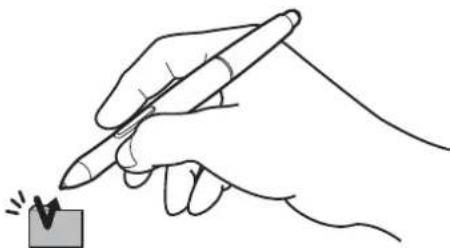
Tap the display screen once with the pen tip, or touch the pen to the display screen with enough pressure to register a click.
Windows tip: To make navigating with the pen easier, configure Windows to select when the pen is over an icon and to launch the icon with a single click. To turn on this feature, first open a folder.
For Windows 7 and Vista, from the ORGANIZE pull-down menu choose FOLDER AND SEARCH OPTIONS. From the GENERAL tab select SINGLE-CLICK TO OPEN AN ITEM (POINT TO SELECT).
For Windows XP, from the TOOLS pull-down menu choose FOLDER OPTIONS.... From the GENERAL tab select SINGLE-CLICK TO OPEN AN ITEM (POINT TO SELECT).
natural_image
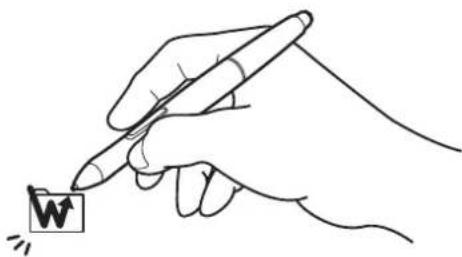
Line drawing of a hand holding a pen with a small square object below, no text or symbols presentPress the upper side switch (when set to DOUBLE CLICK), or quickly tap the display screen twice in the same place with the pen tip. Double-clicking is easier when the pen is perpendicular to the pen display screen.
natural_image
Line drawing of a hand holding a pen writing on a small block with the letter 'W' (no text or symbols present)
natural_image
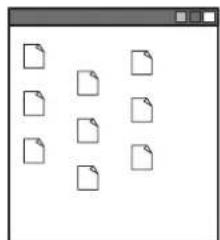
Window with a grid of eight empty document icons arranged in two rows (no text or symbols)DRAGGING
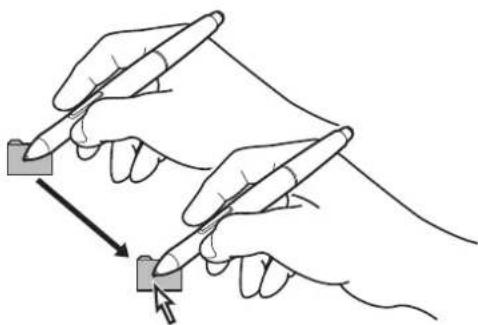
Select an object, then slide the pen tip across the display screen to move the object.
natural_image
Illustration of two hands holding pens with a square button, pointing at a small square (no text or symbols present)USING THE SIDE SWITCH
The pen may be equipped with a DuoSwitch. This switch has two programmable functions that can be selected by rocking the switch in either direction. You can use the DuoSwitch whenever the pen tip is within proximity (5 mm (0.2 inch)) of the display screen surface; you do not need to touch the pen tip to the display surface in order to use the switch. By default, the upper switch is set to DOUBLE CLICK, and the lower switch is set to RIGHT CLICK. Switch functions can be modified or disabled using the Wacom Tablet control panel. See customizing.
WORKING WITH PRESSURE SENSITIVITY
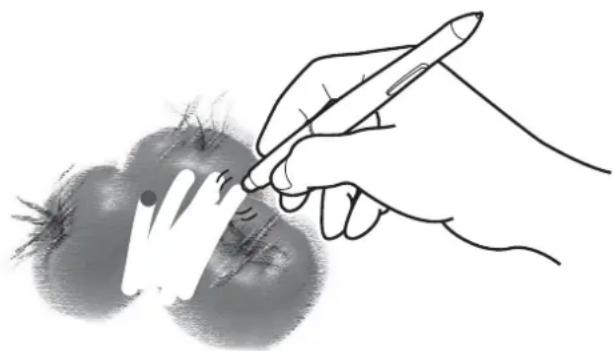
The pen responds to the nuance and inflection of your hand movements, enabling you to create natural-looking pen strokes within applications that support this feature. To annotate and write with pressure, select a pressure-sensitive tool from your application's tool palette. As you work on the screen surface, use various amounts of downward pressure on the tip of the pen.
ERASING
In supporting applications, the pen eraser works like the eraser on a pencil. In text applications, use the eraser to select text, then lift the eraser from the pen display screen to delete the text.
natural_image
Illustration of a hand holding a pen writing on a stylized plant (no text or symbols present)WORKING WITH MULTIPLE MONITORS
When you are working with the pen display and additional monitors on the same system, the screen cursor movement on the standard monitors will depend on your system configuration.
If a second monitor is connected in mirror mode, both the pen display and the other monitor will show identical images and screen cursor movement.
If you are using the pen display with other monitors in extended monitor mode, you have several options for navigating on the other monitors:
- Set a pen side switch to the D ISPLAY TOGGLE function. You can then press the button to toggle the screen cursor between the pen display and your other displays. For example, your product can be used as a pen display (the screen cursor is positioned at the pen tip location) or toggled for use as a standard Wacom tablet (the screen cursor can be moved across the entire desktop or additional displays). See working with Display Toggle for more information.
- Set one of the pen side switches to M ODE TOGGLE. You can then quickly switch between pen mode for working on the pen display and mouse mode for working on the other monitors.
ADJUSTING THE DISPLAY
FACTORY PRESETS, AUTO-SYNC, AND USER SETTINGS
Factory presets: For optimal display quality, set your video card to the maximum (native) resolution that can be used with your pen display. See the product specifications for details.
Auto-sync: The interactive pen display automatically synchronizes to the incoming signal. The auto-sync function sets the horizontal and vertical screen position, as well as pitch and phase. Auto-sync will function between the supported horizontal and vertical frequency ranges. See the product specifications for details.
If the pen display does not automatically synchronize with the incoming signal, you can use the OSD AUTO ADJUST option to initiate display synchronization. Further screen display adjustments can be manually made using the On Screen Display (OSD) controls.
Color calibration: Changing the color, color temperature, contrast, brightness, or backlight from their default settings will invalidate the ICC color profile that was included on the Installation CD. (Some models may not include a color profile.)
ON SCREEN DISPLAY (OSD) SETTINGS
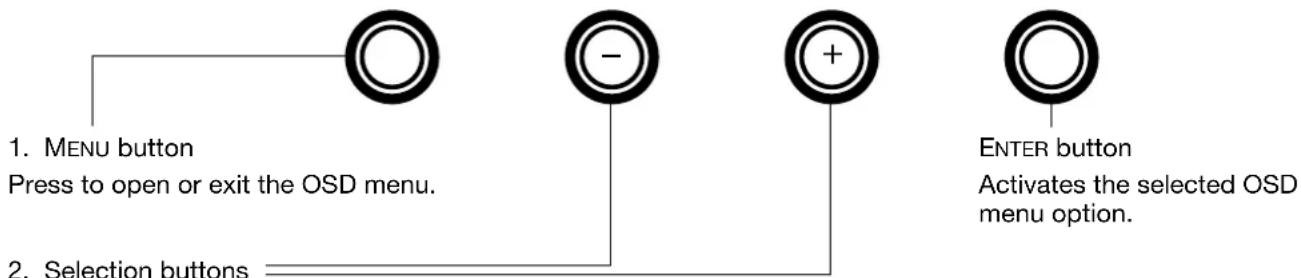
The OSD function enables you to optimize a variety of display settings at the touch of a button. Make adjustments using the OSD controls located on the upper left edge of the unit.
text_image
1. MENU button Press to open or exit the OSD menu. 2. Selection buttons - + ENTER button Activates the selected OSD menu option.Use these buttons to select and highlight an option. Then press the ENTER button. The current settings and adjustment sub-menu for that option will appear. Some settings may not be available when in DVI mode. Use the buttons to select and adjust the option settings. (Press the + button to increase a selected item value. Press the - button to decrease it.)
After making changes, press the ENTER button to save.
See the following pages for a detailed description of menu options.
Note: After changing a setting, the OSD menu will automatically close after a few moments of inactivity. You can also press the MENU button to close the OSD menu. All settings are automatically saved when the OSD menu closes and will be used the next time the unit receives a similar video signal. This is applicable to all display modes. If you make changes to the display appearance and cannot return to the original settings, use the RESET option to return the pen display to its original factory defaults.

Menu options are available when you open the On Screen Display.
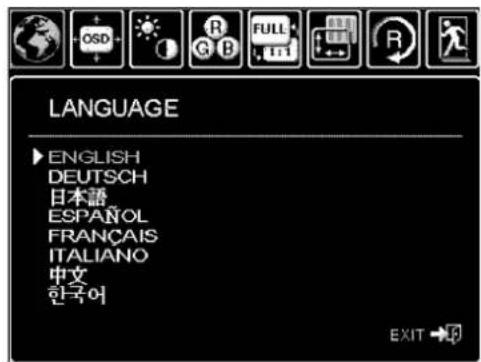
text_image
LANGUAGE ► ENGLISH DEUTSCH 日本語 ESPAÑOL FRANÇAIS ITALIANO 中文 한국어 EXIT →LANGUAGE options allow you to choose the language in which to display the OSD menu.
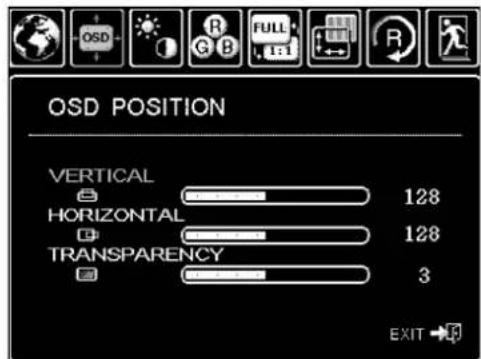
text_image
OSD POSITION VERTICAL 128 HORIZONTAL 128 TRANSPARENCY 3 EXIT →OSD POSITION options include:
• VERTICAL. Adjusts the vertical position of the OSD menu window.
- HORIZONTAL. Adjusts the horizontal position of the OSD menu window.
- TRANSPARENCY. Changes the opaqueness of the OSD menu background.
DISPLAY options include:
- CONTRAST. Increases or decreases image contrast. Changes in contrast may affect color accuracy.
• BRIGHTNESS. Increases or decreases the image brightness. - BACKLIGHT. Increases or decreases the backlight brightness level.
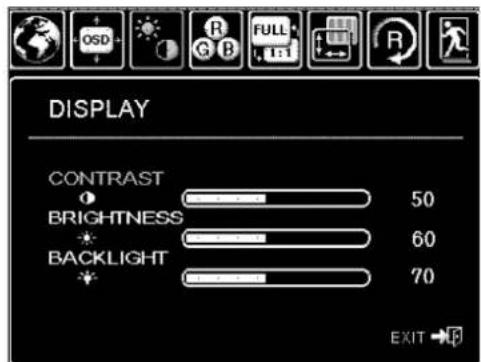
text_image
DISPLAY CONTRAST BRIGHTNESS BACKLIGHT 50 60 70 EXIT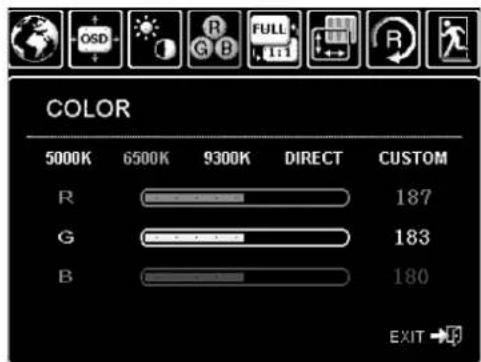
text_image
COLOR 5000K 6500K 9300K DIRECT CUSTOM R 187 G 183 B 180 EXIT →COLOR options include:
- 5000K, 6500K, 9300K. Enables you to adjust the pen display color temperature, in degrees Kelvin.
- DIRECT displays the colors directly from the video card without any adjustment. When selected, contrast or brightness cannot be adjusted.
- CUSTOM enables you to independently adjust the RED, GREEN, and BLUE display colors.
Note: Any changes you manually make to the color settings will invalidate the color profile. (Some models may not include a color profile.)

text_image
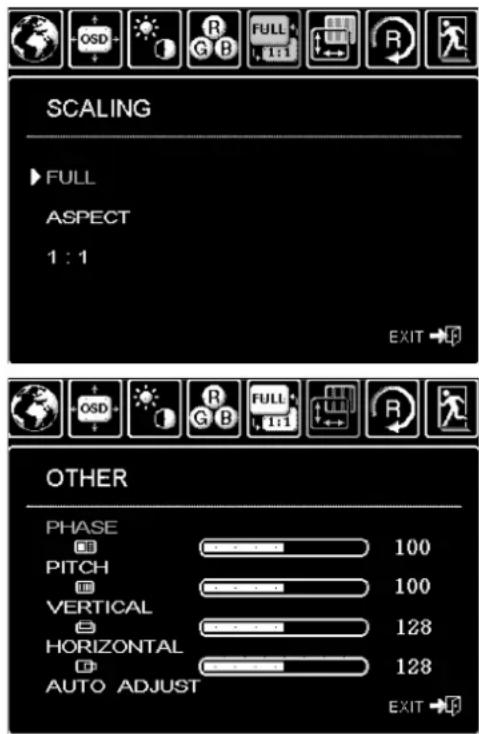
SCALING ► FULL ASPECT 1 : 1 EXIT ► OTHER PHASE PITCH VERTICAL HORIZONTAL AUTO ADJUST 100 100 128 128 EXIT ►SCALING options include:
• FULL. Resizes the image to fill the whole screen.
- ASPECT. Resizes the image to fill as much of the screen as possible while maintaining the correct aspect ratio.
- 1:1. Displays the image at the actual resolution.
OTHER options include:
- PHASE. (VGA only.) Synchronizes the signal timing of the pen display to that of your graphics card. Use when you experience an unstable or flickering image, or horizontal distortion lines.
- PITCH. (VGA only.) Changes the display data frequency to match that of your graphics card. Use when you experience an unstable or flickering image, or vertical distortion lines.
- VERTICAL. (VGA only.) Changes the vertical position of the image. To automatically adjust, use the AUTO ADJUST option.
- HORIZONTAL. (VGA only.) Changes the horizontal position of the image. To automatically adjust, use the AUTO ADJUST option.
- AUTO ADJUST. (VGA only.) Choose this function to automatically optimize the display screen image.
text_image
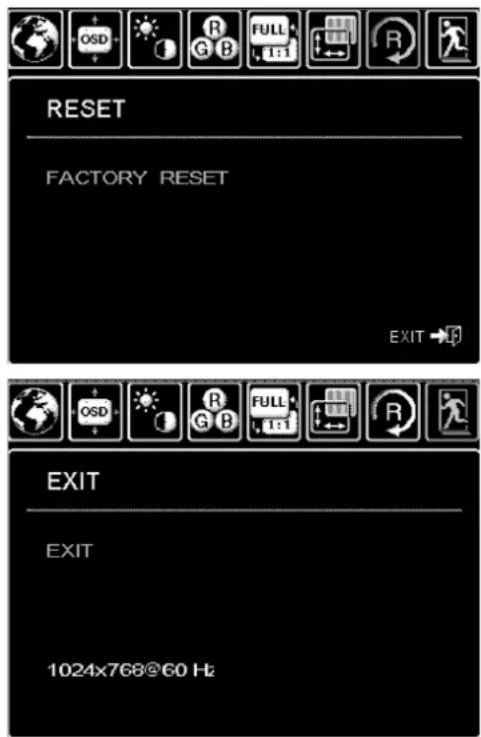
RESET FACTORY RESET EXIT EXIT EXIT 1024x768@60 HzRESET returns the display parameters of the current mode to their factory default settings.
EXIT dismisses the OSD without making changes.
POWER SAVING
The interactive pen display conforms to VESA power saving guidelines.
When used with a Display Power Management Signaling (DPMS) compliant computer or video card, the display will automatically comply with the below power saving parameters.
When these power-saving functions are in effect, the screen display is darker than usual.
MODEL DTU-2231
Computer mode H-sync V-sync Video Power consumption Power lamp
| Power ON Yes Yes Active 39W, max. Blue | |||||
| Standby mode No Yes Blanked | 2W, max. | Blue/Orange* | |||
| Suspend mode | Yes | No | Blanked | 2W, max. | Blue/Orange* |
| OFF mode | No | No | Blanked | 1W, max. | Orange |
MODEL DTU-1631
Computer mode H-sync V-sync Video Power consumption Power lamp
| Power ON Yes Yes Active 29W, max. Blue | |||||
| Standby mode No Yes Blanked | 2W, max. | Blue/Orange* | |||
| Suspend mode | Yes | No | Blanked | 2W, max. | Blue/Orange* |
| OFF mode | No | No | Blanked | 1W, max. | Orange |
* Depending on the specifications and settings of your computer and video card, the power light may only show orange when in standby and suspend modes.
CUSTOMIZING
After mastering the basics of using your pen on the interactive pen display, you may want to customize the way your product works. This chapter describes how to use the Wacom Tablet control panel to adjust your pen display and pen settings.
Advanced users can learn how to further optimize the pen display by creating application-specific settings.
Opening the control panel
Control panel overview
Calibrating the pen display
Adjusting pitch and phase (VGA only)
Customizing the pen
Button functions
Using and customizing the Radial Menu
Working with Display Toggle
Application-specific settings
OPENING THE CONTROL PANEL
To open the Wacom Tablet control panel, use the pen on the pen display:
Windows. Click on the Windows START button and choose ALL PROGRAMS. Then select WACOM TABLET and choose the WACOM TABLET PROPERTIES option.
Macintosh. Open SYSTEM PREFERENCES from either the Dock, the Apple menu, or from the APPLICATIONS folder. Then click on the WACOM TABLET icon.
You can begin customizing the pen display after opening the control panel. See control panel overview.
Note: User-specific preferences are supported. After logging in, each user can customize their personal settings in the Wacom Tablet control panel. Switching to another user will automatically load the settings for that user.
CONTROL PANEL OVERVIEW
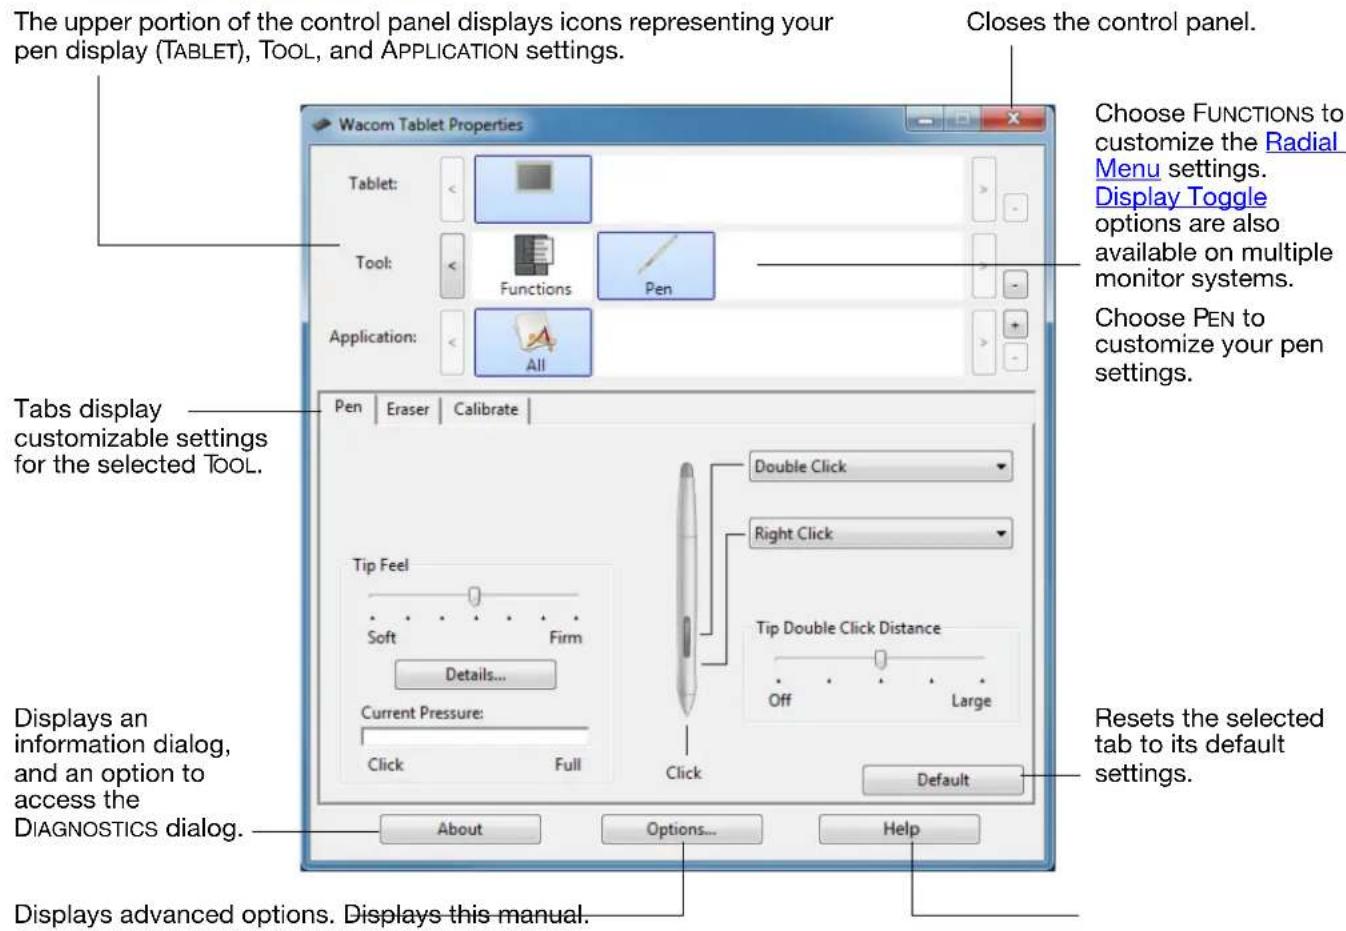
Use the Wacom Tablet control panel to customize the pen display. When you open the control panel, an icon for the pen is displayed in the TOOL list and the appropriate tabs are displayed.
To customize the pen and pen display, make your changes to the tab controls. Experiment with different settings to find what works best for you. Any changes you make will take effect immediately. You can always click DEFAULT to return to the factory settings.
Note: Application-specific settings are for advanced users.
text_image
The upper portion of the control panel displays icons representing your pen display (TABLET), TOOL, and APPLICATION settings. Closes the control panel. Wacom Tablet Properties Tablet: Tool: Applications: Pan: Eraser Calibrate Tables display customizable settings for the selected TOOL. Double Click Right Click Tip Feel Soft Firm Details... Current Pressure: Click Full Click Tip Double Click Distance Off Large Reset the selected tab to its default settings. Default About Options... Help Displays advanced options. Displays this manual.Tool Tips are available for most control panel items. Simply position the screen cursor over an item and let it rest there; in a few moments the Tool Tip will pop up.
Additionally, your keyboard tab and arrow keys can be used to navigate the control panel.

Control panel lists and tabs: The control panel TABLET, TOOL, and APPLICATION lists allow you to select the pen display or tablet, tool, or application for which you want to change settings.
The TABLET list displays an icon for any supported pen display or tablet that has been installed on your system and is currently connected. All settings shown below this list apply to the selected pen display or tablet.
- The control panel will not launch unless a supported pen display or tablet is connected to the computer.
- Settings can only be viewed or changed for an attached pen display or tablet.
- A pen display or tablet cannot be deleted from the control panel list unless it is attached to the computer.
See also installing multiple tablets.
The TOOL list displays an icon for the tablet FUNCTIONS and for the PEN.
Note: When the pen is first used on the tablet it is automatically added to the TOOL list, and functions with the default settings. See customizing the pen for more information.
The APPLICATION list lets you define TOOL settings that only apply to a specific application. See application-specific settings.
Note: The APPLICATION list is for advanced users; it is not necessary to select or add applications in order to customize your pen.
text_image
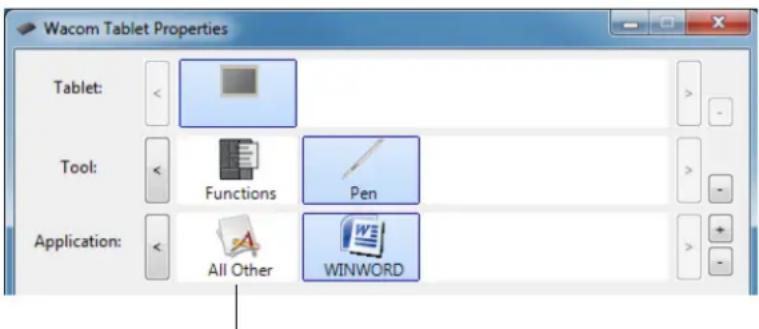
Wacom Tablet Properties Tablet: - - - Tool: - Functions Pen Application: - All Other WINWORDYour current selections are highlighted.
CALIBRATING THE PEN DISPLAY
You must calibrate the pen display to align the screen cursor with the position of the pen on the display screen. This is required to compensate for viewing angle, and to adjust for parallax caused by the display screen cover glass. Set the pen display in its working position, then follow the below procedure.
Important: When using a VGA connection, be sure the display is properly adjusted before calibrating. See adjusting the display and adjusting pitch and phase (VGA only).
- Open the Wacom Tablet control panel. If more than one pen display is installed on your system, select the unit you are working with from the TABLET list.
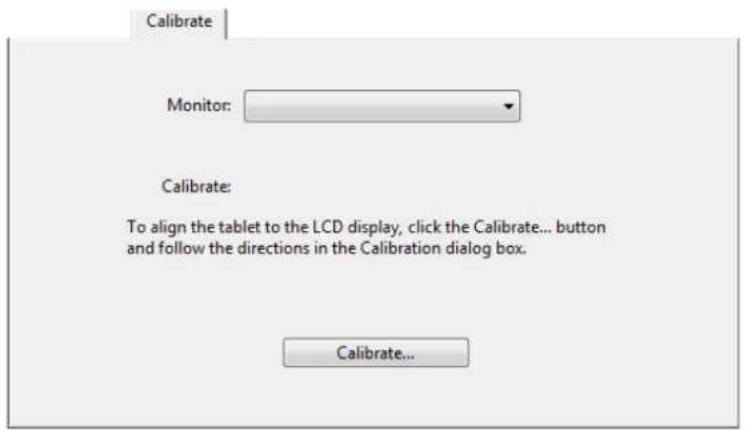
- Select P EN from the TOOL list. Then select the CALIBRATE tab.
- If you are working with multiple monitors, select the MONITOR corresponding to the pen display. (Only monitors that are set to one of the resolutions supported by the unit will appear in the list.)
- Click C ALIBRATE... to activate the calibration screen.
- Hold the pen and position your head as you normally do when working with the pen display. Use the pen tip to click on the center of the crosshairs in the upper-left corner.
- Then click on the center of the crosshairs that are displayed in the lower-right corner.
- Test the alignment by positioning the pen at a few different points on the display. Click OK to accept the calibration. Click TRY AGAIN to recalibrate.
Note: Read the directions in the calibration screen for detailed instructions and additional options. The calibration setting applies to all applications.
Calibrate
Monitor:

Calibrate:
To align the tablet to the LCD display, click the Calibrate... button and follow the directions in the Calibration dialog box.
Calibrate...
Crosshairs
[Adjust display so that the entire window border is on the screen that will be calibrated.]
This dialog allows you to line up the pen tip with the screen cursor, or define the offset between the pen tip and
IMPORTANT: When calibrating, position the Integrated Display the way you will be working with it and hold your head as if you are working with the tablet.
TO LINE UP the pen tip with the screen cursor: First click on the center of the upper-left crochair, then click on the center of the lower-right crochair. TO DEFINE A SMALL OFFSET between the pen tip and easier: First click on the spot that represents the desired offset from the upper-left crochair. (For example, to make the screen cursor appear a little to the left and above the pen tip, click with the pen tip a little to the right and below the croshairs.) Then click on the spot that represents the desired offset from the lower-right crochair. Note: A large offset may make it impossible to click on pinch at the edge of the screens.
Test the alignment and click OK to accept it, or Try Again to change it further. Press Ector cancel.

Adjustment pattern for pitch and phase (VGA only).
Tip: To see the screen cursor slightly offset from the actual position of the pen tip, calibrate by clicking on a spot showing that offset from the crosshairs. For example, to have the screen cursor appear 2.5 mm (1/10th of an inch) above and to the left of the pen tip, calibrate by clicking on a spot 2.5 mm (1/10th of an inch) below and to the right of the crosshairs.
ADJUSTING PITCH AND PHASE (VGA ONLY)
Some computers and video cards may not allow the auto-sync function to fully work when the interactive pen display is first connected. If some portion of text appears blurred, use the AUTO ADJUST option to automatically synchronize to the incoming signal (see factory presets, auto-sync, and user settings). If the image is still blurred, adjust pitch and phase by following the below procedure. For optimum display quality, set your video card to the maximum (native) resolution that can be used with your pen display. See the product specifications for details.
- In the Wacom Tablet control panel, select the CALIBRATE tab.
- If you are working with multiple displays, be sure the option corresponding to the pen display is selected in the MONITOR menu.
- Click on the C ALIBRATE... button to activate the calibration screen.
- Using the OSD controls, open the OSD menu and select the PITCH option. Then adjust the pitch level so the pattern of fine vertical stripes displays evenly.
- In the OSD menu, select the P HASE option. Adjust the phase level so the adjustment pattern shows clearly.
- After completing these adjustments, press the ENTER and MENU buttons to exit the OSD menu.
- Click on the C ANCEL button or press Esc to exit the calibration screen.
text_image
Calibrate Monitor: Calibrate: To align the tablet to the LCD display, click the Calibrate... button and follow the directions in the Calibration dialog box. Calibrate...
text_image
[Adjust display as that the entire window border is on the screen that will be calibrated] This dialing allows you to line up the pan tip with the screen cursor, or define the offset between the pan tip and screen cursor. IMPORTANT: When calibrating, position the integrated Display the way you will be working with it and hold your head as if you are working with the toilet. TO LINE UP the pan tip with the screen cursor. First click on the center of the upper-left crosshair, then click on the center of the lower-right crosshair. To DEFINE A SMALL OFFSET between the pan tip and exterior. First click on the spot that represents the desired offset from the upper-left crosshair. (For example, to make the screen cursor appear a little to the left and above the pan tip, click with the pan tip a little to the right and below the crosshair.) Then click on the spot that represents the desired offset from the lower-right crosshair. Listen a large offset may make it impossible to click on pick at the edge of the screen. Test the alignment and click OK to accept it, or Try Again to change it further. Press Eot to cancel. Adjustment pattern for pitch and phase.CUSTOMIZING THE PEN
Customizing your pen is easy. First open the Wacom Tablet control panel using the pen. The pen will be selected in the TOOL list and the appropriate tabs will be displayed. Select a tab and choose from the available options.
Adjusting tip feel and double-click
Adjusting eraser feel
Advanced tip and eraser pressure settings
Customizing pen buttons
Application-specific settings
ADJUSTING TIP FEEL AND DOUBLE-CLICK
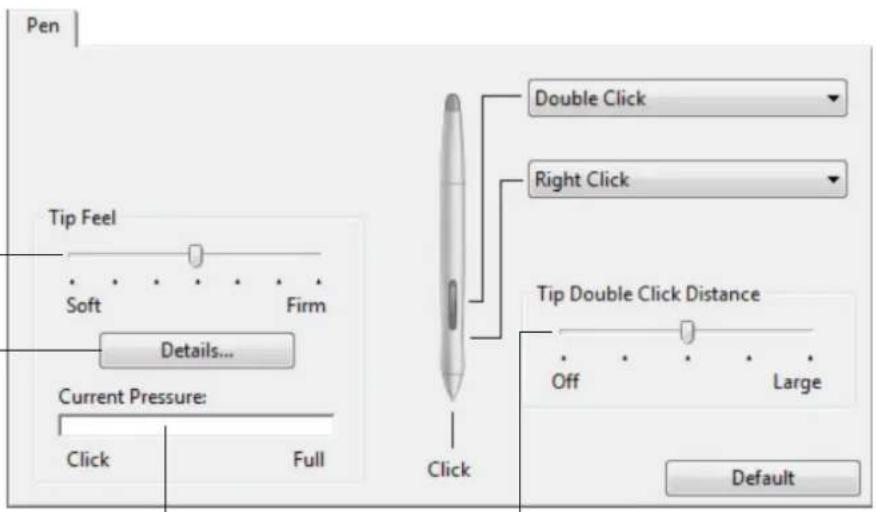
To adjust the tip sensitivity of your pen, select the PEN tab.
Customizes the amount of pressure needed to click or draw.
To create broad brush strokes or to click with a light touch, use a SOFT tip setting. For maximum control while sketching thin lines, use a FIRM tip setting.
Displays the tip FEEL DETAILS dialog box where you can further customize the tip sensitivity.
With your screen cursor positioned — over an empty area of the control panel, press down on the pen display screen with your pen tip to test the current tip feel setting. Use the CURRENT PRESSURE bar to determine how hard you must press on the pen to reach maximum pressure.
text_image
Pen Tip Feel Soft Firm Details... Current Pressure: Click Full Double Click Right Click Click Tip Double Click Distance Off Large DefaultAdjusts the size of the double-click area. A larger setting makes double-clicking easier.
Drag the slider to OFF if you do not want double-click assist.
Tips:
Use a soft TIP FEEL for a wider range of pressure values with most pressure-sensitive applications.
In some applications a soft pressure setting can make the pen overreact – any small press on the pen is magnified on the screen. If you experience this, try a firmer TIP FEEL setting.
To make double-clicking easier, expand the tap area that accepts a double-click (the double-click distance).
A large double-click distance may cause a delay at the beginning of brush strokes in some graphics applications. If you notice such effects, try setting a smaller double-click distance and using the side switch to double-click.
ADJUSTING ERASER FEEL
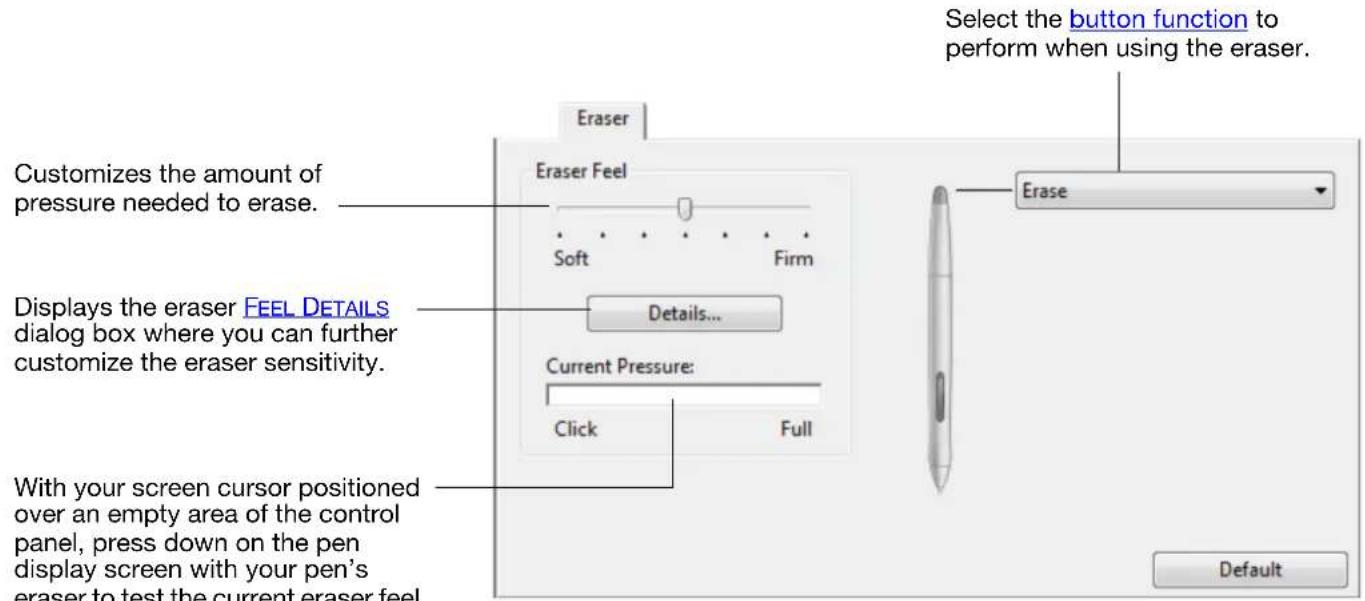
To adjust the eraser sensitivity of your pen, select the ERASER tab.
Note: Some product configurations may include a pen without an eraser.
text_image
Customizes the amount of pressure needed to erase. Displays the eraser FEEL DETAILS dialog box where you can further customize the eraser sensitivity. Current Pressure: Click Full With your screen cursor positioned over an empty area of the control panel, press down on the pen display screen with your pen's eraser to test the current eraser feel Eraser Eraser Feel Soft Firm Details... Erase Select the button function to perform when using the eraser. DefaultADVANCED TIP AND ERASER PRESSURE SETTINGS
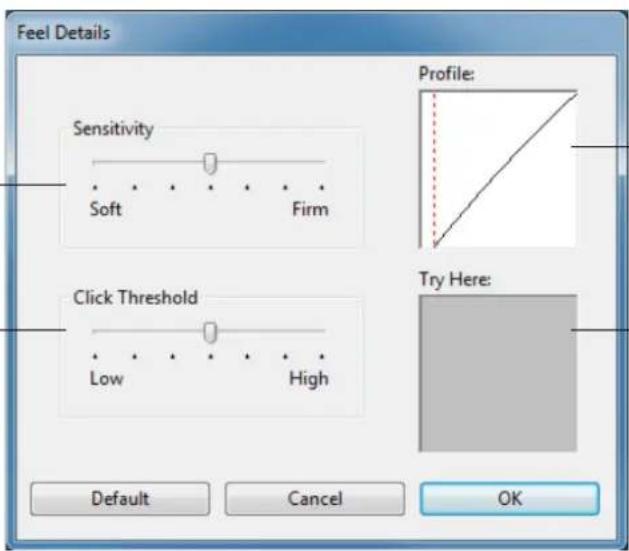
To further customize tip or eraser pressure settings, select the PEN or ERASER tab and click on the DETAILS... button. The options within the FEEL DETAILS dialog box enable you to change the tip or eraser pressure sensitivity and click threshold settings independently. (In the PEN and ERASER tabs, these settings are adjusted simultaneously with the TIP FEEL or ERASER FEEL slider.)
Drag the slider to select a pressure sensitivity setting. If you have a soft touch and want to achieve full pressure without having to apply full force to your pen, choose a softer setting.
text_image
Feel Details Sensitivity Soft Firm Profile: Click Threshold Low High Try Here: Default Cancel OKThe PROFILE graphically displays the selected pressure SENSITIVITY curve and CLICK THRESHOLD settings.
A curve that increases quickly makes the pen feel more sensitive.
Using your pen tip or eraser, make several strokes within the box to test the results of your changes.
Important: The TIP FEEL or ERASER FEEL sliders override the detail pressure settings. If you customize the detail settings, then drag the slider, your detail settings will be removed.
CUSTOMIZING PEN BUTTONS
Select the PEN tab to change the functions assigned to the side switches and tip of your pen.
Note: Some product configurations may include a pen without side switches.
Select the button function to — perform when pressing the upper or lower side switch.
When you bring the pen tip within 5 mm (0.20 inch) of the pen display screen surface without touching the screen and press the upper or lower side switch, the selected function occurs.
Tip: To make double-clicking easier, set the side switch to double-click automatically by selecting DOUBLE CLICK.
text_image
Pen Tip Feel Soft Firm Details... Current Pressure: Click Full Double Click Right Click Click Tip Double Click Distance Off Large DefaultDouble-click here to change the function assigned to the pen tip.
- At least one pen button should be set to the C LICK function.
- The tip must be set to C LICK in order to draw in most graphics applications.
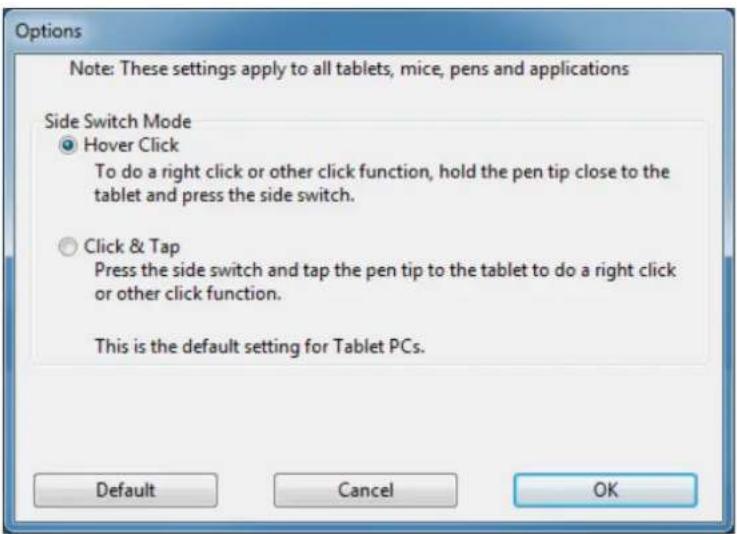
You can change the SIDE SWITCH MODE to best fit the way you like to use the pen when making right-clicks or other click functions. To access the SIDE SWITCH MODE settings, click on the OPTIONS... button at the bottom of the control panel. In the OPTIONS dialog box:
- S e bvea Clock to perform click functions without touching the pen tip to the pen display screen surface.
- When C LICK & TAP is selected, you must press the side switch while touching the pen tip to the pen display screen surface in order to perform a click function. CLICK & TAP enables the precise placement of your click functions, and is the default setting for Tablet PCs.
text_image
Options Note: These settings apply to all tablets, mice, pens and applications Side Switch Mode ○ Hover Click To do a right click or other click function, hold the pen tip close to the tablet and press the side switch. ○ Click & Tap Press the side switch and tap the pen tip to the tablet to do a right click or other click function. This is the default setting for Tablet PCs. Default Cancel OKBUTTON FUNCTIONS
The following options are available for pen or Radial Menu settings. Not all options are available for all controls or pen display models.
FUNCTION NAME DESCRIPTION
CLICKS
- CLICK Simulates a primary mouse button click. Be sure at least one button performs this function so you can always navigate and click.
• RIGHT CLICK Simulates a right mouse button click, which displays a context menu.
• MIDDLE CLICK Simulates a middle mouse button click. - DOUBLE CLICK Simulates a double-click. For easier double-clicking, use this function instead of tapping twice with the pen tip.
- CLICK LOCK Simulates holding down the primary mouse button. Press the pen button once to initiate click lock. Press the button again to release click lock. Click lock is useful for dragging objects or selecting blocks of text.
• 4TH CLICK Simulates a 4th mouse button click. - 5TH CLICK Simulates a 5th mouse button click.
Simulates a primary mouse button click. Be sure at least one button performs this function so you can always navigate and click.
Simulates a right mouse button click, which displays a context menu.
Simulates a middle mouse button click.
Simulates a double-click. For easier double-clicking, use this function instead of tapping twice with the pen tip.
Simulates holding down the primary mouse button. Press the pen button once to initiate click lock. Press the button again to release click lock. Click lock is useful for dragging objects or selecting blocks of text.
Simulates a 4th mouse button click.
Simulates a 5th mouse button click.
KEYSTROKE...
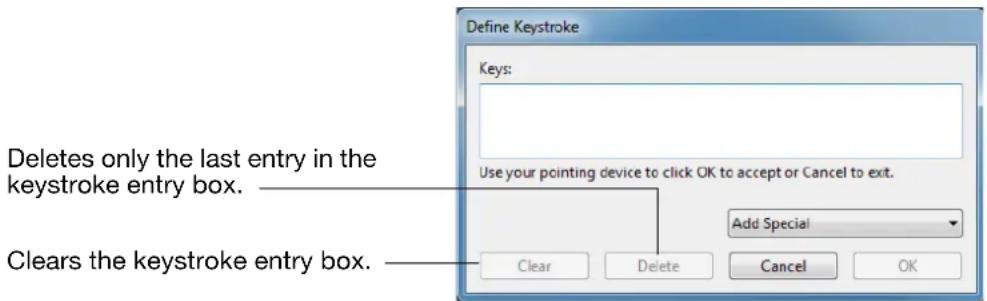
Enables you to simulate keystrokes Select this option to display the DEFINE KEYSTROKE dialog box.
Enter a keystroke or keystroke combination in the KEYS entry box.
Keystroke combinations can include letters, numbers, function keys (such as F3) and modifier keys (such as SHIFT, ALT, or CTRL for Windows, or SHIFT, OPTION, COMMAND, and CONTROL for Macintosh). You can also select special keystrokes or keystroke combinations from the ADD SPECIAL drop-down menu.
After defining a keystroke or keystroke sequence, click OK.
Important: Because the ENTER (Windows) and RETURN (Macintosh) keys can be selected as a defined keystroke, they cannot be used to select OK. You must use your pen to click on the OK button.
If prompted, enter a name for the keystroke definition. The name will be displayed with the respective control or in the Radial Menu, as applicable.
You can create different keystroke functions for different applications.
See application-specific settings.
text_image
Define Keystroke Keys: Use your pointing device to click OK to accept or Cancel to exit. Add Special Clear Delete Cancel OK Deletes only the last entry in the keystroke entry box. Clears the keystroke entry box.To learn which keystroke shortcuts are supported by a particular application, see the documentation that came with the application.

FUNCTION NAME DESCRIPTION
MODIFIER...
Enables you to simulate modifier key(s) (such as SHIFT, ALT, or CTRL for Windows, or SHIFT, OPTION, COMMAND, and CONTROL for Macintosh). Many applications use modifier keys to constrain the size or placement of objects.
Choose one or more modifier key options. Select the CLICK box if you want a mouse click to occur whenever you press the pen button.

text_image
Define Modifier Shift Alt Ctrl Click Cancel OKRADIAL MENU
Displays a Radial Menu on your screen. Each level of the hierarchical menu consists of eight menu slices which may contain various features and options to choose from.
BACK
Simulates the BACK command in browser applications.
FORWARD
Simulates the FORWARD command in browser applications.
PAN/SCROLL...
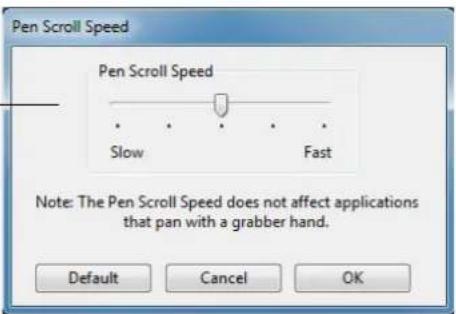
Enables you to position a document or image in any direction within the active pane by pressing a pen button set for PAN/SCROLL and then dragging with the pen tip across the pen display screen active area.
When you select PAN/SCROLL, the PEN SCROLL SPEED dialog box prompts you to set a scrolling speed for use in applications that do not support ____ grabber hand (pixel-level) panning within a document or image.
A slower setting reduces the scroll rate and is useful for close-up and detail work where you need precise control of the image.
As you move the pen tip, the document or image is repositioned to follow the direction of pen movement on the pen display screen surface.
Release the button or lift the pen tip from the display screen surface when you are done.
In some application windows the document will precisely follow the screen cursor as you move the pen tip, while in others it will simply move in the same general direction as the screen cursor.
text_image
Pen Scroll Speed Pen Scroll Speed Slow Fast Note: The Pen Scroll Speed does not affect applications that pan with a grabber hand. Default Cancel OK
FUNCTION NAME DESCRIPTION
| SHOW DESKTOP | Minimizes all open windows to display a clean desktop. | |
| SWITCH APPLICATION | Brings up the application switching dialog with focus on the next open application. On Windows 7 or Vista systems running Aero, Flip 3D will be activated with focus on the next open applications. | |
| OPEN/RUN... | Opens a dialog box where you can select a specific application, file, or script to launch. | |
| Click BROWSE... to locate an application, file, or script to launch. The selection you make appears in the APPLICATION TO RUN box. Click OK to accept the selection. | 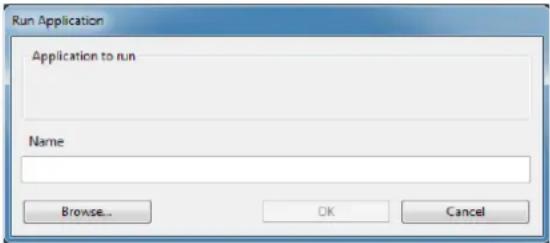 | |
| The dialog box will close and the OPEN/RUN... option you have selected will be assigned as your pen button option. Simply press the pen button to launch the assigned option. | ||
| If your selection is for the Radial Menu, it will be displayed in the Radial Menu. | ||
| INK TOGGLE | (Macintosh.) Toggles the “ink in any application” function of Ink on and off. Ink automatically recognizes and converts your handwriting into text and inserts it into a document. Handwriting recognition must be turned on for this function to work. See your Macintosh help for information on working with Ink. | |
| EXPOSE (Macintosh.) Tiles all open windows. To access this option, first choose KEYSTROKE... and then click on the ADD SPECIAL menu within the dialog box. | ||
| PRESSURE HOLD | Locks the pressure at the current pressure level until the button is released. For example, you can paint with pressure sensitivity until you reach the brush size that you like. You can then press the button and continue painting with the same size brush until the button is released. | |
| PRECISION MODE | Changes the mapping around the current pen tip position such that you must move the pen twice as far for the screen cursor to cover the same distance on the display screen. To activate, press and hold a pen button to which the function has been assigned. Releasing the button returns to normal mapping. When your pen is in mouse mode, screen cursor movement is adjusted to act as if acceleration were off and speed set to slow. | |
| DISPLAY TOGGLE | For multiple monitor systems. Enables you to toggle the screen cursor between the pen display and your other displays. When selected, your product can be used either as a pen display (the screen cursor is positioned at the pen tip location) or as a standard Wacom tablet (the screen cursor can be moved across the entire desktop or additional displays). See working with Display Toggle. | |

FUNCTION NAME DESCRIPTION
MODE TOGGLE...
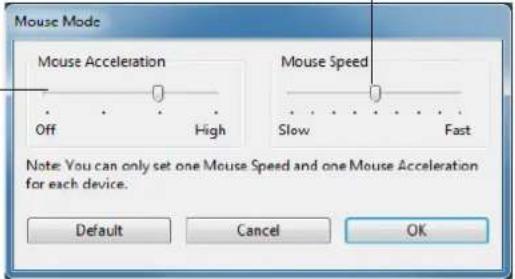
Toggles between pen mode and mouse mode. When first setting a pen button to MODE TOGGLE..., the MOUSE MODE dialog box is displayed where you can adjust the mouse acceleration and speed.
Sets the screen cursor tracking speed when in mouse mode.
Sets the screen cursor acceleration when in mouse mode.
text_image
Mouse Mode Mouse Acceleration Off High Mouse Speed Slow Fast Note: You can only set one Mouse Speed and one Mouse Acceleration for each device. Default Cancel OKMouse mode settings can be accessed from a number of different locations within the control panel. However, for each pen and application that you are customizing, only one MOUSE ACCELERATION and SPEED setting can be made.
The mouse mode acceleration and speed settings are independent of system settings. Changes you make to these settings in the Wacom Tablet control panel do not affect similar system settings. However, changes made to similar system settings may affect your pen display settings.
ERASE
Default setting for the eraser. See erasing for information on using the eraser.
TABLET PC
| TABLET PC INPUT PANEL | (Tablet PCs and Windows systems that support the Tablet PC Input Panel.)Opens the Tablet PC input panel when you press a pen button set to this function. |
| JOURNAL (Windows 7 and Vista, and Tablet PC systems that include Microsoft Journal.)Opens Microsoft Journal. | |
| TABLET PC DEFINED | (Tablet PCs and Windows systems that support the Tablet PC Input Panel.)Sets the button function according to settings found in the:Windows 7 and Vista T ABLET PC SETTINGS and PEN AND INPUT DEVICES control panels.Windows XP Tablet Edition T ABLET AND PEN SETTINGS control panel. |
DISABLED Disables the button function.
APPLICATION DEFINED
Reports only the button number to the application. This is for applications, such as CAD programs, that have built-in tablet support.
DEFAULT Returns a button to its default setting.
USING AND CUSTOMIZING THE RADIAL MENU
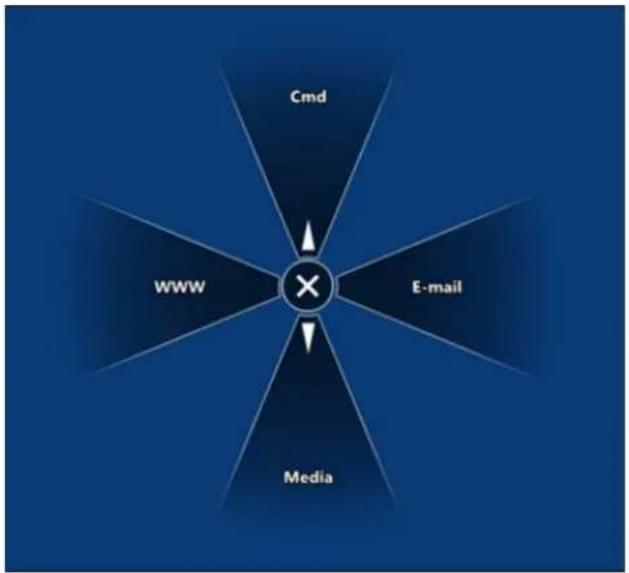
To display the Radial Menu, set a pen button to the RADIAL MENU function. Whenever you press that button, the Radial Menu is displayed. The menu will extend over the entire desktop.
- The hierarchical Radial Menu appears in circular format. Each level of the menu consists of eight control slices which may contain various features and options to choose from.
- Select an available option by clicking on it within the Radial Menu.
- The menu closes after you make a selection. To close the Radial Menu without making a selection, click on the 'X' located at the center of the menu or on a control slice that has no function assigned to it. You can also again press the button used to display the menu.
flowchart
graph TD
    A["×"] --> B["Media"]
    A --> C["E-mail"]
    A --> D["Cmd"]
    A --> E["WWW"]
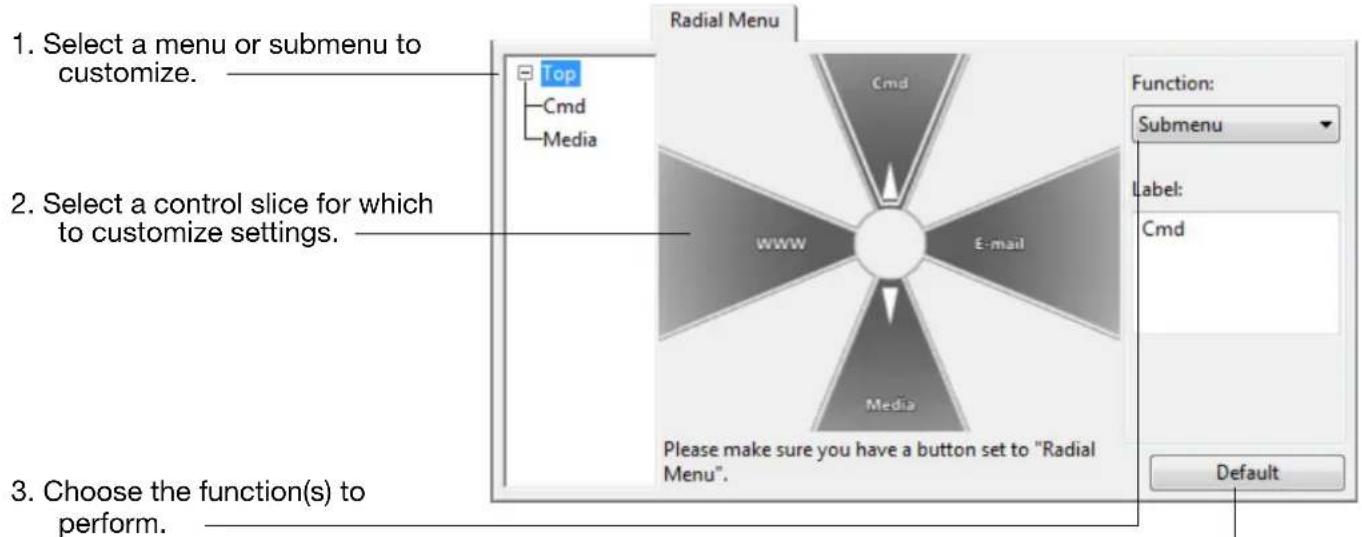
Use the RADIAL MENU tab to customize the available functions on the Radial Menu.
text_image
1. Select a menu or submenu to customize. 2. Select a control slice for which to customize settings. 3. Choose the function(s) to perform. Radial Menu Top Cmd Media Cmd WWW E-mail Media Function: Submenu Label: Cmd Please make sure you have a button set to "Radial Menu". DefaultReturns the currently displayed Radial Menu layout to its default values.
WORKING WITH DISPLAY TOGGLE
DISPLAY TOGGLE is available only on multiple monitor systems. The feature allows you to use your pen on the interactive pen display to navigate the screen cursor to any display on your system. After setting a pen side switch to the DISPLAY TOGGLE function, you can then press that button to toggle the screen cursor between the pen display and your other displays. For example, your product can be used as a pen display where the screen cursor is positioned at the pen tip location, or toggled for use as a standard Wacom tablet where the screen cursor can be moved across the entire desktop or additional displays.
When you open the Wacom Tablet control panel and the pen display is the selected tablet, the DISPLAY TOGGLE tab will be available if the system has two or more displays. The DISPLAY TOGGLE tab enables you to define how the mapping will be applied to each toggled display.
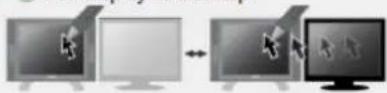
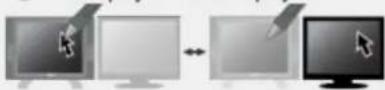
- When PEN DISPLAY TO DESKTOP is selected and you press a pen button that has been assigned the DISPLAY TOGGLE function, the screen cursor will toggle from your pen display to the entire system desktop. Pressing the button a second time returns the screen cursor to the pen display.
- When P EN DISPLAY TO OTHER DISPLAYS is selected and you press the pen button, the screen cursor is toggled from your pen display to another active pen display or monitor. If additional displays are attached to the system, the screen cursor will toggle to each display in turn until it returns to the pen display from where the initial toggle began.
Important: If you are using application-specific settings with DISPLAY TOGGLE, make sure each customized application in the APPLICATION list (including ALL OTHER) has a pen button that is assigned to DISPLAY TOGGLE.
Display Toggle
Settings apply to all tools and all applications.
Display Toggle
Pen display to desktop
Pen display to other displays
Please make sure you have a button set to "Display Toggle".
Active Area
Force Proportions
Use Inset Area
Default
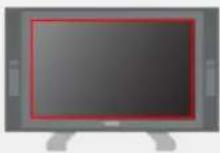
ACTIVE AREA options enable you to determine the size of the area where the pen is functional on the pen display. When you make a selection, the red indicator updates to illustrate your choice.
- FORCE PROPORTIONS adjusts the size of the tablet's active area to maintain correct vertical and horizontal proportions between the pen display and the entire desktop or newly mapped-to display. Depending on your settings, some portions of the tablet active area may no longer be usable when this option is selected.
- When deselected, the correct scale or proportions are not maintained – for example, sketching a circle on the pen display may create an ellipse on a mapped-to display screen.
- USE INSET AREA limits the tablet's active area to a sizing of 6 x 8 inches. If FORCE PROPORTIONS is also selected, this sizing may be less. When deselected, as much as possible of the entire tablet active area will be used for tablet-to-display mapping.
APPLICATION-SPECIFIC SETTINGS
You can customize your pen for use with a particular application. For example, you may prefer a firm pen tip pressure setting in one application and a soft pressure setting in another. The APPLICATION list enables you to add an individual application to the list and then customize your settings for that application.
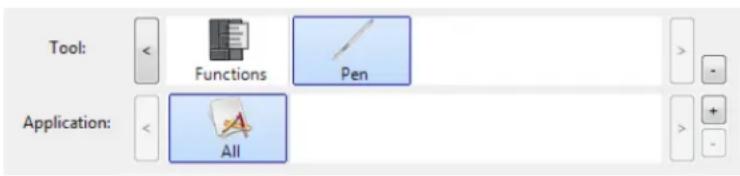
- When no application-specific settings have been created and the pen is selected from the TOOL list, the APPLICATION list displays the ALL icon containing tool settings that apply to all of your applications. In the example below, no application-specific settings have been added for the PEN so the ALL icon is displayed and the PEN will have the same settings in all applications.
text_image
Tool: Functions Pen Application: All- When application-specific settings are added to the APPLICATION list, the ALL icon changes to ALL OTHER, and an application icon is displayed for the newly added application(s).
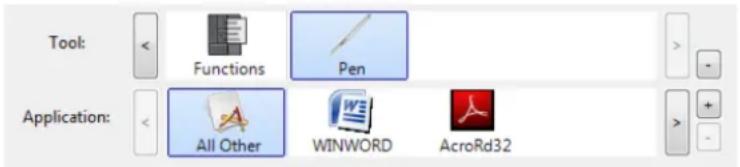
text_image
Tool: Functions Pen Application: All Other WINWORD AcroRd32In the above example, application-specific settings have been added for the PEN. If you select the ALL OTHER icon and make changes to the tab settings, your changes will apply to the PEN in all applications except those which you have added to the APPLICATION list. If you select an application icon and make changes to the tab settings, your changes will apply to the PEN only while you are using that application.
When you create application-specific settings, you are creating a separate group of settings for the pen and selected application. See the following sections for additional details:
Creating an application-specific setting
Changing application-specific settings
Removing application-specific settings
CREATING AN APPLICATION-SPECIFIC SETTING
To create an application-specific setting, first choose the pen display and pen for which you want to create an application-specific setting. Then click on the APPLICATION list's [ + ] button to display the ADD APPLICATION FOR CUSTOM SETTINGS dialog box.
Choose from one of two methods to select an application:
- Open the application for which you want to create custom settings, and then select that application from the CURRENTLY OPEN APPLICATIONS BOX.
- BROWSE to select the executable file of any application installed on your computer.
Your selection is added to the SELECTED APPLICATION box, where the name of the selected application is displayed.
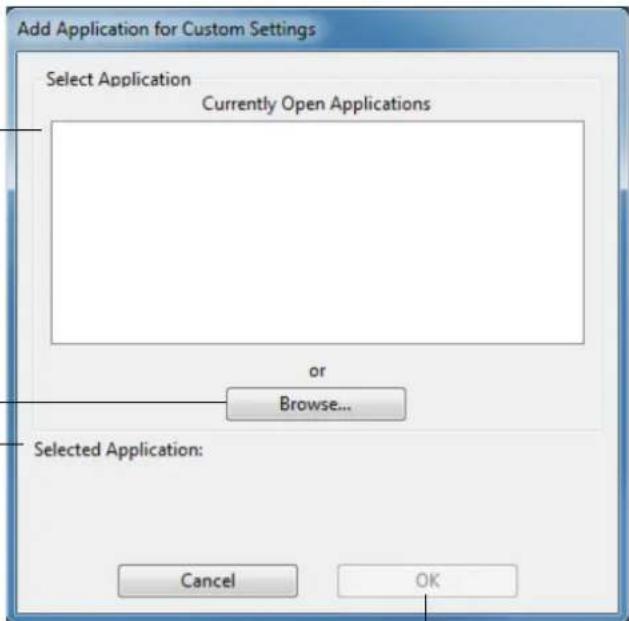
text_image
Add Application for Custom Settings Select Application Currently Open Applications or Browse... Selected Application: Cancel OKClick OK to complete the process.
Note: If two programs have the same executable file name, they will share the same customized settings.
After adding an application, its icon appears in the APPLICATION list whenever the pen is selected in the TOOL list. Select the application and then customize the control panel tab settings for your pen and the selected application.
Once you have created application-specific settings, applications that have not been customized in this manner will use the TOOL settings for ALL OTHER.
Tip: First customize settings for one application. When you feel comfortable with the process, you can create more application-specific settings.
CHANGING APPLICATION-SPECIFIC SETTINGS
To change pen settings for a specific application, select PEN and the application and then customize the tab settings.
REMOVING APPLICATION-SPECIFIC SETTINGS
To remove an application-specific setting:
- In the TOOL list, select the PEN. Then, in the APPLICATION list, select the application you want to remove from the list.
- Click on the A PPLICATION list's [–] button. In the dialog box that appears, click DELETE to confirm your selection. The selected application is removed from the list, along with any custom pen settings that you may have created for it.
Tip: To quickly remove all application-specific settings from the pen, remove the PEN from the TOOL list. Then place the pen back on the pen display. The PEN will be added back to the TOOL list using the default settings.
TROUBLESHOOTING
Most of the time your interactive pen display will work flawlessly. But if you are having trouble, Wacom recommends you do the following:
- If the Wacom driver failed to load properly, first perform the recommended action in any error message that may appear on your screen. If that does not solve the problem, review the troubleshooting procedures in this chapter.
- If the pen display does not function properly, refer to the troubleshooting sections on the following pages. See also display troubleshooting, or look in the pen tablet troubleshooting. Your problem may be described there and you can try the solution offered.
- Open the Wacom pen display Read Me file for any information updates. You can also check the product FAQs (Frequently Asked Questions) on the Wacom web site for your region.
- If you are having a compatibility conflict between the pen display and a new hardware or software product, consider downloading an updated software driver. Wacom periodically updates the software driver to maintain compatibility with new products. See obtaining driver downloads.
- If you have tried the suggestions in this guide and still cannot resolve the problem, then contact Wacom for Technical Support. See the technical support options and the Read Me file for information on where to obtain support for your region.
Testing the interactive pen display
Testing your pen
Display troubleshooting
Pen tablet troubleshooting
Technical support options
Obtaining driver downloads
TESTING THE INTERACTIVE PEN DISPLAY
-
If the pen display power LED does not light, check the following:
-
First verify that the light on the power adapter is on. If the light is not on, check that the power cable is properly connected to the power adapter and to an active AC outlet.
- Check that the power adapter cable is securely connected to the pen display and that the power switch is turned on. The power LED will glow orange or blue whenever the pen display is on.
Important: Use only an AC adapter specified for use with your pen display. Other adapters may cause damage to your product.
-
If there is no display:
-
Make sure that your computer is turned on. The power LED will light blue when the proper video signal is received. It will glow orange if there is no video signal or if the computer is in a power saving mode.
- Verify that the pen display is connected to an active DVI or VGA connector and that the DVI/VGA switch is set to the correct video setting.
-
Check that your video card has been properly installed and is functional. If you have another display that is compatible with your video card, you can connect that display to the card in order to verify that the video card is operating correctly.
-
Verify that the tablet portion of your pen display and pen are working:
-
Press the pen tip against the display and verify that the status LED lights blue.
- If the LED does not light, verify that the USB cable is plugged into an active USB port. If the interactive pen display is plugged into a USB hub, try plugging it directly into the USB port on your computer.
- Be sure that the USB port to which you are connecting has not been disabled. It may be necessary to check your system BIOS setting to verify that you have connected the pen display to an active USB port.
-
The status LED will light blue when the pen display is registered as a USB device and the pen tip is pressed against the display.
-
Check the pen. If you cannot make a selection on the display screen with the pen:
-
Test the pen by pressing the pen tip or eraser against the surface of the pen display. The pen display status LED should light blue.
- Now, without applying pressure to the pen tip but keeping the pen within 5 mm (0.2 inch) of the pen display surface, press the side switch. The status LED should again light blue.
- If the status LED does not light blue for these tests, be sure you are using a pen specified for use with your product.
• S e e testing for detailed information.
If you are still having problems, you may have a defective pen or pen display.
TESTING YOUR PEN
If the pen does not work as you expect, it is a good idea to first check the assigned functions or reset the pen to its default conditions. A quick way to reset a pen to its default settings is to remove it from the TOOL list by clicking on the list's [–] button. After the pen has been removed, place it back onto the display screen surface and the pen will be re-added to the TOOL list with its default settings.
Open the Wacom Tablet control panel and click on the ABOUT button. In the dialog box that appears, click on the DIAGNOSE... button to open the DIAGNOSTICS dialog box. The DIAGNOSTICS dialog box displays dynamic information about the interactive pen display and pen. This information is used when testing the pen display and your pen.
If more than one pen display unit is connected to your system, be sure to select the unit for which you are testing in the TABLET INFO column.
Note: When testing your pen buttons, if a button is set to RADIAL MENU or OPEN/RUN..., that function will occur when the button is pressed. In this case you may want to change that button's function before testing.
- While observing the POINTING DEVICE INFO column, bring your pen within 5 mm (0.2 inch) of the display screen. A value for PROXIMITY, the DEVICE NAME, and DEVICE TYPE should be displayed.
- Move your tool along the pen display screen surface. The X and Y Data values should change to reflect the tool position.
-
Test your pen switches. The pen display status LED should light blue each time you click with the pen tip, press the side switch, or press the pen eraser to the display screen.
-
Press on the display screen surface with the pen tip. The S WITCHES state and PRESSURE value should change. (PRESSURE should change from approximately 0% with no pressure applied to approximately 100% when full pressure is applied.)
- Next, press the side switch without pressing the tip to the display screen surface. The S WITCHES state should change. Do this for both positions of the DuoSwitch.
$$ \text { Tip } = 1, \text { DuoSwitch (lower position) } = 2, \text { DuoSwitch (upper position) } = 3, \text { Eraser } = 1 $$
- Press the pen eraser to the display screen. The S WITCHES state and PRESSURE value should change. (PRESSURE should change from approximately 0% with no pressure applied to approximately 100% when full pressure is applied.)
- When you are done, click on the C LOSE button to exit the dialog box.
DISPLAY TROUBLESHOOTING
If you encounter problems with the display portion of the interactive pen display, refer to the following tables; your problem may be described here and you can try the solution offered. For additional information about color issues, see the documentation that came with your operating system or applications.
General display problems
VGA problems
GENERAL DISPLAY PROBLEMS
No display. Power LED is off. Verify that the AC power cable is connected, and that the pen display power switch is turned on.
| No display. Power LED is lit blue. | Check the contrast, brightness, and backlight controls. Adjust as necessary. Or, open the OSD menu and select the RESET option. |
| The power LED is lit orange.A ‘no signal go to power save’ message appears briefly on your display screen. | ·Your computer may be in a power management mode.Touch the pen tip to the display screen, move the mouse, or depress any key on your keyboard.·Turn off both your computer and the pen display. Check the video cable for bent or broken connector pins. Then properly connect the video cable and turn on the pen display and your computer.·Verify that the DVI/VGA switch is properly set. Restart your computer after changing the position of the switch.·Verify that the video card is properly installed. |
| A ‘cable disconnect go to power save’ message appears briefly on your display screen. | ·Check that your computer is turned on.·Verify that you are using the video cable that came with the pen display.·Check that the video cable is fully connected.·Turn off both your computer and the pen display. Check the video cable and any video adapters for bent or broken connector pins. Then properly connect the video cable and any necessary adapters. |

| Interactive pen display | ||||||
| Contents | Index | 49 | ||||
| An ‘out of range’ message appears briefly on your display screen. | The input signal frequency is incorrectly set or not compatible with the interactive pen display. Set the refresh rate to a vertical frequency that is compatible with your pen display. If your video card driver supports adjustment of the horizontal frequency, make sure it is also set to a compatible value. See the product specifications for frequency range details. On a single monitor system you will need to connect a different display to change the refresh rate.The resolution or refresh rate is set too high. See the product specifications for details about the maximum (native) resolution, refresh rate, and other resolution sizes that can be used with your pen display.Set the display properties to detect plug and play monitors. |
| A ‘set refresh range’ message appears briefly on your display screen. | Set the refresh rate to a vertical frequency that is compatible with your pen display. See the product specifications for frequency range details. |
| The image appears multiple times on the display. | Do not extend the video cable or use an input selector switch box. |
| When a still image is displayed for a long period of time without refreshing the screen, an after-image remains for a short period of time. | Use a screen saver or other power management feature. |
| Color quality is inaccurate. • Open the OSD menu and select the RESET option.Be sure the color profile has been installed and is selected as the profile for use with your operating system and applications. (Some models may not include a color profile.)Any changes to the contrast setting should be made in small increments as changes in contrast may affect color accuracy. | |
| The color white does not display as white. | Be sure the color profile has been installed and is selected as the profile for use with your operating system and applications. (Some models may not include a color profile.)Verify that the display is operating at the factory default settings. If that is not sufficient, then adjust color as necessary. For details on color management, refer to your operating system and application documentation.Verify that the video cable and connector are fully connected. |
VGA PROBLEMS
| The display ripples or flickers. | Open the OSD menu and select the AUTO ADJUST option.Then, if necessary, manually adjust pitch and phase.Verify that the display adapter or video card matches the specifications for the interactive pen display.Adjust the refresh rate in the display properties control panel. |
| The display is not clear.Text or other portions of the screen appear blurred. | Set the display resolution of your video card to the maximum (native) resolution that can be used with your pen display. See the product specifications for details.Turn off the pen display, then turn it back on.Open the OSD menu and select the A UTO ADJUST option.If necessary, manually adjust the brightness, pitch, and phase settings. |
| The display and LCD panel are not lined up. The display size is not correct. | Open the OSD menu and select the A UTO ADJUST option.As necessary, adjust pitch and phase, and horizontal and vertical position. Note that some video cards may not show the display in proper sizing. |
| The display ripples or shows a moiré pattern. The display color is not even. | Open the OSD menu and select the A UTO ADJUST option. If this does not solve the problem, select the RESET option to set the display back to the factory default settings.As necessary, adjust pitch and phase. |
PEN TABLET TROUBLESHOOTING
If you encounter problems with the tablet portion of the interactive pen display, see the following tables. Your problem may be described here, and you can try the solution offered. Be sure you refer to the pen display Read Me file for the latest information.
For additional information, visit Wacom's web site at http://www.wacom.com/productsupport.
GENERAL PROBLEMS
| The computer does not have an available USB port. | Check if there is an available USB port on a USB hub. If not available you will need to add a USB hub or USB card. |
| A USB device plugged into one of the pen display USB ports does not function. | 1. Make sure the pen display itself is properly connected to a working USB port on your computer.2. Then be sure the pen display is powered on and that the power LED lights blue. The unit contains a powered USB hub and the integrated USB ports will not work when the power is off.3. If the USB device does not work, try plugging it into a USB port directly on your computer.4. If your USB device is still not functioning properly, contact the manufacturer for that particular device. |
| The pen display power LED is off. | Make sure the pen display power switch is turned on.Check that the AC power adapter is plugged into both the pen display and an active power outlet.Use only a power adapter specified for use with your pen display; other adapters may cause damage to your product. |
| The pen works only in mouse mode, and does not draw or write with pressure sensitivity. | The driver software for the tablet portion of the pen display was not installed or did not load properly.Make sure the driver software is installed and functioning.Install the driver software in accordance with the instructions found in theinstallationsection of this manual. |
| The pen does not draw or write with pressure sensitivity. | Some applications require that you turn on the pressure capabilities within the application or selected tool before the pen will respond as a pressure-sensitive tool.Verify also that your application supports pressure sensitivity. |
| Clicking is difficult. Open the Wacom Tablet control panel and go to the PTry using a lighter T IP FEEL. | |
| The pen selects everything or will not stop sketching. | Open the Wacom Tablet control panel and go to the PEN tab.Move the TIP FEEL slider toward FIRM or select DETAILS... and increase the CLICK THRESHOLD setting. If this does not help, seetesting your pen. |

| Interactive pen display | |
| Contents | Index |
| Double-clicking is difficult. | Be sure you are quickly tapping the display screen twice in the same place on the pen display active area. Wacom recommends using the side switch to double-click.Open the Wacom Tablet control panel and go to the PEN tab.Try increasing the TIP DOUBLE CLICK DISTANCE or using a lighter TIP FEEL.Windows: Try setting your system to launch programs with a single click. See clicking. |
| The eraser selects everything or will not stop erasing. | Open the Wacom Tablet control panel and go to the ERASER tab.Move the ERASER FEEL slider toward FIRM, or select the DETAILS...button and increase the CLICK THRESHOLD setting. If this does not help, see testing your pen . |
| You notice a delay at the beginning of pen or inking strokes. | Open the Wacom Tablet control panel and go to the PEN tab.Try decreasing the TIP DOUBLE CLICK DISTANCE. If that does not work,move the TIP DOUBLE CLICK DISTANCE slider to the OFF position in order to turn off double-click assist. |
| You have to press hard with the pen when clicking or writing. | Open the Wacom Tablet control panel and go to the PEN tab.Move the TIP FEEL slider toward SOFT, or select the DETAILS... button and decrease the SENSITIVITY and CLICK THRESHOLD settings. |
| The pen tip does not function. | Be sure you are using the pen that originally came with your interactive pen display. Other pens may not function properly on the pen display.Check the control panel's PEN tab and verify that a CLICK function is assigned to the pen tip.Make sure the status LED lights blue when the tip is pressed. If the LED does not light, verify that the USB cable is plugged into an active port on your computer or on a USB hub.If the LED still does not light, you may have defective hardware (see troubleshooting). |
| The pen tip and screen cursor do not properly line up. | Open the Wacom Tablet control panel and select the CALIBRATE tab.Continue with calibrating the pen display. |
| Changing the function settings for the pen has no effect. | Make sure you change the settings for the pen and application that you are using. Seeapplication-specific settings. |

| Interactive pen display | |
| Contents | Index |
| The pen side switch does not work. | Be sure you are using the pen that originally came with your pen display. Other pens may not function properly on the pen display.Be sure to press the side switch when the pen tip is within 5 mm (0.2 inch) of the pen display active area. Do this without pressing down on the pen tip.In the Wacom Tablet control panel, verify that the side switch is set to the proper function you are expecting to occur for the application and tool you are using.Check also the SIDE SWITCH MODE. If CLICK & TAP is selected, you will need to first press the side switch then touch the pen tip to the pen display screen surface in order to perform a click function.Make sure the status LED lights blue when you press the side switch. If not, verify that the USB cable is plugged into an active USB port on your computer or on a USB hub; the LED will not light if the USB cable is not plugged into an active port.If the LED does not light, you may have defective hardware (see troubleshooting). |
| The screen cursor moves but it does not jump to the pen tip location when the pen is placed on the display screen, and it does not follow the pen tip when the pen is moved across the display. | Make sure the Wacom driver has loaded properly by opening the Wacom Tablet control panel. If the driver did not load you will see an error message. If an error message appears, reboot your computer. If the problem persists, refer to the installation instructions and reinstall the Wacom driver software. (For Macintosh, you must restart your computer after installing the Wacom driver for proper operation.)If you have customized the side switch on your pen to toggle between pen mode and mouse mode, make sure that your pen display is operating in pen mode. |
| When using the pen display on a multiple monitor system, you cannot use the pen to control the other monitor(s). | Set a pen button to DISPLAY TOGGLE, and then press that button to cycle between pen control for the pen display and your other displays.You can also use your pen to control the other monitors in mouse mode. To use mouse mode, first set a pen side switch function to MODE TOGGLE.... Then use the switch to toggle between pen mode and mouse mode. |
| The line you are sketching does not line up with the location of the screen cursor. | To function properly, some applications require that the pen is set to pen mode. Make sure the pen has not been toggled to mouse mode.If the pen is set to pen mode and the problem still exists, then you may have a corrupted preferences file. Follow the instructions in the Windows or Macintosh troubleshooting sections to create a new preferences file. |

| Interactive pen display | |
| Contents | Index |
| The computer does not go to sleep. | When you are not using the pen, remove it from the pen display surface or the pen display will continue to send data, keeping the computer awake. |
| The screen cursor jumps back when using your regular mouse or trackball. | When the pen is not in use, place it in the pen storage compartment, or at some location near the pen display – but not on the display.Leaving your pen on the display may interfere with screen cursor positioning when using other input devices. |
| The screen cursor moves erratically or jumps around on the display screen when another tablet is connected to your computer. | The tablet portion of the interactive pen display emits electromagnetic waves at a certain frequency. If another tablet is too closely placed to the unit it may interfere with screen cursor positioning. If this occurs, move the tablet further away from the pen display. |
| WINDOWS-SPECIFIC PROBLEMS | |
| You suspect the pen display preferences may be corrupted, or want to make certain that all settings are at their factory defaults. | Use the Wacom Tablet Preference File Utility to work with your preferences. Close any open applications. Click the START icon and select ALL PROGRAMS. Then select WACOM TABLET and WACOM TABLET PREFERENCE FILE UTILITY.It is a good idea to first back up your tablet preferences. In the TABLET PREFERENCE FILE UTILITY dialog box, click BACKUP... and follow the prompts.Then, delete the tablet preferences a follows:Single user. In the TABLET PREFERENCE FILE UTILITY dialog box, click the REMOVE button under MY PREFERENCES to delete the preferences for the current user.Multiple users. Click the REMOVE button under ALL USER PREFERENCES to delete preferences for multiple users. Note that administrator rights are required to delete preferences for all users.Relaunch any currently open tablet-aware applications that you may be running.You can quickly restore tablet preferences that have been backed up by clicking RESTORE... under MY PREFERENCES. |
| After changing right- and left-handed settings in the computer’s mouse control panel, the pen tip no longer functions properly. | Restart Windows for your Wacom tool settings to be correctly recognized. |
MACINTOSH-SPECIFIC PROBLEMS
At startup, a dialog box appears telling you that either the driver failed to load or the pen display preferences have not yet been created.
The tablet portion of the pen display was not detected at startup. Make sure the USB interface cable is securely connected to an active USB port on your computer or to a USB hub. Make sure that the pen display power LED is on. If this does not correct the problem, see troubleshooting.
From the GO menu, select the UTILITIES folder and launch the SYSTEM PROFILER. Select USB from the HARDWARE section of the CONTENTS list. A Wacom USB pen display model should be listed. If a pen display model is not listed, check the pen display USB cable connection or try plugging the pen display into a different USB port.
If this does not help, contact Wacom for Technical Support. See technical support options.
You suspect the pen display preferences may be corrupted, or want to make certain that all settings are at their factory defaults.
Use the Wacom Tablet Utility to work with your preferences. Close any open applications. Open the main APPLICATIONS folder. Then open the WACOM TABLET folder and run the WACOM TABLET UTILITY.
- It is a good idea to first back up your tablet preferences. In the WACOM TABLET UTILITY dialog box, select CURRENT USER or ALL USERS. Then click BACKUP... and follow the prompts.
- Then, delete the tablet preferences as follows:
Single user. When the utility starts, select CURRENT USER and click on the REMOVE button. Log out, then log back in. When the pen display driver loads it will create a new preferences file with the factory defaults.
Multiple users. When the utility starts, select ALL USERS and click on the REMOVE button. Log out, then log back in. When the pen display driver loads it will create new preferences files with the factory defaults.
You can quickly restore tablet preferences that have been backed up for the CURRENT USER or ALL USERS by clicking on the RESTORE... button within the utility.
Note: Do not manually remove the WACOM TABLET.PREFPANE file from the main LIBRARY PREFERENCE PANES folder. This file is only to be removed when uninstalling the Wacom software driver, and then only when using the WACOM TABLET UTILITY.
Recalibrate the pen display.

Ink does not work correctly with the pen display.
There may be a problem with the Ink preferences. Remove the damaged preference files as follows. They will be re-created when you enable handwriting recognition.
- Open the SYSTEM PREFERENCES pane, choose SHOW ALL and select INK. Then turn off handwriting recognition.
- From the G o menu, choose your HOME. Open the LIBRARY and PREFERENCES folders. Remove the following preferences:
• COM.APPLE.INK.FRAMEWORK.PLIST
• COM.APPLE.INK.INKPAD.PLIST
• COM.APPLE.INK.INKPAD.SKETCH
- Go back to SYSTEM PREFERENCES and INK, and then enable handwriting recognition.
- Test the Ink function using your Wacom pen display and pen.
If this procedure does not resolve your problem with Ink, contact Apple Support for further assistance. Wacom is not the software manufacturer for Ink and we are limited in our abilities to support a third party software application.
TECHNICAL SUPPORT OPTIONS
If you have a problem with your interactive pen display, first check the appropriate installation section in this guide to make sure the unit is installed correctly. Then review the troubleshooting procedures.
If you cannot find the answer in this guide, you may find updated information about your problem in the appropriate Read Me file for your platform (located on the Installation CD). You can also check the product FAQs (Frequently Asked Questions) on the Wacom web site for your region.
If you have an Internet connection, you can download the latest software drivers from the Wacom web site for your region. See obtaining driver downloads.
If you cannot solve the problem and you think your Wacom product is not working properly, contact the Wacom support staff for the area where your product was purchased. See the Wacom pen display Read Me file, located on the Installation CD, for contact information.
When you call, you should be at your computer with the following information available:
- This manual.
- Pen display serial number. (See the label on the back of the unit.)
- Driver version number. (See the Installation CD or click on the Wacom Tablet control panel ABOUT button.)
- The make and model of your computer, and operating system version number.
- The make, model, and connection type of your video card.
- A list of peripheral devices attached to your computer.
- The software application and version you were using when the problem occurred.
- The exact wording of any error message that appeared on your screen.
- What happened and what you were doing when the problem occurred.
- How you tried to solve the problem.
OBTAINING DRIVER DOWNLOADS
Wacom periodically updates the software driver for the tablet portion of the interactive pen display to maintain compatibility with new products. If you are having a compatibility problem between your interactive pen display and a new hardware or software product, it may be helpful to download a new Wacom software driver (when available) from the Internet.
USA, Canada, Central and South America
Worldwide Web: http://www.wacom.com/productsupport Software updates
Europe, Middle East and Africa
Worldwide Web: http://www.wacom.eu/downloads Software updates
Japan
Worldwide Web: http://tablet.wacom.co.jp/download Software updates
(Japanese)
Asia Pacific (English)
Worldwide Web: http://www.wacom-asia.com Software updates
(English)
China
Worldwide Web: http://www.wacom.com.cn Software updates
(Simplified Chinese)
Korea
Worldwide Web: http://www.wacomkorea.com Software updates
(Korean)
Taiwan
Worldwide Web: http://www.wacom.com.tw Software updates
(Traditional Chinese)
APPENDIX
This section contains tips on caring for your interactive pen display, instructions on how to uninstall the software, your license and warranty, and more.
Caring for the interactive pen display
Replacing the pen tip
Using an alternate mount or stand
Uninstalling the interactive pen display
Managing preferences
Installing multiple tablets
Pen and digital ink capabilities in Windows
About the Windows Tablet PC Input Panel
Product specifications
Product information
Ordering parts and accessories
Available parts and accessories
Radio and television interference
Precautions
Warranty (Worldwide, Except for Europe, Africa and Middle East)
Licence warranty conditions (Europe, Africa and Middle East)
CARING FOR THE INTERACTIVE PEN DISPLAY
Keep the pen and the LCD screen surface clean. Dust and dirt particles can stick to the pen and cause excessive wear to the display screen surface. Regular cleaning will help prolong the life of your LCD screen surface and pen.
Keep the pen display and pen in a clean, dry place and avoid extremes in temperature. Room temperature is best. The pen display and pen are not made to come apart. Taking apart the product will void your warranty.
Important: Take care to never spill liquids onto the pen display or pen. Be especially careful of getting the display, or pen buttons and tip wet as they contain sensitive electronic parts that will fail if liquids enter them.
To clean the pen display casing or the pen, use a soft, damp cloth; you can also dampen the cloth using a very mild soap diluted with water. Do not use paint thinner, benzine, alcohol, or other solvents to clean the unit casing or pen.
To clean the display screen, use an anti-static cloth or a slightly damp cloth. When cleaning, apply only a light amount of pressure to the display screen and do not make the surface wet. Do not use detergent to clean the display screen; this may damage the pen display screen. Please note that damage of this kind is not covered by the manufacturer's warranty.
REPLACING THE PEN TIP
The pen tip (nib) will wear with normal use. Excessive pressure will cause it to wear sooner. If your pen display has a coated surface a worn nib may cause damage. To avoid this, periodic tip replacement is recommended.
When the nib gets too short or develops a sharp edge, replace it with one of the extra nibs that came with the pen.
Clasp the old nib with a Wacom nib extraction tool, pair of tweezers, needle-nosed pliers, or similar instrument and pull it straight out of the pen.
Slide the end of the new nib straight into the barrel of the pen. Firmly push the nib until it stops. The new nib will slide into the correct position.
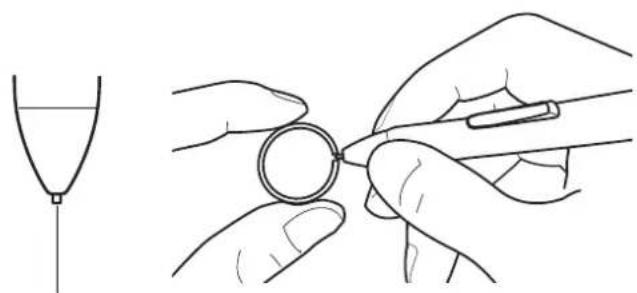
natural_image
Illustration showing two hands manipulating a ring with a string, alongside a simple line drawing of a funnel (no text or symbols)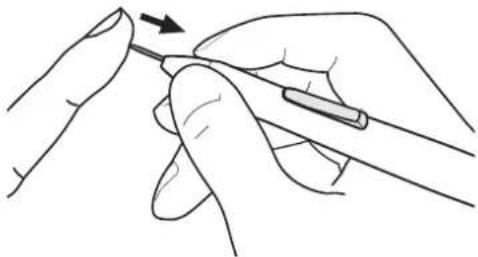
natural_image
Illustration of a hand holding a pen with an arrow indicating direction (no text or symbols)Replace the pen nib when it gets too short, or less than 1 mm (0.04 inch).

Warning
Choking hazard. Prevent children from swallowing the pen nib or side switch. The pen nib or side switch may accidentally be pulled out if children are biting on them.
Important: When not in use, place the pen in the pen storage compartment or lay it flat on your desk. Take care not to damage the pen nib when inserting or removing the pen from the storage compartment. To maintain the sensitivity of your pen, do not store the tool in a container where it will rest on its tip.
USING AN ALTERNATE MOUNT OR STAND
If you will be using the interactive pen display in an installation that requires the use of an alternate mounting platform, you can remove the adjustable stand from the unit and mount the pen display onto any mount arm or stand conforming to the VESA standard.
For model DTU-2231 the mount arm or stand must conform to the VESA 100 mm standard.
For model DTU-1631 the mount arm or stand must conform to the VESA 75 mm standard.
Mounting screws that are 4 mm wide with a 0.7 mm pitch (M4 Regular), with a screw clearance depth of 15 mm are required. Exceeding the clearance depth of 15 mm will damage the internal components of the pen display.
To remove the adjustable stand and attach the pen display to a different mounting platform:
- Turn off your computer and power off the pen display. Then disconnect all cables from between the unit and your computer.
- Protect the display screen surface by spreading a soft cloth onto a flat table and placing the pen display face down on the cloth.
- Remove the four screws and lift the adjustable stand assembly away from the body of the unit.
- Using the appropriate screws for your mounting platform, firmly attach the pen display to the alternate mounting platform.
- Refer to the installation instructions and reattach the cabling.
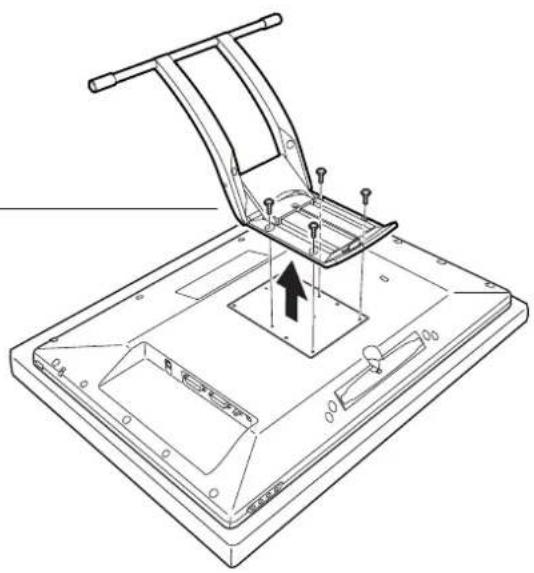
natural_image
Technical line drawing of a mechanical assembly with a bracket and mounting base (no text or symbols)
Caution
When attaching the pen display onto an alternate mounting platform, be sure to follow all instructions in the documentation supplied by the platform manufacturer. If improperly installed, the unit could fall, resulting in damage to the unit or physical injury.
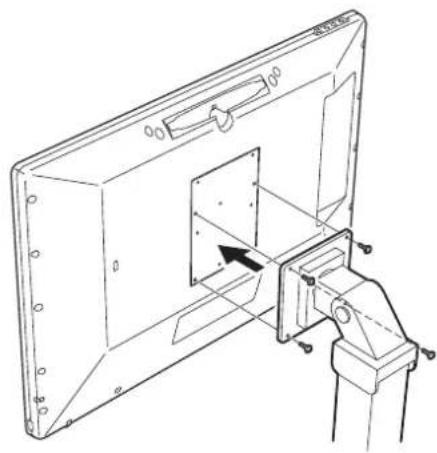
natural_image
Technical line drawing of a mechanical assembly with a bracket and mounting bracket (no text or symbols)UNINSTALLING THE INTERACTIVE PEN DISPLAY
Follow the appropriate procedure below to remove the Wacom driver software and the pen display from your system.
Important: When you remove the Wacom driver software from your system, your Wacom interactive pen display will no longer operate with full tablet functionality but will continue to function as a mouse device.
Windows:
- Click on the Windows START button and open the CONTROL PANEL.
-
In the C ONTROL PANEL window for
-
Windows 7 and Vista: click on UNINSTALL A PROGRAM. In the dialog box that appears, choose WACOM TABLET and click on the UNINSTALL button.
-
Windows XP or XP x64 : select ADD OR REMOVE PROGRAMS. In the ADD OR REMOVE PROGRAMS window, choose WACOM TABLET and click on the REMOVE button.
-
Follow the prompts to remove the software driver. (If prompted, enter your administrator login name and password.)
- When the driver has been removed, shut down your system, power off your computer, and turn off the pen display. When your computer and pen display are off, disconnect the pen display from your computer.
Macintosh:
- From the G o menu, choose APPLICATIONS and open the WACOM TABLET folder.
- Double-click on the W ACOM TABLET UTILITY icon and select the TABLET SOFTWARE: REMOVE button. Enter your administrator login name and password.
- After the removal is completed, click OK.
- Shut down your computer and turn off the pen display. When your computer and pen display are off, disconnect the pen display from your computer.
MANAGING PREFERENCES
Use the Wacom tablet preferences utility to manage your pen display preferences for a single or multiple users.
For Windows, first close any open applications. Then open the utility by clicking the START icon and selecting ALL PROGRAMS. Select WACOM TABLET and WACOM TABLET PREFERENCE FILE UTILITY.
- To remove preferences for the current user, click on the R EMOVE button under MY PREFERENCES.
- To delete preferences for multiple users, click on the R EMOVE button under ALL USER PREFERENCES. Administrator rights are required to delete preferences for all users. Relaunch any currently open tablet-aware applications that you may be running.
- To back up your preferences, click on the B ACKUP... button under MY PREFERENCES.
- To restore preferences that you had previously backed up, click on the R ESTORE... button under MY PREFERENCES.
Be sure to carefully follow any prompts that may appear.
For Macintosh, open the main APPLICATIONS folder. Then open the WACOM TABLET folder and run the WACOM TABLET UTILITY.
- To remove preferences, select CURRENT USER or ALL USERS. Then click on the REMOVE button. Log out, then log back in. When the software driver loads it will create a new preferences file with the factory defaults.
- To back up your preferences, select CURRENT USER or ALL USERS. Then click on the BACKUP... button.
- To restore preferences that you had previously backed up, select CURRENT USER or ALL USERS. Then click on the RESTORE... button.
Be sure to carefully follow any prompts that may appear.
INSTALLING MULTIPLE TABLETS
The TABLET list displays an icon for any supported pen display or tablet that has been detected on your system, and allows you to select the pen display or tablet for which your changes will apply.
Select a pen display or tablet icon for which to customize pen and application settings.
- The control panel will not launch unless a supported pen display or tablet is connected to the computer.
- Settings can only be viewed or changed for an attached pen display or tablet.
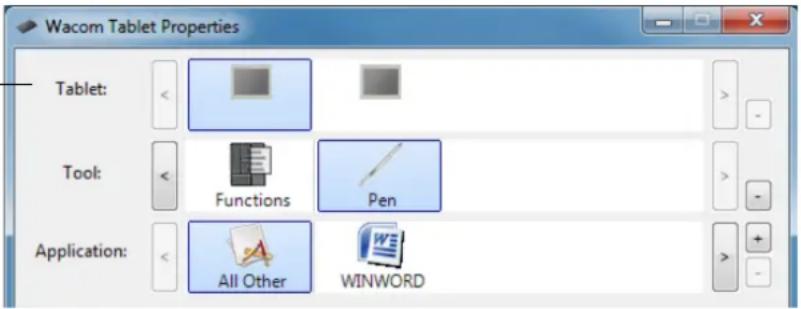
text_image
Wacom Tablet Properties Tablet: - - - Tool: - Functions Pen Application: - All Other WINWORDTo add a new pen display or tablet, connect it to your computer. For USB products, the system searches the USB ports. When the new pen display or tablet is found, it is automatically initialized.
Important: When installing additional pen displays or tablets on Windows systems, please note that the eraser function may not work in some applications when using the additional pen display(s) or tablet(s). The eraser function will continue to work correctly using the first unit that was added to the control panel.
To remove one of multiple tablets from the driver in the Wacom Tablet control panel select the pen display or tablet icon to be deleted and click on the [–] button next to the TABLET list.
- A pen display or tablet cannot be deleted from the control panel list unless it is attached to the computer.
- Note that you will need to restart your computer before you can again add the pen display or tablet to the driver.
PEN AND DIGITAL INK CAPABILITIES IN WINDOWS
Microsoft Windows 7 and Vista provide extensive support for pen* input. When using the interactive pen display with a computer running Windows 7 or Vista, your experience is enhanced by powerful note taking, handwriting recognition, fast navigation, and other digital inking options designed to give you quick, intuitive results with the Wacom pen.
- N o t e Use your Wacom pen to jot notes and capture quick sketches in Windows Journal. Journal simulates a physical notebook, but with the advantages of digital note taking. You can choose from a variety of pen, marker, and highlighter tools, plus an eraser that is easily activated by the eraser of your Wacom pen. Journal also includes a powerful search engine that can even locate your handwritten content.
- Handwriting recognition ____. Because Windows 7 and Vista include powerful handwriting recognition capabilities, you can use your Wacom pen to quickly enter handwritten information anywhere the computer accepts typed input. You can convert your handwritten content to typed text at any time.
- G e s. Use your Wacom pen to make simple gestural movements on the pen display to trigger customizable actions for navigation, editing, and other functions. To customize your gestures, select the FLICKS tab in the PEN AND INPUT DEVICES control panel.
- Digital Ink in Microsoft Office 2007. Use your Wacom pen to full advantage with the enhanced digital mark-up and inking tools available in Microsoft Office 2007 or later applications running on Windows 7 or Vista. Found on the REVIEW tab within applicable applications, these tools provide a consistent set of inking options. For quick access, you can add specific inking tools to the Quick Access Toolbar located at the top of each application.
To make the most of the pen in Microsoft Windows, be sure to study the documentation that came with your system, including the Windows training tools and Tablet PC tutorial. You can access the Tablet PC Pen Training from the START menu by choosing ALL PROGRAMS, TABLET PC, and TABLET PC PEN TRAINING.
Note: The following workarounds in the software driver for the tablet portion of the pen display improve performance in Windows 7 and Vista:
- The Pen Flicks and ‘press-and-hold-to-right-click’ features are disabled in graphics applications using the Wintab API.
- There is no pressure sensitivity in Journal and other Ink features when both the Flicks and 'press-and-hold-to-right-click' features are disabled in the Vista PEN AND INPUT DEVICES control panel.
* Pen features supported in all versions of Windows 7 and Vista except Windows 7 Starter and Home Basic, and Windows Vista Home Basic.
ABOUT THE WINDOWS TABLET PC INPUT PANEL
The Windows 7 or Vista Input Panel enables you to use handwriting or an on-screen keyboard to directly enter text with your Wacom pen. There are different ways to launch the Input Panel:
- Click on the Input Panel icon which appears when you move the screen cursor into a text entry area.
- Click on the Input Panel tab, located by default on the left edge of the display screen.
- Click on the Tablet PC Input Panel icon located on the Windows taskbar. If the icon is not visible, right-click on the taskbar, select TOOLBARS, and TABLET PC INPUT PANEL.
To customize the Input Panel:
- First open the Input Panel and then click on TOOLS in the menu bar.
- Select OPTIONS to open the Input Panel Options dialog box.
- Customize the Input Panel settings for the way you like to work.
To learn more about using your Wacom pen in Microsoft Windows and Office 2007 or later, study the documentation that came with your system and Microsoft Office applications. Be sure to take advantage of the Windows training tools, including the Tablet PC tutorial, available from Microsoft.
You can visit also the Wacom web site at www.wacom.com/vista for additional information on working with your Wacom pen in Windows.
PRODUCT SPECIFICATIONS
Model DTU-2231 interactive pen display
Model DTU-1631 interactive pen display
Pen (model UP-817E)
Pen (model UP-818E)
MODEL DTU-2231 INTERACTIVE PEN DISPLAY
General specifications, DTU-2231
Display, DTU-2231
Tablet, DTU-2231
Power adapter, DTU-2231
GENERAL SPECIFICATIONS, DTU-2231
Dimensions (W x D x H) 564.0 x 374.0 x 55.5 mm (22.2 x 14.7 x 2.2 in), excluding stand
Weight 7.4 kg (16.3 lb), including stand
Input voltage 12 VDC
Power consumption, 39W (max.), 2W or less in sleep mode, 1W or less in off mode with AC adapter
Power management VESA DPMS
Compatibility Windows: 7, Vista, XP (32 and 64 bit) Macintosh: OS X, v10.4 or later
Cover plate Tempered AG etching glass with AR film (backside)
Cables DVI-I to DVI-D, DVI-I to VGA, USB
USB hub Integrated, USB v2.0 powered hub with two external ports, 500 mA per port
Operating temperature and humidity 5° to 45°C, 20 to 85% RH (non-condensing)
Storage temperature and -10^ to 60^ C, 20 to 90% RH (non-condensing)
humidity (maximum storage humidity is 38% at a temperature of 60^ C, and maximum storage temperature is 42^ C at a humidity of 90%)
Certification and compliance FCC part 15 class B & Subpart C, Industry Canada Class B, CE, VCCI Class B, EDID 1.3, C-tick, BSMI, KCC, CCC, GOST-R, CB, J-MOSS, The European Union RoHS Directive 2002/95/EC, Chinese RoHS
DISPLAY, DTU-2231
Display panel a-Si active matrix TFT LCD
Screen size 476.64 x 268.11 mm (18.78 x 10.56 in)
Aspect ratio 16:9
Number of pixels 1920 x 1080
Input video signal Analog: 0.7 Vp-p positive at 75 ohm
H/V separate sync, TTL level, positive/negative
H/V composite sync, TTL level, positive/negative
Digital: DVI revision 1.0
Output video signal Analog: analog output
Video: RGB (75 ohm loading)
Digital: TTL output
Pixel rate: up to 138.5 MHz, Sync: Hs, Vs, Xs
Resolutions, in pixels 1920 x 1080, 1680 x 1050, 1440 x 900, 1280 x 1024, 1280 x 960, 1280 x 800, 1152 x 864, 1024 x 768, 800 x 600, 640 x 480 (all values at 60 Hz)
White luminance uniformity 75% (min.)
Timing modes 12 preset modes + 12 user modes
Display area 476.64 x 268.11 mm (18.78 x 10.56 in)
Pixel pitch 0.24825 x 0.24825 mm (0.00978 x 0.00978 in)
Viewing angles @ CR10:1 170 / 160, typical (horizontal/vertical)
Display colors 16.7 million
Contrast ratio 700 : 1 (max.)
Response time (response time Tr+Tf) or display response time (Tr+Tf) 5 ms typical (rise and fall)
Luminance (brightness) 200 cd/m ^4 (max.)
OSD manual control Brightness, contrast, pitch, phase, vertical position, horizontal position, transparency, auto adjust, language, backlight, menu position, reset, scaling, color temperature (9300K/6500K/5000K/Custom/Direct)
Plug and Play DDC2B, DDC/CI
LCD quality Each interactive pen display LCD panel is produced under very stringent quality standards. Production techniques cannot guarantee an absolutely perfect TFT display. Wacom does not allow any pixel to be always white or always black. A small number of pixels (4 or less) are allowed to show a wrong color for some parts of the color spectrum. This does not mean the display is defective.
TABLET, DTU-2231
Reading technology Electromagnetic resonance method
Active area 476.6 x 268.1 mm (18.78 x 10.56 in)
Resolution 0.01 mm/point (2540 lpi)
Accuracy ±0.5 mm (±0.02 in), center
Edge area 1
(20 mm (0.79 in) wide from edge of display area) to be ±2.0 mm (±0.079 in)
Edge area 2
(3 mm (0.12 in) wide from edge of display area) to be ±4.0 mm (±0.158 in)
Reading height 5 mm (0.2 in)
Maximum report rate 133 points/sec.
Pressure levels 512 levels
Communication interface USB
POWER ADAPTER, DTU-2231
Input voltage 100 to 240 VAC, 50/60 Hz
Output voltage 12 VDC, 5.0 A (max)
MODEL DTU-1631 INTERACTIVE PEN DISPLAY
General specifications, DTU-1631
Display, DTU-1631
Tablet, DTU-1631
Power adapter, DTU-1631
GENERAL SPECIFICATIONS, DTU-1631
Dimensions (W x D x H) 420.0 x 283.0 x 49.0 mm (16.5 x 11.2 x 1.9 in), excluding stand
Weight 4.3 kg (9.5 lb), including stand
Input voltage 12 VDC
Power consumption, 29W (max.), 2W or less in sleep mode, 1W or less in off mode with AC adapter
Power management VESA DPMS
Compatibility Windows: 7, Vista, XP (32 and 64 bit)
Macintosh: OS X, v10.4 or later
Cover plate Tempered glass with AR film (backside)
Cables DVI-I to DVI-D, DVI-I to RGB, USB
USB hub Integrated, USB v2.0 powered hub with two external ports, 500 mA per port
Operating temperature and humidity 5° to 35°C, 20 to 80% RH (non-condensing)
Storage temperature and -10^ to 60^ C, 20 to 90% RH (non-condensing)
humidity (maximum storage humidity is 38% at a temperature of 60^ C, and maximum storage temperature is 42^ C at a humidity of 90%)
Certification and compliance FCC Part 15 Subpart B (class B) & C, CE, VCCI Class B, C-tick, BSMI, KCC, CCC, GOST-R, CB, The European Union RoHS Directive 2002/95/EC, Chinese RoHS, Korean RoHS
DISPLAY, DTU-1631
Display panel a-Si active matrix TFT LCD
Screen size 15.6 inch, 346.23 x 195.54 mm (13.64 x 7.70 in)
Aspect ratio 16:9
Number of pixels 1366 x 768
Input video connector DVI-I (29 pin)
Input video signal Digital: DVI 1.0 compliance / Analog RGB
Output video connector DVI-I (29 pin)
Output video signal Digital: DVI 1.0 compliance / Analog RGB
Resolutions, in pixels 1366 x 768, 1280 x 768, 1024 x 768, 1024 x 720, 800 x 600, 640 x 480 (all values at 60 Hz)
White luminance uniformity 80% (typ.)
Pixel pitch 0.252 (H) x 0.252 (V) mm (0.010 (H) x 0.010 (V) in)
Viewing angles @ CR10:1
90(45/45) / 65(20/45), typ.
(horizontal/vertical)
Display colors 16.7 million
Contrast ratio 400 : 1 (typ.)
Response time (Tr+Tf) 8 ms typ.
Luminance (brightness)
255 cd/m ^4 (typ.)
OSD manual control
Brightness, contrast, pitch, phase, vertical position, horizontal position, transparency, auto adjust, language, backlight, menu position, reset, scaling, color temperature (9300K/6500K/5000K/Direct/Custom)
Plug and Play
DDC 2B, DDC/CI
LCD quality
Each LCD panel is produced under very stringent quality standards.
Production techniques cannot guarantee an absolutely perfect TFT display. Wacom does not allow any pixel to be always white or always black. A small number of pixels are allowed to show a wrong color for some parts of the color spectrum. This does not mean the display is defective.
TABLET, DTU-1631
Reading technology Electro-magnetic resonance technology
Active area 346.2 x 195.5 mm (13.64 x 7.70 in)
Resolution 0.01 mm/point (2540 lpi)
Accuracy ±0.5 mm (±0.02 in), center
Edge area 1 (20 mm (0.788 in) wide from edge of display area)
to be ±2.0 mm (±0.079 in)
Edge area 2 (3 mm (0.118 in) wide from edge of display area)
to be ±4.0 mm (±0.158 in)
Reading height 5 mm (0.2 in) or more, center
Report rate 133 points/sec.
Pen tilt range 40 degrees from vertical, except for corners
Pressure levels 512 levels
Communication interface USB
POWER ADAPTER, DTU-1631
Input voltage 100 to 240 VAC, 50/60 Hz
Output voltage 12 VDC, 3.5 A (max)
PEN (MODEL UP-817E)
Pressure levels 512
Pen tip travel 0.2 mm (0.008 in), approximately
Eraser tip travel 0.2 mm (0.008 in), approximately
Physical dimensions (L x D) 147.5 x 12.5 mm (5.81 x 0.49 in)
Weight 12 g (0.42 oz), approximately
Side switch type Rocker switch
The pen model included with your product may vary.
PEN (MODEL UP-818E)
Pressure levels 512
Pen tip travel 0.2 mm (0.008 in), approximately
Eraser tip travel 0.2 mm (0.008 in), approximately
Physical dimensions (L x D) 147.5 x 12.5 mm (5.81 x 0.49 in)
Weight 12 g (0.42 oz), approximately
Side switch type Rocker switch
The pen model included with your product may vary.
PRODUCT INFORMATION
To learn more about your interactive pen display and how to take full advantage of the many pen and digital inking features in Microsoft Windows 7 and Vista, visit the Wacom web site for your region:
USA, Canada, Central and South America http://www.wacom.com/productinfo
Europe, Middle East and Africa http://www.wacom.eu
Japan http://tablet.wacom.co.jp
Asia Pacific (English) http://www.wacom-asia.com
China (Simplified Chinese) http://www.wacom.com.cn
Korea http://www.wacomkorea.com
Taiwan http://www.wacom.com.tw
Thailand http://www.wacom-thai.com
ORDERING PARTS AND ACCESSORIES
To purchase parts and accessories, refer to the Wacom pen display Read Me file and see who to call for your region.
You can also do the following:
To purchase parts and accessories in the USA or Canada, call 1.888.884.1870 (toll-free) or visit Wacom's web site at http://www.WacomDirect.com (USA only).
To purchase parts and accessories in Europe, call +49 (0)180.500.03.75 or send an email to spareparts@wacom.eu. Or, visit http://shop.wacom.eu. You can also contact your local dealer, distributor, or technical support using the appropriate number for your region.
To purchase parts and accessories in Australia, Singapore, Taiwan and Korea please visit: www.BuyWacom.com.au, www.BuyWacom.com.sg, www.BuyWacom.com.tw and www.BuyWacom.co.kr, respectively.
To purchase parts and accessories in other countries, please contact your local dealer or distributor.
Please note that not all parts and accessories may be available in all regions.
AVAILABLE PARTS AND ACCESSORIES
For a list of available parts and accessories, visit the Wacom web site for your region.
RADIO AND TELEVISION INTERFERENCE
The equipment described in this manual generates, uses, and can radiate radio-frequency energy. If it is not installed and used properly – that is, in strict accordance with applicable instructions – it may cause interference with radio and television reception.
FCC NOTICE
This device complies with Part 15 of the FCC Rules. Operation is subject to the following two conditions: (1) this device may not cause harmful interference, and (2) this device must accept any interference received, including interference that may cause undesired operation.
This equipment has been tested and found to comply with the limits for a Class B digital device, pursuant to Part 15 of FCC Rules. These limits are designed to provide reasonable protection against harmful interference in a residential installation.
This equipment generates, uses and can radiate radio frequency energy and, if not installed and used in accordance with the instructions, may cause harmful interference to radio communications. However, there is no guarantee that interference will not occur in a particular installation.
You can determine whether the equipment is causing interference by powering it off. If the interference stops, it was probably caused by the equipment.
If the equipment does cause interference to radio or television reception, you may be able to correct the interference by using one or more of the following measures:
- Rotate the television or radio antenna until the interference stops.
- Move the equipment farther away from the television or radio.
- Plug the equipment and computer into an outlet that is on a different circuit from the television or radio.
If necessary, consult your Wacom dealer or an experienced radio/television technician for help.
Changes or modifications to this product not authorized by Wacom could void the FCC Certification and negate your authority to operate the product.
See also Industry Canada (Canada only) and CE declaration.
INDUSTRY CANADA (CANADA ONLY)
Industry Canada, Class B
"This Class (B) digital apparatus complies with Canadian ICES-003"
The interactive pen display, models DTU-2231 and DTU-1631, have been tested and found to comply with the following harmonized European Norms:
• IEC 60950-1:2005 (2nd Edition)
• EN 60950-1:2006 + A11:2009
• EN 55022: 2006+A1:2007
• EN 61000-3-2: 2006
• EN 61000-3-3: 1995+A1:2001+A2:2005
• EN 55024: 1998+A1:2001+A2:2003
- IEC61000-4-2: 2008
- IEC61000-4-3: 2008
- IEC61000-4-4:2004+Corr.1:2006+Corr.2:2007
- IEC61000-4-5: 2005
- IEC61000-4-6: 2008
- IEC61000-4-8: 2001
- IEC61000-4-11: 2004
Based on the results of these tests, Wacom declares that the above mentioned device conforms to the EMC Directive 2004/108/EC.
Based on the results of these tests, Wacom declares that the above mentioned device conforms to the Safety Directive 2006/95/EC.
The device must be installed and operated always in strict accordance to the instructions given in this manual. Any changes or modifications to this product that were not specially authorized by Wacom will invalidate this declaration.
COMMISSION REGULATION (EC) No 1275/2008 of 17 December 2008
implementing Directive 2005/32/EC of the European Parliament and of the Council with regard to ecodesign requirements for standby and off mode electric power consumption of electrical and electronic household and office equipment.
PRECAUTIONS
To ensure the safe usage of your product, be sure to follow all instructions, cautions, and warnings found within this manual. Failure to do so could cause the loss of data or damage to your computer. Failure to do so could also void your warranty, in which case Wacom shall have no responsibility to repair or replace the product.

Warning
This symbol indicates an item that, if disregarded, may lead to loss of human life or serious injury.

Caution
This symbol indicates an item that, if disregarded, may lead to human injury or damage to personal property.

Warning
This symbol indicates an item that, if disregarded, may lead to loss of human life or serious injury.
Exercise due care and diligence whenever engaging in a described action.
Physical location
Environment
Usage
Handling
PHYSICAL LOCATION

Warning
The interactive pen display is solely applicable in normal office environments but may be used also as center consoles in climate controlled environments. The product was tested by Wacom for the usage in a normal office environment only and there was no particular inspection with regards to its compatibility in medical and military application areas. In addition, the interactive pen display is neither waterproofed nor explosion-resistant. It serves and can be used solely as a passive display and input device. In all applications that are not designated for its sole usage, no information on the functionality and possible malfunctions of the interactive pen display can be supplied due to inadequate execution of tests. The adoption of the interactive pen display in other application areas than normal office environments is at the user's risk.
ENVIRONMENT

Caution
Do not use or store the pen display where:
- Temperature changes are severe or exceed specifications (e.g., outdoors or inside a vehicle).
- The pen display and pen are exposed to direct sunlight or heat from an appliance, or are exposed to water or any other kind of liquid.

Caution
Do not use the pen display in a dusty environment; this may damage the unit.
USAGE
Warning
Only use a power adapter specified for use with your interactive pen display. If a different type of power adapter is used, the pen display will not work properly or may be damaged. Using a different type of power adapter also has the potential to result in fire. Use of a different power adapter will void your warranty.
Caution
Be sure to use a grounded power source when applying power to the pen display.
Caution
Do not connect or disconnect the video or power cables while the pen display or your computer are turned on; this may damage the display or computer video card. In this case, Wacom shall have no responsibility to repair or replace the product.
Caution
This product is for use with a DVI or VGA video card; using an inappropriate video card may damage the pen display.
Caution
Do not block the rear panel ventilation holes; this may overheat and damage the unit.
When not using the pen display for long periods of time, unplug the power adapter from the AC outlet.
HANDLING
Warning
High Voltage. Do not open or disassemble the interactive pen display. There is a risk of electrical shock when the casing is open. This will also void your warranty and Wacom shall have no responsibility to repair or replace the product.
Warning
If the LCD screen has been damaged, DO NOT touch any liquid that may be leaking from it; this liquid is an irritant. In case of contact with skin, eyes, or mouth, rinse immediately with running water for at least 15 minutes or more. If contact is made with the eyes or mouth, also consult a physician.
Warning
Hg – LAMP(S) INSIDE THIS PRODUCT CONTAIN MERCURY AND MUST BE RECYCLED OR DISPOSED OF ACCORDING TO LOCAL, STATE OR FEDERAL LAWS.
The pen display has a backlight which contains mercury (Hg). Be sure to dispose of properly, and to manage any disposal of this unit in accordance with your local ordinances and laws.
Warning
Choking hazard. Prevent children from swallowing the pen tip or side switch. The pen tip or side switch may accidentally be pulled out if children are biting on them.
Caution
Do not disassemble the pen. This may cause the device to malfunction. In this case, Wacom shall have no responsibility to repair or replace the product.
Caution
Do not scratch the display screen. Avoid placing sharp objects on the display screen surface.
Caution
When adjusting the tilt angle of the pen display, be careful to avoid catching your finger in the gap of the movable portion of the stand.


Caution
Do not lift the pen display by the stand; this may damage the stand mechanism. When lifting or moving the pen display, always do so by grasping the main body casing.

Caution
Avoid intensive shock or vibration to the pen display or the pen. Hitting or dropping the pen display may damage the display screen or other components.

Caution
Do not put heavy articles on the pen display or push against it with a strong force; this may damage the display screen or bend the stand.

Caution
Do not place heavy articles on the pen display cabling, repeatedly bend the cables sharply, or apply heavy stress to the cable connectors; this may damage the unit or cabling.

Caution
If your pen display has a coated surface a worn nib that is sharp or angular may cause damage. Replace the pen tip if necessary.

Caution
Do not use any organic solvent (e.g., alcohol) or even mild detergent to clean the display screen. Use of these cleaners can damage the display screen. Please note that damage of this kind is not covered by the manufacturer's warranty.
- Before cleaning, always disconnect your product from the AC power source.
- To clean the display screen, use an anti-static cloth or a slightly damp cloth. When cleaning, apply only a light amount of pressure to the display screen and do not make the surface wet.
- To clean the pen display casing or pen, use a soft cloth with mild detergent (such as dish washing liquid) diluted with water.

Caution
Do not expose the pen display to high voltage electrostatic discharges or to a build-up of an electrostatic charge on the LCD screen. This may result in a temporary discoloration and blotching of the display. If discolorations occur, leave the display on and the discolorations should disappear within a few hours.

Reuse, recycling and recovery. You are urged to recycle this product when replacing it with a newer product or when it has outlived its useful life by bringing it to an appropriate collection point for recyclable materials in your community or region. By doing this, you can help improve the environment of your community as well as minimize the potential negative effects created should any hazardous substance that may possibly be present within waste material reach the environment during the disposal process.
Within the European Union, users are required not to dispose of Waste Electrical and Electronic Equipment (WEEE) as unsorted municipal waste, according to the Directive 2002/96/EC of the European Parliament and of the Council of 27 January 2003, or the corresponding local laws of the Member States. Products for which this is applicable will be marked with the WEEE symbol shown at the beginning of this note unless this is not feasible because of the size or the function of the product. Wacom products are subject to the Directive 2002/96/EC and therefore you should always collect them separately and bring them to the appropriate collection point in your community or region.
Wacom pen display products comply with the European Union RoHS Directive 2002/95/EC (RoHS Directive).
WARRANTY
(WORLDWIDE, EXCEPT FOR EUROPE, AFRICA AND MIDDLE EAST)
LIMITED WARRANTY
Wacom warrants the product, to the original consumer purchaser, except for the Software and consumable items such as the pen nibs, to be free from defects in materials and workmanship under normal use and service for a period of two (2) years, from the date of original retail purchase, as evidenced by a copy of the receipt and registration with Wacom within 30 days of purchase.
The Software is licensed "as is." Wacom makes no warranty with respect to its quality or performance.
Wacom cannot guarantee you uninterrupted service or the correction of any errors.
Upon discovery of a defect in the product, except in the Software, within the Warranty Period, you should contact Wacom Technical Support via telephone, email, or fax to obtain an RMA (Return Merchandise Authorization) number and instructions for shipping the product to a service location designated by Wacom. You should send the product, shipping charges prepaid, to the designated service location, accompanied by the return authorization number, your name, address and telephone number, proof of purchase date, and a description of the defect. Wacom will pay for return shipping by United Parcel Service or by an equivalent service as chosen by Wacom.
Wacom's sole obligation and entire liability under this warranty shall be, at Wacom's option, either the repair or replacement of the defective product or parts thereof of which Wacom is notified during the Warranty Period; provided, however, that you are responsible for (i) the cost of transportation of the product to the designated service location and (ii) any loss or damage to the product resulting from such transportation.
Wacom shall have no responsibility to repair or replace the product if the failure of the product has resulted from accident, abuse, misuse, negligence, or unauthorized modification or repair, or if it has been handled or stored other than in accordance with Wacom's storage instructions.
Any descriptions, drawings, specifications, samples, models, bulletins, or similar material, used in connection with the sale of the product, shall not be construed as an express warranty that the product will conform or comply with your requirements.
EXCEPT FOR THE LIMITED WARRANTY DESCRIBED ABOVE, THERE ARE NO OTHER WARRANTIES MADE BY WACOM ON THIS PRODUCT. NO ORAL OR WRITTEN INFORMATION OR ADVICE GIVEN BY WACOM, ITS DEALERS, DISTRIBUTORS, AGENTS, OR EMPLOYEES SHALL CREATE A WARRANTY OR IN ANY WAY INCREASE THE SCOPE OF THIS WARRANTY, AND YOU MAY NOT RELY ON ANY SUCH INFORMATION OR ADVICE. THIS WARRANTY GIVES YOU SPECIFIC LEGAL RIGHTS, AND YOU MAY ALSO HAVE OTHER RIGHTS WHICH VARY FROM STATE TO STATE.
WACOM LIMITS THE DURATION OF ANY LEGALLY IMPLIED WARRANTIES INCLUDING IMPLIED WARRANTIES OF MERCHANTABILITY OR FITNESS FOR A PARTICULAR PURPOSE, TO THE DURATION OF WACOM'S EXPRESS WARRANTY. SOME STATES DO NOT ALLOW LIMITATIONS ON HOW LONG AN IMPLIED WARRANTY LASTS, SO THE ABOVE LIMITATION MAY NOT APPLY TO YOU.
NEITHER WACOM NOR ANYONE ELSE WHO HAS BEEN INVOLVED IN THE CREATION, PRODUCTION, OR DELIVERY OF THIS PRODUCT SHALL BE LIABLE FOR ANY DIRECT, CONSEQUENTIAL, OR INCIDENTAL DAMAGES (INCLUDING DAMAGES FOR LOSS OF BUSINESS PROFITS, BUSINESS INTERRUPTION, LOSS OF BUSINESS INFORMATION AND THE LIKE) ARISING OUT OF THE USE OF OR INABILITY TO USE SUCH PRODUCT, EVEN IF WACOM HAS BEEN ADVISED OF THE POSSIBILITY OF SUCH DAMAGES. SOME STATES DO NOT ALLOW THE EXCLUSION OR LIMITATION OF INCIDENTAL OR CONSEQUENTIAL DAMAGES, SO THE ABOVE LIMITATION OR EXCLUSION MAY NOT APPLY TO YOU.
In the event that any of the above limitations are held unenforceable, Wacom's liability for any damages to you or any party shall not exceed the purchase price you paid, regardless of the form of any claim.
This Limited Warranty is governed by the laws of the United States of America and the state of Washington.
This Limited Warranty is valid for and only applies to products purchased and used inside the United States (and its territories or possessions) and Canada.

WARRANTY SERVICE IN THE U.S.A. AND CANADA
To obtain Warranty service within the U.S. or Canada contact:
Wacom Customer Care Center
Phone: 1.360.896.9833
Email Inquiry form: http://www.wacom.com/productsupport/email.cfm
WARRANTY SERVICE OUTSIDE OF THE U.S.A. AND CANADA
For products purchased or used outside of the United States and Canada, the warranty period is one (1) year from the date of original purchase. Upon discovery of a defect in the product, except in the Software, within the Warranty Period you should contact your local dealer or distributor. If an authorized Wacom repair center is not available in your local country you will be responsible for all transportation costs including duties and taxes to and from the Wacom repair center. In all other respects, the terms of the warranty as set forth above apply to such sales.
Wacom Technical Support in Asia Pacific (except Japan and China)
Detailed Asia Pacific Limited Warranty policy and product registration may be found online at http://www.wacom-asia.com
To obtain technical support or Warranty service within Southeast Asia, Oceania and Taiwan, please contact the Wacom Customer Support Service.
Phone numbers can be found here: http://www.wacom-asia.com/support/contact
Should you have any questions about this Agreement, or if you desire to contact Wacom for any reason, please contact in writing:
IN NORTH AND SOUTH AMERICA CONTACT:
IN JAPAN CONTACT:
Wacom Technology Corporation Wacom Co., Ltd.
1311 SE Cardinal Court 2-510-1 Toyonodai
Vancouver, Washington 98683 Otone-Machi, Kitasaitama-Gun
U.S.A. Saitama, 349-1148
Japan
IN ASIA PACIFIC CONTACT:
IN MAINLAND CHINA (EXCEPT HONG KONG) CONTACT:
Wacom Co., Ltd. Wacom China Corporation
Asia Pacific Office Unit 2807, 28th Floor, SK Tower
Harmony Tower 18F, 1-32-2 Hon-Cho, No 6 Jia, Jianguomenwai Avenue,
Nakano-Ku, Tokyo 164-0012 Beijing, 100022, China
Japan E-mail: support@wacom.com.cn
LICENCE WARRANTY CONDITIONS
(EUROPE, AFRICA AND MIDDLE EAST)
SOFTWARE LICENCE AGREEMENT
Important customer information
The scope of delivery of this product covers copyright-protected computer programs ("software"), which are the inalienable intellectual property of WACOM Europe GmbH ("WACOM"). This software is an integral component of the product and is also held on the associated data carrier. The software of WACOM and the associated rights of use are not included with the purchase of this product from your retailer. WACOM grants you-the user-the right to use the software exclusively in accordance with the conditions stipulated in this licence agreement. By purchasing this product, you agree to the following licence conditions.
Conditions for using the software
WACOM issues the user with a personal, non-exclusive licence to use the software solely in connection with this product and for the correct operation of the product. This licence may only be assigned to a third party in connection with this product.
Use of this software includes the creation of permanent or temporary copies of the software by means of loading, displaying, exporting, transferring or saving, for the purposes of exporting the commands and the data they contain or for observing, researching or testing the software functions.
The customer may not license the software to a third party, lease, lend or in any other way provide access to the software. The customer may not copy, change, transfer or edit the software without prior written agreement from WACOM. The only exceptions to this are necessary procedures for creating a back-up copy and the scenarios outlined in section 2.
The customer may not carry out any "reverse engineering", decompile or depacketise the software, or try by any other means to discover the source code of the software. This restriction shall continue to apply after the termination of this agreement. If the software contains interfaces to other programs that are not supported by WACOM, WACOM shall provide the customer with the necessary information on request, as long as the customer can prove his right to use the software and agrees to bear the copying and postage costs.
WACOM AND ITS SUPPLIERS CANNOT OFFER ANY GUARANTEE FOR THE PERFORMANCE OF THE SOFTWARE OR FOR THE RESULTS PRODUCED THERE FROM. WACOM AND ITS SUPPLIERS OFFER NO GUARANTEES OR ASSURANCES (EITHER EXPRESSLY OR IMPLICITLY, INCLUDING THOSE THAT MAY BE DERIVED FROM A BUSINESS RELATIONSHIP OR FROM TRADE PRACTICE, OR FROM LEGAL PROVISIONS OR CUSTOMARY LAW) WITH REGARD TO THE MARKETABILITY, FREEDOM FROM DEFECTS OF TITLE OR USEFULNESS OF THE SOFTWARE.
WACOM AND ITS SUPPLIERS ACCEPT NO LIABILITY FOR DAMAGES, CLAIMS OR COSTS OF ANY KIND, NOR FOR CONSEQUENTIAL DAMAGES, SECONDARY, ACCIDENTAL, INDIRECT OR PENAL DAMAGES, PARTICULAR OR MISCELLANEOUS DAMAGES OR FOR DEMANDS OR INDEMNITY CLAIMS FOR REDUCED PROFITS OR LOSSES. THIS SHALL ALSO APPLY IN THE CASE OF A REPRESENTATIVE OF WACOM BEING PREVIOUSLY AWARE OF THE POSSIBILITY OF SUCH LOSSES, DAMAGES, CLAIMS OR COSTS, OR DEMANDS FROM THIRD PARTIES.

The existing limitations on liability shall not apply in the case of the assumption of explicit guarantees, or in case of fraudulent behaviour on the part of WACOM, nor for damages arising from wilful or grossly negligent behaviour on the part of WACOM, from damages leading to loss of life, personal injury or sickness or in the case of binding legal provisions. For slight negligence, WACOM and its suppliers shall only be liable in the event of a breach of essential contractual obligations. Liability when such an essential contractual obligation is breached is, however, limited to damages typical to this type of contract, which WACOM must have determined at the conclusion of the contract based on the known risks and circumstances at that time. Claims for reduced profits or expenses saved, indemnity claims from third parties or claims for any other direct or consequential damages still cannot be asserted in this case.
The laws of the Federal Republic of Germany shall apply to this agreement. However, the applicability of the United Nations Convention on Contracts for the International Sale of Goods is explicitly excluded. Krefeld is the sole place of jurisdiction for all claims arising from this contractual relationship and all disputes between the parties resulting from the formation, handling or termination of the contractual relationship, provided that the customer is a trader, a legal entity under public law or a special fund under public law.
The jurisdiction agreement shall also apply for customers who do not have a general place of jurisdiction in Germany. The jurisdiction agreement shall not apply if, due to legal provisions, a different sole place of jurisdiction must be established for the case. Furthermore, WACOM is authorised to file a lawsuit against the headquarters of the customer.
This licence constitutes the entire contractual agreement between the parties. It overrides all other verbal and written contracts and agreements and may only be altered by means of a written and signed contract. Should one of the provisions of these licence conditions be or become void, the validity of the other provisions shall not be affected, in full or in part. Should a provision be invalid, the legally permissible regulation most closely resembling the invalid regulation shall apply in its place.
LIMITED WARRANTY
WACOM guarantees to you, as the initial purchaser, that the product hardware, when used as intended, will remain free from material defects and processing errors for a warranty period of TWO (2) YEARS and Cintiq products shall be guaranteed for a warranty period of THREE (3) YEARS, commencing from the purchase date and provided that the product was unused at the time of purchase. Defects in wear parts (e.g. pen tips) resulting from normal wear and tear are exempt from the warranty. Furthermore, WACOM guarantees that the data carriers delivered with the product are free from material defects and processing errors for a period of SIX (6) MONTHS from the date of purchase.
If the product-excluding any software-is discovered to be faulty it must be returned immediately to the place of purchase in its original packaging within the warranty period together with your name, address and telephone number, a description of the problem and a copy of the original receipt. The customer shall be liable for any possible damage or loss of the product during transit for this purpose. Under the provisions of this warranty, WACOM only undertakes to repair or replace the faulty product or parts at its own discretion, in cases where defects are proven and the product is sent within the warranty period.
WACOM is not obligated to repair or replace the product if: (a) the damage to the product results from any accident, misuse, improper use, negligence or unauthorised alteration or repair; (b) the product was not handled or stored according to the instructions provided by WACOM; (c) the damage resulted from normal wear and tear; or d) the serial number affixed by WACOM has been removed or rendered unintelligible.
If, when a claim made under this warranty is checked, it emerges that it is outside the permitted time period or is not covered by the warranty or that the product is not faulty, the costs of any checks or repairs must be borne by the customer.

Any descriptions, drawings, specifications, samples, models, notifications or similar material provided in connection with the purchase of the product cannot be taken as an explicit guarantee that the product corresponds to or fulfils the customer's requirements.
If this product is faulty, the purchaser shall be entitled to assert legal claims against the vendor for liability due to defects. These legal rights against the vendor are not limited by the existing warranty. The warranty grants the customer many additional rights under the conditions stipulated in this text.
This limited warranty shall apply if the registered office of the vendor is in the EU or in Iceland, Norway, Jersey, Switzerland, Russia, Ukraine, Croatia, Serbia, Tunisia, Turkey, Syria, Lebanon, Jordan, Israel, Egypt, United Arab Emirates, Iran or South Africa.
The granting of this limited warranty is subject to the laws of the Federal Republic of Germany. However, the applicability of the United Nations Convention on Contracts for the International Sale of Goods is explicitly excluded. Krefeld is the sole place of jurisdiction for all claims arising from this contractual relationship and all disputes between the parties resulting from the formation, handling or termination of the contractual relationship, provided that the customer is a trader, a legal entity under public law or a special fund under public law.
The jurisdiction agreement shall also apply for customers who do not have a general place of jurisdiction in Germany. The jurisdiction agreement shall not apply if, due to legal provisions, a different sole place of jurisdiction must be established for the case. Furthermore, WACOM is authorised to file a lawsuit against the headquarters of the customer.
Should one of the provisions of these limited warranty conditions be or become void, the validity of the other provisions shall not be affected, in full or in part. Should a provision be invalid, the legally permissible regulation most closely resembling the invalid regulation shall apply in its place.
If you have any questions about this agreement, or would like to contact WACOM for another reason, please contact us by post at this address:
WACOM Europe GmbH
Active area. The area of the pen display where your pen is detected.
Application-specific settings. Pen display tool and tablet settings that have been customized for individual applications. The Wacom Tablet control panel enables you to customize the pen to behave uniquely in different applications. Your application-specific settings are in effect whenever you use the application. See also application-specific settings.
Aspect. The ratio between the vertical and horizontal dimension of the active area on the pen display.
Click force. The amount of force you must apply to the tip of your pen for a click to occur.
Double-click assist. A function of the Wacom Tablet control panel that makes it easier to double-click by setting the size of the double-click distance.
Double-click distance. The maximum distance (in screen pixels) that the cursor can move between clicks and still be accepted as a double-click. Increasing the double-click distance makes double-clicking easier, but may cause a delay in brush strokes in some graphics applications.
Double-click speed. The maximum time that can pass between clicks and still be accepted as a double-click.
Eraser-aware application. A software application that has built-in support for the pen eraser.
These applications take advantage of the eraser in different ways, depending on what makes sense for the application.
Journal. A Microsoft Windows application that electronically simulates a physical journal pad, but with the advantages of digital note taking. For example, you can create quick sketches and jot handwritten notes that can be converted to text and sent on to colleagues for digital mark-up. Journal includes a variety of pen, marker, and highlighter tools, plus an eraser that is easily activated by the eraser end of your Wacom pen. Additionally, your handwritten content is searchable within Journal.
Modifier. Modifier keys include SHIFT, ALT, and CTRL for Windows, or SHIFT, CONTROL, COMMAND, and OPTION for Macintosh. You can customize your pen functions to simulate a modifier key.
Mouse acceleration. A setting that allows you to adjust the screen cursor acceleration when using mouse mode.
Mouse mode. A method for positioning the screen cursor. When you place the pen on the pen display, you can move the screen cursor with a "pick up and slide" motion similar to using a traditional mouse. This is known as relative positioning. See also pen mode.
Mouse speed. A setting that allows you to adjust the speed at which your screen cursor moves when using mouse mode.
Nib. The replaceable pen tip.

Pen mode. A method of positioning the screen cursor. Wherever you place your pen on the interactive pen display, the screen cursor will jump to the corresponding point on the screen. This is known as absolute positioning, and is the default setting for the pen. Also, pen mode allows you to quickly position the screen cursor without having to first find it and then move it across the desktop. See also mouse mode.
Pixel. The smallest unit of measure on your display screen.
Pressure sensitive. A quality of the Wacom pen tip and eraser that senses the amount of pressure being applied. This is used to create natural-looking pen, brush, and eraser strokes in applications that are pressure sensitive.
Pressure-sensitive application. Any application that supports pressure-sensitive input.
Proximity. The height above the pen display active area where the pen is detected.
Radial Menu. A hierarchical menu (in radial format). Each level of the menu consists of eight menu slices which may contain various features and options to choose from. You can customize the buttons of your pen to display this menu.
Screen cursor. The pointer on the display screen. Screen cursors come in different shapes (such as an I-beam, arrow, or box), depending on which application you are running.
Tablet PC Input Panel (TIP). The Microsoft Windows Tablet PC Input Panel enables you to use your Wacom pen to create handwritten notes or work with an on-screen keyboard. The Input Panel dynamically converts your handwriting to text. The information you create can then be inserted into other documents, spreadsheets, or illustrations.
USB. Universal Serial Bus. A hardware interface standard for connecting computer peripheral devices. USB ports support hot-plugging, which allows you to connect or disconnect a USB device without turning off your computer.
Wintab. An interface standard used by Windows applications for receiving tablet information. The pen display supports all Wintab-compatible applications under Windows.
INDEX
Accessories
available 73
ordering 73
Adjusting, pen display 23
Application-specific settings 42
changing 44
creating 43
removing 44
Auto-sync
Button functions 36
Calibrating, pen display 30
Care, for pen display 59
CE declaration 75
Cleaning
pen 59
pen display 59
Clicking, with pen 21
Control panel
lists 29
opening 27
overview 28
tabs 29
Customizing
pen 32
pen display 27
Digital ink, capabilities in Windows 65
Display
problems, general 48
troubleshooting 48
Display Toggle, working with 41
Double-click, adjusting 32
Downloads, obtaining driver 58
Dragging, with pen 21
Driver downloads 58
DuoSwitch, customizing for pen 35
Eraser
feel, adjusting 33
pressure setting, advanced 34
Ergonomics 19
Factory presets 23
FCC notice 74
Features
pen 11
pen display 8
Front view, pen display 8
Functions, button 36
General problems, troubleshooting 51
Holding the pen 20
Incline, adjusting 10
Industry Canada statement 75
Information, product 73
Installation 12
for display portion 13
for pen tablet portion 17
software 18
USB cable 17
Installing
multiple pen displays 64
multiple tablets 64
Interference, radio and television 74
LCD monitor installation, for pen display 13
Macintosh-specific problems, troubleshooting 55
Manual
about 5
navigating 6
Monitors, working with multiple 22
Mount, using alternate 61
Multiple monitors, working with 22
Navigating the manual 6
On Screen Display (OSD) 23
Ordering, parts and accessories 73
Parts
available 73
ordering 73
Pen
buttons, customizing 35
cleaning 59
clicking with 21
customizing 32
dragging with 21

erasing, with 22
features 11
holding 20
positioning with 20
replacing tip 60
testing 47
using 20
using side switch 22
working with pressure sensitivity 22
Pen display
about 7
adjusting 23
incline 10
pitch and phase 31
calibrating 30
caring for 59
cleaning 59
customizing 27
features 8
front view 8
installation 12
installing multiple units 64
LCD monitor installation 13
pen tablet installation 17
rear view 9
testing 46
uninstalling 62
USB cable installation 17
working with 19
Pen tablet, troubleshooting 51
Pen tip, replacing 60
Pitch and phase, adjusting 31
Positioning, with pen 20
Precautions 76
environment 76
handling 77
physical location 76
usage 77
Preferences, managing 63
Pressure sensitivity, working with 22
Product information 73
Radial Menu
customizing 40
using 40
Rear view, pen display 9
Requirements, system 12
Settings
application-specific 42
On Screen Display (OSD) 23
user 23
Side switch, using 22
Software installation 18
Specifications
model DTU-1631 70
display 71
general 70
power adapter 72
tablet 72
model DTU-2231 67
display 68
general 67
power adapter 69
tablet 69
pen
model UP-817E 72
model UP-818E 72
product 67
Stand, using alternate 61
System requirements 12
Tablet PC Input Panel, about 66
Tablets, installing multiple 64
Technical support, options 57
Testing
pen 47
pen display 46
Tip feel, adjusting 32
Tip pressure setting, advanced 34
Troubleshooting 45
display 48
general problems 51
Macintosh-specific problems 55
pen tablet portion 51
Windows-specific problems 54
Uninstalling 62
User settings 23
Using, pen 20
VGA problems 50
Windows-specific problems, troubleshooting 54
Working, with pen display 19
WACOM INTERNATIONAL OFFICES
WACOM TECHNOLOGY CORPORATION WACOM EUROPE GMBH
1311 SE Cardinal Court Europark Fichtenhain A9
Vancouver, WA 98683 47807 Krefeld
U.S.A. Germany
Telephone: +1.360.896.9833 Telephone: +49.(0)2151.3614.0
Fax: +1.360.896.9724 Fax: +49.(0)2151.3614.111
WACOM CO., LTD.
JAPAN MARKETING AND SALES DIVISION
WACOM CO., LTD.
ASIA PACIFIC MARKETING AND SALES DIVISION
Harmony Tower 21F, 1-32-2 Hon-Cho Harmony Tower 18F, 1-32-2 Hon-Cho,
Nakano-Ku, Tokyo 164-0012 Nakano-Ku, Tokyo 164-0012
Japan Japan
Internet: http://tablet.wacom.co.jp Telephone: +81.3.5309.1513
Fax: +81.3.5309.1514
WACOM CHINA CORPORATION WACOM KOREA CO., LTD.
Unit 2807, 28th Floor, SK Tower
No 6 Jia, Jianguomenwai Avenue,
Beijing, 100022, China
Internet: http://www.wacom.com.cn
25th Floor DMC iaan Sangam 2nd Complex, 1653
Sangam-dong, Mapo-gu, Seoul, Korea, 121-270
Telephone: +82.2.557.3894
Fax: +82.2.557.3895
WACOM AUSTRALIA PTY. LTD.
Unit 8, Stage 1 Cumberland Green
2-8 South Street Rydalmere
NSW 2116 Australia
Telephone: +61.2.9422.6700
Fax: +61.2.9420.2272 Fax: +65.6258.8697
WACOM SINGAPORE PTE. LTD.
3 Bishan Place,
CPF Bishan Building #06-08
Singapore 579838
Telephone: +65.6258.8640
WACOM TAIWAN INFORMATION CO., LTD.
Suite 605, 6th floor, No. 205 Tun-Hwa North Road
Taipiei, 105 Taiwan
Telephone: +886.2.2712.2675
Fax: +886.2.2712.9789