
KX-HNS104EX - Home Automation PANASONIC - Free user manual and instructions
Find the device manual for free KX-HNS104EX PANASONIC in PDF.
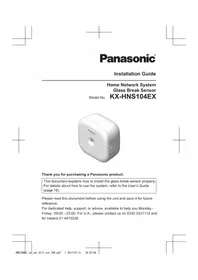


| Product Type | Glass Break Sensor (Home Automation) |
| Brand | Panasonic |
| Model | KX-HNS104EX |
| Dimensions (HxWxD) | Approx. 72 mm x 73 mm x 39 mm (with rear cover) |
| Weight | Approx. 69 g (with rear cover, excluding batteries) |
| Power Source | 2 x AA (LR6) alkaline batteries |
| Battery Life | Up to 1 year (when triggered once a month at 25 °C) |
| Detection Method | Acoustic sensor (microphone) |
| Detection Range (Horizontal) | Approx. ±60° |
| Detection Range (Vertical) | Approx. ±60° |
| Maximum Distance (HIGH sensitivity) | Approx. 4.6 m |
| Maximum Distance (LOW sensitivity) | Approx. 2.3 m |
| Frequency Range | 1.88 GHz – 1.90 GHz (DECT) |
| Operating Temperature | 0 °C – 40 °C |
| Mounting Options | Wall mount with rear cover (flat) or wall mounting adaptor (45° angle) |
| Accessories Included | 2 x AA batteries, wall mounting adaptor, 2 x screws |
| LED Indicator | Green (no detection), Red (detection), Blinking (out of range, registration) |
| Sensitivity Adjustment | Switch between HIGH and LOW |
| Communication Protocol | DECT (Digital Enhanced Cordless Telecommunications) |
| Hub Compatibility | Panasonic Home Network system (hub required) |
| App Control | Via Panasonic [Home Network] app (iPhone/Android) |
| Cleaning Instructions | Wipe with soft moist cloth; do not use benzine, thinner, or abrasive powder |
Frequently Asked Questions - KX-HNS104EX PANASONIC
User questions about KX-HNS104EX PANASONIC
0 question about this device. Answer the ones you know or ask your own.
Ask a new question about this device
Download the instructions for your Home Automation in PDF format for free! Find your manual KX-HNS104EX - PANASONIC and take your electronic device back in hand. On this page are published all the documents necessary for the use of your device. KX-HNS104EX by PANASONIC.
USER MANUAL KX-HNS104EX PANASONIC
Model No. KX-HNS104EX

Thank you for purchasing a Panasonic product.
This document explains how to install the glass break sensor properly. For details about how to use the system, refer to the User's Guide (page 18).
Please read this document before using the unit and save it for future reference.
For dedicated help, support, or advice, available to help you Monday - Friday, 09:00 - 23:00. For U.K., please contact us on 0330 3331112 and for Ireland 01 4475228.
Table of Contents
Introduction
Accessory information ....3
Important Information
Disclaimer ....5
About this system 5
For your safety 5
Important safety instructions .....6
For best performance .....6
Other information ....7
Setup
Part names and functions .....9
LED indicator 9
Setup overview 9
Inserting the batteries .....10
Registering the sensor .....11
Confirming the usage area .....12
Information about sensor features 13
Wall mounting 15
Appendix
Adjusting the sensor sensitivity ....18
Features available when using the [Home Network] app .....18
Accessing the User's Guide ....18
Specifications ......19
Conditions of guarantee .....20
Accessory information
Supplied accessories
| No. | Accessory item/Part number Quantity | |
| 1 | Batteries*1 | 2 |
| 2 | Wall mounting adaptor2/PNKK1111Z1 | 1 |
| 3 | Wall mounting screws (25 mm)/XTB4+25AVW 2 |
*1 When replacing batteries, see "Power source" of "Specifications", page 19 for battery information.
*2 The sensor can be wall mounted with or without the wall mounting adaptor (page 15).
①

②

③

Other information
- Design and specifications are subject to change without notice.
- The illustrations in these instructions may vary slightly from the actual product.
Trademarks
- Phone and iPad are trademarks of Apple Inc., registered in the U.S. and other countries.
- Android is a trademark of Google Inc.
- Microsoft, Windows, and Internet Explorer are either registered trademarks or trademarks of Microsoft Corporation in the United States and/or other countries.
- All other trademarks identified herein are the property of their respective owners.
Sales and support information
Customer Communications Centre
• For customers within the U.K.: 0330 3331112 • For customers within Ireland: 01 4475228 - For further support on your product, please visit our website: www.panasonic.co.uk
Helpline Tel. No.: U.K. 0330 3331112 Ireland 01 4475228
Introduction
Direct Sales at Panasonic U.K.
- Order accessory and consumable items for your product with ease and confidence by phoning our Customer Communications Centre Monday - Friday 9:00am - 5:00pm (Excluding public holidays).
- Go on line through our Internet Accessory ordering application at www.pas-europe.com
- Most major credit and debit cards accepted.
- All enquiries transactions and distribution facilities are provided directly by Panasonic U.K.
For your future reference
We recommend keeping a record of the following information to assist with any repair under warranty.
Serial No. Date of purchase
(found inside the battery compartment)
Name and address of dealer
Attach your purchase receipt here.
Disclaimer
When properly installed and maintained, this product is designed to help provide an added layer of notice in the case of broken glass. Panasonic makes no representations or warranties that it will at all times, or under all circumstances, or in any given circumstance, detect broken glass, or work with all types of glass, or that it will prevent loss of or damage to property or persons. Panasonic shall have no liability for any personal injury, or damage to property or other loss, of any kind, should the product fail to warn or notify.
About this system
- This system is an auxiliary system; it is not designed to provide complete protection from property loss. Panasonic will not be held responsible in the event that property loss occurs while this system is in operation.
- The system's wireless features are subject to interference, therefore functionality in all situations cannot be guaranteed. Panasonic will not be held responsible for injury or damage to property that occurs in the event of wireless communication error or failure.
For your safety
To prevent severe injury and loss of life/property, read this section carefully before using the product to ensure
proper and safe operation of your product.

WARNING
Power connection
- Use only the power source marked on the product.
- Do not connect non-specified devices.
Installation
- To prevent the risk of fire or electrical shock, do not expose the product to rain or any type of moisture.
- Do not place or use this product near automatically controlled devices such as automatic doors and fire alarms. Radio waves emitted from this product may cause such devices to malfunction, resulting in an accident.
- Install the product only on a vertical surface. Do not install the product on a ceiling, as the product may fall, resulting in damage or injury.
- Keep small parts (screws, etc.) out of the reach of children. There is a risk of swallowing. In the event they are swallowed, seek medical advice immediately.
Operating safeguards
- Do not disassemble the product.
Medical
- Consult the manufacturer of any personal medical devices, such as pacemakers or hearing aids, to determine if they are adequately shielded from external RF (radio frequency) energy. DECT features
Helpline Tel. No.: U.K. 0330 3331112 Ireland 01 4475228
Important Information
operate between 1.88 GHz and 1.90 GHz with a peak transmission power of 250 mW.
- Do not use the product in health care facilities if any regulations posted in the area instruct you not to do so. Hospitals or health care facilities may be using equipment that could be sensitive to external RF energy.

CAUTION
Battery
- The batteries should be used correctly, otherwise the product may be damaged due to battery leakage.
- Do not charge, short-circuit, disassemble, or heat the batteries.
- Do not dispose of batteries in a fire.
- Remove all the batteries when replacing.
- Do not mix old, new or different types of batteries.
- It is recommended that batteries are replaced annually.
- Keep out of the reach of small children. There is a risk of swallowing. If the battery is swallowed, seek medical attention immediately.
- Remove the battery if it becomes unusable. There is a risk of leakage, overheating, and rupture. Do not attempt to use a battery if it is leaking.
- Do not intentionally pour water on the battery or allow it to get wet. There is a risk of fire and smoke. If the battery becomes wet, remove it immediately and contact an authorised service centre.
Important safety instructions
When using your product, basic safety precautions should always be followed to reduce the risk of fire, electric shock, and injury to persons, including the following:
- Do not use this product near water for example, near a bathtub, washbowl, kitchen sink, or laundry tub, in a wet basement or near a swimming pool.
- Use only the batteries indicated in this document. Do not dispose of batteries in a fire. They may explode. Check with local codes for possible special disposal instructions.
SAVE THESE INSTRUCTIONS
For best performance
Hub location/avoiding noise
The hub and other compatible Panasonic devices use radio waves to communicate with each other.
- For maximum coverage and noise-free communications, place your hub:
– at a convenient, high, and central location with no obstructions between the product and hub in an indoor environment.
– away from electronic appliances such as TVs, radios, personal computers, wireless devices, or other phones.
– facing away from radio frequency transmitters, such as external
Important Information
antennas of mobile phone cell stations. (Avoid putting the hub on a bay window or near a window.)
- If the reception for a hub location is not satisfactory, move the hub to another location for better reception.
Environment
- Keep the product away from electrical noise generating devices, such as fluorescent lamps and motors.
- The product should be kept free from excessive smoke, dust, high temperature, and vibration.
- The product should not be exposed to direct sunlight.
- Do not place heavy objects on top of the product.
- The product should be kept away from heat sources such as radiators, cookers, etc. It should not be placed in rooms where the temperature is less than 0 °C or greater than 40 °C. Damp basements should also be avoided.
- Operating the product near electrical appliances may cause interference. Move away from the electrical appliances.
- The sensor may make false detections in noisy locations, such as where there is noise from metallic blinds opening and closing, or metallic bells of alarm clocks. Avoid installing the sensor in these locations.
- The sounds of doors opening and closing may cause false detections. Do not install the sensor near doors.
- Do not place screens or shielding (such as sound blocking curtains) between the glass and sensor. This may prevent the sensor from being
able to detect the sound of glass breaking.
- The product may not be able to detect the sound of glass breaking depending on the noise conditions of the surrounding area.
- To avoid false detections, do not install the product in areas where loud noises occur or near devices that produce loud noise.
- Refer to “Sensor detection range” on page 14 and install the product within the wireless communication range of the hub.
Other information
CAUTION: Risk of explosion if battery is replaced by an incorrect type.
Dispose of used batteries according to the instructions.
Routine care
- Clean the outer surface of the product with a soft, moist cloth.
- Do not use benzine, thinner, or any abrasive powder.
Important Information
Disposal of Old Equipment and Batteries (Only for European Union and countries with recycling systems)


These symbols (①, ②) on the products, packaging, and/or accompanying documents mean that used electrical and electronic products and batteries must not be mixed with general household waste.
For proper treatment, recovery and recycling of old products and used batteries, please take them to applicable collection points in accordance with your national legislation.
By disposing of them correctly, you will help to save valuable resources and prevent any potential negative effects on human health and the environment. For more information about collection and recycling, please contact your local municipality.
Penalties may be applicable for incorrect disposal of this waste, in accordance with national legislation.
For business users in the European Union
If you wish to discard electrical and electronic equipment, please contact your dealer or supplier for further information.
Information on Disposal in other Countries outside the European Union
These symbols (①, ②) are only valid in the European Union. If you wish to discard these items, please contact your local authorities or dealer and ask for the correct method of disposal.
Note for the battery symbol
This symbol (②) might be used in combination with a chemical symbol. In this case it complies with the requirement set by the Directive for the chemical involved.
Note for the battery removal procedure
Refer to "Inserting the batteries" on page 10.
Setup
Part names and functions
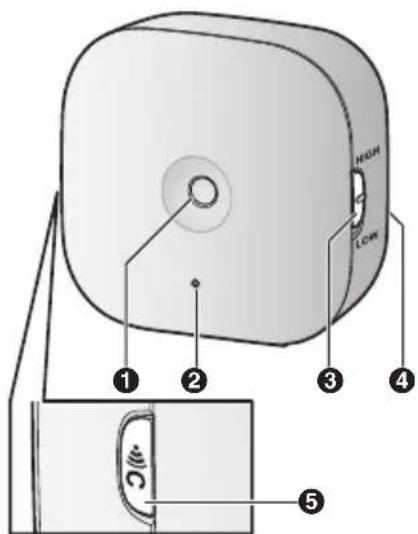
① Microphone
② LED indicator
③ [HIGH]/[LOW]
Used to change the sensor sensitivity (page 18).
④ Rear cover
⑤ [●○○C]
Used to confirm the status of the sensor or register the sensor to the hub.
LED indicator
You can press [●●●] and check the LED indicator to confirm the sensor's status. After confirming the sensor's status, we recommend turning the LED indicator off by pressing [●●●] again as soon as possible, otherwise battery life may be reduced.
| Indicator Status | |
| Green, lit No | glass break detected |
| Red, lit Glass | break was detected |
| Red, blinking | Sensor is out of range of the hub |
| Green, blinking slowly | Registration mode (You pressed and held [●●●)C)) |
| Off No battery | power |
Note:
- the LED indicator does not indicate sensor status if the sensor has not been registered (page 11).
Setup overview
1 Initial setup
Make sure you can access the system using your mobile device. For details, refer to the System Setup Guide included with your hub.
2 Insert the batteries
The sensor is battery powered.
3 Registration
Required only if the sensor was purchased separately (i.e., not as part of a bundle).
4 Confirm the installation area
Read the information in this document to confirm that the desired installation area is suitable for proper operation.
5 Installation
Install the sensor in the desired location.
Setup
Inserting the batteries
- USE ONLY Alkaline batteries AA (LR6) size.
- Do NOT use Manganese/Ni-Cd/Ni-MH batteries.
- Confirm the polarities ⊕, ⊕
1 Remove the rear cover by pressing the upper sides of the cover (①) and sliding it down (②).

2 Insert the batteries.

3 Install the rear cover.
- Place it with the “▽” mark facing upwards and slide it.

Note:
- If the sensor's battery power is low, a message will be displayed on the [Sensor] screen of the [Home Network] app. We recommend you check this screen periodically to ensure that the battery does not become fully discharged. For more information, refer to the User's Guide (page 18).
Setup
Registering the sensor
This procedure is not required for devices that were included as part of a bundle.
Before you can use the sensor, it must be registered to the hub. If you purchased devices separately (i.e., not as part of a bundle), you must register each device to the hub.
You can register each device by using the registration buttons or the [Home Network] app.
Note:
- For information about deregistering devices, refer to the User's Guide (page 18).
Using registration buttons
1 Hub:
Press and hold [●●●]C OTHER DEVICE] until the LED indicator blinks slowly in green.
2 Sensor:
Press and hold [●●●] until the LED indicator blinks slowly in green (page 9).
- When registration is complete, the hub sounds one long beep.
Note:
- To cancel without registering the sensor, press [●●●]C on the hub and on the sensor again.
- If registration fails, the hub sounds several short beeps.
Using the app
When you register the sensor by using the [Home Network] app, you can assign a name to your devices and group them by location. For more information, refer to the User's Guide (page 18).
Setup
Confirming the usage area
Wireless communication range
The wireless communication range of each device in the system from the hub is approximately 50 m indoors and approximately 300 m outdoors. Wireless communication may be unreliable when the following obstacles are located between the hub and other devices.
• Metal doors or screens - Walls containing aluminum-sheet insulation - Walls made of concrete or corrugated iron • Double-pane glass windows - Multiple walls - When using each device on separate floors or in different buildings
Note:
- You can check the sensor's communication status by pressing [●●●C]. If the LED indicator is lit in green or red, the sensor is communicating properly with the hub. If the LED indicator blinks in red, it is out of range of the hub.
Usage area cautions
Using the sensor in the following areas may cause deformation, malfunction, or operational failure.
• In direct sunlight - Areas exposed to grease or steam, such as kitchens • Near fire or heating devices
• Near magnetic fields (such as near microwaves and magnets) - Areas subject to extreme temperature changes, such as next to air conditioners - Near devices that emit strong radio waves, such as mobile phones
Information about sensor features
The sensor uses a microphone to detect the unique sound frequencies that are produced when glass breaks. Please read the following information before deciding where to install the sensor.
Note:
- The sensor's features are not designed to be used in situations that require high reliability. We do not recommend use of the sensor's features in these situations.
- Panasonic takes no responsibility for any injury or damage caused by the use of the sensor.
- The sensor may make false detections when there is noise from metallic blinds opening and closing, metallic bells of alarm clocks, etc.
- The sensor is designed to detect the sound of glass breaking as a result of an impact. It will not detect other types of breaks, such as when glass is cut or removed.
- If the sensor malfunctions, is out of range, or if its battery power is too low, the hub sounds an alert, the hub's indicator flashes, and a message is displayed by the [Home Network] app. You can cancel the alert temporarily by pressing the hub's [Wi-Fi SETUP] button. When you have remedied the situation (e.g., moved the sensor closer to the hub, replaced the battery, etc.), the alert will not sound again.
Applicable glass specifications 4
| Type Thickness | |
| Plate Minimum | 2 mmMaximum: 6 mm |
| Tempered Minimum | 3 mmMaximum: 6 mm |
| Insulating*2 | Minimum: 2 mmMaximum: 6 mm |
*1 In compliance with UL 639. *2 Sealed insulating glass types are protected only if both plates of glass are broken.
Note:
- Minimum size for all types is 28 cm × 28 cm.
- The glass must be secured in a frame, and the frame must be installed in a wall.
- The sensor may not detect glass breaks for types of glass not listed here, such as wire-mesh reinforced glass and glass coated with a film.
- Install the sensor in accordance with the Standard for Installation and Classification of Burglar and Holdup Alarm Systems, UL 681.
Setup
Sensor detection range
The sensor detection range varies depending on position of the sensitivity switch ([HIGH]/[LOW]).
Note:
- Install the sensor in the same room as the window that you want to detect. Walls or other obstacles between the window and the sensor may prevent the sensor from detecting breaking glass, even when the sensor is installed within the ranges listed here.
When looking from above
① Sensor ② Horizontal range: approx. 120° ③ Max. distance: approx. 4.6 m when set to [HIGH], or approx. 2.3 m when set to [LOW] ④ Glass inside detectable area ⑤ Glass outside detectable area
When looking from the side
① Sensor ② Vertical range: approx. 120° ③ Max. distance: approx. 4.6 m when set to [HIGH], or approx. 2.3 m when set to [LOW] ④ Glass inside detectable area ⑤ Glass outside detectable area
Setup
Wall mounting
There are two methods for wall mounting the sensor. To mount the sensor flat against the wall, use the rear cover. To mount the sensor so that it faces 45° to the left or right, use the wall mounting adaptor.
Mounting examples *1 of the rear cover and wall mounting adaptor

*1 View from above.
Note:
- Mount the sensor on a stable location where it can be adequately supported when mounting.
- Do not mount the sensor on a soft material. It may fall down, break, or cause injury.
- Do not mount the sensor on the following places: gypsum board, ALC (autoclaved lightweight cellular concrete), concrete block, plywood less than 25.4 mm thick, etc.
- Install the sensor opposite the window that you want to monitor for glass breaks. Do not install the sensor on the same wall as the window.
- Install the sensor such that there are no obstacles between the sensor and the window that may block the sound of glass breaking.
- Ambient noise, such as the sound of tableware, glass, or metal objects contacting each other, explosive noises, children's voices, howling of dogs, etc., may cause false detections. False detections may occur when the sensor is armed if it is installed in a kitchen, garage, utility room, stairwell, bathroom, etc.
- Do not install the sensor near an air compressor, as the air pressure generated may cause false detections.
- Do not install the sensor where breezes or wind from a fan may blow on the sensor, as this may cause false detections or prevent the sensor from detecting the sound of glass breaking.
- False detections may occur and battery life may be drastically reduced if devices that produce continuous sound (TVs, music players or speakers, musical instruments, etc.) are located near the sensor.
Setup
Using the rear cover
1. Remove the rear cover by pressing the upper sides of the cover (①) and sliding it down (②).

2. Attach the rear cover to the wall by using screws (A).
- Place the rear cover with the "UP" mark facing upwards. • B 37 mm

3. Attach the sensor to the rear cover. - Insert the grooves on the sensor to the 4 tabs on the rear cover, and then push down the sensor.

Setup
Using the wall mounting adaptor
1. Remove the rear cover by pressing the upper sides of the cover (①) and then sliding it down (②).

2. Attach the wall mounting adaptor to the wall by using screws (A).
- Place the wall mounting adaptor with the "UP" mark facing upwards. B 21 mm

3. Attach the sensor to the wall mounting adaptor.
- Insert the grooves on the sensor to the 4 tabs on the wall mounting adaptor, and then push down the sensor.

Appendix
Adjusting the sensor sensitivity
You can use the [HIGH]/[LOW] switch (page 9) to adjust the sensor's sensitivity.
Set it to [LOW] if the sensor frequently makes false detections.
Features available when using the [Home Network] app
Some of the sensor's features that are available when using the [Home
Network] app are listed below. For more information, refer to the User's Guide (page 18).
- Alarm system
You can use the app to arm and disarm the alarm system, confirm the current status of the sensor, and view a log of previous events.
- Sensor integration
You can configure the sensor to trigger other system events, such as camera recording, turning on an electric device (such as a lamp), etc. (Appropriate device required.)
- Telephone alert
You can configure the system to call a preprogrammed phone number when the sensor is triggered.
Accessing the User's Guide
The User's Guide is a collection of online documentation that helps you get the most out of the [Home Network] app.
1 iPhone/iPad
Tap: the app's home screen.
Android™ devices
Tap: or press your mobile device's menu button in the app's home screen.
2 Tap [User's Guide].
Note:
- Microsoft Windows® Internet Explorer® 8 and earlier versions are not supported.
- Android 4.1 or later versions are recommended.
- You can also access the User's Guide at the web page listed below.

www.panasonic.net/pcc/support/tel/homenetwork/manual/
Appendix
Specifications
- Standards DECT (Digital Enhanced Cordless Telecommunications)
- Frequency range 1.88 GHz – 1.90 GHz
- RF transmission power Approx: 10 mW (average power per channel) 250 mW (max.) • Power source AA (LR6) Alkaline battery (2 × 1.5 V)
- Operating conditions 0 °C – 40 °C • Detection method Acoustic sensor
- Sensor detection range Horizontal: approx. ±60° Vertical: approx. ±60° Distance*1: approx. 4.6 m when the sensitivity switch is set to [HIGH]; approx. 2.3 m when set to [LOW]
- Battery life Up to 1 year 2
- Dimensions (height × width × depth)
- With the rear cover attached: Approx. 72 mm × 73 mm × 39 mm
- With the wall mounting adaptor attached: Approx. 72 mm × 73 mm × 61 mm
- Mass (weight)
- With the rear cover attached: Approx. 69 g, excluding the batteries
- With the wall mounting adaptor attached: Approx. 76 g, excluding the batteries *1 When the surrounding temperature is approx. 25 °C.
*2 When the sensor is triggered once a month and the surrounding temperature is approx. 25 °C. Note that battery life may be reduced in very cold environments and in areas where loud noises (such as door slams) occur frequently, and may be drastically reduced when the sensor is installed near devices that produce continuous sound (TVs, music players or speakers, musical instruments, etc.).
Appendix
Conditions of guarantee
This guarantee is in addition to and does not in any way affect any statutory or other rights of consumer purchasers. If within the applicable guarantee period, the product proves to be defective by reason of faulty design, workmanship or materials, we undertake subject to the following conditions to have the defective product (or any part or parts thereof) repaired or replaced free of charge.
- The product shall have been purchased and used solely within either the U.K. or Ireland and in accordance with standard operating instructions and the technical and/or Safety Standards required in the U.K.
- On being found defective, please consult with the retailer from where it was purchased for assistance.
- This guarantee shall not apply to damage caused through fire, accident, lightning, misuse, wear and tear, neglect, incorrect adjustment or repair, to damage caused through installation, adaption, modification or use in an improper manner or inconsistent with the technical and/or safety standards required in the country where this product is used, or to damage occurred during transit to or from the purchaser.
- If at any time during the guarantee period any part or parts of the product are replaced with a part or parts not supplied or approved by us or of an objective quality safe and suitable for the product, or the product has been dismantled or repaired by any person not authorised by us, we shall have the right to terminate this guarantee in whole or in part immediately without further notice.
- The purchaser's sole and exclusive remedy under this guarantee against us is for the repair or replacement of the product or any defective part or parts and no other remedy, including, but not limited to, incidental or consequential damage or loss of whatsoever nature shall be available to the purchaser.
- This guarantee shall not apply to batteries and any other items of limited natural life.
- Our decision on all matters relating to complaints shall be final. Any product or defective part which has been replaced shall become our property.
- The guarantee period applicable to this product shall be 12 months.
Please keep these operating instructions with your receipt.
Panasonic U.K. a branch of Panasonic Marketing Europe GmbH
Receipt No.
Date of purchase
Model No.
Serial No.
Graphical symbols for use on equipment and their descriptions
| Symbol Explanation Symbol Explanation | ||
 | Alternating current (A.C.) Class | equipment(equipment in which protection against electric shock relies on Double Insulation or Reinforced Insulation) |
 | Direct current (D.C.) “ON” (power)[W70X] | |
 | Protective earth “OFF” (power | |
 | Protective bonding earth Stand power | |
 | Functional earth “ON”/“OFF” ( | push-push) |
 | For indoor use only Caution, risk of electric shock | |
Appendix
General information
Declaration of Conformity:
- Panasonic Corporation declares that the radio equipment type (KX-HNS104) is in compliance with Directive 2014/53/EU. The full text of the EU declaration of conformity is available at the following internet address: http://www.ptc.panasonic.eu/doc
Contact to Authorised Representative:
Panasonic Testing Centre Panasonic Marketing Europe GmbH Winsbergring 15, 22525 Hamburg, Germany
Ecodesign information
Ecodesign information under EU Regulation (EC) No. 1275/2008 amended by (EU) Regulation No. 801/2013. From 1 January 2015.
Please visit here: http://www.ptc.panasonic.eu/erp Click [Downloads]
→ Energy related products information (Public)
Power consumption in networked standby and guidance are mentioned in the web site above.

Notes

23
IMPORTANT!
If your product is not working properly. . .
① Use alkaline batteries. (Rechargeable Ni-MH batteries CANNOT be used.) ② Use the Home Network app to access the User's Guide and refer to the Troubleshooting section.

If you still have any problems, please call the Helpline
0330 3331112 (U.K.)
01 4475228 (Ireland)
or contact us through our website:
www.panasonic.co.uk
Sales Department:
Panasonic U.K. a branch of
Panasonic Marketing Europe GmbH
Panasonic House, Willoughby Road, Bracknell, Berkshire, RG12 8FP
Panasonic Corporation
1006, Oaza Kadoma, Kadoma-shi, Osaka 571-8501, Japan
http://www.panasonic.com
© Panasonic Corporation 2015

*PNQX7284WA*
PNQX7284WA CC0815WK3126 (E)
- THANK YOU FOR PURCHASING A PANASONIC PRODUCT
- TABLE OF CONTENTS
- INTRODUCTION
- IMPORTANT INFORMATION
- SETUP
- ADJUSTING THE SENSOR SENSITIVITY
- ACCESSORY INFORMATION
- OTHER INFORMATION
- TRADEMARKS
- SALES AND SUPPORT INFORMATION
- CUSTOMER COMMUNICATIONS CENTRE
- DIRECT SALES AT PANASONIC U.K
- FOR YOUR FUTURE REFERENCE
- DISCLAIMER
- ABOUT THIS SYSTEM
- FOR YOUR SAFETY
- WARNING
- POWER CONNECTION
- INSTALLATION
- OPERATING SAFEGUARDS
- MEDICAL
- CAUTION
- BATTERY
- IMPORTANT SAFETY INSTRUCTIONS
- SAVE THESE INSTRUCTIONS
- FOR BEST PERFORMANCE
- HUB LOCATION/AVOIDING NOISE
- ENVIRONMENT
- ROUTINE CARE
- PART NAMES AND FUNCTIONS
- LED INDICATOR
- NOTE
- SETUP OVERVIEW
- INSERTING THE BATTERIES
- REGISTERING THE SENSOR
- USING REGISTRATION BUTTONS
- HUB
- SENSOR
- USING THE APP
- CONFIRMING THE USAGE AREA
- WIRELESS COMMUNICATION RANGE
- USAGE AREA CAUTIONS
- INFORMATION ABOUT SENSOR FEATURES
- SENSOR DETECTION RANGE
- WALL MOUNTING
- USING THE REAR COVER
- USING THE WALL MOUNTING ADAPTOR
- APPENDIX
- FEATURES AVAILABLE WHEN USING THE [HOME NETWORK] APP
- ALARM SYSTEM
- SENSOR INTEGRATION
- TELEPHONE ALERT
- ACCESSING THE USER'S GUIDE
- IPHONE/IPAD
- ANDROID™ DEVICES
- TAP [USER'S GUIDE]
- SPECIFICATIONS
- CONDITIONS OF GUARANTEE
- GENERAL INFORMATION
- DECLARATION OF CONFORMITY
- CONTACT TO AUTHORISED REPRESENTATIVE
- ECODESIGN INFORMATION
- IMPORTANT
Brand : PANASONIC
Model : KX-HNS104EX
Category : Home Automation