
Multi MK2 ATF036 - Vacuum Cleaner G-TECHNOLOGY - Free user manual and instructions
Find the device manual for free Multi MK2 ATF036 G-TECHNOLOGY in PDF.


| Product Type | Handheld Vacuum Cleaner (Cordless Stick) |
| Brand | Gtech |
| Model | Multi MK2 ATF036 |
| Battery Type | Lithium-Ion (Li-Ion) |
| Battery Voltage | 22V |
| Battery Capacity | 2000mAh |
| Charging Time | 4 hours (1 hour boost possible) |
| Charger Output | 27V DC 500mA |
| Weight | 1.5 kg (with standard nozzle) |
| Bin Capacity | Approx. 0.4 L |
| Filter Type | Washable foam filter (recommended cleaning monthly) |
| Brush Bar | Motorized brush bar, removable for cleaning |
| Power Source | Cordless (battery powered) |
| Included Accessories | Power brush, dusting brush, crevice tool, extension tube, charger |
| Safety Features | Overload protection (red LED indicator), battery safety lock |
| Maintenance | Clean filter and brush bar regularly; wipe with dry cloth |
| Intended Use | Domestic dry vacuum cleaning only |
| Warranty | 2 years (registration required) |
| Country of Origin | Designed in UK |
| Compatible Floor Types | Hard floors, carpets, rugs (avoid delicate loose-pile rugs) |
Frequently Asked Questions - Multi MK2 ATF036 G-TECHNOLOGY
User questions about Multi MK2 ATF036 G-TECHNOLOGY
0 question about this device. Answer the ones you know or ask your own.
Ask a new question about this device
Download the instructions for your Vacuum Cleaner in PDF format for free! Find your manual Multi MK2 ATF036 - G-TECHNOLOGY and take your electronic device back in hand. On this page are published all the documents necessary for the use of your device. Multi MK2 ATF036 by G-TECHNOLOGY.
USER MANUAL Multi MK2 ATF036 G-TECHNOLOGY
AirRam
Model number: AR29
OPERATING MANUAL
IMPORTANT SAFEGUARDS:

IMPORTANT: READ ALL INSTRUCTIONS BEFORE USE. RETAIN INSTRUCTIONS FOR FUTURE REFERENCE.

Do not use in rain or leave outdoors whilst raining.

WARNING: Basic safety precautions should always be observed when using an electrical appliance, including the following to reduce the risk of fire, electrical shock, or injury:
Personal Safety:
- Store indoors in a dry place out of the reach of children.
• Always use responsibly. This appliance can be used by children aged from 8 years and above and persons with reduced physical, sensory or mental capabilities or lack of experience and knowledge if they have been given supervision or instruction concerning use of the appliance in a safe way and understand the hazards involved. - Don't let children play with the appliance; supervise children using or maintaining the appliance.
- Use only manufacturer's recommended attachments as described in this manual; misuse or use of any accessory or attachment other than those recommended, may present a risk of personal injury.
• Take extra care when cleaning stairs. - Keep the appliance and accessories away from hot surfaces.
- Do not block the appliances openings or hinder air flow; keep openings free of any objects including dust, lint, clothing, fingers (and all parts of the body).
• Particularly keep hair away from openings and moving parts.
Electrical safety:
- Only use batteries and chargers supplied by Gtech.
- Never modify the charger in any way.
- The charger has been designed for a specific voltage. Always check that the mains voltage is the same as that stated on the rating plate.
A charger that is suitable for one type of battery pack may create a risk of fire when used with another battery pack; never use the charger with another appliance or attempt to charge this product with another charger.
- Before use, check the charger cord for signs of damage or ageing. A damaged or entangled charger cord increases the risk of fire and electric shock.
- Do not abuse the charger cord.
- Never carry the charger by the cord.
- Do not pull the cord to disconnect from a socket; grasp the plug and pull to disconnect.
- Don't wrap the cord around the charger when storing.
- Keep the charger cord away from hot surfaces and sharp edges.
- The supply cord cannot be replaced. If the cord is damaged the charger should be discarded and replaced.
- Do not handle the charger or the appliance with wet hands.
- Do not store or charge the appliance outdoors.
- The charger must be removed from the socket before removing the battery, cleaning or maintaining the appliance.
- Ensure the Multi is off before connecting or disconnecting the motorised brush bar.
Battery safety:
- This appliance includes Li-Ion batteries; do not incinerate batteries or expose to high temperatures, as they may explode.
- Liquid ejected from the battery may cause irritation or burns.
• In an emergency situation contact professional help immediately!
- Leaks from the battery cells can occur under extreme conditions. Do not touch any liquid that leaks from the battery. If the liquid gets on the skin wash immediately with soap and water. If the liquid gets into the eyes, flush them immediately with clean water for a minimum of 10 minutes and seek medical attention. Wear gloves to handle the battery and dispose of immediately in accordance with local regulations.
- Shorting the battery terminals may cause burns or fire.
- When the battery pack is not in use, keep it away from paper clips, coins, keys, nails, screws or other small metal objects that could make a connection from one terminal to another.
- When you dispose of the appliance remove the battery and dispose of the battery safely in accordance with local regulations.
Service:
- Before using the appliance and after any impact, check for signs of wear or damage and repair as necessary.
- Do not use the appliance if any part is damaged or defective.
- Repairs should be carried out by a service agent or a suitably qualified person in accordance with relevant safety regulations. Repairs by unqualified persons could be dangerous.
- Never modify the appliance in any way as this may increase the risk of personal injury.
- Only use replacement parts or accessories provided or recommended by Gtech.
Intended use:
• This appliance has been designed for domestic dry vacuum cleaning only.
- Do not pick up liquids or use on wet surfaces.
- Do not pick up anything that is flammable, burning or smoking.
- Use only as described in this manual.
- Don't use on concrete, tarmacadam or other rough surfaces.
- The brush bar may damage certain floor surfaces. Before vacuuming flooring, rugs or carpets, check the flooring manufacturer's recommended cleaning instructions.
- May damage delicate fabrics or upholstery. Care should be taken on loose-weave carpets and coverings or where there are loose threads. If in doubt please test on an inconspicuous area first.
- The Gtech AirRAM has been designed to clean a wide variety of floor surfaces without the need to change settings. However some surfaces such as delicate loose-pile rugs or carpets, tasselled rug edges or damaged carpets with exposed threads are not suitable for cleaning with a rotary brush.
- The AirRAM and Multi have a constantly rotating brush bar. Never leave the cleaning head in one spot for an extended period of time as this may damage the floor surface.
WARNING:
- Do not use water, solvents, or polishes to clean the outside of the appliance; wipe clean with a dry cloth.
- Never immerse the unit in water and do not clean in a dish washer.
- Never use the appliance without the filter fitted.
- Ensure the battery is removed before changing tools.

natural_image
Portrait of a smiling man in a striped shirt (no text or symbols visible)Thank you for choosing the Gtech System
"I started Gtech to create sensible, easy to use products that do a great job. Your opinion is important to us and we'll use your feedback to improve our products and services, and to let other people know what it's like to be part of the Gtech family."
Nick Grey – Inventor, owner of Gtech
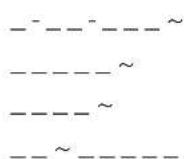
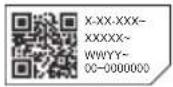
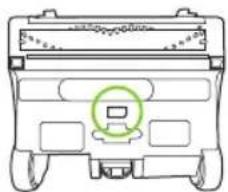
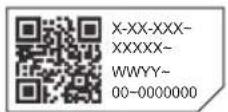
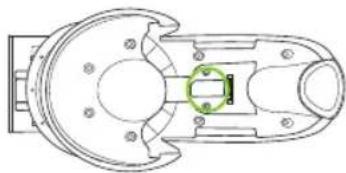
Make a note of both your product's serial number codes for future reference. You can find them on the underside of the AirRAM and the underside of the Multi once the battery has been removed.
natural_image
Front view of a vehicle chassis with a green circular marker indicating a location or feature (no text or symbols present)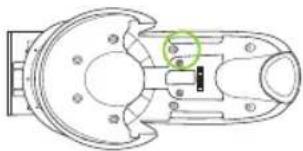
natural_image
Technical line drawing of a mechanical component with no visible text or symbolsWhat's in the box
natural_image
Line drawing of a portable appliance with a top panel and side compartments (no text or symbols)9
natural_image
Technical line drawing of a mechanical tool with two views: top shows a handle and base, bottom shows a flat sheet (no text or symbols)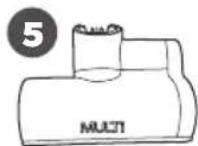
8
AirRam
1 Head full assembly
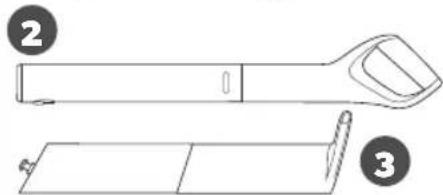
2 Upper handle
3 Lower handle
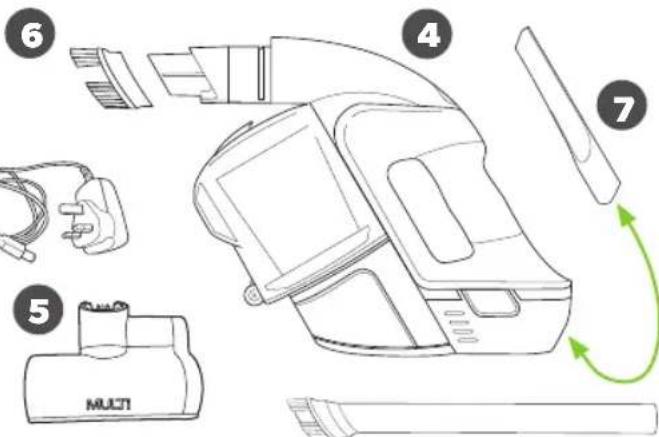
MULTi
4 Multi main unit
5 Power brush
6 Dusting brush
7 Crevice tool (stored inside the handle)
8 Extension tube
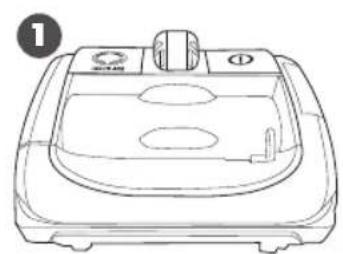
9 Charger (shared)
AirRAM: Assembly
natural_image
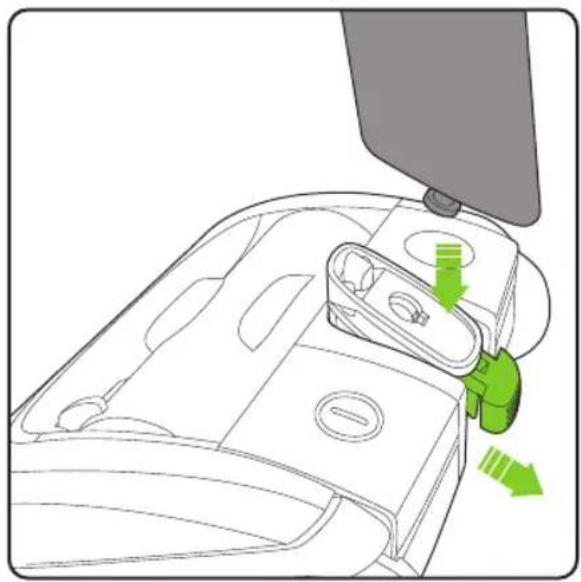
Diagram of a car interior showing a valve mechanism with green directional arrows indicating movement or force (no text or symbols present)To attach the lower handle to the head assembly, insert the metal pin on the lower handle into the hole located on the pivot yoke. Make sure the green locking clip is pulled out to allow the lower handle to fit.
natural_image
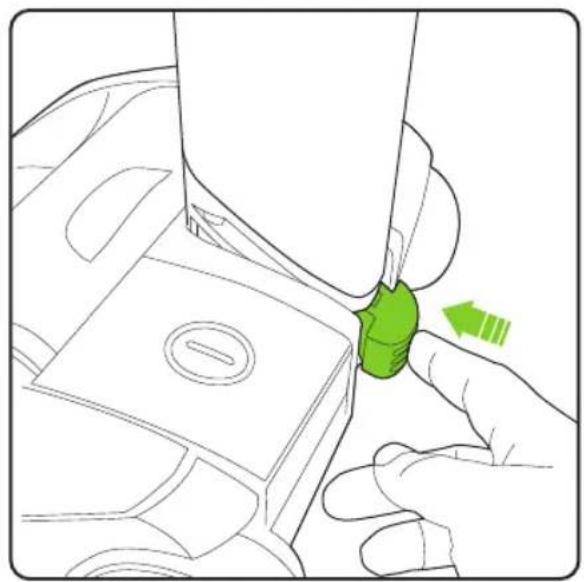
Line drawing of a hand holding a green plastic clip on a mechanical component (no text or symbols)Ensure the lower handle is sitting completely flush against the yoke. Then push the green locking clip into the back of the head.
natural_image
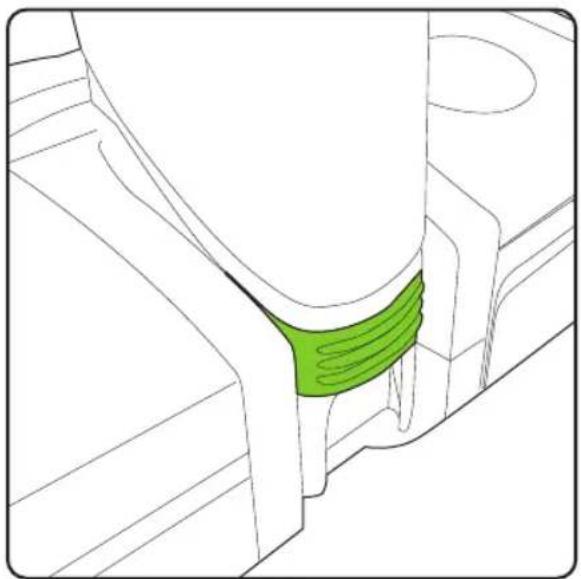
Technical line drawing of a mechanical component with a green highlighted section (no text or symbols)The green locking clip, when correctly fitted, will click and hold the lower handle in place. Should the handle assembly need to be removed the clip can be pulled out to unlock the lower handle.
The green locking clip remains permanently attached to the head assembly.
natural_image
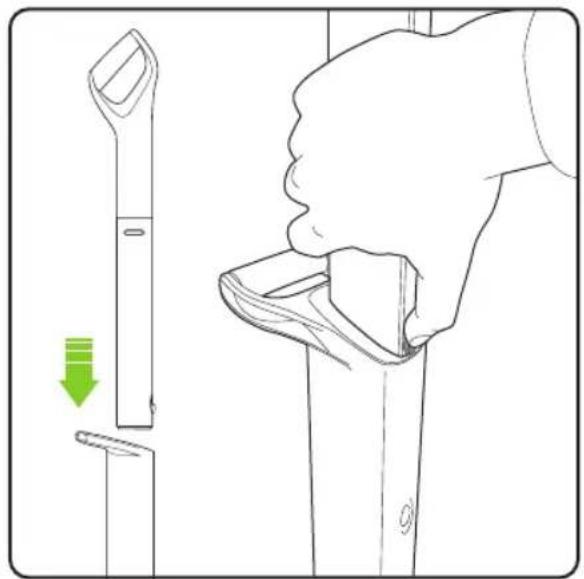
Line drawing of a hand gripping a tool, with a green arrow indicating the downward motion (no text or symbols present)Insert the upper handle into the lower handle. You will need to press the button on the upper handle to fit it in.
Once it slides down you will hear it click into place.
Storage
natural_image
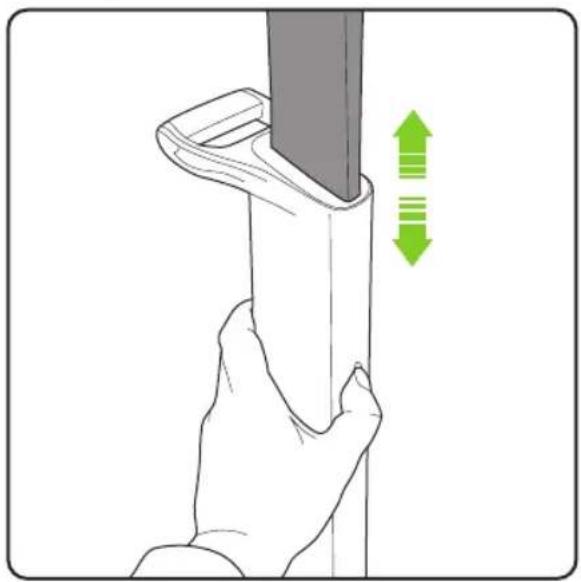
Illustration of a hand holding a cylindrical object with a green double-headed arrow indicating vertical motion (no text or symbols)To stow or extend the upper handle simply press the button on the lower handle to unlock the upper handle.
The upper handle will now slide up or down depending on required position.
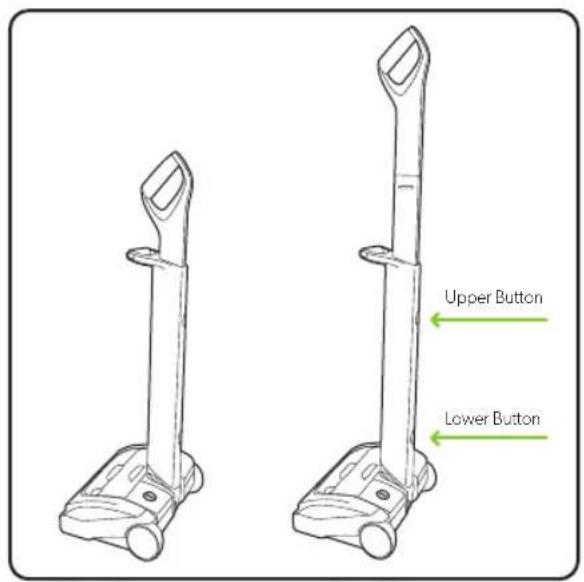
The upper handle can be set in two positions: Lowered for storage and raised for use. To lower the handle, release the upper button. To raise the handle from the stored position, release the lower button.
Operation
natural_image
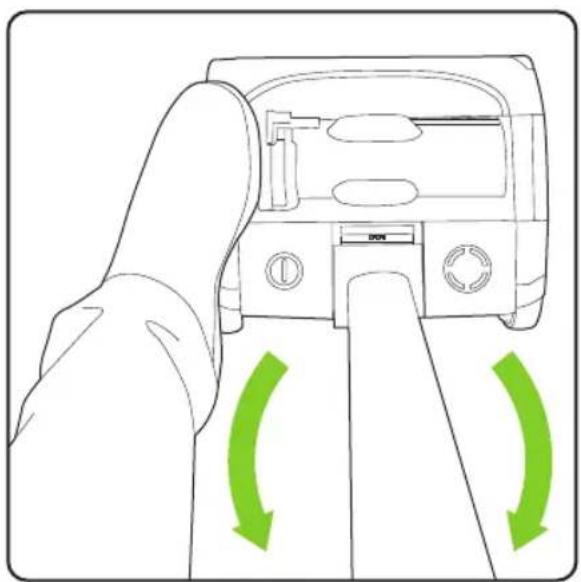
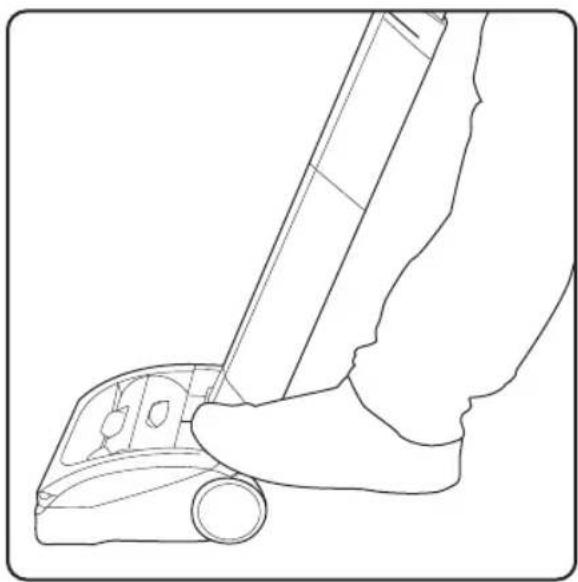
Line drawing of a hand pressing down on a device with green directional arrows indicating rotation (no text or symbols)Without pressing the power button, place your foot on the left side of the AirRAM head and pull the handle back.
natural_image
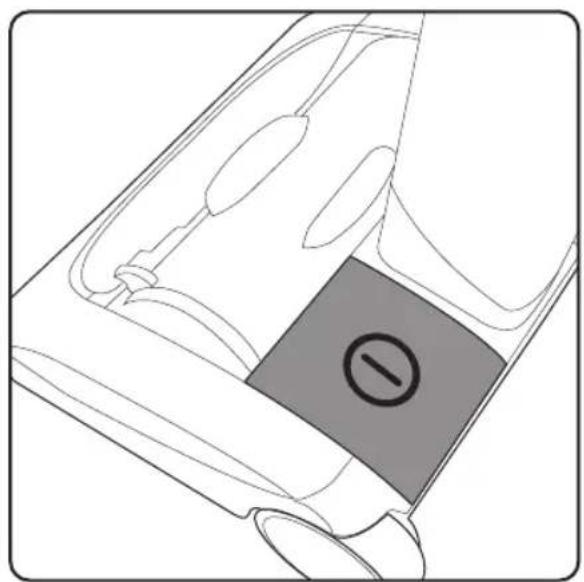
Diagram of a car interior with a highlighted circular component (no text or symbols)The power button is located on the left hand side of the AirRAM head assembly.
natural_image
Line drawing of a hand using a tool to lift a small object (no text or symbols)Press the power button with your foot to turn the AirRAM on.
Battery charging
natural_image
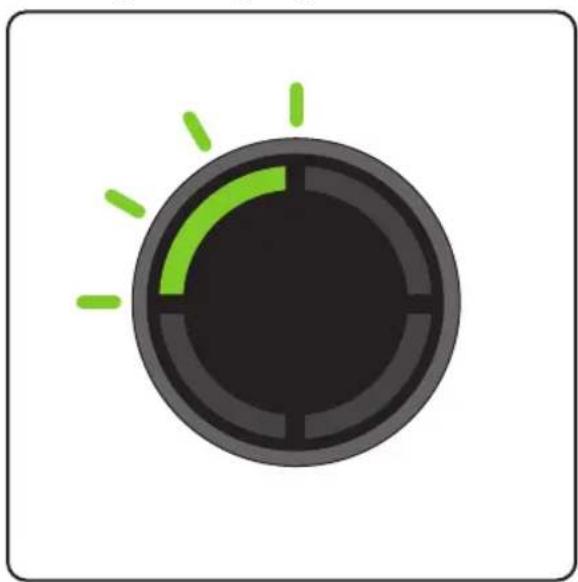
Circular icon with a green arc and light rays, no text or symbols present.When the state of charge indicator starts to flash one green LED, recharge the battery.
natural_image
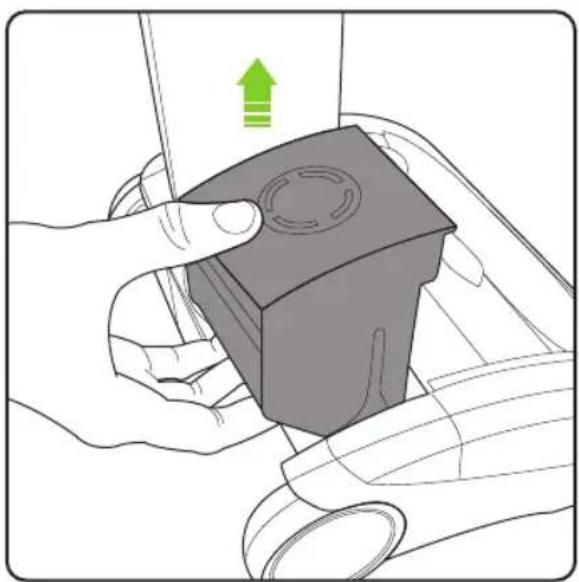
Illustration of hands holding a 3D-printed object with a green upward arrow, no text or symbols presentThe battery can be charged whilst it's in the AirRAM, or when it's off the product. To remove the battery, squeeze the latch underneath and pull upwards.
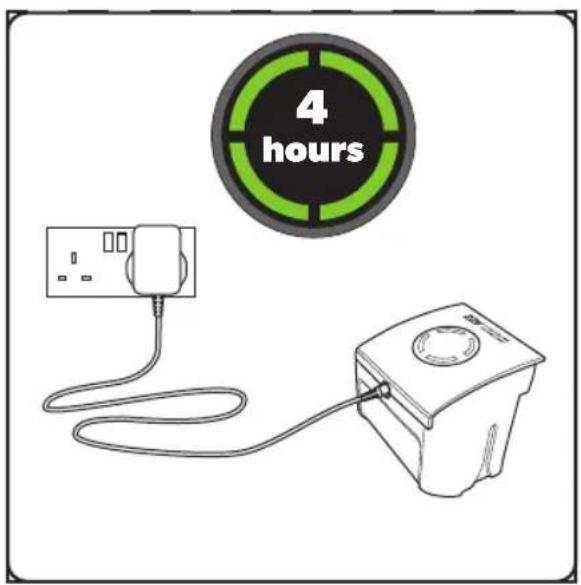
Plug the charger into the mains and connect it to the battery. Switch on at the mains. The battery can be charged from flat in 4 hours. The state of charge indicator will show 4 solid green lights when it is charged.
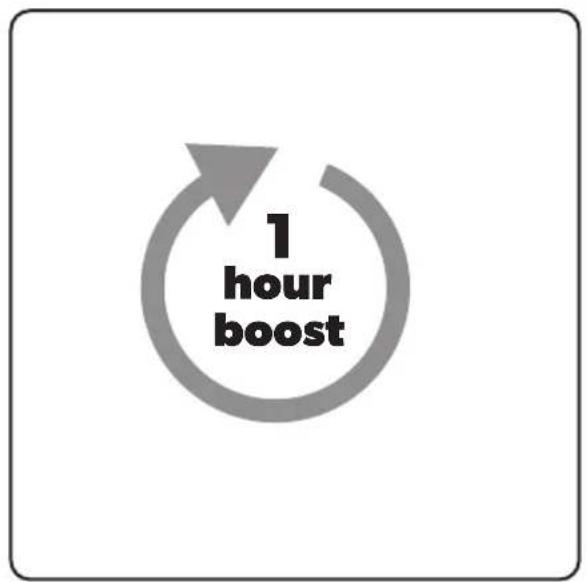
It is OK to charge for 1 hour for a burst of cleaning.
natural_image
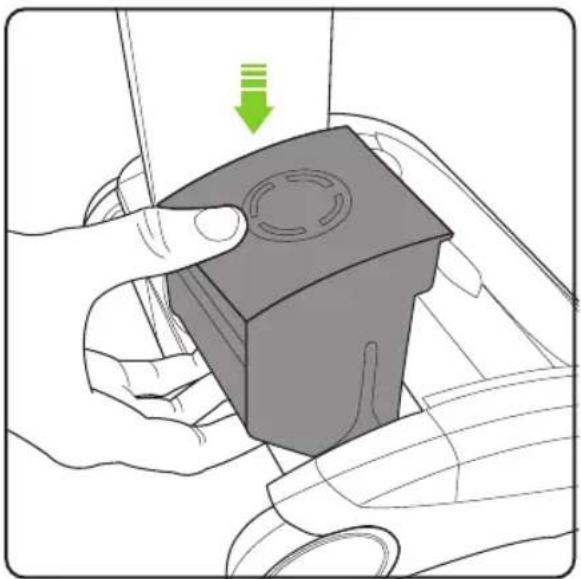
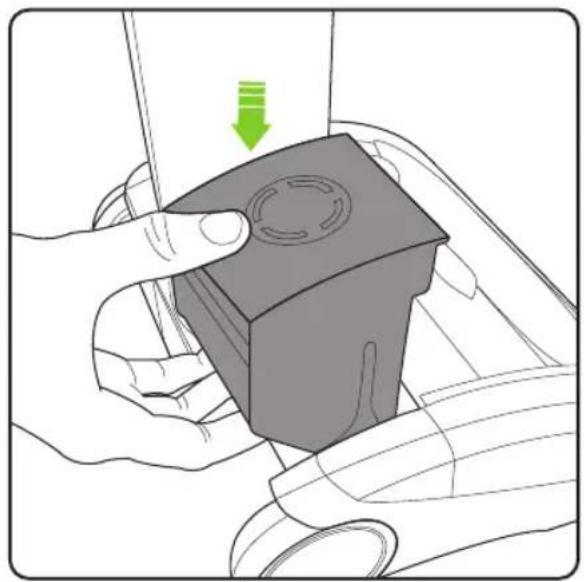
Illustration of a hand holding a small mechanical component with a green arrow indicating downward motion (no text or symbols)Replace the battery by sliding it down into the head assembly. It will click into place.
State of Charge
pie
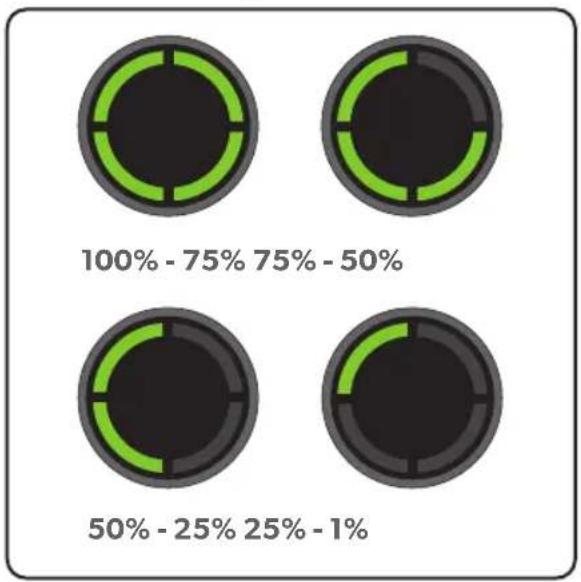
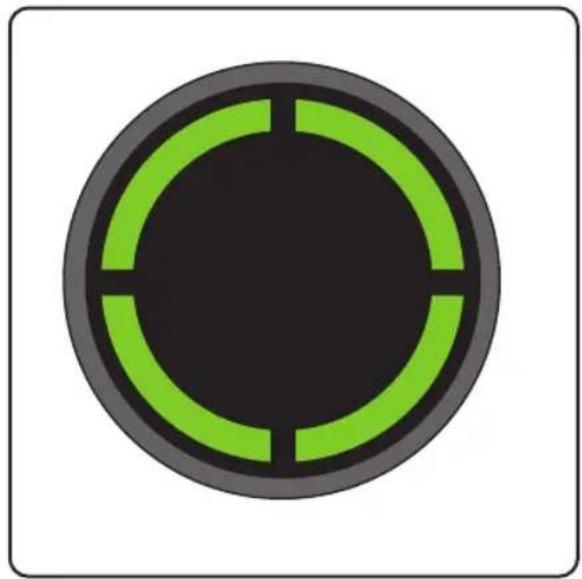
| Range | Percentage | |---|---| | 100% - 75% | 75% - 50% | | 50% - 25% | 25% - 1% |The battery state of charge indicator shows how much charge the AirRAM has. As you use the product, the green lights will turn off in a downwards direction.
natural_image
Circular diagram with green and black segments, no text or symbols presentWhile the battery is on charge, the LEDs will pulsate and in turn illuminate. When the battery is fully charged all of the LEDs will be solid green.
Emptying the bin
natural_image
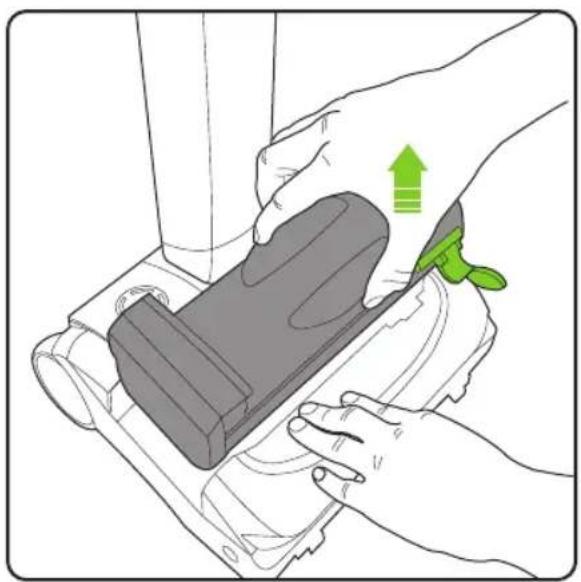
Illustration of hands using a device to adjust or install a component, with a green arrow indicating the process (no text or symbols present)Holding onto the AirRAM with one hand, pull the bin handle and lift the bin out of the AirRAM.
natural_image
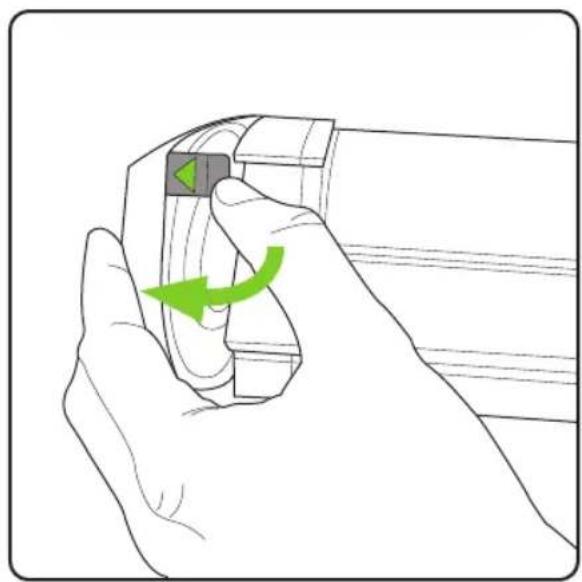
Illustration of a hand holding a device with a green arrow indicating rotation (no text or symbols)Lift and release the latch marked with the green arrow, to pull open the lid.
natural_image
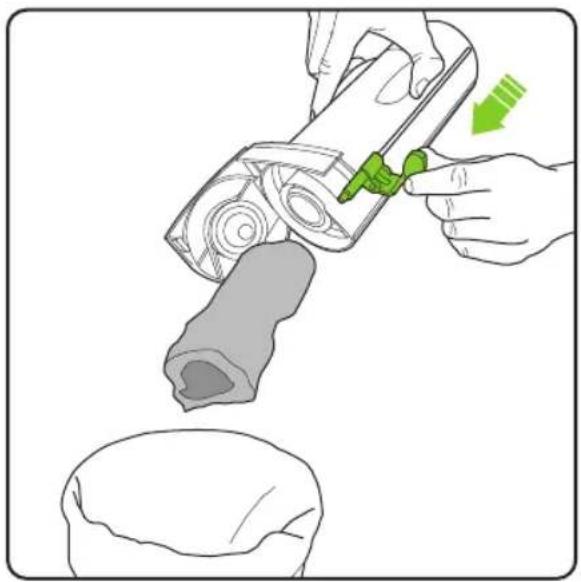
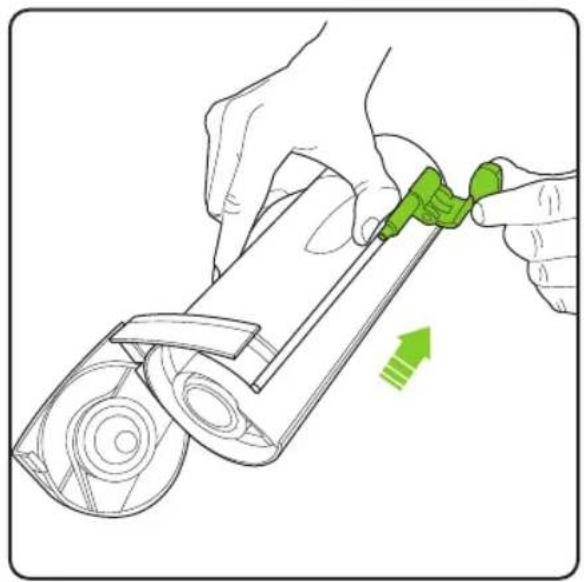
Illustration of a hand using a tool to adjust or install a mechanical component, with no visible text or symbols.Hold the AirRAM's bin over a rubbish bin and push the green lever towards the lid to empty the dirt.
natural_image
Illustration of hands using a tool to adjust or install a mechanical component, with a green arrow indicating the motion (no text or symbols present)Pull the green lever back towards the bottom of the bin. Close the bin lid and reinsert the bin into the AirRAM.
Cleaning the filters - do this once a month or more frequently depending on use.
natural_image
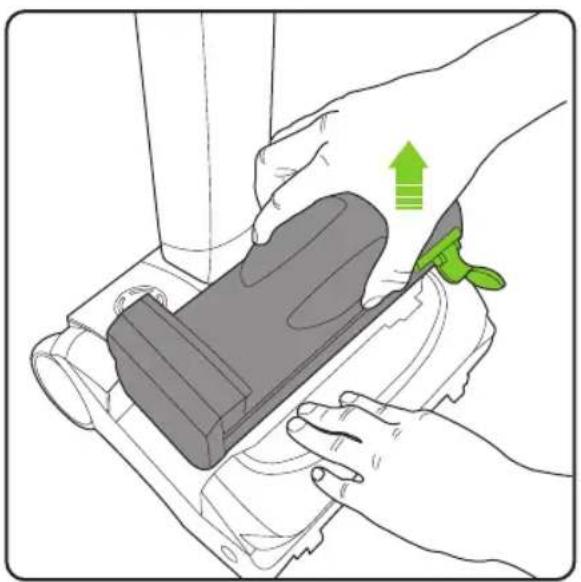
Illustration of hands using a cleaning tool to clean or adjust a mechanical component (no text or symbols visible)Holding onto the AirRAM with one hand, pull the bin handle and lift the bin out of the AirRAM.
natural_image
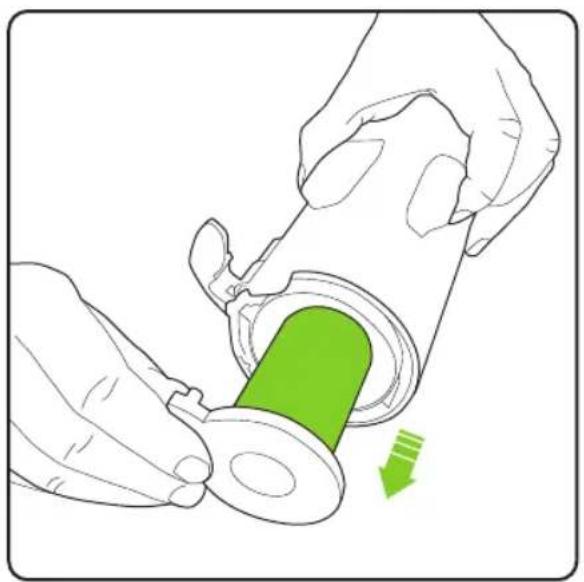
Illustration of hands using a tool to adjust a green cylindrical component into a plastic housing (no text or symbols)Pull the filter out of the filter housing. Tap the dirt from the filter and tip any dirt from the filter housing. Wash the filter if necessary.
natural_image
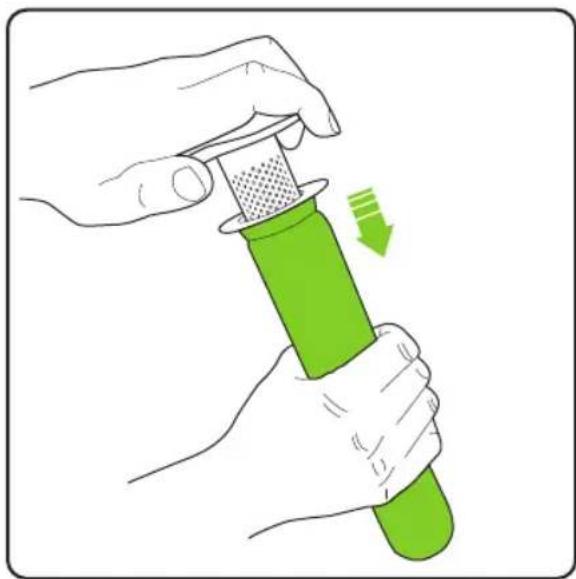
Illustration of hands using a green tool to press or adjust a green object, with a downward arrow indicating motion (no text or symbols)Remove the filter from the inner shroud, by twisting and pulling.
Tap the inner shroud over a bin to remove any excess dirt.
natural_image
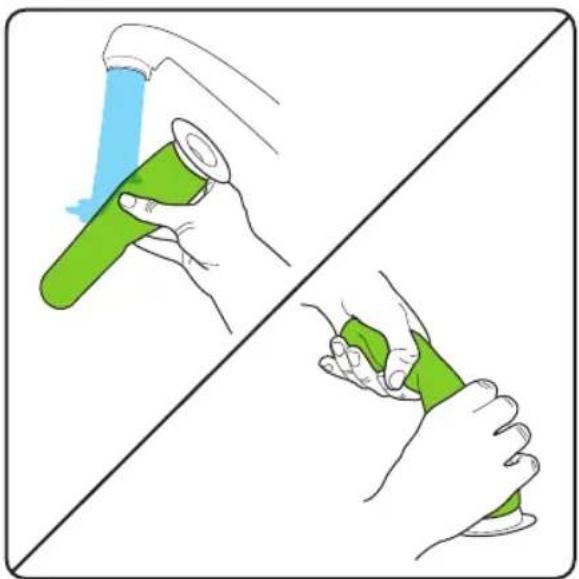
Illustration showing two hands holding green test tubes, one with a blue tool and the other with a green bandage (no text or symbols)Wash the filter under a tap. Squeeze out any excess water then let it dry completely before reinserting into the AirRAM.
Recommended water temperature 40°C. Do not use detergent or soaps. Never put the bin back without filter inside. You could damage the motor.
Replacing the filters
natural_image
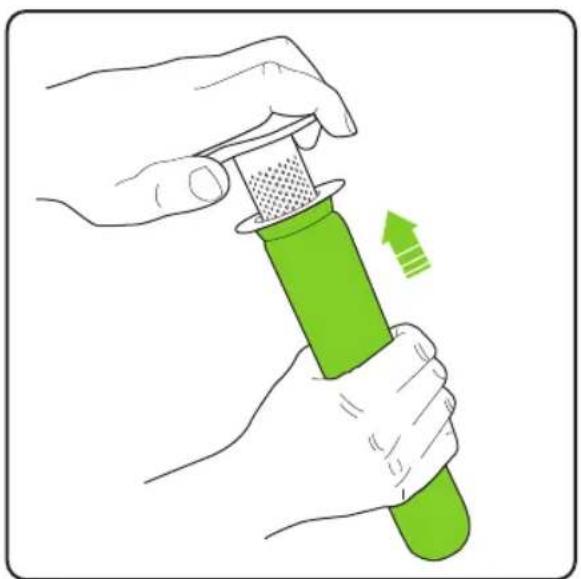
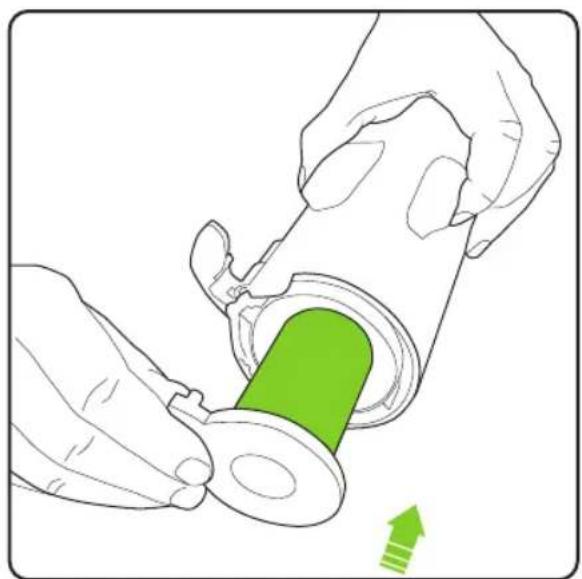
Illustration of hands using a green tool to press or adjust a component, with an arrow indicating motion (no text or symbols present)Slide the filter onto the inner shroud. Slide the filter and inner shroud into the filter housing.
natural_image
Illustration of hands installing a green cylindrical component into a plastic housing (no text or symbols)Removing and cleaning the brush bar
natural_image
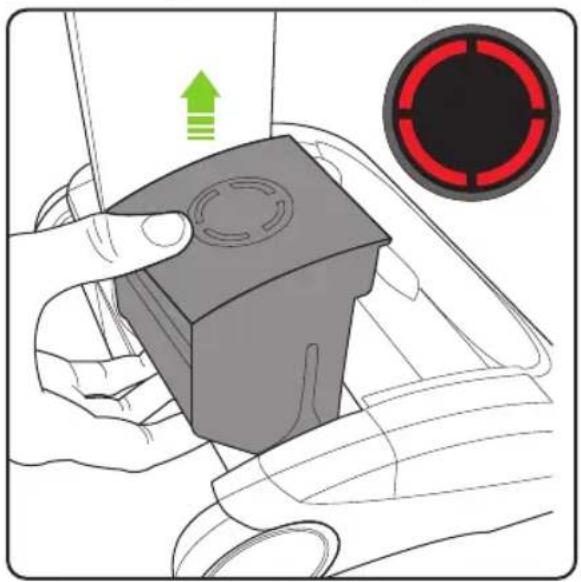
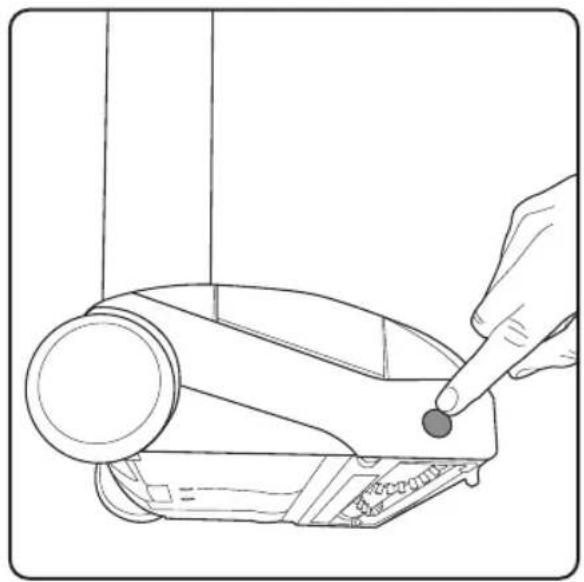
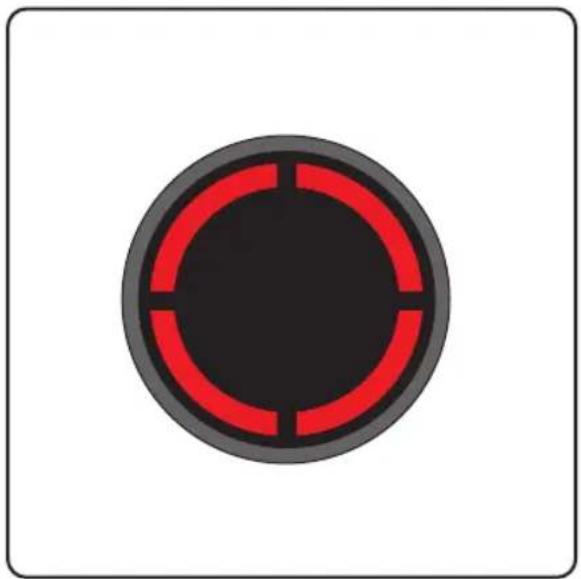
Illustration of a hand pressing a button on a vehicle's side panel, with a circular indicator showing green and red arrows (no text or symbols)If the brush bar jams during use, the AirRAM will stop and the LEDs will appear red. Before checking for a blockage, remove the battery.
natural_image
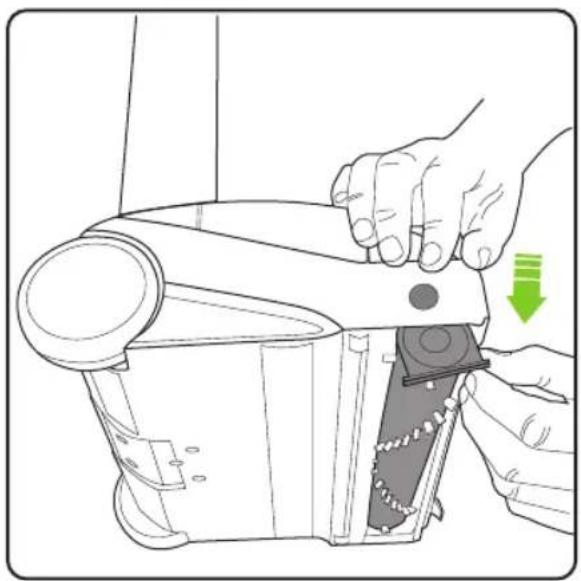
Line drawing of a hand using a stylus to press or install a device component (no text or symbols present)Rest the AirRAM on its side and locate the brush bar button on the right hand side. Press the button inwards and then pull the brush bar out from the bottom of the AirRAM.
natural_image
Illustration of a hand using a sewing machine to adjust or install a component, with a green arrow indicating the process (no text or symbols present)The brush bar can now be removed, starting at the button end.
natural_image
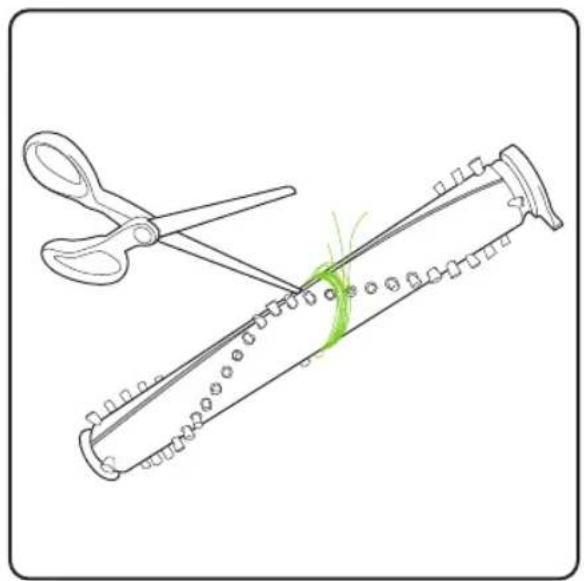
Illustration of a syringe being cut with scissors, showing blade and ring structure (no text or symbols)To remove hair from the brush bar, run an open pair of scissors down the groove to cut the hair, then pull it out.
natural_image
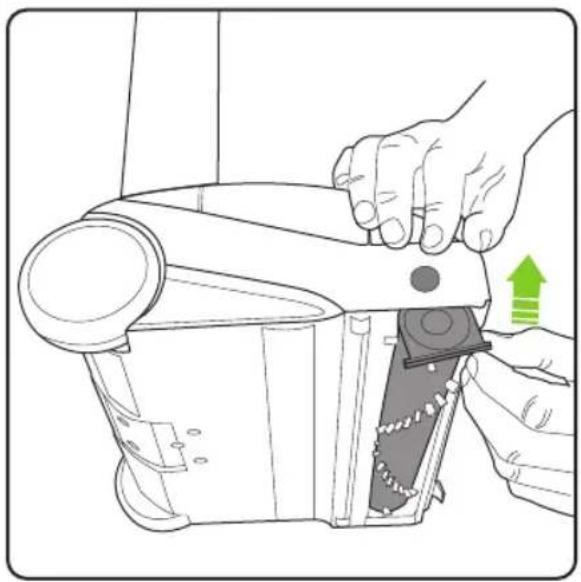
Illustration of a hand using a tool to adjust or install a device component, with a green arrow indicating the process (no text or symbols present)Re-insert the brush bar, starting by the end furthest away from the button. Then line up and push the brush bar into the AirRAM until it clicks into place.
natural_image
Illustration of a hand holding a small mechanical component with a green arrow indicating downward motion (no text or symbols)Replace the battery by sliding it down into the head assembly. It will click into place.
Clearing a jam / fault
natural_image
Circular mechanical component with red and black segments, no text or symbols visibleIf the brush bar jams during use, the AirRAM will stop and the LEDs will appear red. You will need to remove and clean the brush bar (see page 11).
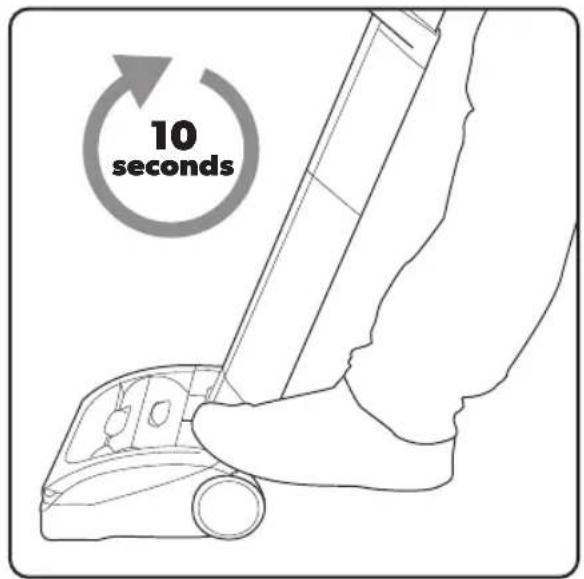
The AirRAM will not re-start until the red lights go out. This will take ten seconds.
If the problem persists, follow the troubleshooting instructions below.
Product Care
Your Gtech AirRAM doesn't need much maintenance: keep the filters clean, keep the brush bar tangle-free and charge the battery. Wipe it with a dry cloth if it gets dirty, including under the bin.
Troubleshooting
| AirRAM is not cleaning well 1. Empty the bin2. Check bin is correctly fitted3. Check filter is correctly fitted4. Clean and/or replace filter5. Check brush bar fitment |
| AirRAM has stopped or won’t work 1. Charge battery2. Clear debris from brush bar |
| Battery will not charge 1. Check the charger is correctly connected to the battery and mains supply2. Check wall socket |
Product Support
If these initial tips don't solve your problem, we have various other ways to help.
Visit: www.gtech.co.uk/support




support@gtech.co.ukLive chat supportOnline How to Videos
AIRRAM TECHNICAL SPECIFICATION
| Battery model 103A022 | |
| Battery 22V 2000mAh Li-Ion | |
| Charging period 4 hours | |
| Battery charger output 27V DC 500mA | |
| Weight 3.2kg | |
14
Multi: Operation
natural_image
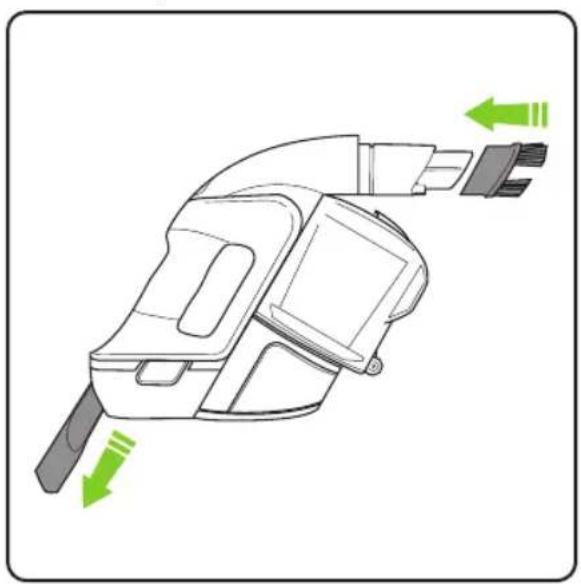
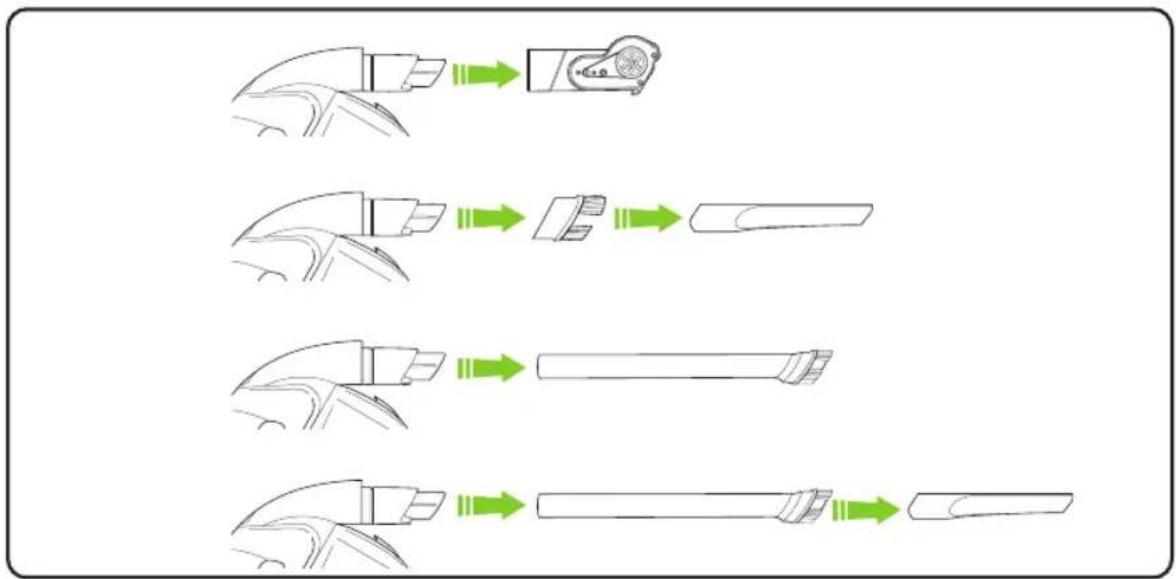
Diagram of a handheld device with directional arrows indicating movement or force (no text or symbols)The dusting brush can be slotted onto the active nozzle. The crevice tool is stored on board the product for easy access.
natural_image
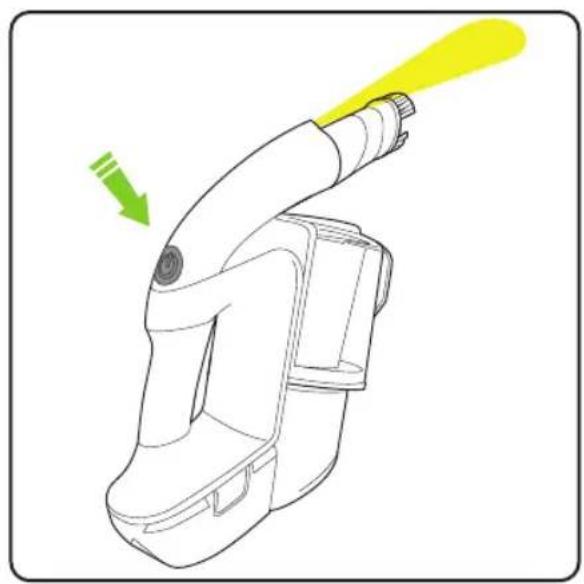
Line drawing of a handheld device with a yellow-orange lever and green arrow indicating direction (no text or symbols)Press the button above the handle to turn the Multi on and off.
flowchart
graph TD
    A["Tool with circular head"] --> B["Component with green arrows"]
    C["Arrowheads on blade"] --> D["Arrowheads on blade"]
    E["Arrowheads on blade"] --> F["Arrowheads on blade"]
An active nozzle is built into your Multi. The dusting brush, crevice tool, extension tube and power brush all attach to the active nozzle.
Power brush
natural_image
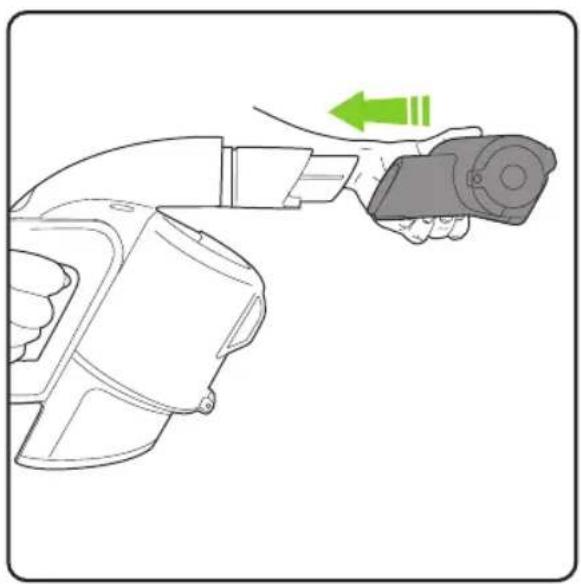
Line drawing of a hand holding a camera with an arrow indicating left motion (no text or symbols)Make sure the terminals on the Power Brush and Active nozzle are correctly lined up and gently push the Power brush onto the Active nozzle. The battery should be removed when changing attachments.
natural_image
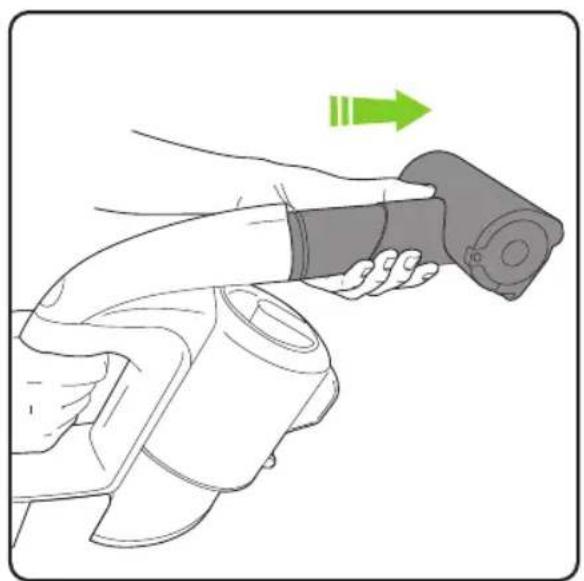
Illustration of a hand holding a handheld device with a green arrow indicating direction (no text or symbols)Gently pull the Power Brush from the Multi to remove. The battery should be removed when changing attachments.
natural_image
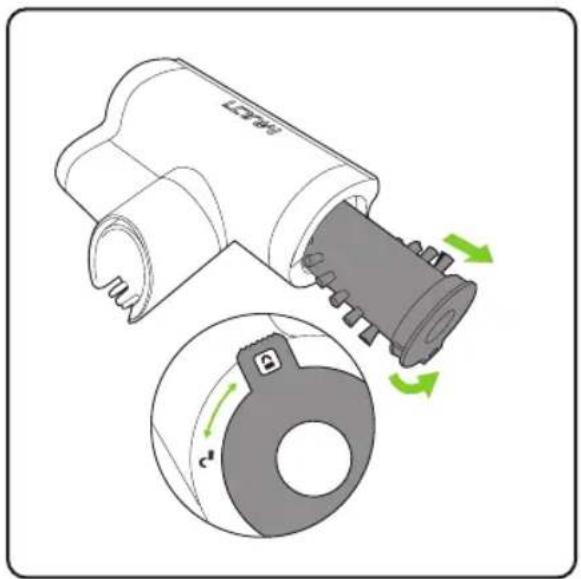
Diagram of a device with green arrows indicating rotation or adjustment, showing mechanical components and a circular inset view (no text or symbols)To clean the brush bar, first remove the power brush. Rotate the latch from the lock to the unlock position and pull out the brush bar.
natural_image
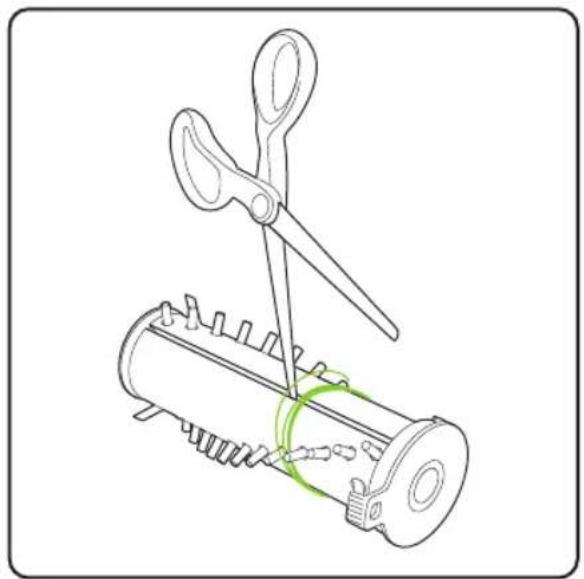
Diagram of a tool cutting into a cylindrical mechanical component with a green circular highlight (no text or symbols)To remove hair from the brush bar, run an open pair of scissors down the groove to cut the hair, then pull it out. Never operate the power brush without the brush bar in.
Battery charging
natural_image
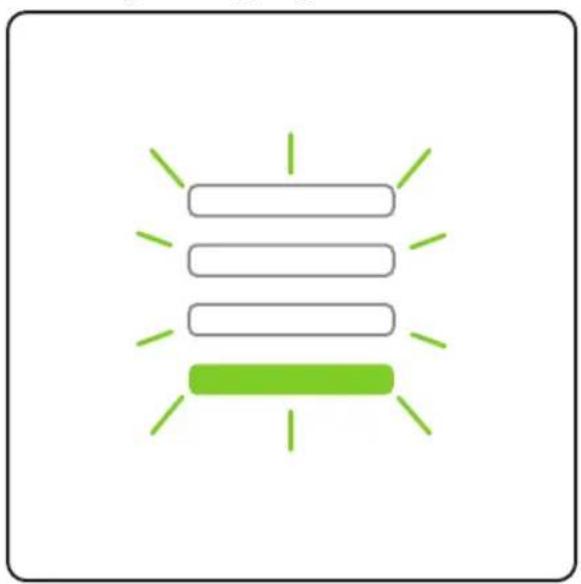
Simple diagram with three horizontal bars and green arrows, no text or symbols presentWhen a single green light flashes, recharge the battery.
natural_image
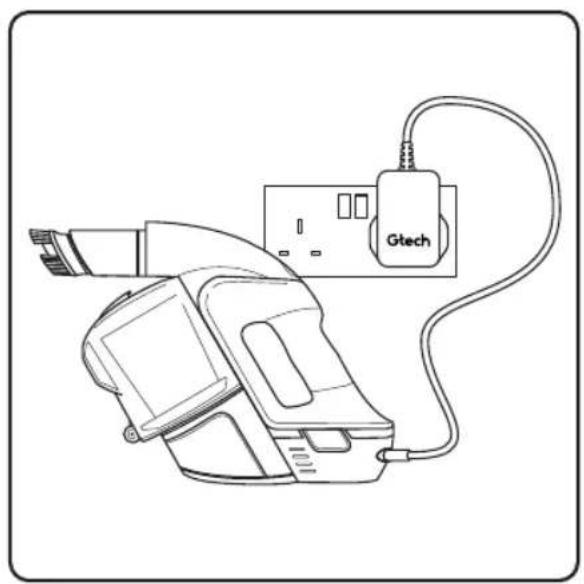
Line drawing of a mobile phone connected to a Gtech device (no text or symbols on device body)The battery can be charged on or off the main unit

After 4 hours, the LEDs turn solid green and charging is complete.
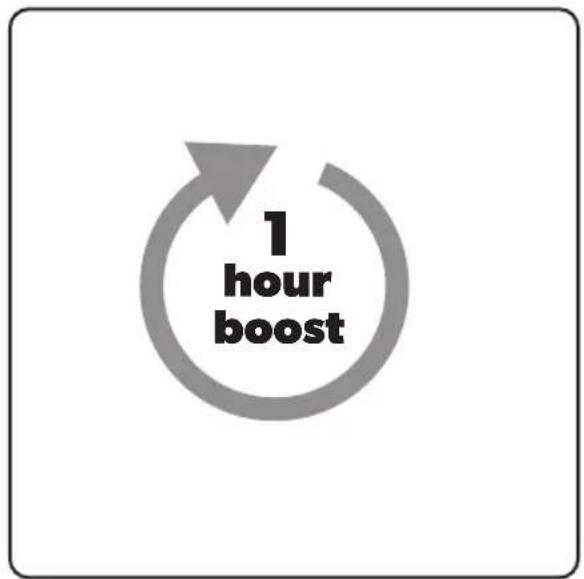
It is OK to charge for 1 hour for a burst of cleaning.
State of Charge
bar
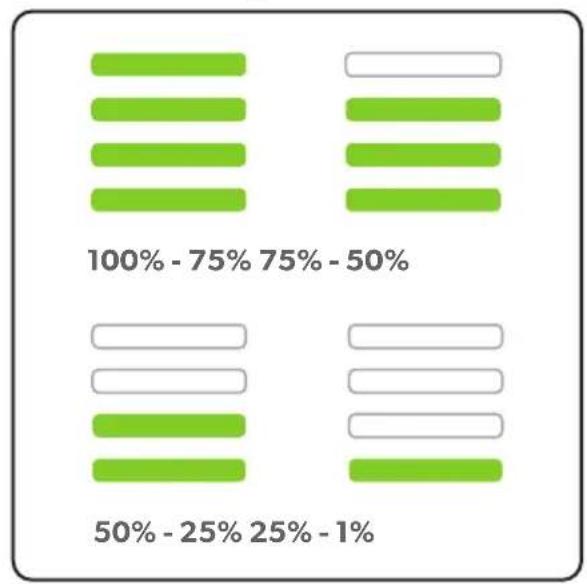
| Range | Green Bar (%) | White Bar (%) | |---|---|---| | 100% - 75% | 25 | 30 | | 75% - 50% | 25 | 30 | | 50% - 25% | 25 | 30 |The battery state of charge indicator shows how much charge the Multi has. As you use the product, the green lights will turn off in a downwards direction.
natural_image
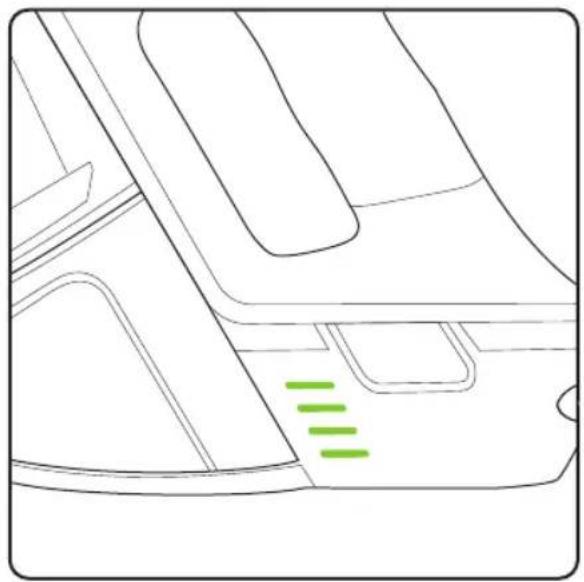
Line drawing of a car interior with three green horizontal lines indicating specific areas (no text or symbols)While the battery is on charge, the LEDs will pulsate and in turn illuminate. When the battery is fully charged all of the LEDs will be solid green.
Emptying the bin
natural_image
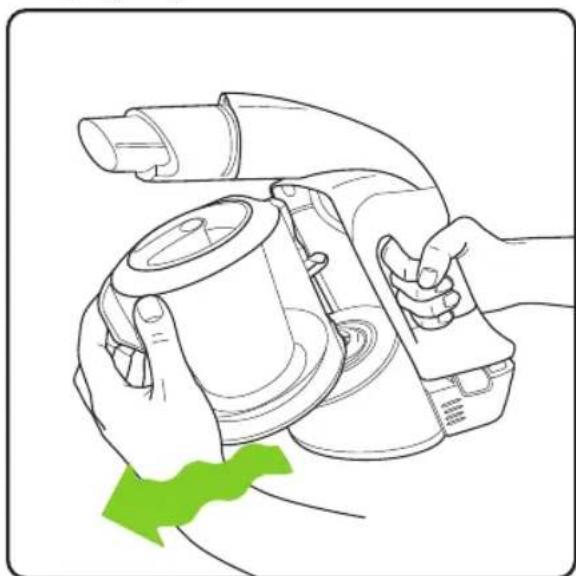
Line drawing of hands operating a portable device with a green arrow indicating the action (no text or symbols present)There's no latch, the bin just pulls off. It's easier if you wiggle it as you pull it.
natural_image
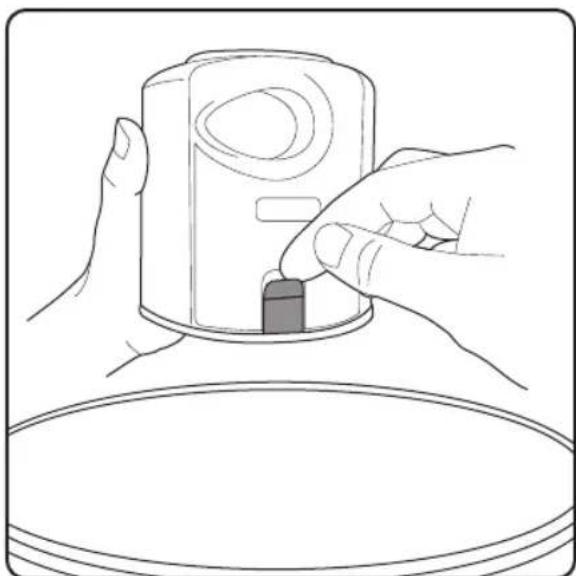
Line drawing of hands holding a camera lens on a plate (no text or symbols)Hold the Multi's bin over a rubbish bin and release the latch to empty the dirt. A gentle tap will help. Remove the filter and tap off the excess debris each time you empty the bin.
Cleaning the filter
natural_image
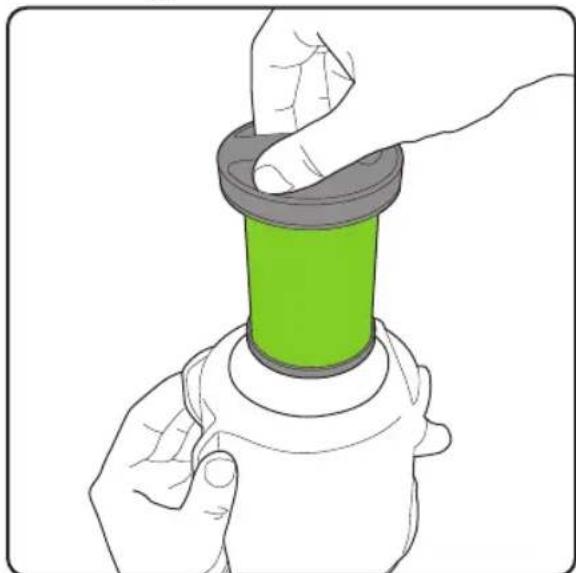
Illustration of hands holding a green cylindrical object with a black lid, no text or symbols presentRemove the filter by pulling it from the top of the bin. Tap the dirt from the filter and tip any dirt from the filter housing. Wash the filter if necessary.

natural_image
Illustration of two hands holding green plastic cups with liquid, one pouring blue liquid from a spool (no text or symbols)Wash the filter under a tap, squeeze it out then let it dry completely before using it. Recommended water temperature 40°C. Do not use detergent or soaps. (You can buy more at www.gtech.co.uk) Never put the bin back without the filter inside. You could damage the motor. 19
If the suction is low when the bin is empty and filter is clean...
natural_image
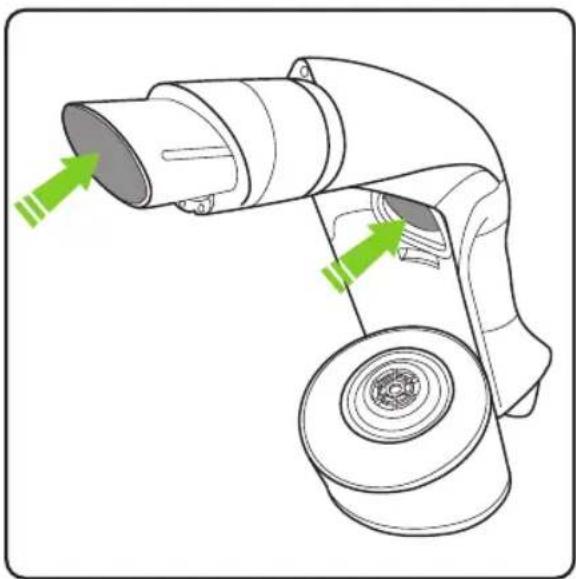
Diagram of a handheld device with green arrows indicating directional flow or movement (no text or symbols)...you have a blockage. Remove the battery & bin and look through both ends of the tube. Remove any blockages.
natural_image
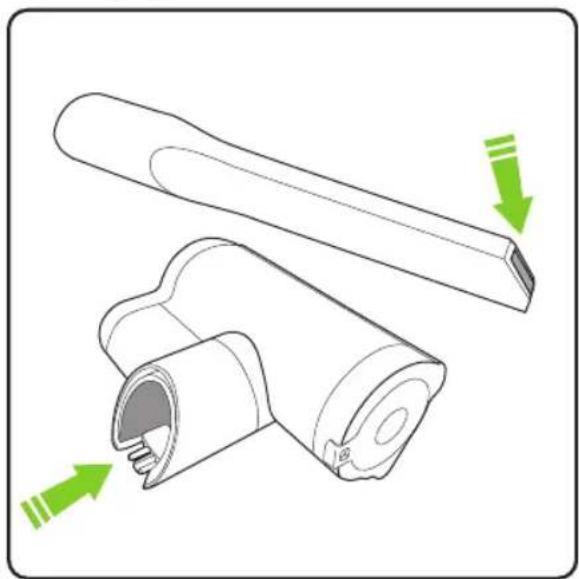
Technical illustration of a mechanical component with green arrows indicating direction (no text or symbols)The tools can block too, sometimes.
Removing the battery
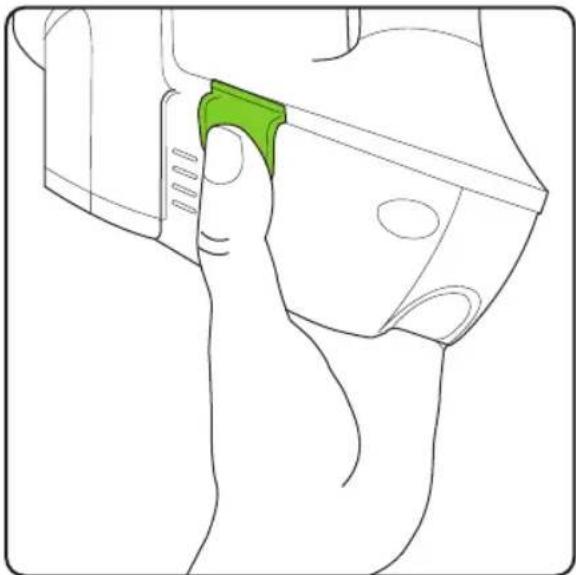
natural_image
Line drawing of a hand holding a green plastic clip, no text or symbols presentPress the green buttons and pull to remove the battery. The battery can be charged on or off the main unit. If you want to buy a spare battery go to www.gtech.co.uk or call 01905 345891 20
Product Care
Your Gtech Multi doesn't need much maintenance: keep the filter clean, check for blockages, remove hair from the brushbar and charge the battery. Wipe it with a dry cloth if it gets dirty, including the area under the bin. Never wash it with liquid, run it under a tap or use it without the filter.
Troubleshooting
| Multi is not cleaning well 1. Empty the bin | 2. Clean the holes in the filter housing3. Wash the filter4. Check for blockages5. Remove hair from brushbar |
| Multi has stopped or won’t work 6. Charge the battery (check the socket works and is turned on)7. It might be blocked– check items 1 to 4 above | |
| 4 red lights displayed on battery 8. Brush bar jammed.9. Turn off Multi, remove the battery and clear the blockage. |
Product Support
If these initial tips don't solve your problem, we have various other ways to help.
Visit: www.gtech.co.uk/support




support@gtech.co.ukLive chat supportOnline How to Videos
GTECH MULTI TECHNICAL SPECIFICATION
| Battery model 113A1003 | |
| Battery 22V 2000mAh Li-Ion | |
| Charging period 4 hours | |
| Battery charger output 27V DC 500mA | |
| Weight (with standard nozzle) 1.5kg | |
WARRANTY - REGISTRATION
Visit www.gtech.co.uk/warrantyregistration to register your product to ensure that we have all the information required to provide you with quick and efficient support.
You will need both your product's serial codes.
natural_image
Technical line drawing of a mechanical component with no visible text or symbols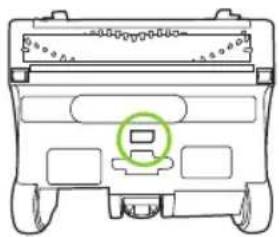
natural_image
Front view of a vehicle chassis with no visible text or symbolsIf you purchased directly from Gtech your details are already registered and your 2 year warranty will start automatically.
If you purchased from an authorised Gtech retailer, please register your warranty within 3 months and you will need to provide proof of purchase to support any claim against your warranty.
WARRANTY - TERMS AND CONDITIONS
Your Gtech Multi and AirRAM are guaranteed against material or manufacturing faults for 2 years from the date of purchase, subject to the following terms and conditions:

WHAT ISN'T COVERED SUMMARY
Gtech does not guarantee the repair or replacement of a product as a result of:
• Normal wear and tear (e.g. filters & brush bar)
- Accidental damage, faults caused by negligent use or care, misuse, neglect, careless operation or handling of the vacuum cleaner which is not in accordance with Gtech operating manual.
- Blockages - please refer to the Gtech operating manual for details of how to unblock your vacuum cleaner.
- Use of the vacuum cleaner for anything other than the normal domestic household purposes.
- Use of parts and accessories which are not Gtech genuine components.
• Repairs or alterations carried out by parties other than Gtech or its authorised agents.
- If you are in doubt as to what is covered by your guarantee, please call the Gtech Customer Care Helpline on 01905 345 891.
- The guarantee becomes effective at the date of purchase (or the date of delivery if this is later).
- You must provide proof of delivery/purchase before any work can be carried out on the vacuum cleaner. Without this proof, any work carried out will be chargeable. Please keep your receipt or delivery note.
- All work will be carried out by Gtech or its authorised agents.
- Any parts which are replaced will become the property of Gtech.
- The repair or replacement of your vacuum cleaner is under guarantee and will not extend the period of guarantee.
The symbol indicates that this product is covered by legislation for waste electrical and electronic products (EN2002/96/EC)
When the vacuum has reached the end of its life, it and the Li-Ion battery it contains should not be disposed of with general household waste. The battery should be removed from the vacuum and both should be disposed of properly at a recognised recycling facility.
Call your local council, via amenity site, or recycling centre for information on the disposal and recycling of electrical products. Alternatively visit www.recycle-more.co.uk for advice on recycling and to find your nearest recycling facilities.

Grey Technology Limited
Brindley Road, Warndon, Worcester WR4 9FB
email: support@gtech.co.uk
telephone: 01905 345891
www.gtech.co.uk
CPN4121


- AirRam
- Model number: AR29
- OPERATING MANUAL
- IMPORTANT SAFEGUARDS:
- IMPORTANT: READ ALL INSTRUCTIONS BEFORE USE. RETAIN INSTRUCTIONS FOR FUTURE REFERENCE.
- Personal Safety:
- Electrical safety:
- Battery safety:
- Service:
- Intended use:
- WARNING:
- Thank you for choosing the Gtech System
- What's in the box
- MULTi
- AirRAM: Assembly
- Removing and cleaning the brush bar
- Product Care
- Product Support
- If the suction is low when the bin is empty and filter is clean...
- Removing the battery
- Troubleshooting
- WARRANTY - REGISTRATION
- WARRANTY - TERMS AND CONDITIONS
- WHAT ISN'T COVERED SUMMARY
Brand : G-TECHNOLOGY
Model : Multi MK2 ATF036
Category : Vacuum Cleaner