Quartz Date - Watch Philip Watch - Free user manual and instructions
Find the device manual for free Quartz Date Philip Watch in PDF.


User questions about Quartz Date Philip Watch
0 question about this device. Answer the ones you know or ask your own.
Ask a new question about this device
Download the instructions for your Watch in PDF format for free! Find your manual Quartz Date - Philip Watch and take your electronic device back in hand. On this page are published all the documents necessary for the use of your device. Quartz Date by Philip Watch.
USER MANUAL Quartz Date Philip Watch
We thank you for the confidence that you have shown in us by choosing the Philip Watch brand. To enable you to use your watch to the best advantage, we recommend that you carefully read the instructions in this leaflet.
The movement of your Philip Watch will be clean every 2 years, the lady watch will be cleaned in shortest time.
If your watch will have some troubles, please contact an official Philip Watch dealer or an authorized Service Center.
PRECAUTIONS
For the models with a screw down crown, unscrew the crown before pulling it out, then set the watch as required. Screw the crown back down after use. Do not operate the crown and the push-buttons when the watch is in the water. To ensure that the watch is sealed, do not immerse it when the alarm switch is activated.
To ensure that the watch is sealed, always check that the crown is correctly tightened.
NOTE
When setting the hour (crown pulled by 1 notch or 2 depending on the model), the movement stops.
NOTE
If the second hand moves on by 2-4 seconds at a time, this may mean that the battery is almost flat. Have the watch checked by an official Philip Watch dealer.
8299040136imp
4-09-2007
9:25
Pagina 5
AUTOMATICO
text_image
PHILIP/WATCH 26A1 A2 A3
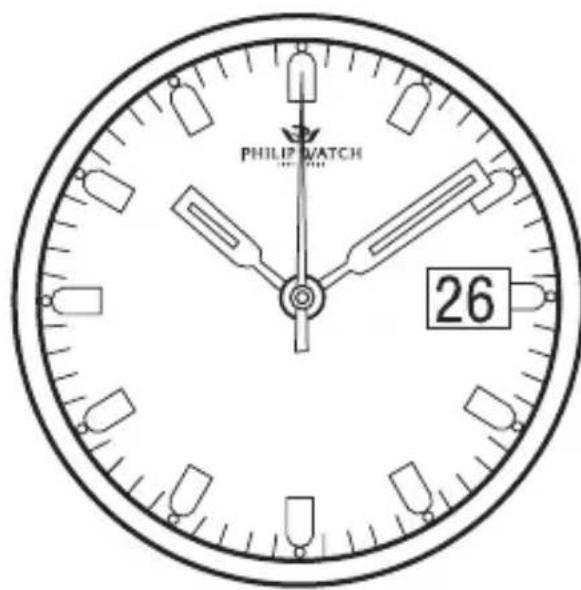
FUNCTIONS: hours, minutes and seconds.
Date at 3 o'clock.
HOUR ADJUSTEMENT: unscrew the crown, pull it out, position A3, rotate it clockwise to correct the hour.
DATE: unscrew the crown, pull it out to position A2, rotate it clockwise, every click to the crown corresponds to one day (1-31).
ATTENTION: do not correct the date during the time period between 10 p.m. and 3 a.m.
GMT AUTOMATICO
text_image
1 2 3 4 10 20 21 22 23 24 1 2 3 14 1 2 3Funzioni
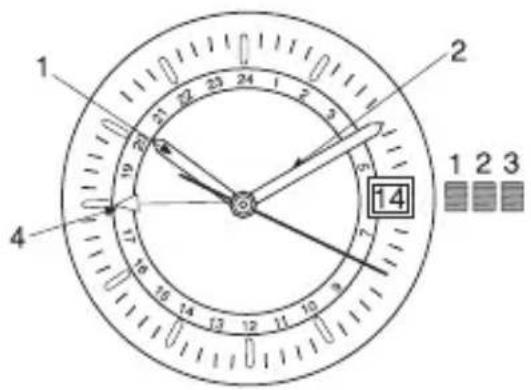
Display of local time (for instance Reykjavik 10 p.m.) by means of hour (1) and minute (2) hand; a second time zone (for instance New York 6 p.m.) can be selected by means of the additional hand (4), which completes one revolution in 24 hours.
1 Normal position
2 Date correction
3 Hands setting
CRONOGRAFO
AUTOMATICO
text_image
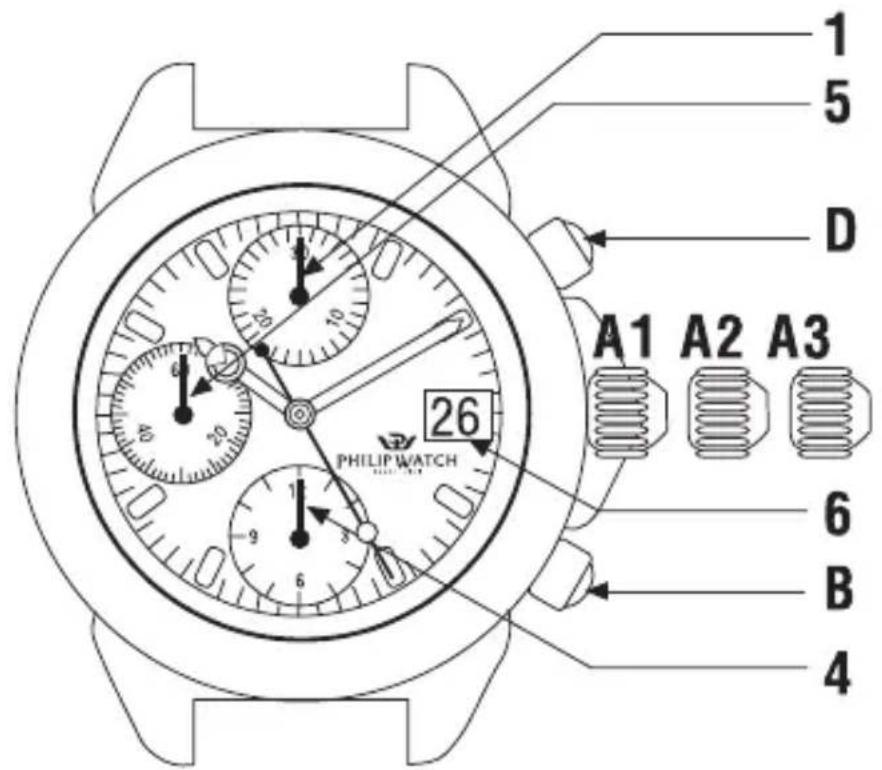
1 5 D A1 A2 A3 6 B 4 PHILIP WATCH 26FUNCTIONS: hours, minutes and seconds. Smail seconds counter in position 5, date in position 6.
CHRONOGRAPH FUNCTIONS: hours, minutes and seconds. 12 hours counter in position 4, minutes counter in position 1. Seconds hand in the center.
HOUR ADJUSTEMENT: unscrew the crown, pull it out, position A3, rotate it clockwise to correct the hour.
DATE: unscrew the crown, pull it out, to position A2, rotate clockwise, every click of the crown corresponds to one day (1-31).
CHRONOGRAPH SETTING: to start the chronograph press pushbutton "D", the second hand in the center of the dial will immediately start moving. At the end of each complete round the hand on the dial (position 1) shall move forward indicating the minutes which have passed. After 60 minutes, the hand on the dial (position 4) will move automatically indicating the chronograph hour.
To stop the chronograph press pushbutton "D". To zero the readings, press "B".
ATTENTION: do not correct the date during the time period between 7 p.m. and 3 a.m.
QUARZO
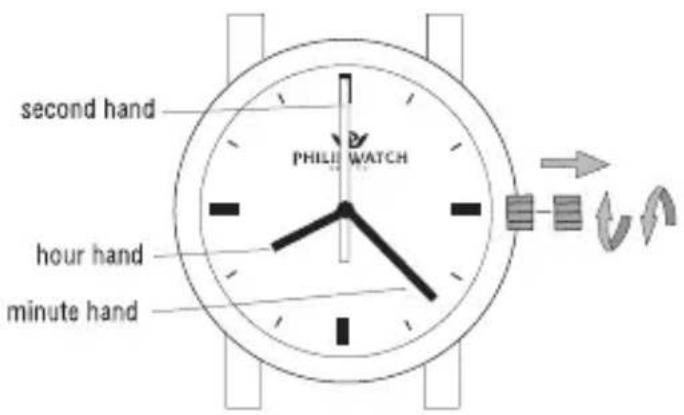
Pull the crown by 1 notches and turn it in either direction to move the hands forward.
text_image
second hand PHILI WATCH hour hand minute handQUARZO ORA, DATA E GIORNO
Pull the crown by 1 notch and turn it clockwise. The date display changes.
Setting the time
Pull the crown by 2 notches and turn it in either direction to move the hands forward.
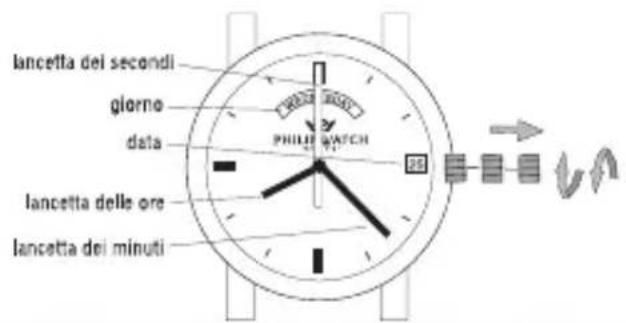
Pull the crown by 1 notch and turn it anticlockwise. The date display changes.
Setting the time
Pull the crown by 2 notches and turn it in either direction to the hands forward or back.
Reading the 2nd time zone
You can also read the current time in a second time zone by using the 24 h. hand and 24h display.
Correcting the 2^ nd time zone, pull the crown by 1 notch and turn it clockwise
IMPORTANT
Never change the date between 8 p.m. and 4.30 a.m.
text_image
9:41:24:00 → →QUARZO-MOON PHASES
text_image
JAN DEC FEB 11 9 7 5 3 1 5 4 9 12 1 47 45 D NOV PHILIP WATCH MAR 10 9 17 15 13 11 MAY OCT SEP 3 2 1 2 AUG 33 31 29 27 25 JUN 7 6 5 4 3 2 19 NPR MAY JUN JULISTRUZIONI
Modello:
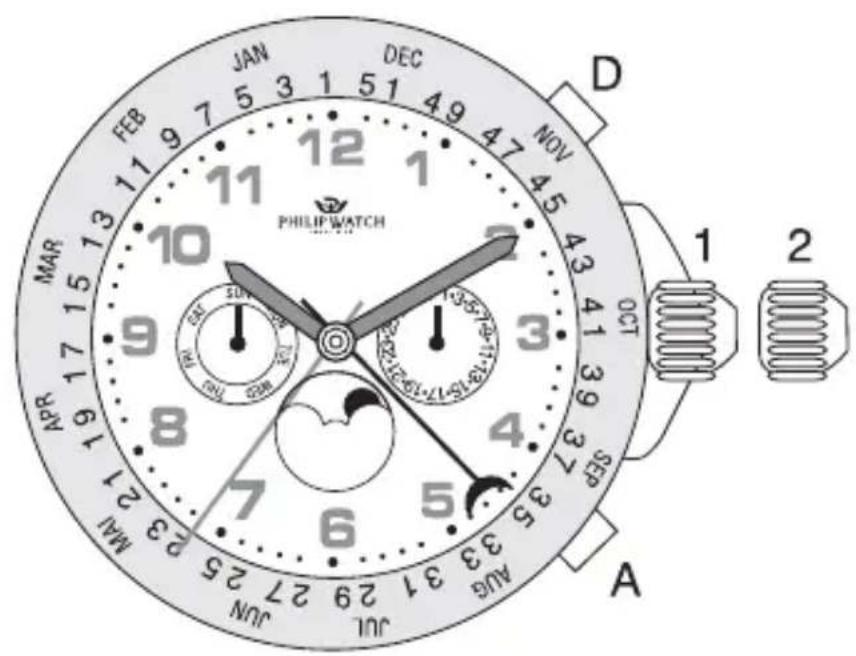
Movement specification: Moon Phases quartz analog movement with the following displays: Date, day, moon phase and calendar week.
Day change: Tuesday to Sunday approx. midnight; Monday approx. 12.15 a.m.
Date change: Monday to Sunday approx. 1.30 a.m. to 3.00 a.m.
Change of moon phase: Monday to Sunday approx. 8.00 p.m.
Change of calendar week: Monday approx. 12.15 a.m.
Times during which calendar functions must not be changed (limited time zones): Calendar functions must not be altered between 11.30 p.m. and 5.30 a.m. because automatic changes are in progress at these times. Pressing the pusher during these times may damage the movement.
Setting of time after a battery change:
Winding crown position 1
- Normal position Watch is running
Winding crown position 2
- Stop-second
Movement stops (interruption of motor pulses)
- Set moon phase Set date Set day Rotate hands clockwise past midnight until the full moon position appears in the window on the dial. Continue rotating hands until 6.00 a.m. (outside of limited time zone). With the winding crown turn the hands forwards and backwards past midnight until the day of the last full moon is reached (see table) and use the quick-change corrector (pusher A) to set the date of the last full moon. Then use the crown to turn the hands forwards until the current date is reached. You have now set the correct moon phase position, date and day.
1a. Set date Set day
Movements without moon phase display Set movement to 6.00 a.m. (outside limited time zone). With
the winding crown set the current day and with the pusher A the current date.
2. Set time
Rotate hands forwards and set time.
N.B.: remember the 24-hour cycle! If you turn the hands past midnight, the moon, day and date will move forward by one day.
3. Set calendar week:
Use pusher D (see quickchange correctors, pusher D).
Quick change correctors
Pusher D at 2 o'clock position
- Quick change corrector for calendar week:
Pressing pusher D moves the calendar week display forward by one
week. You must not use this quick change corrector between 11.30 p.m. on Saturday and 12.45 a.m. on Tuesday because the automatic change mechanism is in operation between these times.
Push-piece A at 4 o'clock position - Quick change corrector for date:
Pressing pusher A moves the date forward by one day. You must not use this quick change corrector between 11.30 p.m. and 5.30 a.m. because the automatic change mechanism is in operation between these times.
Set day only possible using the win- ding crown:
Set the watch to 11.30 p.m. and then rotate the hands forward to 12.30 a.m. The day will change to the following day. Repeat this procedure by
winding the hands backward and forwards past midnight until you reach the current day of the week. You must not use this quick-change corrector between 11.30 p.m. and 5.30 a.m. because the automatic change mechanism is in operation between these times.
Setting the moon phase only possible the winding crown:
Rotate hands clockwise past midnight until the full moon position appears in the winusing dow on the dial. Continue rotating hands until 6.00 a.m. (outside limited time zone). With the winding crown turn the hands forwards and backwards past midnight until the day of the last full moon is reached (see table) and use the quick-change corrector (pusher A) to set the date of the last full
moon. Then use the crown to turn the hands forwards until the current date is reached. You have now set the correct moon phase position, date and day. You can set time.
QUARZO
SWISS CHRONO 1/10
text_image
Diagram of a clock face with time and duration markings, showing directional arrows and symbolstext_image
Diagram of a clock face with time and duration labels, showing directional arrows and symbolstext_image
second counter minute counter 10th of a second counter push-button A start/stop push-button B intermediate time/ catch-up/ reset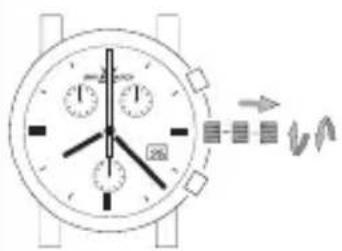
text_image
Diagram of a clock face with hour and minute hands, showing directional arrows and waveform patterns1 - SETTING THE TIME
1 Unscrew the crown (if screwed).
2 Pull out the crown by 2 notches.
3 Turn the crown in either direction to move the hands forward or back.
4 Return the crown to the normal position.
5 Retighten the crown.
NOTE
By pulling the crown by 2 notches (point 2), the movement stops (second stop function).
text_image
T T T 12s → un2 - CORRECTING THE DATE
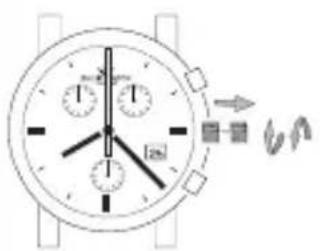
1 Unscrew the crown (if screwed).
2 Pull out the crown by 1 notch.
3 Turn the crown clockwise The date display changes.
4 Return the crown to the normal position.
5 Retighten the crown.
IMPORTANT
Do not leave the crown pulled by 1 notch for more than 20 minutes as this will effect the hour.
3 - USING THE CHRONOGRAPH IMPORTANT
If the hands of the chronograph are not correctly positioned, please refer to Section 6.
Chronograph
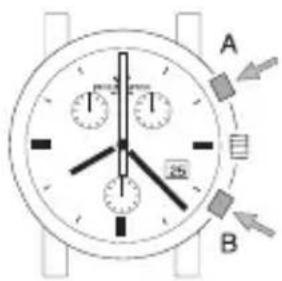
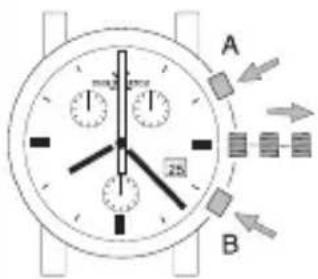
1 Start chronograph (push-button A).
2 Stop chronograph (push-button A).
3 Read the final time.
4 Reset (push-button B).
NOTE
The sequence of points 1+2 can be repeated (added times).
Intermediate time
1 Start chronograph (push-button A).
2 Intermediate time (push-button B).
3 Read intermediate time.
4 Real time catch-up (push-button B).
5 Stop chronograph (push-button A).
6 Read the final time.
7 Reset (button B).
NOTE
The sequence of point 2 to 4 can be repeated (multiple intermediate times).
text_image
A B4 - ZEROING THE
CHRONOGRAPH COUNTERS
After changing the battery, or if something exceptional has occurred, reset the chronograph counters to zero (starting position) by hand.
Minutes
1 Unscrew the crown (if screwed).
2 Pull out the crown by 2 notches.
3 Reset the minute counter (push-button A).
4 Return the crown to the normal position.
5 Retighten the crown.
Seconds and 10th of a second
1 Unscrew the crown (if screwed).
2 Pull out the crown by 1 notch.
3 Reset the 10th of a second counter (push-button B).
4 Return the crown to the normal position.
5 Retighten the crown.
NOTE
For a quick correction (points 3), press the push-button mentioned for more than one second.
text_image
A BANADIGIT
flowchart
graph LR
    A["Ore"] --> B["Minuti"]
    B --> C["Secondi"]
    C --> D["12/24 ore"]
    style A fill:#f9f,stroke:#333
    style B fill:#f9f,stroke:#333
    style C fill:#f9f,stroke:#333
    style D fill:#f9f,stroke:#333
    note1["S2(regolazione)"]
    note2["S2(regolazione)"]
    note3["S2(regolazione)"]
    note4["S2(selezione)"]
    note5["S3"]
    note6["S3"]
    note7["S3"]
    note8["S3"]
    note9["S3"]
    note10["S3"]
    note11["S3"]
    note12["S3"]
    note13["S3"]
    note14["S3"]
    note15["S3"]
    note16["S3"]
    note17["S3"]
    note18["S3"]
    note19["S3"]
    note20["S3"]
    note21["S3"]
    note22["S3"]
    note23["S3"]
    note24["S3"]
    note25["S3"]
    note26["S3"]
    note27["S3"]
    note28["S3"]
    note29["S3"]
    note30["S3"]
    note31["S3"]
    note32["S3"]
    note33["S3"]
    note34["S3"]
    note35["S3"]
    note36["S3"]
    note37["S3"]
    note38["S3"]
    note39["S3"]
    note40["S3"]
    note41["S3"]
    note42["S3"]
    note43["S3"]
    note44["S3"]
    note45["S3"]
    note46["S3"]
    note47["S3"]
    note48["S3"]
    note49["S3"]
    note50["S3"]
    note51["S3"]
    note52["S3"]
    note53["S3"]
    note54["S3"]
    note55["S3"]
    note56["S3"]
    note57["S3"]
    note58["S3"]
    note59["S3"]
    note60["S3"]
    note61["S3"]
    note62["S3"]
    note63["S3"]
    note64["S3"]
    note65["S3"]
    note66["S3"]
    note67["S3"]
    note68["S3"]
    note69["S3"]
    note70["S3"]
    note71["S3"]
    note72["S3"]
    note73["S3"]
    note74["S3"]
    note75["S3"]
    note76["S3"]
    note77["S3"]
    note78["S3"]
    note79["S3"]
    note80["S3"]
    note81["S3"]
    note82["S3"]
    note83["S3"]
    note84["S3"]
    note85["S3"]
    note86["S3"]
    note87["S3"]
    note88["S3"]
    note89["S3"]
    note90["S3"]
    note91["S3"]
    note92["S3"]
    note93["S3"]
    note94["S3"]
    note95["S3"]
    note96["S3"]
    note97["S3"]
    note98["S3"]
    note99["S3"]
text_image
RL 20 20:00on On (Attive)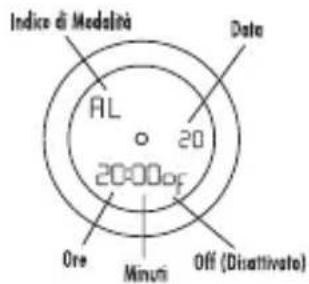
text_image
Tm 19 20 00:00:02NOTA:
Rotate S2 to enter the Modes (Up; Down).

flowchart
graph LR
    A["Normal Time"] --> B["Calendar"]
    B --> C["Alarm Mode"]
    C --> D["Chronograph"]
    D --> E["Timer"]
    E --> F["Date"]
    F --> G["Normal Time"]
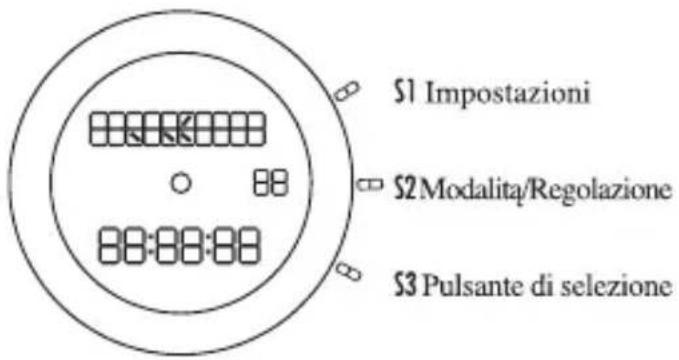
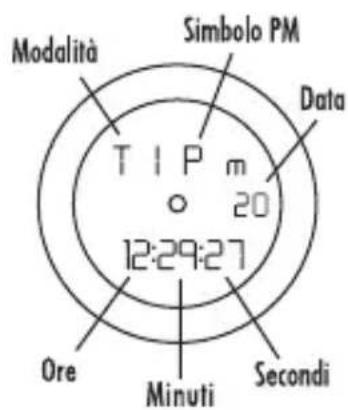
1 - NORMAL TIME
- Press and hold for 3 seconds to enter the setting mode and Hour digits Flash.
- Rotate S2 in clockwise or anti-clockwise for increasing or decreasing in digit.
- Press S3 to jump from each of the setting items.
- Press S1 to exit the setting mode.
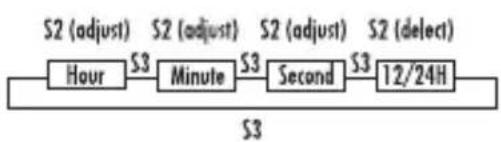
flowchart
graph LR
    A["Hour"] --> B["Minute"]
    B --> C["Second"]
    C --> D["12/24H"]
    style A fill:#f9f,stroke:#333
    style B fill:#f9f,stroke:#333
    style C fill:#f9f,stroke:#333
    style D fill:#f9f,stroke:#333
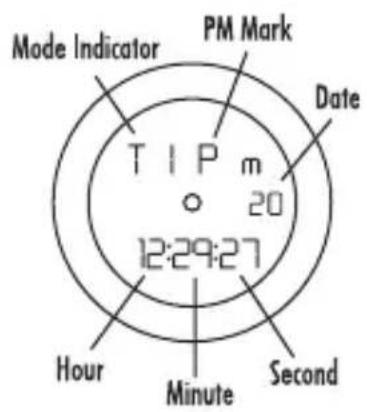
text_image
Mode Indicator PM Mark Date TIP m 20 12:29:27 Hour Minute SecondFor Analog Setting
Pull the crown out and turn the crown upward or downward to adjust the hands at the desired time.
For T2 Time:
In Normal Time Mode, press S3 to enter the T2 time mode, press S1 for 3sec. to enter the setting mode and the setting procedures is shown as follows.
REMARK:
Digital and analog setting procedures is separate, i.e. digital increase but the analog will not change.
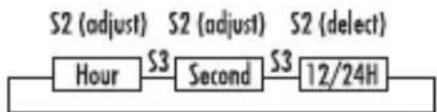
flowchart
graph LR
    A["Hour"] --> B["Second"]
    B --> C["12/24H"]
    style A fill:#f9f,stroke:#333
    style B fill:#f9f,stroke:#333
    style C fill:#f9f,stroke:#333
REMARK:
1) In T2 Time mode the Analog will not increase while setting in digital.
2) The date can only increase or decrease one day.
3) The minute should not be adjusted in T2.
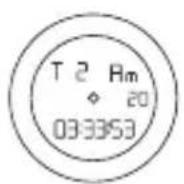
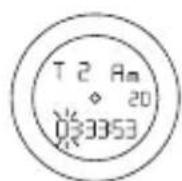

T2 Time setting Mode T2 Time setting Mode
2 - CALENDAR MODE
- Turn S2 upwards to enter the Calendar Mode.
- Press and hold S1 for 3 seconds to enter the setting mode.
- Rotate S2 up or down for increasing or decreasing in digit.
- Press S3 to jump from each of the setting items.
- Press S1 to exit the setting mode.
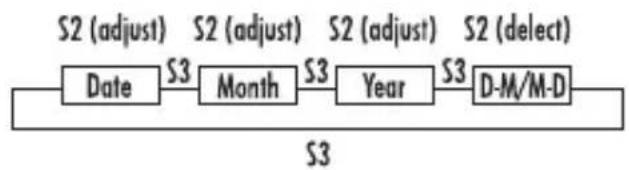
flowchart
graph LR
    A["S2 (adjust)"] --> B["Date"]
    B --> C["S3"]
    C --> D["Month"]
    D --> E["S3"]
    E --> F["Year"]
    F --> G["S3"]
    G --> H["D-M/M-D"]
    H --> I["S3"]
    style A fill:#f9f,stroke:#333
    style I fill:#f9f,stroke:#333
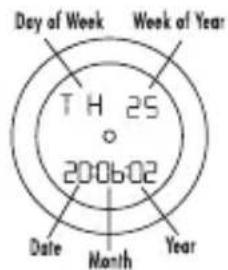
text_image
Day of Week Week of Year T H 25 2006.02 Date Month Year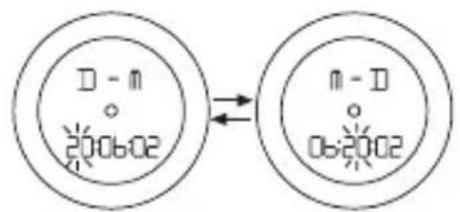
text_image
D - m 2006.02 m - D 06:2002REMARK:
1) Day of Week and Week of Year will change automatically by the calendar setting.
2) Perpetual Calendar (until 2099).
3) Press S1 to display or hide the week of Year.
4) Pressing S3 will display "No Function".
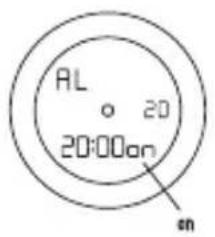
3 - ALARM MODE
- Turn S2 upwards to enter the Alarm Mode.
- Press S1 to select Alarm On or Off.
- Press and hold S1 for 3 seconds to enter the setting mode.
- Rotate S2 in clockwise or anti-clockwise for increasing or decreasing in digit.
- Press S3 to jump from of the setting items.
- Press S1 to exit the setting mode.
S2 (adjust) S2 (adjust)
Hour 53 Minute
S3
text_image
AL 20 20:00am on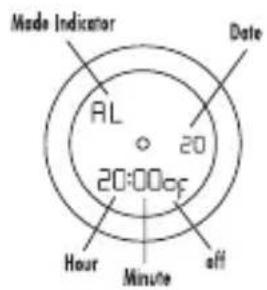
text_image
Mode Indicator Date AL 20 20:00:00 Hour Minute offREMARK:
Beep sound will be released for 60 seconds at pre-set Alarm and press any key to stop it.
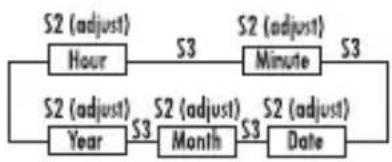
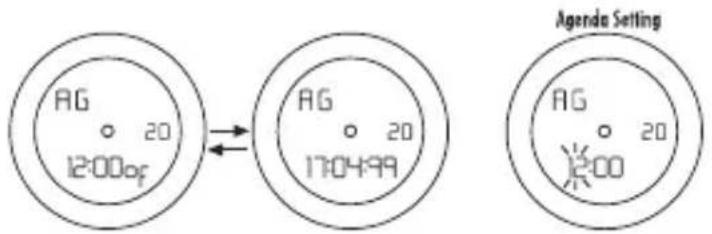
For Alarm Agenda:
- In Alarm Mode, press S3 to enter Alarm Agenda Mode and once again return to Alarm Mode
- Press and hold S1 for 3 seconds to enter the setting mode
- Rotate S2 in clockwise or anti-clockwise for increasing or decreasing in digit
- Press S3 to jump from each of the setting items
- Press S1 to exit the setting mode
flowchart
graph LR
    A["Hour"] -->|S3| B["Minute"]
    B -->|S3| C["Date"]
    D["Year"] -->|S3| E["Month"]
    E -->|S3| F["Date"]
    style A fill:#f9f,stroke:#333
    style B fill:#f9f,stroke:#333
    style C fill:#f9f,stroke:#333
    style D fill:#f9f,stroke:#333
    style E fill:#f9f,stroke:#333
    style F fill:#f9f,stroke:#333
text_image
AG 20 12:00 of AG 20 17:04:99 Agenda Setting AG 20 2:00REMARK:
1) Hour-Minute or Date-Month-Year display will interchange continually.
2) The Alarm Agenda is ON automatically when the preset agenda is sometime in future and press S1 to activate AG alarm ON or OF.
3) If setting a past time, the mode will show OFF and pressing S1 will show "No Function".
4) Alarm will be released for 60 seconds at preset time and press any key to stop it.
4 - CHRONOGRAPH
- Turn S2 upwards to enter the Chronograph Mode.
- Press S1 to start Chronograph.
- Press S1 to stop the timing and show the ADD data or press S3 to show Split data.
- When the timing stop, press S3 to reset to zero.
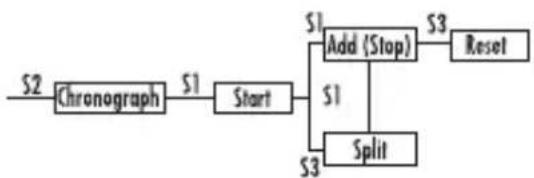
flowchart
graph LR
    A["Chronograph"] -->|S1| B["Start"]
    B -->|S1| C["Add (Stop)"]
    C -->|S3| D["Reset"]
    C -->|S1| E["Split"]
    E -->|S3| C
    style A fill:#f9f,stroke:#333
    style D fill:#ccf,stroke:#333
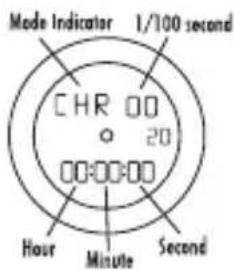
text_image
Mode Indicator 1/100 second CHR 00 20 00:00:00 Hour Minute Second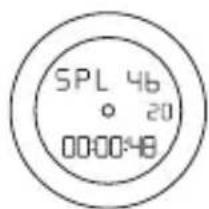
text_image
SPL 46 ° 20 00:00:48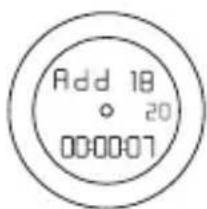
text_image
Add 18 20 00:00:07REMARK:
1) The Maximum range: 99 days 23 hrs 59 min. and 59 sec. (Resolution: 1/100 sec. to 24 hrs or 1 sec. for the rest).
2) ADD, SPLIT function supported.
5 - COUNT-DOWN TIMER
- Turn S2 upwards to enter the Timer Mode.
- Press and hold S1 for 3 seconds to enter the setting mode and the setting procedure is shown follows.
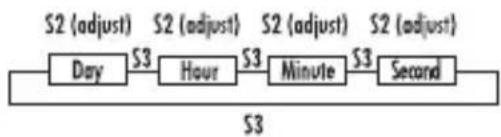
flowchart
graph LR
    A["Day"] --> B["S3"]
    B --> C["Hour"]
    C --> D["S3"]
    D --> E["Minute"]
    E --> F["S3"]
    F --> G["Second"]
    style A fill:#f9f,stroke:#333
    style G fill:#f9f,stroke:#333
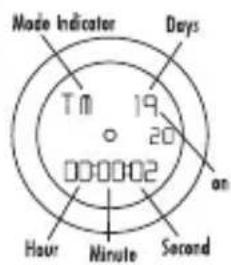
text_image
Mode Indicator Days T M 19 20 000002 on Hour Minute Second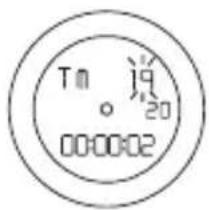
text_image
Tm 19 o 20 00:00:02REMARK:
1) Press S1 to start or stop and press S3 to reset to preset value when the timer stop.
2) During the timing S3 will show "No Function".
3) The Maximum range: 99 days 23 hrs 59 min. and 59 sec.
4) Beep sound will be released for 60 seconds at 0 and press any key to stop it.
6 - PERMANENT DATE
- Turn S2 upwards to enter the Permanent Date Mode.
- Date at 3 o'clock will display permanently except for Calendar Mode.
For display On/Off
1) Press S1 to turn off the display in Permanent Date Mode.
2) Press S1 once again to turn on the display or rotate S2 to enter to the next Mode.

text_image
20 S3REMARK:
1) The date can not be adjusted in the setting mode, it will change according to the change of the date of Calendar Mode.
2) The analog time can be adjusted.
3) Pressing S3 will show "No Function".
7 - END OF LIFE INDICATED
- Whatever mode the display is, it will automatically change to corresponding mode when the Timer, Alarm or Alarm Agenda release the alarm.
General Feature:
If the battery has a voltage of less than 2.5 V, the Permanent Data Function will display the characters EOL (End Of Life), indicating a flat battery; in other models the numeric display will flash.
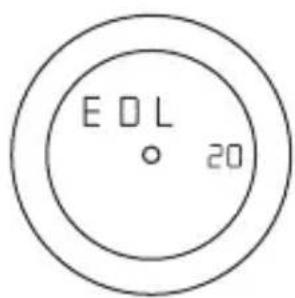
text_image
EDL 208299040136imp
4-09-2007
9:25
Pagina 67

PHILIP WATCH
sINCE 1858
GARANZIA
The warranty is valid for two years from date of purchase; it is honored all over the world in the case of conformity defects, duly confirmed by authorized Service Centers.
To benefit from the warranty it is essential to present to a Dealer or a Technical Service Center the International Warranty card duly compiled, stamped and dated by the Dealer at the time of purchase.
Defects deriving from accidents (knocks, crushing, etc.), improper use, the use of non-prescribed batteries, dead batteries left inside the watch, alterations, repairs and/or unauthorized tampering are strictly excluded from the warranty.
Batteries, glass, discoloration of the plating or color, and the consequences of normal wear and tear and aging of the watch are also excluded from the warranty.
Interventions under warranty must be carried out at authorized Technical Service Centers. The same goes for interventions for replacing the batteries.
For these, the authorized Technical Service Centers will issue clients with certifications of water resistance tests carried out.
U.S.A. Cranston - PROVIDENCE WATCH HOSPITAL INC.
1024 Reservoir Avenue - RI 02910 Craston
Fax +1-401-944.19.93 - Tel. +1-401-944.19.93
E-mail: provwatch@aol.com
Russia Moscow - TIME&TECHNOLOGY LTD
Aptekarsky per. 4 - 107005 Moscow
Fax +7-095-2343493 - Tel. +7-095-2343493
U.A.E. Dubai - FANTASIA TRADING L.L.C.
Business Avenue, Port Saeed Road, Suite 713 & 714 - Dubai
Fax +971 4 29 57 576 Tel. +971 4 29 57 579
E-mail fantazya@emirates.net.ae
America Brazil - SECTOR GROUP DO BRASIL
Rua Iguatemi, 448 - 4° andar - cj. 402 Itaim Bibi São Paulo
SP CEP: 01451-010
Tel: (55) (11) 3079-1876 - Fax: (55) (11) 3079-3340
Email: sac@sectorgroup.com.br
FOR USA MARKET ONLY
LIMITED WARRANTY SECTOR GROUP S.p.A.
What this warranty covers. Sector Group S.p.A. (“Sector Group”), the licensed distributor for ROBERTO CAVALL brand watches, warrants that ROBERTO CAVALL watches sold in the U.S.A. (“Watches”) shall be free from defects in material and workmanship, subject to the conditions and exceptions stated below. In addition, Sector Group warrants that, at time of first purchase at retail, Watches will meet the water-resistant standard of ISO 2281.
Who is covered by this warranty. This warranty extends only to the first purchaser at retail in the U.S.A. (“Purchaser”) and is not transferable. How long the warranty lasts. Coverage under this warranty lasts for a period of two years from the date of original retail purchase.
What Sector Group will do. Sector Group will, at its sole discretion either (i) replace a defective Watch free of charge, or (ii) replace the Watch with an equivalent Watch, such equivalence to be determined at Sector Group's sole discretion. In either case, the Purchaser must comply with the Claims Procedure described below.
Claime Procedure. The Purchaser must notify Sector Group of defects in the Watch in writing by registered or certified mail, return receipt requested, within thirty (30) days after the discovery thereof, but no later than two years from date of purchase. The notice must include the defective Watch and proof of purchase, sent to the following address: PROVIDENCE WATCH HOSPITAL INC., 1024 RESERVOIR AVENUE, CRANSTON, RHODE ISLAND, RI 02910. Sector Group will not be responsible for shipping charges for Watches shipped to Sector Group for replacement or repair. However, Sector Group will be responsible for shipping charges for replacement or repaired Watches shipped to the Purchaser. In any case, Sector Group will not be responsible for any risk of loss that will be borne by the Purchaser.
Limitations. This warranty shall not apply to defects or damage (latent or otherwise) caused by the use of or effect of using batteries other than those of the technical specification and quality prescribed by Sector Group or by leaving dead batteries in the watch; defects arising from accidents, mishandling or improper or abusive use (such as knocks, dents, crushes, or scratches); or alterations, repairs or tampering. Also excluded are the batteries, glass and discoloration of the plating or color, and the effects of normal wear and tear, and aging of the watch. Because external conditions which are beyond Sector Group's control may affect water-resistance, Sector Group will not be responsible for the effects of such conditions. Sector Group's warranty of water-resistance only applies to new Watches purchased at an authorized retailer.
Sole and exclusive warranty, THIS WARRANTY IS EXPRESSLY IN LIEU OF ALL OTHER WARRANTIES, EXPRESSED OR IMPLIED, INCLUDING, TO THE EXTENT ALLOWED BY LAW, ANY IMPLIED WARRANTY OF MERCHANTABILITY OR FITNESS FOR A PARTICULAR PURPOSE, AND ANY OTHER OBLIGATION ON THE PART OF SECTOR GROUP, INCLUDING WITHOUT LIMITATION ANY OBLIGATIONS WITH RESPECT TO INCIDENTAL, CONSEQUENTIAL AND SPECIAL DAMAGES).
How state law applies. Some states do not allow limitations on how long an implied warranty lasts, so the above limitation may not apply to you. Also, some states do not allow the exclusion or limitation of incidental, special or consequential damages so the above limitation or exclusion may not apply to you. This warranty gives you specific legal rights, and you may have other rights which vary from state to state.
8299040136imp 4-09-2007 9:25 Pagina 79
natural_image
Pure architectural or structural diagram with no text, numbers, or symbols8299040136imp 4-09-2007 9:25 Pagina III
8299040136imp
4-09-2007
9:25
Pagina IV
82 99 040 136
X-Press 10/06

text_image
PHILIP WATCHSINCE 1858
Philip Watch S.p.A.
natural_image
Pure geometric diagram with a black L-shaped frame and four small circular markers at the corners (no text or symbols)8299040136imp 4-09-2007 9:25 Pagina VII