
DMR-ES15EBL - DVD Recorder PANASONIC - Free user manual and instructions
Find the device manual for free DMR-ES15EBL PANASONIC in PDF.

| Product Type | DVD Recorder |
| Brand | Panasonic |
| Model | DMR-ES15EBL |
| Region Code | 2 |
| Disc Compatibility | DVD-RAM, DVD-R, DVD-R DL, DVD-RW, +R, +R DL, +RW, DVD-Video, DVD-Audio, CD, Video CD, SVCD, MP3, JPEG/TIFF |
| Recording Formats | VR (DVD Video Recording) and DVD-Video |
| Recording Modes | XP (1h), SP (2h), LP (4h), EP (8h/6h), FR (Flexible) |
| Video Outputs | COMPONENT VIDEO (Y/Pb/Pr), S VIDEO, VIDEO (RCA), SCART (AV1, AV2) |
| Audio Outputs | Optical digital, analog stereo (RCA) |
| Power Supply | AC 220-240 V, 50 Hz |
| Power Consumption | Approx. 25 W (typical) |
| Dimensions (W x H x D) | 430 x 65 x 270 mm |
| Weight | Approx. 4.5 kg |
| Included Accessories | Remote control, AC mains lead, 2 RF coaxial leads (black/grey), 2 batteries (R6), audio/video cable |
| Remote Control Code | DVD 1/2/3 (adjustable) |
| Q Link Compatible | Yes (via SCART) |
| Timer Recording | Up to 16 programs (Video Plus+ or manual) |
| Playback Features | Chasing playback, simultaneous rec/play, time slip, manual skip, chapter creation |
| Cleaning | Soft dry cloth for exterior; use DVD lens cleaner RP-CL720E annually |
| Safety | Class 1 laser product; AC mains lead with 5A fuse |
| Special Functions | Owner ID, child lock, finalize, format, create top menu, close first layer (DL discs) |
Frequently Asked Questions - DMR-ES15EBL PANASONIC
User questions about DMR-ES15EBL PANASONIC
0 question about this device. Answer the ones you know or ask your own.
Ask a new question about this device
Download the instructions for your DVD Recorder in PDF format for free! Find your manual DMR-ES15EBL - PANASONIC and take your electronic device back in hand. On this page are published all the documents necessary for the use of your device. DMR-ES15EBL by PANASONIC.
USER MANUAL DMR-ES15EBL PANASONIC
Operating Instructions
DVD Recorder
Model No. DMR-ES15EB/EBL
(Model suffix: "EB" for UK model, "EBL" for Ireland model)

Web Site: http://www.panasonic-europe.com

Panasonic®
Region number supported by this unit
Region numbers are allocated to DVD players and DVD-Video according to where they are sold.
• The region number of this unit is "2".
- The unit will play DVD-Video marked with labels containing "2" or "ALL".
Example:

Dear customer
Thank you for purchasing this product. For optimum performance and safety, please read these instructions carefully.
Before connecting, operating or adjusting this product, please read the instructions completely.
Please keep this manual for future reference.
Note
"EB" on the packaging indicates the United Kingdom.
RQT8320-1B
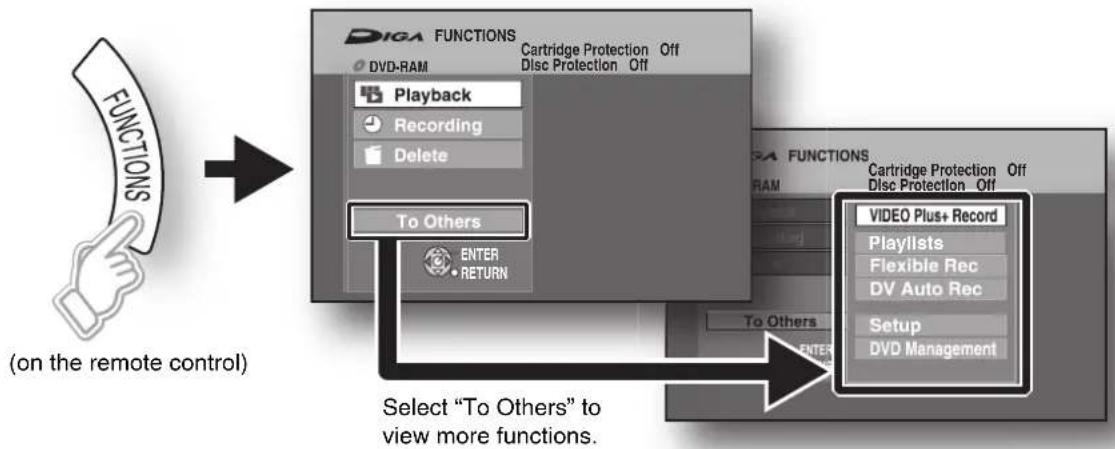
Quick access to a variety of useful functions—“FUNCTIONS” menu
Display the FUNCTIONS menu to view all functions on this unit and select function for timer recording etc.
flowchart
graph TD
    A["FUNCTIONS (on the remote control)"] --> B["To Others"]
    B --> C["Select "To Others" to view more functions."]
    C --> D["Video Plus+ Record"]
    C --> E["Playlists"]
    C --> F["Flexible Rec"]
    C --> G["DV Auto Rec"]
    C --> H["Setup"]
    C --> I["DVD Management"]
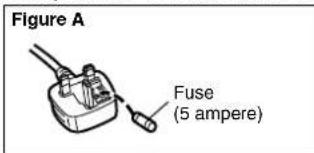
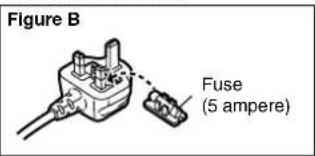
Caution for AC Mains Lead
(For United Kingdom and Republic of Ireland) ("EB" and "EBL" area code model only)
For your safety, please read the following text carefully.
This appliance is supplied with a moulded three pin mains plug for your safety and convenience.
A 5-ampere fuse is fitted in this plug.
Should the fuse need to be replaced please ensure that the replacement fuse has a rating of 5-ampere and that it is approved by ASTA or BSI to BS1362.
Check for the ASTA mark or the BSI mark on the body of the fuse.
If the plug contains a removable fuse cover you must ensure that it is refitted when the fuse is replaced.
If you lose the fuse cover the plug must not be used until a replacement cover is obtained.
A replacement fuse cover can be purchased from your local dealer.
CAUTION!
IF THE FITTED MOULDED PLUG IS UNSUITABLE FOR THE SOCKET OUTLET IN YOUR HOME THEN THE FUSE SHOULD BE REMOVED AND THE PLUG CUT OFF AND DISPOSED OF SAFELY.
THERE IS A DANGER OF SEVERE ELECTRICAL SHOCK IF THE CUT OFF PLUG IS INSERTED INTO ANY 13-AMPERE SOCKET.
If a new plug is to be fitted please observe the wiring code as stated below.
If in any doubt please consult a qualified electrician.
IMPORTANT
The wires in this mains lead are coloured in accordance with the following code:
Blue: Neutral, Brown: Live.
As these colours may not correspond with the coloured markings identifying the terminals in your plug, proceed as follows:
The wire which is coloured Blue must be connected to the terminal which is marked with the letter N or coloured Black or Blue.
The wire which is coloured Brown must be connected to the terminal which is marked with the letter L or coloured Brown or Red.
WARNING: DO NOT CONNECT EITHER WIRE TO THE EARTH TERMINAL WHICH IS MARKED WITH THE LETTER E, BY THE EARTH SYMBOL ⊥ OR COLOURED GREEN OR GREEN/YELLOW.
THIS PLUG IS NOT WATERPROOF—KEEP DRY.
Before use
Remove the connector cover.
How to replace the fuse
The location of the fuse differ according to the type of AC mains plug (figures A and B). Confirm the AC mains plug fitted and follow the instructions below.
Illustrations may differ from actual AC mains plug.
- Open the fuse cover with a screwdriver.
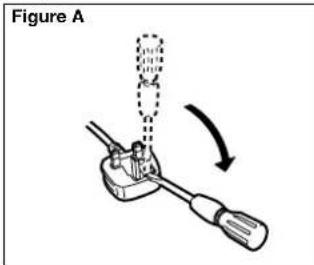
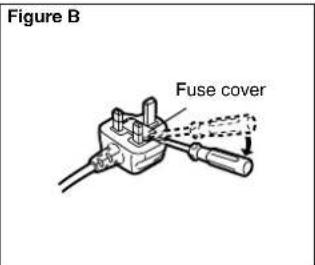
- Replace the fuse and close or attach the fuse cover.
Getting started
Quick access to a variety of useful functions—“FUNCTIONS” menu....2
Caution for AC Mains Lead....2
Safety precautions ....3
Included accessories 4
Disc handling 4
Unit care 4
Control reference guide ....5
Disc information....6
The remote control information....7
Connection....8
TV Tuning (Auto Setup) .....12
Set up to match your television and remote control . . .14
Recording
Important notes for recording .....16
Recording modes and approximate recording times...17
Disc Insertion/Ejection .....17
Recording television programmes .....18
To specify a time to stop recording -One Touch Recording....19
Flexible Recording 19
Playing while you are recording .....19
Timer recording .....20
Using VIDEO Plus+ system to make timer recordings .20
Manually programming timer recordings....21
To cancel recording when recording has already begun....21
To release the programme from recording standby ...21
Notes on timer recording....21
Check, change or delete a programme.....22
Making timer recordings on the television. . . . . . . . . . .22
Recording from a satellite/digital terrestrial receiver . .23
Manual Recording....23
Linked timer recordings with external equipment (SKY
Digital STB/digital terrestrial receiver)-EXT LINK . . .23
Playing back
Playing discs....24
Changing audio during play 24
Operations during play .....25
Using menus to play MP3 and still pictures (JPEG/TIFF)....26
Playing MP3 26
Playing still pictures (JPEG/TIFF) .....27
Useful functions during still picture play .....27
Using on-screen menus/FUNCTIONS window and Status message....28
Using on-screen menus .....28
FUNCTIONS window .....29
Status message .....29
Editing
Editing titles/chapters 30
Editing titles/chapters and playing chapters ..... 30
Title operations 31
Chapter operations 31
Creating, editing and playing playlists 32
Creating playlists 32
Editing and playing playlists/chapters 33
Playlist operations 33
Chapter operations 33
Copying
Copying from a video cassette recorder 34
DV automatic recording DV Auto Rec . . 34
Manual recording. 34
Convenient functions
Deleting titles 35
Using DELETE Navigator to delete titles. 35
Deleting titles during play 35
DVD Management 36
Common procedures.... 36
Providing a name for a disc. 36
Setting the protection 36
Deleting all titles and playlists –Delete all titles ..... 36
Deleting all the contents of a disc –Format Disc ..... 36
Selecting whether to show the Top Menu first -Auto-Play Select 37
Enabling discs to be played on other equipment -Finalize 37
Creating Top Menu –Create Top Menu 37
Enabling the second layer on DL (dual- or double- layer on single side) discs to be recordable
-Close First Layer 37
Linked operations with the TV (Q Link) 38
Child Lock 38
Changing the unit's settings 39
Common procedures.... 39
Summary of settings 39
Set the clock manually 41
Resetting channel setting 42
TV System 43
Entering text 43
Reference
Messages.... 44
Frequently asked questions 45
Troubleshooting guide 46
Glossary. 49
Specifications 50
Index. Back cover
Safety precautions
Placement
Set the unit up on an even surface away from direct sunlight, high temperatures, high humidity, and excessive vibration. These conditions can damage the cabinet and other components, thereby shortening the unit's service life.
Do not place heavy items on the unit.
Voltage
Do not use high voltage power sources. This can overload the unit and cause a fire.
Do not use a DC power source. Check the source carefully when setting the unit up on a ship or other place where DC is used.
AC mains lead protection
Ensure the AC mains lead is connected correctly and not damaged. Poor connection and lead damage can cause fire or electric shock. Do not pull, bend, or place heavy items on the lead.
Grasp the plug firmly when unplugging the lead. Pulling the AC mains lead can cause electric shock.
Do not handle the plug with wet hands. This can cause electric shock.
Foreign matter
Do not let metal objects fall inside the unit. This can cause electric shock or malfunction.
Do not let liquids get into the unit. This can cause electric shock or malfunction. If this occurs, immediately disconnect the unit from the power supply and contact your dealer.
Do not spray insecticides onto or into the unit. They contain flammable gases which can ignite if sprayed into the unit.
Service
Do not attempt to repair this unit by yourself. If sound is interrupted, indicators fail to light, smoke appears, or any other problem that is not covered in these instructions occurs, disconnect the AC mains lead and contact your dealer or an authorized service center. Electric shock or damage to the unit can occur if the unit is repaired, disassembled or reconstructed by unqualified persons.
Extend operating life by disconnecting the unit from the power source if it is not to be used for a long time.
Included accessories

Please check and identify the supplied accessories. Use numbers when asking for replacement parts.
(Product numbers correct as of December 2005. These may be subject to change.)
To order accessories, refer to "Sales and Support Information" (→ below).


1 Remote control (EUR7659Y50)


1 AC mains lead (RJA0044-3C)
- For use with this unit only. Do not use it with other equipment.
Also do not use the cords for other equipment with this unit.


2 RF coaxial leads (black)
(K1TWACC00001)


2 Batteries
R6 Size
for remote control


1 RF coaxial lead (grey) (K1TWACA00001)


1 Audio/video cable (K2KA6BA00003)
■Sales and Support Information
Customer Care Centre
• For customers within the UK: 08705 357357
• For customers within the Republic of Ireland: 01 289 8333
- Visit our website for product information
• E-mail: customer.care@panasonic.co.uk
Direct Sales at Panasonic UK
- Order accessory and consumable items for your product with ease and confidence by phoning our Customer Care Centre Monday-Thursday 9:00am-5:30pm, Friday 9:30am-5:30pm (Excluding public holidays).
- Or go on line through our Internet Accessory ordering application at www.panasonic.co.uk
- Most major credit and debit cards accepted.
- All enquiries transactions and distribution facilities are provided directly by Panasonic UK Ltd.
- It couldn't be simpler!
- Also available through our Internet is direct shopping for a wide range of finished products, take a browse on our website for further details.
Interested in purchasing an extended guarantee?
Please call 0870 240 6284 or visit our website www.panasonic.co.uk/guarantee
Disc handling
■How to hold a disc
Do not touch the recorded surface.
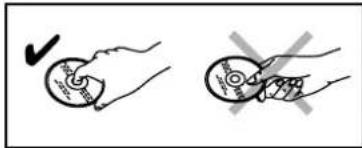
natural_image
Two hand-drawn diagrams showing a circular object being dropped and crossed, with no text or symbols present.■Concerning non-cartridge discs
Be careful about scratches and dirt.
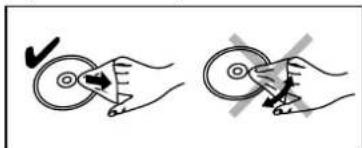
■If there is dirt or condensation on the disc
Wipe with a damp cloth and then wipe dry.
natural_image
Two hand diagrams showing a circular object being twisted, with no text or symbols present.■Handling precautions
- Do not attach labels or stickers to discs. (This may cause disc warping and un-balanced rotation, rendering it unusable.)
- Write on the label side of the disc only with a soft, oil-based felt pen. Do not use ballpoint pens or other hard writing implements. (This may cause disc warping and unbalanced rotation, rendering it unusable.)
- Do not use record cleaning sprays, benzine, thinner, static electricity prevention liquids or any other solvent.
- Do not use scratch-proof protectors or covers.
- Do not drop stack, or impact discs. Do not place objects on them.
- Do not use the following discs:
–Discs with exposed adhesive from removed stickers or labels (rental discs, etc.).
-Discs that are badly warped or cracked.
-Irregularly shaped discs, such as heart shapes.
- Do not place in the following areas:
-In direct sunlight.
-In very dusty or humid areas.
-Near a heater.
- Locations susceptible to significant difference in temperature (condensation can occur).
-Where static electricity or electromagnetic waves occur.
- To protect discs from scratches and dirt, return them to their cases or cartridges when you are not using them.
The manufacturer accepts no responsibility and offers no compensation for loss of recorded or edited material due to a problem with the unit or recordable media, and accepts no responsibility and offers no compensation for any subsequent damage caused by such loss. Examples of causes of such losses are
- A disc recorded and edited with this unit is played in a DVD Recorder or computer disc drive manufactured by another company.
- A disc used as described above and then played again in this unit.
- A disc recorded and edited with a DVD Recorder or computer disc drive manufactured by another company is played in this unit.
Unit care
The precision parts in this unit are readily affected by the environment, especially temperature, humidity, and dust. Cigarette smoke also can cause malfunction or breakdown.
To clean this unit, wipe with a soft, dry cloth.
- Never use alcohol, paint thinner or benzine to clean this unit.
- Before using chemically treated cloth, carefully read the instructions that came with the cloth.
Observe the following points to ensure continued listening and viewing pleasure.
Dust and dirt may adhere to the unit's lens over time, making it impossible to record or play discs.
Use the DVD lens cleaner (RP-CL720E) about once every year, depending on frequency of use and the operating environment. Carefully read the lens cleaner's instructions before use.
Before moving the unit, ensure the disc tray is empty. Failure to do so will risk severely damaging the disc and the unit.
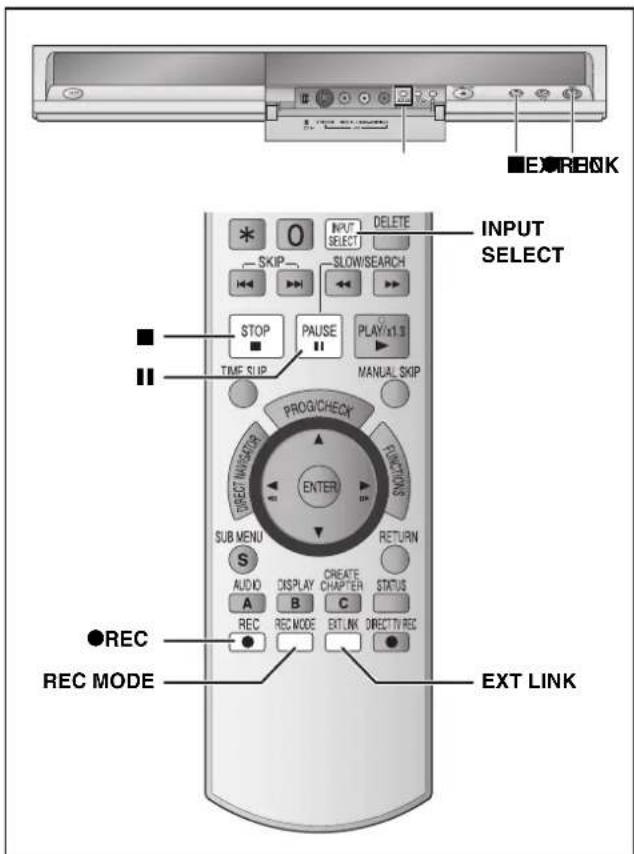
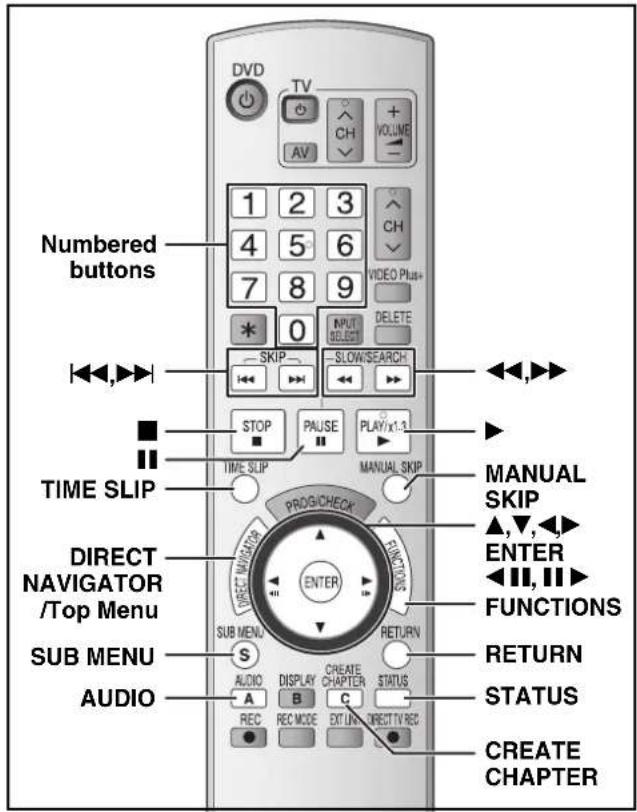
Remote control
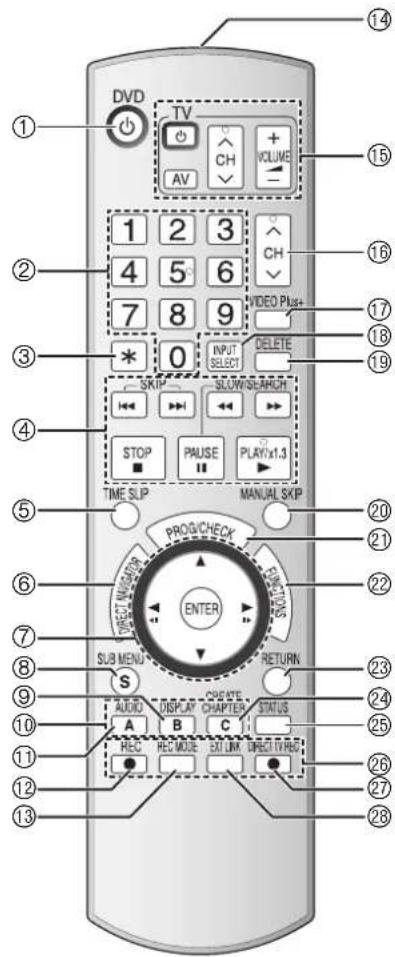
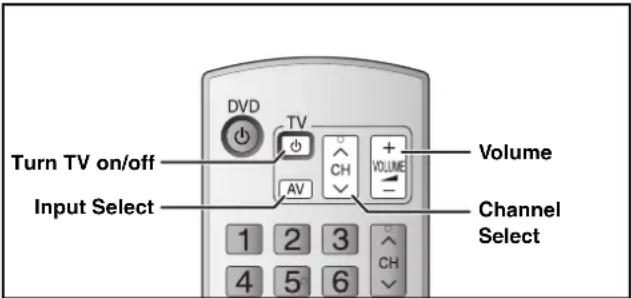
① Turn the unit on/off ( page 12)
② Select channels and title numbers etc./Enter numbers
③ Cancel
④ Basic operations for recording and play
⑤ Skip the specified time (→ page 25)
⑥ Show Direct Navigator/Top menu (→ page 24, 26, 30)
⑦ Selection/Enter, Frame-by-frame (→ page 12, 25)
⑧ Show sub menu (→ page 27, 30, 33)
⑨ Show on-screen menu (→ page 28)
⑩ Manual tuning operation (→ page 42)
⑪ Select Audio (→ page 24)
⑫ Start recording (→ page 18)
⑬ Change recording mode (→ page 18)
⑭ Transmit the remote control signal
⑮ Television operations (→ page 15)
⑯ Channel select (→ page 18)
⑰ Show VIDEO Plus+ screen (→ page 20)
⑱ Input select (AV1, AV2, AV3 or DV)
⑲ Delete items (→ page 35)
⑳ Skip 30 seconds forward (→ page 25)
②1 Show timer recording programme screen (→ page 21)
②2 Show FUNCTIONS window (→ page 2, 14, 29)
②3 Return to previous screen
② Create chapter ( page 25)
②5 Show status messages (→ page 29)
②6 Recording function
② Direct TV recording (→ page 38)
②8 Linked timer recordings with external equipment (→ page 23)
Main unit
① Standby/on switch (⊕/l) (→ page 12)
Press to switch the unit from on to standby mode or vice versa. In standby mode, the unit is still consuming a small amount of power.
② Disc tray ( page 18)
③ Connection for digital video (DV) camcorder (→ page 34)
④ Connection for camcorder etc. (→ page 34)
⑤ Linked timer recordings with external equipment ( page 23)
⑥ Channel select (→ page 18)
⑦ Open/close disc tray (→ page 18)
⑧ Display (→below)
⑨ Stop (→ page 18, 25)
⑩ Start play (→ page 24)
⑪ Remote control signal sensor
⑫ Start recording (→ page 18)/ Specify the time to stop recording (→ page 19)
The unit's display

① Linked timer recordings with external equipment indicator
② Disc indicator
- This indicator lights up when a disc that is supported by this unit is inserted.
③ Timer recording indicator
④ Main display section
⑤ Playing indicator
⑥ Recording indicator
Discs you can use for recording and play
| Disc type DVD-RAM | DVD-R | DVD-R DL 1*(dual layer on single side) | DVD-RW | +R2 +R DL | 1 (double layer on single side) | +RW | |
| Indication in these instructions by | RAM | -RBeforefinalization | -R DLBeforefinalization | -RW(V)Beforefinalization | +RBeforefinalization | +R DLBeforefinalization | +RW |
| DVD-VAfterfinalization | DVD-VAfterfinalization | DVD-VAfterfinalization | DVD-VAfterfinalization | DVD-VAfterfinalization | |||
| Logo | DVRAMRAM4.7 | DR4.7 | DRRLDL | DRWR | —— | —— | |
| Recording format(→below) | VR | DVD-Video | DVD-Video | DVD-Video | +VR | +VR | +VR |
| Re-writable3 | √ | × | × | √ | × | × | √ |
| What you can do on this unit | |||||||
| Recording broadcasts that allow one copy | √※4 | × | × | × | × | × | × |
| Recording both M 1 and M 2 of bilingual broadcasts | √ | × | × | × | × | × | × |
| Recording 16:9 aspect picture | √ | × | × | × | × | × | × |
| Creating playlists | √ | × | × | × | × | × | × |
| Compatibility | |||||||
| Usable high speed recording disc type5 | Up to 5x | Up to 16x | Up to 4x | Up to 6x | Up to 16x | Up to 2.4x | Up to 4x5 |
| Play on other players | Only on DVD-RAMcompatibleplayers. (It is not possible to finalize the disc.) | √ | √※7 | √ | √ | √※8 | √(It is not possible to finalize the disc.) |
| Only on compatible players after finalizing the disc (→ page 37) | |||||||
√: Can do, x: Cannot do
• We recommend using Panasonic discs. We also recommend using DVD-RAM discs with cartridges to protect them from scratches and dirt.
- You may not be able to record depending on the condition of the discs and you may not be able to play due to the condition of the recording.
- For the recording time, refer to "Recording modes and approximate recording times" on page 17.
- You cannot record programmes that allow "One time only recording" to CPRM compatible DVD-R and DVD-RW on this unit. You can record other programmes as DVD-Video format.
※1 You cannot continue a recording from the first layer to the second layer on dual- or double-layer discs. To record onto the second layer, you must first close the first layer using the "Close First Layer" item in DVD Management (→ page 37). You will no longer be able to record to the first layer after you do this (→ page 16).
When playing a title recorded on both layers, video and audio may momentarily cut out when the unit is switching layers.
※2 You may not be able to use +R recorded on this unit in another Panasonic DVD recorder and vice versa. Once the disc is finalized, however, it can be played in the other unit.
※3 The amount of the recordable disc space doesn't increase even if the programme is deleted when you use a one time recording disc.
※4 CPRM (→ page 49) compatible discs only.
※5 This unit can use the high-speed recording discs shown in the chart, but using them will not shorten the recording time.
※6 You can play 8x recording speed discs recorded on another equipment.
※7 Play on DVD-R DL compatible equipment.
※8 Play on +R DL compatible equipment.
Regarding recording format
VR (DVD Video Recording) format
This is a recording method which allows you to freely record and edit television broadcasts and so on.
- Digital broadcasts that allow "One time only recording" can be recorded to a CPRM compatible disc. You can record to CPRM compatible DVD-RAM on this unit.
- Play is only possible on a compatible DVD player.
DVD-Video format
This recording method is the same as commercially available DVD-Video.
- Digital broadcasts that allow "One time only recording" cannot be recorded.
- You can play on compatible equipment such as DVD players after finalizing the disc on this unit.
Play-only discs
| Disc type | DVD-Video | DVD-Audio | DVD-RW (VR format) |
| Indication in these instructions | DVD-V | DVD-A | -RW(VR) |
| Logo |  |  |  |
| Instructions | High quality movie and music discs | High fidelity music discs• Played on this unit in 2 channels. | DVD-RW recorded on another DVD Recorder※ 1• You can play programmes that allow “One time only recording” if they have been recorded to a CPRM compatible disc.• By formatting (→ page 36) the disc, you can record to it in DVD-Video format.• It may be necessary to finalize the disc on the equipment used for recording. |
| Disc type | Audio CD | Video CD | SVCD※2 | DVD-R | CD | ||
| Indication in these instructions | CD | VCD | MP3 | JPEG | MP3 | JPEG | |
| Logo |  |  |  | —  | — | ||
| Instructions | Music and audio recorded (including CD-R/RW※1) | Music and video recorded (including CD-R/RW※1) | CD-R/RW and DVD-R※1 with MP3/Still pictures (JPEG and TIFF) | ||||
- The producer of the disc can control how discs are played. So you may not always be able to control play as described in these operating instructions. Read the disc's instructions carefully.
※1 Close the session after recording. Play may be impossible on some discs due to the condition of the recording.
※2 Conforming to IEC62107.
Regarding DVD-Audio
Some multi-channel DVD-Audio will prevent down-mixing ( page 49) of all or part of their contents if this is the manufacturer's intention. Tracks that are prevented from being down-mixed will not play properly on this unit (e.g. audio is played from the front two channels only). Refer to the disc's jacket for more information.
Discs that cannot be played
• 2.6 and 5.2 GB DVD-RAM, 12 cm
• 3.95 and 4.7 GB DVD-R for Authoring
• DVD-R recorded by VR format
- DVD-R (DVD-Video format), DVD-R DL, DVD-RW (DVD-Video format), +R, +R DL recorded on another unit and not finalized (→page 49).
- DVD-Video with a region number other than "2" or "ALL"
-Blu-ray
- DVD-ROM, +R (8 cm), CD-ROM, CDV, CD-G, Photo CD, CVD, SACD, MV-Disc, PD, DivX Video Disc, "Chaoji VCD" available on the market including CVD, DVCD and SVCD that do not conform to IEC62107, etc.
Types of disc for the type of connected TV
When you use the discs recorded either PAL or NTSC, refer to this table.
(▼Possible to view, x: Impossible to view)
| TV type | Disc | Yes/No |
| Multi-system TV | PAL | √ |
| NTSC | √※3 | |
| NTSC TV | PAL | × |
| NTSC | √※4 | |
| PAL TV | PAL | √ |
| NTSC | √※5 (PAL60) |
※3 If you select "NTSC" in "TV System" (→page 43), the picture may be clearer.
※4 Select "NTSC" in "TV System" (→page 43).
※5 If your television is not equipped to handle PAL 525/60 signals the picture will not be shown correctly.
The remote control information
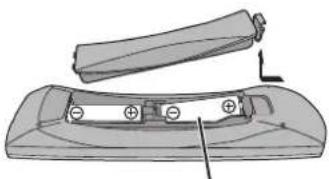
■Batteries
- Insert so the poles (+ and -) match those in the remote control.
- Do not use rechargeable type batteries.
- Do not mix old and new batteries.
- Do not use different types at the same time.
- Do not heat or expose to flame.
- Do not take apart or short circuit.
- Do not attempt to recharge alkaline or manganese batteries.
- Do not use batteries if the covering has been peeled off.
Mishandling of batteries can cause electrolyte leakage which can damage items the fluid contacts and may cause a fire.
Remove if the remote control is not going to be used for a long period of time. Store in a cool, dark place.
natural_image
Diagram of a mechanical component with a cylindrical part inserted, showing internal components and alignment lines (no text or symbols)R6/LR6, AA
Use
Remote control signal sensor
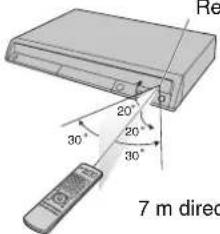
7 m directly in front of the unit
Connection
Use of the supplied RF coaxial leads
To prevent interference patterns from appearing on your TV, use only the supplied RF coaxial leads when you connect this unit to your TV and aerial outlet or aerial lead, as shown in connection types A-C.
- Keep the RF coaxial leads as far away as possible from other leads.
- Do not roll up the RF coaxial leads.
- Before connection, turn off the mains for all connected equipment and read the appropriate operating instructions. Be sure to read the Caution for AC Mains Lead on page 2.
- Choose from one of the connection types A-C that suits your requirement.

Connecting to a television only
Using a fully wired 21-pin Scart lead
- You can use a variety of Q Link functions by connecting the unit to a Q Link compatible television (→ page 38).
- You can enjoy high-quality viewing by connecting the unit to an RGB compatible television.
Required setting
"AV1 Output" in the Setup menu (→page 40)
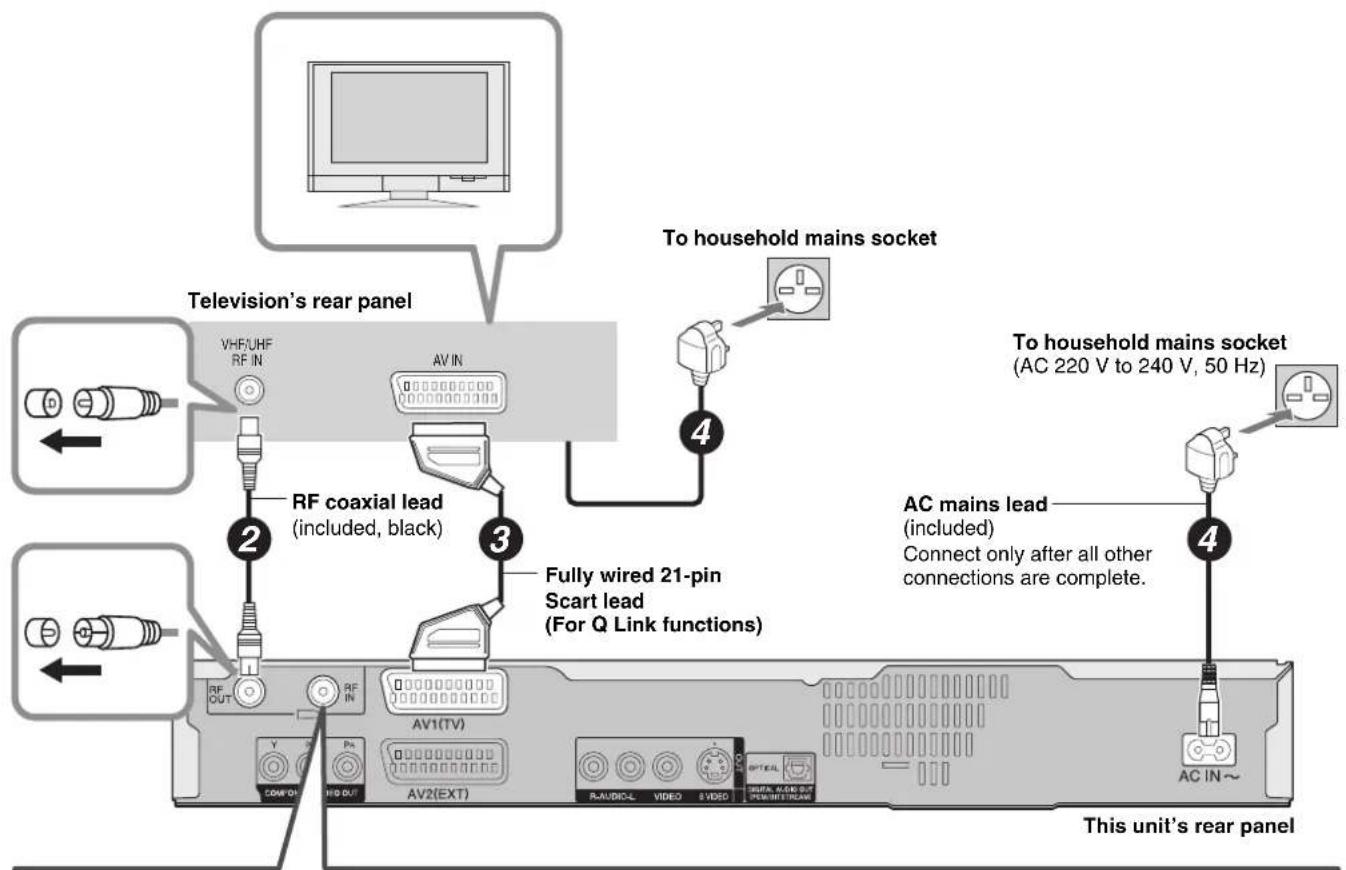
Use one of the RF coaxial lead (black or grey) to connect this unit's RF IN terminal to your aerial socket or aerial lead.
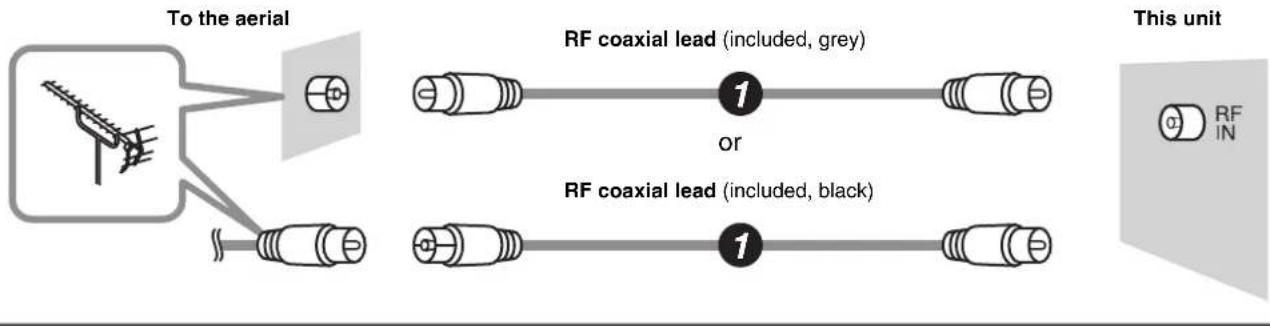
flowchart
graph LR
    A["To the aerial"] --> B["RF coaxial lead (included, grey)"]
    A --> C["RF coaxial lead (included, black)"]
    B --> D["1 or 2"]
    C --> E["1 or 2"]
    F["This unit"] --> G["RF IN"]
Connecting a terminal other than the 21-pin Scart terminal ( page 11).
After completing the above connections, proceed to the TV Tuning ( page 12).
Using a fully wired 21-pin Scart lead
- You can use a variety of Q Link functions by connecting the unit to a Q Link compatible television (→ page 38).
- You can enjoy high-quality viewing by connecting the unit to an RGB compatible television.
Required setting
"AV1 Output" and "AV2 Input" in the Setup menu (→ page 40–41)
flowchart
graph TD
    A["To the aerial"] --> B["RF coaxial lead"]
    B --> C["RF coaxial lead (included, black)"]
    C --> D["TV/AV1(TV)"]
    D --> E["AC MAINS lead (included)"]
    E --> F["Connect only after all other connections are complete."]
    F --> G["AC IN~"]
    G --> H["TV/AV2(EXT)"]
    H --> I["RT/AV1(V)"]
    I --> J["TV/AV2(V)"]
    J --> K["TV/AV2(V)"]
    K --> L["TV/AV2(V)"]
    L --> M["TV/AV2(V)"]
    M --> N["TV/AV2(V)"]
    N --> O["TV/AV2(V)"]
    O --> P["TV/AV2(V)"]
    P --> Q["TV/AV2(V)"]
    Q --> R["TV/AV2(V)"]
    R --> S["TV/AV2(V)"]
    S --> T["TV/AV2(V)"]
    T --> U["TV/AV2(V)"]
    U --> V["TV/AV2(V)"]
    V --> W["TV/AV2(V)"]
    W --> X["TV/AV2(V)"]
    X --> Y["TV/AV2(V)"]
    Y --> Z["TV/AV2(V)"]
    Z --> AA["TV/AV2(V)"]
    AA --> AB["TV/AV2(V)"]
    AB --> AC["TV/AV2(V)"]
    AC --> AD["TV/AV2(V)"]
    AD --> AE["TV/AV2(V)"]
    AE --> AF["TV/AV2(V)"]
    AF --> AG["TV/AV2(V)"]
    AG --> AH["TV/AV2(V)"]
    AH --> AI["TV/AV2(V)"]
    AI --> AJ["TV/AV2(V)"]
    AJ --> AK["TV/AV2(V)"]
    AK --> AL["TV/AV2(V)"]
    AL --> AM["TV/AV2(V)"]
    AM --> AN["TV/AV2(V)"]
    AN --> AO["TV/AV2(V)"]
    AO --> AP["TV/AV2(V)"]
    AP --> AQ["TV/AV2(V)"]
    AQ --> AR["TV/AV2(V)"]
    AR --> AS["TV/AV2(V)"]
    AS --> AT["TV/AV2(V)"]
    AT --> AU["TV/AV2(V)"]
    AU --> AV["TV/AV2(V)"]
    AV --> AW["TV/AV2(V)"]
    AW --> AX["TV/AV2(V)"]
    AX --> AY["TV/AV2(V)"]
    AY --> AZ["TV/AV2(V)"]
    AZ --> BA["TV/AV2(V)"]
    BA --> BB["TV/AV2(V)"]
    BB --> BC["TV/AV2(V)"]
    BC --> BD["TV/AV2(V)"]
    BD --> BE["TV/AV2(V)"]
    BE --> BF["TV/AV2(V)"]
    BF --> BG["TV/AV2(V)"]
    BG --> BH["TV/AV2(V)"]
    BH --> BI["TV/AV2(V)"]
    BI --> BJ["TV/AV2(V)"]
    BJ --> BK["TV/AV2(V)"]
    BK --> BL["TV/AV2(V)"]
    BL --> BM["TV/AV2(V)"]
    BM --> BN["TV/AV2(V)"]
    BN --> BO["TV/AV2(V)"]
    BO --> BP["TV/AV2(V)"]
    BP --> BQ["TV/AV2(V)"]
    BQ --> BR["TV/AV2(V)"]
    BR --> BS["TV/AV2(V)"]
    BS --> BT["TV/AV2(V)"]
    BT --> BU["TV/AV2(V)"]
    BU --> BV["TV/AV2(V)"]
    BV --> BW["TV/AV2(V)"]
    BW --> BX["TV/AV2(V)"]
    BX --> BY["TV/AV2(V)"]
    BY --> BZ["TV/AV2(V)"]
    BZ --> CA["TV/AV2(V)"]
    CA --> CB["TV/AV2(V)"]
    CB --> CC["TV/AV2(V)"]
    CC --> CD["TV/AV2(V)"]
    CD --> CE["TV/AV2(V)"]
    CE --> CF["TV/AV2(V)"]
    CF --> CG["TV/AV2(V)"]
    CG --> CH["TV/AV2(V)"]
    CH --> CI["TV/AV2(V)"]
    CI --> CJ["TV/AV2(V)"]
    CJ --> CK["TV/AV2(V)"]
    CK --> CL["TV/AV2(V)"]
    CL --> CM["TV/AV2(V)"]
    CM --> CN["TV/AV2(V)"]
    CN --> CO["TV/AV2(V)"]
    CO --> CP["TV/AV2(V)"]
    CP --> CQ["TV/AV2(V)"]
    CQ --> CR["TV/AV2(V)"]
    CR --> CS["TV/AV2(V)"]
    CS --> CT["TV/AV2(V)"]
    CT --> CU["TV/AV2(V)"]
    CU --> CV["TV/AV2(V)"]
    CV --> CW["TV/AV2(V)"]
    CW --> CX["TV/AV2(V)"]
    CX --> CY["TV/AV2(V)"]
    CY --> CZ["TV/AV2(V)"]
To view satellite/digital terrestrial programmes
Press [INPUT SELECT] to select the input channel "AV2" or put this unit in standby mode.
To record satellite/digital terrestrial programmes
Refer to "Recording from a satellite/digital terrestrial receiver" (→ page 23).
Connecting a terminal other than the 21-pin Scart terminal ( page 11).
After completing the above connections, proceed to the TV Tuning ( page 12).

Connecting to a television and VCR
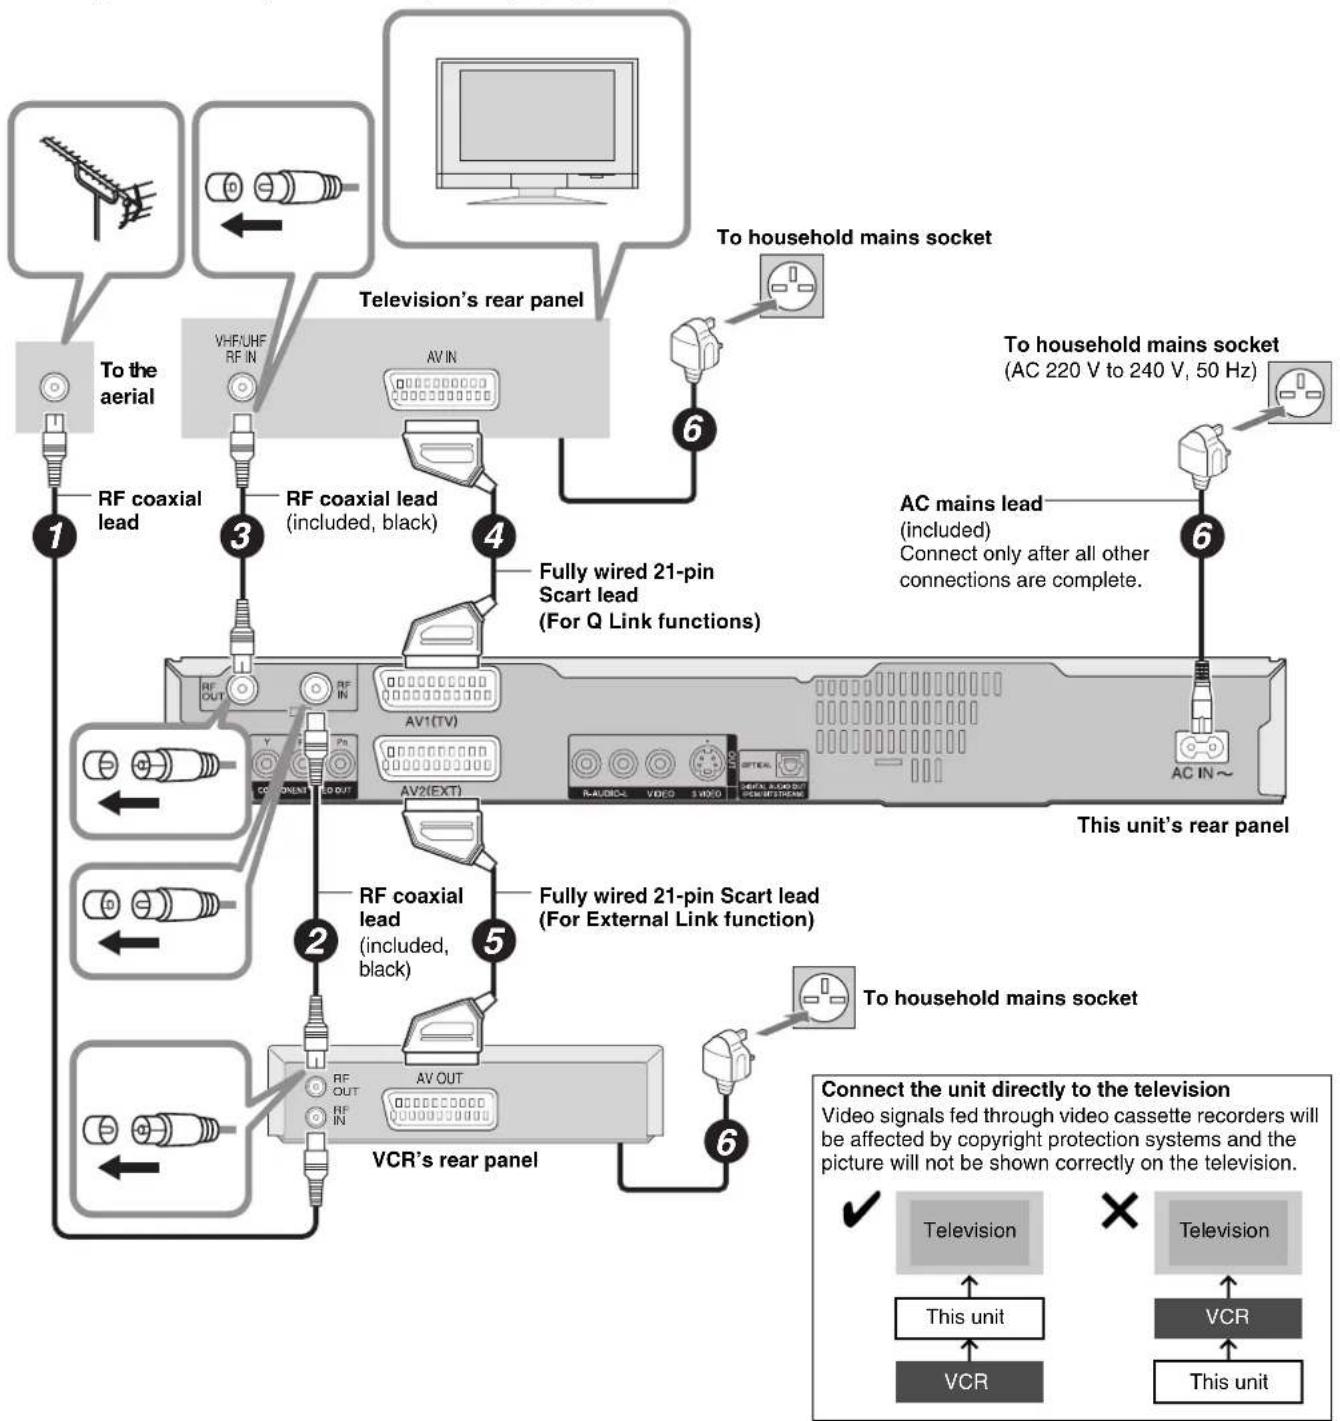
Using a fully wired 21-pin Scart lead
- You can use a variety of Q Link functions by connecting the unit to a Q Link compatible television (→ page 38).
- You can enjoy high-quality viewing by connecting the unit to an RGB compatible television.
Required setting
"AV1 Output" and "AV2 Input" in the Setup menu (→ page 40–41)
flowchart
graph TD
    A["To the aerial"] --> B["RF coaxial lead"]
    B --> C["RF coaxial lead (included, black)"]
    C --> D["Fully wired 21-pin Scart lead (For Q Link functions)"]
    D --> E["AC mains lead (included)"]
    E --> F["AC 220 V to 240 V, 50 Hz"]
    F --> G["To household mains socket (AC 220 V to 240 V, 50 Hz)"]
    G --> H["AC IN ~"]
    H --> I["This unit's rear panel"]
    I --> J["RF coaxial lead (included, black)"]
    J --> K["Fully wired 21-pin Scart lead (For External Link function)"]
    K --> L["To household mains socket"]
    L --> M["VCR's rear panel"]
    M --> N["To household mains socket"]
    N --> O["To household mains socket"]
    O --> P["Television's rear panel"]
    P --> Q["Television"]
    P --> R["Television"]
    style A fill:#f9f,stroke:#333
    style P fill:#ccf,stroke:#333
To copy from a VCR
Refer to "Copying from a video cassette recorder" (→ page 34).
Connecting a terminal other than the 21-pin Scart terminal ( page 11).
After completing the above connections, proceed to the TV Tuning ( page 12).
Other connections
Connecting to a television with AUDIO/VIDEO terminals
Television's rear panel
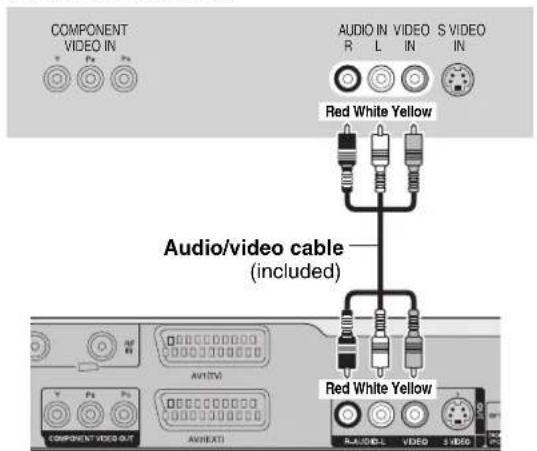
This unit's rear panel
Connecting to a television with S VIDEO terminals
The S VIDEO OUT terminal achieves a more vivid picture than the VIDEO OUT terminal. (Actual results depend on the television.)
Television's rear panel
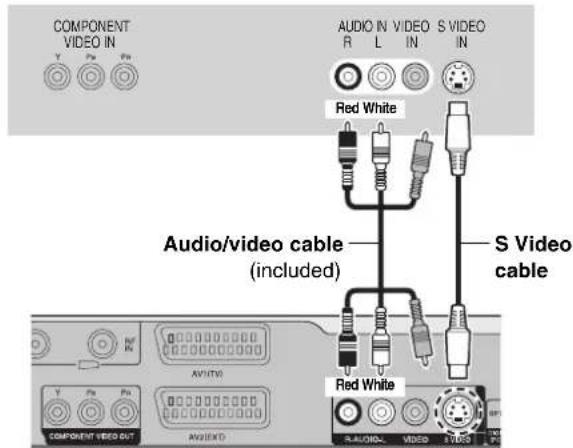
This unit's rear panel
Connecting to a television with COMPONENT VIDEO terminals
Television's rear panel
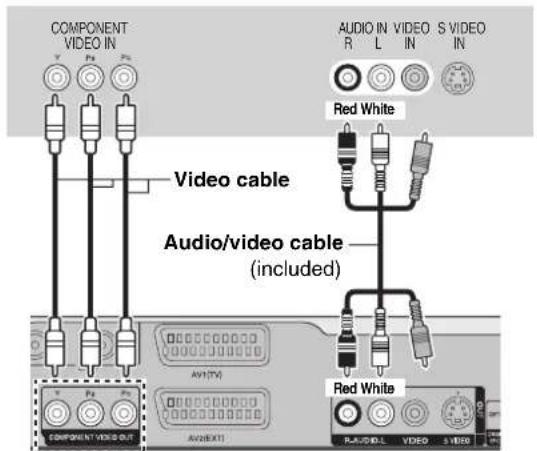
This unit's rear panel
COMPONENT VIDEO terminals can be used for either interlace or progressive output ( page 49) and provide a purer picture than the S VIDEO OUT terminal.
- Connect to terminals of the same colour.
If you have a regular television (CRT : cathode ray tube)
Use component output with progressive "Off" (Factory setting, page 40), even if it is progressive compatible, because progressive output can cause some flickering. This is the same for multi system televisions using PAL mode.
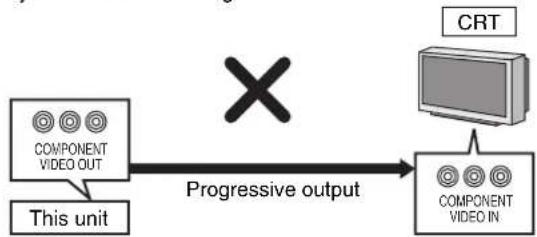
flowchart
graph LR
    A["COMPONENT VIDEO OUT"] --> B["This unit"]
    C["CRT"] --> D["COMPONENT VIDEO IN"]
    D -->|Progressive output| B
Connecting to an amplifier or system component
■Connecting to an amplifier with a digital input terminal
- To enjoy multi-channel surround sound DVD-Video, connect an amplifier with Dolby Digital, DTS and MPEG decoders.
Required setting
"Digital Audio Output" in the Setup menu (→ page 40)
- Before purchasing an optical digital audio cable, check the terminal shape of the connected equipment.
- You cannot use DTS Digital Surround decoders not suited to DVD.
- Even if using this connection, output will be only 2 channels when playing DVD-Audio.
■Connecting to a stereo amplifier
Amplifier's rear panel
This unit's rear panel
TV Tuning (Auto Setup)

1 Turn on the mains for the television (and connected equipment) and select the AV input for this unit.
2 Press [∅ DVD] to turn the unit on.
- If the TV is Q Link compatible, it will start to download TV tuning information to this unit.
- If the TV is not Q Link compatible, Auto Setup will start to tune in all available TV stations. This may take about 5 minutes.
3 When setup has completed, the confirmation screen appears. Press [ENTER].
4 The Owner ID settings screen appears. Press [▶] and press the numbered buttons to enter your choice of a 4-digit PIN number.
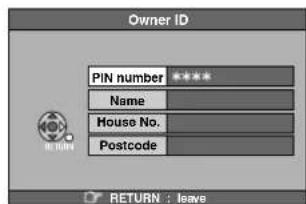
Make a note of the PIN number (don't forget), as it is not possible to return to the factory preset.
5 Press [ENTER] to store the PIN number.
6 Press [◀,▶] to select "Yes" and press [ENTER]. The cursor moves to "Name".
7 Press [▶].
8 Press [▲,▼] to select a letter and then press [▶] to move to next character. Repeat this to enter the name.
9 Press [ENTER] to store the name.
10 Press [▼] and [▶], and then repeat steps 8, 9 to enter and store “House No.” and “Postcode”.
11 Press [RETURN]. The Owner ID settings screen disappears.
To abort Auto Setup Press [RETURN].
■If the clock setting menu appears Set the clock manually (→page 41).
■To confirm that stations have been tuned correctly (→page 42)
■ Resetting channel setting ( page 42)
■To enter the satellite station's name (→page 42)
The name of the satellite station may not be set automatically. ("——" will appear under "Name" in the programme list.) In this case, enter the name manually.
Note
If this unit is connected to a digital TV (Freeview), only the analogue station's tuning information will be downloaded.
Timer recording from satellite receiver with VIDEO Plus+
This unit is not designed to control (turn on or change channels on) your satellite receiver. However, you can use VIDEO Plus+ Recording by making the satellite receiver's VIDEO Plus+ numbers available for recognition on this unit. Take the following steps to make all satellite stations available for recognition on this unit.
Through these steps, you can make timer recording from satellite stations with VIDEO Plus+ constantly available as the unit keeps the setting in memory.
Preparation
- Turn on the Satellite receiver(s).
- Select a correct station on the Satellite receiver(s).
1 Press [VIDEO Plus+].
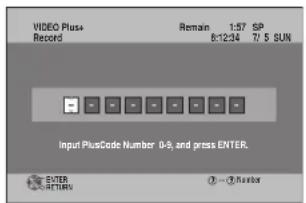
2 Press the numbered buttons to enter the VIDEO Plus+ number for a satellite station (e.g. Sky One).
- To correct the number Press [◀] to correct any mistakes.
3 Press [ENTER].
“——” will appear in the “Name” column.
4 Press [▲,▼] to select the channel or AV input that is to be used for recording from the satellite station.
5 Press [ENTER].
6 Press [▲] to select the programme that you have just set and press [] to delete it from the timer recording list.
It is no longer needed.
Repeat the steps above until you have set dummy timer recordings for each of the satellite stations that you will make VIDEO Plus+ recordings from.
To exit the screen
Press [RETURN].
Set up to match your television and remote control
Selecting television type and aspect
Choose the setting to suit your television and preference.
1 While stopped
Press [FUNCTIONS].
2 Press [▲,▼] to select "To Others" and press [ENTER].
3 Press [▲,▼] to select "Setup" and press [ENTER].
4 Press [▲,▼] to select "Connection" and press [▶].
5 Press [▲,▼] to select "TV Aspect" and press [ENTER].
6 Press [▲,▼] to select the TV aspect and press [ENTER].
• 16:9: 16:9 widescreen television
• 4:3: 4:3 standard aspect television
RAM Even if it records and plays, the aspect does not change.
DVD-V Video recorded for a widescreen is played as Pan & Scan (unless prohibited by the producer of the disc) (→page 49).
- Letterbox: 4:3 standard aspect television Widescreen picture is shown in the letterbox style (→page 49).
To enjoy progressive video
You can enjoy progressive video by connecting this unit's COMPONENT VIDEO OUT terminals to an LCD/plasma television or LCD projector compatible with progressive scan (→page 49).
1 While stopped
Press [FUNCTIONS].
2 Press [▲,▼] to select "To Others" and press [ENTER].
3 Press [▲,▼] to select "Setup" and press [ENTER].
4 Press [▲,▼] to select "Connection" and press [▶].
5 Press [▲,▼] to select "AV1 Output" and press [ENTER].
6 Press [▲,▼] to select "Video (with component)" or "S Video (with component)" and press [ENTER].
Set according to the signal and terminal of the connected TV.
7 Press [▲,▼] to select "Progressive" and press [ENTER].
8 Press [▲,▼] to select "On" and press [ENTER].
Output becomes progressive.
Note
- When connected to a CRT (Cathode ray tube) television or a multi system television using PAL mode, even if it is progressive compatible, progressive output can cause some flickering. Turn off "Progressive" if this occurs.
- Picture will not be displayed correctly if connected to an incompatible television.
- There is no output from the COMPONENT VIDEO OUT terminals if "AV1 Output" in the Setup menu is set to "RGB 1 (without component)" or "RGB 2 (without component)" (→page 40).
Television operation
You can operate the TV through the unit's remote control.
Point the remote control at the television While pressing [☐TV], enter the code with the numbered buttons.
$$ \text { e.g., } 0 1: [ 0 ] \rightarrow [ 1 ] $$
Manufacturer and Code No.
| Brand Code | Brand Code | ||
| Panasonic | 01/02/03/04/45 | NOKIA 25/26/27 | |
| AIWA 35 NORDMENDE 10 | |||
| AKAI 27/30 ORION | 37 | ||
| BLAUPUNKT | 09 | PHILIPS | 05/06 |
| BRANDT | 10/15 PHONOLA | 31/33 | |
| BUSH | 05/06 | PIONEER | 38 |
| CURTIS | 31 PYE | 05/06 | |
| DESMET | 05/31/33 | RADIOLA | 05/06 |
| DUAL | 05/06 SABA | 10 | |
| ELEMIS | 31 | SALORA | 26 |
| FERGUSON | 10 SAMSUNG | 31/32/43 | |
| GOLDSTAR/LG | 31 | SANSUI | 05/31/33 |
| GOODMANS | 05/06/31 | SANYO | 21 |
| GRUNDIG | 09 | SBR | 06 |
| HITACHI | 22/23/31/40/41/42 | SCHNEIDER | 05/06/29/30/31 |
| INNO HIT | 34 | SELECO | 06/25 |
| IRRADIO | 30 SHARP | 18 | |
| ITT | 25 | SIEMENS | 09 |
| JVC | 17/39 SINUDYNE | 05/06/33 | |
| LOEWE | 07/46 | SONY | 08 |
| METZ | 28/31 TELEFUNKEN | 10/11/12/13/14 | |
| MITSUBISHI | 06/19/20 | THOMSON | 10/15/44 |
| MIVAR | 24 TOSHIBA 16 | ||
| NEC | 36 | WHITEWESTINGHOUSE | 05/06 |
Test by turning on the television and changing channels. Repeat the procedure until you find the code that allows correct operation.
- If your television brand is not listed or if the code listed for your television does not allow control of your television, this remote control is not compatible with your television.
When other Panasonic products respond to this remote control
When other Panasonic products placed nearby affect this unit's remote control, change the remote control code on the main unit and the remote control (the two must match). Under normal circumstances use the factory set code "DVD 1".
To change the code on the main unit
1 While stopped
Press [FUNCTIONS].
2 Press [▲,▼] to select "To Others" and press [ENTER].
3 Press [▲,▼] to select "Setup" and press [ENTER].
4 Press [▲,▼] to select “Others” and press [▶].
5 Press [▲,▼] to select "Remote Control" and press [ENTER].
6 Press [▲,▼] to select the code ("DVD 1", "DVD 2" or "DVD 3") and press [ENTER].
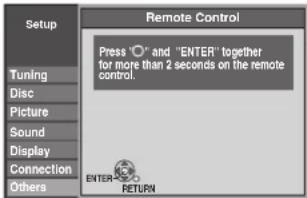
To change the code on the remote control
7 While pressing [ENTER], press and hold the numbered button ([1], [2] or [3]) for more than 2 seconds.
8 Press [ENTER].
■When the following indicator appears on the unit's display

Press and hold [ENTER] and the indicated number button at the same time for more than 2 seconds.
Note
Executing “Shipping Condition” in the Setup menu returns the main unit code to “DVD 1”. Change the remote control code to 1 ( step 7).
To exit the screen
Press [RETURN] several times.
To return to the previous screen
Press [RETURN].
Important notes for recording
| Recording of bilingual programme | RAMBoth main and secondary audio can be recordedYou can change the audio during playback.(→page 24, “Changing audio during play”) If you record from external equipment-Select both “M 1” and “M 2” on the external equipment. If you record from external equipment-Select both “M 1” and “M 2” on the external equipment. | -R -R DL -RW(V) +R +R DL +RWSelect the main or secondary audio before recording(→page 40, “Bilingual Audio Selection”)The selected audio only is recorded. If you record from external equipment-Select “M 1” or “M 2” on the external equipment. If you record from external equipment-Select “M 1” or “M 2” on the external equipment. | |
| Recording of Widescreen broadcasting | RAM16:9 aspect (Widescreen) | -R -R DL -RW(V) +R +R DL +RWRecorded in 4:3 aspect | |
| Recording of digital broadcasting | It is not possible to record digital broadcasts that allow “One time only recording” onto DVD-R, DVD-R DL, DVD-RW, +R, +R DL, +RW or 8 cm DVD-RAM discs. Use a CPRM (→ page 49) compatible DVD-RAM.RAM (CPRM compatible disc only) | -R -R DL -RW(V) +R +R DL +RW ✓: Can do, x: Cannot do ✓: Can do, x: Cannot do | |
| Playing the disc on other DVD players | -R -R DL -RW(V) -R -R DLThe disc must be finalized after recording (→ page 37).It is necessary to finalize DVD-R, etc. on this unit after recording or copying titles to them. You can then play them as a commercially sold DVD-Video. However, the discs become play-only and you can no longer record or copy.* You can record or copy again if you format DVD-RW.  Finalize Finalize  | ||
| Recording to DVD-R DL and +R DL | -R DL +R DLDVD-R DL and +R DL discs have two layers of recording surface on one side.It is not possible to record continuously from the first layer to the second layer. Recording stops when space on the first layer becomes full. You must close the first layer to start recording on the second layer (→ page 37, “Close First Layer”). Closing makes the first layer unavailable for recording (editing is still available). You cannot cancel closing. Make certain before proceeding. | ||
Recording modes and approximate recording times
Depending on the content being recorded, the recording times may become shorter than indicated.
| Recording Mode | DVD-RAM | DVD-R, DVD-RW, +R, +RW 4.7 GB | |
| 4.7 GB | 9.4 GB (Double-sided*1) | ||
| XP (High quality) | 1 h. 2 h. 1 h. | ||
| SP (Standard) | 2 h. 4 h. | 2 h. | |
| LP (Long play) | 4 h. 8 h. | 4 h. | |
| EP (Extra long play) | 8 h. (6 h.**2) | 16 h. (12 h. **2) | 8 h. (6 h. **2) |
| FR (Flexible Recording) | 8 h. maximum | 8 h. maximum for one side | 8 h. maximum |
| Recording Mode | DVD-R DL, +R DL ^3 8.5 GB | |
| First layer (L0) | Second layer (L1) | |
| XP (High quality) | 55 min. | 50 min. |
| SP (Standard) | 1 h. 50 min. | 1 h. 40 min. |
| LP (Long play) | 3 h. 40 min. | 3 h. 20 min. |
| EP (Extra long play) | 7 h. 25 min.(5 h. 30 min. ^*2 ) | 6 h. 50 min.(5 h. 15 min. ^*2 ) |
| FR (Flexible Recording) | 7 h. 25 min.maximum | 6 h. 50 min.maximum |
bar
| Picture quality | Recording time | | :--- | :--- | | XP | 10 | | SP | 25 | | LP | 45 | | EP (6Hours)*² | 70 | | EP (8Hours) | 90 |^1 It is not possible to record or play continuously from one side of a double sided disc to the other.
^2 When “Recording time in EP mode” is set to “EP (6Hours)” in the Setup menu ( page 39). The sound quality is better when using “EP (6Hours)” than when using “EP (8Hours)”.
^3 It is not possible to record continuously from the first layer to the second layer.
Note
- This unit uses variable bit rate (VBR) recording which varies the amount of data recorded to suit the images, so actual recording times and remaining recording times shown by the unit will be different. (The difference will be especially noticeable with DVD-R DL and +R DL.) Use a disc with plenty of remaining time to be sure.
- When recording to DVD-RAM using EP (8Hours) mode, play may not be possible on DVD players that are compatible with DVD-RAM. In this case use EP (6Hours) mode.
FR (Flexible Recording)
The unit automatically selects a recording rate between XP and EP (8Hours) that will enable the recordings to fit in the remaining disc space with the best possible recording quality.
- You can use FR mode in timer recordings (→ page 20, 21, step 3) and Flexible Recording (→ page 19).
Using FR mode is convenient in these kind of situations
- When the amount of free space on the disc makes selecting an appropriate recording mode difficult
- When you want to record a long programme with the best picture quality possible
e.g., Recording a 90 minutes programme to disc
If you select XP mode
The programme will not fit one disc.
If you select SP mode
The programme will fit one disc.

If you select FR mode
The programme will fit one disc perfectly.

Disc Insertion/Ejection
Refer to the control reference on page 14.
When the format confirmation screen is displayed
RAM -RW(V) +R +R DL +RW
When you insert a new disc and a disc recorded on a computer or other equipment, a format confirmation screen might be displayed.
Format the disc to use it. However all the recorded contents are deleted.
Press [◀,▶] to select "Yes" and press [ENTER].
- Several steps are necessary to format a disc. Refer to "Deleting all the contents of a disc –Format Disc" (→page 36).
When remove a recorded disc
-R -R DL -RW(V) +R +R DL
When you press [▲OPEN/CLOSE] on the main unit while stopped:
The screen shown at left appears when you have not processed the disc for play on other equipment.
■When finalizing the disc
Press [●REC].
- You cannot stop this process once you have started it.
- If you want to provide the disc with a name or set play menu select, select "Disc Name" (→ page 36) or "Auto-Play Select" (→ page 37) in "DVD Management" before finalizing.
■When opening the tray without disc finalization Press [▲OPEN/CLOSE] on the main unit.
Recording television programmes
RAM -R -R DL -RW(V)
- You can record up to 99 titles on one disc.
+R +R DL +RW
- You can record up to 49 titles on one disc.
See also the notes "Important notes for recording" (→page 16).
Note
- +RW can create a Top Menu using "Create Top Menu" (→ page 37). Recording or editing on the disc may delete the menu. In that case, create the menu again.
- RAM not possible to record continuously from one side of a double sided disc to the other. You will need to eject the disc and turn it over.
Preparation
- Turn on the television and select the appropriate video input to suit the connections to this unit.
- Turn the unit on.
1 Press [▲ OPEN/CLOSE] on the main unit to open the tray and insert a disc.
- Press the button again to close the tray. - When using 8 cm DVD-RAM, or 8 cm DVD-R, remove the disc from the cartridge.
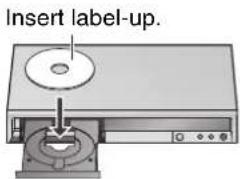
■ Cartridge disc

↑— Insert fully.
2 Press [∧∨CH] to select the channel.
![PANASONIC DMR-ES15EBL - Press [∧∨CH] to select the channel. - 1](/content/2026/05/794710/images/ab2099315ffc99add838e958f4ef9455b494895caaff9d2e32d9318ac9fee5bc.jpg)
To select with the numbered buttons:
$$ \begin{array}{l} e. g., \quad 5: \quad [ 0 ] \rightarrow [ 5 ] \ 1 5: \quad [ 1 ] \rightarrow [ 5 ] \ \end{array} $$
3 Press [REC MODE] to select the recording mode (XP, SP, LP or EP).

4 Press [● REC] to start recording.
![PANASONIC DMR-ES15EBL - Press [● REC] to start recording. - 1](/content/2026/05/794710/images/9c78fda4b96dfc3821be0aa29bd299f4e5766ae160128dc400c474c0937d3feb.jpg)
The elapsed time is shown on the display. Recording will take place on open space on disc. Data will not be overwritten.
- You cannot change the channel or recording mode during recording. You can change the channel or recording mode while paused; however, the recording will then be as a separate title.
- You can record while the unit is in standby for timer recording, but once the time for the timer recording to begin is reached, any recording taking place will stop and the timer recording will begin.
- RAM can change the audio being received by pressing [AUDIO] during recording. (This does not affect the actual recording of the audio.)
■To pause recording
Press [11].
Press again to restart recording.
You can also press [●REC] to restart.
(Recorded title is not split into separate titles.)
■To stop recording
Press [■].
- From the start to the end of the recording is called one title.
- -R -R DL -RW(V) +R +R DL +RW
It takes about 30 seconds for the unit to complete recording management information after recording finishes.
■If a station also broadcasts Teletext information
The unit automatically records the programme name and station name if the station's "Title Page" is correctly set (→page 42).
- The unit may take some time to retrieve titles (up to 30 minutes) and may fail in some cases.
Quick Start
1 Sec. Quick Start for Recording on DVD-RAM
Recording on DVD-RAM starts about 1 second after first pressing [∅/l] on the main unit or [∅ DVD] to turn on the unit and then sequentially pressing [● REC].
Note
Startup takes more time when:
-you play a disc or start recording to discs other than DVD-RAM.
-the clock has not been set.
To specify a time to stop recording-One Touch Recording
During recording
Press [● REC] on the main unit to select the recording time.
- The unit's display changes as shown below.

- This does not work during timer recordings (→ page 20) or while using Flexible Recording (→ below).
- If you change the channel or recording mode while recording is paused, the time specified to stop recording is cancelled.
- The unit turns off automatically after the time to stop recording is reached.
To cancel
Press [●REC] on the main unit several times until the counter appears.
- The time to stop recording is cancelled; however, recording continues.
To stop recording partway
Press [■].
Flexible Recording
(Recording that fits the remaining disc space)
RAM R-R DL-RW (V) +R+R DL +RW
The unit sets the best possible picture quality that fits the recording within the remaining disc space. The recording mode becomes FR mode. Refer to “FR (Flexible Recording)” ( page 17).
Preparation
- Select the channel or the external input to record.
1 While stopped
Press [FUNCTIONS].
2 Press [▲,▼] to select “To Others” and press [ENTER].
3 Press [▲,▼] to select "Flexible Rec" and press [ENTER].
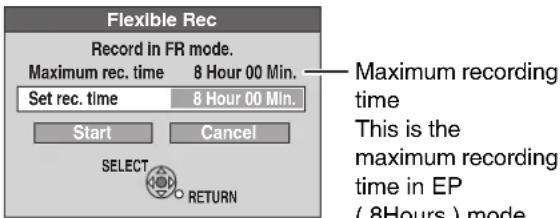
4 Press [◀,▶] to select “Hour” and “Min.” and press [▲,▼] to set the recording time.
- You can also set the recording time with the numbered buttons.
- You cannot record for more than 8 hours.
5 When you want to start recording
Press [▲,▼,◀,▶] to select “Start” and press [ENTER].
Recording starts.
To exit the screen without recording
Press [RETURN].
e.g., DVD-RAM
To stop recording partway Press [■].
To show the remaining time Press [STATUS].
Note
When performing EXT LINK recording ( page 23), the flexible recording function does not work.
Playing while you are recording
RAM
Playing from the beginning of the title you are recording-Chasing playback
Press [▶] (PLAY) during recording.
- There is no sound output while searching forward or backward.
To stop play
Press [■].
To stop recording
① Press [■] to stop playing.
② Press [■] (after 2 seconds).
To stop timer recording
① Press [■] to stop playing.
② Press [■] (after 2 seconds).
③ Press [◀,▶] to select "Stop Recording" and press [ENTER].
Playing a title previously recorded while recording—Simultaneous rec and play
1 Press [DIRECT NAVIGATOR] during recording.
2 Press [▲,▼,◀,▶] to select a title and press [ENTER].
To stop play
Press [■].
To stop recording
① Press [■] to stop playing
② Press [DIRECT NAVIGATOR] to exit screen.
③ Press [■].
To stop timer recording
① Press [■] to stop playing
② Press [DIRECT NAVIGATOR] to exit screen.
③ Press [■].
④ Press [◀,▶] to select "Stop Recording" and press [ENTER].
Timer recording
DVD
Numbered buttons
VIDEO Plus+

PROG/CHECK

A
REC MODE
See also the notes "Important notes for recording" (→page 16).
Preparation
- Turn on the television and select the appropriate video input to suit the connections to this unit.
- Check the time on the unit is correct.
- Insert a disc ( page 18).
Entering VIDEO Plus+ number is an easy way of timer recording. You can find these numbers in TV listings in newspapers and magazines.
- You can enter up to 16 programmes up to a month in advance.
- Using VIDEO Plus+ numbers for Satellite stations Set this unit to recognise VIDEO Plus+ numbers for Satellite stations before you start the following operations (→ page 13, Timer recording from satellite receiver with VIDEO Plus+).
1 Press [VIDEO Plus+].
$$ \begin{array}{c} {{\mathrm{VIDEOPres+}}} \ {{\mathrm{Recent}}} \end{array} $$
$$ \begin{array}{c c c} \text {Remain} & 1: 3 7 & \text {SP} \ 0: 1 2: 3 4 & 7: 5 & \text {SUN} \end{array} $$
$$ \begin{array}{c} \text { 13 TLR. } \ \text { BETLER } \end{array} $$
$$ \mathrm{I} - 1 \mathrm{Number} $$
2 Press the numbered buttons to enter the VIDEO Plus+ number.
- To correct the number Press [◀] to move back to correct a digit.
3 Press [ENTER].
$$ \begin{array}{c} \text {Liter} \ \text {Rotating;} \end{array} $$
$$ \begin{array}{c c c} \text {Remain} & 1: 5 7 & \text {SP} \ 8: 1 4 5 6 & 7: 5 & \text {SUN} \end{array} $$
$$ \mathrm{BECI} $$
$$ \text { Programme Name } $$
- Confirm the programme and make corrections if necessary using [▲,▼,◀,▶] (→ page 21, Manually programming timer recordings, step 3).
- When “——” appears in the “Name” column, you cannot set timer recording. Press [▲,▼] to select desired programme position. After you have entered the information of a TV station, it is kept in the unit’s memory.
- You can also press [REC MODE] to change the recording mode.
- To enter programme name Press [◀▶] to select "Programme Name" and press [ENTER] (→page 43).
4 Press [ENTER].
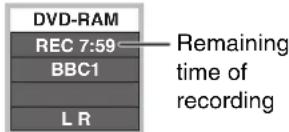
The settings are stored and the programme goes to timer recording standby. The timer icon is displayed in left column.
Timer Recording
Timer icon
01 BBC1
“∅” lights on the unit's display to indicate timer recording standby has been activated.
01 BBC1 7/5 SUN 19:00 20:00 SP OK New Timer Programme
When “!” appears, make sure the disc has a sufficient space.
Repeat steps 1–4 to programme other recordings.
■ Notes on timer recording (→ page 21)
To exit the timer recording list Press [PROG/CHECK].
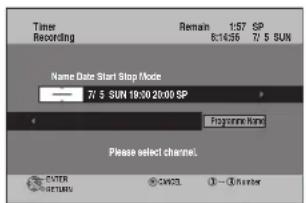
Manually programming timer recordings
You can enter up to 16 programmes up to a month in advance.
(Each daily or weekly programme is counted as one programme.)
1 Press [PROG/CHECK].
2 Press [▲,▼] to select "New Timer Programme" and press [ENTER].
3 Press [▶] to move through the items and change the items with [▲,▼].
![PANASONIC DMR-ES15EBL - Press [▶] to move through the items and change the items with [▲,▼]. - 1](/content/2026/05/794710/images/3bdc9eccb4322c9eb8afdf40aa28be67a35dc710fd84b2c229da16d8ab0c857f.jpg)
- Press and hold [▲,▼] to alter Start (Start time) and Stop (Finish time) in 30-minute increments.
- You can also set Name (Programme position/TV Station Name), Date, Start (Start time), and Stop (Finish time) with the numbered buttons.
- You can also press [REC MODE] to change the recording mode.
- Date
Date: Current date up to one month later minus one day ↓↑ Daily timer: SUN-SAT → MON-SAT → MON-FRI ↓↑ Weekly timer: SUN → --- → SAT
• To enter programme name
Press [◀▶] to select "Programme Name" and press [ENTER] (→page 43).
4 Press [ENTER].
The settings are stored and the programme goes to timer recording standby.
The timer icon is displayed in left column.
“💡” lights on the unit’s display to indicate timer recording standby has been activated.

Repeat steps 2–4 to programme other recordings.
To exit the timer recording list
Press [PROG/CHECK].
To cancel recording when recording has already begun
1 When this unit is on
Press [■].
The confirmation screen appears.
2 Press [◀,▶] to select "Stop Recording" and press [ENTER].
Recording stops and the timer recording is cancelled. (Daily and weekly timers remain and timer recording will start as programmed.)
To release the programme from recording standby
1 Press [PROG/CHECK].
2 Press [▲,▼] to select the programme and press [A].
The timer icon ( left) disappears.
• To put the programme on recording standby again
Perform step 2 again before the programme start time to put the programme on recording standby. Timer recording will work only if the timer icon is displayed.
Notes on timer recording
- “①” flashes on the unit’s display for about 5 seconds when the unit cannot go to timer recording standby (e.g., a recordable disc is not in the disc tray).
- Timer recordings begin when the set time is reached even when recording or when playing.
- If the unit is turned on when timer recording begins, it remains turned on after recording finishes. It does not turn off automatically. You can turn the unit off during timer recording.
- If the unit is not put in the timer recording standby mode at the last 10 minutes before the programmed timer recording starting time, “☐” flashes on the unit’s display. In this case, insert a recordable disc to put the unit in the timer recording standby mode.
- If you are making consecutive recordings that will start one after the other, the beginning of the later programme cannot be recorded.
e.g., Programme① 10:00–11:00
Programme② 11:00–12:00
- If the actual broadcasting times of timer recordings overlap, the recording that starts first always has priority, and the recording of the later programme will start only after the first timer recording has finished.
Refer to the control reference on page 20.
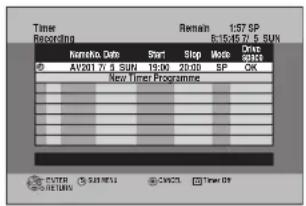
Check, change or delete a programme
Even when the unit is turned off, you can display the timer recording list by pressing [PROG/CHECK].
Press [PROG/CHECK].
Icons
Timer recording standby is activated.
● This programme is currently recording.
w The times overlap those in another programme. Recording of the programme with the later start time starts when the earlier programme finishes recording.
- You stopped a weekly or daily timer recording. The icon disappears the next time the timer programme starts recording.
F The disc was full so the programme failed to record.
The material was copy-protected so it was not recorded
✗ The programme did not complete recording because the disc is dirty or some other reason.
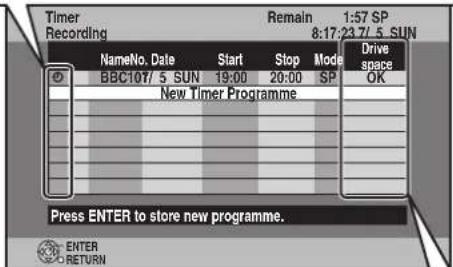
Message displayed in the "Drive space" line
OK: Displayed if the recording can fit in the remaining space.
→ (Date): For recordings made daily or weekly, the display will show until when recordings can be made (up to a maximum of one month from the present time) based on the time remaining on the disc.
!: It may not be possible to record because:
• the disc is write-protected
- there is no more space left
- the number of possible titles has reached its maximum.
■To change a programme
Press [▲,▼] to select the programme and press [ENTER]. (→ page 21, Manually programming timer recordings, step 3)
■To delete a programme
Press [▲,▼] to select the programme and press [*].
■To exit the timer recording list Press [PROG/CHECK].
- Programmes that failed to record are deleted from the timer recording list at 4 a.m. two days later.
Making timer recordings on the television
(e.g., of digital broadcasts)
To make a timer recording with your television, connect to a television with a Q Link function ( page 38) that you can use for setting timer recordings using a fully wired 21-pin Scart lead ( page 8–10).
1 Make timer programming on the TV.
2 Press [∅ DVD] to put the unit in "standby" mode.
The start and end of recording is controlled by TV.
To stop recording
Press [■].
Note
- When this unit is in EXT LINK standby ("EXT-L" on the unit's display), recording from TV does not start.
- Programmes are recorded as one title on this unit when the end time of the earlier timer recording and the start time of the later timer recording are close to each other.
RAM To divide the titles, go to "Divide Title" (→ page 31).
Recording from a satellite/digital terrestrial receiver
RAM R-R DL-RW(V)+R+DL-RW
Preparation
- Insert a disc ( page 18).
- When recording a bilingual programme (→ page 16).
Manual Recording
Preparation
- Connect a satellite/digital terrestrial receiver to this unit's input terminals (→page 9).
- When the output signal from the external equipment is NTSC, change the "TV System" to "NTSC" in the Setup menu (→page 43).
1 While stopped
Press [INPUT SELECT] to select the input channel for the equipment you have connected.
e.g., If you have connected to the AV2 input terminals, select "AV2".
2 Press [REC MODE] to select the recording mode.
3 Select the channel on the other equipment.
4 Press [●REC].
Recording starts.
To skip unwanted parts
Press [1] to pause recording. (Press again to restart recording.)
To stop recording
Press [■].
Linked timer recordings with external equipment (SKY Digital STB/digital terrestrial receiver)—EXT LINK
To record programmes from a SKY Digital STB/digital terrestrial receiver using timer programming
Preparation
- Make sure you connect the AV2 input terminal of this unit to "VCR Scart Terminal" of a SKY Digital STB/digital terrestrial receiver with a 21-pin scart lead (→ page 9).
- Set the "AV2 Input" and "Ext Link" to match the connected equipment in the Setup menu (→ page 41).
1 Make timer programming on SKY Digital STB/digital terrestrial receiver.
2 Press [EXT LINK].
The unit turns off and "EXT-L" lights on the unit's display to indicate timer recording standby has been activated.
To cancel the external control
Press [EXT LINK] to stop recording or to cancel linked timer recording standby.
- In order to prevent accidental operation, press [EXT LINK] to cancel the setting after recording is finished.
For your reference
- This function does not work with some equipment. Refer to the equipment's operating instructions.
- The beginnings of recordings may not be recorded correctly in some cases.
- When "Ext Link" is set to "Ext Link 2", this function does not work if the input signal is NTSC system.
- Programmes are recorded as one title on this unit when the end time of the earlier timer recording and the start time of the later timer recording are close to each other.
RAM To divide the titles, go to "Divide Title" (→page 31).
- While the unit is in EXT LINK standby mode or recording, video picture is from the AV2 input terminal irrespective of "AV1 Output" setting.
Preparation
- Turn on the television and select the appropriate video input to suit the connections to this unit.
- Turn on this unit.
1 Insert a disc ( page 18).
2 Press [▶] (PLAY).
RAM -R -R DL -RW(V) +R +R DL +RW -RW(VR)
Play starts from the most recently recorded title.
DVD-V DVD-A CD P VCD
Play starts from the beginning of the disc.
![PANASONIC DMR-ES15EBL - Press [▶] (PLAY). - 1](/content/2026/05/794710/images/b103050fd39863d1a811900818b7d21c9fdee09c045cd26eeeab910c288cfd19.jpg)
■When a menu screen appears on the television
DVD-V DVD-A
Press [▲,▼,◀,▶] to select the item and press [ENTER].
Some items can also be selected using the numbered buttons.
VCD
Press the numbered buttons to select the item.
$$ \text { e.g., } 5: [ 0 ] \rightarrow [ 5 ] 1 5: [ 1 ] \rightarrow [ 5 ] $$
• To return to the menu screen
DVD-V Press [DIRECT NAVIGATOR] or [SUB MENU].
DVD-A Press [DIRECT NAVIGATOR].
VCD Press [RETURN].
- The playing method may differ from the one described above depending on disc types. Read the disc's instructions carefully.
Selecting recorded programmes (titles) to play-Direct Navigator
Simply select the recorded programmes (titles) you want to play from the menu.
RAM -R -R DL -RW(V) +R +R DL +RW -RW(VR)
1 Press [DIRECT NAVIGATOR].

2 Press [▲,▼,◀,▶] to select the title and press [ENTER].
You can also select titles with the numbered buttons. e.g., 5: [0] → [5] 15: [1] → [5]
To show other pages
Press [◀◀] (Previous) or [▶▶] (Next).
To exit the screen
Press [DIRECT NAVIGATOR].
Direct Navigator screen icons
● Currently recording.
Title protected.
Title that was not recorded due to recording protection (Digital broadcasts etc.)
✗ Title cannot be played because data is damaged.
Title with "One time only recording" restriction
(NTSC) Title recorded using a different encoding system from that of the TV system currently selected on the unit.
Note
- RAM -R -R DL -RW(V) +R +R DL +RW The unit stops playing a disc when timer recording starts.
- RAM Press [▶] (PLAY) when you wish to start playing the disc while recording (→ page 19, "Chasing playback").
Changing audio during play
Press [AUDIO].
RAM RW(VR) /CD
![PANASONIC DMR-ES15EBL - Press [AUDIO]. - 1](/content/2026/05/794710/images/f7a6b4ef5178f0fcb9758b2deef9f3f02d0a81c757bc8a94d5e23aacb5742807.jpg)
e.g., "L R" is selected
![PANASONIC DMR-ES15EBL - Press [AUDIO]. - 2](/content/2026/05/794710/images/fbc7a7befb05024c6e97e42e96ec71b2ee943e561ec7058e9c15f6becbad68b0.jpg)
DVD-V DVD-A
You can change the audio channel number each time you press the button. This allows you to change things like the soundtrack language.

e.g., DVD-V English is the selected language ( page 28, Soundtrack).
Operations during play
| Stop | Press [■].The stopped position is memorized.Resume play functionPress [▶] (PLAY) to restart from this position.The stopped position is cleared when:–you press [■] several times.–you open the tray.–DVD-A [CD] VCDyou turn the unit off. |
| Pause | Press [■].Press again or press [▶] (PLAY) to restart play. |
| Search | Press [◀◀] or [▶▶].• The speed increases up to 5 steps (+R +R DL +RW ps).• P re s s [▶] (PLAY) to restart play.• Audio is heard during first level search forward.DVD-A (excluding motion picture parts) CD d MP3Audio is heard during all levels of search.• Depending on the disc, searching may not be possible. |
| Skip | During play or while paused, press [◀◀] or [▶▶].The unit will skip titles, chapters, or tracks according to the number of times the button is pressed and play will begin. |
| Starting from a selected title | Press the numbered buttons.Play starts from the selected title, chapter or track.MP3/JPEGe.g., 5: [0] → [0] → [0] → [5]15: [0] → [0] → [1] → [5]DVD-A Selecting groups Other discs (You can select a trackWhile stopped (screen saver is displayed on the television → right)e.g., 5: [5] e.g., 5: [0] → [5]15: [1] → [5]This works only when stopped (screen saver is displayed on the television → above) with some discs.•VCD h playback control)If you press the numbered buttons while stopped (the above screen saver is displayed on the television) you can cancel PBC. (Elapsed play time appears on the unit's display.) |
| Quick View RAM | Press and hold [▶] (PLAY/x1.3).Play speed is quicker than normal.• Press again to return to normal speed. |
| Slow-motion*RAM -R -R DL -RW(V) +R +R DL+RW DVD-VDVD-A (Motion picture parts only)-RW(VR) VCD | While paused, press [◀◀] or [▶▶].• The speed increases up to 5 steps.• P re s s [▶] (PLAY) to restart play.•VCD ward direction [▶▶] only.• The unit will pause if slow-motion play is continued for approximately 5 minutes (excluding DVD-V DVD-A VCD). |
| Frame-by-frame*RAM -R -R DL -RW(V) +R +R DL+RW DVD-VDVD-A (Motion picture parts only)-RW(VR) VCD | While paused, press [◀◀] or [■■].• Each press shows the next frame.• Press and hold to change in succession forward or backward.• P re s s [▶] (PLAY) to restart play.•VCD ward direction [■■] only. |
| Skipping the specified time (Time Slip)*RAM -R -R DL -RW(V) +R +R DL+RW -RW(VR) | 1 Press [TIME SLIP].2 Press [▲,▼] to select the time and press [ENTER].Play skips the specified time.• Each time you press [▲,▼], the time increases [▲] or decreases [▼] by 1 minute intervals. (Press and hold for 10-minute intervals.) |
| Manual Skip*RAM -R -R DL -RW(V) +R +R DL+RW -RW(VR) | Press [MANUAL SKIP].Play restarts from approximately 30 seconds later. |
| Create Chapter RAM(→page 30, Title/Chapter) | Press [CREATE CHAPTER].Chapters are divided at the point pressed.• Press [◀◀,▶▶] to skip to the start of a chapter.• You cannot create chapters when the unit is in EXT LINK standby. |
* Excluding MP3/JPEG
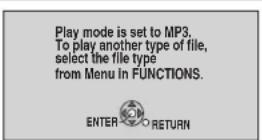
Using menus to play MP3 and still pictures (JPEG/TIFF)
Regarding MP3 and still pictures (JPEG/TIFF)
- Compatible formats: ISO9660 level 1 or 2 (except for extended formats) and Joliet
- Maximum number of files (tracks) and folders (groups) recognizable: 3000 files ^1 (tracks) and 300 (including the root folder) folders (groups)
*1 Total number of recognizable file including MP3, JPEG and other type of files is 4000.
- This unit is compatible with multi-session but reading or play of the disc may take time if there are a lot of sessions.
- Operation may take time to complete when there are many files (tracks) and/or folders (groups) and some may not display nor be playable.
- English alphabet and Arabic numerals are displayed correctly. Other characters may not be displayed correctly.
- The display order on this unit may differ from how the order is displayed on a computer.
- Depending on how you create the disc (writing software), files (tracks) and folders (groups) may not play in the order you numbered them.
- This unit is not compatible with packet-write format.
- Depending on the recording, some items may not be playable.
Regarding MP3
- File format: MP3
Files must have the extension ".mp3" or ".MP3".
- Bit rates: 32 kbps to 320 kbps
- Sampling frequency: 16 kHz/22.05 kHz/24 kHz/32 kHz/44.1 kHz/48 kHz
- This unit is not compatible with ID3 tags.
- If there is a large amount of still picture data etc. within a MP3 file, play may not be possible.
Regarding still pictures (JPEG/TIFF)
- File format: JPEG, TIFF (non-compressed RGB chunky format)
Files must have the extension ".jpg", ".JPG", ".tif" and ".TIF".
• Number of pixels: 34 x 34 to 6144 x 4096 (Sub sampling is 4:2:2 or 4:2:0)
- Operation may take time to complete when playing TIFF format still pictures.
- MOTION JPEG is not supported.
- You can play MP3 and still pictures (JPEG/TIFF) on this unit by making folders as shown below. However depending on how you create the disc (writing software), play may not be in the order you numbered the folders.
Structure of MP3 folders
Prefix with 3-digit numbers in the order you want to play them.
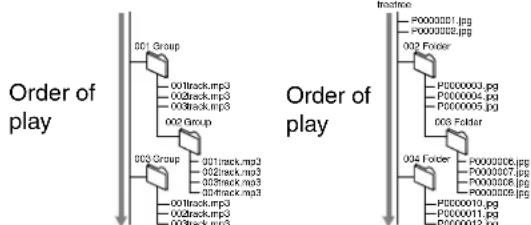
*2 When the highest level folders are "DCIM" folders, they are displayed first on the tree.
Refer to the control reference on page 24.
Playing MP3
You can play CD-R/RW and DVD-R discs which contain MP3 files that have been recorded on a computer.
The screen shown at right is displayed when you insert a disc containing MP3 files and still pictures (JPEG/TIFF).
Press [ENTER], and follow the steps below.
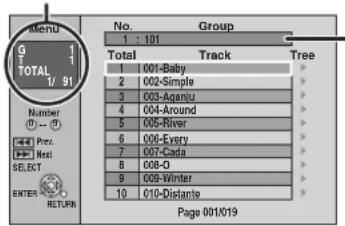
1 Press [DIRECT NAVIGATOR].
G: Group no.
T: Track no. in the group
TOTAL: Track no./Total track no. in all groups
Selected group
- Files are treated as tracks and folders are treated as groups.
2 Press [▲,▼] to select the track and press [ENTER].
Play starts on the selected track.
- “”indicates the track currently playing.
- You can also select the track with the numbered buttons.
$$ \begin{array}{l} \text { e.g., } 5: \quad [ 0 ] \rightarrow [ 0 ] \rightarrow [ 0 ] \rightarrow [ 5 ] \ 1 5: \quad [ 0 ] \rightarrow [ 0 ] \rightarrow [ 1 ] \rightarrow [ 5 ] \ \end{array} $$
To show other pages
Press [◀◀] (Previous) or [▶▶] (Next).
■To select other group
1 Press [▶].
G: Selected group no. /Total group no. If the group has no track, “—” is displayed as group number.
2 Press [▲,▼] to select a group and press [ENTER].
The file list for the group appears.
To stop playing
Press [■].
To return to the previous screen
Press [RETURN].
To switch to JPEG menu
(→page 27, "To select JPEG Menu")
To exit the screen
Press [DIRECT NAVIGATOR].
Playing still pictures (JPEG/TIFF)
You can play CD-R/RW and DVD-R discs which contain still pictures (JPEG/TIFF) that have been recorded on a computer.
The screen shown at right is displayed when you insert a disc containing MP3 files and still pictures (JPEG/TIFF). Press [ENTER], and follow the steps below.

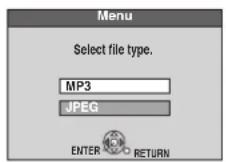
■To select JPEG Menu
1 Press [FUNCTIONS].
2 Press [▲,▼] to select "Menu" and press [ENTER].
3 Press [▲,▼] to select "JPEG" and press [ENTER].
→below, step 2
1 Press [DIRECT NAVIGATOR].
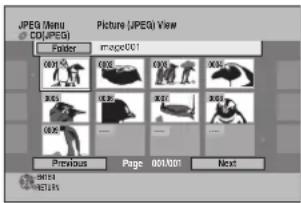
2 Press [▲,▼,◀,▶] to select the still picture and press [ENTER].
- The selected still picture is displayed on the screen.
- You can also select still pictures with the numbered buttons.
$$ \begin{array}{l l} \text {e.g., 5:} & [ 0 ] \to [ 0 ] \to [ 0 ] \to [ 5 ] \ 1 5: & [ 0 ] \to [ 0 ] \to [ 1 ] \to [ 5 ] \end{array} $$
To show other pages
Press [◀◀] (Previous) or [▶▶] (Next).
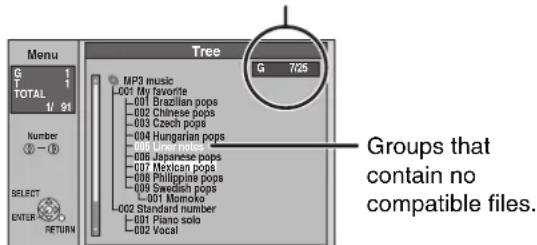
■To select another folder
While the JPEG Menu is displayed
1 Press [▲,▼,◀,▶] to select "Folder" and press [ENTER].
F: Selected folder no./Total folder no.
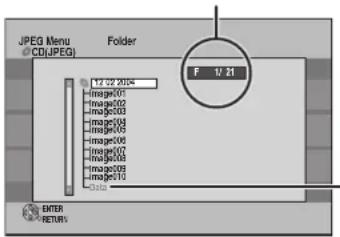
Folders that contain no compatible files.
2 Press [▲,▼] to select the folder and press [ENTER].
To display the previous or next still picture during play Press [◀▶].
To stop playing
Press [■].
- The unit remembers the still picture where you stopped play. This is cleared when you turn the unit off or remove the disc.
To return to the previous screen
Press [RETURN].
To switch to MP3 menu
Select "MP3" in step 3 of "To select JPEG Menu" (→ above).
To exit the screen
Press [DIRECT NAVIGATOR].
Useful functions during still picture play
You can display still pictures one by one with constant interval.While the JPEG Menu is displayed1Press [▲,▼,◄,►] to select “Folder” and press [SUB MENU].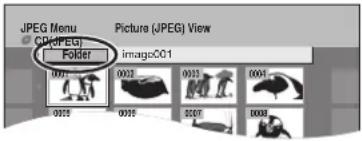 | ||
| Start Slide ShowSlide Interval | 2Press [▲,▼] to select “Start Slide Show” and press [ENTER].To change the slide interval1In step 2above, press [▲,▼] to select “Slide Interval” and press [ENTER].2Press [◄►] to select the slide interval and press [ENTER].• You can select a slide interval between 0-30 seconds. | 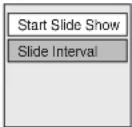 |
| Rotate | While playing1Press [SUB MENU]2Press [▲,▼] to select “Rotate RIGHT” or “Rotate LEFT” and press [ENTER].To return the rotated picture to its original positionPress [▲,▼] to select the opposite rotation in step 2and press [ENTER].• Rotation information will not be stored. | 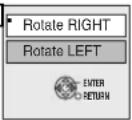 |
| Zoom in Zoom out | While playing1Press [SUB MENU]2Press [▲,▼] to select “Zoom in” and press [ENTER].To return the picture to its original sizePress [▲,▼] to select “Zoom out” in step 2and press [ENTER].• When zooming in, the picture may be cut off.• The enlargement information will not be stored.• The “Zoom in/Zoom out” function is only available for still pictures smaller than 640 x 480 pixels. | 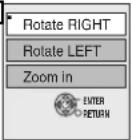 |
| Properties | While playingPress [STATUS] twice.[IMAGE]Shooting dateTo exit the picture properties screenPress [STATUS] again. | |
| Start Slide ShowSlide Interval | You can display still pictures one by one with constant interval.While the JPEG Menu is displayed1Press [▲,▼,◄,►] to select “Folder” and press [SUB MENU].2Press [▲,▼] to select “Start Slide Show” and press [ENTER].To change the slide interval1In step 2above, press [▲,▼] to select “Slide Interval” and press [ENTER].2Press [◄►] to select the slide interval and press [ENTER].• You can select a slide interval between 0-30 seconds. |
| Rotate | While playing1Press [SUB MENU].2Press [▲,▼] to select “Rotate RIGHT” or “Rotate LEFT” and press [ENTER].To return the rotated picture to its original positionPress [▲,▼] to select the opposite rotation in step 2and press [ENTER].• Rotation information will not be stored. |
| Zoom in Zoom out | While playing1Press [SUB MENU].2Press [▲,▼] to select “Zoom in” and press [ENTER].To return the picture to its original sizePress [▲,▼] to select “Zoom out” in step 2and press [ENTER].• When zooming in, the picture may be cut off.• The enlargement information will not be stored.• The “Zoom in/Zoom out” function is only available for still pictures smaller than 640 x 480 pixels. |
| Properties | While playingPress [STATUS] twice.12:03:00 7/5Date 26/11/2004 No. 2/30Shooting dateTo exit the picture properties screenPress [STATUS] again. |
Using on-screen menus/FUNCTIONS window and Status message
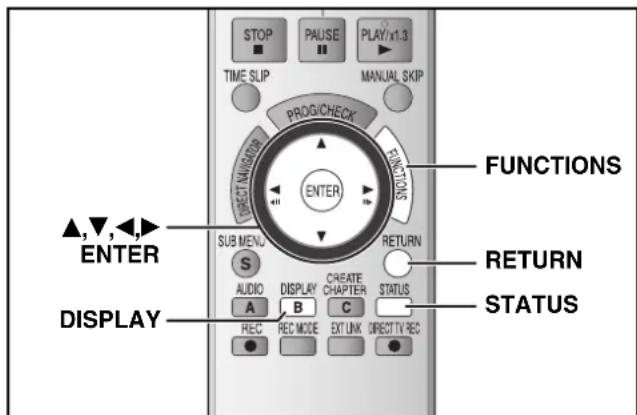
Using on-screen menus
Common procedures
1 Press [DISPLAY].
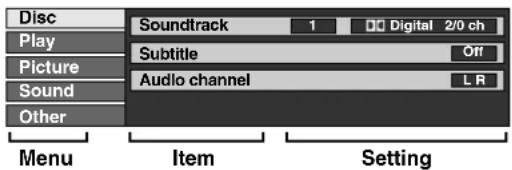
- Depending on the condition of the unit (playing, stopped, etc.) and disc contents, there are some items that you cannot select or change.
2 Press [▲,▼] to select the menu and press [▶].
3 Press [▲,▼] to select the item and press [▶].
4 Press [▲,▼] to select the setting. • Some items can be changed by pressing [ENTER].
To clear the on-screen menus Press [DISPLAY].
Disc menu—Setting the disc content
Soundtrack® DVD-V DVD-A
Select the audio and language ( right, Audio attribute, Language).
RAM -R -R DL -RW(V) +R +R DL +RW -RW(VR)
The disc's audio attributes appear.
VCD (SVCD)
Select the soundtrack number (1-2).
Subtitle\* DVD-V DVD-A
Turn the subtitle on/off and select the language ( right, Language).
RAM -R -R DL -RW(V) +R +R DL +RW -RW(VR)
discs that contain subtitle on/off information)
- Subtitle on/off information cannot be recorded using this unit.
VCD (SVCD)
Turn the subtitle on/off and select the subtitle number (1-4).
Audio channel RAM -RW(VR) VCD
→page 24, Changing audio during play
Angle ^× DVD-V DVD-A
Change the number to select an angle.
STILL-P (Still picture) DVD-A
Selects the play method for still pictures.
Slide Show: Plays according to the default order on the disc.
Page: Select the still picture number and play.
• RANDOM: Plays in random order.
- Return: Returns to the default still picture on the disc.
PBC (Playback control →page 49) VCD
Indicates whether menu play (playback control) is on or off. (unchangeable)
* With some discs, you may only be able to make changes using the menus (→ page 24) on the disc.
- The display changes according to the disc content. You cannot change when there is no recording.
Audio attribute
LPCM/PPCM/D Digital/DTS/MPEG: Signal type
| ch (channel): | Number of channels |
| k (kHz): | Sampling frequency |
| b (bit): | Number of bits |
Language
ENG: English DAN: Danish THA: Thai
FRA: French POR: Portuguese POL: Polish
DEU: German RUS: Russian CES: Czech
ITA: Italian JPN: Japanese SLK: Slovak
ESP: Spanish CHI: Chinese HUN: Hungarian
NLD: Dutch KOR: Korean FIN: Finnish
SVE: Swedish MAL: Malay *: Others
NOR: Norwegian VIE: Vietnamese
- Enter a code (→ page 50) when you select “*: Others”.
Play menu—Change the play sequence
This function works only when the elapsed play time is displayed.
Select the item for repeat play. Depending on the disc, the items that can be selected will differ.
Repeat Play
| • All | CD | VCD | |||||
| • Chapter | RAM | -R | -R DL | -RW(V) | +R | +R DL | +RW |
| DVD-V | -RW(VR) | ||||||
| • Group | DVD-A | and MP3 | |||||
| • PL (Playlist) | RAM | -RW(VR) | |||||
| • Title | RAM | -R | -R DL | -RW(V) | +R | +R DL | +RW |
| DVD-V | -RW(VR) | ||||||
| • Track | DVD-A | CD | VCD | and MP3 | |||
| Select “Off” to cancel. | |||||||
( O n l y
Picture menu—Change the picture quality
Playback NR
Reduces noise and picture degradation.
On Off
Progressive\* (→page 49)
Select "On" to enable progressive output.
Select "Off" if the picture is stretched horizontally.
Transfer ^® [When “Progressive” ( above) is set to “On”]
Select the method of conversion for progressive output to suit the type of title being played ( page 49, Film and video).
When the output signal is PAL
• Auto: Automatically detects the film and video content, and appropriately converts it.
- Video: Select when using "Auto", and the video content is distorted.
- Film: Select this if the edges of the film content appear jagged or rough when "Auto" is selected. However, if the video content is distorted as shown in the illustration to the right, then select "Auto".
- When the tray is opened, the setting will return to "Auto".
When the output signal is NTSC
- Auto 1 (normal):
Automatically detects the film and video content, and appropriately converts it.
- Auto 2: In addition to "Auto 1", automatically detects film contents with different frame rates and appropriately converts it.
- Video: Select when using "Auto 1" and "Auto 2", and the video content is distorted.
AV-in NR (Only when AV1, AV2, AV3 or DV is selected)
Reduces video tape noise while dubbing.
- Automatic: Noise reduction only works on picture input from a video tape.
- On: Noise reduction works for any input video.
- Off: Noise reduction is off. You can record the input signal as it is.
* Only when you have set "Progressive" to "On" in the Setup menu (→page 40).
Sound menu-Change the sound effect
V.S.S.
RAM -R -R DL -RW(V) +R +R DL +RW DVD-V DVD-A
-RW(VR)
(Dolby Digital, MPEG, 2-channel or over only)
Enjoy a surround-like effect if you are using two front speakers only.
- Turn V.S.S. off if it causes distortion. (Check the surround function on the connected equipment.)
• V.S.S. does not work for bilingual recordings.
Dialog Enhancer
RAM -R -R DL -RW(V) +R +R DL +RW DVD-V DVD-A
-RW(VR)
(Dolby Digital, 3-channel or over only, including a center channel)
The volume of the center channel is raised to make dialog easier to hear.
Other menu-Change the display position
Position
1 - 5: The higher the setting the lower the on-screen menu moves.
FUNCTIONS window
By using the FUNCTIONS window you may access the main functions quickly and easily.
1 While stopped
Press [FUNCTIONS].
Functions displayed depend on the type of disc.
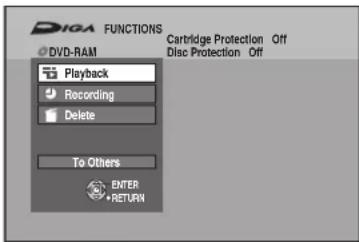
2 Press [▲,▼] to select an item and press [ENTER].
- If you select "To Others" and press [ENTER], the following screen appears. Press [▲,▼] to select an item and press [ENTER].
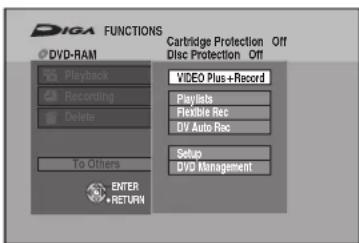
- If you press [RETURN], you can return to the previous screen.
To exit the FUNCTIONS window
Press [FUNCTIONS].
Status message
Status messages appear on the television during operation to show the condition of the unit.
Press [STATUS].
The display changes each time you press the button.
![PANASONIC DMR-ES15EBL - Press [STATUS]. - 1](/content/2026/05/794710/images/615448d0a124ac35511b018b7f939a108c43a65c2758540a2a0601e47b0566c6.jpg)
flowchart
graph TD
    A["DVD-RAM"] --> B["Type of disc"]
    B --> C["REC"]
    C --> D["PLAY"]
    D --> E["NICAM"]
    E --> F["L R"]
    F --> G["TV audio type being received (NICAM or MONO)"]
    G --> H["Selected audio type"]
    I["Date and time"] --> J["12:34:50 7/5"]
    J --> K["T12 0:01.23 SP"]
    L["Available recording time and recording mode"] --> M["T12 0:12.34 SP"]
    N["Title number and elapsed time during play/Recording mode"] --> O["No display"]
    P["Title number and elapsed time during recording/Recording mode"] --> Q["No display"]
Editing titles/chapters
RAM -R -R DL -RW(V) +R +R DL +RW -RW(VR)
Title/Chapter
Programmes are recorded as a single title consisting of one chapter.

RAM You can divide a title into multiple chapters. (→page 25, 31, "Create Chapter")

RAM You can change the order of chapters and create a playlist (→page 32).
- -R + R DL -RW(V) -R + R DL into about 5-minute (+R +R DL inute) chapters after finalizing (→page 37).
• The maximum number of items on a disc:
-Titles: 99 (+R +R DL +RWitles)
-Chapters: Approximately 1000
(+R +R DL +RW roximately 254)
(Depends on the state of recording.)
Note
- Once deleted or partially deleted, title/chapters cannot be restored to their original state. Make certain before proceeding.
- You cannot edit during recording.
- +RW can create a Top Menu using "Create Top Menu" (→ page 37). Recording or editing on the disc may delete the menu. In that case, create the menu again.
- +R I +R Dlement information is recorded in unused sections when you edit discs. The available space on these discs decreases each time you edit their contents.
Preparation
- Turn on the television and select the appropriate video input to suit the connections to this unit.
- Turn the unit on.
- Insert the disc with the title to edit (→ page 18).
• RAMease protection (→page 36).
Editing titles/chapters and playing chapters
1 During play or while stopped Press [DIRECT NAVIGATOR].
2 Press [▲,▼,◀,▶] to select the title.
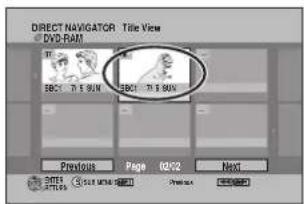
To show other pages
Press [◀◀] (Previous) or [▶▶] (Next).
Multiple editing
Select with [▲,▼,◀,▶] and press [■]. (Repeat.)
- A check mark appears. Press [11] again to cancel.
3 Press [SUB MENU], then press [▲,▼] to select the operation and press [ENTER].
- If you select "Edit", press [▲,▼] to select the operation and press [ENTER].
flowchart
graph TD
    A["Delete"] --> B["Properties"]
    B --> C["Edit"]
    D["Chapter View"] --> E["Enter Name"]
    E --> F["Set up Protection"]
    F --> G["Cancel Protection"]
    G --> H["Partial Delete"]
    H --> I["Change Thumbnail"]
    I --> J["Divide Title"]
    J --> K["Refer to "Title operations" (→page 31)."]
If you select "Chapter View" (→ step 4)
4 Press [▲,▼,◀,▶] to select the chapter. To start play → Press [ENTER]. To edit → Step 5.
• To show other pages/Multiple editing (→ above)
5 Press [SUB MENU], then press [▲,▼] to select the operation and press [ENTER].
flowchart
graph TD
    A["Delete Chapter"] --> B["Create Chapter"]
    B --> C["Combine Chapters"]
    C --> D["Title View"]
    D --> E["Refer to "Chapter operations" (→ page 31)."]
- You can go back to the Title View.
To exit the screen
Press [DIRECT NAVIGATOR].
To return to the previous screen
Press [RETURN].
Title operations
| After performing steps 1-3 (→ page 30) | ||
| Delete*RAM R-R DL-RW V)+R R DL + W | Press [◀,▶] to select “Delete” and press [ENTER].Once deleted, the recorded contents are lost and cannot be restored.Make certain before proceeding.-R+ R DL +F+R V+L+L+L+L+L+L+L+L+L+L+L+L+L+L+L+L+L+L+L+L+L+L+L+L+L+L+L+L+L+L+L+L+L+L+L+L+L+L+L+L+L+L+L+L+L+L+L+L+L+L+ L+R+R+R+R+R+R+R+R+R+R+R+R+R+R+R+R+R+R+R+R+R+R+R+R+R+R+R+R+R+R+R+R+R+R+R+R+R+R+R+R+R+R+R+R+R+R+R+R+R+R+ | |
| PropertiesRAM R-R DL-RW V)+R R DL + W +R R DL + W | Information (e.g., time and date) is shown.Press [ENTER] to exit the screen. | PropertiesDinosaurNo. 01Date 7/5/2008 SUN Time 12:19Rec time 6:30 (SP)Name 4 ENTERCETARS |
| Enter NameRAM R-R DL-RW V)+R R DL + W | You can give names to recorded titles.→page 43, Entering text | |
| Set up Protection*Cancel Protection*RAM +R R DL + W | If set, this will protect the title from accidental deletion.Press [◀,▶] to select “Yes” and press [ENTER].The lock symbol appears when the title is protected. |  |
| Partial DeleteRAM(→below, “For your reference”) | You can remove unnecessary part of the recording.1 Press [ENTER] at the start point and end point of the section you want to delete.2 Press [▲,▼] to select “Exit” and press [ENTER].Select “Next” and press [ENTER] to delete other sections.3 Press [◀,▶] to select “Delete” and press [ENTER]. |  |
| Change ThumbnailRAM R-R DL-RW V)+R R DL + W(→below, “For your reference”) | You can change the image to be shown as a thumbnail picture in the Title View.1 Press [▶] (PLAY) to start play.2 Press [ENTER] when the image you want to use as a thumbnail is shown.To change the thumbnailRestart play and press [▲,▼] to select “Change”, then press [ENTER] at the point you want to use as the thumbnail.3 Press [▲,▼] to select “Exit” and press [ENTER]. |  |
| Divide TitleRAM(→below, “For your reference”) | You can divide a title into two.1 Press [ENTER] at the point you want to divide the title2 Press [▲,▼] to select “Exit” and press [ENTER].3 Press [◀,▶] to select “Divide” and press [ENTER].To confirm the division pointPress [▲,▼] to select “Preview” and press [ENTER]. (The unit plays 10 seconds before and after the division point.)To change the division pointRestart play and press [▲,▼] to select “Divide”, then press [ENTER] at the point you want to divide.NoteThe divided titles retain the name and CPRM property (→ page 49) of the original title.Video and audio just before and after the dividing point may momentarily be cut out. Carry out the title division after checking it with “Preview” (→ above). |  |
* Multiple editing is possible.
Chapter operations
| After performing steps 1–5 (→ page 30) | ||
| Delete Chapter ^※ RAM | Press [◀,▶] to select “Delete” and press [ENTER].• Once deleted, the recorded contents are lost and cannot be restored.Make certain before proceeding. | |
| Create ChapterRAM(→below, “For your reference”) | Select the point where you want to start a new chapter while viewing the title.1 Press [ENTER] at the point you want to divide.• Repeat this step to divide at other points.2 Press [▲,▼] to select “Exit” and press [ENTER]. |  |
| Combine ChaptersRAM | Press [◀,▶] to select “Combine” and press [ENTER].• The selected chapter and next chapter are combined. | |
* Multiple editing is possible.
For your reference
- Use search or Time Slip (→ page 25) to find the desired point.
- To skip to the start or end of a title, press [◀◀] (start) or [▶▶] (end).
Creating, editing and playing playlists

You can arrange the chapters ( page 30) to create a playlist.
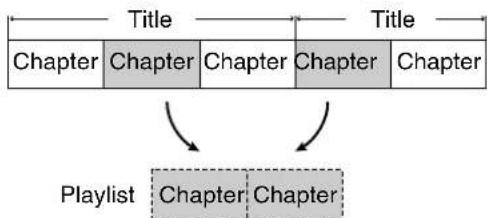
flowchart
graph TD
    A["Chapter"] --> B["Title"]
    B --> C["Chapter"]
    C --> D["Chapter"]
    D --> E["Chapter"]
    F["Title"] --> G["Title"]
    G --> H["Title"]
    H --> I["Title"]
    J["Playlist"] --> K["Chapter"]
    K --> L["Chapter"]
- Editing playlists doesn't modify the recorded data. Playlists are not recorded separately so this doesn't use much capacity.
- You cannot create or edit a playlist while recording.
RAM
• The maximum number of items on a disc:
-Playlists: 99
—Chapters in playlists: Approximately 1000
(Depends on the state of recording.)
- If you exceed the maximum numbers of items for a disc, all the items entered will not be recorded.
Preparation
- Turn on the television and select the appropriate video input to suit the connections to this unit.
- Turn the unit on.
- Insert the disc with the title to edit (→ page 18).
- Release disc or cartridge protection (→ page 36).
Creating playlists
1 While stopped
Press [FUNCTIONS].
2 Press [▲,▼] to select "To Others" and press [ENTER].

3 Press [▲,▼] to select "Playlists" and press [ENTER].
4 Press [▲,▼,◀,▶] to select "Create" and press [ENTER].
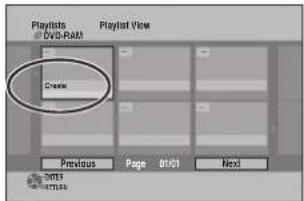
5 Press [◀,▶] to select the source title and press [▼].
- Press [ENTER] to select all the chapters in the title, then skip to step 7.
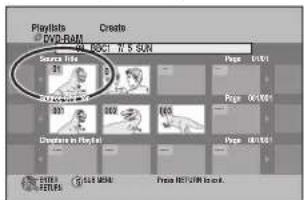
6 Press [◀,▶] to select the chapter you want to add to a playlist and press [ENTER].
- Press [▲] to cancel.
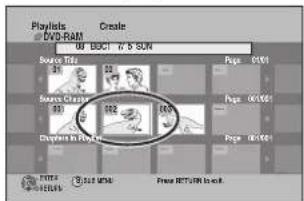
- You can also create a new chapter from the source title. Press [SUB MENU] to select "Create Chapter" and press [ENTER] (→ page 31, "Create Chapter").
7 Press [◀,▶] to select the position to insert the chapter and press [ENTER].
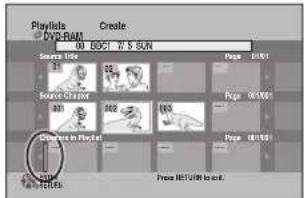
- Press [▲] to select other source titles.
- Repeat steps 5–7 to add other chapters.
8 Press [RETURN].
To exit the screen
Press [RETURN] several times.
To return to the previous screen
Press [RETURN].
Editing and playing playlists/chapters
RAM
-RW(VR) (play only)
1 While stopped
Press [FUNCTIONS].
2 Press [▲,▼] to select "To Others" and press [ENTER].
3 Press [▲,▼] to select "Playlists" and press [ENTER].
4 Press [▲,▼,◀,▶] to select the playlist.
To start play → Press [ENTER].
To edit → Step 5.
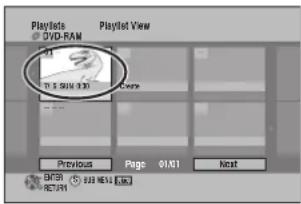
• To show other pages/Multiple editing ( page 30)
5 Press [SUB MENU], then press [▲,▼] to select the operation and press [ENTER].
- If you select "Edit", press [▲,▼] to select the operation and press [ENTER].
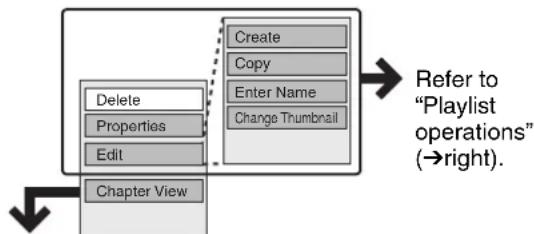
flowchart
graph TD
    A["Delete"] --> B["Properties"]
    B --> C["Edit"]
    C --> D["Chapter View"]
    E["Create"] --> F["Copy"]
    F --> G["Enter Name"]
    G --> H["Change Thumbnail"]
    H --> I["Refer to "Playlist operations" (→right)."]
If you select "Chapter View" (→ step 6)
6 Press [▲,▼,◀,▶] to select the chapter. To start play → Press [ENTER]. To edit → Step 7.
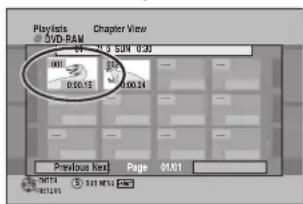
• To show other pages/Multiple editing ( page 30)
7 Press [SUB MENU], then press [▲,▼] to select the operation and press [ENTER].
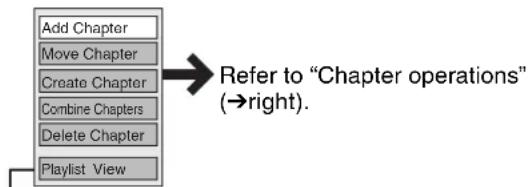
flowchart
graph TD
    A["Add Chapter"] --> B["Move Chapter"]
    B --> C["Create Chapter"]
    C --> D["Combine Chapters"]
    D --> E["Delete Chapter"]
    E --> F["Playlist View"]
    F --> G["Refer to "Chapter operations" (→right)."]
- You can go back to the Playlist View.
To exit the screen
Press [RETURN] several times.
To return to the previous screen
Press [RETURN].
Playlist operations
After performing steps 1–5 ( left)
| Delete ^ RAM | Press [◀▶] to select “Delete” and press [ENTER].Once deleted, the playlists are lost and cannot be restored.Make certain before proceeding. |
| PropertiesRAM -RW(VR) | Playlist information (e.g., time and date) is shown.• Press [ENTER] to exit the screen. |
| Create RAM | →page 32, Creating playlists, steps 5–8 |
| Copy® RAM | Press [◀,▶] to select “Copy” and press [ENTER].• The copied playlist becomes the newest one in the playlist view screen. |
| Enter Name RAM | →page 43, Entering text |
| Change Thumbnail RAM | →page 31, Change Thumbnail |
* Multiple editing is possible.
Chapter operations
RAM
After performing steps 1–7 ( left)
- Editing chapters in a playlist does not modify the source titles and source chapters.
| Add Chapter | →page 32, Creating playlists, steps 5–8 |
| Move Chapter | Press [▲,▼,◀,▶] to select the position to insert the chapter and press [ENTER].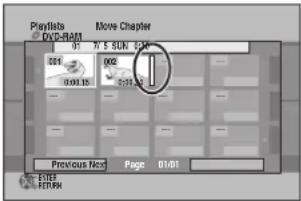 |
| Create Chapter | →page 31, Create Chapter |
| Combine Chapters | →page 31, Combine Chapters |
| Delete Chapter* | →page 31, Delete ChapterThe playlist itself is deleted if you delete all the chapters in it. |
* Multiple editing is possible.
Copying from a video cassette recorder
Refer to the control reference on page 35.
e.g., Connecting other video equipment to the AV3 or DV IN terminals
You can also connect to the AV2 input terminal on the rear.
- Turn off the unit and other video equipment before connecting.
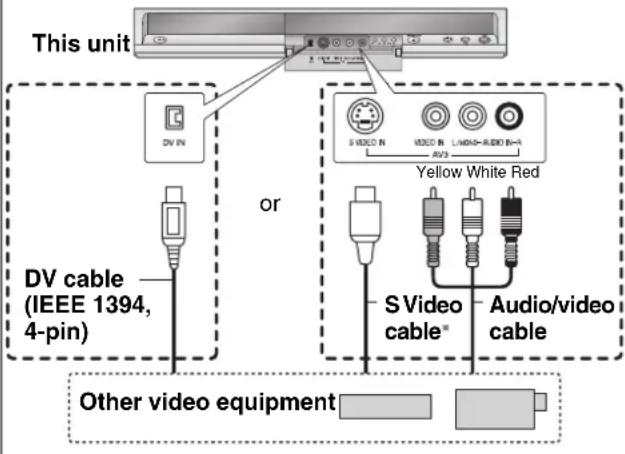
If the audio output of the other equipment is monaural Connect to L/MONO on the AV3 input terminals at the front.
* The S VIDEO terminal achieves a more vivid picture than the VIDEO terminal.
Preparation
- Turn on the unit and connected equipment.
- Insert a disc (→ page 18).
- Press [REC MODE] to select the recording mode.
- When recording a bilingual programme (→ page 16).
- When the output signal from the external equipment is NTSC, change "TV System" to "NTSC" in the Setup menu (→ page 43). This unit cannot record to discs containing both PAL and NTSC signals.
- To reduce noise in input from external equipment, set "AV-in NR" to "On" (→page 29).
- When recording from the unit's DV IN terminal Select the type of audio recording from "Audio Mode for DV Input" in the Setup menu (→ page 40). When recording from DV equipment (e.g., digital video camcorder), you can record audio/video recordings from DV tape only.
DV automatic recording (DV Auto Rec)
RAM R-F V(V) +R RW
RAM Programmes are recorded as a title while at the same time chapters are created at each break in the images and the playlist is created automatically.
When "DV Auto Rec" screen is displayed
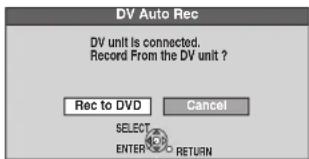
Press [◀,▶] to select "Rec to DVD" and press [ENTER].
You can proceed to step 4.
1 While stopped
Press [FUNCTIONS].
2 Press [▲,▼] to select "To Others" and press [ENTER].
3 Press [▲,▼] to select "DV Auto Rec".
4 Press [◀,▶] to select "Rec" and press [ENTER].
Recording starts.
When recording finishes
The confirmation screen appears. Press [ENTER] to finish DV automatic recording.
To stop recording
Press [■]. The confirmation screen appears. Press [ENTER].
Note
- Only one piece of DV equipment (e.g., digital video camcorder) can be connected to the unit via the DV IN terminal.
- It is not possible to operate the unit from the connected DV equipment.
- The DV IN terminal on this unit is for use with DV equipment only. (It cannot be connected to a computer, etc.)
- The DV equipment name may not be shown correctly.
- Depending on the DV equipment, the images or audio may not be input properly.
- The date and time information on the tape of the DV equipment will not be recorded.
- You cannot record and play simultaneously.
If the DV automatic recording function does not work properly, check the connections and DV equipment settings, and turn the unit off and back on.
If that does not work, follow the instructions for manual recording ( below).
Manual recording
RAM -R -R DL -RW(V) +R +R DL +RW
1 While stopped
Press [INPUT SELECT] to select the input channel for the equipment you have connected.
e.g., If you have connected to AV3 input terminals, select "AV3".
2 Start play on the other equipment.
3 When you want to start recording Press [●REC].
Recording starts.
- Using Flexible Recording (→ page 19), you can record the content of a video cassette (approx. 1–8 hours) to a 4.7 GB disc with the best possible quality of recording without wasting disc space.
To skip unwanted parts
Press [■] to pause recording. (Press again to restart recording.)
To stop recording
Press [■].
Almost all videos and DVD software on sale have been treated to prevent illegal copying. Any software that has been so treated cannot be recorded using this unit.
RAM R-R DL-RW V) +R +F DL RW
- A title cannot be restored once it is deleted.
Make certain before proceeding.
- You cannot delete while recording.
RAM
When a recorded title is deleted the available disc space will increase by the amount deleted.
The available disc space increases if any of these is deleted.
| Title1 | Title2 | ---- | The last recorded title | The available space |
-RW(V) -RW
Disc space increases only when the last recorded title is deleted.

-R+1DL+F+R
Available space does not increase after deletion.
Using DELETE Navigator to delete titles
Preparation
- Turn on the television and select the appropriate video input to suit the connections to this unit.
- Turn the unit on.
- Insert the disc (→page 18).
1 While stopped Press [FUNCTIONS].
2 Press [▲,▼] to select "Delete" and press [ENTER].
3 Press [▲,▼,◄,►] to select the title and press [ENTER].
To show other pages
Press [◀◀] (Previous) or [▶▶] (Next).
Multiple deleting
Select with [▲,▼,◀,▶] and press [■]. (Repeat.)
- A check mark appears. Press [1] again to cancel.
4 Press [◀,▶] to select "Delete" and press [ENTER].
To return to the previous screen
Press [RETURN].
To exit the screen
Press [RETURN] several times.
Deleting titles during play
1 While playing
Press [DELETE].
2 Press [◀,▶] to select "Delete" and press [ENTER].
Refer to the control reference on page 35.
Common procedures
Preparation
• RAM Release protection ( below).
1 While stopped Press [FUNCTIONS].
2 Press [▲,▼] to select "To Others" and press [ENTER].
3 Press [▲,▼] to select "DVD Management" and press [ENTER].
Select which step 4 to perform depending on what you want to do next.
To exit the screen
Press [RETURN] several times.
To return to the previous screen
Press [RETURN].
Providing a name for a disc
RAM -R -R DL -RW(V) +R +R DL +RW
After performing steps 1–3 ( above)
4 Press [▲,▼] to select "Disc Name" and press [ENTER].
→page 43, Entering text
- The disc name is displayed in the DVD Management window.
- With a finalized disc and +RW, the name is displayed on the Top Menu.
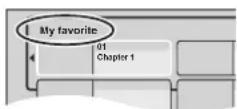
Setting the protection
RAM
After performing steps 1–3 ( above)
4 Press [▲,▼] to select "Disc Protection" and press [ENTER].
5 Press [◀,▶] to select "Yes" and press [ENTER].
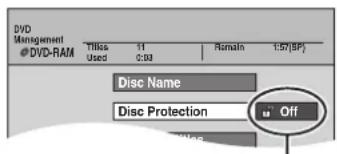
The lock symbol appears closed when the disc is write-protected.
Cartridge-protection
RAM (with a cartridge)
With the write-protect tab in the protect position, play automatically starts when inserted in the unit.
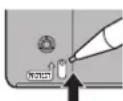
Deleting all titles and playlists –Delete all titles
RAM
After performing steps 1–3 ( left)
4 Press [▲,▼] to select "Delete all titles" and press [ENTER].
5 Press [◀,▶] to select "Yes" and press [ENTER].
6 Press [◀,▶] to select "Start" and press [ENTER].
A message appears when finished.
7 Press [ENTER].
Note
- Once deleted, the recorded contents are lost and cannot be restored. Make certain before proceeding.
- Deleting all video titles will result in all playlists also being deleted.
- Delete does not work if one or more titles are protected.
Deleting all the contents of a disc -Format Disc
RAM -RW(V) +RW -RW(VR)
+R +R DLw disc only)
Note
Formatting deletes all contents (including computer data), and they cannot be restored. Check carefully before proceeding. The contents are deleted when you format it even if you have set protection.
After performing steps 1–3 ( left)
4 Press [▲,▼] to select "Format Disc" and press [ENTER].
5 Press [◀,▶] to select "Yes" and press [ENTER].
6 Press [◀,▶] to select "Start" and press [ENTER].
A message appears when formatting is finished.
Note
- Do not disconnect the AC mains lead while formatting. This can render the disc unusable.
- Formatting normally takes a few minutes, however it may take up to a maximum of 70 minutes RAM
7 Press [ENTER].
Note
- -R-R DL or CD ting cannot be performed on the disc.
- -RW(V) -RW(VR) You can format only as DVD-Video format on this unit.
- When a disc has been formatted using this unit, it may not be possible to use it on any other equipment.
To stop formatting RAM
Press [RETURN].
- You can cancel formatting if it takes more than 2 minutes. The disc must be reformatted if you do this.
Selecting whether to show the Top Menu first —Auto-Play Select
-R -R DL -RW(V) +R +R DL +RW
You can select whether to show the top menu after finalizing. Make selections before finalizing the disc.
After performing steps 1–3 ( page 36)
4 Press [▲,▼] to select "Auto-Play Select" and press [ENTER].
5 Press [▲,▼] to select items and press [ENTER].
Top Menu:The top menu appears first.
Title 1: The disc content is played without displaying the top menu.
Enabling discs to be played on other equipment -Finalize
-R -R DL -RW(V) +R +R DL
Finalize the disc so you can play it on other DVD equipment. The equipment must be able to play finalized discs. To check compatibility with other equipment, refer to page 6.
After performing steps 1–3 ( page 36)
4 Press [▲,▼] to select "Finalize" and press [ENTER].
5 Press [◀,▶] to select "Yes" and press [ENTER].
6 Press [◀▶] to select "Start" and press [ENTER].
- Finalizing starts. You cannot cancel finalizing.
- Finalizing can take a few minutes, up to a maximum of 15 minutes, depending on the remaining space on the disc. (-R DL +R DL minutes.)
Note
Do not disconnect the AC mains lead while finalizing. This will render the disc unusable.
7 Press [ENTER].
After finalizing
- -R -R DLc +R +R DLmes play-only and you can no longer record or edit.
- -RW(V) can record and edit the disc after formatting (→ page 36) although it becomes play-only after finalizing.
- Titles are divided into about 5-minute (+R +R DL)minutes) chapters after finalizing. This time varies greatly depending on the condition and mode of recording.
-
There is a pause of several seconds between titles and chapters during play.
-
You cannot finalize discs recorded on other manufacturers' equipment.
- Discs finalized on this unit may not be playable on other players due to the condition of the recording.
- When finalizing a high-speed recording compatible disc, it may take longer than displayed on the confirmation screen (approximately four times).
Creating Top Menu –Create Top Menu
+RW
+RW discs contain no Top Menu data. Top Menu is a convenient function. We recommend you to create the menu before playing a +RW disc on other equipment.
After performing steps 1–3 ( page 36)
4 Press [▲,▼] to select "Create Top Menu" and press [ENTER].
5 Press [◀,▶] to select "Yes" and press [ENTER].
6 Press [◀,▶] to select "Start" and press [ENTER].
Creating Top Menu starts. You cannot cancel creating. Creating Top Menu can take a few minutes.
7 Press [ENTER].
- Recording or editing on the disc may delete the menu. In that case, create the menu again.
- You cannot use the title menu for playing on this unit.
Enabling the second layer on DL (dual- or double- layer on single side) discs to be recordable –Close First Layer
-R DL +R DL
DVD-R DL and +R DL discs have two layers of recording surface on one side. This unit does not offer seamless recording on two layers. Recording stops when space on the first layer becomes full. You must close the first layer to start recording on the second layer. Closing makes the first layer unavailable for recording (editing is still available). You cannot cancel closing. Make certain before proceeding.
After performing steps 1–3 ( page 36)
4 Press [▲,▼] to select "Close First Layer" and press [ENTER].
5 Press [◀,▶] to select "Yes" and press [ENTER].
6 Press [◀,▶] to select "Start" and press [ENTER].
Closing the layer starts. You cannot cancel closing. Closing the layer can take several minutes, up to a maximum of 30 minutes, depending on the remaining space on the first layer.
Note
Do not disconnect the AC mains lead while closing the layer. This will render the disc unusable.
7 Press [ENTER].
- You cannot close the first layer when it has no recording.
- By closing the layer, you can record or edit discs that have been recorded on the second layer by other equipment.
■To confirm the layer you can record
You can confirm the remaining recording time on the layer you can record.
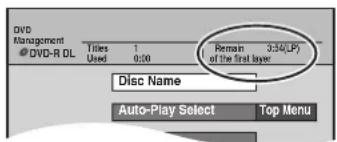
Linked operations with the TV (Q Link)
What is Q Link?
Q Link enables you to connect this unit to a Q Link-equipped Panasonic TV and perform various linked functions.
The following systems from other manufacturers have similar function to Q Link from Panasonic.
For details, refer to your television's operating instructions or consult your dealer.
• Q Link (registered trademark of Panasonic)
- Easy Link (registered trademark of Philips)
• SMARTLINK (registered trademark of Sony)
• DATA LOGIC (registered trademark of Metz)
- Megalogic (registered trademark of Grundig)
Preparation
- Connect this unit to your TV with a fully wired 21-pin Scart lead (→ page 8–10).
| TV/DVD Auto On | When you press the following buttons, linked operations with the TV activate and corresponding screens appear.When this unit is on:Press [▶] (PLAY)[DIRECT NAVIGATOR][VIDEO Plus+][PROG/CHECK][FUNCTIONS]• DVD-V DVD-A CD VCD and MP3The TV is automatically turned on and corresponding screens appear when you insert the discs. | |
| DVD Auto Standby | When you turn the TV off, the unit is turned off as well. However, this function works in the stop mode [while screen saver (→ right) is displayed on the television, this does not work].This function does not work during the following operations: channel reception setting, Auto Clock Setting, Child Lock and Manual Tuning. |  |
| Direct TV Recording | You can record the same programme that you are watching on the TV.• This function allows you to immediately start recording the programme that you are viewing on the TV without having to change the channels on this unit.• Just make sure you have a disc ready in the unit so that when a programme comes on the television that you want to record, all you have to do is press [● DIRECT TV REC]. You don't even have to turn this unit on.Press [●DIRECT TV REC] for 1 second.Recording starts.To stop recordingPress [■]. | |
| Download from the TV | As you set TV stations, the station list data is automatically copied from the TV to the unit, and the TV stations are assigned to the programme positions on the unit in the same order as on the TV. | |
Child Lock
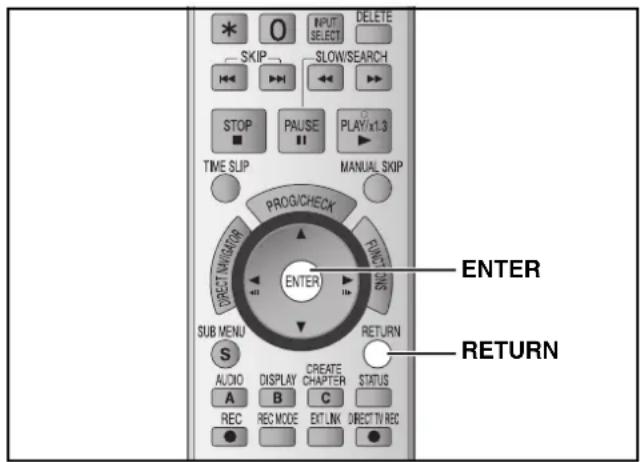
The Child Lock deactivates all buttons on the unit and remote control. Use it to prevent other people from operating the unit.
Press and hold [ENTER] and [RETURN] simultaneously until "X HOLD" appears on the unit's display.
![PANASONIC DMR-ES15EBL - Press and hold [ENTER] and [RETURN] simultaneously until "X HOLD" appears on the unit's display. - 1](/content/2026/05/794710/images/e18aa5be284b53b25334725ffdfc23c26defa5a4d99ad12c5692c94cc2e84f07.jpg)
If you press a button while the Child Lock is on, "X HOLD" appears on the unit's display and operation is impossible.
To cancel the Child Lock
Press and hold [ENTER] and [RETURN] simultaneously until "X HOLD" disappears.
Refer to the control reference on page 35.
Common procedures
1 While stopped
Press [FUNCTIONS].
2 Press [▲,▼] to select "To Others" and press [ENTER].
3 Press [▲,▼] to select "Setup" and press [ENTER].
Tabs Menus Options
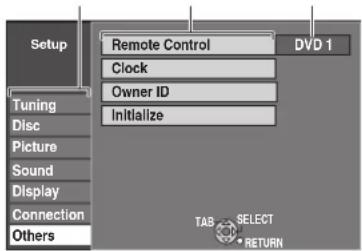
4 Press [▲,▼] to select the tab and press [▶].
5 Press [▲,▼] to select the menu and press [ENTER].
6 Press [▲,▼] to select the option and press [ENTER].
To return to the previous screen
Press [RETURN].
To exit the screen
Press [RETURN] several times.
Note
There may be differences in operation methods. If this happens, follow the on-screen instructions for the operation.
Summary of settings
The settings remain intact even if you switch the unit to standby.
Tabs Menus Options (Underlined items are the factory presets.)
Tuning Manual (→page 42)
Auto-Setup Restart (→page 42)
Download from TV ( page 42)
Disc Settings for Playback
- Press [ENTER] to show the following settings.
Ratings
| Set a ratings level to limit DVD-Video play. |
| Follow the on-screen instructions. Enter a 4-digit password with the numbered buttons when the password screen is shown. |
| • Do not forget your password. |
DVD-Audio Video mode Playback
| Select “On” to play DVD-Video content on some DVD-Audio. |
Soundtrack
| DVD-V |
| • Enter a code (→ page 50) with the numbered buttons when you |
Subtitle
| DVD-V |
[Non-Text]
| Year Ended December 31, | ||
| 2018 | 2017 | |
| (in millions) | ||
| Revenues | 1,465 | 1,395 |
| Costs and expenses | (1,038) | (1,008) |
| Net income | 1,465 | 1,395 |
Menus
| DVD-V |
Settings for Recording
- Press [ENTER] to show the following setting.
Recording time in EP mode
| Select the maximum number of hours for recording in EP mode (→page 17, Recording modes and approximate recording times). |
Picture Comb Filter
| Select the picture sharpness when recording. The setting is fixed with “On” if you set “TV System” to “NTSC” (→page 43). |
Still Mode
| Select the type of picture shown when you pause play (→ page 49, Frames and fields). |
- 1 to 7: Prohibits play of DVD-Video with corresponding ratings recorded on them.
- 8 No Li All DVD-Video can be played.
- 0 Lock All: Prohibits play of all DVD-Video.
- Unlock Recorder
- Change Password
- Change Level
- Temporary Unlock
- On: The setting returns to "Off" when you change the disc or turn the unit off.
• Off - English
- German
- French
- Italian
- Spanish
- Original: The original language of each disc will be selected.
- Other***
- Automatic: If the language selected for "Soundtrack" is not available, subtitles of that language will automatically appear if available on that disc.
- English
- German
- French
- Italian
- Spanish
- Other
- English
- German
- French
- Italian
- Spanish
- Other
- EP (6Hours):
You can record for 6 hours on an unused 4.7 GB disc.
• EP (8Hours):
You can record for 8 hours on an unused 4.7 GB disc.
- On: Select it to record clear picture.
- Off: Normally, use this setting.
- Automatic:
- Field: Select if jittering occurs when "Automatic" is selected. (The picture is coarser.)
- Frame: Select if small text or fine patterns cannot be seen clearly when "Automatic" is selected. (The picture is clearer and finer.)
Refer to the control reference on page 35.
| Tabs Menus Options (Underlined items are the factory presets.) | |||
| Sound | Dynamic Range Compression DVD-V Digital only)Change the dynamic range for late night viewing. | • On • Off — | |
| Bilingual Audio Selection-R -R DL -RW(V) +R +R DL +RWSelect whether to record the main or secondary audio type when recording to a disc. | • M 1 • M 2You cannot select this when recording from an external source (except from DV equipment connected to this unit's DV IN terminal). Select the audio on the other equipment. | ||
| Digital Audio OutputChange the settings when you have connected equipment through this unit's DIGITAL AUDIO OUT terminal(→page 11).• Press [ENTER] to show the following settings. | |||
| PCM Down ConversionSelect how to output audio with a sampling frequency of 96 kHz or 88.2 kHz.• Signals are converted to 48 kHz or 44.1 kHz despite the above settings if the signals have a sampling frequency of over 96 kHz or 88.2 kHz, or the disc has copy protection. | • On: Signals are converted to 48 kHz or 44.1 kHz.(Choose when the connected equipment cannot process signals with a sampling frequency of 96 kHz or 88.2 kHz.)• Off: Signals are output as 96 kHz or 88.2 kHz.(Choose when the connected equipment can process signals with a sampling frequency of 96 kHz or 88.2 kHz.) | ||
| Dolby Digital[IMAGE] | Select how to output the signal.Select “Bitstream” if the connected equipment decodes the signal.Select “PCM” if this unit decodes the signal and output it as 2 channel.NoteNot making the proper settings may result in noise or some trouble for digital recording. | • Bitstream: When connecting to equipment displaying the Dolby Digital logo.• PCM: When connecting to equipment not displaying the Dolby Digital logo. | |
| DTSDIGITAL[IMAGE] | • Bitstream: When connecting to equipment displaying the DTS logo.• PCM: When connecting to equipment not displaying the DTS logo. | ||
| MPEG | • Bitstream: When connected to equipment with a built-in MPEG decoder.• PCM: When connected to equipment without a built-in MPEG decoder. | ||
| Audio Mode for DV InputYou can select the kind of audio when recording from the unit's DV IN terminal (→ page 34). | • Stereo Records audio (L1, R1).• Stereo 2: Records added audio such as narration (L2, R2) subsequent to original recording.• Mix: Records both Stereo 1 and Stereo 2.-R -R DL -RW(V) +R +R DL +RWWhen recording bilingual broadcast to a disc, select the type of audio in advance from “Bilingual Audio Selection” (→above). | ||
| Display | On-Screen MessagesChoose whether to show status messages automatically. | • Automatic • Off | |
| Grey BackgroundSelect “Off” if you do not want to have the unit show the grey background when tuner reception is weak. | • On • Off | ||
| FL DisplayChanges the brightness of the unit's display. | • Br i g h t • Dim | ||
| Connection | TV Aspect (→ page 14) | • 16:9 • 4:3 • Letterbox | |
| Progressive (→page 14)This setting is fixed with “Off” if you set “AV1 Output” to “RGB 1 (without component)” or “RGB 2 (without component)” (→ below). | • On • Off — | ||
| TV System (→ page 43) | • PAL • NTSC | ||
| AV1 OutputSelect the output from the AV1 terminal.Select “RGB 1 (without component)” or “RGB 2 (without component)” for RGB output.Select “Video (with component)” or “S Video (with component)” for component output (progressive output).Set according to the signal and terminal of the connected TV. | • Video (with component):Select when a TV is connected that can receive a composite signal.• S Video (with component):Select when a TV is connected that can receive an S Video signal.• RGB 1 (without component):Select when you have connected a TV that can receive RGB signals.Select this mode so the TV automatically switches to display the picture from the unit when you turn the unit on.• RGB 2 (without component):Select when you have connected a TV that can receive RGB signals.If you would like to switch to display the picture from the unit only when playback or viewing menus, select this mode. | ||
Tabs Menus Options (Underlined items are the factory presets.)
| Connection(Continued) | AV2 SettingsSet to match the connected equipment.Press [ENTER] to show the following setting. | ||
| AV2 InputThis setting is according to the output signal of the connected equipment. | Video | S Video | |
| Ext LinkThis setting cannot be made when the “TV System” is set to “NTSC” (→page 43). | Ext Link:When a satellite/digital terrestrial receiver (SKY Digital STB etc.) which transmits a special control signal recordings via the 21-pin Scart lead is connected.Start and stop timings of recording are controlled by the control signal (SKY Digital STB/digital terrestrial receiver using the “SKY Personal Planner” function).Ext Link 2:When an external equipment with a timer function is connected.When it turns on, recording starts.When it turns off, recording stops. | ||
| Others | Remote Control (→ page 15) | DVD 1 | DVD 2 DVD 3 |
| Clock (→below) | |||
| Owner ID (→page 12)In order to prevent another person from using this unit if it is stolen, you can set a PIN number and input your personal information.Once the PIN number has been set, you cannot return to the factory preset. Make sure not to forget this. | PIN numberHouse No. | NamePost code | |
| InitializePress [ENTER] to show the following setting. | |||
| Shipping ConditionAll the settings except for the ratings level, ratings password, Owner ID and time settings return to the factory preset. The timer recording programmes are also cancelled. | Yes | No | |
| Default SettingsAll the settings except for the programmed channels, time settings, disc language settings, ratings level, ratings password, Owner ID and remote control code return to the factory presets. | Yes | No | |
Set the clock manually
Refer to the control reference on page 35.
- Usually, the unit's channel reception setting function ( page 12) automatically adjusts the clock to correct time. Under some reception conditions, however, the unit cannot set the clock automatically.
- In this case, follow the operation steps below to manually set the clock.
- In the case of a power failure, the clock setting remains in memory for approximately 60 minutes.
1 While stopped Press [FUNCTIONS].
2 Press [▲,▼] to select "To Others" and press [ENTER].
3 Press [▲,▼] to select "Setup" and press [ENTER].
4 Press [▲,▼] to select "Others" and press [▶].
5 Press [▲,▼] to select "Clock" and press [ENTER].
6 Press [▲,▼] to select "Off" of "Automatic" and press [ENTER].
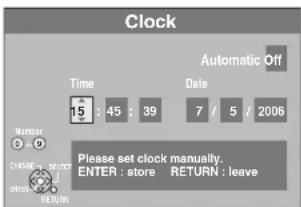
7 Press [◀,▶] to select the item you want to change.
The items change as follows: Hour←→Minute←→Second←→Day←→Month←→Year ↑ ↑
8 Press [▲,▼] to change the setting.
You can also use the numbered buttons for setting.
9 Press [ENTER] when you have finished the settings.
The clock starts.
To exit the screen
Press [RETURN] several times.
To return to the previous screen
Press [RETURN].
Note
If a TV station transmits a time setting signal, and when "Automatic" in the Clock setting menu is set to "On", the automatic time correction function checks the time and if necessary it is adjusted several times every day.
Resetting channel setting
Refer to the control reference on page 35.
You can add or delete channels, or change programme positions.
1 While stopped
Press [FUNCTIONS].
2 Press [▲,▼] to select "To Others" and press [ENTER].
3 Press [▲,▼] to select "Setup" and press [ENTER].
4 Press [▲,▼] to select “Tuning” and press [▶].
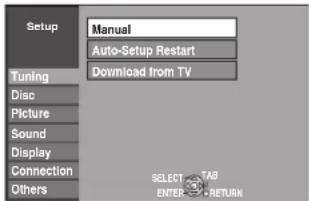
5 Press [▲,▼] to select "Manual" and press [ENTER].
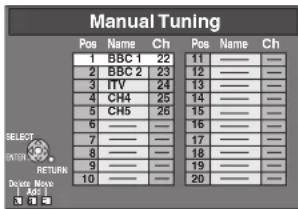
To delete a programme position
Press [▲,▼,◀,▶] to select a programme position and press [A].
To add a blank programme position
Press [▲,▼,◀,▶] to select a programme position and press [B].
To move a TV station to another programme position
① Press [▲,▼,◀,▶] to select a programme position and press [C].
② Press [▲,▼] to select the new programme position to which you want to assign the TV station and press [ENTER].
Note
When the unit connected to a Q Link-compatible TV with a fully wired 21-pin Scart lead sets itself automatically ( page 12), only deletion of the programme position can be performed.
To change detailed station settings
After performing steps 1–5 ( above)
6 Press [▲,▼,◀,▶] to select a programme position and press [ENTER].
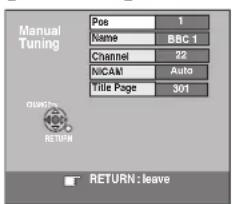
Press [▲,▼] to select an item and press [▶].
| Pos To change the programme position in which the TV stations are assignedPress [▲,▼] or the numbered buttons to select the number of the desired programme position and press [ENTER]. | |
| Name To enter or change the name of a TV stationPress [▲,▼,◄►] to enter station name and press [ENTER].If the station name needs a blank space, select the blank between “Z” and “*”. | |
| Channel To enter newly available TV stations or change the channel number of an already tuned TV stationPress [▲,▼] or the numbered buttons to enter the channel number of the desired TV station.Wait a few moments until the desired TV station has been tuned.After the desired TV station is tuned, press [ENTER]. | |
| NICAM To select the type of sound to be recordedPress [▲,▼] to select “Auto” and press [ENTER].Select “Off” if you want to record the normal (mono) sound during a stereo, bilingual or NICAM broadcast, or if the stereo sound is distorted due to inferior reception conditions. | |
| Title Page | To enter the Teletext title page for a channelEntering title page number allows the unit to automatically record programme and station names.Press [▲,▼] or the numbered buttons to enter the number and press [ENTER].To find the correct title page for the station, refer to its Teletext TV guide.The unit’s clock must be set correctly. |
Automatic setting
You can restart auto channel setting if the channel reception setting ( page 12) fails for some reason.
After performing steps 1–4 ( left)
5 Press [▲,▼] to select "Auto-Setup Restart" or "Download from TV" and press [ENTER].
The confirmation screen appears.
Select "Download from TV" when you connect the unit to a Q Link-compatible TV with a fully wired 21-pin Scart lead. (Programme positions are downloaded from the TV and copied through this convenient function.)
6 Press [◀,▶] to select "Yes" and press [ENTER].
You can also use the following method to restart Auto-Setup. When the unit is on and stopped
Press and hold [∨ CH] and [CH ∧] on the main unit for about 5 seconds.
- All the settings except for the ratings level, ratings password, Owner ID and time settings return to the factory preset. The timer recording programmes are also cancelled.
To exit the screen
Press [RETURN] several times.
To return to the previous screen
Press [RETURN].
TV System
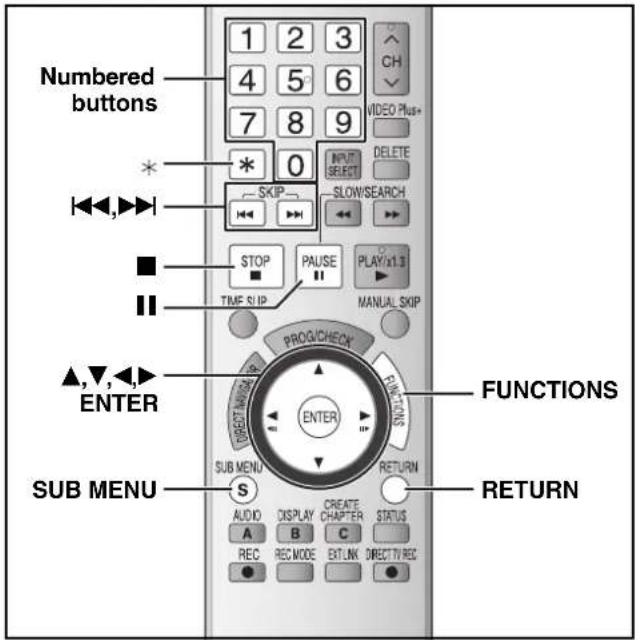
Change this setting if you connect an NTSC television or to record NTSC video from another source.
1 While stopped
Press [FUNCTIONS].
2 Press [▲,▼] to select "To Others" and press [ENTER].
3 Press [▲,▼] to select "Setup" and press [ENTER].
4 Press [▲,▼] to select "Connection" and press [▶].
5 Press [▲,▼] to select "TV System" and press [ENTER].
6 Press [▲,▼] to select the TV system and press [ENTER].
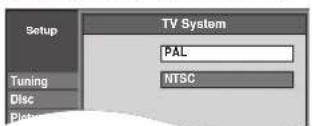
• PAL (factory preset)
-Select when connecting to a PAL or Multi-system television. Programmes recorded using NTSC are played as PAL 60.
-Select to record television programmes and PAL input from other equipment.
•NTSC
-Select when connecting to a NTSC television. Television programmes cannot be recorded properly.
-Select to record NTSC input from other equipment. The confirmation screen appears.
7 Press [◀,▶] to select "Yes" and press [ENTER].
To exit the screen
Press [RETURN] several times.
To return to the previous screen
Press [RETURN].
■ To change the setting all at once (PAL ↔ NTSC)
While stopped, press and hold [■] and [▲ OPEN/CLOSE] on the main unit at the same time for about 5 seconds.
Entering text
RAM -R -R DL -RW(V) +R +R DL +RW
You can give names to recorded titles, etc.
The maximum number of characters:
| RAM | Characters | -R + R DL-RW(V) | R+R DL +RW | Characters |
| Title | 64 (44*) | Title 44 | |
| Playlist 64 | Disc | 40 | |
| Disc 64 |
■ Title name for timer recording
If a name is long, parts of it may not be shown in some screens.
1 Show Enter Name screen.
| Title (timer recording) | (→ page 20, 21, step 3) |
| Title | (→ page 30, step 3) |
| Playlist | (→ page 33, step 5) |
| Disc | (→ page 36, “Providing a name for a disc”) |
Name field: shows the text you have entered
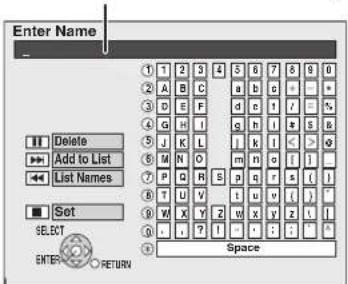
2 Press [▲,▼,◀,▶] to select a character and press [ENTER].
Repeat this step to enter other characters.
• To delete a character
Press [▲,▼,◀,▶] to select the character in the name field and press [■].
- Using the numbered buttons to enter characters e.g., entering the letter "R"
① Press [7] to move to the 7th row.
② Press [7] twice to highlight "R".
③ Press [ENTER].
To enter a space
Press [ * and press [ENTER].
Add/recall names ( below)
3 Press [■] (Set).
Returns to the previously displayed screen.
To end partway
Press [RETURN].
Text is not saved.
■To add a name
You can add frequently used names and recall them later. Maximum number of registered names: 20
Maximum number of characters per name: 20
After entering the name (→above, steps 1–2).
1 Press [▶▶] while the name to be added is shown in the name field.
2 Press [◀] to select "Add" and press [ENTER].
To cancel adding word
Press [RETURN].
■To recall an added name
1 Press [◀◀].
2 Press [▲,▼,◀,▶] to select the name to be recalled and press [ENTER].
■To delete an added name
1 Press [◀◀].
2 Press [▲,▼,◀,▶] to select the name to be deleted and press [SUB MENU].
3 Press [ENTER]
4 Press [◀] to select "Delete" and press [ENTER].
5 Press [RETURN].
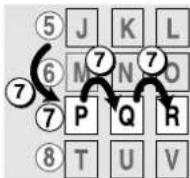
On the television
Page
| Cannot finish recording completely. | The programme was copy-protected.The disc may be full.The maximum number of times you can record the programme is exceeded. | — — — |
| Cannot record on the disc. | The disc may be dirty or scratched. | 4 |
| Unable to format. | ||
| Please check the disc. | ||
| Cannot record. Disc is full. | Create space by deleting any unnecessary titles. RAM RW(V) RW(Even if you delete recorded content from DVD-R, DVD-R DL, +R or +R DL, there is no increase in disc space.)Use a new disc. | 31, 35, 36 — |
| Cannot record. Maximum numbers of titles exceeded. | ||
| No disc • The disc may be upside | down. — | |
| This is a non-recordable disc. | The unit cannot record on the disc you inserted. Insert a DVD-RAM or unfinalized DVD-R, DVD-R DL, DVD-RW (DVD-Video format), +R, +R DL or +RW.You inserted an unformatted DVD-RAM, DVD-RW, +R, +R DL or +RW. Format the disc with this unit. | 636 |
| This disc is not formatted properly. | ||
| ☒ | The operation is prohibited by the unit or disc. — |
On the unit's display
The following messages or service numbers appear on the unit's display when something unusual is detected during startup and use.
| DVD □(“□ stands for a number.) | ·The remote control and main unit are using different codes. Change the code on the remote control. Press and hold [ENTER] and the indicated number button at the same time for more than 2 seconds.  | 15 |
| HARD ERR(“HARD” and “ERR” are alternately displayed.) | ·If there is no change after turning the unit on and off, consult the dealer where the unit was purchased. | — |
| NoREAD ·The disc is dirty or badly | ·Scratched. The unit cannot record, play, or edit.·This message may appear when the DVD lens cleaner has finished cleaning. Press [▲OPEN/CLOSE] on the main unit to eject the disc. | 4— |
| NoWRIT | ·Recording may be unavailable due to a disc problem. Use a new disc.·The unit’s “TV System” setting differs from the TV system used by the disc. Change the “TV System” in the Setup menu. | —43 |
| NoERAS | ·Deleting an item may be unavailable due to a disc problem. Use a new disc. | — |
| PLEASE WAIT(“PLEASE” and “WAIT” are alternately displayed.) | ·Displayed when the unit is started. This is not a malfunction.·The unit is carrying out its recovery process. You cannot operate the unit while “PLEASE WAIT” is displayed. | — |
| PROG FULL(“PROG” and “FULL” are alternately displayed.) | ·There are already 16 timer programmes. Delete unnecessary timer programmes. | 22 |
| UNSUPPORT(“UNSUP” and “PORT” are alternately displayed.) | ·You have inserted a disc the unit cannot play or record on. | 6,7 |
| UNFORMAT(“UNFOR” and “MAT” are alternately displayed.) | ·You have inserted a new DVD-RW/+R/+R DL/+RW or a DVD-RAM/DVD-RW (DVD-Video format) recorded on other equipment. | 36 |
| U59 | ·The unit is hot.The unit switches to standby for safety reasons. Wait for about 30 minutes until the message disappears.Select a position with good ventilation when installing the unit. Do not block the vent on the rear of the unit. | — |
| U61 | ·The unit detected an error while recording or playing with no disc in the disc tray. The unit is carrying out its recovery process. This process restores the unit to normal operation. The unit is not broken. Wait until the message disappears. | — |
| U88 | ·The unit detected an error while recording or playing with a disc in the disc tray. The unit is carrying out its recovery process. This process restores the unit to normal operation. The unit is not broken. Wait until the message disappears. | 46 |
| U99 | ·The unit fails to operate properly. Press [∅/l] on the main unit to switch the unit to standby. Now press [∅/l] on the main unit again to turn the unit on. | — |
| X HOLD | ·The Child Lock function is activated.Press and hold [ENTER] and [RETURN] simultaneously until “X HOLD” disappears. | 38 |
Frequently asked questions
Set up Page
| What equipment is necessary to play multi channel surround sound? | • DVD-Video:You can play DVD-Video multi channel surround by digitally connecting an amplifier equipped with a Dolby Digital, DTS or MPEG decoder.• DVD-Audio:This unit plays DVD-Audio in 2 channels. You cannot play multi channel surround sound. | 11— |
| Are the headphones and speakers directly connected to the unit? | • You cannot directly connect to the unit. Connect through the amplifier etc. 11 | |
| The television has a Scart terminal and component video input terminal. Which terminal should I connect with? | • If you have a regular television (CRT: cathode ray tube), we recommend using the Scart terminal. You can enjoy high-quality RGB video from this unit by connecting to an RGB compatible television.If you have an LCD/plasma television or LCD projector compatible with progressive scan, connect through the component video terminals for high-quality progressive video.If you have a CRT television or a multi system television using PAL mode that is compatible with progressive scan, we cannot recommend progressive output as some flickering can occur. | 8–11 |
| Is my television progressive output compatible? | • All Panasonic televisions that have 625 (576)/50i · 50p, 525 (480)/60i · 60p input terminals are compatible. Consult the manufacturer if you have another brand of television. | — |
Disc
| Can DVD-R, DVD-R DL, DVD-RW (DVD-Video Format), +R, +R DL and +RW recorded on this unit be played on other equipment? | ·You can play on compatible equipment such as DVD players after finalizing the disc on this unit. It is not necessary to finalize +RW. However depending on the condition of the recording, the quality of the disc and capabilities of the DVD player, play may not be possible. | 37 |
| Can I play DVD-Video, DVD-Audio and Video CDs bought in another country? | ·You cannot play DVD-Video if their region number does not include “2” or “ALL”. Refer to the disc’s jacket for more information. | Cover |
| Can a DVD-Video that does not have a region number be played? | ·The DVD-Video region number indicates the disc conforms to a standard. You cannot play discs that do not have a region number. | — |
| Please tell me about DVD-R, DVD-R DL, DVD-RW, +R, +R DL and +RW compatibility with this unit. | ·This unit records and plays DVD-R, DVD-R DL, DVD-RW (DVD-Video format), +R, +R DL and +RW, and plays DVD-RW (VR format).·This unit also records and plays high speed recording compatible discs.·After recording but before finalizing +R, +R DL discs– You may not be able to play and record discs on this unit after recording them on other Panasonic products or other manufacturer’s equipment.– You may not be able to play and record discs on other equipment after recording them on this unit.After finalizing the disc, however, you will be able to play it on any DVD-Video compatible player. | 6, 7—— |
| Please tell me about CD-R and CD-RW compatibility with this unit. | ·This unit plays CD-R/CD-RW discs (audio recording discs) which have been recorded under one of the following standards: CD-DA, Video CD, SVCD (conforming to IEC62107), MP3 and still pictures (JPEG/TIFF).Close the session after recording.·You cannot write to a CD-R or CD-RW with this unit. | 7, 26— |
Recording
| Can I record from a commercially purchased video cassette or DVD? | ·Most commercially sold video cassettes and DVD are copy protected; therefore, recording is usually not possible. | — |
| Can I record digital audio signals using this unit? | ·You cannot record digital signals. The digital audio terminals on this unit are for output only. (The audio recorded using the unit's DV IN terminal from a digital video camcorder, for example, is recorded digitally.) | — |
| Can a digital audio signal from this unit be recorded to other equipment? | ·You can record if using the PCM signal. When recording DVD, change the “Digital Audio Output” settings to the following from the Setup menu.-PCM Down Conversion: On- Dolby Digital/DTS/MPEG: PCMHowever, only- As long as digital recording from the disc is permitted.- As long as the recording equipment is compatible with a sampling frequency of 48 kHz.·You cannot record MP3 signals. | 40 |
| Can I switch to bilingual broadcast during recording? | ·With DVD-RAM, you can. Just press [AUDIO]. This does not affect the actual recording of the audio.·With DVD-R, DVD-R DL, DVD-RW (DVD-Video format), +R, +R DL or +RW, you cannot. | — |
Troubleshooting guide
Before requesting service, make the following checks. If you are in doubt about some of the check points, or if the remedies indicated in the chart do not solve the problem, consult your dealer for instructions.
The following do not indicate a problem with this unit:
| Regular disc rotating sounds.Poor reception due to atmospheric conditions.Image disturbance during search.Interruptions in reception due to periodic satellite broadcasting breaks. | Operations do not work due to a poor-quality disc. (Try again using a Panasonic disc.)The unit freezes due to one of its safety devices being activated. (Press and hold [ð/l] on the main unit for 10 seconds.) |
Power Page
| No power.The unit does not turn on pressing [∅DVD].The unit switches to the standby mode. | Insert the AC mains lead securely into a known active AC mains socket.Linked timer recordings with external equipment is in recording standby (“EXT-L” on the unit’s display blinks when [∅ DVD] is pressed). Press [EXT LINK] to cancel the recording standby.One of the unit’s safety devices is activated. Press [∅/l] on the main unit to turn the unit on. | 8–1023— |
TV screen and video
| Television reception worsens after connecting the unit. | This can occur because the signals are being divided between the unit and other equipment. It can be solved by using a signal booster, available from audio-visual suppliers. If it is not solved by using a signal booster, consult the dealer. | — |
| Status messages do not appear. | Select “Automatic” in “On-Screen Messages” in the Setup menu. 40 | |
| The grey background does not appear. | Select “On” in “Grey Background” in the Setup menu. 40 | |
| Picture does not appear during timer recording. | Timer recordings work regardless whether the unit is on or off. To confirm the timer recording is going to work properly, turn the unit on. | — |
| The 4:3 aspect ratio picture expands left and right. | Use the television to change the aspect. If your television does not have that function, set “Progressive” in the Picture menu to “Off”. | 29 |
| Screen size is wrong. | Check the settings for “TV Aspect” in the Setup menu. | 14 |
| There is a lot of after-image when playing video. | Set “Playback NR” in the Picture menu to “Off”. 29 | |
| When playing DVD-Video using progressive output, one part of the picture momentarily appears to be doubled up. | Set “Progressive” in the Picture menu to “Off”. This problem is caused by the editing method or material used on DVD-Video, but should be corrected if you use interlace output. | 29 |
| There is no apparent change in picture quality when adjusted with the Picture menu in the on-screen menus. | The effect is less perceivable with some types of video. — | |
| The images from this unit do not appear on the television. | Make sure that the television is connected to the AV1 terminal, VIDEO OUT terminal, S VIDEO OUT terminal or COMPONENT VIDEO OUT terminals on this unit.Make sure that the television’s input setting (e.g., AV1) is correct. | 8–11— |
| Picture is distorted. | Progressive output is set to on but the connected television is not progressive compatible. Press and hold [■] and [▶ x1.3] on the main unit at the same time for about 5 seconds. The setting will change to interlace.The unit’s “TV System” setting differs from the TV system used by the disc now playing. While stopped, press and hold [■] and [▲ OPEN/CLOSE] on the main unit for 5 or more seconds. The system switches from PAL to NTSC or vice versa. | —43 |
Displays
| The display is dim. “0:00” is flashing on the unit’s display. The clock is not correct. | · Change “FL Display” in the Setup menu. · Set the clock. · Under adverse reception conditions, etc., the automatic time correction function may not work. In this case, “Automatic” is automatically turned to “Off”. If re-setting the Auto Clock Setting does not work, set the time manually. | 40 41 41 |
| The time recorded on the disc and the available time shown do not add up. The play time shown for MP3 does not agree with the actual time. | · Times shown may disagree with actual times. · Even if you delete recorded content from DVD-R, DVD-R DL, +R or +R DL, there is no increase in disc space. · Available recording space on a DVD-RW (DVD-Video format) or +RW increases only when the last recorded title is deleted. It does not increase if other titles are deleted. · More disc space than the actual recording time is used after recording or editing DVD-R, DVD-R DL, +R or +R DL 200 times or more. (For the second layer on DVD-R DL and +R DL, this happens after about 60 times.) · While searching, the elapsed time may not display correctly. | — — — — — — |
| “U88” is displayed and the disc cannot be ejected. | · The unit is carrying out the recovery process. Do the following to eject the disc. 1 Press [∅/l] on the main unit to switch the unit to standby. If the unit doesn’t switch to standby, press and hold [∅/l] on the main unit for about 10 seconds. The unit is forcibly switched to standby. 2 While the unit is off, press and hold [■] and [CH ∧] on the main unit at the same time for about 5 seconds. Remove the disc. | — |
Sound
| No sound.Low volume. | ·Check the connections and settings. Check the input mode on the amplifier if you have connected one. | 8-11, 40 |
| Distorted sound.Cannot hear the desired audio type. | ·Press [AUDIO] to select the audio.·Turn off V.S.S. in the following cases.-When using discs that do not have surround sound effects such as Karaoke discs.-When playing bilingual broadcast programmes.·The disc may have a restriction on the method of audio output. Some discs prohibit down-mixing and this unit can then only output the front two channels. Refer to the disc's jacket. | 2429— |
| Cannot switch audio. | ·You cannot change the audio type when playing DVD-R, DVD-R DL, DVD-RW (DVD-Video format), +R, +R DL or +RW. When any these disc types is in use, the audio of broadcast programme cannot be changed.·When connecting an amplifier using an optical digital cable, you cannot switch the audio if “Dolby Digital” is set to “Bitstream”. Set “Dolby Digital” to “PCM” or connect using audio cables.·There are discs which audio cannot be changed because of how the disc was created. | —11, 40— |
Operation Page
| Cannot operate the television.The remote control doesn't work. | · Change manufacturer code. Some televisions cannot be operated even if you change the code.· The remote control and main unit are using different codes. Change the code on the remote control.Press and hold [ENTER] and the indicated number button at the same time for more than 2 seconds.· The batteries are depleted. Replace them with new ones.· You are not pointing the remote control at the main unit's remote control signal sensor during operation.· Coloured glass may obstruct the signal reception/transmission.· Don't place the signal sensor in direct sunlight or in areas that may be subject to sunlight exposure.· It may be necessary to set the code on the remote control again after changing the batteries.· It may be necessary to set the manufacturer code again after changing the batteries.· The child lock function is activated. | 151577——151538 |
| The unit is on but cannot be operated. | · Some operations may be prohibited by the disc.· The unit is hot ("U59" appears on the display). Wait for "U59" to disappear.· One of the unit's safety devices may have been activated.Reset the unit as follows:1 Press [∅/l] on the main unit to switch the unit to standby.If the unit doesn't switch to standby, press and hold [∅/l] on the main unit for about 10 seconds.The unit is forcibly switched to standby.Alternatively, disconnect the AC mains lead, wait one minute, then reconnect it.2 Press [∅/l] on the main unit to switch it on. If the unit still cannot be operated, consult the dealer. | ——— |
| Cannot eject disc. | · Linked timer recordings with external equipment is in recording standby ("EXT-L" on the unit's display blinks when [∅ DVD] is pressed). Press [EXT LINK] to cancel the recording standby.· The unit is recording.· The unit may have a problem. While the unit is off, press and hold [■] and [CH ∧] on the main unit at the same time for about 5 seconds. Remove the disc and consult the dealer.· If the Child Lock function is activated, above operation does not work. Cancel the Child Lock function. | 23——38 |
| Cannot tune channels.Cannot download the tuning positions. | · Check the connections.· You must connect to a television equipped with the Q Link function with a fully wired 21-pin Scart lead to download channel presets. | 8-108-10 |
| Startup is slow. | · Startup is slow if the clock is not set, there was a power failure or the AC plug has just been connected.· Twenty to 30 seconds after turning on the unit, you can play a disc or start recording to discs other than DVD-RAM.· Startup takes time for a few minutes after 5:15 am due to system maintenance of this unit. | ——— |
| Takes time to read DVD-RAM. | · It may take time to read a disc if it is being used for the first time in this unit or it has not been used for a long time. | — |
Recording, timer recording and copying
| Cannot record. | You haven't inserted a disc or the disc you inserted cannot be recorded on. Insert a disc the unit can record onto.The disc is unformatted. Format the disc.RAM -RW(V) +R +R DL +RWThe write-protect tab on the cartridge is set to PROTECT, or the disc is protected with DVD Management.Some programmes have limitations on the number of times they can be recorded. (CPRM)You cannot record when there is not enough space or when the number of titles has reached its limit. Delete unwanted titles or use a new disc.You cannot record on finalized DVD-R, DVD-R DL, DVD-RW (DVD-Video format), +R, +R DL or DVD-RW (VR format) discs.Due to peculiarities of DVD-R, DVD-R DL, DVD-RW (DVD-Video format), +R, +R DL or +RW, you may be unable to record onto them if you either insert and remove the disc or switch the unit on and off while a disc is loaded, a total of fifty times.DVD-R, DVD-R DL, DVD-RW (DVD-Video format), +R, +R DL or +RW recorded on this unit may not be recordable on other Panasonic DVD recorders. | 636364931, 35, 36—— |
| Cannot record from external equipment. | Check that the connection is correct.Select the input channel ("AV2", "AV3" or "DV") for the equipment you have connected. | 8–10, 34— |
| Timer recording does not work properly.VIDEO Plus+ programming does not work properly. | The timer programme is incorrect or different timer programme times overlap. Correct the programme.The unit or the timer programme is not on timer recording standby. ("_) on the unit's display or the timer icon in the timer recording list is not on.)Put the unit and the timer programme on timer recording standby.Set the clock. | 2220, 2141 |
| Timer recording does not stop even when [■] is pressed. | When this unit is on, press [■]. A dialog appears, so press [◀▶] to select "Stop Recording" and press [ENTER].When using the linked timer recording with external equipment, press [EXT LINK]. ("EXT-L" disappears.) | 2123 |
| The timer programme remains even after recording finishes. | The timer programme remains if set to daily or weekly. | 21 |
| A part or whole of a recorded title has been lost. | If there is a power failure or the plug is disconnected from the household AC mains socket while recording or editing, the title may be lost or the disc may become unusable. You will have to format the disc(RAM -RW(V) +RW)a new disc. We cannot offer any guarantee regarding lost programmes or discs. | — |
| The DV automatic recording function does not work. | If images cannot be recorded or if the recording is aborted, check the connections and DV equipment settings.You cannot start recording until the images from the DV equipment appear on the television.Recording may not be performed as desired if the time codes on the tape in the DV equipment are not successive.Depending on the equipment, the DV automatic recording may not operate properly.You can only record audio/video images on a DV tape. | 34——— |
Play Page
| Play fails to start even when [▶] (PLAY) is pressed.Play starts but then stops immediately. | • Insert the disc correctly with the label facing up.• The disc is dirty.• You tried to play a blank disc or disc unplayable on this unit.• You tried to play a +RW that needs to be finalized on the equipment used for recording.• When recording to DVD-RAM using EP ( 8Hours ) mode, play may not be possible on DVD players that are compatible with DVD-RAM. In this case use EP ( 6Hours ) mode.• You cannot play discs during DV automatic recording. | 1846, 7—39— |
| Audio and video momentarily pause. | • This occurs between playlist chapters.• This occurs as scenes change during Quick View. | —— |
| DVD-Video is not played. | • You have set a ratings level to limit DVD-Video play. Change this setting. | 39 |
| Alternative soundtrack and subtitles cannot be selected. | • The languages are not recorded on the disc.• You may have to use the disc's menus to select languages. | —24 |
| No subtitles. • Subtitles are not recorded on the disc. | • Set “Subtitle” on the on-screen menu to “On”. | —28 |
| Angle cannot be changed. | • Angles can only be changed during scenes where different angles are recorded. | — |
| You have forgotten your ratings password. | • While the disc tray is open, press and hold [● REC] and [▶ x1.3] on the main unit at the same time for 5 or more seconds (“INIT” will appear on the unit’s display). The ratings level returns to “8”. | — |
| Quick View does not work. • | This does not work when audio is other than Dolby Digital.• This does not work when recording in XP or FR mode. | —— |
| The resume play function does not work. | • Memorized positions are cancelled when the unit is turned off or when the tray is opened. The memorized position on the playlist is also cancelled when the playlist and title are edited. | — |
| The Video CD picture does not display properly. | • When connecting to Multi-system TV, select “NTSC” in “TV System” in the Setup menu.• When connecting to PAL TV, the lower part of the picture cannot be displayed correctly during search. | 43— |
| Time Slip does not work. | • Time Slip does not work when the unit’s “TV System” settings are different from the title recorded on the disc. | 43 |
| When playing PAL disc, picture distorted. | • Set “Transfer” in Picture menu to “Auto”. 29 |
Edit
| Cannot format. • The disc is dirty. Wipe with a damp cloth and then wipe dry. | 4 | |
| 6, 7 | ||
| • You tried formatting a disc that is not compatible with this unit. | ||
| Cannot create chapters. | — | |
| • The unit writes the chapter information to the disc when you turn it off or remove the disc. The information is not written if there is an interruption to the power before this. | ||
| Cannot mark the start point or the end point during “Partial Delete” operation. | — | |
| — | ||
| Cannot delete chapters. | When the chapter is too short to delete, use “Combine Chapters” to make the chapter longer. | 31 |
| The available recording space doesn’t increase even after deleting recordings on the disc. | Available recording space on DVD-R, DVD-R DL, +R or +R DL does not increase even after deleting previously recorded titles. | — |
| Available recording space on DVD-RW (DVD-Video format) or +RW increases only when the last recorded title is deleted. It does not increase if other titles are deleted. | — | |
| Cannot create a playlist. | You cannot select all the chapters at once in a title if the title also includes still pictures. Select them individually. | — |
To reset this unit
| To return all the settings other than the main ones to the factory preset. | Select “Yes” in “Shipping Condition” in the Setup menu. All the settings except for the ratings level, ratings password, Owner ID and time settings return to the factory preset. The timer recording programmes are also cancelled.Select “Yes” in “Default Settings” in the Setup menu. All the settings other than the programmed channels, time settings, disc language settings, ratings level, ratings password, Owner ID and remote control code return to the factory presets.Press and hold [∨ CH] and [CH ∧] on the main unit for about 5 seconds. All the settings except for the ratings level, ratings password, Owner ID and time settings return to the factory preset. The timer recording programmes are also cancelled. | 4141— |
| To reset the ratings level settings. | While the disc tray is open, press and hold [● REC] and [▶ x1.3] on the main unit at the same time for 5 or more seconds. | — |
| To restore the unit if it freezes due to one of the safety devices being activated. | Press and hold [∅/I] on the main unit for 10 seconds. (The settings remain.) | — |
Bitstream
This is the digital form of multi-channel audio data (e.g., 5.1 channel) before it is decoded into its various channels.
Component video output
Component signal outputs the colour difference signals (PB/PR) and luminance signal (Y) separately in order to achieve high fidelity in reproducing colours. If the television is compatible with progressive output, a high quality picture can be output because this unit's component video output terminal outputs a progressive output signal.
CPRM (Content Protection for Recordable Media)
CPRM is technology used to protect broadcasts that are allowed to be recorded only once. Such broadcasts can be recorded only with CPRM compatible recorders and discs.
Dolby Digital
This is a method of coding digital signals developed by Dolby Laboratories. Apart from stereo (2-channel) audio, these signals can also be multi-channel audio. A large amount of audio information can be recorded on one disc using this method.
Down-mixing
This is the process of remixing the multi-channel audio found on some discs into two channels for stereo output. It is useful when you want to listen to the 5.1-channel audio recorded on DVDs through your television's speakers. Some discs prohibit down-mixing and this unit can then only output the front two channels.
DTS (Digital Theater Systems)
This surround system is used in many movie theaters. There is good separation between the channels, so realistic sound effects are possible.
Dynamic range
Dynamic range is the difference between the lowest level of sound that can be heard above the noise of the equipment and the highest level of sound before distortion occurs. Dynamic range compression means reducing the gap between the loudest and softest sounds. This means you can listen at low volumes but still hear dialog clearly.
Film and video
DVD-Videos are recorded using either film or video. This unit can determine which type has been used, then uses the most suitable method of progressive output.
Film:
Recorded at 25 frames per second (PAL discs) or 24 frames per second (NTSC discs). (NTSC discs recorded at 30 frames per second as well.) Generally appropriate for motion picture films. Video:
Recorded at 25 frames/50 fields per second (PAL discs) or 30 frames/60 fields per second (NTSC discs). Generally appropriate for TV drama programmes or animation.
Finalize
A process that makes play of a recorded CD-R, CD-RW, DVD-R etc. possible on equipment that can play such media. You can finalize DVD-R, DVD-R DL, DVD-RW (DVD-Video format), +R or +R DL on this unit.
After finalizing, the disc becomes play-only and you can no longer record or edit. However, finalized DVD-RW can be formatted to become recordable.
Formatting
Formatting is the process of making media such as DVD-RAM recordable on recording equipment.
You can format DVD-RAM, DVD-RW (only as DVD-Video format), +R, +R DL or +RW on this unit.
When you use a new DVD-RW, +R, +R DL or +RW, it must be formatted.
Formatting deletes irrevocably all contents.
Frames and fields
Frames refer to the single images that constitute the video you see on your television. Each frame consists of two fields.

Frame Field Field
- A frame still shows two fields, so there may be some blurring, but picture quality is generally better.
- A field still shows less picture information so it may be rougher, but there is no blurring.
JPEG (Joint Photographic Experts Group)
This is a system used for compressing/decoding colour still pictures. If you select JPEG as the storage system on digital cameras etc., the data will be compressed to 1/10–1/100 of its original size. The feature of JPEG is less deterioration in picture quality considering the degree of compression.
MP3 (MPEG Audio Layer 3)
An audio compression method that compresses audio to approximately one tenth of its size without any considerable loss of audio quality. You can play MP3 you have recorded onto DVD-R, CD-R and CD-RW.
Pan & Scan/Letterbox
In general, DVD-Video are produced with the intention that they be viewed on a widescreen television (16:9 aspect ratio), so images often don't fit regular (4:3 aspect ratio) televisions. Two styles of picture, "Pan & Scan" and "Letterbox", deal with this problem.
Pan & Scan: The sides are cut off so the picture fills the screen.
Letterbox: Black bands appear at the top and bottom of the picture so the picture itself appears in an aspect ratio of 16:9.
Playback control (PBC)
If a Video CD has playback control, you can select scenes and information with menus.
(This unit is compatible with version 2.0 and 1.1.)
Progressive/Interlace
The PAL video signal standard has 625 (or 576) interlaced (i) scan lines, whereas progressive scanning, called 625p (or 576p), uses twice the number of scan lines. For the NTSC standard, these are called 525i (or 480i) and 525p (or 480p) respectively.
Using progressive output, you can enjoy the high-resolution video recorded on media such as DVD-Video.
Your television must be compatible to enjoy progressive video.
Panasonic televisions with 625 (576)/50i · 50p, 525 (480)/60i · 60p input terminals are progressive compatible.
Protection
You can prevent accidental deletion by setting writing protection or deletion protection.
RGB
This refers to the three primary colours of light, red (R), green (G), and blue (B) and also the method of producing video that uses them. By dividing the video signal into the three colours for transmission, noise is reduced for even higher quality images.
Sampling frequency
Sampling is the process of converting the heights of sound wave (analogue signal) samples taken at set periods into digits (digital encoding). Sampling frequency is the number of samples taken per second, so larger numbers mean more faithful reproduction of the original sound.
Thumbnail
This refers to a miniature representation of a picture used to display multiple pictures in the form of a list.
TIFF (Tag Image File Format)
This is a system used for compressing/decoding colour still pictures. A common format for storing high quality images on digital cameras and other devices.
Specifications
Recording System
DVD-RAM: DVD Video Recording format
DVD-R: DVD-Video format
DVD-R DL (Dual Layer): DVD-Video format
DVD-RW: DVD-Video format
+R
+R DL (Double Layer)
+RW
Recording time
Maximum 8 hours (using 4.7 GB disc)
XP: Approx. 1 hour
SP: Approx. 2 hours
LP: Approx. 4 hours
EP: Approx. 6 hours/8 hours
Recordable discs
DVD-RAM: Ver. 2.0
Ver. 2.1/3x-SPEED DVD-RAM Revision 1.0
Ver. 2.2/5x-SPEED DVD-RAM Revision 2.0
DVD-R: for General Ver. 2.0
for General Ver. 2.0/4x-SPEED DVD-R Revision 1.0
for General Ver. 2.x/8x-SPEED DVD-R Revision 3.0
for General Ver. 2.x/16x-SPEED DVD-R Revision 6.0
for DL Ver. 3.0
for DL Ver. 3.x/4x-SPEED DVD-R for DL Revision 1.0
DVD-RW: Ver. 1.1
Ver. 1.x/2x-SPEED DVD-RW Revision 1.0
Ver. 1.x/4x-SPEED DVD-RW Revision 2.0
Ver. 1.x/6x-SPEED DVD-RW Revision 3.0
+R: Ver. 1.0
Ver. 1.1
Ver. 1.2
Ver. 1.3
for DL Ver. 1.0
+RW: Ver. 1.1
Ver. 1.2/4x-SPEED
playable discs
DVD-RAM (DVD Video Recording format), DVD-R (DVD-Video format, MP3, JPEG), DVD-R DL (Dual Layer) (DVD-Video format), DVD-RW (DVD-Video format, DVD Video Recording format), +R, +R DL (Double Layer), +RW, DVD-Video, DVD-Audio, CD-Audio (CD-DA), Video CD, CD-R/RW (CD-DA, Video CD, SVCD ^1 , MP3, JPEG formatted discs), SVCD ^1
*1 Conforming to IEC62107.
Quick Start for Recording
1 Sec. Quick Start for Recording on DVD-RAM ^2
^2 From the power off state, recording on DVD-RAM starts about 1 second after first pressing the Power button and then sequentially pressing the REC button.
Video
Video System: PAL colour signal, 625 lines, 50 fields
NTSC colour signal, 525 lines, 60 fields
Recording System: MPEG2 (Hybrid VBR)
Video In (SECAM/PAL/NTSC):
AV1/AV2 (21 pin), AV3 (pin jack) 1 Vp-p 75 Ω, termination
S-Video In (SECAM/PAL/NTSC):
AV2 (21 pin), AV3 (S terminal) 1 Vp-p 75 Ω, termination
Video Out (PAL/NTSC):
AV1/AV2 (21 pin), Video Out (pin jack) 1 Vp-p 75 Ω, termination
S-Video Out (PAL/NTSC):
AV1 (21 pin), S-Video Out (S terminal) 1 Vp-p 75 Ω, termination
RGB Out (PAL/NTSC)
AV1 (21 pin) 0.7 Vp-p (PAL) 75 Ω, termination
Component video output (NTSC 480p/480i, PAL 576p/576i)
Y: 1.0 Vp-p 75 Ω, termination
P_B : 0.7 Vp-p 75 Ω, termination
PR: 0.7 Vp-p 75 Ω, termination
Audio
Recording System: Dolby Digital 2ch
Input Level: Standard: 0.5 Vrms, Full scale: 2.0 Vrms at 1 kHz
Input Impedance: More than 10 kΩ
Audio Out: AV1/AV2 (21 pin), Audio Out (pin jack)
Output Level: Standard: 0.5 Vrms, Full scale: 2.0 Vrms at 1 kHz
Output Impedance: Less than 1 kΩ
Digital Audio Out:
cal terminal (PCM, Dolby Digital, DTS, MPEG)
Television System
Tuner System: PAL-I
Channel Coverage:
The United Kingdom
Republic of Ireland
UHF: CH 21–68
VHF: CH 4–13, A–J
UHF: CH 21–68
RF Converter Output:
Optical pick-up
Not provided
System with 1 lens, 2 integration units
(662 nm wavelength for DVDs,
780 nm wavelength for CDs)
LASER Specification
Class 1 LASER Product
Wave Length: 780 nm (CDs), 662 nm (DVDs)
Laser Power:
No hazardous radiation is emitted with the safety protection
DV Input IEEE 1394 Standard, 4 pin: 1 pc
Others
Region Code: #2
Operating temperature: 5 °C–40 °C
Operating humidity range: 10%–80% RH (no condensation)
Power supply: AC 220 V–240 V, 50 Hz
Power consumption: Approx. 22 W
Dimensions (W×D×H): 430 mm × 316 mm × 58 mm
Mass: 3.2 kg
Note
Specifications are subject to change without notice.
Mass and dimensions are approximate.
Language code list Enter the code with the numbered buttons.
| Abkhazian: | 6566 | Catalan: | 6765 | Gujarati: | 7185 | Lingala: | 7678 | Rhaeto-Romance: | Tamil: | 8465 |
| Afar: | 6565 | Chinese: | 9072 | Hausa: | 7265 | Lithuanian: | 7684 | Tatar: | 8484 | |
| Afrikaans: | 6570 | Corsican: | 6779 | Hebrew: | 7387 | Macedonian: | 7775 | Romanian: | 8279 | Telugu: |
| Albanian: | 8381 | Croatian: | 7282 | Hindi: | 7273 | Malagasy: | 7771 | Russian: | 8285 | Thai: |
| Ameharic: | 6577 | Czech: | 6783 | Hungarian: | 7285 | Malay: | 7783 | Samoan: | 8377 | Tibetan: |
| Arabic: | 6582 | Danish: | 6865 | Icelandic: | 7383 | Malayalam: | 7776 | Sanskrit: | 8365 | Tigrinya: |
| Armenian: | 7289 | Dutch: | 7876 | Indonesian: | 7378 | Maltese: | 7784 | Scots Gaelic: | 7168 | Tonga: |
| Assamese: | 6583 | English: | 6978 | Interlingua: | 7365 | Maori: | 7773 | Serbian: | 8382 | Turkish: |
| Aymara: | 6589 | Esperanto: | 6979 | Irish: | 7165 | Marathi: | 7782 | Serbo-Croatian: | 8372 | Turkmen: |
| Azerbaijani: | 6590 | Estonian: | 6984 | Italian: | 7384 | Moldavian: | 7779 | Shona: | 8378 | Twi: |
| Bashkir: | 6665 | Faroese: | 7079 | Japanese: | 7465 | Mongolian: | 7778 | Sindhi: | 8368 | Ukrainian: |
| Basque: | 6985 | Fiji: | 7074 | Javanese: | 7487 | Nauru: | 7865 | Singhalese: | 8373 | Urdu: |
| Bengali; Bangla: | Finnish: | 7073 | Kannada: | 7578 | Nepali: | 7869 | Slovak: | 8375 | Uzbek: | |
| 6678 | French: | 7082 | Kashmiri: | 7583 | Norwegian: | 7879 | Slovenian: | 8376 | Vietnamese: | |
| Bhutani: | 6890 | Frisian: | 7089 | Kazakh: | 7575 | Oriya: | 7982 | Somali: | 8379 | Volapük: |
| Bihari: | 6672 | Galician: | 7176 | Kirghiz: | 7589 | Pashto, Pushto: | 8083 | Spanish: | 6983 | Welsh: |
| Breton: | 6682 | Georgian: | 7565 | Korean: | 7579 | Persian: | 7065 | Sundanese: | 8385 | Wolof: |
| Bulgarian: | 6671 | German: | 6869 | Kurdish: | 7585 | Polish: | 8076 | Swahili: | 8387 | Xhosa: |
| Burmese: | 7789 | Greek: | 6976 | Laotian: | 7679 | Portuguese: | 8084 | Swedish: | 8386 | Yiddish: |
| Byelorussian: | 6669 | Greenlandic: | 7576 | Latin: | 7665 | Punjabi: | 8065 | Tagalog: | 8476 | Yoruba: |
| Cambodian: | 7577 | Guarani: | 7178 | Latvian, Lettish: | 7686 | Quechua: | 8185 | Tajik: | 8471 | Zulu: |
CAUTION!
THIS PRODUCT UTILIZES A LASER. USE OF CONTROLS OR ADJUSTMENTS OR PERFORMANCE OF PROCEDURES OTHER THAN THOSE SPECIFIED HEREIN MAY RESULT IN HAZARDOUS RADIATION EXPOSURE. DO NOT OPEN COVERS AND DO NOT REPAIR YOURSELF. REFER SERVICING TO QUALIFIED PERSONNEL.
CAUTION!
- DO NOT INSTALL OR PLACE THIS UNIT IN A BOOKCASE, BUILT-IN CABINET OR IN ANOTHER CONFINED SPACE. ENSURE THE UNIT IS WELL VENTILATED. TO PREVENT RISK OF ELECTRIC SHOCK OR FIRE HAZARD DUE TO OVERHEATING, ENSURE THAT CURTAINS AND ANY OTHER MATERIALS DO NOT OBSTRUCT THE VENTILATION VENTS.
- DO NOT OBSTRUCT THE UNIT'S VENTILATION OPENINGS WITH NEWSPAPERS, TABLECLOTHS, CURTAINS, AND SIMILAR ITEMS.
- DO NOT PLACE SOURCES OF NAKED FLAMES, SUCH AS LIGHTED CANDLES, ON THE UNIT.
- DISPOSE OF BATTERIES IN AN ENVIRONMENTALLY FRIENDLY MANNER.
WARNING:
TO REDUCE THE RISK OF FIRE, ELECTRIC SHOCK OR PRODUCT DAMAGE, DO NOT EXPOSE THIS APPARATUS TO RAIN, MOISTURE, DRIPPING OR SPLASHING AND THAT NO OBJECTS FILLED WITH LIQUIDS, SUCH AS VASES, SHALL BE PLACED ON THE APPARATUS.
THIS UNIT IS INTENDED FOR USE IN MODERATE CLIMATES. (→page 50, Specifications—Others)
This product may receive radio interference caused by mobile telephones during use. If such interference is apparent, please increase separation between the product and the mobile telephone.
The socket outlet shall be installed near the equipment and easily accessible or the mains plug or an appliance coupler shall remain readily operable.
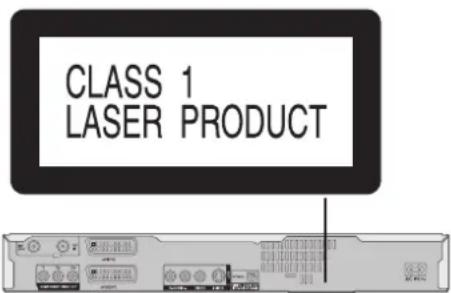
(Back of product)
| DANGER -VISIBLE AND INVISIBLE LERADIATION WHEN OPEN, AVOID DIRECT EXPOSURE TO BEAM. FDA 21 CFR/Class IIb | |
| 注意 | 一打开时有可见及不可见激光辐射,避免光来照射。 |
| 注意 | 一ごを聞くと可视後の不可視レーザウ光出来ます。 |
| ビームを取り、触いたりできないください。 | |
| CAUTION | -CLASS 38 VISIBLE AND INVISIBLE LASERADIATION WHEN OPEN, AVOID EXPOSURE TO THE BEAM. EQ6025-1-AD Class 28 |
| ATTENTION | -RAYONNEMENT LASER VIRILE ET INVISIBLE, CLASSE 38, EN CAS D'OUVERTURE, ÉVITER UNES EXPOSITION FAISCEAU. |
| FORSIGTIG | -SYNLIG OU USYNLIG LASERSTRALING KLASSE 38, NAR LAGET ER ARENT, UNIDGA AT BLIVE UDSAT FOR STRALEN. |
| VARO | -AVATTAESSA OLET ALTINA LUOKAN 38 NAKYVAÄ JA NAKYMÄTÖNTÄ LASERATELYA, WHO ALISTUMSTA SATIELLE. |
| VARNING | -KLASS 38 SYNLIG OCH OSYNLIG LASERSTRALNING NAR DENNA DEL AR OPPNAD, UNDWK EXPONERING FOR STRALEN. |
| VORSICHT | -SICHTBARE UNSICHTBARE LASERSTRALUNG KLASSE 38, WHEN ABDECKUNG GEÖFFNET, NICHT DEM STRAHL, AISSETZEN. |
| CAUTION | -VISIBLE AND INVISIBLE LASER RADIATION WHEN OPEN, AVOID EXPOSURE TO THE BEAM. EQ6025-21. |
| ATTENTION | -RAYONNEMENT LASER VIRILE ET INVISIBLE EN CAS D'OUVERTURE, EXPOSITION DANGEREUSE FAISCEAU. |
| ADVERSEL | -SYNLIG OU USYNLIG LASERSTRALING VED ABNING, UNDIYIN, UNDIYIN, UNDIYIN, UNDIYIN, UNDIYIN, UNDIYIN, UNDIYIN, UNDIYIN, UNDIYIN, UNDIYIN, UNDIYIN, UNDIYIN, UNDIYIN, UNDIYIN, UNDIYIN, UNDIYIN, UNDIYIN, UNDIYIN, UNDIYIN, UNDIYIN, UNDIYin, UNDIYIN, UNDIYIN, UNDIYIN, UNDIYIN, UNDIYIN, UNDIYIN, UNDIYIN, UNDIYIN, UNDIYIN, UNDIYIN, UNDIYIN, UNDIYIN, UNDIYIN, UNDIYIN, UNDIYIN, UNDIYIN, UNDIYIN, UNDIYIN, UNDIYIN, UNDIYIn, UNDIYIN, UNDIYIN, UNDIYIN, UNDIYIN, UNDIYIN, UNDIYIN, UNDIYIN, UNDIYIN, UNDIYIN, UNDIYIN, UNDIYIN, UNDIYIN, UNDIYIN, UNDIYIN, UNDIYIN, UNDIYIN, UNDIYIN, UNDIYIN, UNDIYIN, UNDIYIIn, UNDIYIN, UNDIYIN, UNDIYIN, UNDIYIN, UNDIYIN, UNDIYIN, UNDIYIN, UNDIYIN, UNDIYIN, UNDIYIN, UNDIYIN, UNDIYIN, UNDIYIN, UNDIYIN, UNDIYIN, UNDIYIN, UNDIYIN, UNDIYIN, UNDIYIN, UNDIyIn, UNDIyIn, UNDIyIn, UNDIyIn, UNDIyIn, UNDIyIn, UNDIyIn, UNDIyIn, UNDIyIn, UNDIyIn, UNDIyIn, UNDIyIn, UNDIyIn, UNDIyIn, UNDIyIn, UNDIyIn, UNDIyIn, UNDIyIn, UNDIyIn, UNDIyIn, UNDIyin, UNDIyIn, UNDIyIn, UNDIyIn, UNDIyIn, UNDIyIn, UNDIyIn, UNDIyIn, UNDIyIn, UNDIyIn, UNDIyIn, UNDIyIn, UNDIyIn, UNDIyIn, UNDIyIn, UNDIyIn, UNDIyIn, UNDIyIn, UNDIyIn, UNDIyIn, UNDIyIIn, UNDIyIn, UNDIyIn, UNDIyIn, UNDIyIn, UNDIyIn, UNDIyIn, UNDIyIn, UNDIyIn, UNDIyIn, UNDIyIn, UNDIyIn, UNDIyIn, UNDIyIn, UNDIyIn, UNDIyIn, UNDIyIn, UNDIyIn, UNDIyIn, UNDIyIn, UNDIYIn, UNDIyIn, UNDIyIn, UNDIyIn, UNDIyIn, UNDIyIn, UNDIyIn, UNDIyIn, UNDIyIn, UNDIyIn, UNDIyIn, UNDIyIn, UNDIyIn, UNDIyIn, UNDIyIn, UNDIyIn, UNDIyIn, UNDIyIn, UNDIyIn, UNDIyIn, UNDIiIn, UNDIyIn, UNDIyIn, UNDIyIn, UNDIyIn, UNDIyIn, UNDIyIn, UNDIyIn, UNDIyIn, UNDIyIn, UNDIyIn, UNDIyIn, UNDIyIn, UNDIyIn, UNDIyIn, UNDIyIn, UNDIyIn, UNDIyIn, UNDIyIn, UNDIyIn, UNDIvIn, UNDIyIn, UNDIyIn, UNDIyIn, UNDIyIn, UNDIyIn, UNDIyIn, UNDIyIn, UNDIyIn, UNDIyIn, UNDIyIn, UNDIyIn, UNDIyIn, UNDIyIn, UNDIyIn, UNDIyIn, UNDIyIn, UNDIyIn, UNDIyIn, UNDIyIn, UNDI yIn, UNDIyIn, UNDIyIn, UNDIyIn, UNDIyIn, UNDIyIn, UNDIyIn, UNDIyIn, UNDIyIn, UNDIyIn, UNDIyIn, UNDIyIn, UNDIyIn, UNDIyIn, UNDIyIn, UNDIyIn, UNDIyIn, UNDIyIn, UNDIyIn, UNDIyIn, UNDIxIn, UNDIyIn, UNDIyIn, UNDIyIn, UNDIyIn, UNDIyIn, UNDIyIn, UNDIyIn, UNDIyIn, UNDIyIn, UNDIyIn, UNDIyIn, UNDIyIn, UNDIyIn, UNDIyIn, UNDIyIn, UNDIyIn, UNDIyIn, UNDIyIn, UNDIyIn, UNDIzIn, UNDIyIn, UNDIyIn, UNDIyIn, UNDIyIn, UNDIyIn, UNDIyIn, UNDIyIn, UNDIyIn, UNDIyIn, UNDIyIn, UNDIyIn, UNDIyIn, UNDIyIn, UNDIyIn, UNDIyIn, UNDIyIn, UNDIyIn, UNDIyIn, UNDIyIn, UNDIyzIn, UNDIyIn, UNDIyIn, UNDIyIn, UNDIyIn, UNDIyIn, UNDIyIn, UNDIyIn, UNDIyIn, UNDIyIn, UNDIyIn, UNDIyIn, UNDIyIn, UNDIyIn, UNDIyIn, UNDIyIn, UNDIyIn, UNDIyIn, UNDIyIn, UNDIyIn, UNDIzyIn, UNDIyIn, UNDIyIn, UNDIyIn, UNDIyIn, UNDIyIn, UNDIyIn, UNDIyIn, UNDIyIn, UNDIyIn, UNDIyIn, UNDIyIn, UNDIyIn, UNDIyIn, UNDIyIn, UNDIyIn, UNDIyIn, UNDIyIn, UNDIyIn, UNDIyIn, UNDIyyIn, UNDIyIn, UNDIyIn, UNDIyIn, UNDIyIn, UNDIyIn, UNDIyIn, UNDIyIn, UNDIyIn, UNDIyIn, UNDIyIn, UNDIyIn, UNDIyIn, UNDIyIn, UNDIyIn, UNDIyIn, UNDIyIn, UNDIyIn, UNDIyIn, UNDIyIn, UNDIyaIn, UNDIyIn, UNDIyIn, UNDIyIn, UNDIyIn, UNDIyIn, UNDIyIn, UNDIyIn, UNDIyIn, UNDIyIn, UNDIyIn, UNDIyIn, UNDIyIn, UNDIyIn, UNDIyIn, UNDIyIn, UNDIyIn, UNDIyIn, UNDIyIn, UNDIyIn, UNDIybIn, UNDIyIn, UNDIyIn, UNDIyIn, UNDIyIn, UNDIyIn, UNDIyIn, UNDIyIn, UNDIyIn, UNDIyIn, UNDIyIn, UNDIyIn, UNDIyIn, UNDIyIn, UNDIyIn, UNDIyIn, UNDIyIn, UNDIyIn, UNDIyIn, UNDIyIn, UNDIbIn, UNDIyIn, UNDIyIn, UNDIyIn, UNDIyIn, UNDIyIn, UNDIyIn, UNDIyIn, UNDIyIn, UNDIyIn, UNDIyIn, UNDIyIn, UNDIyIn, UNDIyIn, UNDIyIn, UNDIyIn, UNDIyIn, UNDIyIn, UNDIyIn, UNDIyIn, UNDIykIn, UNDIyIn, UNDIyIn, UNDIyIn, UNDIyIn, UNDIyIn, UNDIyIn, UNDIyIn, UNDIyIn, UNDIyIn, UNDIyIn, UNDIyIn, UNDIyIn, UNDIyIn, UNDIyIn, UNDIyIn, UNDIyIn, UNDIyIn, UNDIyIn, UNDIyIn, UNDIkIn, UNDIyIn, UNDIyIn, UNDIyIn, UNDIyIn, UNDIyIn, UNDIyIn, UNDIyIn, UNDIyIn, UNDIyIn, UNDIyIn, UNDIyIn, UNDIyIn, UNDIyIn, UNDIyIn, UNDIyIn, UNDIyIn, UNDIyIn, UNDIyIn, UNDIyIn, UNDIyeIn, UNDIyIn, UNDIyIn, UNDIyIn, UNDIyIn, UNDIyIn, UNDIyIn, UNDIyIn, UNDIyIn, UNDIyIn, UNDIyIn, UNDIyIn, UNDIyIn, UNDIyIn, UNDIyIn, UNDIyIn, UNDIyIn, UNDIyIn, UNDIyIn, UNDIyIn, UNDIyiIn, UNDIyIn, UNDIyIn, UNDIyIn, UNDIyIn, UNDIyIn, UNDIyIn, UNDIyIn, UNDIyIn, UNDIyIn, UNDIyIn, UNDIyIn, UNDIyIn, UNDIyIn, UNDIyIn, UNDIyIn, UNDIyIn, UNDIyIn, UNDIyIn, UNDIyIn, UNDIiyIn, UNDIyIn, UNDIyIn, UNDIyIn, UNDIyIn, UNDIyIn, UNDIyIn, UNDIyIn, UNDIyIn, UNDIyIn, UNDIyIn, UNDIyIn, UNDIyIn, UNDIyIn, UNDIyIn, UNDIyIn, UNDIyIn, UNDIyIn, UNDIyIn, UNDIyIn, UNDIydIn, UNDIyIn, UNDIyIn, UNDIyIn, UNDIyIn, UNDIyIn, UNDIyIn, UNDIyIn, UNDIyIn, UNDIyIn, UNDIyIn, UNDIyIn, UNDIyIn, UNDIyIn, UNDIyIn, UNDIyIn, UNDIyIn, UNDIyIn, UNDIyIn, UNDIyIn, UNDIygIn, UNDIyIn, UNDIyIn, UNDIyIn, UNDIyIn, UNDIyIn, UNDIyIn, UNDIyIn, UNDIyIn, UNDIyIn, UNDIyIn, UNDIyIn, UNDIyIn, UNDIyIn, UNDIyIn, UNDIyIn, UNDIyIn, UNDIyIn, UNDIyIn, UNDIyIn, UNDIyhIn, UNDIyIn, UNDIyIn, UNDIyIn, UNDIyIn, UNDIyIn, UNDIyIn, UNDIyIn, UNDIyIn, UNDIyIn, UNDIyIn, UNDIyIn, UNDIyIn, UNDIyIn, UNDIyIn, UNDIyIn, UNDIyIn, UNDIyIn, UNDIyIn, UNDIyIn, UNDIyxIn, UNDIyIn, UNDIyIn, UNDIyIn, UNDIyIn, UNDIyIn, UNDIyIn, UNDIyIn, UNDIyIn, UNDIyIn, UNDIyIn, UNDIyIn, UNDIyIn, UNDIyIn, UNDIyIn, UNDIyIn, UNDIyIn, UNDIyIn, UNDIyIn, UNDIyIn, UNDIywIn, UNDIyIn, UNDIyIn, UNDIyIn, UNDIyIn, UNDIyIn, UNDIyIn, UNDIyIn, UNDIyIn, UNDIyIn, UNDIyIn, UNDIyIn, UNDIyIn, UNDIyIn, UNDIyIn, UNDIyIn, UNDIyIn, UNDIyIn, UNDIyIn, UNDIyIn, UNDIyrIn, UNDIyIn, UNDIyIn, UNDIyIn, UNDIyIn, UNDIyIn, UNDIyIn, UNDIyIn, UNDIyIn, UNDIyIn, UNDIyIn, UNDIyIn, UNDIyIn, UNDIyIn, UNDIyIn, UNDIyIn, UNDIyIn, UNDIyIn, UNDIyIn, UNDIyIn, UNDIýIn, UNDIýIn, UNDIýIn, UNDIýIn, UNDIýIn, UNDIýIn, UNDIýIn, UNDIýIn, UNDIýIn, UNDIýIn, UNDIýIn, UNDIýIn, UNDIýIn, UNDIýIn, UNDIýIn, UNDIýIn, UNDIýIn, UNDIýIn, UNDIýIn, UNDIýIn, UNDIyIn, UNDIýIn, UNDIýIn, UNDIýIn, UNDIýIn, UNDIýIn, UNDIýIn, UNDIýIn, UNDIýIn, UNDIýIn, UNDIýIn, UNDIýIn, UNDIýIn, UNDIýIn, UNDIýIn, UNDIýIn, UNDIýIn, UNDIýIn, UNDIýIn, UNDIyIn, UNDIyIn, UNDIýIn, UNDIýIn, UNDIýIn, UNDIýIn, UNDIýIn, UNDIýIn, UNDIýIn, UNDIýIn, UNDIýIn, UNDIýIn, UNDIýIn, UNDIýIn, UNDIýIn, UNDIýIn, UNDIýIn, UNDIýIn, UNDIýIn, UNDIyIn, UNDIýIn, UNDIyIn, UNDIýIn, UNDIýIn, UNDIýIn, UNDIýIn, UNDIýIn, UNDIýIn, UNDIýIn, UNDIýIn, UNDIýIn, UNDIýIn, UNDIýIn, UNDIýIn, UNDIýIn, UNDIýIn, UNDIýIn, UNDIýIn, UNDIýIn, UNDIyIn, UNDIyIn, UNDIyIn, UNDIýIn, UNDIýIn, UNDIýIn, UNDIýIn, UNDIýIn, UNDIýIn, UNDIýIn, UNDIýIn, UNDIýIn, UNDIýIn, UNDIýIn, UNDIýIn, UNDIýIn, UNDIýIn, UNDIýIn, UNDIýIn, UNDIyIn, UNDIýIn, UNDIýIn, UNDIyIn, UNDIýIn, UNDIýIn, UNDIýIn, UNDIýIn, UNDIýIn, UNDIýIn, UNDIýIn, UNDIýIn, UNDIýIn, UNDIýIn, UNDIýIn, UNDIýIn, UNDIýIn, UNDIýIn, UNDIýIn, UNDIýIn, UNDIyIn, UNDIýIn, UNDIyIn, UNDIyIn, UNDIýIn, UNDIýIn, UNDIýIn, UNDIýIn, UNDIýIn, UNDIýIn, UNDIýIn, UNDIýIn, UNDIýIn, UNDIýIn, UNDIýIn, UNDIýIn, UNDIýIn, UNDIýIn, UNDIýIn, UNDIýIn, UNDIyIn, UNDiýIn, UNDiýIn, UnDiýIn, UnDiýIn, UnDiýIn, UnDiýIn, UnDiýIn, UnDiýIn, UnDiýIn, UnDiýIn, UnDiýIn, UnDiýIn, UnDiýIn, UnDiýIn, UnDiýIn, UnDiýIn, UnDiýIn, UnDiýIn, UnDiýIn, UnDiýIn, UnDiýIn, UnDiýIn,UnDiýIn, UnDiýIn, UnDiýIn, UnDiýIn, UnDiýIn, UnDiýIn, UnDiýIn, UnDiýIn, UnDiýIn, UnDiýIn, UnDiýIn, UnDiýIn, UnDiýIn, UnDiýIn, UnDiýIn, UnDiýIn, UnDiýIn, UnDiýIn, UnDiýIn, UnDiýIn,UNDiýIn,UnDiýIn,UnDiýIn,UnDiýIn,UnDiýIn,UnDiýIn,UnDiýIn,UnDiýIn,UnDiýIn,UnDiýIn,UnDiýIn,UnDiýIn,UnDiýIn,UnDiýIn,UnDiýIn,UnDiýIn,UnDiýIn,UnDiýIn,UnDiýIn,UnDiýIn,UnDiýIn, UnDiýIn,UnDiýIn,UnDiýIn,UnDiýIn,UnDiýIn,UnDiýIn,UnDiýIn,UnDiýIn,UnDiýIn,UnDiýIn,UnDiýIn,UnDiýIn,UnDiýIn,UnDiýIn,UnDiýIn,UnDiýIn,UnDiýIn,UnDiýIn,UnDiýIn,UnDiýIn,UNDiýIn,UnDiýIn,UnDiýIn,UnDiýIn,UnDiýIn,UnDiýIn,UnDiýIn,UnDiýIn,UnDiýIn,UnDiýIn,UnDiýIn,UnDiýIn,UnDiýIn,UnDiýIn,UnDiýIn,UnDiýIn,UnDiýIn,UnDiýIn,UnDiýIn, UnDiýIn, UnDiýIn, UnDiýIn, UnDiýIn, UnDiýIn, UnDiýIn, UnDiýIn, UnDiýIn, UnDiýIn, UnDiýIn, UnDiýIn, UnDiýIn, UnDiýIn, UnDiýIn, UnDiýIn, UnDiýIn, UnDiýIn, UnDiýIn,UnDiýIn,UnDiýIn,UnDiýIn,UnDiýIn,UnDiýIn,UnDiýIn,UnDiýIn,UnDiýIn,UnDiýIn,UnDiýIn,UnDiýIn,UnDiýIn,UnDiýIn,UnDiýIn,UnDiýIn,UnDiýIn,UnDiýIn,UnDiýIn, UnDiýIn,UNDiýIn,UnDiýIn,UnDiýIn,UnDiýIn,UnDiýIn,UnDiýIn,UnDiýIn,UnDiýIn,UnDiýIn,UnDiýIn,UnDiýIn,UnDiýIn,UnDiýIn,UnDiýIn,UnDiýIn,UnDiýIn,UnDiýIn,UnDiýIn, UnDiýIn,UnDiýIn, UnDiýIn, UnDiýIn, UnDiýIn, UnDiýIn, UnDiýIn, UnDiýIn, UnDiýIn, UnDiýIn, UnDiýIn, UnDiýIn, UnDiýIn, UnDiýIn, UnDiýIn, UnDiýIn, UnDiýIn, UnDiýIn, UnDiýIn,UnDiýIn,UnDiýIn, UnDiýIn, UnDiýIn, UnDiýIn, UnDiýIn, UnDiýIn, UnDiýIn, UnDiýIn, UnDiýIn, UnDiýIn, UnDiýIn, UnDiýIn, UnDiýIn, UnDiýIn, UnDiýIn, UnDiýIn, UnDiýIn, UnDiýIn,UnDiýIn, UnDiýIn,UnDiýIn,UnDiýIn,UnDiýIn,UnDiýIn,UnDiýIn,UnDiýIn,UnDiýIn,UnDiýIn,UnDiýIn,UnDiýIn,UnDiýIn,UnDiýIn,UnDiýIn,UnDiýIn,UnDiýIn,UnDiýIn,UnDiýIn, UnDiýIn,UnDiýIn,(UnDiý) , UnDiýIn , UnDiýIn , UnDiýIn , UnDiýIn , UnDiýIn , UnDiýIn , UnDiýIn , UnDiýIn , UnDiýIn , UnDiýIn , UnDiýIn , UnDiýIn , UnDiýIn , UnDiýIn , UnDiýIn , UnDiýIn , UnDiýIn , UnDiýIn , UnDiýIn , UnDiýIn , UnDiýin , UnDiýin , UnDiýin , UnDiýin , UnDiýin , UnDiýin , UnDiýin , UnDiýin , UnDiýin , UnDiýin , UnDiýin , UnDiýin , UnDiýin , UnDiýin , UnDiýin , UnDiýin , UnDiýin , UnDiýin , UnDiýin , UnDiýin , UnDiý in , UnDiýin , UnDiýin , UnDiýin , UnDiýin , UnDiýin , UnDiýin , UnDiýin , UnDiýin , UnDiýin , UnDiýin , UnDiýin , UnDiýin , UnDiýin , UnDiýin , UnDiýin , UnDiýin , UnDiýin , UnDiýin , UnDiýin , UnDiýine , UnDiýin , UnDiýin , UnDiýin , UnDiýin , UnDiýin , UnDiýin , UnDiýin , UnDiýin , UnDiýin , UnDiýin , UnDiýin , UnDiýin , UnDiýin , UnDiýin , UnDiýin , UnDiýin , UnDiýin , UnDiýin , UnDiýin , UnDiýil , UnDiýin , UnDiýin , UnDiýin , UnDiýin , UnDiýin , UnDiýin , UnDiýin , UnDiýin , UnDiýin , UnDiýin , UnDiýin , UnDiýin , UnDiýin , UnDiýin , UnDiýin , UnDiýin , UnDiýin , UnDiýin , UnDiýin , UnDiýim , UnDiýin , UnDiýin , UnDiýin , UnDiýin , UnDiýin , UnDiýin , UnDiýin , UnDiýin , UnDiýin , UnDiýin , UnDiýin , UnDiýin , UnDiýin , UnDiýin , UnDiýin , UnDiýin , UnDiýin , UnDiýin , UnDiýin , UnDiýi , UnDiýin , UnDiýin , UnDiýin , UnDiýin , UnDiýin , UnDiýin , UnDiýin , UnDiýin , UnDiýin , UnDiýin , UnDiýin , UnDiýin , UnDiýin , UnDiýin , UnDiýin , UnDiýin , UnDiýin , UnDiýin , UnDiýin , UnDiýn , UnDiýin , UnDiýin , UnDiýin , UnDiýin , UnDiýin , UnDiýin , UnDiýin , UnDiýin , UnDiýin , UnDiýin , UnDiýin , UnDiýin , UnDiýin , UnDiýin , UnDiýin , UnDiýin , UnDiýin , UnDiýin , UnDiýin , UnDiým , UnDiYin , UnDiYin , UnDiYin , UnDiYin , UnDiYin , UnDiYin , UnDiYin , UnDiYin , UnDiYin , UnDiYin , UnDiYin , UnDiYin , UnDiYin , UnDiYin , UnDiYin , UnDiYin , UnDiYin , UnDiYin , UnDiYin , UnDiYin , UnDiYing , UnDiYin , UnDiYin , UnDiYin , UnDiYin , UnDiYin , UnDiYin , UnDiYin , UnDiYin , UnDiYin , UnDiYin , UnDiYin , UnDiYin , UnDiYin , UnDiYin , UnDiYin , UnDiYin , UnDiYin , UnDiYin , UnDiYin , UnDiYidin , UnDiYidin , UnDiYidin , UnDiYidin , UnDiYidin , UnDiYidin , UnDiYidin , UnDiYidin , UnDiYidin , UnDiYidin , UnDiYidin , UnDiYidin , UnDiYidin , UnDiYidin , UnDiYidin , UnDiYidin , UnDiYidin , UnDiyin , UnDiyin , UnDiyin , UnDiyin , UnDiyin , UnDiyin , UnDiyin , UnDiyin , UnDiyin , UnDiyin , UnDiyin , UnDiyin , UnDiyin , UnDiyin , UnDiyin , UnDiyin , UnDiyin , UnDiyin , UnDiyin , UnDiyin , UnDiiYin , UnDiiYin , UnDiiYin , UnDiiYin , UnDiiYin , UnDiiYin , UnDiiYin , UnDiiYin , UnDiiYin , UnDiiYin , UnDiiYin , UnDiiYin , UnDiiYin , UnDiiYin , UnDiiYin , UnDiiYin , UnDiiYin , UnDiYin , UnDiiYin , UnDiiYin , UnDiiYin , UnDiiYin , UnDiiYin , UnDiiYin , UnDiiYin , UnDiiYin , UnDiiYin , UnDiiYin , UnDiiYin , UnDiiYin , UnDiiYin , UnDiiYin , UnDiiYin , UnDiiYin ,UnDiiYin ,UnDiiYin ,UnDiiYin ,UnDiiYin ,UnDiiYin ,UnDiiYin ,UnDiiYin ,UnDiiYin ,UnDiiYin ,UnDiiYin ,UnDiiYin ,UnDiiYin ,UnDiiYin ,UnDiiYin ,UnDiiYin ,UnDiiYin ,UnDiiYing ,UnDiiYin ,UnDiiYin ,UnDiiYin ,UnDiiYin ,UnDiiYin ,UnDiiYin ,UnDiiYin ,UnDiiYin ,UnDiiYin ,UnDiiYin ,UnDiiYin ,UnDiiYin ,UnDiiYin ,UnDiiYin ,UnDiiYin ,UnDiiYin ,UnDIIYin ,UnDIIYin ,UnDIIYin ,UnDIIYin ,UnDIIYin ,UnDIIYin ,UnDIIYin ,UnDIIYin ,UnDIIYin ,UnDIIYin ,UnDIIYin ,UnDIIYin ,UnDIIYin ,UnDIIYin ,UnDIIYin ,UnDIIYin ,UnDIIYin ,UNDIIYin ,UNDIIYin ,UNDIIYin ,UNDIIYin ,UNDIIYin ,UNDIIYin ,UNDIIYin ,UNDIIYin ,UNDIIYin ,UNDIIYin ,UNDIIYin ,UNDIIYin ,UNDIIYin ,UNDIIYin ,UNDIIYin ,UNDIIYin ,UNDIIYing ,UNDIIYin ,UNDIIYin ,UNDIIYin ,UNDIIYin ,UNDIIYin ,UNDIIYin ,UNDIIYin ,UNDIIYin ,UNDIIYin ,UNDIIYin ,UNDIIYin ,UNDIIYin ,UNDIIYin ,UNDIIYin ,UNDIIYin ,UNDIIYin ,UNDIIIYin ,UNDIIYin ,UNDIIYin ,UNDIIYin ,UNDIIYin ,UNDIIYin ,UNDIIYin ,UNDIIYin ,UNDIIYin ,UNDIIYin ,UNDIIYin ,UNDIIYin ,UNDIIYin ,UNDIIYin ,UNDIIYin ,UNDIIYin ,UNDIIYin ,UnDIIYin ,UNDIIYin ,UNDIIYin ,UNDIIYin ,UNDIIYin ,UNDIIYin ,UNDIIYin ,UNDIIYin ,UNDIIYin ,UNDIIYin ,UNDIIYin ,UNDIIYin ,UNDIIYin ,UNDIIYin ,UNDIIYin ,UNDIIYing ,UNDIIYing ,UNDIIYing ,UNDIIYing ,UNDIIYing ,UNDIIYing ,UNDIIYing ,UNDIIYing ,UNDIIYing ,UNDIIYing ,UNDIIYing ,UNDIIYing ,UNDIIYing ,UNDIIYing ,UNDIIYing ,UNDIIYing ,UNDIIYing ,UNDIIIYing ,UNDIIIYing ,UNDIIIYing ,UNDIIIYing ,UNDIIIYing ,UNDIIIYing ,UNDIIIYing ,UNDIIIYing ,UNDIIIYing ,UNDIIIYing ,UNDIIIYing ,UNDIIIYing ,UNDIIIYing ,UNDIIIYing ,UNDIIIYing ,UNDIIIYing ,UNDIIIYing ,UnDIIYing ,UnDIIYing ,UnDIIYing ,UnDIIYing ,UnDIIYing ,UnDIIYing ,UnDIIYing ,UnDIIYing ,UnDIIYing ,UnDIIYing ,UnDIIYing ,UnDIIYing ,UnDIIYing ,UnDIIYing ,UnDIIYing ,UnDIIYing ,UnDIIYing ,UNDIIYing ,UNDIIYing ,UNDIIYing ,UNDIIYing ,UNDIIYing ,UNDIIYing ,UNDIIYing ,UNDIIYing ,UNDIIYing ,UNDIIYing ,UNDIIYing ,UNDIIYing ,UNDIIYing ,UNDIIYing ,UNDIIYing ,UNDIIYng ,UNDIIYng ,UNDIIYng ,UNDIIYng ,UNDIIYng ,UNDIIYng ,UNDIIYng ,UNDIIYng ,UNDIIYng ,UNDIIYng ,UNDIIYng ,UNDIIYng ,UNDIIYng ,UNDIIYng ,UNDIIYng ,UNDIIYng ,UNDIIYng ,UNDIIIYng ,UNDIIIYng ,UNDIIIYng ,UNDIIIYng ,UNDIIIYng ,UNDIIIYng ,UNDIIIYng ,UNDIIIYng ,UNDIIIYng ,UNDIIIYng ,UNDIIIYng ,UNDIIIYng ,UNDIIIYng ,UNDIIIYng ,UNDIIIYng ,UNDIIIYng |
(Inside of product)
- For your safety, be sure not to connect or handle the equipment with wet hands.
- Your attention is drawn to the fact that recording pre-recorded tapes or discs or other published or broadcast material may infringe copyright laws.
Do not place the unit on amplifiers or equipment that may become hot.
The heat can damage the unit.
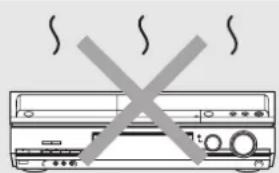
natural_image
Diagram of a front-loading air conditioner with no text or symbols-If you see this symbol-
Information on Disposal for Users of Waste Electrical & Electronic Equipment (private households)

This symbol on the products and/or accompanying documents means that used electrical and electronic products should not be mixed with general household waste.
For proper treatment, recovery and recycling, please take these products to designated collection points, where they will be accepted on a free of charge basis. Alternatively, in some countries you may be able to return your products to your local retailer upon the purchase of an equivalent new product.
Disposing of this product correctly will help to save valuable resources and prevent any potential negative effects on human health and the environment which could otherwise arise from inappropriate waste handling. Please contact your local authority for further details of your nearest designated collection point.
Penalties may be applicable for incorrect disposal of this waste, in accordance with national legislation.
For business users in the European Union
If you wish to discard electrical and electronic equipment, please contact your dealer or supplier for further information.
Information on Disposal in other Countries outside the European Union
This symbol is only valid in the European Union.
If you wish to discard this product, please contact your local authorities or dealer and ask for the correct method of disposal.
Index
Angle 28
Audio
attribute 28
language 28
playback 24
AV-in NR 29
Change Thumbnail.... 31
Channel
audio 28
settings.... 12,42
Chapter 25,30
Chasing playback. 19
Child Lock. 38
Cleaning
disc. 4
lens 4
main unit 4
Clock settings.... 41
Close First Layer 37
Connection
aerial 8,9,10
amplifier, system component . 11
AV3 input terminals ..... 34
DV IN terminal 34
satellite/digital terrestrial
receiver 9
television 8,9,10,11
video cassette recorder. 10, 34
Copy (playlist) 33
Copying
DV automatic recording .... 34
from a video cassette
recorder 34
Manual recording ..... 34
CPRM.... 49
Create Chapter ..... 25, 31, 33
Create playlists.... 32
Create Top Menu 37
Default Settings 41
Delete
all titles 36
chapter 31, 33
playlist 33
title 31,35
Delete Navigator.... 35
Dialog Enhancer.... 29
Direct Navigator 24
Direct TV Recording.... 38
Divide Title 31
DV automatic recording ..... 34
DVD-RAM, DVD-R, DVD-R DL,
DVD-RW, +R, +R DL, +RW...6, 16
Enter name
disc 36
entering text 43
playlist 33
title 20, 21, 31
EXT LINK 23,41
Finalize....37,49
Flexible Recording ..... 19
Format disc 36
FR (Flexible Recording)
Mode....17, 19
FUNCTIONS window.....2, 29
JPEG 26, 27, 49
Language
code list. 50
soundtrack 28,39
subtitle 28,39
Manual Skip 25
Menu
JPEG 27
MP3 26
on-screen 28
Setup 39
Mode
recording....17
still mode. 39
MP3. 26,49
Noise reduction (NR)
AV-in NR 29
Playback NR 29
On-screen
menus 28
status messages.....29
Owner ID 12,41
Partial Delete 31
PCM Down Conversion.....40
Picture settings....29, 39
Playback NR 29
Playlist 32
Progressive ..... 14, 29, 40, 49
Properties
playlist 33
still picture 27
title 31
Protection
cartridge 36
disc 36
title 31
Q Link 38
Quick Start 18
Quick View 25
Ratings level.... 39
Recording
Direct TV Recording ..... 38
DV automatic recording .... 34
External Link 23
Flexible Recording..... 19
mode 17
timer.... 20
Remote control code ..... 15
Repeat play.... 28
Resetting channel setting .... 42
Resume play function ..... 25
RGB.... 40, 49
Setup menu 39
Shipping Condition ..... 41
Simultaneous rec and play . . . 19
Soundtrack 28
Status messages ..... 29
Subtitle 28
Teletext.... 18
Thumbnail 31
TIFF 26, 27, 49
Time Slip.... 25
Timer recording 20
Transfer.... 29
Tuning
manual.... 42
settings 12,42
TV aspect 14,40
TV System (PAL/NTSC) ..... 43
VIDEO Plus+.... 20
v.s.s. 29
Manufactured under license from Dolby Laboratories. "Dolby" and the double-D symbol are trademarks of Dolby Laboratories.
“DTS” and “DTS 2.0 + Digital Out” are trademarks of Digital Theater Systems, Inc.
VIDEO Plus+ and PlusCode are registered trademarks of Gemstar Development Corporation.
The VIDEO Plus+ system is manufactured under license from Gemstar Development Corporation.
MPEG Layer-3 audio decoding technology licensed from Fraunhofer IIS and Thomson multimedia.
This product incorporates copyright protection technology that is protected by method claims of certain U.S. patents and other intellectual property rights owned by Macrovision Corporation and other rights owners. Use of this copyright protection technology must be authorized by Macrovision Corporation, and is intended for home and other limited viewing uses only unless otherwise authorized by Macrovision Corporation. Reverse engineering or disassembly is prohibited.