CFS4185V - Freezer Elvita - Free user manual and instructions
Find the device manual for free CFS4185V Elvita in PDF.


| Product Type | Chest Freezer |
| Brand | Elvita |
| Model | CFS4185V |
| Total Capacity | 200 L |
| Freezing Capacity (24h) | 12 kg |
| Energy Efficiency Class | A+ |
| Annual Energy Consumption | 220 kWh |
| Climate Class | SN-T |
| Noise Level | 40 dB(A) |
| Dimensions (H x W x D) | 85 x 100 x 70 cm |
| Weight | 35 kg |
| Power Supply | 220-240 V ~ 50 Hz |
| Power Consumption | 100 W |
| Defrost Method | Manual (Drip Tray) |
| Temperature Range | -18°C to -24°C |
| Control Type | Mechanical Thermostat |
| Interior Light | Yes (LED) |
| Door Alarm | No |
| Lock | Yes (Key) |
| Refrigerant | R600a |
| Compressor Warranty | 5 Years |
| Spare Parts Availability | 7 Years |
| Recycling Instructions | Per local regulations |
Frequently Asked Questions - CFS4185V Elvita
User questions about CFS4185V Elvita
0 question about this device. Answer the ones you know or ask your own.
Ask a new question about this device
Download the instructions for your Freezer in PDF format for free! Find your manual CFS4185V - Elvita and take your electronic device back in hand. On this page are published all the documents necessary for the use of your device. CFS4185V by Elvita.
USER MANUAL CFS4185V Elvita
Viktigt!
natural_image
Pure architectural line drawing of two adjacent rectangular structures with curved roof-like elements (no text or symbols)natural_image
Diagram showing a hand holding a tool interacting with a panel, with an arrow indicating direction (no text or symbols present)natural_image
Front view of a stainless steel refrigerator with a door and front panel (no visible text or symbols)natural_image
Diagram showing a hand holding a tool above a bracket with an arrow indicating direction (no text or symbols present)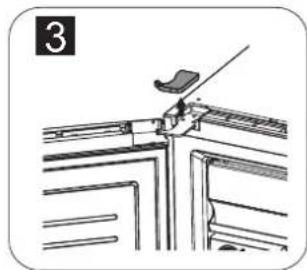
natural_image
Technical line drawing of a mechanical assembly with no visible text or symbolsViktigt!
flowchart
graph TD
    A["Step 1: Top part with arrows indicating upward motion"] --> B["Step 2: Left side with directional arrows and labeled parts 1, 2, 3"]
    B --> C["Step 3: Left side with internal structure and numbered parts 3, 4, 5, 6"]
    C --> D["Step 4: Downward movement with arrows and labeled parts 1, 2, 3, 4, 5, 6"]
    D --> E["Step 5: Right side with arrow and labeled parts 1, 2, 3, 4, 5, 6"]
natural_image
Diagram of a refrigerator interior showing hand holding a tool, with multiple hanging devices and arrows indicating movement (no text or symbols present)SE
natural_image
Mechanical assembly diagram showing two bracket components with arrows indicating motion direction (no text or symbols)natural_image
Diagram showing airflow around a curved pipe or duct, with no visible text or symbols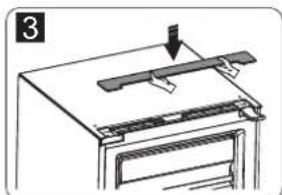
natural_image
Simple line drawing of a mechanical setup with a lever and base plate (no text or symbols)natural_image
Illustration of a hand inserting a tray into an oven with an arrow indicating direction (no text or symbols)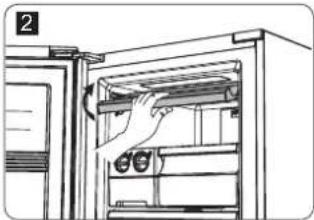
natural_image
Line drawing of a refrigerator interior showing hand opening the door with a scroll inside (no text or symbols)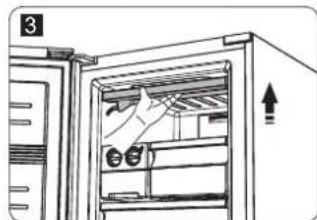
natural_image
Line drawing of an open refrigerator with doors, shelves, and a door handle (no text or symbols)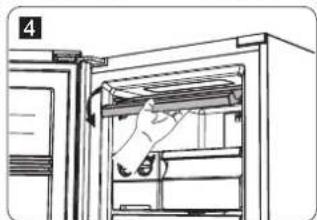
natural_image
Line drawing of a refrigerator interior with hand near the door (no text or symbols)Fryslåda
natural_image
Technical illustration of a mechanical assembly with layered components and a directional arrow (no text or symbols)Iskubsinfrysare
Viktigt!
natural_image
Illustration of hands pouring liquid into a tray with a leaf symbol (no text or labels)natural_image
Illustration of a hand inserting a 3D printer into a rack, showing mechanical components (no text or symbols)Praktiska tips
Energibesparande tips
Viktig!
Denne enheten er ment til bruk innenfor klimaklasse SN, N, ST, T (+10–43 °C). Enheten fungerer kanskje ikke korrekt hvis den må arbeide i lengre tid i en temperatur utenfor angitt område.
Viktig!
natural_image
Pure architectural line drawing of a symmetrical structure with two rectangular panels and curved supports (no text or symbols)natural_image
Diagram showing a hand holding a tool interacting with a panel, with an arrow indicating direction (no text or symbols present)natural_image
Front view of a stainless steel refrigerator with a control panel and door handle (no visible text or symbols)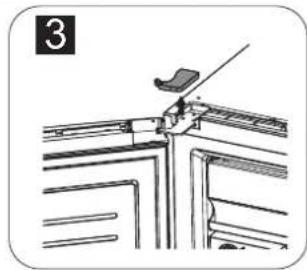
natural_image
Technical line drawing of a mechanical assembly with no visible text or symbolsViktig!
Hold i døren under pkt. 4 for å hindre at den faller.
natural_image
Diagram of a refrigerator interior showing hand holding a tool, with arrows indicating movement or change (no text or symbols present)NO
natural_image
Mechanical assembly diagram showing two metal bracket components with arrows indicating motion direction (no text or symbols)natural_image
Diagram showing airflow around a curved pipe or duct, with no visible text or symbols- Ta magnetkontakten ut av holderen (del 3 i punkt 3) og monter den på den andre holderen merket "L / R".
flowchart
graph TD
    A["Device Module 1"] -->|Signal| B["Device Module 2"]
    B -->|Signal| A
    A -->|Output| C["Output"]
    B -->|Output| D["Output"]
OBS!
Kontroller at magnetkontakten sitter i riktig holder for den siden den skal sitte på.
"L" = Venstre
"H" = Høyre
natural_image
Line drawing of a mechanical device with a lever and handle (no text or symbols)- Skapskrog
- Luke
- Isbitinnfryser (manuell)
- Isbitoppbevaring
- ∅vre fryseskuff
- Midtre fryseskuffer x 3 (store)
- Händtak
- Dør
- Nedre fryseskuff
- Tetningslist
- Justerbare føtter
- LED-belysning
- Fryseskuff
- Glasshylle
- Hyllekonsoll
- ∅vre hylle
- Innvendig frysebrett i fryseskuff
- Midtre hylle
- Nedre hylle x 2
natural_image
Illustration of a hand opening a refrigerator with an arrow indicating direction (no text or symbols)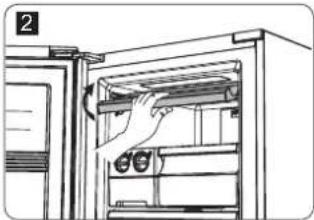
natural_image
Line drawing of a refrigerator interior showing hand opening the door with clothes and a scroll inside (no text or symbols)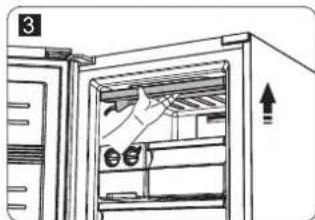
natural_image
Line drawing of a refrigerator interior showing storage racks and air ducts (no text or symbols)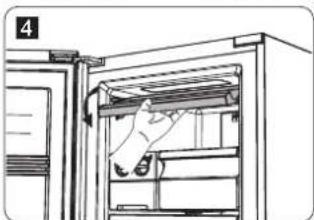
natural_image
Line drawing of a refrigerator interior with a hand inserting a fan into the drawer (no text or symbols)Fryseskuff
natural_image
Technical illustration of two stacked rectangular components with a directional arrow indicating movement (no text or symbols)Isbitinnfryser
Viktig!
natural_image
Illustration of hands pouring liquid into a tray with a leaf symbol (no text or labels)natural_image
Illustration of a hand inserting a device into a rack, showing no text or symbolsPraktiske tips
Energibesparende tips
Safety and warning information 39
Installing your new appliance 43
Description of the appliance 47
Control panel 48
Using your appliance 50
Useful tips 51
Cleaning and care 52
Troubleshooting 53
Disposing of your appliance 54
CE
This appliance complies with the following EU directives: 2014/35/EU, 2014/30/EU, 2009/125/EC, EC.643/2009 and 2002/96/EC
Safety and warning information
For your safety and to ensure correct use, please read this user manual carefully, including the tips and warnings, before you install and use the appliance for the first time. To avoid unnecessary mistakes and accidents it is important that everyone who uses the appliance is familiar with its operation and safety features. Save this user manual and make sure that it accompanies the appliance if it is moved or sold, so that everyone who uses it throughout its life is informed how to use the appliance and what safety precautions are required.
To ensure the safety of life and property, please follow the safety precautions in this user manual. The manufacturer does not accept any liability for damage caused by neglect.
Safety of children and other vulnerable groups
- This appliance can be used by children from the age of 8 upwards, and by individuals with reduced physical, sensory or mental capabilities or lack of experience and knowledge, on condition that they are supervised or instructed in how to use the appliance safely, and that they understand the hazards involved. Children
must not be allowed to play with the appliance. Cleaning and user maintenance must not be carried out by children without supervision.
- Keep all packaging away from children to avoid the risk of suffocation.
- To dispose of the appliance, unplug the appliance from the power socket, cut off the power cord (as close to the appliance as possible) and remove the door so that playing children cannot get an electric shock or become trapped in the appliance.
General safety
- WARNING – This appliance is intended for use in non-commercial domestic environments.
- WARNING – Do not store explosive substances, such as aerosol cans that contain flammable propellants, inside this appliance.
-
WARNING – If the power cord is damaged it must be replaced by the manufacturer, the manufacturer's service agent or some other qualified person to avoid danger.
-
WARNING – Make sure that ventilation openings in the exterior or interior of the appliance are not obstructed.
- WARNING – Do not use tools or other means to speed up the defrosting process, other than recommended by the manufacturer.
- WARNING – Do not damage the refrigerant circuit.
- WARNING – Do not use electrical devices inside the appliance, except where recommended by the manufacturer.
- WARNING – The refrigerant and insulating materials are flammable. When disposing of the appliance, take it to an authorized recycling facility. Do not expose the appliance to fire.
Refrigerant
Isobutene refrigerant (R600a) is used in the refrigeration circuit. This is a naturally occurring gas that is relatively environmentally friendly, but it is still flammable. Make sure that none of the components of the refrigeration circuit are damaged during transport and installation. The refrigerant (R600a) is flammable.
Warning: risk of fire
If the refrigeration circuit is damaged:
- Avoid open flames and sources of ignition.
- Make sure the room where the appliance is located is well ventilated.
It is dangerous to alter technical data or modify this product in any way. Any damage to the power cord can cause a short circuit, fire and/or electric shock.

ctrical safety
- Do not extend the power cord by using an extension cord.
- Make sure the plug is not crushed or damaged. A crushed or damaged plug may overheat and cause a fire.
- Make sure you have access to the appliance's plug.
- Do not pull on the power cord.
- If the power socket is loose, do not plug in the appliance. Otherwise there is a risk of electric shock or fire.
- Do not use the appliance if the cover is missing from the interior light.
- The appliance is designed to be powered by a single-phase AC supply, 220–240 V/50 Hz. If local voltage variations mean that the voltage may vary outside this range, an automatic voltage
regulator rated for a minimum of 350 W should be connected between the power socket and the appliance, for reasons of safety. Do not connect the appliance to the same power socket as other electrical devices. The power socket and plug must be grounded.
Daily use
- Do not store flammable gases or liquids inside the appliance. Otherwise there is a risk of explosion.
- Do not use any electrical devices inside the appliance (e.g. electric ice cream makers, mixers etc.).
- Always unplug the appliance by pulling out the plug, not by pulling on the power cord.
- Do not place hot items near plastic components of the appliance.
- Do not place food items directly against the air outlet in the rear wall.
- Store pre-packed frozen food according to the food manufacturer's instructions.
- Carefully follow the food storage recommendations of the appliance manufacturer. See the relevant instructions for food storage.
- Frozen food can cause frostbite if you eat it straight from the freezer.
-
Keep lighted candles, lamps and naked flames at a safe distance from the appliance, to avoid the risk of fire.
-
The appliance is intended for storing food and drink in normal domestic use, as described in this user manual.
- Do not touch frozen food with damp/wet hands, as this can cause frostbite.
- Do not stand on the appliance's plinth, drawers or doors, etc., and do not use them as a support.
- Do not re-freeze frozen food once it has thawed.
- Do not suck on ice lollies or ice cubes straight from the freezer – they can cause frostbite to your mouth and lips.
Caution!
Cleaning and care
- Before carrying out maintenance, switch off the appliance and unplug it from the power socket.
- Do not clean the appliance with metal items, steam, essential oils, organic solvents or abrasive cleaners.
- Do not use sharp objects to remove frost from the appliance. Use a plastic scraper instead.
Important during installation!
- Do not place the appliance in direct sunlight.
- The appliance is heavy. Take care when you are moving it.
- When plugging in the appliance, carefully follow the instructions in this user manual.
Unpack the appliance and check that there is no damage to it. Do not plug in the appliance if it is damaged. Report any damage to the retailer immediately. Keep the packaging material in case of damage. -
It is recommended that you wait at least four hours before plugging in the appliance, to allow the refrigerant to run back into the compressor.
-
Make sure there is adequate air circulation around the appliance, otherwise it may overheat. Follow the installation instructions to ensure adequate ventilation.
- Where possible the appliance should be installed with its back against a wall, to prevent anyone from touching hot components (compressor, condenser). Follow the installation instructions to avoid the risk of fire.
- Do not place the appliance close to a radiator or oven.
- Make sure the plug is accessible after the appliance has been installed.
Servicing
Any electrical work that is required during servicing must be carried out by a qualified electrician or competent person. This product should only be repaired at an authorized service centre, using genuine spare parts.
Installing your new appliance
Ventilation
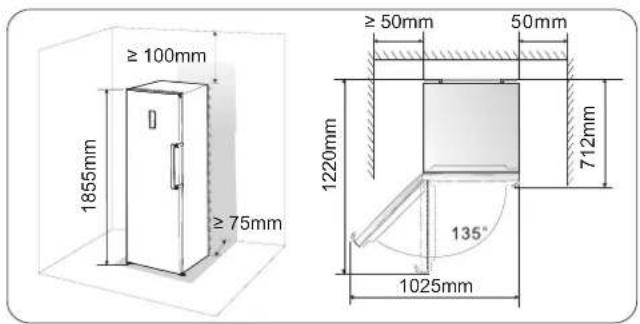
To maximize the efficiency of the refrigeration system and save energy, it is important to maintain good ventilation around the appliance so that heat is carried away. So make sure there is adequate free space around the appliance. Recommendation: We recommend there is at least 75 mm clearance at the rear, at least 100 mm above the appliance, 50 mm at the sides and enough free space in front to allow the door to be opened through 135°. See the following images.
Important!
This device is intended for use in climate class SN, N, ST, T (+10–43°C). The appliance may not operate correctly if it has to run for a long time at a temperature outside the specified range.
Important!
• Install the appliance in an area with low humidity.
- Protect the appliance from direct sunlight, rain and frost. Install the appliance well away from heat sources, such as an oven, stove or heater.
Installing in pairs
natural_image
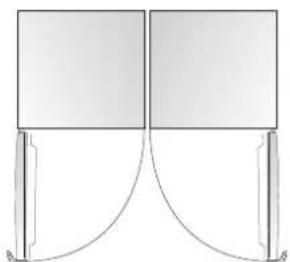
Pure architectural line drawing of two rectangular panels with curved cutouts, no text or symbols present- Two appliances can be installed as a pair, as illustrated.
- The appliances can be installed as shown, with the handles in the middle.
Levelling the appliance
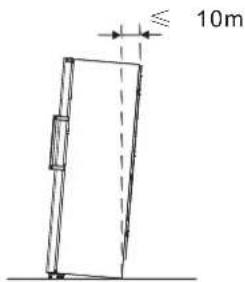
- It may be necessary to adjust the feet so that the appliance stands vertically, with adequate room for ventilation. You can adjust the feet by hand, or with the aid of a suitable open-ended spanner.
- To ensure that the door closes by itself, adjust the feet so that the top of the appliance leans backwards by around 10 mm.
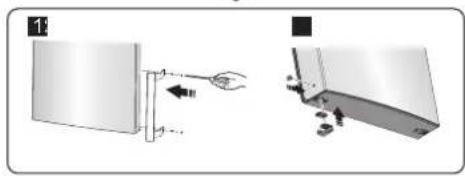
Fitting the door handle
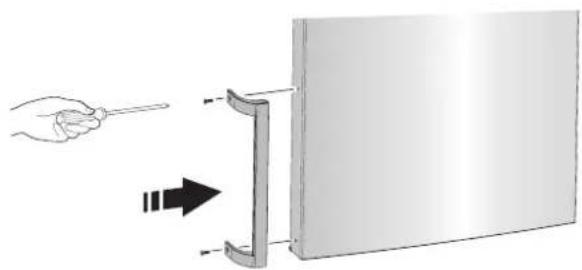
The door handle is supplied in a separate plastic bag to simplify transport. Fit the door handle as follows.
- Place the handle at the edge of the door as shown in the diagram, with the holes lined up with the screw holes in the door.
- Secure the handle with the screws provided.
natural_image
Diagram showing a hand holding a tool interacting with a panel, with an arrow indicating direction (no text or symbols present)Reversing the door
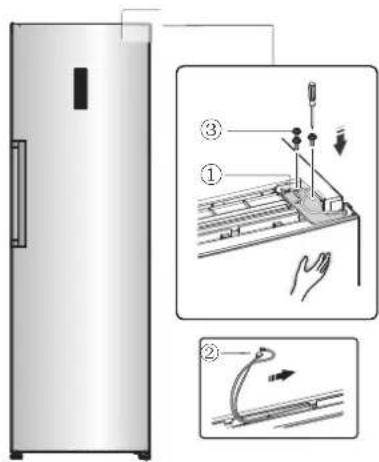
The door can be rehung so that it opens on the other side, if needed. In this description the door hinges are switched from the left to the right.
Warning! Make sure the appliance has been unplugged from the power socket before reversing the door. Tools you will need:
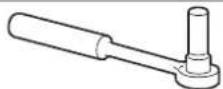 |  |
| Wrench with 8 mm socket Cross-head screwdriver | |
 | 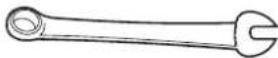 |
| Flat-head screwdriver 8 mm ring spanner | |
Important
Proceed as follows to reverse the door.
- Position the appliance so that it is vertical.
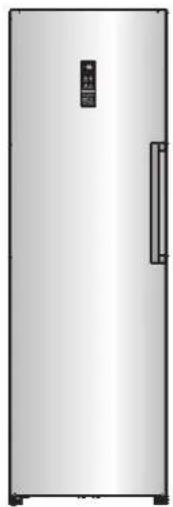
natural_image
Front view of a stainless steel refrigerator with control panel and door (no visible text or symbols)- Remove part ① from the top of the cabinet on the left side and then remove ② and ③ from the door in the same way. Also remove part ④
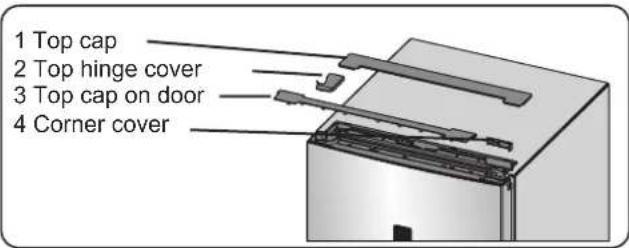
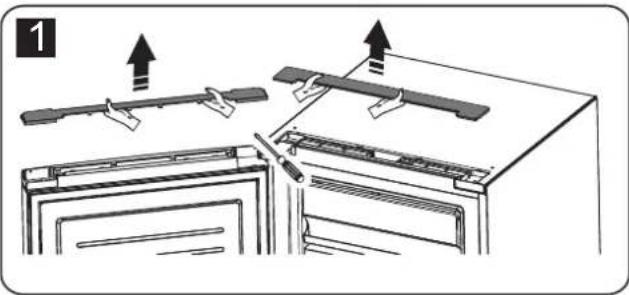
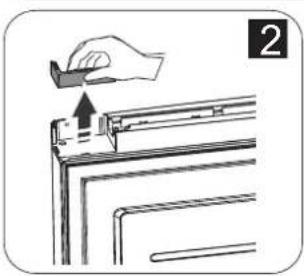
natural_image
Diagram showing a hand holding a tool above a bracket with an arrow indicating direction (no text or symbols present)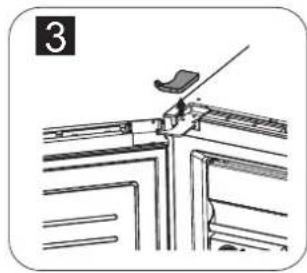
natural_image
Technical line drawing of a mechanical assembly with no visible text or symbols- Unplug connectors ① and ②. Then remove part ③
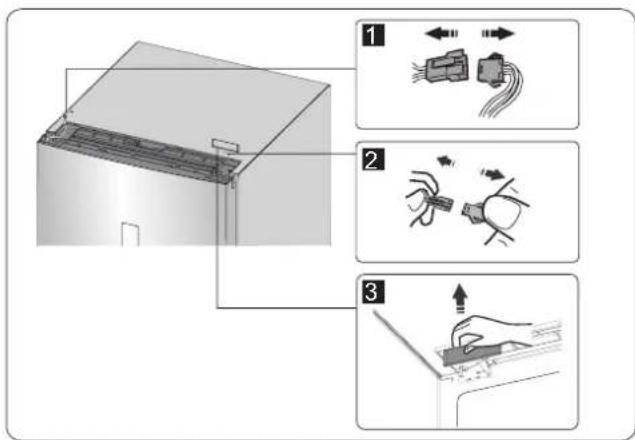
Important!
Support the door during step 4 to prevent it from dropping.
- Remove the screws ①, disconnect the ground cable ② and remove part ③
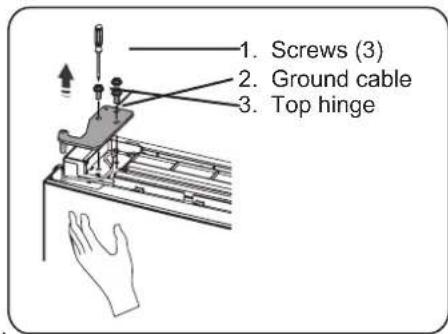
- Lift off the door and place it on a flat surface with the outside facing upwards. Remove part ④ and undo the screws ① as shown in the diagram. Transfer the handle ② to the opposite side, secure with the screws ① and then fit the cover plugs ④ in the empty screw holes.
Remove the screws 6, remove parts 4 and 5, turn the parts around 5 and refit parts 4 and 5 to the other side using the screws 6.
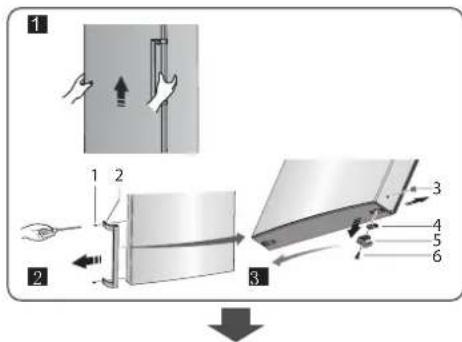
- Tilt the cabinet backwards with the aid of an assistant, unscrew part ③ and undo the screws ④. Remove part ② and ①.
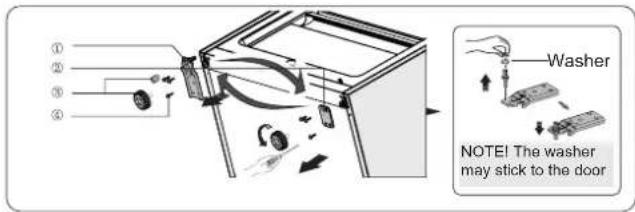
- Bottom hinge 2. Plate 3. Adjustable feet 4. Screws
- Unscrew the bottom hinge, transfer it to the other side and screw it in place, with the washer.
- Refit the parts in reverse order from step 6, moving parts ① and ② to the opposite side and securing them with the screws ④. Finally, fit part ③.
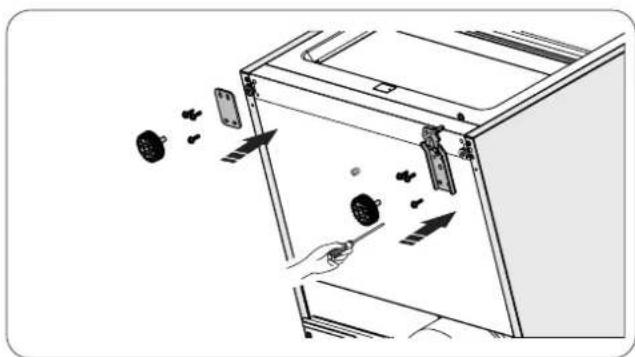
natural_image
Diagram of a refrigerator interior showing hand holding a tool, with multiple windows and buttons visible (no text or symbols)- Unscrew the top hinge pin, turn over the top hinge plate and fit the pin as shown in the diagram. Put this part aside for later.

natural_image
Mechanical assembly diagram showing two metal bracket components with arrows indicating motion direction (no text or symbols)- Swap the positions of the cables in the channels on the left and right sides of door.
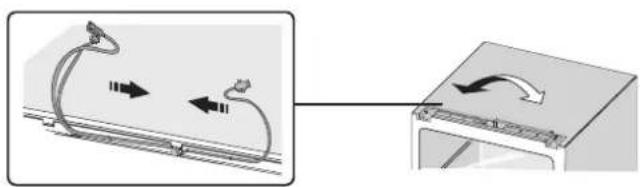
natural_image
Diagram showing airflow around a curved pipe or duct, with no visible text or symbols- Move the door into the correct position, and adjust ① so that the door is correctly positioned. Move the connecting cable ② in the door channel and then secure part ① and the cable ② with the screws ③.
(Support the door to prevent it from dropping.)
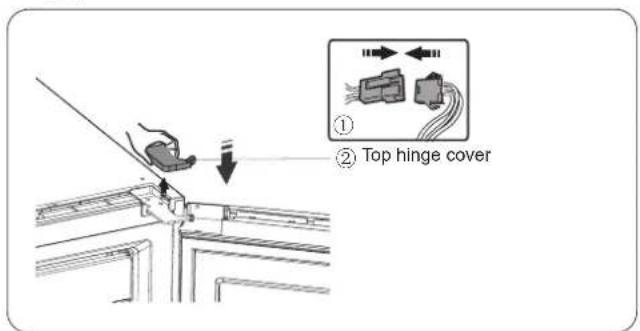
- Reconnect the connectors ① from step 3, then fit part ②.
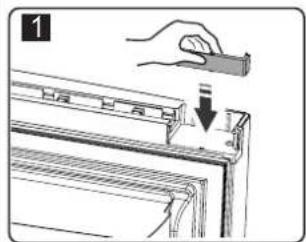
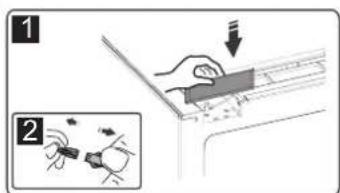
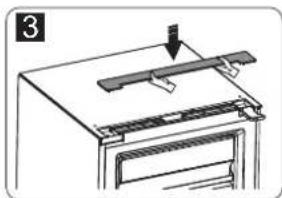
- Rotate part ① through 180^ and fit it to the other corner of the door. Then fit part ②. (Both were removed in step 2.)
natural_image
Illustration of a hand holding a rectangular object above a window frame, with a downward arrow indicating a drop or adjustment (no text or symbols present)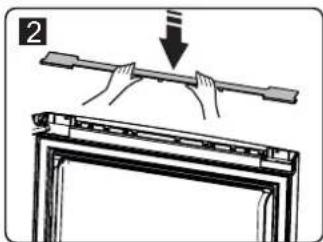
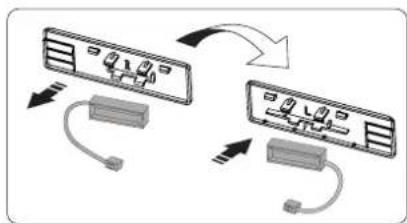
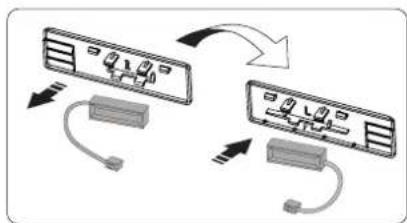
- Remove the magnetic switch from its holder (part 3 in step 3) and fit it to the other holder marked "L/R".
flowchart
graph TD
    A["Device 1"] -->|Data Link| B["Device 2"]
    B -->|Data Link| A
    A --> C["Port 1"]
    B --> D["Port 2"]
    C --> E["Port 3"]
    D --> F["Port 4"]
NOTE!
Make sure the magnetic switch sits in the correct holder to suit the side it will be located on.
“L” = Left
“R” = Right
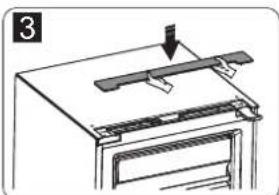
- Fit part ①, reconnect the connector ② and refit part ③.
natural_image
Diagram of a mechanical assembly with a lever and clamping mechanism (no text or symbols)Description of the appliance
Overview of Freezer CFS4185V
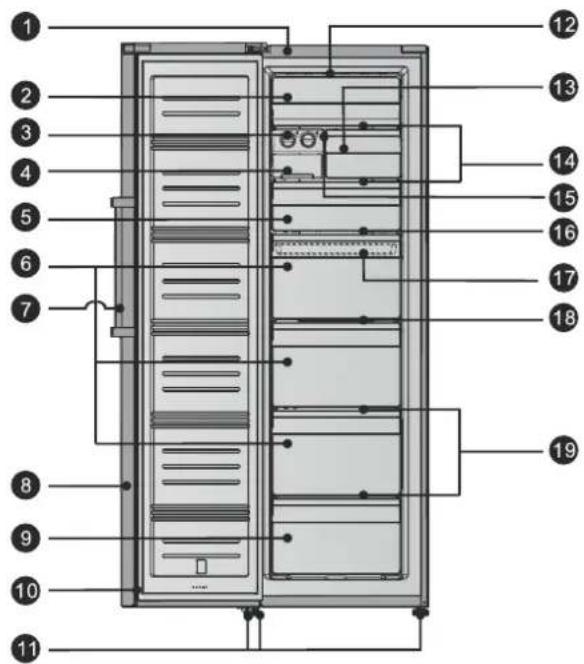
- Cabinet
- Hinged panel
- Ice cube freezer (manual)
- Ice box
- Top freezer drawer
- Middle freezer drawers x 3 (large)
- Handle
- Door
- Bottom freezer drawer
- Seal
- Adjustable feet
- LED light
- Freezer drawer
- Glass shelves
- Shelf bracket
- Top shelf
- Internal freezer tray in freezer drawer
- Middle shelf
- Bottom shelves x 2
We continuously develop our products, so your appliance may look slightly different to that shown in the manual, but its operation and use will be the same.
Control panel
The following instructions describe how to use your appliance. The diagrams below illustrate the features and operation of your appliance. When you turn on the appliance for the first time all the symbols on the display will be backlit. If you do not press any buttons and the doors are closed the backlighting will be turned off.
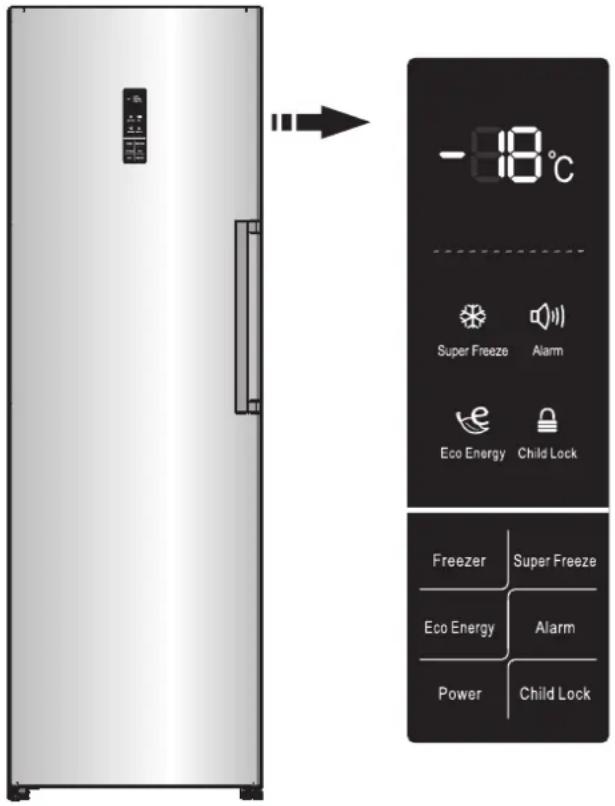
Setting the temperature
We recommend that you set the temperature to -18 ^ when you turn on the freezer for the first time. To adjust the temperature, follow the instructions below.
Remember!
When you set the temperature you are setting the desired average temperature for the whole freezer. The temperatures in the individual compartments may vary from the temperature shown on the display, depending on the amount of food you place in them and how you arrange the food. The ambient temperature can also effect the actual temperature in the appliance.
1. "Freezer"
Press "Freezer" to adjust the freezer temperature between -14^ and -24^ , as you require. The display shows the set value.

2. "Super Freeze"

Super Freeze is a feature that quickly lowers the temperature in the freezer so that food will freeze faster. This preserves vitamins and nutrients in
fresh food and keeps food fresh for longer.
- Press the "Super Freeze" button to start the fast freeze process. The light will come on and the temperature display will show -24 °C.
- If you fill the freezer completely you should wait around 24 hours.
- Super Freeze mode is turned off automatically after 26 hours.
- You can turn off Super Freeze by pressing "Super Freeze" or the "Freezer" button. The temperature setting then reverts to the previous setting, or the freezer switches to "Eco Energy" mode.
3. "Eco Energy"

The Eco Energy feature puts the freezer in energy-saving mode, which is useful if you are going away for several days, as it reduces energy
consumption. Press the “Eco Energy” button for 3 seconds, until the light comes on.
- In Eco Energy mode the freezer temperature is automatically set to -15^ to minimize energy consumption.
- You can turn off Eco Energy mode by pressing "Eco Energy" or the "Freezer" button. The temperature setting then reverts to the previous setting.
4. "Alarm"

If there is an alarm the "Alarm" symbol will light up and a buzzer will sound. Press the "Alarm" button to cancel the alarm. The "Alarm" light will go out and the buzzer will stop.
Door alarm
- If the door is left open for more than 2 minutes the door alarm will sound. The door alarm buzzer will sound 3 times every minute and will stop after 10 minutes.
• To save energy, leave the door open for as short a time as possible. The door alarm is cancelled when you close the door.
Temperature alarm
- If the temperature in the freezer rises too high due to a power cut or some other reason, the temperature alarm will sound and the temperature display will show “--”.
- The temperature alarm buzzer will sound 10 times and will then stop automatically.
- If the temperature alarm sounds, press the "Alarm" button for 3 seconds to check the maximum freezer temperature. The temperature reading and the "Alarm" symbol will flash simultaneously for 5 seconds.
It is normal for the temperature alarm to be triggered if there is a power cut. Cancel the alarm by pressing "Alarm".
5. "Power"

If you intend to clean the appliance or stop using it, first switch it off by pressing the "Power" button.
- When the appliance is running you can switch it off by pressing the "Power" button for 5 seconds. The display will go dark.
- When the appliance is turned off you can turn it on by pressing the "Power" button for 1 second. The appliance reverts to the previously selected temperature setting.
6. "Child Lock"

Press the "Child Lock" button if there is a risk that children could reach the control panel. When the child lock is on, all the buttons except the "Alarm" button are inactive.
- When the appliance is running you can activate the child lock by pressing the "Child Lock" button for 3 seconds. The "Child Lock" symbol will light up on the display.
- When the child lock is on you can turn it off by pressing the "Child Lock" button for 3 seconds. The "Child Lock" symbol will then go out.
Using your appliance
This part of the user manual describes how to use the appliance correctly.
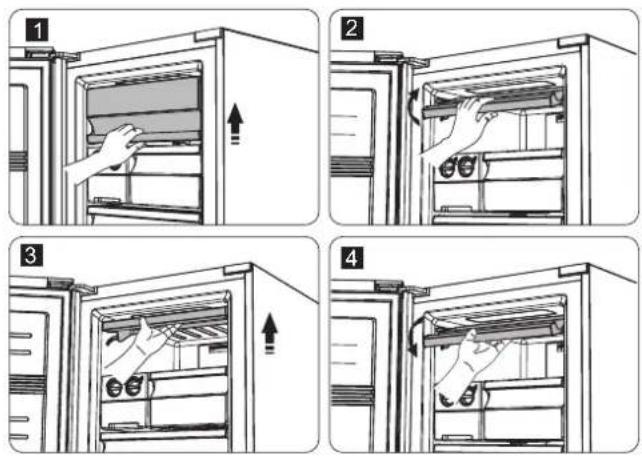
Hinged panel
- You can lift this panel up to take food out of the topmost compartment.
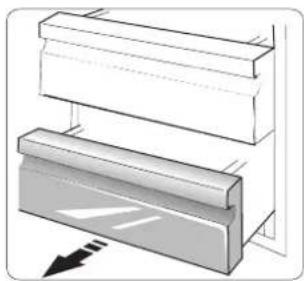
Freezer drawer
• The freezer has drawers of different sizes.
• These are used for storing food that needs to be frozen, such as meat, fish, ice cream, etc.
natural_image
Diagram of two stacked rectangular blocks with a directional arrow indicating movement or force (no text or symbols)Ice cube freezer
Important!
If you are using this for the first time, or if it has not been used for a while, wash it before use.
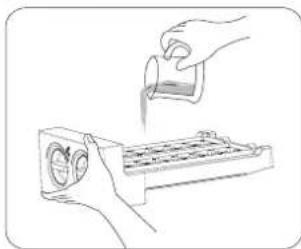
The ice cube freezer is used to make and store ice cubes. Use it as follows:
- Pull out the freezer module.
- Pour water into the ice tray. Do not fill above the maximum water line.
natural_image
Illustration of hands pouring liquid into a tray with a leaf icon (no text or symbols)- Place the water-filled tray back in the freezer module.
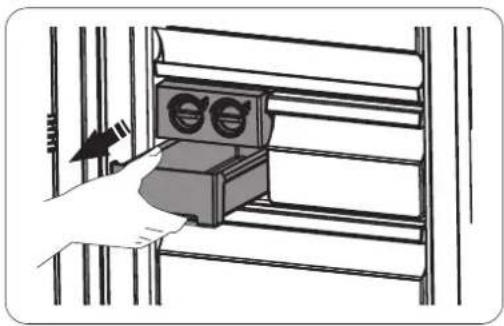
- When the ice cubes are frozen, turn the knobs clockwise so that the cubes fall into the ice box.
- The ice box is used to store ice cubes. Take out as many ice cubes as you need. Remember to remove old ice cubes regularly.
natural_image
Illustration of a hand inserting a 3D printer into a rack (no text or symbols visible)Useful tips
Energy-saving tips
We recommend that you follow the tips below to save energy.
- Leave the door open for as short a time as possible, to save energy.
- Make sure the appliance is positioned well away from heat sources (direct sunlight, an electric oven or hob, etc.)
- Do not set the temperature lower than necessary.
- Do not put hot food or liquids in the appliance. Let them cool down first.
• Install the appliance in a well-ventilated area. See the chapter on Installing your new appliance.
Tips for freezing
• After you first turn on the appliance, or if it has been turned off for a while, let it run for at least 2 hours at a low temperature setting before placing food in it.
- Prepare food in small portions so that it will freeze quickly and thoroughly, and so that you can take out just the amount you need to thaw.
- Wrap food in aluminium foil or plastic film.
- Do not let fresh unfrozen food touch food that is already frozen. Otherwise the frozen food may thaw partially.
- If you eat frozen products straight from the freezer they may cause frostbite.
- Mark all frozen food items with the date, so that you can keep track of the storage time.
- Frozen food spoils quickly once it has thawed it, so it must not be frozen again. Do not keep frozen food longer than the period specified by the food manufacturer
Turning off the appliance
If you need to turn off the appliance for an extended period, do as follows to prevent the growth of mould.
- Remove all food.
- Unplug the appliance from the power socket.
- Clean and dry the interior thoroughly.
- Make sure all doors are left slightly open so that air can circulate.
Cleaning and care
For reasons of hygiene the appliance should be cleaned regularly, at least every two months (including interior and exterior accessories).
Caution!
- Unplug the appliance before cleaning it. Risk of electric shock. Before cleaning, turn off the appliance and unplug it from the power socket.
- Do not use sharp objects, as they could scratch the surfaces of the appliance.
- Do not use thinners, car cleaning products, chlorinated detergents, essential oils, abrasive cleaners or organic solvents such as benzene for cleaning. They could damage the surfaces of the appliance and cause a fire.
Cleaning the exterior
You should clean the appliance regularly to preserve its appearance.
- Wipe the control panel and display with a clean, soft cloth.
- Clean the door, handle and cabinet exterior with a mild detergent solution, and dry them with a soft cloth.
Cleaning the interior
You should clean the interior regularly. This is easiest to do when there is not much food inside.
- Remove the food and take out all shelves and drawers. Wipe the interior of the appliance with a dilute solution of bicarbonate of soda, then rinse with warm water using a damp sponge or cloth.
- Dry the interior completely before refitting the shelves and drawers. Wipe all surfaces and removable parts. Although the appliance is defrosted automatically a layer of frost may form on the interior walls if the door is opened frequently or left open for too long. If the layer of frost becomes too thick, choose a time when there is not much food in the appliance and do as follows:
- Remove the drawers and food, unplug the appliance from the power socket and leave the door open. Make sure the room is well ventilated to speed up defrosting.
- Do not use sharp objects to remove frost from the appliance. Once the appliance is completely dry you can plug it in and turn it on.
Cleaning the door seal
Take care to keep the door seal clean. Sticky food and drink can cause the seal to stick to the cabinet and become damaged when you open the door. Clean the seal with a mild detergent and water. Rinse and dry it carefully after cleaning.
Remember!
Do not turn the appliance back on until the door seal has dried completely.
Troubleshooting
If there is a problem with your appliance or you are worried that it is not working correctly, you can carry out some simple checks before calling for service. See below.
Warning!
Do not try to repair the appliance yourself. If the problem persists after you have carried out the checks below, contact a qualified electrician, authorized service technician or the store where you bought the product.
| Problem Possible | cause and solution |
| Appliance is not working correctly | Check that the power cord is correctly plugged into the power socket. |
| Check that the appliance is turned on by pressing the “Power” button for 1 second. | |
| Check the fuse for the appliance. Replace the fuse if necessary. | |
| It is normal for the compressor to be idle during automatic defrosting, and for a short while after the appliance has been turned on – this is intended to protect the compressor. | |
| Odour from inside the cabinet | The interior may need cleaning. |
| Some foods, containers and plastic films can give off odours. | |
| Noise from the appliance | The sounds listed below are perfectly normal:Sound of compressor running.Sound of airflow from the small fan inside the appliance.Gurgling sound similar to water boiling.Popping sound during automatic defrosting.Clicking when the compressor starts up. |
| Other sounds may be due to the reasons given below and may make it necessary to check and take action.Cabinet is not level.Back of appliance is touching the wall.Bottles or containers have fallen over or are rolling about. | |
| Compressor runs continuously | It is normal to hear the compressor run more frequently if it is working harder under the following circumstances:Temperature setting is lower than necessary.A large amount of hot food has been placed in the appliance.The ambient temperature is high.The doors are left open for too long or too often.After first installing the appliance or switching it on after it has been switched off for a long time. |
| A layer of frost forms inside the appliance | Check that the air outlets are not blocked by food and make sure that food is arranged so that air can circulate. Make sure the door is properly closed. To remove the frost, see the chapter on “Cleaning and care”. |
| The temperature inside the appli-ance is too high | The door may have been left open for too long or too often; something may be preventing the door from closing; or there may not be enough clearance at the sides, back or above the appliance. |
| The temperature inside the appli-ance is too low | Raise the temperature setting by following the instructions in the chapter on “Control panel”. |
| The door is diffi-cult to close | Check whether the top of the cabinet is tilted back by 10–15 mm so that the door closes under its own weight, or if something inside the cabinet is preventing the door from closing. |
| Water dripping on the floor | The water tank (at the bottom rear of the cabinet) may not be level; the drainage tube (underneath the top of the compressor compartment) may not be correctly routed to lead water into the water tank; or the tube may be blocked. You may need to pull the appliance away from the wall to check the water tank and tube. |
Important safety instructions
This appliance must not be disposed of as household waste.
Packaging material
Packaging material that is marked with the recycling symbol can be recycled. Dispose of the packaging in a container intended for recyclable material.
Warning!
This appliance contains a refrigerant. Refrigerants and gases must be disposed of by trained personnel as they may cause eye injuries or fire. Make sure that the refrigerant circuit piping is not damaged before the appliance is sent for recycling.
Correct disposal of this appliance
This mark indicates that the product must not be disposed of with other household waste in the EU. To prevent harm to the environment or human health due to uncontrolled waste disposal, please recycle this product responsibly to promote the sustainable reuse of raw materials. To dispose of your product at the end of its life, please use local collection and recycling services or contact the retailer where the product was purchased. The retailer can ensure the product is recycled in an environmentally friendly way.
GB

natural_image
Gray circular icon with three white gears, no text or symbols presentGARANTI WARRANTY
Quality warranty applies to consumer
- Viktigt!
- SE
- Fryslåda
- Iskubsinfrysare
- Praktiska tips
- Energibesparande tips
- Viktig!
- NO
- OBS!
- Fryseskuff
- Isbitinnfryser
- Praktiske tips
- Energibesparende tips
- CE
- Safety and warning information
- Safety of children and other vulnerable groups
- General safety
- Refrigerant
- Warning: risk of fire
- ctrical safety
- Daily use
- Caution!
- Cleaning and care
- Important during installation!
- Servicing
- Installing your new appliance
- Ventilation
- Important!
- Installing in pairs
- Levelling the appliance
- Fitting the door handle
- Reversing the door
- Important
- NOTE!
- Description of the appliance
- Control panel
- Setting the temperature
- Remember!
- "Freezer"
- "Super Freeze"
- "Eco Energy"
- "Alarm"
- Door alarm
- Temperature alarm
- "Power"
- "Child Lock"
- Using your appliance
- Hinged panel
- Freezer drawer
- Ice cube freezer
- Useful tips
- Energy-saving tips
- Tips for freezing
- Turning off the appliance
- Cleaning the exterior
- Cleaning the interior
- Cleaning the door seal
- Troubleshooting
- Warning!
- Important safety instructions
- Packaging material
- Correct disposal of this appliance
- GARANTI WARRANTY
Brand : Elvita
Model : CFS4185V
Category : Freezer