
Mamba - Computer Mouse RAZER - Free user manual and instructions
Find the device manual for free Mamba RAZER in PDF.


| Product Type | Wireless Ergonomic Gaming Mouse |
| Model | Razer Mamba (2018 Edition) |
| Connectivity | 2.4 GHz Wireless / USB Wired Mode |
| Sensor | Razer 5G Optical Sensor (16,000 DPI) |
| Max DPI | 16,000 DPI |
| Buttons | 9 Programmable Buttons (including scroll wheel) |
| Switch Type | Razer Mechanical Mouse Switches (50 million clicks) |
| Lighting | Razer Chroma RGB (16.8 million colors) |
| Dimensions (L x W x H) | 127.6 x 70.1 x 38.2 mm |
| Weight | 106 g (without cable) |
| Power Source | Rechargeable Li-ion Battery (up to 50 hours with lighting off) |
| Charging Port | Micro-USB (cable included) |
| Battery Life | Up to 50 hours (default lighting) / Up to 200 hours with lighting off |
| Compatibility | Windows 10 / 11, macOS, Linux (limited), Xbox One (via USB) |
| Software | Razer Synapse 3 (for customization and updates) |
| Polling Rate | 1000 Hz (1 ms) |
| Mouse Feet | Five low-drag white mouse feet |
| Ergonomics | Right-handed design with rubber side grips |
| Warranty | 2 years manufacturer warranty |
| What's in the Box | Razer Mamba Wireless, USB charging cable, documentation |
Frequently Asked Questions - Mamba RAZER
User questions about Mamba RAZER
0 question about this device. Answer the ones you know or ask your own.
Ask a new question about this device
Download the instructions for your Computer Mouse in PDF format for free! Find your manual Mamba - RAZER and take your electronic device back in hand. On this page are published all the documents necessary for the use of your device. Mamba by RAZER.
USER MANUAL Mamba RAZER

natural_image
Abstract white line drawing of a stylized creature or creature on a dark background, enclosed in a rounded corner (no text or symbols)
CONTENTS
02 Introduction
02 Package Contents
02 System Requirements
03 Message from Razerguy
04 Key Features
06 Installation / Registration / Technical Support
11 Configuring your Razer Mamba
23 Using your Razer Mamba
28 Safety and Maintenance
30 Legalese
33 FCC Declaration of Conformance
33 FCC Caution
34 WEEE information
RAZER

The Razer Mamba™ wireless gaming mouse is engineered to free you from your reins while achieving the highest gaming standards within an impeccably designed shell. Combine that with a system that allows the flexibility of wired play and onboard memory that lets you bring your settings wherever you go, the Razer Mamba is the epitome of gaming mouse nirvana.
Now you are Free to Frag.
package contents
• Razer Mamba Gaming Mouse
- Charging Dock
- Rechargeable Lithium-Ion Polymer Battery with Battery Door
- USB Cable
• Certificate of Authenticity
- Quick Start Guide
- Master Guide
2 | for gamers, by gamers...
system requirements
- PC with USB port
• Windows XP / x64 / Vista / Vista64 - Internet connection
(for driver installation)
• 35MB of free hard disk space

message From razerguy
Wireless freedom, ergonomic design, and lag free speed make the Razer Mamba™ the first true wireless gaming mouse. From the company that invented the gaming mouse, the Razer Mamba™ brings gaming grade technologies to wireless gaming which were previously nonexistent.
With latency measurements decreased and the wireless polling rate at 1ms, the Mamba, arguably the fastest snake in the world, does not disappoint its namesake. The wireless design combined with Razer's zero-acoustic Ultraslick™ feet creates a frictionless experience that is as smooth as it is quick.
The Razer Mamba also features a system that allows gamers instant wired / wireless convertibility. By inserting the braided USB cable, the Razer Mamba transforms into a wired mouse, the garner is freed from battery life worries and wireless interference.
With the much improved wireless performance and the flexibility to play either wired or wireless, we have now truly set you free.
Free to Frag.

RazerGuy
razerguy@razerzone.com
www.rezerzone.com | 3
KEY FEATURES
Default button assignments

A Mouse Button 1 - Click
B Mouse Button 2 - Menu
C Mouse Button 3 - Scroll Wheel and Button
D Mouse Button 6 - Sensitivity Stage Up
E Mouse Button 7 - Sensitivity Stage Down
F Battery / Sensitivity Stage Indicator
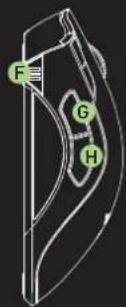

G Mouse Button 5 - Forward
H Mouse Button 4 - Backward
I Razer Precision™ 3.5G Laser Sensor
J Power On / Off Switch
K Pairing Button
L Rechargeable Battery
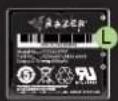


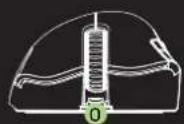
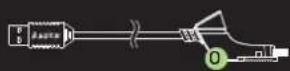
M Ultraslick™ Feet
N Cable Lock/Unlock Button
0 Connector Jack for Mini-USB End of Cable (Wired Mode / Battery Charging)
P Battery Charging Connector
Q Pairing Button
R Connector Jack for Mini-USB End of Cable (Wireless Model)
www.razerzone.com
INSTALLATION / REGISTRATION / TECHNICAL SUPPORT
For best results, please charge the battery fully the first time you use the Razer Mamba. A depleted battery will be fully charged in about three hours.
WIRELESS MODE
- Connect the mini-USB end of the cable to the Charging Dock.
- Pull back the pull-tab and insert the battery into the battery compartment. (The pull-tab shall allow you to remove the battery easily).
- Close the battery compartment.


- Switch on the Razer Mamba.
- Press the pairing buttons on the Razer Mamba and Charging Dock. The pairing button on the Charging Dock will start blinking to indicate the pairing process.
- When the pairing process is completed, the button will stop blinking. Your Razer Mamba is then ready for use in wireless mode.
6 | for gamers, by gamers.


7. To charge the Razer Mamba in wireless mode, place it on the Charging Dock. Alternatively, the Razer Mamba can be charged by plugging it directly into a PC USB port.


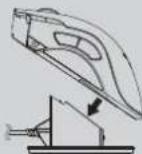
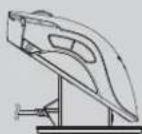
www.razerzone.com | 7
natural_image
Simple line drawing of a hand pouring liquid into a container with an arrow indicating direction (no text or symbols)

WIRED MODE
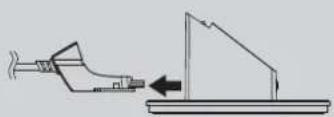
- Connect the mini-USB end of the cable to the Razer Mamba.
- Plug mouse into the USB port of your computer. The Razer Mamba is then ready for use as a high performance wired mouse. In addition, its battery will start charging automatically in this wired mode.
- To remove the cable, push cable button to the right as shown before pulling out the mini-USB connector.

a | for gamers, by gamers."
Windows XP / x64 / Vista / Vista64 installation instructions
- Download the Driver Installer from http://www.razersupport.com
- Unzip the file and run the installer program.
- The Razer Mamba introduction screen appears. Click CONTINUE.
- Important information regarding the Razer Mamba driver will be shown. Click CONTINUE after reading.
- Read the software license agreement and click CONTINUE.
- A confirmation popup screen will appear. Click AGREE if you accept all terms of the agreement.
- If you wish to choose the destination folder where the driver software will reside, click CHANGE INSTALL LOCATION. Otherwise, click INSTALL to begin installation.
- At the end of the installation, follow the instructions onscreen to restart your computer. Click RESTART.
Please visit www.razerzone.com/registration/ for online product registration.
What you'll get:
- 2 years' limited manufacturer's warranty - Free online technical support at www.razersupport.com
www.razerzone.com | 9
BATTERY/SENSITIVITY STAGE INDICATOR BEHAVIOR
The Razer Mamba has a Battery/Sensitivity LED indicator on its left side, which displays the status of battery life/sensitivity stage.
BATTERY LIFE INDICATOR BEHAVIOR
- 100% Battery
3 green lit LEDs ( - 70% Battery
2 green lit LEDs (□) - 30% Battery
1 green lit LED (U) - 5% Battery
1 green blinking LED (000)
SENSITIVITY STAGE INDICATOR BEHAVIOR
- Sensitivity Stage 1
2 green and 1 red lit LEDs [ ] - Sensitivity Stage 2
1 green and 2 red lit LEDs - Sensitivity Stage 3
3 red lit LEDs (■■) - Sensitivity Stage 4
2 red and 1 green lit LEDs ( - Sensitivity Stage 5
1 red and 2 green lit LEDs [ ]
configuring your razer mamba
RAZER SYNAPSETM
ONBOARD MEMORY
With Razer Synapse, all settings will be saved on the profile selected and will apply on another computer even without the Razer™ Configurator installed. [Note:
On-The-Fly Sensitivity™ requires the Razer Mamba driver to be installed
ASSIGN BUTTONS TAB
In the Assign Buttons tab, you can assign various functions to each of the buttons based on your own preferences.

www.razerzone.com | 11
The following functions are possible:
CLICK
Perform a normal mouse click.
MENU
Open a context-sensitive menu.
UNIVERSAL SCROLLING
Activate universal scrolling by clicking and holding the assigned button. Drag your Razer Mamba to scroll in the direction of the mouse movement.
DOUBLE CLICK
Perform a double click with the assigned button.
MACRO
If the button function or key is not listed, or if you would like to assign a macro to a button, select MACRO from the dropdown menu. In addition, all saved macros will be shown on a sub dropdown menu for quick selection when you mouse over the MACRO option.
PROFILE SETTINGS
Switch to a profile on the fly and immediately load all your preferred mouse settings. When you select PROFILE SETTINGS from the dropdown menu, a sub-menu will appear and allow you to choose desired profile to switch to.
12 | For samers, by samers?

www.rezerzone.com | 18
FORWARD
Issue a "Forward" command in Windows Explorer / Internet Explorer.
BACKWARD
Issue a "Back" command in Windows Explorer / Internet Explorer.
ON-THE-FLY SENSITIVITY
Enable change of sensitivity settings on the fly without the need to enter the configuration menu.
SINGLE KEY
Activate a key on your keyboard.
SCROLL UP
Scroll up the page you are currently viewing.
SCROLL DOWN
Scroll down the page you are currently viewing.
BUTTON OFF
Disable any function on the assigned button.
14 | for gamers, by gamers.
ADJUST PERFORMANCE TAB

www.razerzone.com
CURRENT SENSITIVITY
Sensitivity is how much your cursor moves on the screen in relation to your physical movement of the mouse. A higher sensitivity value would translate to less physical movement of the mouse, and vice versa.
In the ADJUST PERFORMANCE tab, the current sensitivity of your Razer Mamba in dots per inch (DPI) is indicated and can be easily adjusted by moving the arrow along the slider in steps of 100DPI. For greater flexibility in adjustment, you can select the ENABLE INDEPENDENT X-Y SENSITIVITY option and move the individual X and Y arrows along the slider.
To display the On-The-Fly Sensitivity indicator onscreen whenever you make changes on the fly, select the ENABLE ON-THE-FLY SENSITIVITY ONSCREEN DISPLAY option.
ACCELERATION
Acceleration allows you to increase your physical mouse movement to onscreen cursor movement ratio based on the rate of change of your movement speed. The higher the value of acceleration, the higher the ratio will be. You can activate acceleration by checking the ENABLE ACCELERATION box and moving the arrow along the slider.
POLLING RATE
The polling rate determines the time intervals that the PC retrieves data from your mouse. A higher value would mean shorter intervals and therefore less latency. You can switch between 125Hz, 500Hz and 1000Hz by clicking on the individual polling rate buttons.
38 | for gamers by gamers."

www.rozerzone.com | 27
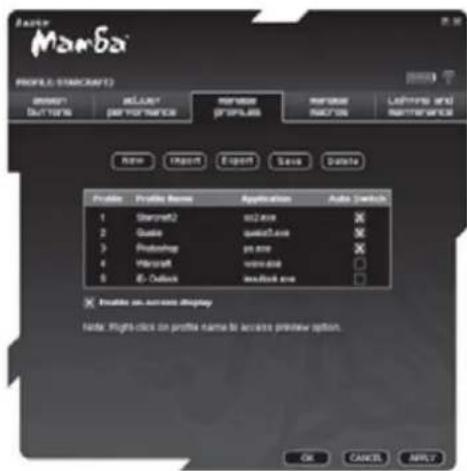
MANAGE PROFILES TAB
18 | for gamers, by gamers.
A profile allows you to store your various mouse settings such as sensitivity, button assignments and macros as a single group for your convenience.
In the Manage Profiles tab, you can create and launch customized profiles based on the application you have activated.
a. Profile: Indicates the profile number
b. Profile Name: Double-click this field to enter a profile name of your choice.
c. Application: Double-click this field to open up directory browsing. Select the executable file of the program you want the profile to be tied to.
d. Auto Switch: Select this option to activate the current profile as an On-The-Fly profile.
With Razer Synapse, you can save up to five profiles on your Razer Mamba. If you require more profiles and do not wish to delete the existing profiles, simply export the existing profiles to your hard disk and import them back as and when needed.
www.razerzone.com | 19

Right-clicking inside the Manage Profile tab allows you to quickly access a list of extra commands.
20 | for gamers, by gamers-
MANAGE MACROS TAB
A macro is a sequence of keystrokes executed in a particular order and timing. It allows you to execute a chain of commands, with the press of just one button, to optimize your gameplay.
In the Manage Macros tab, you can record macros of up to 500 keystrokes (dependent on length of delays). These macros can also be imported and exported onto your hard disk for future usage.

www.rezerzone.com | 23
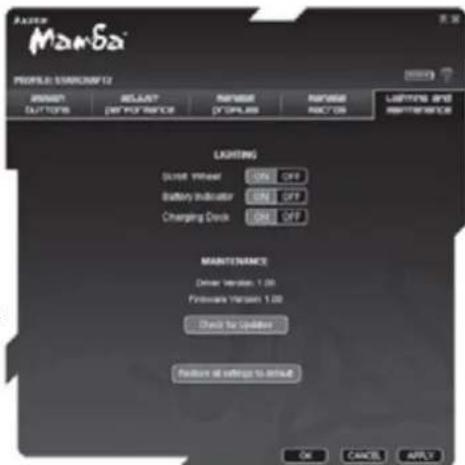
LIGHTING AND MAINTAINENCE
LIGHTING
Turn on/off the charging dock light, as well as the scroll button and battery indicator lights on the Razer Mamba.
MAINTENANCE
Update the Razer driver and firmware software by clicking on the CHECK FOR UPDATES button. This will connect you to
www.razersupport.com for the latest driver/firmware downloads.
ee | for samers, by samers?
using your razer mamba
SETTING SENSITIVITY STAGES
A sensitivity stage is a preset sensitivity value you can swap to on the fly. This means you can change to your preferred sensitivity instantly by toggling between sensitivity stages.
To preset a sensitivity stage;
-
Load the Razer configurator and click on the Adjust Performance lab.
-
Click on the SENSITIVITY STAGE button. A Sensitivity Stage Settings pop up box will appear.

www.razerzone.com | 28
- Select the number of sensitivity stages needed.
- Click on the stage you would like to preset and adjust using the arrow on the slider below.
- Click APPLY when done. To switch between different sensitivity stages, simply assign the Sensitivity Stage Up and Sensitivity Stage Down functions to the desired buttons. (Default: Mouse buttons 6 and 7)
CREATING MACROS

24 | for gamers. by gamers...
A. Load the Razer configurator and click on the Manage Macros tab.
B.Click RECORD to start creating a macro.
C.Type out the desired sequence of keystrokes, then click STOP to end the recording.
D. Right-click on the recorded keystroke to access more options.
E. You can also insert additional commands by clicking on the ADVANCED button.
F. Click APPLY when done.

www.razerzone.com | 25
ON-THE-FLY SENSITIVITY
On-The-Fly Sensitivity is a feature that allows you to fine-tune your sensitivity settings even in the midst of gameplay. If On-The-Fly Sensitivity has been assigned to a button, pressing that assigned button and moving the scroll wheel will produce a bar at the lower right-hand corner of your screen. While this feature allows you to dynamically adjust your sensitivity settings, it is accessible only if the driver is installed.

26 | For samers, by samers?
The Razer Mamba can be charged both during wired mode and when placed on the Charging Dock in wireless mode.
During charging, the battery indicator on the mouse will blink. When charging in wireless mode, the Charging Dock will emit a pulsing glow. Once the battery is fully charged, the battery indicator will be fully lighted up and the Charging Dock will cease to pulse.
For best results, please charge the battery fully the first time you use the Razer Mamba. A depleted battery will be fully charged in about three hours. If the mouse has not been used for an extended period, the battery might need to be recharged before usage.
The Razer Mamba requires a USB connection that is able to supply sufficient power during battery charging process. The battery charging process of the Razer Mamba may be affected if connected to a non-powered USB hub or non-powered USB ports found on certain keyboards and other peripherals.
When in doubt, it is preferable to connect the Razer Mamba directly to the USB port found on the CPU unit of your computer system.
www.razerzone.com | 27
safety and maintenance
SAFETY GUIDELINES
In order to achieve maximum safety while using your mouse, we suggest that you adopt the following guidelines:
- Avoid looking directly into the laser beam of your mouse or pointing the beam in any one else's eye. Note that the infrared beam is NOT visible to the naked human eye and is set on an always-on mode.
- Should you have trouble operating the mouse properly and troubleshooting does not work, unplug the device and contact the Razer hotline or go to www.razerzone.com for support. Do not attempt to service or fix the device yourself at any time.
- Do not take apart the mouse (doing so will also void your warranty) and do not attempt to service it yourself or operate it under abnormal current loads.
- Keep your mouse away from liquid, humidity or moisture. Operate your mouse only within the specified temperature range of 0^ C [32^ F] to 40^ C [104^ F]. Should you operate it in a temperature that is beyond this range, unplug and switch off the device in order to let the temperature stabilize within the optimal temperature range.
COMFORT
Here are some tips to ensure that you are comfortable while using your mouse. Research has shown that long periods of repetitive motion, improper positioning of your computer peripherals, incorrect body position, and poor habits may be associated with physical discomfort and injury to nerves, tendons, and muscles. Please follow these guidelines to ensure comfortable use of your mouse and avoid injury.
- Position your keyboard and monitor directly in front of you with your mouse next to it. Place your elbows next to your side, not too far away and your mouse within easy reach.
- Adjust the height of your chair and table so that the keyboard and mouse are at or below elbow height.
- Keep your feet well supported, posture straight and your shoulders relaxed.
- During gameplay, relax your wrist and keep it straight. If you do the same tasks with your hands repeatedly, try not to bend, extend or twist your hands for long periods.
-
Do not rest your wrists on hard surfaces for long periods. Use a wrist support such as Razer's gel-filled eXactRest™ to support your wrist while gaming.
-
Customize the buttons on your mouse to suit your style of gaming in order to minimize repetitive or awkward motions while gaming.
- Make sure that your mouse fits comfortably in your hands.
- Do not sit in the same position all day. Get up, step away from your desk and do exercises to stretch your arms, shoulders, neck and legs.
- If you should experience any physical discomfort while using your mouse, such as pain, numbness, or tingling in your hands, wrists, elbows, shoulders, neck or back, please consult a qualified medical doctor immediately.
MAINTENANCE AND USE
The Razer Mamba is equipped with a laser sensor, which has a tracking beam that is invisible to the naked human eye. There is a little regular maintenance to keep the Razer Mamba in optimum condition. Once a month we recommend you unplug the mouse from the USB port and clean the lens below the Razer Mamba with a soft cloth or cotton swab. Use a little warm water but no soap or harsh cleaning agents.
To get the ultimate experience in movement and control, we highly recommend a premium mousing surface from Razer. Some surfaces will cause
undue wear on the feet requiring constant care and eventual replacement.
Do note that the sensor of the Razer Mamba is 'tuned' or optimized especially for the Razer mousing surfaces. This means that the sensor has been tested extensively to confirm that the Razer Mamba reads and tracks best on Razer mousing surfaces. Other premium mousing surfaces from companies like Everglide™ may work just as well.
BATTERY
Razer Mamba contains an internal, lithium-ion polymer rechargeable battery. In general, the life expectancy of such batteries is dependent upon usage. Heavy daily usage use will result in shorter battery life. Casual use will extend battery life. If you suspect that the lithium-ion polymer rechargeable battery inside the Razer Mamba may be drained (has a low charge), try charging it. If the battery does not recharge after several attempts, it may be non-operational. Please dispose the battery promptly.

BATTERY WARNING
Caution: risk of explosion and personal injury if batteries are replaced by incorrect type. Do not open, mutilate, or expose to conducting materials [metall, moisture, liquid, fire, or heat. Deing so may cause batteries to leak or explode, resulting in personal injury. Dispose of spent, leaking or damaged batteries according to manufacturer instructions and local laws. Do not use or charge
30 | for samers, by samers?
batteries (lithium-polymer rechargeables) if leaking, discolored, or deformed. Do not mix battery types. Do not change alkaline batteries. Do not leave rechargeable batteries discharged or unused for extended periods. Battery life varies with usage. When replacing, remove all spent batteries, and do not mix old batteries with now. When device is not in used for extended periods, remove batteries to avoid leakage and store away from children in a cool, dry place at room temperature.
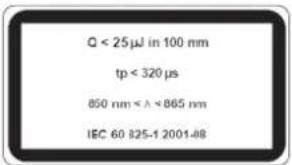
CLASS 1M LASER PRODUCTS
International standards and safety. INVISIBLE LASER RADIATION: DD NOT VIEW DIRECTLY WITH OPTICAL INSTRUMENTS. Class 1m laser products comply with International Standard IEC 60825-1 Ed 2: 2007, Class TM Laser Product Invisible
SAFETY AND USAGE GUIDELINES FOR LASER PRODUCTS
Do not direct laser beam toward eye. For Class 1M laser products, viewing laser output with optical instruments (e.g., eye loupes, magnifiers, and microscopes) within a distance of 100mm may pose an eye hazard.
LEGALESE
COPYRIGHT INFORMATION
©2009 Razer USA Ltd. All Rights Reserved. Razor™, the Razor Triple-Headed Snake
logo, the Razer distressed word logo, Mamba™ and other trademarks contained herein are the property of Razer USA Ltd and/or its affiliated or associated companies, registered in the United States or other countries. All other trademarks are the property of their respective owners. Actual product may differ from pictures.
Razer ^™ assumes no responsibility for any errors that may appear in this software, manual or help file. Information contained herein is subject to change without notice.
Razer ^™ may have patents, patent applications, trademarks, copyrights, trade secrets or other property rights, intellectual and otherwise concerning the product and subject matter in this manual and software. Except as is provided in any written license agreement provided by Razer ^™ , furnishing of this manual does not give you a license to any such patents, trademarks, copyrights or other intellectual property rights, whether registered or otherwise. Patent Pending.
SOFTWARE LICENSE AGREEMENT ['AGREEMENT']
Razer™ IS WILLING TO LICENSE THE ENCLOSED SOFTWARE TO YOU ONLY ON THE CONDITION THAT YOU ACCEPT ALL OF THE TERMS CONTAINED IN THIS LICENSE AGREEMENT. This is a legal agreement between you (either an individual end-user, corporate entity or any other entity whatsoever) and Razer™. By installing, uploading, copying or utilizing in any way the
software, you are agreeing to be bound by the terms and conditions of this Agreement. If you do not agree to the terms of this Agreement, do not install the software and promptly return the software package and other items that are part of this product in their original package with your payment receipt to your point of purchase for a full refund.
GRANT OF LICENSE
Razer™ grants you a non-exclusive, revocable license to use one copy of the enclosed software program, licensed and not sold to you, ("Software") on one computer only with the Razer™ product you have purchased. No other rights are granted. The Software is in use if it is installed, including but not limited to loaded on the computer's permanent or temporary memory. For backup purposes only, you may make one copy of the Software for your own use. You must include on the backup copy all copyright and other notices included in the Software as supplied by Razer™. Installation on a network server for the sole purpose of your internal distribution of the Software is permitted only if you have purchased an individual Software package or concurrent dedicated license for each networked computer to which the Software is distributed.
RESTRICTIONS
Razer™ retains full ownership of the Software. You
www.razerzone.com | 31
shall not directly and/or indirectly attempt to decompile, disassemble, reverse-engineer, or modify the Software licensed to you in any way except as allowed by law. You may not transmit the Software over a network [except as expressly permitted above] or electronically using any means, You may not directly and/or indirectly transfer the Software except upon a permanent transfer of the enclosed Razer™ product provided that all Software updates are included in the transfer, you do not retain a copy of the Software, and the transfere agrees to be bound by the terms and conditions in this license. Upon any violation of any of the provisions of the Agreement, your rights to use the software shall automatically terminate and all copies of the Software must be returned to Razer™ or destroyed.
LIMITATION OF LIABILITY
The warranties set forth in this agreement replace and/or supersede all other warranties and your remedies for breach of warranty are expressly limited to those herein set forth. Razer™ expressly disclaims all other warranties to the extent allowed by law including, but not limited to, the implied warranties of merchantability, fitness for a particular purpose and non-infringement of third-party rights with respect to the documentation, software (including patches and/or updated) and hardware. No Razer™ supplier,
dealer, agent, or employee is authorized to make any modification, extension or alteration of the warranty or to substitute products or services, lost profits, loss of information or data, or any other special, indirect, consequential or incidental damages arising in any way out of the distribution of, sale of, resale of, use of, or inability to use any product or software subject to warranty herein set forth. In no event will Razer™ be liable for any special, incidental, indirect or consequential damages whatsoever.
COSTS OF PROCUREMENT PRODUCT OR SERVICE
For the avoidance of doubt, in no event will Razer ^™ be liable for any costs of procurement unless it has been advised of the possibility of such damages, and in no case shall Razer ^™ be liable for any costs of procurements liability exceeding the actual money paid for the products subject to warranty at issue. In the event some jurisdictions do not allow the limitation of implied warranties or liability for incidental, consequential, special, or indirect damages, the above limitation may not apply. The above limitations will not apply in case of personal injury where and to the extent that applicable laws require such liability.
U.S. GOVERNMENT RESTRICTED RIGHTS
The Software is provided to the U.S. government only with restricted rights and limited rights. Use, duplication, or disclosure by the U.S. Government is subject to restrictions set forth in 48 C.F.R. 2.101 (October 1995), consisting of "Commercial Computer Software" and "Commercial Computer Software Documentation as such terms are used in 48C.F.R. 12.212 (September 1995), and in FAR Sections 52-227-14 and 52-227-19 r DFARS Section 52-227-7013 ©(1) list, or their successors, as applicable. Consistent with 48 C.F.R. 12.512 and 48 C.F.R. 227-7202-1 through 27-7204-4 [June 1995], or any successor regulations, this Software is provided to U.S. Government users pursuant to the terms and conditions hereon.
FCC declaration of conformance
This equipment has been tested and found to comply with the limits for a Class B digital device, pursuant to part 15 of the FCC Rules. These limits are designed to provide reasonable protection against harmful interference in a residential installation. This equipment generates, uses and can radiate radio frequency energy and, if not installed and used in accordance with the instructions, may cause
harmful interference to radio communications. However, there is no guarantee that interference will not occur in a particular installation. If this equipment does cause harmful interference to radio or television reception, which can be determined by turning the equipment off and on; the user is encouraged to try to correct the interference by one or more of the following measures: Reorient or relocate the receiving antenna.
Increase the separation between the equipment and the receiver.
Connect the equipment into an outlet on a circuit different from that to which the receiver is connected.
Consult the dealer or an experienced radio TV technician for help.
For more information, refer to the online help system on www.razerzone.com
FCC CAUTION
Any changes or modifications not expressly approved by the party responsible for compliance could void the user's authority to operate this equipment.
This device complies with Part 15 of the FCC Rules.
[1] This device may not cause harmful interference, and [2] this device must accept any interference received, including interference that may cause undesired operation.
This device and its antenna(s) must not be co-located or operating in conjunction with any other antenna or transmitter.
32 | For gamers, by gamers.
www.rezerzone.com | 99

weee information
ENGLISH
Correct Disposal of This Product [Waste Electrical & Electronic Equipment]
Applicable in the European Union into other European countries with sepsis and collection systems. This marking shown on the product or its land sale, indicates that I should not be exposed within other household residences at the end of its working time. To prevent possible harm to the environment, or women health from uncoated waste dispose, please separate the two types of resources and recycle a responsibility to promote their disposal of these industrial products. This material should contact either the capital company or any other government authorities, details of whom and have they can take this item for environmentally safe mending. Business users should contact their supplier and check the terms and conditions of the purchase country. This product should not be mixed with other commercial wastes for disposal.
FRANÇAIS
34 | For samers, by samers?
DEUTSCH
www.cazerzone.com | 35
DANSK
Korrekt effektionskøtskølfelse at dette produkt (elektirisk å sklekronsn og på)l. Mierkel på dette produkt eller ieder medlegende dokumentation bevelde av producti ikke må borksaffes sammen med afkredelig motrådeingsfættet ered ered vælret, for at omug skædsige mites-er øndhædsplæknigder på grund at aktvorenere intensforer, for dettning til åsning de indikrekt og indikrekt som någårt og for dettning til åsning de indikrekt og indikrekt som någårt og for dettning til åsning de indikrekt og indikrekt som någårt og for dettning til åsning de indikrekt og indikrekt som någårt og for dettning til åsning de indikrekt og indikrekt som någårt og for dettung til åsning de indikrekt og indikrekt som någårt og for dettung til åsning de indikrekt og indikrekt som någårt og for dettung til åsning de indikrekt og indikrekt som någårt og for dettung til åsning de indikrekt og indikrekt som någårt og for dettung til ås meaning der kinden forstång av betekurbe beskent kontakte forshandeten, hvor kan som kontakte forstång av betekurbe beskent kontakte forstång av betekurbe beskent kontakte forstång av betekurbe beskent kontakte forstång av betekurbe beskent kontakte forstång av betekurbe beskent kontakte forstång av betekurbe beskent kontakte forstång av betekurbe beskent kontakte forstång av betekurbe beskent kontok
POLISH
36 | for samers, by samers.

natural_image
Solid black rounded rectangle shape with no text or symbols


- CONTENTS
- RAZER
- package contents
- system requirements
- message From razerguy
- INSTALLATION / REGISTRATION / TECHNICAL SUPPORT
- WIRELESS MODE
- WIRED MODE
- Windows XP / x64 / Vista / Vista64 installation instructions
- What you'll get:
- BATTERY/SENSITIVITY STAGE INDICATOR BEHAVIOR
- BATTERY LIFE INDICATOR BEHAVIOR
- SENSITIVITY STAGE INDICATOR BEHAVIOR
- configuring your razer mamba
- RAZER SYNAPSETM
- ONBOARD MEMORY
- ASSIGN BUTTONS TAB
- CLICK
- MENU
- UNIVERSAL SCROLLING
- DOUBLE CLICK
- MACRO
- PROFILE SETTINGS
- FORWARD
- BACKWARD
- ON-THE-FLY SENSITIVITY
- SINGLE KEY
- SCROLL UP
- SCROLL DOWN
- BUTTON OFF
- CURRENT SENSITIVITY
- ACCELERATION
- POLLING RATE
- MANAGE MACROS TAB
- LIGHTING AND MAINTAINENCE
- LIGHTING
- MAINTENANCE
- using your razer mamba
- SETTING SENSITIVITY STAGES
- safety and maintenance
- SAFETY GUIDELINES
- COMFORT
- MAINTENANCE AND USE
- BATTERY
- BATTERY WARNING
- CLASS 1M LASER PRODUCTS
- SAFETY AND USAGE GUIDELINES FOR LASER PRODUCTS
- COPYRIGHT INFORMATION
- SOFTWARE LICENSE AGREEMENT ['AGREEMENT']
- GRANT OF LICENSE
- RESTRICTIONS
- LIMITATION OF LIABILITY
- COSTS OF PROCUREMENT PRODUCT OR SERVICE
- U.S. GOVERNMENT RESTRICTED RIGHTS
- FCC declaration of conformance
- FCC CAUTION
- This device complies with Part 15 of the FCC Rules.
- weee information
- ENGLISH
- FRANÇAIS
- DEUTSCH
- DANSK
- POLISH
Brand : RAZER
Model : Mamba
Category : Computer Mouse