
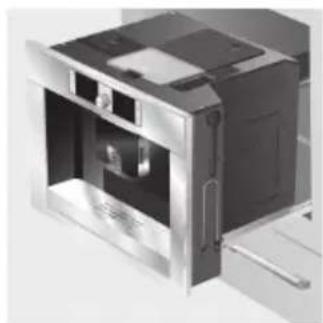
TCC78K751C - Coffee maker BOSCH - Free user manual and instructions
Find the device manual for free TCC78K751C BOSCH in PDF.

User questions about TCC78K751C BOSCH
0 question about this device. Answer the ones you know or ask your own.
Ask a new question about this device
Download the instructions for your Coffee maker in PDF format for free! Find your manual TCC78K751C - BOSCH and take your electronic device back in hand. On this page are published all the documents necessary for the use of your device. TCC78K751C by BOSCH.
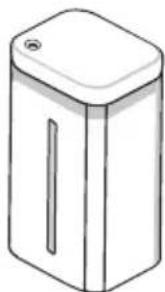
USER MANUAL TCC78K751C BOSCH
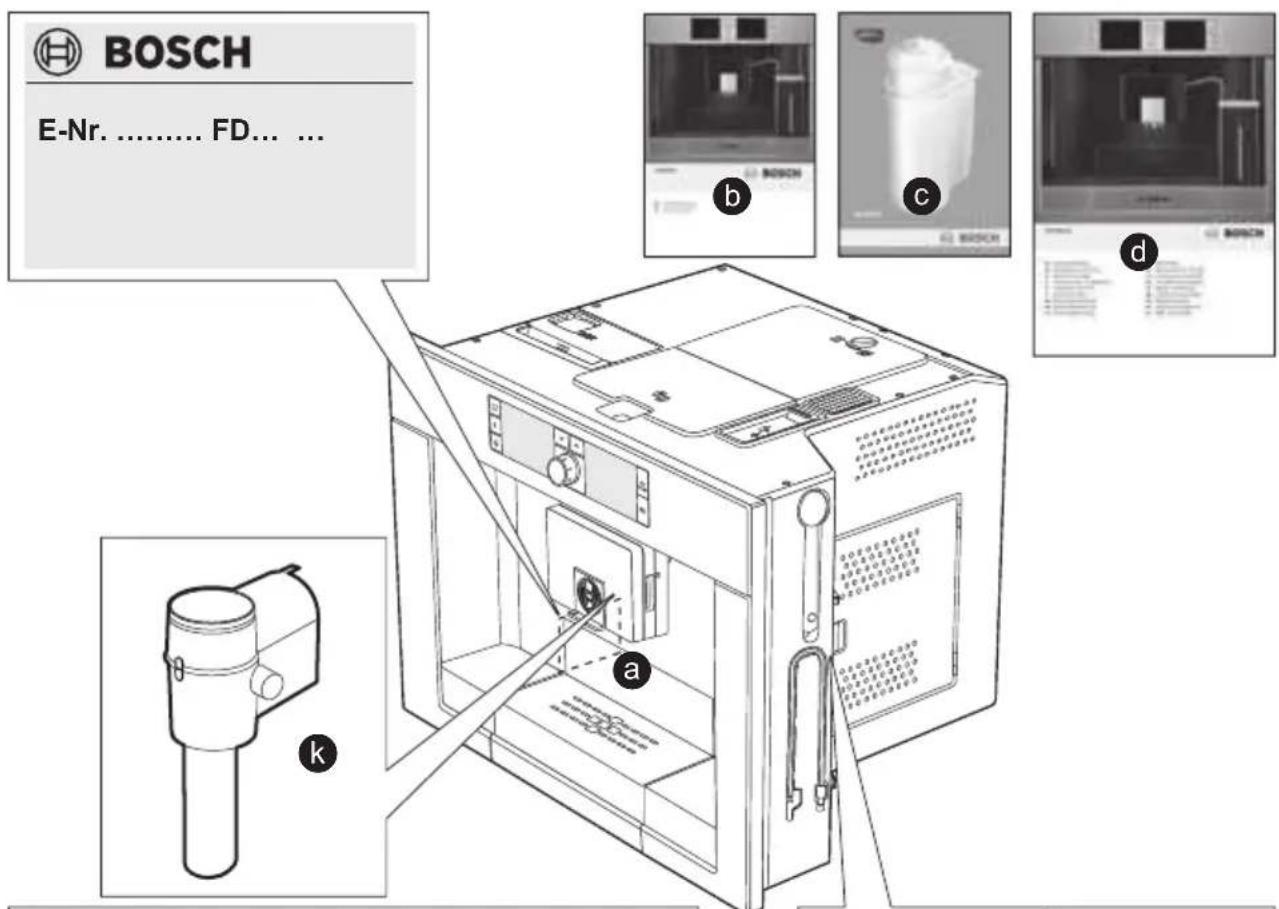
natural_image
Interior view of a Bosch air conditioner oven with control panel and fan (no visible text or symbols)咖啡机
Coffee Machine
TCC78K751
TCC78K751C

BOSCH
zh 操作说明书
en operating instructions
供货清单fang第ihen\$eitincluded in delivery(see page 36)
j
natural_image
Simple line drawing of a baby bottle (no text or symbols)i
natural_image
Simple line drawing of a rectangular box with a lid and vertical slot (no text or symbols)h
f
e

祝贺
natural_image
Illustration of a hand inserting a rectangular object into an oven (no text or symbols visible)目录
5 安全说明
6 供货清单
6 电器及其零部件
7 控件和显示屏
7 电源开关 O/I
7 菜单和显示信息
8 显示信息
10 展开系统
10 附件
10 操作
10 常规信息
11 安装电器
12 制作饮品
12 饮品选择
12 二次研磨 (双份香料)
13 实例
14 使用预磨咖啡制作
14 使用牛奶制作
15 一次两杯
16 My coffee (个性咖啡) □+
17 制作奶沫和温牛奶
17 分装茶水
18 信息和设置
18 显示信息
18 显示设置
20 设置每杯容量
20 调节研磨装置
21 检查水的硬度
21 节能技巧
21 日常维护和清洁
21 日常维护
22 清洁牛奶系统
23 清洁冲泡装置
25 保养程序
25 除垢
27 清洁
27 钙化清洁
29 附件、存储、处置、保修
29 附件
29 存储
29 处置
29 保修
30 简单的故障检修
32 技术参数
安全说明

natural_image
Illustration of a hand using a computer to press documents (no text or symbols visible)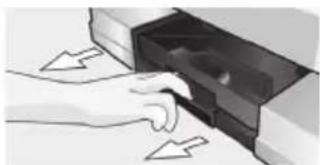
natural_image
Hand inserting a file into a folder with arrows indicating direction (no text or symbols)natural_image
3D rendering of a microwave oven with open door and internal compartments (no text or symbols visible)展开位置 1
natural_image
3D rendering of a stainless steel microwave oven with ventilation slots and cooling fins (no text or symbols visible)展开位置 2
然后将电器完全推回至嵌入装置中。

禁止在冲泡过程中使用展开功能。
附件
natural_image
Close-up of a kitchen appliance with a highlighted interior fixture and control panel (no text or symbols visible)二次研磨
(双份香料)
natural_image
3D rendering of a coffee mug on a counter with a digital display (no text or symbols visible)natural_image
Close-up of a mechanical component with a labeled part '19' (no other text or symbols visible)- 倒入不超过两平匙的咖啡粉。

不要使用整豆或即溶咖啡。
natural_image
Illustration of a coffee mug on a tray with a door and window, no text or symbols present- 按下 ☐ 启动/停止按键 (10)。
natural_image
Cross-sectional diagram of a mechanical or electronic component with numbered parts (12 and 13), no readable text or symbols beyond labels.natural_image
Technical illustration showing a device with labeled parts and a magnified inset of a component (no text or symbols present)natural_image
Interior view of a modern kitchen appliance with a coffee mug and water dispenser (no visible text or symbols)natural_image
Interior kitchen scene with two mugs on a tray, no visible text or symbolsnatural_image
Interior view of a modern kitchen appliance with a coffee cup and sink (no visible text or symbols)- 按下 ☐ 启动/停止按键 (10)。
- 按下 ☐ 启动/停止按键 (10)。
显示设置
Please short rinse the milk system.
(请快速清洗牛奶系统。)
Press (按下)
- 在用后未进行清洁时
- 在电器刚自动关断且未事先清洁时。
natural_image
Illustration of a hand holding a small device with an upward arrow, next to a metallic tool (no text or symbols)清洁冲泡装置
natural_image
Mechanical assembly diagram showing a tool pressing down on a mechanical component (no text or symbols visible)- 将冲泡装置筛网放在流水下。
natural_image
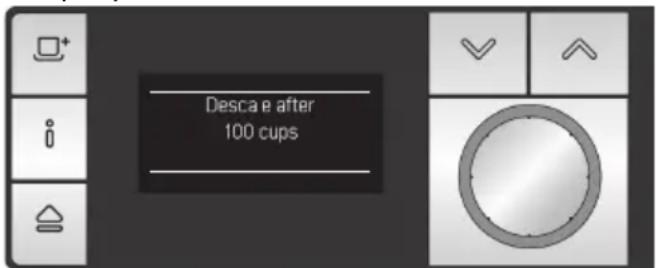
Close-up of a mechanical component with a magnified inset showing internal components (no visible text or symbols)Service - change filter & - button 3 sec.
Service -
clean
8 - button 3 sec.
Service - descale
i - button 3 sec.
Service - Calc'n'Clean
& - button 3 sec.
Remove filter (取出过滤器)
Press ☐ (按下 ☐)
Clean and refill water tank 清洁并添加水箱)
Press ☐ (按下 ☐)
Cleaning program Start with (清洁
程序 按下 ☐ 开始)
或
如要在无提示的情况下启动(参见“显示设
Cleaning program Start with (清洁
程序 按下 ☐ 开始)
Empty drip tray (排空滴水盘)
排空滴水盘(22)。
Replace drip tray (装回滴水盘)
装回滴水盘。
Cleaning (正在清洁)
Open drawer (打开抽屉)
展开电器,打开抽屉(19)。
Insert cleaning tablet! (插入清洁片剂!)
Close drawer! (关闭抽屉!)
将一片清洁片剂放入抽屉中,再次关闭抽
屉。这时,清洁程序将运行大约1分钟。
Press ☐ (按下 ☐)
Empty drip tray (排空滴水盘)
排空滴水盘。
Replace drip tray (装回滴水盘)
装回滴水盘。
电器再次准备就绪。
钙化清洁

Empty drip tray (排空滴水盘)
排空滴水盘(22)。
Replace drip tray (装回滴水盘)
装回滴水盘。

如果未插入牛奶打泡器,则显示以下信息:
Set up milk frother (安装牛奶打泡器)
插入牛奶打泡器 (12)
Place container under milk frother.
(将容器放在牛奶打泡器下。)
Press ☐ (按下 ☐)
将一个容量至少 1 升的容器放在牛奶打
泡器(12)下。按下启动/停止按键
(10)。电器清洗两次。

Close drawer! (关闭抽屉!)
Remove filter (取出过滤器)
Press ☐ (按下 ☐)
Add 0.5 l water and descaler
(添加 0.5 升水和除垢剂)
Press ☐ (按下 ☐)
Clean and refill water tank 清洁并添加水箱)
Press ☐ (按下 ☐)
... on purchasing this product. With this fully automatic espresso machine you have acquired a high-quality kitchen appliance of innovative design which combines a multitude of functions with easy operation. It will enable you to prepare a variety of delicious hot drinks quickly and simply – whether you’re in the mood for a traditional cup of coffee, a smooth milk coffee or latte macchiato, a creamy cappuccino or an invigorating espresso. At the same time the appliance offers you a wide range of options for adapting it to your individual taste.
To ensure that you can use this fully automatic espresso machine with all its functions and features reliably and safely, we would like you to familiarize yourself with its components, functions, displays and controls. These instructions are designed to help you, so please take the time to read them before you switch on the appliance.
How to use these instructions
If you unfold the front cover of these instructions you will find illustrations of the appliance with numbered parts. These numbers are referred to throughout the text. Example: Water tank (14)

If you leave the cover page unfolded, you can always refer back to it quickly, wherever you are in the instructions.
Displays and lettering on buttons are always shown in a different font from the text of the instructions so that you can easily recognize what is displayed or printed on the appliance.
Example: Espresso
The appliance comes with a quick reference guide on which you can find the most important functions at a glance. It can be stored in the outer compartment on the right of the appliance.
natural_image
Illustration of a hand inserting a card into a microwave oven (no text or symbols visible)Contents
35 Safety instructions
36 Included in delivery
36 The appliance and its parts
37 Controls and display
37 Power switch O/I
37 Menu and display
38 Display messages
40 Deployment system
40 Accessories
40 Operation
40 General
41 Setting up the appliance
42 Preparing drinks
42 Drink selection
42 Dual grind (AromaDouble Shot)
43 Example
44 Preparation using pre-ground coffee
44 Preparation using milk
45 Two cups at once
46 My coffee □+
47 Preparing milk froth and warm milk
47 Dispensing tea water
48 Information and settings
48 Displaying information
48 Displaying settings
50 Set per-cup quantity
50 Adjusting the grinding unit
51 Checking the water hardness
51 Tips on energy saving
51 Daily maintenance and cleaning
51 Daily maintenance
52 Cleaning the milk system
53 Cleaning the brewing unit
54 Service programmes
55 Descaling
56 Cleaning
57 Calc'n'Clean
58 Accessories, storage, disposal, guarantee
58 Accessories
59 Storage
59 Disposal
59 Guarantee
60 Simple troubleshooting
62 Technical data
Safety instructions
Please read the operating instructions carefully before using the appliance and keep them for future reference.
You should also note the enclosed quick reference guide.
This fully automatic espresso machine is designed for preparation of small amounts of coffee for domestic use or for use in noncommercial, household-like environments, such as staff kitchens in shops, offices, agricultural and other small businesses or for use by guests at bed-and-breakfast establishments, small hotels and similar residential facilities.
It should only be filled with fresh water and the substances described in these instructions (coffee, cleaning/descaling agents).
Use indoors and at room temperature only. Do not allow persons (including children) with reduced physical, sensory or mental capabilities, or lack of experience and knowledge, to use this appliance, unless they are being supervised or have been given instruction concerning use of the appliance by a person responsible for their safety. Keep children away from the appliance. Children should be supervised to ensure that they do not play with the appliance.

Risk of electric shock! Connect and operate the appliance only in accordance with the specifications on the rating label. Do not use if either the power cord or the appliance is damaged. In the event of a malfunction, switch off the appliance immediately by the power on/off switch. Then pull out the power plug. Do not open the appliance or dismantle it. Never immerse the power cord in water.
To avoid potential hazards, repairs such as replacing a damaged power cord should only be performed by our service personnel.
Risk of injury! Do not reach into the grinding unit.
Risk of burns! The milk frother for milk and hot water gets very hot.
After use, allow to cool down first before touching.
Risk of injury! Be careful when pulling the appliance out of the built-in unit
and pushing it back in, so that fingers are not trapped.
Included in delivery
(See the illustration at the beginning of this instruction manual)
Fully automatic espresso machine
TCC78K751
Instruction manual
Filter instructions
Installation instructions
Measuring spoon
Milk tube
Quick reference guide
Milk container
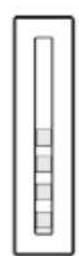
Water filter
Water hardness testing strip
Milk frother
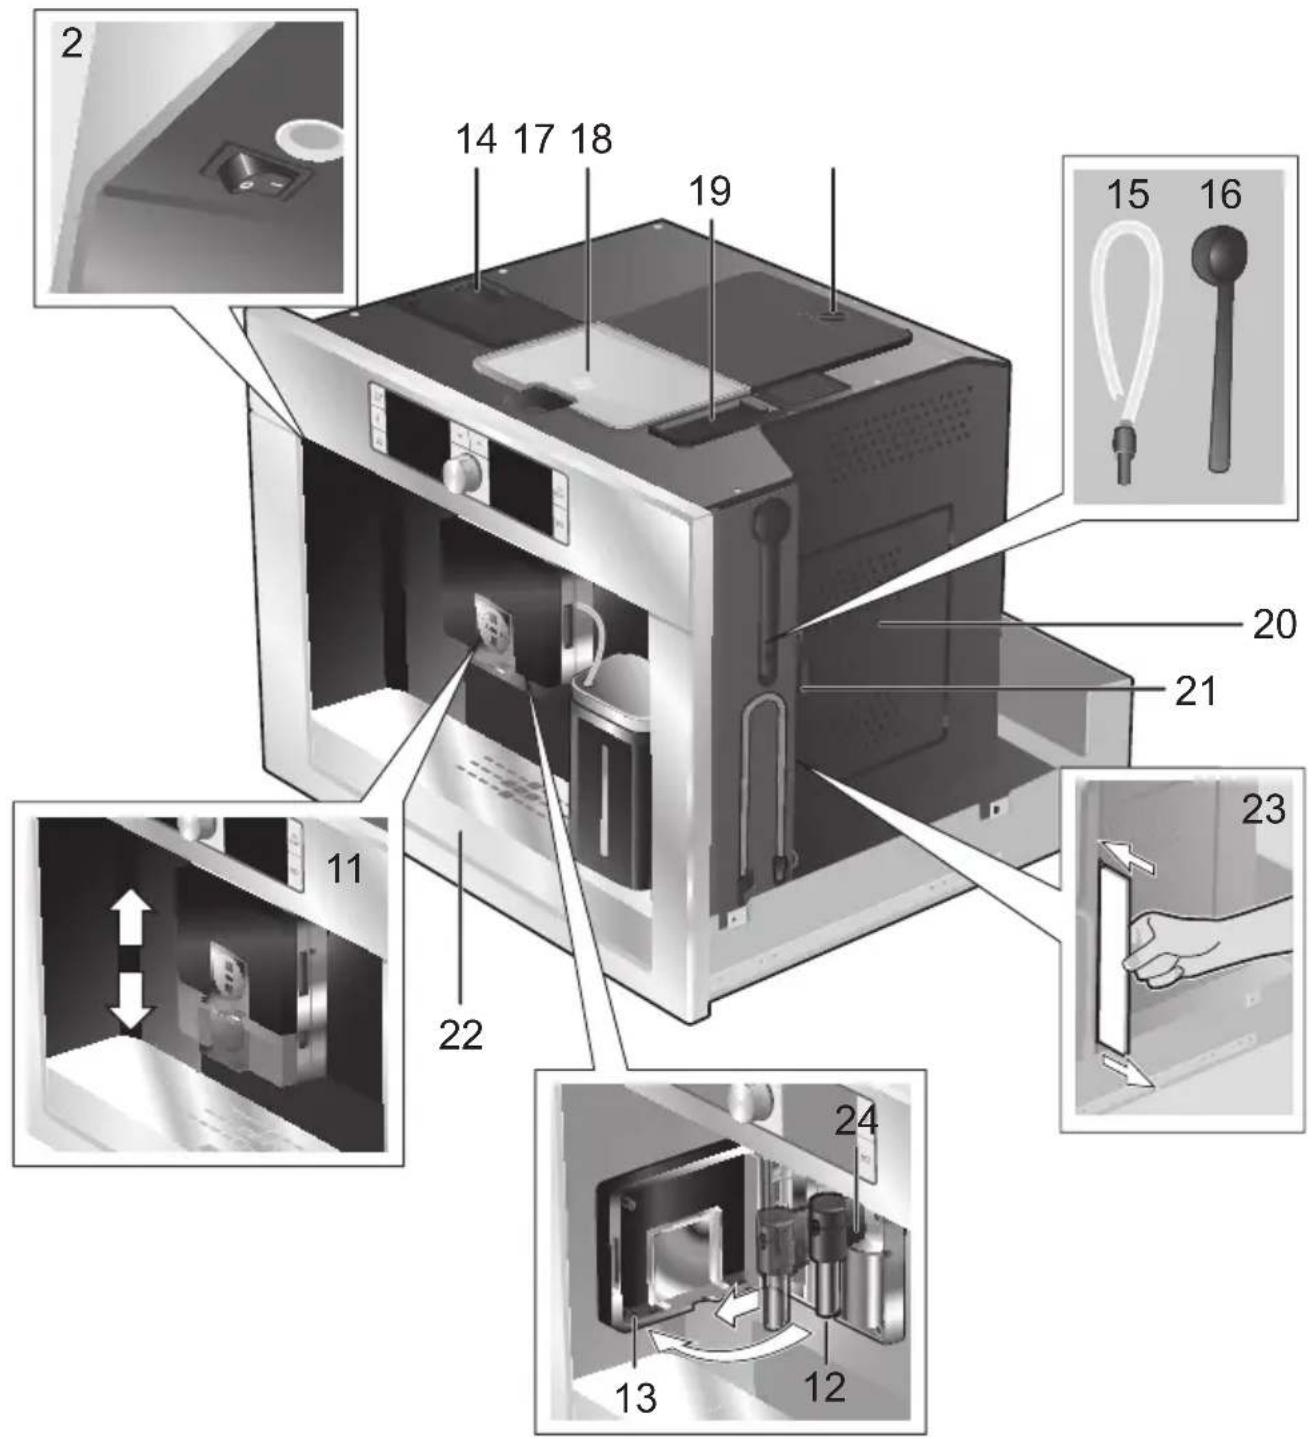
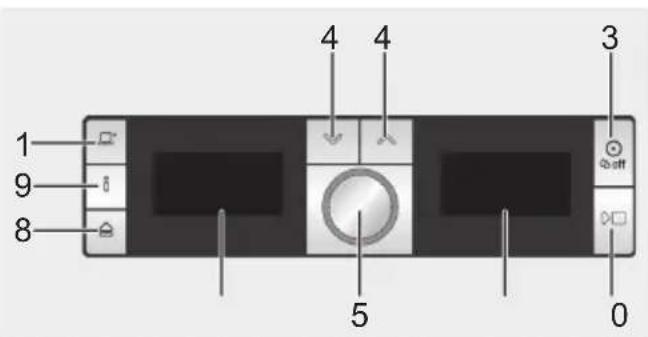
The appliance and its parts
(See illustration on the fold-out front cover of these instructions)
1 ☐+ My coffee button
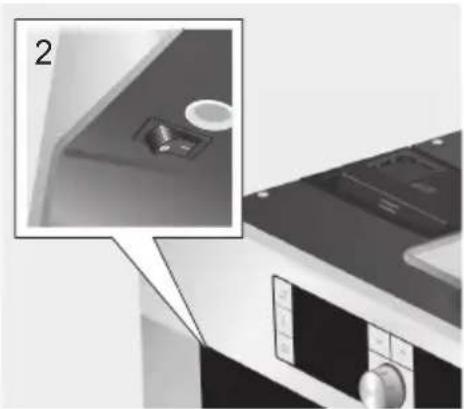
2 Power switch O/I
3 button (rinsing and switching off)
4 Selection buttons ∨ ∧
5 Rotary knob ⚙ for settings on the display
6 Display
7 Symbol display
8 ≅ Deployment button
9 i button (information/settings)
10 □ start/stop button
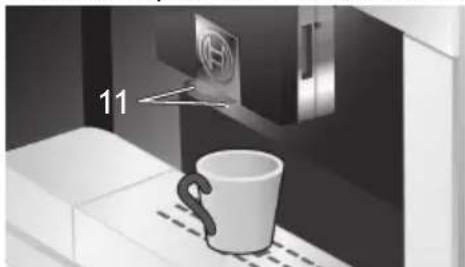
11 Coffee outlet (height-adjustable)
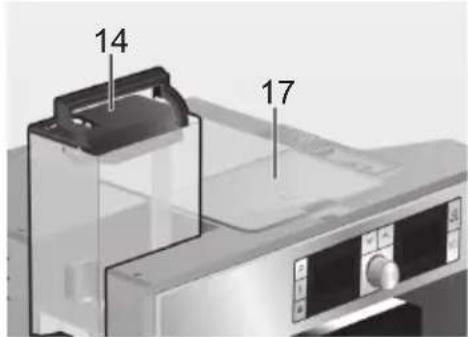
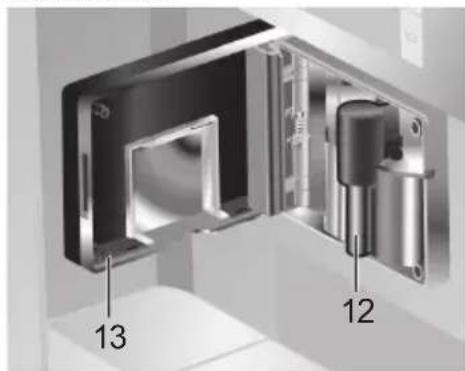
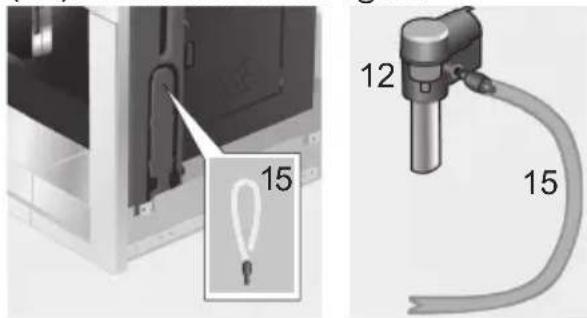
12 Milk frother, removable (for milk/hot water)
13 Cover of coffee outlet/milk frother
14 Removable water tank
15 Milk tube
16 Measuring spoon
17 Bean container with aroma cover
18 Selector for adjusting the grind
19 Drawer (for ground coffee/cleaning tablet)
20 Door to brewing unit
21 Door opener
22 Drip tray unit
23 Quick reference guide
24 Holder for milk frother
25 Brewing unit
a) Lock for brewing unit
b) Button for brewing unit
26 Grate
27 Drip tray
28 Coffee grounds container
29 Drip tray panel
30 Milk container (insulated)
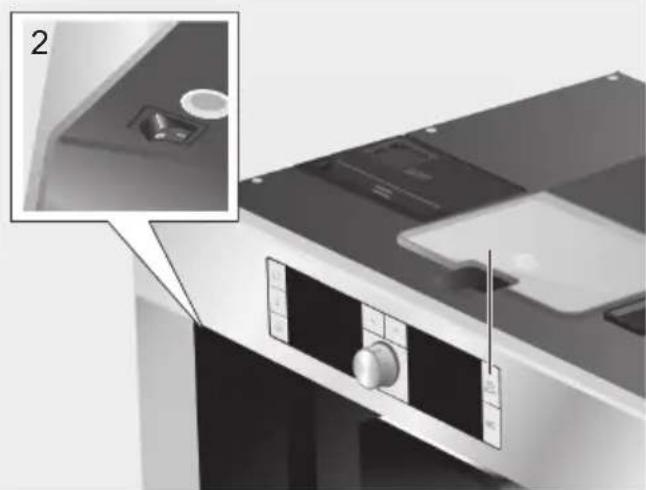
Controls and display
Power switch O/I
The appliance is switched on and off using the power switch O/I (2).
natural_image
Close-up of a kitchen appliance's front panel showing a knob and control panel, with an inset close-up highlighting a component (no text or symbols visible)
Important: Do not press the power switch while the appliance is operating. To activate the rinsing function, switch off the appliance with the button (3) ⊙ (rinsing and switching off) or wait until the appliance automatically switches off (the length of time this takes can be set, see Auto off after in the section “Displaying Settings”). The power switch is automatically set to “0”.
Menu and display
The appliance features user-friendly menu navigation to ensure that operation is as easy as possible while at the same time offering a wide range of functions. It allows you to select from a multitude of options in only a few steps once you know how. The display shows which programme you have selected and lets you know when you need to top up the appliance with water or coffee, or run one of the service programmes. Basic menu operation is described in the following pages.
▶ Rinsing and switching off (3): With this button, the automatic rinsing process is started and the appliance switched off. The rinsing process does not take place if there was no coffee drawn.
▶ v A (4): These buttons are used to navigate upwards and downwards in the display (6).
▶ Rotary knob (5): This is turned to select and change settings in the display (e.g. coffee strength or per-cup quantity).
▶ Display (6): The display uses symbols and texts to indicate settings, ongoing processes and messages.
▶ Symbol display (7): Icons shown in the symbol display give information and prompts in addition to the display text.
▶ Use ≅ (8) to deploy the appliance automatically out of the built-in unit (see “Deployment system”).
▶ i (9): If you press i, information is shown on the display (see “Displaying information”). If you keep i pressed for longer than 3 seconds, you open the settings menu (see “Displaying settings”).
▶ Press ☐ start/stop (10) to start drink preparation or to start a service programme.
Press ☐ start/stop (10) again during drink preparation to stop the dispensing process.
When a button is pressed, a simultaneous audible signal is emitted. This can be switched ON and OFF (see „Displaying settings“).
Display messages
The displays show not only the current operating status, but also various messages that give you status information or let you know when you need to take action. As soon as you have taken the necessary action, the message disappears and the menu for drink selection is displayed again.
Information:
| Display message Symbol Meaning | ||
| Water tank almost empty |  | Water tank must be refilled soon |
| Bean container almost empty |  | Bean container must be refilled soon |
| Insufficient temperature Please wait | Appliance is working; please wait a moment | |
Prompts:
| Display message Symbol What you need to do | ||
| Refill water tank |  | Reill water tank |
| Replace water tank |  | Replace water tank |
| Check water tank Remove water tank and replace correctly | ||
| Replace drip tray |  | Replace drip tray |
| Empty drip tray |  | Empty drip tray and clean |
| Refill bean container | [GCWS] | Refill bean container |
| Set up milk frother Set up milk frother | ||
| Replace brewing unitClose door | Replace brewing unit and close door | |
| Clean brewing unit Clean brewing unit | ||
| Service - change filteri - button 3 sec. | Change water filter | |
| Service - descalei - button 3 sec. | Run “Descaling” service programme | |
| Service - cleani - button 3 sec. | Run “Cleaning” service programme | |
| Service - Calc‘n‘Cleani - button 3 sec. | Run “Calc‘n‘Clean” service programme | |
| Please short rinse the milk system.Press | Rinse milk system | |
| Rinse milk frother before turning off!Press | Rinse milk system | |
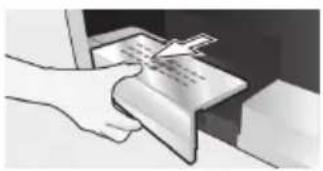
Deployment system
The appliance can be pulled out of the built-in unit. To do this,
▶ press ≅ (8) (appliance must be switched on for this) or
▶ remove grate and pull on the handle underneath which is now accessible:
natural_image
Illustration of a hand holding a document with a pen, no visible text or symbols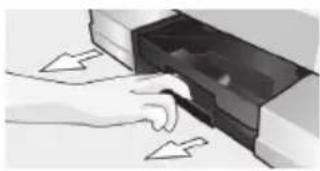
natural_image
Illustration of a hand placing a dark object into a rectangular box with arrows indicating movement (no text or symbols)The appliance now moves into deployment position 1. In this position it can be filled with water, coffee beans, ground coffee and cleaning/descaling tablets, and the accessories on the right of the appliance can be removed.
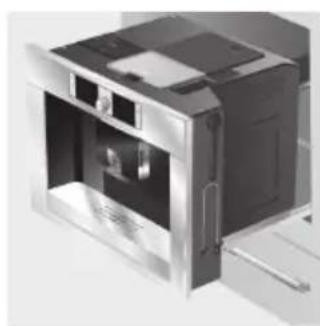
To pull the appliance out fully,
▶ press ≅ (8) again and pull the appliance out by hand into position 2 or
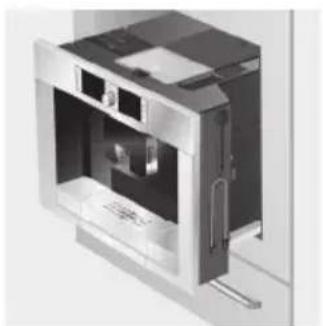
▶ pull the appliance out fully by the handle. In deployment position 2 the brewing unit can be removed and the grinding unit adjusted.
natural_image
3D cutaway view of a stainless steel oven or refrigerator unit (no text or symbols visible)Deployment position 1
natural_image
3D rendering of a stainless steel oven with internal compartments and ventilation slots (no text or symbols visible)Deployment position 2
Then push the appliance back fully into the built-in unit.

During the brewing process, deployment is prevented.
Accessories
The fully automatic espresso machine has special compartments for storing the accessories and quick reference guide (23) with the appliance. These are located on the right side (15, 16) and are accessible when the appliance is pulled out into deployment position 1.
Operation
General
Fill the water tank with fresh, uncarbonated water only, and preferably use only beans for fully automatic coffee and espresso machines. Do not use coffee beans that have been glazed, caramelised or treated with other additives containing sugar, since they will block the brewing unit.
If the appliance is being used for the first time or has not been operated for a long period, the first cup of coffee will not have the full aroma.
When using the espresso machine for the first time, you will achieve a suitably thick and stable “crema” only after the first few cups have been dispensed.
The factory settings of the fully automatic espresso machine are programmed for optimal performance. The appliance switches off automatically after one hour. This setting, like many others, can be changed (see Auto off after under "Displaying settings").

Important: Only use the appliance in frost-free rooms. If the appliance has been transported or stored at temperatures below 0 °C, wait at least 3 hours before operation.
Setting up the appliance
- Deploy the appliance (see "Deployment system").
- Remove the water tank (14) by pulling it upward, rinse and fill it with fresh cold water. Do not fill above the "max" mark.
- Replace the water tank and push it firmly downward into place.

Fill the water tank with fresh water every day. The tank should always contain sufficient water for operating the appliance.
- Fill the bean container (17) with coffee beans (for preparation using pre-ground coffee, see page 44).
- Push the appliance back into the built-in unit.
- Press the power switch (2).
natural_image
Close-up of a kitchen appliance with a highlighted component and a magnified view of the interior (no text or symbols visible)- The appliance now heats up and rinses. Some water will run out of the coffee outlet. The language selection is shown in the display:

- Press the retracted rotary knob (5) and turn it to select the language in which you want the display texts to appear. The following languages can be selected:
Deutsch Português
English Dansk
Русский Norsk
Nederlands Suomi
Français Česky
Italiano Türkçe
Svenska Magyar
Español Ελληνικά
Polski Български
- Press → start/stop (10). The language you selected is saved.
You can change the language setting at any time (see "Displaying settings").
- The company logo and various symbols will first light up in the display, followed by the drinks selection menu.

- Set the water hardness (see "Displaying settings").
Preparing drinks
Drink selection
In the drinks selection menu that is displayed after the appliance is started, you can choose from the following using the (5) rotary knob:

Coffee
2 Coffee
Espresso
2 Espresso
Cappuccino
1/3 espresso + 1/3 milk + 1/3 milk froth; best served in a cup
Latte Macchiato
equal quantities of espresso and milk froth; topped up with milk; best served in a tall glass
White coffee
1/2 coffee + 1/2 milk;
best served in a wide cup
Tea water
Warm milk
Milk froth
Short rinse
In the drink selection (apart from Warm milk and Milk froth) you can use √ and ∧ (4) to select further options, such as the coffee strength and per-cup quantity. The option you have selected is shown in the display. Use the rotary knob Ⓞ (5) to select settings within this option.

Dual grind (AromaDouble Shot)
The longer the coffee is brewed, the more bitter substances and undesired aromas are released. This has a negative effect on the taste and makes the coffee less easily digestible. That's why your fully automatic espresso machine includes a special dual-grind function for the very strong and extra strong strength settings. When half the quantity has been prepared, coffee is ground and brewed again so that only the pleasant, aromatic scents are released.
This function is available for the following beverages:
Coffee (1 cup)
Cappuccino (1 cup)
White coffee (1 cup)
My coffee (1 cup)
Espresso (1 cup, medium and large)
Example
Let's assume you would like a large cup of mild coffee made from coffee beans.
- Place the cup under the coffee outlet (11):

natural_image
Illustration of a coffee mug on a counter with a digital icon and number 11 overlay (no text or symbols on the main subject)- Turn the rotary knob(5) until Coffee appears on the left of the display:

- Press (4) once to get to the per-cup quantity setting. The cup size is shown in the display:
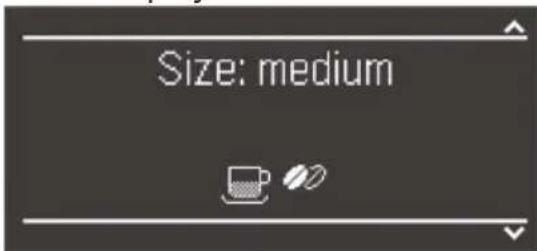
- Now turn the rotary knob (5) to select the Size: large.

- Press♥ (4) again to get to the strength setting. The strength setting is displayed:

- Turn the rotary knob(5) to Strength: mild.

- Press ^10 start/stop (10). The coffee you have selected is prepared. Proceed in the same way to prepare other types of coffee in different strengths and per-cup quantities.

In the case of the strength settings very strong and extra strong, the appliance brews twice in succession. Wait until the procedure is fully completed.
Preparation using preground coffee
This fully automatic espresso machine also offers the option of making coffee with pre-ground coffee. A measuring spoon is included with the appliance.
-
Deploy the appliance and remove the measuring spoon.
-
Open the drawer (19).
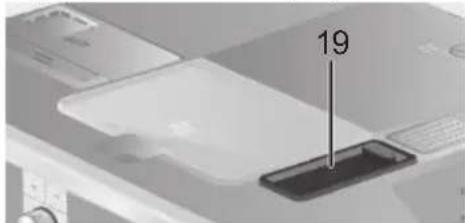
- Pour in no more than two level spoons of ground coffee.

Do not use whole beans or instant coffee.
-
Close the drawer again.
-
Push the appliance back in.
-
Set the required drink and per-cup quantity with the rotary knob (5):

- Place a cup under the coffee outlet (11):
natural_image
Illustration of a coffee mug on a tray with a hand holding a small object above it, no text or symbols present.- Press ▶ start/stop (10).
The coffee is brewed and then dispensed into the cup(s).
For another cup of coffee, pour in more ground coffee and repeat the procedure. If no coffee is taken within 90 seconds, the brewing chamber empties automatically to avoid overfilling. The appliance rinses.
Preparation using milk

For optimal milk froth, use cold milk with a fat content of at least 1.5 % if possible.
- Flip the cover of the milk frother (13) to the left; the milk frother (12) is now accessible:
natural_image
3D diagram of a mechanical assembly with labeled parts (12 and 13), showing internal components without any text or symbols.-
Deploy the appliance (see "Deployment system").
-
Take the milk tube supplied with the appliance and connect it to the attachment point on the milk frother (12). Close the cover again.
-
Push the appliance back in.
-
Place container with milk next to the milk frother. Introduce the milk tube into the container. The notched end of the tube should be fully immersed in the milk.
natural_image
Interior view of a modern coffee machine with a mug and side table (no visible text or symbols)-
Place a cup or glass under the coffee outlet.
-
Select Latte Macchiato, Cappuccino or White coffee by turning the rotary knob. The display shows the selected drink along with the setting for coffee strength and per-cup quantity for this drink:

-
Choose your settings for strength and per-cup quantity.
-
Press start/stop (10). First milk is drawn in, prepared and dispensed into the cup or glass. Immediately after that the coffee is brewed and then runs into the cup or glass.

In the case of the strength settings very strong and extra strong, the appliance brews twice in succession. Wait until the procedure is fully completed.

Dried milk residue is difficult to remove, so clean the milk system immediately after use (see “Cleaning the milk system”).
Two cups at once
- Place two cups under the two coffee outlets left and right:
natural_image
Interior kitchen scene with two mugs on a tray, no visible text or symbols-
Select 2 Espresso or 2 Coffee with the rotary knob (5).
-
Set the required amount and strength using the √ (4) button and the (5) rotary knob.
-
Press☐ start/stop (10). Coffee is dispensed into the two cups.

The appliance brews twice in succession; wait for the complete process to finish.
My coffee □+
The My coffee setting allows you to define the exact mix of coffee and frothed milk that suits your own individual taste.
- Connect the milk tube to the milk frother (see "Preparation using milk").
- Place container with milk on the grate. Introduce the milk tube into the container. The notched end of the tube should be fully immersed in the milk.
natural_image
Interior view of a modern kitchen appliance showing a coffee mug, sink, and appliances (no text or symbols visible)-
Place a cup under the coffee outlet (11).
-
Press □ My coffee:

- Set the required memory location with the rotary knob (5). Four locations from 1-4 are available.

- Press ∨ (4) to continue to the per-cup quantity selection (size). Turn the rotary knob (5) to set the required size (small, medium, large):

- Press ∨ (4) to continue to the coffee strength. Turn the rotary knob ●(5) to set the required strength to ⚡mild, ⚡ regular, ⚡ strong, ⚡ strong or ⚡ extra strong:

- Press ∨ (4) to switch to selection of the coffee/milk ratio. Set the required mix by turning the rotary knob ●(5) in 20% steps. about 20 % □about 40 % □about 60 % | about●● 80 % ●●●●

- Press → start/stop (10); the drink is prepared in the required coffee/milk ratio.

The changes you have made are saved automatically. It is not necessary to confirm them additionally. To exit the menu without dispensing a drink, press ☐+ My coffee again.
Preparing milk froth and warm milk

Risk of burns!
The milk frother (12) gets very hot. After use, allow to cool
down first before touching.

For optimal milk froth quality, use cold milk with a fat content of at least 1.5 % if possible.
- Take the milk tube and connect it to the milk frother (see "Preparation using milk").
- Place a cup or glass under the outlet of the milk frother (12).
- Select the required Milk froth or Warm milk setting by turning the rotary knob (5):

- Press☐ start/stop (10).
Milk froth or warm milk runs out of the milk frother outlet (takes about 40 or 60 seconds respectively).
Press ☐ start/stop (10) again to cut the process short.

The appliance may make a whistling noise when warm milk is being prepared. This is caused by the milk frother (12) for technical reasons.

Dried milk residue is difficult to remove, so clean the milk frother immediately after use (see “Cleaning the milk system”).
Dispensing tea water
Risk of burns!
The milk frother (12), from which the tea water flows, gets very
hot. After use, allow to cool down first before touching.
The appliance can also be used to prepare tea.
- Place a cup or glass under the coffee outlet.
- Select Tea water with the rotary knob (5):

- Press (4) to switch to the temperature selection. Set the required temperature with the rotary knob (5):

- Press □ start/stop (10).
Hot water runs out of the milk frother outlet for about 40 seconds.
Press ☐ start/stop (10) again to cut the process short.

Warm up cups before use, especially small, thick espresso cups, with the hot water.
Information and settings
Use k (9) to display information (press briefly) and adjust settings (hold down for at least three seconds).
Displaying information
In the Info menu (press i (9) briefly) you can call up the following information:
▶ when it is necessary to descale the appliance
▶ when it is necessary to clean the appliance
▶ when it is necessary to change the filter
▶ how much coffee has been dispensed since the appliance was first put into operation
▶ how many milk drinks have been dispensed
▶ how much tea water has been prepared
Displaying settings
Hold down i (9) for at least 3 seconds; the different setting options are then displayed:

Turn the rotary knob (5) to switch between the different setting options. The currently active setting is always shown in the display with brackets. You can change the setting that is currently displayed by pressing the arrow button (4). The brackets show the new option, e.g. English. Now select the new setting with the rotary knob. To exit the menu, press (9) again.

The changes you have made are saved automatically. It is not necessary to confirm them additionally.
The following setting options are available to you:
- Language: Press the arrow button. Turn the knob to select the display language.
- Per-cup quantities: The per-cup quantity can be set separately for each type of drink and each cup size (see “Set per-cup quantity”).
- Descaling program: If you want to descale the appliance, press start/stop (10) and run the descaling programme (see “Descaling”).
-
Cleaning program: If you want to clean the appliance, press 📄 start/stop (10) and run the cleaning programme (see "Cleaning").
-
Calc'n'Clean: If you want to descale and clean the appliance at the same time, press start/stop (10) and run the Calc'n'Clean programme (see "Calc'n'Clean").
- Water hardness: Press the arrow button . Turn the knob to select the required water hardness (1, 2, 3 or 4) (refer also to "Checking and setting the water hardness").
- Coffee temperature: Press the arrow button ∨. Turn the knob to set the coffee temperature.
- Auto off after: Press the arrow button. Turn the rotary knob to enter the time span after which the appliance should automatically switch off following the last drink preparation. A time between 5 minutes and 8 hours can be set. The default time is one hour, but this can be shortened to save energy.
- Illumination: Press the arrow button . The lighting can be set to Off, On (factory setting) or Off after 5 min.
- Tone: Press the arrow button. The audible signal you hear when a button is pressed can be switched OFF or ON by turning the rotary knob.
- Contrast: Press the arrow button. The display contrast can be set from -20 to +20 with the rotary knob. The default setting is 0.
-
Water filter: Each time a new water filter is inserted in the water tank (14), it must be rinsed:
-
Place the water filter in the water tank (14) and fill the tank with water up to the "max" mark.
-
Press the arrow button
[ Start with ☐ ]
and press ☐ start/stop (10).
-
Place a container with a capacity of 0.5 litres under the milk frother (12).
-
Press start/stop (10). Water will now run first through the filter to rinse it and then into the container.
Empty the container. The appliance is ready to use once more.
Rinsing the filter simultaneously activates the setting for the Service – change filter display.
The filter is no longer effective when the Service – change filter display appears, or at the latest after two months. It needs to be replaced for reasons of hygiene and so that there is no build-up of limescale (this could damage the appliance).
Replacement filters can be obtained from retailers or customer service (see "Accessories").
After every filter change the filter must first be rinsed. Proceed as described at the beginning of this section.
If no new filter is used, turn the water filter setting to Off.

You can find detailed information about the water filter in the enclosed filter instructions.

If the appliance has not been used for a prolonged period (e.g. during your vacation) the filter should be rinsed before the appliance is used again. To do this, simply dispense a cup of hot water.
- factory settings: You can cancel your own settings and reset the factory settings. To activate the factory settings, press 📄 start/ stop (10).
Set per-cup quantity
The per-cup quantity can be adjusted individually to suit your cups. It can be set separately for each type of drink and each cup size.
- To call up the default settings, keep depressed for at least 3 seconds.
- Select Per-cup quantities with the rotary knob.
- Press V.
- Select the type of beverage with the rotary knob
- Press v .
- Select the cup size with the rotary knob
- Press v .
- Adjust the beverage quantity with the rotary knob
A returns you to cup size and drink selection. To quit the default settings, press i. The settings are stored.

Important: The selected amount in ml is an approximate value and can vary significantly as a result of crema forming, the grind setting or the type of milk used, etc.
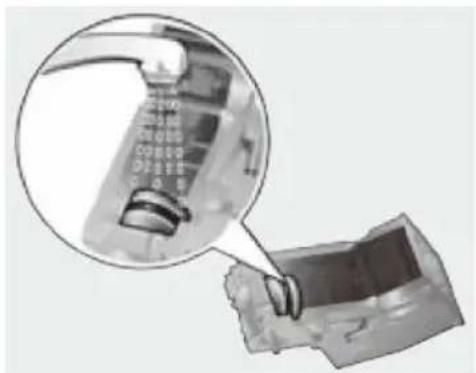
Adjusting the grinding unit
The rotary selector (18) on the top of the appliance adjusts the degree of grinding from coarse to fine as required.

natural_image
Close-up of a smartphone with a display screen showing the number 18 (no readable text or symbols beyond the number)
Warning: Adjust the grinding unit only while it is running. Otherwise the appliance may be damaged.
- Deploy the appliance fully (see "Deployment system").
- In the drink selection menu, select Espresso.
- Press □ start/stop (10).
- While the grinding unit is running, adjust the rotary selector (18) from fine ■ to coarse & or back as required.

The new setting will not become apparent until after the second cup of coffee.

For dark roast coffee beans, choose a finer grind, for lighter beans a coarser grind.
Checking the water hardness
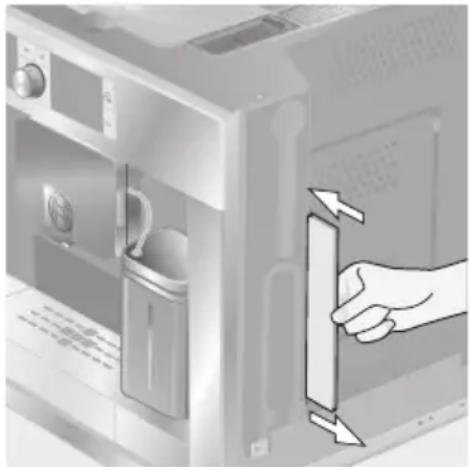
The water hardness setting can be adjusted on this appliance. It is important to set the water hardness correctly, so that the appliance indicates accurately when the descaling programme should be run. The factory setting for the water hardness is 4. You can check the water hardness using the enclosed test strip or by asking your local water supplier.
Dip the test strip briefly in water, gently shake off any drips, and check the result after one minute.
Water hardness levels and settings:
| Level | Water hardness | |
| German (°dH) | French (°fH) | |
| 1 | 1-7 | 1-13 |
| 2 | 8-14 | 14-25 |
| 3 | 15-21 | 26-38 |
| 4 | 22-30 | 39-54 |
Tips on energy saving
The fully automatic espresso machine switches off automatically after one hour (factory setting). The default time of one hour can be shortened (see Auto off after under “Displaying settings”).
▶ If the appliance is not being used, switch it off at the power switch.
If possible, do not interrupt coffee or milk froth dispensing. Stopping a process prematurely results in higher energy consumption and the drip tray fills up more quickly.
▶ Always descale the appliance when Service – descale is displayed (see “Descaling”) to avoid a build-up of limescale. Limescale residue results in higher energy consumption.
Daily maintenance and cleaning
Risk of electric shock! Before cleaning the appliance, switch it off at the power switch.
Do not use a steam cleaner.
Daily maintenance
- Wipe the outside of the appliance with a soft, damp cloth. Do not use abrasive cloths or cleaning agents.
- Always remove any limescale, coffee, milk or descaling fluid residue immediately. Such residue can cause corrosion.
- Do not use alcohol-based or spirit-based cleaning agents on the high-gloss surfaces.
- Rinse out the water tank (14) with water only.
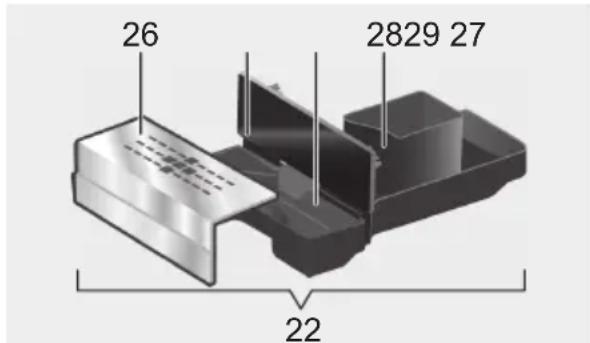
- Take off the grate (26). Pull out the drip tray (27). Take off the drip tray panel (29). Empty out any water and coffee grinds (28). Clean the drip tray or put it in the dishwasher. Do not put the grate (26) or the drip tray panel (29) in the dish washer.
-
The lid and the insulating cover of the milk container should only be wiped gently with a damp cloth. Do not put them in the dish washer.
-
Wipe out the inside of the tray holders.
- Clean the milk frother (procedure described below).
- Replace all the parts again.

Important: Drip tray for coffee outlet (27) and coffee grounds container (28) should be emptied and cleaned daily to prevent mould from developing.

If the appliance is switched off using the button (3) ☉(rinsing and switching off) or it switches off in accordance with the “Auto off after” settings, the rinsing process will automatically take place. In other words the pipework inside the appliance is cleaned by the machine itself.

Important: If the appliance has not been used for a prolonged period of time (e.g. after a vacation), clean the entire appliance thoroughly, including the milk system and brew-ing unit.
Cleaning the milk system

Risk of burns! The milk frother (12) gets very hot. After use, allow to cool down first before
touching.
The message
Please short rinse the milk system.
Press ☐ appears
- if cleaning has not been performed after use
- if the appliance has just switched off automatically and it was not cleaned beforehand.
If this message appears, start with Step 2 under “Short rinse for milk system”.
Clean the milk system immediately after use.
Short rinse for milk system:
- In the menu for drink selection, select Short rinse and press 📄 start/stop (10).
- Place a cup under the milk frother (12) and the end of the milk tube in the cup.
- Press ☐ start/stop (10). The appliance now fills the cup automatically with water and draws it in again through the milk tube for rinsing. The rinse procedure takes about 1 minute.
- Empty the cup and clean the milk tube.

All the parts can also be put in the dishwasher.
Cleaning the milk system:
- Dismantle the milk frother for cleaning. To do this, open the cover (13), grasp the milk frother (12) and pull it out forward:
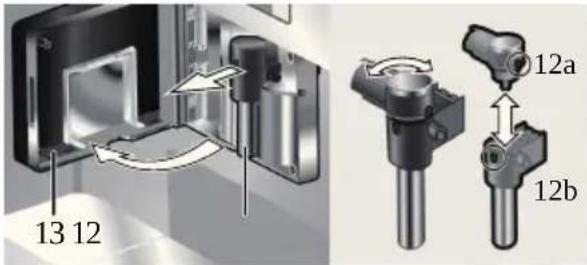
- Clean the holder of the milk frother (24) with a soft cloth.
- Turn the upper part (12a) in an anti-clock-wise direction and remove from the lower part (12b).
- Clean individual parts with detergent solution and a soft cloth or put them into the dishwasher (cutlery basket).
- Put all the parts back together, making sure the markings are overlapping. The milk frother can then be clicked back into place in the appliance.
natural_image
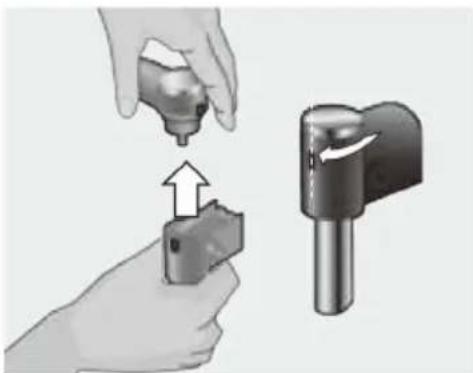
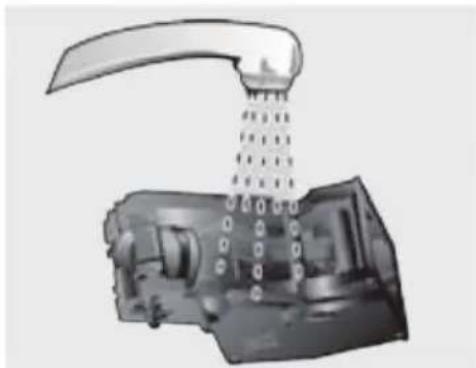
Illustration of a hand holding a small mechanical component with an arrow indicating upward motion, next to a metallic cylindrical device (no text or symbols present)Cleaning the brewing unit
In addition to the automatic cleaning programme, the brewing unit should be removed regularly for cleaning.

Warning: Clean the brewing unit without detergent and do not put it in the dishwasher.
- Deploy the appliance fully (see Deployment system").
- Switch off the appliance using the button (3) ⊙ (rinsing and switching off).
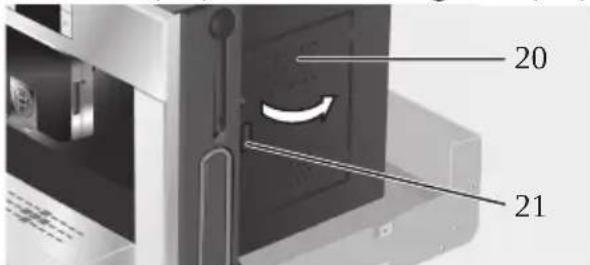
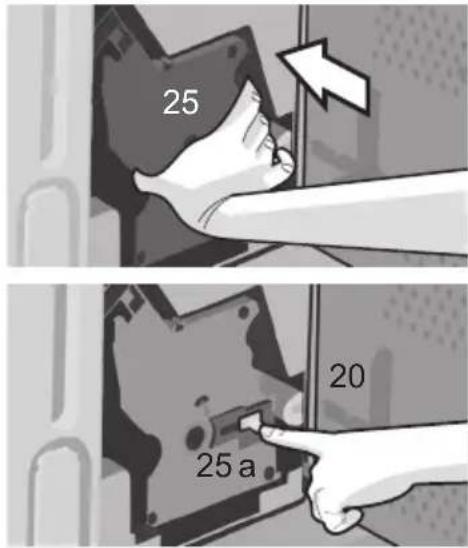
- Grasp the door opener (21) and open the door (20) to the brewing unit (25):
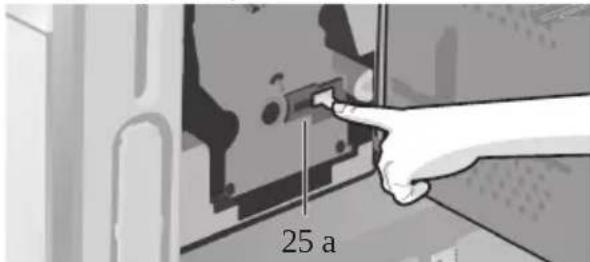
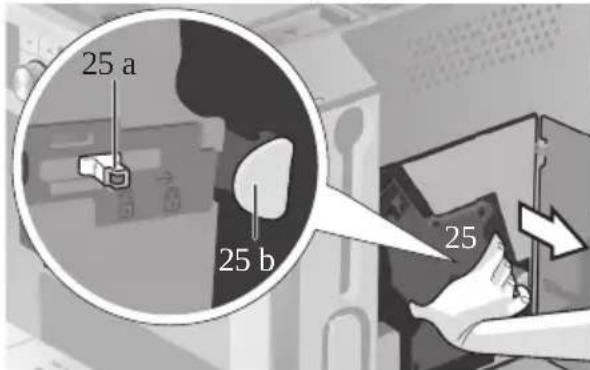
- Slide the red lock (25a) on the brewing unit completely forward:
- Press the red button (25b), grasp the brewing unit (25) by the recessed grips and remove carefully.
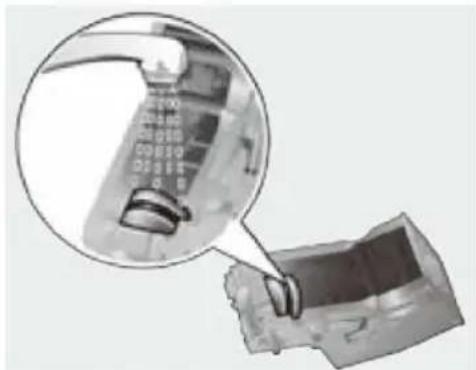
- Rinse the brewing unit (25) thoroughly under running water.
natural_image
Mechanical assembly diagram showing a tool interacting with a mechanical component (no text or symbols visible)- Hold the brewing unit sieve under the running water.
natural_image
Close-up of a hand holding a mechanical component, with a magnified inset showing internal components (no visible text or symbols)-
Wipe out the inside of the appliance thoroughly with a damp cloth and remove any coffee residues.
-
Allow the brewing unit and the inside of the appliance to dry.
-
Reinsert the brewing unit (25) fully into the appliance. Slide the red lock (25a) back fully and close the door (20).
Service programmes
At certain intervals, depending on how the appliance is used, the display will show one of the following texts instead of the coffee selection:
Service - change filter
8 - button 3 sec.
Service -
clean
8 - button 3 sec.
Service - descale
8 - button 3 sec.
Service - Calc'n'Clean
i - button 3 sec.
Then the water filter should be changed immediately or the appliance cleaned or descaled using the corresponding programme (described on the next pages). Otherwise the appliance may be damaged.

The service programmes can also be started manually in the settings menu (see “Displaying settings”).
Do not drink the liquids. Never use vinegar, vinegar-based products, citric acid or citric acid-based products for descaling. For cleaning and descaling only use the tablets intended for such. They were specially developed for this fully automatic espresso machine, and replacements are available from retailers or customer service (see “Accessories”).
Never put descaling tablets or any other descaling agents in the drawer for ground coffee/cleaning tablets.
Never interrupt the service programme. If one of the service programmes is interrupted, e.g. by a power cut, proceed as follows:
- Rinse the water tank (14) and refill it with fresh water up to the “max” mark.
- Press start/stop (10). The cleaning programme will now run for about three minutes.
Cleaning
The appliance is ready for use again.
Descaling

Important: If there is a filter in the water tank (14), it needs to be removed before the service programme is run and should only be replaced once the programme is finished.
If the prompt Service — descale is displayed, press and hold down i (9) for at least three seconds. The display shows: Descaling program Start with K or
To start without the prompt (see
"Displaying Settings") press and hold down (9) for at least three seconds and select
Descaling program Start with ☐
Press 📄 start/stop (10). The display will guide you through the programme.
Empty drip tray
Empty the drip tray (22).
Replace drip tray
Replace the drip tray.

If the milk frother is not inserted, the following message is displayed:
Set up milk frother
Insert the milk frother (12)
Place container under milk frother Press
Place a container with a capacity of 0.5 litres under the milk frother (12). Press ☐ start/stop (10).

The coffee grounds container (28) can also be used. To avoid spluttering, push the coffee outlet (11) down fully.

If the water filter is activated, the following message is displayed:
Remove filter
Press
Remove the water filter and press √start/stop (10).
Add 0.5 l water and descaler
Press □□
Pour lukewarm water into the empty water tank (14) up to the calc (0.5 litre) mark and dissolve two descaling tablets in it. Press → start/stop (10). The descaling programme now runs for about 24 minutes:
Descaling

If there is not enough descaling fluid in the water tank, the following message is displayed:
Not enough descaling fluid
Refill fluid Press
Pour lukewarm water into the empty water tank (14) up to the calc (0.5 litre) mark and dissolve two descaling tablets in it. Press □ start/stop (10). The descaling programme will continue.
Clean and refill water tank
Press
Rinse the water tank and refill it with fresh water up to the “max” mark.
Press ☐ start/stop (10). The descaling programme will now run for about 1 minute:
Descaling
Empty drip tray
Empty the drip tray.
Replace drip tray
Replace the drip tray.
Replace the filter if one is being used.
The appliance is ready for use again.

Important: Wipe down the appliance using a soft, damp cloth to immediately remove any descaler residue. Such residue can cause corrosion. New sponge cloths may contain salts. Salts can cause rust film on stainless steel and must therefore be washed out thoroughly before use.
Cleaning
If the prompt Service – clean is displayed, press and hold down i (9) for at least three seconds. The display shows:
Cleaning program Start with
or
To start without the prompt (see
„Displaying Settings“) press and hold down i (9) for at least three seconds and select
Cleaning program Start with ☐
Press 📄 start/stop (10). The display will guide you through the programme.
Empty drip tray
Empty the drip tray (22).
Replace drip tray
Replace the drip tray.
Cleaning
Open drawer
Deploy the appliance and open the drawer (19).
Insert cleaning tablet! Close drawer!
Drop a cleaning tablet in the drawer and close the drawer again. The cleaning programme will now run for about 1 minute.
Press □
Press 📄 start/stop (10). The cleaning programme will now run for about 7 minutes.
Cleaning
Empty drip tray
Empty the drip tray.
Replace drip tray
Replace the drip tray.
The appliance is ready for use again.
Calc'n'Clean

Important: If there is a filter in the water tank (14), it needs to be removed before the service programme is run and should only be replaced once the programme is finished.
Calc'n'Clean combines the separate functions of descaling and cleaning. If the two programmes are both due to run soon, the fully automatic espresso machine suggests this service programme automatically.
If the prompt Service – Calc'n'Clean is displayed, press and hold down i (9) for at least three seconds. The display shows:
Calc'n'Clean
Start with ☐
or
To start without the prompt (see
„Displaying Settings“) press and hold down i (9) for at least three seconds and select
Calc'n'Clean Start with
Press 📄 start/stop (10). The display will guide you through the programme.
Empty drip tray
Empty the drip tray (22).
Replace drip tray
Replace the drip tray.

If the milk frother is not inserted, the following message is displayed:
Set up milk frother
Insert the milk frother (12)
Place container under milk frother
Press
Place a container with a capacity of at least one litre under the milk frother (12). Press ☐ start/stop (10). The appliance rinses twice.

The coffee grounds container (28) can also be used. To avoid spluttering, push the coffee outlet (11) down fully.
Cleaning
Open drawer
Deploy the appliance and open the drawer (19).
Insert cleaning tablet!
Close drawer!
Drop a cleaning tablet in the drawer and close the drawer again. The cleaning programme will now run for about 1 minute.

If the water filter is activated, the following message is displayed:
Remove filter
Press
Remove the water filter and press start/stop (10).
Add 0.5 l water and descaler
Press
Pour lukewarm water into the empty water tank (14) up to the calc (0.5 litre) mark and dissolve two descaling tablets in it. Press ☐ start/stop (10).
The descaling programme now runs for about 24 minutes:
Descaling

If there is not enough descaling fluid in the water tank, the following message is displayed:
Not enough descaling fluid
Refill fluid Press
Pour lukewarm water into the empty water tank (14) up to the calc (0.5 litre) mark and dissolve two descaling tablets in it. Press start/stop (10). The descaling programme will continue.
Clean and refill water tank
Press ☐
Rinse the water tank and refill it with fresh water up to the "max" mark. Press ☐ start/stop (10).
The descaling programme will now run for about 1 minute:
Descaling
The cleaning programme then runs for about 6 minutes and rinses the appliance:
Cleaning
Empty drip tray
Empty the drip tray.
Replace drip tray
Replace the drip tray.
Replace the filter if one is being used.
The appliance is ready for use again.

Important: Wipe down the appliance using a soft, damp cloth to immediately remove any descaler residue. Such residue can cause corrosion. New sponge cloths may contain salts. Salts can cause rust film on stainless steel and must therefore be washed out thoroughly before use.
Accessories, storage, disposal, guarantee
Accessories
The following accessories are available from retailers or customer service:
| Accessories Ordering numberRetail Customer service | |
| Cleaning tablets | TCZ6001 310575 |
| Descaling tablets | TCZ6002 310967 |
Water filter TCZ7003 467873
Storage
To avoid frost damage during transport and storage, the appliance must be completely emptied first.

Before emptying it as follows, the appliance must be ready for use and the water tank (14) filled.
- Place a large, narrow receptacle under the milk frother (12).
- Select the Milk froth setting on the display, press ☐ start/stop (10) and release steam for about 15 seconds.

- Switch the appliance off at the power switch O/I (2).
- Empty the water tank (14) and the drip tray (22).
Guarantee
The guarantee conditions for this appliance are as defined by our representative in the country in which it is sold. Details regarding these conditions can be obtained from the dealer from whom the appliance was purchased. The bill of sale or receipt must be produced when making any claim under the terms of this guarantee.
Right of modification reserved.
Disposal
This appliance is labelled in accordance with the European Directive 2002/96/EG relating to waste electrical and electronic equipment – WEEE. The directive provides the framework for the EU-wide take-back and disposal of end-of-life appliances. Please ask your specialist retailer about current disposal facilities.
Simple troubleshooting
| Problem Cause Solution | ||
| Display showsRefill bean containeralthough the bean containeris full, the appliance doesnot grind the coffee beans. | Beans are not falling intothe grinding unit (beans too oily). | Change the type of coffeeif necessary. Wipe out theempty bean container with a dry cloth. |
| No tea water dispensed. The milk frother or its holder is blocked. | Clean the milk frother or itsholder (see “Cleaning themilk system”). | |
| Milk froth insufficient or toorunny.The milk frother does notdraw the milk in. | The milk frother or its holderis blocked. | Clean the milk frother or itsholder (see “Cleaning themilk system”). |
| Milk unsuitable for frothing. Use low-fat milk (1.5 % fat). | ||
| The milk frother (12) is notcorrectly assembled. | Wet the milk frother partsand press together firmly. | |
| Build-up of limescale in theappliance. | Descale the applianceusing two descaling tablets,if necessary repeat theprocedure. | |
| Coffee dispensing slows to atrickle or stops completely. | Coffee is ground too finely.Pre-ground coffee is too fine. | Adjust the grinding unit to acoarser setting. Use coarserpre-ground coffee. |
| Build-up of limescale in theappliance. | Descale the appliance. | |
| Coffee has no “crema”(creamy foam). | Unsuitable type of coffee. Use a type of coffee with ahigher proportion of robustabeans. | |
| The beans are no longerfresh. | Use fresh beans. | |
| The grinding setting is notsuitable for the beans. | Adjust the grinding setting tofine. | |
| Coffee is too “acidic”. The grinding setting is toocoarse or the pre-groundcoffee is too coarse. | Adjust the grinding unit to afiner setting or use finer pre-ground coffee. | |
| Coffee is too “bitter”. The grinding setting is toofine or the pre-ground coffeeis too fine. | Adjust the grinding unit toa coarser setting or usecoarser pre-ground coffee. | |
Simple troubleshooting
| Problem Cause Solution | ||
| Display showsErrorPlease contact hotline | The appliance has a fault. Call the hotline (see rear cover). | |
| The water filter does not stay in position in the water tank. | The water filter is not mounted correctly. | Firmly press the water filter straight down into the tank connection. |
| The coffee grounds are not compact and are too wet. | The grinding setting is too fine or too coarse, or not enough ground coffee has been used. | Adjust the grinding unit to a coarser or finer setting, or use 2 level measuring spoons of ground coffee. |
| Display showsClean brewing unit | Brewing unit has a build up of coffee residue | Clean brewing unit. |
| Too much pre-ground coffee in the brewing unit. | Clean brewing unit.(Pour in no more than 2 level measuring spoons of ground coffee). | |
| The brewing unit's mechanism is stiff. | Clean brewing unit (see “Daily maintenance and cleaning”). | |
| Coffee or milk froth quality varies considerably. | Build-up of limescale in the appliance. | Descale the appliance with two descaling tablets as described in the instructions. |
| Water dripped onto the inner floor of the appliance when the drip tray was removed. | Drip tray removed too early. | Wait a few seconds after the last drink was dispensed before removing the drip tray. |
If you are unable to solve the problem, do not try to find the fault yourself or dismantle the appliance or repair it yourself. Call the hotline (see rear cover).
Technical data
Power connection (voltage/frequency) 220-240 V / 50-60 Hz
| Heater wattage 1700 W | |
| Maximum static pump pressure 19 bar | |
| Maximum water tank capacity (without filter) 2.5 liters | |
| Maximum capacity of the coffee bean container 1000 grams | |
| Length of power cable 150 cm | |
| Dimensions (H x W x D) 454 x 594 x 535 mm | |
| Weight, empty | 25.9 kg |
| Type of grinding unit | Ceramic |
服务热线Ho@Service-Hotlines
www.bosch-home.com
| AE | 04 803 0500 | SE | 0771 11 22 77 |
| AL | 066 206 47 94 | SK | 02 444 520 41 |
| AT | 0810 700 400 | SL | 01 200 70 17 |
| AU | 1300 368 339 | TR | 444 6333 |
| BA | 033 213 513 | Çağrı merkezini sabit hatlardan aramanşehir içi ücretlendirme, Cep telefonla kullanılan tarifeye göre değişkenlik gi | |
| BE | 070 222 141 | ||
| BG | 02 931 50 62 | US | 800 94 2904 toll free |
| CH | 043 455 4095 | XK | 044 172 309 |
| CN | 400 885 5888 | XS | 011 21 39 552 |
通话费用取决于所使用的电信网络
CZ 0251 095 546
DE 0911 70 440 040
DK 44 89 89 85
EE 0627 8730 / 0651 2214
ES 902 245 255
FI 020 7510 700
Lankapuhelimesta 8,28 snt/puhelu + 7 snt/min (al v 23%)
Mat kapuhel i mesta 8,28 snt / puhelu + 17 snt / min (al v 23%)
FR 0140 10 1100
GB 0844 892 8979
Calls from a BT landline will be charged at up to 3 pence per minute.
A call set-up fee of up to 6 pence may apply
GR 18 182 (αστική χρέωση)
HR 01 3028 226
HU 01 489 5461
IE 01450 2655
IL 08 9777 222
IS 0520 3000
LI 05 274 1788
LU 26 349 300
LV 067 425 232
ME 050 432 575
MK 02 2454 600
NL 088 424 4010
NO 22 66 06 00
PL 801 191 534
PT 21 4250 730
RO 021 203 9748
RU 8 800 200 29 61
服务中心
| DE Deutschland, German AU Australia | CH Schweiz, Suisse, | |
| BSH Hausgeräte Service BShb Home Appliances Pty. Svdzzera, Switzerland | ||
| Zentral werkstatt für 7-9 Arco Lane BSH Hausgeräte AG | ||
| kleine Hausgeräte HEATHERTON, Victoria 320er skundendienst | ||
| Trautskirchener Strasse Te6-8 1300 368 339 f ü r Hausgeräte | ||
| 90431 Nürnberg mail to: bshau-as@bshg.cfahrweidstrasse 80 | ||
| Online Auftragsstatus, www.bosch-home.com.au 8954 Geroldswil | ||
| Service für Kaffeevoll automaten mail to: ch-info.hausgeraet | ||
| und viele weitere Infos unter Bosna i Hercegovina | ||
| www.bosch-home.de Bosnia-Herzegovina | ||
| "HI GH" d.o.o. Service Tel.: 0848 840 04 | ||
| Reparaturservice, Ersatztelačka 29b Service Fax: 0848 840 041 | ||
| Zubehör, Produkt-Information Sarajevo mail to: ch-reparatur@bshg. | ||
| Tel.: 0911 70 440 040 Info-Line: 061 100 905 Ersatzteile Tel.: 0848 88 | ||
| mail to: cp-servicecenter F@bshg.330a213 513 Ersatzteile Fax: 0848 880 | ||
| Wir sind an 365 Tagen rund umail to: ch-ersatzteil @bshg | ||
| erreichbar. mail to: ch-ersatzteil @bshg | ||
| AE United Arab Emirate BE Belgi que, België, Belgium | ||
| الإمارات العربية المتحدة BSH Home Appliances S.ACY Cyprus, Купроç | ||
| BSH Home Appliances FZE Avenue du Laerbeek 74 BSH Ikiakes Syskeves-Serv | ||
| Round About 13, Laarbeeklaan 74 39, Arh. Makaariou III St | ||
| Plot Nr MO-0532A 1090 Bruxelles - Brusse 2407 Egomi / Nikosia (Lefko | ||
| Jebel Ali Free Zone - Dubai Tel.: 070 222 141 Tel.: 77 77 807 | ||
| Tel.: 04 881 4401 Fax: 024 757 291 Fax: 022 658 128 | ||
| mail to: service-uae@bshg.com mail to: bru-repairs@bshg.com mail to: bsh.service.cyprus | ||
| www.bosch-home.com/ae www.bosch-home.be cytanet.com.cy | ||
| AL Republika e Shqi per se BG Bulgaria CZ Česká Republika, Albania BSH Domakinski Uredi Czech Republic | ||
| AERTECH SH.P.K. Bulgaria EOOD BSH domácí spotřebiče s.r.c | ||
| Rruga Qemal Stafa 115K Tsarigradsko Firemní servis domácích | ||
| Pallati i ri per ball Prokurorise Spotřebičů | ||
| Pergjithshme European Trade Center Pekařská 10b | ||
| Hyrja C Kati 10 Building, 5th floor 155 00 Praha 5 | ||
| Tirana 1784 Sofia Tel.: 0251 095 546 | ||
| Tel.: 066 206 47 94 Fax: 02 878 79 72 www.bosch-home.com/cz | ||
| mail to: g.volina@aertech mail to: informacia.servis-bq@ | ||
| AT Österreich, Austria bshg.com www.bosch.home.bg DK Danmark, Denmark | ||
| BSH Hausgeräte www.bosch.home.bg BSH Hvidevarer A/S | ||
| Gesellschaft mbH BH Bahra بارير 4 Telegrafvej 4 | ||
| Werkskundendienst Khalai Fat Company 2750 Ballerup | ||
| für Hausgeräte Manama Tel.: 44 89 89 85 Fax: 44 89 89 86 | ||
| Quellenstrasse 2 Tel.: 01 7400 553 mail to: BSH-Service.dk@ | ||
| 1100 Wien mail to: service@khalai fat.com | ||
| Tel.: 0810 550 511* www.bosch-home.dk | ||
| Fax: 01 605 75 51 212 BY Belarus, Беларусь EE Eesti, Estonia | ||
| mail to: vie-stoerungsanome@CS Бытовая техника" SIMSON OÜ | ||
| bshg.com tel.: 495 737 2961 Raua 55 | ||
| Hotline für Espresso-Gemtle:o:mok-kdhl@bshg.com 10152 Tallinn | ||
| Tel.: 0810 700 400* Tel.: 0627 8730 | ||
| www.bosch-home.at Fax: 0627 8733 | ||
| *innerhalb Österreichs zum Regional tarif mail to: teenindus@simson.e | ||
| ES España, Spain | HK Hong Kon香港 | IS Iceland |
| En caso de avería puede en contacto con nosotros | Bshchosne Appliances Lim | Smtieh & Norland hf. |
| unitsu & 2, 3rd Floor | Noatuni 4 | |
| aparato será trasladad | Noa thru e btorck, Skyway Hou | 105 Reykjavik |
| taller especializado de | Gahart Moang. Road | Tel.: 0520 3000 |
| Tel.: 902 28 88 38 | Tai Kok Tsui, Kowloon | Fax: 0520 3011 |
| BSH Electrodomésticos | Hong Kong | www.s minor.is |
| España S.A. | Tel.: 2565 6151 | IT Italia, Italy |
| Servicio Oficial del Fati | Fax: 2565 6681 | BSH Elettrodomestici S.p. |
| Parque Empresarial PLAZA | mailto:bosch.hk.service@ | Nizzoli 1 |
| C/ Manfredonia, 6 | www.bosch-home.cn | 20147 Milano (MI) |
| 50197 Zaragoza | HR Hrvatska, Croatia | Numero verde 800 829 120 |
| Tel.: 902 245 255 | BSH kućni uređaji d.o. | mailto:info@ |
| Fax: 976 578 425 | Kneza Branimira 22 | bosch-elettrodomestici.it |
| mailto:CAU-Bosch@bshg. | doi:00 Zagreb | www.bosch-home.com/it |
| www.bosch-home.es | Tel.: 01 640 36 09 | KZ Kazakhstan, Kasakstan |
| FI Suomi, Finland | Fax: 01 640 36 03 | I.P Turebekov Yerzhan |
| BSH Kodinkoneet Oy | mailto:informacije ser | Nur manevich |
| Itälahdenkatu 18 A, PL | bshg.com | Jangeldina str. 15 |
| 00201 Helsinki | www.bosch-home.com/hr | Shimkent 160018 |
| Tel.: 0207 510 700 | HU Magyarország, Hungat | Teyl.: 0252 31 00 06 |
| Fax: 0207 510 780 | BSH Háztartási Készülé | mailto:evrika_kz@mail.ru |
| mailto:Bosch-Service-FI | @heskedelmi Kft. | LB Lebanon, Jin |
| www.bosch-home.fi | Házrtartási gépek márkas | Teheni, Hana & Co. |
| Lankapuhelimesta 8,28 snt/pu | Kelruályhágó tér 8-9. | Boulevard Dora 4043 Beyro |
| +7 snt/min (alv 23%) | 1126 Budapest | P.O. Box 90449 |
| Matkapuhelimesta 8,28 snt/pu | Hi babej elentés | Jdeideh 1202 2040 |
| +17 snt/min (alv 23%) | Tel.: 01 489 5461 | Tel.: 01 255 211 |
| FR France | Fax: 01 201 8786 | mailto:Info@Teheni-Hana.c |
| BSH Electroménager S.A. | mailto:hi babej elentes@bsh.hu | LT Lietuva, Lithuania |
| 50 rue Ardoin - BP 47 | Al katrészrendelés | Senuku prekybos centras U |
| 93401 SAINT-OUEN cedex | Tel: 01 489 5463 | Jonavos g. 62 |
| Service interventions | @domi cl | 44192 Kaunas |
| 01 40 10 11 00 | Fax: 01 201 8786 | Teb@bsh.chr 12146 |
| Service Consommateurs: | mailto:alkatreszrendele | Fax: 0372 12165 |
| 0 892 698(010 € TTC/mn) | www.bosch-home.com/hu | |
| mailto:soa-bosch-conso@ | E Republic of Ireland | www.senukai.lt |
| bshg.com | BSH Home Appliances Ltd | LU Luxembourg |
| Service Pièces Détaché | Unit F4, Ballymount Drip | BSH électroménagers S.A. |
| et Accessoires: | Ballymount Industrial | EsLatse ZI Breedeweues |
| 0 892 698 009 (0,34 € TT | Walkinstown | 1259 Senningerberg |
| www.bosch-home.fr | Dublin 12 | Tel.: 26349 300 |
| GB Great Britain | Service Requests, Spare | Faxand26349 315 |
| BSH Home Appliances Ltd | Accessories | mailto: |
| Grand Union House | Tel.: 01450 2655 | lux-service.electromenage |
| Old Wolverton Road | Fax: 01450 2520 | bshg.com |
| Wolverton | www.bosch-home.cu.uk | www.bosch-home.com/lu |
| Milton Keynes MK12 5PT | IL Israel, S### | LV Latvija, Latvia |
| To arrange an engineer | C/S/B Home Appliance Ltd | General Serviss Limited |
| order spare parts and | Uisit Building | Bullu street 70c |
| or for product advice | accessories | 1067 Riga |
| www.bosch-home.co.uk | Hamejacha St. | Tel.: 07 42 41 37 |
| or call | Industrial Park North | mailto:bt@olimpeks.lv |
| Tel.: 0844 8928979* | 71293 Lod | MD Moldova |
| *Calls from a BT landline wi | Tel.: 08 9777 222 | S.R.L. "Rialto-Studio" |
| up to 3 pence per minute. A | Fax: 08 9777 245 | yn.t. Шусева 98 |
| of up to 6 pence may apply. | mailto:cb@brev@zahav. | 2012 Кишинев |
| GR Greece, ELLAÇS | IN India, Bharat, भारत | tel./факс: 022 23 81 80 |
| BSH Ikiakes Siskeves A. | BSHE.Customer Service | mailto:bosch-md@mail.ru |
| Central Branch Service | Front Office | ME Crna Gora, Montenegro |
| 17 km E.O. Athinon-Lami | Shop No.4, Everest Grare | Elektronika komerc |
| Potamou 20 | Opp. Shanti Nagar Bus | Shop-Slobode 17 |
| 14564 Kifisia | Mahakali Caves Road, | 84000 Bijelo Polje |
| Павеллнію тнлєфшо: 181 82 | Andheri East | Tel./Fax: 050 432 575 |
| (аστική χρέωση) | Mumbai 400 093 | Mobil: 069 324 812 |
| www.bosch-home.gr | mailto:ekobosch.servis@ | |
| MK Macedonia, Македонија PT Portugal | SK Slovensko, Slovakia | |
| GORENECJane Sandanski 69 lok.1000 SkopjeTel.: 02 2454 600Mobil: 070 697 463mailto: goreneec@yahoo.comMT MaltaOxford House Ltd.Notabile RoadMriehel BKR 14Tel.: 021 442 334Fax: 021 488 656www.oxfordhouse.com.mtMV Raajjeyge Jumhoori y Ma ledivesLintel InvestmentsMa. Maadheli, Majeedhee MaléTel.: 0331 0742mailto: mohamed.zuhuree@lintel.com.mvNL Nederlande, Netherl Goods" БСХ Бытовая техника"BSH Hui shoudapparaten Taurusavenue 362132 LS HoofddorpStoringsmelding:Tel.: 088 424 4010Fax: 088 424 4845mailto: bosch-contactcenter@bshg.comOnderdelenverkoop:Tel.: 088 424 4010Fax: 088 424 4801mailto: bosch-onderdelengbshg.comwww.bosch-home.nlNO Norge, NorwayBSH HusholdningsapparatteriBresesvingen 90661 OsloTel.: 22 66 06 00Fax: 22 66 05 50mailto: Bosch-Service-NO@69 Solnabshg.comwww.bosch-home.noNZ New ZealandBSH Home Appliances LtdUnit F2, 4 Orbit DriveMairangi BayAuckland 0632Tel.: 09 477 0492Fax: 09 477 2647mailto: bshnz-cs@bshg.comwww.bosch-home.co.nzPL Polska, PolandBSH Sprzęt GospodarstwaDomowego Sp. z o.o.Al. Jerozolimskie 18302-222 WarszawaTel.: 801 191 534Fax: 022 572 7709mailto: Serwi s. Fabryczny@1000 Ljubljanabshg.comwww.bosch-home.pl | BSHP ElectrodomésticosRua Alto do Montijo, n2790-012 CarnaxideTel.: 707 500 545*Fax: 214 250 701mailto: bosch.electrodomésticosbshg.comwww.bosch-home.pt*(PT 0,10 €/min., Mobile 0,26 €/min.)RO România, RomaniaBSH Electrocasnice srlSos. Bucuresti -Ploiestnr. 19-21, sect. 113682 BucurestiTel.: 021 203 9748Fax: 021 203 9733mailto: service.romani@bshg.comwww.bosch-home.roRU Russia, РоссияSA Saudi Arabia,Бервис от производителяМалая Калужская 19/1119071 Москвател.: 495 737 2961mailto: mok-kdhl@bshg.comwww.bosch-home.comSA Saudi Arabia,Берисот производителяМалая Калужская 19/1119071 Москвател.: 495 737 2961mailto: mok-kdhl@bshg.comwww.bosch-home.comSA Saudi Arabia,Берисот производителяМалая Калужская 19/1119071 Москвател.: 495 737 2961mailto:mok-kdhl@bshg.comwww.bosch-home.comSA Saudi Arabia,Берисот производителяМалая Калужская 19/1119071 Москвател.: 495 737 2961mailto:mok-kdhl@bshg.comwww.bosch-home.comSA Saudi Arabia,Берисот производителяМалая Калужская 19/1179071 Москвател.: 495 737 2961mailto:mok-kdhl@bshg.comwww.bosch-home.comSA Saudi Arabia,Берисот производителяМалая Калужская 19/1119071 Москвател.: 495 737 2961mailto:mok-kdhl@bshg.comwww.bosch-home.comSASaudi Arabia,Берисот производителяМалая Калужская 19/1119071 Москвател.: 495 737 2961mailto:mok-kdhl@bshg.comwww.bosch-home.comSASaudi Arabia,Берисот производителяМалая Калужская 19/1119071 Москвател.: 495 737 3061mailto:mok-kdhl@bshg.comwww.bosch-home.comSASaudi Arabia,Берисот производителяМалая Калужская 19/1119071 Москвател.: 495 737 3061mailto:mok-kdhl@bshg.comwww.bosch-home.comSASaudi Arabia,Берисот производителяМалая Калужская 18/1119071 Москвател.: 495 737 3061mailto:mok-kdhl@bshg.comwww.bosch-home.comSASaudi Arabia,Берисот производителяМалая Калужская 18/1119071 Москвател.: 495 737 3061mailto:mok-kdhl@bshg.comwww.boscch-home.comSASaudi Arabia,Берисот производителяМалая Калужская 18/1119071 Москвател.: 495 737 3061mailto:mok-kdhl@bshg.comwww.bosch-home.comSASaudi Arabia,Берисот производителяМалая Калужская 18/1119071 Москвател.: 495 kldhl@bshg.comwww.bosch-home.comSASaudi Arabia,Берисот производителяМалая Калужская 18/1119071 Москвател.: 495 kldhl@bshg.comwww.bosch-home.comSASaudi Arabia,Берисот производителяМалая Калужская 18/1119071 Москвател.: 495 kldhl @bshg.comwww.bosch-home.comSASaudi Arabia,Берисот производителяМалая Калужская 18/1119071 Москвател.: 495 kldhl @bshg.comwww.bosch-home.comSASaudi Arabia,Берисот производителяМалая Калужская 18/1119071 Москвател.: 495 kldhl @bssgh.comwww.bosch-home.comSASaudi Arabia,Берисот производителяМалая Калужская 18/1119071 Москвател.: 495 kldhl @bshg.comwww.bosch-home.comSASaudi Arabia,Берисот производителяМалая Калужская 18/1119071 Москвател.: 495 kldhl @bshg.com www.bosch-home.comSASaudi Arabia,Берисот производителяМалая Калужская 18/1119071 Москвател.: 495 kldhl @bshg.comwww.bosch-home.comSASaudi Arabia,Берисот производителяМалая Калужская 18/1119071 Москвател.: 495 kldhl @bshg.comwww.bozh-home.comSASaudi Arabia,Берисот производителяМалая Калужская 18/1119071 Москвател.: 495 kldhl @bshg.comwww.bozh-home.comSASaudi Arabia,Берисот производителяМалая Калужская 18/1119071 Москвател.: 495 kldhl @bshg.comwww.bozh-home.com.siaSaudi Arabia,Берисот производителяМалая Калужская 18/1119071 Москвател.: 495 kldhl @bshg.comwww.bozh-home.comSASaudi Arabia,Берисот производителяМалая Калужская 18/1119071 Москвател.: 495 kldhl @bshg.comwww.bozh-home.comSASaudi Arabic,Берисот производителяМалая Калужская 18/1119071 Москвател.: 495 kldhl @bshg.comwww.bozh-home.comSASaudi Arabic,Берисот производителяМалая Калужская 18/1119071 Москвател.: 495 kldhl @bshg.comwww.bozh-home.comSASaudi Arabic,Верисот производителяМалая Калужская 18/1119071 Москвател.: 495 kldhl @bshg.comwww.bozh-home.comSASaudi Arabic,Верисот производителяМалая Калужская 18/1119071 Москвател.: 495 kldhl @bshg.comwww.bozh-home.comSASaudi Arabic,Версот производителяМалая Калужская 18/1119071 Москвател.: 495 kldhl @bshg.comwww.bozh-home.comSASaudi Arabic,Верисот производителяМалая Калужская 18/1119071 Москвател.: 495 kldhl @bshg.comwww.bozh-home.comSASaudi Arabic,ВерисотпроизводителяМалая Калужская 18/1119071 Москвател.: 495 kldhl @bshg.comwww.bozh-home.comSASaudi Arabic,ВерисотпроизводителяМалая Калужская 18/1119071 Москвател.: 495 kldhl @bshg.comwww.bozh-home.comSASaudi Arabic,Верисотпроизводителя Малая Калужская 18/1119071 Москвател.: 495 kldhl @bshg.comwww.bozh-home.comSASaudi Arabic,ВерисотпроизводителяМалая Калужская 18/1119071 Москвател.: 495 kldhl @bshg.comwww.bozh-home.comSASaudi Arabic,ВерисотпроизводителяМаля Калужская 18/1119071 Москвател.: 495 kldhl @bshg.comwww.bozh-home.comSASaudi Arabic,ВерисотпроизводителяМаля Калужская 18/1119071 Москвател.: 495 kldhl @bshg.comwww.bozh-home.comSASaudi Arabic,ВерисотпроизводителяМаля Кralужская 18/1119071 Москвател.: 495 kldhl @bshg.comwww.bozh-home.comSASaudi Arabic,ВерисотпроизводителяМаля Кralужская 18/1119071 Москвател.: 495 kldhl @bshg.comwww.bozh-home.comSASaudi Arabic,ВерисотпроизводителяМаля Кralужское,Берисот производителяМаля Кralужское,Берисот производителяМаля Кralужское,Берисот производителяМаля Кralужское,Берисот производителяМаля Кralужское,Берисот производителяМаля Кralужское,Берисот производителяМаля Кralужское,Берисот производителяМаля Кralужское,Берисот производителя Маля Кralужское,Берисот производителяМаля Кralужское,Берисот производителяМаля Кralужское,Берисот производителяМаля Кralужское,Берисот производителяМаля Кralужское,Берисот производителяМаля Кralужское,Берисот производителяМаля Кralужское,Берисот производителяМалья Кralужское,Берисот производителяМаля Кralужское,Берисот производителяМаля Кralужское,Берисот производителяМаля Кralужское,Берисот производителяМаля Кralужское,Берисот производителяМаля Кralужское,Берисот производителяМаля Кralужское,Берисот производителяМаля Кралужское,Берисот производителяМаля Кралужское,Берисот производителяМаля Кралужское,Берисот производителяМаля Кралужское,Берисот производителяМаля Кралужское,Берисот производителяМаля Кралужское,Берисот производителяМаля Кралужское,Берисот производителя Маля Кралужское,Берисот производителяМаля Кралужское,Берисот производителяМаля Кралужское,Берисот производителяМаля Кралужское,Берисот производителяМаля Кралужское,Берисот производителяМаля Кралужское,Берисот производителяМаля Кралужское,Бегдайна,Бегдайна,Бегдайна,Бегдайна,Бегдайна,Бегдайна,Бегдайна,Бегдайна,Бегдайна,Бегдайна,Бегдайна,Бегдайна,Бегдайна,Бегдайна,Бегдайна,Бегдайна,Бегдайна,Беггайна,Бегдайна,Бегдайна,Бегдайна,Бегдайна,Бегдайна,Бегдайна,Бегдайна,Бегдайна,Бегдайна,Бегдайна,Бегдайна,Бегдайна,Бегдайна,Бегдайна,Бегдайна,Бегдайна,Верисот производителяМаля Кралужское,Берисот производителяМаля Кралужское,Берисот производителяМаля Кралужское,Берисот производителяМаля Кралужское,Берисот производителяМаля Кралужское,Берисот производителяМаля Кралужское,Берисот производителяМаля Ккні aparati d.o.o.Malя Кралужское,Берисот производителяМаля Кралужское,Берисот производителяМаля Кралужское,Берисот производителяМаля Кралужское,Берисот производителяМаля Кралужское,Берисот производителяМаля Кралужское,Берисот производителяМаля Кралужское,БерихотводительКартина,Картина,Картина,Картина,Картина,Картина,Картина,Картина,Картина,Картина,Картина,Картина,Картина,Картина,Картина,Картина,Картина,Картина,Картина,Картина,Картина,Kартина,Картина,Картина,Картина,Картина,Картина,Картина,Картина,Картина,Картина,Картина,Картина,Картина,Картина,Картина,Картина,Картина,Картина,Картина,Картина,Жартина,Жартина,Жартина,Жартина,Жартина,Жартина,Жартина,Жартина,Жартина,Жартина,Жартина,Жартина,Жартина,Жартина,Жартина,Жартина,Жартина,Жартина,Жартина,Жартина,Картина,Картина,Картина,Картина,Картина,Картина,Картина,Картина,Картина,Картина,Картина,Картина,Картина,Картина,Картина,Картина,Картина,Картина,Картина,Номеде,Комеде,Комеде,Комеде,Комеде,Комеде,Комеде,Комеде,Комеде,Комеде,Комеде,Комеде,Комеде,Комеде,Комеде,Комеде,Комеде,Комеде,Комеде,Комеде,Комеде,Сою,Сою,Сою,Сою,Сою,Сою,Сою,Сою,Сою,Сою,Сою,Сою,Сою,Сою,Сою,Сою,Сою,Сою,Сою,Сою,Сою,Сою,Сою,Сою,Сою,Соу,Соу,Соу,Соу,Соу,Соу,Соу,Соу,Соу,Соу,Соу,Соу,Соу,Соу,Соу,Соу,Соу,Соу,Соу,Соу,Соу,Соу,Соу,Соу,Соу,СоУ,СоУ,СоУ,СоУ,СоУ,СоУ,СоУ,СоУ,СоУ,СоУ,СоУ,СоУ,СоУ,СоУ,СоУ,СоУ,СоУ,СоУ,СоУ,СоУ,СоУ,СоУ,СоУ,СоУ,СоУ,СоU,СоУ,СоУ,СоУ,СоУ,СоУ,СоУ,СоУ,СоУ,СоУ,СоУ,СоУ,СоУ,СоУ,СоУ,СоУ,СоУ,СоУ,СоУ,СоУ,СоУ,СоУ,СоУ,СоУ,СоУ,СоИ,СоИ,СоИ,СоИ,СоИ,СоИ,СоИ,СоИ,СоИ,СоИ,СоИ,СоИ,СоИ,СоИ,СоИ,СоИ,СоИ,СоИ,СоИ,СоИ,СоИ,СоИ,СоИ,СоИ,СоИ,СоП,СоП,СоП,СоП,СоП,СоП,СоП,СоП,СоП,СоП,СоП,СоП,СоП,СоП,СоП,СоП,СоП,СоП,СоП,СоП,СоП,СоП,СоП,СоП,СоП,СоИ,СоИ,СоИ,СоИ,СоИ,СоИ,СоИ,СоИ,СоИ,СоИ,СоИ,СоИ,СоИ,СоИ,СоИ,СоИ,СоИ,СоИ,СоИ,СоИ,СоИ,СоИ,СоИ,СоИ,СоI,СоИ,СоИ,СоИ,СоИ,СоИ,СоИ,СоИ,СоИ,СоИ,СоИ,СоИ,СоИ,СоИ,СоИ,СоИ,СоИ,СоИ,СоИ,СоИ,СоИ,СоИ,СоИ,СоИ,СоИ,СоII,СоII,СоII,СоII,СоII,СоII,СоII,СоII,СоII,СоII,СоII,СоII,СоII,СоII,СоII,СоII,СоII,СоII,СоII,СоII,СоII,СоII,СоII,СоII,СоII,СоIII,СоIII,СоIII,СоIII,СоIII,СоIII,СоIII,СоIII,СоIII,СоIII,СоIII,СоIII,СоIII,СоIII,СоIII,СоIII,СоIII,СоIII,СоIII,СоIII,СоIII,СоIII,СоIII,СоIII,СоIII,СоII,СоII,СоII,СоII,СоII,СоII,СоII,СоII,СоII,СоII,СоII,СоII,СоII,СоII,СоII,СоII,СоII,СоII,СоII,СоII,СоII,СоII,СоII,СоII,СоI,СоII,СоII,СоII,СоII,СоII,СоII,СоII,СоII,СоII,СоII,СоII,СоII,СоII,СоII,СоII,СоII,СоII,СоII,СоII,СоII,СоII,СоII,СоII,СоII,Со II,CоII,CоII,CоII,CоII,CоII,CоII,CоII,CоII,CоII,CоII,CоII,CоII,CоII,CоII,CоII,CоII,CоII,CоII,CоII,CоII,CоII,CоII,CоII,CоII,CоII,CоII,CоII,CоII,CоII,CоII,CоII,CоII,CоII,CоII, B | |