
SOP500IX - Oven NORDMENDE - Free user manual and instructions
Find the device manual for free SOP500IX NORDMENDE in PDF.


| Product Type | Built-in Electric Oven |
| Brand | Nordmende |
| Model | SOP500IX |
| Energy Source | Electric |
| Voltage | 220-240 V |
| Frequency | 50/60 Hz |
| Oven Functions | Defrost, Static (Lower-Upper), Turbo Fan, Fan + Lower-Upper, Grill, Grill + Upper, Grill + Fan, Pyrolytic Cleaning |
| Control Type | Knobs and Digital Timer |
| Display Type | Digital Timer Display |
| Cleaning Method | Pyrolytic Self-Cleaning |
| Safety Features | Door Lock during Pyrolytic, Cooling Fan, Child Supervision Recommended |
| Installation Type | Built-in |
| Number of Functions | 8 |
| Oven Capacity | Approximately 60 L (estimated) |
| Weight | Approximately 35 kg (estimated) |
| Dimensions (W x H x D) | 595 x 595 x 550 mm (estimated standard) |
| Spare Parts | Use original Nordmende spare parts; contact Authorized Service |
| Warranty | Refer to manufacturer warranty documentation |
Frequently Asked Questions - SOP500IX NORDMENDE
User questions about SOP500IX NORDMENDE
0 question about this device. Answer the ones you know or ask your own.
Ask a new question about this device
Download the instructions for your Oven in PDF format for free! Find your manual SOP500IX - NORDMENDE and take your electronic device back in hand. On this page are published all the documents necessary for the use of your device. SOP500IX by NORDMENDE.
USER MANUAL SOP500IX NORDMENDE
natural_image
Line drawing of a standard open oven with control knobs and door (no text or symbols)Dear Customer,
We take offering quality products more than your expectation as goal, offers you the products produced in modern facilities carefully and particularly tested for quality.
Your manual is prepared in order to help you to use your appliance that is manufactured by the most recent technology, with confidence and maximum efficiency.
Before use of your appliance, carefully read this guide that includes the basic information for right and safe installation, maintenance and use. Contact to the nearest Authorized Service for mounting of your product.
Contents
1- Presentation and size of product
2-Warnings
3- Preparation for installation and use
4- Using the oven
5- Cleaning and maintenance of your product
6- Service and Transport
PART 1: PRESENTATION AND SIZE OF PRODUCT
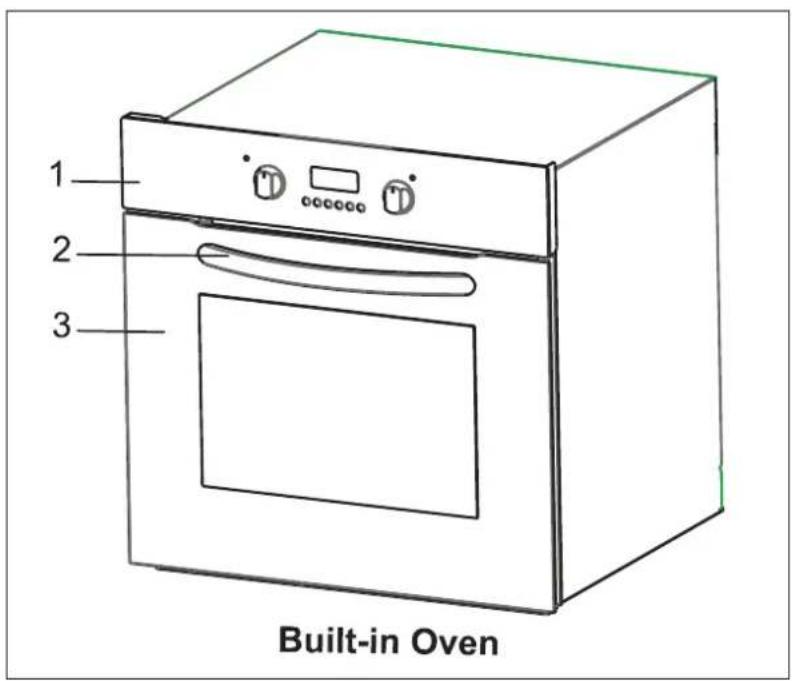
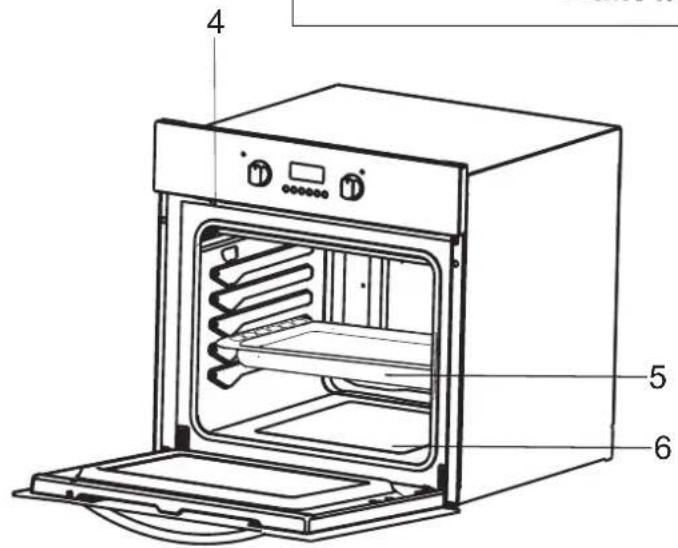
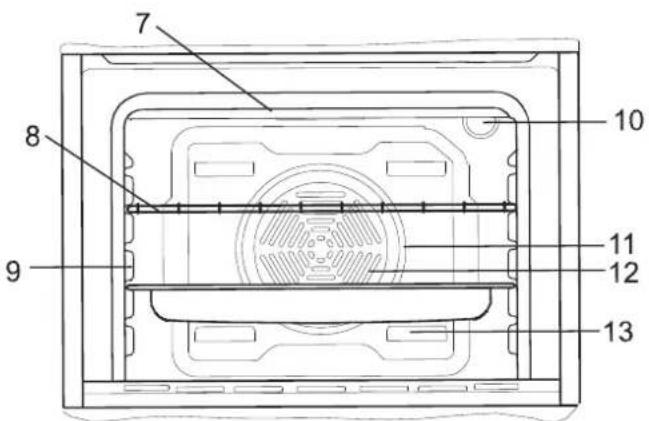
Figure 1
LIST OF COMPONENTS :
1- Control panel
2- Handle
3- Oven Door
4- Door Lock
5- Tray
6- Lower Heating Element (behind the plate)
7- Upper Heating Element (behind the plate)
8- Wire Grill
9- Racks
10- Oven Light
11- Turbo Heating Element(behind the plate)
12- Fan (behind the plate)
13- Air Outlet Shutters
BEFORE STARTING TO USE THE APPLIANCE, PLEASE TAKE ALL ESSENTIAL SAFETY MEASURES AND THROUGHLY READ THE USER MANUAL
This appliance has been designed for domestic use as built-in furniture.
■ After removing the packaging, make sure to check if there is any damage to the appliance. If there is any damage, never attempt to use the appliance and immediately contact your Authorized Service. As packaging materials need to be collected immediately and put out of reach.
- Never leave packaging residues unattended in the home. Seperate the various packaging materials by type and consign them to the nearest separate disposal centre.
The appliance must be installed and put in operation by an authorised technician under the conditions provided by the manufacturer in this manual. The manufacturer cannot be held responsible for any damage that might occur due to faulty installation.
Before connecting your appliance to the mains at home, make sure to check the conformity of voltage settings, which are specified on the information sticker attached to the appliance and/or packaging, with the usage conditions available.
- Do not operate the oven before it is fully installed.
- Be sure that the supply cable is not wedged during the installation of the appliance.
- The supply cable should never be replaced by the customer, in the event any damage occurs to the supply cable for any reason, please contact your Authorized Service.
■ Before replacing the oven lamp, turn off the power to the appliance.
- Switch off the appliance before cleaning, maintenance work etc.
- Some parts of the appliance may preserve their heat for a long time; please wait until the parts primarily exposed to heat cool off before touching them.
- Do not keep flammable items/substances near the appliance while it is in use.
- When operating other electrical devices near the appliance, pay attention that their cables do not come into contact with heated parts.
- When the appliance is not in use, make sure that the buttons are in “0” (off) position.
The cooling fan operates during cooking. Air is expelled through vents between the oven door and the control panel. The cooling fan may run on after the oven is switched off to keep the controls cool. This is quite normal.
■ Always cook with the oven door closed.
- Your appliance needs sufficient air circulation while it is operating. Carefully read the part of this manual, where installation procedures are explained, and make sure the relevant conditions are satisfied.
This operating manual has been prepared jointly for multiple models. Some of the specifications explained in the manual, may not be included, in your appliance. Pay attention to the explanations with illustrations while reading the manual. - Do not use harsh abrasive cleaners or sharp metal scrapers to clean the oven door glass since they can scratch the surface, which may result in shattering of the glass.
- Keep children away from the oven.
This appliance is not intended for use by persons (including children) with reduced physical, sensory or mental capabilities, or lack of experience and knowledge, unless they have been given supervision or instruction concerning use of the appliance by a person responsible for their safety.
■ Children should be supervised to ensure that they do not play with the appliance. - Attention! Do not place objects on the oven base and do not cover any parts of the oven with aluminium foil while cooking, as this could cause a heat built-up which would affect the baking results and damage the oven enamel. Always plays pans, heat-resisting pans and enamelled trays on the shelf which has been inserted in the shelf runners.
FOR THE EFFICIENCY AND SAFETY OF THE APPLIANCE, WE RECOMMEND THAT YOU ALWAYS USE ORIGINAL SPARE PARTS AND CALL ONLY AUTHORIZED SERVICE PERSONNEL SHOULD YOU NEED HELP.
Pay attention to the following when using your appliance.
- Be careful to connect your appliance to an earthed power outlet or line.
- Do not place the power cord of your appliance near any heated spot. Do not pass it near the hob. Contact the nearest Authorized Service in the event any damage occurs to the power cord.
For the models with timers, make sure to adjust the time at first run or in case of a power failure. Heat and moisture will form in your cooking environment. Throughly ventilate your kitchen. - When you first run your oven a certain smell will be emanated arising from the insulation materials and the heater elements. For this reason, before using your oven, run it empty at maximum temperature for 45 minutes. At the same time you need to property ventilate the environment in which the oven is installed.
- Do not touch the interior and the heater when using the oven part of the appliance as it will be hot. After switching off the burner, do not touch it with your hand before it is completely cooled off.
Do not put flammable and combustible materials into the oven. Do not place combustibles including any pressured container, paper, plastic and fabric near the hob surface.
- Be careful when using the oven part of the appliance as the oven surface can be hot. Keep children away from the oven.
While the front door is open. Do not let children climb on the door or sit on it.
The values indicated on the printed documents found on the product are values obtained in laboratory environment according to relevant standards. These values may vary according to the usage and environment conditions of product.
During use the appliance becomes hot. Care should be taken to avoid touching heating elements inside the oven.
Do not use steam cleaners for cleaning the oven.
PART 3: PREPARATION FOR INSTALLATION AND USE
Manufactured with best quality parts and materials, this modern, functional and practical oven will meet your needs in all respects. Make sure to read the manual to obtain successful results and not to experience any problems in the future. The information given below contain rules that are necessary for correct positioning and service operations. They should be read without fail especially by the technician who will position the appliance.
CONTACT THE AUTHORIZED SERVICE FOR INSTALLATION OF YOUR OVEN!
3.1. CHOOSING A PLACE FOR THE OVEN
There are several points to pay attention to when choosing a place for your oven. Make sure to take into account our recommendations below in order to prevent any problems and dangerous situations, which might occur later!
- When choosing a place for the oven, attention should be paid that there are no flammable or combustible materials in the close vicinity, such as curtains, oil, cloth etc. which quickly catch fire.
- Furnitures surrounding the oven must be made of materials resistant to temperatures above 90 C°.
The dimensions and material of the cabinet in which the oven will be installed must be correct and resistant to increases in temperature. Installing the appliance in the close vicinity of a refrigerator or a deep-freezer is not recommended. Otherwise, the performance of the above-mentioned appliances will be negatively affected due to emanating heat. After removing your oven from its packaging, be sure that the oven is not harmed. In case, you suspect of any damage to the appliance, do not use it; immediately contact Authorized Service.
3.2. INSTALLATION OF BUILT\_IN OVEN
Cabinet cut-out sizes
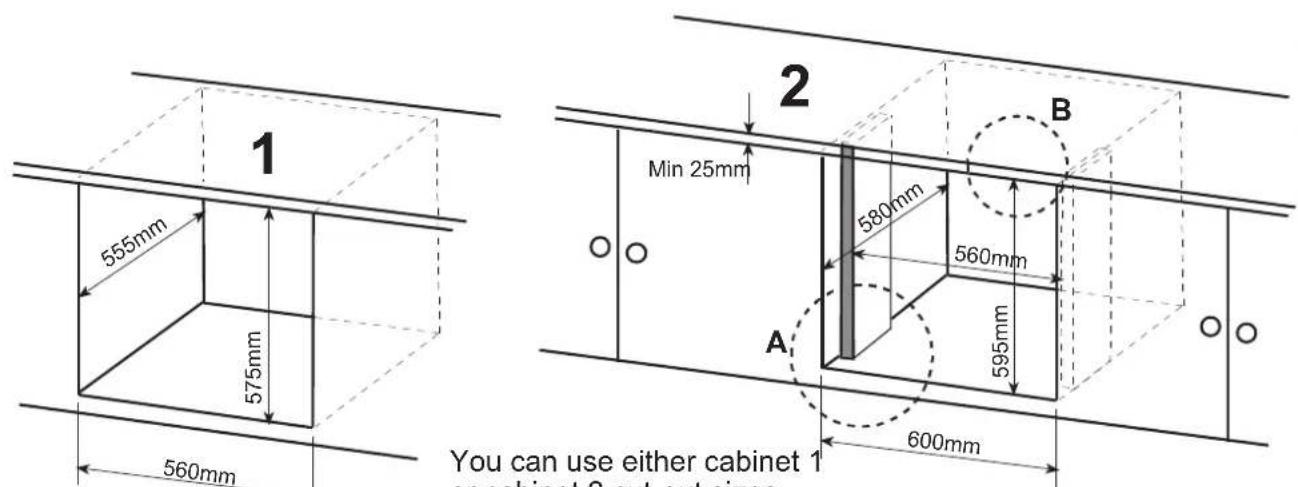
You can use either cabinet 1 or cabinet 2 cut-out sizes
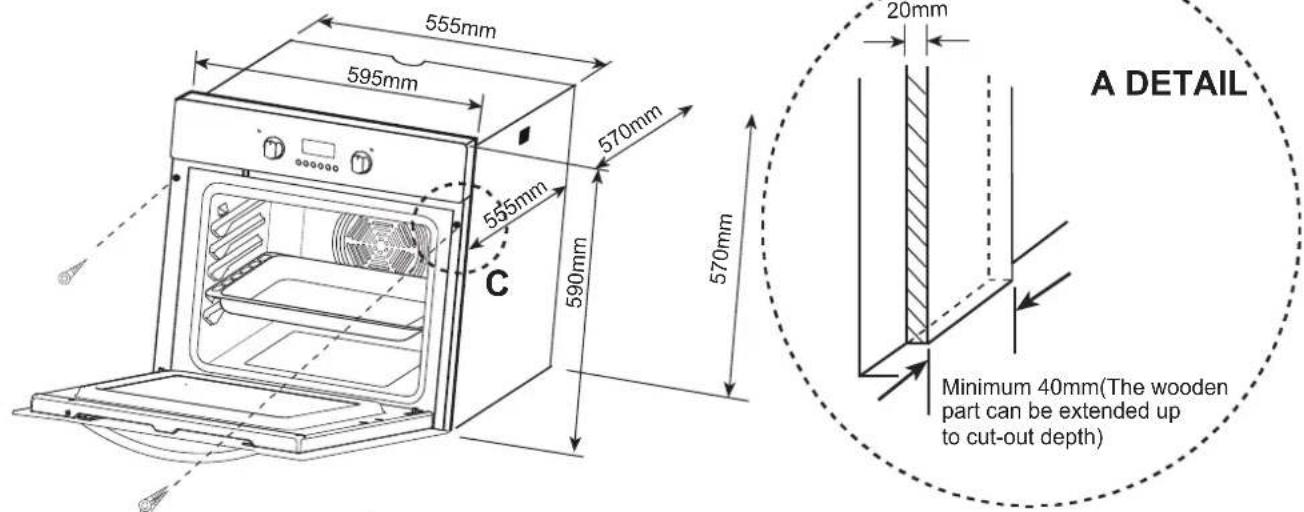
Product sizes
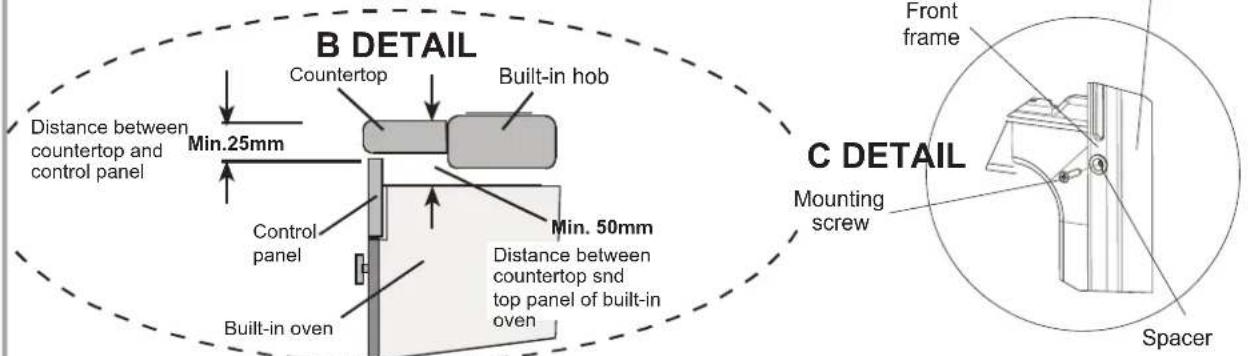
Figure 2
Insert the oven into cabinet by pushing it forward. Open the oven door and insert 2 screws in the holes located on the oven frame. While the product frame touches the wooden surface of cabinet, tighten the screws.
3.3. WIRING AND SAFETY OF BUILT\_IN OVEN
The instructions given below must be followed without fail during wiring :
- The earthing cable must be connected via the screw with the earthing mark. Supply cable connection must be as shown in Figure 3. If there is no earthed outlet conforming to regulations in the installation environment, call the Authorized Service immediately. There is to install an all pole disconnector inside they supply circuit with a contact opening of at least 3mm (rated 16A).
The earthed outlet must be in close vicinity of the appliance. Never use an extension cord. - The supply cable should not contact the product's hot surface.
In case of any damage to the supply cable, make sure to call the Authorized Service. The cable must be replaced by the Authorized Service. - Wiring of the appliance must be performed by the Authorized Service. H05VV-F type supply cable must be used.
- Faulty wiring may damage the appliance. Such a damage will not be covered under the warranty.
- The appliance is designed to connect to 220-240V\~ electricity is different than the value given above, call the Authorized Service immediately.
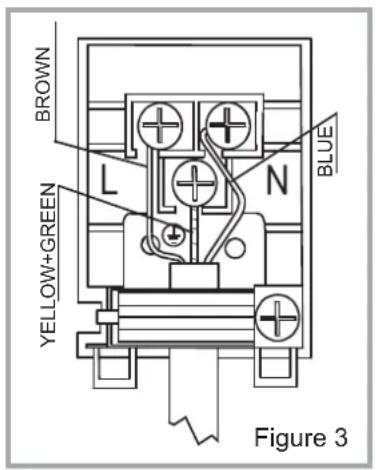
3.4. GENERAL WARNING AND PRECAUTIONS
- Your appliance is produced in conformity with the relevant safety instructions relating to electrical appliances. Maintenance and repair works must be performed only by Authorized Service technicians. Installation and repair works, performed without observing the rules may be dangerous.
- The outer surfaces is heated while your appliance is operating. The elements heating the inner surface of the oven and the steam out are extremely hot. These sections will continue to preserve their heat for certain while even if the appliance is switched off. Never touch the hot surfaces. Keep children away.
In order to cook in your oven, the oven function and temperature setting buttons need to be adjusted and the oven timer, needs to be programmed. Otherwise, the oven will not operate.
■ While the oven door or drawer is open, do not place anything on it. You may disturb the balance of the appliance or break the door.
■ Unplug your appliance when it is not in use. - Protect your appliance from atmospheric effects. Do not leave it under the effects of the sun, rain, snow, dust etc.
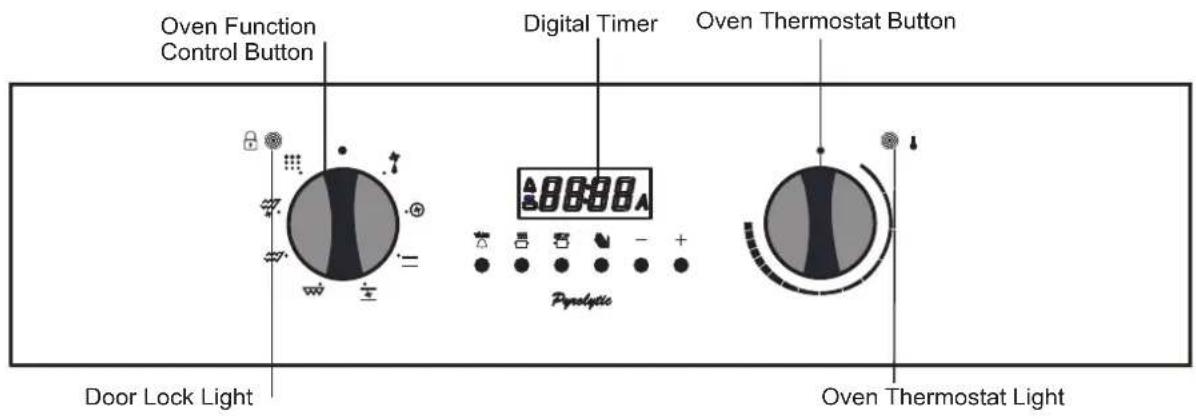
4.1 CONTROL PANELS
Built_in Oven
4.2. USING THE OVEN PART OF THE APPLIANCE
Oven Function Control Knob:
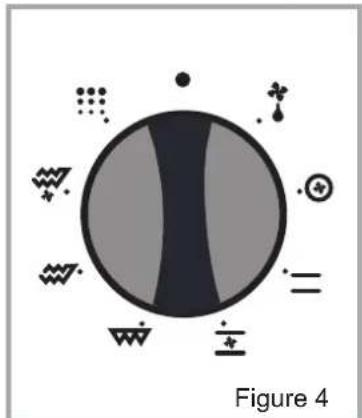
For you to select the oven functions (Figure 4). Explained in the next part and in Table 1. You need to adjust the function selection button and the oven thermostat knob together to a temperature value you wish to select. Otherwise, the function stage you selected will not operate.
Oven Thermostat Knob:
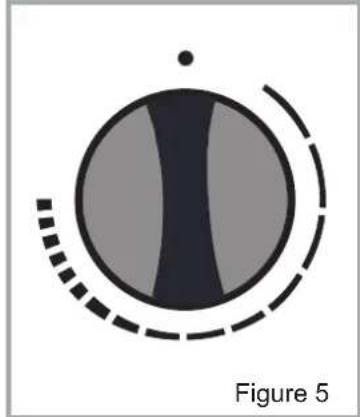
For you to select the oven function control knob. Adjusted temperature is shown on the display. When the temperature inside your oven reaches the value you set, the thermostat will cut the circuit and the thermostat light will go off. When the temperature falls below the set value, the thermostat will again be turned on and the thermostat light will be on.
natural_image
Diagram of a celestial body with shaded regions and dashed orbital paths, labeled Figure 5 (no text or symbols within the diagram itself)4.3. USING THE OVEN FUNCTION CONTROL BUTTON
Table 1
 | The oven light, the red warning light and the fan will be turned on. Performs the function of defrosting the frozen foods. |
 | The oven's thermostat and warning lights, the fan and the turbo heater will be switched on. |
 | The oven's thermostat and warning lights and the lower and upper heating elements will be switched on. |
 | The oven's thermostat and warning lights, the fan and the lower and upper heating elements will be switched on. |
 | The oven's thermostat and warning lights and the grill heater function will be switched on. |
 | The oven's thermostat and warning lights, the upper heating element and the grill heater function will be switched on. |
 | The oven's thermostat and warning lights, the upper heating element, the grill heater and the fan function will be switched on. |
 | This function allows you to clean throughly the oven cavity. |
Availability of the functions explained below vary depending on the product model.

Defrost Function :
natural_image
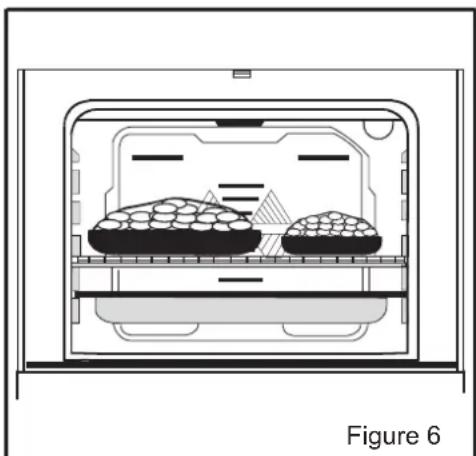
Diagram of a food storage tray with two plates and a tray, labeled Figure 6 (no text or symbols on the diagram itself)You can start the defrost operation by putting the frozen food into oven and bringing the button to the indicated mark. This function does not cook/bake the food; it only helps defrost it within a short time. Put the food to be defrosted on the wire rack that you will place on the third rack support from the bottom (Figure 6). To collect the water to accumulate due to the melting ice, insert an oven tray into the lower rack.

Lower-Upper Heating Element Function (Static Coking) :
In this type of cooking which is described as the traditional method, the heat emanating evenly from the lower and upper resistors into the oven ensures even cooking of the lower and upper side of the food that you are cooking. Adjust the thermostat bottom of your oven to a temperature recommended on the cooking table for the cooking operation you will perform. A preheating of the oven for about 10 minutes is recommended. Leave a food to cook, which is placed in a suitable container, for the recommended duration. This position is a preferred function in making cakes, sponge cakes, pastry, baked pasta, lasagne, pizza.
After a cooking/baking, turn off the oven function control button and the thermostat button and cancel the timer program if available. Take the cooked/bake food out of the oven, place it on a safe place and ensure that the oven copmletely cools off by keepig the oven door open. As the oven will be hot, stay away from the oven and keep your children away as well.

Turbo Fan Function :
The turbo fan function evenly disperses the heat in the oven. All foods on all racks will be cooked evenly.
Adjust the thermostat button to the desired degree. Turn the function button so it will point to the Tubo function symbol. After completing the preheating of 10 minutes, place the foods into the oven, which need to be put into suitable containers. This function is suitable for cooking multiple dishes.
If you are going to cook using two trays at the same time; while adjusting the cooking temperature, select the temperature that is the lowest among the levels suitable for your foods, as shown on the table. Cooking with two trays requires additional cooking time compared to cooking with one tray. Usually, the foods on both trays do not finish at the same time. Therefore, take the tray out of the oven, which you observed is finished and continue the cooking operation for the other tray.
After the cooking/baking, turn off the oven function control button and the thermostat button and cancel the timer program if available. Take the cooked/baked food out of the oven, place it on a safe place and ensure that the oven completely cools off by keeping the oven door open. As the oven will be hot, stay away from the oven and keep your children away as well.

Fan and the Lower - Upper Heating Element Function:
This is the position where the air is coming from the lower and upper heating elements is circulated into the oven by the fan motor and blade.
Adjust the thermostat button of your oven to temperature recommended on the cooking table for the cooking operation yo will perform. Turn the oven button so it will point to the
symbol of this function, adjust the oven timer to the recommended time for cooking and preheat the oven for about 10 minutes. The food placed in a suitable container is put into the oven and the operation is started. This position is position where usually very good results are obtained in baking pastry. All parts of the foods will be cooked evenly in this position. Suitable for cooking with one tray.
After the cooking/baking, turn off the oven function control button and the temperature setting button and cancel the timer program if available. Take the cooked/baked food out of the oven, place it on a safe place and ensure that the oven completely cools off by keeping the oven door open. As the oven will be hot, stay away from the oven and keep your children away as well.

Grill Function :
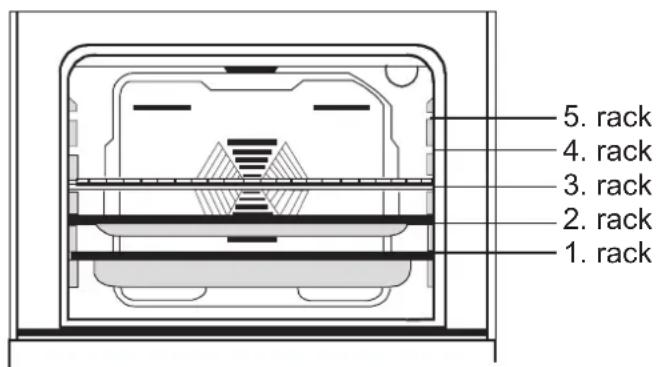
This function is used for grills. For grills; put the foods on the grill, and the grill on the highest rack. After placing the oven tray on the 3. Rack, You can start the grill operation. The tray placed on the 3. Rack will ensure that the oil dropping from he foods will be collected. When grilling, the oven door must be closed and the oven temperature should be adjusted to 190^ C.
Turn your oven's thermostat button so it will point to this temperature value. After a preheating period of 5 minutes, put your food into the oven.
After the cooking, turn off the oven function control button and the thermostat button and cancel the timer program. Take the cooked/baked food out of the oven, place it on a safe place and ensure that the oven completely cools off by keeping the oven door open. As the oven will be hot, stay away from the oven and keep your children away as well.

Upper Heating Element and Grill Function :
This function is used for faster grills and for grills. For grills; put the foods on the grill, and the grill on the highest rack. After placing the oven tray on the 3. Rack, you can start teh grill operation. 3, the tray placed on the 3. Rack will ensure that the oil dropping from the foods will be collected. When grilling, the oven door must be closed and the oven temperatures should be adjusted to 190^ C.
Turn your oven's thermostat button so it will point to this temperature value. After a preheating period of 5 minutes, put your foods into the oven.
After the cooking, turn off the oven function control button and the thermostat button and cancel the timer program if available. Take the cooked/baked food out of the oven, place it on a safe place and ensure that the oven completely cools off by keeping the oven door open.
As the oven will be hot, stay away from the oven and keep your children away as well.

Grill and Fan Function :
At this function; ensuring complete frying by working together, the fan, the grill and the upper heating element perform the operation. It is also used for faster grills and for grills. For grills; put the foods on the grill, and the grill on the highest rack. After placing the oven tray on the 3. rack, you can start the grill operation. The tray placed on the 3. rack will ensure that the oil dropping from the foods will be collected. When grilling, the oven door must be closed and the oven temperature should be adjusted to 190^ .
Turn your oven's thermostat button so it will point to this temperature value. After a preheating period of 5 minutes, put your foods into the oven.
After the cooking, turn off the oven function control button and the thermostat button and cancel the timer program. Take the cooked/baked food out of the oven, place it on a safe place and ensure that the oven completely cools off by keeping the oven door open. As the oven will be hot, stay away from the oven and keep your children away as well.

Pyrolytic cleaning function
Before activating pyrolytic cleaning function, remove any excessive spillage and make sure that the oven is empty. Do not leave any thing inside the oven cavity (e.g. pans, grids, baking tray, dripping pan, etc.. ) As this could heavily damage them.
Before activating the pyrolytic cleaning function, remove the oven shelves and shelf supports.
■ Ensure that the oven door closed before activating the pyrolytic cleaning function.
When the pyrolytic cleaning function is on, it is advisable not to use a hob if it is fitted above the oven. This could cause overheating and damage to both appliances.
During the pyrolytic cleaning cycle the oven door becomes hot. Children should be kept away until it has cooled.
At the end of pyrolytic cleaning process, the display shows the time of day. The oven door will be locked when the pyrolytic function started.
Pyrolytic Cleaning
The oven cavity is coated with a special emanel resistant to high temperatures.
During the pyrolytic cleaning operation, the temperature inside the oven can reach about 475^ C does burning food residuals.
For your security, during the pyrolytic cleaning operation, the oven door automatically locks.
Upon completion of the cleaning operation the oven door will be locked until the oven cavity has cooled down.
The cooling fan operates during cooking until the oven has cooled down. After cooking, it is advisable to remove all the food residues with a wet sponge.
It is advisable to wipe the oven over with a sponge soaked in warm water after each pyrolytic cleaning cycle is carried out.
During the Pyrolytic operation, some smell will be emanated due to destruction of the food residual, it is normal.
During the Pyrolytic operation, the room where the oven installed must be ventilated sufficiently.
4.4. USING THE OVEN PROGRAMMER / DIGITAL TIMER
Setting and using the oven programmer/timer
Selecting manual operation mode
"Minute Minder" symbol
After your appliance is connected to your mains supply for the first time, the numbers on the timer display will flash. Before you can select a cooking function or set a temperature, you must set the appliance into “manual operation” mode.
To select manual operation mode, press the "manual operation" button on the control panel.
"Manual operation" symbol
"Auto" function symbol
Setting the time of day
After setting your oven for manual operation, you should also set the time of day.
Use the "minus" button and "plus" button to adjust the time that appears in the display.
After getting display to the correct time, release the “minus” and “plus” buttons. After 5 seconds the time will fix in the display you will be able to use your oven.
Setting the minute minder function
You are able to set minute minder at any time, regardless of whether an oven function has been selected. You can set a period of time using the minute minder function and an alarm will sound when this period of time has elapsed.
Press the “minute minder” button, the display will show a value of 00:00. Set the period of time that you wish the minute minder to countdown for, by using the “minus” and “plus” buttons.
Once the display has got to your desired countdown time, let go of the “minus” and “plus” buttons. The minute minder symbol will appear on the time display.
Once a countdown time has been set, it is possible to shorten or lengthen the time by using the "minus" or "plus" buttons.
An alarm will sound when the countdown time has elapsed. The alarm can be silenced by pressing the "minute minder" button or "manual operation button".
Setting the duration function
This function will allow you to set a countdown time similar to the minute minder function. However the oven will no longer continue to heat, once the countdown period has elapsed.
Use the thermostat control knob to set the temperature that you require. The manual operation symbol will appear on the display.
Use the oven function selector knob to select the mode of cooking that you require.
It is then possible to set the duration of the cooking time that you require.
Press the “duration” button and the display will show a value of 00:00. Set the period of time that you wish the duration function to countdown for, by using the “minus” and “plus” buttons.
Once the display has got to your desired countdown time, let go of the “minus” and “plus” buttons. The countdown will start immediately on the word A will appear on the time display.
Once a countdown time has been set, it is possible to shorten or lengthen the time by using the "minus" or "plus" buttons.
An alarm will sound when the countdown time has elapsed and the oven will switch off. The word A will flash and the heating symbol will disappear.
To silence the audible signal and return the oven to manual operation mode, once the duration has been used. You should press the “manual operation” button, the word A will disappear from the display and the manual operation symbol will appear instead.
Important : If you do not turn the thermostat control knob and oven function selector knob 0. Then the appliance will continue to operate as soon as you press the “manual operation” button.
Setting the end cook function
This function is similar to the duration function, however instead of selecting a period of time that you wish the oven to switch off after. You select the time of day that you wish the oven switch off at.
Use the thermostat control knob to set the temperature that you require. The manual operaiton symbol will appear on the display.
Use the oven cooking function selector knob to select the mode of cooking that you require.
Press the “end cook” button and the display will show a value of 00:00. Set time of day that you wish the oven to stop cooking at by using the “minus” and “plus” buttons. The timer will calculate how long the cooking time will be, based on the time of day that you have selected and show it on the display.
Once the display has got to the timer of day that you want the oven to stop cooking at, let go of the “minus” and “plus” buttons. The countdown will start immediately and the word A will appear on the timer display.
When the time is set, it can be modified by pressing the "minus" and "plus" buttons.
When the time of day reaches the end of cooking time that you set, the oven will switch off and an alarm will sound. The word A will flash and the heating symbol will disappear.
To silence the audible signal and return the oven to manual operation mode, once the end cook function has been used. To do this you should press the “manual operation” button, the word A will disappear from the display and the manual operation symbol will appear instead.
Setting the start and end time function
This function will allow you to set a time in the future that the oven switches on at and a time that the oven will switch off at.
Use the thermostat control knob to set the temperature that you require. The manual operation symbol will appear on the display.
Use the oven function selector knob to select the mode of cooking that you require.
Press the “duration” button and the display will show a value of 00:00. Set the period of time that you wish to cook for, by using the “minus” and “plus” buttons. The word A will appear on the timer display.
Immediately press the “end cook” button and the timer display will show the value 00:00. Set the time of day that you want the oven switch off at, using the “minus” and “plus” buttons.
The oven will calculate what time it needs to switch on at, so that your food will cook for the length of time that you selected. It will automatically switch itself on, once it reaches the time of day that it has calculated.
When the time of day reaches the end cooking time that you set, the oven will switch off and an alarm will sound. The word A will flash and the heating symbol will disappear.
To silence the audible signal and return the oven to manual operation mode, once the start and end time function has been used. To do this you should press the “manual operation” button, the word A will disappear from the display and the manual operation symbol will appear instead.
Adjusting the audible signal
To adjust the level of the audible signal, when it is sounding, press the minus button and it will adjust through the 3 sound levels. Release the minus button and the sound level of the audible signal will be set.
| DISHES | TURBO | LOWER-UPPER | LOWER-UPPER FAN | GRILL | ||||||||
| Thermostat pos.(°C) | Rack pos. | Cooking period(min) | Thermostat pos.(°C) | Rack pos. | Cooking period(min) | Thermostat pos.(°C) | Rack pos. | Cooking period(min) | Thermostat pos.(°C) | Rack pos. | Cooking period(min) | |
| Layered pastry | 170 - 190 | 1-2-3 | 35 - 45 | 170 - 190 | 1-2 | 35 - 45 | 170 - 190 | 1-2 | 25 - 35 | |||
| Cake | 150 - 170 | 1-2-3 | 30 - 40 | 170 - 190 | 1-2 | 30 - 40 | 150 - 170 | 1-2-3 | 25 - 35 | |||
| Cookie | 150 - 170 | 1-2-3 | 25 - 35 | 170 - 190 | 1-2 | 30 - 40 | 150 - 170 | 1-2-3 | 25 - 35 | |||
| Grilled meatballs | 200 | 4 | 10 - 15 | |||||||||
| Watery food | 175 - 200 | 2 | 40 - 50 | 175 - 200 | 2 | 40 - 50 | 175 - 200 | 2 | 40 - 50 | |||
| Chicken | 200 | 1-2 | 45 - 60 | 200 | 1-2 | 45 - 60 | 200 | * | 50 - 60 | |||
| Chop | 200 | 3-4 | 15 - 25 | |||||||||
| Beefstake | 200 | 4 | 15 - 25 | |||||||||
| Two-tray cake | 160 - 180 | 1-4 | 30 - 40 | |||||||||
| Two-tray pastry | 170 - 190 | 1-4 | 35 - 45 | |||||||||
| * Cook with roast chicken skewer.... | ||||||||||||
4.5. ACCESSORIES USED IN THE OVEN
It is recommended that you use the containers indicated on the table depending on the food you will cook in your oven, you can also use glass containers, cake cutters, special oven trays suitable for use in your oven, available in the market. Pay attention to the information given by the manufacturer firm concerning this issue. If small sized containers are used, place this container on the inner grill wire so it will be precisely on the middle of the wire. The information given below should be implemented for enamelled containers.
If the food to be cooked does not completely cover the oven tray, if the food is taken out of the deep-freezer or if the tray is used to collect the dripping juices of the foods during the grill operation; deformation might be observed on the tray due to high temperatures forming during the cooking/frying operation. This is normal, physical state that results during the heat transfer. Do not leave a glass tray or container in a cold environment immediately after cooking in them. Do not place them on cold and wet surfaces. Ensure that they slowly cool off placing them on a dry piece of cloth. Otherwise, the glass tray or container might break. If you are going to perform a grill operation in your oven, we recommend that use use the grill on tray, supplied together with your product (if your product includes this equipment). This way, splattering and dripping oils will not make the oven interior dirty. If you are going to use the large wire grill, insert a tray into one of the lower racks to avoid accumulation of the oils. To make cleaning easier, add some water into it as well. In a grilling operation, use the 3. Or the 4.rack and ail the grill to prevent the food to be grilled from sticking to the grill.
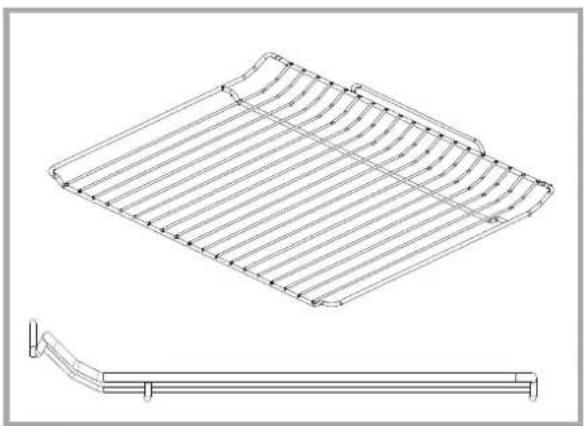
Wire grid: Used for grills or placing different containers other than the cooking tray on it.
Shallow tray: Used for baking pastry such as flans etc.
Deep tray: Used for baking stews.
Figure 8
Pan anti-tilting wire
natural_image
Technical line drawing of a grid-like structure with a separate 2D view of a bent pipe or support bracket (no text or symbols)- To locate grid correctly in the cavity, put it to any rack and push the grid up to the end.
- The pan anti-tilting wire must be placed inside of the cavity.
Removal of wire shelf
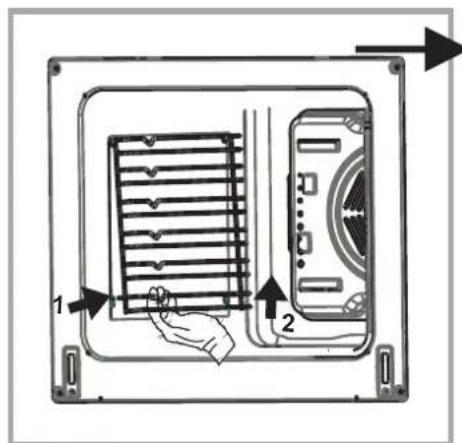
Pull the wire shelf as shown in the picture. After releasing it from clips, lift it up.
PART 5: CLEANING AND MAINTENANCE OF YOUR OVEN
5.1. CLEANING
Before starting to clean your oven, be sure that all control buttons are off and your appliance is cooled off. Unplug the appliance.
Do not use cleaning materials containing particles that might scratch the enamelled and painted parts of your oven. Use cream cleaners or liquid cleaners, which do not contain particles. As they might ahrm the surfaces, do not use caustic creams, abrasive cleaning powders, rough wire wool or hard tools. In the event the excess liquids spilling over your oven should burn, it may cause a damage to the enamel. Immediately clean up the split liquids. Do not use steam cleaners for cleaning the oven.
Cleaning the interior of the oven
Make sure to unplug the oven before starting to clean it. You will obtain best results if you clean the oven interior while the oven is slightly warm. Wipe your oven with a soft piece of cloth dampened with soap water after each use. Then wipe it again, this time with a wetted cloth, and wipe it dry. A complete cleaning using dry and powder type cleaners. For product with catalytic enamel frames, the rear and side walls of the inner frame do not require cleaning. However; depending on usage, it is recommended that you replace them after a certain period of time.
* The door seal may be cleaned using a sponge that has been soaked in lukewarm water. Do not use abrasive cleaners and do not crumble the seal.
* Check the door seals around the oven periodically. If the seals are damaged, please contact your nearest Technical Service Center and make change it with new one.
5.2. MAINTENANCE
Replacing the Oven Light
It is recommended that you leave this operation to the Authorized Service. Unplug the oven first and make sure that is cold. After removing the lid in front of the light, take also the bulb of its place. Insert the new bulb resistant to 300^ C, which you will find at Authorized Services, into the place of the bulb you have removed. Then fit the light protecting glass back into its place. After that, your oven will be ready for use.
6.1. REQUIREMENTS BEFORE CONTAINING TO SERVICE
If the oven does not operate :
The oven may be plugged off, there has been a black out. On models fitted with a timer, time may not be regulated.
If the oven does not heat :
The heat may be not adjusted with oven's heater control switch.
If the interior lighting lamp does not light :
The electricity must be controlled. It must be controlled whether the lamps are defective. If they are defective, you can change them as following the guide.
Cooking (if lower-upper part does not cook equally):
Control the shelf locations, cooking period and heat values according to the manual.
Except these, if you still have any problem with your product, please call to the "Authorized Service".
6.2. INFORMATION RELATED TO TRANSPORT
If you need any transport :
Keep the original case of product and carry it with its original case when need to be carried. Follow the transport signs on case. Tape the cooker on upper parts, hats and heads and saucepan carriers to the cooking panels.
Place a paper between the upper cover and cooking panel, cover the upper cover, than tape to the side surfaces of oven.
Tape carboard or paper onto the front cover on interior glass of oven as it will be suitable to the trays, for the wire grill and trays in your oven not damage to the oven's cover during transport. Also tape the oven's covers to the side walls.
If does not have the original case :
Take measure for external surfaces (glass and paintes surfaces) of oven against possible blows.
The symbol on the product or on its packaging indicates that this product may not be treated as household waste. Instead it shall be handed over to the applicable collection point for the recycling of electrical and electronic equipment. By ensuring this product is disposed of correctly, you will help prevent potential negative consequences for the environment and human health, which could otherwise be caused by inappropriate waste handling of this product. For more detailed information about recycling of this product, please contact your local city office, your household waste disposal service or the shop where you purchased the product.
NORDMENDE™
SOP500IX
DE
natural_image
Line drawing of a standard open oven with control knobs and door (no text or symbols)Werte Kunden,
1- Presentation and size of product
2-Warnings
3- Preparation for installation and use
4- Using the oven
5- Cleaning and maintenance of your product
6- Service and Transport
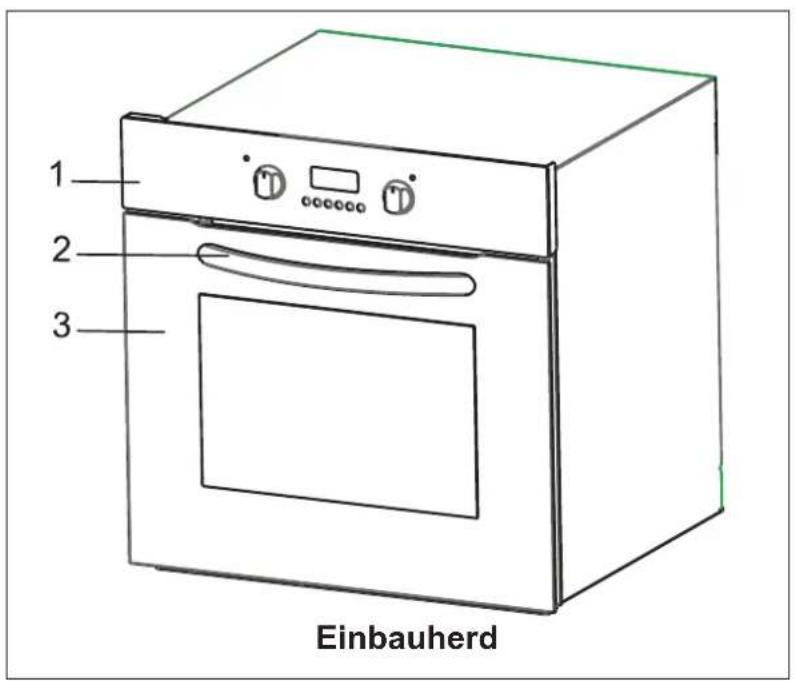
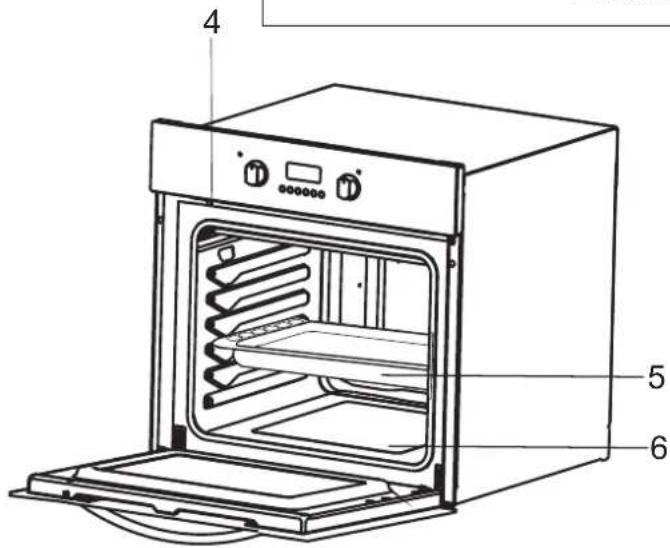
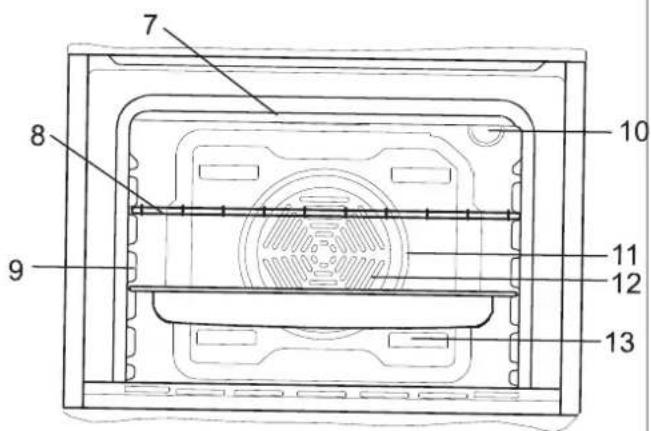
Abb. 1
LISTE DER BESTANDTEILE :
natural_image
Abstract diagram with a central dark band and surrounding dashed and solid lines, labeled 'Abb. 5' at bottom (no text or symbols within the diagram itself)natural_image
Diagram of a food storage or processing unit with two oval-shaped dishes inside, labeled Abb. 6 (no text or symbols on the diagram itself)natural_image
Technical line drawing of a grid-like structure with a separate extension view (no text or symbols)- Dear Customer,
- Contents
- PART 1: PRESENTATION AND SIZE OF PRODUCT
- LIST OF COMPONENTS :
- BEFORE STARTING TO USE THE APPLIANCE, PLEASE TAKE ALL ESSENTIAL SAFETY MEASURES AND THROUGHLY READ THE USER MANUAL
- FOR THE EFFICIENCY AND SAFETY OF THE APPLIANCE, WE RECOMMEND THAT YOU ALWAYS USE ORIGINAL SPARE PARTS AND CALL ONLY AUTHORIZED SERVICE PERSONNEL SHOULD YOU NEED HELP.
- PART 3: PREPARATION FOR INSTALLATION AND USE
- CONTACT THE AUTHORIZED SERVICE FOR INSTALLATION OF YOUR OVEN!
- CHOOSING A PLACE FOR THE OVEN
- INSTALLATION OF BUILT\_IN OVEN
- WIRING AND SAFETY OF BUILT\_IN OVEN
- The instructions given below must be followed without fail during wiring :
- GENERAL WARNING AND PRECAUTIONS
- CONTROL PANELS
- USING THE OVEN PART OF THE APPLIANCE
- Oven Function Control Knob:
- Oven Thermostat Knob:
- USING THE OVEN FUNCTION CONTROL BUTTON
- Defrost Function :
- Lower-Upper Heating Element Function (Static Coking) :
- Turbo Fan Function :
- Fan and the Lower - Upper Heating Element Function:
- Grill Function :
- Upper Heating Element and Grill Function :
- Grill and Fan Function :
- Pyrolytic cleaning function
- Pyrolytic Cleaning
- USING THE OVEN PROGRAMMER / DIGITAL TIMER
- Setting and using the oven programmer/timer
- Selecting manual operation mode
- Setting the time of day
- Setting the minute minder function
- Setting the duration function
- Setting the end cook function
- Setting the start and end time function
- Adjusting the audible signal
- ACCESSORIES USED IN THE OVEN
- Pan anti-tilting wire
- Removal of wire shelf
- PART 5: CLEANING AND MAINTENANCE OF YOUR OVEN
- CLEANING
- Cleaning the interior of the oven
- MAINTENANCE
- Replacing the Oven Light
- REQUIREMENTS BEFORE CONTAINING TO SERVICE
- If the oven does not operate :
- If the oven does not heat :
- If the interior lighting lamp does not light :
- Cooking (if lower-upper part does not cook equally):
- INFORMATION RELATED TO TRANSPORT
- If you need any transport :
- If does not have the original case :
- NORDMENDE™
- Werte Kunden,
- LISTE DER BESTANDTEILE :
Brand : NORDMENDE
Model : SOP500IX
Category : Oven