
32912 - Television SEG - Free user manual and instructions
Find the device manual for free 32912 SEG in PDF.


| Product Type | LCD Television |
| Display Technology | TFT LCD |
| Maximum Resolution | 1920 x 1080 pixels |
| Screen Size | 32 inches (estimated) |
| Tuner | VHF (Band I/III), UHF (Band U), Hyperband |
| RF Aerial Input | 75 Ohm (unbalanced) |
| Power Supply | 220-240 V AC, 50 Hz |
| Remote Control Batteries | 2 x AAA |
| Connections | HDMI, VGA (D-Sub 15), SCART, AV (RCA), Headphone, RF |
| Supported PC Input Modes | Various (up to 1920x1080) |
| Sound Output | Mono, Stereo, Dual I/II |
| Teletext | Yes |
| Child Lock | Yes |
| Sleep Timer | Yes (up to 2 hours) |
| Picture Modes | User, Cinema, Dynamic, Natural |
| Noise Reduction | Low, Medium, High, Off |
| Game Mode | Yes |
| HDMI True Black | Yes |
| Power Save Mode | Yes |
| VESA Mount | Not specified |
| Weight | Not specified |
| Dimensions (W x H x D) | Not specified |
Frequently Asked Questions - 32912 SEG
User questions about 32912 SEG
0 question about this device. Answer the ones you know or ask your own.
Ask a new question about this device
Download the instructions for your Television in PDF format for free! Find your manual 32912 - SEG and take your electronic device back in hand. On this page are published all the documents necessary for the use of your device. 32912 by SEG.
USER MANUAL 32912 SEG
natural_image
Diagram of a battery inside a housing with an arrow indicating rotation (no text or symbols)SAFETY PRECAUTIONS 9
Specifications 10
Supported PC Input Typical Display Modes 10
Step 1 - Installing the Batteries to the Remote 10
Step 2 - Control Touch Buttons ....10
Step 3 - Connecting External Devices 10
Step 4 - Connect Power and Antenna/Cable 11
Step 5 - Switching On/Off 11
Step 6 - First Time Installation 11
Menu Operation....11
Remote Control 12
Menu Features and Functions....12
SAFETY PRECAUTIONS
Read the following recommended safety precautions carefully for your safety.
Power Source: The TV set should be operated only from a 220-240 V AC, 50 Hz outlet. Ensure that you select the correct voltage setting for your convenience.
Power Cord: Do not place the set, a piece of furniture, etc. on the power cord (mains lead) or pinch the cord. The connection plug should be readily accessible to the power cord and mains. Handle the power cord by the plug. Do not unplug the appliance by pulling from the power cord and never touch the power cord with wet hands as this could cause a short circuit or electric shock. Never make a knot in the cord or tie it with other cords. The power cords should be placed in such a way that they are not likely to be stepped on. A damaged power cord can cause fire or give you an electric shock. When it is damaged and needs to be replaced, it should be done by qualified personnel.
Moisture and Water: Do not use this device in a humid and damp place (avoid the bathroom, the sink in the kitchen, and near the washing machine). Do not expose this device to rain or water, as this may be dangerous and do not place objects filled with liquids, such as flower vases, on top. Avoid from dripping or splashing. If any solid object or liquid falls into the cabinet, unplug the TV and have it checked by qualified personnel before operating it any further.
Cleaning: Before cleaning, unplug the TV set from the wall outlet. Do not use liquid or aerosol cleaners. Use a soft, dry cloth.
Ventilation: The slots and openings on the TV set are intended for ventilation and to ensure reliable operation. To prevent overheating, these openings must not be blocked or covered in anyway.
Heat and Flames: The set should not be placed near to open flames and sources of intense heat such as an electric heater. Ensure that no
open flame sources, such as lighted candles, are placed on top of the TV. Batteries should not be exposed to excessive heat such as sunshine, fire or the like.
Lightning: In case of storm and lightning or when going on holiday, disconnect the power cord from the wall outlet.

Replacement Parts: When replacement parts are required, make sure that the service technician has used replacement parts, which are specified by the manufacturer or have the same specifications as the original one. Unauthorized substitutions may result in fire, electrical shock or other hazards.
Servicing: Please refer all servicing to qualified personnel. Do not remove the cover yourself as this may result in an electric shock.
Waste Disposal: Packaging and packaging aids are recyclable and should principally be recycled. Packaging materials, such as a foil bag, must be kept away from children. Batteries, including those which are heavy metal-free, should not be disposed of with household waste. Please dispose of used batteries in an environmentally friendly manner. Find out about the legal regulations which apply in your area. Don't try to recharge batteries. Danger of explosion. Replace batteries only with the same or equivalent type. Cold cathode fluorescent lamp in LCD PANEL contains a small amount of mercury; please follow the local laws or regulations for disposal.
Disconnecting the Device: The mains plug is used to disconnect the TV set from the mains and therefore it must remain readily operable.
Headphone Volume: Excessive sound pressure from earphones and headphones can cause hearing loss.
Installation: To prevent injury, this device must be securely attached to the wall in accordance with the installation instructions when mounted to the wall (if the option is available).
LCD Screen: The LCD panel is a very high technology product with about a million thin film transistors, giving you fine picture details. Occasionally, a few non-active pixels may appear on the screen as a fixed blue, green or red point. Please note that this does not affect the performance of your product.
Warning: Do not leave your TV in standby or operating mode when you leave your house.
Connection to a TV Distribution System from Tuner Device connected to the protective earthing of the building installation through the mains connection or through other apparatus with a connection to protective earthing-and to a television distribution system using coaxial cable, may in some circumstances create a fire hazard. Connection to a cable distribution system has therefore to be provided through a device providing electrical isolation below a certain frequency range (galvanic isolator, see EN 60728-11).
Note: The HDMI connection between PC and TV may cause radio interference in which case it is recommended to use VGA(DSUB-15) connection.
Never let children use electrical device unsupervised. Children can't always recognize properly the possible dangers. Batteries / accumulators can be life threatening when swallowed. Store batteries unreachable for small children. In case of swallowing a battery medical aid has to be sought immediately. Also keep the packaging foils away from children. There is danger of suffocation.
Specifications
RF AERIAL INPUT 75 Ohm (unbalanced)
Transmission Standards: VHF (BAND I/III) UHF (BAND U) HYPERBAND
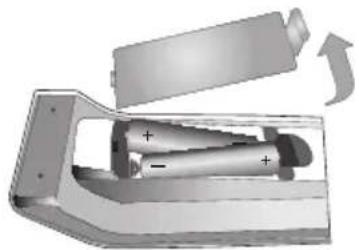
Step 1 - Installing the Batteries to the Remote
- Lift the cover on the back of the remote upward as shown in the figure to the right.
- Install two AAA batteries. Make sure to match the + and - ends of the batteries to the diagram in the battery compartment.
- Replace the cover.
natural_image
Diagram of a battery inside a housing with an arrow indicating rotation (no text or symbols)Step 2 - Control Touch Buttons
![[MENU] - + - PICH + TV/AV](/content/2026/05/792607/images/b6c44942039775086d8ae7054051c88461e7bb12dd355e346c2d9591addb88c8.jpg)
You can adjust the volume or change channels using -4+ and P/CH buttons on your TV.
Use TV/AV button to change sources.
Press - and - buttons at the same time to view the main menu.
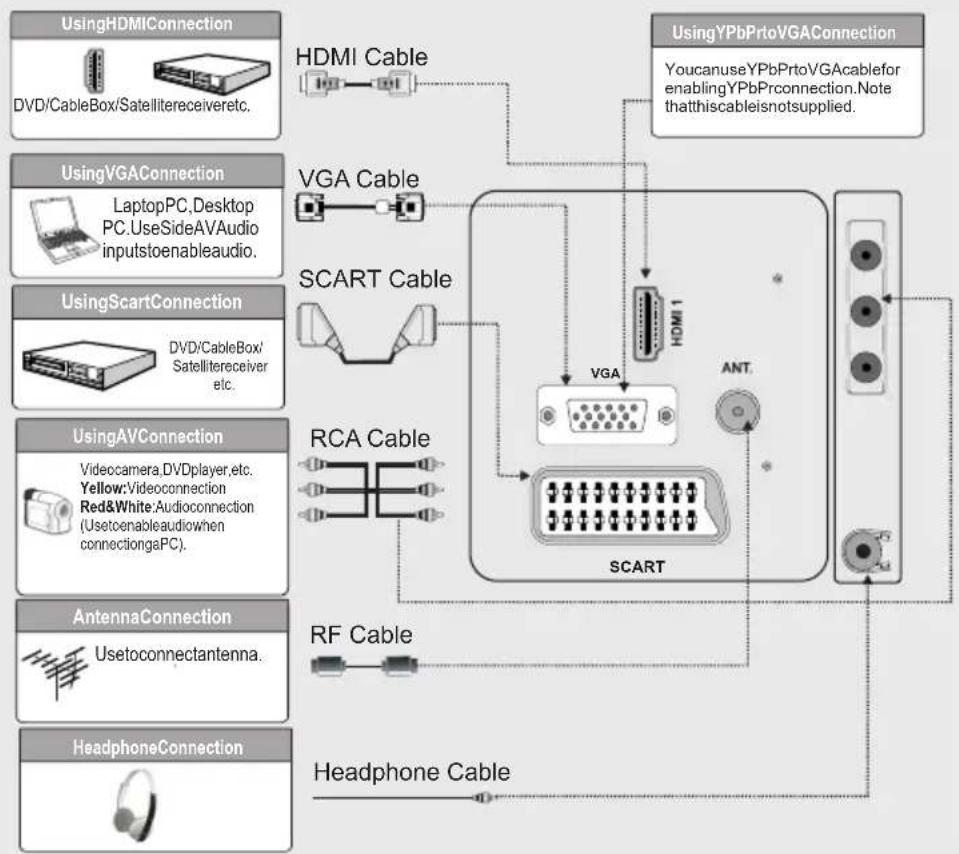
Step 3 - Connecting External Devices
flowchart
graph TD
    A["UsingHDMIConnection"] --> B["HDMI Cable"]
    C["UsingVGACConnection"] --> D["VGA Cable"]
    E["UsingScartConnection"] --> F["SCART Cable"]
    G["UsingAVConnection"] --> H["RCA Cable"]
    I["AntennaConnection"] --> J["RF Cable"]
    K["HeadphoneConnection"] --> L["Headphone Cable"]
    B --> M["HDMI 1"]
    D --> M
    F --> M
    H --> M
    J --> M
    L --> M
    M --> N["SCART"]
    style A fill:#f9f,stroke:#333
    style C fill:#f9f,stroke:#333
    style E fill:#f9f,stroke:#333
    style G fill:#f9f,stroke:#333
    style K fill:#f9f,stroke:#333
Note: It is recommended that the output resolution of a connected device via the HDMI input should be set to AUTO (or original). If the connected device does not include AUTO (or original) resolution, selecting 576i for non-HD content is recommended. If the connected device does not include AUTO (or original); or 576i options, watching non-HD content via the Scart or Side AV connectors is recommended.
Supported PC Input Typical Display Modes
The display has a maximum resolution of 1920 X 1080. Your TV may not support different resolutions. If you switch PC to an unsupported mode, a warning OSD will appear on the screen.
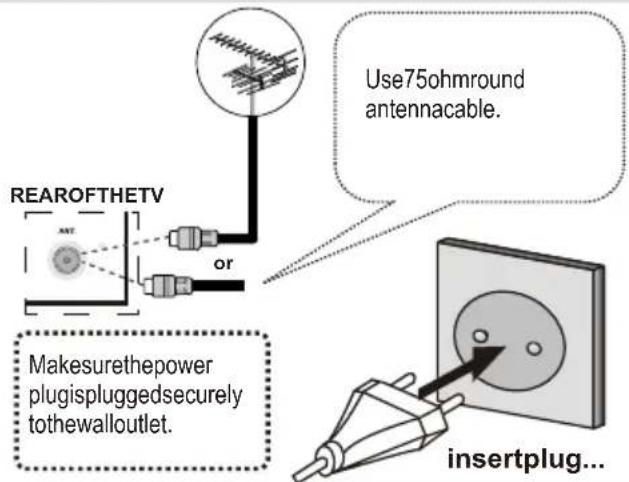
Step 4 - Connect Power and Antenna/Cable
Step 5 - Switching On/Off
Connect the power cord to the 220-240V AC 50 Hz. Then the standby LED lights up. Press and hold the "button" button on the TV, P+ / P- or a numeric button on the remote control. The TV will then switch on..
To Switch the TV Off
Press and hold the “•” button on the TV or on the remote control, so the TV will switch to standby mode. To power down the TV completely, unplug the power cord from the mains socket.
Step 6 - First Time Installation
The following menu appears on the screen for the first time you switch on your TV:
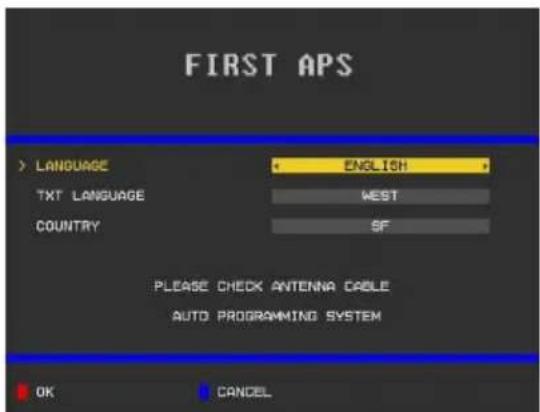
Select your Language, Text language and Country by using "▼ or " " ▲ and " " or ◀" buttons. Press "OK" or RED button to continue. To cancel, press BLUE button. The following menu will be displayed during the automatic tuning:
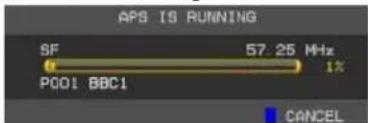
After APS is finalized, the programme table will appear on the screen. In the programme table you will see the programme numbers and names assigned to the programmes.
Input Selection
Once you have connected external systems to your TV, you can switch to different input sources. Press SOURCE button on your remote control consecutively for directly changing sources.
Changing Channels and Volume
You can change the channel and adjust the volume by using the V+/- and P+/- buttons on the remote. You can also change the channels by pressing the buttons on the front panel of your TV.
Changing Image Size: Picture Formats
Programmes can be watched in different picture formats, depending on the transmission received. You can change the aspect ratio (image size) of the TV for viewing the picture in different zoom modes. Press SCREEN button repeatedly to change the image size.
Menu Operation
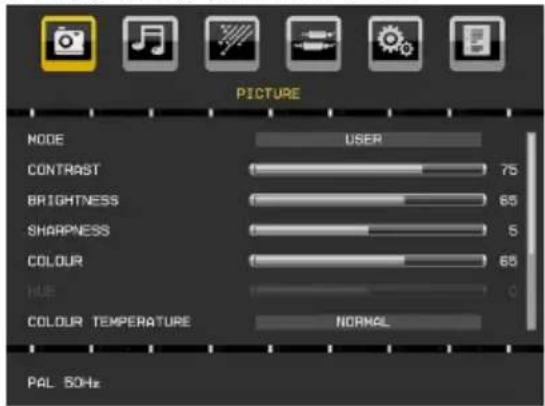
Press MENU button to view main menu. Use “◀” or “▶” button to select a menu icon and use “ ” or “ ” ▲ to highlight an item. Set an item by using “◀” or “▶” button. Press OK to confirm or enter.
Teletext
The teletext system is available if your broadcaster supports. The teletext system transmits information such as news, sports and weather on your TV. Basic remote control txt functions are as the following:
| Teletext On / Mix / Teletext Off | |
| ▶ | Subcode Pages |
| RETURN | Teletext index page |
| INFO | Reveal |
| SCREEN | Expand |
| P+/P- / 0-9 | Select page |
| Coloured Buttons | Operates accordingly |
Remote Control
- Standby
- Mono-Stereo / Dual I-II
- Expand (in TXT mode) / Image size
- Green / Picture menu
- Red / Sound menu
- Numeric buttons
- Teletext / Mix
- Cursor left
- Menu on/off
- AV / Source
- No function
- Volume Up
- Info / Reveal (in TXT mode)
- Mute
- Volume down
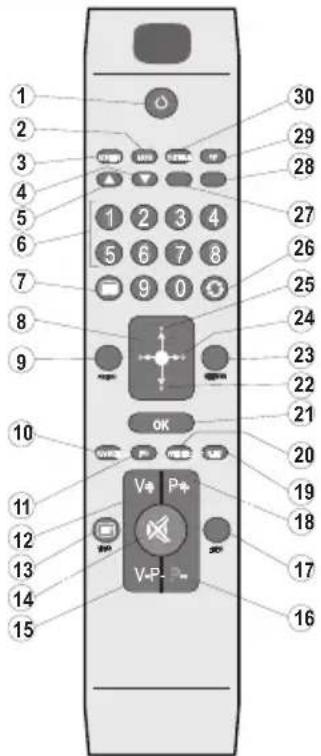
- Programme down
- No function
- Programme up
- Sleep timer
- Picture mode selection
- OK / Select / Hold (in TXT mode)
- Cursor down
- Return / Index page (in TXT mode)
- Cursor right / Subpage (in TXT mode)
- Cursor up
- Previous programme
- Yellow / Feature menu
- Blue / Install menu
- No function
- TXT Subtitle
Menu Features and Functions
| Picture Menu | |
| Mode | For your viewing requirements, you can set the related mode option. Picture mode can be set to one of these options: User, Cinema, Dynamic and Natural. |
| Contrast | Sets the lightness and darkness values of the screen. |
| Brightness | Sets the brightness value for the screen. |
| Sharpness | Sets the sharpness value for the objects displayed on the screen. |
| Colour | Sets the colour value, adjusting the colors. |
| Hue | Press “◀ or “▶button to set the level. Hue option can only be visible when the TV receives an NTSC signal. |
| Colour Temperature | Sets the desired colour tone. |
| Picture Zoom | Sets the picture size to Auto,16:9 or 4:3. |
| Reset | Resets the picture settings to factory default settings. |
| Advanced Controls | |
| Noise Reduction | If the broadcast signal is weak and the picture is noisy, use Noise Reduction setting to reduce the noise amount. Noise Reduction can be set to one of these options: Low, Medium, High or Off. |
| Film Mode | Turn this feature on when you are watching films to see the fast motion scenes clearly. |
| Dynamic Contrast | Sets the contrast level in accordance with the displayed content with regard to the selected mode. Dynamic contrast rate can be set to one of these options: Low, Medium, High or Off. |
| Skin Tone | Adjust the desired skin tone. |
| RGB Gain | You can configure the colour temperature values using the RGB Gain feature. |
| Game Mode | When Game Mode is set to On, specific game mode settings, which are optimized for better video quality, will be loaded. Picture Mode, Contrast, Brightness, Sharpness, Colour and Colour Temperature settings will be invisible and disabled while Game Mode is on. Picture mode selection button will have no function while Game Mode is on. |
| HDMI True Black | While watching from HDMI source, this feature will be visible in the Advance Settings menu. You can use this feature to enhance blackness in the picture You can set this feature as “On” for activating HDMI True Black mode |
| Sound Menu | |
| Volume | Adjusts volume level. |
| Equalizer | In equalizer menu, the preset can be changed to Music, Movie, Speech, Flat and User. Press the MENU button to return to the previous menu. Equalizer menu settings can be changed manually only when the Equalizer Mode is in User. |
| Balance | This setting is used for emphasizing left or right speaker balance. |
| Sound Mode | You can select Mono, Stereo, Dual I or Dual II mode, only if the selected channel supports that mode. |
| AVL | Automatic Volume Limiting (AVL) function sets the sound to obtain fixed output level between programmes (For instance, volume level of advertisements tend to be louder than programmes). |
| Reset | Resets the picture settings to factory default settings. |
| Feature Menu | |
| Sleep Timer | Sets sleep timer. The timer can be programmed between Off and 2 hours (120 minutes) in steps of 10 minutes. If Sleep Timer is activated, at the end of the selected time, the TV goes automatically to standby mode. |
| Child Lock | Enables or disables child lock. When On is selected, the TV can only be done by the remote control. In this case the control panel buttons will not work, except for the Standby/On button. When Child Lock is activated you are able to switch the TV to Standby mode with the Standby/ On button. To switch the TV on again, you need the remote control. Hence, if one of those buttons is pressed, Child Lock is Open will be displayed on the screen when the menu screen is not visible. |
| Language | Sets the language. |
| Default Zoom (Optional) | While zoom mode is set as AUTO, the TV will set the zoom mode in account with the signal of the broadcast. If there is no WSS or aspect ratio information the TV will then use this setting to adopt. Press▼” or “▲button to select Default Zoom. You can set Default Zoom to 16:9 or 4:3 pressing “◀” or “▶” button. |
| Blue Background | Activates or deactivates blue background system when the signal is weak or absent. |
| Menu Timeout | Changes timeout duration for menu screens. |
| TXT Language | Sets the teletext language. |
| EXT Out | Enables or disables EXT Out. For copying from a DVD or VCR device, you should choose desired source from source menu and turn “On” to EXT Out from a menu. Ext Out should be On in order to use Timers function in the DTV mode. |
| Auto TV Off | You can set the timeout value of auto off feature. After the timeout value is reached and the Tv is not operated for selected time, the TV will go off. |
| Store Mode | If you set store mode to “ON”, your TV’s features will be illustrated on the top of the screen. To deactivate this feature, please set to “OFF”. |
| Backlight (optional) | Sets Backlight to Auto, Medium, Maximum or Minimum. |
| Power Save Mode (optional) | Sets Power Save Mode as On or Off. If you set Power Save Mode as On, the TV will switch to energy-saving mode and luminance level of TV set will be decreased to optimum level. Note that some picture settings will be unavailable to be changed when the TV is in Power Save Mode. |
| Source Menu | |
| Once you have connected optional equipment systems to your TV, you should select the required input to view pictures from that source. In source menu, highlight a source by pressing “▼” or “▲” button and switch to that mode by pressing “OK” button. With the◀” or ▶buttons you can set Off or On. When Off is selected; this source does not appear in the OSD when you press the “SOURCE” button of the remote control.Note: YPbPr mode can be used only when you connect a device that has a YPbPr output through the PC-VGA input with YPbPr to PC cable (YPbPr cable is not supplied). | |
| Install Menu | |
| Program | Use “◀or “ ”button to select the program number. You can also enter a number using the numeric buttons on the remote control. There are 200 programme storage between 0 and 199. |
| Band | Band can be selected either C or S |
| Channel | Channel can be changed by “◀or “ ”button or numeric buttons. |
| Colour System | Use “◀or “ ”button to change the colour system to AUTO, PAL or SECAM. |
| Sound System | Press “◀or “ ”button to change the sound system to BG, DK, I, L or L’. |
| Fine Tune | You can use this setting for fine tuning channels. |
| Search | Use “◀or “ ”button to start programme searching. You can also enter the desired frequency using the numeric buttons while Search item highlighted. |
| Store | Press “▶” or OK button to store the settings. “Stored...” will be displayed on the screen. |
| Program Table Menu | |
| Using the program table and by moving the cursor in four directions you can reach 20 programmes in the same page. You can scroll the pages up or down by pressing the navigation buttons to see all the program in TV mode (except for the AV modes). By cursor action, programme selection is done automatically. | |
| Name | To change the name of a programme, select the programme and press the RED button. The first letter of the selected name will be highlighted. Press “▼or “ ”▲button or numeric buttons to change that letter and “ ” ◀or “▼” button to select the other letters. By pressing the RED button, you can store the name. |
| Delete | To delete a programme, press the YELLOW button. Pressing the YELLOW button again erases the selected programme from the programme list, and the following programmes shift one line up. |
| Move | Select the programme which you want to move by using the navigation buttons. Press the GREEN button. By using the navigation buttons move the selected programme to the decided programme space and press the GREEN button again. |
| APS | Deletes all stored channels and settings, resets TV to factory settings and starts first time installation. See the First Time Installation section for more information on this process. |
| PC Position Menu | |
| Autoposition (in PC mode) | Automatically optimizes the display. Press OK to optimize. |
| H Position (in PC mode) | This item shifts the image horizontally to right hand side or left hand side of the screen. |
| V Position (in PC mode) | This item shifts the image vertically towards the top or bottom of the screen. |
| Phase (in PC mode) | Depending on the resolution and scan frequency that you input to the TV set, you may see a hazy or noisy picture on the screen. In such a case you can use this item to get a clear picture by trial and error method. |
| Dot Clock (in PC mode) | Dot Clock adjustments correct the interference that appear as vertical banding in dot intensive presentations like spreadsheets or paragraphs or text in smaller fonts. |
Dear Customer;
This appliance is manufactured with TFT LCD Display technology.
An image is created with colour light points called pixels in TFT-LCD appliances.
Each pixel consists of 3 sub-pixels [fixed colour (red, green, blue) light points].
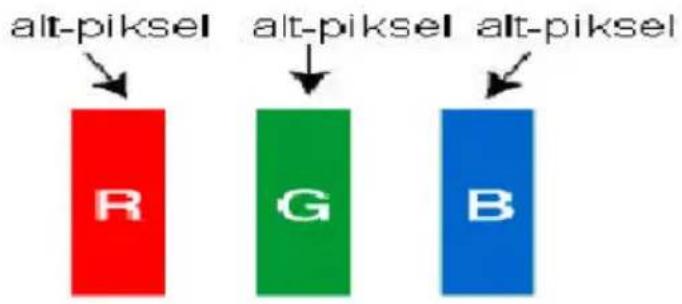
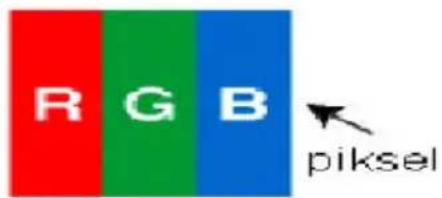
As a requirement of production technologies, the abovementioned sub-pixels may cause
"sub-pixel errors" by way of lighting continuously or remaining dim continuously.
Please consider the following explanation about a possible sub-pixel error.
This problem can be encountered during the production phase as well as during use.
Sub-pixel errors are mainly 2 types.
Type 1 : The sub-pixel lighting continuously (may be red, green or blue)
Type 2 : The sub-pixel which is continuously dim (seems black)
The sub-pixel errors determined according to the ISO 13406-2 standard are given in the following table.
| Type | Explanation | Quantity | Note |
| Type 1 | Random (at 5 mm or higher intervals) | 2 | Within the compass of the criterion, not intervened |
| Adjacent 2 pixels | 1 | Within the compass of the criterion, not intervened | |
| Adjacent 3 or more pixels | Off-criterion | ||
| Type 2 | Random (at 5 mm or higher intervals) | 7 | Within the compass of the criterion, not intervened |
| Adjacent 2 pixels | 2 | Within the compass of the criterion, not intervened | |
| Adjacent 3 or more pixels | Off-criterion | ||
| Type 1 and Type 2 Total | 7 | Within the compass of the criterion, not intervened | |
IMPORTANT WARNINGS
1. Rights reserved by the manufacturer:
The manufacturer reserves the right to change the features stated in the product or in the user's manual of the product without giving any information, when required by the improvements in technology.
2. Warnings about Screen Technology:
Due to TFT and Plasma technologies, there may be inactive or continuously shining white, red or blue pixels in the screen. This does not affect the performance of the product, and it is not a failure. The related details are given in the related pages of the user's manual. The manufacturer does not have any responsibility in the cases within the compass of the criteria.
3. A continuous fixed image on the screen:
Due to TFT and Plasma technologies, “burning” effect may arise in the screen after a continuous fixed image on the screen, displaying the same background continuously or watching a 4:3 video on a 16:9 television for a long time. In order to avoid this effect, it is highly recommended that you follow the followings.
Do not watch a fixed image continuously.
Do not watch videos in the format of 4:3 in your television which supports the format of 16:9.
Try to use contrast and brightness at a minimum level.
4. In Full HD products;
The expected performance may not be achieved in TV broadcasts and the broadcasts of satellite receivers which are not supported by other sources in terms of high definition, DVD players or cable television; and in these broadcasts, mosaic images may occur, sharpness and resolution of the image may be low; some effects may arise on the screen. This is not a failure. It is advisable to watch high definition broadcasts for your TV which supports high definition (1920x1080) to work with a high performance as a requirement of the Full HD technology. The expected performance may not be achieved in TV broadcasts and the broadcasts of satellite receivers which are not supported by other sources in terms of high definition, DVD players or cable television; and in these broadcasts, mosaic images may occur, sharpness and resolution of the image may be low; some effects may arise on the screen. This is not a failure. If your appliance supports high definition, it is recommended that you use high definition broadcast sources in order to achieve a high screen performance as a requirement of the high definition (HD) technology.
5. About Working Sound of the Appliance:
A working sound may be generated in the electronic circuits in your appliance as a requirement of its technology depending on the current on it while running or in standby status. This sound can sometimes be heard depending on the sensitivity of human ear and watching distance although it is within the compass of the standards. This sound does not affect the performance of your appliance and it is not a failure.
6. Make sure that the panel (screen) of your appliance is never subjected to any external mechanical impact:
The panels (screens) of the TFT-LCS televisions are not only a piece of glass; on the contrary they are composed of layers. If your appliance is damaged in its panel (screen) which is the front part by an external impact, the inner layer of the screen might be broken / cracked even when no break/crack arises in the layer of the screen which is the closest to the outer environment. This can be technically detected by the authorized service. Therefore, make sure that the panel (screen) of your appliance is never subjected to any external mechanical impact. Otherwise, as any damage “caused by an external hit” is considered as a usage error, the manufacturer will not have any legal responsibility.
7. About the use of the appliance:
The appliance you purchased was produced for home-type use, and it can be used only at home and for the specified purposes, not for commercial or collective use. Otherwise, the manufacturer and the dealer will not be responsible for the failures within the period of warranty and free repair, which is determined in the provisions of the Act on the Protection of Consumers.


- SAFETY PRECAUTIONS
- Read the following recommended safety precautions carefully for your safety.
- Specifications
- Step 1 - Installing the Batteries to the Remote
- Step 2 - Control Touch Buttons
- Step 3 - Connecting External Devices
- Supported PC Input Typical Display Modes
- Step 4 - Connect Power and Antenna/Cable
- Step 5 - Switching On/Off
- To Switch the TV Off
- Step 6 - First Time Installation
- Input Selection
- Changing Channels and Volume
- Changing Image Size: Picture Formats
- Menu Operation
- Teletext
- Remote Control
- Sub-pixel errors are mainly 2 types.
- IMPORTANT WARNINGS
- Rights reserved by the manufacturer:
- Warnings about Screen Technology:
- A continuous fixed image on the screen:
- In Full HD products;
- About Working Sound of the Appliance:
- Make sure that the panel (screen) of your appliance is never subjected to any external mechanical impact:
- About the use of the appliance:
Brand : SEG
Model : 32912
Category : Television