
MP300 - Projector 3M - Free user manual and instructions
Find the device manual for free MP300 3M in PDF.


| Product Type | Portable LED Video Projector |
| Brand | 3M |
| Model | MP300 |
| Dimensions (W x D x H) | 120 x 90 x 40 mm |
| Weight | 0.3 kg |
| Power Supply | AC 100-240V, 50/60 Hz via adapter |
| Power Consumption | 30 W typical |
| Light Source | LED, 20,000 hours life |
| Brightness | 300 ANSI lumens |
| Native Resolution | WVGA (854 x 480) |
| Contrast Ratio | 1000:1 |
| Projection Lens | Manual focus |
| Projection Distance | 0.5 m - 3 m |
| Image Size (Diagonal) | 20 - 100 inches |
| Input Ports | HDMI, VGA, USB-A, 3.5 mm audio |
| Output Ports | Headphone jack |
| Built-in Speaker | 1 W mono |
| Noise Level | < 30 dB |
| Operating Temperature | 5°C to 35°C |
| Storage Temperature | -20°C to 60°C |
| Cleaning | Wipe lens with soft, dry cloth |
| Safety Features | Auto-off after 15 minutes idle, vented chassis |
| Spare Parts | Remote control, power adapter available |
| Repairability Index | 6.5/10 |
Frequently Asked Questions - MP300 3M
User questions about MP300 3M
0 question about this device. Answer the ones you know or ask your own.
Ask a new question about this device
Download the instructions for your Projector in PDF format for free! Find your manual MP300 - 3M and take your electronic device back in hand. On this page are published all the documents necessary for the use of your device. MP300 by 3M.
USER MANUAL MP300 3M
Mobile Projector MP300
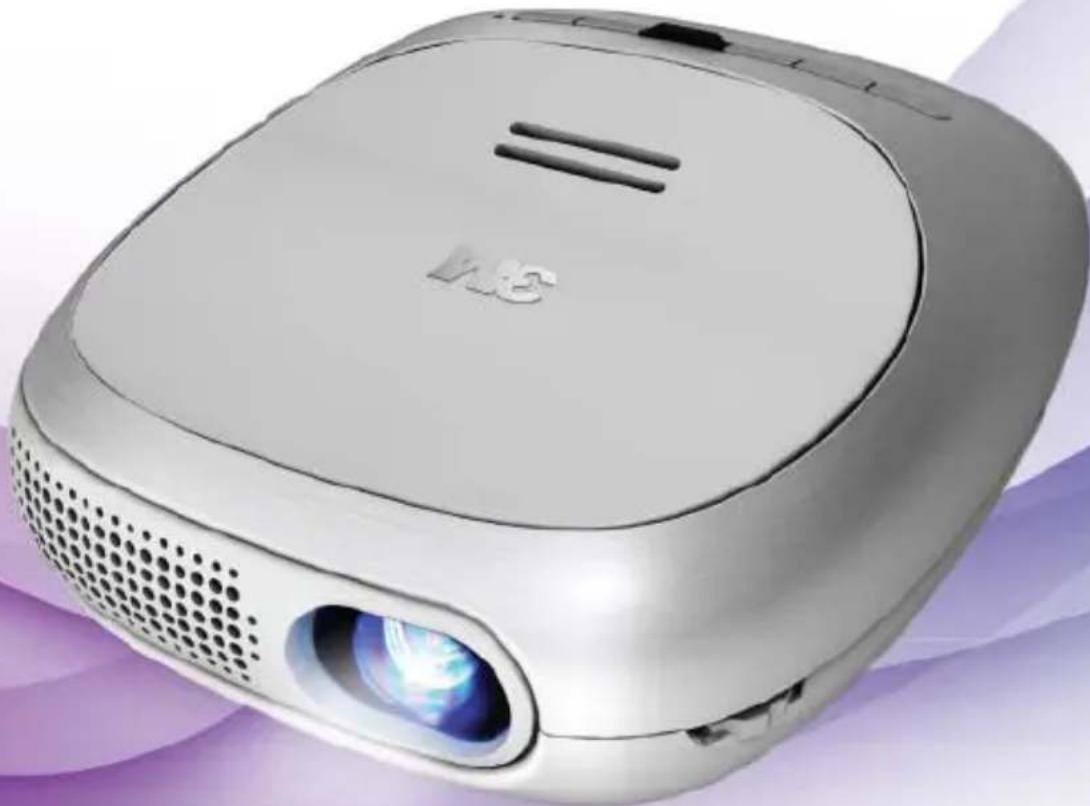
natural_image
Silver analog projector with visible lens and ventilation slots (no text or symbols)User Manual
3M ^TM Mobile Projector MP300
Important Notice
All statements, technical information, and recommendations related to 3M's products are based on information believed to be reliable, but the accuracy or completeness is not guaranteed. Before using this product, you must evaluate it and determine if it is suitable for your intended application. You assume all risks and liability associated with such use. Any statements related to the product which are not contained in 3M's current publications, or any contrary statements contained on your purchase order shall have no force or effect unless expressly set forth in a written agreement signed by an authorized officer of 3M.
Technical Support
For technical support, call 1-866-631-1656 or email meetings@mmm.com
Copyright, Trademarks and Properties Notices
3M and the 3M logo are trademarks of 3M Company. Used under license in Canada. MHL and the MHL logo are a trademark, registered trademark or service mark of MHL, LLC in the United States and/or other countries.
High Definition Multimedia Interface (HDMI) is a registered trademark of HDMI Licensing, LLC in the United States and/or other countries.
iPad is a trademark of Apple, Inc., registered in the U.S. and other countries.
DLP and the DLP® logo are trademarks of Texas Instruments.
DisplayPort, Certified DisplayPort, Dual-mode DisplayPort and VESA are registered Trademarks of the Video Electronics Standards Association.
microSD ^™ and the microSD logo are Trademarks of the SD Card Association.
All other product names are trademarks, registered trademarks, or servicemarks of their respective owners.
Intended Use Statement
The 3M ^TM Mobile Projector MP300 is designed to operate with the 3M Power Adapter and an HDMI ^® or MHL ^TM enabled device in environments that meet these conditions.
- 0^ to 35^ (32° to 95°F)
• 10–80% RH (without condensation) - 0–1829 m (0–6000 feet) above sea level
Continued exposure to smoke, grease, oil and other airborne contaminants can affect the operation or performance of the projector. Use of this product in adverse conditions will void the product warranty.
Safety Information
Please read, understand, and follow all safety information contained in these instructions prior to the use of this projector. Retain these instructions for future reference.
| Explanation of Signal Word Consequences | |
| Warning: | Indicates a potentially hazardous situation, which, if not avoided, could result in death or serious injury and/or property damage. |
| Caution: | Indicates a potentially hazardous situation, which, if not avoided, may result in minor or moderate injury and/or property damage. |
Warning
To reduce the risk associated with hazardous voltage, fire, explosion, battery leakage or overheating which may cause serious injury or death:
- Do not leave the product in a car or in direct sunlight for extended periods of time. (-20 C to 70 C)
- Do not disassemble/ modify the product or attempt to remove the battery.
- Do not attempt to service this product. Contact manufacturer.
- Do not use the product in water or a damp environment.
- Do not use a damaged product, cables or power adapter.
- Charge with 3M power adapter only.
- Do not dispose of the remote control battery by incineration or fire.
To reduce the risks associated with driver distraction:
- Do not shine light into the driver's eyes.
- Driver should not operate product while driving.
To reduce the risks associated with choking:
- Keep the remote control, all cables, and small parts away from young children.
To reduce the risks associated with hearing loss:
- Be sure to read earphone manufacturer's instructions with respect to volume level.
- User is responsible to set a safe volume level.
To reduce the risk of injury to small children:
- Supervise the use of this product by small children.
- Keep small children away from the projector lens when the product is powered on.
Caution
To reduce the risk associated with environmental disposal hazards which may cause minor or moderate injury:
- Dispose of the product and accessories in accordance with the federal, state, local or regional laws which cover the disposal of electrical and electronic waste.
To reduce the risks associated with projector LED bright light:
- Do not look directly into the projector lens or shine it into anyone's eyes.
To reduce the risks associated with tripping and falling:
- Position the cables so that they are not a tripping hazard.
To reduce the risk of muscle strain which if not avoided may cause minor or moderate injury:
- Do not mount or position the projector in awkward viewing positions.
SAVE THESE INSTRUCTIONS
Introduction
Thank You
This product has been produced in accordance with 3M quality and safety standards to provide smooth and trouble-free use in the years to come. For optimum performance, please follow the operating instructions carefully.
Product Features
Quick, seamless visual presentations are critical in today's business world, however, projectors often act as a roadblock to accomplishing this fundamental task. Many professionals are opting for lugging around a huge projector, renting a projector at a substantial cost, or opting for no projector at all and eating the cost of printing color presentations. Say goodbye to these frustrations. Say hello to simple, plug-n-play projection. Introducing the 3M^TM Mobile Projector MP300
- Ultra portable – small enough to put into a coat pocket with up to 3.5 hour battery life
- Quick set up – turn on and present in seconds
- Built in speaker
- Bright enough for a variety of settings – 60 lumens (not designed for brightly lit environments)
- Beautiful design – intuitive plug-n-play interface
- HDMI/MHL – mirror* your iPad®, tablet, laptop and smartphone device
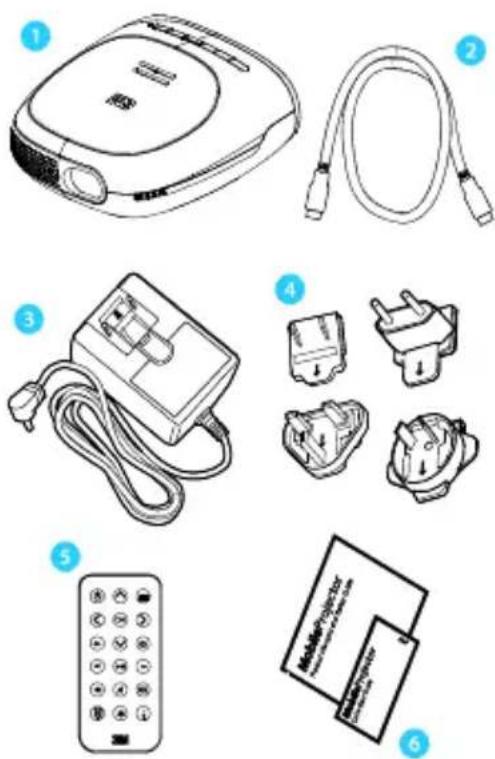
Package Contents
The 3M™ Mobile Projector MP300 comes with the following items. If you are missing any of these items please contact 3M.
1 3M Mobile Projector MP300
2 HDMI Cable
3 Power Adapter
4 Outlet Adapters (4)
5 Remote Control
6 Product Warranty and Safety Guide and Quick Start Guide
Parts of Projector
Front-Top View
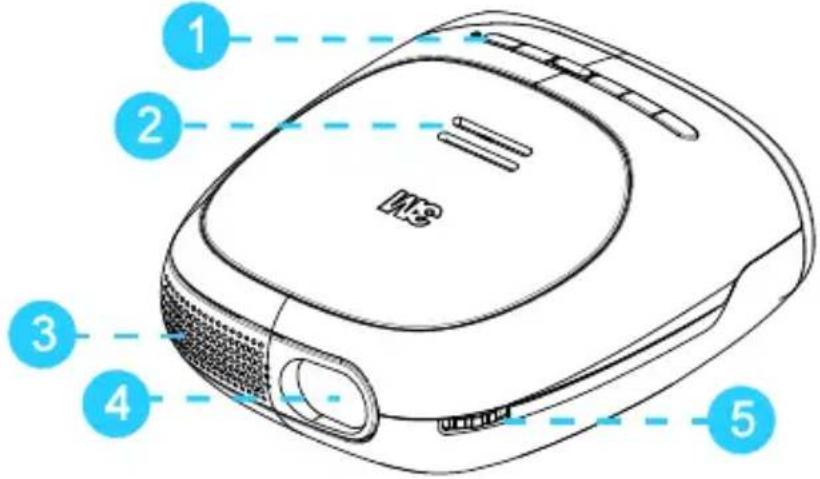
1 Button Panel - Turn on and control projector
2 Speaker
3 Air Vent - Do not block the air vents while projector is operating or cooling down. This will cause projector to overheat and automatically turn off.
4 Projection Lens
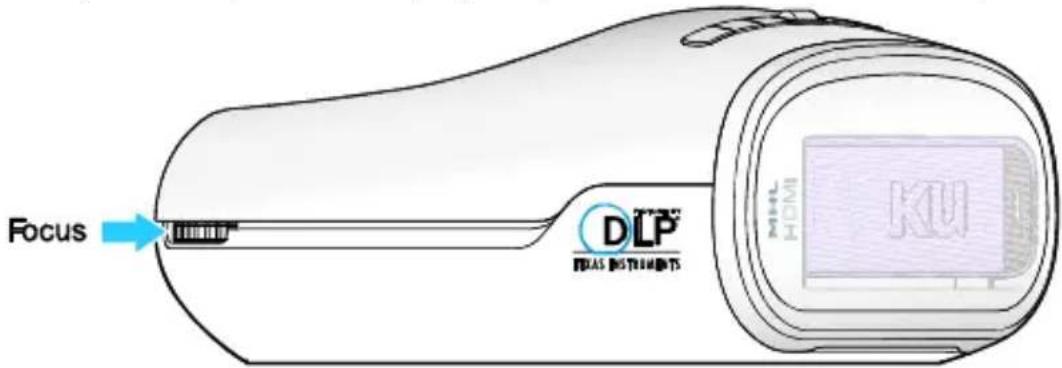
5 Focus Wheel - Adjusts the image sharpness
Bottom-Rear View
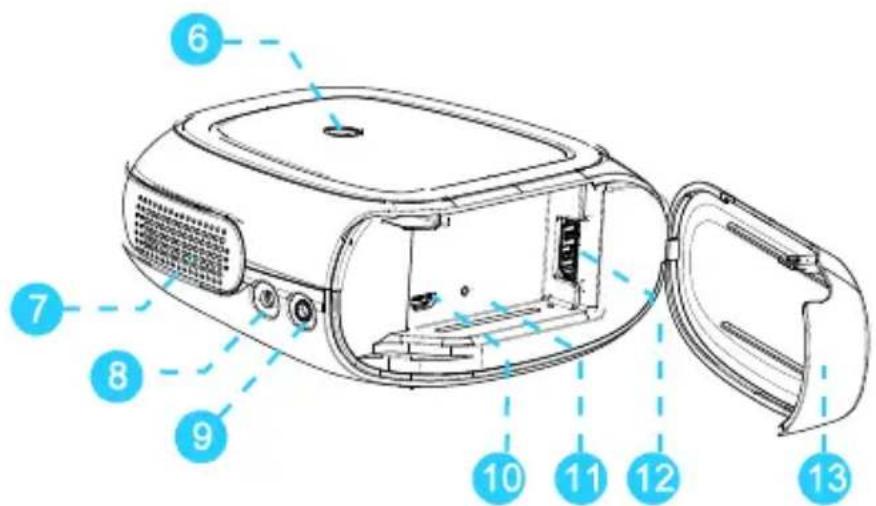
6 Tripod Mount
7 Air Vents - Do not block fans or vents while projector is operating or cooling down. This will cause projector to overheat and automatically turn off.
8 DC Input - Powers the projector or charges the battery using the 3M power supply.
9 Audio Output – Allows you use earphones or external speakers instead of the built-in speaker.
10 Service Ror
11 Projector Reset Button
12 HDMI/MHL Port – Receives HDMI and MHL signal from compatible video devices
13 Cover
Projector Button Panel
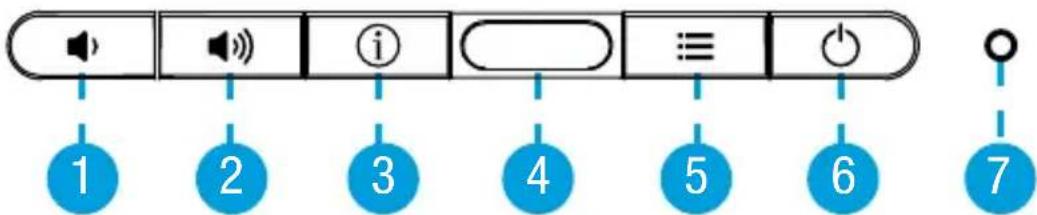
1 Volume Down Button -Turns down speaker or audio out output. Down and Left Arrow for projector menu system.
2 Volume Up Button - Turns up speaker or audio out output. Up and Right Arrow for projector menu system.
3 Information Button – Opens the projector information window.
4 Remote Control Receiver - Accepts commands from 3M remote control.
5 Menu Button – Opens the projector menu
6 Power Button - Powers the projector on and off.
7 Status Light – Provides the projector's power and charging status.
Parts of Remote Control
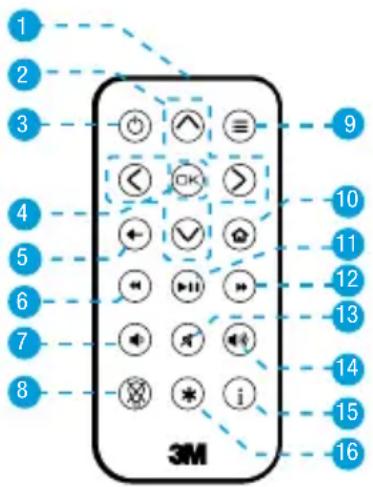
1 Infrared LED – Transmit remote control commands to projector.
2 Arrow Buttons – Moves the selector or cursor in projector menu or the MHL enabled device's screen.
3 Standby – Turns the projector's lamp off or on.
4 OK Button – Press to select or click an item.
5 Back Button – Press to open previous screen on the MHL enabled device.
6 Rewind – Rewinds video and music during playback.
7 Volume Down - Decreases the audio volume.
8 Lamp ON/OFF – Turn off the projector lamp while keeping projector power on.
9 Menu Button – Press to open the projector menu.
10 Home Button – Press to open the Home screen on the MHL enabled device.
11 Fast Forward – Advances video music playback.
12 Play/Pause - Start or Pause video or music playback.
13 Volume Up – Increases the audio volume.
14 Info Button – Opens the projector information window and is the select button when the projector menu is open.
15 Options – View more options on the MHL-enabled device.
Getting Started
In the following section, charge the projector's battery, and turn on the projector.
Power Adapter
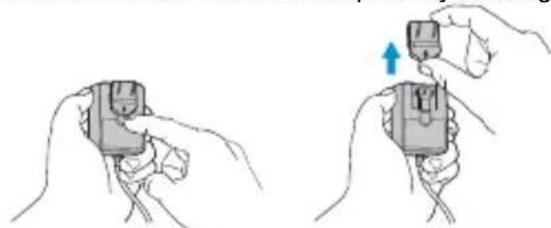
The power adapter is used to charge the battery or power the projector. There are four outlet adapters. When the power adapter is first shipped, it is fitted with a blank outlet adapter. This must be removed before installing an outlet adapter.
Installing an Outlet Adapter
1 Press the "PUSH" button on the underside of the power adapter.
2 Remove the blank outlet adapter by sliding up.
natural_image
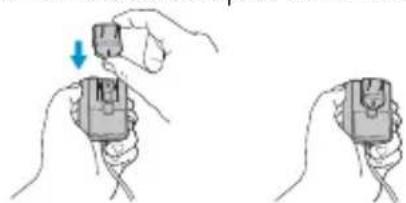
Illustration of two hands holding a small device with a blue arrow indicating the change (no text or symbols present)3 Select the outlet adapter that will plug into your wall outlet and align to the power adapter.
4 Slide the outlet adapter down until it clicks into place.
natural_image
Illustration of two hands holding a small electronic device with a blue arrow indicating the change (no text or symbols present)Charging the Battery
The rechargeable battery in 3M Mobile Projector MP300 gives you up to three hours of battery life while in ECO lamp mode. When the battery needs to be charged, the status indicator LED starts flashing red. The battery should be fully charged before using the projector for the first time.
Charge the battery:
1 Turn the projector power off.
2 Connect the power adapter to the projector's DC input.
3 Connect the other end of the power adapter to the electrical outlet.
4 The status indicator will change to amber while the battery is charging.
5 Allow three hours to fully charge the battery. When charging is complete, the status indicator will flash green.
Battery Charging Notes:
- If the projector power is off, allow three hours for the battery to fully recharge. If the projector power is on, the battery will take longer to charge.
- The battery has a lifespan and ages every time it is fully charged and discharged. The battery will gradually lose charge capacity as it ages.
Battery Maintenance Tips:
- Charge and discharge the battery by turning on the projector at least once a month.
- When storing the projector for more than a month, store it at 50% charge.
- The battery is at 50% charge when half of the battery icon is white.
- Do not store the projector when it is fully discharged. It will lose the ability to charge.
Turning on and off the Projector
Press the power button on the projector to turn on the projector. After the projector is powered on for the first time, you use the power button the projector or remote control to turn the projector on and off.
MHL-enabled device such as a smartphone receives power from the projector. You can turn off the projector's lamp without turning off the MHL-enabled device. The Lamp On and Off button is on the remote control.
Turning the Projector On: Press the power button on the projector or remote control.
Note: Some devices that receive their power from the projector and might take 30 seconds or more to become ready to use.
Turning the Projector Off: Press and hold the power button until the projector turns off.
Turning the Lamp On and Off: You can turn the projector's lamp off without turning the projector off by pressing the lamp button on the remote control. The projector lamp will turn off immediately while the cooling fans continue to run.
While the projector's lamp is off, the status indicator remains green. This tells you that the lamp is off but the projector is still on. Press Lamp On/Off button on the remote again and the lamp will turn on.
Important Note: Even though the lamp is off, the projector continues to use a power and generate heat. The projector will turn off if it overheats or looses battery power. You prevent the projector from turn off by keeping the air vents clear and plugging it into the power adapter.
Status Indicator lights
The status indicator light provides information about the projector's power, battery, and error status.
| Status Indicator Light Meaning |
| Solid amber The projector is charging. |
| Solid green The projector is on. |
| Flashing green The projector is finished charging. |
| Flashing amber The projector has overheated. |
| Flashing red The battery power is low. |
Setting up the Projector
The projector is quick and easy to setup. You can project the image onto most flat surfaces. This section covers positioning the projector, focusing the image, and adjusting the brightness and contrast settings.
Choosing a surface
The best surface for the image is a flat, white surface. In most cases, lightly textured walls do not affect the image quality. Alternatively, a color wall will change the hue of the image. You can either point the projector at a wall or projector screen or a ceiling.
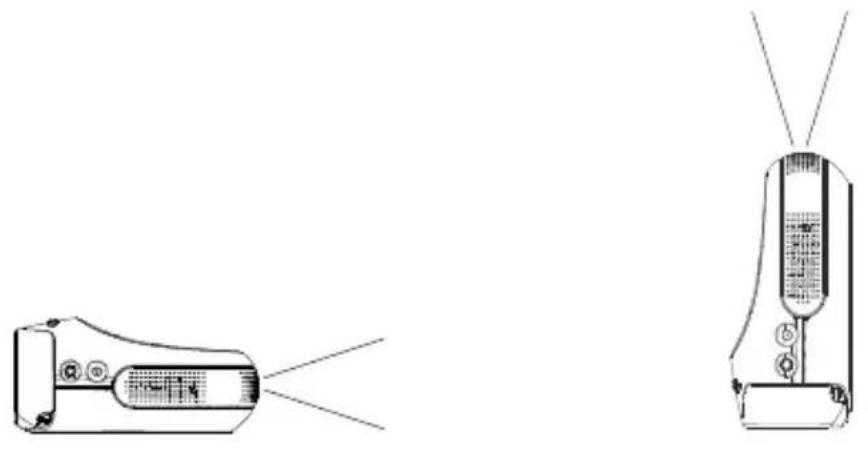
Placing the projector
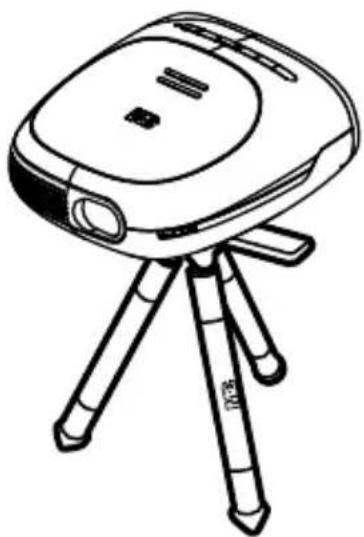
Place the projector on a stable surface. You can place the projector on its foot or on the rear cover. You can even attach the projector to a tripod.
natural_image
Technical line drawing of a handheld device with two views: front view and side view (no text or symbols)Attaching the Projector to Tripod (Optional Accessory)
On the bottom of the projector, you will find a tripod socket (1/4"-20) that fits most standard camera tripods, including the optional 3M tripod (78-6972-0073-7).
natural_image
Line drawing of a tripod-mounted surveying instrument with no text or symbolsDistance versus Image Size
The 3M Mobile Projector can project an image from 10 inches (22.1 cm) to 80 inches (265.7 cm) diagonal. As you increase the size of the projected image, you will need to decrease (darken) the ambient room lighting. Refer to the chart for associated dimensions.
| Image Size Distance | ||||
| Diagonal Width Heigh | t | |||
| 10 in (25.4 cm) | 8 3/4 in (22.1 cm) | 4 7/8 in (12.4 cm) | 16 5/8 in (42.2 cm) | |
| 20 in (50.8 cm) | 17 3/8 in (44.3 cm) | 9 3/4 in (24.9 cm) | 33 1/4 in (84.3 cm) | |
| 35 in (88.9 cm) | 30 1 | /2 in (77.5 cm) | 17 1/8 in (43.6 cm) | 58 1/8 in (147.6 cm) |
| 45 in (114.3 cm) | 39 1/4 in (99.6 cm) | 22 in (56.0 cm) | 74 3/4 in (189.7 cm) | |
| 55 in (139.7 cm) | 47 in (121.8 cm) | 26 in (68.4 cm) | 91 1/4 in (231.9 cm) | |
| 65 in (165.1 cm) | 56 5/8 in (143.9 cm) | 31 7/8 in (80.9 cm) | 107 7/8 in (274.1 cm) | |
| 76 in (193.0 cm) | 66 1/4 in (168.3 cm) | 37 1/4 in (94.6 cm) | 126 1/8 in (320.4 cm) | |
| 80 in (203.2 cm) | 69 3 | /4 in (177.1 cm) | 39 1 | /4 in (99.6 cm) |
Adjusting the Focus
After you find a place for the projector, rotate the focus wheel to sharpen the image.
Adjusting the Brightness and Contrast settings
You can use the projector brightness and contrast settings to adjust the image based on the lighting conditions.
Adjusting the Brightness
Adjust the brightness setting until details in the dark levels of the image appear. If you are unable to see the detail, try reducing the image size or the lighting in the room.
Using the Remote: Press the menu button at the top-right of the remote control; press Ok button; press the right arrow to increase the brightness or the left arrow button to decrease the brightness. You can exit the menu by pressing the menu button twice.
Using the Projector Keypad: Press the menu button; press the Info button; press the volume down to decrease the brightness and volume up to increase the brightness. You can exit the menu by pressing the menu button twice.
Adjusting Contrast
Adjust the contrast setting until details in the bright level of the image appear.
Using the Remote: Press the menu button at the top-right of the remote control; press the down arrow; press Ok button; press the right arrow to increase the contrast brightness or the left arrow button to decrease the contrast. You can exit the menu by pressing the menu button twice.
Using the Projector Keypad: Press the menu button; press the Info button; press the volume down to decrease the brightness and volume up to increase the brightness. You can exit the menu by pressing the menu button twice.
Volume Up/ Down
The volume buttons on the projector and the remote control adjust the sound from the speakers or the audio output. Additionally, MHL enabled devices plugged into the projector can adjust the projector volume level using the device's remote.
Display Volume Level: Press the volume up or down button to display the volume slider.

natural_image
Simple black and white graphic of a speaker with sound waves, no text or symbols present.Increase or Decrease Volume: Press the volume up button to increase the audio volume or press the volume down to decrease the audio volume.
Quickly Increase or Decrease Volume: Press and hold the volume up button to quickly increase the audio volume or press and hold the volume down to quickly decrease or mute the audio volume.
Mute the Sound: Press the volume up and down on the projector at the same time or press the mute button on the remote control.
Remote Control
The 3M remote control controls the projector, or any MHL enabled device plugged into the projector.
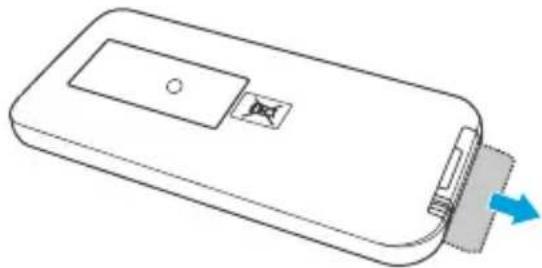
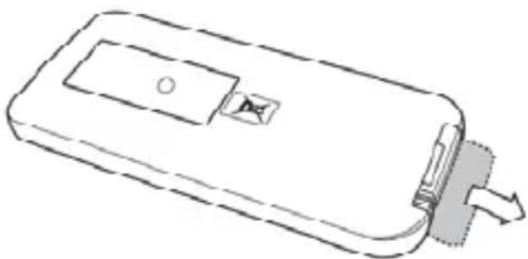
Remove Protective Film
Before you can begin using the remote control, you must remove the protective film from the battery compartment. Remove the film as shown below.
natural_image
Line drawing of a rectangular electronic device with a blue arrow indicating direction (no text or symbols)Using the Remote
When using the remote control, point the remote control's infrared transmitter at the receiver on the projector. Sometimes you can control the projector by pointing the remote at the surface in front, beside, or above the projector. The remote control's range is up to 20 feet.
Note: Sun light and some indoor lighting may reduce the range of the remote control.
Replacing the Battery in the Remote Control
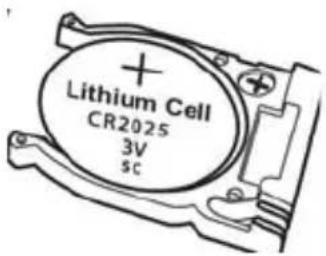
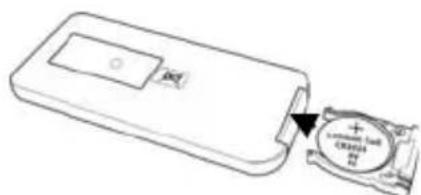
Replace the battery in the remote control with a CR2025 battery.
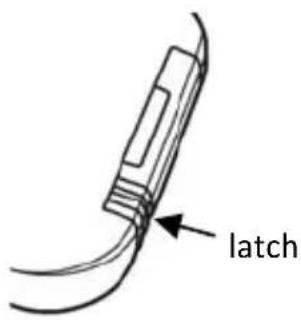
- Remove the battery and battery tray by holding latch toward the center of the tray and then pull the tray out of the remote control.
- Place the new battery into the tray and orientating the battery positive size (+) as indicated on the tray.
- Finally, slide the tray into the remote control.
Connecting to other devices
The 3M Mobile Projector connects to other digital video devices such as tablets, computers, smartphones, and dvd players. Compatible device will most likely have one of the following video output connector:
| Description | Connector on Device | Cable Connector | Example Devices |
| HDMI® | 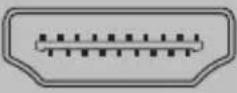 | 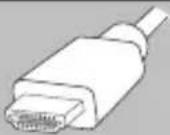 | DVD Players, BluRay DVD Players, Game Consoles, Set-Top Boxes, Computers |
| Mini-HDMI | 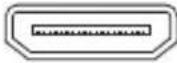 | 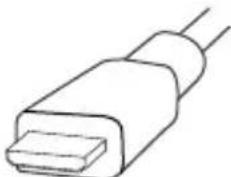 | Portable Digital Media Player, Computers |
| Micro HDMI |  | 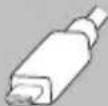 | Tablet and Smartphones |
| Micro USB (MHL) |  | 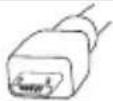 | Tablets and Smartphones |
| Display Port® | 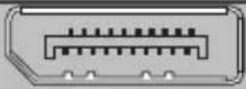 | 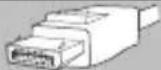 | Computers |
Notes:
- Not all devices with a microUSB port are MHL enabled devices. Check the device's specification before purchasing a MHL cable.
- Some products have proprietary connectors not shown above (such as the dock connector on the Apple iPad or iPhone.) Check for a digital video accessory adapters or cable from the manufacture.
Connecting to the Projector
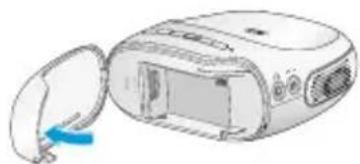
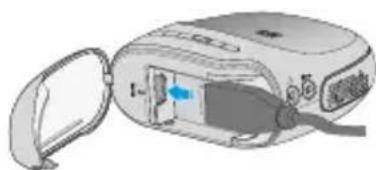
The HDMI/MHL port on the projector can accept a standard HDMI connector. Once you plug the cable into the port, you can close the cover.
- Open Cover
natural_image
Illustration of a portable electronic device with a blue arrow pointing to its side panel (no text or symbols visible)- Plug in HDMI cable
natural_image
Illustration of a computer monitor with an open lid and cable, showing internal components (no text or symbols)- Route the cable and close the cover
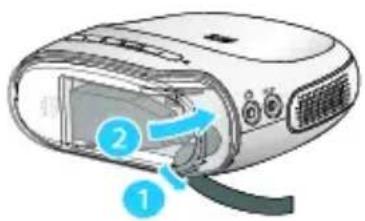
Connecting to a MHL Device
The 3M Mobile Projector supports MHL through the HDMI port. While playing video and audio from your MHL compatible device, the 3M Mobile Projector charges your device. Additionally, you can control your device using the projector's remote control. The standard MHL cable has a microUSB connector on one end and a HDMI connector on the other.
1 Connect the HDMI end of cable to the projector's HDMI/MHL input.
2 Connect the other end of the cable to the device's microUSB port (MHL).
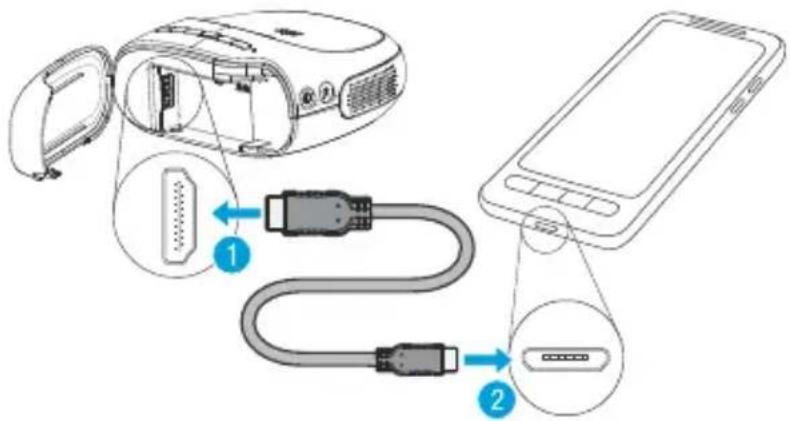
Notes:
- MHL cable not included. This cable is also known as a "passive MHL cable".
- Please reference the device's user manual and specification for compatibility with MHL.
Connecting to a HDMI Video Device
The 3M Mobile Projector can playback video and audio from a device with HDMI output.
1 Connect the HDMI end of the cable to the projector's HDMI/MHL input.
2 Connect the other end of the cable to the video device's audio and video outputs.
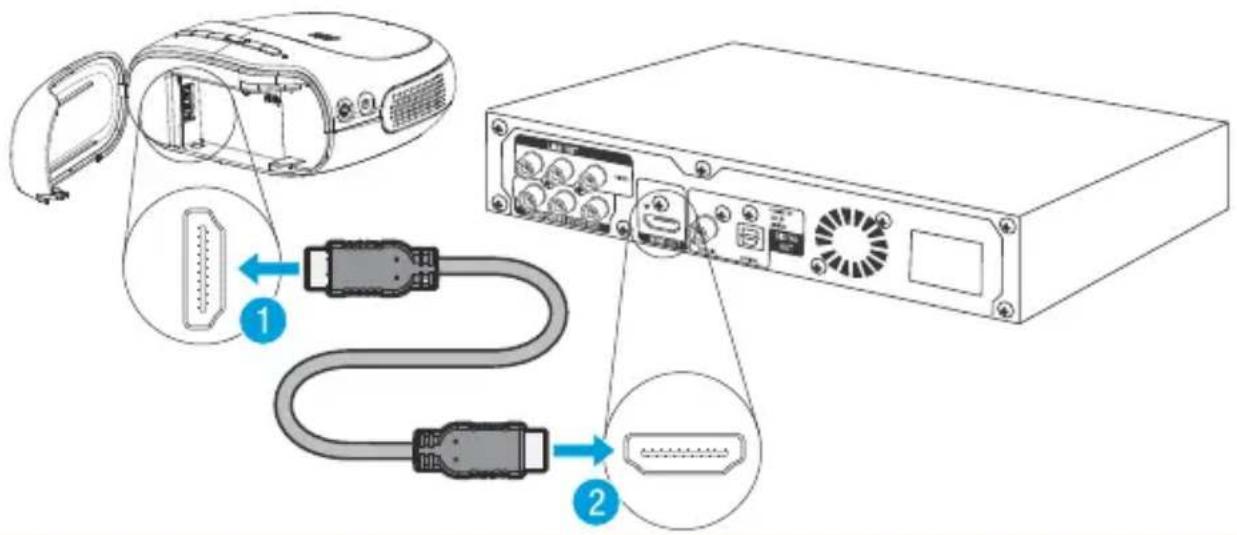
Notes:
- HDMI not included.
- Please reference the device's user manual and specification for compatibility with HDMI.
Connecting to a Display Port® Video Device
The 3M Mobile Projector can play video and audio from your Display Port compatible device. You will need a Display Port to HDMI Adapter or cable.
1 Connect DisplayPort to HDMI adapter into device.
2 Connect the HDMI end of the cable to the projector's HDMI/MHL input.
3 Connect the other end of the cable into the HDMI port on the adapter.
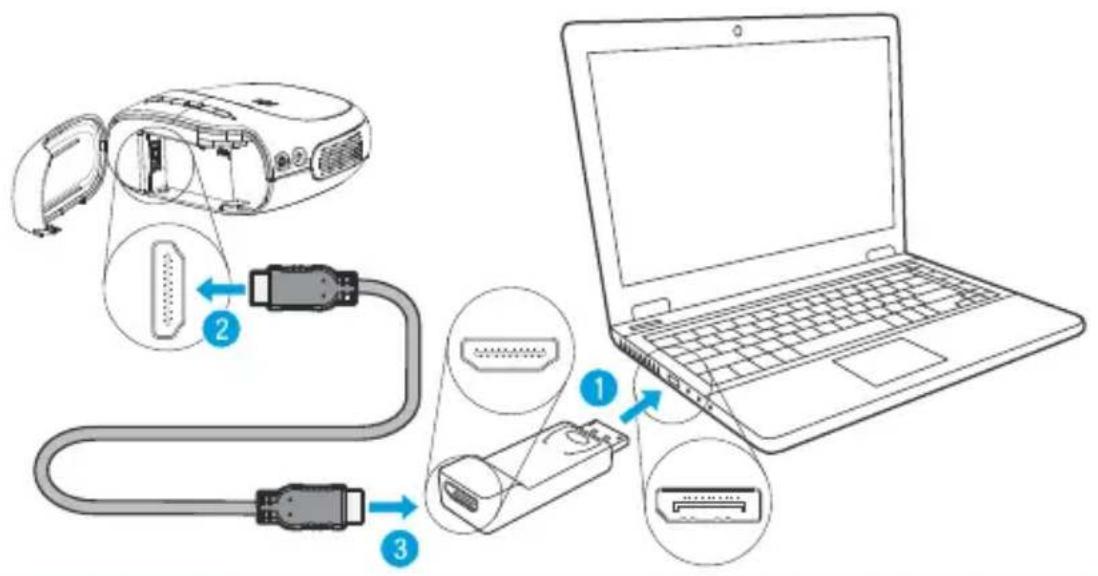
Notes:
- The DisplayPort adapter and HDMI Cable are not included.
- Please reference the device's user manual and specification for compatibility with Display Port.
Menu
The projector's menu allows you to adjust the brightness, contrast, lamp power, and picture mode. The following section description each setting and how the navigate the menu system.
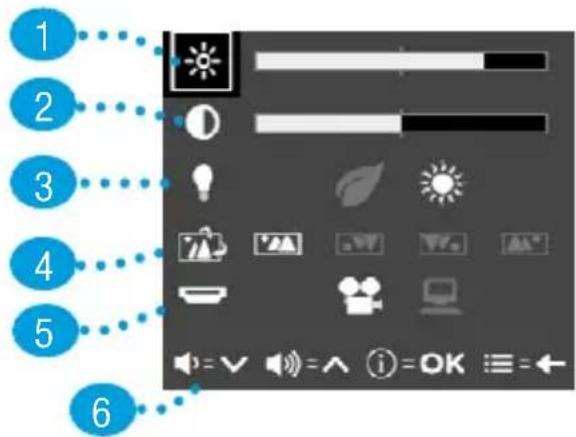
| Item | Menu Item | Description |
| 1 | Brightness | Adjusts the dark levels of the image. |
| 2 | Contrast | Adjusts the bright levels of the image. |
| 3 | Lamp Powe | r Switches between standard and eco mode. Eco mode extends the battery life by reducing the power and brightness of the lamp. - Eco- Normal (Default) - Eco- Normal (Default) |
| 4 | Image Changes the image orientation | |
| Orientation |  - Normal (Default) - Normal (Default) | |
 - Upside down - Upside down | ||
 - Upside down and mirrored - Upside down and mirrored | ||
 - Mirrored - Mirrored | ||
| 5 Picture Mode Changes the image based on the input type: video or computer. | ||
| 6 Navigation Help | Since the buttons on the projector have multiple purposes, the navigation help provides a key for the buttons on the projector. | |
Using the menu
You can navigate the menu using the buttons on the projector or the remote control. Open the Projector Menu: Press the Menu button.
Select a Menu Item:
- Projector Control Panel: Press the Volume Up and Down to move the selector.
- Remote Control: Press the up or down arrows
Adjust Menu Item:
- Projector Control Panel: Press the Info button and press Volume Up and Down to adjust the setting.
- Remote Control: Press the Ok or right arrow and then press right or left button to adjust the setting.
Return to Menu Item Selection: Press the Menu button or press OK on the remote control.
On-Screen Icons
One of the these icons will appear when the projector does not detect an input, detects an MHL device but no input, or the video resolution is not supported.
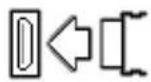
- No input detected
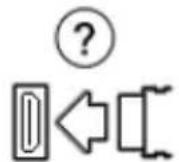
- video resolution is not supported

- A MHL device is detected but the video signal is not detected.
Information Screen
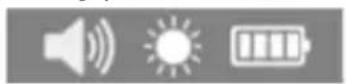
Press the Info button on the remote or projector to open the information screen. The information shows you the if the sound is muted or not, the lamp power level and battery power level.
Reset Button
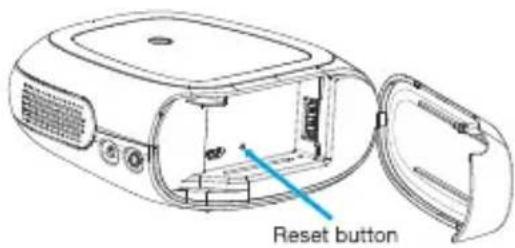
The reset button restarts the projector in the event the projector stops responding. Reset the projector by disconnecting the video input and power, and then press the reset button using an uncoiled paper clip. This will turn off the projector and allow you to turn the projector on again.
Cleaning the Projector
1 Turn off the projector and disconnect power and other cables.
2 Use a soft cloth, such as the 3M^TM High Performance Cleaning Cloth, to wipe off dust. If the dust is difficult to remove, dampen the cloth with clean water and then wipe the projector clean. Then use a clean cloth to dry the projector.
Important Note: Do not use cleaning chemicals or solvents to clean the projector. Cleaning chemicals and solvents may cause the plastic parts to discolor.
Troubleshooting
The Power Adapter and Charging the Battery
I do not see where to insert the outlet clip into the power adapter.
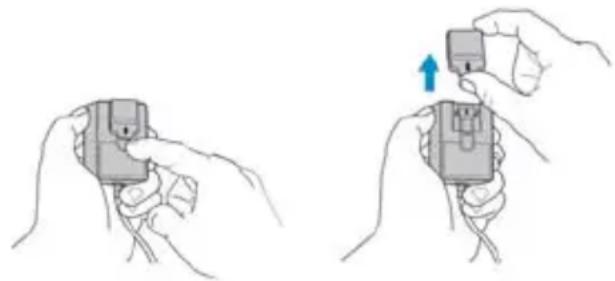
- There is a blank clip inserted into the power adapter when it is shipped. Remove the blank clip which covers the power adapter contacts. Now install an outlet clip.
natural_image
Illustration of two hands holding a device with a blue upward arrow indicating motion (no text or symbols)I do not see an amber light when I plug the power adapter into the projector.
- Make sure the power outlet is working.
- Make sure the connector from the power adapter is plugged into the "DC In" on the projector and not the headphone jack.
- When fully charged, the LED indicator will flash green.
Installing the HDMI or MHL cable into the Projector
The HDMI or MHL cable will not insert into the projector.
- There may be a dust cap on the end of the connector. Remove it before inserting connector into the projector.
- When you insert the connector, make sure the connector orientated correctly.
The cover hits the cable when I close the cover.
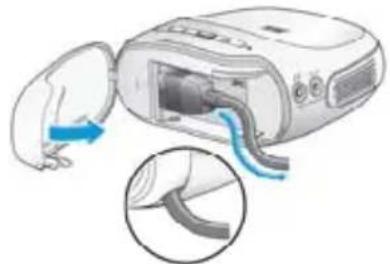
- There is a cutout on the bottom corner of the cover for the cable to exit. Route the cable down and to the right then close the cover.
natural_image
Illustration of a computer monitor with cable being inserted, showing internal components and cable routing (no text or symbols)The cover does not close properly.
- There is tab on the bottom corner of the cover. Make sure the tab inserts into the groove on the projector and the rest of the cover snaps into place.
Turning the Projector On or Off
The projector will not turn on.
- The battery is not charged. Plug the power adapter into the projector and try again.
The projector button panel is on but the projector is not projecting an image.
- The video source (such as the DVD Player) is outputting a black image. First, try disconnecting the HDMI video cable. Do you see the 3M^TM logo screen? If not, try turning off the projector and turning it on again. If you still do not see a 3M Logo screen while the status indicator is green, contact 3M for additional support.
• The Lamp is off. Press the Lamp ON/Off button on the remote control.
The remote control will not turn on the projector.
- When the projector is new and never been turned on, you must use the power button on the projector. Now you can turn on the projector by pressing the power button on the projector or the remote control.
The status indicator on the projector flashes red.
- The projector's battery needs to be charged.
Setting Up the Projector
The projector falls over when I place it on its rear cover.
- The cover may not be seated properly. There is a tongue on the bottom corner of the cover. Insert the tongue into the groove on the projector and the rest of the cover will snap into place.
The image is tinted or discolored.
- The wall or surface you're projecting onto is colored. Try projecting onto a white wall or surface.
- The lens may be dirty. Use a dry cotton swab to clean it off.
Focusing the Image
The image is blurry.
- Use the focus wheel on the side of the projector (next to the lens) to sharpen the image.
- Reduce the input resolution. The native resolution of projector is 480p. Therefore, resolutions greater than 720p may appear blurry.
- If you are closer to the projected image than the projector, you might be seeing the individual pixels that make up the image. Reduce the size of the image or move away from the image.
The image is too dim.
- Reduce the image size and/or decrease (darken) the room lighting.
The image seems bright enough but there are no details in the dark shadows.
- Open the projector menu and increase brightness setting and then decrease the contrast slightly.
The image seems bright enough but there are no details in the highlights.
- Open the projector menu and decrease contrast.
Adjusting the Volume
There is no audio coming out of the speaker
- Turn up the volume or turn off mute.
- Turn up the volume on the external speakers.
- There may be a moment of silence in the show you are watching.
Using the Remote Control
The remote control does not work.
- Remove the plastic film that is in-between the battery and the remote control.
natural_image
Line drawing of a rectangular electronic device with a handle and internal components (no text or symbols)- Replace the battery. The battery size is a CR 2025.
- The remote control is out of range of the projector. The remote control's range is up to 20 feet.
- Sunlight or lighting in the room can interfere with the projector's reception of the remote control's signal.
Product Specification
| Imager | Technology | TI | DLP |
| Size | 0.3" | ||
| Resolution | WVGA 854 x 480 Pixels | ||
| Aspect | Ratio | 16:9 | |
| Projection Distance | 16 5/8 in. – 199 1/4 in. (42.2– 506 cm) | ||
| Image Size | 10 in. – 80 in. Diagonal (25.4– 203.2 cm) | ||
| Throw Ratio (Diagonal: Distance) | 1:1.66 | ||
Lens Offset 100%
Inputs DC-in, HDMI (MHL)
Audio Outputs 1x2 Watt Speaker, Headphone Jack
| Video Compatibility | NTSC, PAL |
| Video Resolutions | 480p,576p, 720p,1080i |
| Dimensions | 4.33 x 4.21 x 2 in. (110 x 107 x 51.6mm) |
| Weight | ≤ 15.9 oz ( ≤ 450 g) |
| Tripod Socket | 14'' - 20 |
| Operating Conditions | Temperature Range | 32 – 95°F (0-35°C) |
| Humidity Range | 10–80% RH without | |
| Altitude Range | Sea Level to 1,829 m |
| Power Consumption | 11.5 Watts (Standard Lamp Mode) |
| 7.0 Watts (Eco Lamp Mode) |
Battery Specification
Type Rechargeable Lithium-Ion Battery
Rated Capacity 7.4 V, 2600mAh
Video and Audio Support
The following list is the resolutions are supported by the projector. The projector displays a WVGA (854x480) image. The best input resolution for the projector is 480p. Other higher resolution will be reduced to 480p resolution.
Video Support
| Description | Resolution (width x height) | Refresh Rate | Aspect Ratio |
| 480p 640x480p | 59.94/60 Hz 4:3 | ||
| 720x480p | 59.94/60 | ||
| 720x480p | 59.94/60 Hz 16:9 | ||
| 576p | 720x576p | 50 | Hz |
| 720x576p | 50 Hz | 16:9 | |
| 720p | 1280x720p | 59.94/60 | Hz |
| 1280x720p | 50 Hz | 16:9 | |
| 1080i | 1920x1080i | 59.94/60 Hz | 16:9 |
| 1440x1080i | 50 Hz | 16:9 | |
Audio Support
Audio Format: Linear PCM,
Number of Channels: 2
Sampling Frequency: 32, 44.1, and 48 kHz
Number of Bits Per Sample: 16, 20 or 24 bits
3M™ Mobile Projector MP300
Accessory List
Call 1-866-831-1656 to order 3M accessories.
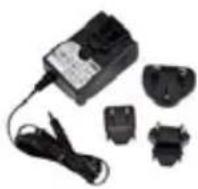
3M Power Adapter Kit
78-6972-0123-0
Replacement power supply and battery charger
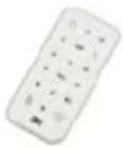
3M Remote
78-6972-0124-8
Replacement Remote Control
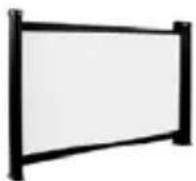
3M ^™ Portable Screen:
78-6972-0059-6
Double the brightness of your image for a professional look. Fits up to a 26" image.
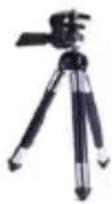
3M™ Tripod:
78-6972-0073-7
A snap to set up, collapse and carry. Legs extend 12".
Limited Warranty
The 3M™ Mobile Projector MP300 (the “3M Product”) is warranted to be free from defects in material or manufacture for a period of 90 days from the date or purchase. If the product does not conform to the warranty within the warranty period, 3M’s exclusive obligation is to repair, replace or refund the purchase price of the non-conforming product. To the extent permitted by law, 3M will not be liable for indirect, incidental, special or consequential damages, irrespective of the legal theory asserted. If the product needs service, please call 1-866-631-1656. For the detailed terms and conditions of the warranty go to http://www.3MPocketProjector.com/support, or contact us at 1-866-631-1656 or meetings@mmm.com
Regulatory Notices
FCC STATEMENT - CLASS B
This equipment has been tested and found to comply with the limits for aClass B digital device, pursuant to part 15 of the FCC Rules. These limits are designed to provide reasonable protection against harmful interference in a residential installation. This equipment generates, uses and can radiate radio frequency energy and, if not installed and used in accordance with the instructions, may cause harmful interference to radio communications. However, there is no guarantee that interference will not occur in a particular installation. If this equipment does cause harmful interference to radio or television reception, which can be determined by turning the equipment off and on, the user is encouraged to try to correct the interference by one or more of the following measures:
- Reorient or relocate the receiving antenna.
- Increase the separation between the equipment and receiver.
- Connect the equipment into an outlet on a circuit different from that to which the receiver is connected.
- Consult the dealer or an experienced radio/TV technician for help.
NOTICE: This Class B digital apparatus complies with Canadian ICES-003.
INSTRUCTIONS TO USERS: This equipment complies with the requirements of FCC equipment provided that the following conditions are met. If the cables include a EMI ferrite core, attach the ferrite core end of the cable to the projector. Use the cables which are included with the projector or specified.
Note: Changes or modifications not expressly approved by the party responsible for compliance could void the user's authority to operate the equipment.
CE Statement
ElectroMagnetic Compatibility Statement: Meets 2004/108/EC Directive Low Voltage Directive: Meets 2006-95-EC Directive.
WEEE Statement
The following information is only for EU-members States: The mark shown to the right is in compliance with Waste Electrical and Electronic Equipment Directive 2002/96/EC (WEEE). The mark indicates the requirement NOT to dispose the equipment as unsorted municipal waste, but use the return and collection systems according to local law.
RoHS Statement
Restriction of the Use of Certain Hazardous Substances in Electrical and Electronic Equipment (known as “RoHS”), 2011/65/EU of the European Parliament and of the Council and the Regulation 1907/2006 (known as “REACH”) relating to “Substances of Very High Concern (“SVHC’s”), the European Union’s Directive 94/62/EC relating to packaging, the U.S. Lacey Act and other similar laws (“Substance Laws”). Product will not contain substances in excess of permitted concentration values established by Substance Laws unless the applicable specifications specifically permit that substance in a higher concentration value. Without limiting the forgoing, substances in the product will not exceed the following maximum concentration values in any homogeneous material (“Restricted Values”): (a) 0.1% (by weight) for each of lead, mercury,
3M™ Mobile Projector MP300
hexavalent chromium, polybrominated biphenyls or polybrominated diphenyl ethers; or (b) 0.01% (by weight) for cadmium.
For additional support:
866-631-1656
3MMobileProductivity.com
Mobile Interactive Solutions Division
3M Austin Center 6801 River Place Blvd. Austin, TX 78726-9000
- Mobile Projector MP300
- Important Notice
- Technical Support
- Copyright, Trademarks and Properties Notices
- Intended Use Statement
- Safety Information
- Warning
- Caution
- Introduction
- Thank You
- Product Features
- Package Contents
- Parts of Projector
- Bottom-Rear View
- Projector Button Panel
- Parts of Remote Control
- Getting Started
- Power Adapter
- Installing an Outlet Adapter
- Charging the Battery
- Charge the battery:
- Battery Charging Notes:
- Battery Maintenance Tips:
- Turning on and off the Projector
- Status Indicator lights
- Setting up the Projector
- Choosing a surface
- Placing the projector
- Attaching the Projector to Tripod (Optional Accessory)
- Distance versus Image Size
- Adjusting the Focus
- Adjusting the Brightness and Contrast settings
- Adjusting the Brightness
- Adjusting Contrast
- Volume Up/ Down
- Remote Control
- Remove Protective Film
- Using the Remote
- Replacing the Battery in the Remote Control
- Connecting to other devices
- Notes:
- Connecting to the Projector
- Connecting to a MHL Device
- Connecting to a HDMI Video Device
- Connecting to a Display Port® Video Device
- Menu
- Using the menu
- Select a Menu Item:
- Adjust Menu Item:
- On-Screen Icons
- Information Screen
- Reset Button
- Cleaning the Projector
- Troubleshooting
- The Power Adapter and Charging the Battery
- Installing the HDMI or MHL cable into the Projector
- The cover does not close properly.
- Turning the Projector On or Off
- The projector will not turn on.
- The projector button panel is on but the projector is not projecting an image.
- The remote control will not turn on the projector.
- The status indicator on the projector flashes red.
- The image is tinted or discolored.
- Focusing the Image
- The image is too dim.
- Adjusting the Volume
- Using the Remote Control
- Product Specification
- Battery Specification
- Video and Audio Support
- Accessory List
- 3M Power Adapter Kit
- 3M Remote
- 3M ™ Portable Screen:
- 3M™ Tripod:
- Limited Warranty
- Regulatory Notices
- FCC STATEMENT - CLASS B
- CE Statement
- WEEE Statement
- RoHS Statement
- 866-631-1656
- 3MMobileProductivity.com
- Mobile Interactive Solutions Division
Brand : 3M
Model : MP300
Category : Projector