
JWR2100 - Router j5 create - Free user manual and instructions
Find the device manual for free JWR2100 j5 create in PDF.


| Product Type | Wireless Presentation System / Dual Band AC2100 Router |
| Brand | j5 create |
| Model | JWR2100 |
| Wireless Standards | IEEE 802.11 a/b/g/n/ac |
| Frequency Bands | 2.4 GHz and 5 GHz |
| Maximum Data Rate | AC2100 (up to 300 Mbps on 2.4 GHz + 1733 Mbps on 5 GHz) |
| Ports | 1 x WAN (Gigabit), 4 x LAN (Gigabit), 1 x HDMI, 1 x VGA, 1 x USB 2.0, 1 x Audio Out |
| Power Supply | 12V DC, 2A |
| Antennas | 4 external antennas |
| Wireless Projection | Supports Windows, Mac, iOS, Android |
| Security | WPA/WPA2-Personal, WPS, Firewall, MAC Filter |
| USB Features | FTP server, Network Neighborhood, Printer server, DLNA |
| Guest Network | Yes (separate SSID for 2.4G and 5G) |
| Parental Control | Yes (time-based scheduling) |
| VPN Server | PPTP |
| Dimensions (approx.) | 200 x 150 x 30 mm |
| Weight (approx.) | 500 g |
| Package Contents | Router, power adapter, RJ45 cable, quick installation guide, warranty card, key pad |
| System Requirements | Windows 7/8/10, Mac OS X 10.9+, Android 5.0+, iOS 9.0+ |
| Maintenance | Keep in well-ventilated area, avoid direct sunlight, clean with dry cloth |
Frequently Asked Questions - JWR2100 j5 create
User questions about JWR2100 j5 create
0 question about this device. Answer the ones you know or ask your own.
Ask a new question about this device
Download the instructions for your Router in PDF format for free! Find your manual JWR2100 - j5 create and take your electronic device back in hand. On this page are published all the documents necessary for the use of your device. JWR2100 by j5 create.
USER MANUAL JWR2100 j5 create
Wireless Presentation Systemwith Dual Band AC2100 Router
Contents
Chapter 1: Know your JWR2100 router
Package content ....3
Description for the appearance of JWR2100 router 3
Chapter 2: Build your network
Router location....4
System requirements of product....4
Build your JWR2100 router ....5
Wired connection....6
Wireless connection....6
Set up the TCP/IP setting of system....7
Windows setting....7
Mac setting....7
Chapter 3: Management setting interface of wireless router
Network setup wizard 8
General setting 9
Description for the network map....10
Visitor network setting....12
Parental control setting....13
USB application....14
Wireless network 2.4G setting....17
Wireless network 5G setting 22
Internal network setting....27
External network setting 28
IPv6 setting....29
Virtual private network 29
Firewall setting 30
System management/information 30
NTP setting 31
Configuration management....31
Upgrade firmware ....32
System log....32
Chapter 4: Introduction of the wireless projection function
Requirement for the wireless projection environment....33
Wireless projection setting....33
Installation on Windows....34
Voice output in Windows 34
Installation on Mac....35
Installation on Android 35
Voice output in Android 36
Installation regarding Key Pad for iOS 36
Description for the operation and light of Key Pad (App/hardware applicable)....37
Instruction for the light of KeyPad....37
Chapter 5: Troubleshooting....38
Chapter 1: Know your JWR2100 router
Package content:
Please check if all accessories of JWR2100 are included in the box.
□ JWR2100 wireless router □ RJ45 cable
□ Power converter 12V-2A □ Quick installation guide
□ Warranty card
□ A key pad (Go to j5create website to contact us for additional key pads.)
☆ Reminder
For any damaged or missing accessory, contact the seller or j5create customer service center soon. Please refer to the contact information of j5create customer service center at the back of the manual.
Description for the appearance of JWR2100 router:
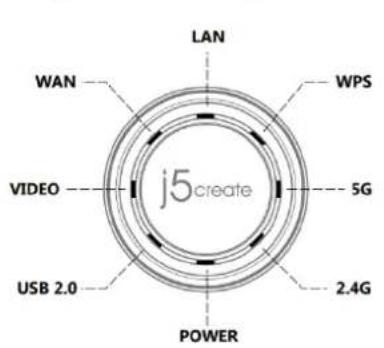
● Panel indicator of router (Fig. 1 Clockwise direction)
LAN port indicator
WPS button indicator
5GHz indicator
2.4GHz indicator
Power indicator
USB 2.0 port indicator
VIDEO output indicator
WAN port indicator
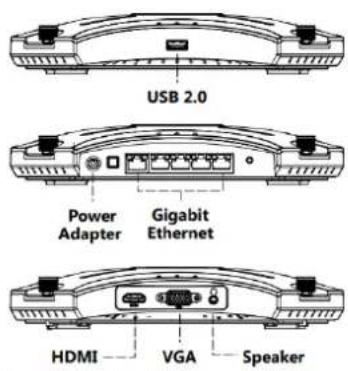
● Description for the ports on the side of router (Fig. 2)
USB 2.0 port
Power outlet (12V DC-IN)
Power button
Port for the WAN network x 1 (blue)
Port for the LAN network x 4 (yellow)
WPS/Reset button: Press it to activate WPS/Press and hold it to return to the default setting.
HDMI port
VGA port
Speaker Audio output port
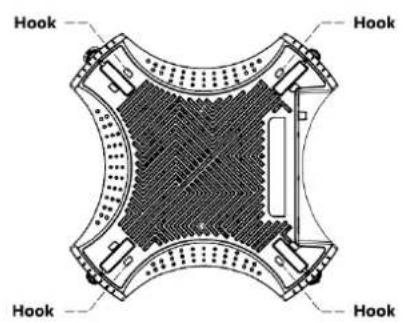
● Rear view of the router (Fig. 3)
Identification sticker
Default account and password of router
Wall mount hole
☆ Reminder
Please use the power converter that comes with the product. (The following diagram shows that the positive pole of converter is inside and the negative one is outside.) The router might be damaged if the power converters with other specifications are used.
OUTPUT/输出: +12V---2A ⊖—⊕—⊕
Chapter 2: Build your network
Router location
To ensure smooth transmission of wireless signal between the wireless router and the network device connected to the wireless router, check the following before deciding whether to put your router:
● Put the router at the center of the building to ensure that all wireless devices are covered
● It is suggested that the router must not be placed near metal objects or in the area with direct sunlight
- Keep the router at a distance from other WiFi routers, boosters, engines, microwaves, refrigerators and other high-power devices to prevent the router from having signal interference or not being able to receive signals
● Place the router in an area with great ventilation and heat dissipation
System requirements of product:
Your PC must meet the system requirements below before setting up your network:
● An Ethernet RJ45 port (LAN Port) 10Base-T/100bASE-TX/1000BaseTX
● Support the IEEE 802.11 a/b/g/n/ac wireless function
● The system supports TCP/IP services
● Web browsers are available, such as Google chrome, Firefox, Safari, Opera, Internet Explorer and Edge
☆ Reminder
Please check if any network device is available in your computer.
If using the single-band IEEE 802.11 b/g/n NIC when receiving the wireless signal from JWR2100, you can only receive the 2.4GHz band.
If using the single-band IEEE 802.11 a/b/g/n/ac NIC when receiving the wireless signal from JWR2100, you can receive the 2.4GHz or 5GHz band.
The length of RJ-45 Ethernet cable connecting to the network device must not exceed 100 m, otherwise the router might not be able to receive any signal or the signal would be unstable.
If you want to replace the router, please disconnect the network (pulling off the network cable and shutting down the router) and reboot the computer.
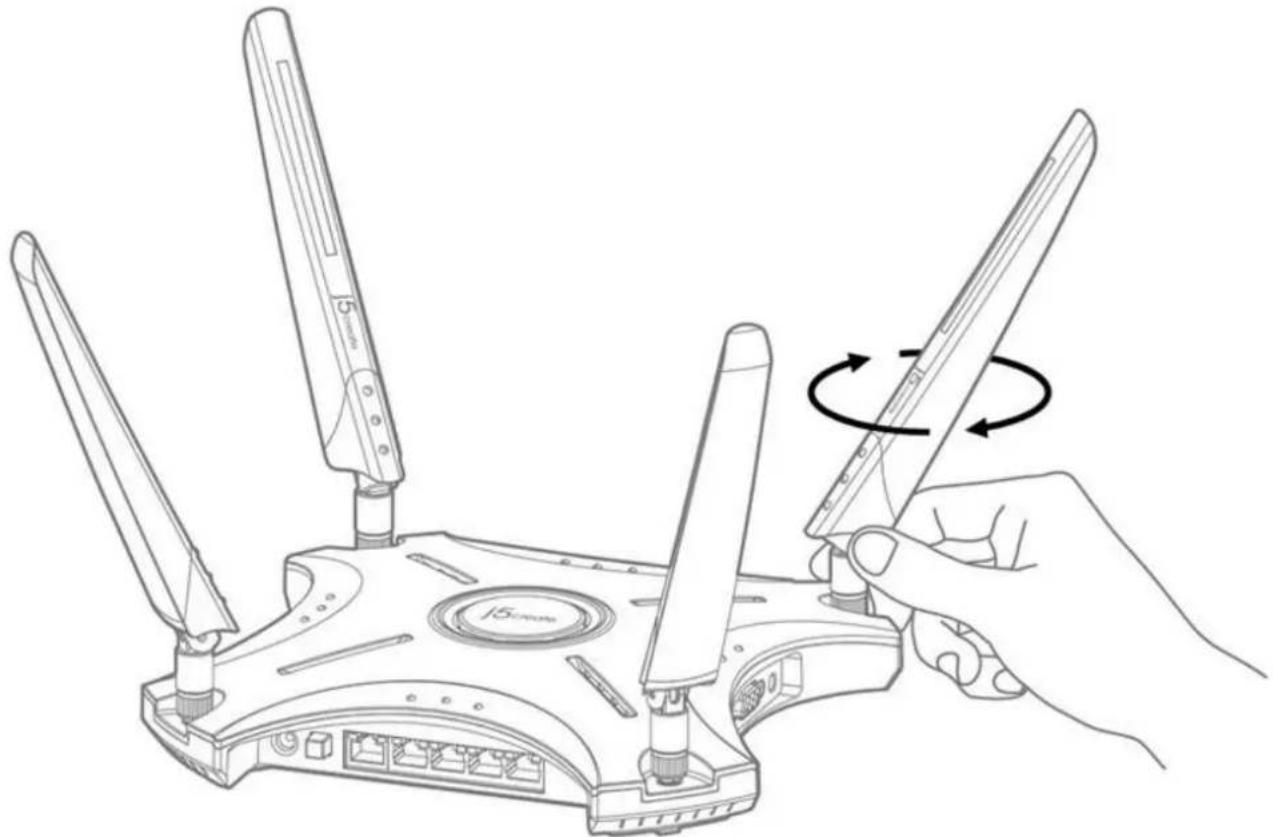
Build your JWR2100 router:
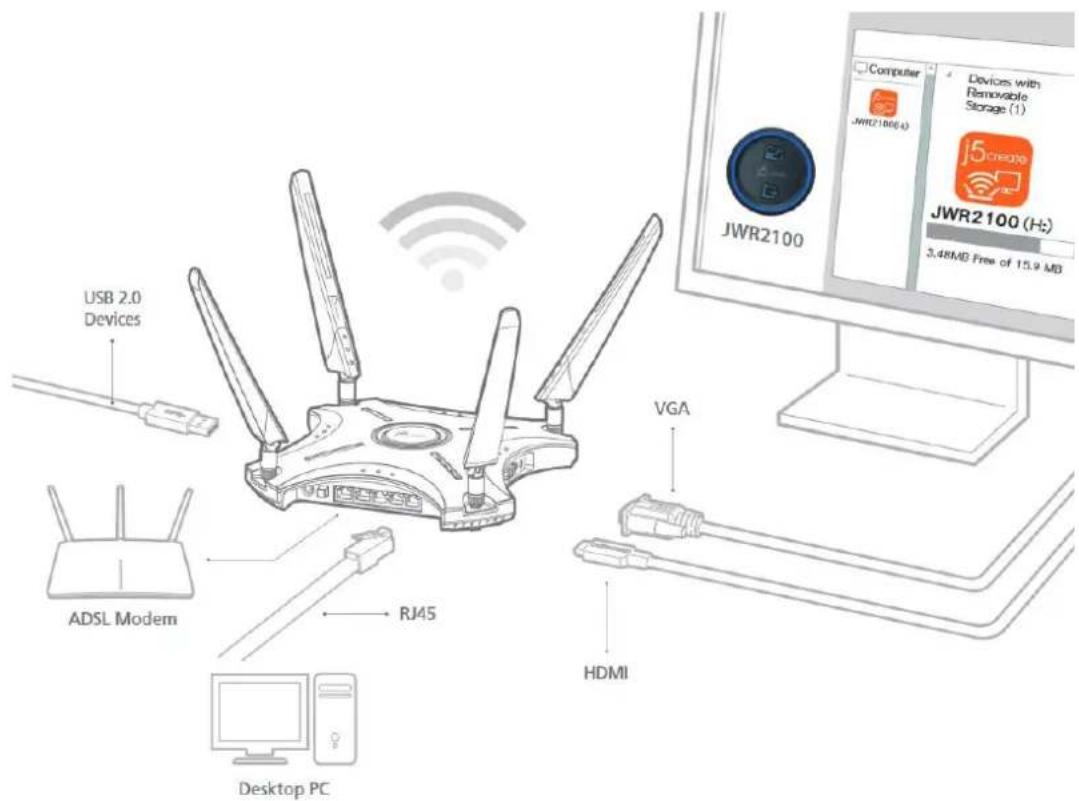
Please install the four antennas in the package onto the router in clockwise direction.
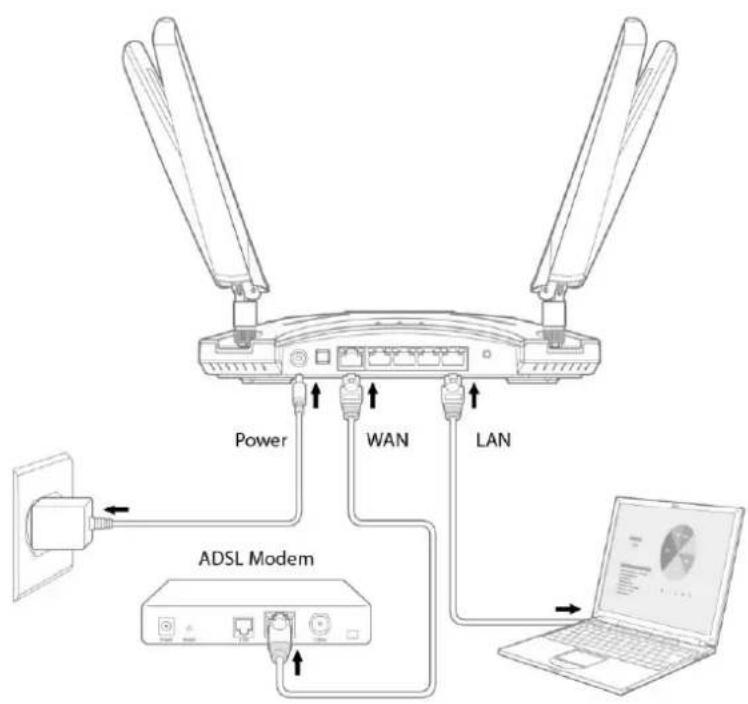
Wired connection
- Insert the AC adapter of wireless router into the DC-IN port and plug in the power cord.
- Use the RJ-45 cable to connect your computer to the LAN port of wireless router.
- Make sure that LAN port indicator of the wireless router flashes and the wired connection is completed.
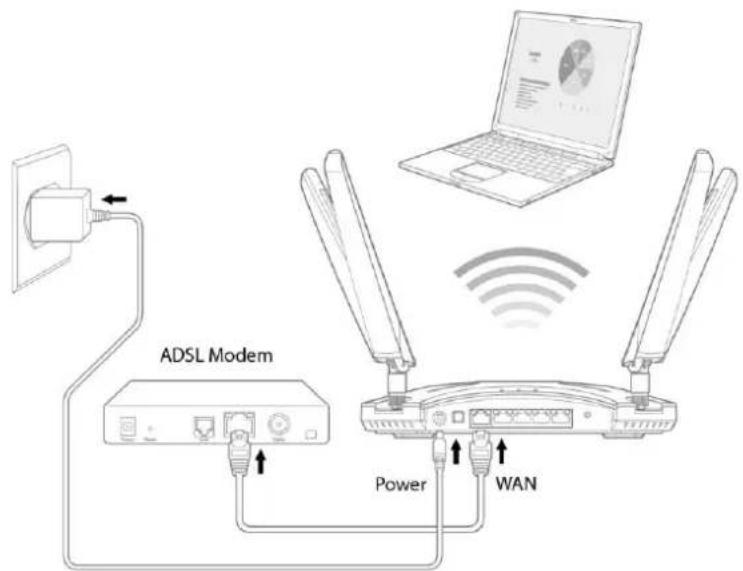
Wireless connection
- Insert the AC adapter of wireless router into the DC-IN port and plug in the power cord.
- Use the RJ-45 cable that comes with the package to connect your ISP modem to the WAN port of wireless router.
- Make sure that the ISP modem is on.
- Use the wireless card on the computer to set up the network.
Set up the TCP/IP setting of system
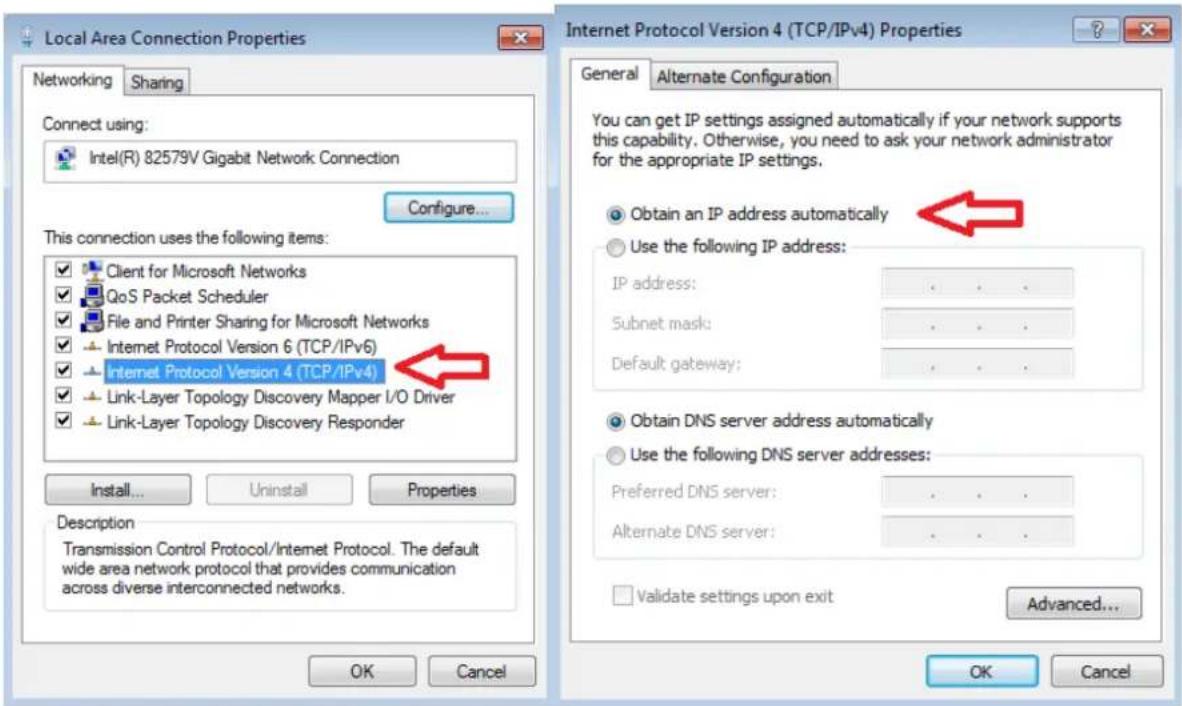
Windows setting: TCP/IP receives the IP address automatically.
- Click Start > Control Panel > Network and Internet > Network and Sharing Center > Manage Network Connections
- Click Internet Protocol Version 4 (TCP/IPv4) and click "Properties".
- To obtain the IPv4 setting automatically, click "Obtain an IP" address automatically.
- Click "OK" after completing the procedure.
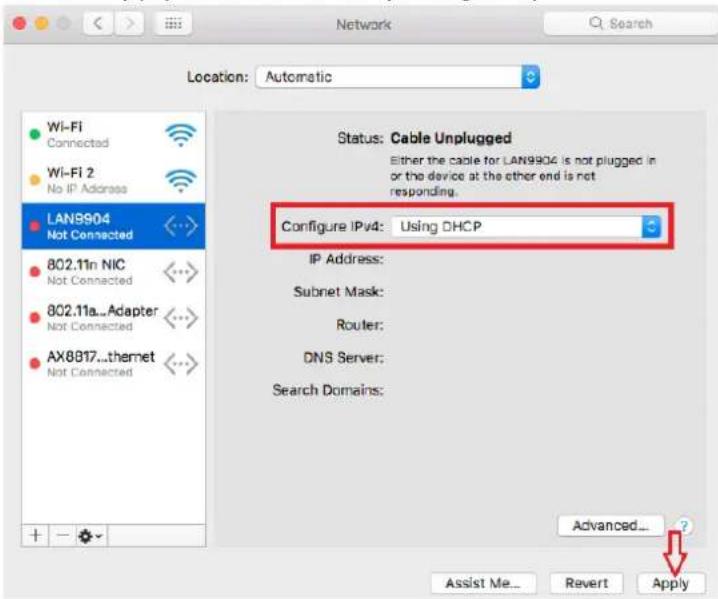
Mac setting: TCP/IP receives the IP address automatically.
- Click the apple icon on the top-left corner.
- Click System Preferences > Network > Settings...
- Click the TCP/IP tab. Select DHCP from the dropdown list ofConfigure IPv4.
- Click "Apply Now" after completing the procedure.
☆ Reminder
Refer to "Help" in your OS for more information on TCP/IP.
Chapter 3: Management setting interface of wireless router
JWR2100 comes with a smart web page GUI, allowing you to set up router functions via various web browsers, such as Internet Explorer, Firefox, Chrome and Safari.
Network setup wizard
When using this system for the first time, you will enter the network setup wizard after login.
Follow the steps below to log in the management setting interface:
- Enter the default IP address in your web browser (e.g. Internet Explorer, Firefox, Google Chrome, Safari): 10.10.10.254.
- A login window appears. Enter the default account and password. Default account: admin; default password: password
Authentication Required
http://10.10.10.254 requires a username and password.
Your connection to this site is not secure
User Name:
Password:
Log In
Cancel
☆ Reminder
Make sure that you've set that the TCP/IP will receive the IP address automatically.
- Enter the network setup wizard. Change the default login password of the router for first time login. Click "Next" after changing the password.
Account
admin
Password
●●●●●
Verify Password
●●●●●
- Set the time zone of your country and click "Next".
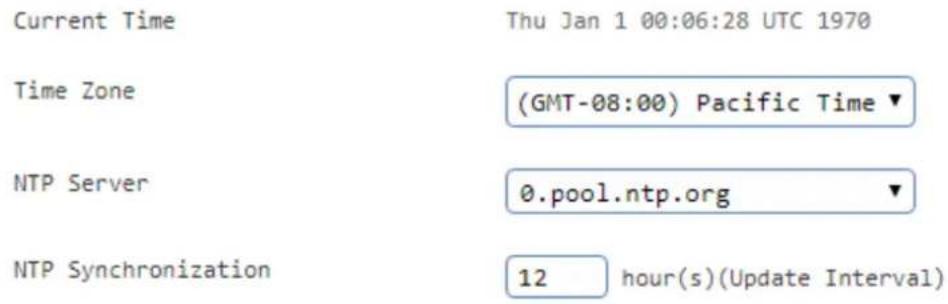
- You can adjust the external network setting if necessary. Click "Next" after confirming the setting.
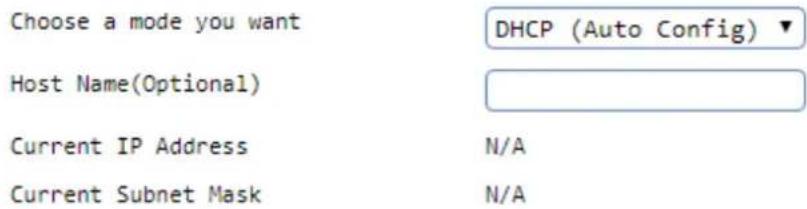
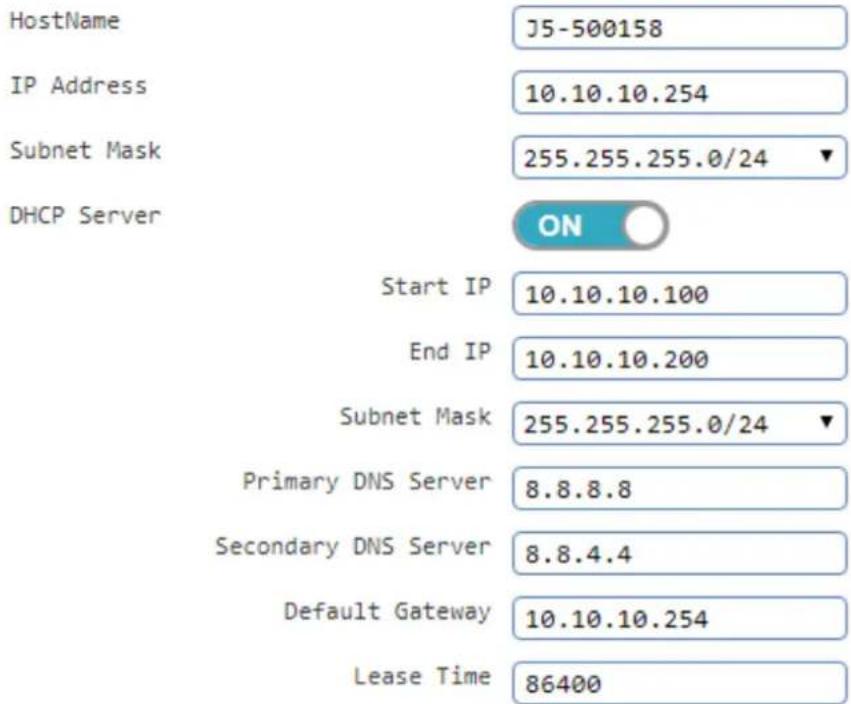
- You can adjust the internal network setting if necessary. It is suggested to use the default setting. Click "Next" after confirming the setting.
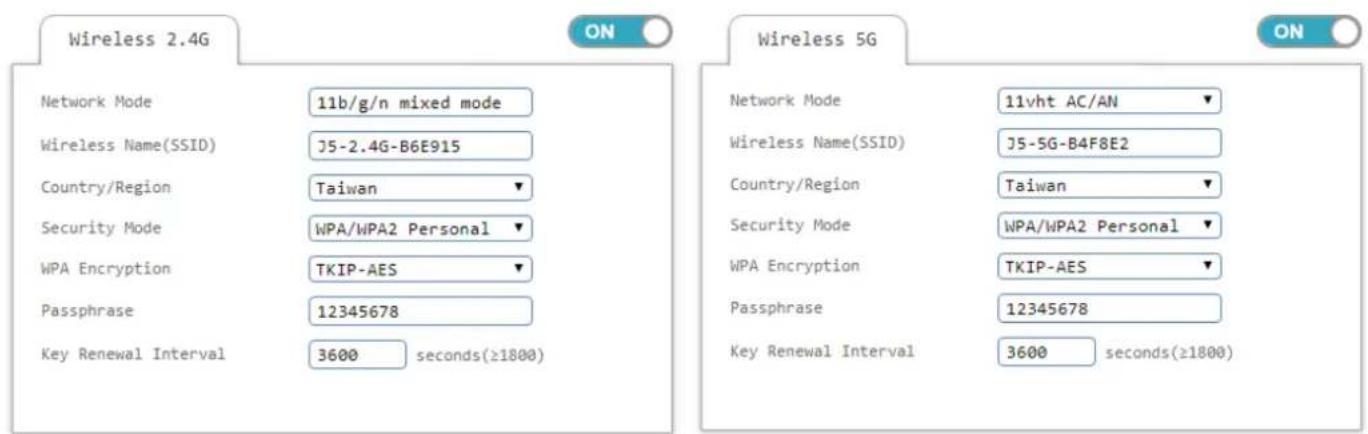
- You can adjust the wireless network setting if necessary. It is suggested to change the default SSID and password of 2.4G/5G. Click "OK" after confirming the setting.
General setting
Description for the network map:
The basic setting is completed. Enter the home screen of router setting afterwards. Check the current status of 2.4G and 5G from the "Network Map", such as SSID, security mode, encryption setting, network switch and output screen status.
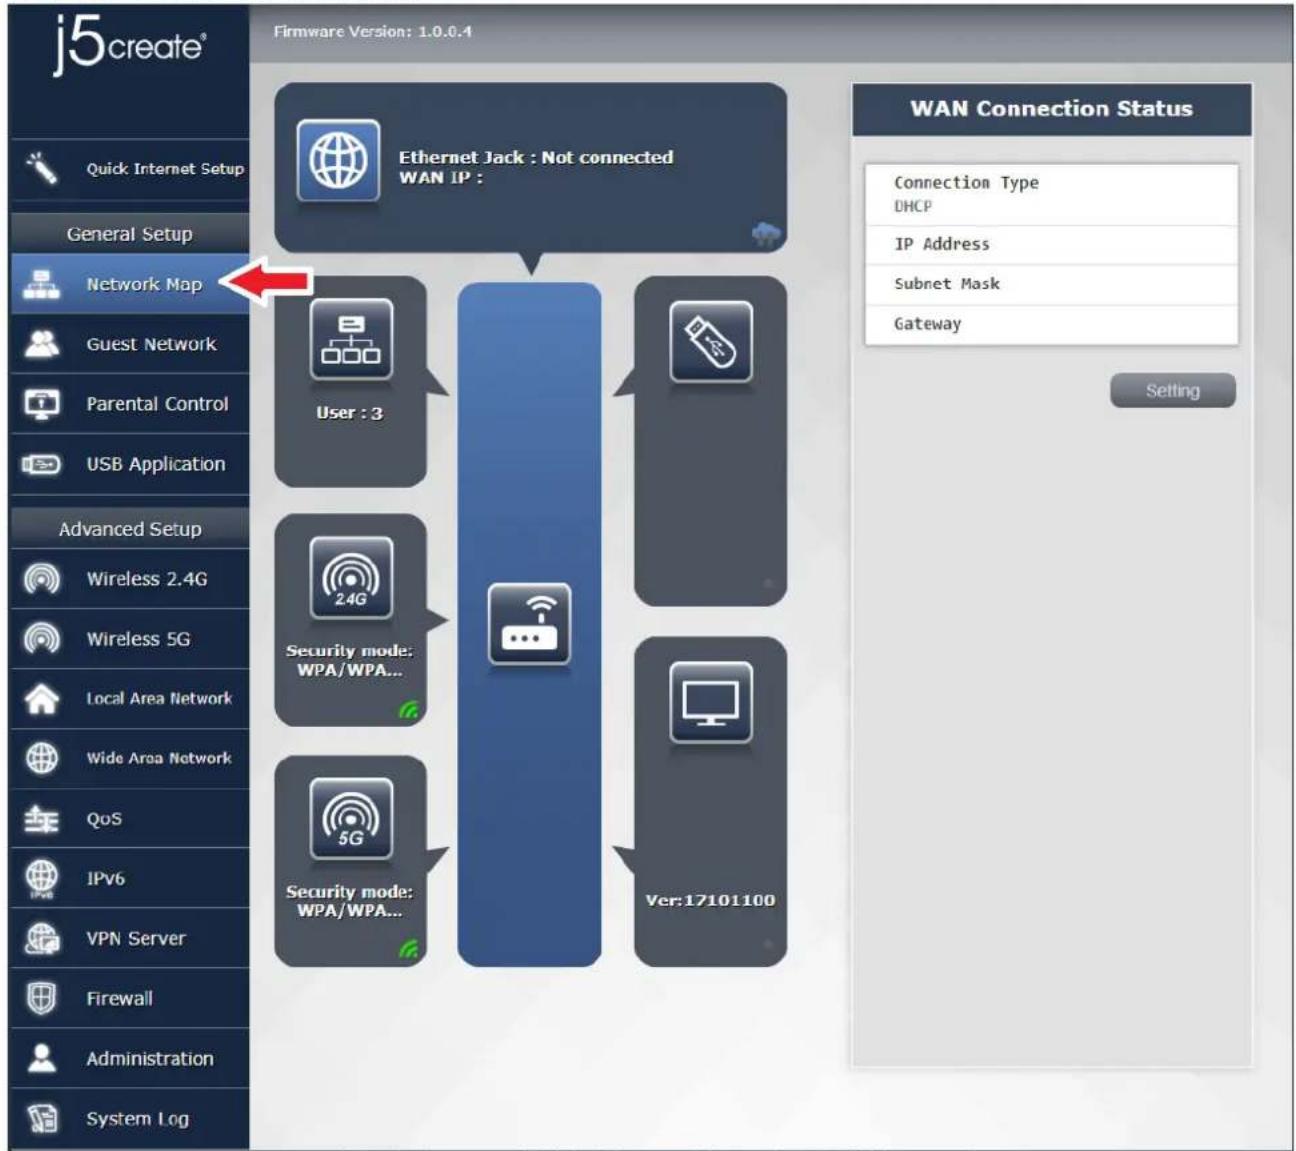

Connection of external network : Check the current type of external network connection, dress, network mask and gateway setting quickly.
User connection status : Check the name of the user connecting to the router and the network
address of the router.
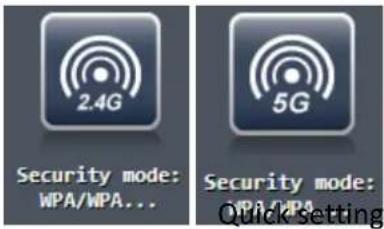
of 2.4G and 5G network:
Set your wireless network name (SSID), Wi-Fi switch, country/region, security mode/encryption method/verification password and key update cycle. Click “Apply” after completing the setting. Wait for the system to reboot and the setting will be completed.

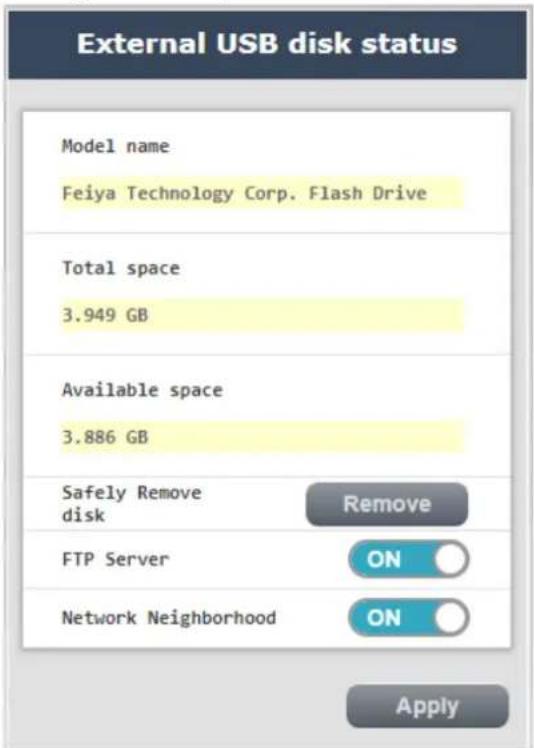
Connection of external USB drive:
Check the status of your current USB drive. You can remove the USB safely, and set the FTP and switch of network neighborhood. Click "Apply" after completing the setting. Wait for the system to reboot and the setting will be completed.

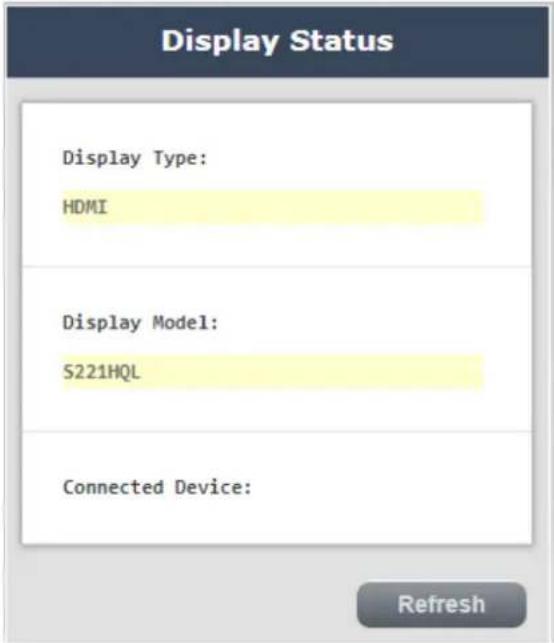
Display status: Check the status of the connected HDMI/VGA display.
Visitor network setting
The characteristic of this function is that you can set a set of wireless AP separated from the internal network while connected to the Internet in the 2.4G and 5G bands, respectively. You don't need to worry about data leakage while offering connection to visitors, which is convenient and safe. We allow users to decide when the connection should be available, which is more convenient for management.
Guest Network
2.4G
Wi-Fi Power
ON

Wi-Fi Name
Authentication Method
WPA/WPA2 Personal
WPA Encryption
TKIP/AES
WPA-PSK Key(8 or more characters)
12345678
Show Passphrase/WEP Key
Enable
● Disable
Access Time
08:00
18:00
5G
Wi-Fi Power
ON

Wi-Fi Name

Authentication Method
WPA/WPA2 Personal
WPA Encryption
TKIP/AES
WPA-PSK Key(8 or more characters)
12345678
Show Passphrase/WEP Key
Enable
Disable
Access Time
08:00
18:00
Apply
How to open the visitor network
- Turn on the Wi-Fi.
- Enter the WiFi name/encryption method/wireless password desired.
- If you want to show the password on the
screen, select to activate the "Display verification password/WEP key". - Set the time of use.
- Click "Apply". Wait for the system to reboot and the setting will be completed.
Parental control setting
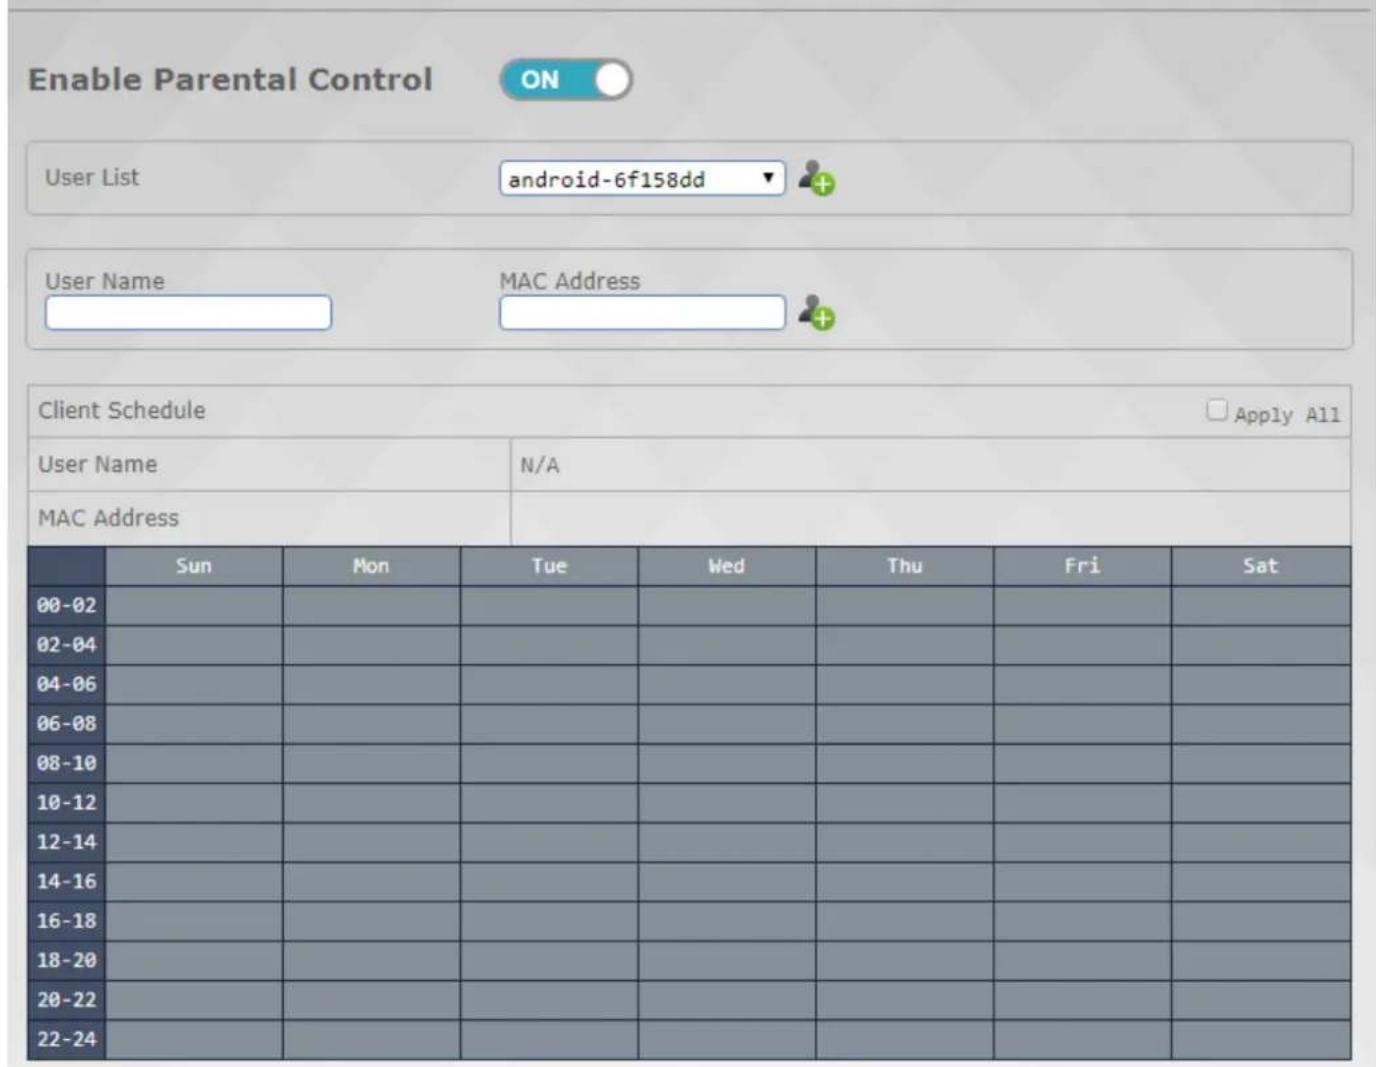
The parental control setting allows you to limit the network usage time for the user. You can set the usage time for each user easily by following instructions on the screen.
Parental Control
Apply
- Select the user you want to control from the [User schedule] table.
- Click on the time that you wish the network would be available by selecting the date above to set the network to be available all day or decide to set the network available in a fixed period every week.
Click "Apply". Wait for the system to reboot and the setting will be completed.

The JWR2100 router provides a USB 2.0 port for USB device connection. Plug in the USB device before operating this function. Plug in the flash drive or printer depending on your need.

Function of USB storage device: The user can save the file on the USB shared from the router.
Click the introduction of the top-bottom function of "FTP".
- FTP: Set to turn this function on or off.
- Server name: Set the server name you want to use.
- FTP port: It is suggested to use the default setting.
- Maximum connections: Set the number of connections available for the FTP simultaneously.
- Anonymous login: Set whether to allow anonymous login for the FTP.
- Create directory: Set whether to open the privilege for the connected user to add folders on the FTP server.
- Delete or rename the file/directory: Set whether to open the privilege for the connected user to delete or rename the file/directory on the FTP server.
- Upload/download (bps): Set the upload and download speed for each connection.
Click "Apply" after completing the setting. Wait for the system to reboot and the setting will be completed.
USB Application
| FTP Server Settings | |
| FTP Server | ON |
| Server Name | FTPServer |
| FTP Port | 21 |
| Max Connections | 5 |
| Anonymous Login | Enable Disable |
| Create Directory | Enable Disable |
| Remove FILE/Directory | Enable Disable |
| Rename FILE/Directory | Enable Disable |
| Upload(bps) | Enable Disable |
| Download(bps) | Enable Disable |

☆ Reminder
To open the FTP, the client must connect to 10.10.10.254 and use the account and password that are the same with as the one used with the management interface.
Click the introduction of the top-bottom function of "Network Neighborhood".
- Network Neighborhood setting: Set to turn this function on or off.
- Workgroup: Set the workgroup name.
- NetBIOS name: Set the NetBIOS name.
Click "Apply" after completing the setting. Wait for the system to reboot and the setting will be completed.

☆ Reminder
Please execute \10.10.10.254. The account and password shall be the same as the one used on the management interface.

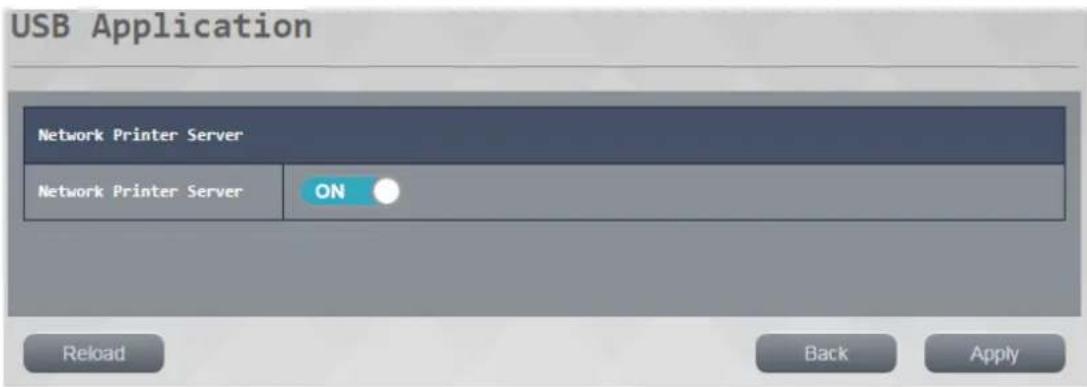
Function of network printer server: Connect to the printer on the USB port on the router,
allowing the user to use the printer from the LAN.
Click "Apply" after completing the setting. Wait for the system to reboot and the setting will be completed.

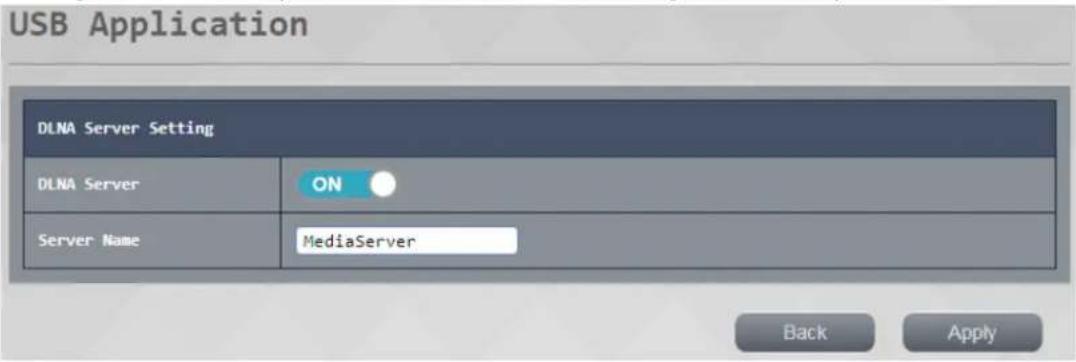
Function of DLNA server: Play the HD video, photo and music saved in the USB device via the
DLNA server.
Set the DLNA switch and the name of the DLNA server you wish to set. Click "Apply" after completing the setting. Wait for the system to reboot and the setting will be completed.
☆ Reminder
The wireless router supports most of the formats of the USB storage device, such as FAT and NTFS. It is suggested to remove the USB device from the management interface before removing it physically.

Wireless 2.4g
Wireless network 2.4G setting
This page is for the advanced setting of 2.4G wireless network. You can make advanced settings for the security of wireless network here. It is suggested to keep the default setting if you don't have any special need. Refer to the advanced setting of Wi-Fi if you wish to change it.
Basic setting:
● Wi-Fi ON/Off: Set your 2.4G wireless network switch.
● Network mode: Check the network mode for your 2.4G wireless network.
● Wireless network name: Set the wireless network name (SSID) you wish to use.
● Supported channel/frequency: Select your current 2.4G wireless network channel. You can change this option to avoid unstable signals caused by having other routers or wireless signals using the same channel.
● MAC location: Display the MAC address of router.
Click "Apply" after completing the setting. Wait for the system to reboot and the setting will be completed.
Basic
| Wireless Network | |
| WiFi UP/DOWN | ON |
| Network Mode | 11b/g/n mixed mode |
| Wireless Name(SSID) | j5-2.4g-50015A |
| Country/Region | United States ▼ |
| Support Channel | CH 1~11 ▼ |
| Frequency(CH) | AutoSelect ▼ |
| MAC Address | 00:05:18:50:01:5A |
Solid mode for high transmission rate:
This setting page is for 802.11n. You can set the 802.11n network setting of the router. It is suggested to keep the default system setting if you don't have any special needs. Click "Apply" after completing the setting. Wait for the system to reboot and the setting will be completed.
| HT Physical Mode | |
| Operating Mode | Mixed Mode ▼ |
| Channel Bandwidth | 20/40M Auto ▼ |
| Guard Interval | Auto ▼ |
| Modulation and coding scheme(MCS) | Auto ▼ |
| Space-Time Block Code(STBC) | ○ Enable ● Disable |
| Reverse Direction Grant(RDG) | ○ Enable ● Disable |
| Aggregation MSDU(A-MSDU) | ○ Enable ○ Disable |
| Auto Block ACK | ○ Enable ● Disable |
| Decline BA Request | ○ Enable ○ Disable |
| Disallow TKIP | ○ Enable ● Disable |
| 20/40M Coexistence | ○ Enable ○ Disable |
| Low-Density Parity Check(LDPC) | ○ Enable ○ Disable |
| Transmission MIMO Spatial Stream | 2 ▼ |
| Reception MIMO Spatial Stream | 2 ▼ |
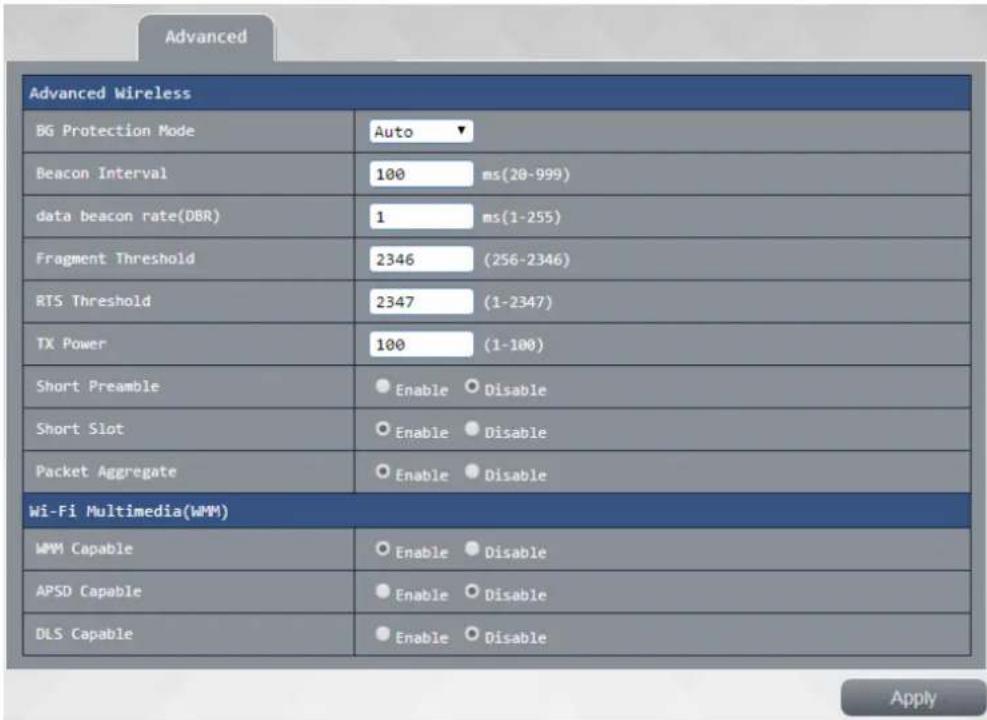
Advanced setting:
You can set the 2.4G advanced setting. You can customize the BG protection mode of 2.4G and transmission rate. It is suggested to keep the default system setting if you don't have any special need. Click "Apply" after completing the setting. Wait for the system to reboot and the setting will be completed.
Security setting:
You can make advanced settings for the security of 2.4G wireless network on this page.
Security mode: Decide whether you want to turn on the 2.4G wireless signal and select an encryption mode. Also, decide whether you want the WEP and WPA/WPA2 security encryption modes to be supported.
If you select the WPA/WPA2 personal mode, you can enter an 8-64 bit password for the verification password.
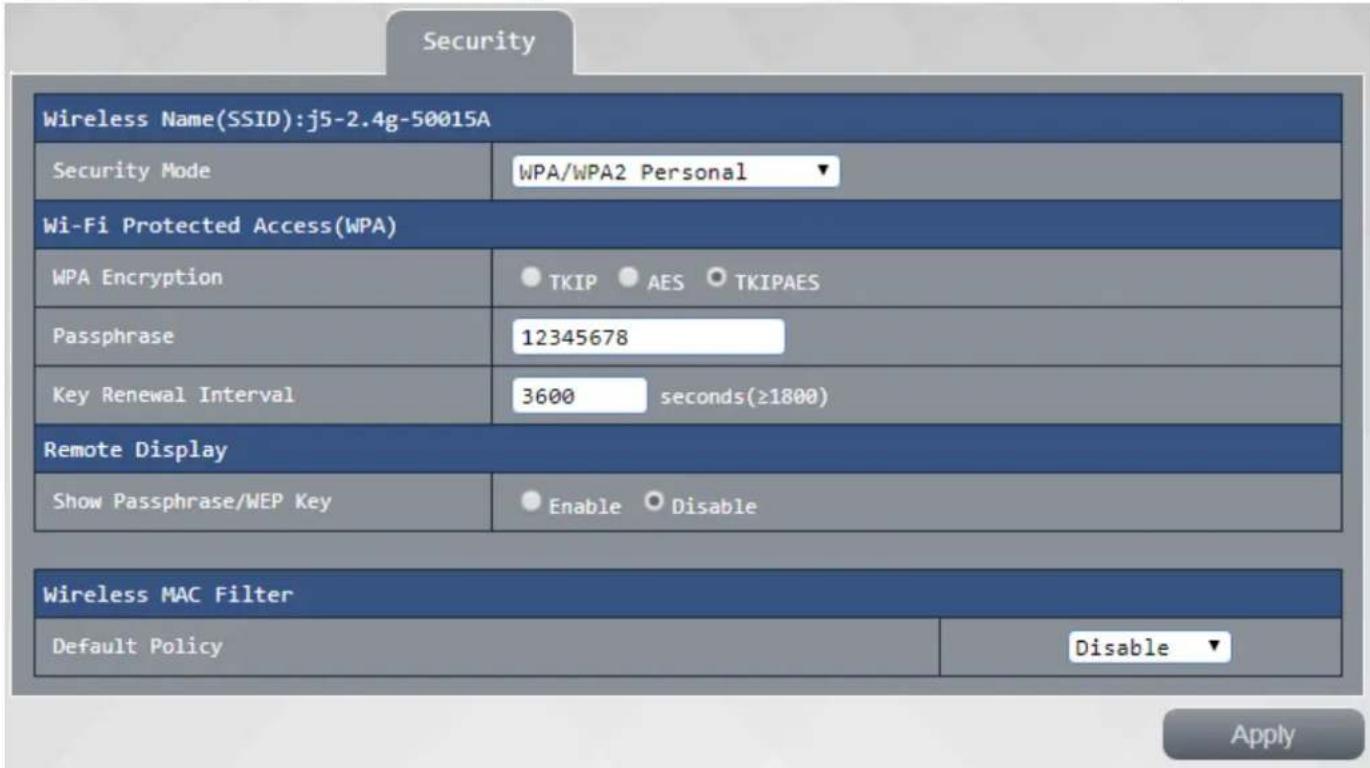
Remote display: This setting allows you to decide whether users can see your key of wireless login when JWR2100 carries out the wireless projection.
Security
Wireless Name(SSID):j5-2.4g-50015A
| Security Mode | WPA/WPA2 Personal ▼ |
| Wi-Fi Protected Access(WPA) | |
| WPA Encryption | ● TKIP ● AES ○ TKIPAES |
| Passphrase | 12345678 |
| Key Renewal Interval | 3600 seconds(≥1800) |
| Remote Display | |
| Show Passphrase/WEP Key | ● Enable ○ Disable |
Wireless MAC Filter
| Default Policy | Disable |
Apply
WPS
Wi-Fi Protected Setup(WPS)
| WPS | ON |
| WPS Summary | |
| Wireless Name(SSID) | j5-2.4g-50015A |
| AP PIN Code | 52432262 Generate New PIN |
| WPS Status | Idle |
| Device Configure | |
| Configure via Push Button | Connect Device |
| Configure via Pin Code | Connect Device |
This picture shows the SSID and key you will see on the output screen when you activate to display the verification password/WEP key.
- Connect to Wi-Fi
SSID: J5-2.4G-XXXXX
Password: 12345678

This is the picture you will see on the output screen when the verification password/WEP key is not displayed.
- Connect to Wi-Fi
SSID: J5-2.4G-XXXXXX
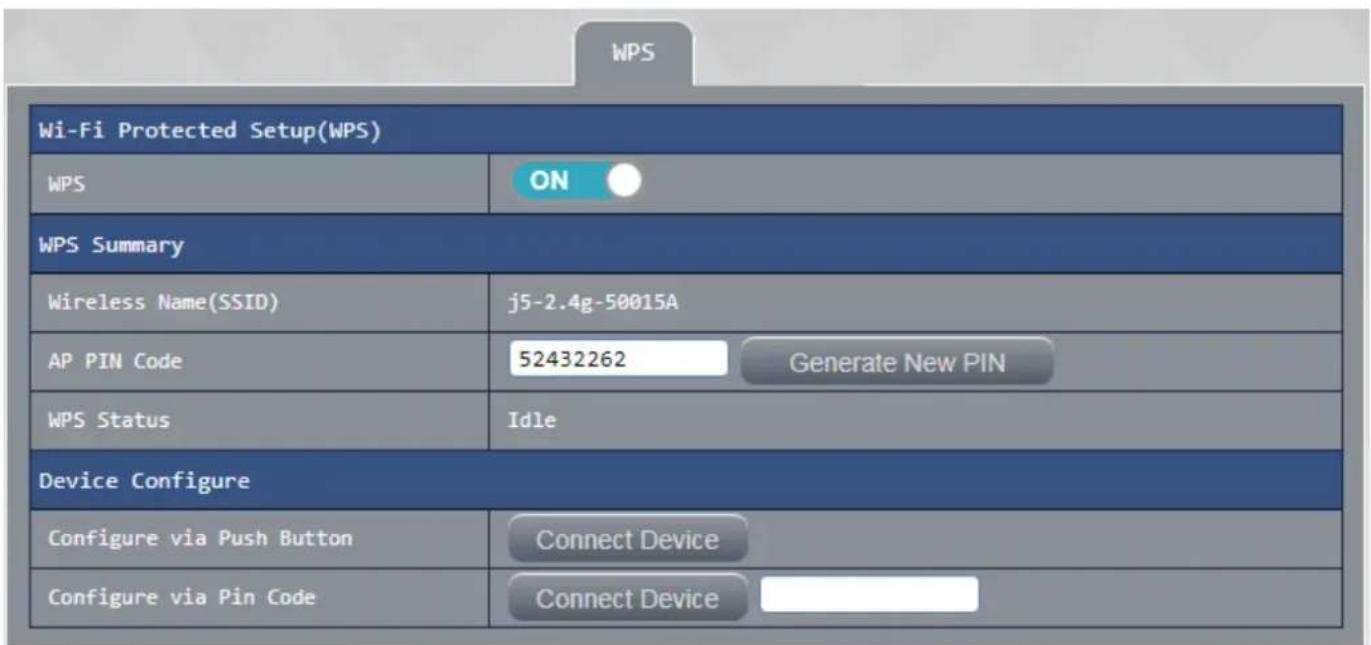
WPS setting:
You can connect to the WPS at the user end easily by any of the methods below.
Method 1: Press the WPS button on the router and the one on the wireless card at the user end to wait for the connection.
Method 2: Enter the pin number of base station at the user end and wait for the connection.
Method 3: Press the "Connect to device" button on the interface and the WPS button on the wireless card at the user end to wait for the connection.
Method 4: Obtain the pin number at the user end, enter it in the [Connect to device via pin number] section and press "Connect to device" to wait for the connection.
Workstation list:
This page shows the usage condition of the user connected to the router now.
Station List
Wireless Network
| MAC Address | Aid | PSM | MimoPS | TX Rate | RSSI | Last RX Rate | Connect Time |
| 80:01:84:13:B9:5B | 1 | 1 | 0 | MCS 740M, LGIMM | MCS 740M, LGIMM | 00:07:18 |
Refresh
Statistics
This page allows you to check the Wi-Fi package transmission. You can press "Reset" or "Refresh" to obtain the current data.
statistics
Transmit Statistics
| Tx Success | 649 |
| Tx Retry Count | 0 |
| Tx Fail After Retry | 284 |
| RTS Successfully Receive CTS | 0 |
| RTS Fail To Receive CTS | 0 |
| Receive Statistics | |
| Frames Received Successfully | 14756 |
| Frames Received With CRC Error | 8308 |
| Signal-to-noise ratio(SNR) | |
| Signal-to-noise ratio(SNR) | n/a, n/a, n/a |
Reset
Refresh
This page is for the advanced setting of 5G wireless network. You can make advanced settings for the security of wireless network here. It is suggested to keep the default setting if you don't have any special needs. Refer to the advanced setting of Wi-Fi if you wish to change it.
Basic setting:
● Wi-Fi ON/Off: Set your 5G wireless network switch.
- Network mode: Check the network mode for your 5G wireless network and make sure that 802.11 ac/an/a are supported.
● Wireless network name: Set the wireless network name (SSID) you wish to use.
● Supported channel/frequency: Select your current 2.4G wireless network channel. You can change this option to avoid unstable signals caused by having other routers or wireless signals using the same channel.
● MAC location: Display the MAC address of router.
Click "Apply" after completing the setting. Wait for the system to reboot and the setting will be completed.
| Wireless Network | |
| WiFi UP/DOWN | ON |
| Network Mode | 11vht AC/AN ▼ |
| Wireless Name(SSID) | j5-5g-50015B |
| Country/Region | United States ▼ |
| Support Channel | CH36~48, CH149~165 ▼ |
| Frequency(CH) | AutoSelect ▼ |
| MAC Address | 00:05:18:50:01:5B |
Solid mode for high transmission rate:
This settings page is for 802.11 ac/an/a. You can set the 802.11 ac/an/a network setting of the router. It is suggested to keep the default system setting if you don't have any special need. Click "Apply" after completing the setting. Wait for the system to reboot and the setting will be completed.
| HT Physical Mode | |
| Operating Mode | Mixed Mode▼ |
| Channel Bandwidth | 20/40M Auto▼ |
| Guard Interval | Auto▼ |
| Modulation and coding scheme(MCS) | Auto▼ |
| Space-Time Block Code(STBC) | ○ Enable ● Disable |
| Reverse Direction Grant(RDG) | ○ Enable ● Disable |
| Aggregation MSDU(A-MSDU) | ○ Enable ○ Disable |
| Auto Block ACK | ○ Enable ● Disable |
| Decline BA Request | ○ Enable ○ Disable |
| Disallow TKIP | ○ Enable ● Disable |
| 20/40M Coexistence | ○ Enable ● Disable |
| Low-Density Parity Check(LDPC) | ○ Enable ○ Disable |
| VHT Option | |
| VHT Channel Bandwidth | 80M▼ |
| VHT Space-Time Block Code(STBC) | ○ Enable ● Disable |
| VHT Short Guard Interval | ○ Enable ● Disable |
| VHT BW Signaling | ○ Enable ○ Disable |
| VHT LDPC | ○ Enable ○ Disable |
| Transmission MIMO Spatial Stream | 4▼ |
| Reception MIMO Spatial Stream | 4▼ |
Advanced setting:
You can set the 5G advanced setting. You can customize the BG protection mode of 5G and transmission rate. It is suggested to keep the default system setting if you don't have any special need. Click "Apply" after completing the setting. Wait for the system to reboot and the setting will be completed.
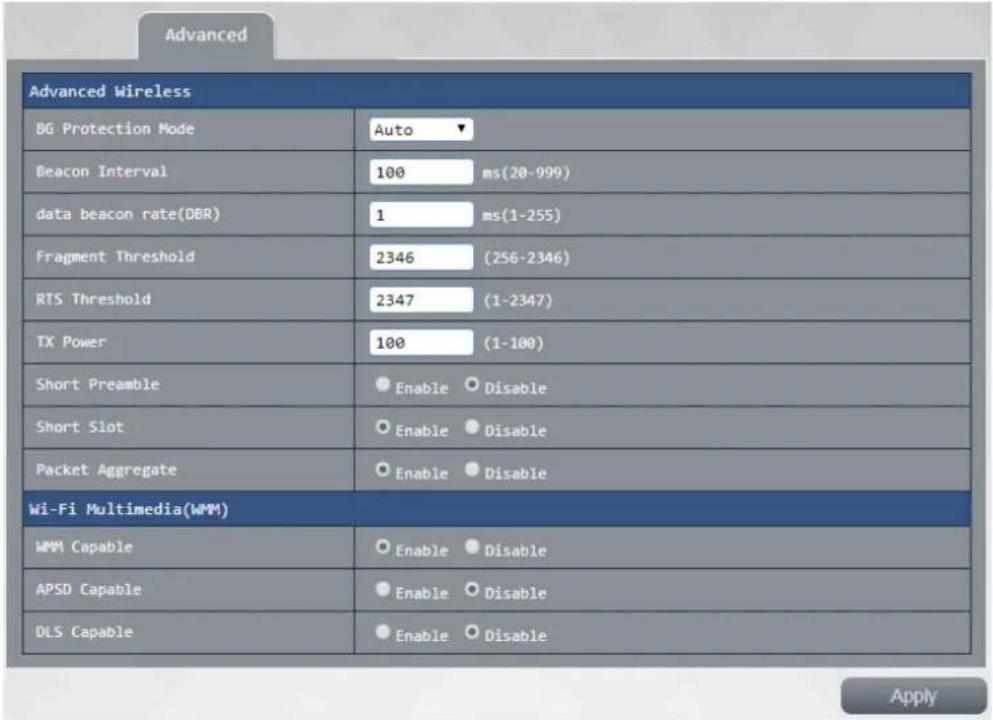
Security setting:
You can make advanced settings for the security of 5G wireless network on this page.
Security mode: Decide whether you want to turn on the 5G wireless signal and select an encryption mode. Also, decide whether you want the WPA/WPA2 personal security encryption mode and WPA/WPA2 enterprise security encryption mode to be supported. If you select the WPA/WPA2 personal security mode, you can use the AES or TKIP/AES encryption. You can define your own verification password and key update cycle.
Security
Wireless Name(SSID):j5-2.4g-50015A
Security Mode
WPA/WPA2 Personal
Wi-Fi Protected Access(WPA)
WPA Encryption
Passphrase
Key Renewal Interval
Remote Display
Show Passphrase/WEP Key
TKIP
AES
TKIPAES
12345678
3600
seconds(≥1800)
Ena
Disable
Wireless MAC Filter
Default Policy
Disable ▼
Apply
Security
Wireless Name(SSID):j5-2.4g-50015A
Security Mode
WPA/WPA2 Personal
Wi-Fi Protected Access(WPA)
WPA Encryption
Passphrase
Key Renewal Interval
TKIP
AES
TKIPAES
12345678
3600
seconds(≥1800)
Remote Display
Show Passphrase/WEP Key

Enable
Disable
Wireless MAC Filter
Default Policy
Disable ▼
Apply
Remote display: This setting allows you to decide whether users can see your key of wireless login when JWR2100 carries out the wireless projection.
This picture shows the SSID and key you will see on the output screen when you activate to display the verification password/WEP key.
- Connect to Wi-Fi
SSID: J5- 5G-XXXXX
Password: 12345678

This is the picture you will see on the output screen when the verification password/WEP key is not displayed.
- Connect to Wi-Fi
SSID: J5- 5G-xxxxx
Password:
WPS setting:
You can connect to the WPS at the user end easily by any of the method below.
Method 1: Press the WPS button on the router and the one on the wireless card at the user end to wait for the connection.
Method 2: Enter the pin number of base station at the user end and wait for the connection.
Method 3: Press the "Connect to device" button on the interface and the WPS button on the wireless card at the user end to wait for the connection.
Method 4: Obtain the pin number at the user end, enter it in the "Connect to device via pin number" and press "Connect to device" to wait for the connection.

Workstation list:
This page shows the usage condition of the user connected to the router now.
Station List
Wireless Network
| MAC Address | Aid | PSM | MimoPS | TX Rate | RSSI | Last RX Rate | Connect Time |
| 80:01:84:13:B9:5B | 1 | 1 | 0 | MCS 740M, LGIMM | MCS 740M, LGIMM | 00:07:18 |
Refresh
Statistics
This page allows you to check the Wi-Fi package transmission. You can press "Reset" or "Refresh" to obtain the current data.
statistics
Transmit Statistics
| Tx Success | 649 |
| Tx Retry Count | 0 |
| Tx Fail After Retry | 284 |
| RTS Successfully Receive CTS | 0 |
| RTS Fail To Receive CTS | 0 |
| Receive Statistics | |
| Frames Received Successfully | 14756 |
| Frames Received With CRC Error | 8308 |
| Signal-to-noise ratio(SNR) | |
| Signal-to-noise ratio(SNR) | n/a, n/a, n/a |
Reset
Refresh
Internal network setting
Go to the "Advanced setting" at the left side of the setting page and click on the internal network to enter the advanced setting page of the internal network. You can make advanced settings for the internal network of router on this page, such as the host name, network address, network mask, and manual or automatic settings for the DHCP server. After modification, press "Apply" for the change of setting to take effect.

Local Area Network
Local Area Network
Setting LAN
| HostName | J5-500158 |
| IP Address | 10.10.10.254 |
| Subnet Mask | 255.255.255.0/24▼ |
| MAC Address | 00:05:1B:50:01:58 |
| ☐ 802.1d Spanning Tree | ☐ LLTD |
| ☐ IGMP Proxy | ☐ UPNP |
| ☐ Router Advertisement | ☐ DNS Proxy |
| DHCP Server | ON |
| Start IP | 10.10.10.100 |
| End IP | 10.10.10.200 |
| Subnet Mask | 255.255.255.0/24▼ |
| Primary DNS Server | 8.8.8.8 |
| Secondary DNS Server | 8.8.4.4 |
| Default Gateway | 10.10.10.254 |
| Lease Time | 86400 |
| Statically Assigned | MAC Address xx:xx:xx:xx:xx:xx |
| IP Address xxx.xxx.xxx.xxx | |
| MAC Address xx:xx:xx:xx:xx:xx | |
| IP Address xxx.xxx.xxx.xxx | |
| MAC Address xx:xx:xx:xx:xx:xx | |
| IP Address xxx.xxx.xxx.xxx |
Apply
If you want to assign a specific IP to a specific machine, you can assign it manually. We allow you to assign 3 IP addresses manually. You can enter the MAC address of a device in the "Mac Address" field and enter the IP you want to assign into the "Network Address" field.
☆ Reminder
Make sure that the IP address and router address must be in the same network segment.
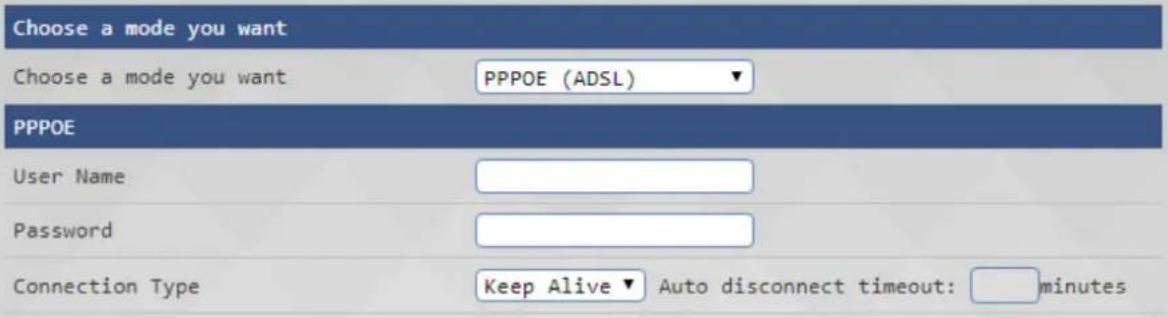
External network setting
Click on the external network to enter the advanced setting page for the external network. This mode supports the static mode (fixed IP), dynamic mode (IP obtained automatically), PPPoE (float IP) and PPTP (P2P protocol). After completing the setting, press "Apply" for the change of setting to take effect.

Wide Area Network
IPv6 setting
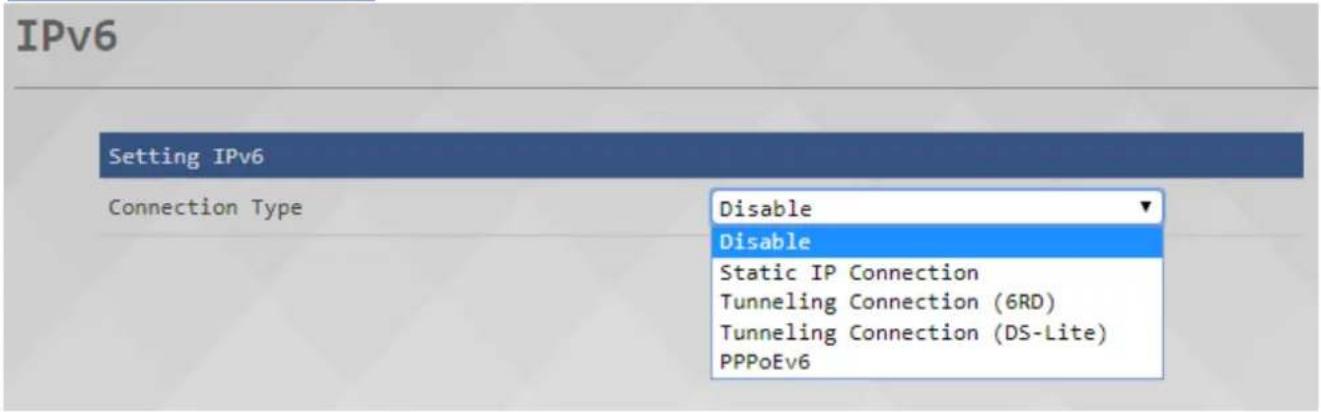
The JWR2100 wireless router supports IPv6, such as the static IPv6, quick tunneling deployment (6RD), double tunneling protocol (DS-Lite) and PPPoEv6. After completing the setting, press "Apply" for the change of setting to take effect.

Virtual private network
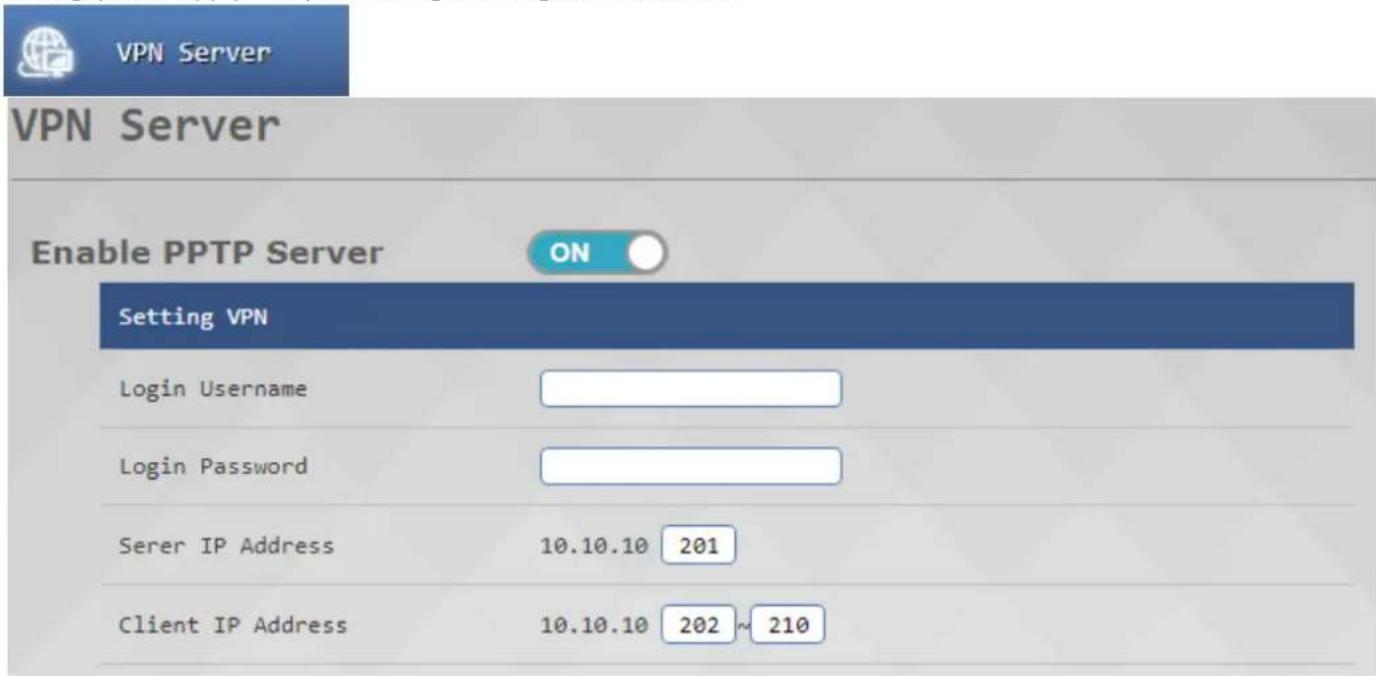
The JWR2100 router supports the VPN. Your internal network can connect to the WAN via router by activating this function. A device in the external network can send or receive data like in the internal network. After completing the setting, press "Apply" for your setting or change to take effect.
Firewall setting
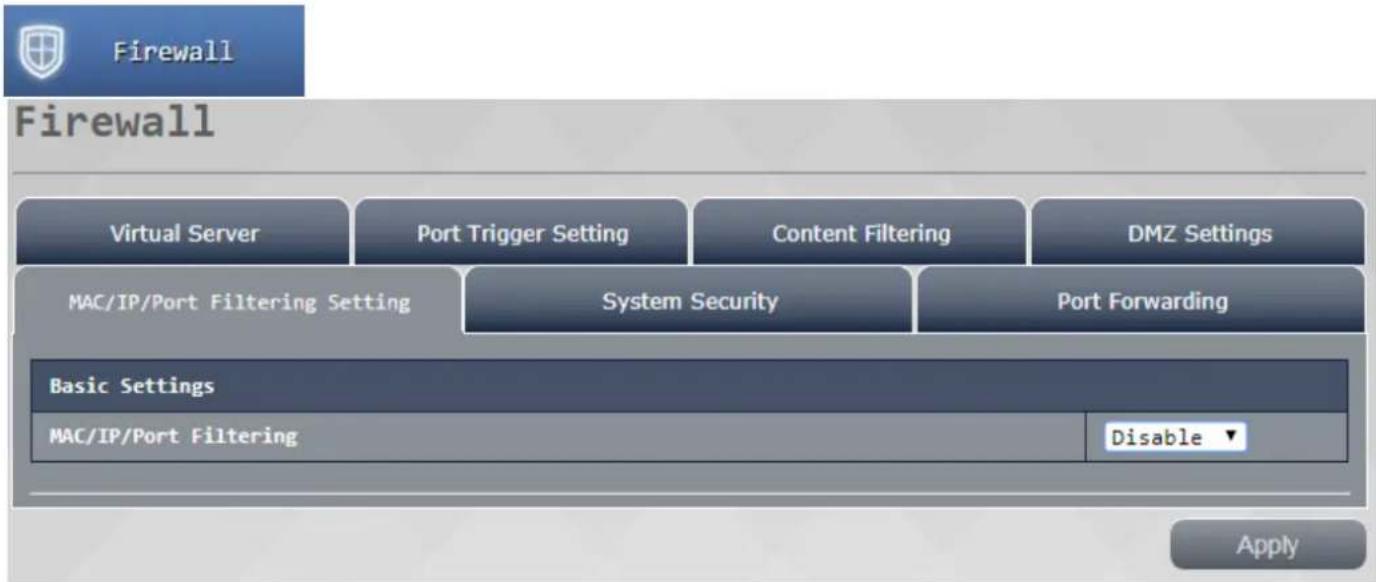
The JWR2100 router supports the firewall function for your internal or external network to become connected. Valid users can access the network via firewall mechanisms including MAC/IP/Port filter setting, port forwarding, DMZ setting, content filtering, port triggering setting and virtual mechanism. This function prevents invalid users from breaching your network security. It protects the data and provides defense and filtering functions. After completing the setting, press "Apply" for your setting or change to take effect.
System management
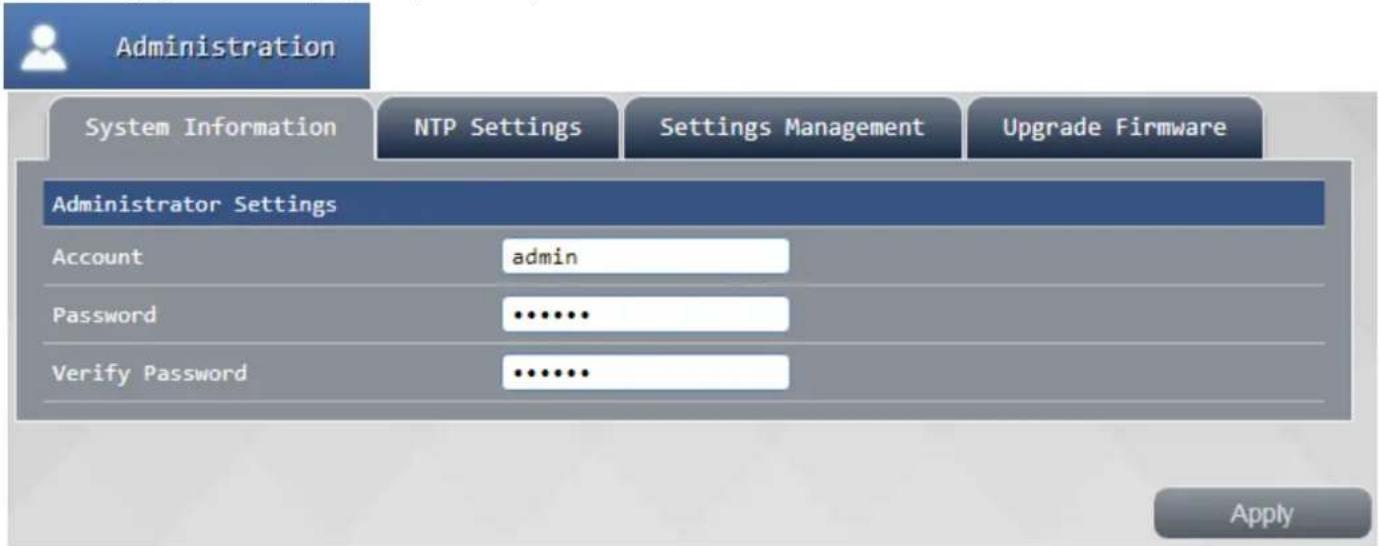
In this page, you can set/change the administrator account and password of your router, time setting, backup or import of the file used in the router, and the upgrade of router firmware. After completing the setting, press "Apply" for your setting or change to take effect.
System information
In this page, you can change your registration account and password of administrator. Check your password again after changing it. Press "Apply" for your new password to take effect.
NTP setting
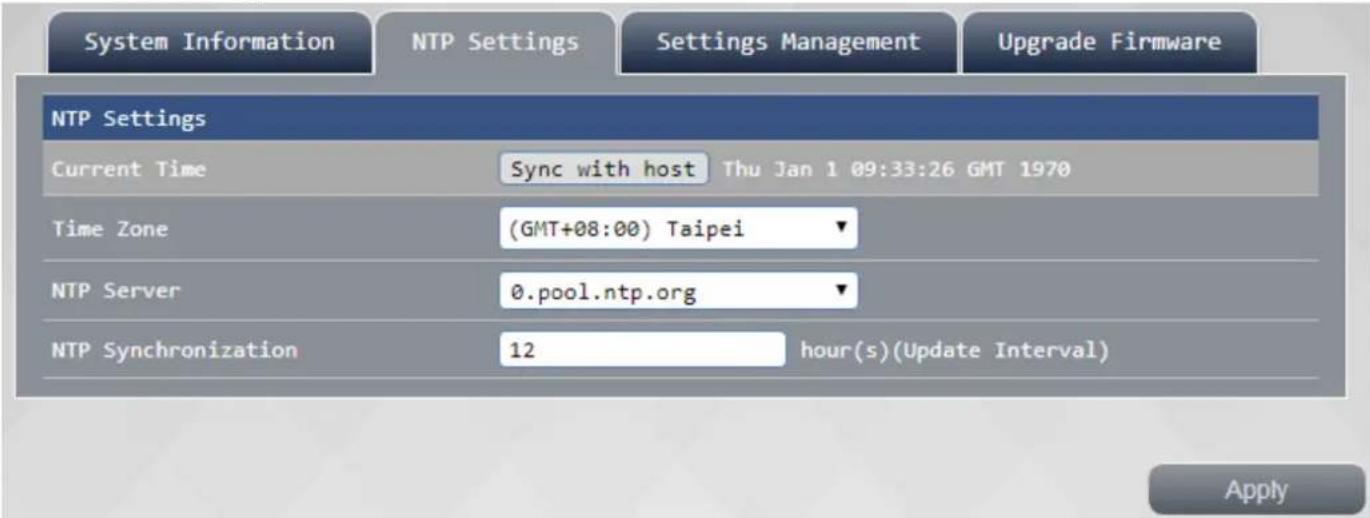
Use this NTP setting function to set your time and time zone of your router. Press "Apply" for your new setting to take effect after change.
Configuration management
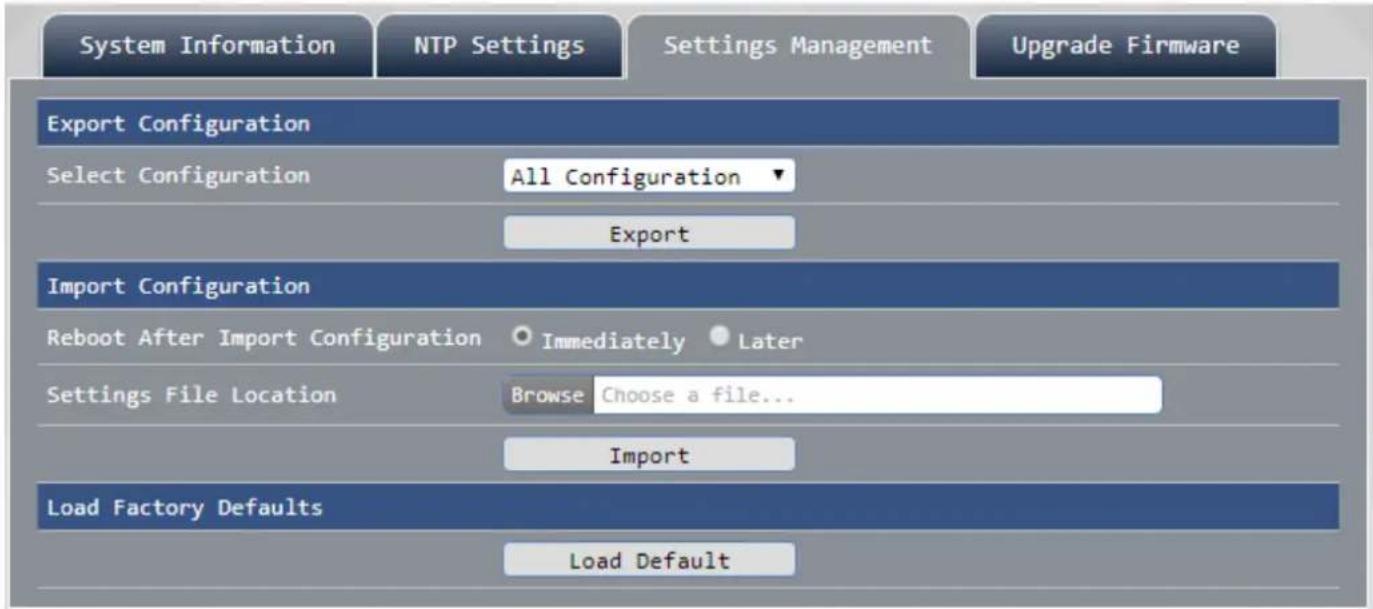
In the configuration management page, you can export the current setting of your router for backup or import your previous setting. Click "Load the default setting" to reset the router to the default setting if necessary. Click to confirm the selection and the router will reboot.
Upgrade firmware
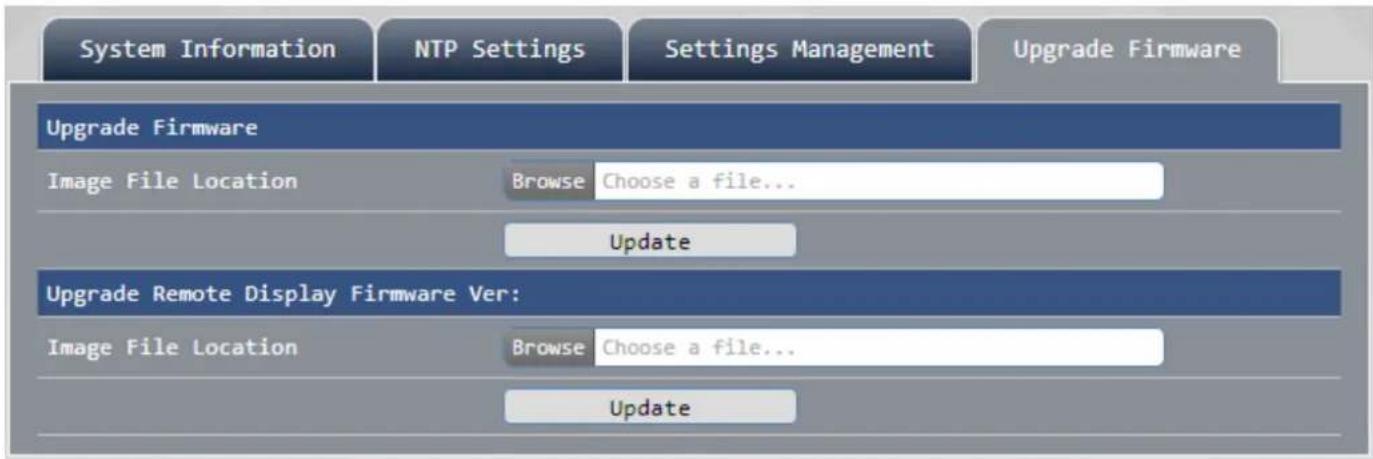
You can upgrade the firmware of your router or display port (HMID/VGA) in this page if any firmware update for the router is available for download.
The router will reboot automatically after the update is complete. The firmware update will be completed after reboot.
System log
In this page, you can check the reports on the LAN of the router, wireless network connection, memory usage and network traffic.
| System Information | |
| System Uptime | 2:41 |
| Internet Configurations | |
| Connection Type | DHCP (Auto Config) |
| IP Address | 192.168.1.113 |
| Subnet Mask | 255.255.255.0 |
| Gateway | 192.168.1.1 |
| Primary DNS Server | 8.8.8.8 |
| Secondary DNS Server | 168.95.1.1 |
| MAC Address | 00:05:1B:51:F2:52 |
| Local Area Network | |
| IP Address | 10.10.10.254 |
| Subnet Mask | 255.255.255.0 |
| MAC Address | 00:05:1B:54:15:A6 |
| Wireless 2.4G | |
| Network Mode | 11b/g/n mixed mode |
| Wireless Name (SSID) | J5-2.4G-B6E915 |
| Security Mode | WPA/WPA2 Personal |
| MAC Address | 00:05:1B:B6:E9:15 |
| Current Channel | Channel 11 |
| Wireless 5G | |
| Network Mode | 11ac/n |
| Wireless Name (SSID) | J5-5G-B4F8E2 |
| Security Mode | WPA/WPA2 Personal |
| MAC Address | 00:05:1B:B4:F8:E2 |
| Current Channel | Channel 157 |
| ScreenWave Display | |
| Version | |
Chapter 4: Introduction of the wireless projection function
The JWR2100 router comes with the j5create wireless projection function. The user can project the screen of platforms such as Windows/Mac/iOS/Android onto the HDMI/VGA output screen via the wireless signal of router.Follow the setting below to create your wireless projection environment.
Requirement for the wireless projection environment
Windows: Windows10, 8.1, 8, 7 (32-bit or 64-bit)
Mac: 10.9 or later
iOS: iOS 9.0 or later
Android: 5.0 or later
The router can display up to 9 devices on the screen at the same time.
Voice output
Windows can support the voice output.
For Android 6.0 and above, you need to connect the router to the keypad to support the voice output.
Neither Mac or iOS supports the voice output.
Wireless projection setting
Connect the HDMI/VGA screen to the router. The following image shows on the screen. Please follow the installation instructions for each system.
- Connect to Wi-Fi
SSID: J5-5G-xxxxxx
Password: 12345678
SSID: J5-2.4G-xxxxxx
Password: 12345678
- Set up for your device
Introduction of keypad function
Hardware keypad:
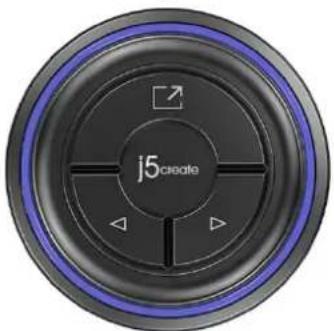
Connect the keypad to Windows/Mac/Android.

is the fullscreen/screen minimization function. Click twice to return the screen projected to the preview screen of JWR2100.

On the projection preview screen, you can select the location of the screen being output.
If you click these buttons while using a document, you can check the upper/lower page of the document or scroll the document, depending on the document attribute.
app Key Pad:

Use the Key Pad app in Android.

Project

Stop

Pause projec

Full screen

Minimize screen

Move to left/up

Move to right/down
On the projection preview screen, you can select the location of the screen being output.
If you click these buttons while using a document, you can check the upper/lower page of the document or scroll the document, depending on the document attribute.
Keypad installation in Windows
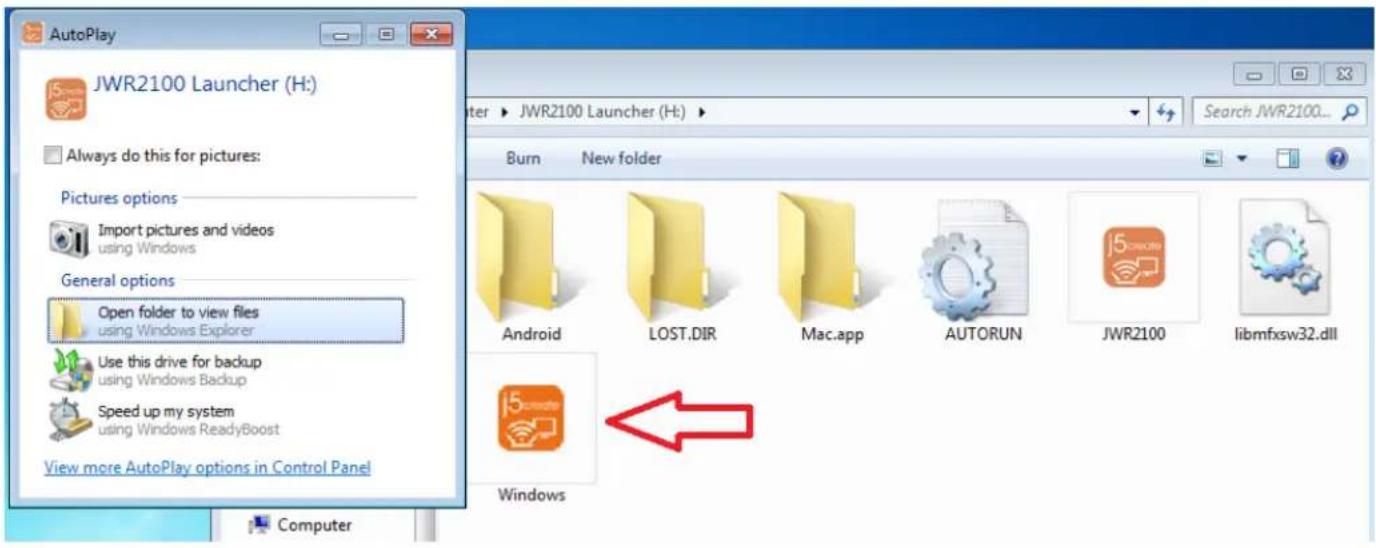
Set the Wi-Fi signal source in Windows to the 2.4G or 5G signal sending through the JWR2100 router. After making sure that the connection is made, insert the keypad into the USB port. The LED of keypad is illuminated. Insert the HDMI or VGA cable of the monitor into the display port of the JWR2100 router, where the signal will be output to. Now, check the SSID and password for the connection of JWR2100 remote display on the display monitor.
Click on the "Windows.exe" executive file in the keypad you inserted. This file will carry out connection in your system and synchronize the Windows screen to the monitor. To end the projection, please remove the keypad by following the procedure for safe USB removal.
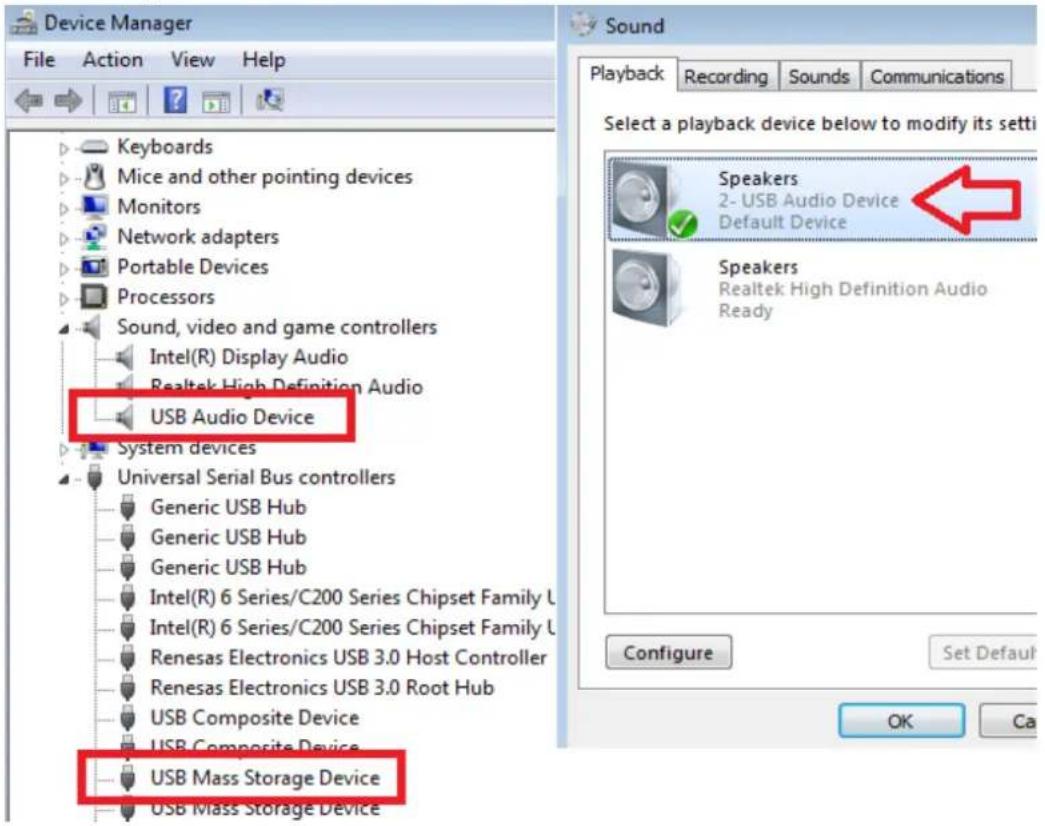
In Windows, the voice outputs from the keypad
To output the voice from the router via the keypad, insert the key pad to Windows. The default voice output port of Windows will be changed in the way that the voice will be output from the keypad to the router. From the device administrator section, you can see how the USB Audio Device and USB Mass Storage Device are created. The default setting of the voice will be changed in the way that the voice will be output from the HDMI/Audio port of the router instead. After the removal of keypad, the voice output of Windows will be returned to the default setting of Windows automatically.
Keypad installation in Mac
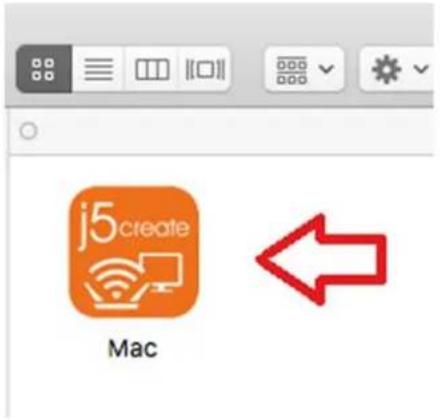
Set the Wi-Fi connection source in Mac to the 2.4G or 5G signal sending through the JWR2100 router. After making sure that the connection is made, insert the keypad into the USB port. The LED of keypad is illuminated. Connect the HDMI or VGA cable of the external monitor to the display port of the JWR2100 router. Check the SSID and password for the connection of JWR2100 Remote display on the display monitor.
Click on the "Mace" executive file, which carries out the keypad program in your system. It will cooperate with your keypad hardware to control the output screen. To end the projection, please remove the keypad by following the procedure for safe USB removal.
☆ Reminder
If the light of "j5create" on the key pad is illuminated but no image is output after the driver is installed, your system is not connected to any wireless signal of the JWR2100 router.
Keypad installation in Android
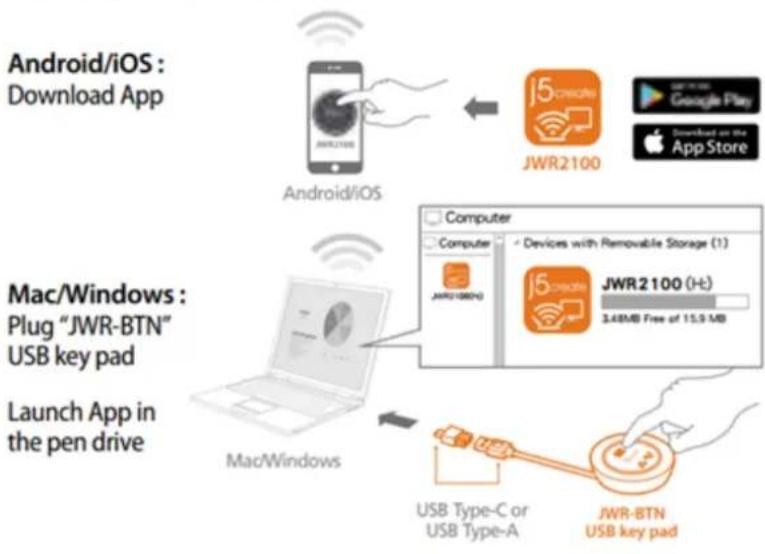
Connect the wireless signal of the Android device to the Wi-Fi SSID of the JWR2100 router. Refer to the SSID and password shown on the output screen. (The external monitor shows the SSID for 2.4G and 5G for the Remote Display. The default password 12345678 will show for the first connection.)
screenwave
JWR2100
j5create
1. Connect to Wi-Fi
SSID: J5-5g-xxxxxx
Password: 12345678
SSID: J5-2.4g-xxxxxx
Password: 12345678
2. Set up for your device
Android/IOS :
Download App
![graph LR A["Android iOS"] -->|Wireless Signal| B["JWR2100"] B --> C["Downloaded on the App Store"] C --> D["Google Play"]](/content/2026/05/792272/images/17845b5802b1ad7c360a417254fe342b05c9a9bb8d43b6ebc279972c722b9002.jpg)
Mac/Windows :
Plug "JWR-BTN"
USB key pad
Launch App in
the pen drive
![graph TD A["MacWindows"] --> B["Computer"] B --> C["Computers"] C --> D["Devices with Removable Storage (1)"] D --> E["JWR2100 (H)"] E --> F["3.4MB free of 15.9 MB"] G["USB Type-C or USB Type-A"] --> H["JWR-SIN USB KeyPad"]](/content/2026/05/792272/images/42091e73b375891940ec69f7ccb02e76c02795c894ae66ab201372345724ba9a.jpg)
Go to Google Play to download "JWR2100" App after making the connection.

JWR2100
j5create (Kaijet Technology)
The following dialogue window will appear after installation and execution. Check "Do not show this again" and click "Start" to use the wireless projection function.
JWR2100 will start capturing everything that's displayed on your screen.

JWR2100
Open JWR2100 when this USB device is connected?

Don't show again
CANCEL
START NOW

Use by default for this USB device
To change your default app settings, go to Settings > Applications > Default applications.
CANCEL
OK
Voice output in Android
To output the voice on the Android device from the display port of JWR2100, insert the keypad via the USB adapter. The dialogue window below shows on the program. Check "Use for this USB device by default" and click "OK" to output the voice on the Android device from the HDMI/Audio port of JWR2100.
☆ Reminder

Click to execute the JWR2100 App if it is not executed automatically.
Key Pad for iOS, keypad installation/use
Caution! Due to the limitation of iOS, the video playback function of the Key Pad for iOS App can only be used on the Key Pad for iOS App.
Connect the wireless signal of the iOS device to the Wi-Fi SSID of the JWR2100 router. Refer to the SSID and password shown on the output screen. (The external monitor shows the SSID for 2.4G and 5G for the Remote Display. The default password 12345678 will show for the first connection.) Go to Apple Store to download "JWR2100" app after making the connection. You can use the wireless projection function after installing and executing the app.
screenwave
JWR2100
j5create
1. Connect to Wi-Fi
SSID: J5-5g-xxxxxx
Password: 12345678
SSID: J5-2.4g-xxxxxx
Password: 12345678
2. Set up for your device
Android/IOS : Download App
![graph LR A["Android iOS"] -->|Wireless Signal| B["JW2100"] B --> C["Download via Google Play"] B --> D["Download via App Store"]](/content/2026/05/792272/images/18b21c0c61a9b592fe3a8769e2b6676aff97ef54f42872488212f0d5de9b294a.jpg)
Mac/Windows : Plug "JWR-BTN" USB key pad
Launch App in the pen drive
![graph TD A["MacWindows"] --> B["USB Type-C or USB Type-A"] B --> C["JWR-BTN USB key pad"] C --> D["5.2MB Devices with Removable Storage (1)"] D --> E["JWR2100 (64MB) Free of 13.3 MB"]](/content/2026/05/792272/images/a98981cb66405bd5d7e982f15633e21d3e9c13b32ba1a2d3098b776b921add3f.jpg)
The following is the description for the interface of Key Pad for iOS App:

iPhone wireless setting

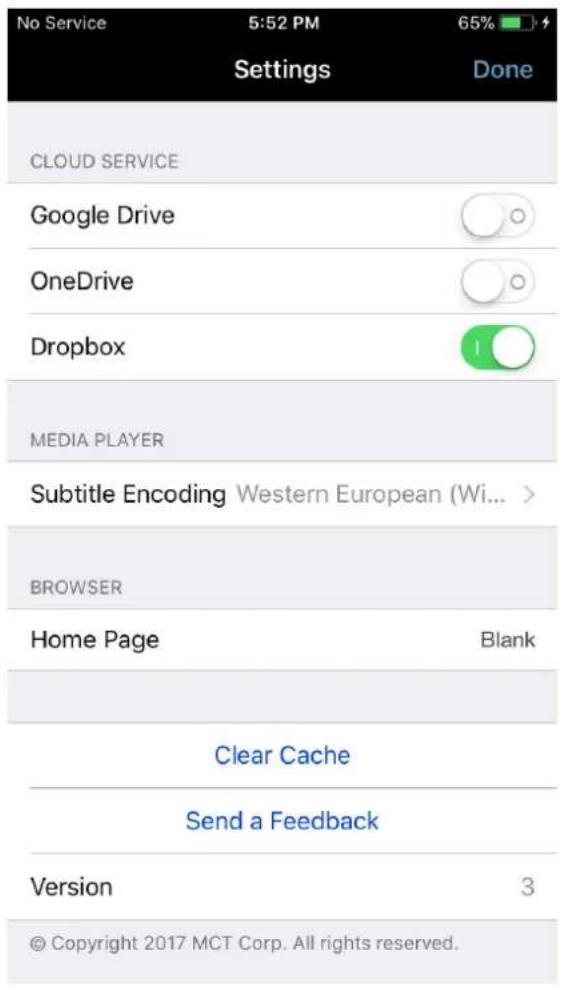

Browse the file in the path of the Key Pad for iOS App.

Browse the photo in the path of the Key Pad for iOS App.

Play the video shot by the camera.

A browser is built in the Key Pad for iOS App. You can output the image under this browser to the
screen.

You can connect to the cloud network service you applied for and access files stored on the cloud, such as videos, photos and documents.

Output the screen of Key Pad for iOS App to the monitor.

Stop the image output.

Expand the output screen to full screen view.
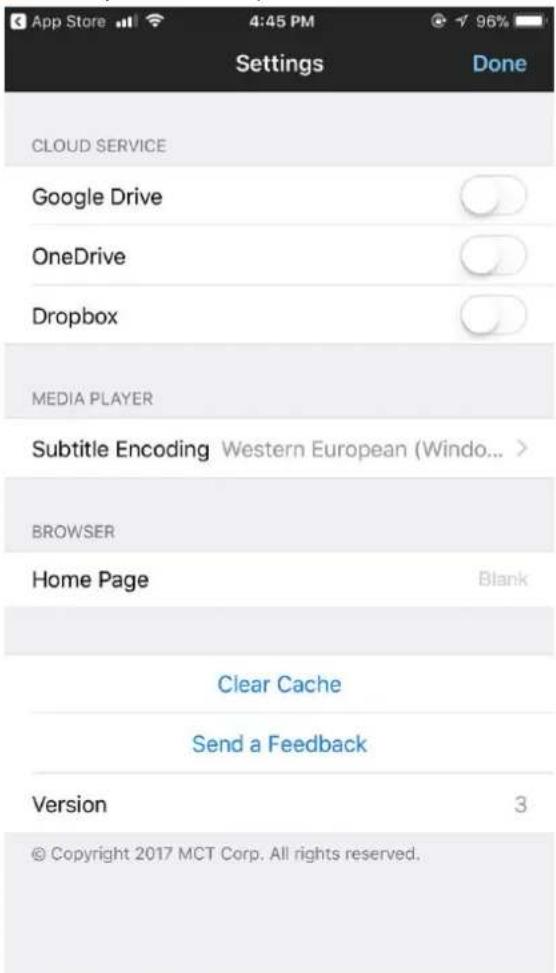
App cloud service switch, media player caption code, clear app temporary archive settings
☆ Reminder
Install iTunes if you wish to add/manage files.
Chapter 5: Troubleshooting
Q1: The computer cannot find the wireless router.
A1:
- Check if the wireless card in your computer is activated. Please reactivate it if disabled.
- Check if your wireless card can acquire the IP address dynamically.
- Check if the physical connection of network is correct and check if the setting regarding the wireless connection of the JWR2100 router is accurate.
Q2: What should I do if I forgot about the wireless password?
A2: Log in the router and reset your 2.4G / 5G wireless signal. It is suggested to use the "WPA2-Personal" security setting when resetting the password of wireless signal. This is the safest authorization method for now.
Q3: The computer cannot go online via the wireless connection with the router.
A3:
- Check if the SSID and password of the wireless router are correct.
- Check if the computer can find the name (SSID) of the wireless router.
- Make sure that you've set that your wireless card will receive the IP address automatically.
- Check if your computer can go online while there is a cable connecting to the wireless router.
- Check if the light on the router for wireless connection is illuminated.
- Check if the wireless function of the router is activated.
- Check if other wireless devices have the same problem.
Q4: The wireless connection gets disconnected easily.
A4:
-
Check if the firmware version of the wireless router has been updated to the latest version.
-
Try to switch the wireless channel to the one with less interruption.
-
Make sure there is no object near the wireless router that would interrupt the wireless signal, such as the microwave, wireless phone, transformer box...etc.
-
Make sure there is no object near the wireless router that would block the wireless signal, such as the iron cabinet, iron door or concrete wall. Also, make sure that the wireless router is not placed inside a sealed cabinet, on the ground or behind the sofa.
-
Please try to put the wireless router somewhere else. For example, it is suggested to put it on a wooden cabinet or a desk. You can also place it near the area with poor connection or the center of the house to see if the connection gets better.
Q5: The light for wireless connection is not illuminated.
A5:
- Go to the setting page to check if the wireless function is activated.
- Check if the firmware version of the wireless router is the latest version.
- Try to return the router to the default factory setting.
Q6: The light for WAN is abnormal.
A6:
- Check if the firmware version of the wireless router has been updated to the latest version.
(Contact the j5 customer service center to check the version.)
-
Check if the WAN port of your wireless router is connected properly.
-
Check with your Internet service provider (ISP) to see if the network works properly.
Q7: The computer cannot connect to Internet via the router.
A7:
- Check if the WAN port of your wireless router is connected properly.
- Make sure that you've set the network card of your computer will receive the IP address automatically.
- Check if your computer can go online in other network environments.
- Check with your Internet service provider (ISP) for the connection setting and relevant information.
- Connect your computer to the network provided by the Internet service provider (ISP) to see if you can go online.
- Check if the firmware version of the wireless router has been updated to the latest version.
- Return the wireless router to the default factory setting.
There is a "Reset button" at the back of the router. While the router is turned on, press and hold the "Reset button" for more than 5 seconds and wait for the power light to flash. Release the "Reset button" and wait for the reboot to complete the reset process.
- After returning to the default setting, login again to execute the quick installation guide of the router to complete the setting.
Q8: The USB printer can't be used.
A8:
- Check if the firmware version of the wireless router is the latest version.
- Check if the printer driver is installed.
Q9: The USB drive cannot be recognized.
A9:
- Check if the firmware version of the wireless router has been updated to the latest version.
- Connect the hard drive to the computer to see if it can be read.
- Test if other external hard drives can be recognized.
- Ask the customer to backup important data if necessary.
- Reformat the hard drive and connect it to the router to test if the hard drive can be read.
Q10: The mobile phone cannot detect the network signal shared by the router.
A10:
- Check if the firmware version of the wireless router has been updated to the latest version.
- Turn off the wireless switch of the mobile phone and turn it on again to see if the mobile phone can detect the signal.
- Reboot your mobile phone and router to see if the problem is solved.
Q11: I cannot enter the interface of wireless router:
A11:
- Please connect the wireless router properly via a cable first.
- Make sure that you've set the network card of your computer will receive the IP address automatically.
-
Make sure that the proxy setting of your web browser is not turned off. Turn off the proxy setting if it is on.
-
Return the wireless router to the default factory setting and try to open the setting page.
There is a "Reset button" at the back of the router. While the router is turned on, press and hold the "Reset button" for more than 5 seconds and wait for the power light to flash. Release the "Reset button" and wait for the reboot to complete the reset process.
※Note: If you return the router to the default factory setting, you must reset all settings.
Q12: The firmware update for the router/keypad fails.
A12: Please Contact with customer service center.
Q13: What are the video/image formats that can be transferred via the USB drive?
A13: Image: JPEG
Audio: mp3, wma, wav, pcm, mp4, lpcm, ogg
Video: asf, avi, divx, mpeg, mpg, ts, vob, wmv, mkv, mov
Q 14: How to upgrade the firmware of keypad?
A 14:
- Use Windows to upgrade the firmware.
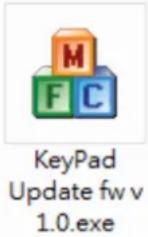
- Please download the update firmware "KeyPad Update fw" of Key Pad from the support website for j5.
- Insert your keypad to the USB port of your PC/NB and execute the update.
- Do not remove the keypad during update. After the message notifying the completion of update, remove the keypad to complete the update procedure.
Q15: Is HDMI or VGA the main output port?
A15: HDMI is used as the main output port when both HDMI and VGA are connected.
Q16: When I insert the keypad, Windows tells me that it is suspicious. What's the problem?
A16: The antivirus software has made mistakes. Please change the setting to prevent the antivirus software from detecting your keypad.
Q17: Why does the screen turn black when playing the video with HDCP?
A17: The JWR2100 router does not support the digital content protection (HDCP).
Q18: After my Android phone is connected to the keypad, why is there no response or voice output?
A18: Only phones with Android 6.0 and above support the USB keypad and voice output.
Q19: After my phone with Android 6.0 is connected to the keypad, why is there no voice output?
A19: Some phones cannot output any voice via keypad due to CPU limit, such as Nexus 6P. Please play the audio directly by phone.
Q20: Why Use KeyPad to Execute on Windows System
"Windows detected low performance on your computer. It may be because there is not enough resources to perform Windows Aero color configuration."?
A20: The JWR2100 uses GPU resources. Windows 7 default messages suggest that Aero be disabled to improve computer performance.
You can ignore this message and select "Keep current color profile"
Q 21 : Why does my device can not see the 5G SSID?
A 21 : This question indicates that your device currently does not support the JWR2100 default band.
Please go to 5G Settings page → Support channel → modify the settings to Channel 36\~48 If the band is already set to channel 36-48 and it still doesn't work, then your device cannot be used in this area.
Q22 : In the mac system, pptp function must be installed third party software to use
Federal Communication Commission Interference Statement
This equipment has been tested and found to comply with the limits for a Class B digital device, pursuant to Part 15 of the FCC Rules. These limits are designed to provide reasonable protection against harmful interference in a residential installation.
This equipment generates, uses and can radiate radio frequency energy and, if not installed and used in accordance with the instructions, may cause harmful interference to radio communications. However, there is no guarantee that interference will not occur in a particular installation. If this equipment does cause harmful interference to radio or television reception, which can be determined by turning the equipment off and on, the user is encouraged to try to correct the interference by one of the following measures:
. Reorient or relocate the receiving antenna
. Increase the separation between the equipment and receiver.
. Connect the equipment into an outlet on a circuit different from that to which the receiver is connected.
. Consult the dealer or an experienced radio/TV technician for help.
FCC Caution: To assure continued compliance, any changes or modifications not expressly approved by the party responsible for compliance could void the user's authority to operate this equipment. (Example - use only shielded interface cables when connecting to computer or peripheral devices).
FCC Radiation Exposure Statement
This equipment complies with FCC RF radiation exposure limits set forth for an uncontrolled environment. This equipment should be installed and operated with a minimum distance of 20 centimeters between the radiator and your body.
This transmitter must not be co-located or operating in conjunction with any other antenna or transmitter.
The antennas used for this transmitter must be installed to provide a separation distance of at least 20 cm from all persons and must not be co-located or operating in conjunction with any other antenna or transmitter.
This device complies with Part 15 of the FCC Rules. Operation is subject to the following two conditions: (1) This device may not cause harmful interference, and (2) This device must accept any interference received, including interference that may cause undesired operation.


- CONTENTS
- CHAPTER 1: KNOW YOUR JWR2100 ROUTER
- CHAPTER 2: BUILD YOUR NETWORK
- CHAPTER 3: MANAGEMENT SETTING INTERFACE OF WIRELESS ROUTER
- CHAPTER 4: INTRODUCTION OF THE WIRELESS PROJECTION FUNCTION
- CHAPTER 5: TROUBLESHOOTING....38
- PACKAGE CONTENT
- DESCRIPTION FOR THE APPEARANCE OF JWR2100 ROUTER
- ROUTER LOCATION
- SYSTEM REQUIREMENTS OF PRODUCT
- BUILD YOUR JWR2100 ROUTER
- WIRED CONNECTION
- WIRELESS CONNECTION
- SET UP THE TCP/IP SETTING OF SYSTEM
- NETWORK SETUP WIZARD
- GENERAL SETTING
- DESCRIPTION FOR THE NETWORK MAP
- VISITOR NETWORK SETTING
- GUEST NETWORK
- 2.4G
- 5G
- PARENTAL CONTROL SETTING
- PARENTAL CONTROL
- APPLY
- USB APPLICATION
- ☆ REMINDER
- WIRELESS 2.4G
- WIRELESS NETWORK 2.4G SETTING
- BASIC SETTING
- BASIC
- ADVANCED SETTING
- SECURITY
- STATISTICS
- INTERNAL NETWORK SETTING
- LOCAL AREA NETWORK
- EXTERNAL NETWORK SETTING
- WIDE AREA NETWORK
- IPV6 SETTING
- VIRTUAL PRIVATE NETWORK
- FIREWALL SETTING
- SYSTEM MANAGEMENT
- SYSTEM INFORMATION
- NTP SETTING
- CONFIGURATION MANAGEMENT
- UPGRADE FIRMWARE
- SYSTEM LOG
- REQUIREMENT FOR THE WIRELESS PROJECTION ENVIRONMENT
- VOICE OUTPUT
- WIRELESS PROJECTION SETTING
- INTRODUCTION OF KEYPAD FUNCTION
- KEYPAD INSTALLATION IN WINDOWS
- IN WINDOWS, THE VOICE OUTPUTS FROM THE KEYPAD
- KEYPAD INSTALLATION IN MAC
- KEYPAD INSTALLATION IN ANDROID
- SCREENWAVE
- CONNECT TO WI-FI
- SET UP FOR YOUR DEVICE
- VOICE OUTPUT IN ANDROID
- KEY PAD FOR IOS, KEYPAD INSTALLATION/USE
- CHAPTER 5: TROUBLESHOOTING
- FCC RADIATION EXPOSURE STATEMENT
Brand : j5 create
Model : JWR2100
Category : Router