
JUE303 - Network card / adapter j5 create - Free user manual and instructions
Find the device manual for free JUE303 j5 create in PDF.


| Type | Wireless AC USB Adapter |
| Brand | j5create |
| Model | JUE303 |
| Interface | USB 2.0 (or 3.0 - not specified, assume USB 2.0) |
| Wireless Standard | IEEE 802.11ac/b/g/n |
| Frequency Band | 2.4 GHz / 5 GHz |
| Maximum Data Rate | Up to 433 Mbps (typical) |
| Security | WPA / WPA2 (typical) |
| Operating Systems Supported | Windows 8.1/8/7/Vista/XP (32/64-bit), Mac OS X v10.6~10.10, Linux |
| Power Source | USB bus powered |
| Dimensions | Approximately 2.5 x 1 x 0.5 inches (6.4 x 2.5 x 1.3 cm) |
| Weight | Approximately 0.5 oz (14 g) |
| Warranty | 1-year limited warranty |
| Package Contents | Wireless AC USB Adapter, Installation CD, Quick Installation Guide |
| Installation Requirement | Driver must be installed before plugging in the adapter |
| Technical Support | Phone: 888-689-4088, Email: service@j5create.com, Live Chat available |
Frequently Asked Questions - JUE303 j5 create
User questions about JUE303 j5 create
0 question about this device. Answer the ones you know or ask your own.
Ask a new question about this device
Download the instructions for your Network card / adapter in PDF format for free! Find your manual JUE303 - j5 create and take your electronic device back in hand. On this page are published all the documents necessary for the use of your device. JUE303 by j5 create.
USER MANUAL JUE303 j5 create
Do Not plug in the j5create Wireless AC USB Adapter until the driver is completely installed on your computer.
Wireless AC USB Adapter
JUE303 / JUE304

System Requirements
- Microsoft Windows 8.1 / 8 / 7 / Vista / XP (32-bit or 64-bit)
• Mac OSX v10.6\~v10.10 - Linux OS
- Available USB port
Introduction
Thank you for purchasing the j5create Wireless AC USB Adapter. The j5create Wireless AC USB Adapter can easily upgrade your desktop/laptop to receive a wireless Internet connection. Once connected, access your high-speed Internet connection while sharing photos, files, music, videos, printers and storage. Get a better Internet experience with a faster wireless connection so you can enjoy smoother digital phone calls, gaming, downloading and video streaming.
STOP!
If you have any problems with this product please contact our technical support team before returning it to the store.
TECHNICAL SUPPORT
Customer Service: 888-988-0488
Technical Support: 888-689-4088
Email: service@j5create.com
Live Chat: www.j5create.com/livechat
Support Ticket: tickets.j5create.com
2015Feb-V1
Windows
Driver Installation
Step 1 Step 2.3 Step 4
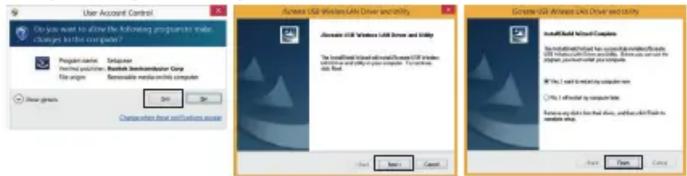
Step 1
Insert the installation CD into your CDROM. The Windows 7/8 User Account Control dialog is shown. Click Yes to continue.
Step 2
The Preparing Setup dialog is shown.
Step 3
The wizard is ready to install the driver and the utility. Click Next to begin the installation.
Step 4
Click Finish, then restart your computer to complete the installation process
■ Connecting to a Wireless Network
Step 1 Step 2

Step 3 Step 4
![Create USB Fitness List Utility File Edit Options [ ] File Edit Options [ ] File Edit Options Default: Default [ ] Default [ ] Default [ ] Default [ ] Default [ ] Default [ ] Default [ ] Default [ ] Default [ ] Default [ ] Default [ ] Default [ ] Default [ ] Default [ ] Default [ ] Default [ ] Default [ ] Default [ ] Default [ ] Default [ ] Default [ ] Default](/content/2026/05/1072852/images/1260f7332a22c6526f0ac346a6b1c416b42f2696380e7c4381050ad4fb0ce153.jpg)
Step 1
Plug the Wireless AC USB Adapter into a USB port. Double-click the 5 credit icon on your desktop to start the Wireless AC Network Utility or in the task bar.
Step 2
Click the Available Network button to scan for available access points.
Step 3
Double-click on the service set identifier (SSID) of the network that you are going to connect to. Enter the Network Key (password) and press OK.
Step 4
Your wireless network is ready for use.
Mac
Driver Installation
Step 2 Step 1 Step 3

Step 1
Save the installation file from the installation CD onto your MAC.
Step 2
Open the dmg file and start the installation process. Click Continue to begin installation.
Step 3
Once installation has finished, restart your Mac.
■ Connecting to a Wireless Network
Step 1 Step 2


Step 3 Step 4
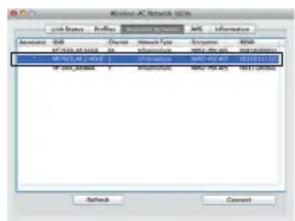
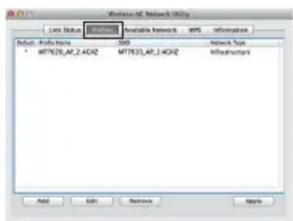
Step 1
Plug the Wireless AC USB Adapter into a USB port. The Wireless AC Network Utility should launch automatically.
Step 2
Click the Available Network button to scan for available access points.
Step 3
Double-click on the service set identifier (SSID) of the network that you are going to connect to. Enter the Network Key (password) and press OK.
Step 4
Once the network is connected, click on Add to Profile to save the network and it will automatically connect next time. Now your wireless network is ready for use.
Limited Warranty
j5create offers a limited 1-year warranty. User's wear & tear damage is not included. The user shall call or e-mail j5create's customer service with information regarding the defect(s) of the product and obtain a return authorization number. Users are responsible for one way return freight cost and we will take care of one way freight back. In order to obtain a return authorization number, users should have the following information handy when calling or emailing the service team:
(i) a copy of the original purchase invoice to verify your warranty
(ii) a product serial number
(iii) a description of the problem
(iv) customer's name, address, and telephone number
j5create does not warrant that the operation of the product will be uninterrupted or error-free. j5create is not responsible for damage arising from failure to follow instructions relating to the product's use. This warranty does not apply to:(a) consumable parts, unless damage has occurred due to a defect in materials or workmanship; (b) cosmetic damage, including but not limited to scratches, dents, and broken plastic on ports; (c) damage caused by use with non-j5create products; (d) damage cause by natural disasters (flood, fire, earthquake, lighting strike, typhoon etc.); (e) damage caused by human misuse (lost, accident, abuse, misuse or other external causes); (f) damage caused by operating the product outside the permitted or intended uses described by j5create; (g) damage caused by service (including upgrades and expansions) performed by anyone who is not a representative of j5create or a j5create Authorized Service Provider; (h) a product or part that has been modified to alter functionality or capability without the written permission of j5create; or (i) if any j5create serial number on the product has been removed or defaced. If such a situation occurs, j5create will calculate the cost of materials and repair for your reference. This warranty is given by j5create in lieu of any other warranties expressed or implied.
Copyright© 2015 j5create. All rights reserved. All trade names are registered trademarks of their respective owners. Features and specifications are subject to change without notice. Product may not be exactly as shown in the diagrams.
■ Regulatory Compliance
FCC
This device complies with Part 15 of the FCC Rules. Operation is subject to the following two conditions:
- This device may not cause harmful interference.
- This device must accept any interference received, including interference that may cause undesired operation.
Note:
This equipment has been tested and found to comply with the limits for a Class B digital device, pursuant to Part 15 of the FCC Rules. These limits are designed to provide reasonable protection against harmful interference in a residential installation. This equipment generates, uses and can radiate radio frequency energy and, if not installed and used in accordance with the instructions, may cause harmful interference to radio communications. However, there is no guarantee that interference will not occur in a particular installation. If this equipment does cause harmful interference to radio or television reception, which can be determined by turning the equipment off and on, the user is encouraged to try to correct the interference by one or more of the following measures:
Reorient or relocate the receiving antenna.
Increase the separation between the equipment and receiver.
Connect the equipment into an outlet on a circuit different from that to which the receiver is connected.
Consult the dealer or an experienced radio/television technician for help.
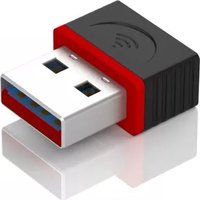


Brand : j5 create
Model : JUE303
Category : Network card / adapter