3 in 1 Trimmer 95597 - Lawn mower Visage - Free user manual and instructions
Find the device manual for free 3 in 1 Trimmer 95597 Visage in PDF.


| Product Type | 3 in 1 Trimmer (nose/ear hair, contour, eyebrow/beard) |
| Model | 95597 |
| Dimensions (H × Diameter) | 5.12 in × 1.10 in (13 cm × 2.8 cm) |
| Weight (excluding battery) | 0.23 lbs (102 g) |
| Power Source | 1 × 1.5 V AA battery (included) |
| Battery Type | LR6 (AA) alkaline |
| Operating Time | Min. 90 minutes |
| Attachments | Nose/ear hair attachment, contour attachment, eyebrow/beard attachment, guide comb (3mm/6mm), 2 protective caps |
| Blade Material | Stainless steel rotary blades |
| LED Light | Built-in automatic LED light |
| Housing Material | Plastic with textured grip |
| Intended Use | Human hair: nose, ear, eyebrows, sideburns, moustache, small beards |
| Cleaning | Rinse attachments under running water; wipe body with damp cloth; dry thoroughly |
| Safety Features | Protective caps, on/off switch, use mirror recommended, keep away from eyes and scalp |
| Water Resistance | Do not submerge; protect from moisture |
| Storage | Remove battery; store in base; keep away from children and animals |
| Warranty | Refer to warranty card for service address |
Frequently Asked Questions - 3 in 1 Trimmer 95597 Visage
User questions about 3 in 1 Trimmer 95597 Visage
0 question about this device. Answer the ones you know or ask your own.
Ask a new question about this device
Download the instructions for your Lawn mower in PDF format for free! Find your manual 3 in 1 Trimmer 95597 - Visage and take your electronic device back in hand. On this page are published all the documents necessary for the use of your device. 3 in 1 Trimmer 95597 by Visage.
USER MANUAL 3 in 1 Trimmer 95597 Visage

English .....06
Español .....25
Contents
Overview 3
Use....4
Product contents/device parts....6
General information....7
Reading and storing the user manual....7
Explanation of symbols 7
Safety 8
Proper use....8
Safety notes 9
Battery notes....12
First use....14
Checking the trimmer and package contents......14
Basic cleaning....15
Inserting the battery....15
Operations 16
Using the nose/ear hair attachment....16
Using the contour attachment 17
Using the eyebrow/beard attachment....18
Cleaning and maintenance ....19
Cleaning the trimmer....19
Cleaning the nose/ear hair attachment......20
Cleaning the contour attachment 20
Cleaning the eyebrow/beard attachment......20
Storage....21
Technical data....22
Disposal....23
Disposing of the packaging 23
Disposing of the trimmer......23
A


B


C


D

E



Product contents/device parts
1 Nose/ear hair attachment
2 LED light
3 On/off switch
4 Body
5 Guide comb (3 mm/0.12 inch; 6 mm/0.24 inch)
6 Base
7 Contour attachment
8 Eyebrow/beard attachment
9 Protective cap (eyebrow/beard attachment)
10 Protective cap (trimmer)
11 Battery
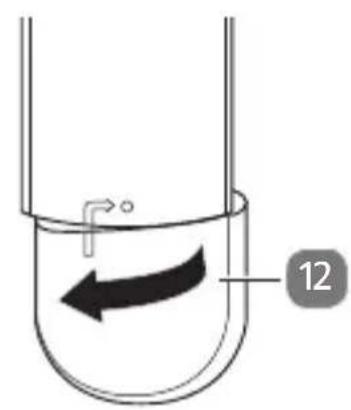
12 Battery compartment cover
13 Blade

The product contents include one type LR6 1.5 V battery.
General information
Reading and storing the user manual

This user manual accompanies this 3 in 1 trimmer (hereafter referred to as the “trimmer”), and contains important information regarding set up and operation.
Before using the trimmer, read the user manual carefully. This particularly applies to the safety notes. Failure to do so may result in personal injury or damage to the trimmer.
Store this user manual for further use. Make sure to include this user manual when passing the trimmer on to third parties.
Explanation of symbols
The following symbols and signal words are used in this user manual, on the trimmer or on the packaging.

WARNING!
This signal symbol/word designates a hazard with moderate risk, which may result in death or severe injury if not avoided.

CAUTION!
This signal symbol/word designates a hazard with low risk, which may result in minor or moderate injury if not avoided.
NOTICE!
This signal word warns of possible damage to property.
Safety
Proper use
The trimmer is exclusively designed to cut real, human hair from the nose and the ear, and for trimming eyebrows, sideburns, moustaches, and small beards. It is only intended for private home use and is not suitable for commercial purposes. The trimmer is not a toy for children.
Only use the trimmer as described in this user manual. Any other use is considered improper and may result in damage to property.
The manufacturer or vendor cannot be held liable for damages incurred through improper or incorrect use.
Safety notes

WARNING!
Risk of suffocation!
Children can become trapped in the plastic wrapping and suffocate. They can also suffocate if they swallow or inhale the provided small parts.
- Keep children away during assembly.
- Ensure that children do not play with the packaging and small parts.

WARNING!
Risk of injury!
Keep the trimmer away from scalp hair and eyes, otherwise, there is an increased risk of injury.
- Do not insert the nose/ear hair cutting attachment too far into the nostril or ear. This may cause personal injury.
- Never guide the contour attachment from the bottom up. This may cause cuts.
- Always use a mirror when using the trimmer.
- Always replace the protective cap when you are not using the trimmer.

WARNING!
Danger for children and persons with impaired physical, sensory or mental capacities (e.g., partially disabled persons, older persons with reduced physical and mental capacities) or lack of experience and knowledge (e.g., older children).
- If they are supervised or have been instructed on how to safely use the trimmer and have understood the risks associated with operating it, this trimmer may be used by children ages eight and over as well as persons with impaired physical, sensory or mental capacities, or those lacking experience and knowledge. Children may not play with the trimmer.
- Cleaning and user maintenance must not be performed by unsupervised children.
NOTICE!
Risk of damage!
If you do not use the trimmer properly, you may damage it.
- Inspect the trimmer and the accessories before each use. Do not use the trimmer or the accessories if they are damaged, or if the housing exhibits cracks or breaks, or is deformed.
- Do not submerge the trimmer in water or other liquids.
- Protect the trimmer from moisture, dripping water or splashes.
- Use the original accessories only.
- Do not use any harsh or abrasive cleaning agents.
- Only use the trimmer indoors. Do not use it in damp or wet areas.
- Never store the trimmer in such a way that there is a risk of it falling into a sink or bath tub or any other container with liquid.
- Do not insert any objects into the housing.
- Never expose the trimmer or the accessories to high temperatures (e.g., oven) or the effects of weather (e.g., rain). Never fill the housing with liquids.
- Do not make any modifications to the trimmer or the accessories. Only use the trimmer and the accessories in the ways that are recommended by the manufacturer.
- Do not drop, strike or expose the trimmer to strong vibrations or magnetic fields.
- Do not load anything on to the trimmer whether it is in use or not in use.
Battery notes

WARNING!
Health hazards!
There is a high health hazard if children or animals swallow the battery.
- Store the battery so that it is not accessible to children and animals.
- Immediately dispose of used and leaky batteries in accordance with the
applicable guidelines.
- If you suspect a battery has been swallowed, seek immediate medical attention.

WARNING!
Risk of explosion!
If you do not handle the batteries properly, there is an increased risk of explosion.
- Store batteries in a cool, dry place. Never expose batteries to excessive heat (e.g., direct sunlight, or heater). Otherwise there is an increased danger of the batteries leaking.
- Batteries must not be charged or reactivated in any way, must not be disassembled, or short-circuited, and must not be disposed of in a fire.
- Only replace the battery with a battery of the same type.
- Ensure that the battery is inserted correctly by observing the polarities as illustrated on the housing (+ and -).
- Always use batteries of premium quality. Batteries of poor quality may leak and cause damage.
- Before inserting the battery, make sure the contacts inside the battery compartment and on the battery itself are dry, clean and intact. Clean them if necessary.
- Remove the battery from the trimmer if it is dead. Also remove the battery if you do not intend to use the trimmer for a prolonged period. Otherwise the battery may leak and cause damage.
- Remove the battery before disposing of the trimmer.
First use
Checking the trimmer and package contents
NOTICE!
Risk of damage!
If you are not cautious when opening the packaging with a sharp knife or other
pointed or sharp object, you may quickly damage the trimmer.
- For this reason, be very careful when opening the package.
- Take the trimmer out of the packaging.
- Check to make sure that all parts are included (see Fig. A and B).
- Check whether the trimmer or individual parts are damaged. If this is the case, do not use the trimmer. Contact the manufacturer via the service address indicated on the warranty card.
Basic cleaning
- Remove the packaging material and all plastic wrappings.
- Clean all parts of the trimmer before first use as described in the chapter “Cleaning and maintenance”.
Inserting the battery
Before use, insert the included AA battery 11.
- Turn the battery compartment cover 12 clockwise at the bottom of the trimmer (see Fig. B).
- Align the polarities, insert the battery and replace the battery compartment cover (see Fig. C). Twist counterclockwise to lock the cover.
- Make sure the trimmer is working before use by turning it on using the on/off switch 3 (see Fig. D). There should be a whirring sound and the built-in LED light 2 should light up (see Fig. E).
Operations
Using the nose/ear hair attachment

WARNING!
Risk of injury!
The trimmer accessories' blades are very sharp and may rotate at high speeds. Be careful that you only use the trimmer as recommended by the manufacturer, otherwise you may injure yourself.
- Do not insert the nose/ear hair attachment too far into your nostril or ear.
- Do not use the device on injured skin (e.g., open wounds, swelling, rash, sunburn, etc.).
- Switch off the trimmer before changing the attachments, each time before cleaning, and before storing.
- Keep the trimmer away from hair scalp and eyes.
- To avoid any risk, do not make any changes to the trimmer or accessories. Repairs should only be carried out by a qualified professional or our Service Center.

CAUTION!
Risk of injury!
If you cannot see your actions when using the trimmer, you may injure yourself.
- Always use a mirror when using the trimmer.
- Remove the protective cap 10 from the body 4.
- Slide the on/off switch 3 up. The rotary blades 13 will start turning. The built-in LED light 2 will also automatically light up (see Fig. E). The trimmer is ready to cut nose and ear hair.
- Switch off the trimmer after each use by sliding the on/off switch down.
Using the contour attachment

CAUTION!
Risk of injury!
If you do not use the trimmer properly, you may cause cuts or other injuries.
- Do not guide the trimmer from the bottom up or sideways.
The contour attachment 7 is especially suited to trim difficult-to-access areas.
- Switch off the trimmer.
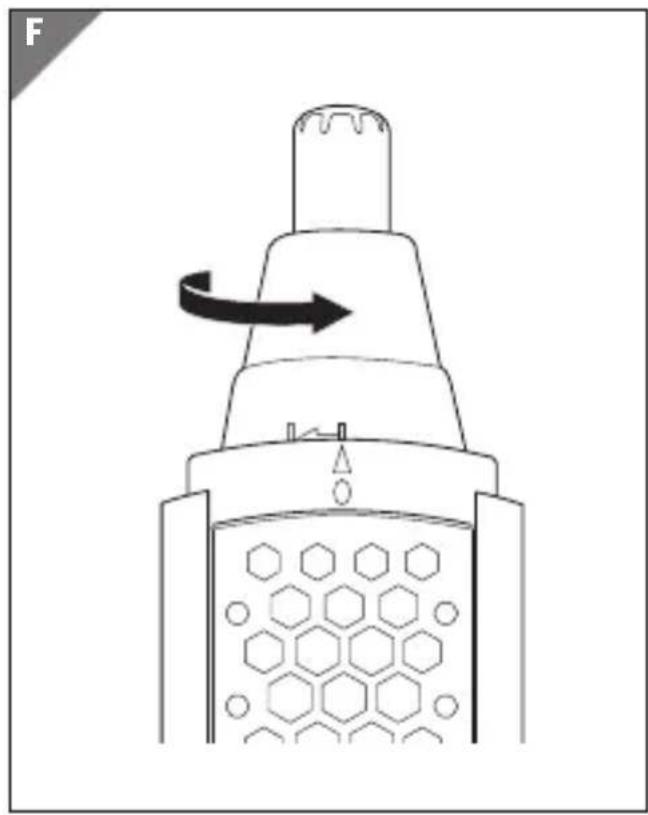
- Turn the nose/ear hair attachment 1 counterclockwise (bayonet catch) to remove it from the trimmer (see Fig. F).
- Align the contour attachment so that it can be slotted into the bayonet catch (see step 1, Fig. H).
- Twist clockwise to secure the contour attachment (see step 2, Fig. H).
- Position the trimmer on the hairline at a right angle and slowly pull downwards. Repeat till desired trim is achieved.
Using the eyebrow/beard attachment

CAUTION!
Risk of injury!
If you do not use the trimmer properly, you may cause cuts or other injuries. If you cannot see your actions when using the trimmer, you may injure yourself.
- Keep the trimmer away from eyes.
- Always use a mirror when using the trimmer.
The eyebrow/beard attachment 8 is especially suited to trim eyebrows and to shorten or shape (small) beards and sideburns.
- Switch off the trimmer.
- Turn any previously used attachment counterclockwise (bayonet catch) to remove it from the trimmer.
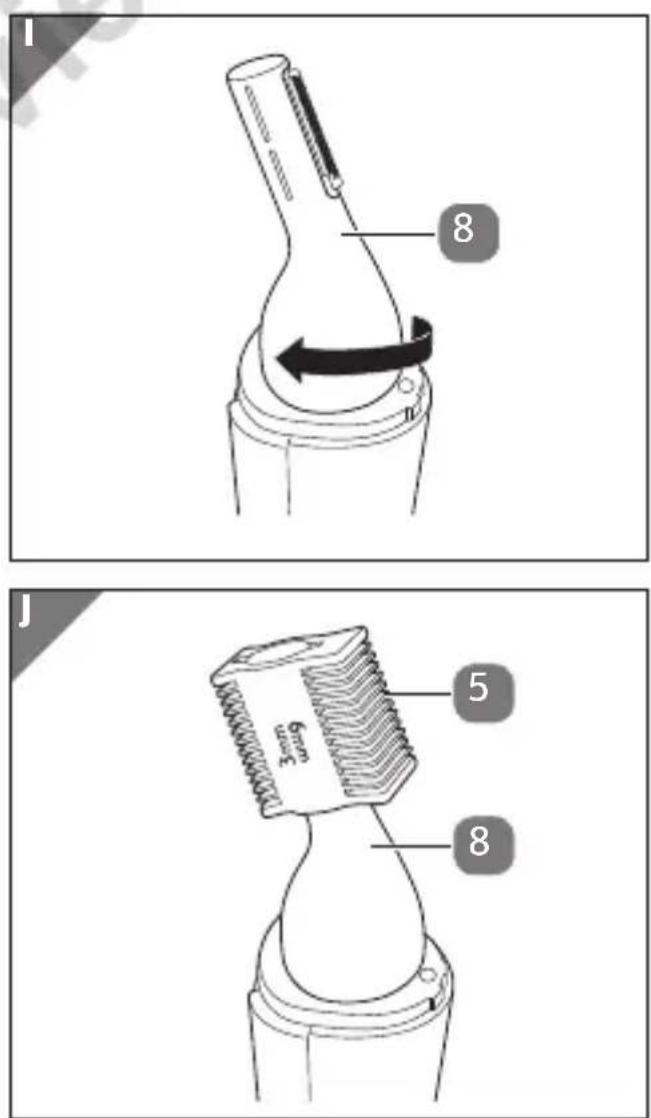
- Align the eyebrow/beard attachment so that it can be slotted into the bayonet catch. Twist clockwise to secure the eyebrow/beard attachment (see Fig. I).
- Position the trimmer on the area at a right angle and slowly pull downwards. Repeat till desired trim is achieved.
- After use, slide the protective cap 9 from the top downwards to be fully attached.
Attaching a guide comb
- Make sure the trimmer is switched off and remove the protective cap 9.
- Align the guide comb 5 so that it can be slotted onto the eyebrow/beard attachment (see Fig. J).
- Change the guide comb direction to adjust the trimming length between 3 mm (0.12 inch) and 6 mm (0.24 inch).
Cleaning and maintenance
Cleaning the trimmer
- Make sure the trimmer is switched off.
- Remove any attachment.
- Use a soft, damp cloth to wipe off the trimmer.
- Make sure all components are thoroughly dry before attaching the protective caps 9 / 10 and storing.
Cleaning the nose/ear hair attachment
- Switch off the trimmer.
- Remove the attachment and take the blade 13 out of the attachment (see Fig. G).
- Thoroughly rinse off the attachment and blade under running water.
- Make sure all components are thoroughly dry before reassembling and storing the attachment.
Cleaning the contour attachment
- Switch off the trimmer and remove the attachment.
- Thoroughly rinse off the contour's blade under running water.
- Make sure all components are thoroughly dry before storing the attachment.
Cleaning the eyebrow/beard attachment
- Switch off the trimmer and remove the attachment.
- Thoroughly rinse off the eyebrow/beard attachment's blade under running water.
- Make sure all components are thoroughly dry before storing the attachment.
Storage

CAUTION!
Risk associated with leaked battery fluid and risk of damage!
If you store the trimmer for a prolonged period with a battery inserted, the battery could leak and permanently damage the trimmer. The battery fluid (electrolyte) is corrosive.
- If you do not use the trimmer for a prolonged period, store the battery separately and make sure it is not accessible to children and animals.
- Wipe up leaked battery fluid with a damp cloth. You can wash the cloth and reuse it or dispose of it with your household waste.
- Do not remove battery fluid with your bare hands. Do not allow the battery fluid to come in contact with skin, eyes, or mucus membranes. Use normal household washing gloves. If, however, your skin has come into contact with
the battery fluid, wash your hands immediately and consult a physician if necessary.
- Switch off the trimmer and clean all components (see chapter “Cleaning and maintenance”). Ensure all parts are dry before reassembling.
- Turn the battery compartment cover 12 clockwise to unlock (see Fig. B). Remove the battery and replace the battery compartment cover.
- Store the battery in a safe place that is not accessible to children and animals.
- Store the trimmer in the base 6, and make sure the trimmer and its accessories are not accessible to children and animals.
Technical data
Model: 95597
Article number: 95597
Battery (included): 1×1.5 V
(AA)
Weight (excluding battery): 0.23 lbs (102 g)
Dimensions (H × Diameter): 5.12 in × 1.10 in
(13 cm × 2.8 cm)
Operating time: Min. 90 minutes
Disposal
Disposing of the packaging
- Sort the packaging before you dispose of it. Dispose of paperboard and cardboard with the recycled paper service and wrappings with the appropriate collection service.
Disposing of the trimmer
- Should the trimmer no longer be capable of being used at some point in time, dispose of it in accordance with the regulations in force in your city or state.
- Please ensure your recycling information applies to local regulations and the EPA recommendations (www.epa.gov).
Batteries and rechargeable batteries may not be disposed of with household waste!
As the end user you are required by law to bring all batteries and rechargeable batteries, regardless whether they contain harmful substances* or not, to a collection point run by the city, county, or state, or to a retailer, so that they can be disposed of in an environmentally friendly manner.
* labeled with: Cd = cadmium, Hg = mercury, Pb = lead
For review R1
Contenido
Conjunto....3
Uso....4
¡ADVERTENCIA!
- CONTENTS
- OVERVIEW 3
- USE....4
- PRODUCT CONTENTS/DEVICE PARTS....6
- GENERAL INFORMATION....7
- SAFETY 8
- FIRST USE....14
- OPERATIONS 16
- CLEANING AND MAINTENANCE ....19
- STORAGE....21
- TECHNICAL DATA....22
- DISPOSAL....23
- PRODUCT CONTENTS/DEVICE PARTS
- GENERAL INFORMATION
- READING AND STORING THE USER MANUAL
- EXPLANATION OF SYMBOLS
- WARNING
- CAUTION
- NOTICE
- SAFETY
- PROPER USE
- SAFETY NOTES
- RISK OF SUFFOCATION
- RISK OF INJURY
- RISK OF DAMAGE
- BATTERY NOTES
- HEALTH HAZARDS
- RISK OF EXPLOSION
- FIRST USE
- CHECKING THE TRIMMER AND PACKAGE CONTENTS
- BASIC CLEANING
- INSERTING THE BATTERY
- OPERATIONS
- USING THE NOSE/EAR HAIR ATTACHMENT
- USING THE CONTOUR ATTACHMENT
- USING THE EYEBROW/BEARD ATTACHMENT
- ATTACHING A GUIDE COMB
- CLEANING AND MAINTENANCE
- CLEANING THE TRIMMER
- CLEANING THE NOSE/EAR HAIR ATTACHMENT
- CLEANING THE CONTOUR ATTACHMENT
- CLEANING THE EYEBROW/BEARD ATTACHMENT
- STORAGE
- RISK ASSOCIATED WITH LEAKED BATTERY FLUID AND RISK OF DAMAGE
- THE BATTERY FLUID, WASH YOUR HANDS IMMEDIATELY AND CONSULT A PHYSICIAN IF NECESSARY
- TECHNICAL DATA
- DISPOSAL
- DISPOSING OF THE PACKAGING
- DISPOSING OF THE TRIMMER
- BATTERIES AND RECHARGEABLE BATTERIES MAY NOT BE DISPOSED OF WITH HOUSEHOLD WASTE
- CONTENIDO
- CONJUNTO....3
- USO....4
- ¡ADVERTENCIA
Brand : Visage
Model : 3 in 1 Trimmer 95597
Category : Lawn mower