
HMIP-PCBS - Electronic board EQ-3 - Free user manual and instructions
Find the device manual for free HMIP-PCBS EQ-3 in PDF.


| Product Type | Homematic IP Switch Circuit Board (HmIP-PCBS) |
| Dimensions (W x H x D) | 28 x 48 x 21 mm (including relay) |
| Weight | 13 g |
| Supply Voltage | 5 to 25 VDC |
| Current Consumption (without relay) | 50 mA max |
| Current Consumption (with relay) | 70 mA max |
| Relay Switching Output | Changeover contact, 1-pole, up to 30 V / 1 A (ohmic load) |
| Open Collector Output | Up to 30 V / 0.5 A |
| Radio Frequency | 868.3 MHz / 869.525 MHz |
| Typical Range (open area) | 350 m |
| Ambient Temperature | -10 to +35 °C |
| Protection Class | III (SELV) |
| Pollution Degree | 2 |
| Max. Cable Length | 50 cm |
| Cable Cross Section | 0.75 – 1.0 mm² (rigid or flexible) |
| Mounting | Built-in module with fixing holes |
| Maintenance | No user maintenance required; contact expert for repairs |
| Safety Notices | Install in suitable housing; avoid electrostatic discharge; do not exceed specified loads |
| Intended Use | Wireless switching of loads in extra-low voltage range (e.g., switches, LEDs, signaling devices) |
| System Integration | Homematic IP system via Access Point or CCU2 |
Frequently Asked Questions - HMIP-PCBS EQ-3
User questions about HMIP-PCBS EQ-3
0 question about this device. Answer the ones you know or ask your own.
Ask a new question about this device
Download the instructions for your Electronic board in PDF format for free! Find your manual HMIP-PCBS - EQ-3 and take your electronic device back in hand. On this page are published all the documents necessary for the use of your device. HMIP-PCBS by EQ-3.
USER MANUAL HMIP-PCBS EQ-3
Switch Circuit Board p. 25

natural_image
Electronic circuit board with green PCB and various components (no visible text or symbols)Lieferumfang
Anzahl Bezeichnung
Printed in Hong Kong
natural_image
Line drawing of a hand inserting a device into a control panel (no text or symbols)Inhaltsverzeichnis
1 Switch Circuit Board
1 Operating manual
Documentation © 2017 eQ-3 AG, Germany.
All rights reserved. Translation from the original version in German. This manual may not be reproduced in any format, either in whole or in part, nor may it be duplicated or edited by electronic, mechanical or chemical means, without the written consent of the publisher.
Typographical and printing errors cannot be excluded. However, the information contained in this manual is reviewed on a regular basis and any necessary corrections will be implemented in the next edition. We accept no liability for technical or typographical errors or the consequences thereof.
All trademarks and industrial property rights are acknowledged. Printed in Hong Kong
Changes may be made without prior notice as a result of technical advances.
150437
Version 1.0 (01/2017)
Table of contents
1 Information about this manual....27
2 Hazard information....27
3 Function and device overview 30
4 General system information ....31
5 Start-up 31
5.1 Installation....31
5.2 Connection assignment....32
5.2.1 Configuration of the open collector output:...32
5.2.2 Configuration with relay switching output: ..... 32
5.3 Connection examples.... 32
5.4 Teaching-in....36
6 Operation....37
7 Troubleshooting 38
7.1 Command not confirmed....38
7.2 Duty cycle 39
7.3 Error codes and flashing sequences ....40
8 Restore factory settings....41
9 General information about radio operation......42
10 Technical specifications....43
1 Information about this manual
Please read this manual carefully before beginning operation with your Homematic IP components. Keep the manual so you can refer to it at a later date if you need to. If you hand over the device to other persons for use, please hand over this manual as well.
Symbols used:

Attention!
This indicates a hazard.

Please note:
This section contains important additional information.
2 Hazard information

To ensure adequate protection against electrostatic discharge, the device must be installed inside a suitable housing so that there is no risk of the circuit being damaged by contact with fingers or objects.

The device does not contain any parts that can be maintained by the user. In the event of an error, please have the device checked by an expert.

For safety and licensing reasons (CE), unauthorized change and/or modification of the device is not permitted.

The device may only be operated in dry and dust-free environment and must be protected from the effects of moisture, vibrations, solar or other methods of heat radiation, cold and mechanical loads.

The device is not a toy; do not allow children to play with it. Do not leave packaging material lying around. Plastic films/bags, pieces of polystyrene, etc. can be dangerous in the hands of a child.

Do not use the device if there are signs of damage to the housing, control elements or connecting sockets, for example, or if it demonstrates a malfunction. If you have any doubts, have the device checked by an expert.

We do not assume any liability for damage to property or personal injury caused by improper use or the failure to observe the hazard information. In such cases, any claim under warranty is extinguished! For consequential damages, we assume no liability!

All load data relates to ohmic loads! Do not exceed the capacity specified for the device. Exceeding this capacity could lead to the destruction of the device, to a fire or to an electrical accident. Provide fuse protection to the switching outputs (relays, transistor)!

In order to ensure that the equipment is electrically safe, the feeding source must be a safety extra-low voltage.

The connected cables must not exceed a length of 50 cm. The power supply cables may be run only in dry indoor rooms.

Using the device for any purpose other than that described in this operating manual does not fall within the scope of intended use and shall invalidate any warranty or liability. This also applies to any conversion or modification work.

The device does not require you to carry out any maintenance. Enlist the help of an expert to carry out any maintenance or repairs.

The device may only be operated within residential buildings.
3 Function and device overview
The Homematic IP Switch Circuit Board offers wireless switching of e.g. a switch or push-button input, 12 V signalling device or LEDs in the extra-low voltage range. The PCB is intended for operation with permanent power supply.
The switching output of the PCB offers the following application possibilities:
The device has a miniature relay with a switching capacity of up to 30 V/1 A.
If this is not required, you can simply break off the corresponding part from the module and use the open collector switching output instead. The open collector switching output enables switching of loads with a switching voltage of up to 30 V and a switching current of up to 0.5 A. It can be used for switching of external relays and loads and for controlling electronic circuits.
Device overview (see figure 1):
(A) Device LED
(B) System button
(C) Operating voltage
(D) Fixing holes
(E) Open collector switching output
(F) Relay switching output
4 General system information
This device is part of the Homematic IP smart home system and works with the Homematic IP radio protocol. All devices of the system can be configured comfortably and individually with the Homematic IP smartphone app. Alternatively, you can operate the Homematic IP devices via the Homematic Central Control Unit CCU2 or in connection with various partner solutions. The available functions provided by the system in combination with other components are described in the Homematic IP User Guide. All current technical documents and updates are provided at www.eQ-3.de.
5 Start-up
5.1 Installation

Please read this entire section before starting to install the device.
The PCB is a built-in module and can be easily retrofitted into you own installations using the fixing holes (D). Please observe the information in sec. "2 Hazard information" on page 27 when installing it into a housing. Also observe the following permitted wire cross-section for connecting to the switch circuit board.
| rigid cable [mm2] | flexible cable with/without ferrule [mm2] |
| 0.75 – 1.0 0.75 – 1.0 |
5.2 Connection assignment
5.2.1 Configuration of the open collector output:
see fig. 2
5.2.2 Configuration with relay switching output:
see fig. 3
5.3 Connection examples
The PCB can be operated in an operating voltage range between 5 to 25 V.
As an alternative to direct switching of loads by the miniature relay, the PCB can control the relay switching module RSM1, if switching of higher loads is required. Controlling of other external power relays is possible as well.
The connection examples on the following pages show typical applications of the PCB:
(1) Controlling a switch input (in this case a microprocessor controller) and power supplied by this circuit:
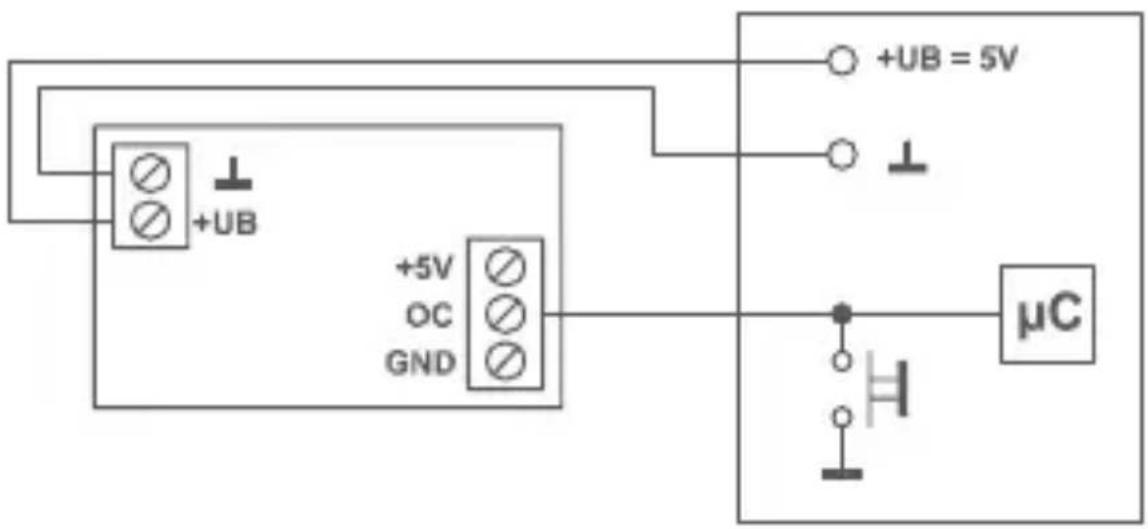
(2) Controlling a switch input (in this case a microprocessor controller) and power supplied by own power source:

(3) Controlling an external relay (with free-wheeling diode) or a lamp load of up to 0.5 A with load supplied by the input voltage:
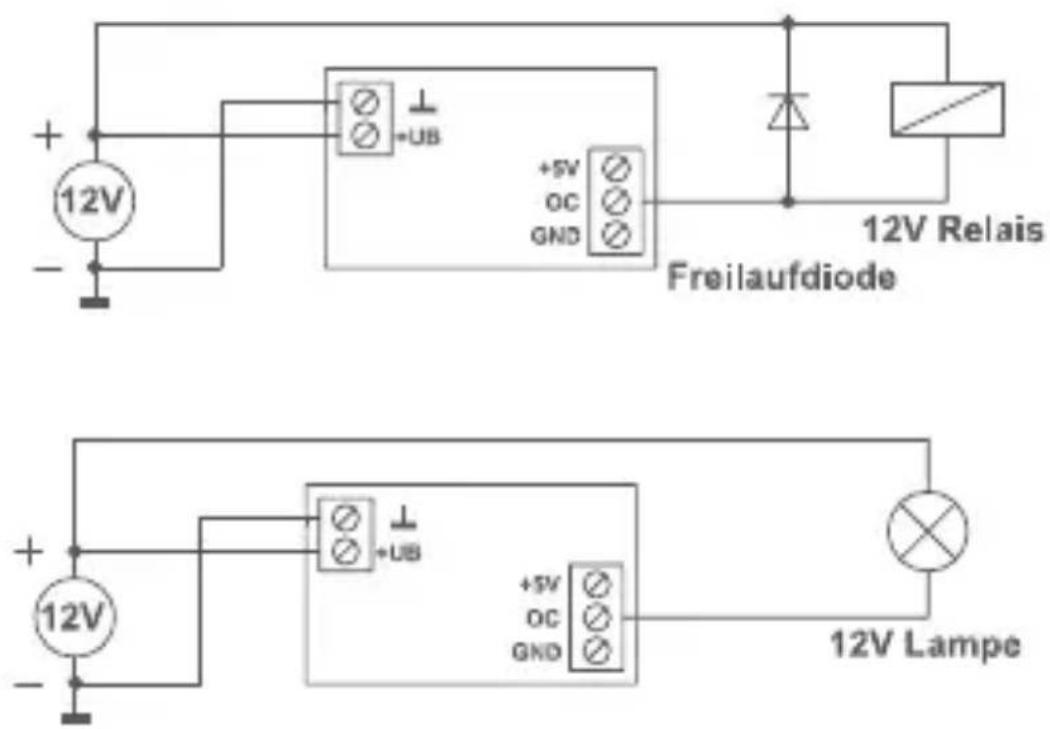
(4) Controlling an external 5 V relay (with free-wheeling diode) or an optocoupler or LED (series resistor according to the component):


(5) Controlling the relay module RSM1 with power supplied for the relay module by the operating voltage of the actuator:
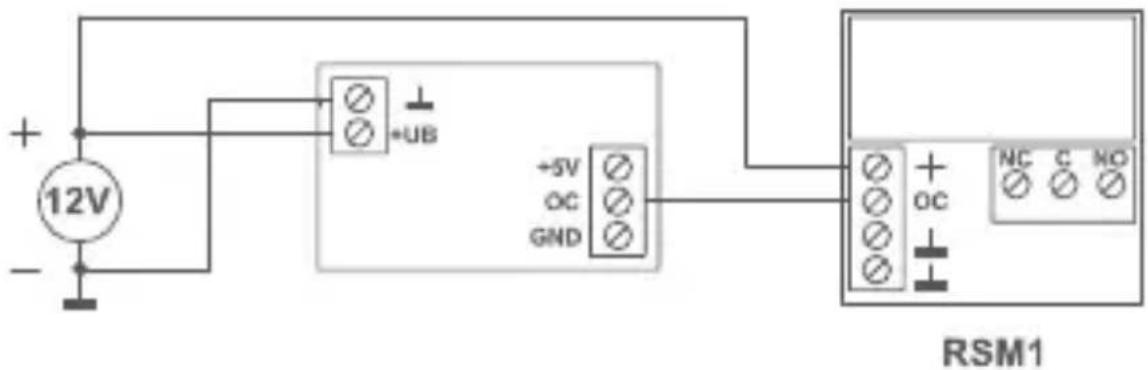
(6) Controlling the relay module RSM1 with independent power supply of the relay module:

(7) Controlling of a load (0.5 A max.) with power supplied directly by the operating voltage of the acutator:

5.4 Teaching-in

Please read this entire section before starting the teach-in procedure.

First set up your Homematic IP Access Point via the Homematic IP app to enable operation of other Homematic IP devices within your system. For further information, please refer to the operating manual of the Access Point.

You can connect the device either to the Access Point or to the Homematic Central Control Unit CCU2. For detailed information, please refer to the Homematic IP User Guide, available for download in the download area of www.eQ-3.de.
To integrate the switch circuit board into your system and enable it to communicate with other Homematic IP devices, you must teach-in the device to your Homematic IP Access Point first.
To teach-in the switch circuit board, please proceed as follows:
- Open the Homematic IP app on your smartphone.
- Select the menu item "Teach-in device".
- After connecting the PCB to the power supply, the teach-in mode remains activated for 3 minutes.

You can manually start the teach-in mode for another 3 minutes by pressing the system button (B) shortly (see figure 4).
- Your device will automatically appear in the Homematic IP app.
- To confirm, please enter the last four digits of the device number (SGTIN) in your app or scan the QR code. Therefore, please see the sticker supplied or attached to the device.
- Please wait until teach-in is completed.
- If teaching-in was successful, the device LED (A) lights up green. The device is now ready for use.
- If the device LED lights up red, please try again.
- Please select, in which application (e.g. light or security) you would like to use the device.
- Allocate the device to a room and give the device a name.
6 Operation
After teaching-in, you can control the switch circuit board e.g. using a connected Homematic IP Remote Control or the Homematic IP app and switch connected devices on or off.
Simple operating functions are available also directly on the device:
- To trigger a function test or to switch the actuator on of off, press the system button (B) shortly. The device LED (A) indicates the switching state. The device LED lights up permanently as soon as the actuator is switched on.
7 Troubleshooting
7.1 Command not confirmed
If at least one receiver does not confirm a command, the device LED (A) lights up red at the end of the failed transmission process. The failed transmission may be caused by radio interference (see „1 Information about this manual“ on page 27). This may be caused by the following:
- Receiver cannot be reached.
- Receiver is unable to execute the command (load failure, mechanical blockade, etc.).
- Receiver is defective.
7.2 Duty cycle
The duty cycle is a legally regulated limit of the transmission time of devices in the 868 MHz range. The aim of this regulation is to safeguard the operation of all devices working in the 868 MHz range.
In the 868 MHz frequency range we use, the maximum transmission time of any device is 1% of an hour (i.e. 36 seconds in an hour). Devices must cease transmission when they reach the 1% limit until this time restriction comes to an end. Homematic IP devices are designed and produced with 100% conformity to this regulation. During normal operation, the duty cycle is not usually reached. However, repeated and radio-intensive teach-in processes mean that it may be reached in isolated instances during start-up or initial installation of a system. If the duty cycle is exceeded, this is indicated by three long flashes of the device LED (A), and may manifest itself in the device temporarily working incorrectly. The device starts working correctly again after a short period (max. 1 hour).
7.3 Error codes and flashing sequences
| Flashing code | Meaning Solution | |
| Short orange flashing | Radio transmission/attempting to transmit/data transmission | Wait until the transmission is completed. |
| 1x long green lighting | Transmission confirmed | You can continue operation. |
| 1x long red lighting | Transmission failed | Please try again (s. „7.1 Command not confirmed“ on page 38). |
| Short orange flashing (every 10 s) | Teach-in mode active | Please enter the last four numbers of the device serial number to confirm (see „5.4 Teaching-in“ on page 36). |
| 1x long red lighting | Transmission failed or duty cycle limit is reached | Please try again (see sec. „7.1 Command not confirmed“ on page 38 or „7.2 Duty cycle“ on page 39). |
| 6x long red flashing | Device defective | Please see your app for error message or contact your retailer. |
| 1x orange and 1 x green lighting (after power supply is applied) | Test display Once | Once the test display has stopped, you can continue. |
8 Restore factory settings

The factory settings of the device can be restored. If you do this, you will lose all your settings.
To restore the factory settings of the switch circuit board, please proceed as follows:
- Disconnect the switch circuit board from the power supply.
- Restore the power supply of the PCB while pressing the system button (B) and hold down the system button for 4 seconds (see fig. 4) until the LED (A) will quickly start flashing orange.
- Release the system button again. - Press and hold down the system button again for 4 seconds, until the status LED lights up green.
- Release the system button to finish the procedure. The device will perform a restart.
9 General information about radio operation
Radio transmission is performed on a non-exclusive transmission path, which means that there is a possibility of interference occurring. Interference can also be caused by switching operations, electrical motors or defective electrical devices.

The range of transmission within buildings can differ greatly from that available in the open air. Besides the transmitting power and the reception characteristics of the receiver, environmental factors such as humidity in the vicinity have an important role to play, as do on-site structural/screening conditions.
eQ-3 AG hereby declares that this device complies with the essential requirements and other relevant regulations of Directive 1999/5/EC. You can find the full declaration of conformity at www.eQ-3.de.
10 Technical specifications
Device short description: HmIP-PCBS
Supply voltage: 5 to 25 VDC
Current consumption without relay: 50mA max.
Current consumption with relay: 70 mA max.
Relay: changeover contact, 1-pole, µ contact
Kind of load: ohmic load
Switching voltage (max.): 30 V
Switching current (max.): 1 A
Transistor switching output: open-collector
Switching voltage (max.): 30 V
Switching current (max.): 0.5 A
Cable type and cross section: rigid and flexible cable, 0.75-1.0 mm 4
Ambient temperature: -10 to +35 °C
Protection class: III
Pollution degree: 2
Dimensions (W x H x D): 28 x 48 x 21 mm
(incl. relay)
Weight: 13 g
Radio frequency: 868.3 MHz/869.525 MHz
Receiver category: SRD category 2
Typ. open area RF range: 350 m
Duty cycle: < 1 % per h/< 10 % per h
Subject to technical changes.
Instructions for disposal
Do not dispose of the device with regular domestic waste! Electronic equipment must be disposed of at local collection points for waste electronic equipment in compliance with the Waste Electrical and Electronic Equipment Directive.
Information about conformity

The CE sign is a free trading sign addressed exclusively to the authorities and does not include any warranty of any properties.

For technical support, please contact your retailer.
Kostenloser Download der Homematic IP App! Free download of the Homematic IP app!




Bevollmächtigter des Herstellers: Manufacturer's authorised representative:

eQ-3 AG Maiburger Straße 29 26789 Leer / GERMANY www.eQ-3.de


- Lieferumfang
- Anzahl Bezeichnung
- Inhaltsverzeichnis
- Table of contents
- Information about this manual
- Symbols used:
- Attention!
- Please note:
- Hazard information
- Function and device overview
- Device overview (see figure 1):
- General system information
- Start-up
- Installation
- Please read this entire section before starting to install the device.
- Connection assignment
- Configuration of the open collector output:
- Configuration with relay switching output:
- Connection examples
- Teaching-in
- Please read this entire section before starting the teach-in procedure.
- Operation
- Troubleshooting
- Command not confirmed
- Duty cycle
- Restore factory settings
- General information about radio operation
- Technical specifications
- Subject to technical changes.
- Instructions for disposal
- Information about conformity
- Kostenloser Download der Homematic IP App! Free download of the Homematic IP app!
Brand : EQ-3
Model : HMIP-PCBS
Category : Electronic board