SU2950 - Vacuum Cleaner SAMSUNG - Free user manual and instructions
Find the device manual for free SU2950 SAMSUNG in PDF.


User questions about SU2950 SAMSUNG
0 question about this device. Answer the ones you know or ask your own.
Ask a new question about this device
Download the instructions for your Vacuum Cleaner in PDF format for free! Find your manual SU2950 - SAMSUNG and take your electronic device back in hand. On this page are published all the documents necessary for the use of your device. SU2950 by SAMSUNG.
USER MANUAL SU2950 SAMSUNG
natural_image
Line drawing of a Samsung vacuum cleaner with coiled hose and ventilation slots (no text or symbols on device)Vacuum Cleaner
SU-2950 Series
Operating Instructions
IMPORTANT SAFETY INSTRUCTIONS .... 1
ASSEMBLING PARTS 2
OPERATION 3
MAINTENANCE 5
TROUBLESHOOTING 8
Read these instructions before operating the vacuum cleaner
•The design and specification may be different depending on the models.
Register your product at www.samsung.com/global/register
Thank you for purchasing a Samsung vacuum cleaner. When using an electrical appliance, basic precautions should always be followed, including the following:
PLEASE READ ALL INSTRUCTIONS BEFORE USING THIS VACUUM CLEANER.
WARNING:
To reduce the risk of fire, electric shock, or injury:
- Do not leave vacuum cleaner unattended when it is plugged in.
- Unplug from outlet when not in use and before servicing.
- Do not use outdoors or on wet surfaces.
- The appliance is not intended for use by young children or infirm persons without supervision.
- Young children should be supervised to ensure that they do not play with the appliance.
- Use only as described in this manual. Use only manufacturer's recommended attachments.
- Do not use with damaged cord or plug.
- If vacuum cleaner is not working as it should, or has been dropped, damaged, left outdoors or dropped in water, take it to a service center.
- Do not pull or carry by cord, use cord as a handle, close a door on cord, or pull the cord around sharp edges or corners. Keep cord away from heated surface.
- Do not unplug by pulling on the cord. To unplug, grasp the plug, not the cord.
- Do not handle vacuum cleaner or plug with wet hands.
- Do not put any object into openings. Do not use with any opening blocked; keep openings free of dust, lint, hair and anything that may reduce air flow.
- Keep hair, loose clothing, fingers and all parts of body away from openings and moving parts.
- Do not pick up anything that is burning or smoking, such as cigarettes, matches or hot ashes.
- Do not use without dirt cup or filters in place. Empty cup and clean filter frequently when picking up very fine materials such as powder.
- Turn off all controls before unplugging vacuum cleaner.
- Use extra care when cleaning on stairs.
- Do not use to pick up flammable or combustible materials such as gasoline or fine wood standings or use in areas where they may be present.
- Store your vacuum cleaner indoors in a cool, dry area.
- Avoid picking up hard, sharp objects with the cleaner, they may damage the cleaner.
- Always turn off this appliance before connecting or disconnecting the hose, removing the bottom plate for maintenance.
- Use only on dry, indoor surfaces, never change the plug in any way.
- Do not modify the polarized plug to fit a non-polarized outlet or extension cord.
- Do not touch the brush roller when it is rotating.
- Keep suction away from your face when using nozzles and pipe.
- Do not pull the power cord around sharp corners and do not allow it to become trapped.
- Unplug before connecting turbine nozzle.(only using turbine-brush model)
SAVE THESE INSTRUCTIONS FOR FUTURE USE.
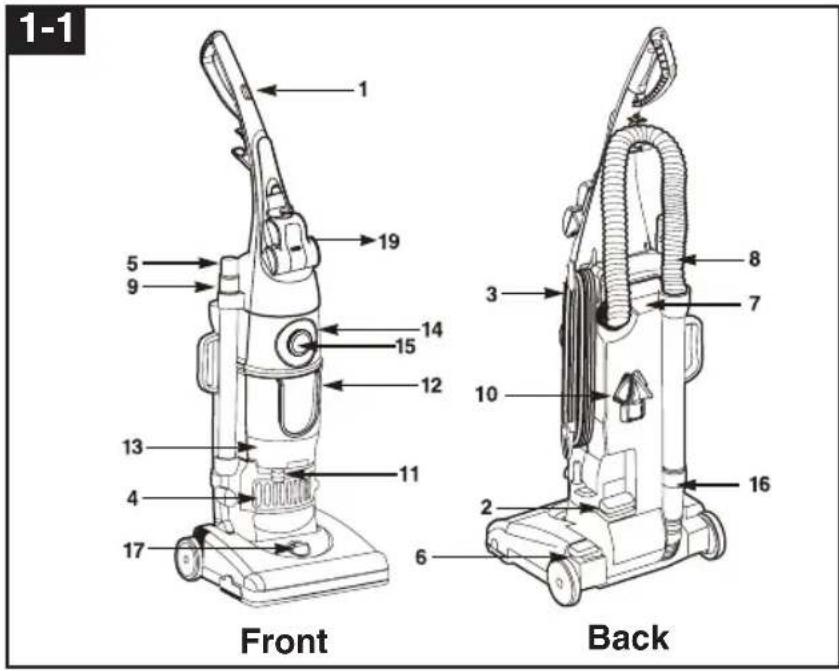
Identifications of parts
text_image
1-1 Front BackThe assembled cleaner will look like the illustration to the left.
- Handle
- Power switch
- Quick release cord hook
- Post-Motor Filter
- Crevice tool
- Handle release
- Carrying handle
- Hose
- Extension wand
- Combination tool
- Cyclone-Lever
- Dirt Cup
- Filter Cup
- Upper Tank
- Cap Cyclone
- Hose Wand Base
- Height Adjustment Dial
- Hose Clip
- Mini Turbo Brush
WARNING!
OPERATE THE VACUUM CLEANER ONLY AT THE VOLTAGE SPECIFIED ON THE NAMEPLATE.
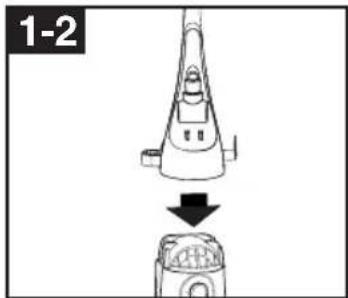
Step 1. Attaching the Handle
text_image
1-2Stand the vacuum upright and slide the base of the handle firmly into the grooves at the top of the vacuum body.
natural_image
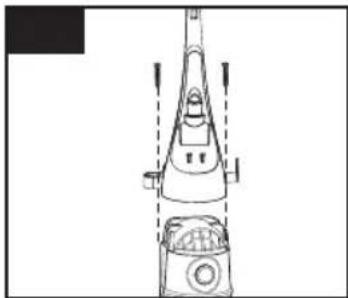
Technical line drawing of a mechanical device with no visible text or symbolsInsert the screw provided into the existing hole. Tighten the screw securely with a screwdriver. Before securing the handle, please check that the handle is fitted to the vacuum body and make sure there's no gap.
Step 2. Attaching the Hose and Tools
text_image
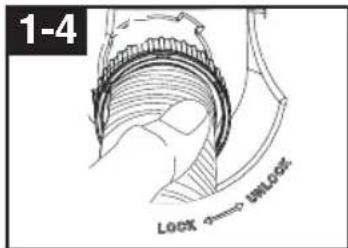
1-4 LOCK → BUNLOCKLine up the tabs on the base of the Twist Snap Hose with the corresponding notches on the hose collar as shown.
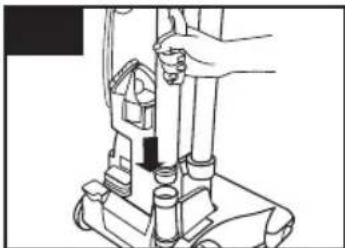
natural_image
Line drawing of a hand operating a vacuum cleaner with a valve and handle (no text or symbols)Slide the end of the hose wand with tabs into the Hose Wand Base.
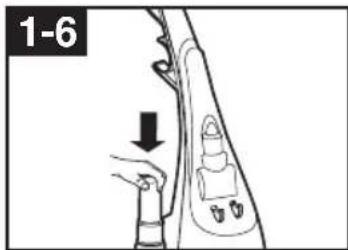
text_image
1-6Slide the extension wand and the crevice tool together into the storage clip.
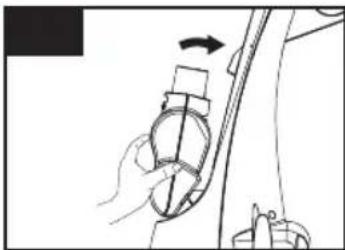
natural_image
Line drawing of a hand holding a device with an arrow indicating rotation (no text or symbols)Attach the Mini Turbo Brush by putting the rib at the bottom of Mini Turbo Brush on two hooks of Handle. Snap Mini Turbo Brush into place as shown.
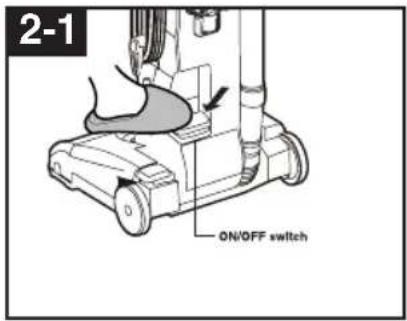
text_image
2-1 ON/OFF switchON-OFF Switch
- To turn cleaner on, press the Power switch.
- To the cleaner off, press the Power switch again.
natural_image
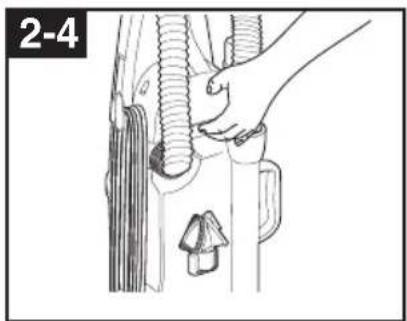
Illustration of a hand adjusting a mechanical component with threaded parts and a small inset detail (no text or symbols)Carrying handle
The cleaner can also be moved by using the carrying handle.
natural_image
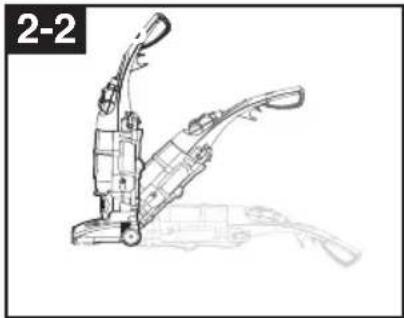
Technical line drawing of a mechanical device with no visible text or symbolsHandle positions
The handle of your cleaner has three positions; upright for storage and when using cleaning tools; operating for general operation on carpet and floors; low for reaching under low furniture. Step on handle release pedal to lower handle.
natural_image
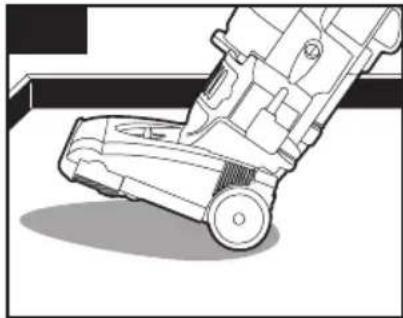
Line drawing of a vacuum cleaner with wheels and mounting bracket (no text or symbols)Transporting cleaner
To move your cleaner from room to room, put the handle in upright position, tilt the cleaner back on its rear wheels and push forward.
text_image
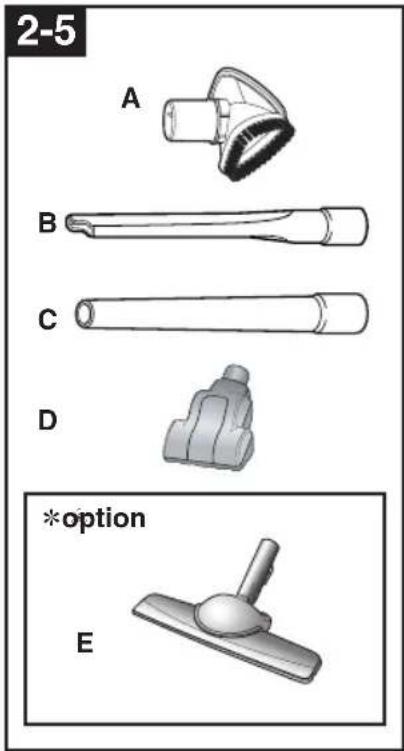
2-5 A B C D *option ECleaning Tool attachments
Attachment tools can be used to clean furniture or drapes, on stairs or in corners. When using the attachments, ensure the vacuum cleaner is placed firmly on the floor with the handle in the upright position. Do not place the vacuum on top of furniture or steps as the brushroller may cause damage.
A. Combination tool:
Two types of cleaning tools are included in one attachment: rotate for desired tool.
- Use brush side to dust furniture, blinds, books, lamps, shelves.
- Use upholstery side for curtains, draperies, cushions, fabrics.
B. Crevice tool:
Use in corners, on stairs, baseboards, and behind furniture.
C. Extension Wand:
Use with desired attachments and narrow wand for a longer reach.
D. Mini Turbo Brush :
Use rotating brush action for small areas such as stairs and upholstery.
Note: Press gently when using Mini Turbo Brush to gain maximum cleaning. Too much pressure could cause the brush to stop rotating.
\* option
E. Wooden Floor Brush (Select Models): Use for bare floors. Swivel head turns to get into tight spaces and fits under cabinets
Note: The Wooden Floor Brush does not store on board.

natural_image
Diagram of a robotic vacuum cleaner performing a circular maneuver with motion arrows (no text or symbols)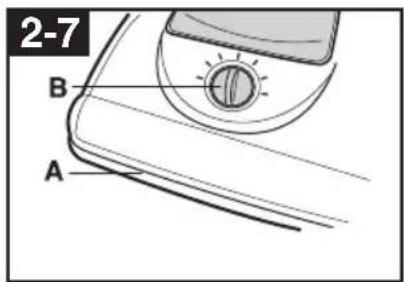
text_image
2-7 B A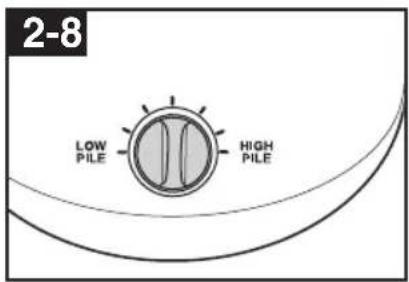
text_image
2-8 LOW PILE HIGH PILECleaning lightweight flexible rugs
Stand on one end of rug and move cleaner toward other end or edge. Before reaching edge, push down on handle. This will lift up the nozzle(front of cleaner)and will prevent rug from clinging to cleaner.
Continue to lift front of cleaner so that when you have reached the edge, it is completely off the rug. Move cleaner back to start again, lower front of cleaner, and use only forward strokes.
Carpet height adjustment
Carpet and rug cleaning takes place at the nozzle (A).
When it is necessary to raise and lower the nozzle for various carpet pile heights, rotate the nozzle control dial (B) to the desired setting.
For maximum cleaning performance, The following carpet height settings are recommended:
- Lowest setting: for bare floors
• Medium setting : for short and medium pile carpets - Higher settings: for very deep pile carpet where easier pushing effort is desired, while maintaining good cleaning performance.
Note: If the cleaner is difficult to push, rotate knob to the next higher setting.
Familiarize yourself with these home maintenance tasks as proper use and care of your cleaner will ensure continued cleaning effectiveness.
When to empty the Dirt Cup
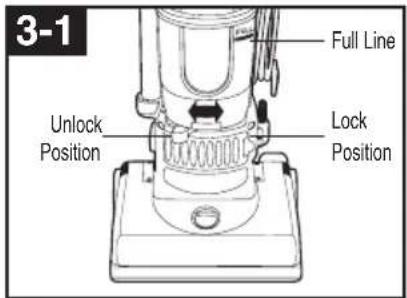
The dirt cup needs to be emptied when the dirt reaches the "Full" line on the side of the Cup.
If more dirt than this accumulates, your cleaner will not operate effectively.
Note: All new carpet has loose fibers which can fill the Dirt Cup quickly while vacuuming.
Emptying the Dirt Cup
Disconnect cleaner from electrical outlet.
text_image
3-1 Full Line Lock Position Unlock Position Lock PositionSlide the Cyclone-Lever to the "Unlock" position.
Grasp handle and pull the Dirt Cup straight out to remove from Vacuum.
natural_image
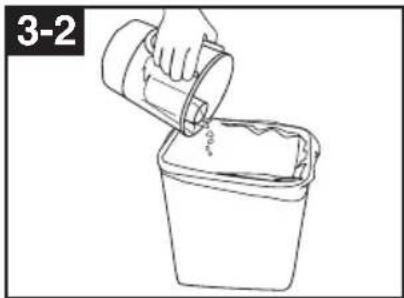
Line drawing of a hand pouring liquid into a container (no text or symbols)Empty dirt into garbage container. Put the Dirt Cup back in the vacuum and slide the lever to the "Lock" position.
natural_image
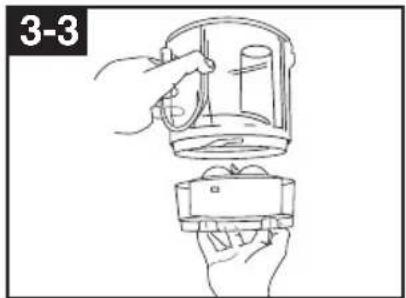
Line drawing of hands assembling a device with a cylindrical component (no text or symbols)Cleaning The Circular Filters.
Grasp the Filter Cup located at the bottom of the Dirt Cup and twist counterclockwise to unlock and remove.
Cleaning the Pre/Post-motor Filter
text_image
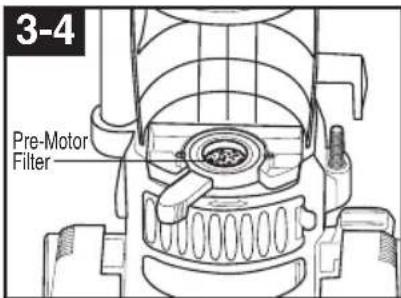
3-4 Pre-Motor FilterHow to clean
Disconnect cleaner from electrical outlet.
The Pre-Motor Filter protects the Motor from debris.
It is located underneath the Dirt Cup and Filter Cup in the Center of the round part of the Cyclone-Lever.
Remove the small round Filter and any debris on top of it. Rinse
well under warm water, then air dry thoroughly before replacing.
text_image
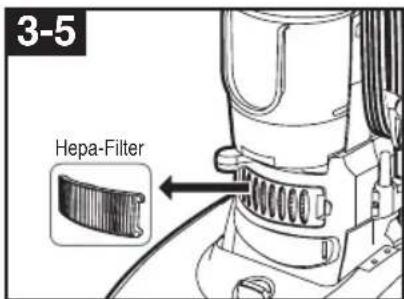
3-5 Hepa-FilterThe Post-Motor Filter assists in the filtration process to return clean air to the room. It is located behind the door on the front of the Cleaner.
When the filter becomes dirty, The Hepa-Filter :
Open the door, remove the filter and replace.
The Hepa-Filter is not washable and must be replaced.
Replace the door by inserting the tabs on the left side and snapping the right side into place.
natural_image
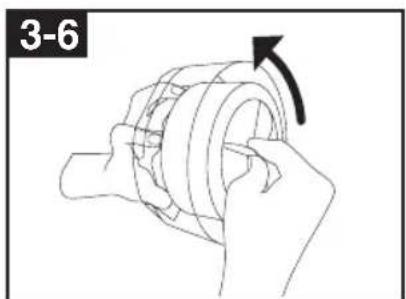
Hand holding a mechanical component with an arrow indicating rotation (no text or symbols)Grasp the Circular Filters and twist to unlock.
Pull straight up to remove. Separate the Outer foam and Inner pleated Circular Filters. Wash each individually by hand in warm water. Mild detergent may be used if desired.
Rinse well, then air dry Thoroughly dry before putting them back together and replacing in the Filter Cup The Filter Cup may be washed In warm water with a mild detergent. Make sure it is completely dry before reassembling with fliters.
Do not operate cleaner without Either the Pre-Motor Filter or Post-Motor Filter in place.
The belt
The belt on your cleaner causes the agitator to rotate and is important for the effective operation of the cleaner. The belt is located under the bottom plate of the cleaner and should be checked from time to time to be sure it is in good condition.
When to replace
Disconnect cleaner from electrical outlet.
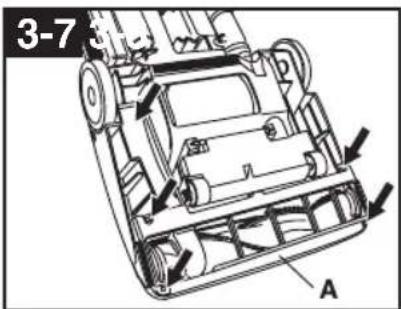
To check belt, remove bottom plate as shown in "How to replace." Replace belt if it is stretched, cut or broken.
text_image
3-7 AHow to replace
Disconnect cleaner from electrical outlet.
Place handle in low position and turn cleaner over so bottom side is up. Remove the 5 screws as shown with a screw driver.
natural_image
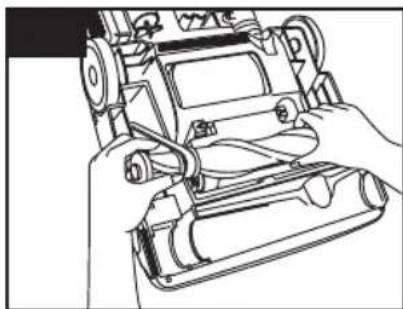
Line drawing of hands operating a handheld electronic device with cables (no text or symbols visible)Remove agitator and used belt. Discard used belt.
text_image
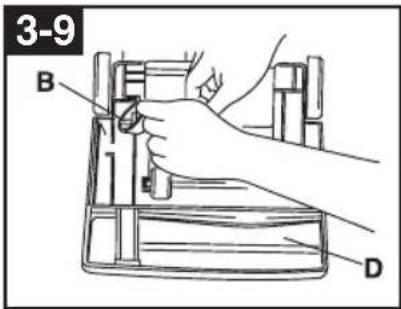
3-9 B DWith lettering on outside of belt and positioned as shown in box on (D), slide new belt over motor pulley (B).
text_image
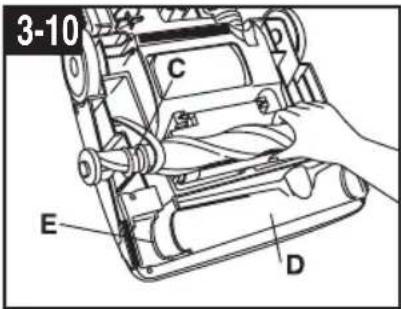
3-10 C E DInsert agitator through belt and place belt in belt guide (C) on agitator.
Should the agitator shield (D) become dislodged while replacing the belt or the agitator, reposition it as shown, noting the placement of its belt guide (E)
text_image
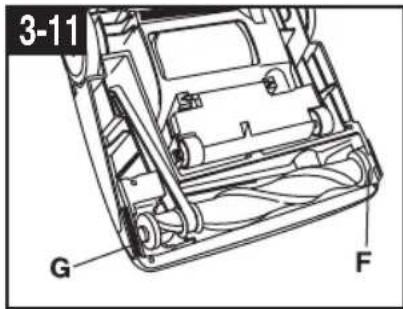
3-11 G FGrasp agitator firmly and fit it into position by first sliding the end opposite the belt into the rectangular slot (F) on side of cleaner.
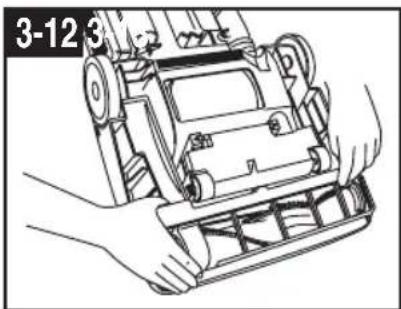
Pull other side of agitator (G) into place. Turn agitator, making sure belt is not pinched between agitator and agitator shield.
natural_image
Line drawing of a robotic vehicle with hands operating it, no text or symbols presentReposition bottom plate and 5 screws. Tighten screws securely.
When to replace the agitator brush roll
When agitator brushes are worn, the agitator should be replaced.
To check condition of brushes, disconnect cleaner from electrical outlet.
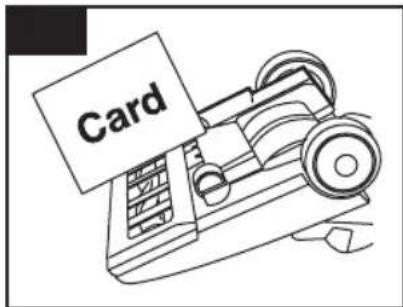
Move the edge of a card across bottom plate while turning agitator. To maintain cleaning effectiveness, replace agitator if brushes do not touch card.
text_image
CardHow to replace
Disconnect cleaner from electrical outlet.
Remove bottom plate, belt and agitator following directions in "The belt" section beginning with Fig. 3-10.
Discard old agitator.
Continue following the directions in "The belt" section to reposition belt, new agitator and bottom plate.
Clearing Blockages
Disconnect cleaner from electrical outlet.
The hose on the back of the vacuum cleaner that carries the dirt from the nozzle to the Dirt Cup can sometimes become clogged. If you notice a change in the sound of the vacuum motor, check for blockages.
text_image
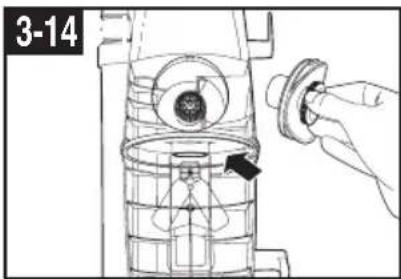
3-14Check Upper Tank and Grille Cyclone. To open the Cap, grasp the holder and turn Toward the left. If the Grille was blocked, check and clear the grille in the center of the Cyclone.
text_image
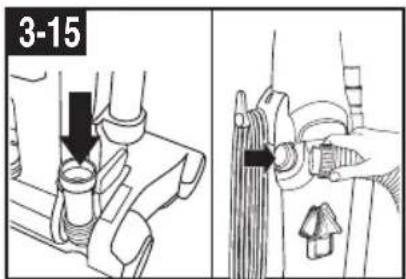
3-15Remove the Hose and disconnect the Wand. Check for clogs in the vacuum base, the wand, the hose and the suction inlet.
natural_image
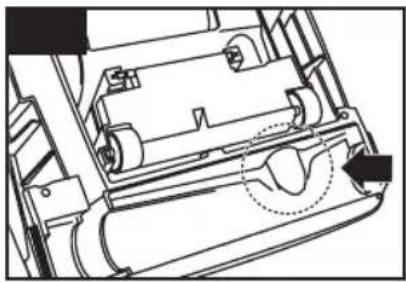
Technical line drawing of a mechanical assembly with no visible text or symbolsIf the blockage persists, turn the vacuum cleaner off and unplug it. Remove the bottom plate. Lift up the short hose in the base of the vacuum. Inspect the hose for clogs and remove any obstructions. Replace the short nozzle hose and the bottom plate.
Mini Turbo Brush
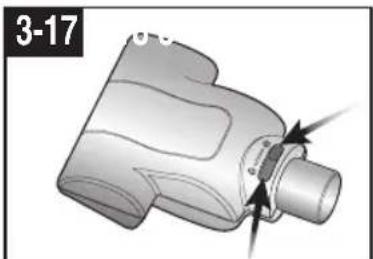
Use for upholstered furniture, carpeted stairs and hard-to-reach places.
natural_image
3D mechanical component diagram showing a pipe fitting with arrows indicating movement or force (no text or symbols)Brush bar Replacement
Remove the tool from the hose, and turn upside down. Slide the switch to unlock position.
natural_image
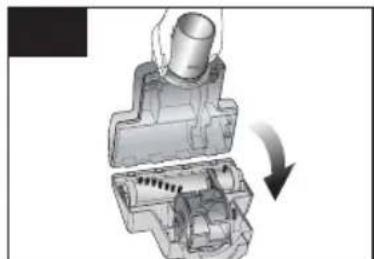
Mechanical assembly diagram showing a cylindrical component being inserted into a housing (no text or symbols visible)Remove bottom plate. And remove brushbar and discard. Inspect belt to ensure that it is in good condition. If broken or cracked, please replace. (See below for details.)
natural_image
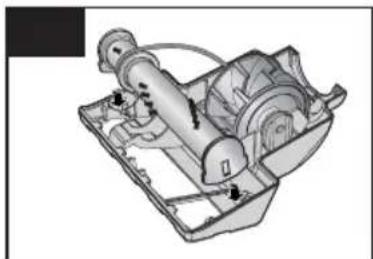
Mechanical assembly diagram showing a motor and housing components (no text or labels)With the curved ends facing down, slide end plates of brushbar into slots on the tool. To replace bottom plate, insert the four tabs on edge of bottom plate into slots on front of tool. Pivot bottom plate down and snap closed.
natural_image
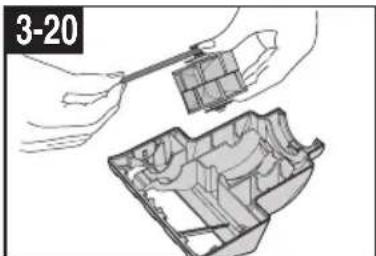
Illustration of hands assembling a mechanical component (no text or symbols visible)Belt Replacement
Grasp turbine and pull firmly to remove.
Remove belt from turbine pulley.
Replace with new belt.
natural_image
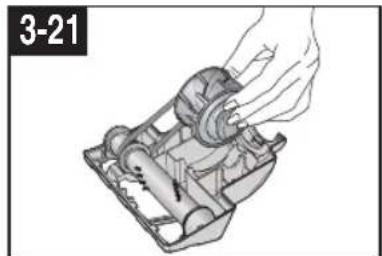
Mechanical assembly diagram showing a hand operating a component with no visible text or symbolsWith flat sides of turbine retainers pointing down, slide retainers into grooves in tool housing and snap into place. Replace brushbar and bottom plate.
natural_image
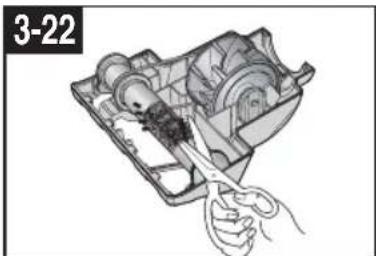
Illustration of a hand using scissors to cut or wire around a mechanical device (no text or symbols visible)Cleaning Brushbar
- Cut off pet hairs or threads surrounding brush by using scissors.
Check this list of possible problems and solutions before bringing your vacuum to a service center.
Problem: Cleaner won't run
Possible Cause
Possible Solution
- Not firmly plugged in
- Plug unit in firmly
- No voltage in wall plug
- Check fuse or breaker
- Blown fuse or tripped breaker
- Replace fuse or reset breaker
- Filters blocked or dirty
- Clean filters as per manual instructions
Problem : Dust escapes the Dirt Cup
Possible Cause
Possible Solution
- Dirt Cup improperly installed
- Re-install the Dirt Cup.
Problem : Cleaner hard to push
Possible Cause
Possible Solution
- Incorrect carpet height setting
- Rotate nozzle control knob to lower setting
Problem : Poor job of dirt pickup
Possible Cause
Possible Solution
· Full or clogged Dirt Cup
- Empty the Dirt Cup and check for blockages.
• Broken or worn belt
- Replace belt.
· Clogged hose or nozzle
- Clean hose or nozzle area.
· Hole in hose
- Replace hose.
· Dirt Cup improperly installed
• Properly install the Dirt Cup
- Incorrect carpet height setting
- Rotate nozzle control knob to lower setting
· Clogs in air flow passage
- Clear clogs/clean filters as per manual instructions
Problem : Abnormal sound
Possible Cause
Possible Solution
- Strange sound like rushing air
- Check for clogs in hose, nozzle area and or filters, clear or claen any clogs or blockages as per manual instructions
THis Vacuum cleaner is approved the following.
EMC Directive: 89/336/EEC, 92/31/EEC and 93/68/EEC
Low Voltage Safety Directive: 73/23/EEC and 93/68/EEC
If you have any comments or questions regarding a Samsung products, contact the SAMSUNG customer care center.
| Country | Customer Care Center | Web Site |
| U.K | 0870 7267864 (SAMSUNG) | www.samsung.com/uk |
| SOUTH AFRICA | 0860 7267864 (SAMSUNG) | www.samsung.com/za |
MEMO
SAMSUNG
MEMO
SAMSUNG