
L238DPH-2ES - Screen V7 - Free user manual and instructions
Find the device manual for free L238DPH-2ES V7 in PDF.


| Product Type | 23.8-inch LED-backlit LCD Monitor |
| Model | V7 L238DPH-2ES |
| Screen Size | 23.8 inches (60.4 cm) |
| Resolution | Full HD 1920 x 1080 (max) |
| Refresh Rate | 60 Hz (max) |
| Panel Type | TFT with LED backlight |
| Pixel Pitch | 0.2745 x 0.2745 mm |
| Display Colors | 16.7 million |
| Active Display Area | 527.4 mm x 296.46 mm |
| Input Ports | VGA, DVI, HDMI, DisplayPort |
| Audio | Audio input (3.5mm), Headphone output, Built-in speakers |
| Tilt Angle | -5° to 22° (±2°) |
| Power Input | AC 100-240V, 50/60Hz |
| Power Consumption (Off) | < 0.5 W |
| Compliance | FCC, CE, Energy Star |
| Package Contents | Monitor, AC Power Cord, VGA Cable, Audio Cable, Cable Holder, Quick Start Guide |
| Operating Temperature | 0°C to 40°C |
| Storage Temperature | -20°C to 60°C |
Frequently Asked Questions - L238DPH-2ES V7
User questions about L238DPH-2ES V7
0 question about this device. Answer the ones you know or ask your own.
Ask a new question about this device
Download the instructions for your Screen in PDF format for free! Find your manual L238DPH-2ES - V7 and take your electronic device back in hand. On this page are published all the documents necessary for the use of your device. L238DPH-2ES by V7.
USER MANUAL L238DPH-2ES V7
24" Class Slim HD Widescreen Monitor L238DPH

natural_image
Line drawing of a flat-screen computer monitor with a circular base (no text or symbols)1 Getting Started
Package includes
Installation
2 Control Panel/ Back Panel
Control Panel
Back Panel
3 On Screen Display
4 Technical Specs
5 Care & Maintenance
6 Troubleshooting
No Power
Power on but no screen image
Wrong or Abnormal Colors
7 Safety info & FCC warning
Package includes
- AC Power Cord
• VGA Cable - Audio cable
- Cable holder
- Quick start guide

natural_image
Diagram showing a rectangular panel and a circular component with a screw, both without any text or symbols.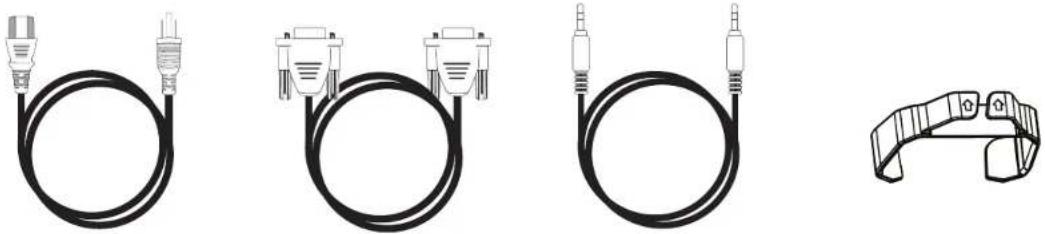
natural_image
Illustration of four different types of audio/video cables with no text or symbolsAC Power Cord VGA Cable Audio cable Cable holder
Installation
- Slide cable holder onto post 2. Screw base into post
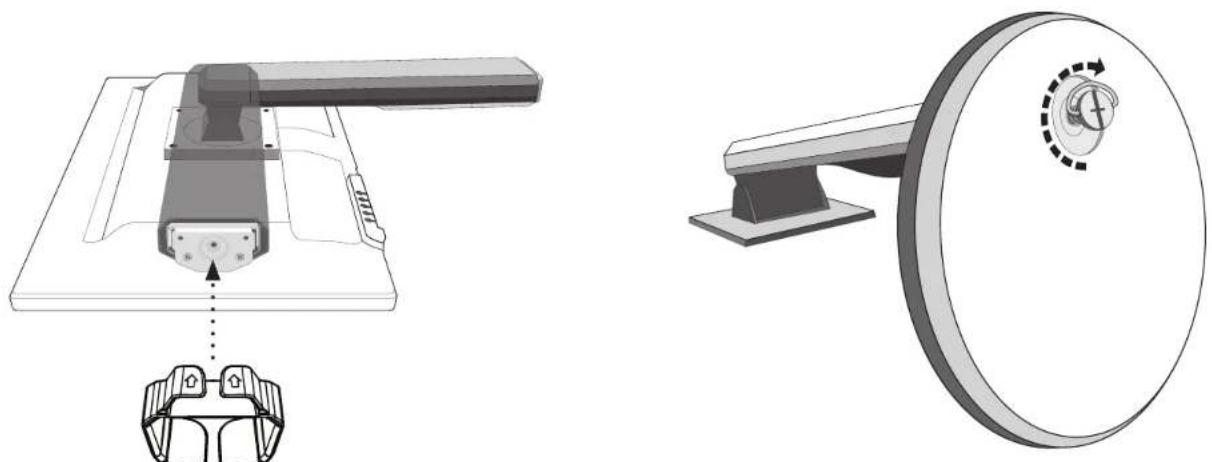
- Connect video cable, Connect power cord, Connect Audio cable

- Power on computer and monitor
Control Panel

Back Panel
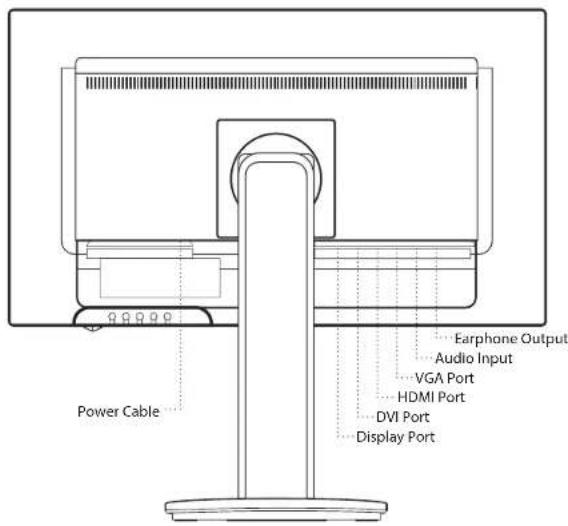
Using On Screen Display (OSD) Functions
| 1 | Display main menu |
| Exit from OSD menu | |
| 2 Manual adjust mode select for VGA, DVI, HDMI, DisplayPort, Auto mode | |
| [CH7] | Select the desired item when in OSD menu |
| When not in OSD menu, directly enters Contrast/Brightness menu | |
| [SCYK] | Select the desired item when in OSD menu |
| When not in OSD menu, directly enters Picture mode | |
| [BNAC] [KHT] ▲ | Recall both of Contrast and Brightness (when not in OSD menu) |
| [40KA]◀ | Power Lock (when not in OSD menu) |
 ▶ ▶ | OSD Lock (when not in OSD menu) |
Main Menu

Short Cuts Function from the button(s)
 | Auto Image Adjust | To auto adjust Horizontal Position, Vertical Position, Phase (Fine Tune) and Clock (H. Size) of the screen. |
 | Contrast/Brightness | To manually adjust the Contrast, Brightness, DCR, ECO and OD of screen image. |
| Contrast: To adjust the foreground white level of screen image.▲ increase contrast,▼ decrease contrast. | ||
| Brightness: To adjust the luminance of the video.▲ increase brightness,▼ decrease brightness. | ||
| DCR: To detect the distribution of the visual signals inputs, and create an optimized contrast. Brightness and ECO adjustment will be disabled when DCR is active. | ||
| ECO: Allows the user to change the ECO mode. Contrast, Brightness and DCR adjustment will be disabled when ECO is active. | ||
| OD: Allows the user to change the Over Drive strength. Improve the quality of the motion pictures. | ||
 | Input Source | When Input Select is pressed, change Input signal to VGA, DVI, HDMI, DisplayPort or Auto. |
 | Audio Adjust | To adjust the audio functions. |
| Volume: To adjust the volume of speaker output. | ||
| Mute: To turn the Mute ON/OFF. | ||
| Audio input: When in HDMI input, select where the audio source comes from Line-In or HDMI.When in DisplayPort input, select where the audio source comes from Line-in or DisplayPort. | ||
 | Color Adjust | To select the color for improving brightness and color saturation between Cool, Normal, Warm and User colour and Picture mode. |
| Cool: Adds blue to screen image for cooler white. | ||
| Normal: Adds red to screen image for warmer white and richer red. | ||
| Warm: Adds green to screen image for a darker color. | ||
| User colour: Individual adjustments for red (R), green (G), blue (B).1. Press button 2 to select the desired color.2. Press ▲ or ▼ button to adjust selected color. | ||
| Short Cuts Function from the button(s) | ||
| Picture mode: Provides an optimum display environment depending on the contents displayed. It contains 5 user selectable presets.Standard is for general windows environment and monitor default setting.Game optimized for PC game environment.Video optimized for movie and video environment.Landscape optimized for displaying outdoor scenery images.Text optimized for text editing and viewing in a word processing environment | ||
 | Information | To display the information, regarding the current input signal coming from the graphic card in your computer.Note: See your graphic card user guide for more information about changing the resolution and refresh rate. |
 | Manual Image Adjustment | To manually adjust the H./V. Position, Horizontal size, Fine tune and Sharpness. |
| H./V. Position: To adjust the horizontal and vertical position of the video.H. Position: ▲: move screen to the right, ▼: move screen to the left.V. Position: ▲: move screen up, ▼: move screen down. | ||
| Horizontal Size: To adjust the width of the screen image.▲: increase the width of the screen image, ▼: decrease the width of the screen imagePhase: To adjust the delay time of data and clock.Press ▲ or ▼ to adjust to your preference. | ||
| Sharpness: To adjust the clarity of a non-Full HD Resolution (1920x1080) signal with ▲ or ▼ button | ||
| Video mode adjust: To select the video mode from Aspect Ratio 4:3 or Full Screen. | ||
| Aspect Ratio 4:3: To select 4:3 image size. | ||
| Full Screen: To select full-screen size image. | ||
 | Menu Setting | To set up Language select, OSD Position, OSD time out and OSD background. |
| Language Select: To allow users to choose from available languages | ||
| OSD Position: Press ▲ or ▼ button to select between horizontal and vertical OSD Position Adjustment.OSD H. Position: To horizontally adjust the OSD Position▲: move OSD to the right, ▼: move OSD to the leftOSD V. Position: To vertically adjust the OSD position.▲: move OSD up, ▼: move OSD down. | ||
| OSD time out: To automatically turn off On Screen Display (OSD) after a preset period of time. | ||
| OSD background: Allows the user to turn the OSD background On or Off | ||
 | Memory recall | To recall factory settings for Video & Audio controls. Press button 2 to select the Memory Recall menu option. |
Technical Specification
| LCD Panel 60.4 cm (23.8") TFT (with LED back light) | |
| Power Management | Energy StarVESA DPMS compatibleOff Mode, < 0.5 W |
| Displayable Resolution | Full HD 1920 x 1080 max.Vertical Frequency 60Hz max. |
| Pixel Dimension 0.2745 x 0.2745 mm | |
| LCD Display Color 16.7M | |
| Tilt -5°~22° (±2°) | |
| Active Display Area | 527.4 mm x 296.46 mm |
| Temperature | Operating: 0°C ~ + 40°CStorage: -20°C ~ + 60°C |
| Compliance FCC, CE, Energy Star | |
| Power Input Voltage AC100-240 V | |
Care
- Avoid exposing your monitor directly to sunlight or other heat source. Place your monitor away from the sun to reduce glare.
- Put your monitor in a well ventilated area.
- Do not place any heavy things on top of your monitor
- Make certain your monitor is installed in a clean and moisture-free area.
- Keep your monitor away from magnets, motors, transformers, speakers, and TV sets.
Safety Tips
- If smoke, abnormal noise or odor came out from your monitor, caution you should remove the power cord immediately and call your service center.
- Never remove the rear cover of your monitor cabinet. The display unit inside contains high-voltage parts and may cause electric shock to human bodies.
- Never try to repair your monitor yourself. Always call your service center or a qualified technician to fix it.
No Power
- Make sure A/C power cord is securely inserted to both the AC-INLET socket on the monitor and wall outlet.
- Plug another electrical device into the power outlet to verify that the outlet is supplying proper voltage.
• Make sure all signal cables are installed.
Power on but no screen image
- Make sure the video cable supplied with the monitor is tightly secured to the video output port on back of the computer. If not, tightly secure it.
- Adjust brightness
Wrong or abnormal colors
- If any colors (red, green, blue) are missing, check the video cable to make sure it is securely connected. Loose or broken pins in the cable connector could cause an improper connection
- Connect the monitor to another computer
Safety Precautions
This monitor is manufactured and tested on a ground principle that a user's safety comes first. However, improper use or installation may result danger to the monitor as well as to the user. Carefully go over the following WARNINGS before installation and keep this guide handy.
WARNINGS
- This monitor should be operated only at the correct power sources indicated on the label on the rear end of the monitor. If you're unsure of the power supply in your residence, consult your local dealer or power company.
- Do not try to repair the monitor yourself as it contains no user-serviceable parts. The monitor should only be repaired by a qualified technician.
- Do not remove the monitor cabinet. There is high-voltage parts inside that may cause electric shock to human bodies, even when the power cord is disconnected.
- Stop using the monitor if the cabinet is damaged. Have it checked by a service technician.
- Put your monitor only in a clean, dry environment. Unplug the monitor immediately if gets wet and consult your service technician.
• Always unplug the monitor before cleaning it. Clean the cabinet with a clean, dry cloth. Apply non-ammonia based cleaner onto the cloth, not directly onto the glass screen. - Keep the monitor away from magnetic objects, motors, TV sets, and transformer.
- Do not place heavy objects on the cable or power cord.
- Due to safety concerns, if the VESA mounting kit is purchased separately, please make sure the mounting kit is UL-Listed, and replaceable only by service personnel.
FCC RADIO FREQUENCY INTERFERENCE STATEMENT WARNING: (FOR FCC CERTIFIED MODELS)
This monitor has been tested and found compliant with the limits for a Class B digital device, pursuant to part 15 of the FCC Rules. These limits are designed to provide proper protection against harmful interference to a residential installation. This monitor generates, uses, and can radiate radio frequency energy. Harmful interference to radio communication may be led as a result if it's not properly installed and used. However, there is no guarantee that interference will not occur in a particular installation. If this monitor does cause serious interference to radio or television reception, resetting the monitor may determine it. Moreover, users are encouraged to correct interference by doing one or more of the following:

- Reorient or relocate the receiving antenna.
- Move the monitor and the receiver further away from each other.
- Connect the monitor into an outlet on a circuit different from that to which the receiver is connected.
- Consult your local dealer or an qualified technician.
FCC Warning:
To assure a continued FCC compliance, a user must use a grounded power supply cord and the provided shielded video interface cable with bonded ferrite cores. Also, any unauthorized changes or modifications to this monitor would void the user's authority to operate this device.
Each country in the European Union should have its collection centers for electrical and electronic equipment recycling. For information about your recycling drop off area, please contact your related electrical and electronic equipment waste management authority or the retailer where you bought the product.
Note: If necessary, shielded interface cables and AC power cord must be used to meet the emission level limits.
www.tuv.com ID:141060599
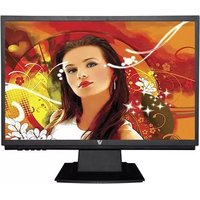

- 24" Class Slim HD Widescreen Monitor L238DPH
- Getting Started
- Control Panel/ Back Panel
- On Screen Display
- Technical Specs
- Care & Maintenance
- Troubleshooting
- Safety info & FCC warning
- Package includes
- Installation
- Care
- Safety Tips
- No Power
- Power on but no screen image
- Wrong or abnormal colors
- Safety Precautions
- WARNINGS
- FCC RADIO FREQUENCY INTERFERENCE STATEMENT WARNING: (FOR FCC CERTIFIED MODELS)
- FCC Warning:
Brand : V7
Model : L238DPH-2ES
Category : Screen