UPort 2210 - Uncategorized Moxa - Free user manual and instructions
Find the device manual for free UPort 2210 Moxa in PDF.


User questions about UPort 2210 Moxa
0 question about this device. Answer the ones you know or ask your own.
Ask a new question about this device
Download the instructions for your Uncategorized in PDF format for free! Find your manual UPort 2210 - Moxa and take your electronic device back in hand. On this page are published all the documents necessary for the use of your device. UPort 2210 by Moxa.
USER MANUAL UPort 2210 Moxa
UPort 2000 Series User's Manual
First Edition, May 2008
www.moxa.com/product
MOXA®
© 2008 Moxa Inc., all rights reserved. Reproduction without permission is prohibited.
UPort 2000 Series User's Manual
The software described in this manual is furnished under a license agreement and may be used only in accordance with the terms of that agreement.
Copyright Notice
Copyright © 2008 Moxa Inc.
All rights reserved.
Reproduction without permission is prohibited.
Trademarks
MOXA is a registered trademark of Moxa Inc.
All other trademarks or registered marks in this manual belong to their respective manufacturers.
Disclaimer
Information in this document is subject to change without notice and does not represent a commitment on the part of Moxa.
Moxa provides this document “as is,” without warranty of any kind, either expressed or implied, including, but not limited to, its particular purpose. Moxa reserves the right to make improvements and/or changes to this manual, or to the products and/or the programs described in this manual, at any time.
Information provided in this manual is intended to be accurate and reliable. However, Moxa assumes no responsibility for its use, or for any infringements on the rights of third parties that may result from its use.
This product might include unintentional technical or typographical errors. Changes are periodically made to the information herein to correct such errors, and these changes are incorporated into new editions of the publication.
Technical Support Contact Information
www.moxa.com/support
Moxa Americas:
Toll-free: 1-888-669-2872
Tel: +1-714-528-6777
Fax: +1-714-528-6778
Moxa China (Shanghai office):
Toll-free: 800-820-5036
Tel: +86-21-5258-9955
Fax: +86-10-6872-3958
Moxa Europe:
Tel: +49-89-3 70 03 99-0
Fax: +49-89-3 70 03 99-99
Moxa Asia-Pacific:
Chapter 1 Introduction....1-1
Overview 1-2
Package Checklist 1-2
Product Features.... 1-2
Product Specifications.... 1-2
Panel Layout.... 1-3
Dimensions.... 1-4
Chapter 2 Driver Installation 2-1
UPort's USB Usage Limitation 2-2
Installing the Windows Driver 2-2
Connecting the Hardware.... 2-5
Installing the Driver for the Converter.... 2-6
Installing the Driver for the Ports.... 2-9
Configuring the Ports.... 2-12
Uninstalling the UPort 2000.... 2-15
Advanced UPort 2000 Driver Functions.... 2-16
Uninstalling the Driver.... 2-20
Linux Kernel 2.6.x 2-21
Installing the Linux Driver.... 2-21
Loading the Moxa Driver.... 2-22
Unloading the Moxa Driver 2-22
Removing the Moxa Driver and Utility Files.... 2-22
Using the mxustty Utility....2-22
Chapter 3 Pin Assignment ....3-1
Moxa's UPort 2000 Series of entry-level USB-to-serial converters are used to add 2 or 4 serial ports to a PC through the PC's USB port. The UPort 2000 converters are compatible with both new and legacy RS-232 devices, and are a perfect solution for mobile, instrumentation, and point-of-sale applications.
The UPort 2000 Series includes two models:
• UPort 2210 2-port RS-232 USB-to-serial converter
• UPort 2410 4-port RS-232 USB-to-serial converter
In this manual, UPort 2000 is used in examples and explanations to represent either the UPort 2210 or the UPort 2410.
The following topics are covered in this chapter:
Overview
□ Package Checklist
□ Product Features
□ Product Specifications
Panel Layout
Dimensions
Overview
UPort 2000 Series products are easy to install and use. After installing the drivers on your PC, connect the UPort to your computer, plug in your serial devices, and you're ready to go. Programming is NOT required, and you do not need to worry about IRQs, configuring a board, power requirements, or connection schemes.
UPort 2000 Series products are compliant with USB 1.1, and 2.0 specifications, and meet the 480 Mbps high-speed requirement of Hi-Speed USB 2.0. Using your computer's USB ports to connect serial devices reduces the total cost of ownership, investment in hardware, and long term management and integration costs.
Package Checklist
Moxa's UPort 2000 Series products are shipped with the following items:
• UPort 2210 or 2410 USB-to-serial converter
- 1 USB cable
• Document and Software CD-ROM
• UPort 2000 Series Quick Installation Guide (printed)
NOTE: Notify your sales representative if any of the above items are missing or damaged.
Product Features
UPort 2000 Series products have the following features:
• Hi-Speed USB 2.0 supported for up to 480 Mbps transmission through the USB port
• Additional I/O or IRQ not required
- Serial transmission rate up to 921.6 Kbps
• Built-in 15 KV ESD protection
- Windows 2000/XP/2003/Vista/2008, Linux Kernel 2.6.x drivers supported
- Easy maintenance with LED display and management software
• COM port assignments maintained across different PCs
Product Specifications
| USB | ||
| Compliance | USB 1.1/2.0 compliant | |
| Connector USB type B | ||
| Speed High speed 480 Mbps | ||
| Serial Interface | ||
| Number of Ports UPort 22 | 10:2UPort 2410:4 | |
| Serial Standards RS-232 | ||
| Connectors | DB9 male | |
| Serial Line Protection | ||
| ESD Protection 15 KV embedded | ||
| Performance | ||
| Baudrate 50 bps to 921.6 Kbps | ||
| Serial Communication Parameters | ||
| Data Bits 5, 6, 7, 8 | ||
| Stop Bit 1, 1.5, 2 | ||
| Parity None, Even, Odd, Space, Mark | ||
| Flow Control RTS/CTS, XON/XOFF | ||
| I/O Address Assigned by BIOS | ||
| IRQ | Assigned by BIOS | |
| FIFO | 16 bytes | |
| Serial Signals | ||
| RS-232 TxD, RxD, RTS, CTS, DTR, DSR, DCD, GND | ||
| Driver Support | ||
| Operating Systems Windows (2000, XP x86/x64, 2003 x86/x64, Vista x86/x64, 2008 x86/x64), Linux Kernel 2.6.x | ||
| Physical Characteristics | ||
| Housing | Plastic | |
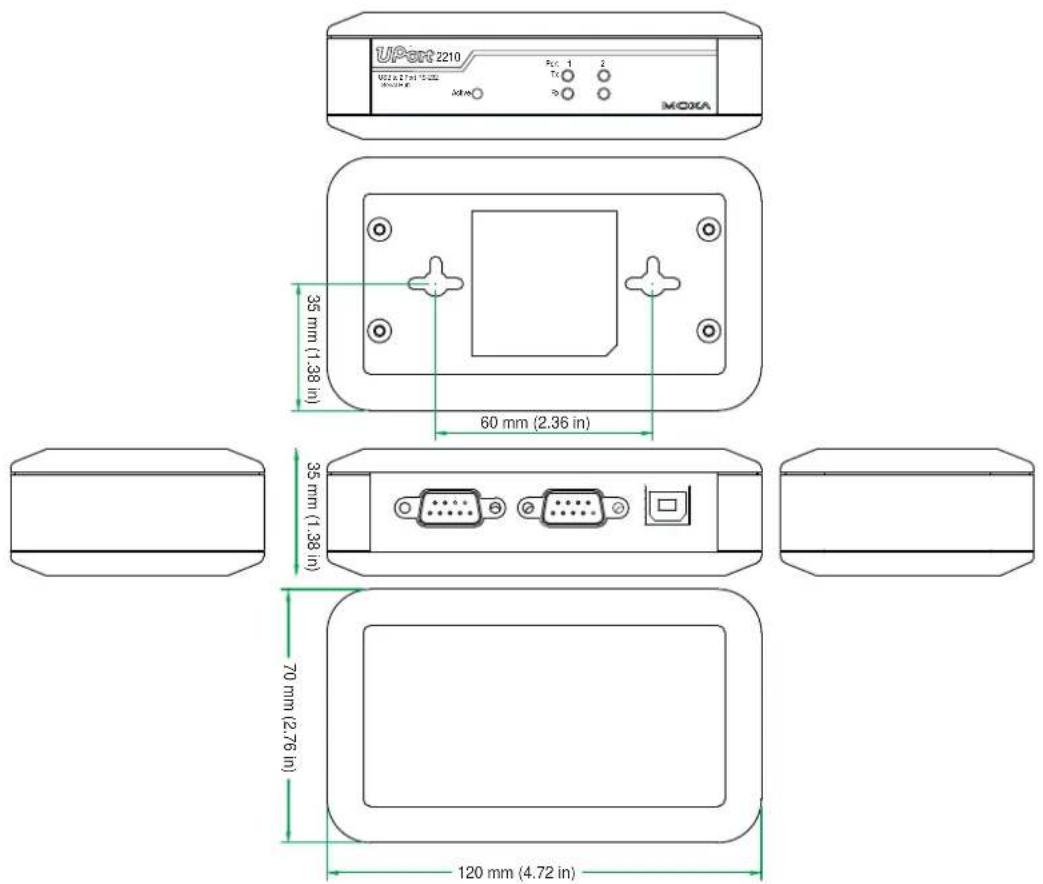
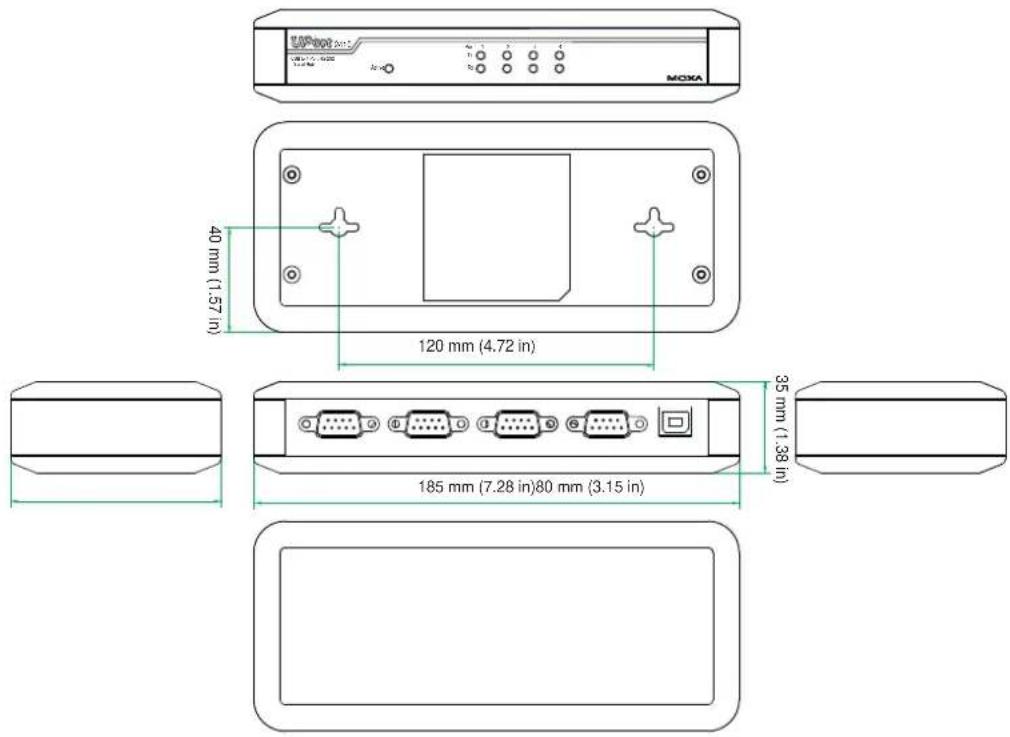
| Dimensions UPort 2210: 70 x 35 x 120 mm (2.76 x 1.38 x 4.72 in)UPort 2410: 80 x 35 x 185 mm (3.15 x 1.38 x 7.28 in) | ||
| Environmental Limits | ||
| Operating Temperature 0 to 55°C (32 to 131°F) | ||
| Operating Humidity 5 to 95% RH | ||
| Storage Temperature -20 to 75°C (-4 to 167°F) | ||
| Regulatory Approvals | EN55022 Class B, EN55024, EN61000-3-2, EN61000-3-3, IEC 61000-4-2, IEC 61000-4-3, IEC 61000-4-4, IEC 61000-4-5, IEC 61000-4-6, IEC 61000-4-8, IEC 61000-4-11, FCC Part 15 Class B | |
| Warranty | ||
| Warranty Period | 5 years | |
| Details | See www.moxa.com/warranty | |
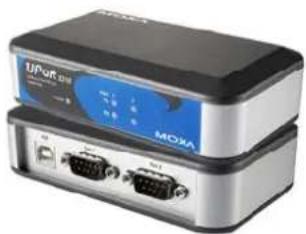
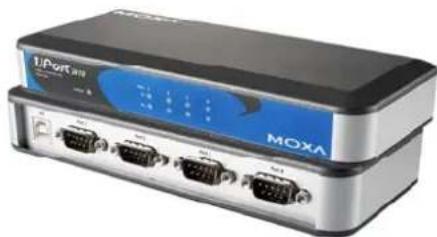
Panel Layout
UPort 2210
natural_image
Two connected devices labeled 'UPort One' and 'MOXA', each with two USB ports (no visible text or symbols on the devices themselves)UPort 2410
natural_image
Exterior view of a mobile network device labeled 'MOXA' with ports and indicator lights (no readable text beyond branding)Dimensions
UPort 2210
text_image
UPart 2210 M02A 2.7 mm (1.38 in) MOXKA 35 mm (1.38 in) 60 mm (2.36 in) 35 mm (1.38 in) 70 mm (2.76 in) 120 mm (4.72 in)UPort 2240
text_image
MOXA 40 mm (1.57 in) 120 mm (4.72 in) 35 mm (1.38 in) 185 mm (7.28 in) 80 mm (3.15 in)In this chapter, we use Windows XP to illustrate how to install the UPort 2000 USB-to-serial converters. The procedures for Windows 2000/2003/2008 and Windows Vista are essentially the same.
We recommend installing the UPort 2000 Series driver first, before connecting the UPort 2000 USB-to-serial converter to your computer's USB port.
The following topics are covered in this chapter:
□ UPort's USB Usage Limitation
□ Installing the Windows Driver
Connecting the Hardware
- Installing the Driver for the Converter
➢ Installing the Driver for the Ports
➢ Configuring the Ports
▶ Uninstalling the UPort 2000
- Advanced UPort 2000 Driver Functions
▶ Uninstalling the Driver
□ Linux Kernel 2.6.x
- Installing the Linux Driver
- Loading the Moxa Driver
▶ Unloading the Moxa Driver
➢ Removing the Moxa Driver and Utility Files
➢ Using the mxustty Utility
UPort's USB Usage Limitation
- A maximum of 4 UPort 2000 converters can be connected to one PC host. Connecting more than 4 UPort 2000 converters will put a strain on system resources, and could cause the computer to become unstable.
- We recommend connecting the UPort 2000 directly to your PC's USB port.
- Although your UPort 2000 supports USB 1.1, we recommend using a USB 2.0 host controller or HUB to get the best and most stable performance.
Installing the Windows Driver
- Run the Setup Wizard located on the UPort 2000 Series Document and Software CD-ROM. Click Next to start installing the driver.
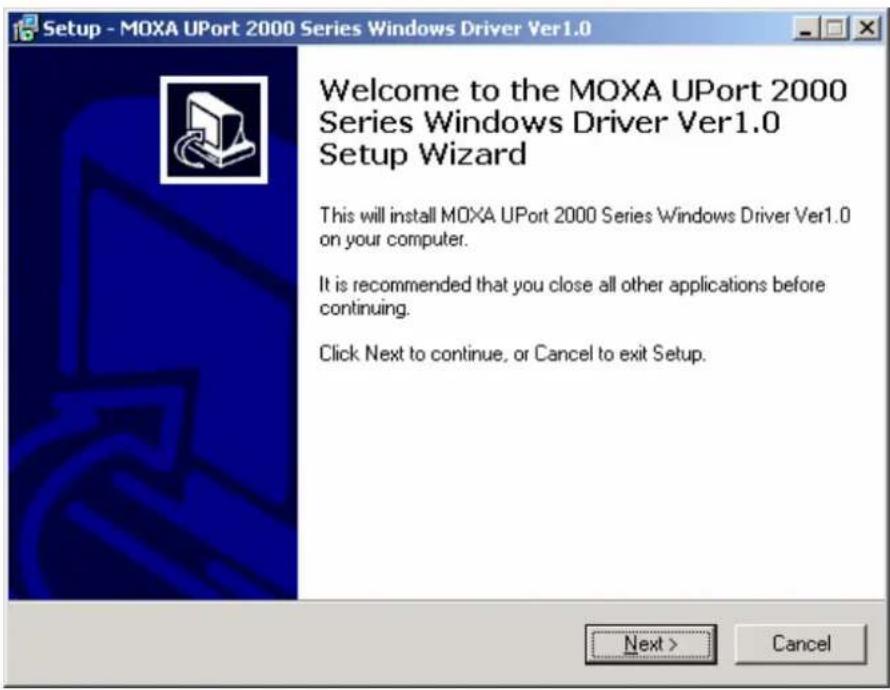
text_image
Setup - MOXA UPort 2000 Series Windows Driver Ver1.0 Welcome to the MOXA UPort 2000 Series Windows Driver Ver1.0 Setup Wizard This will install MOXA UPort 2000 Series Windows Driver Ver1.0 on your computer. It is recommended that you close all other applications before continuing. Click Next to continue, or Cancel to exit Setup. Next > Cancel- Click Next to install the driver in the indicated folder.
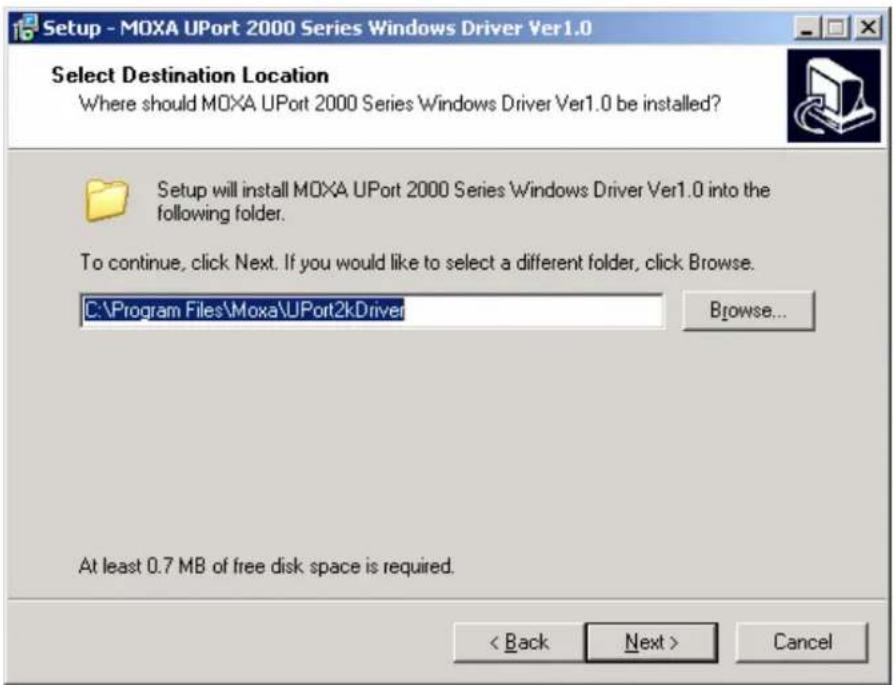
text_image
Setup - MOXA UPort 2000 Series Windows Driver Ver1.0 Select Destination Location Where should MOXA UPort 2000 Series Windows Driver Ver1.0 be installed? Setup will install MOXA UPort 2000 Series Windows Driver Ver1.0 into the following folder. To continue, click Next. If you would like to select a different folder, click Browse. C:\Program Files\Moxa\UPort2kDriver Browse... At least 0.7 MB of free disk space is required. < Back Next > Cancel- Click Next to create the program's shortcuts in the indicated folder.
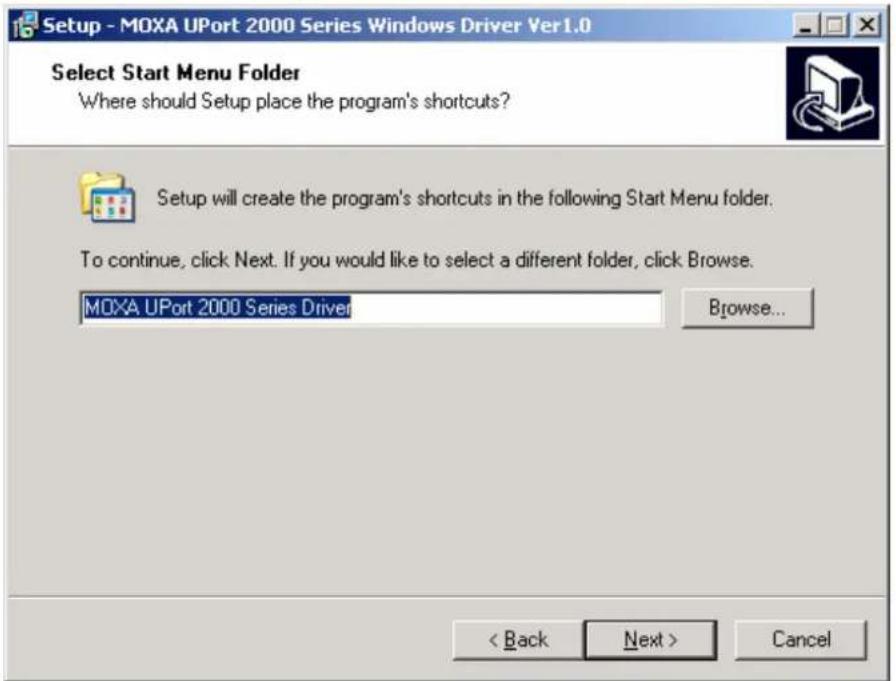
text_image
Setup - MOXA UPort 2000 Series Windows Driver Ver1.0 Select Start Menu Folder Where should Setup place the program's shortcuts? Setup will create the program's shortcuts in the following Start Menu folder. To continue, click Next. If you would like to select a different folder, click Browse. MOXA UPort 2000 Series Driver Browse... < Back Next > Cancel- Click Install to proceed with the installation.
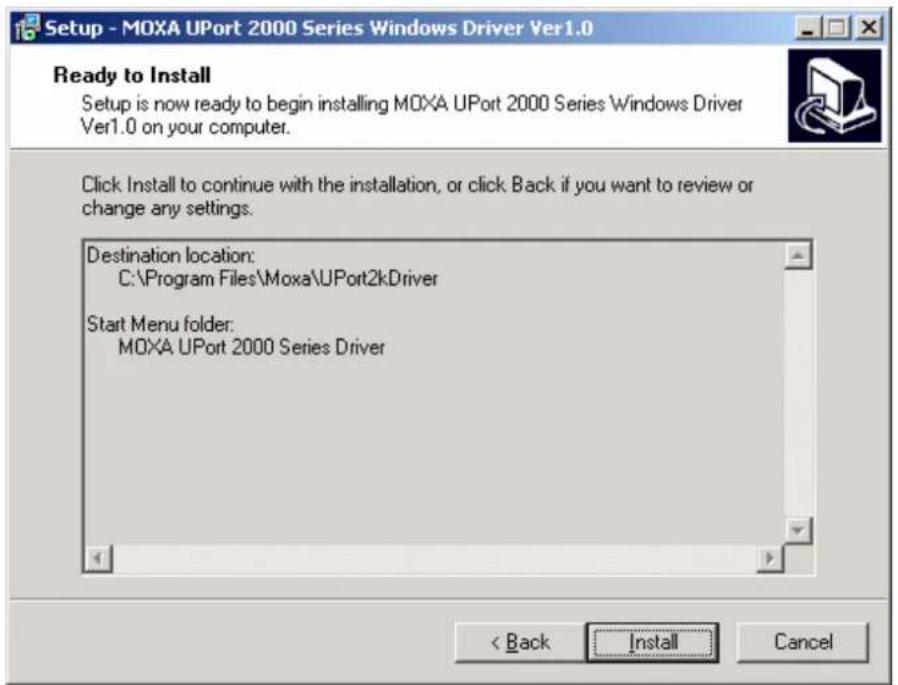
text_image
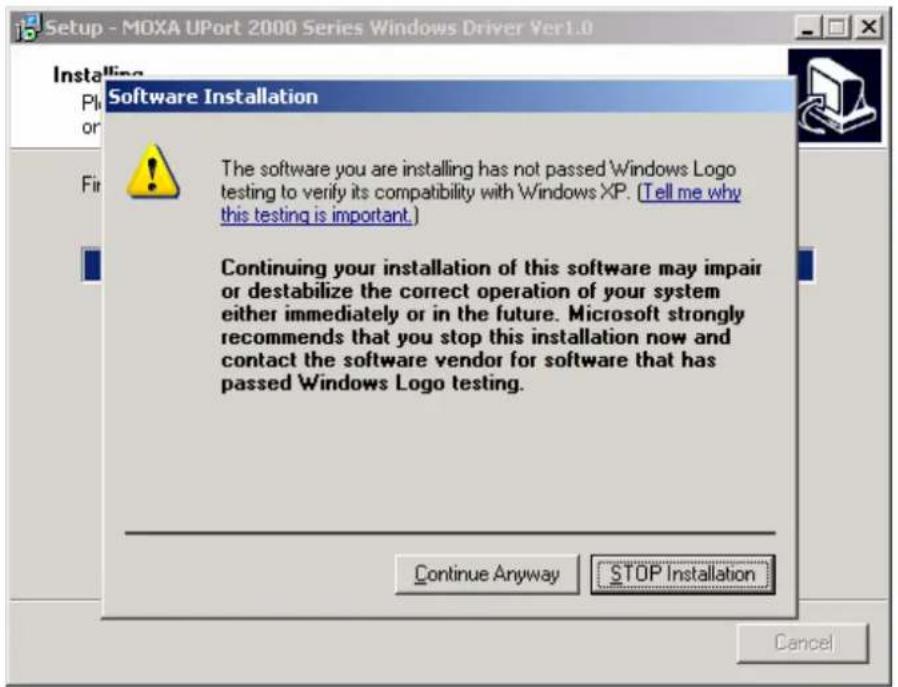
Setup - MOXA UPort 2000 Series Windows Driver Ver1.0 Ready to Install Setup is now ready to begin installing MOXA UPort 2000 Series Windows Driver Ver1.0 on your computer. Click Install to continue with the installation, or click Back if you want to review or change any settings. Destination location: C:\Program Files\Moxa\UPort2kDriver Start Menu folder: MOXA UPort 2000 Series Driver < Back Install Cancel- The next window that opens cautions you that although this software has not passed Windows logo testing, the driver has already been tested and shown that it can support the Windows operating system. Click Continue Anyway to proceed.
text_image
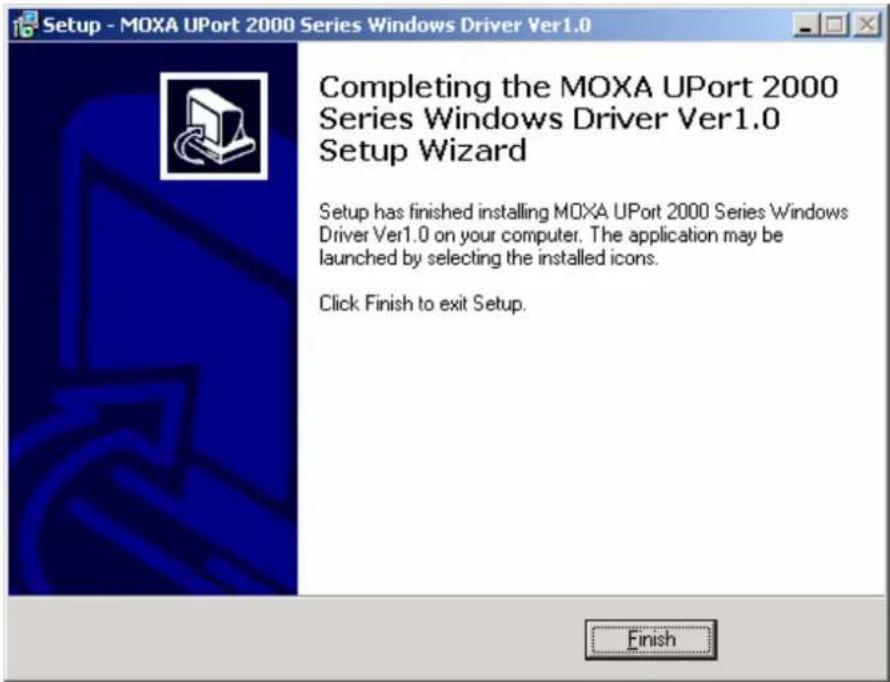
Setup - MOXA UPort 2000 Series Windows Driver Ver1.0 Installing Plk or Fire Software Installation The software you are installing has not passed Windows Logo testing to verify its compatibility with Windows XP. (Tell me why this testing is important.) Continuing your installation of this software may impair or destabilize the correct operation of your system either immediately or in the future. Microsoft strongly recommends that you stop this installation now and contact the software vendor for software that has passed Windows Logo testing. Continue Anyway STOP Installation Cancel- Click Finish to complete the driver installation.
text_image
Setup - MOXA UPort 2000 Series Windows Driver Ver1.0 Completing the MOXA UPort 2000 Series Windows Driver Ver1.0 Setup Wizard Setup has finished installing MOXA UPort 2000 Series Windows Driver Ver1.0 on your computer. The application may be launched by selecting the installed icons. Click Finish to exit Setup. FinishConnecting the Hardware
Please install the driver before connecting the UPort 2000 to your PC's USB port. See the previous section for details.
Connecting to a Serial Device
Use the proper serial cables to connect your serial devices to the UPort 2000's serial ports, which support the RS-232 interface. The UPort 2000's serial ports use DB9 male connectors with standard RS-232 pin assignment.
LED Indicators
The UPort 2000 has LEDs on the front panel. The “Active” LED indicates the power status, and the “TxD” and “RxD” LEDs indicate the transmission status of each serial port. In addition, when you click “Locate” for a particular UPort, that UPort’s “Active” LED will blink to indicate its location.
| LED Name LED Color LED | Function | |
| Active | Green Power is on | |
| Off Power is off, or power error condition exists | ||
| TxD, RxD | Orange Port is receiving data from attached device | |
| Green Port is transmitting data to attached device | ||
| Off No data is being transmitted or received | ||
Installing the Driver for the Converter
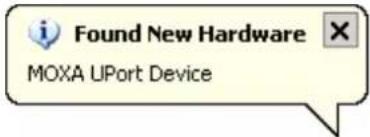
- After connecting the USB cable from UPort to host the PC, Windows XP will automatically detect the new UPort, and the Found New Hardware balloon will open in the bottom right corner of the Windows desktop.
text_image
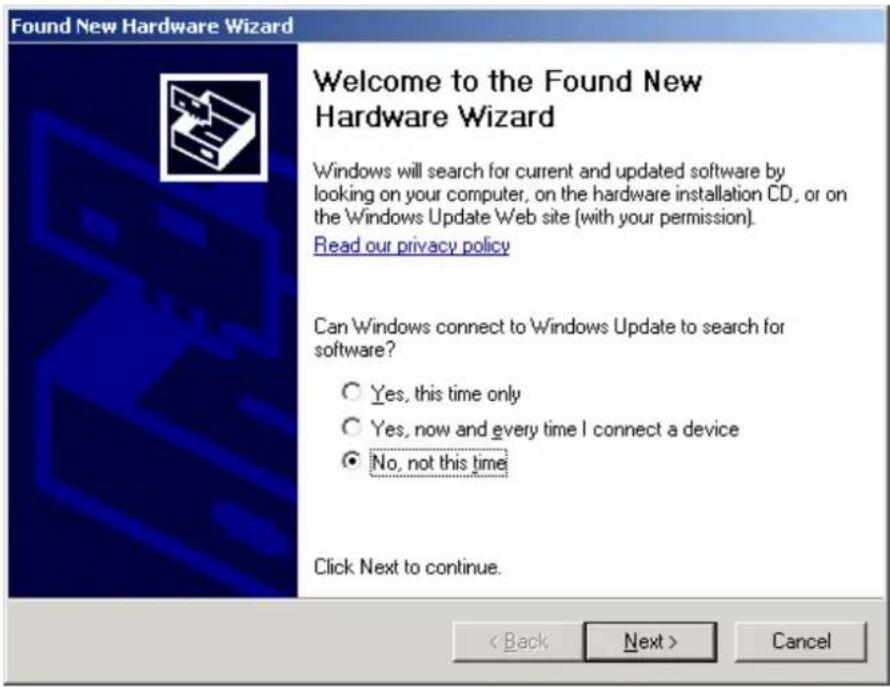
Found New Hardware MOXA UPort Device- Select No, not at this time. Click Next to start the installation.
text_image
Found New Hardware Wizard Welcome to the Found New Hardware Wizard Windows will search for current and updated software by looking on your computer, on the hardware installation CD, or on the Windows Update Web site (with your permission). Read our privacy policy Can Windows connect to Windows Update to search for software? ○ Yes, this time only ○ Yes, now and every time I connect a device ● No, not this time Click Next to continue. < Back Next > Cancel- Select Install the software automatically (Recommended), and then click Next to continue.

text_image
Found New Hardware Wizard This wizard helps you install software for: MOXA UPort 2210 Series If your hardware came with an installation CD or floppy disk, insert it now. What do you want the wizard to do? ○ Install the software automatically (Recommended) ○ Install from a list or specific location (Advanced) Click Next to continue. < Back Next > Cancel- Wait while the installation wizard searches for the correct drivers. The next window that opens cautions you that although this software has not passed Windows logo testing, this driver has already been tested and shown that it can support the Windows operating system. Click Continue Anyway to proceed.

text_image
Found New Hardware Wizard Please wait while the wizard installs the software... Hardware Installation The software you are installing for this hardware: MOXA UPort 2210 Series has not passed Windows Logo testing to verify its compatibility with Windows XP. (Tell me why this testing is important.) Continuing your installation of this software may impair or destabilize the correct operation of your system either immediately or in the future. Microsoft strongly recommends that you stop this installation now and contact the hardware vendor for software that has passed Windows Logo testing. Continue Anyway STOP Installation- The next window shows the model name of the board, and indicates that Windows has completed the driver installation. Click Finish to proceed with the rest of the installation procedure.
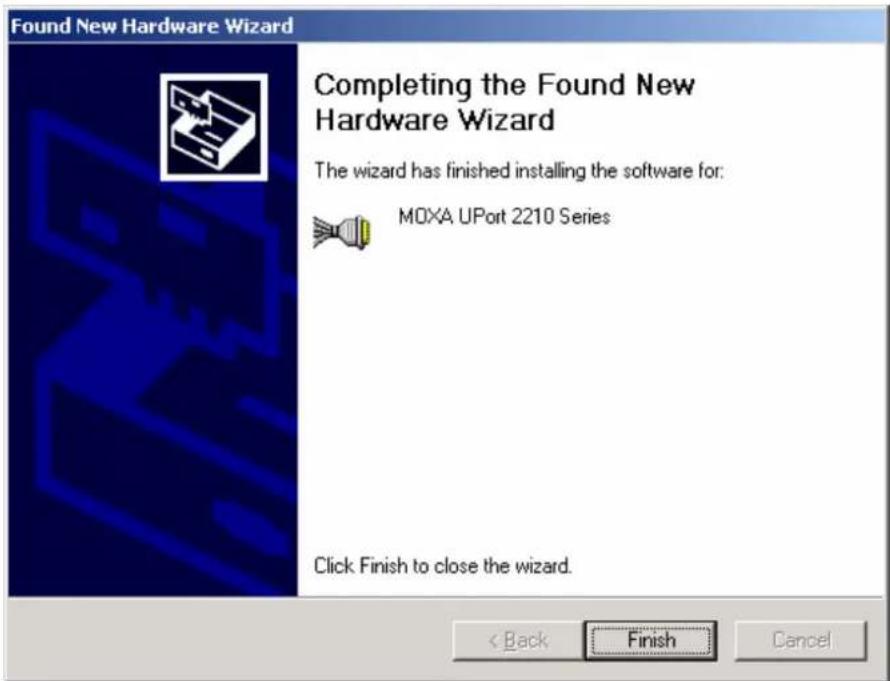
text_image
Found New Hardware Wizard Completing the Found New Hardware Wizard The wizard has finished installing the software for: MOXA UPort 2210 Series Click Finish to close the wizard. < Back Finish Cancel- Open the Windows Device Manager to check that the installation was successful. The UPort USB-to-serial converter should appear under Multi-port serial adapters.
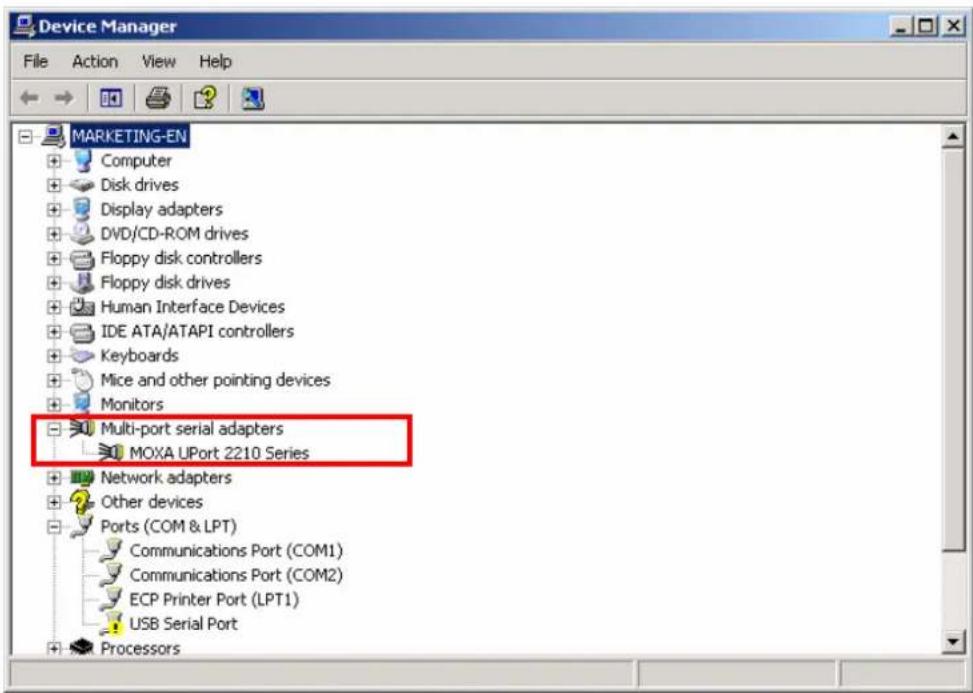
text_image
Device Manager File Action View Help MARKETING-EN Computer Disk drives Display adapters DVD/CD-ROM drives Floppy disk controllers Floppy disk drives Human Interface Devices IDE ATA/ATAPI controllers Keyboards Mice and other pointing devices Monitors Multi-port serial adapters MOXA UPort 2210 Series Network adapters Other devices Ports (COM & LPT) Communications Port (COM1) Communications Port (COM2) ECP Printer Port (LPT1) USB Serial Port ProcessorsInstalling the Driver for the Ports
- The Found New Hardware Wizard window will open to help you install the driver. This window will offer to connect to the Windows update site to search for a driver. Select No, not at this time and then click Next to continue.
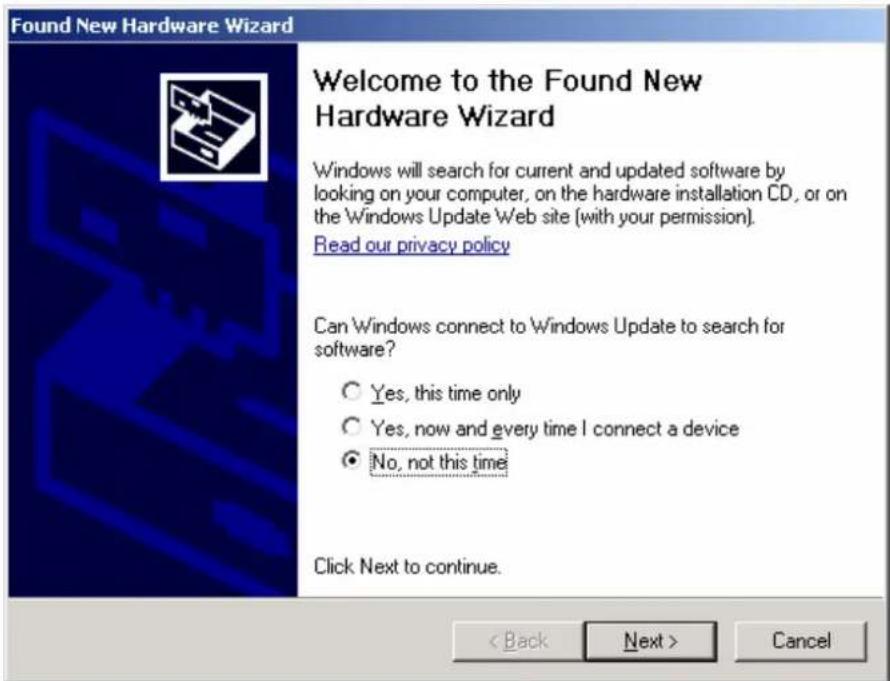
text_image
Found New Hardware Wizard Welcome to the Found New Hardware Wizard Windows will search for current and updated software by looking on your computer, on the hardware installation CD, or on the Windows Update Web site (with your permission). Read our privacy policy Can Windows connect to Windows Update to search for software? ○ Yes, this time only ○ Yes, now and every time I connect a device ● No, not this time Click Next to continue. < Back Next > Cancel- Select Install the software automatically (Recommended), and then click Next to continue.
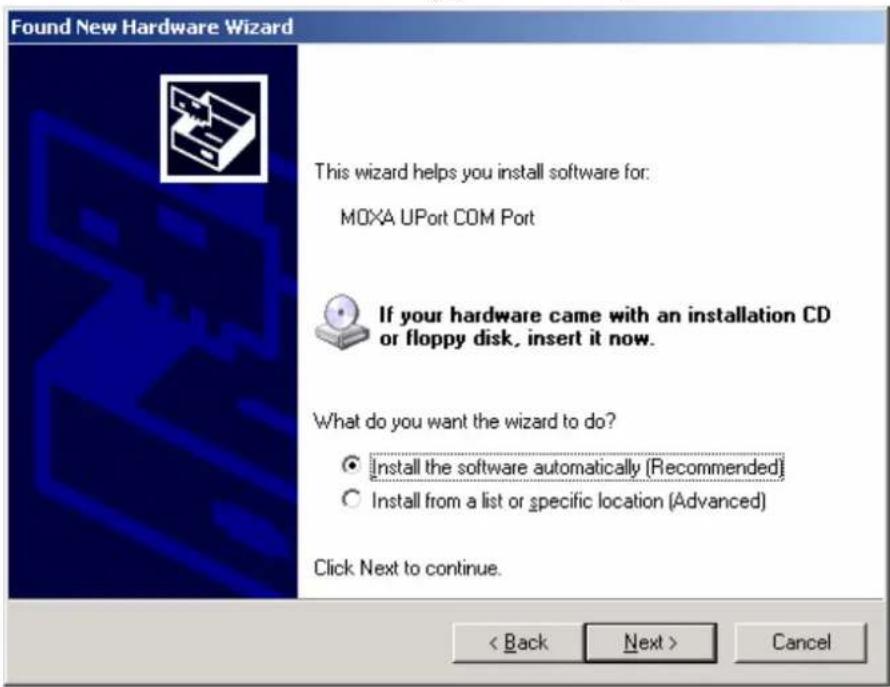
text_image
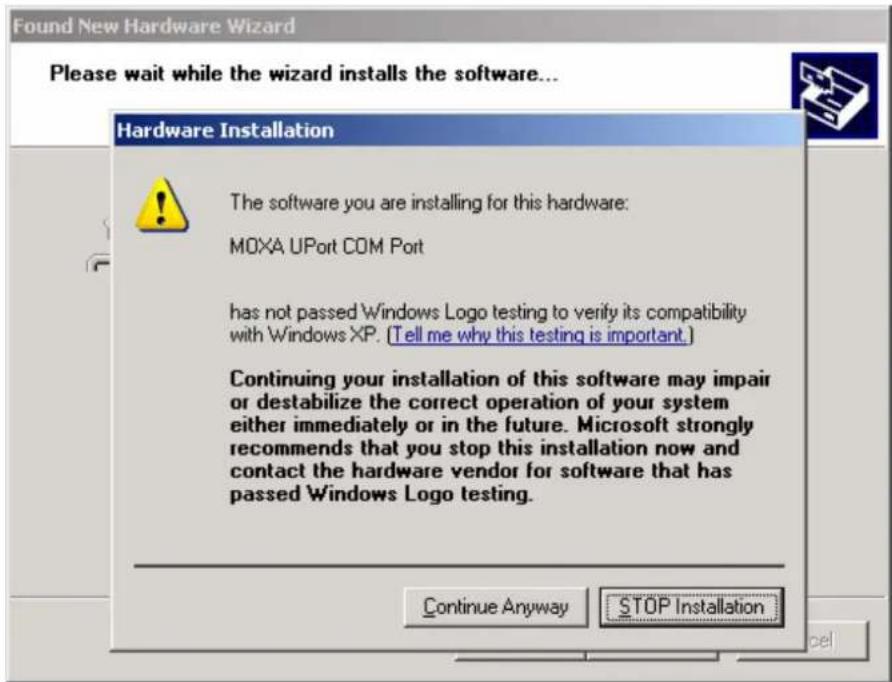
Found New Hardware Wizard This wizard helps you install software for: MOXA UPort COM Port If your hardware came with an installation CD or floppy disk, insert it now. What do you want the wizard to do? ○ Install the software automatically (Recommended) ○ Install from a list or specific location (Advanced) Click Next to continue. < Back Next > Cancel- Wait while the installation wizard searches for the correct drivers. The next window that opens cautions you that although this software has not passed Windows logo testing, this driver has already been tested and shown that it can support the Windows operating system. Click Continue Anyway to proceed.
text_image
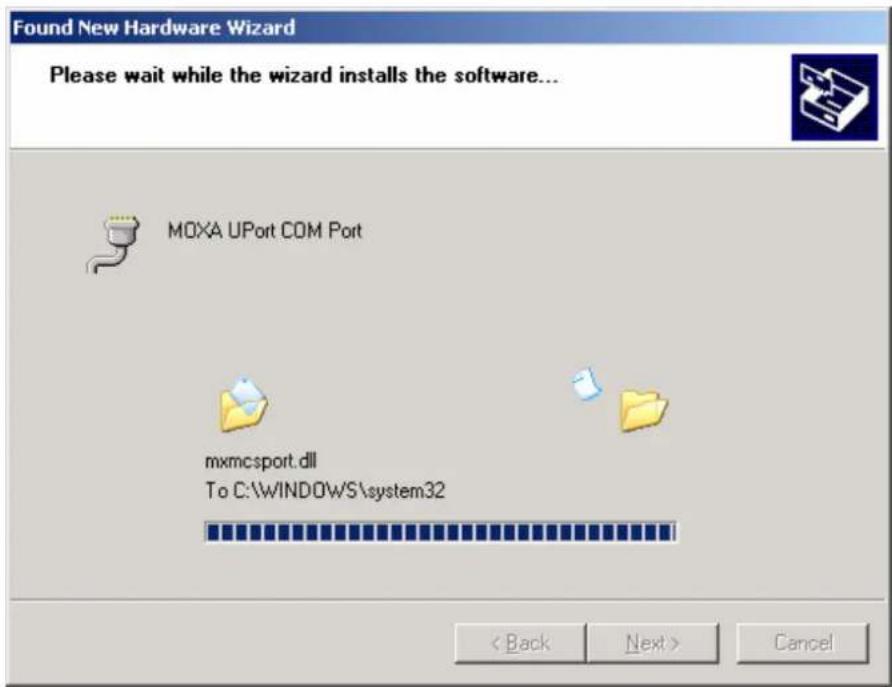
Found New Hardware Wizard Please wait while the wizard installs the software... Hardware Installation The software you are installing for this hardware: MOXA UPort COM Port has not passed Windows Logo testing to verify its compatibility with Windows XP. (Tell me why this testing is important.) Continuing your installation of this software may impair or destabilize the correct operation of your system either immediately or in the future. Microsoft strongly recommends that you stop this installation now and contact the hardware vendor for software that has passed Windows Logo testing. Continue Anyway STOP Installation- Wait while the driver is installed.
text_image
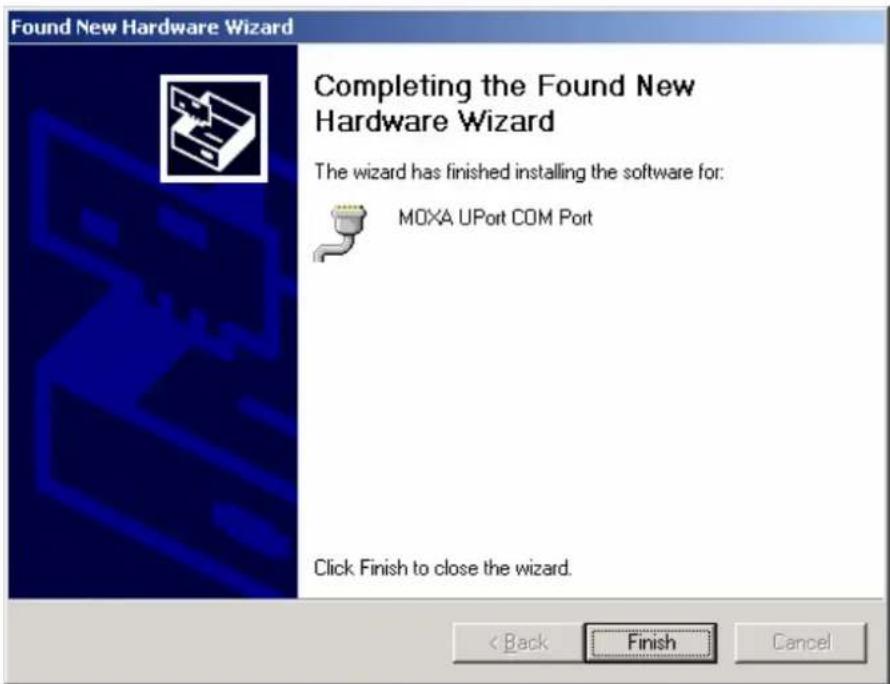
Found New Hardware Wizard Please wait while the wizard installs the software... MOXA UPort COM Port mxmcport.dll To C:\WINDOWS\system32 < Back Next > Cancel- After all files have been copied to the system, the Completing the Found New Hardware Wizard window will open to indicate that it has finished installing driver. Click Finish to proceed with the rest of the installation.
text_image
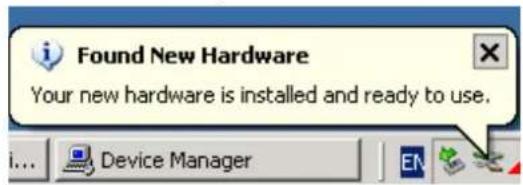
Found New Hardware Wizard Completing the Found New Hardware Wizard The wizard has finished installing the software for: MOXA UPort COM Port Click Finish to close the wizard. < Back Finish Cancel- Repeat Step 1 through Step 5 for each of the remaining ports (1 port for the UPort 2210, and 3 ports for the UPort 2410).
- The Found New Hardware balloon will reappear to inform you that the hardware was installed successfully.
text_image
Found New Hardware Your new hardware is installed and ready to use.Configuring the Ports
After the driver has been installed, use Windows' Device Manager to configure the UPort serial ports.
- With the System Properties window open, click on the Hardware tab, and then click on Device Manager.
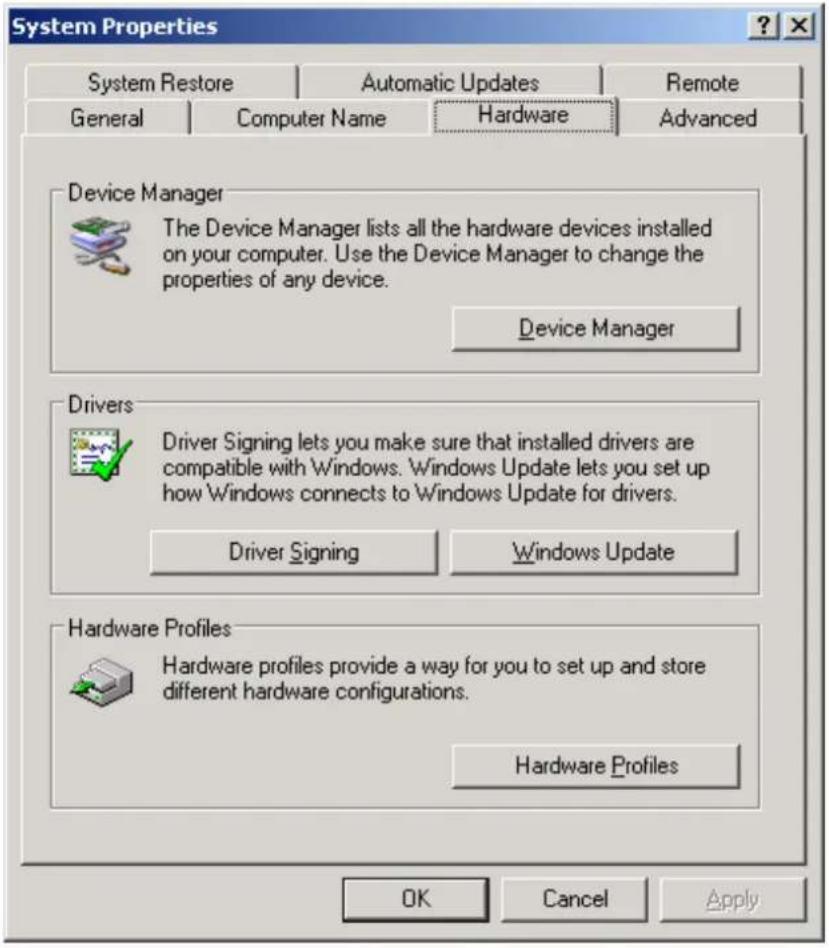
text_image
System Properties System Restore Automatic Updates Remote General Computer Name Hardware Advanced Device Manager The Device Manager lists all the hardware devices installed on your computer. Use the Device Manager to change the properties of any device. Device Manager Drivers Driver Signing lets you make sure that installed drivers are compatible with Windows. Windows Update lets you set up how Windows connects to Windows Update for drivers. Driver Signing Windows Update Hardware Profiles Hardware profiles provide a way for you to set up and store different hardware configurations. Hardware Profiles OK Cancel Apply- Expand the Multi-port serial adapters tab, right click MOXA UPort 2210 (or 2410), and then click Properties to open the UPort's configuration panel.
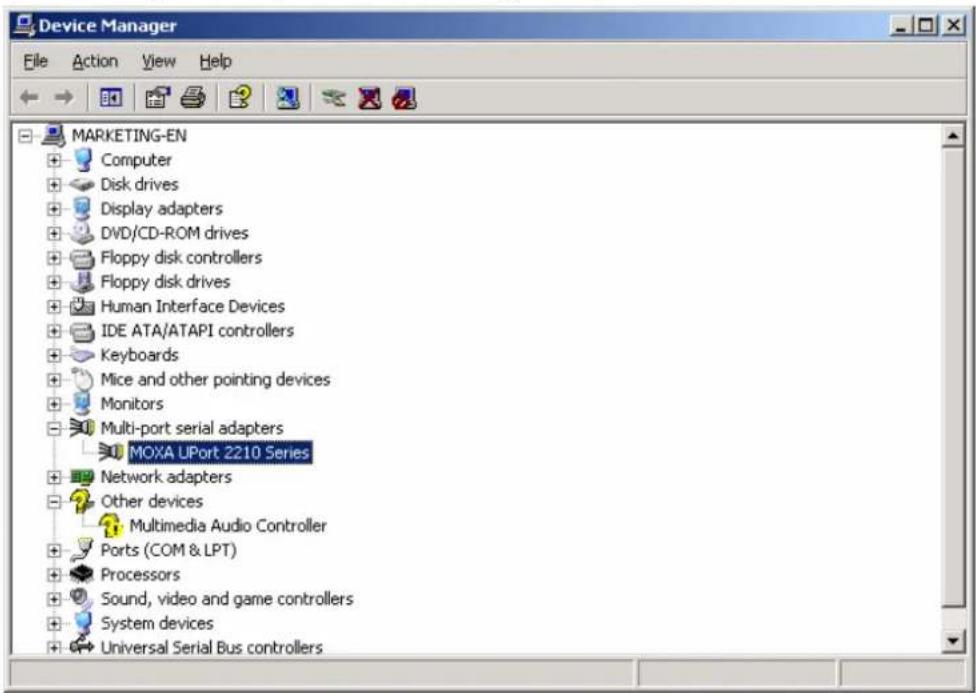
text_image
Device Manager File Action View Help MARKETING-EN Computer Disk drives Display adapters DVD/CD-ROM drives Floppy disk controllers Floppy disk drives Human Interface Devices IDE ATA/ATAPI controllers Keyboards Mice and other pointing devices Monitors Multi-port serial adapters MOXA UPort 2210 Series Network adapters Other devices Multimedia Audio Controller Ports (COM & LPT) Processors Sound, video and game controllers System devices Universal Serial Bus controllersThe Ports Configuration page settings are described below.
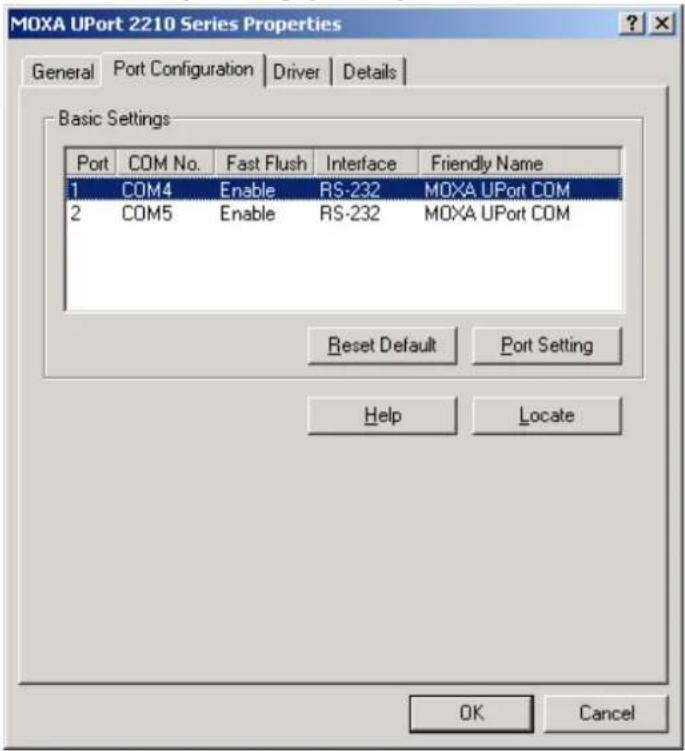
text_image
MOXA UPort 2210 Series Properties General Port Configuration Driver Details Basic Settings Port COM No. Fast Flush Interface Friendly Name 1 COM4 Enable RS-232 MOXA UPort COM 2 COM5 Enable RS-232 MOXA UPort COM Reset Default Port Setting Help Locate OK CancelPort Settings
Auto Enumerating COM Number
If the Auto Enumerating COM Number checkbox is checked, COM numbers will be assigned automatically and in sequence to the ports. E.g., COM3 to Port 1, COM4 to Port 2, etc.
If you do not enable this check box, only the COM number for the selected port will be changed to the COM number listed in the drop-down list box. Enable this function if you want to configure the UPort's serial ports with sequential COM numbers.
Friendly Name
| Setting Factory Default Necessity | |
| 1 to 20 characters(E.g., UPort 2210) | Moxa UPort COM Optional |
Users can assign a Friendly name to each of the UPort 2000's serial ports. The friendly name gives users an easy way to identify the serial devices connected to the UPort's serial ports. If you enable set the change to all ports and then click OK, the same friendly name will be assigned to all ports.
Fast Flush
| Setting Factory Default Necessity | ||
| Enable/Disable | Enable | Required |
The Fast Flush setting is designed for applications that call the Win32 PurgeComm() function before reading or writing data. If Fast Flush is not enabled, then instead of just flushing the local buffer, the UPort's driver will query the UPort's firmware repeatedly in a short period of time to make sure that no data is queued in the UPort's firmware buffer. For this reason, you may find that your PC's native COM ports respond much more quickly when making PurgeComm() function calls compared to the UPort's serial ports. In this case, enable Fast Flush (enabled by default) to speed up the reaction of the UPort's serial ports.
Interface
| Setting Factory Default Necessity | ||
| RS-232 | RS-232 | Required |
Other Settings
Reset default
If you click the Reset default button, all the settings will return to the factory default settings:
COM Number:
Fast Flush: Enable
Interface: RS-232
Help
Click on Help to open the UPort 2000's online help utility.
Locate
Use the Locate function to determine the location of a particular UPort 2000. This function is particularly useful when two or more UPorts are installed on the same PC. The Locate function will cause the selected UPort 2000's LED to flash, and UPort 2410 will sound the buzzer.
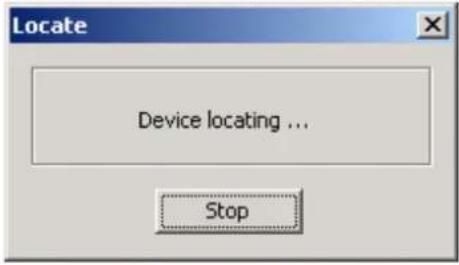
text_image
Locate Device locating ... StopUninstalling the UPort 2000
To remove a particular UPort 2000 from you PC, simply remove that UPort 2000 from the Device Manager. However, the UPort driver will NOT be removed so that other UPort 2000 converters connected to the PC will continue to work properly.
- To uninstall the UPort 2000, click Start → Settings → Control Panel → System, select the Hardware tab, and then click Device Manager.

text_image
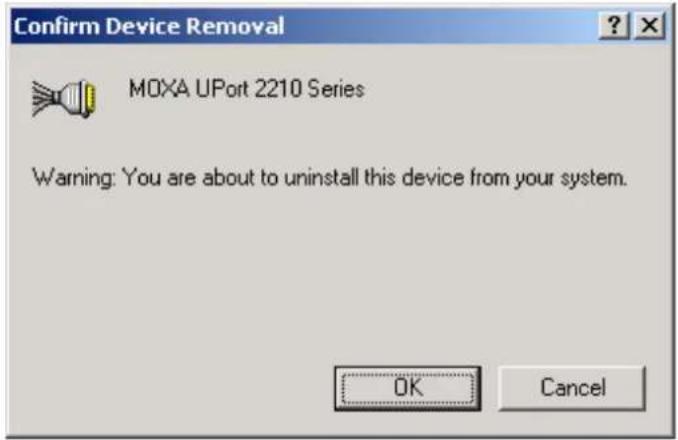
System Properties System Restore Automatic Updates Remote General Computer Name Hardware Advanced Device Manager The Device Manager lists all the hardware devices installed on your computer. Use the Device Manager to change the properties of any device. Device Manager Drivers Driver Signing lets you make sure that installed drivers are compatible with Windows. Windows Update lets you set up how Windows connects to Windows Update for drivers. Driver Signing Windows Update Hardware Profiles Hardware profiles provide a way for you to set up and store different hardware configurations. Hardware Profiles OK Cancel Apply- Expand the Multi-port serial adapters tab, right click MOXA UPort 2210 Series, and then click Remove to uninstall this UPort 2000. A window will pop up to confirm that you want to remove this UPort.
text_image
Confirm Device Removal MOXA UPort 2210 Series Warning: You are about to uninstall this device from your system. OK Cancel- Click OK to continue uninstalling the UPort device. The UPort device will be removed from the list of Multi-port serial adapters.
Advanced UPort 2000 Driver Functions
Moxa's UPort 2000 Series Utility gives users a convenient tool for configuring and maintaining products from the UPort 2000 Series. In this section, we introduce the difference between "Normal COM Mode" and "Fixed-base COM Mode".
The Default Setting is Normal COM Mode
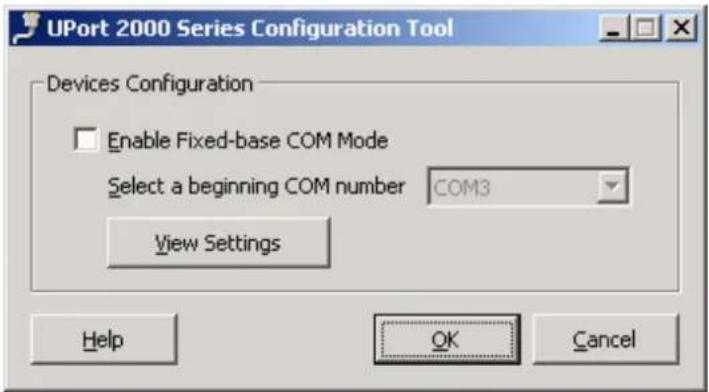
Each of Moxa's UPort 2000 products comes with a unique serial number to register with the Windows OS. If your UPort is reconnected to a different USB port, the host will recognize that it's the same UPort and then utilize the same COM port numbers.
text_image
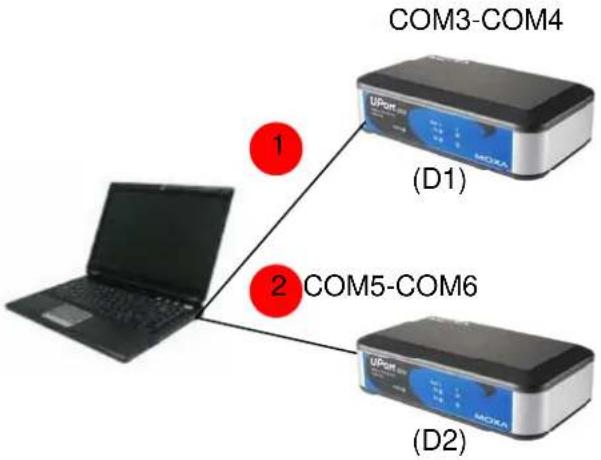
UPort 2000 Series Configuration Tool Devices Configuration Enable Fixed-base COM Mode Select a beginning COM number COM3 View Settings Help OK CancelTo use Normal COM Mode, be sure to the leave Enable Fixed-base COM Mode unchecked. For the sake of argument, assume that we are using two UPort 2210 USB-to-serial converters configured for "Normal COM Mode." Each UPort 2210 has two serial ports. When you plug UPort D1 (please refer to the figure below) into your computer, your computer's operating system assigns the first two available COM numbers (COM3 and COM4 in this example) to the UPort's serial ports. If you now plug UPort D2 into another of your computer's USB ports, your computer will again assign the first two available COM numbers (COM5 and COM6 in this example). At this point you can use the UPort utility to assign different COM numbers to these ports.
flowchart
graph TD
    A["Laptop"] -->|1| B["UPORT"]
    A -->|2| C["COM5-COM6"]
    B -->|(D1)| D["UPORT"]
    C -->|(D2)| E["MOXA"]
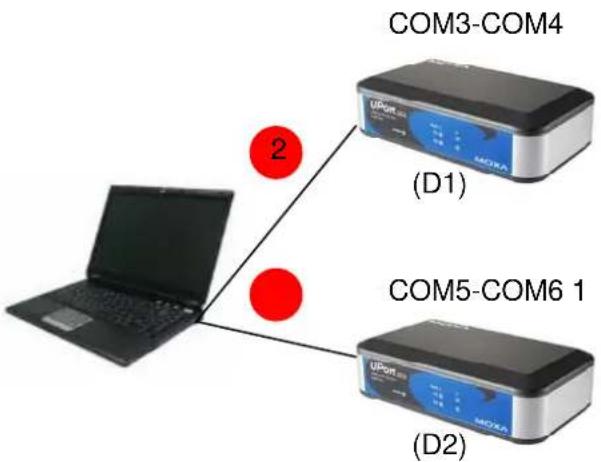
The UPort's "Normal COM Mode" has an added twist. Your computer uses the serial number of each UPort to record which COM numbers are assigned to the UPort's serial ports. If one or both of the UPorts are unplugged from the computer, and then plugged back in, the COM numbers of the UPorts' serial ports will be the same as they were before the UPorts were unplugged.
For example, if both D1 and D2 are unplugged, and then D2 is plugged back in first, your computer will assign COM5 and COM6 to D2's serial ports. When D1 is plugged back in, your computer will assign COM3 and COM4 to D1's serial ports.
flowchart
graph TD
    A["Laptop"] -->|2| B["COM3-COM4"]
    A -->|2| C["COM5-COM6 1"]
    B -->|(D1)| D["UPORT"]
    C -->|(D2)| E["UPORT"]
In "Normal COM Mode" you can reset the COM numbers and configuration parameters of individual ports to the values needed for your application at any time.
Fixed-base COM Mode
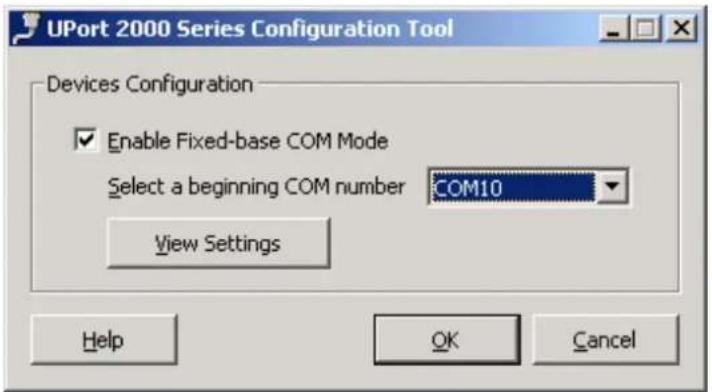
Moxa's UPort 2000 series provides a unique fixed-base COM function that allows users to set a specific initial COM port number. Regardless of which UPort is plugged into the host, the COM port numbers for the UPort's serial ports will be numbered sequentially starting with the initial COM port number.
text_image
UPort 2000 Series Configuration Tool Devices Configuration Enable Fixed-base COM Mode Select a beginning COM number COM10 View Settings Help OK CancelTo use "Fixed-base COM Mode," be sure to check the "Enable Fixed-base COM Mode" check box.
"Fixed-base COM Mode" allows users to specify which COM number will be assigned first. In addition, COM numbers are assigned sequentially, and are not tied to specific UPort converters.
For example, assume that you have set COM10 as the first COM number that will be assigned. If UPort D1 is plugged into your computer first, your computer will assign COM10 and COM11 to the UPort's serial ports. When UPort D2 is plugged in, the computer will assign COM numbers COM12 and COM13.
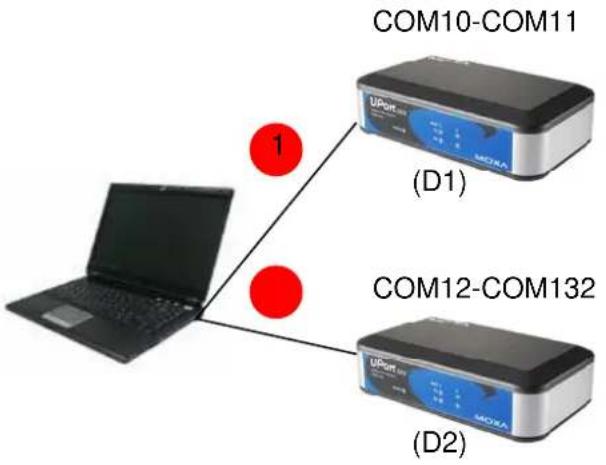
flowchart
graph TD
    A["Laptop"] -->|1| B["UPout"]
    A -->|1| C["COM12-COM132"]
    B --> D["D1"]
    C --> E["D2"]
If both UPorts are unplugged from the computer, and then UPort D2 is plugged back in, the computer will now assign COM10 and COM11 to the UPort's serial ports. When UPort D1 is plugged back in, COM numbers COM12 and COM13 will be assigned the UPort's serial ports.
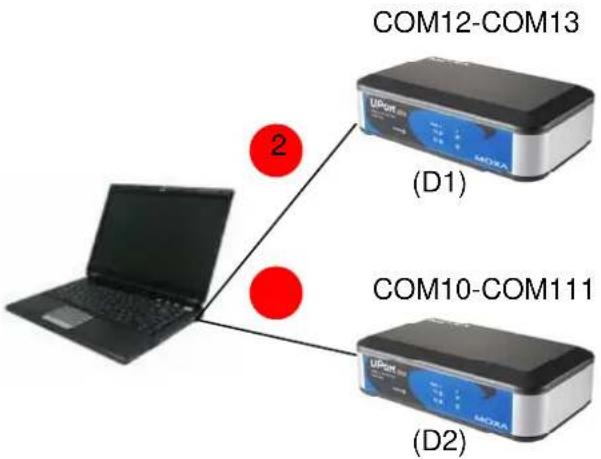
text_image
COM12-COM13 (D1) COM10-COM111 (D2)When "Fixed-base COM Mode" is enabled for the first time, all COM port numbers and serial port parameters will be reset to their default values. You can then set the COM numbers and configuration parameters to the values needed for your application.
For example, let's assume that before you enable "Fixed-base COM Mode" you set the parameters of the UPort 2000 as follows:
Port Number: COM5
Friendly Name: POS Device 1
Fast Flush: Disable.
If you now enable "Fixed-base COM Mode," all parameters will be reset to their default values:
Port Number: COM3
Friendly Name: MOXA UPort COM
Fast Flush: Enable
At this point you can set the COM numbers and other serial parameters to the values needed for your application. If you subsequently disable "Fixed-base COM Mode," all parameters will be restored to the original settings:
Port Number: COM5
Friendly Name: POS Device 1
Fast Flush: Disable
In "Fixed-base COM Mode," you can reset the COM numbers and configuration parameters of individual ports to the values needed for your application at any time.
Uninstalling the Driver
- To uninstall the driver, open the Windows' Control Panel, and click Add/Remove Programs.
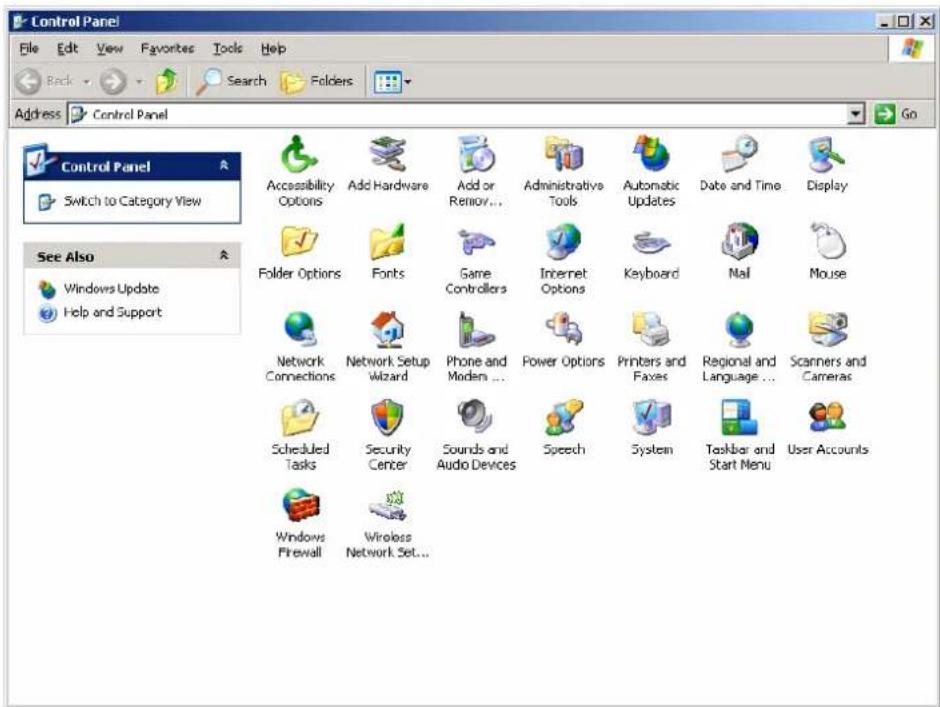
text_image
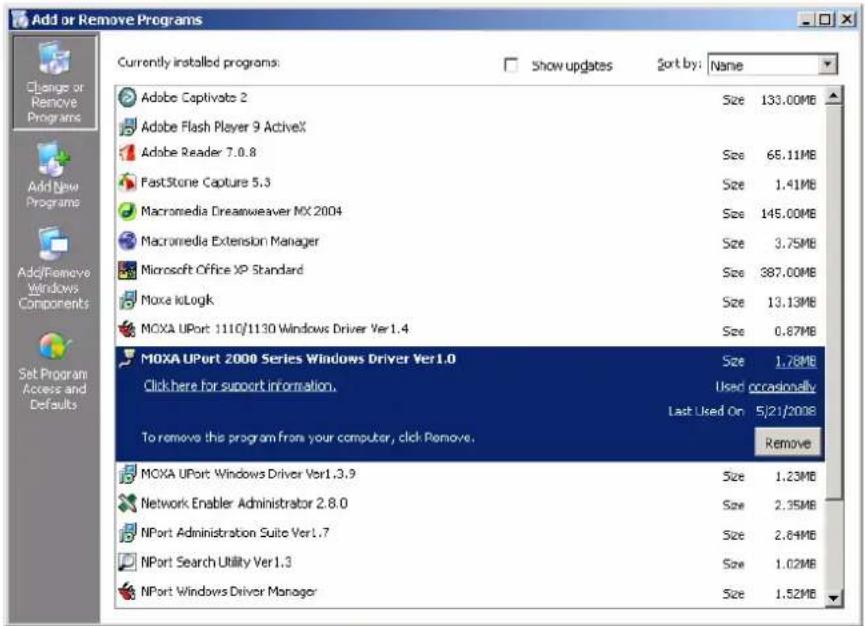
Control Panel File Edit View Favorites Tools Help Back Search Folders Address Control Panel Go Control Panel Switch to Category View See Also Windows Update Help and Support Accessibility Options Add Hardware Add or Remove... Administrative Tools Automatic Updates Date and Time Display Folder Options Fonts Game Controllers Internet Options Keyboard Nail Mouse Network Connections Network Setup Wizard Phone and Modem ... Power Options Printers and Faxes Regional and Language ... Scanners and Cameras Scheduled Tasks Security Center Sounds and Audio Devices Speech System Toolbar and Start Menu User Accounts Windows Firewall Wireless Network Set...- Select Moxa UPort 2000 Series Windows Driver Ver1.0, and then click the Remove button. Wait while the driver software is uninstalled.
text_image
Add or Remove Programs Currently installed programs: Show updates Sort by: Name Adobe Captivate 2 Size 133.00MB Adobe Flash Player 9 ActiveX Size 65.11MB Adobe Reader 7.0.8 Size 1.41MB FastStone Capture 5.3 Size 145.00MB Macromedia Dreamweaver MX 2004 Size 3.75MB Macromedia Extension Manager Size 387.00MB Microsoft Office XP Standard Size 13.13MB Moxa iLogk Size 0.87MB MOXA UPort 1110/1130 Windows Driver Ver1.4 Size 1.76MB MOXA UPort 2000 Series Windows Driver Ver1.0 Used occasionally Click here for support information. Last Used On 5/21/2008 To remove this program from your computer, click Remove. Remove MOXA UPort Windows Driver Ver1.3.9 Size 1.23MB Network Enabler Administrator 2.8.0 Size 2.35MB NPort Administration Suite Ver1.7 Size 2.64MB NPort Search Utility Ver1.3 Size 1.02MB NPort Windows Driver Manager Size 1.52MB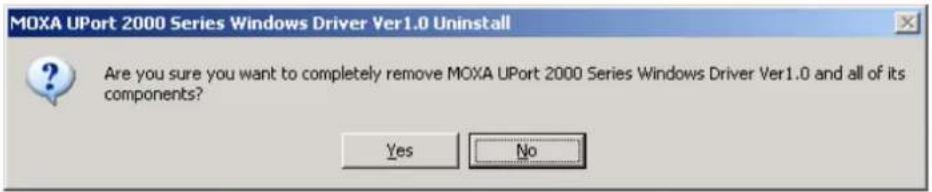
text_image
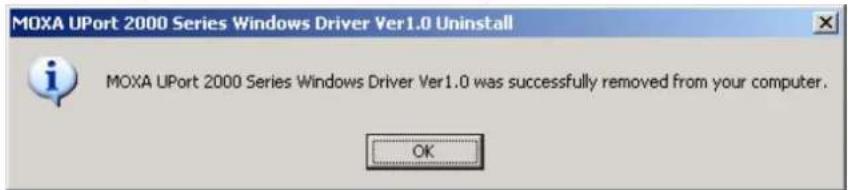
MOXA UPort 2000 Series Windows Driver Ver1.0 Uninstall Are you sure you want to completely remove MOXA UPort 2000 Series Windows Driver Ver1.0 and all of its components? Yes No- Click OK to proceed with the un-installation procedure.
text_image
MOXA UPort 2000 Series Windows Driver Ver1.0 Uninstall MOXA UPort 2000 Series Windows Driver Ver1.0 was successfully removed from your computer. OKLinux Kernel 2.6.x
The Linux driver for Moxa's UPort 2000 Series of USB-to-serial converters maps a Linux host's ttyUSBxx ports to the UPort's serial ports. Once the mapping has been established, Linux users and applications can connect to a device port as if it were a ttyUSBxx port. The Linux drivers have been tested with the majority of Linux distributions, including Linux kernel 2.6.x. Please check Moxa's website (http://www.moxa.com) for the latest Linux kernel support information.
In this section, we explain how to complete the following tasks:
- Installing the Linux Driver
- Loading the Moxa Driver
- Unloading the Moxa Driver
- Removing the Moxa Driver and Utility files
- Using the mxustty Utility
Installing the Linux Driver
Obtain the driver file from the Document and Software CD, or from the Moxa website at http://www.moxa.com.
To install and load the Linux drivers, execute the following commands from the Linux prompt:
<h1 id="mount-devcdrom-mnt">mount /dev/cdrom /mnt</h1>
<h1 id="cd">cd /</h1>
<h1 id="mkdir-moxa">mkdir moxa</h1>
<h1 id="cd-moxa">cd /moxa</h1>
<h1 id="cp-mntcdromdriver-directorydriv_linux26_uport2000_vxx_build_yymmddhhtgz-moxa">cp /mnt/cdrom/<driver directory>/driv_linux2.6_uport2000_vx.x_build_yymmddhh.tgz /moxa</h1>
<h1 id="tar-xvfz-driv_linux26_uport2000_vxx_build_yymmddhhtgz">tar -xvfz driv_linux2.6_uport2000_vx.x_build_yymmddhh.tgz</h1>
<h1 id="cd-moxamxuport2000">cd /moxa/mxuport2000</h1>
<h1 id="make-install">make install</h1>
*Note: xx=version, yy = year, mm = month, dd = day, hh = hour
Loading the Moxa Driver
After installing the driver, you will be able to load the Moxa driver. The driver will be loaded automatically when you plug the UPort 2000 into your PC, or you can load the driver manually by issuing the following command:
# modprobe mxuport2000
If the driver has loaded successfully, you should see a message such as the following:
_MOXA UPort 2000 series driver ver 1.0 loaded successfully.
You can verify that the driver has loaded by entering the following command:
# lsmode
For additional information, please refer to readme.txt file in the mxuport2000 directory.
Unloading the Moxa Driver
The driver will not unload automatically when you unplug the UPort 2000 from the PC. To unload the Moxa driver, you must remove it manually by issuing the following command:
rmmod mxuport2000
You can verify that the driver was unloaded by entering the following command:
# lsmode
For additional information, please refer to readme.txt file in the mxuport2000 directory.
Removing the Moxa Driver and Utility Files
To remove the Moxa driver and utility files, navigate to the path /moxa/mxuport2000, and then execute the following command:
make clean;
Both the driver and utility files will be removed.
Using the mxustty Utility
To determine which UPort 2000 a particular serial device is connected to, use the "I" option with the "mxustty" utility.
General usage:
mxustty
option = h to activate the help file
option = I (ell) to locate a particular UPort device
Use the following function call to locate the device ttyUSB3:
# mxustty -l /dev/ttyUSB3
The UPort 2210 has 2 ports RS-232 interface and UPort 2410 has 4 ports RS-232 interface.
DB9 Male RS-232 Port for UPort 2210/2410

text_image
1 5 6 9| Pin RS-232 | |
| 1 | DCD |
| 2 | RxD |
| 3 | TxD |
| 4 | DTR |
| 5 | GND |
| 6 | DSR |
| 7 | RTS |