UPort 1410 - Uncategorized Moxa - Free user manual and instructions
Find the device manual for free UPort 1410 Moxa in PDF.


User questions about UPort 1410 Moxa
0 question about this device. Answer the ones you know or ask your own.
Ask a new question about this device
Download the instructions for your Uncategorized in PDF format for free! Find your manual UPort 1410 - Moxa and take your electronic device back in hand. On this page are published all the documents necessary for the use of your device. UPort 1410 by Moxa.
USER MANUAL UPort 1410 Moxa
UPort 1200/1400/1600 Series
User's Manual
Fifth Edition, March 2009
www.moxa.com/product
MOXA®
© 2009 Moxa Inc. All rights reserved. Reproduction without permission is prohibited.
UPort 1200/1400/1600 Series User's Manual
The software described in this manual is furnished under a license agreement and may be used only in accordance with the terms of that agreement.
Copyright Notice
Copyright © 2009 Moxa Inc.
All rights reserved.
Reproduction without permission is prohibited.
Trademarks
MOXA is a registered trademark of Moxa Inc.
All other trademarks or registered marks in this manual belong to their respective manufacturers.
Disclaimer
Information in this document is subject to change without notice and does not represent a commitment on the part of Moxa.
Moxa provides this document “as is,” without warranty of any kind, either expressed or implied, including, but not limited to, its particular purpose. Moxa reserves the right to make improvements and/or changes to this manual, or to the products and/or the programs described in this manual, at any time.
Information provided in this manual is intended to be accurate and reliable. However, Moxa assumes no responsibility for its use, or for any infringements on the rights of third parties that may result from its use.
This product might include unintentional technical or typographical errors. Changes are periodically made to the information herein to correct such errors, and these changes are incorporated into new editions of the publication.
Technical Support Contact Information
support@moxa.com
Moxa Americas:
Toll-free: 1-888-669-2872
Tel: +1-714-528-6777
Fax: +1-714-528-6778
Moxa China (Shanghai office):
Toll-free: 800-820-5036
Tel: +86-1-5258-9955
Fax: +86-10-6872-3958
Moxa Europe:
Tel: +49-89-3 70 03 99-0
Fax: +49-89-3 70 03 99-99
Moxa Asia-Pacific:
Chapter 1 Introduction....1-1
Overview....1-2
ADDCTM (Automatic Data Direction Control) for RS-485 1-2
ARDC (Automatic Recovery Data Communication).... 1-2
Package Checklist 1-2
Product Features....1-3
Product Specifications.... 1-3
Panel Layout.... 1-6
Dimensions.... 1-7
Chapter 2 Driver Installation....2-1
UPort's USB Usage Limitation 2-2
Installing the Windows Driver 2-2
Hardware Description 2-5
Connecting the Hardware.... 2-6
Installing the Driver for the Converter 2-8
Installing the Driver for the Ports.... 2-12
Configuring the Ports 2-15
Uninstalling the UPort 2-25
Uninstalling the Driver....2-26
Installing the Windows CE Driver 2-28
Installation with an installation package for Win CE 6.0....2-29
Installation with an installation package for Win CE 5.0....2-37
Removing the Moxa Win CE 5.0/CE6.0 Driver 2-39
Installation with a CAB File 2-40
Removing the Moxa Win CE 5.0/CE6.0 Driver 2-42
Installing the Linux Driver 2-43
Linux Kernel 2.6.x 2-43
Driver Files 2-43
Module Driver Configuration 2-44
Setting the Serial Parameters 2-45
Troubleshooting 2-45
Chapter 3 Pin Assignment ....3-1
Serial Port Pinouts.... 3-1
The Moxa UPort 1200/1400/1600 are advanced USB-to-serial converters that add 2, 4, 8, or 16 serial ports to a PC through the PC's USB port. The UPort 1200/1400/1600 are compatible with both new and legacy RS-232 or RS-422/485 devices. These plug and play USB-to-serial converters are ideal for mobile, instrumentation, and point-of-sale applications.
In this manual, we refer to the products in the series collectively as the UPort 1200/1400/1600 Series, or simply as the UPort. The UPort 1200/1400/1600 Series includes the following models:
• UPort 1250 2-port RS-232/422/485 USB-to-serial converter
- UPort 1250I 2-port RS-232/422/485 USB-to-serial converter w/ isolation protection
- UPort 1410 4-port RS-232 USB-to-serial converter
• UPort 1450 4-port RS-232/422/485 USB-to-serial converter
- UPort 1450I 4-port RS-232/422/485 USB-to-serial converter w/ isolation protection
• UPort 1610-8 8-port RS-232 USB-to-serial converter
• UPort 1650-8 8-port RS-232/422/485 USB-to-serial converter
• UPort 1610-16 16-port RS-232 USB-to-serial converter
• UPort 1650-16 16-port RS-232/422/485 USB-to-serial converter
The following topics are covered in this chapter:
Overview
☐ ADDC™ (Automatic Data Direction Control) for RS-485
☐ ARDC (Automatic Recovery Data Communication)
□ Package Checklist
□ Product Features
□ Product Specifications
Panel Layout
Dimensions
Overview
UPort 1200/1400/1600 Series products are easy to install and use. After installing the drivers on your PC, connect the UPort to your computer, plug in your serial devices, and you're ready to go. Programming is NOT required, and you do not need to worry about IRQs, configuring a board, power requirements, or connection schemes.
UPort 1200/1400/1600 Series products are compliant with USB 1.1, and 2.0 specifications, and meet the 480 Mbps high-speed requirement of Hi-Speed USB 2.0. Using your computer's USB ports to connect serial devices reduces the total cost of ownership, investment in hardware, and long term management and integration costs.
The UPort 1400 series converters support both bus power and external power. The UPort 1250I, UPort 1600-8, and UPort 1600-16 converters support external power only. When using bus power, the UPort will get 500 mA through the laptop's or workstation's USB port. When an external power adaptor or power cord is used, the UPort will only get 100 mA through the laptop's or workstation's USB port.
ADDC™ (Automatic Data Direction Control) for RS-485
ADDC ^™ (Automatic Data Direction Control) makes it easier to manage 2-wire RS-485 half-duplex connections, eliminating the need for software interference. This means that it is not necessary to write extra code for Windows applications to control the half-duplex protocol. ADDC ^™ intelligence is built into the UPort 1200/1400/1600 USB-to-serial converters that support the RS-485 serial interface.
ARDC (Automatic Recovery Data Communication)
ARDC (Automatic Recovery Data Communication) makes it easier to auto recover data transmission and even the cable from getting unplugged accidentally. This means the user does not need to worry about reconfiguring complex settings to ensure smooth data transmission. If the USB cable is accidentally unplugged, simply plug it back into the same port and the converter will automatically reconnect with the host and continue to transfer data. This feature not only reduces reconfiguration time, but also the probability of data loss.
Package Checklist
Moxa's UPort 1200/1400/1600 products are shipped with the following items:
Standard Accessories
• UPort 1200, 1400, or 1600 USB-to-serial converter
• 1 USB-IF certified cable
- Document and Software CD-ROM
• UPort 1200/1400/1600 Quick Installation Guide (printed)
• Power Adaptor (UPort 1250I/1450/1450I/1600-8) or Power Cord (UPort 1600-16)
Optional Accessories
- Wall Mount Kit
- Din-Rail kit
- Magnets (magnets are used to attach the UPort converter to the PC case; suitable for UPort 1400/1600-8)
- Mini DB9F-to-TB adaptor
NOTE: Please notify your sales representative if any of the above items are missing or damaged.
Product Features
UPort 1200/1400/1600 Series products have the following features:
• Hi-Speed USB 2.0 supported (up to 480 Mbps)
• Additional I/O or IRQ not required
- Serial transmission speed up to 921.6 Kbps
• 128-byte FIFO and on-chip H/W, S/W flow control
• Built-in 15 KV ESD protection
- Windows 2000/XP/2003/Vista/2008 (x86, x64), Win CE5.0/CE6.0, Linux 2.4, 2.6 x86/x84 drivers supported
• Both bus power and external power supported (UPort 1410/1450)
• Suitable for 4-wire RS-422/485 and 2-wire RS-485 applications
- Easy maintenance with LED display
• IP30, rugged metal case
• COM port assignments maintained across different PCs
- Optional magnet accessories for attaching to the PC's housing
- Mini DB9 female to terminal block attachment for easy wiring
• Wall mount and DIN-rail accessories available
Product Specifications
| USB | |
| Compliance | USB 1.1/2.0 compliant |
| Connector USB type B | |
| Speed 480 Mbps (Hi-Speed USB) and 12 Mbps (Full-Speed USB) | |
| Serial Interface | |
| Number of Ports UPort 1200: | 2UPort 1400: 4UPort 1600-8: 8UPort 1600-16: 16 |
| Serial Standards UPortTM 141 | 0/1610: RS-232UPortTM 1250/1250I/1450/1450I/1650: RS-232/422/485 |
| Connectors | DB9 male |
| Serial Line Protection | |
| ESD Protection 15 KV embedded | |
| Optical Isolation Protection 2 | KV (UPortTM 1250I/1450I only) |
| Performance | |
| Baudrate 50 bps to 921.6 Kbps | |
| Serial Communication Parameters | |
| Data Bits 5, 6, 7, 8 | |
| Stop Bits 1, 1.5, 2 | |
| Parity None, Even, Odd, Space, Mark | |
| Flow Control | RTS/CTS, XON/XOFF |
| FIFO | 128 bytes |
| Serial Signals | |
| RS-232 TxD, RxD, RTS, CTS | DTR, DSR, DCD, GND |
| RS-422 TxD+(B), TxD-(A), RxD+(B), RxD-(A), GND | |
| RS-485-4w TxD+(B), TxD-(A), RxD+(B), RxD-(A), GND | |
| RS-485-2w Data+(B), Data-(A), GND | |
| RS-485 Data Direction ADD ^TM (Automatic Data Direction Control) | |
| Driver Support | |
| Operating Systems Windows | (2000, XP x86/x64, 2003 x86/x64, Vista x86/x64, 2008 x86/x64) and WinCE 5.0/CE6.0, Linux 2.4, 2.6 x86/x64 |
| Physical Characteristics | |
| Housing SECC sheet metal (mm), IP30 protection | |
| Weight | UPort 1200:Product only: 180 g (0.40 lb)Packaged: 660 g (1.45 lb)UPort 1400:Product only: 720 g (1.59 lb)Packaged: 1345 g (2.96 lb)UPort 1600-8:Product only: 835 g (1.84 lb)Packaged: 1435 g (3.16 lb)UPort 1600-16:Product only: 2475 g (5.45 lb)Packaged: 3485 g (7.68 lb) |
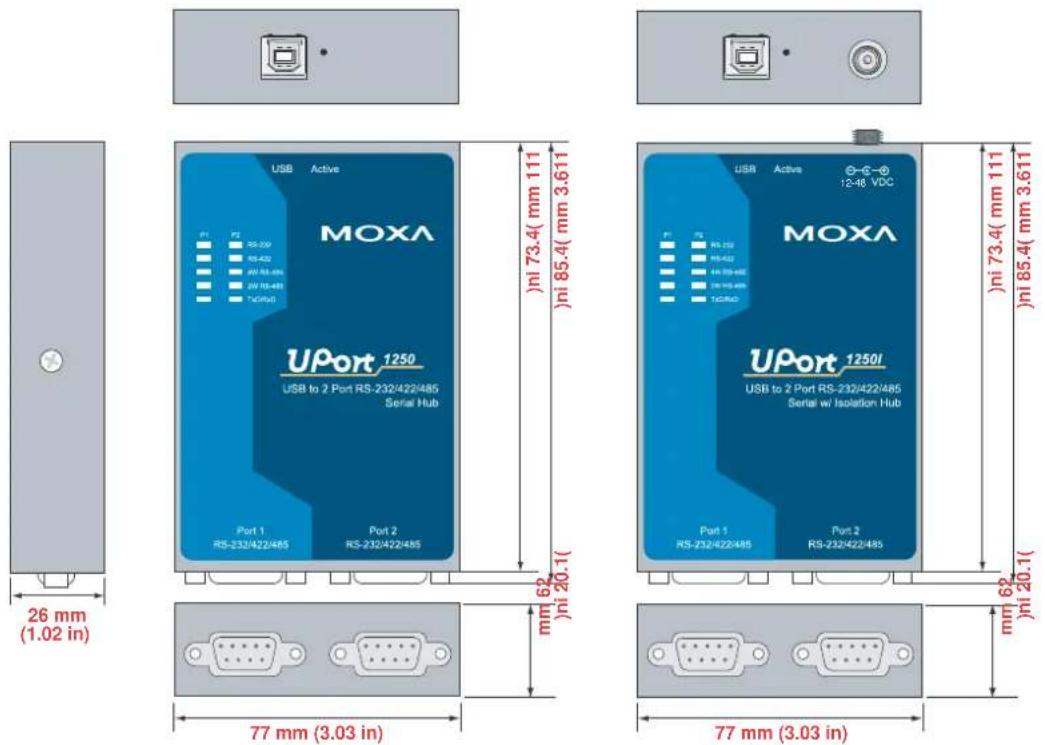
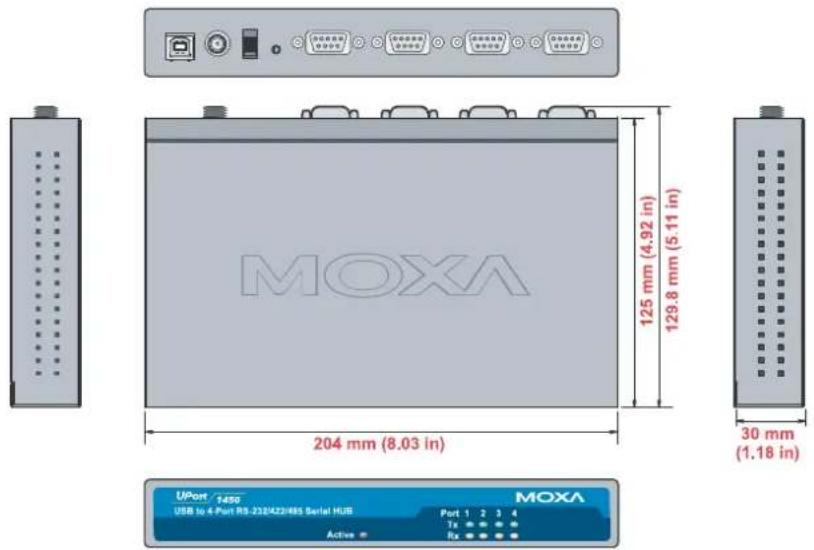
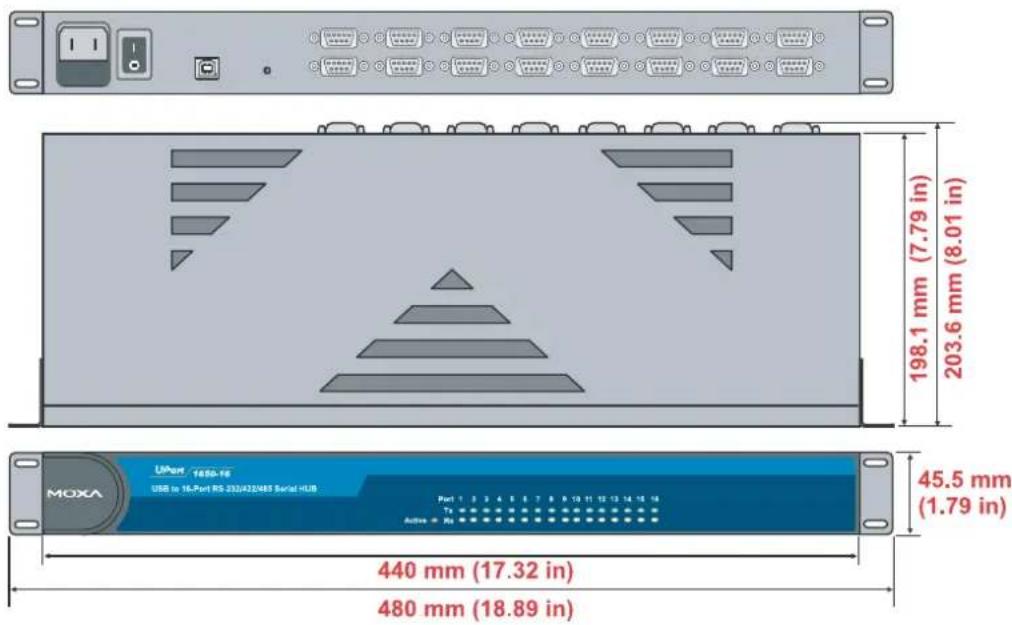
| Dimensions UPort 1200: 77 x | 26 x 111 mm (3.03 x 1.02 x 4.37 in)UPort 1400: 204 x 30 x 125 mm (8.03 x 1.18 x 4.92 in)UPort 1600-8: 204 x 44 x 125 mm (8.03 x 1.73 x 4.92 in)UPort 1600-16: 440 x 45.5 x 198.1 mm (17.32 x 1.79 x 7.80 in) |
| Environmental Limits | |
| Operating Temperature 0 to 5 | 5°C (32 to 131°F) |
| Operating Humidity 5 to 95% | RH |
| Storage Temperature -20 to 7 | 5°C (-4 to 167°F) |
| Regulatory Approvals EN550 | 22 Class A, EN55024, EN61000-3-2, EN61000-3-3,EN61000-4-2, EN61000-4-3, EN61000-4-4, EN61000-4-5,EN61000-4-6, EN61000-4-8, EN61000-4-11 FCC Part 15 Class A,UL, CUL, TÜV |
| Power Requirements | |
| Power Consumption • Bus power:UPortTM 1250: 360 mA @ 5 VDCUPortTM 1410: 180 mA @ 5 VDC• 12 to 48 VDC external power:UPortTM 1250I: 200 mA @ 12 VDCUPortTM 1410: 180 mA @ 12 VDCUPortTM 1450: 260 mA @ 12 VDCUPortTM 1450I: 360 mA @ 12 VDCUPortTM 1610-8: 230 mA @ 12 VDCUPortTM 1650-8: 340 mA @ 12 VDCUPortTM 1610-16: 130 mA @ 100 VACUPortTM 1650-16: 150 mA @ 100 VAC | |
| Warranty | |
| Warranty Period 5 years | |
| Details | See www.moxa.com/warranty |
Panel Layout
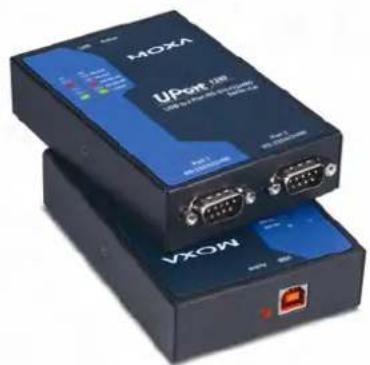
UPort 1250 UPort 1250I
natural_image
Two black USB devices labeled HOXA and VXOW, each with a port and indicator lights (no visible text or symbols on the devices themselves)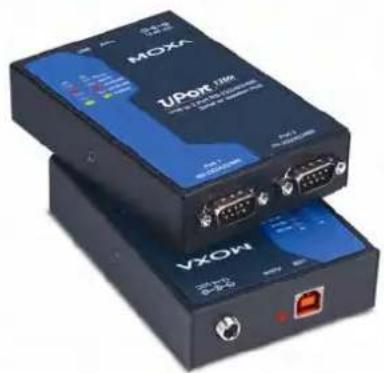
natural_image
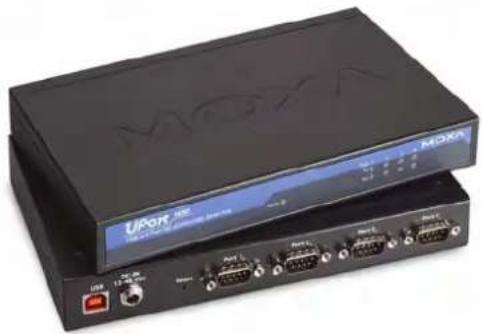
Two black electronic devices labeled MOXA and VXOM, each with visible ports and connectors (no readable text beyond branding)UPort 1410/1450/1450I UPort 1610-8/1650-8
natural_image
Exterior view of a black MiOXA wireless device with ports and an external screen (no visible text or symbols on the device body)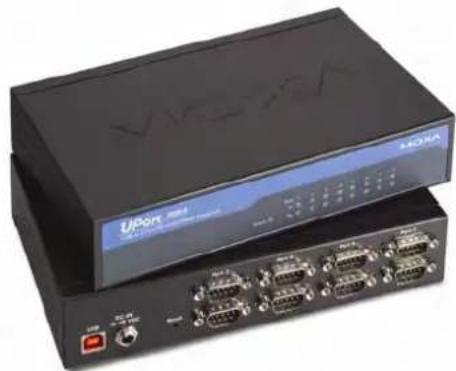
natural_image
Exterior view of a black server rack with multiple Ethernet ports and a blue LCD screen (no visible text or symbols on the device body)UPort 1610-16/1650-16
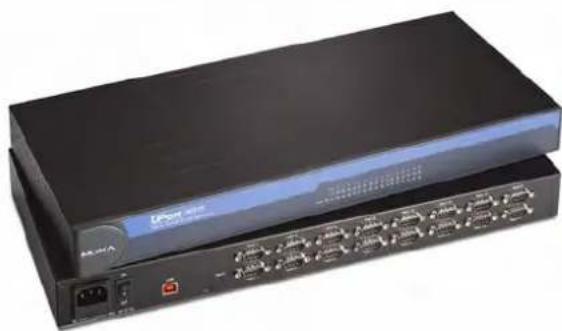
natural_image
Exterior view of a black network equipment unit with ports and connectors (no visible text or symbols)Dimensions
UPort 1250 UPort 1250I
UPort 1410/1450/1450I
UPort 1610-8/1650-8
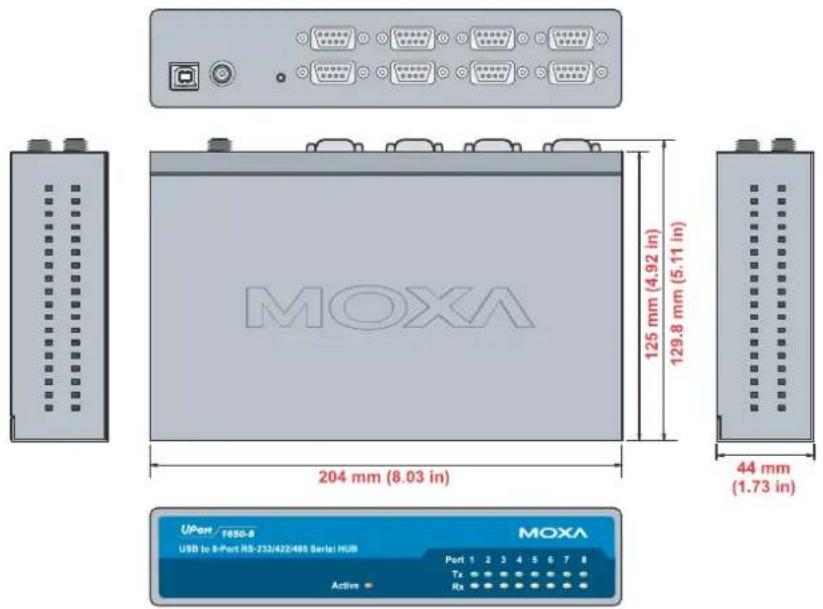
text_image
MOXA 125 mm (4.92 in) 129.8 mm (5.11 in) 204 mm (8.03 in) 44 mm (1.73 in) UPort / 1650-8 USB to B-Port RS-232/422/465 Serial HUB MOXA Port 1 2 3 4 5 6 7 8 Tx RxUPort 1610-16/1650-16
text_image
198.1 mm (7.79 in) 203.6 mm (8.01 in) 45.5 mm (1.79 in) 440 mm (17.32 in) 480 mm (18.89 in)In this chapter, we use Windows XP to illustrate how to install the UPort 1200/1400/1600
USB-to-serial converters. The procedures for Windows 2000/2003 and Vista are essentially the same.
We recommend installing the UPort driver first, before connecting the UPort to your computer's USB port.
The following topics are covered in this chapter:
□ UPort's USB Usage Limitation
□ Installing the Windows Driver
▶ Hardware Description
Connecting the Hardware
➢ Installing the Driver for the Converter
➢ Installing the Driver for the Ports
- Configuring the Ports
▶ Uninstalling the UPort
▶ Uninstalling the Driver
☐ Installing the Windows CE Driver
➢ Installation with an installation package for Win CE 6.0
➢ Installation with an installation package for Win CE 5.0
➢ Removing the Moxa Win CE 5.0/CE6.0 Driver
➢ Installation with a CAB File
➢ Removing the Moxa Win CE 5.0/CE6.0 Driver
□ Installing the Linux Driver
Linux Kernel 2.6.x
Driver Files
➢ Module Driver Configuration
➢ Setting the Serial Parameters
Troubleshooting
UPort's USB Usage Limitation
- A maximum of 4 UPort converters can be connected to one PC host. Connecting more than 4 UPort converters will strain system resources and potentially destabilize the computer.
- We recommend connecting the UPort directly to your PC's USB port.
- Although your UPort supports USB 1.1, we recommend using a USB 2.0 host controller or hub for the best and most stable performance.
Installing the Windows Driver
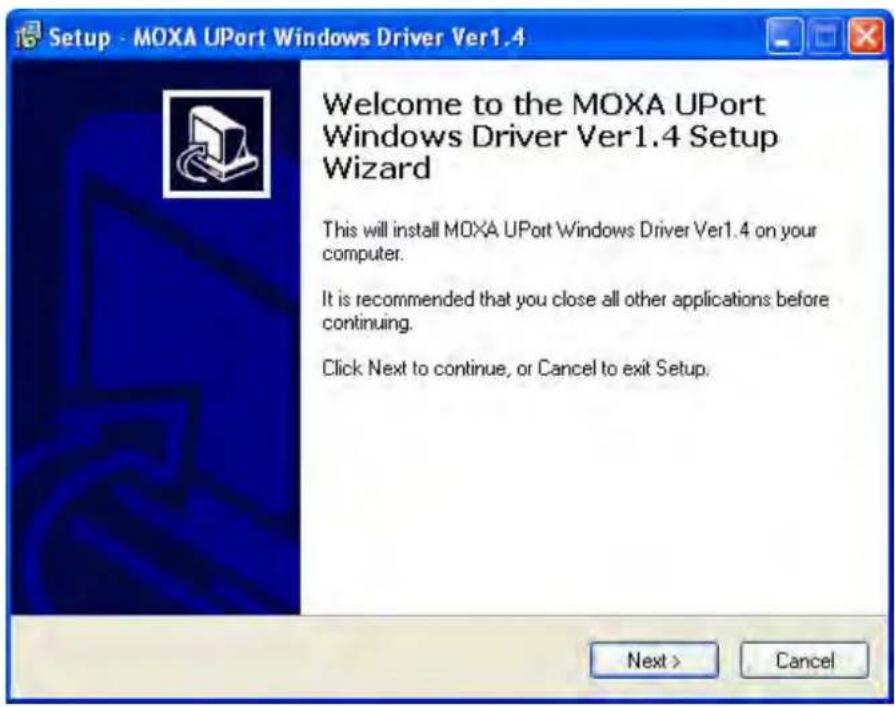
- Run the Setup Wizard located on the UPort 1200/1400/1600 Series Document and Software CD-ROM. Click Next to start installing the driver.
text_image
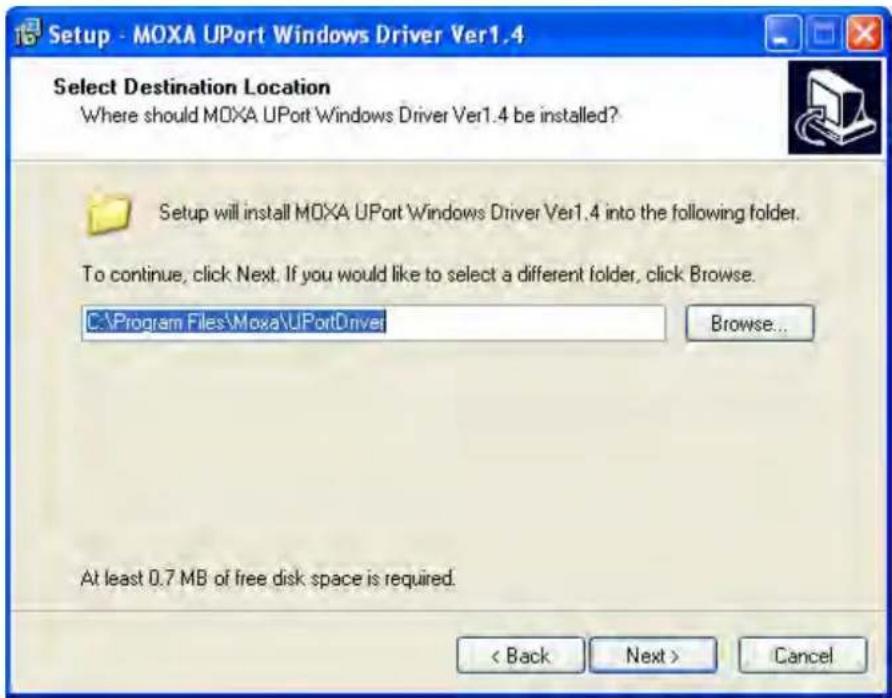
Setup - MOXA UPort Windows Driver Ver1.4 Welcome to the MOXA UPort Windows Driver Ver1.4 Setup Wizard This will install MOXA UPort Windows Driver Ver1.4 on your computer. It is recommended that you close all other applications before continuing. Click Next to continue, or Cancel to exit Setup. Next > Cancel- Click Next to install the driver in the indicated folder.
text_image
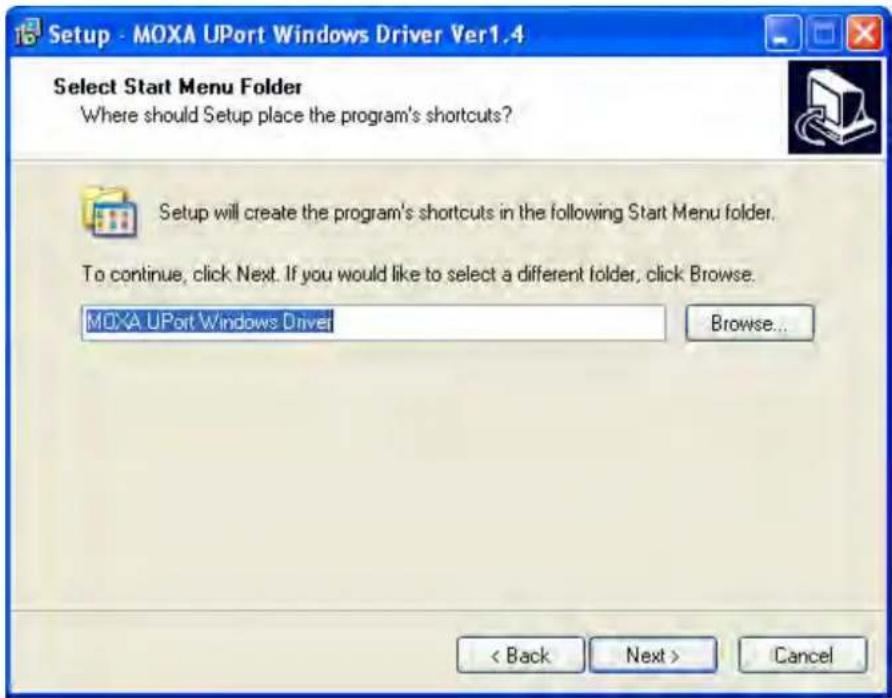
Setup - MOXA UPort Windows Driver Ver1.4 Select Destination Location Where should MOXA UPort Windows Driver Ver1.4 be installed? Setup will install MOXA UPort Windows Driver Ver1.4 into the following folder. To continue, click Next. If you would like to select a different folder, click Browse. C:\Program Files\Moxa\UPortDriver Browse... At least 0.7 MB of free disk space is required. < Back Next > Cancel- Click Next to create the program's shortcuts in the indicated folder.
text_image
Setup - MOXA UPort Windows Driver Ver1.4 Select Start Menu Folder Where should Setup place the program's shortcuts? Setup will create the program's shortcuts in the following Start Menu folder. To continue, click Next. If you would like to select a different folder, click Browse. MOXA UPort Windows Driver Browse... < Back Next > Cancel- Click Install to proceed with installation.
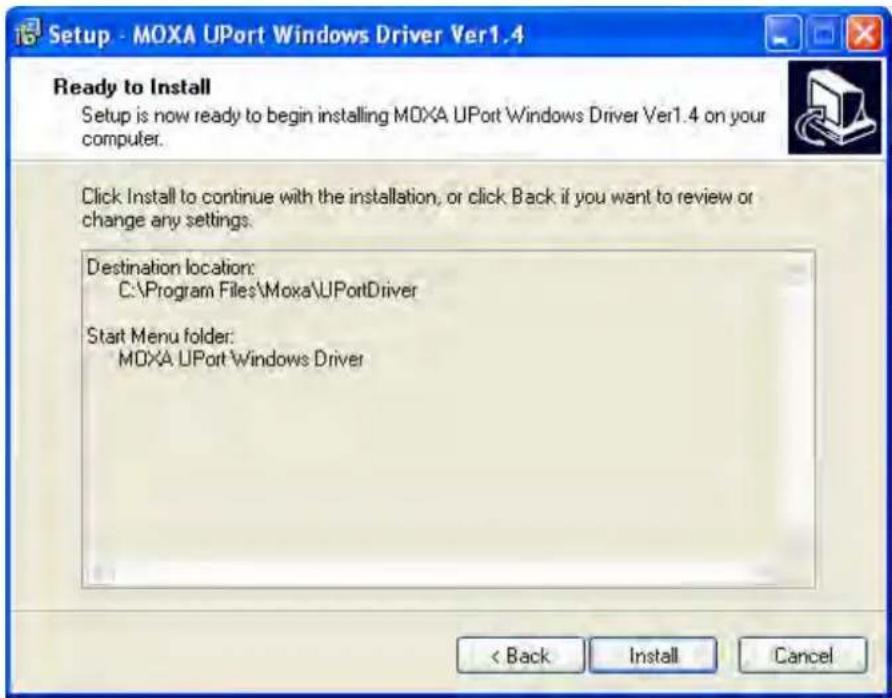
text_image
Setup - MOXA UPort Windows Driver Ver1.4 Ready to Install Setup is now ready to begin installing MOXA UPort Windows Driver Ver1.4 on your computer. Click Install to continue with the installation, or click Back if you want to review or change any settings. Destination location: C:\Program Files\Moxa\UPortDriver Start Menu folder: MOXA UPort Windows Driver < Back Install Cancel- The next window that opens cautions you that although this software has not passed Windows logo testing, the driver has already been tested and shown that it can support the Windows operating system. Click Continue Anyway to proceed.
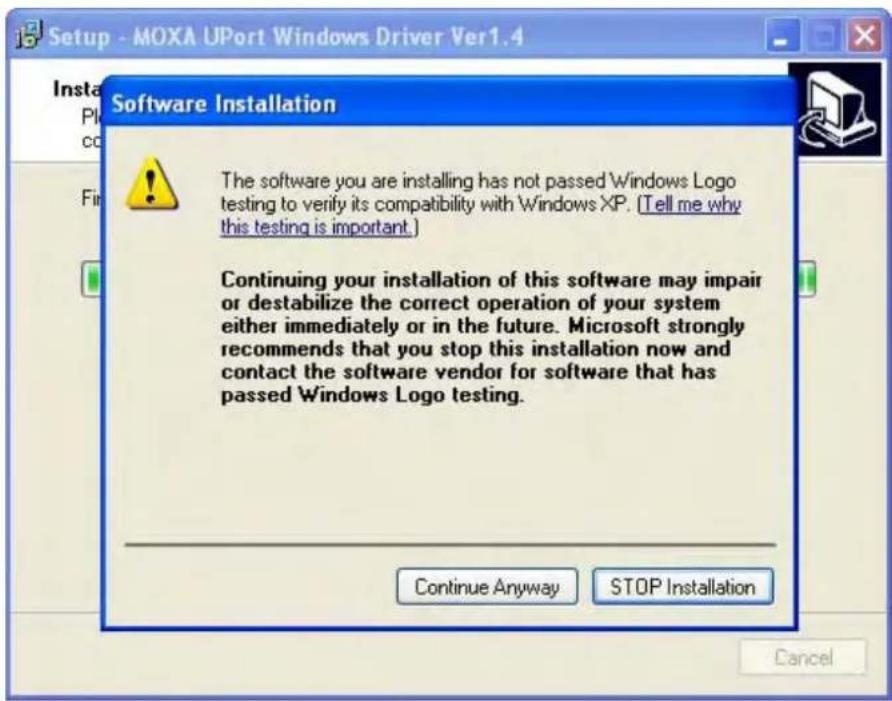
text_image
Setup - MOXA UPort Windows Driver Ver1.4 Software Installation The software you are installing has not passed Windows Logo testing to verify its compatibility with Windows XP. [Tell me why this testing is important] Continuing your installation of this software may impair or destabilize the correct operation of your system either immediately or in the future. Microsoft strongly recommends that you stop this installation now and contact the software vendor for software that has passed Windows Logo testing. Continue Anyway STOP Installation Cancel- Click Finish to complete the driver installation.
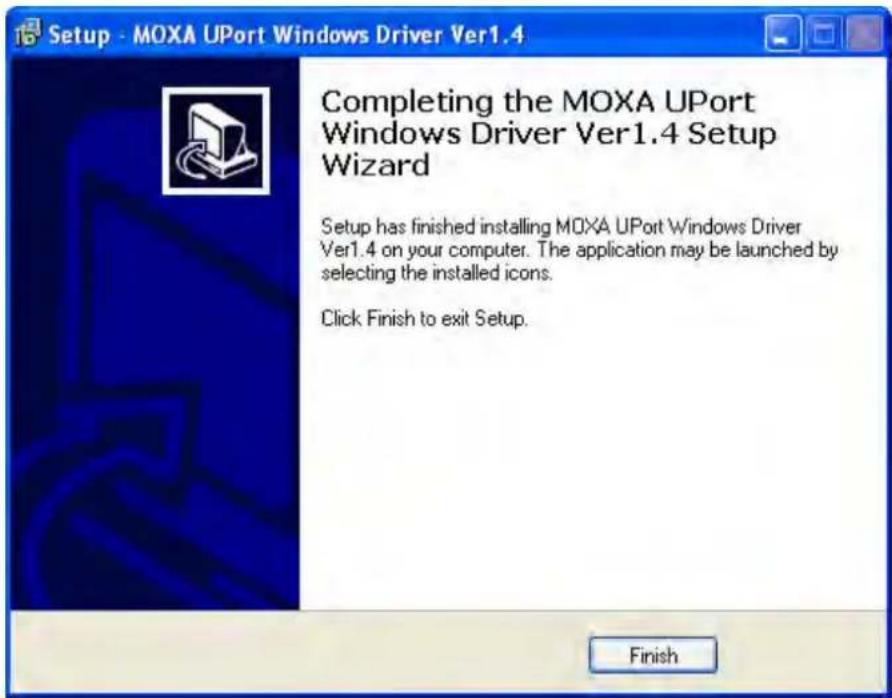
text_image
Setup - MOXA UPort Windows Driver Ver1.4 Completing the MOXA UPort Windows Driver Ver1.4 Setup Wizard Setup has finished installing MOXA UPort Windows Driver Ver1.4 on your computer. The application may be launched by selecting the installed icons. Click Finish to exit Setup. FinishHardware Description
We recommend installing the driver before connecting the UPort to your PC. Some UPort models require an external power adaptor or cord, and other models support both external and bus power.
| UPort 1 | 250 UPort 1250 | I UPort 1400 | UPort 1600-8 | UPort 1600-16 | |
| Bus Power | √ | --- | √ | --- | --- |
| External Power (adaptor) | --- √ √ | √ | --- | ||
| External Power (cord) | --- | --- | --- | --- |
√
If you want to use bus power with the UPort 1410/1450, set the DIP switch to bus when you connect the USB cable between the host PC and the UPort 1410/1450. The UPort 1450I requires external power.
Using an External Power Source
The UPort 1250I, UPort 1450/1450I, and UPort 1600-8 come with a power adaptor for connecting to an external AC power source. UPort 1410 users can purchase a power adaptor separately. The UPort 1600-16 comes with a power cord as a standard accessory.
If the power is properly supplied, the Active LED will glow a solid green.
Buzzer (UPort 1400 and 1600 only)
The UPort 1400 and UPort 1600 will sound the built-in buzzer twice when the power is turned on. You will also hear the buzzer when using the Locate function from the driver property page of the UPort utility.
Connecting the Hardware
Please install the driver before connecting the UPort series to your PC's USB port. See the previous section for details.
Connecting to a Serial Device
Use the proper serial cables to connect your serial devices to the UPort's serial ports, which support the RS-232 and/or RS-422/485 interface. The UPort's serial ports use DB9 male connector with standard pin assignment. Please see Chapter 3 for detail pin assignment.
LED Indicators
UPort 1250/1250I
There are five LEDs per port for indicating the status of the ports. The LEDs are listed under P1 and P2.
| LED Name LED Color LED | Function | |
| Active | Red Power is on | |
| Off Power is off, or power error condition exists | ||
| RS-232 Red Port is configured for RS-232 operation | ||
| RS-422 Red Port is configured for RS-422 operation | ||
| 4W RS-485 Red Port is configured for 4-wire RS-485 operation | ||
| 2W RS-485 Red Port is configured for 2-wire RS-485 operation | ||
| TxD/RxD | Orange Port is receiving data from attached device | |
| Green Port is transmitting data to attached device | ||
| Off No data is being transmitted or received | ||
UPort 1400/1600
There are five LEDs per port for indicating the status of the ports. The LEDs are listed under P1, P2, P3, etc.
| LED Name | LED Color | LED | Function |
| Active | Green Power is on | ||
| Off Power is off, or power error condition exists | |||
| Tx/Rx | Orange Port is receiving data from attached device | ||
| Green Port is transmitting data to attached device | |||
| Off No data is being transmitted or received | |||
Adjustable Pull High/low Resistors for the RS-485 Port
The UPort uses DIP switches to set the pull high/low resistor values for each serial port.
To set the pull high/low resistors to 150 KΩ, make sure both of the assigned DIP switches are in the OFF position.
To set the pull high/low resistors to 1 KΩ, make sure both of the assigned DIP switches are in the ON position. This is the default setting.
| SW | 1 | 2 |
| Pull High Pull Low | ||
| ON | 1 KΩ | 1 KΩ |
| OFF | 150 KΩ | 150 KΩ |
UPort 1200 DIP Switches
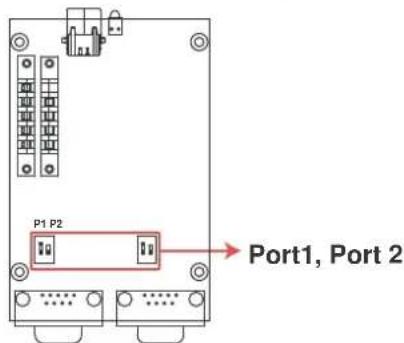
text_image
P1 P2 Port1, Port 2UPort 1400 DIP Switches
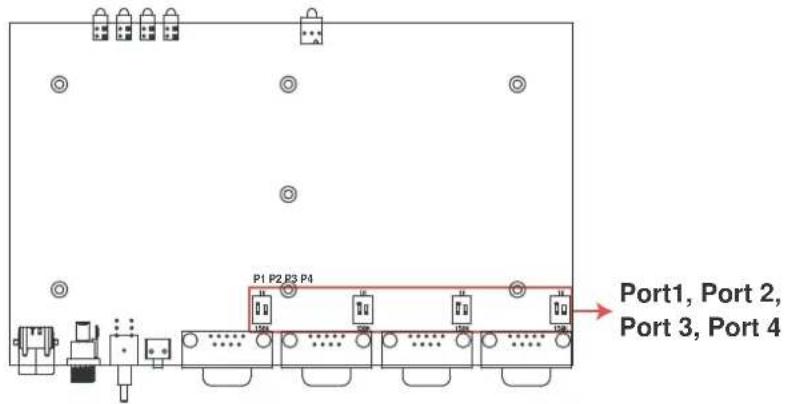
text_image
P1 P2 P3 P4 Port1, Port 2, Port 3, Port 4UPort 1600-8 DIP Switches
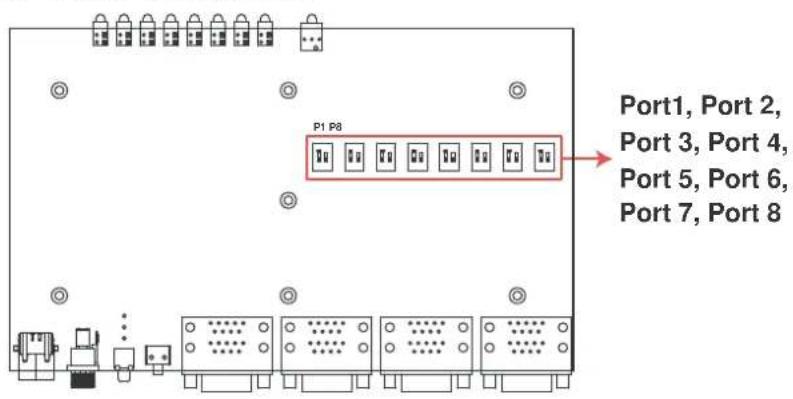
text_image
P1 P8 Port1, Port 2, Port 3, Port 4, Port 5, Port 6, Port 7, Port 8UPort 1600-16 DIP Switches
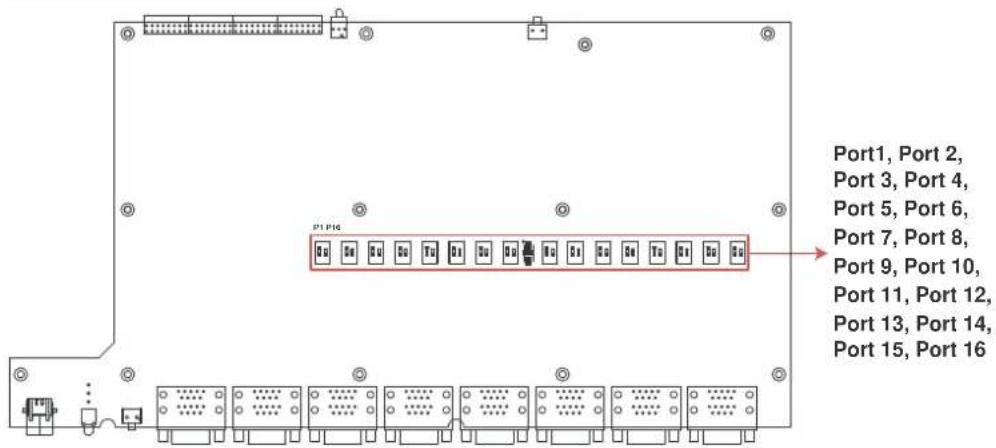
text_image
Port1, Port 2, Port 3, Port 4, Port 5, Port 6, Port 7, Port 8, Port 9, Port 10, Port 11, Port 12, Port 13, Port 14, Port 15, Port 16Installing the Driver for the Converter
NOTE
The operating system will automatically detect the UPort when you plug it into one of your computer's USB ports. If you have installed the latest UPort driver, the UPort and the UPort's serial port will be installed automatically. If the UPort and the serial ports are not installed automatically, follow the instructions below.
Case 1: The UPort Driver is Certified
If the UPort driver that you installed has been certified by Microsoft, the UPort and the UPort's serial ports will be installed automatically when you plug the UPort into your computer's USB port.
Case 2: The UPort Driver is NOT Certified
If the UPort driver that you installed has not been certified by Microsoft, then plugging the driver into your computer's USB port will activate the UPort installation program. The first part of the installation procedure installs the software for the UPort itself (the second part of the procedure installs the serial ports).
- After connecting the USB cable from the UPort to the host PC, Windows XP will automatically detect the new UPort, and the Found New Hardware balloon will open in the bottom right corner of the Windows desktop.
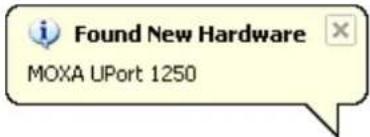
text_image
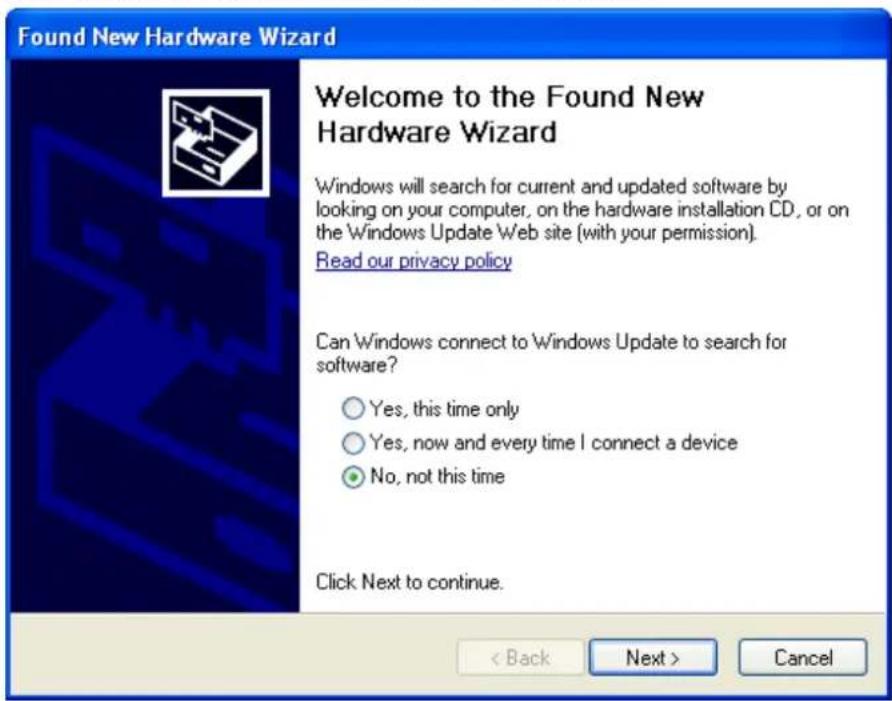
Found New Hardware MOXA UPort 1250- Select No, not at this time. Click Next to start the installation.
text_image
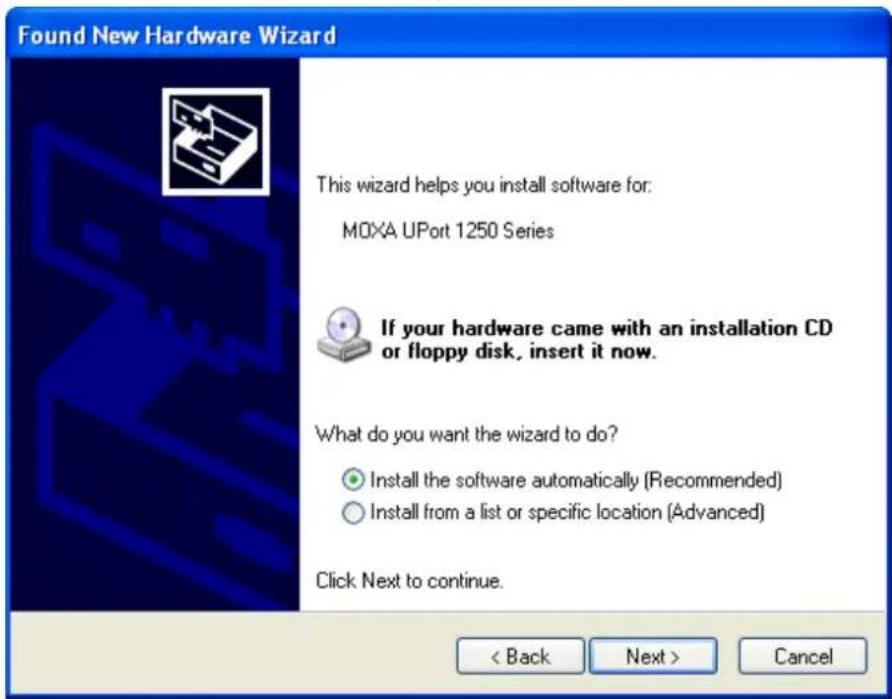
Found New Hardware Wizard Welcome to the Found New Hardware Wizard Windows will search for current and updated software by looking on your computer, on the hardware installation CD, or on the Windows Update Web site (with your permission). Read our privacy policy Can Windows connect to Windows Update to search for software? ○ Yes, this time only ○ Yes, now and every time I connect a device ● No, not this time Click Next to continue. < Back Next > Cancel- Select Install the software automatically (Recommended), and then click Next to continue.
text_image
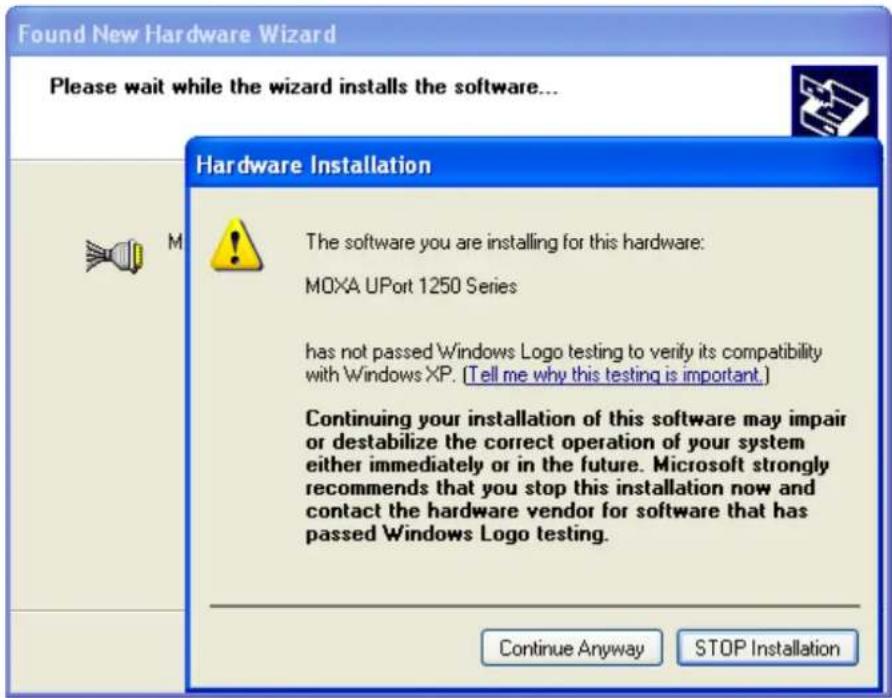
Found New Hardware Wizard This wizard helps you install software for: MOXA UPort 1250 Series If your hardware came with an installation CD or floppy disk, insert it now. What do you want the wizard to do? • Install the software automatically (Recommended) • Install from a list or specific location (Advanced) Click Next to continue. < Back Next > Cancel- Wait while the installation wizard searches for the correct drivers. The next window that opens cautions you that although this software has not passed Windows logo testing, this driver has already been tested and shown that it can support the Windows operating system. Click Continue Anyway to proceed.
text_image
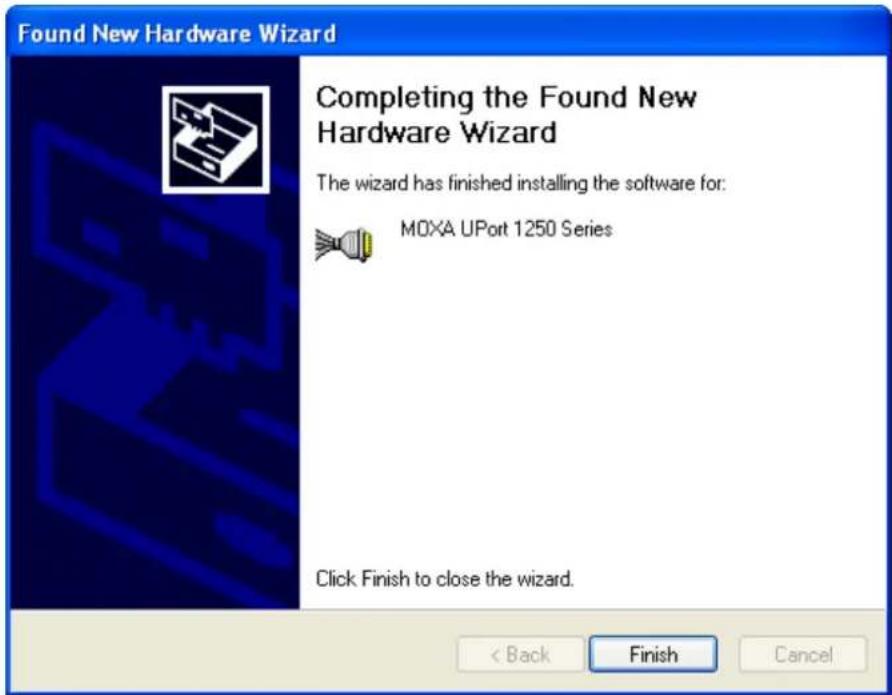
Found New Hardware Wizard Please wait while the wizard installs the software... Hardware Installation The software you are installing for this hardware: MOXA UPort 1250 Series has not passed Windows Logo testing to verify its compatibility with Windows XP. (Tell me why this testing is important.) Continuing your installation of this software may impair or destabilize the correct operation of your system either immediately or in the future. Microsoft strongly recommends that you stop this installation now and contact the hardware vendor for software that has passed Windows Logo testing. Continue Anyway STOP Installation- The next window shows the model name of the board, and indicates that Windows has completed the driver installation. Click Finish to proceed with the rest of the installation procedure.
text_image
Found New Hardware Wizard Completing the Found New Hardware Wizard The wizard has finished installing the software for: MOXA UPort 1250 Series Click Finish to close the wizard. < Back Finish Cancel- Open Windows Device Manager to check that the installation was successful. The UPort USB-to-serial converter should appear under Multi-port serial adapters.
Installing the Driver for the Ports
- The Found New Hardware Wizard window will open to help you install the driver. This window will offer to connect to the Windows update site to search for a driver. Select No, not at this time and then click Next to continue.
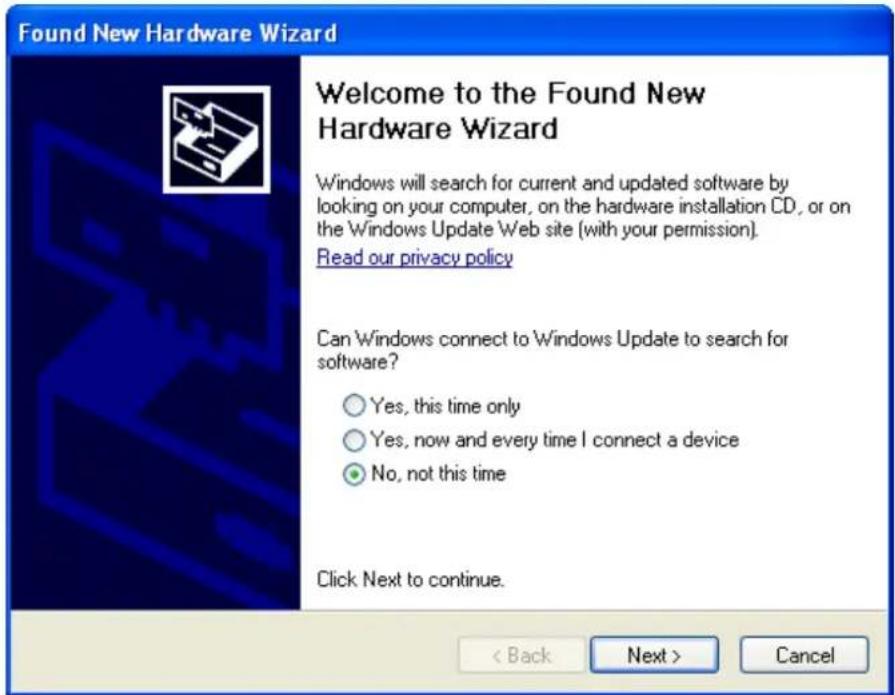
text_image
Found New Hardware Wizard Welcome to the Found New Hardware Wizard Windows will search for current and updated software by looking on your computer, on the hardware installation CD, or on the Windows Update Web site (with your permission). Read our privacy policy Can Windows connect to Windows Update to search for software? ○ Yes, this time only ○ Yes, now and every time I connect a device ● No, not this time Click Next to continue. < Back Next > Cancel- Select Install the software automatically (Recommended), and then click Next to continue.
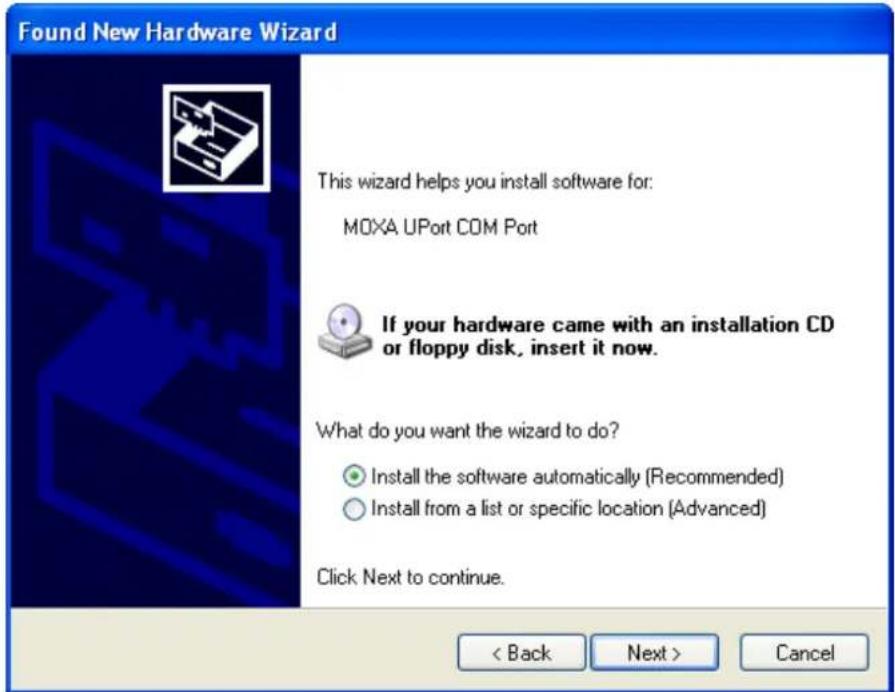
text_image
Found New Hardware Wizard This wizard helps you install software for: MOXA UPort COM Port If your hardware came with an installation CD or floppy disk, insert it now. What do you want the wizard to do? • Install the software automatically (Recommended) • Install from a list or specific location (Advanced) Click Next to continue. < Back Next > Cancel- Wait while the installation wizard searches for the correct drivers. The next window that opens cautions you that although this software has not passed Windows logo testing, this driver has already been tested and shown that it can support the Windows operating system. Click Continue Anyway to proceed.
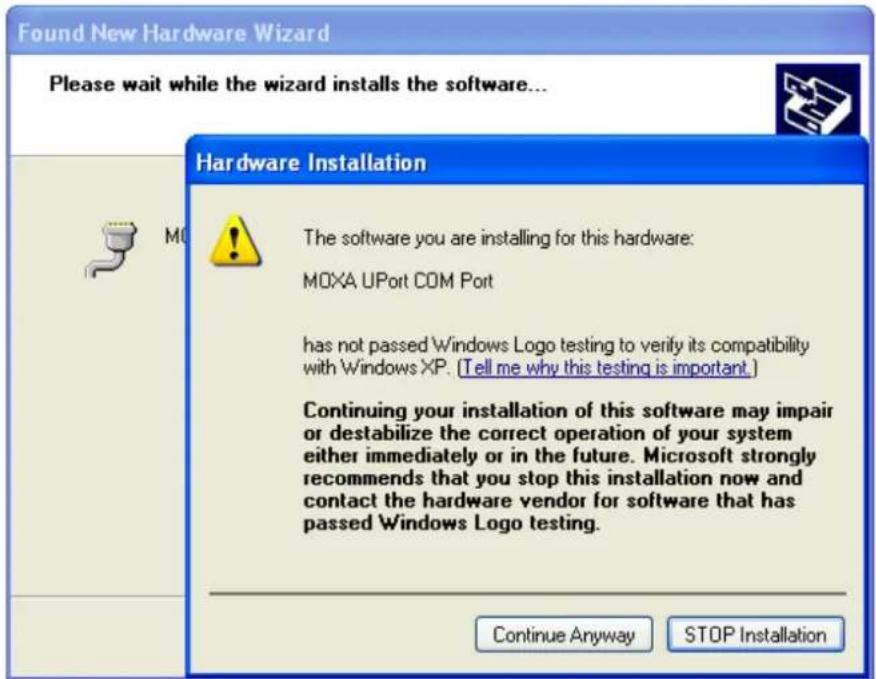
text_image
Found New Hardware Wizard Please wait while the wizard installs the software... Hardware Installation The software you are installing for this hardware: MOXA UPort COM Port has not passed Windows Logo testing to verify its compatibility with Windows XP. (Tell me why this testing is important.) Continuing your installation of this software may impair or destabilize the correct operation of your system either immediately or in the future. Microsoft strongly recommends that you stop this installation now and contact the hardware vendor for software that has passed Windows Logo testing. Continue Anyway STOP Installation- Wait while the driver software is installed.
- After all files have been copied to the system, the Completing the Found New Hardware Wizard window will open to indicate that it has finished installing driver. Click Finish to proceed with the rest of the installation.
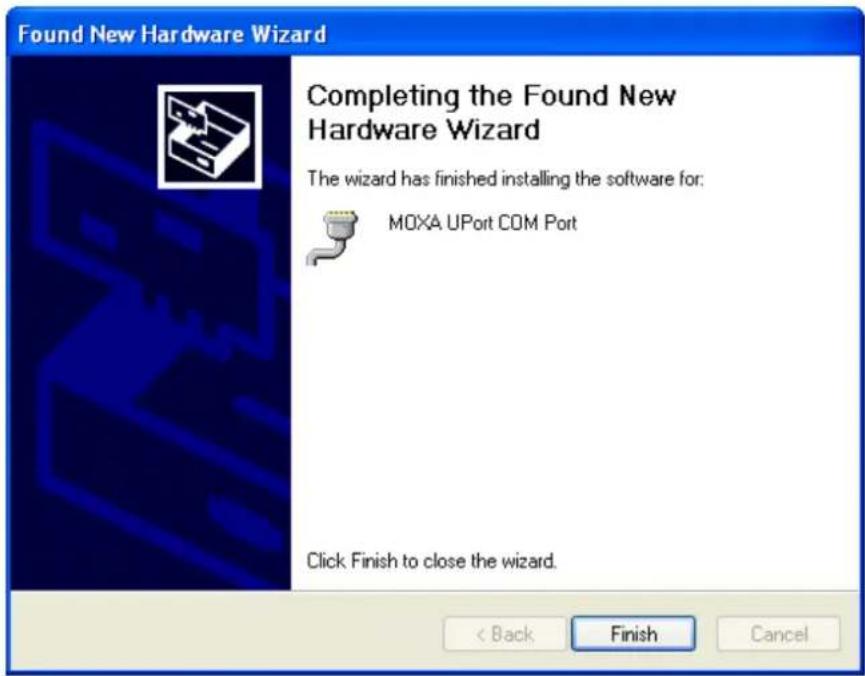
text_image
Found New Hardware Wizard Completing the Found New Hardware Wizard The wizard has finished installing the software for: MOXA UPort COM Port Click Finish to close the wizard. < Back Finish Cancel- Repeat Step 1 through Step 5 for each of the remaining ports (once for the UPort 1200 series, 3 times for the UPort 1400 series, 7 times for the UPort 1600-8 series, 15 times for the UPort 1600-16 series).
- The Found New Hardware balloon will reappear to inform you that the hardware was installed successfully.

text_image
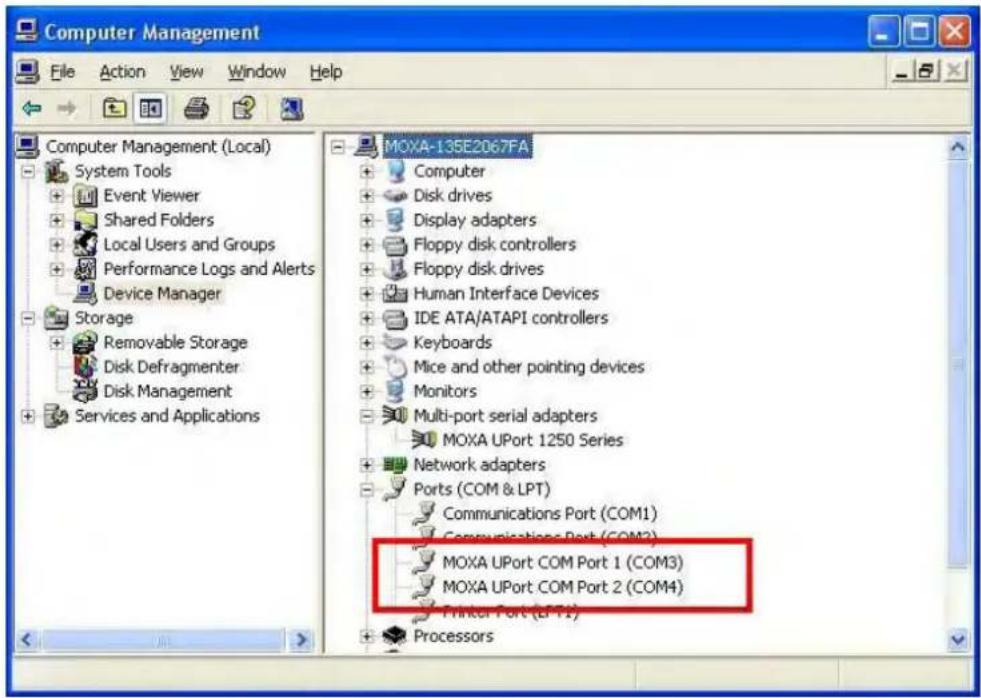
Found New Hardware Your new hardware is installed and ready to use.- Open Windows Device Manager to check that the installation was successful. The UPort USB-to-serial converter should appear under Ports (COM&LPT).
text_image
Computer Management File Action View Window Help Computer Management (Local) System Tools Event Viewer Shared Folders Local Users and Groups Performance Logs and Alerts Device Manager Storage Removable Storage Disk Defragmenter Disk Management Services and Applications MOXA-135E2067FA Computer Disk drives Display adapters Floppy disk controllers Floppy disk drives Human Interface Devices IDE ATA/ATAPI controllers Keyboards Mice and other pointing devices Monitors Multi-port serial adapters MOXA UPort 1250 Series Network adapters Ports (COM & LPT) Communications Port (COM1) Communications Port (COM2) MOXA UPort COM Port 1 (COM3) MOXA UPort COM Port 2 (COM4) Printer Port (of PA) ProcessorsConfiguring the Ports
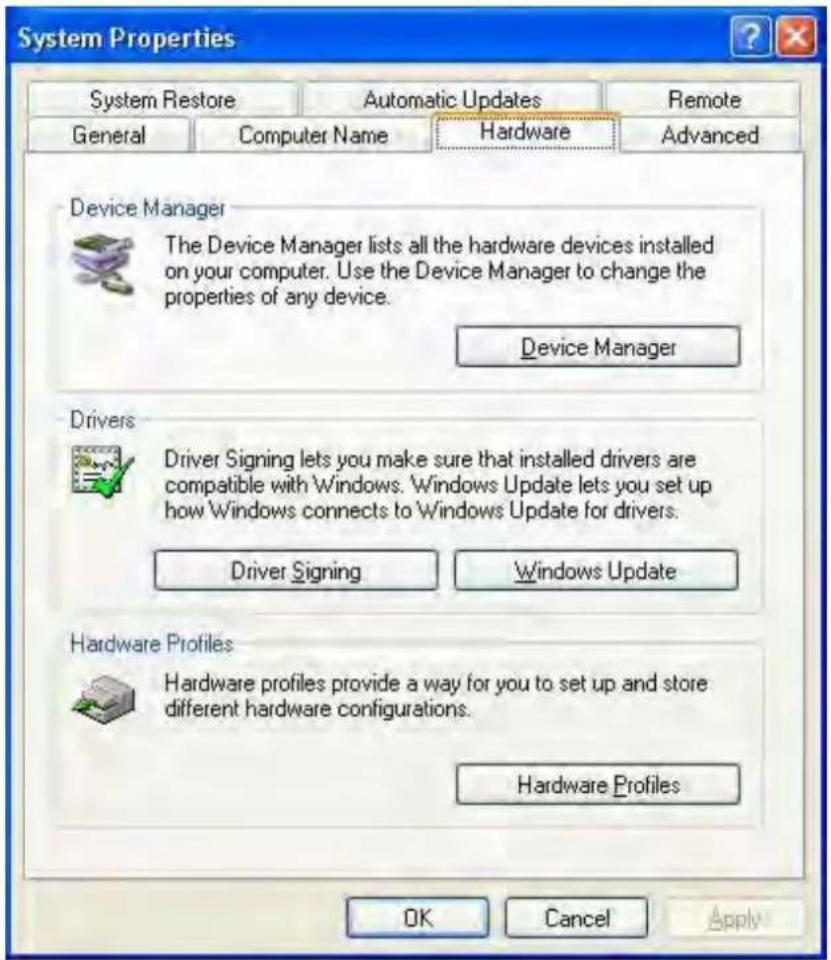
After the driver has been installed, use Windows' Device Manager to configure the UPort serial ports.
- With the System Properties window open, click on the Hardware tab, and then click on Device Manager.
text_image
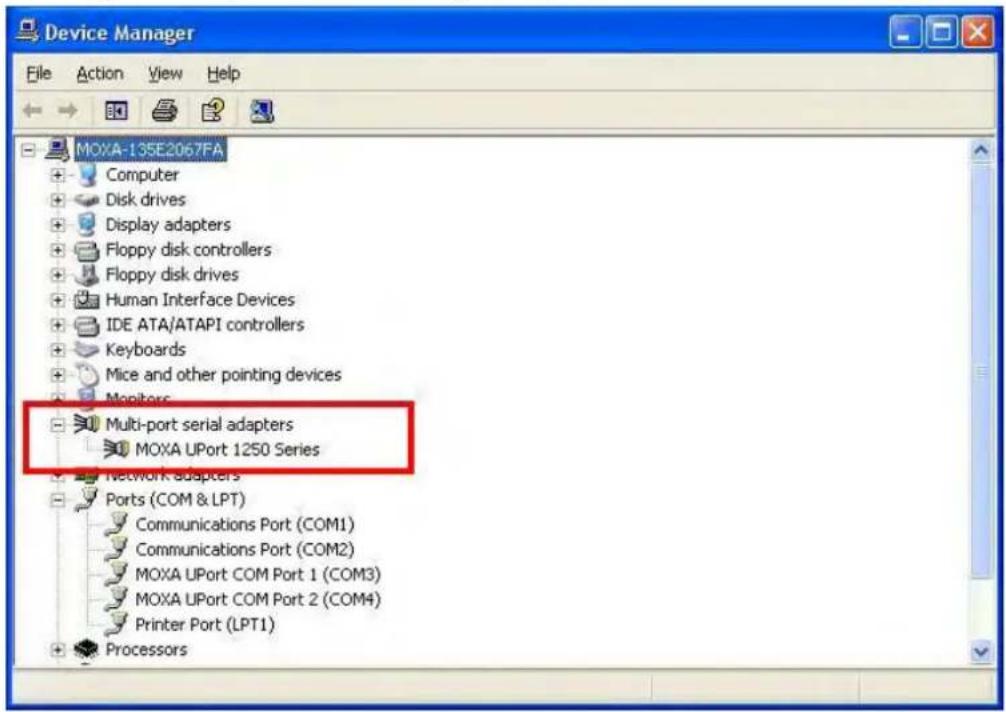
System Properties System Restore Automatic Updates Remote General Computer Name Hardware Advanced Device Manager The Device Manager lists all the hardware devices installed on your computer. Use the Device Manager to change the properties of any device. Device Manager Drivers Driver Signing lets you make sure that installed drivers are compatible with Windows. Windows Update lets you set up how Windows connects to Windows Update for drivers. Driver Signing Windows Update Hardware Profiles Hardware profiles provide a way for you to set up and store different hardware configurations. Hardware Profiles OK Cancel Apply- Expand the Multi-port serial adapters tab, right click MOXA UPort 1250 Series, and then click Properties to open the UPort's configuration panel.
text_image
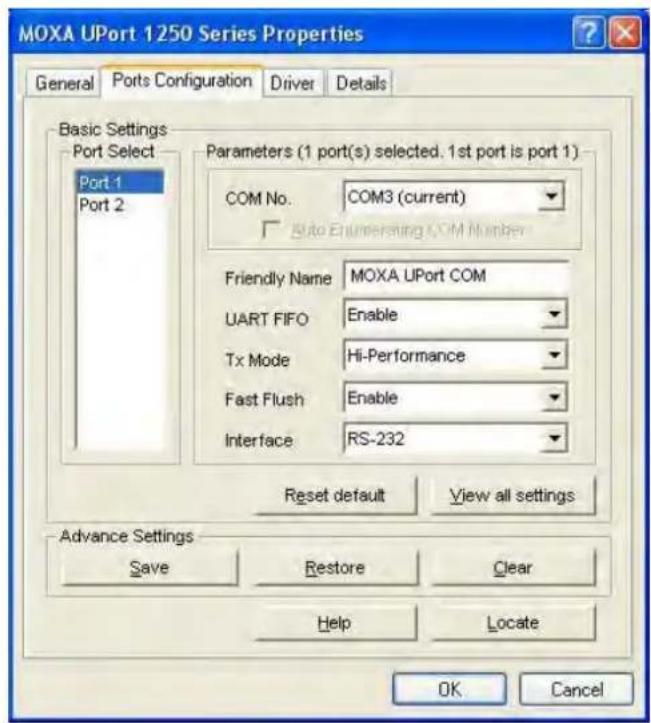
Device Manager File Action View Help MOXA-135E2067FA Computer Disk drives Display adapters Floppy disk controllers Floppy disk drives Human Interface Devices IDE ATA/ATAPI controllers Keyboards Mice and other pointing devices Monitors Multi-port serial adapters MOXA UPort 1250 Series Network adapters Ports (COM & LPT) Communications Port (COM1) Communications Port (COM2) MOXA UPort COM Port 1 (COM3) MOXA UPort COM Port 2 (COM4) Printer Port (LPT1) ProcessorsThe Ports Configuration page settings are described below.
text_image
MOXA UPort 1250 Series Properties General Ports Configuration Driver Details Basic Settings Port Select Port 1 Port 2 Parameters (1 port(s) selected. 1st port is port 1) COM No. COM3 (current) Auto Enumerating COM Number Friendly Name MOXA UPort COM UART FIFO Enable Tx Mode Hi-Performance Fast Flush Enable Interface RS-232 Reset default View all settings Advance Settings Save Restore Clear Help Locate OK CancelPort Settings
Auto Enumerating COM Number
If the “Auto Enumerating COM Number” checkbox is checked, COM numbers will be assigned automatically and in sequence to the ports. E.g., COM3 to Port 1, COM4 to Port 2, etc.
If you do not enable this check box, only the first COM Number will be changed to new COM number list in the drop-down list box. Enable this function if you want to configure several ports with sequential numbers.
Friendly Name
Setting Factory Default Necessity
1 to 20 characters
(E.g., UPort 1610-8)
Moxa UPort COM Optional
Use the “Friendly name” to allow easy identification of the serial devices that are connected to the UPort’s serial ports.
UART FIFO
Setting Factory Default Necessity
Enable/Disable
Enable
Required
The UPort's serial ports provide a 128-byte FIFO both in the Tx and Rx directions. Disable UART FIFO setting when your serial device does not have a FIFO to prevent data loss during communication. For a slow serial device, we recommend you disable FIFO to improve the latency. If you want to use XON/XOFF flow control, we recommend disabling UART FIFO.
Tx Mode
Setting Factory Default Necessity
Hi-Performance, Classical Hi-Performance Required
To improve the write performance, you can select Hi-Performance mode. Under classical mode, the driver will not notify the user's program that Tx is completed until all Tx data has been sent out from the UPort; this mode will cause lower throughput. If you want to ensure that all data is sent out before further processing, classical mode is recommended. Classical mode is the same as the COM Port behavior: The WriteFile() call will only finish when all queued data are sent out.
Fast Flush
| Setting Factory Default Necessity | ||
| Enable/Disable | Enable | Required |
- For some applications, the user's program will use the Win32 PurgeComm() function before it reads or writes data. With our design, after the program uses this PurgeComm() function, the UPort driver will keep querying the UPort's firmware several times to make sure that no data is queued in the UPort's firmware buffer, rather than just flushing the local buffer. This kind of design is used because of some special considerations. However, it might take more time (about several hundred milliseconds) than a native COM1, because it needs to work over Ethernet. This is why the native COM ports on the motherboard can work fast with this function call, but the UPort requires much more time.
- To begin with, make sure there are some PurgeComm() functions being used in your application program. In this kind of situation, you might find that your UPort exhibits a much poorer operation performance than when using the native COM1 port. Once you have enabled the Fast Flush function, you can check to see if there has been an improvement in performance.
- By default, the optional Fast Flush function is enabled, which allows the UPort driver to work faster when using the PurgeComm() function.
- Win32 function PurgeComm() with PURGE_TXCLEAR will clear all queued Tx data. But for some applications, it will call this function for each transaction and result in low throughput. To avoid this, you can enable this function. The driver will only clear the data queued in the local buffer; it will not send firmware through the USB port to clear the data queued in the firmware buffer.
Interface
UPort 1410, 1610-8, 1610-16
| Setting Factory Default Necessity | ||
| RS-232 | RS-232 | Required |
UPort 1250, 1250I, 1450, 1450I, 1650-8, 1650-16
| Setting Factory Default Necessity | ||
| RS-232, RS-422, 4-wire RS-485, 2-wire RS-485 | RS-232 | Required |
Reset default
If you click the Reset default button, all the settings will return to Factory default settings:
COM Number:
Tx Mode: Hi-Performance
UART FIFO: Enable
Fast Flush: Enable
Interface: RS-232
View All Settings
You can preview all ports settings with this function.
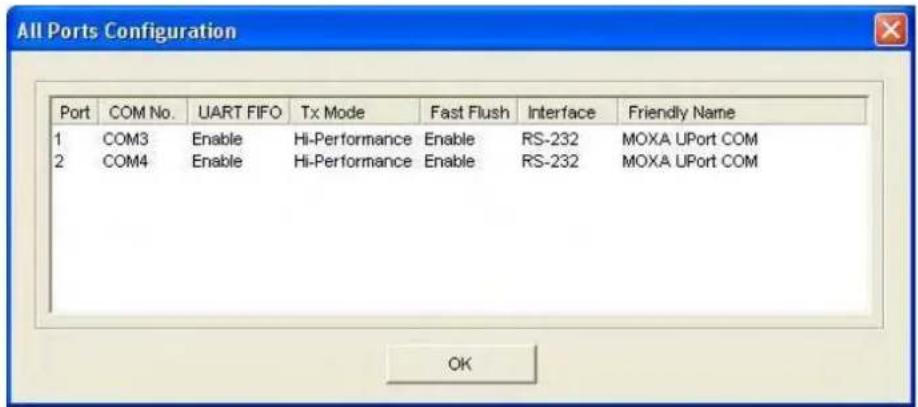
text_image
All Ports Configuration Port COM No. UART FIFO Tx Mode Fast Flush Interface Friendly Name 1 COM3 Enable Hi-Performance Enable RS-232 MOXA UPort COM 2 COM4 Enable Hi-Performance Enable RS-232 MOXA UPort COM OKAdvanced Settings
Serial transmission applications use names such as COM3 and COM4 to identify COM ports. Unfortunately, most USB-to-serial products are unable to use fixed COM names on the host PC. This means the names of the COM ports change when the USB-to-serial device is plugged into a different USB port, either on the same or a different PC, forcing the user to reconfigure the COM names manually from within the application. Moxa's UPort™ 1200/1400/1600 USB-to-serial converters have two advanced features that allow them to use fixed COM names when the user enables the COM port.
With Moxa's COM Preserver™ function or fixed-base COM mode, the COM names remain on the UPort™ device. Moreover, the COM Preserver™ function can even create the same COM port names on a different host PC. With this feature, you do not need to modify application programs, or rebuild the entire project every time you install a new operating system or upgrade the computer. Don't worry about moving the UPort™ from one USB hub to another, or even from one computer to another.
COM Preserver - Driver Setting Management
UPort provides one special function to help you manage the UPort settings. In the general case, you need write down all the settings including COM number to prevent them from being lost. In some applications, to clone multiple systems you also need to worry about how to clone the COM Port settings. Using the UPort COM Preserver function, you just need to save all the settings into UPort device directly—just like a USB Mass Storage device. You do not need to record it using additional paper or disk. If your host crashes, you can just install the driver into new host, plug the original UPort and click the Restore button to restore all settings back very quickly.
NOTE
If you want to use these settings in another PC, be sure the PC has a free COM port available. Otherwise, the new settings will copy over the settings of a COM port that is already in use.
Save
Save all settings to the UPort.
text_image
Information Configurations store successfully. OKRestore
Read all UPort settings as new settings. Click OK to activate.
text_image
Information Configurations restore successfully. OKClear
Clear the UPort settings stored in the UPort. This operation is similar to resetting all settings to their factory defaults.
text_image
Information Configurations clear successfully. OKThe following settings will be saved to the UPort if you select Save:
COM number, Friendly Name, Transmission Mode, FIFO settings, Fast Flush settings, and Interface.
Help
Clicking Help will open the online help for the UPort.
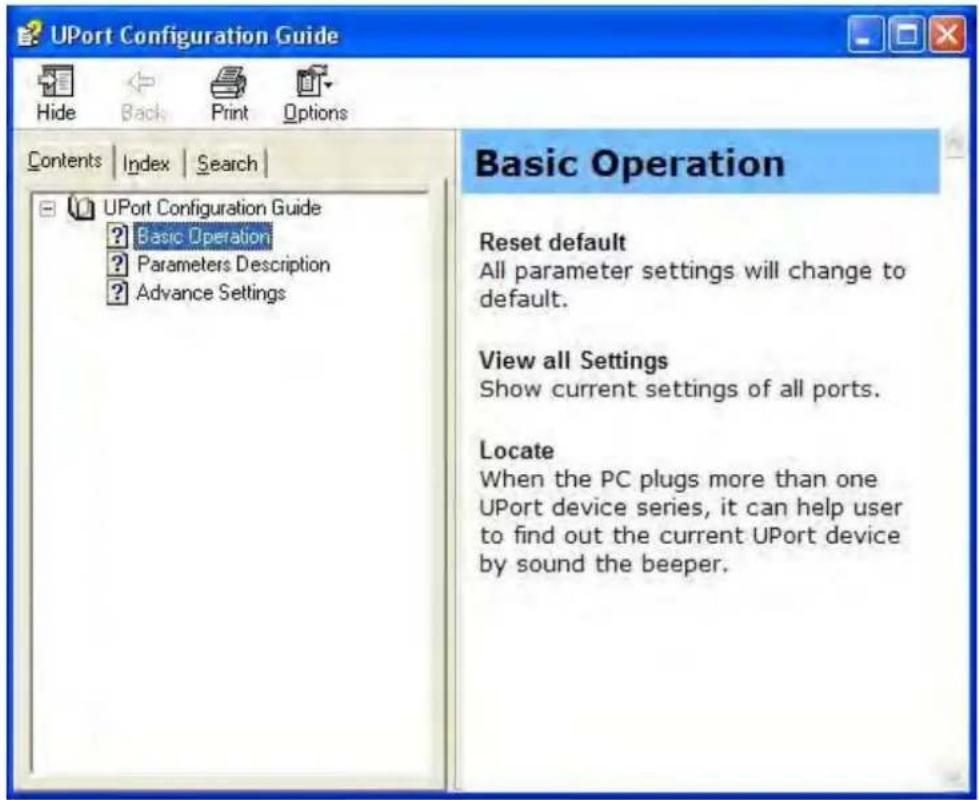
text_image
UPort Configuration Guide Hide Back Print Options Contents Index Search UPort Configuration Guide ? Basic Operation ? Parameters Description ? Advance Settings Basic Operation Reset default All parameter settings will change to default. View all Settings Show current settings of all ports. Locate When the PC plugs more than one UPort device series, it can help user to find out the current UPort device by sound the beeper.Locate
Use this function to identify the UPort's location, especially when two or more UPorts are installed in the same computer. This function will ask the UPort to flash the ready LED and turn on the Buzzer until you stop it.
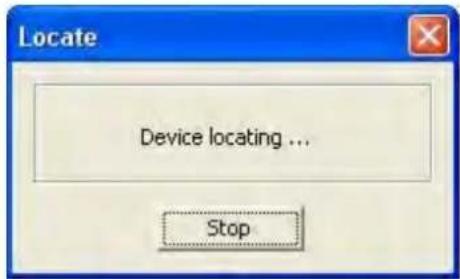
text_image
Locate Device locating ... StopFixed-base COM
Moxa's UPort 1200/1400/1600 Series Utility gives users a convenient tool for configuring and maintaining products from the UPort series. In this section, we introduce the “Fixed-base COM Mode” function that enables user to set COM names on the host PC. We use the UPort 1250 as an example.
Enable Fixed-base COM Mode
Moxa's UPort 1200/1400/1600 series provides a unique fixed-base COM function that allows users to set a specific initial COM port number. Regardless of which UPort is plugged into the host, the COM port numbers for the UPort's serial ports will be numbered sequentially starting with the initial COM port number. The default setting is disabling Fixed-base COM Mode. To use "Fixed-base COM Mode," be sure to check the "Enable Fixed-base COM Mode" check box.
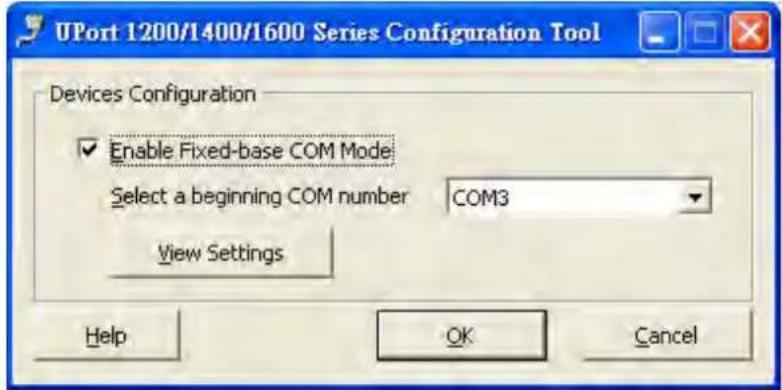
text_image
UPort 1200/1400/1600 Series Configuration Tool Devices Configuration Enable Fixed-base COM Mode Select a beginning COM number COM3 View Settings Help OK Cancel“Fixed-base COM Mode” allows users to specify which COM number will be assigned first. In addition, COM numbers are assigned sequentially, and are not tied to specific UPort converters. For example, assume that you have set COM10 as the first COM number that will be assigned. If UPort D1 is plugged into your computer first, your computer will assign COM10 and COM11 to the UPort’s serial ports. When UPort D2 is plugged in, the computer will assign COM numbers COM12 and COM13.
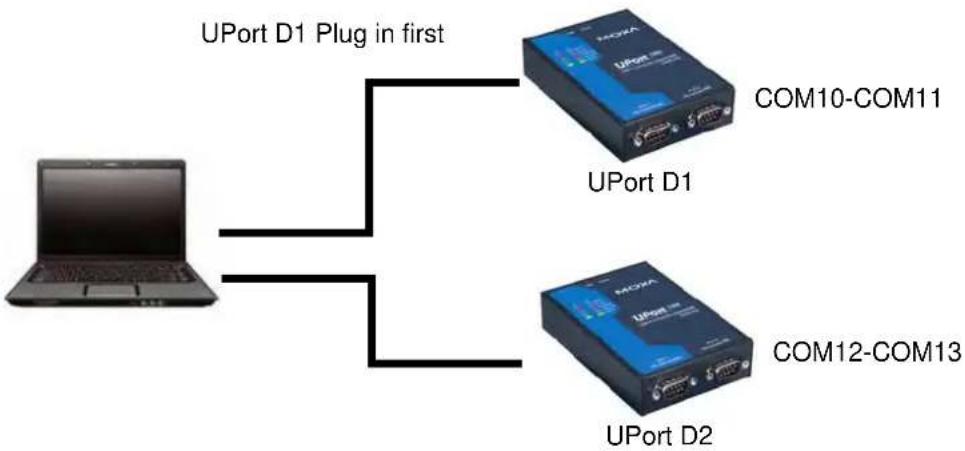
flowchart
graph TD
    A["Laptop"] --> B["UPort D1 Plug in first"]
    A --> C["UPort D2"]
    B --> D["COM10-COM11"]
    B --> E["COM12-COM13"]
If both UPorts are unplugged from the computer, and then UPort D2 is plugged back in, the computer will now assign COM10 and COM11 to the UPort's serial ports. When UPort D1 is plugged back in, COM numbers COM12 and COM13 will be assigned the UPort's serial ports.
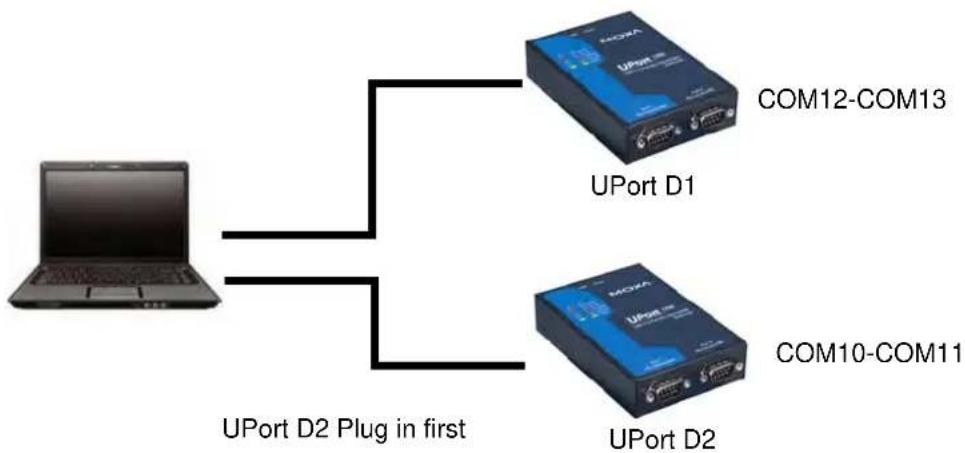
flowchart
graph TD
    A["Laptop"] --> B["UPort D1"]
    A --> C["UPort D2 Plug in first"]
    B --> D["COM12-COM13"]
    C --> E["COM10-COM11"]
When "Fixed-base COM Mode" is enabled for the first time, all COM port numbers and serial port parameters will be reset to their default values. You can then set the COM numbers and configuration parameters to the values needed for your application.
For example, let's assume that before you enable "Fixed-base COM Mode" you set the parameters of the UPort 1250 as follows:
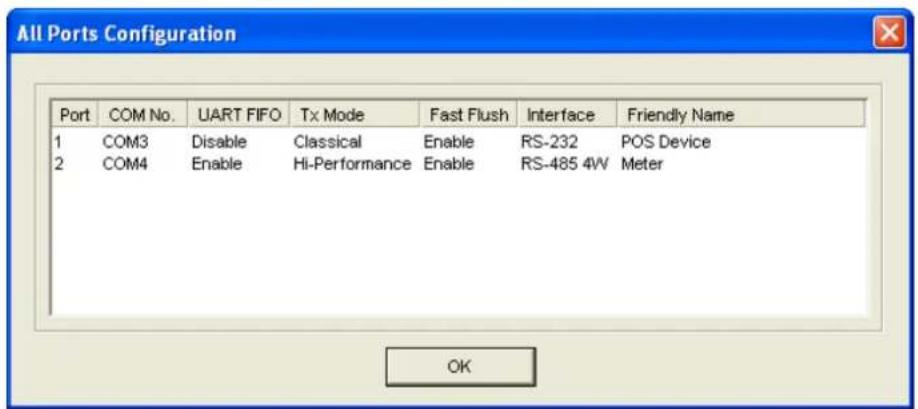
text_image
All Ports Configuration Port COM No. UART FIFO Tx Mode Fast Flush Interface Friendly Name 1 COM3 Disable Classical Enable RS-232 POS Device 2 COM4 Enable Hi-Performance Enable RS-485 4W Meter OKIf you enable "Fixed-base COM Mode," all parameters will be reset to their default values:

text_image
All Ports Configuration Port COM No. UART FIFO Tx Mode Fast Flush Interface Friendly Name 1 COM10 Enable Hi-Performance Enable RS-232 MOXA UPort COM 2 COM11 Enable Hi-Performance Enable RS-232 MOXA UPort COM OKAt this point you can set serial parameters to the values needed for your application.
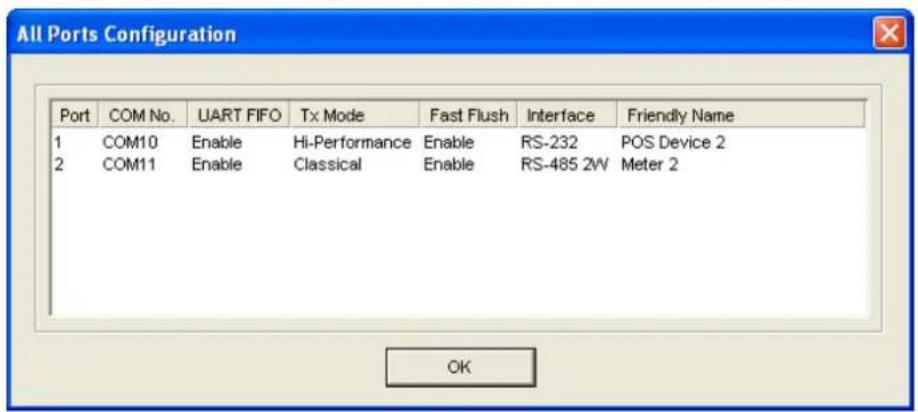
text_image
All Ports Configuration Port COM No. UART FIFO Tx Mode Fast Flush Interface Friendly Name 1 COM10 Enable Hi-Performance Enable RS-232 POS Device 2 2 COM11 Enable Classical Enable RS-485 2W Meter 2 OKIf you subsequently disable "Fixed-base COM Mode," all parameters will be restored to the original settings:
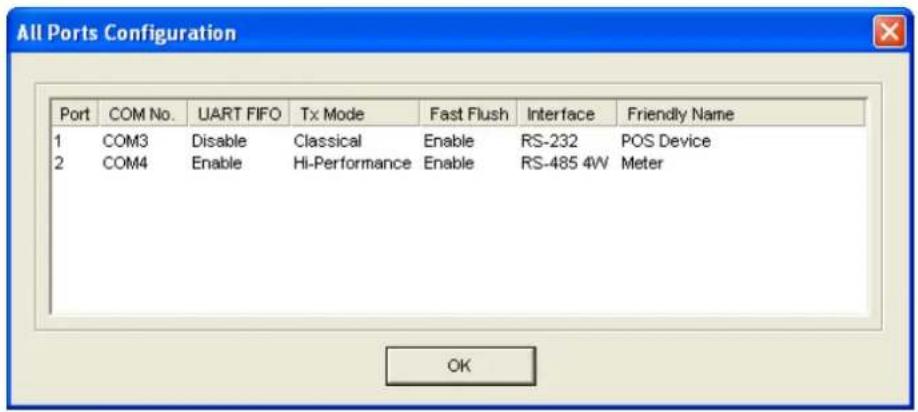
text_image
All Ports Configuration Port COM No. UART FIFO Tx Mode Fast Flush Interface Friendly Name 1 COM3 Disable Classical Enable RS-232 POS Device 2 COM4 Enable Hi-Performance Enable RS-485 4W Meter OKUninstalling the UPort
If you want to remove the UPort, you just need to remove the device from Device Manager. The UPort driver will still stay alive enabling other UPort devices to keep working.
- To uninstall the UPort, click Start → Settings → Control Panel → System, select the Hardware tab, and then click Device Manager.
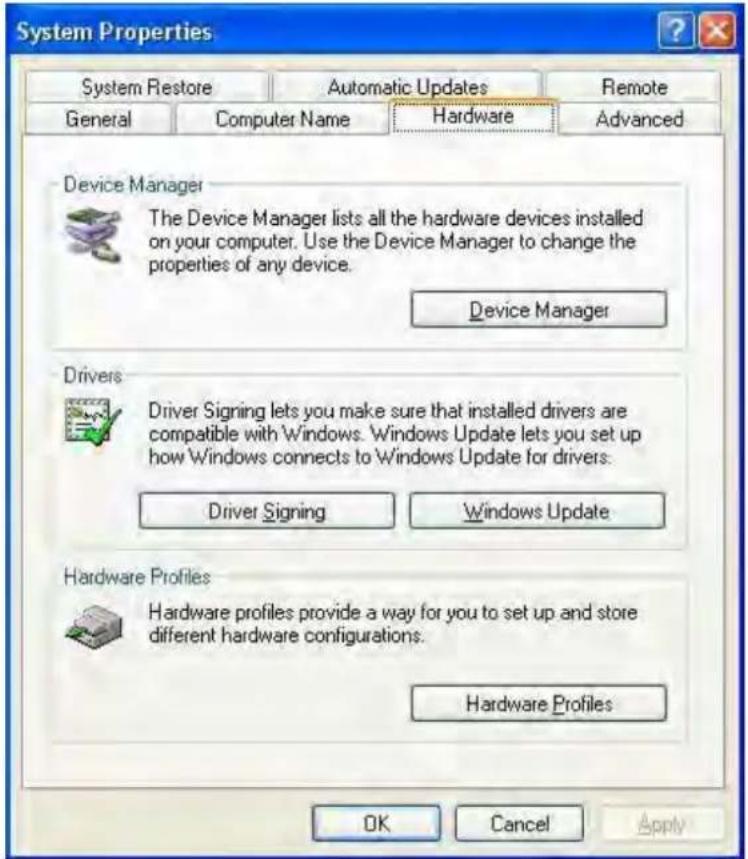
text_image
System Properties System Restore Automatic Updates Remote General Computer Name Hardware Advanced Device Manager The Device Manager lists all the hardware devices installed on your computer. Use the Device Manager to change the properties of any device. Device Manager Drivers Driver Signing lets you make sure that installed drivers are compatible with Windows. Windows Update lets you set up how Windows connects to Windows Update for drivers. Driver Signing Windows Update Hardware Profiles Hardware profiles provide a way for you to set up and store different hardware configurations. Hardware Profiles OK Cancel Apply- Expand the Multi-port serial adapters tab, right click MOXA UPort 1250 Series, and then click Uninstall to uninstall this UPort. A window will pop up to confirm that you want to remove this UPort.
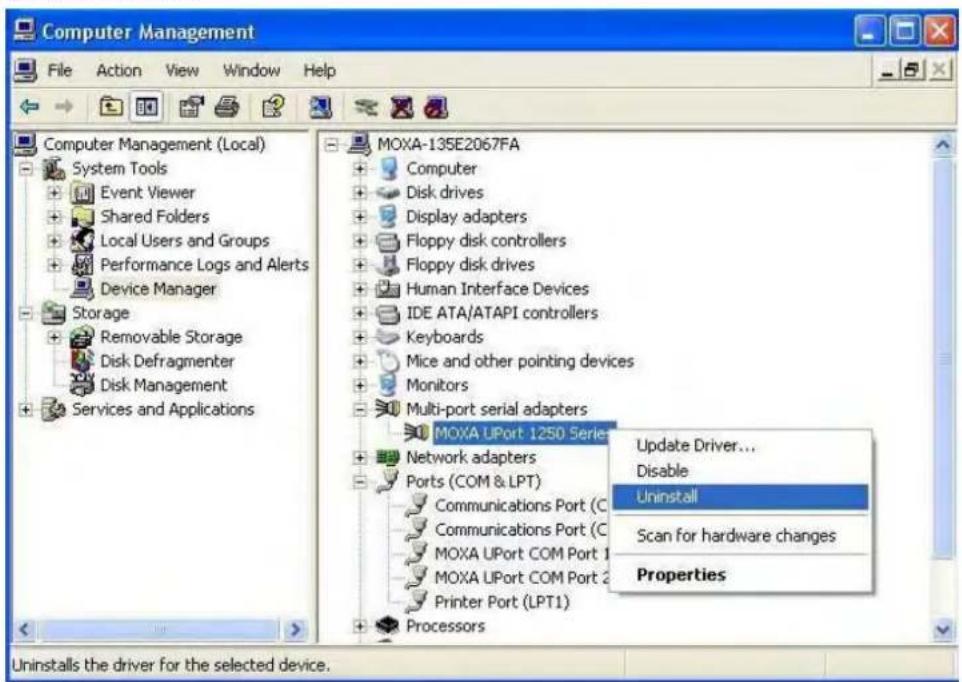
text_image
Computer Management File Action View Window Help Computer Management (Local) System Tools Event Viewer Shared Folders Local Users and Groups Performance Logs and Alerts Device Manager Storage Removable Storage Disk Defragmenter Disk Management Services and Applications MOXA-135E2067FA Computer Disk drives Display adapters Floppy disk controllers Floppy disk drives Human Interface Devices IDE ATA/ATAPI controllers Keyboards Mice and other pointing devices Monitors Multi-port serial adapters MOXA UPort 1250 Series Network adapters Ports (COM & LPT) Communications Port (C) Communications Port (C) MOXA UPort COM Port 1 MOXA UPort COM Port 2 Printer Port (LPT1) Processors Update Driver... Disable Uninstall Scan for hardware changes Properties Uninstalls the driver for the selected device.- Click OK to continue uninstalling the UPort. The UPort will be removed from the list of Multi-port serial adapters.
Uninstalling the Driver
- To uninstall the driver, open the Control window, and click Add/Remove Programs.
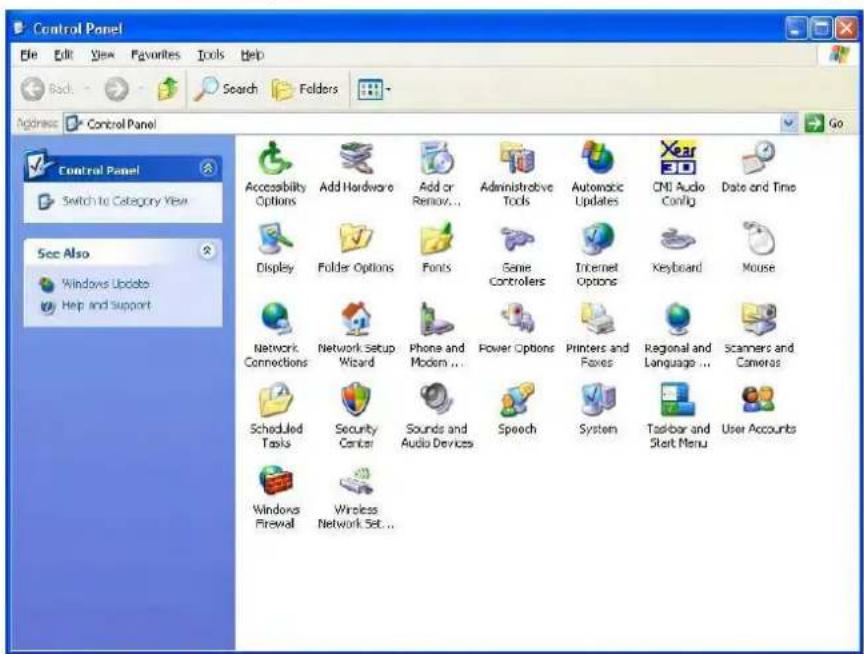
text_image
Control Panel File Edit View Favorites Tools Help Back Search Folders Address Control Panel Control Panel Switch to Category View See Also Windows Update Help and support Accessibility Options Add Hardware Add or Remove... Administrative Tools Automatic Updates Year 3D CMI Audio Config Date and Time Display Folder Options Fonts Gene Controllers Internet Options Keyboard Mouse Network Connections Network Setup Wizard Phone and Modem... Power Options Printers and Boxes Regional and Language... Scanners and Cameras Scheduled Tasks Security Center Sounds and Audio Devices Speech System Taskbar and Start Menu User Accounts Windows Firewall Wireless Network Set...- Select Moxa UPort Windows Driver Ver1.4. Click the Remove button.
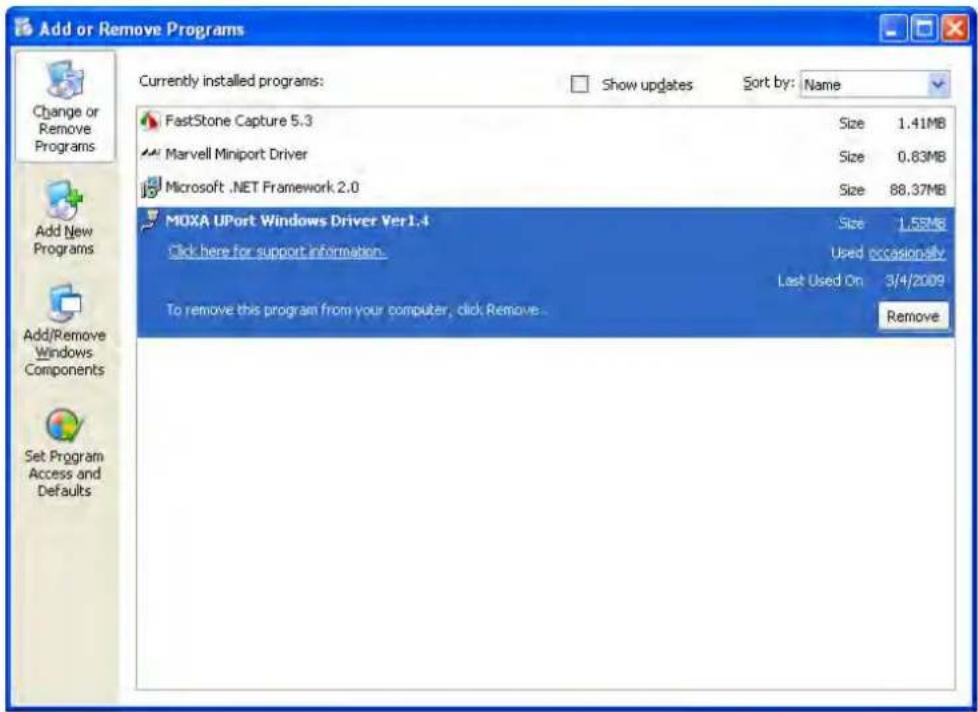
text_image
Add or Remove Programs Currently installed programs: Show updates Sort by: Name FastStone Capture 5.3 Size 1.41MB Marvell Miniport Driver Size 0.83MB Microsoft .NET Framework 2.0 Size 88.37MB MOXA UPort Windows Driver Ver1.4 Size 1.55MB Click here for support information. Used occasionally Last Used On 3/4/2009 To remove this program from your computer, click Remove... Remove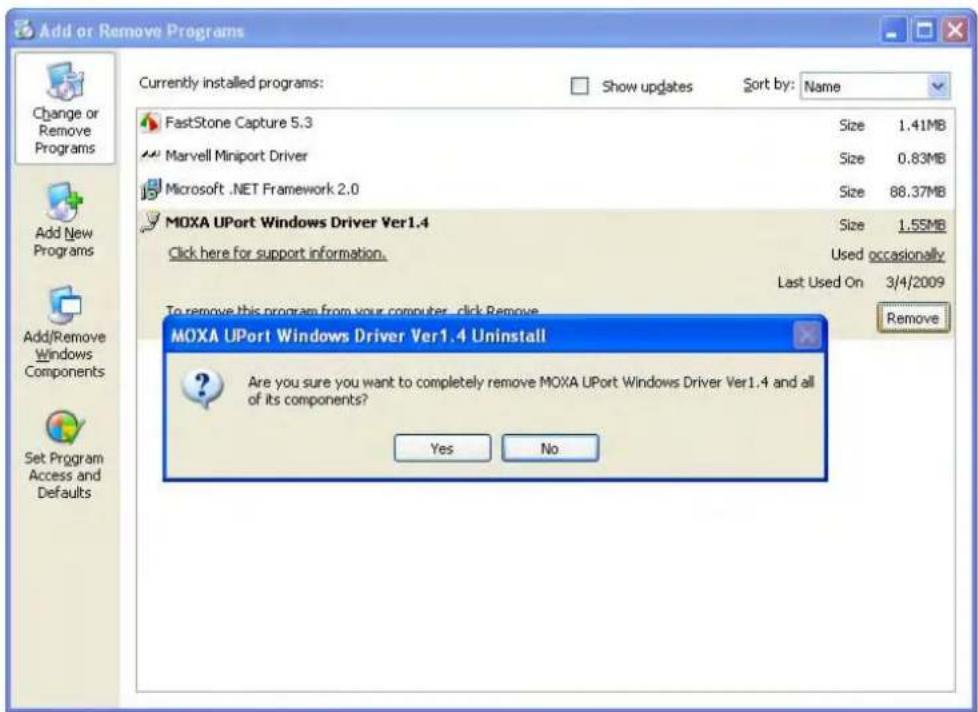
text_image
Add or Remove Programs Currently installed programs: Show updates Sort by: Name FastStone Capture 5.3 Size 1.41MB Marvell Miniport Driver Size 0.83MB Microsoft .NET Framework 2.0 Size 88.37MB MOXA UPort Windows Driver Ver1.4 Size 1.55MB Click here for support information. Used occasionally Last Used On 3/4/2009 To remove this program from your computer, click Remove MOXA UPort Windows Driver Ver1.4 Uninstall Are you sure you want to completely remove MOXA UPort Windows Driver Ver1.4 and all of its components? Yes No Remove- Click OK to proceed with the un-installation procedure.

text_image
MOXA UPort Windows Driver Ver1.4 Uninstall MOXA UPort Windows Driver Ver1.4 was successfully removed from your computer. OKInstalling the Windows CE Driver
In this section, we introduce installation procedures for the Windows CE 5.0 and Windows CE 6.0 drivers. Both Win CE 5.0 and Win CE 6.0 need the Win CE platform builder for installation. The only difference is that Win CE 6.0 also requires Visual Studio 2005. Win CE 6.0 platform builder has tools necessary for you to design, create, build, test, and debug Windows CE. Visual Studio 2005 and Win CE 6.0 Builder provide a workspace where you can work on both OS designs and projects to build your own embedded system.
Win CE 6.0 installation requires both Visual Studio 2005 and Win CE 6.0 Builder. When installing Visual Studio 2005, you can select your preferred language with .NET Framework SDK or use the "default".
After completing installation for Visual Studio 2005, run Win CE 6.0 Builder "setup.exe" to install and download the files.
You will need to select "x86" for the CE 6.0 operating system.
This process will may take a couple of hours and the folder size is around 3 GB.
Installation with an installation package for Win CE 6.0
Installation procedure
Copy the UPort 1200/1400/1600 WinCE 6.0 driver package onto your computer and extract. Double click on the installation package and it will automatically copy the Mxser folder to C:\MOXAUPORT\wince600\Uport.
Step 1: Launch Visual Studio 2005 with Platform Builder WinCE6.0. Open the OSDesign that you want to install.
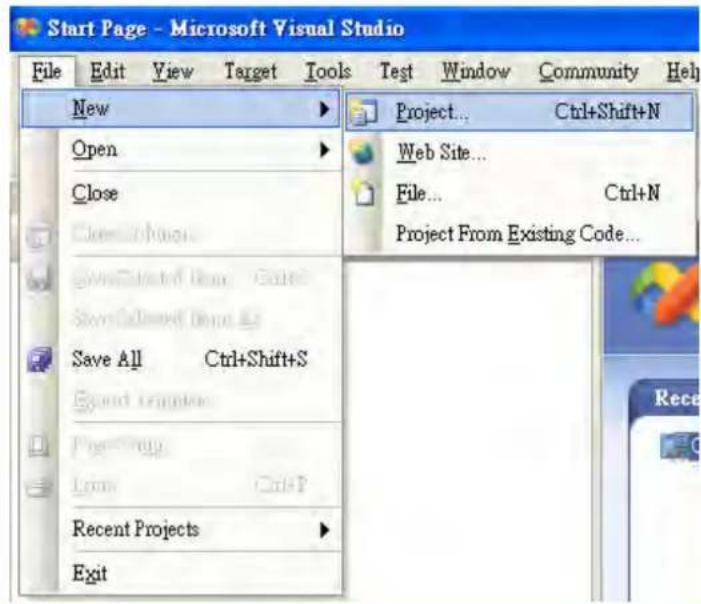
In Visual Studio 2005, click File → New → Project, and select "Platform Builder for CE 6.0". Select "OS Design" for the template then click OK.
text_image
Start Page - Microsoft Visual Studio File Edit View Target Tools Test Window Community Help New Open Close Save All Ctrl+Shift+S Recent Projects Exit Project... Ctrl+Shift+N Web Site... File... Ctrl+N Project From Existing Code...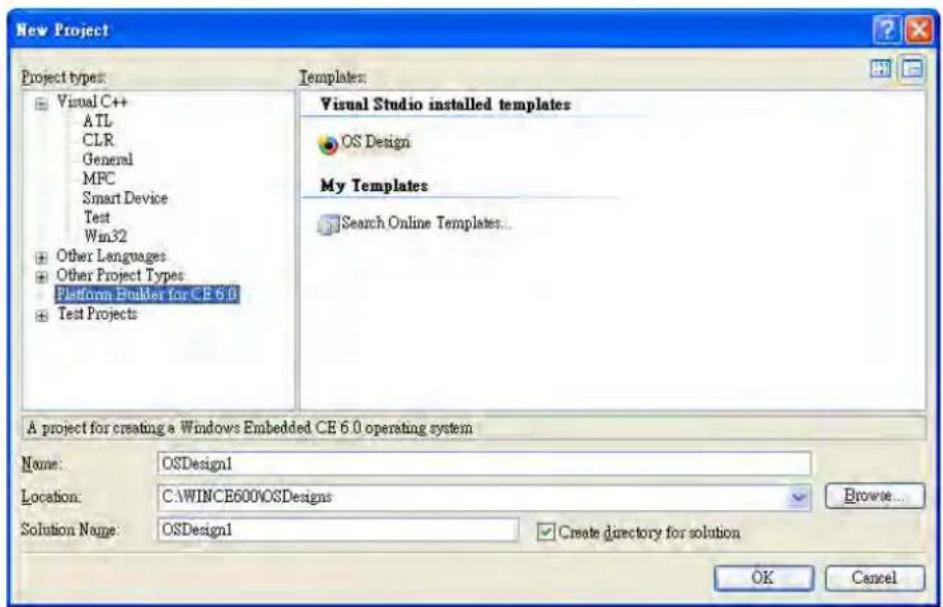
text_image
New Project Project types: Visual C++ ATL CLR General MFC Smart Device Test Win32 Other Languages Other Project Types Platform Builder for CE 6.0 Test Projects Templates: Visual Studio installed templates OS Design My Templates Search Online Templates... A project for creating a Windows Embedded CE 6.0 operating system Name: OSDesign1 Location: C:\WINCE600\OSDesigns Solution Name: OSDesign1 Browse... Create directory for solution OK CancelStep 2: When the CE 6.0 OS Design Wizard starts, select CEPC: x86 for Board Support Packages.

text_image
Windows Embedded CE 6.0 OS Design Wizard Welcome to the Windows Embedded CE 6.0 OS Design Wizard This wizard guides you through the process of creating an OS design for a CE 6.0 based platform. An OS design defines the characteristics of a CE 6.0 OS. You can create an OS design by choosing a design template and one or more board support packages (BSPs). A BSP includes an OEM adaptation layer (OAL) and device drivers. This wizard helps you: Choose a BSP. Choose a design template. Add items to your OS design or remove items from it. To continue, click Next. Next >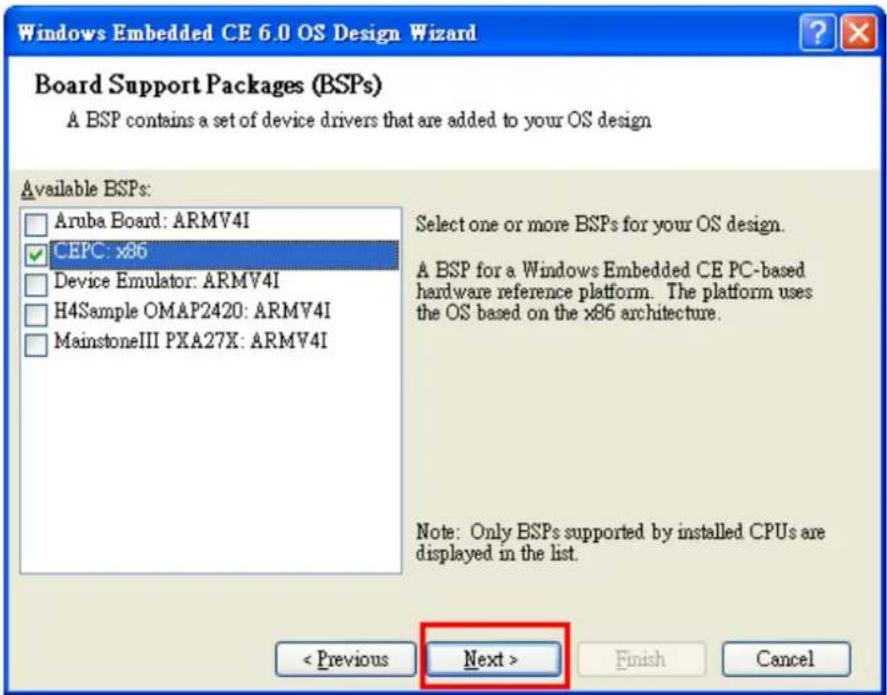
text_image
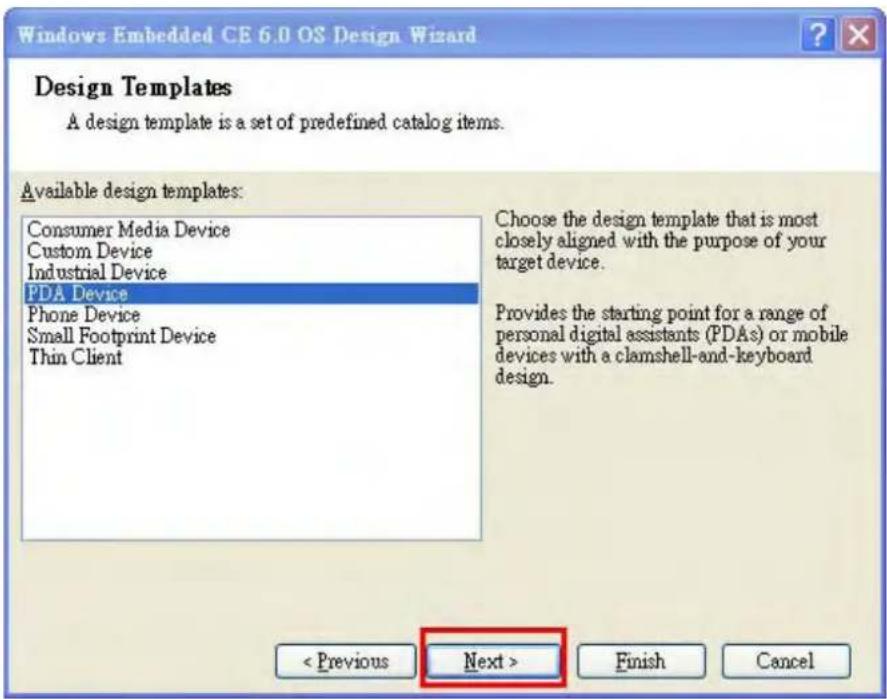
Windows Embedded CE 6.0 OS Design Wizard Board Support Packages (BSPs) A BSP contains a set of device drivers that are added to your OS design Available BSPs: Aruba Board: ARMV4I CEPC: x86 Device Emulator: ARMV4I H4Sample OMAP2420: ARMV4I MainstoneIII PXA27X: ARMV4I Select one or more BSPs for your OS design. A BSP for a Windows Embedded CE PC-based hardware reference platform. The platform uses the OS based on the x86 architecture. Note: Only BSPs supported by installed CPUs are displayed in the list. < Previous Next > Finish CancelStep 3: Under Design Templates and Design Template Variants, select your environment, such as PDA Device or Mobile Handheld, and then click Next. In Application & Media and Networking & Communication, also select your environment, such as .NET Compact Framework 2.0, ActiveSync, Quarter VGA Resources-Portrait Mode, or TCP/IPv6 Support.
text_image
Windows Embedded CE 6.0 OS Design Wizard Design Templates A design template is a set of predefined catalog items. Available design templates: Consumer Media Device Custom Device Industrial Device PDA Device Phone Device Small Footprint Device Thin Client Choose the design template that is most closely aligned with the purpose of your target device. Provides the starting point for a range of personal digital assistants (PDAs) or mobile devices with a clamshell-and-keyboard design. < Previous Next > Finish Cancel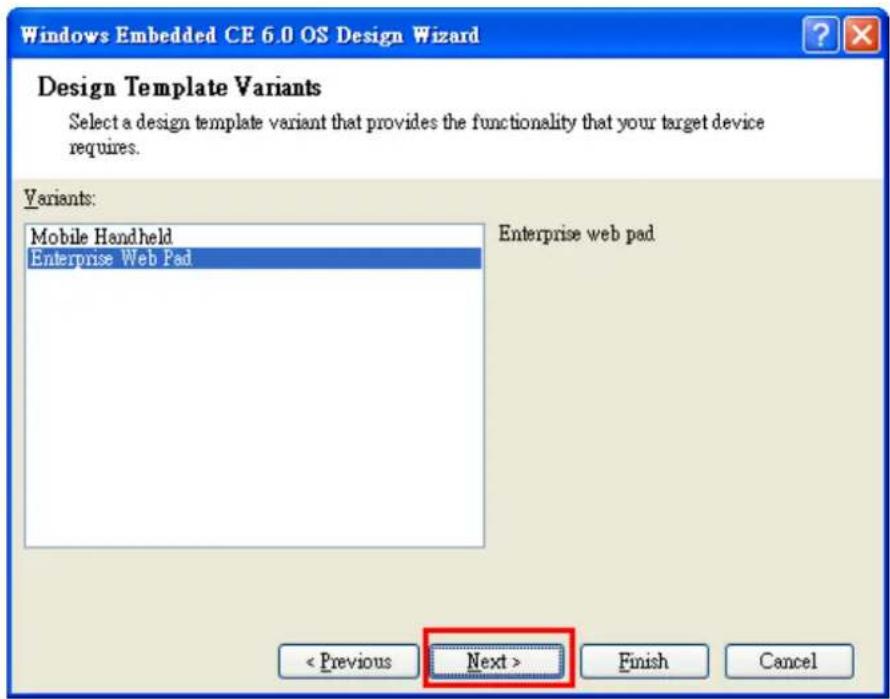
text_image
Windows Embedded CE 6.0 OS Design Wizard Design Template Variants Select a design template variant that provides the functionality that your target device requires. Variants: Mobile Handheld Enterprise Web Pad Enterprise web pad < Previous Next > Finish Cancel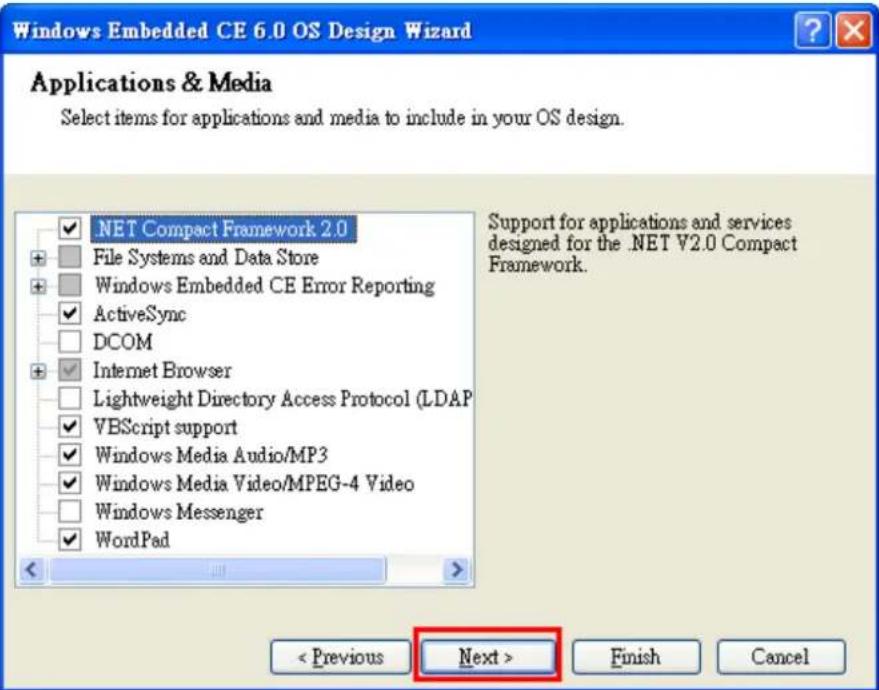
text_image
Windows Embedded CE 6.0 OS Design Wizard Applications & Media Select items for applications and media to include in your OS design. NET Compact Framework 2.0 File Systems and Data Store Windows Embedded CE Error Reporting ActiveSync DCOM Internet Browser Lightweight Directory Access Protocol (LDAP VBScript support Windows Media Audio/MP3 Windows Media Video/MPEG-4 Video Windows Messenger WordPad Support for applications and services designed for the .NET V2.0 Compact Framework. < Previous Next > Finish Cancel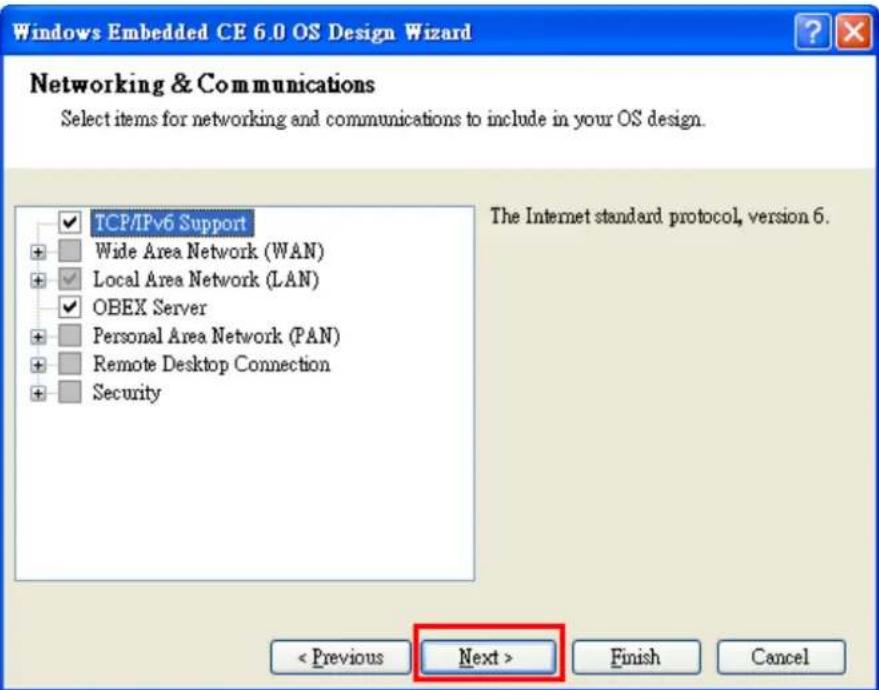
text_image
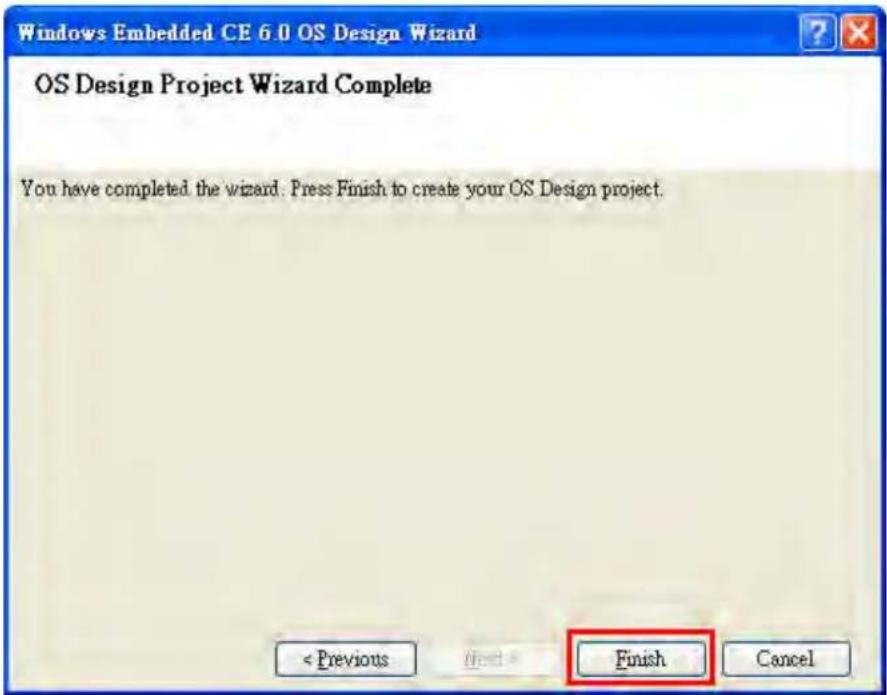
Windows Embedded CE 6.0 OS Design Wizard Networking & Communications Select items for networking and communications to include in your OS design. TCP/IPv6 Support Wide Area Network (WAN) Local Area Network (LAN) OBEX Server Personal Area Network (PAN) Remote Desktop Connection Security The Internet standard protocol, version 6. < Previous Next > Finish CancelStep 4: When the OS Design Project Wizard Complete screen appears, click Finish. The notification will pop up. Click “Acknowledge” to finish the project.
text_image
Windows Embedded CE 6.0 OS Design Wizard OS Design Project Wizard Complete You have completed the wizard. Press Finish to create your OS Design project. < Previous Finish Cancel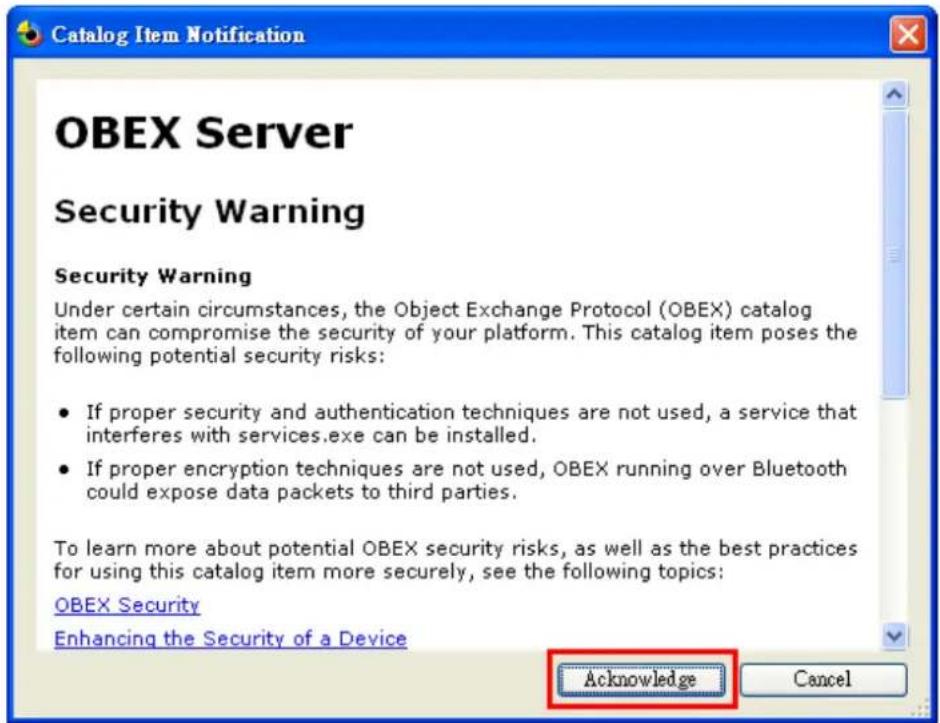
text_image
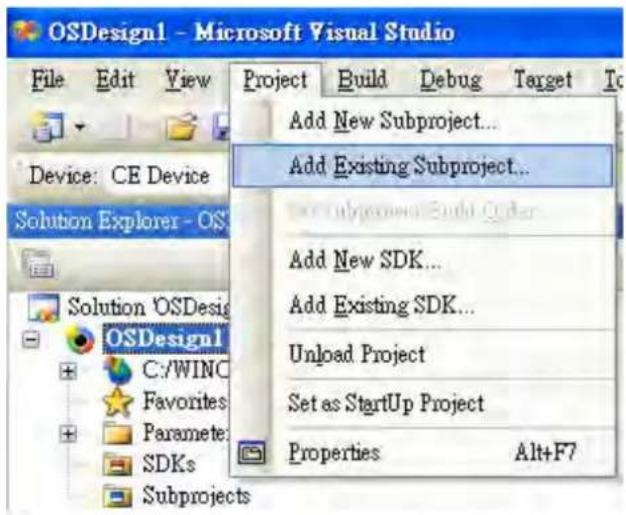
Catalog Item Notification OBEX Server Security Warning Security Warning Under certain circumstances, the Object Exchange Protocol (OBEX) catalog item can compromise the security of your platform. This catalog item poses the following potential security risks: • If proper security and authentication techniques are not used, a service that interferes with services.exe can be installed. • If proper encryption techniques are not used, OBEX running over Bluetooth could expose data packets to third parties. To learn more about potential OBEX security risks, as well as the best practices for using this catalog item more securely, see the following topics: OBEX Security Enhancing the Security of a Device Acknowledge CancelStep 5: Open the project you created. Click Project on top of the screen, and then select Add Existing Subproject. Switch the folder to "C:\MOXAUPORT\wince600\Uport" and add subprojects into your OS Design. Assign the pbpxml file to a different folder (i.e.mxupce6.pbpxml).
text_image
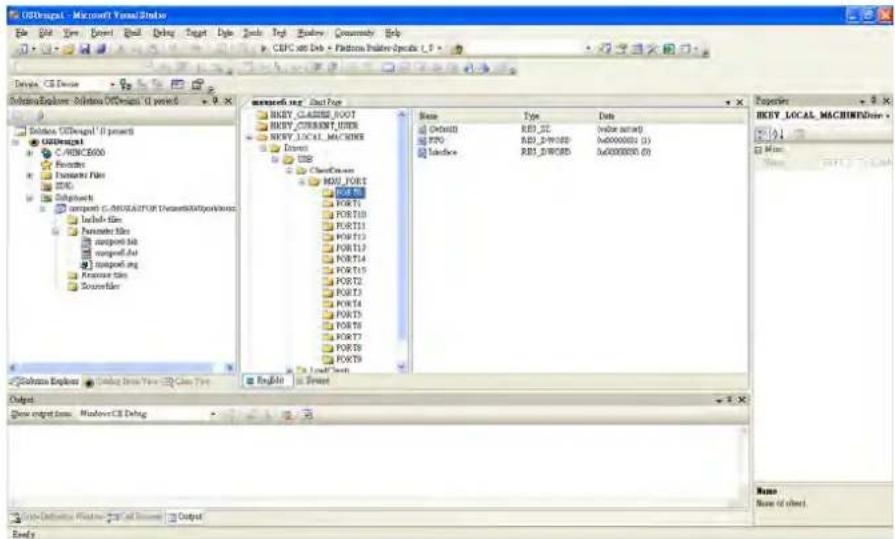
OSDesign1 - Microsoft Visual Studio File Edit View Add New Subproject... Add Existing Subproject... Add New SDK... Add Existing SDK... Unload Project Set as StartUp Project Properties Alt+F7 Solution Explorer - OS Solution OSDesign OSDesign1 C:/WINO Favorites Paramete SDKs SubprojectsStep 6: After the subproject is added, you may configure the "mxupce6.reg" registry file with the location
[HKEY_LOCAL_MACHINE\Drivers\USB\ClientDrivers\MXU_PORT].
text_image
C:\Users\Layout\Solution\C-OSB2500\Solution\C-OSB2500\Solution\C-OSB2500\Solution\C:\Users\C:\Users\C:\Users\C:\Users\C:\Users\C:\Users\C:\Users\C:\Users\C:\Users\C:\Users\C:\Users\C:\Users\C:\Users\C:\Users\C:\Users\C:\Users\C:\Users\C:\Users\C:\Users\C:\Users\C:\Users\C:\Users\C:\Users\C:\Users\C:\Users\C:\Users\C:\Users\C:\Users\C:\Users\C:\Users\C:\Users\C:\Users\C:\Users\C:\Users\Layout\Layout\Layout\Layout\Layout\Layout\Layout\Layout\Layout\Layout\Layout\Layout\Layout\Layout\Layout\Layout\Layout\Layout\Layout\Layout\Layout\Layout\Layout\Layout\Layout\Layout\Layout\Layout\Layout\Layout\Layout\Layout\Layout\Layout\Layout\Layout\Layout\Layout\Layout\Layout\Layout\Layout\Layout\Layout\Layout\Layout\Layout\Layout\Layout\Layout\Location Name Output Show output from: Microsoft\C:\Users\C:\Users\C:\Users\C:\Users\C:\Users\C:\Users\C:\Users\C:\Users\C:\Users\C:\Users\C:\Users\C:\Users\C:\Users\C:\Users\C:\Users\C:\Users\C:\Users\C:\Users\C:\Users\C:\Users\C:\Users\C:\Users\C:\Users\C:\Users\C:\Users\C:\Users\C:\Users\C:\Users\C:\Users\C:\Users\C:\Users\C:\Users\C:\Users/C:\Users/C:\Users/C:\Users/C:\Users/C:\Users/C:\Users/C:\Users/C:\Users/C:\Users/C:\Users/C:\Users/C:\Users/C:\Users/C:\Users/C:\Users/C:\Users/C:\Users/C:\Users/C:\Users/C:\Users/C:\Users/C:\Users/C:\Users/C:\Users/C:\Users/C:\Users/C:\Users/C:\Users/C:\Users/C:\Users/C:\Users/C:\Users/C:\Users/C :\Users/C:\Users/C:\Users/C:\Users/C:\Users/C:\Users/C:\Users/C:\Users/C:\Users/C:\Users/C:\Users/C:\Users/C:\Users/C:\Users/C:\Users/C:\Users/C:\Users/C:\Users/C:\Users/C:\Users/C:\Users/C:\Users/C:\Users/C:\Users/C:\Users/C:\Users/C:\Users/C:\Users/C:\Users/C:\Users/C:\Users/C:\Users/C:\Users/C:\Hours Name Base of sheet.Step 7: Open "Build", select "Advanced Build Commands" and "Build Sysgen". This operation will take you a few minutes.
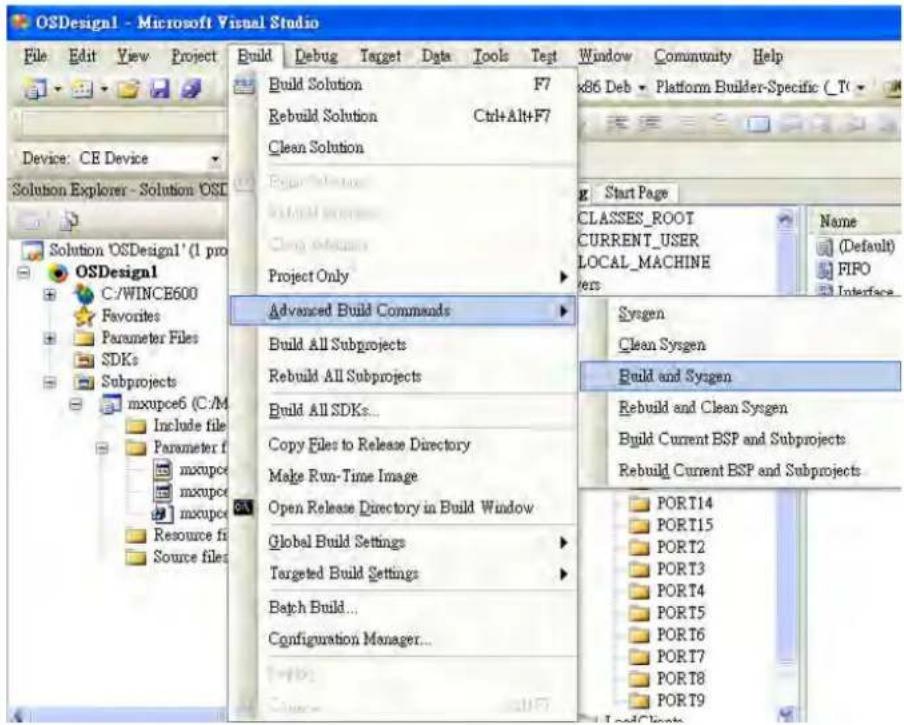
text_image
OSDesign1 - Microsoft Visual Studio File Edit View Project Build Debug Target Data Tools Test Window Community Help Build Solution F7 Rebuild Solution Ctrl+Alt+F7 Clean Solution Advanced Build Commands Build All Subprojects Rebuild All Subprojects Build All SDKs... Copy Files to Release Directory Make Run-Time Image Open Release Directory in Build Window Global Build Settings Targeted Build Settings Batch Build... Configuration Manager... Build and Sysgen Rebuild and Clean Sysgen Build Current BSP and Subprojects Rebuild Current BSP and Subprojects PORT14 PORT15 PORT2 PORT3 PORT4 PORT5 PORT6 PORT7 PORT8 PORT9Step 8: After building sysgen, select "Build" and "Make Run-Time Image" to create the WinCE OS image. Finally, copy your image file to the target Host.
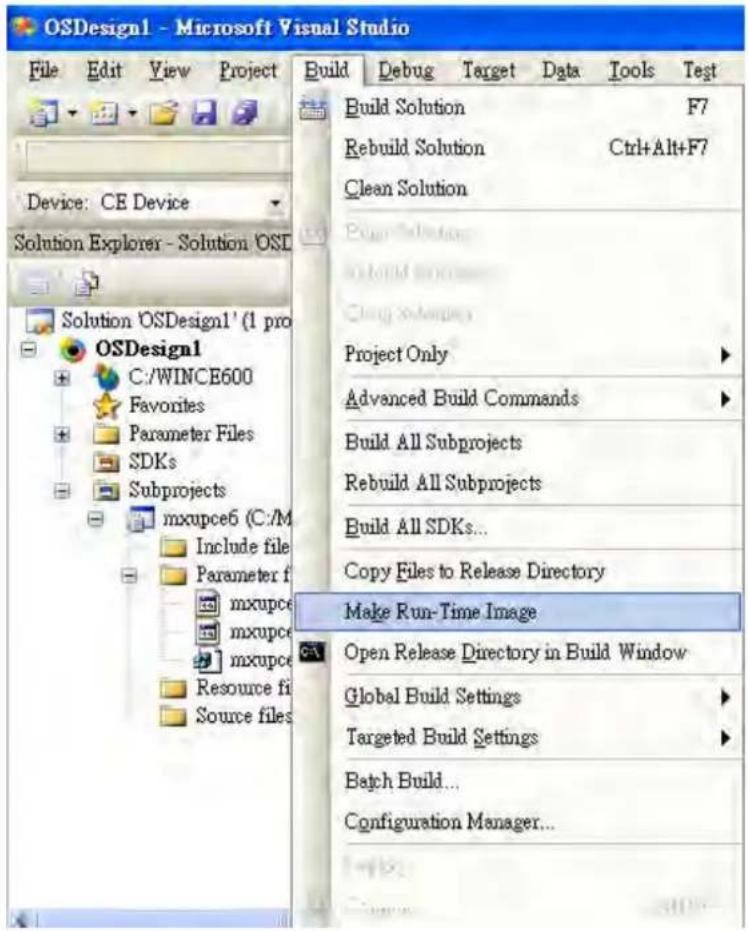
text_image
OSDesign1 - Microsoft Visual Studio File Edit View Project Build Debug Target Data Tools Test Build Solution F7 Rebuild Solution Ctrl+Alt+F7 Clean Solution Project Solutions Build Solutions Clean Solutions Project Only ▶ Advanced Build Commands ▶ Build All Subprojects Rebuild All Subprojects Build All SDKs... Copy Files to Release Directory Make Run-Time Image Open Release Directory in Build Window Global Build Settings ▶ Targeted Build Settings ▶ Batch Build... Configuration Manager...Step 9: Configure the interface on the target device using the configuration tool found in "Start → Programs → MOXA UP Configuration Panel\UPort Configuration Utility".
Installation with an installation package for Win CE 5.0
In this section, we describe how to install the Moxa Win CE 5.0 Driver on a Windows CE 5.0 operating system.
Step 1: Obtain a copy of the UPort 1200/1400/1600 Series WinCE 5.0 driver package and extract it to your computer. Double click the installation package and it will automatically copy the UPort folder to “\WINCE500\PLATFORM” (e.g., C:\WINCE500\PLATFORM\UPort) and import the UPort 1200/1400/1600 WinCE 5.0 driver into the “Catalog”.
Step 2: Open your workspace in Platform Builder, and then open “Manage Catalog Items” (View → Catalog). You will find the UPort 1200/1400/1600 WinCE 5.0 driver in the “Third Party” folder.
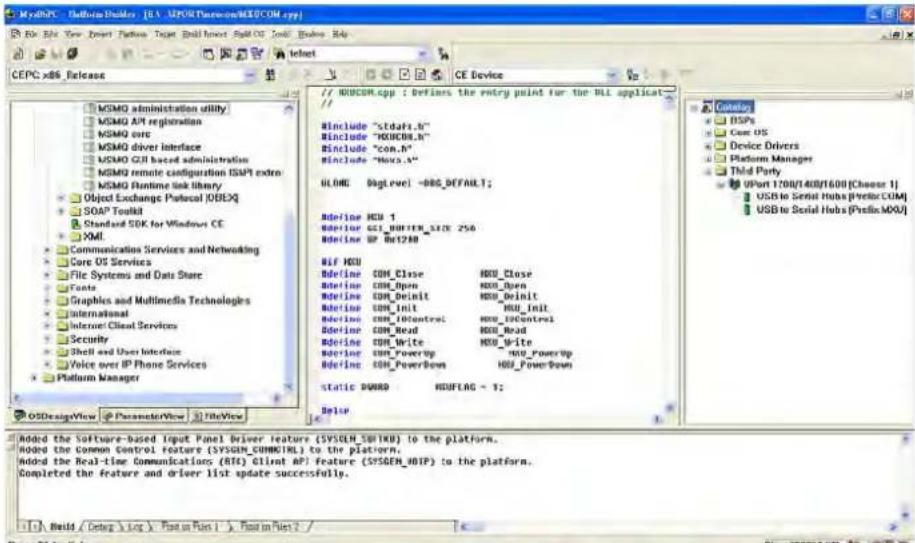
text_image
MSMQ administration utility MSMQ API registration MSMQ core MSMQ driver interface MSMQ GUI based administration MSMQ remote configuration ISAPI extra MSMQ Runtime link library Object Exchange Protocol [UEX] SOAP Toolkit Standard SDK for Windows CE XML Communication Services and Networking Core OS Services File Systems and Data Store Tools Graphics and Multimedia Technologies International Internet Client Services Security Shell and User Interface Voice over IP Phone Services Platform Manager OSDesignView ParameterView FileView // H0UCOM.cpp : defines the entry point for the URL applicat // Include "stdata.h" Include "KUCOM.h" Include "com.h" Include "neg.s" NONE ObjLevel = -ORG_DEFAULT1; Admline HCH 1 Admline GSI Monitoring SIZE 256 Admline IP Box1248 WIF HCH Admline COM_Close HCH_Close Admline COM_Open HCH_Open Admline COM_Dinit HCH_Dinit Admline COM_Init HCH_Init Admline COM_IDControl HCH_IDControl Admline COM_Read HCH_Read Admline COM_Write HCH_Mite Admline COM_PowerUp HCH_PowerUp Admline COM_PowerDown HCH_PowerDown static DWORD HOWFLAG = 1; Below Added the Software-based Input Panel Driver feature (SYSLH_SBITMXI) to the platform. Added the Common Control Feature (SYSLH_COMHKINL) to the platform. Added the Real-time Communications (RTI) Client API Feature (SYSLH_HBIP) to the platform. Completed the feature and driver list update successfully.Step 3: Right-click on the driver “USB to Serial Adaptors (Prefix COM)” or “USB to Serial Adaptors (Prefix MXU)” and then choose “Add to OS Design.” After adding the driver, you will be able to find it in your workspace, after which you can start to build your OS and download it into a target.
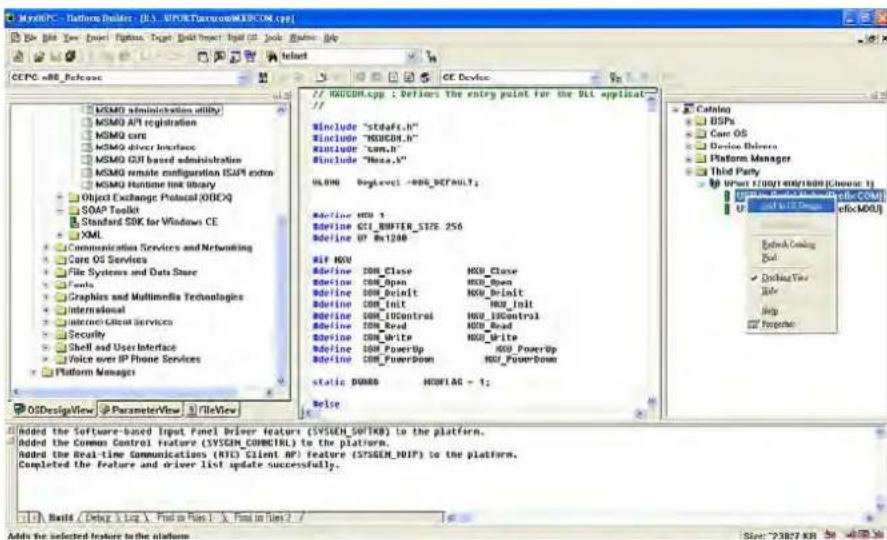
text_image
Microsoft Control Panel - [JLA:\MPOR\Thermo\MSCOM.ppt] CEPC w80_Release // MSOM administration utility MSOM API registration MSOM care MSOM driver interface MSOM G31 based administration MSOM remote configuration (ISUM) exten MSOM Runtime not library Object Exchange Protocol (OIEC) SOAP Toolkit Standard SDK for Windows CE XML Communication Services and Networking Care OS Services File Systems and Data Store Tools Graphics and Multimedia Technologies International Internet Client Services Security Shell and User Interface Voice over IP Phone Services Platform Manager OSDesignView ParameterView FileView Include "stdrefs.h" Include "MSCOM.h" Include "com.h" Include "com.s" ULOM0 bgllevel -MDK_DEFAULT; Define HOU 1 Define CIT_BUFFER_SIZE 256 Define UP Bx1200 AIF NOU Define COM_Class HOU_Class Define COM_Open HOU_Open Define COM_Dinit HOU_Dinit Define COM_Init HOU_Init Define COM_UControl HOU_UControl Define COM_Read HOU_Read Define COM_Write HOU_Mrite Define COM_PowerUp HOU_PowerUp Define COM_PowerDown HOU_PowerDown static NUMB HOWIAG - 1; Define Added the Software-based Input Panel Driver feature (SYSECH_SOTIKB) to the platform. Added the Common Control Feature (SYSEM_CONFIGTRL) to the platform. Added the Real-time Communications (RITC) Client AP feature (SYSEM_HIP) to the platform. Completed the feature and driver list update successfully. Builds (Debug Log, Find in Bus 1, Fm in Set 2) Add the selected feature to the platform.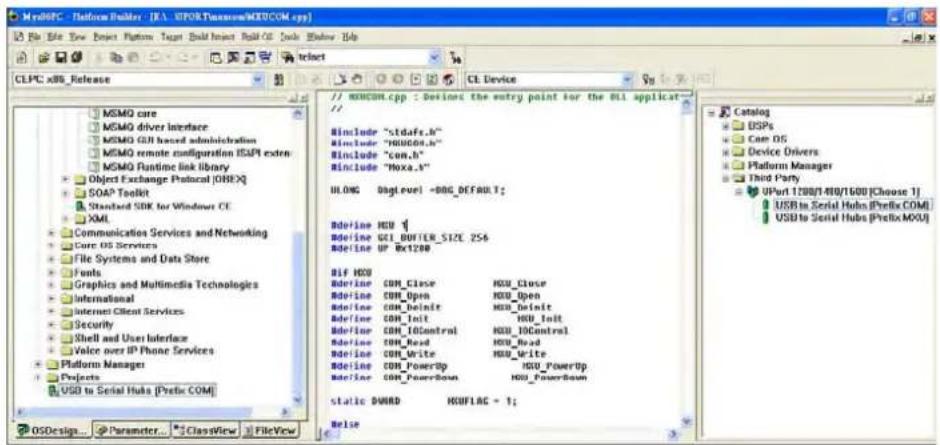
text_image
MydOPC - Platform Builder - [A:\MPOR\Tansw\MX1.COM.cyp] File Edit View Project Platform Target Build Event Build CL Tools Window Help CLPC x88_Release // HUHCOM.cpp : Design the entry point for the RLI applicat // Include "stdafe.h" Include "HOOCO.h" Include "com.h" Include "Hoxa.v" ILOG: Dsglevel -DOG_DEFAULT; Rguide HDV 1 Rcode CE1_DOUTER_SIZE_256 Rcode UP_Wx1200 Bif HDV Rcode COM_Close HDV_Close Rcode COM_Open HDV_Open Rcode COM_UdInit HDV_UdInit Rcode COM_Init HDV_Init Rcode COM_IOControl HDV_IOControl Rcode COM_Read HDV_Read Rcode COM_Write HDV_Write Rcode COM_PowerUp HDV_PowerUp Rcode COM_PowerDown HDV_PowerDown static DWORD HOUFLAG = 1; Nelse OSDesign... Parameter... ClassView FileView Catalog DSPs Can OS Device Drivers Platform Manager Third Party UPort 1/00/1/400/1600 [Choose 1] USB to Serial Hubs [Prefix COM] USB to Serial Hubs [Prefix MOV]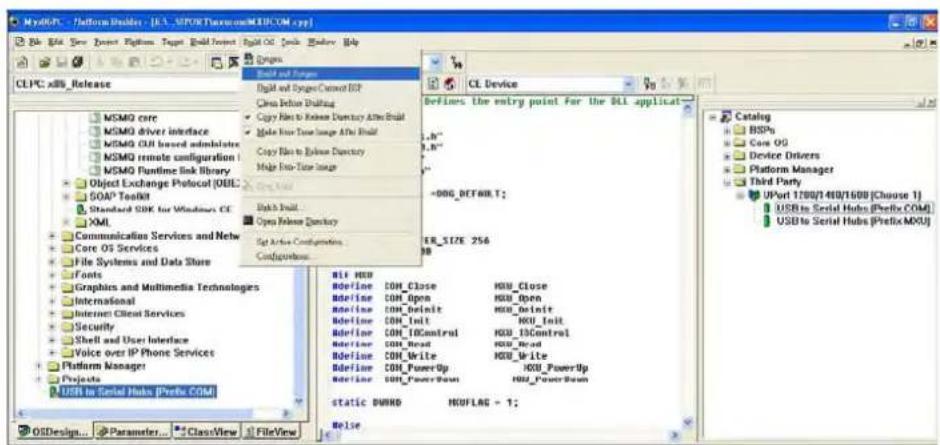
text_image
MyD6PC - SoftwareBuilder - [E:\_SPORTTavcomMULCOM .cyp] CLPC: x88_Release MSMQ core MSMQ driver interface MSMQ GUI based administers MSMQ remote configuration 1 MSMQ Puntime Link library Object Exchange Protocol (OUIL) SOAP Toolkit Standard SDK for Windows, CE XML Communication Services and Web Core OS Services File Systems and Data Store Fonts Graphics and Multimedia Technologies International Internet Client Services Security Shell and User Interface Voice over IP Phone Services Platform Manager Projects USB to Serial Hubs [Prelic.com] OSDesign... Parameter... ClassView FileView CE Device Defines the entry point for the BIL application +006_DEFRR.T: EB_SIZE 256 MB NIF HUB Nefine COH_Close HUB_Close Nefine COH_Open HUB_Open Nefine COH_Dinit HUB_Dinit Nefine COH_Init HUB_Init Nefine COH_IDControl HUB_IDControl Nefine COH_Name HUB_Name Nefine COH_Write HUB_Write Nefine COH_PowerUp HUB_PowerUp Nefine COH_PowerPoint HUB_PowerPoint static DWORD HUFLAG - 1; NelseStep 4: Interface configuration. On the target device, configuration tool will be found in "Start→Programs→MOXA UP Configuration Panel\UPort Configuration Utility".
Removing the Moxa Win CE 5.0/CE6.0 Driver
For Win CE 6.0 Driver:
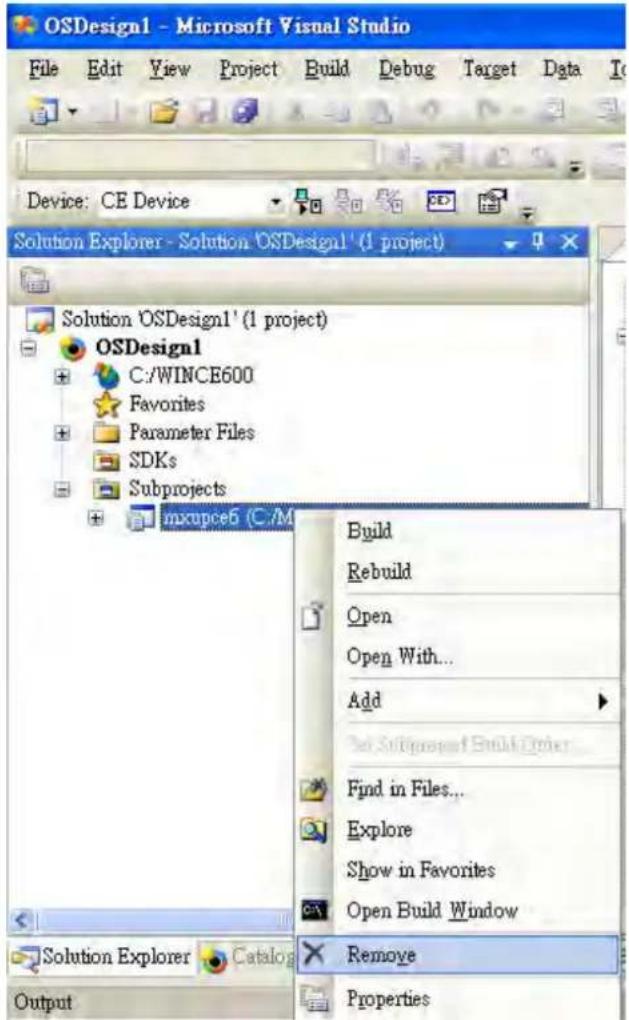
Step 1: Select the driver to remove.
text_image
OSDesign1 - Microsoft Visual Studio File Edit View Project Build Debug Target Data To Device: CE Device Solution Explorer - Solution 'OSDesign1' (1 project) Solution 'OSDesign1' (1 project) OSDesign1 C:/WINCE600 Favorites Parameter Files SDKs Subprojects mxupce6 C:/M Build Rebuild Open Open With... Add Set SubProject Build Order... Find in Files... Explore Show in Favorites Open Build Window Solution Explorer Catalog Output Remove PropertiesStep 2: Switch the folder to C:\MOXAUPORT\ and double click "unins000.exe" to remove the installation folder.
For Win CE 5.0 Driver:
Step 1: In the "OSDesign_View", delete "USB to Serial Adaptors (Prefix XXX)".
Step 2: Remove the driver from Control Panel.
Step 3: Checkmark "clean before building".
Step 4: Use "build and sysgen" to rebuild the image.
Installation with a CAB File
Install the UPort 1200/1400/1600 series Win CE driver onto the target host.
Step 1: timeSyndoinstallaMicrosoft ActiveSync in the source PC. Before running ActiveSync, use an RS-232 null modem cable to connect the WinCE Device (CEPC) and the PC.
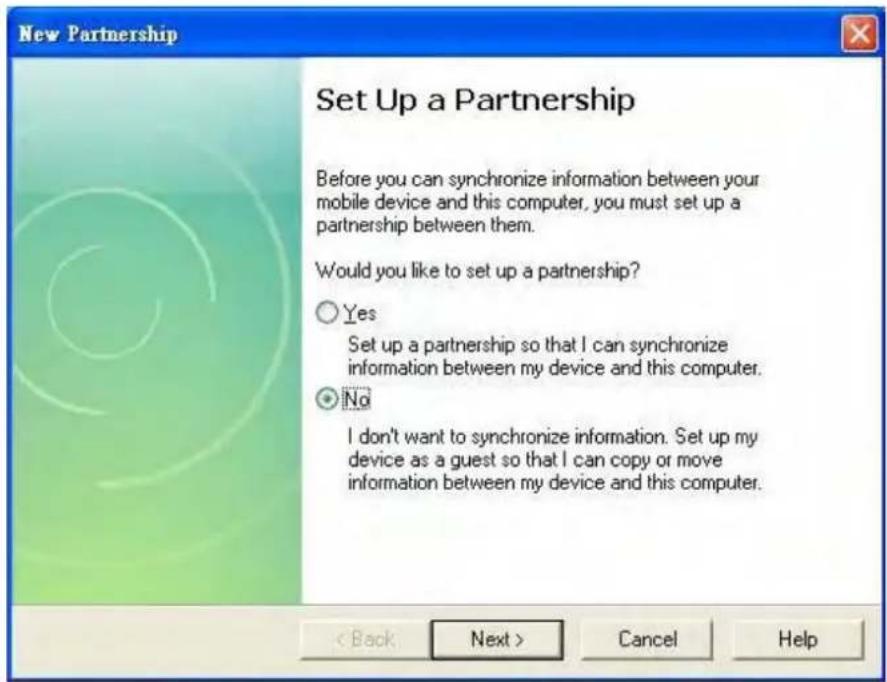
Step 2: Execute the command repllog from the WinCE device's command prompt. When the New Partnership window appears, select No and then click Next to connect through ActiveSync.
text_image
New Partnership Set Up a Partnership Before you can synchronize information between your mobile device and this computer, you must set up a partnership between them. Would you like to set up a partnership? ○ Yes Set up a partnership so that I can synchronize information between my device and this computer. ● No I don't want to synchronize information. Set up my device as a guest so that I can copy or move information between my device and this computer.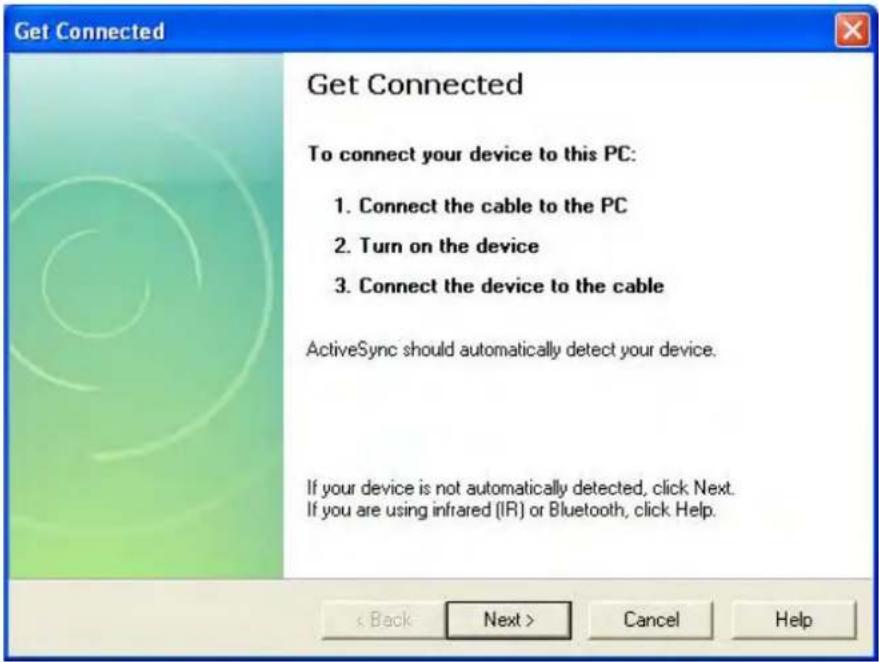
text_image
Get Connected To connect your device to this PC: 1. Connect the cable to the PC 2. Turn on the device 3. Connect the device to the cable ActiveSync should automatically detect your device. If your device is not automatically detected, click Next. If you are using infrared (IR) or Bluetooth, click Help.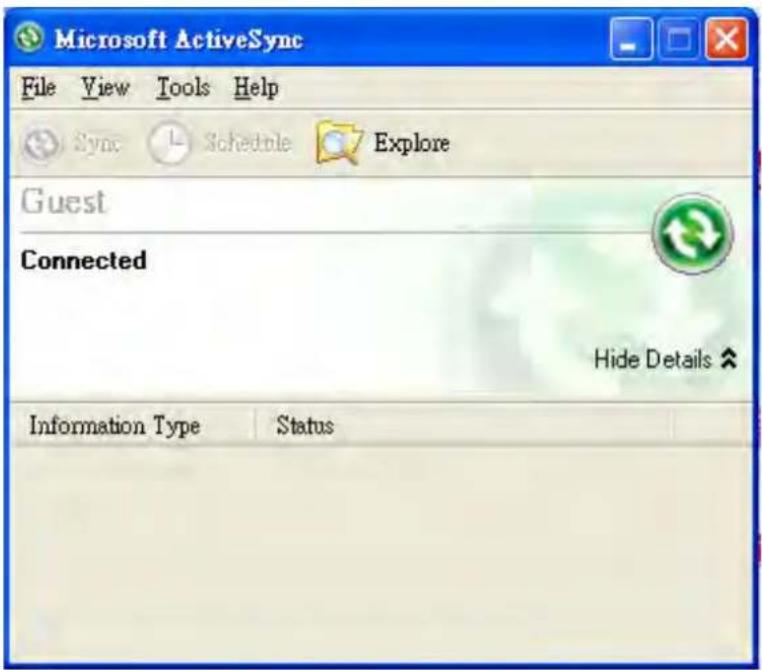
text_image
Microsoft ActiveSync File View Tools Help Sync Schedule Explore Guest Connected Hide Details Information Type StatusStep 3: Click on the "Explore" button in the ActiveSync window, and then copy the UPort_COM_v1.0_Setup.cab (Win CE 6.0) or UPort_COM_v1.1_Setup.cab (Win CE 5.0) file to the "Mobile/Target Device".
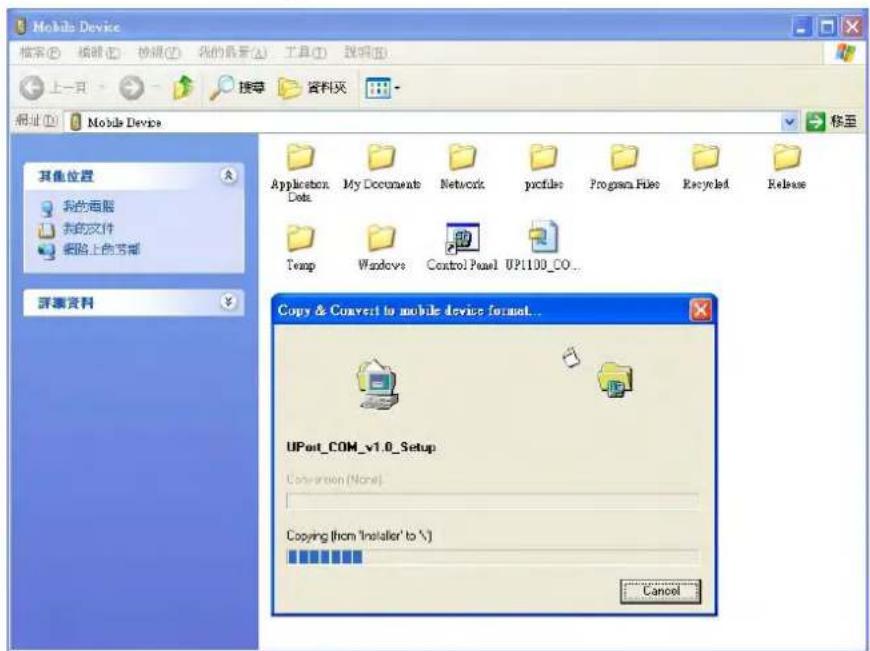
Step 4: Double click on the CAB file (UPort_COM_v1.0_Setup.cab (Win CE 6.0) or UPort_COM_v1.1_Setup.cab (Win CE 5.0)) to start installing the UPort 1200/1400/1600 Series WinCE driver. After installing the driver, plug the UPort 1200/1400/1600 Series USB Serial device into the WinCE device's USB port. The driver will be loaded automatically, after which the UPort 1200/1400/1600 will be ready to use.
Removing the Moxa Win CE 5.0/CE6.0 Driver
Step 1: Enter Control Panel → Remove Programs.
Step 2: Select MOXA UPort 1200/1400/1600 Windows CE6 Driver Ver1.0 (For Win CE 6.0) or MOXA UPort 1200/1400/1600 Windows CE5 Driver Ver1.1 (For Win CE 5.0)
Step 3: Click Remove.
Installing the Linux Driver
Linux Kernel 2.6.x
The Linux driver provided with the UPort 1200/1400/1600 maps Linux host ttyMXUSBxx ports to UPort device ports. Once the mapping has been set up, Linux users and applications can connect to a device port as if it were a ttyMXUSBxx port. These drivers have been designed and tested for the majority of Linux distributions, including Linux kernel version 2.6.x. Please check Moxa's website (http://www.moxa.com) for the latest Linux kernel support.
The Linux drivers support the following models:
2-port UPort Models
• UPort 1250: 2-port RS-232/422/485 USB-to-serial converter
- UPort 1250I: 2-port RS-232/422/485 USB-to-serial converter with isolation
4-port UPort Models
• UPort 1410: 4-port RS-232 USB-to-serial converter
• UPort 1450: 4-port RS-232/422/485 USB-to-serial converter
- UPort 1450I: 4-port RS-232/422/485 USB-to-serial converter with isolation
8-port UPort Models
• UPort 1610-8: 8-port RS-232 USB-to-serial converter
• UPort 1650-8: 8-port RS-232/422/485 USB-to-serial converter
16-port UPort Models
• UPort 1610-16: 16-port RS-232 USB-to-serial converter
• UPort 1650-16: 16-port RS-232/422/485 USB-to-serial converter
Driver Files
First obtain the Linux driver file driv_linux2.6_uport_v1.0_build_xxx.tgz from the Document and Software CD, or from Moxa's website at http://www.moxa.com. Save the driver file to a specific directory, such as /moxa, and then execute the commands listed below. In this example, we use the Ver. 1.0 driver file name: driv_linux2.6_uport_v1.0_build_xxx.tgz.
<h1 id="cd">cd /</h1>
<h1 id="mkdir-moxa">mkdir moxa</h1>
<h1 id="cd-moxa">cd /moxa</h1>
<h1 id="cp-devfd0driv_linux26_uport_v10_build_xxxtgz">cp /dev/fd0/driv_linux2.6_uport_v1.0_build_xxx.tgz .</h1>
<h1 id="tar-xvfz-driv_linux26_uport_v10_build_xxxtgz">tar xvfz driv_linux2.6_uport_v1.0_build_xxx.tgz</h1>
or
<h1 id="cd-2">cd /</h1>
<h1 id="mkdir-moxa-2">mkdir moxa</h1>
<h1 id="cd-moxa-2">cd /moxa</h1>
<h1 id="cp-mntcdromdriver-dirdriv_linux26_uport_v10_build_xxxtgz">cp /mnt/cdrom/<driver dir>/driv_linux2.6_uport_v1.0_build_xxx.tgz .</h1>
<h1 id="tar-xvfz-driv_linux26_uport_v10_build_xxxtgz-2">tar xvfz driv_linux2.6_uport_v1.0_build_xxx.tgz</h1>
Module Driver Configuration
We cover the following topics in this section:
▶ Building the Moxa Driver
➢ Installing the Moxa Driver
Building the Moxa Driver
Before using the Moxa driver, you will need to compile all of the source code. This only needs to be done once, unless you modify the source code. If the source code is modified, then you will need to re-compile it.
To compile the source code, change to the /moxa/mxuport directory, and then run the ls (list) command to check if the Makefile file is in the directory. Next, run the "make" command as follows:
# make
Installing the Moxa Driver
To install the Moxa driver, change to the /moxa/mxuport directory, and then run the ls (list) command to check if the Makefile file is in the directory. Next, run the “make install” command as follows:
# make install
The driver files “mxuport.ko” and “mxusbserial.ko” will be compiled and copied to system directories.
Loading the Moxa Driver
To load the Moxa driver, change to the /moxa/mxuport directory, and then run the ls (list) command to check if the Makefile file is in the directory. Next, run the "modprobe mxuport" command as follows:
# modprobe mxuport
After loading the Moxa driver, run the following command to check the Moxa serial port
# ls /dev/ttyMXUSB*
NOTE: The serial COM port will be ttyMXUSB[nnn], nnn = 0\~255.
For example,ttyMXUSB0,ttyMXUSB1 ...
Unloading the Moxa driver
To unload the Moxa driver, change to the /moxa/mxuport directory, and then run the ls (list) command to check if the Makefile file is in the directory. Next, run the two "rmmod" commands as follows:
# rmmod mxuport
rmmod mxusbserial
Uninstalling the Moxa driver
To uninstall the Moxa driver, change to the /moxa/mxuport directory, and then run the ls (list) command to check if the Makefile file is in the directory. Next, run the two “make remove” command as follows:
# make remove
Setting the Serial Parameters
After installing the Moxa Linux Driver, you will be able to configure parameters.
1. Serial Interface:
The UPort 1250/1250I/1450/1450I/1650-8/1650-16 supports four interfaces: RS-232, RS-485 2W, RS-485 4W, RS-422. If you want to switch to a different interface, execute the setserial command to set the port's interface. The supported parameters are listed below.
| Parameter Value Interface | |
| 0x0 RS-232 | |
| 0x1 RS-485 2W | |
| 0x2 RS-422 | |
| 0x3 RS-485 4W | |
Example:
(i) The following command sets the interface of "/dev/ttyMXUSB0" to RS-422: # setserial /dev/ttyMXUSB0 port 0x2
(ii) Use the following command to look up the serial settings of the current port: # setserial -g /dev/ttyMXUSB0
2. Serial Baudrate:
spd_hi Use 57.6 KB when the application requests 38.4 KB.
spd_vhi Use 115.2 KB when the application requests 38.4 KB.
spd_shi Use 230 KB when the application requests 38.4 KB.
spd_warp Use 460 KB when the application requests 38.4 KB.
spd_normal Use 38.4 KB when the application requests 38.4 KB.
Example:
# setserial /dev/ttyMXUSB0 spd_vhi
Troubleshooting
1. Compile error
Building a Moxa driver requires kernel header files. If you get a compile error, run rpm -qa | grep kernel to check if the kernel-source package is installed properly. If not, get the kernel-source irpm package and run rpm -ivh
2. No such file or directory
This problem occurs when a device node is not generated automatically when loading the driver. It usually happens with previous kernel versions, such as versions 2.6.0 to 2.6.5. Therefore, just execute the make node script “upmknod” to generate the device node.
The UPort 1250/1250I have 2 RS-232/422/485 ports, the UPort 1410 has 4 RS-232 ports, the UPort 1450/1450I have 4 RS-232/422/485 ports, the UPort 1610-8/1610-16 have 8 or 16 RS-232 ports, and the UPort 1650-8/1650-16 has 8/16 RS-232/422/485 ports.
Serial Port Pinouts
DB9 Male RS-232 Port for UPort 1410/1610-8/1610-16
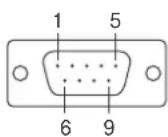
| Pin | RS-232 |
| 1 | DCD |
| 2 | RxD |
| 3 | TxD |
| 4 | DTR |
| 5 | GND |
| 6 | DSR |
| 7 | RTS |
| 8 | CTS |
DB9 Male RS-232/422/485 Port for UPort 1250/1250I/1450/1450I/1650-8/1650-16
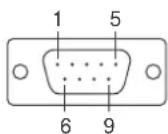
| Pin | RS-232 | RS-422/4-wire RS-485 | 2-wire RS-485 |
| 1 | DCD | TxD-(A) | --- |
| 2 | RxD | TxD+(B) | --- |
| 3 | TxD | RxD+(B) | Data+(B) |
| 4 | DTR | RxD-(A) | Data-(A) |
| 5 | GND | GND | GND |
| 6 | DSR | --- | --- |
| 7 | RTS | --- | --- |
| 8 | CTS | --- | --- |
Mini DB9F-to-TB* for RS-422/485 wiring
| DB9F | Terminal Block |
| 1 | 2 |
| 2 | 1 |
| 3 | 3 |
| 4 | 4 |
| 5 | 5 |
* An adaptor is included with the UPort 1250, 1250I, 1450, 1450I, 1650-8, and 1650-16.