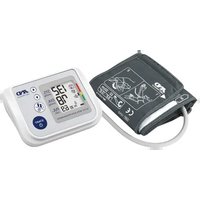
UA-767NFC - Blood pressure monitor A&D - Free user manual and instructions
Find the device manual for free UA-767NFC A&D in PDF.


User questions about UA-767NFC A&D
0 question about this device. Answer the ones you know or ask your own.
Ask a new question about this device
Download the instructions for your Blood pressure monitor in PDF format for free! Find your manual UA-767NFC - A&D and take your electronic device back in hand. On this page are published all the documents necessary for the use of your device. UA-767NFC by A&D.
USER MANUAL UA-767NFC A&D
Digital Blood Pressure Monitor
Model UA-767NFC
Instruction Manual
Original
Preliminary Remarks....2
Precautions 2
Parts Identification 4
Symbols......5
Operation Mode 7
Using the Monitor 8
Installing / Changing the Batteries....8
Connecting the AC Adapter 8
Connecting the Air Hose 9
Setting and Adjusting the Clock....9
Notes on the Built-in Clock....10
Selecting the Correct Cuff Size.... 11
Applying the Arm Cuff 12
How to Take Accurate Measurements.... 12
Measurement 12
After Measurement....12
Measurements....13
Normal Measurement....13
Measurement with the Desired Systolic Pressure.... 14
Notes for Accurate Measurement.... 15
Near Field Communication (NFC) Function.... 16
Displaying the Memory Data....16
Switching the Memory Setting.... 17
Transmitting the Memory Data 18
Transmitting the Measurement Data 18
What is an Irregular Heartbeat 19
Pressure Bar Indicator 19
About Blood Pressure....19
What is Blood Pressure?......19
What is Hypertension and How is it Controlled?...... 20
Why Measure Blood Pressure At Home? 20
WHO Blood Pressure Classification....20
Blood Pressure Variations....20
Troubleshooting....21
Maintenance....22
Technical Data 22
Dear Customers
Congratulations on purchasing a state-of-the-art A&D blood pressure monitor, one of the most advanced monitors available today. Designed for ease of use and accuracy, this monitor will facilitate your daily blood pressure regimen.
We recommend that you read through this manual carefully before using the device for the first time.
Preliminary Remarks
☐ This device conforms to the European Directive 93/42 EEC for Medical Products. This is made evident by the C_0123 mark of conformity. (0123: The reference number to the involved notified body)
☐ The device is designed for use on adults only, not newborns or infants.
- Environment for use. The device is for use in the home healthcare environment.
☐ This device is designed to measure blood pressure and pulse rate of people for diagnosis.
Precautions
- Precision components are used in the construction of this device. Extreme temperature, humidity, direct sunlight, shock or dust should be avoided.
- Clean the device and cuff with a dry, soft cloth or a cloth dampened with water and a neutral detergent. Never use alcohol, benzene, thinner or other harsh chemicals to clean the device or cuff.
- Avoid tightly folding the cuff or storing the hose tightly twisted for long periods, as such treatment may shorten the life of the components.
Take care to avoid accidental strangulation of babies or infants with the hose.
☐ Do not twist the air hose during measurement. This may cause injury due to continuous cuff pressure.
☐ The device and cuff are not water resistant. Prevent rain, sweat and water from soiling the device and cuff.
□ Measurements may be distorted if the device is used close to televisions, microwave ovens, X-ray or other devices with strong electrical fields.
□ Used equipment, parts and batteries are not treated as ordinary household waste, and must be disposed of according to the applicable local regulations. - When the AC adapter is used, make sure that the AC adapter can be readily removed from the electrical outlet when necessary.
- When reusing the device, confirm that the device is clean.
☐ Do not modify the device. It may cause accidents or damage to the device.
☐ To measure blood pressure, the arm must be squeezed by the cuff hard enough to temporarily stop blood flow through the artery. This may cause pain, numbness or a temporary red mark to the arm. This condition will appear especially when measurement is repeated successively. Any pain, numbness, or red marks will disappear with time.
☐ Measurement blood pressure too frequently may cause harm due to blood flow interference. Check that the operation of the device does not result in prolonged impairment of blood circulation, when using the device repeatedly.
☐ If you have had a mastectomy, please consult a doctor before using the
device.
☐ Do not let children use the device by themselves and do not use the device in a place within the reach of infants.
☐ There are small parts that may cause a choking hazard if swallowed by mistake by infants.
- Wireless communication devices, such as home networking devices, mobile phones, cordless phones and their base stations, walkie-talkies can affect this blood pressure monitor.
Therefore, a minimum distance of 3.3 meters(11 feet) should be kept from such devices.
Contraindications
The following are precautions for proper use of the device.
☐ Do not apply the cuff on an arm with another medical electrical equipment attached. The equipment may not function properly.
- People who have a severe circulatory deficit in the arm must consult a doctor before using the device, to avoid medical problems.
☐ Do not self-diagnose the measurement results and start treatment by yourself. Always consult your doctor for evaluation of the results and treatment.
☐ Do not apply the cuff on an arm with an unhealed wound.
☐ Do not apply the cuff on an arm receiving an intravenous drip or blood transfusion.
It may cause injury or accidents.
☐ Do not use the device where flammable gases such as anesthetic gases are present. It may cause an explosion.
☐ Do not use the device in highly concentrated oxygen environments, such as a high-pressure oxygen chamber or an oxygen tent. It may cause a fire or explosion.
Parts Identification
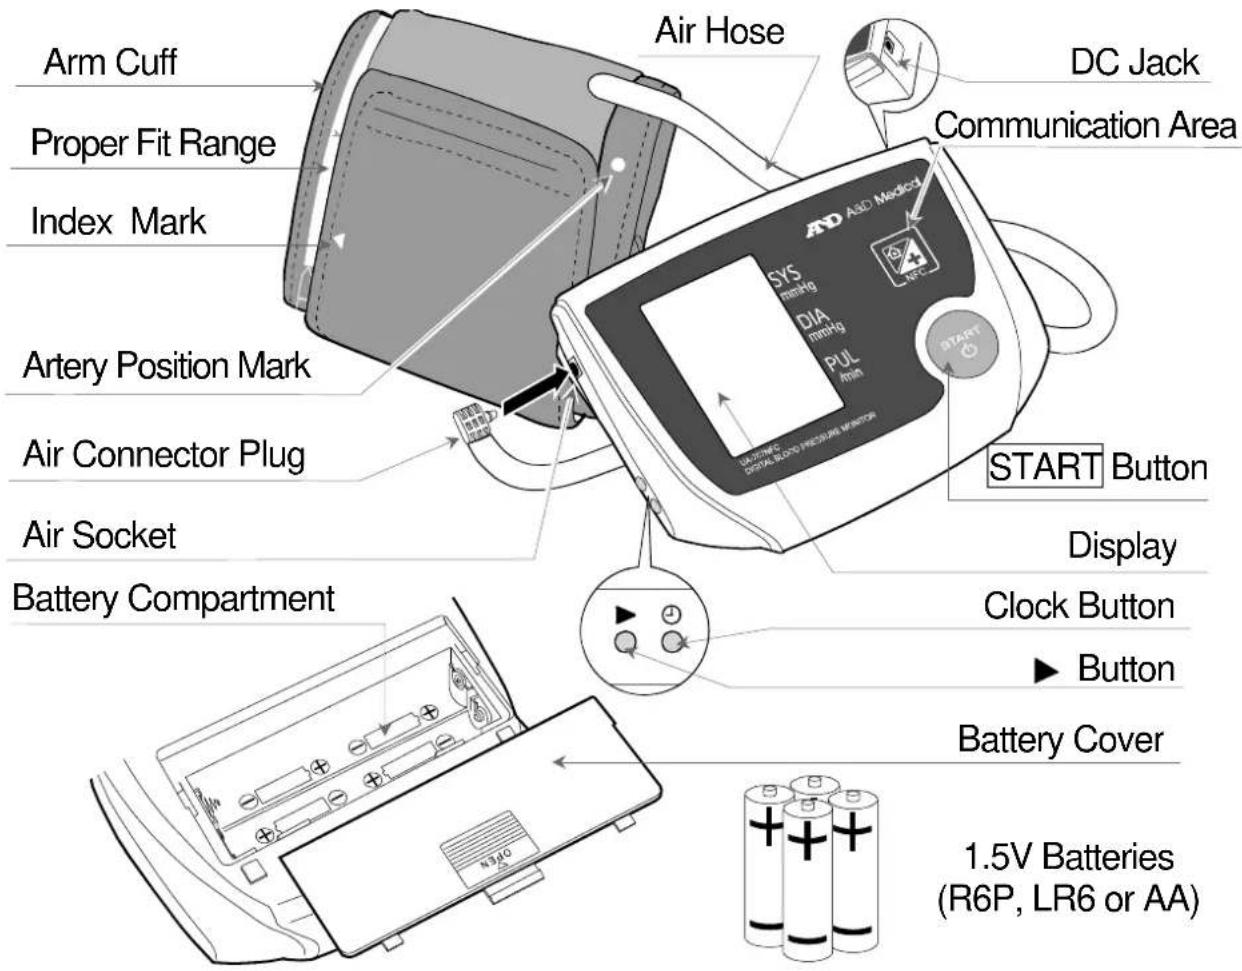
text_image
Air Hose DC Jack Communication Area Arm Cuff Proper Fit Range Index Mark Artery Position Mark Air Connector Plug Air Socket Battery Compartment SYS miniHg DIA miniHg PUL mini START Button Display Clock Button Button Battery Cover 1.5V Batteries (R6P, LR6 or AA)Part of Display
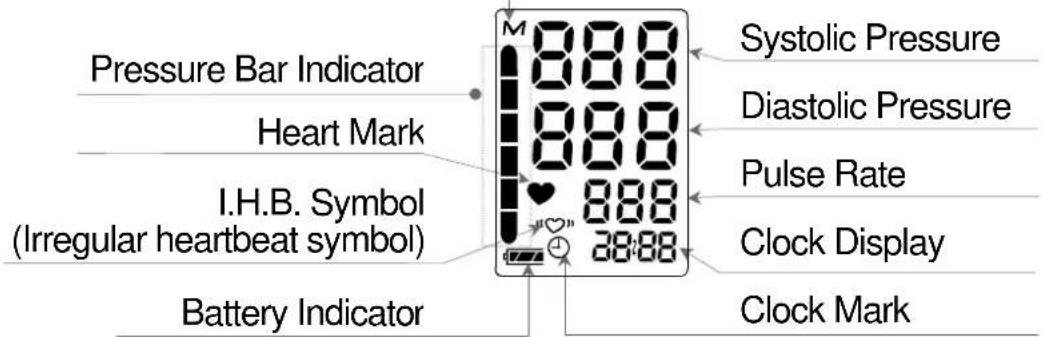
text_image
Pressure Bar Indicator Heart Mark I.H.B. Symbol (Irregular heartbeat symbol) Battery Indicator M 888 888 888 28:88 Systolic Pressure Diastolic Pressure Pulse Rate Clock Display Clock MarkSymbols
Symbols that are printed on the device case
| Symbols | Function / Meaning |
| Standby and Turn the device on. | |
| SYS | Systolic blood pressure in mmHg |
| DIA | Diastolic blood pressure in mmHg |
| PUL/min | Pulse per minute |
| Battery installation guide | |
| Direct current | |
| Type BF: Device, cuff and tubing are designed to provide special protection against electrical shocks. | |
| EC directive medical device label | |
| EU-representative | |
| Manufacturer | |
| Date of manufacture | |
| International protection symbol | |
| WEEE label | |
| Serial number | |
| Refer to instruction manual/booklet | |
| Polarity of DC jack | |
| Keep dry |
Symbols that appear on the display
| Symbols | Function / Meaning | Recommended | Action |
 | Appears while measurement is in progress. It blinks when the pulse is detected. | Measurement is in progress.Remain as still as possible. | |
 | Irregular Heartbeat symbol (I.H.B.) Appears when an irregular heartbeat is detected. It may light when a very slight vibration like shivering or shaking is detected. | —— | |
 | Previous measurements stored in MEMORY. | —— | |
Symbols
| Symbols | Function / Meaning | Recommended | Action |
 | FULL BATTERYThe battery power indicator during measurement. | —— | |
 | LOW BATTERYThe battery is low when it blinks. | Replace all batteries with new ones, when the indicator blinks. | |
 | Unstable blood pressure due to movement during the measurement. | Try the measurement again.Remain very still during the measurement. | |
| The systolic and diastolic values are within 10 mmHg of each other. | Fasten the cuff correctly, and try the measurement again.. | ||
| The pressure value did not increase during the inflation. | |||
 | The cuff is not applied correctly. | ||
 | PUL. DISPLAY ERRORThe pulse is not detected correctly. | ||
 | Cannot communicate. | The communication device may be slanted or placed out of the communication area of the device.Hold the communication symbol of the NFC-enabled communication device close to the communication area of the device until “End” appears. | |
 | |||
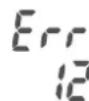 | |||
 | Attempted to transmit the memory data when the memory setting is 0. | Set the memory to 100. | |
 | Appears during the clock setting procedure | —— | |
Operation Mode
1. Normal Measurement
Press the START button. Blood pressure is measured.
2. Memory Function
When the memory setting is 100:
This device will store the last 100 measurements in memory.
When the measurement exceeds 100, the oldest data will be deleted automatically and the most recent data will be stored.
When the memory setting is 0:
This device will not store any data in memory.
3. Deleting all Data Stored in Memory
Make sure that the device displays the clock.
Press and hold the button.
The M mark appears. After a while it starts blinking, then disappears.
Now all data stored in memory has been deleted.
Note: This operation will delete all data stored in memory. You cannot select which data to delete.

flowchart
graph TD
    A["Start"] --> B["M"]
    B --> C["Step 1:3"]
    C --> D["M"]
    D --> E["Step 2:3"]
4. Measurement with the Desired Systolic Pressure
Refer to page 14 for measurement with the desired systolic pressure.
Using the Monitor
Installing / Changing the Batteries
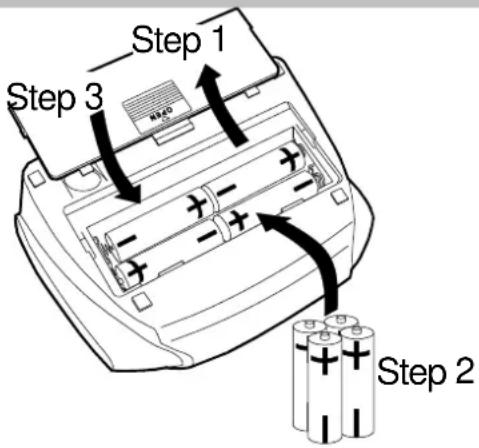
- Slide the battery cover up to open it.
- Remove the used batteries
and insert new batteries into the battery compartment as shown, taking care that the polarities (+) and (−) are correct.
- Slide the battery cover down to close.
Use only R6P, LR6 or AA batteries.
text_image
Step 1 Step 3 Step 2CAUTION
☐ Insert the batteries as shown in the battery compartment. If installed incorrectly, the device will not work.
- When ( LOW BATTERY mark) blinks on the display, replace all batteries with new ones. Do not mix old and new batteries. It may shorten the battery life, or cause the device to malfunction.
Wait two seconds or more after turning the device off, to replace the batteries.
☐ (LOW BATTERY mark) appears even after the batteries are replaced, make a blood pressure measurement. The device may then recognize the new batteries.
☐ (LOW BATTERY mark) does not appear when the batteries are drained.
☐ The battery life varies with the ambient temperature and may be shorter at low temperatures. Generally, four new LR6 batteries will last approximately for six months when used twice for measurement each day.
□ Use the specified batteries only.
- Remove the batteries if the device is not to be used for a long time.
The batteries may leak and cause a malfunction.
Connecting the AC Adapter
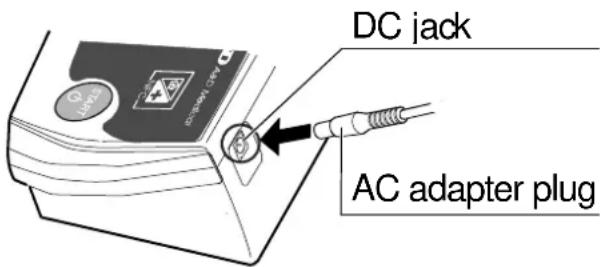
Insert the AC adapter plug into the DC jack.
Then, connect the AC adapter to an electrical outlet.
☐ Use the specified AC adapter. (Refer to page 22.)
text_image
DC jack AC adapter plugNote: When inserting the batteries or connecting the AC adapter, "Year" blinks automatically and the screen will go to the clock setting mode. Set the clock as described on page 8.
Every time the batteries are inserted or the AC adapter is connected, the clock needs to be reset. Measurement cannot start until a time is set on the clock.
Using the Monitor
Connecting the Air Hose
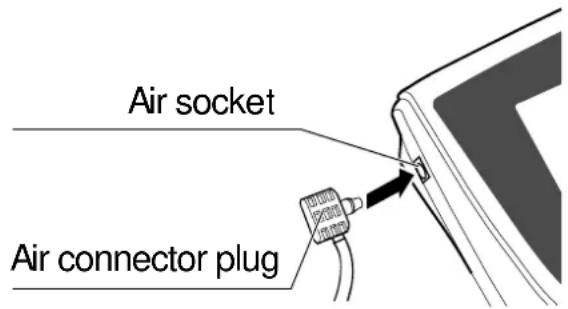
Insert the air connector plug into the air socket firmly.
text_image
Air socket Air connector plugSetting and Adjusting the Clock
Set or adjust the clock prior to use.
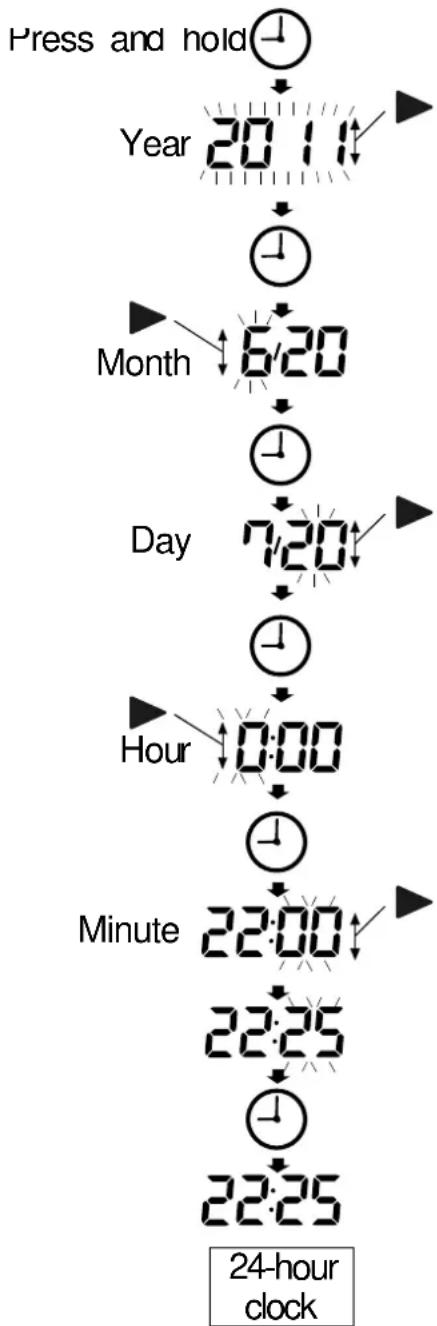
- Press and hold the ⏻ button until the year starts blinking.
When inserting the batteries or connecting the AC adapter, "Year" blinks automatically.
- Select the year using the ▶ button. Press the button to set the current year and move to month/day selection. The date can be set anywhere between the years 2011 and 2055.
- Select the month using the▶ button. Press the① button to set the current month and move to day selection.
- Select the day using the ▶ button. Press the ^① button to set the current day and move to hour/minute selection.
- Select the hour using the ▶ button. Press the button to set the current hour and move to minute selection.
- Select the minute using the ▶ button. Press the button to set the current minute and activate the clock.
flowchart
graph TD
    A["Press and hold"] --> B["Year 20:00"]
    B --> C["Month 6:20"]
    C --> D["Day 7:20"]
    D --> E["Hour 0:00"]
    E --> F["Minute 22:00"]
    F --> G["23:25"]
    G --> H["23:25"]
    style A fill:#f9f,stroke:#333
    style H fill:#f9f,stroke:#333
Notes on the Built-in Clock
☐ The device displays the clock as long as power is connected.
□ Adjust the clock prior to use.
☐ During measurement, the clock adjustment is not available.
☐ When adjusting the clock, press the button to increase the value by one, or press and hold the ▶ button to change the value continuously.
☐ The setting procedure cannot be reversed. If the wrong value is set, start the setting procedure again.
☐ The current clock setting will be cleared if the batteries are removed, or power is not connected for approximately 30 seconds while the AC adapter is used. In this case, adjust the clock again.
If the clock is set and you want to manually adjust the time:
☐ Press and hold the ⏻ button to go to clock settings.
☐ You can cancel the settings by pressing the START button and the screen will return to the clock display mode.
- After 30 seconds of non-operation, the setting procedure will be automatically canceled and the screen will return to the clock display mode.
When inserting, exchanging the batteries or connecting the AC adapter:
☐ “Year” blinks automatically and the screen will go to clock settings.
☐ To start measurement, set the clock as described on page 8.
- Pressing the START button will not return to the clock display mode. You must complete clock settings first.
☐ After 30 seconds of non-operation, the setting procedure will be automatically canceled and the screen will display 0:00. (Clock setting is not completed and measurement cannot start.)
- When exchanging the batteries or reconnecting the AC adapter, the screen displays Year, month, and date last time the batteries or AC adapter was removed. You need to complete the setting of actual date and clock before use.
Using the Monitor
Selecting the Correct Cuff Size
Using the correct cuff size is important for an accurate reading. If the cuff is not the proper size, the reading may yield an incorrect blood pressure value.
☐ The arm size is printed on each cuff.
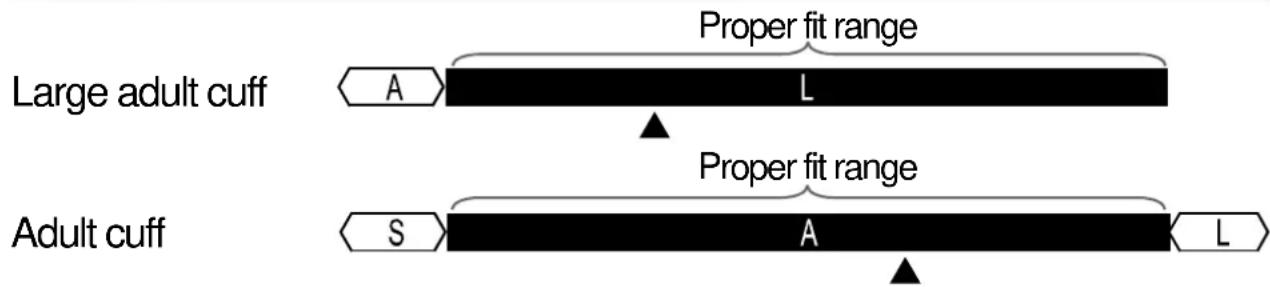
☐ The index ▲ and proper fit range, on the cuff, tell you if you are applying the correct cuff. (Refer to "Symbols that are printed on the cuff".)
☐ If the index ▲ points outside of the range, contact your local dealer to purchase a replacement cuff.
☐ The arm cuff is a consumable. If it becomes worn, purchase a new one.
| Arm Size Recommended Cuff Size Catalog Number | |
| 31 cm to 45 cm Large adult cuff CUF-F-LA | |
| 22 cm to 32 cm Adult Cuff CUF-F-A | |
Arm size: The circumference of the biceps.
Note: The UA-767NFC is not designed for using a small adult cuff.
Symbols that are printed on the cuff.
| Symbols | Function / Meaning Recommended Action | |
| ● | Artery Position mark | Set the ● mark on the artery of the upper arm or in line with the ring finger on the inside of the arm. |
| ▲ | Index | —— |
| REF | Catalog number | —— |
| A | Proper fit range for the Adult cuff.It's printed on the Adult cuff. | —— |
| L | Over range printed on the Adult cuff. | Use the Large adult cuff instead of the Adult cuff. |
| L | Proper fit range for the Large adult cuff.It's printed on the Large adult cuff. | —— |
| S | Under range printed on the Adult cuff. | |
| A | Under range printed on the Large adult cuff. | Use the Adult cuff instead of the Large adult cuff. |
| LOT | Lot number | —— |
text_image
Large adult cuff A L Proper fit range Proper fit range Adult cuff S A LEnglish
Using the Monitor
Applying the Arm Cuff
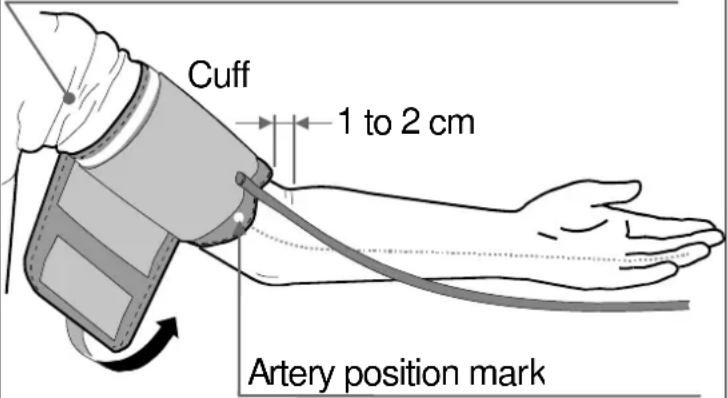
- Wrap the cuff around the upper arm, about 1 – 2 cm above the inside of the elbow, as shown. Place the cuff directly against the skin, as clothing may cause a faint pulse, and result in a measurement error.
- Constriction of the upper arm, caused by tightly rolling up a shirtsleeve, may prevent accurate readings.
- Confirm that the index ▲ points within the proper fit range.
Do not roll up shirtsleeve tightly
text_image
Cuff 1 to 2 cm Artery position mark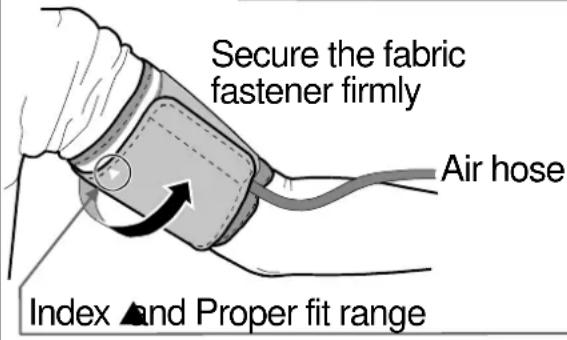
text_image
Secure the fabric fastener firmly Air hose Index ▲ and Proper fit rangeHow to Take Accurate Measurements
For the most accurate blood pressure measurement:
- Sit comfortably on a chair. Rest your arm on the table. Do not cross your legs. Keep your feet on the floor and straighten your back.
- Relax for about five to ten minutes before measurement.
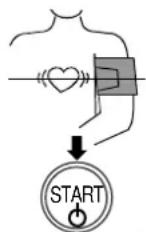
- Place the center of the cuff at the same level as your heart.
- Remain still and keep quiet during measurement.
☐ Do not measure right after physical exercise or a bath. Rest for twenty or thirty minutes before taking the measurement. - Try to measure your blood pressure at the same time every day.
Measurement
During measurement, it is normal for the cuff to feel very tight. (Do not be alarmed).
After Measurement
After measurement, press the START button to turn the device off.
Remove the cuff and record your data.
Measurements
Before measurement, refer to the section "Notes for Proper Measurement" on page 14.
Normal Measurement
- Place the cuff on the arm (preferably the left arm).
Sit quietly during measurement.
- Press the START button.
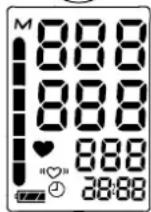
All of the display segments are displayed.
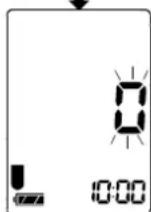
Zero (0) is displayed blinking briefly.
The display changes, as indicated in the figure at the right, as the measurement begins. The cuff starts to inflate. It is normal for the cuff to feel very tight. A pressure bar indicator is displayed, on the left edge of the display, during the inflation.
Note: If you wish to stop inflation at any time, press the START button again.
- When inflation is complete, deflation starts automatically and ♥ (heart mark) blinks, indicating that the measurement is in progress. Once the pulse is detected, the mark blinks with each pulse beat.
Note: If an appropriate pressure is not obtained, the device starts to inflate again automatically.
To avoid re-inflation, see
"Measurement with the Desired Systolic Pressure" on the next page.
- When the measurement is complete, the systolic and diastolic pressure readings and pulse rate are displayed.
The cuff exhausts the remaining air and deflates completely.
- Press the START button to turn the device off.
After one minute of non-operation, the device will turn off automatically.
Note: Allow at least three minutes between measurements on the same person.
At heart level
Press
All of the display segments displayed
Zero display Starts inflation
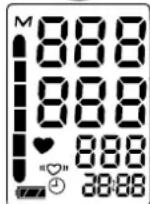
Pressurizing
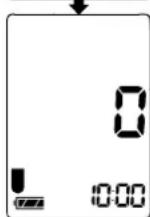
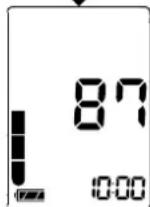
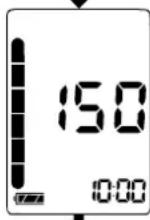
Measurement in progress

Systolic pressure
Diastolic pressure
Pulse
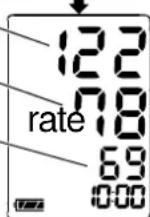
Exhausts remaining air automatically
Measurements
Measurement with the Desired Systolic Pressure
The UA-767NFC is designed to detect the pulse and to inflate the cuff to a systolic pressure level automatically.
Use this method when re-inflation occurs repeatedly or when the results are not displayed even if the pressure decreases to 20 mmHg or less.
When the memory setting is 0:
- Place the cuff on the arm (preferably the left arm).
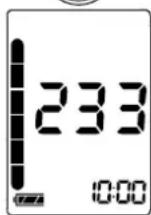
- Press and hold the START button until a number about 30 to 40 mmHg higher than your expected systolic pressure appears.
- When the desired number is reached, release the START button to start measurement. Continue to measure your blood pressure as described on the previous page.
When the memory setting is 100:
- Place the cuff on the arm (preferably the left arm).
- Press the START button. All of the display segments are displayed. Zero (0) is displayed blinking briefly.
- Press and hold the START button until a number about 30 to 40 mmHg higher than your expected systolic pressure appears.
- When the desired number is reached, release the START button to start measurement. Continue to measure your blood pressure as described on the previous page.
At heart level
Press and hold the button
Release the button at the desired systolic pressure
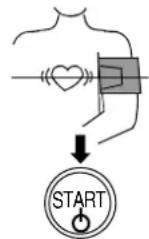
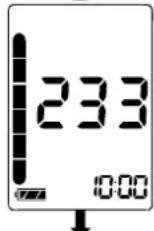
Refer to the previous page for measurement
At heart level
Press
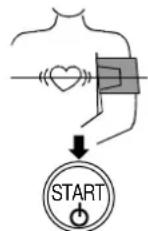
All of the display segments displayed
Zero blinking
Press and hold the button
Release the button at the desired systolic pressure
Refer to the previous page for measurement
Notes for Accurate Measurement
Sit down in a comfortable position. Place your arm on a table with your palm facing upward and the cuff at the same level as your heart.
☐ Relax for about five to ten minutes before taking a measurement. If you are excited or depressed by emotional stress, the measurement will reflect this stress as a higher (or lower) than normal blood pressure reading and the pulse reading will usually be faster than normal.
☐ An individual's blood pressure varies constantly, depending on what you are doing and what you have eaten. What you drink can have a very strong and rapid effect on your blood pressure.
☐ This device bases its measurements on the heartbeat. If you have a very weak or irregular heartbeat, the device may have difficulty determining your blood pressure.
- Should the device detect a condition that is abnormal, it will stop the measurement and display an error symbol. Refer to page 6 for the description of symbols.
☐ This blood pressure monitor is intended for use by adults only. Consult with your physician before using this device on a child. A child should not use this device unattended.
Near Field Communication (NFC) Function
To transmit data to or from the device, communication devices that comply with the communication specifications of the device are required.
Examples of communication devices that comply
□ NFC-enabled cellular phone
☐ Personal computer with NFC reader/writer
□ Access Point
Displaying the Memory Data
When the memory setting is 100, the memory data can be displayed.
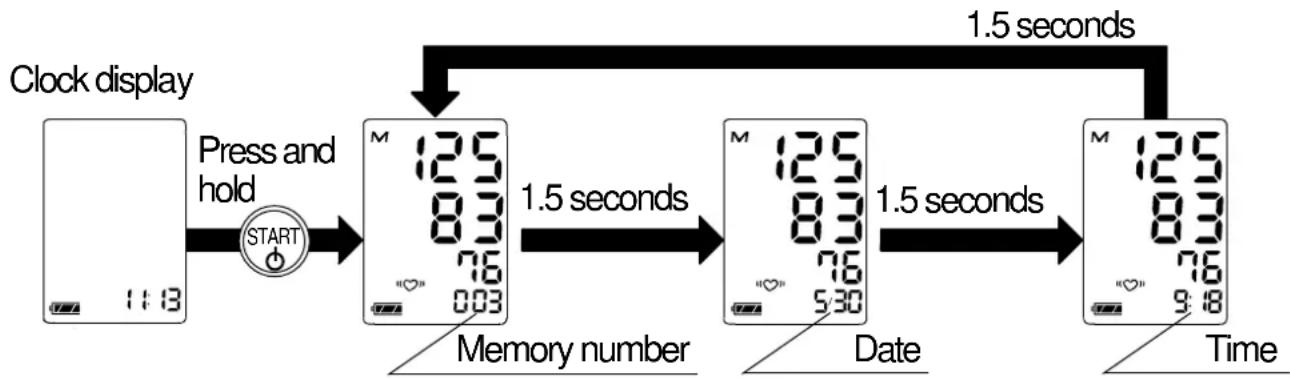
While the device displays the clock, press and hold the START button. The systolic pressure, diastolic pressure and pulse rate with the memory number are displayed. At every 1.5 seconds, the memory number display changes to the date, then to the time, and then to the memory number again.
Press the button to increase the memory number by one and press the ▶ button to decrease the memory number by one.
Press the START button to return to the clock display. After one minute of non-operation, the device will return to the clock display.
flowchart
graph LR
    A["Clock display"] --> B["Press and hold"]
    B --> C["Memory number M 125 83 76 003"]
    C --> D["Date"]
    D --> E["Time"]
    E --> F["1.5 seconds"]
    F --> G["1.5 seconds"]
    G --> H["1.5 seconds"]
    H --> I["1.5 seconds"]
    I --> J["1.5 seconds"]
    J --> K["1.5 seconds"]
    K --> L["1.5 seconds"]
    L --> M["1.5 seconds"]
    M --> N["1.5 seconds"]
    N --> O["1.5 seconds"]
    O --> P["1.5 seconds"]
    P --> Q["1.5 seconds"]
    Q --> R["1.5 seconds"]
    R --> S["1.5 seconds"]
    S --> T["1.5 seconds"]
    T --> U["1.5 seconds"]
    U --> V["1.5 seconds"]
    V --> W["1.5 seconds"]
    W --> X["1.5 seconds"]
    X --> Y["1.5 seconds"]
    Y --> Z["1.5 seconds"]

Press to increase the memory number by one.

Press to decrease the memory number by one.

Press to return to the clock display.
Note: Displaying the memory data is not available when the memory setting is 0.
Switching the Memory Setting
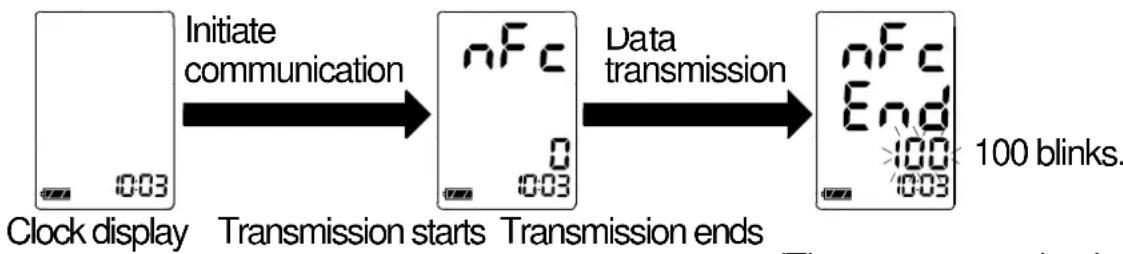
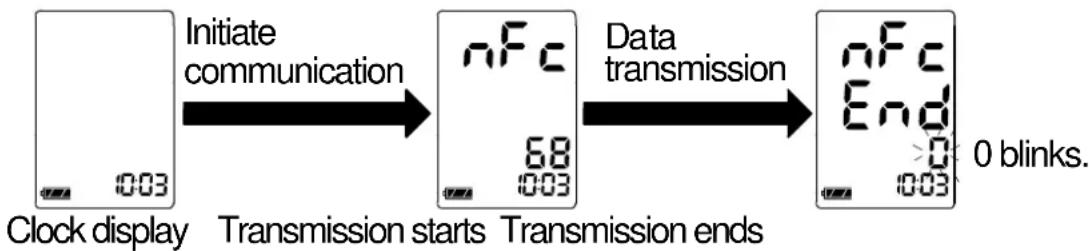
While the device displays the clock, hold the communication symbol of the NFC-enabled communication device close to the communication area (☐) of the device until "End" appears. The memory setting is switched.
flowchart
graph LR
    A["Clock display 0:03"] -->|Initiate communication| B["nFc 0:03"]
    B -->|Data transmission| C["nFc End 100:03"]
    C -->|100 blinks.| D["End"]
(The memory setting has been switched to 100.)
flowchart
graph LR
    A["Clock display"] -->|Initiate communication| B["nFc 68 003"]
    B -->|Data transmission| C["nFc End 0 003"]
    C -->|0 blinks.| D["End"]
(The memory setting has been switched to 0.)
Note: When switching the memory setting from 100 to 0, the memory data, if any, will be deleted.
Transmitting the Memory Data
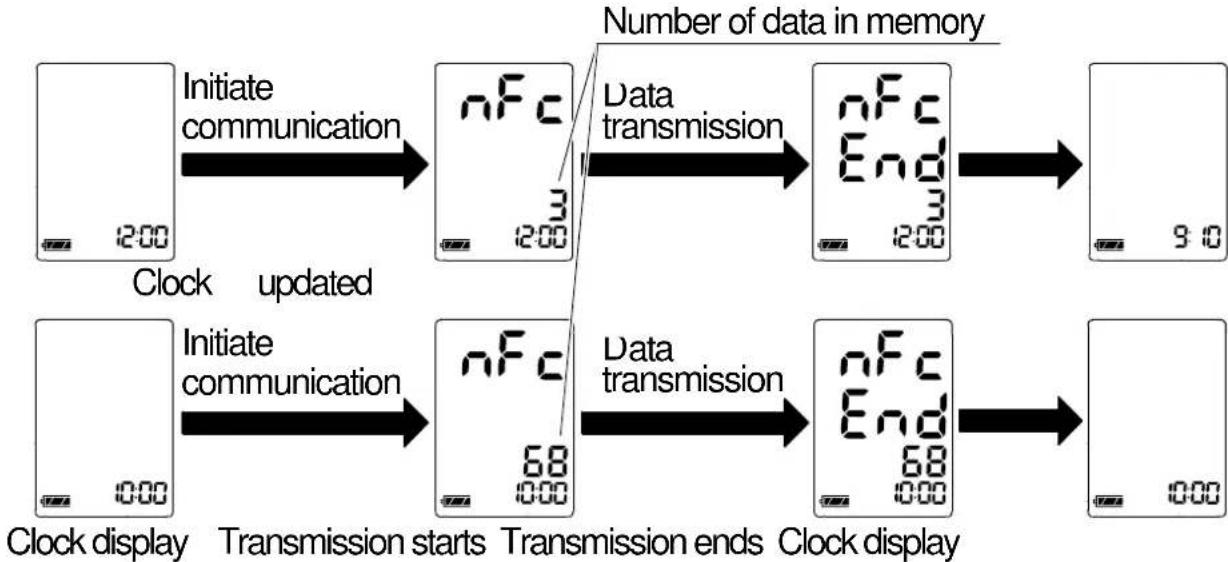
While the device displays the clock, hold the communication symbol of the NFC-enabled communication device close to the communication area (☐) of the device until “End” appears. The memory data transmission is performed. If the clock of the device is not correct, the clock will be updated at the same time.
flowchart
graph LR
    A["2:00 clock"] --> B["Initiate communication"]
    B --> C["nFc 3 2:00"]
    C --> D["Data transmission"]
    D --> E["nFc End 3 2:00"]
    E --> F["9:0 clock display"]

    G["0:00 clock"] --> H["Initiate communication"]
    H --> I["nFc 68 0:00"]
    I --> J["Data transmission"]
    J --> K["nFc End 68 0:00"]
    K --> L["0:00 clock display"]

    M["1:00 clock"] --> N["Transmission starts"]
    N --> O["Transmission ends"]
    O --> P["Clock display"]

    Q["Number of data in memory"] --> R["End 3"]
Transmitting the Measurement Data
When the measurement is complete and the device displays the results, hold the communication symbol of the NFC-enabled communication device close to the communication area (☐) of the device until “E” appears. The data transmission is performed. If the clock of the device is not correct, the clock will be updated at the same time.
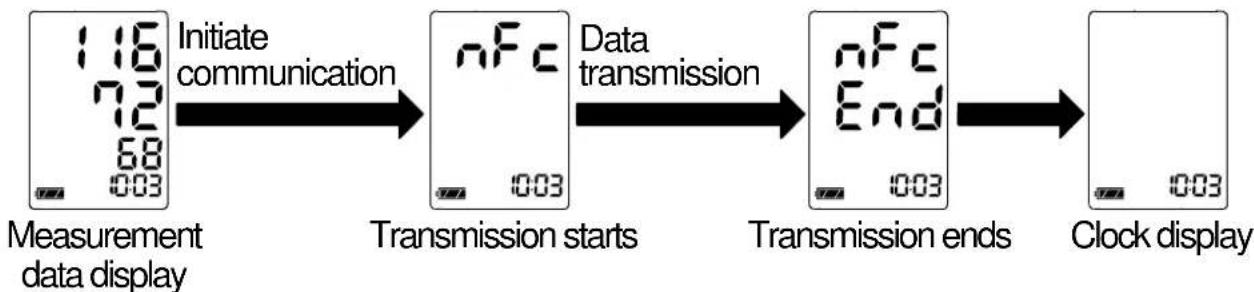
flowchart
graph LR
    A["Measurement data display"] -->|Initiate communication| B["Transmission starts"]
    B -->|Data transmission| C["Transmission ends"]
    C --> D["Clock display"]
Note: The result display will turn off automatically after one minute. To transmit the measurement data, initiate the communication within one minute after the measurement is complete.
Caution on Using the NFC Function
The UA-767NFC has an NFC Forum Type 3 Tag wireless interface module built in. When the device is used near wireless communication devices which use the same frequency as that of the device (13.56 MHz) or use its harmonic frequencies, electromagnetic interference may occur. In that case, turn off the devices that are not in use, or place the device 1 meter or more away from the devices.
What is an Irregular Heartbeat
The UA-767NFC provides a blood pressure and pulse rate measurement even when an irregular heartbeat occurs. An irregular heartbeat is defined as a heartbeat that varies by 25% from the average of all heartbeats during the blood pressure measurement. It is important that you are relaxed, remain still and do not talk during measurements.
Note: We recommend contacting your physician if you see this “(♡)” symbol frequently.
Pressure Bar Indicator
The indicator monitors the progress of pressure during measurement.
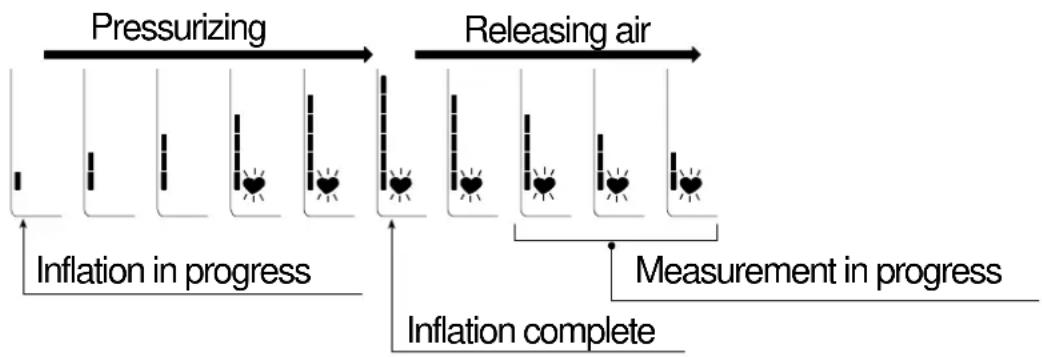
flowchart
graph LR
    A["Pressurizing"] --> B["Releasing air"]
    B --> C["Inflation complete"]
    C --> D["Measurement in progress"]
    style A fill:#f9f,stroke:#333
    style B fill:#ccf,stroke:#333
    style C fill:#cfc,stroke:#333
    style D fill:#fcc,stroke:#333
About Blood Pressure
What is Blood Pressure?
Blood pressure is the force exerted by blood against the walls of the arteries. Systolic pressure occurs when the heart contracts. Diastolic pressure occurs when the heart expands. Blood pressure is measured in millimeters of mercury (mmHg). One's natural blood pressure is represented by the fundamental pressure, which is measured first thing in the morning while one is still at rest and before eating.
About Blood Pressure
What is Hypertension and How is it Controlled?
Hypertension, an abnormally high arterial blood pressure, if left unattended, can cause many health problems including stroke and heart attack. Hypertension can be controlled by altering lifestyle, avoiding stress, and with medication under a doctor's supervision.
To prevent hypertension or keep it under control:
☐ Do not smoke Exercise regularly
- Reduce salt and fat intake Have regular physical checkups
- Maintain proper weight
Why Measure Blood Pressure At Home?
Blood pressure measured at a clinic or doctor's office may cause apprehension and can produce an elevated reading, 25 to 30 mmHg higher than that measured at home. Home measurement reduces the effects of outside influences on blood pressure readings, supplements the doctor's readings and provides a more accurate, complete blood pressure history.
WHO Blood Pressure Classification
Standards to assess high blood pressure, without regard to age, have been established by the World Health Organization (WHO), as shown in the chart.
Reference Material: Journal of Hypertension 1999, Vol 17 No.2

bar
| Hypertension Category | Diastolic blood pressure (mmHg) | | :--- | :--- | | Optimal | 80 | | Normal | 85 | | High-normal | 90 | | Grade 1 hypertension (mild) | 95 | | Grade 2 hypertension (moderate) | 100 | | Grade 3 hypertension (severe) | 110 |Blood Pressure Variations
An individual's blood pressure varies greatly on a daily and seasonal basis. It may vary by 30 to 50mmHg due to various conditions during the day. In hypertensive individuals, variations are even more pronounced. Normally, the blood pressure rises while at work or play and falls to its lowest levels during sleep. So, do not be overly concerned by the results of one measurement.
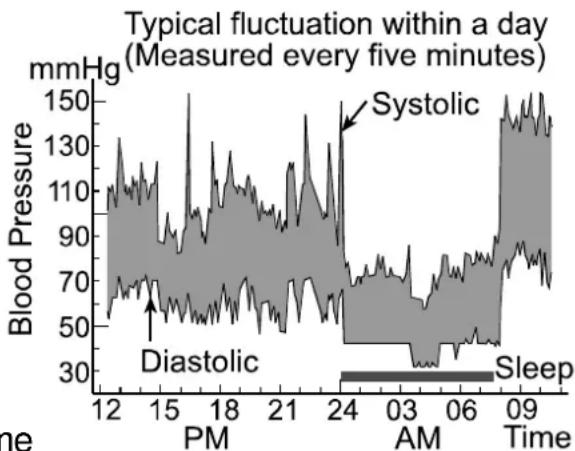
line
| Time | Blood Pressure (mmHg) | |------|------------------------| | 12 | ~70 | | 15 | ~150 | | 24 | ~150 | | 03 | ~30 | | 06 | ~30 | | 09 | ~150 |Take measurements at the same time
every day using the procedure described in this manual to get to know your normal blood pressure. Regular readings give a more comprehensive blood pressure history. Be sure to note the date and time when recording your blood pressure. Consult your doctor to interpret your blood pressure data.
Troubleshooting
| Problem | Possible Reason | Recommend |
| Nothing appears on the display, even when the power is turned on. | Batteries are drained. Replace all batteries with new ones. | |
| Battery terminals are not in the correct position. | Reinstall the batteries with negative and positive terminals matching those indicated on the battery compartment. | |
| The cuff does not inflate. | Battery voltage is too low.(LOW BATTERY mark) blinks. If the batteries are drained completely, the mark does not appear. | Replace all batteries with new ones. |
| The device does not measure. Readings are too high or too low. | The cuff is not applied properly. | Apply the cuff correctly. |
| You moved your arm or body during measurement. | Make sure you remain very still and quiet during measurement. | |
| The cuff position is not correct. | Sit comfortably and still.Place your arm on a table with your palm facing upward and the cuff at the same level as your heart. | |
| —— | If you have a very weak or irregular heartbeat, the device may have difficulty in determining your blood pressure. | |
| Other | The value is different from that measured at a clinic or doctor's office. | Refer to “Why Measure Blood Pressure At Home?”. |
| —— | Remove the batteries. Place them back properly and take another measurement. | |
Note: If the actions described above do not solve the problem, contact the dealer. Do not attempt to open or repair this product, as any attempt to do so will make your warranty invalid.
Maintenance
Do not open the device. It uses delicate electrical components and an intricate air unit that could be damaged. If you cannot fix the problem using the troubleshooting instructions, contact the authorized dealer in your area or our customer service department. The A&D customer service will provide technical information, spare parts and units to authorized dealers.
The device was designed and manufactured for a long service life. However it is generally recommended to have the device inspected every 2 years, to ensure proper functioning and accuracy. Please contact the authorized dealer in your area or A&D for maintenance.
Technical Data
Type UA-767NFC
Measurement method Oscillometric measurement
Measurement range Pressure: 0 - 280 mmHg
Pulse: 40 - 180 beats / minute
Measurement accuracy Pressure: ±3 mmHg
Pulse: ±5%
Power supply 4 x 1.5V batteries (R6P, LR6 or AA) or
AC adapter (TB-233) (Not included)
Number of measurements Approximately 450 measurements,
when AA Alkaline batteries are used, with pressure value of 180 mmHg, at room temperature of 23 °C.
Classification Internally powered ME equipment (Sup by batteries) / Class II (Supplied by adapter) Continuous operation mode
Clinical test According to ANSI / AAMI SP-10 1992
EMC IEC 60601-1-2: 2007
Memory 0 or 100 measurements (Only for devices that rewriting of the memory data is enabled.)
Operating condition +10 °C to +40 °C / 15 %RH to 85 %RH /
800 hPa to 1060 hPa
Transport / Storage condition -10 °C to +60 °C / 15 %RH to 95 %RH
Dimensions Approx. 147 [W] x 64 [H] x 110 [D] mm
Weight Approx. 300 g, excluding the batteries
Ingress protection Device:IP21
Applied part Cuff Type BF

Useful life Device: 5 years (when used six times a
day)
Cuff: 2 years (when used six times a day)
Wireless communication NFC wireless interface module
Accessory AC adapter The adapter is to connect the device to a
power source at home.
TB-233 Please contact your local A&D dealer for
purchasing.
The AC adapter is required to be inspected
or replaced periodically.
TB-233C
Input: 100–240V
Output: 6V --- 500mA


TB-233BF
Input: 240V
Output: 6V --- 500mA


Accessories sold separately
Cuff
| Catalog Number | Cuff Size | Arm Size |
| CUF-F-LA | Large adult cuff | 31 cm to 45 cm |
| CUF-F-A | Adult cuff | 22 cm to 32 cm |
Arm size: The circumference at the biceps.
AC adapter
| Catalog Number | Plug (Outlet type) |
| TB-233C | Type C |
| TB-233BF | Type BF |
Note: Specifications are subject to change without prior notice.
AND

A&D Company, Limited
1-243 Asahi, Kitamoto-shi, Saitama 364-8585, JAPAN
Telephone: [81] (48) 593-1111 Fax: [81] (48) 593-1119

A&D INSTRUMENTS LIMITED
Unit 24/26 Blacklands Way, Abingdon Business Park, Abingdon, Oxfordshire OX14 1DY United Kingd Telephone: [44] (1235) 550420 Fax: [44] (1235) 550485
A&D ENGINEERING, INC.
1756 Automation Parkway, San Jose, California 95131, U.S.A.
Telephone: [1] (408) 263-5333 Fax: [1] (408)263-0119
A&D AUSTRALASIA PTY LTD
32 Dew Street, Thebarton, South Australia 5031, AUSTRALIA
Telephone: [61] (8) 8301-8100 Fax: [61] (8) 8352-7409