Dualphone 3058 - Phone RTX - Free user manual and instructions
Find the device manual for free Dualphone 3058 RTX in PDF.


User questions about Dualphone 3058 RTX
0 question about this device. Answer the ones you know or ask your own.
Ask a new question about this device
Download the instructions for your Phone in PDF format for free! Find your manual Dualphone 3058 - RTX and take your electronic device back in hand. On this page are published all the documents necessary for the use of your device. Dualphone 3058 by RTX.
USER MANUAL Dualphone 3058 RTX
text_image
PC REQUIRED DUaLphone™ Taking internet telephony a step further 3058 DUALphone™ skype™ The whole world can talk for free. Skype.com Simple, clear internet calls with Skype™. skype Certified Cordless handset CALL FOR FREE EASY TO USEDUALphone™
Taking internet telephony a step further 3058
english
text_image
DUSLphone PC σo 1 ABC 2 DEF 3 GHI 4 JKL 5 MNO 6 PQRS 7 TUV 8 WXYZ 9 ★ a/A ← 0 ← # ○ R INTUser Manual
Dear customer
Thank you for purchasing our product. We hope you will enjoy using it. Please read this User Manual before you start using your new DUALphone 3058. If you experience any difficulties, please consult our support centre at www.dualphone.net.
CE Conformity of the telephone with EU directives is confirmed by the CE symbol. We hereby declare that the DUALphone 3058 comply with the essential requirements and other relevant provisions of the R&TTE Directive 1999/5/EEC. The declaration of conformity is available in the user manual at www.dualphone.net.
The DUALphone 3058 is covered by the European Directive 2002/96/EC which indicates that this product should not be disposed via the normal household waste stream. To prevent possible harm to the environment or human health, please separate this product from other waste streams to ensure that it can be recycled in an environmentally sound manner. For more details on available collection facilities, please contact your local government office or the retailer from whom you purchased this product.
Copyright © 2006 RTX Products A/S. All rights reserved. All forms of copying or reproduction of the product or its associated User Manual are strictly prohibited. This product is manufactured for RTX Products A/S.
Accessories
Approved DUALphone accessories such as batteries, extension kits, headsets etc. can be ordered from authorised dealers.
Intended use
This DUALphone is designed for telephony within a telephone network. Any other use is considered unintended use. Unauthorised modifications or reconstruction not described in this User Manual are not permitted.
Exemption from liability
We cannot guarantee the correctness of the information in this User Manual. The product and its accessories are subject to constant improvement and further development. Therefore, we reserve the right to modify components, accessories, technical specifications and related documentation of the product without notification.
This User Manual serves purely informational purposes. Its contents are not part of any contract of sale. All the data specified relates to nominal values. The equipment and options described may differ from country to country according to national requirements.
Trademarks
- Skype™, SkypeMe™, SkypeOut™, SkypeIn™, Skype Voicemail™, the whole world can talk for free™, the Skype logo and the S logo are trademarks of Skype S.A.
- DUALphone™ is a trademark of RTX Products A/S.
In this guide
INSTALLATION 7
Packaging Contents 7
Connecting the base station and power plug 8
Getting Started 8
Installing and charging the batteries 8
Attaching the belt clip....9
System requirements 9
Installing software (from CD).... 10
Updating software 18
Uninstalling software.... 18
User Manual 20
MENU STRUCTURE (HANDSET) 23
HANDSET AND BASE STATION LAYOUTS 26
LCD display 28
LCD icon description 28
USING THE HANDSET 30
Basic operation 30
Power on/off operation 30
Selecting language 30
Making landline external calls (PSTN).... 30
Making Skype calls 31
Taking calls 32
Redialling 32
Dialling from the phone book 33
Muting the microphone and ringer 33
Call hold/transfer.... 33
Party conference 33
Call waiting.... 33
Changing the earpiece and ring volume 34
Paging the handset 34
Handset speaker phone.... 34
Key lock 34
Warning signals, confirmation signals 34
Short key definition.... 34
Call log 35
Browsing, deleting, saving. 35
Missed calls, answered calls, dialled calls 35
Deleting 36
PHONE BOOK 37
Searching 37
Storing entries 37
Groups in the phone book 38
Speed dialing 38
Checking the phone book.... 38
Emergency call 38
Area code 39
HANDSET SETTINGS 40
R inger type....40
R inger volume 40
R inger on/off 40
Prefix 40
Prefix on/off 40
Prefix edit 40
Call barring 41
Message waiting 41
Wallpaper 41
Contrast 42
Key tones 42
Auto answer 42
H andset name 42
Menu style 42
Backlight 43
IP (Skype) contacts 43
R eglistration....43
D e-registration.... 44
S elect base station 44
D efault handset settings .... 44
BASE STATION SETTINGS 45
Base ringer 45
Base ringer on/off 45
D ial mode.... 45
S ystem PIN 45
Flash time 45
IP (Skype) status 46
D default base settings ...... 46
FUNCTION 47
G ames.... 47
Snake 47
Guess number.... 47
T imer....47
Set date/time.... 47
Alarm 47
TROUBLESHOOTING GUIDE 49
CE DECLARATION OF CONFORMITY 56
Installation
■ Packaging Contents
• 1 cordless handset
• 1 base station with USB cable
• 1 power supply for the base station
• 1 telephone cable
• 1 installation CD-ROM
• 1 User Manual (this document)
• 1 credit card-size quick guide
• 2 batteries (AAA; rechargeable)
• 1 safety and warranty sheet
- 1 belt clip
Please check the contents of the package carefully. If anything is missing or shows signs of transport damage, do not put your DUALphone into service, but contact your sales outlet with the purchase receipt.
Note:
- Keep the equipment packaging so that your DUALphone will not be damaged in the event of transport.
■ Connecting the base station and power plug
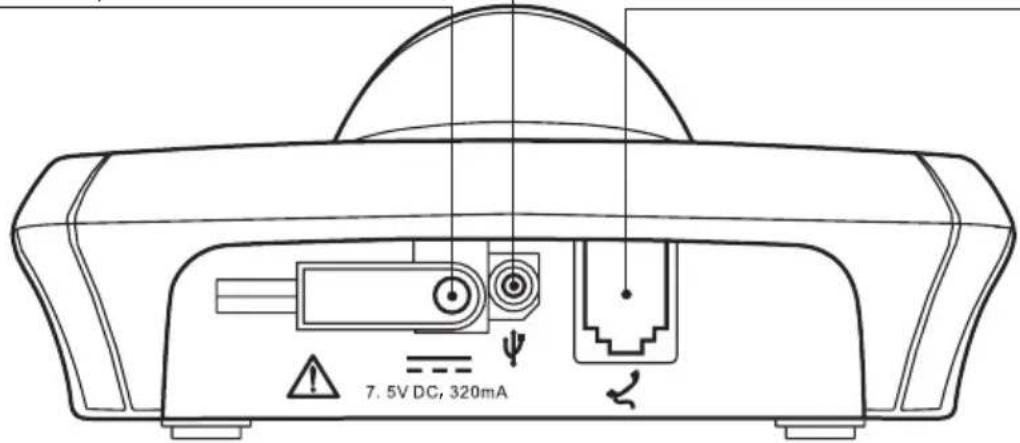
This is how you connect the plugs to the corresponding sockets in the base station – please note that they cannot be connected incorrectly because the sockets and plugs are designed to prevent reverse poling:
1) Lay the cable under the telephone to the rear.
2) Plug the telephone line in the telephone connection socket.
3) Connect the power supply to the base and into a socket outlet.
4) Plug the USB cable into the USB port on your PC.
The base station in now ready to operate.
Note:
- Only use the connection cable supplied.
USB Cable
AC Power Input
Phone Jack
text_image
7. 5V DC, 320mA
CAUTION:
Plug the adapter into a socket outlet that is close to the equipment and easily accessible. Use only the power supply supplied with the unit. The use of any other power supply may damage the unit.
■ Getting Started
Installing and charging the batteries
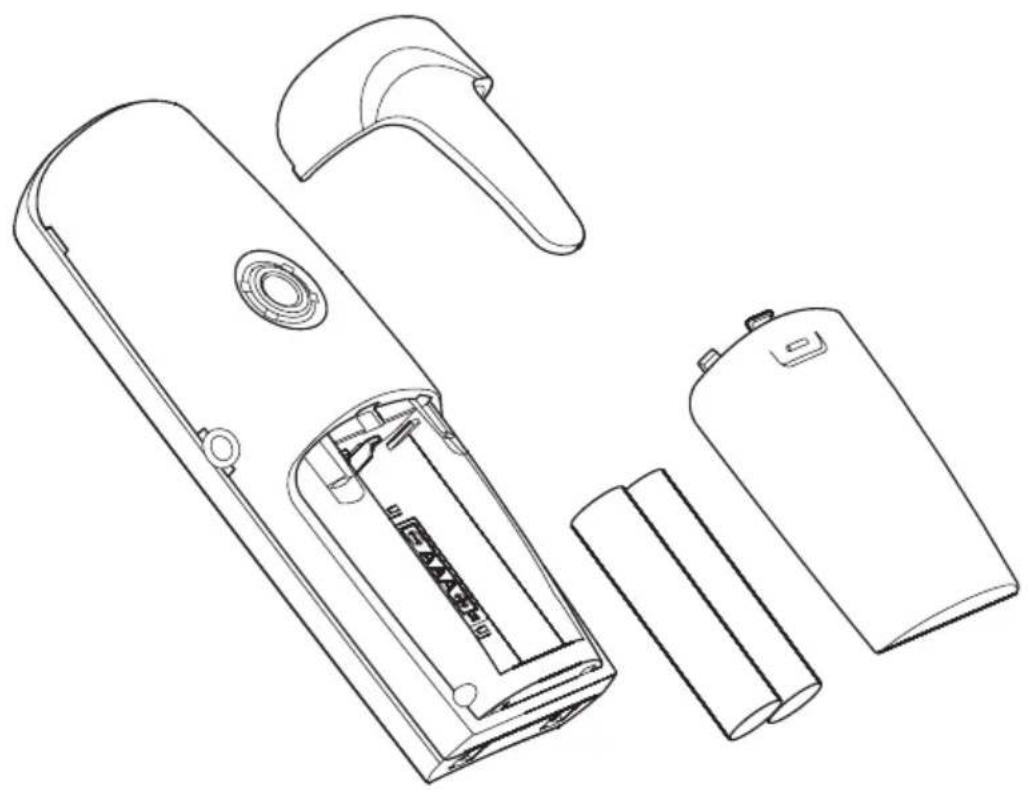
1) Insert two rechargeable AAA size batteries in the compartment, ensuring correct polarity.
2) Close the compartment.
3) Place the handset in the base station to charge for 14 hours prior to first use.
natural_image
Line drawing of a handheld remote control device with internal components and external casing (no text or symbols)Note:
- If you do not charge your DUALphone properly, the battery performance will be compromised.
Warning: The handset will not work and will be damaged if the wrong batteries are used.
Attaching the belt clip
1) Push the belt clip into the opening on the back of the handset.
2) The clip will bend slightly until it clicks into place.
System requirements
Minimum system requirements:
• PC running Windows 2000 or XP operating system
- 400 MHz processor
- 128 MB RAM
• 10 MB free disk space on your hard drive
- Internet connection, either dial-up (minimum 33.6 kbps modem) or any broadband (cable, DSL).
Recommended system requirements:
• PC running Windows 2000 or XP operating system
- 1 GHz processor
- 256 MB RAM
• 30 MB free space on your hard drive
- Cable, DSL or equivalent broadband connection to the Internet
• Standard PSTN line (RJ-11).
Installing software (from CD)
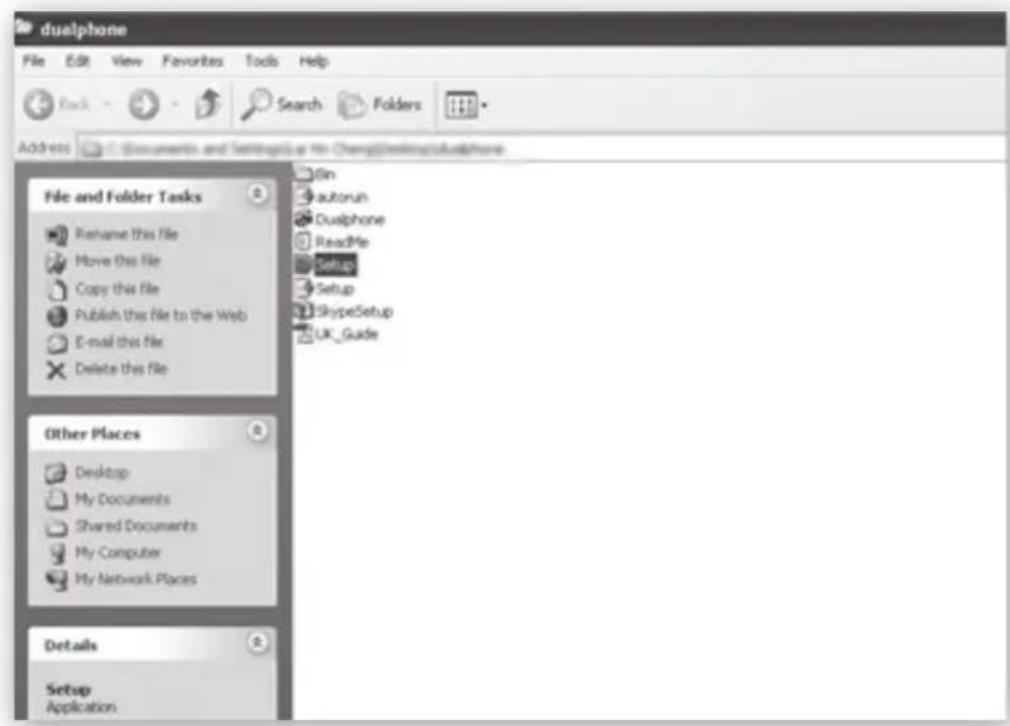
If the installation CD included in the package does not run automatically when inserted into the CD ROM drive of your computer, please open your CD-ROM drive and double-click on setup.exe to open the main screen.
text_image
dualphone File Edit View Favorites Tools Help Back Search Folders Address Documents and SettingsUp to Change Daming/ dualphone File and Folder Tasks Rename this file Move this file Copy this file Publish this file to the Web E-mail this file Delete this file Other Places Desktop My Documents Shared Documents My Computer My Network Places Details Setup Application1) Select the language you wish to use and click Continue.
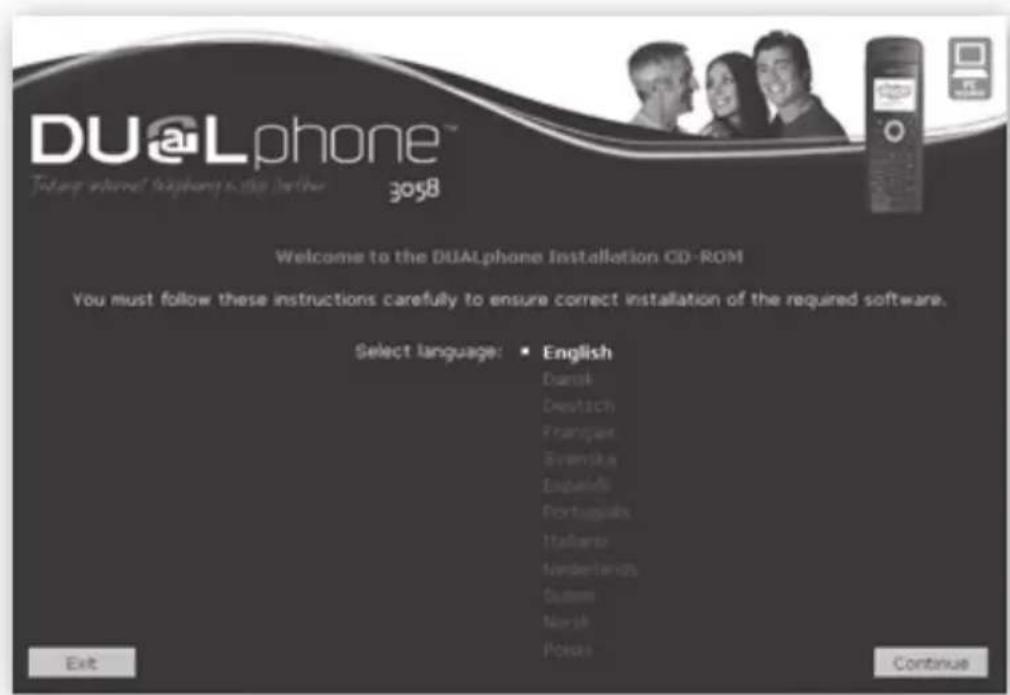
text_image
DUALphone™ Turing internet telephone to the Internet 3058 Welcome to the DUALphone Installation CD-ROM You must follow these instructions carefully to ensure correct installation of the required software. Select language: ▪ English Danish Deutsch Français Svenska England Portugues Italano Nordelands Gunes Norish Focus Exit Continue2) If you wish to read the user manual, click on Open user manual (CD-ROM). A new window will pop up.
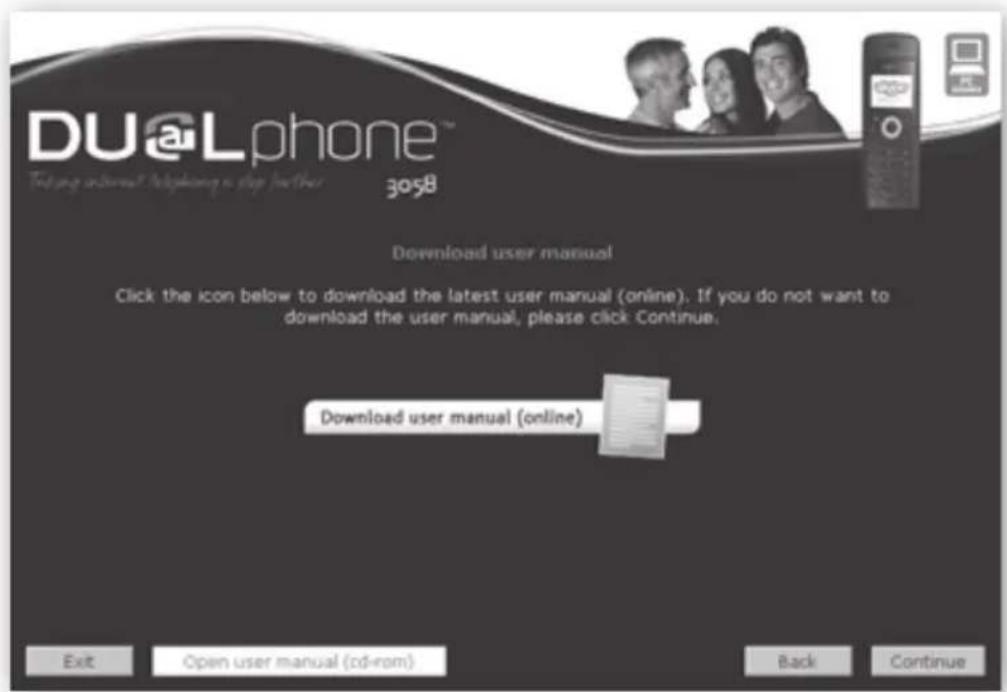
text_image
DUaLphone™ Testing any online, please change to stop further 3058 Download user manual Click the icon below to download the latest user manual (online). If you do not want to download the user manual, please click Continue. Download user manual (online) Exit Open user manual (cd-rom) Back ContinueIf you choose to save the manual, select File and then Save as. After having saved the PDF file, close the window. To proceed with the installation, click Continue.
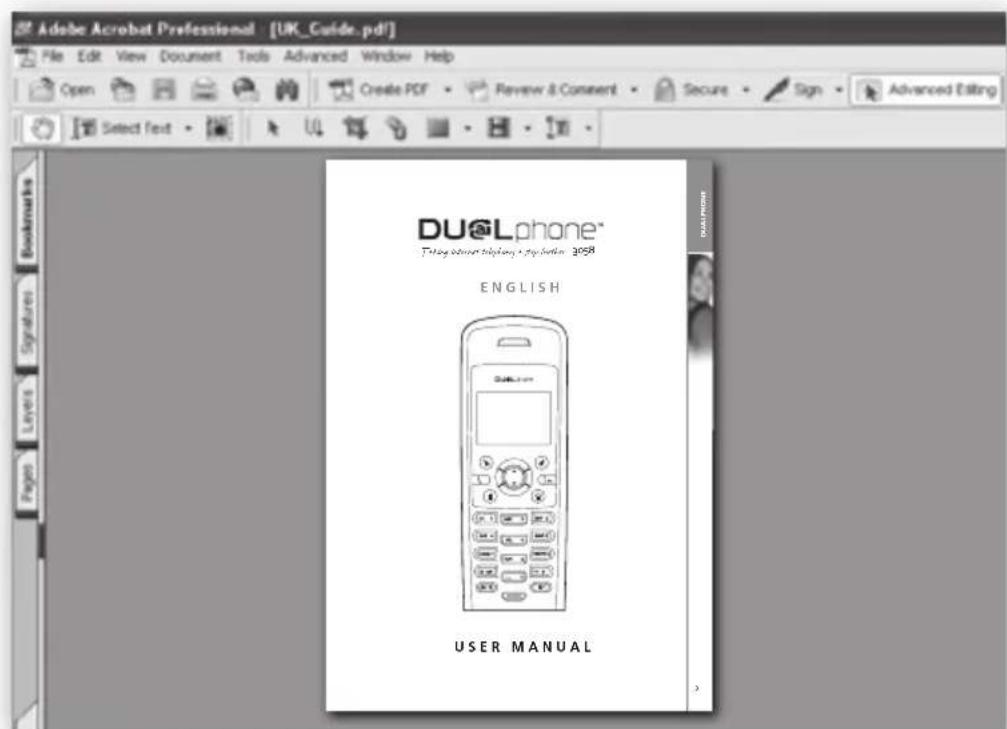
text_image
Adobe Acrobat Professional - [UK_Cuide.pdf] File Edit View Document Tools Advanced Window Help Open Create PDF Review & Consent Secure Sign Advanced Editing Select Text DU@Lphone® Playing street telephony + play button 2PS8 ENGLISH USER MANUALNote:
- If you would like to have the user manual in a different language, click on the icon Download user manual (online).
3) Click Install from CD-ROM to proceed.
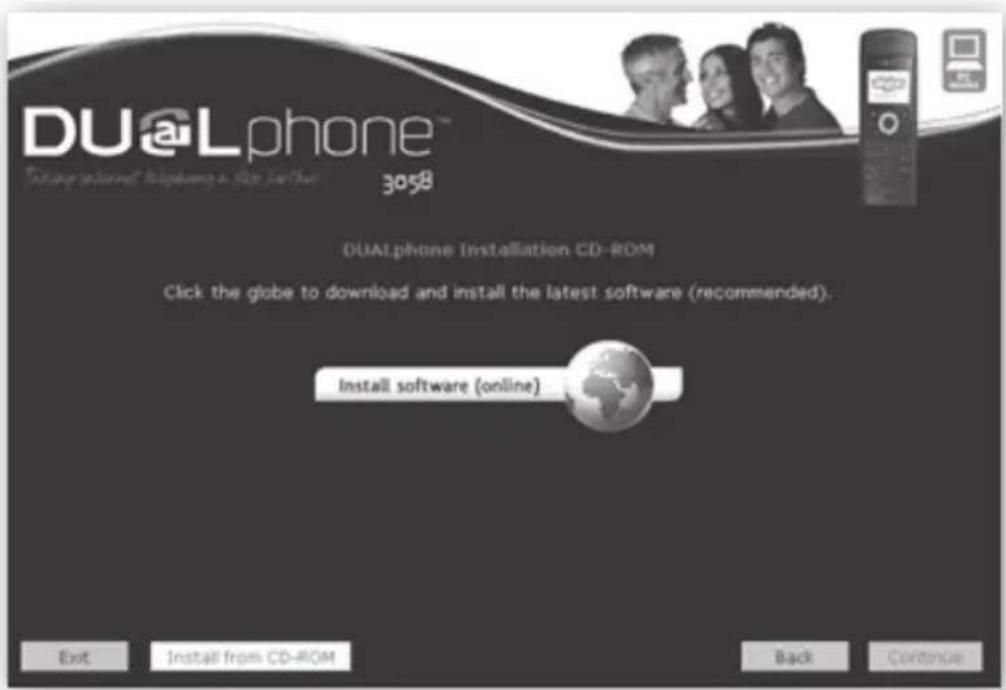
text_image
DUALphone 3058 DUALphone Installation CD-ROM Click the globe to download and install the latest software (recommended). Install software (online) Exit Install from CD-ROM Back ContinueNote:
- If you want to install the latest software, click Install software (online). A new window will pop up. The rest of the installation procedure will then take place over the Internet. When the online installation is completed, click Exit to exit the CD-ROM.
4) If you do not have Skype installed on your computer, click on the Skype™ button. The system now prepares to install Skype.
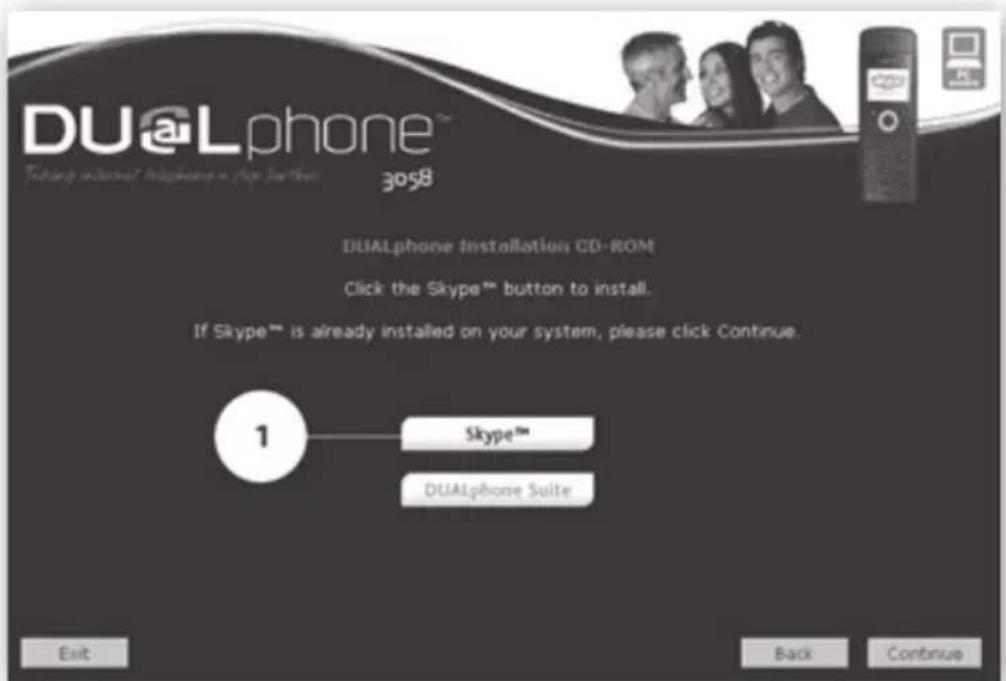
text_image
DUALphone Taking external telephone on top within 3058 DUALphone Installation CD-ROM Click the Skype™ button to install. If Skype™ is already installed on your system, please click Continue. 1 Skype™ DUALphone Suite Exit Back Continue5) Please follow the three steps in order to start the installation of Skype.
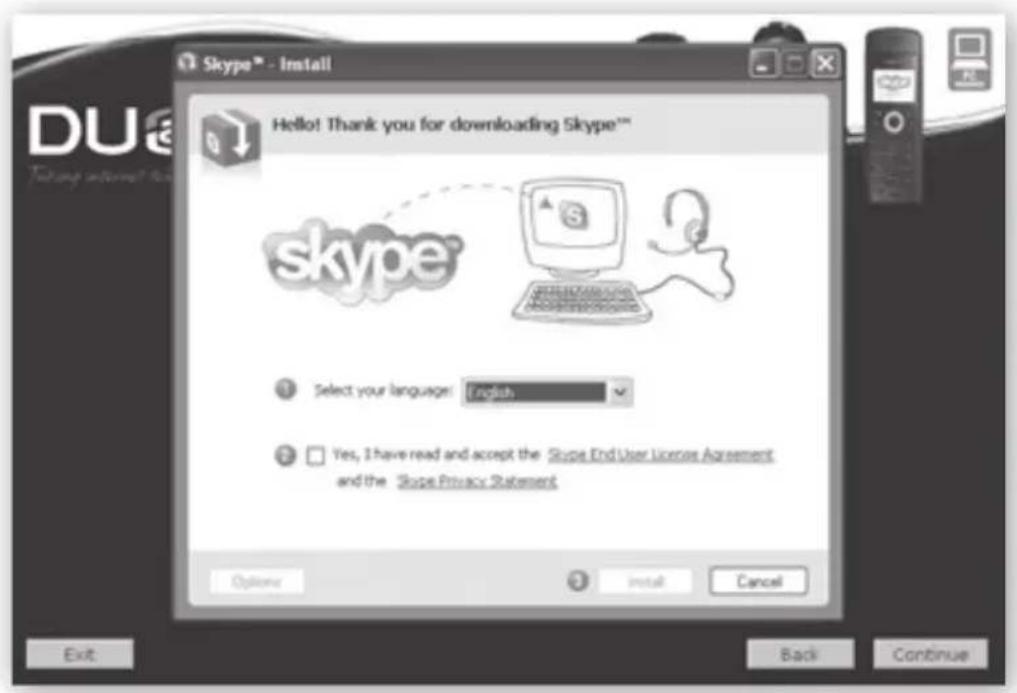
text_image
Skype™ - Install Hello! Thank you for downloading Skype™ skype™ Select your language: English Yes, I have read and accept the Skype End User License Agreement and the Skype Privacy Statement Options Install Cancel Exit Back Continue6) Click on Dualphone Suite to initiate the DUALphone Suite installation procedure.
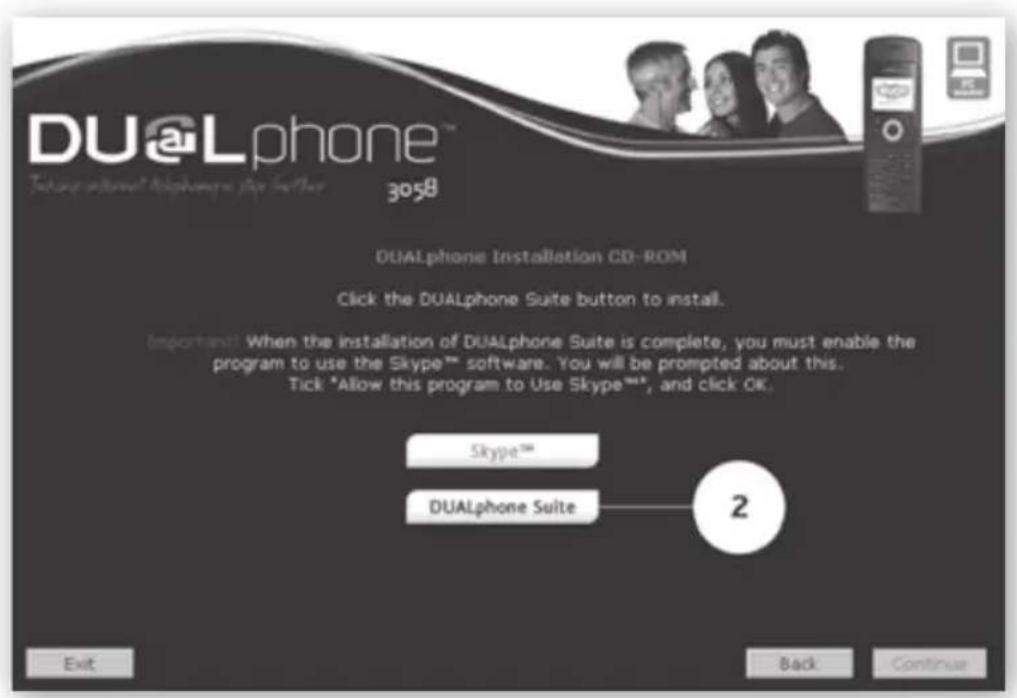
text_image
DUALphone 3058 DUALphone Installation CD-ROM Click the DUALphone Suite button to install. Important: When the installation of DUALphone Suite is complete, you must enable the program to use the Skype™ software. You will be prompted about this. Tick "Allow this program to Use Skype™", and click OK. Skype™ DualPhone Suite 2 Exit Back ContinueSelect the language you wish to use and click Next. The system now prepares the setup.
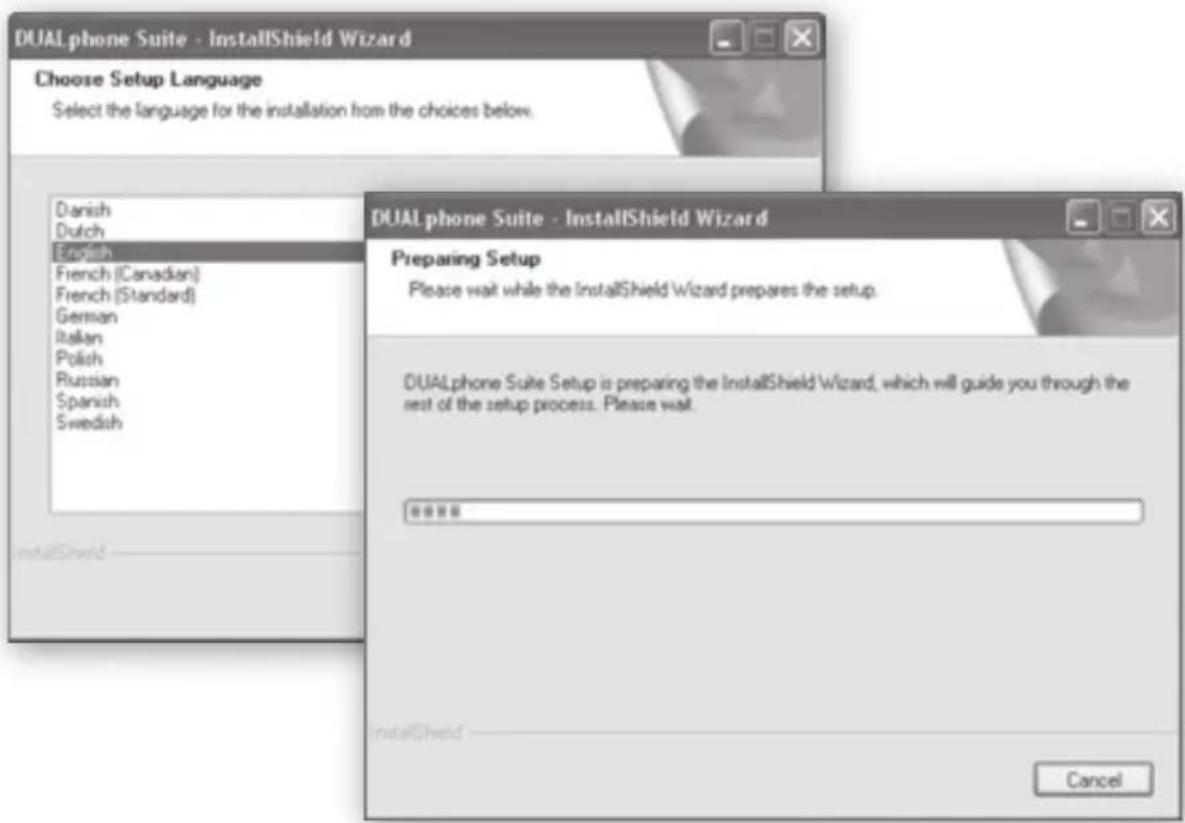
text_image
DUALphone Suite - InstallShield Wizard Choose Setup Language Select the language for the installation from the choices below. Danish Dutch English French (Canadian) French (Standard) German Italian Polish Russian Spanish Swedish DUAL phone Suite - InstallShield Wizard Preparing Setup Please wait while the InstallShield Wizard prepares the setup. DUAL phone Suite Setup is preparing the InstallShield Wizard, which will guide you through the next of the setup process. Please wait. 暂停更新 InstallShield CancelIf you wish to stop the software installation then click Cancel.
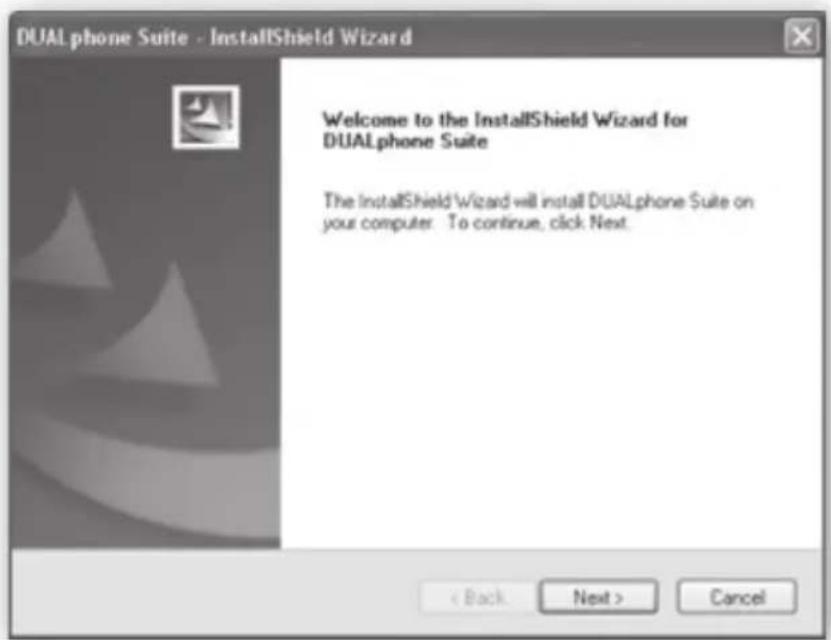
7) Click Next to continue or Cancel to terminate the procedure.
text_image
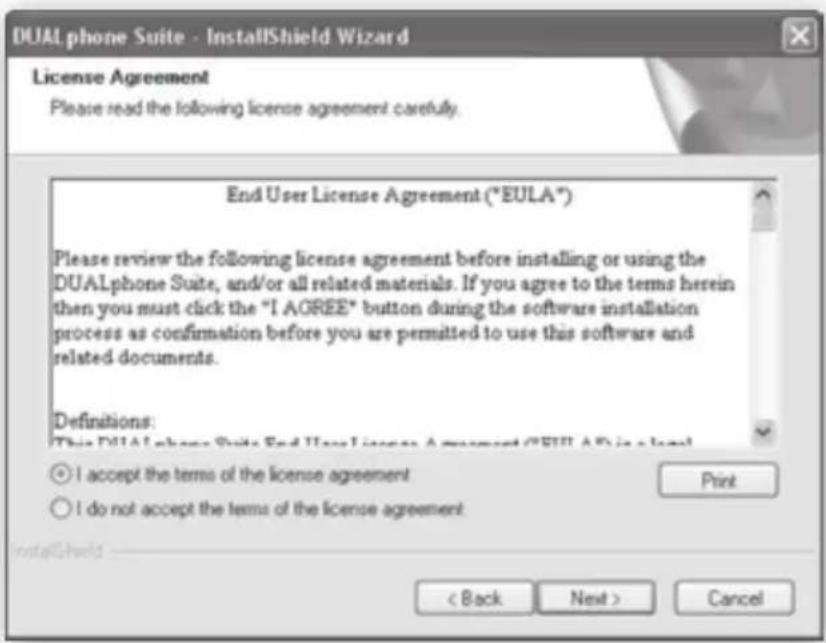
DUALphone Suite - InstallShield Wizard Welcome to the InstallShield Wizard for DUALphone Suite The InstallShield Wizard will install DUALphone Suite on your computer. To continue, click Next. < Back Next > Cancel8) Select I accept the terms of the license agreement and then click Next to continue.
text_image
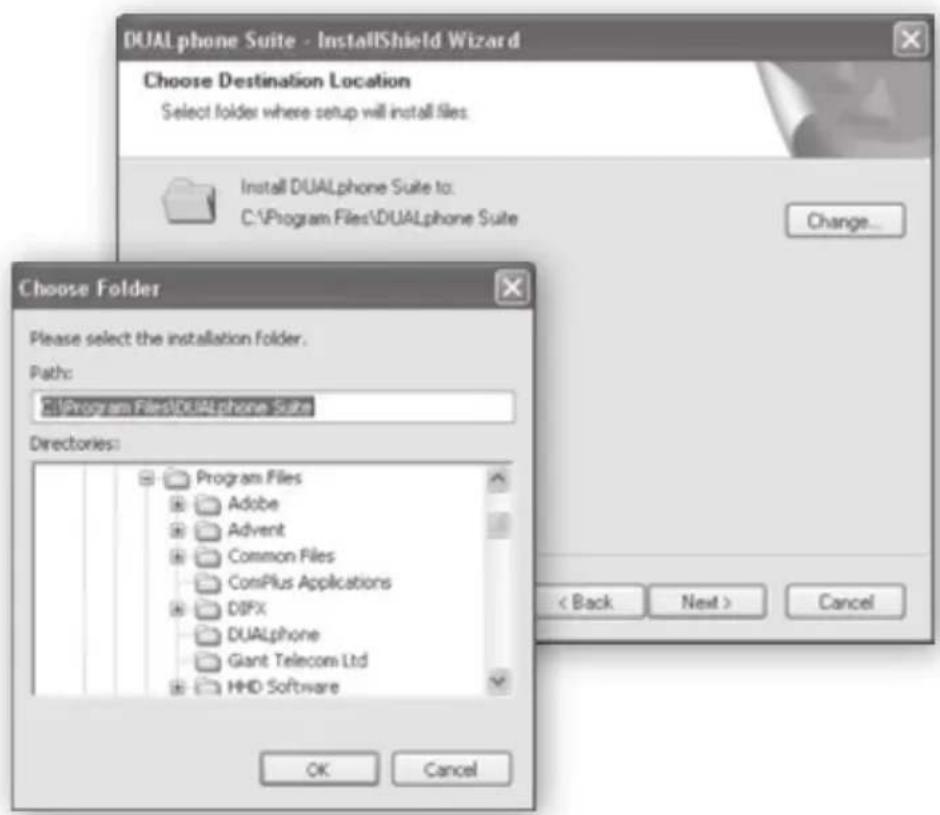
DUALphone Suite - InstallShield Wizard License Agreement Please read the following license agreement carefully. End User License Agreement ("EULA") Please review the following license agreement before installing or using the DUALphone Suite, and/or all related materials. If you agree to the terms herein then you must click the "I AGREE" button during the software installation process as confirmation before you are permitted to use this software and related documents. Definitions: This DUALphone Suite End User License Agreement ("EULA") is a local ○ I accept the terms of the license agreement ○ I do not accept the terms of the license agreement < Back Next > Cancel9) By default, the installation files will be stored in the directory C:\Program Files\ DUALphone Suite. Click Change... to change directory, then click N ext to continue.
text_image
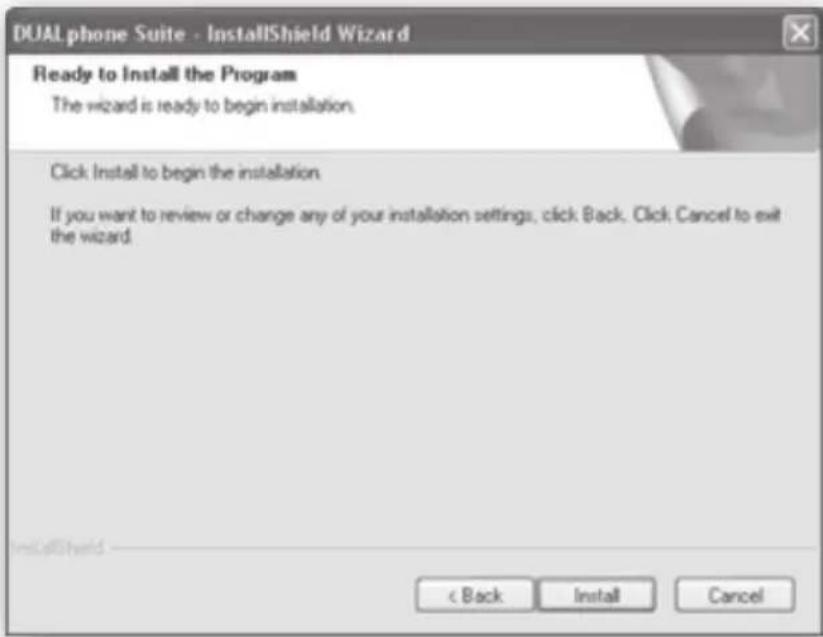
DUAL phone Suite - InstallShield Wizard Choose Destination Location Select folder where setup will install files. Install DUALphone Suite to: C:\Program Files\DUALphone Suite Change... Choose Folder Please select the installation folder. Path: All Program Files\DUAL phone Suite Directories: Program Files Adobe Advent Common Files ConPlus Applications DIPX DUALphone Giant Telecom Ltd HHD Software < Back Next > Cancel OK Cancel10) The following window will be displayed. Click Install to continue.
text_image
DUAL phone Suite - InstallShield Wizard Ready to Install the Program The wizard is ready to begin installation. Click Install to begin the installation. If you want to review or change any of your installation settings, click Back. Click Cancel to exit the wizard. < Back Install Cancel11) Your DUALphone Suite has now been installed. Click Finish to exit the wizard.

text_image
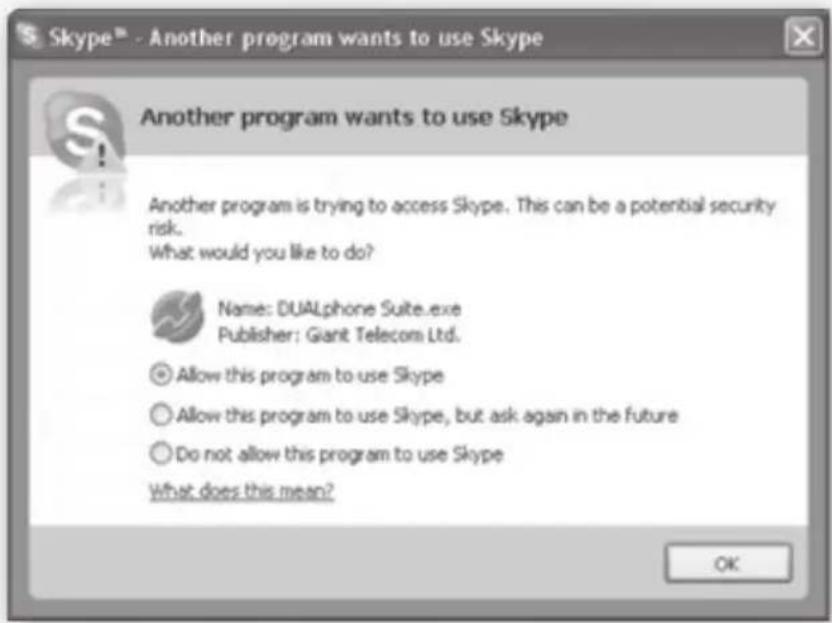
DUAL phone Suite - InstallShield Wizard InstallShield Wizard Complete The InstallShield Wizard has successfully installed DUAL phone Suite. Click Finish to exit the wizard.A Skype prompt window may pop up. Select Allow this program to use Skype to ensure that the DUALphone Suite works properly with Skype.
text_image
Skype™ - Another program wants to use Skype Another program wants to use Skype Another program is trying to access Skype. This can be a potential security risk. What would you like to do? Name: DUALphone Suite.exe Publisher: Giant Telecom Ltd. Allow this program to use Skype Allow this program to use Skype, but ask again in the future Do not allow this program to use Skype What does this mean? OK12) Congratulations! The installation wizard is now complete. Click Finish to exit the wizard.
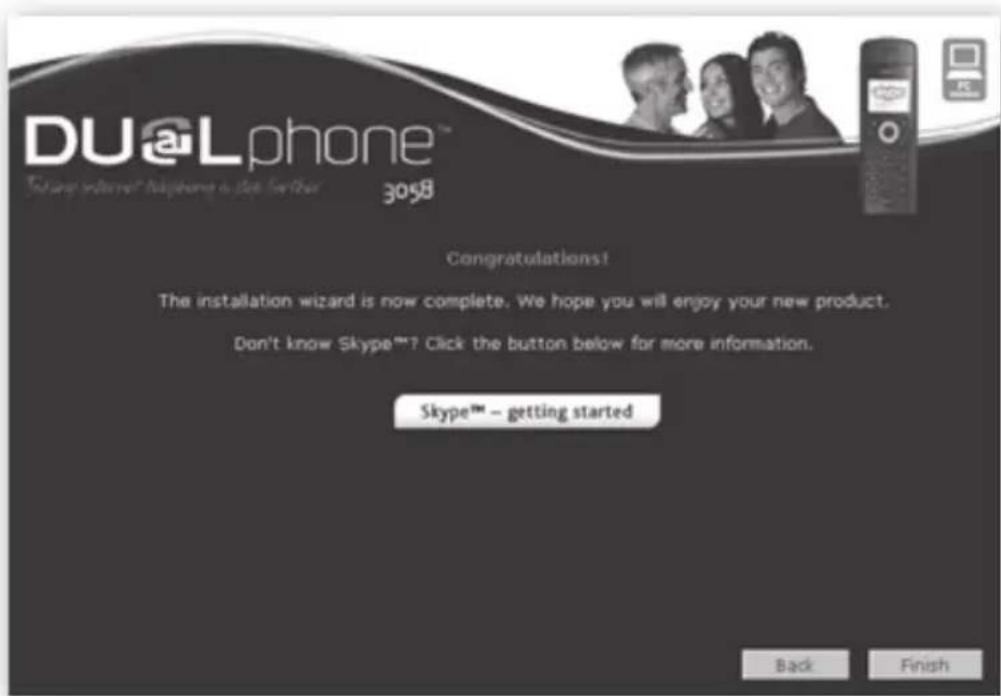
text_image
DUALphone 305B Congratulations! The installation wizard is now complete. We hope you will enjoy your new product. Don't know Skype™? Click the button below for more information. Skype™ – getting started Back FinishIf you wish to learn more about Skype, click on the icon Skype™ – getting started.
Updating software
1) Double-click the DUALphone Suite Monitor icon on your PC desktop.
2) Select Tools, and click Start under Online update.
3) The software will now be updated automatically.
4) After the update, the system will restart and will then be ready for use.
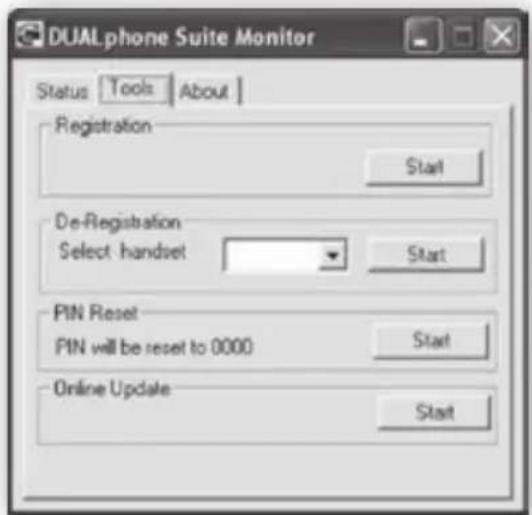
text_image
DUALphone Suite Monitor Status Tools About Registration Start De-Registration Select handset Start PIN Reset PIN will be reset to 0000 Start Online Update StartUninstalling software
1) If you choose to uninstall the software from your PC, select Start→Settings→Control Panel.
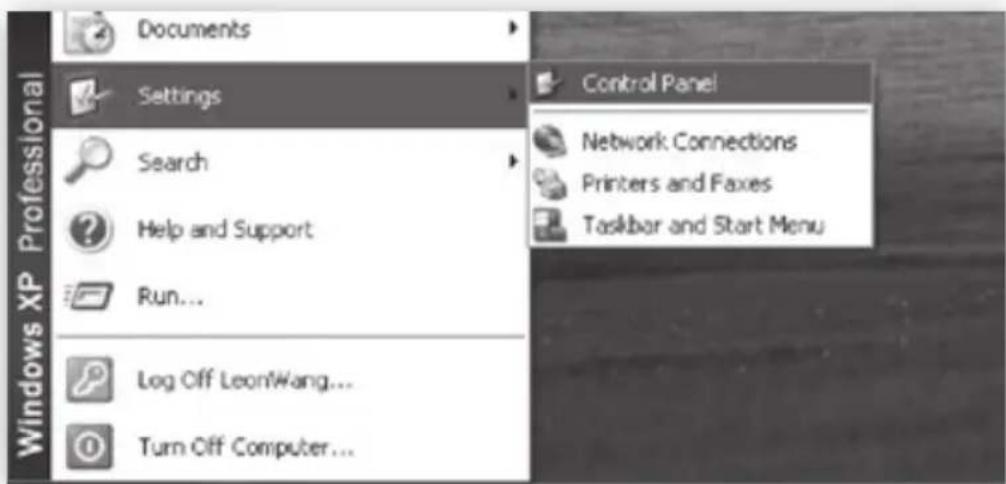
text_image
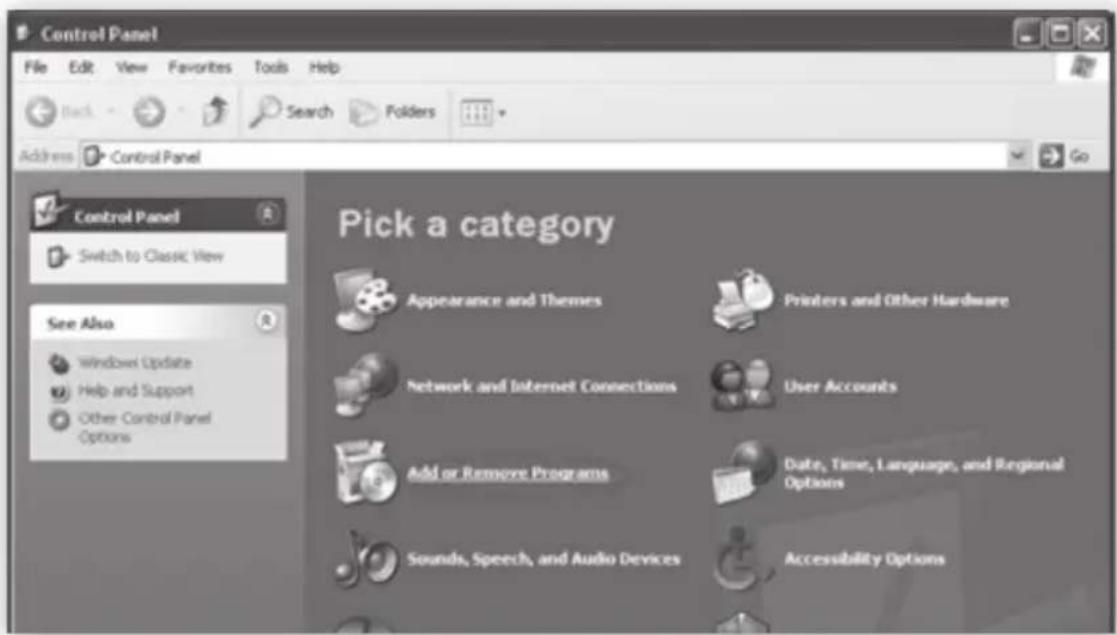
Documents Settings Search Help and Support Run... Log Off LeonWang... Turn Off Computer... Control Panel Network Connections Printers and Faxes Taskbar and Start Menu2) Select the Add or Remove Programs icon, then select DUALphone Suite from the list and click Remove to uninstall.
text_image
Control Panel File Edit View Favorites Tools Help Back Search Folders Address Control Panel Control Panel Switch to Classic View See Also Windows Update Help and Support Other Control Panel Options Pick a category Appearance and Themes Printers and Other Hardware Network and Internet Connections User Accounts Add or Remove Programs Date, Time, Language, and Regional Options Sounds, Speech, and Audio Devices Accessibility Options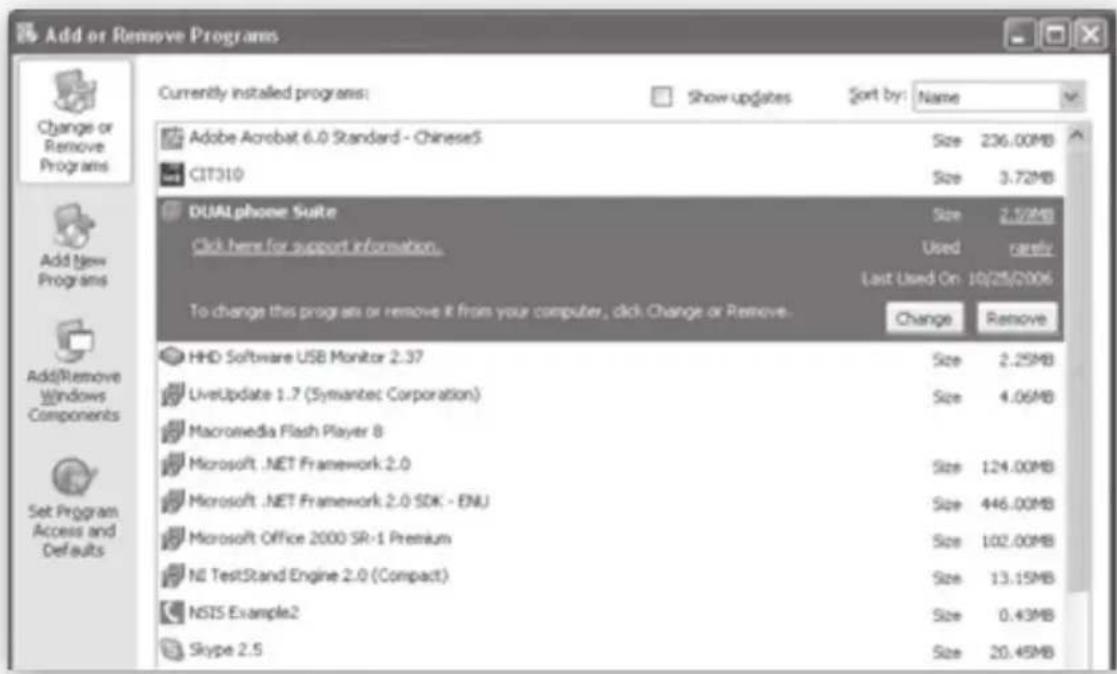
text_image
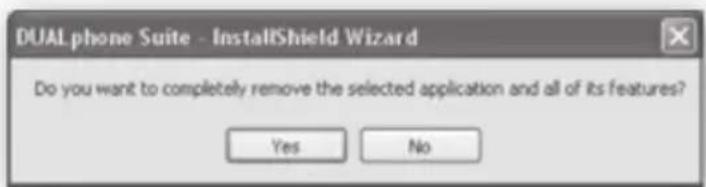
Add or Remove Programs Currently installed programs: Show updates Sort by: Name Adobe Acrobat 6.0 Standard - Chinese5 CIT310 Size: 236.00MB Size: 3.72MB DUAL phone Suite Click here for support information. Size: 2.59MB Used: rarely Last Used On: 10/25/2006 To change this program or remove it from your computer, click Change or Remove. Change Remove HHD Software USB Monitor 2.37 Size: 2.25MB LiveUpdate 1.7 (Symantec Corporation) Size: 4.06MB Macrosedia Flash Player 8 Size: 124.00MB Microsoft .NET Framework 2.0 Size: 446.00MB Microsoft .NET Framework 2.0 SDK - ENU Size: 102.00MB Microsoft Office 2000 SR-1 Premium Size: 13.15MB NE TestStand Engine 2.0 (Compact) Size: 0.43MB NSTS Example2 Size: 20.45MB Skype 2.53) When the message box below is shown, click Yes to continue, No to cancel.
text_image
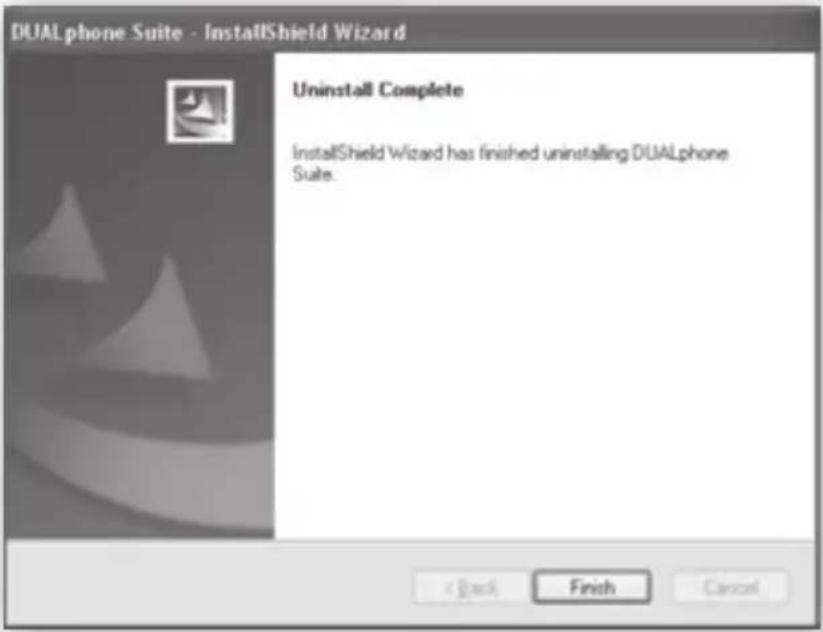
DUALphone Suite - InstallShield Wizard Do you want to completely remove the selected application and all of its features? Yes No4) After uninstalling the program, click Finish to exit the wizard.
text_image
DUAL phone Suite - InstallShield Wizard Uninstall Complete InstallShield Wizard has finished uninstalling DUAL phone Suite.User Manual
1) When you have finished the entire installation procedure, double-click the
D UALphone Suite Monitor icon on your PC desktop.
2) Select Status to view the DUALphone Suite as well as the Skype running status.
If Skype is not installed, you are logged out or logged in, you are offline or your connection is closed, DUALphone Suite will show a status message. Also, it will inform you about the reason, should your DUALphone not connect to Skype.
Under About, you will find software information as well as links to support (www.dualphone.net) and user manual (PDF format, different languages).
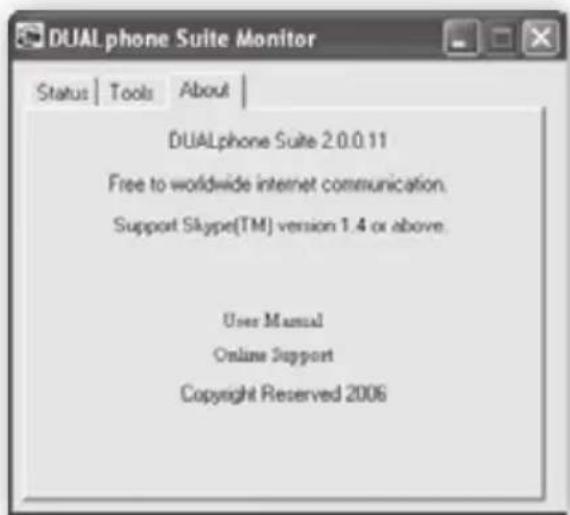
text_image
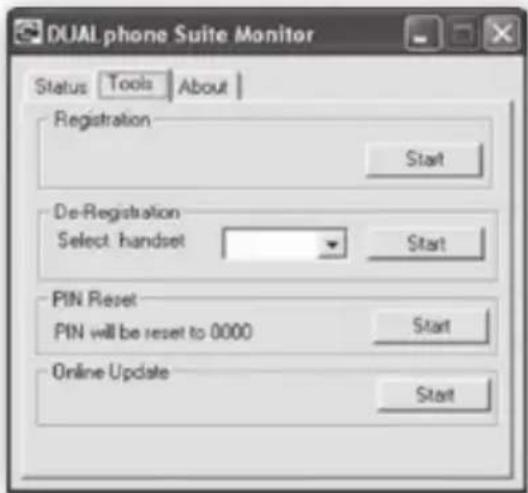
DUALphone Suite Monitor Status Tools About DUALphone Suite 2.0.0.11 Free to worldwide internet communication. Support Skype(TM) version 1.4 or above. User Manual Online Support Copyright Reserved 2006Under Tools, you can register/deregister your handset or reset the System PIN code of your base station.
text_image
DUAL phone Suite Monitor Status Tools About Registration Start De-Registration Select handset Start PIN Reset PIN will be reset to 0000 Start Online Update Start- If you want to register the handset to the base station, just put the handset in the base station and click Start under Registration. The handset will register automatically.
- If you want to deregister the handset, just select the desired handset number from the drop-down list and click Sart under De-Registration. The handset will de-register automatically.
- If you want to reset the System PIN code of your base station to "0000", just click Start under PIN Reset.
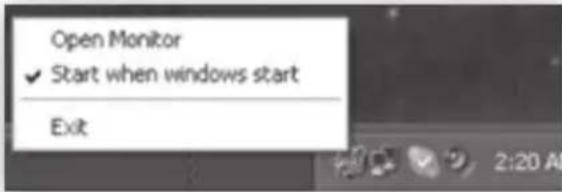
If you right-click the DUALphone Suite icon, you can select Open Monitor and choose whether you want the software to start when Windows starts. Click Exit to close.
text_image
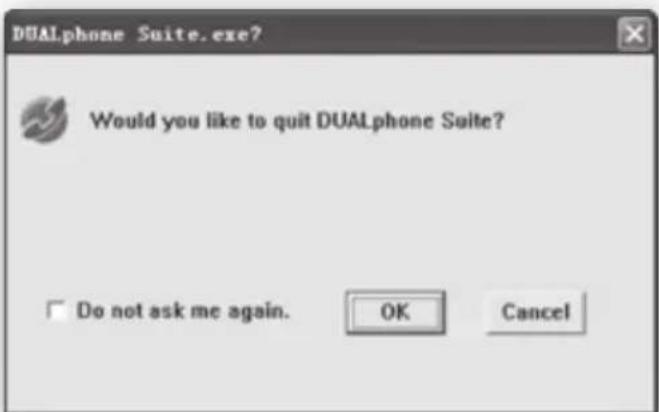
Open Monitor ✓ Start when windows start ExitWhen you want to quit the DUALphone Suite, a window will pop up to ask your ratification.
text_image
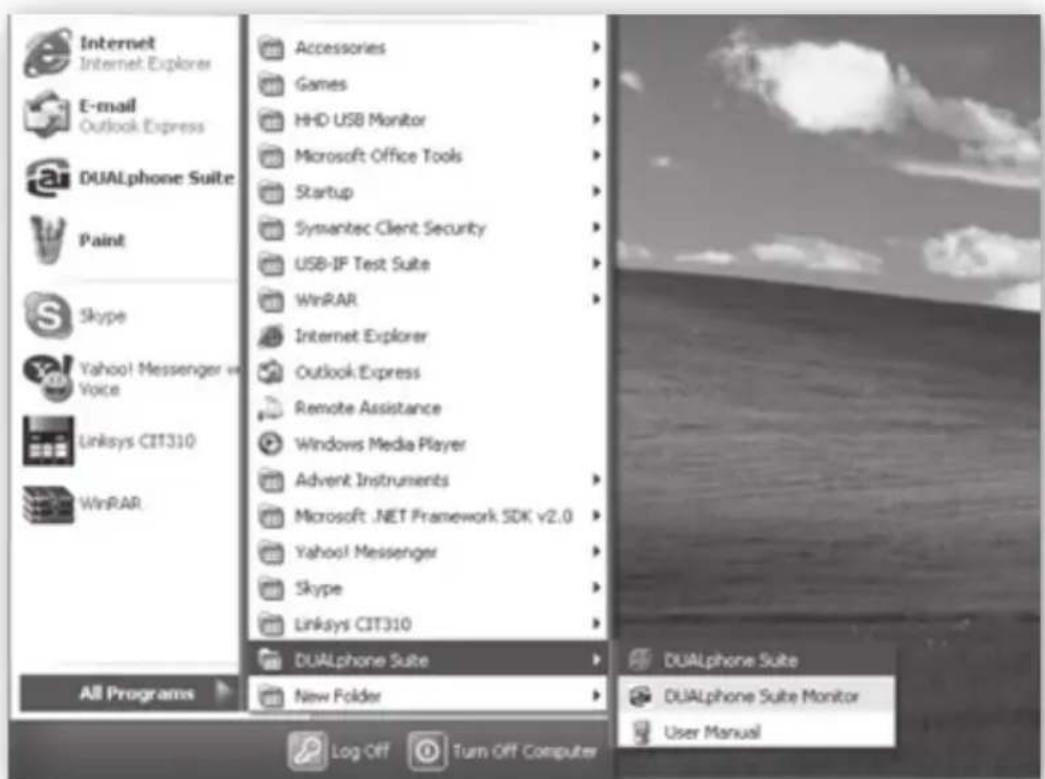
DUALphone Suite.exe? Would you like to quit DUALphone Suite? Do not ask me again. OK CancelAn electronic User Manual is provided with the product. Its location is as follows:
Start→Programs→DUALphone Suite→User Manual. Also, you can access the user manual from the main screen. Simply click User Manual and retrieve it from the opened folder.
text_image
Internet Internet Explorer E-mail Outlook Express DUALphone Suite Paint Skype Yahoo! Messenger ve Voice Linksys CIT310 WinRAR All Programs Log Off Turn Off Computer Accessories Games HHD USB Monitor Microsoft Office Tools Startup Symantec Client Security USB-IF Test Suite WinRAR Internet Explorer Outlook Express Remote Assistance Windows Media Player Advent Instruments Microsoft .NET Framework SDK v2.0 Yahoo! Messenger Skype Linksys CIT310 DUALphone Suite New Folder DUALphone Suite DUALphone Suite Monitor User ManualNote:
In order to keep your DUALphone working properly, please check the following:
1) Your are signed into Skype and it is running,
2) Your DUALphone is connected to your PC, and the USB driver is functioning,
3) Your PC is not in hibernating mode,
4) The Skype software is version 1.4 or later.
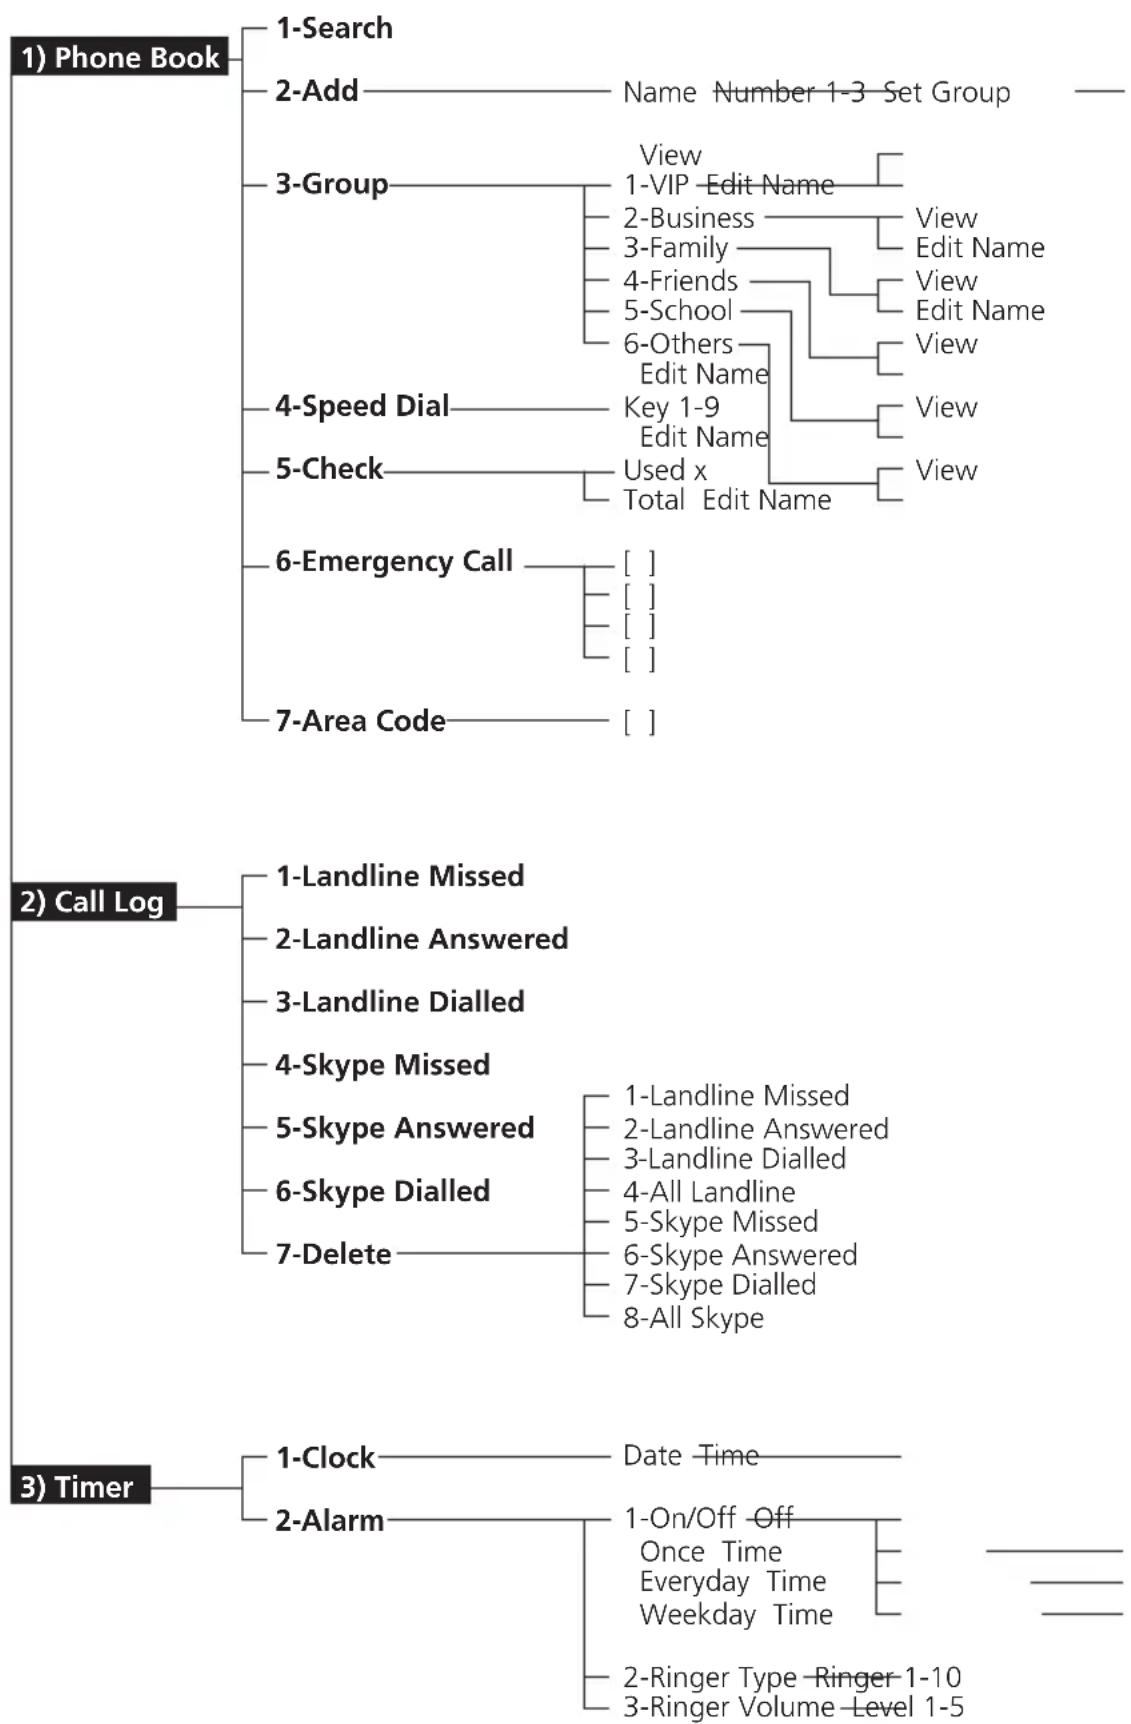
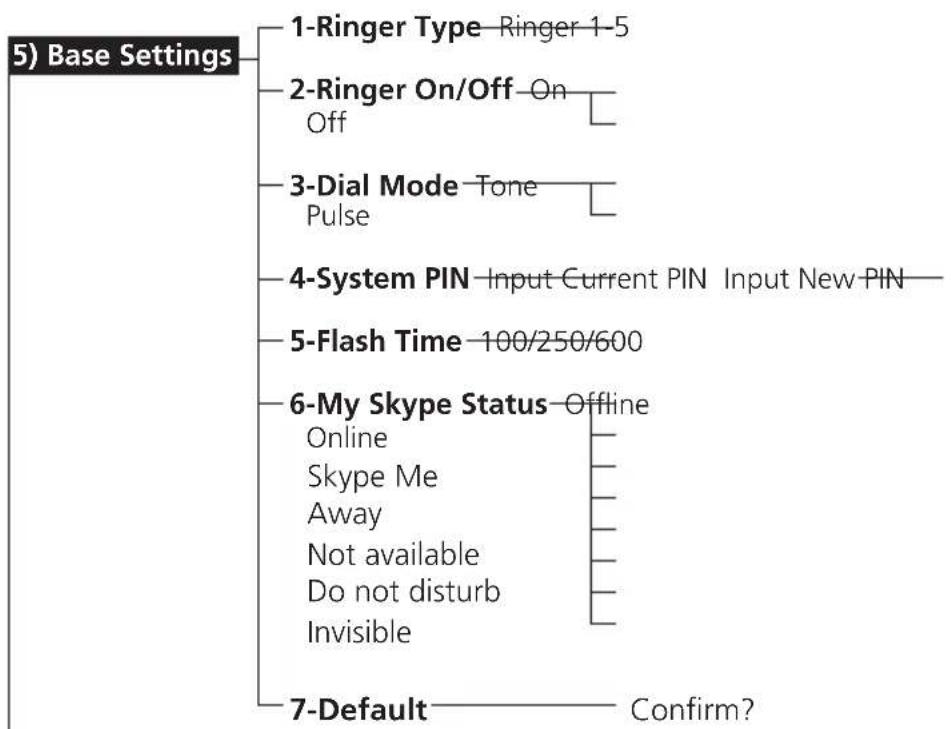
Menu Structure (Handset)
flowchart
graph TD
    A["1) Phone Book"] --> B["1-Search"]
    A --> C["2-Add"]
    A --> D["3-Group"]
    D --> E["View"]
    E --> F["1-VIP Edit Name"]
    D --> G["2-Business"]
    G --> H["View"]
    G --> I["3-Family"]
    I --> J["Edit Name"]
    D --> K["4-Friends"]
    K --> L["View"]
    K --> M["5-School"]
    M --> N["Edit Name"]
    D --> O["6-Others"]
    O --> P["View"]
    D --> Q["4-Speed Dial"]
    Q --> R["Key 1-9"]
    R --> S["Edit Name"]
    D --> T["5-Check"]
    T --> U["Used x"]
    U --> V["View"]
    D --> W["6-Emergency Call"]
    W --> X["[ "]
    W --> Y["[ "]
    W --> Z["[ "]
    W --> AA["[ "]
    W --> AB["[ "]
    W --> AC["[ "]
    W --> AD["[ "]
    W --> AE["[ "]
    W --> AF["[ "]
    W --> AG["[ "]
    W --> AH["[ "]
    W --> AI["[ "]
    W --> AJ["[ "]
    W --> AK["[ "]
    W --> AL["[ "]
    W --> AM["[ "]
    W --> AN["[ "]
    W --> AO["[ "]
    W --> AP["[ "]
    W --> AQ["[ "]
    W --> AR["[ "]
    W --> AS["[ "]

    B --> AT["2) Call Log"]
    C --> AT
    D --> AT
    E --> AT
    F --> AT
    G --> AT
    H --> AT
    I --> AT
    J --> AT
    K --> AT
    L --> AT
    M --> AT
    N --> AT
    O --> AT
    P --> AT
    Q --> AT
    R --> AT
    S --> AT
    T --> AT
    U --> AT
    V --> AT
    W --> AT
    X --> AT
    Y --> AT
    Z --> AT
    U --> AT
    V --> AT
    W --> AT
    X --> AT
    Y --> AT
    Z --> AT
    AA --> AT
    AB --> AT
    AC --> AT
    AD --> AT
    AE --> AT
    AF --> AT
    AG --> AT
    AH --> AT
    AI --> AT
    AJ --> AT
    AK --> AT
    AL --> AT
    AM --> AT
    AN --> AT
    AO --> AT

natural_image
Close-up grayscale photo of a person's face with visible eyes and mouth (no text or symbols)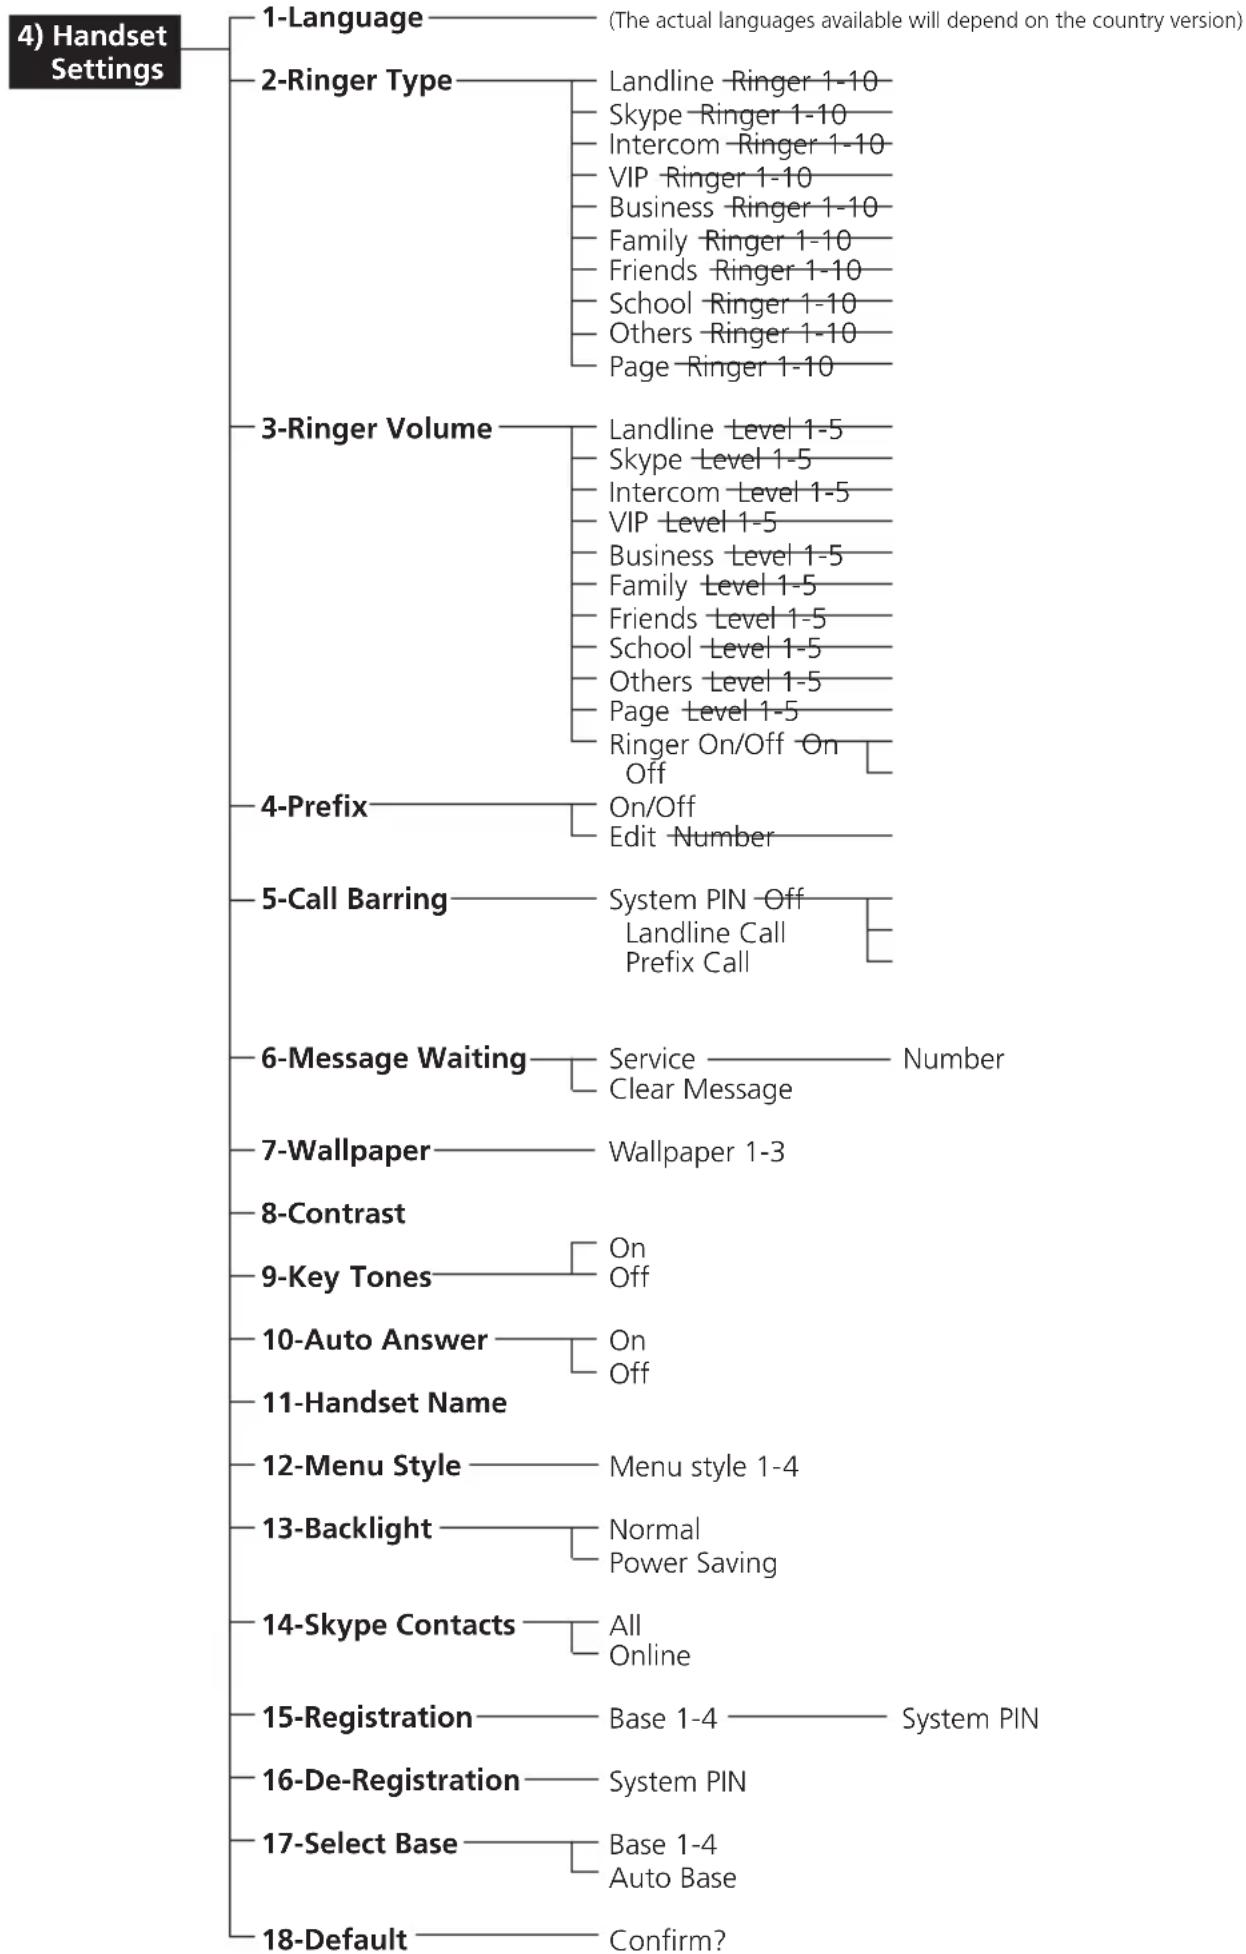
flowchart
graph TD
    A["4) Handset Settings"] --> B["1-Language"]
    A --> C["2-Ringer Type"]
    A --> D["3-Ringer Volume"]
    A --> E["4-Prefix"]
    A --> F["5-Call Barring"]
    A --> G["6-Message Waiting"]
    A --> H["7-Wallpaper"]
    A --> I["8-Contrast"]
    A --> J["9-Key Tones"]
    A --> K["10-Auto Answer"]
    A --> L["11-Handset Name"]
    A --> M["12-Menu Style"]
    A --> N["13-Backlight"]
    A --> O["14-Skype Contacts"]
    A --> P["15-Registration"]
    A --> Q["16-De-Registration"]
    A --> R["17-Select Base"]
    A --> S["18-Default"]

    B --> T["(The actual languages available will depend on the country version)"]
    C --> U["Landline -Ringer 1-10"]
    C --> V["Skype -Ringer 1-10"]
    C --> W["Intercom -Ringer 1-10"]
    C --> X["VIP -Ringer 1-10"]
    C --> Y["Business -Ringer 1-10"]
    C --> Z["Family -Ringer 1-10"]
    C --> AA["Friends -Ringer 1-10"]
    C --> AB["School -Ringer 1-10"]
    C --> AC["Others -Ringer 1-10"]
    C --> AD["Page -Ringer 1-10"]

    D --> AE["Landline Level 1-5"]
    D --> AF["Skype Level 1-5"]
    D --> AG["Intercom Level 1-5"]
    D --> AH["VIP Level 1-5"]
    D --> AI["Business Level 1-5"]
    D --> AJ["Family Level 1-5"]
    D --> AK["Friends Level 1-5"]
    D --> AL["School Level 1-5"]
    D --> AM["Others Level 1-5"]
    D --> AN["Page Level 1-5"]
    D --> AO["Ringer On/Off On Off"]

    E --> AP["On/Off Edit Number"]

    F --> AQ["System PIN Off Landline Call Prefix Call"]

    G --> AR["Service Number Clear Message"]

    H --> AS["Wallpaper 1-3"]

    I --> AT["On Off"]

    J --> AU["On Off"]

    K --> AV["Normal Power Saving"]

    L --> AW["All Online"]

    M --> AX["Base 1-4 System PIN"]

    N --> AY["Base 1-4 Auto Base"]

    O --> AZ["Confirm?"]
flowchart
graph TD
    A["5) Base Settings"] --> B["1-Ringer Type Ringer 1-5"]
    A --> C["2-Ringer On/Off On Off"]
    A --> D["3-Dial Mode Tone Pulse"]
    A --> E["4-System PIN Input Current PIN Input New PIN"]
    A --> F["5-Flash Time 100/250/600"]
    A --> G["6-My Skype Status Offline Online Skype Me Away Not available Do not disturb Invisible"]
    A --> H["7-Default Confirm?"]
flowchart
graph TD
    A["6) Function"] --> B["Play"]
    B --> C["1-Games"]
    C --> D["1-Snake"]
    D --> E["Set speed"]
    D --> F["Highest Score"]
    D --> G["Help"]
    C --> H["2-Guess Number"]
    H --> I["Start Game"]
    H --> J["Level"]
    H --> K["Highest Score"]
    H --> L["Help"]
Handset and base stations layouts
Handset layouts
text_image
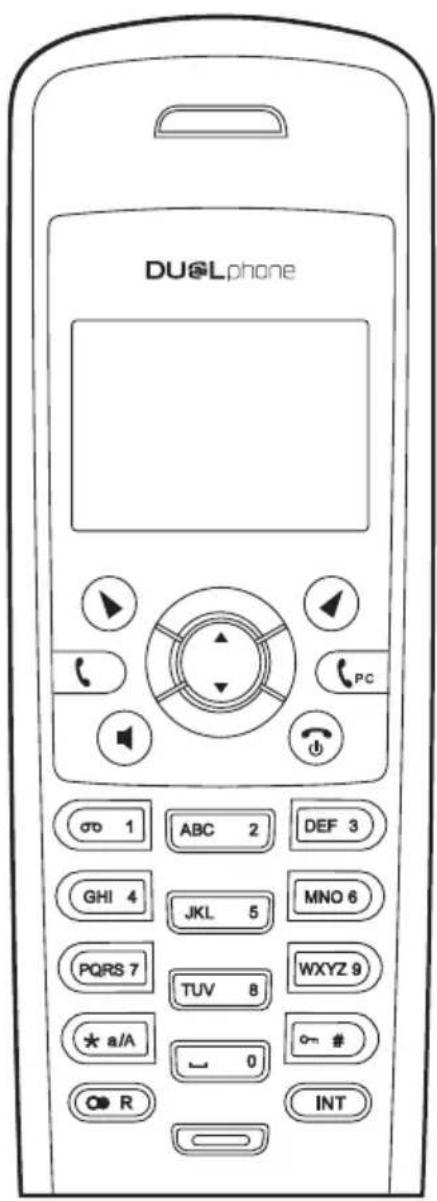
Handset layouts DU@Lphone Up/Down Key SKL (Left Soft Key) SKR (Right Soft Key) Externall call Key PC Key Speaker Key Off Key Asterisk Key Hash Key Flash Key INT KeyPhone keys
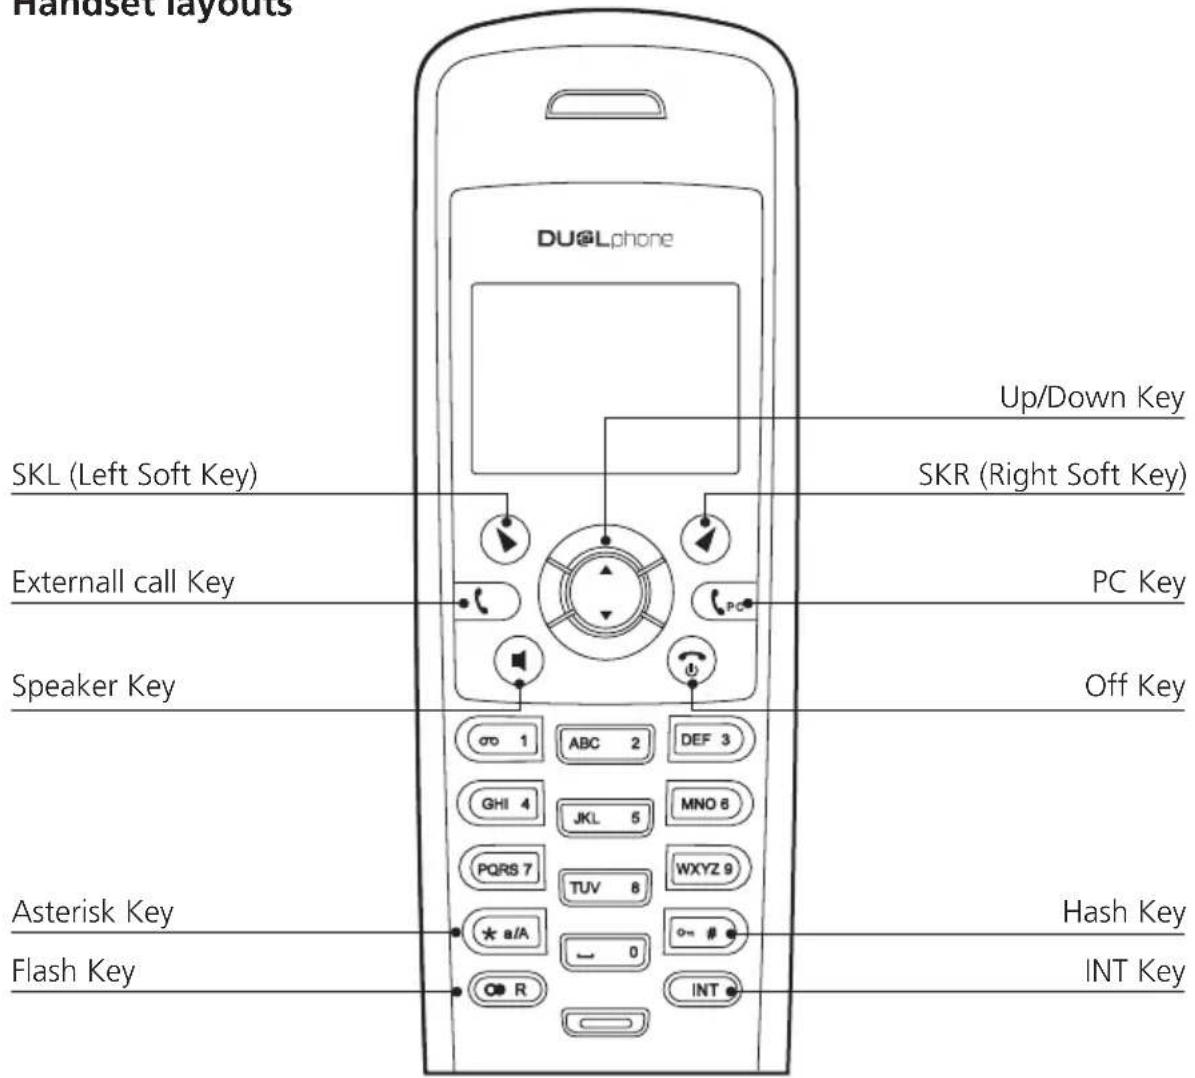
| SYMBOL NAME USAGE | ||
 | SKL | View menu and confirm settings. Mute or un-mute microphone when talking or ringing during incoming call. When playing games use to pause/play. |
 | SKR | View name. Return to previous menu. |
 | Up | View content above current. Short-key to enter Missed Calls list. |
 | Down | View content below current. Short-key to enter Answered Calls list. |
 | External call | Initiate an external call. |
 | PC | Enter Skype contacts list in standby mode. |
 | Speaker | Activate/deactivate hands-free speaker. |
 | Off | Power on/off. Terminate call. When operating unit, pressing this key can return it to standby mode. |
 | Flash | Redial. Flash. |
 | INT | Initiate an intercom connection and pause or hold the external line. |
 | Asterisk | * digit. Short-key to switch DTMF and Pulse dial mode. Activate Message Waiting Service in standby mode. |
 | Hash | # digit. Short-key to lock/unlock keyboard. Pause an outgoing call. |
Base stations layouts
natural_image
Line drawing of a portable air conditioner unit with internal compartments and a control knob (no text or symbols)Base station symbols
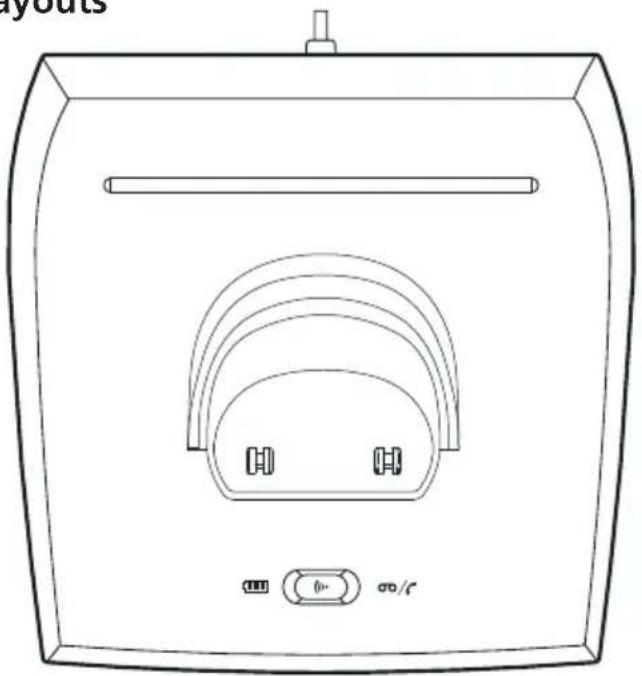
| SYMBOL USAGE | |
 | Page key. |
 | Charging indicator. |
 | Message Waiting/Incoming call indicator. |
■ LCD Display
Main Menu
98x67 (W x H)

text_image
1 skype 18:41Online

text_image
out of Range 18:41Out of Range
text_image
Phone BookPhone Book
Contrast
98×67 (W × H)
text_image
Handset Settings Contrast Key Tones Auto Answer Handset NameContrast

text_image
ContrastContrast Level 3

text_image
ContrastContrast Level 4
LCD Icon Description
Small icons
| ICON NAME DESCRIPTION | ||
 | Signal | Handset is used within the operational range. |
 | Key lock | Keypad is locked. |
| [D28Y] | Line in use | Line is in use. |
 | Alarm | Alarm is set. |
 | Ring | External ringer volume is on. |
 | Battery | Battery level. |
| [TCA0] | No ring | External ringer volume is off. |
 | Mute | Microphone or handset ringer is muted. |
 | Message waiting | Message is waiting. |
Skype icons
| ICON NAME DESCRIPTION | ||
 | Online | User is online. |
 | Offline | User is offline. |
 | Away | User is away. |
 | Do Not disturb | User is busy. |
 | Not Available | User is not available. |
 | Invisible | User is not visible. |
 | Skype me | External ringer volume is off. |
 | PC not available | Microphone or handset ringer is muted. |
 | Conference | Message is waiting. |
 | Skypeln | Type of Skype contact. |
 | SkypeOut | Type of Skype contact. |
Large icons
| ICON NAME DESCRIPTION | ||
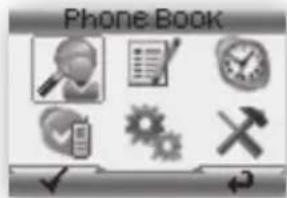
 | Phone Book | Phone book can be set. |
 | Call Log | Call log can be set. |
 | Timer | Timer settings. |
 | Handset Settings | Handset settings. |
 | Base Settings | Base station settings. |
 | Function | Other functions. |
Using the handset
■ Basic Operation
Power on/off operation
1) The handset is powered on by plugging in the battery or by pressing ⚙ for two seconds.
2) To power off the handset, press 📄 for two seconds.
Note:
- If the handset is in the base station, only ⏻ and Ⓥ are functional.
Selecting language
Different languages are available for the handset. To select a language:
1) Press ☐ to enter the main menu.
2) Press ▼ or ▲ to select Handset Settings, then ▶ to enter.
3) Press ▼ or ▲ to scroll through the menu until Language appears.
4) Press ☐ to enter language selection.
5) Press ▼ or to select language.
6) When English is selected, press ⬆ to confirm without additional input language, or press ⬇ to add an additional input language, then press ▼ or ⬆ select the additional language and press ⬇ to confirm.
7) Press to confirm the selection when selecting another language than English.
Making landline external calls (PSTN)
Post-dialling
1) Press or and wait for a dialling tone.
2) Dial the telephone number.
3) Press ⓤ to end the call.
Pre-dialling
1) Dial the telephone number (up to 24 digits); delete any incorrect entries by pressing ⬇.
2) Press or, and the number entered is dialled.
3) Press ☐ to end the call.
Note:
- If call barring is enabled and the number dialled matches with the barring conditions, you will be prompted that the call is barred. During the conversation you can use ▼ or ▲ to adjust the speaking volume (five levels).
- The call timer will start counting when the call is connected; the call timer format is HH:MM:SS. After the connection is established, you can view the Phone Book by pressing 🔑.
Making Skype calls
Making a SkypeOut call
SkypeOut allows you to use your Internet connection to call ordinary telephones and mobile telephones worldwide.
There are two ways to make a SkypeOut call:
Direct dialling
1) Dial the number using the format "00/011 + country code + telephone number".
2) Press to dial out the number.
3) Press ☐ to end the call.
Dialling from Skype contacts list
1) Press, and the first entry in the Skype contacts list appears.
2) Press ▼ or ▲ to select the required subscriber from the list. Alternatively, enter the first letter of the name required.
3) Press r_pc to dial out the selected SkypeOut number.
4) Press Ⓜ to end the call.
Note:
- If one call is ended, pressing 📞 can terminate the other call.
Taking calls
When an external landline call is received, the telephone number of the caller may appear (depending on configuration and network). If the caller has been entered in your phone book, the name may appear.
When a Skype call is received, the incoming Skype username or Skypeln number will be shown on the screen.
When receiving a landline or Skype call, the handset will ring, and the green LED on the base station will flash.
Handset is in the base station
1) Take the handset from the base station, and the connection is automatically established (provided the AUTO ANS function is active). Otherwise, press 📞PC, 📞INT.
2) Carry out the conversation.
3) Press ☐ to end the call.
Handset is not in the base station
1) Press 📞 or 📞 📞 INT to carry out the conversation.
2) Press to end the call.
Note:
- You can reject a call by simply pressing ⓞ.
Redialing
Your DUALphone stores up to 20 last dialled landline numbers in the Landline Dialled Log and an unlimited number of dialled Skype usernames or SkypeOut numbers in the Skype Dialled Log.
Press 📄 R to view the dialled calls or use the user menu (see Call Log for details).
Note:
- If there are no records in the Dialled Call Log, there will be no information on the display, and you will automatically be returned to the main menu.
1) Press ▼ or to select the desired type of dialled call.
2) Press ☐ to confirm your selection.
3) Press ▼ or to select the desired record.
4) Press 📞 or 🔒 to redial the desired record. If Skype Dialled is selected, 📞 is also available.
5) Press to end the call.
Dialling from the Phone Book
1) Press 📂 and the first entry in the Phone Book appears (alternatively the text No Records if you have no entries) – or access the Phone Book through the user menu (see Phone Book for details).
2) Press ▼ or ▲ to view the name list or enter the first letter of the name to quick search an entry.
3) Press to view the details.
4) Press ▼ or to select the required number.
5) Press or to dial the number.
6) Press ⓣ to end the call.
Muting the microphone and ringer
- Press to switch the microphone on or off during a call.
- Press ▶ to switch the ringer on or off during ringing.
Call hold/transfer
If your DUALphone is connected to a PABX network, it is possible to put external landline calls on hold and transfer them to other extensions.
1) Press to put the call on hold.
2) Enter the extension number you want, and the extension called will ring.
3) Press R again if you would like to take back the call, or to transfer the call.
Party conference
Skype conference call
1) Press to enter the Skype contacts list.
2) Press ▼ or ▲ to view the contacts, and press ⬇ to select participants one by one (up to four Skype users can be chosen to join the conference). Press ⬇ again to cancel a selected party from the conference group.
3) Press to start the conference call.
4) Press ☐ to disconnect from the conference call, allowing the others to continue with the external call.
Call waiting
During an ongoing call you can always start a new call by pressing the corresponding button.
Note:
- You can press 📞 to terminate the ongoing Skype call and turn to the landline call or press 📞 to release the landline call and turn to the Skype call. If one call is ended, pressing 🔒 can terminate the other call.
Changing the earpiece and ringer volume
Press ▼ or ▲ as often as necessary to change the earpiece and ringer volume during a call.
Paging the handset
If the handset has been misplaced, it is possible to call it by pressing on the base station. Pressing any key will stop the handset page ring.
Handset speaker phone
Press ☐to activate or deactivate the handset speaker.
Key lock
Lock/unlock the handset keypad by pressing and holding of two seconds.
Note:
- Incoming calls can still be received and the alarm can be turned off by pressing any key. Only on # and are functional when the keypad is locked.
Warning signals, confirmation signals
| Key tone | Acoustic signal when a key is pressed. Can be switched off (see Handset Settings). |
| Low battery charge | If a low battery condition is detected, the handset will beep every 30 seconds, and the empty battery icon will be displayed on the screen. |
| Out of range | When the handset is too far away from the base station, the text Out of Range will be displayed on the screen. |
| PC Not Available | When Skype cannot be accessed successfully, the PCNot Available icon will be displayed and activate an error tone. |
Short-key definition
There are six short-keys: ▼, ▲ ⓤPC INT, and :
In standby mode, press ▼ to enter the Answered Call log.
In standby mode, press ▲ to enter the Missed Call log.
In standby mode, press 📞 _PC , to access the Skype Contacts list.
In standby mode, press INT , to access the intercom menu.
In standby mode, press ⬆ R to access the Dialled Call log.
In standby mode, press ⬇ to access the landline Phone Book.
■ Call Log
Browsing, deleting, saving
IMPORTANT: To use the Call Log function, you must subscribe to your network operator's Caller Line Identification (CLI) service.
Missed calls, answered calls, dialled calls
There are six types of call logs: Landline missed, Landline answered and Landline dialled, Skype missed, Skype Answered and Skype dialled. Each landline log can contain up to 20 records while the Skype logs are unlimited.
1) Press to enter the main menu.
2) Press ▼ or ▲ to select Call Log, then press ▶ to enter the log.
Note:
- If there are no records in the call log, there will be no information on the display, and you will automatically be returned to the main menu.
1) Press ▼ or ▲ to select the desired call log type, then press ⬇ to confirm.
2) Press ▼ or to find the desired record.
3) Press ▶ to view detailed information (date/time).
4) Press ▶
The Landline Call logs operate as follows:
1) Press ▼ or ▲ to select Save or Delete.
2) Press to confirm, or press to back up.
If you select Save:
1) Press ▼ or ▲ to select a location in which to store the number, then press ⬇ to confirm.
2) Press to switch input method.
3) Press to confirm.
4) Press ▼ or ▲ to select a group, then press ▶ to confirm.
If you select Delete:
1) Simply press ⏻ key to confirm.
Note:
- Short-keys are available in standby mode: Press ▲ to access the Missed Call log, press ▼ to access the Received Call log, and press ⬆ R to access the Dialled Call log. In the Skype call logs, just press ▶ to delete the selected entry.
Deleting
1) Press ▼ or ▲ to select Delete through the submenu Call Log, then press ▶.
2) Press ▼ or to select one type of calls or all calls.
3) Press to delete the desired records, or pres to go back.
Note:
- When viewing the records, press 🔔, and the highlighted record will be recalled immediately.
Phone Book
Your DUALphone can store up to 100 entries in the Phone Book with three numbers for each name. Store frequently used numbers in order to be able to dial them quickly and easily. When the function is supported by the telephone provider, the handset displays the name of the caller (when stored in the Phone Book).
You can access the Phone Book directly from standby mode by pressing ⬇.
■ Searching
Press ▼ or ▲ to select Phone Book through the main menu, then press ▶ to access.
Note:
- If there are no records in the Phone Book, no information will be displayed, and you will automatically be returned to the main menu.
1) Press ▼ or to select Search, then press.
2) Enter the index character or the desired name, then press
3) Press ▼ or to select the desired name, then press.
4) Press ▼ or to view the name and numbers.
5) Press to edit the name and numbers, delete the entry or change the group.
■ Storing entries
1) Press ▼ or ▲ to select Add through the submenu Phone Book, then press ▶.
2) Enter the name (maximum 16 characters).
Note:
- To enter the characters, press the relevant key the corresponding number of times, according to the position on the key. For example, press the digit 5 three times for the letter L. Delete incorrect entries by pressing ⬇. Press ✦ switch between number, lowercase and uppercase.
1) Press to confirm.
2) Enter the number (maximum 24 digits), and press ▶ to confirm.
3) Enter a second number, then press ▶ to confirm.
4) Enter a third number, and press to confirm.
5) Press ▼ or to select the group.
6) Press ☑ to confirm and complete storing the entry.
Note:
- If all the memory slots are occupied, the text Memory Full appears in the display. You can also store entries in the Phone Book by pressing digit keys to enter a number in standby mode, then pressing ▶ to save the number. Alternatively, you can save a number in the Phone Book through the call log (see Call Log Operation).
■ Groups in the Phone Book
1) Press ▼ or ▲ to select Group through the submenu Phone Book, then press ▶.
2) Press ▼ or to select one of the groups, then press to access.
3) Press ▼ or ▲ to select View or Edit Name.
4) Press to view the details of the group or edit the group name.
Note:
- When viewing the details of the group, you can edit the names and numbers in the group, change the group and delete entries.
■ Speed dialling
1) Press ▼ or ▲ to select Speed Dial through the submenu Phone Book, then press ▶.
2) Press ▼ or ▲ to select the speed dial key (1→9), then press ▶ to confirm.
3) Press ▼ or ▲ to select Phone Book or Delete, then press ▶ to confirm.
4) Under Phone Book, press ▼ or ▲ to select a number to set as speed dial number, then press ▶ to confirm.
5) Under Delete, press to delete the speed dial number.
6) To dial the defined speed dial number, press and hold the corresponding speed dial key in standby mode until the dial number appears on the screen.
■ Checking the Phone Book
1) Press ▼ or ▲ to select Check through the submenu Phone Book.
2) Press to view the used memory slots and total memory slots.
■ Emergency call
1) Press ▼ or ▲ to select Emergency Call through the submenu Phone Book, then press ▶.
2) Press ▼ or to select the location of the emergency call, then press.
3) Enter the emergency call number, and press to confirm.
Note:
- The emergency call number can be edited and dialled even when the keypad is locked.
■ Area code
1) Press ⬇ standby mode to view the submenus under Phone Book.
2) Press ▼ or to select Area Code.
3) Press ▶ then type the digits and press again to confirm (maximum five digits).
Note:
- Edit the area code using the same procedure.

natural_image
Close-up of a person's face with visible teeth and facial features (no text or symbols)Handset Settings
■ Ringer type
1) Press ▼ or ▲ to select Handset Settings through the main menu, then press ⬇ to access.
2) Press ▼ or ▲ to select Ringer Type, then press ⬇.
3) Press ▼ or to select the desired selection, then press.
4) Press ▼ to select one of 10 melodies, then press to confirm.
■ Ringer volume
1) Press ▼ or ▲ to select Ringer Volume through the submenu Handset Settings, then press ▶.
2) Press ▼ or to select the desired selection, then press.
3) Press ▼ or ▲ to adjust the ringer volume (five levels), then press ⬇ to confirm.
■ Ringer on/off
1) Press ▼ or ▲ to select Ringer Volume through the submenu Handset Settings, then press ▶.
2) Press ▼ or ▲ to select Ringer On/Off, then press ⬇.
3) Press ▼ or to select, then press to confirm.
■ Prefix
Prefix on/off
1) Press ▼ or ▲ to select Prefix through the submenu Handset Settings, then press ▶.
2) Press ▼ or to select On/Off, then press.
3) Press ▼ or to select, then press to confirm.
Prefix editing
1) Press ▼ or ▲ to select Edit through the submenu Prefix, then press ▶.
2) Enter the prefix number (maximum five digits), then press to confirm.
Note:
- If a prefix number exists and the prefix function is turned on, the entered prefix number must be dialled first when making an external call.
■ Call barring
1) Press ▼ or ▲ to select Call barring through the submenu Handset Settings, then press ▶.
2) Enter System PIN (default setting = 0000), then press ▶
3) Press ▼ or ▲ to select Off, Landline Call or Prefix Call, then press ▶ to confirm.
Note:
- Off = all outgoing calls are allowed; Landline Call = all outgoing external calls are barred; Prefix Call = all outgoing calls matched with prefix number are barred.
■ Message waiting
If you subscribe to a voice messaging service, the green LED light on the base station will flash to alert you if you have a message waiting. To hear your messages, contact your voice messaging service provider.
Note:
- For quick dialling, you can store the voice messaging service number on you DUALphone. To dial the programmed number, press and hold a/A for two seconds.
To store/dial the voice messaging service number:
1) In the Handset Settings menu, press ▼ or ▲ to display Message Waiting, then press ▶ to select.
2) Press ▼ or ▲ to display Service, then press ▶ to confirm.
3) Enter the number of your messaging service provider, then press to confirm.
4) Press to dial the number.
5) Press ☐ to return to standby mode.
Clearing messages
To turn off the green LED light when you have listened to you messages:
1) In the Handset Settings menu, press ▼ or ▲ to display Message Waiting, then press ▶ to select.
2) Press ▼ to display Clear Message, then press to confirm.
3) Press to return to standby mode.
■ Wallpaper
1) Press ▼ or ▲ to select Wallpaper through the submenu Handset Settings, then press ▶.
2) Press ▼ or ▲ to select Wallpaper 1, Wallpaper 2 or Wallpaper 3.
3) Press to view the wallpaper.
4) Press again to confirm the selection.
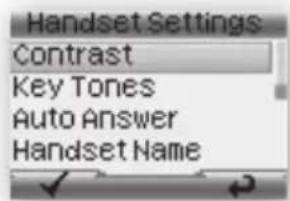
■ Contrast
1) Press ▼ or ▲ to select Contrast through the submenu Handset Settings, then press ▶.
2) Press ▼ or to adjust the contrast level, then press to confirm.
■ Key tones
1) Press ▼ or ▲ to select Key Tones through the submenu Handset Settings, then press ▶.
2) Press ▼ or ▲ to select Off or On, then press ⬇ to confirm.
■ Auto answer
1) Press ▼ or ▲ to select Auto Answer through the submenu Handset Settings, then press ▶.
2) Press ▼ or ▲ to select Off or On, then press ▶ to confirm.
■ Handset name
1) Press ▼ or ▲ to select Handset Name through the submenu Handset Settings, then press ▶.
2) Enter the handset name and press to confirm.
Note:
• Key assignment overview:
1 [1] [-?!,.&=:#" \$] 7 [7] [pq r s] [P Q R S]
2 [2] [a b c] [A B C] 8 [8] [t u v] [T U V]
Press a/A to switch between number, lowercase and uppercase.
■ Menu style
1) Press ▼ or ▲ to select Menu Style through the submenu Handset Settings, then press ▶.
2) Press ▼ or ▲ to select Menu Style 1, Menu Style 2, Menu Style 3 or Menu Style 4, then press ▶ to confirm.
Note:
- When a specific colour scheme is selected, the background colour will be changed to the corresponding colour.
■ Backlight
1) Press ▼ or ▲ to select Backlight through the submenu Handset Settings, then press ▶.
2) Press ▼ or ▲ to select Normal or Power Saving, then press ▶ to confirm.
Note:
- If Power Saving is chosen, the backlight will be on for 15 seconds – if Normal is selected, it will be on for 30 seconds. During an incoming call, the backlight will always be on. When the alarm rings, the backlight will be on for five seconds. After a call is ended, the backlight will be on for three seconds.
■ Skype contacts
1) Press ▼ or ▲ to select Skype Contacts through the submenu Handset Settings, then press ▶.
2) Press ▼ or ▲ to select All (all contacts will be displayed) or Online (only online users will be displayed), then press ▶ to confirm.
■ Registration
1) Press ▼ or ▲ to select Registration through the submenu Handset Settings, then press ▶.
2) Press ▼ or ▲ to select a specific base (1→4), then press ⬇.
3) Enter the System PIN (default setting = 0000).
4) Press to register the handset.
5) Press and hold on the base station for two seconds.
Note:
- The base station(s) to which the handset is already registered will be indicated by **. Once the registration procedure is complete, the new handset will automatically be allocated the next available handset number. This number will be shown on the display under the signal icon.
■ De-registration
1) Press ▼ or ▲ to select De-Registration through the submenu Handset Settings, then press ▶.
2) Enter the System PIN (default setting = 0000).
3) Press ▼ or ▲ to select a specific handset (1→4), then press ▶.
4) Press ▶ again to confirm.
■ Selecting base station
1) Press ▼ or ▲ to select Select Base through the submenu Handset Settings, then press ▶.
2) Press ▼ or ▲ to select a specific base station or auto base, then press to confirm.
Note:
- The base station(s) to which the handset is already registered will be indicated by **, and the base station you are using will be highlighted.
■ Default handset settings
1) Press ▼ or ▲ to select Default through the submenu Handset Settings, then press ▶.
2) Press ▶ again to reset to the default settings, or press ◀ to cancel.
Base station settings
■ Base ringer
1) Press ▼ or ▲ to select Base Settings through the main menu, then press ⬇ to confirm.
2) Press ▼ or ▲ to select Ringer Type, then press ▶.
3) Press ▼ or ▲ to select Ringer 1, Ringer 2, Ringer 3, Ringer 4 or Ringer 5, then press ▶ to confirm.
■ Base ringer on/off
1) Press ▼ or ▲ to select Ringer On/Off through the submenu Base Settings, then press ▶.
2) Press ▼ or ▲ to select Off or On, then press ▶ to confirm.
■ Dial mode
1) Press ▼ or ▲ to select Dial Mode through the submenu Base Settings, then press ▶.
2) Press ▼ or to select Tone or Pulse, then press to confirm.
■ System PIN
1) Press ▼ or ▲ to select System PIN through the submenu Base Settings, then press ▶.
2) Enter the current PIN (default setting = 0000), then press
3) Enter the new PIN, then press
4) Enter the new PIN again, then press ▶ to confirm.
■ Flash time
1) Press ▼ or ▲ to select Flash Time through the submenu Base Settings, then press ▶.
2) Press ▼ or ▲ to select 100, 250 or 600, then press ▶ to confirm.

natural_image
Black-and-white portrait of a smiling woman (no text or symbols visible)■ Skype status
1) Press ▼ or ▲ to select My Skype Status through the submenu Base Settings, then press ▶.
2) Press ▼ or to select desired status, then press to confirm.
■ Default base settings
1) Press ▼ or ▲ to select Default through the submenu Base Settings.
2) Press to reset to the default settings or press to cancel.
Function
■ Games
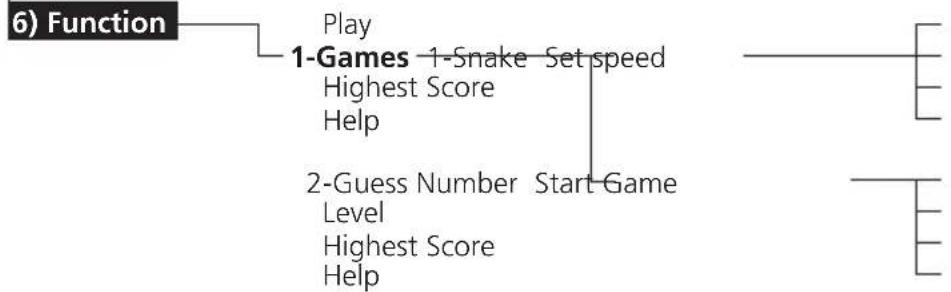
Your DUALphone contains two games, Snake and Guess number.
Snake
1) Press ▼ or ▲ to select Game through the submenu Function, then press ⬇ to confirm.
2) Press ▼ or ▲ to select Snake, then press ▶ to confirm.
3) Enter Play to start the game.
4) Enter Set speed to choose from five speed levels – press ▼ or ▲ to adjust and ▶ to confirm or ⏻ to cancel setting.
5) Enter Highest Score to view historic highest score (it will be cleared after power off).
6) Enter Help to get operation help for the game.
Guess number
1) Press ▼ or ▲ to select Game through the submenu Function, then press ⬇ to confirm.
2) Press ▼ or to select Guess number, then press to confirm.
3) Enter Start Game to start the game.
4) Enter Level to choose difficulty levels – use ▼ or ▲ to select High, Medium or Low and ▶ to confirm or ⏱ to cancel setting.
5) Enter Highest Score to view historic highest score (it will be cleared after power off).
6) Enter Help to get operation help for the game.
Timer
Setting date/time
1) Press ▼ or ▲ to select Clock through the submenu Timer, then press ▶.
2) Enter the date, then press ▶
3) Enter the time, then press to confirm the date/time setting.
Alarm
1) Press ▼ or ▲ to select Alarm through the submenu Timer, then press ▶.
2) Press ▼ or ▲ to select Alarm, then press .
3) Press ▼ or ▲ to select On/Off, Ringer Type or Ringer Volume.
4) Press ▶ to confirm the relevant settings.
Note:
- If you select On/Off, there are four options: O ff, Once, Everyday and Weekday. To set Off, simply press 📋 to confirm. To set one of the three other items, you need to set the time (see Setting date/time for details). If you select Ringer Type or Ringer Volume, press ▼ or ▲ to select your desired selection, then press to confirm. Once the alarm is set, the alarm icon will appear in the top icon bar.
troubleshooting Guide
Should you forget the base station System PIN, follow this procedure to reset the units.
Note: All memory and settings will be lost at resetting.
1) Disconnect AC Power supply.
2) Hold ◦ and plug in the AC power supply (Hold until line in-use LED is on).
3) Release ◦ and hold it again until you hear 3 beeps.
4) Disconnect AC power supply and Plug in it again.
5) The unit will return to its default System PIN code (0000).
Note:
- Please follow User Manual to register the handset again.
If you can not make/receive Skype calls after installation
Cause 1: The USB plug is not connected to your PC.
Solution: Connect the USB plug to the PC.
Cause 2: The base station does not work.
Solution: Check whether the power adaptor is connected to base station.
Cause 3: The Skype software is not running.
Solution: Run Skype software and sign in.
Cause 4: The DUALphone Suite is not running correctly.
Solution: Follow these steps:
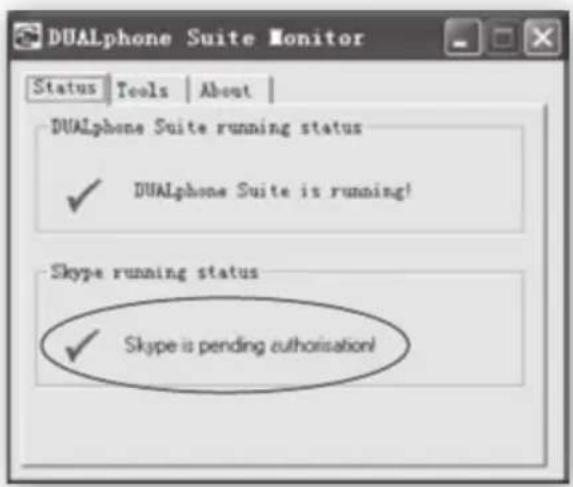
text_image
DUALphone Suite Monitor Status Tools About DUALphone Suite running status ✓ DUALphone Suite is running! Skype running status ✓ Skype is pending authorisation!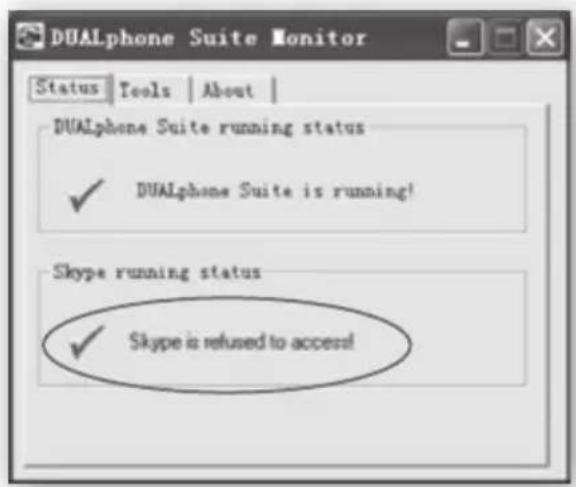
text_image
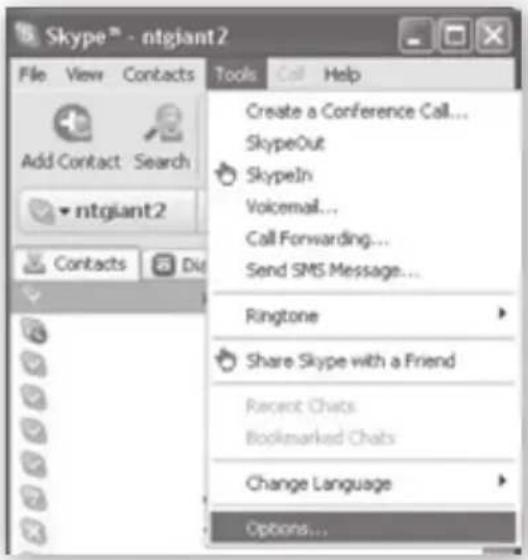
DUALphone Suite Monitor Status Tools About DUALphone Suite running status ✓ DUALphone Suite is running! Skype running status ✓ Skype is refused to access!1) Go to the Skype menu: Select Tools→Options.
text_image
Skype™ - ntgiant2 File View Contacts Tools Call Help Create a Conference Call... SkypeOut SkypeIn Voicemail... Call Forwarding... Send SMS Message... Ringtone Share Skype with a Friend Recent Chats Bookmarked Chats Change Language Options...2) Select Privacy→Manage other programs' access to Skype.
text_image
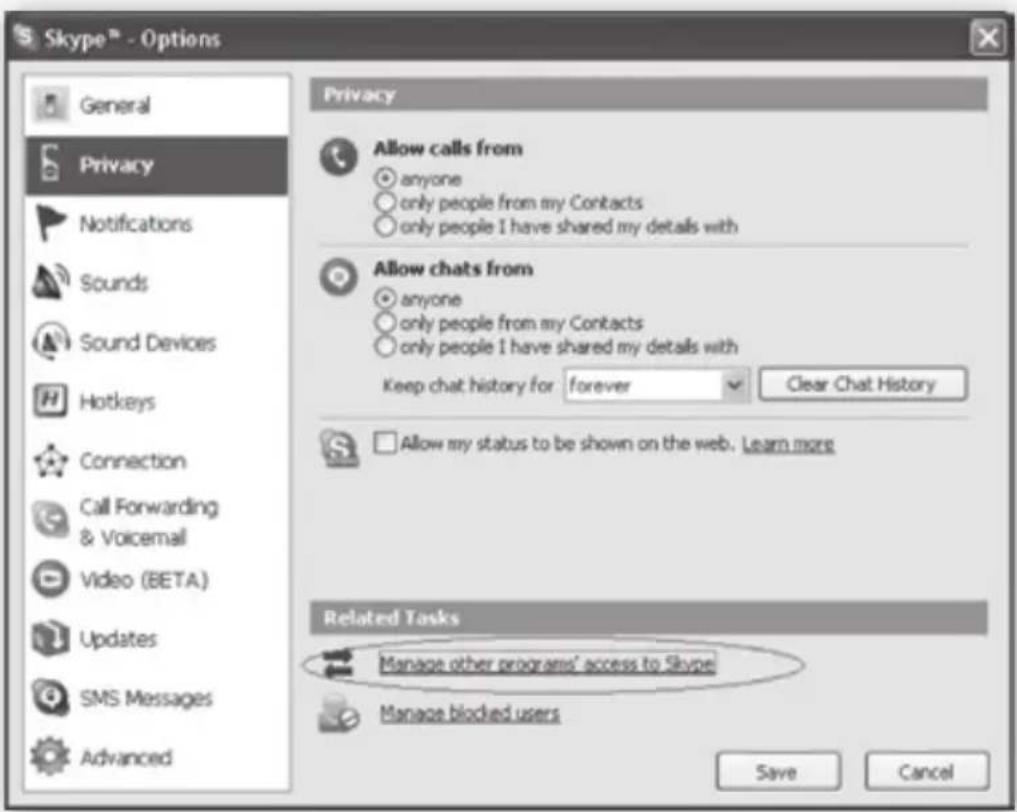
Skype® - Options General Privacy Notifications Sounds Sound Devices Hotkeys Connection Call Forwarding & Voicemail Video (BETA) Updates SMS Messages Advanced Privacy Allow calls from anyone only people from my Contacts only people I have shared my details with Allow chats from anyone only people from my Contacts only people I have shared my details with Keep chat history for forever Clear Chat History Allow my status to be shown on the web. Learn more Related Tasks Manage other programs' access to Skype! Manage blocked users Save Cancel3) Select DUALphone Suite, then click Change.
text_image
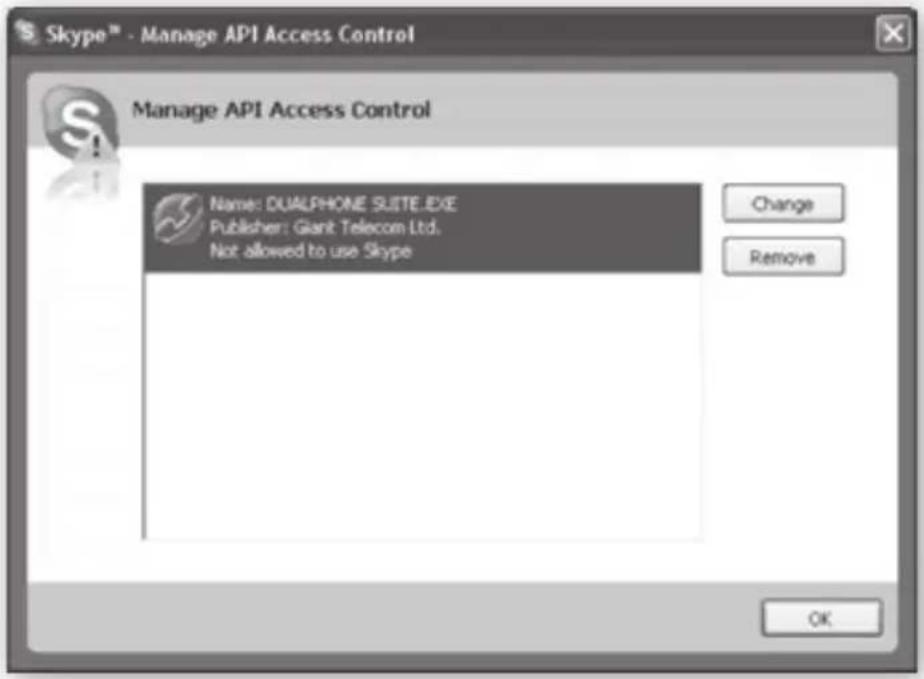
Skype™ - Manage API Access Control Manage API Access Control Name: DUALPHONE SUITE.EXE Publisher: Giant Telecom Ltd. Not allowed to use Skype Change Remove OK4) A window will pop up, asking you to select Allow this program to use Skype. Press OK.
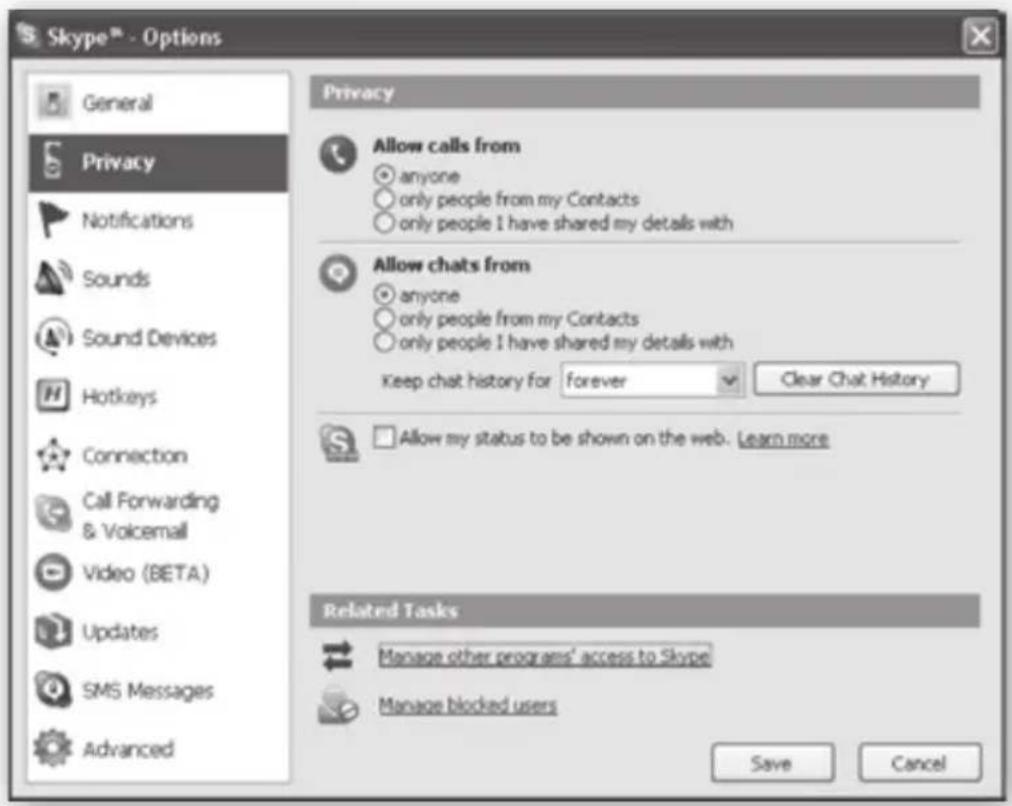
5) Click Save to save the option selected.
text_image
Skype™ - Options General Privacy Notifications Sounds Sound Devices Hotkeys Connection Call Forwarding & Voicemail Video (BETA) Updates SMS Messages Advanced Privacy Allow calls from anyone only people from my Contacts only people I have shared my details with Allow chats from anyone only people from my Contacts only people I have shared my details with Keep chat history for forever Clear Chat History Allow my status to be shown on the web. Learn more Related Tasks Manage other programs' access to Skype! Manage blocked users Save CancelTroubleshooting – General
| PROBLEM POSSIBLE CAUSE | |
| The registration does not work | · The handset and the base station were not prepared for registration.· The handset or the base station has not been entered into registration mode.· The base station is registered full. |
| No display | · The battery is empty. |
| No reactions to keystroke | · The keypad is locked. |
| No radio connection to the base station – the LED is blinking | · The handset is outside the base station range.· The handset is not registered.· The base station does not work. |
| No dial tone when pressing | · The base station is not powered on.· The handset is too far from the base station.· The line is not connected to the base station. |
| No signal icon | · The handset is not registered· The handset is out of range of the base station. |
| When the handset is placed in the base station, no beep is heard | · The handset is not placed properly in the base station.· The charging contacts are dirty.· The base station is not powered on. |
| The battery icon remains empty although the handset has charged for 14 hours | · The handset's batteries are defective.· The handset is not placed properly in the base station. |
| I cannot hear the other party clearly or the speaker is too loud/quiet | · The volume on the handset is too low. |
| The phone does not ring when a call comes in | · The ringer may be set off.Unplug and then plug in the power adapter.SeeUser Manualfor correct registration of base station and handset.Presson the base station to page the registered handsets, then perform the deregistration operation. Finally, register the handset you want to use. |
| ce them (seeBattery charging). | |
| Press* a/Afor longer than two seconds. | |
| Move closer to the base station.Register the handset (seeRegistering handset).Check if the power adapter is connected to the power outlet (220-230V AC / 50 Hz) and the other end is connected to the power jack on the base station bottom. | |
| Check the power adaptor connection.Move the handset closer to the base station.Plug in the line. | |
| Register the handset.Move the handset closer to the base station. | |
| Take the handset out of the base station and put it back again.Clean the charging contacts with a clean and dry cloth.Verify that the base station is powered on. | |
| Buy new rechargeable batteries.Make sure the battery icon is scrolling – otherwise put the handset back in the base station. | |
| plume. | |
| n. | |

natural_image
Close-up grayscale portrait of a person (no visible text or symbols)Troubleshooting – Skype
| PROBLEM POSSIBLE CAUSE | |
| The CD-ROM cannot run automatically | |
| Contact list/user status returns PC Not Available message | Please check as follows: If the base station is powered on.If the USB driver is functioning properly and the USB plug is connected successfully.If you are signed into Skype.If the DUALphone Suite is running and shows that the connections are successful. |
| I cannot call an ordinary phone number | 00/011 or country code is omitted.Your Skype account has too little of no credit.The handset loses its link. |
| Bad audio quality | There may be interference from nearby electrical appliances.The base station is installed in a room with thick walls, or the handset is too far way from the base station.The quality of the network is not good, or the audio device is not good enough.Right-click the icon of your CD driver, then selectOpen. Double-click the DUALphoneSetup.exefile to enter the installation process. |
| Start and sign into Skype.Make sure the DUALphone Suite is installed and running.Verify that the USB driver is functioning properly and the USB plug is properly connected.Verify that the setting of Skype can allow DUALphone Suite to access it. | |
| Enter 00/011 and country code before the number dialled.Buy more Skype credits.Verify that the link is successful. | |
| Move the PC to a different location.Move the handset closer to the base station.Get an audio device with higher quality. | |

natural_image
Close-up of a person's face with visible teeth and smile (no text or symbols)Ce deClaration of ConForMitY
This product is manufactured for RTX Products A/S. Please also refer to the introduction in the User Manual, guarantee and safety & warranty information sheet.
The DUALphone 3058 comply with the requirements of EC directives:
99/5/EC Directive for radio facilities and telecommunication terminals
The presumption of conformity with essential requirements regarding Council Directive 99/05/EC is assured according to:
R&TTE Directive 99/05/EC Standard: EN301406 V 1.5.1
The DUALphone 3058 is in conformity with the below mentioned directives:
EMC Directive 89/336/EC Standard: EN301489 - 1 V 1.5.1
Standard: EN301489 - 6 V 1.2.1
Safety Directive 73/23/EC Standard: EN60950 - 1:2001
(1st edition)
SAR Recommendation 99/519/EC Standard: EN50360, EN50385
Due to existing differences between public telecommunication networks in different states, this authentication does not constitute in itself an unconditional guarantee for successful operation of these units on every network terminal point.
Intended use:
The DUALphone 3058 is designed to switch onto the analogue telephone network via the normal telephone socket and USB interface on a PC connected to a broadband connection. Any other use is deemed as not intended use. The company does not accept claims resulting from unauthorised alterations or modifications not described in this user manual.
Denmark, Noerresundby, 01-11-2006

text_image
Klenis BullbackKlaus Ahlbeck
RTX Products A/S
Stroemmen 6
9400 Noerresundby
Denmark
Telephone: +45 96322300
Fax: +45 96322310


Cordless handset