
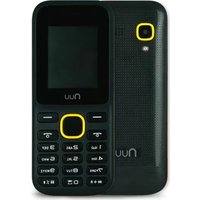
NU2S - Smartphone NUU Mobile - Free user manual and instructions
Find the device manual for free NU2S NUU Mobile in PDF.


| Product Type | Smartphone |
| Model | NU2S |
| Brand | NUU Mobile |
| Operating System | Android 5.0 Lollipop |
| Carrier Compatibility | Carrier-unlocked |
| Dimensions (Approx.) | 140 x 70 x 9 mm |
| Weight (Approx.) | 150 g |
| Battery | Removable Li-ion (approx. 2000 mAh) |
| Display | Touchscreen, capacitive |
| Camera | Rear camera with Photo Sphere, Panorama, Face Beauty, Motion Track; Front camera |
| Connectivity | Bluetooth, Wi-Fi, HotKnot, FM Radio, GPS, USB 2.0 |
| Sensors | Proximity sensor, accelerometer |
| SIM Card | Dual SIM support (micro-SIM) |
| Storage | Internal storage + microSD card support |
| Audio | 3.5mm headphone jack, speaker, FM radio with headphones as antenna |
| Notifications | Notification LED (red charging, green full, blue message) |
| Security | Screen lock (slide, face, PIN, pattern, password), encryption |
| Maintenance | Use only NUU Mobile accessories; avoid water, heat, chemicals |
| Safety | Do not text and drive; avoid use near explosives, medical equipment, or in airplanes when prohibited |
| Spare Parts & Repairability | Battery user-replaceable; other repairs by qualified service |
| General Information | Includes user manual with setup, operation, and troubleshooting tips |
Frequently Asked Questions - NU2S NUU Mobile
User questions about NU2S NUU Mobile
0 question about this device. Answer the ones you know or ask your own.
Ask a new question about this device
Download the instructions for your Smartphone in PDF format for free! Find your manual NU2S - NUU Mobile and take your electronic device back in hand. On this page are published all the documents necessary for the use of your device. NU2S by NUU Mobile.
USER MANUAL NU2S NUU Mobile
natural_image
Simple green circular arc icon with no text or symbolsNU2S
User Manual
Contents
Welcome to the NUU Mobile NU2S! 4
Installing the SIM Card and Powering Up ____ 5
Controls & Using The Touchscreen 5
Those Three Buttons 7
Common Onscreen Buttons 8
How Do I...? 9
Initial Configuration 9
Find An App, Move Apps, Add Widgets 11
Power On/Off, Wake Up, Unlock, Go To Sleep 14
Make A Phone Call 15
Browse The Web 16
Send Text Messages 17
Take Pictures 18
Notifications 20
FM Radio 21
Clock 22
Gallery & Photos 23
Contacts 25
Bluetooth 26
HotKnot 27
Music 28
The Settings Menu 29
USB Connections 34
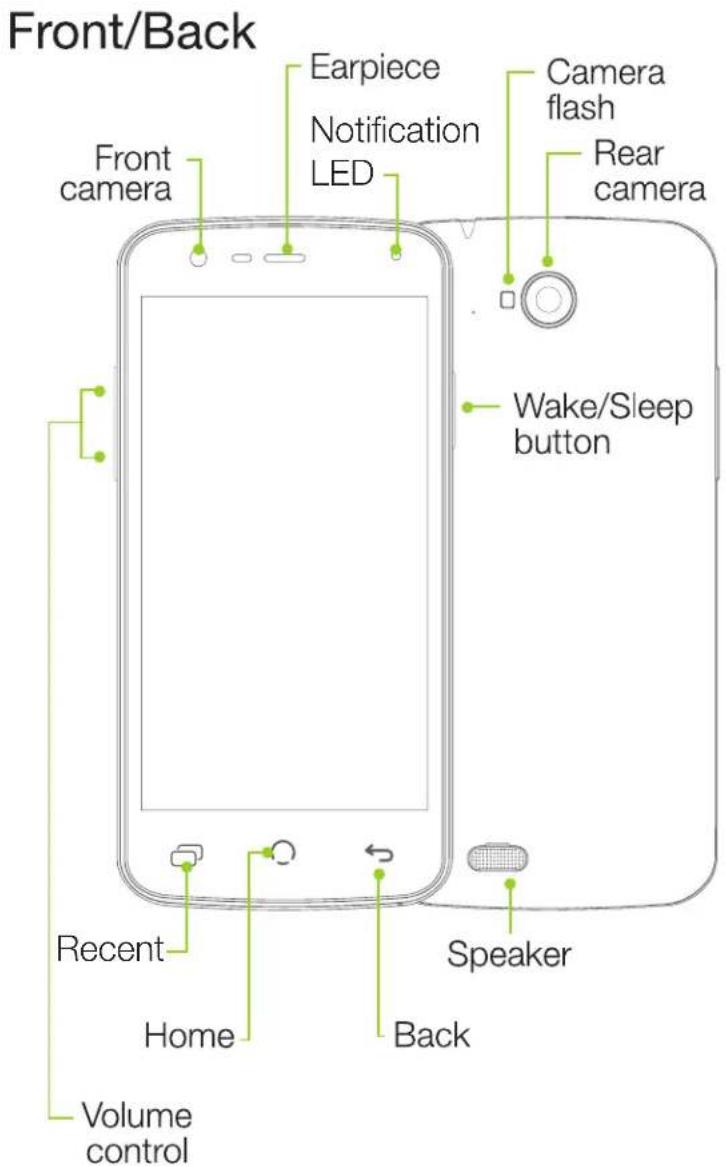

Welcome to the NUU Mobile NU2S!
Thank you for purchasing a NUU smartphone! We're proud to have you as a customer and we think you'll get a lot of enjoyment and usefulness out of our smartphone.
Your NUU Mobile NU2S is a carrier-unlocked Android™ smartphone. Like all smartphones, you can use it to call, e-mail, video chat, text, use apps, and that's just for starters. Since your phone is carrier-unlocked, you can use it with any compatible carrier.
Before you get started using your NU2S, please keep in mind the following safety tips.
First of all, do not text and drive!
It is unsafe as well as against the law.
Emergency Calls: To make an emergency call when the phone is locked with a passcode, press the Power button and tap “Emergency call”. Then dial the emergency number and press the phone-shaped button below the keypad. If the NU2S isn’t secured with a passcode or PIN when powered on, slide the phone icon to the right and dial from there.
Airplane Use: Please follow all instructions from airline staff. Some airlines will allow phone usage and some will not and it is up to you to listen and learn which.
In Hospitals: Do not use your phone around medical equipment as it may interfere with sensitive electronics. If in doubt, turn off your phone and ask hospital staff where it is safe to use your phone.
Chemical Safety: Do not use your phone around chemical fumes, as this may present a fire or explosion hazard.
Demolitions and Other Explosives: If you encounter a sign that says “Turn off all radios, explosives in use!”, do not put the phone to sleep but instead power it off completely. Remove the battery as well if you want to be extra safe.
Water: Don't let your phone go for a swim! It's not waterproof.
NUU Mobile Accessories Only, Please!: If you need a replacement battery or accessory, please use only NUU Mobile-brand items.
Written Backup: We strongly recommend that you keep a written record of all important information (eg: your Google credentials and so on) and that you store the record in a safe, secure place.
Installing the SIM Card and Powering Up
SIM Card Safety Note: SIM cards are small enough to become a choking hazard, so please keep them away from children. SIM cards are also quite delicate. Please be careful when handling your card, and if you need to store the card, we recommend using a small bottle or a dedicated card-carrier to keep your card safe (Old film canisters and clean, empty prescription bottles work well).
You must insert your SIM card before using your phone!
Power On, Power Off: Inserting or removing a SIM card requires that your phone be completely off. Here's how to power your phone on or off.
On: Hold down the power button for a few seconds. You will see the NUU logo when the phone powers on successfully.
Off: Hold down the power button for a few seconds. When you see the menu pop up, tap the "Power Off" option. Confirm the choice to power off the phone.
Installation:
1: Power off your phone fully.
2: Remove the rear cover and battery.
3: Insert SIM card according to the diagram inside the phone.
4: Re-insert the battery and close the rear cover.
5: Power on your phone.
Controls & Using The Touchscreen
While your NU2S smartphone certainly has a number of buttons you can push, you will control it primarily by using the touchscreen. You may wonder just how many different ways one can touch a screen, and as it turns out there are a few of them! You'll find a handy list of the most common ones below, which includes the name for the gesture and a description how to perform it.
Important!:
Your phone's touchscreen is NOT pressure-sensitive, as it instead works by sensing tiny electrical currents. This means that when you touch the screen, you only need to make contact, you do not need to apply pressure. If your fingertips are heavily callused (or if you are wearing
non-conductive gloves), the screen may not "hear" you or register your touches properly. In that case, try a different fingertip or a patch of bare skin.
“Tap”: In some documentation, this may also be referred to as a “touch” or even a “click”. It’s almost exactly like tapping your finger on a table; aim a single fingertip, touch it to the screen, and pull it away from the screen. You can have your finger in contact with the screen for quite a bit before the phone registers it as a “long-press”, so don’t feel like you have to pull away instantly.
“Double-tap”: Two taps in rapid succession, almost exactly like double-clicking a mouse, but with your fingertip. Rarely called a “double-click”. Used for different things in different apps, so make sure to consult the help for that app!
"Long-press": Sometimes referred to as "hold" or "tap-and-hold" or "touch-and-hold". Place your finger on the screen and keep it there. After about a full second, the phone will recognize this as a long-press and give you some kind of feedback: a menu might appear, an icon might start shaking, or some element of the interface will change to indicate that you have the phone's complete attention.
What makes the long-press a little difficult is that in some apps, removing your finger from the screen makes your next selection, and in other apps, you're expected to make a separate "tap" to select the thing you want after a long-press. This behavior isn't constant across all apps so you'll need to experiment a little with your apps.
“Drag-and-drop”: Sometimes mentioned as “drag-n-drop”, “drag”, or “touch, hold, and drag”. First you long-press something, then once you’ve gotten the visual feedback that shows that the phone interpreted your long-press, you keep your finger on the screen as you move it around. When you remove your finger from the screen, you “drop” the item in question.
The usual example is moving your app icons around. First you long-press the icon in question until you see it get “picked up” or highlighted somehow, then (keeping your finger on the screen) you “drag” the icon to its new spot. When you let go, you’ve “dropped” it. The key part is that a drag-and-drop always starts with a long-press.
"Slide": Closely related to the drag-and-drop. While a drag-and-drop requires a long-press at the beginning, a slide does not. Unlocking the phone, answering a call, and bringing up Google Now all require slide motions, where you slide an on-screen button in a straight line, with no pause or delay after touching the button.
"Swipe": A swipe is a gesture that's just like moving a playing card across a smooth felt table. There's no pause at either end, just a smooth motion. The tricky part of swiping is
what is meant by the term "swipe left" or "swipe right".
In NUU documentation (and Google's) the direction refers to the way your fingertip goes. So “swipe left” means your fingertip starts on the right side of the screen and goes to the left. That swiping left often looks like the whole app “jumped” to the right is where the potential confusion comes from. When in doubt, follow your fingertip!
Swiping is normally used to bring a menu onto the screen, switch between windows, or other large-scale actions that involve most or all of the screen instead of just a single part, like the slide.
"Two-finger swipe": Just like a regular swipe, but with two fingertips instead of just one. Sometimes you'll even see apps that ask for a three-finger swipe, but this is pretty rare.
“Pinch”: Sometimes simply referred to as “zoom” and the two terms are often combined into “pinch-to-zoom”. Google sometimes calls it “scale”. This refers to placing two fingertips on the screen and either pinching them together or spreading them apart to change the size of something, usually a picture or a web page. Note that you can often rotate an image with this gesture as well as zoom.
Those Three Buttons
At the bottom of the screen you'll find three buttons (consult the NU2S Overview diagram for their location).

Recent


BackHome
Here's what they do.
Recent: Tapping this button brings up the “Recent” menu. This is a vertical list of apps that are currently active. If you have Chrome’s “merge tabs” feature turned on, Recent also lets you switch between Chrome tabs. You can slide the list up and down to see the whole list. Slide an app’s picture off the screen (left or right works) to make it inactive. You can also tap the app’s X button to do the same thing. This is often referred to as “killing” or “force-quitting” an app, and it’s a useful thing to know as doing so can solve many problems with a misbehaving app!
Home: The Home button has two main functions. Tapping the Home button will always take you back to your Home screen, the “center” screen in the pages of icons you can have on your phone. If you’re lost, tap Home and you’ll be taken back to familiar territory!
Long-pressing the Home button brings up the Search app, which lets you search the contents of your phone and the web at the same time.
Back: This does exactly what its name suggests; it takes you back one step. If you called up a sub-menu, for example, and wanted to go back to the previous menu, just tap the Back button one time to do that. If you tap Back enough times, you will eventually work all the way to your Home screen, so this is another way of getting back to familiar territory if you're lost.
Common Onscreen Buttons

Drawer: This button is used to access a general menu in a particular app. In Google Maps, for example, it lets you switch between map and satellite view, among other things. In GMail, the Drawer allows you to switch between folders. If your app has a Drawer button, you should familiarize yourself with the options it presents. Sometimes the Drawer is also referred to as “options” or “hamburger” or, confusingly, “menu”.

Share: Pressing Share allows you to send the content of your current app to someone else. For example, when looking at the details for an app in the Play Store, using the Share button allows you to send a link to that app by e-mail, Bluetooth, MMS, or in a variety of other ways. The same thing can be done in the Contacts app and other places. Sometimes this button is referred to as “Send” or “Send Using...”.

Overflow: The official name is both “Menu” and “Overflow”, but NUU documentation uses “Overflow” to avoid confusion. Sometimes also known as “options” or “the stoplight”. Whatever its name, this button brings up options relevant to the current screen. If you were looking at a Contact card, for example, “Overflow” would allow you to edit, delete, share, or set the ringtone for that contact only. “Overflow” provides access to your bookmarks and other settings in the Google Chrome app.

Microphone: Used for Google Now, OK Google, and voice-recognition. Tap Microphone and then speak when prompted.

Call: Dials the number entered on the keypad, or if you are looking at a contact page, dials the preferred number for that contact.

Locate: Most often found in mapping software, tapping this centers the map on your location if it was not already.

Search: This magnifying-glass icon, when tapped, activates the search function for whatever app you are using.

Send: Most often seen in e-mail apps, this sends the current message to its recipient.

Select All: Selects every single item in a checklist. This button isn't seen often, but when it is, it's rarely labeled.

Trash: Destroys the currently-selected item. There is usually no way to undo this, so be careful!
How Do I...?
In the following pages you'll find short introductions to the things you can do with a smartphone. These are not as in-depth as you'd find in the official Android User Guide from Google, as they're meant to get you started.
You can access Google's Android help pages at the following address: https://play.google.com/store/books/details?id=dnzVBAAAQBAJ
or by tapping this link if you are viewing this manual on your NUU Mobile phone.
Google's Android Quick Start Guide, Android 5.0, Lollipop can be found in the Play Store by searching for its title or by tapping this link if you are viewing this manual on your NUU Mobile phone.
Initial Configuration
The very first time you power on your phone, you'll have to go through the initial setup. It's not too difficult, but you will have a fair amount of choices to make and account information to enter, namely your Google credentials. Here is the general order of events:

Welcome Screen: Pick your language by swiping up and down and pressing the > button.
Insert SIM Card: Pops up if there's no SIM installed. You can skip this screen.
Connect to WiFi: If you're in range of a trusted Wi-Fi hotspot, configure it and connect to it here.
Check Connection, Update Software: Lollipop automatically updates itself the first time it connects to the Internet. Just let that update happen and then continue on to the next screen when it's done.
Google Account: In these next screens, you have the option of skipping them entirely or filling out your Google account credentials, or even making a new Google account if you've never had one. Regardless you will at some point need a Google account, as they are necessary to use the Play Store and get apps and app updates. You will also need to accept Google's Terms of Service during this portion of the setup.
Generally it is best to leave these all checked to provide a smooth experience.
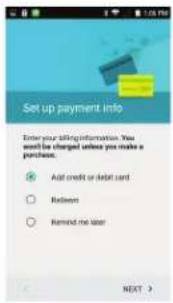
Add Payment: This concerns how you pay for things in the Google Play Store. Select "Remind Me Later" if you don't wish to set that up right away.

If you signed in or created a Google account earlier, you will also be presented with a list of checkboxes to check or uncheck. These concern how Google backs up your data, how it determines your location, and whether or not you receive e-mail from them.

FINISH
Find An App, Move Apps, Add Widgets
Like any good smartphone, your NUU Mobile smartphone allows you to arrange your app icons as you see fit. You'll have several screens on which you can place your icons, each screen accessible by swiping left or right.

You can always see which screen you are on by consulting the Navigation Bar at the bottom. Each dot corresponds to a Home screen, and the larger dot shows which one you are looking at.

Add an App Icon: To add an app icon to a Home screen, find the app in All Apps. Long-press on the app, at which point All Apps will fade into the background and you will see your Home screen. Drag-n-drop the icon where you like.

If you can't locate the All Apps button, press the Home button at the bottom of the screen. When you get back to the Home screen, All Apps will be located at the bottom-center of the screen, just above Home.

Move an App Icon: To move an icon, long-press on the icon until it enlarges under your finger. At this point you may drag it around the screen. An outline will appear showing you where the icon will go when it is dropped. If you move the icon to the left or right edges of the screen, you will transition to the next Home screen over on that side When you let go, the icon drops back into place in the new location you've specified.

You may also make folders of icons. Just move one icon over another and they will automatically make a folder when the first is dropped on the second. You can rename the folder by opening it with a tap and then tapping on “Unnamed Folder”. To destroy a folder, drag all icons out of it. Folders are a great way to group icons by purpose and keep a neat Home screen.

Remove an App Icon: To remove an app icon from your Home screen, long-press it and then drop it on the "X Remove" target at the top of the screen.

WIDGETS:
Widgets are special add-ons that come with many apps. Some are also built into Android itself. To access available widgets, long-press on any blank spot on the Home screen, then tap “WIDGETS.”
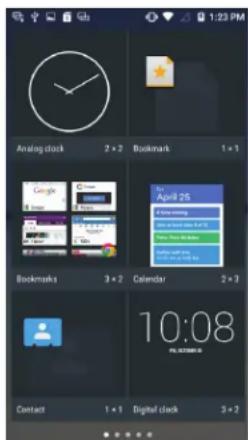
Like regular apps, just long-press and then drag-n-drop to place the widget. Note that each widget as a size listing underneath its picture, and this tells you how many rows and columns of icons it will take up when placed. 4x3 widget, for example, is 4 icons across and 3 high, and as a result takes up the entire width of a Home screen.
Widgets can be removed from your Home screen in the same manner as app icons.
Power On/Off, Wake Up, Unlock, Go To Sleep
Your phone can power on and power off fully, as discussed on the SIM card installation page. Here are those instructions again for reference.

ON: Hold down the power button for a few seconds. You will see the NUU logo when the phone powers on successfully.
Off: Hold down the power button for a few seconds. When you see the menu pop up, tap the "Power Off" option. Confirm the choice to power off the phone.
Your phone can also go to sleep, and wake up from this sleep. Putting your phone to sleep saves battery power without the inconvenience of fully powering-off the phone.
Sleep: Tap the power button. The phone will immediately go to sleep. Wake: Tap the power button and the phone will wake up and show you the Lock Screen.

The Lock Screen shows up every time you wake your phone from sleep. To unlock it, slide the padlock icon straight up. You can also access the phone by sliding the phone icon to the right, and you can access the camera by sliding the camera icon to the left.
You can modify the Lock Screen to behave differently, but that's an advanced topic better left to Google's official documentation.
Your phone keeps a list of every installed app in one spot so they're easy to find. This place is called "All Apps", and to get to it you press the All Apps button.
If you can't locate the All Apps button, press the Home button at the bottom of the screen. When you get back to the Home screen, All Apps will be located at the bottom-center of the screen, just above Home.
Make A Phone Call
Of course, a phone should make calls, and your NUU Mobile smartphone will do just that.
First, start the Phone app. It's located on the main Home screen or can be accessed from All Apps. It can also be accessed from the Lock Screen by sliding the phone icon to the right.
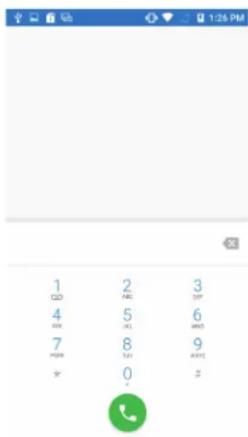
Press the keypad icon 🎨 to bring up a numeric keypad.
Type the phone number you wish to dial and then press the dial button which looks like a phone handset on a green circle. At that point, you may put the phone up to your ear and speak normally after the other party picks up. If you need to dial an extension, you may press the keypad icon during the call and enter it that way.
Press the Recents tab RECENTS to bring up a list of recent incoming and outgoing calls. You can choose to re-dial a number from this list by tapping the number and then tapping the Call Back button.
Press the Contacts tab _CONTACTS_ to bring up a list of your contacts. You can select a contact by tapping on it, and then choose to dial that contact's number.
NOTE: Your phone is equipped with a proximity sensor. When you place the phone next to your ear, the touchscreen is automatically shut off so that you do not activate any controls accidentally. When you pull the phone away from your ear, the touchscreen wakes back up.

Browse The Web
Your phone includes Google Chrome found on the main Home screen or in the All Apps folder. You can use Chrome to pull up pages from all over the web, and it's particularly useful when the company or site you want to view doesn't have a dedicated app.


Omnibox: Sometimes known as the "address bar". Typing into this will either search for what you type, or go directly to a web page if you type in a full web address.
Tabs: Press this button to show what tabs you have open or to create a new tab. If you have multiple tabs open, you can slide the list up and down to see all of them. Tap a tab to select it and bring it to the front.
NOTE: Newer versions of Chrome change this behavior. Instead of a Tabs button, you press the Recent button ☐ to access all of the tabs you have open. You can change this behavior in Chrome's settings.

Favorites: When you choose to bookmark a web site as a favorite, this is where the bookmark goes. You can go back to a bookmark at any time.
Recent//History: This is a chronological list of websites you've visited.
To scroll a web page, just swipe up or down (or left and right for some really wide ones).
Zoom into a web page by pinching or double-tapping. Some web pages disallow this, but you can dig into Chrome's accessibility settings (Overflow > Settings > Accessibility > Force Enable Zoom) to override this behavior.
Long-pressing a link will get you a menu of options, like opening the link in a new tab, for instance. This is really useful when trying to research a subject and you need multiple web pages open at once.
Send Text Messages
As always, DO NOT TEXT AND DRIVE. It's illegal and always dangerous. Google's voice controls, once properly set up through Google Now, are quite sufficient to text hands-free.
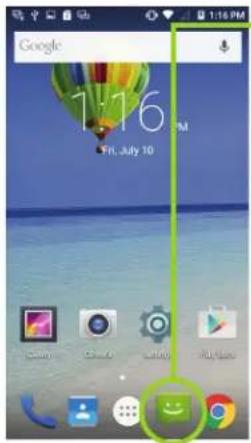
In any case, the Messaging app 🤔 is located on your Main Home Screen at the bottom. Open it up and tap New Message 🌐 to make a new message. You can fill out the recipient field (the top one) with a single contact or multiple contacts or even an entire contact group if you wish. The Contact button on the right 🔒 lets you do this. Once you have the recipients arranged as you like, tap into the message field at the bottom and start typing.

The Plus + button lets you send pictures, video, audio, and contact cards with your message. Adding an attachment automatically converts the message from SMS type to MMS type, which can have an effect on how your service provider charges for the message.
Overflow allows you to change the message subject, discard the message, use a “quick text” template, or open up the fairly vast array of messaging settings. In the settings you can change how (or if) texts are stored, make templates, get delivery reports by SIM, add a signature, get read receipts, change roaming settings, adjust push and notification settings, just to name the major ones.
You'll want to consult the documentation that came with your SIM card for any special configuration you must make.

We very strongly recommend installing an microSD card before using the camera! Use the microSD card so that your photos are easily transferable.
It is said that the best camera is the one you have with you, and part of the point of buying a smartphone is to have one with you as needed. Your NUU smartphone has a pair of cameras for which you'll find excellent uses.
To start taking pictures, load the Camera app. 📄 If it’s not on your Home screen, check the All Apps button for it. You can also load the Camera app from the lock screen--just swipe from right to left starting from the edge of the screen.
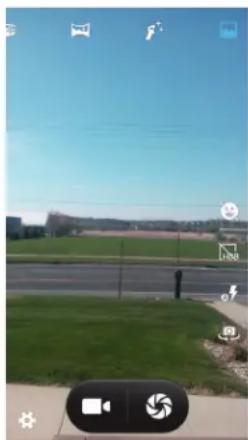
Once in the Camera, you'll see some floating controls on the edges of the screen.

natural_image
Outdoor scene with green grass, a paved road, and blue sky (no visible text or symbols)Top Edge: From left to right they are Photo Sphere, Panorama, Face Beauty, Motion Track, and Normal. You must slide the list left and right to access all of them.
Photo Sphere: Lets you take spherical panorama shots. Follow the on-screen guide to aim your camera properly.
Panorama: Lets you take linear panorama shots (horizons and the
Face Beauty: For selfies and portraits.
natural_image
Outdoor scene with a grassy field, road, and clear blue sky (no visible text or symbols)Motion Track: Captures motion on several photos in sequence.
Normal: Acts like a garden-variety smartphone camera.
Right Edge: Displays a message that shows what mode the camera is in (and what it's for) or shows controls that apply to each mode individually. Normal mode has the most controls, and touching each one shows a message about what they do and how to use them.
Bottom Edge: From left to right, these are Settings, Record Video, Shutter, and a preview of the last picture you took.
Settings: Lets you change the general options, camera options, and video options. Tap the icons at the top of the Settings menu to change which options you are adjusting, then slide the menu up and down to access each option in turn.
Record Video: Tapping this starts or stops video recording.
Shutter: Tapping this takes a regular photo. Long-pressing this will, in Normal mode, take photographs in rapid succession.
Preview: This only shows up after you've taken at least one photo. Tapping it takes you to the Gallery app so you can review the photos you've taken.
When taking a photo, tap the screen to bring up the focus square. [ ] Tapping on the screen changes the location of the focus ring. If you've got most of the automatic options turned on, doing this will adjust the color balance, exposure, focus point, and so on.
When shooting video, the white Record button becomes a red Record button. Tap it to stop or start recording.
Panoramic photos are easy, but do require steady movement. Put the camera in panorama mode, tap the Shutter button, and slowly swing the camera in one sideways direction as if you were spinning around. Tap the shutter button again to stop taking a panorama. The camera app will automatically stop taking a panorama if you've turned far enough--about 180 degrees.
One of the things that makes a smartphone smart is its capability to notify you of things and your ability to customize those notifications to your liking. Want your smartphone to tell you when you've got new e-mail? You can do that. Want it to skip the e-mail and only vibrate if you get a severe weather alert? You can do that, too.

Your NU2S also includes a handy Notification LED in the upper-right corner of the front side. This glows red while the NU2S is charging, green when it is fully charged, and blue when you have a new message waiting for you.
Notifications show up at the top of the screen. Swipe down from the top of the screen in order to get a more detailed view. The Dismiss button ≡ will make all current notifications go away. The Quick Settings button Ⓐ lets you get at common settings for your phone, like Airplane Mode and brightness controls. It also has a link to the main Settings app as well as a link to profiles. You can also access
Quick Settings by swiping down from the top of the screen with two fingers, instead of one.
Some notifications, like e-mail, can be tapped on. Doing this usually takes you right to the app so you can respond. You can also swipe down slowly on some notifications to get response options without actually having to switch to another app. You can also long-press a notification to get at options for it.

Quick Settings
Notifications are configured from within each app. Make use of the Overflow : button or the various option buttons in the app to check those settings.
Notification
Dismiss all
You can find the FM Radio app

by using the All Apps

button.
You must plug in a pair of headphones to use the FM radio! The headphone cable is used as the FM antenna. You can make the sound output through the phone speakers, but you still must have the headphones plugged in.
Once you've started the radio playing, just press Home to have it play in the background while you do other things.
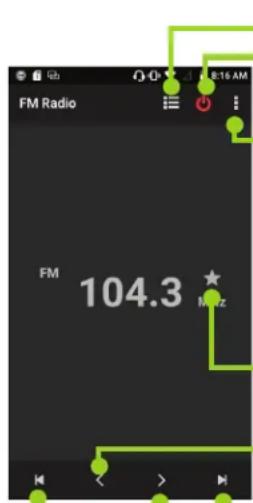
Channel List: If you've scanned for FM stations, they will show up here, as will any favorites you have saved.
Power: Tapping this button shuts off the radio and quits the app.
Overflow: Lets you scan for stations, change to speakerphone output, or record from a station.
Star: Marks the currently-tuned station as a favorite.
Scan Left: Searches downward through the FM spectrum for the next tunable station.
Tune Left: Steps down through FM frequencies one by one.
Tune Right: Steps up through FM frequencies one by one.
Scan Right: Searches upward through the FM spectrum for the next tunable station.

You can use the scan or tune buttons to set a station manually. You can also tap Overflow > Search in order to have the phone auto-scan stations for you and add them to the Channel List. Take note that this will not add weak stations to the Channel List.
If you long-press a station in the Channel List you can do two things: add it to your favorites and rename it. You can only rename a station that has first been added to your favorites.
When you choose to record from the radio, it is saved as a .3gpp file.
These files are stored in the “FM Recordings” folder on your phone’s internal storage.
Clock
The Clock app has many features to go with its world clock abilities. Set alarms, use it as a stopwatch, and even turn it into one (or more!) countdown timers.
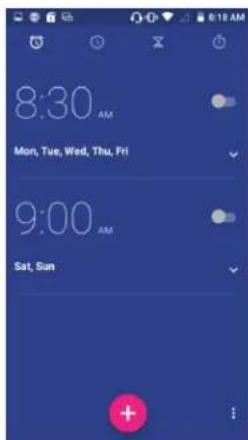
Alarm: Tap the red New Alarm/+ button to add an alarm. From here you can choose the time of day, the ringtone the alarm uses, on what days it repeats, whether it vibrates the phone, and its name. Press the Overflow button to configure how alarms behave and what your phone's buttons do to an alarm.

World Clock: By default, this displays your current time. You can add other world clocks by using the red button and then checking one or more cities. Use the Back arrow to get out of the city selection process. Use the Overflow button to configure how the clock displays.

Countdown Timer: Use the keypad to enter in a length of time, then tap the red Start button. Once you've started a timer, you can change its label by tapping the word "label", extend the time +1, stop it with the red pause button, or delete it 📁. You can also use the + button to add more timers, which you can all have going at once if you like.

Stopwatch: This is a basic stopwatch with start/stop functions and a lap button ⏻. A stopped timer can be shared with the share button ⏻.
Gallery
This app allows you to view, edit, and share the photos you take and save. You can find Gallery in All Apps.
Gallery has many features and you'll want to take your time exploring them all. At its heart, though, Gallery is a means to show and share the pictures you've taken.
To view pictures, open the app and select an album by tapping on it. The album shows up as a grid of photos. Tap a photo to view it, or swipe up and down to see the entire grid if there are more photos than will fit on the screen. When viewing a single photo, you may swipe left and right to load the next and previous photos in the album, respectively.
This sounds more confusing than it looks in motion. The way the photos look when you swipe makes the organization quite a bit clearer and easier to grasp. Don't forget that the Back button will back you out of any screen!
When you are viewing a photo, you will also see a Share button . When you tap this button, you'll get a list of ways to share the photo. The list will change depending on what apps you have installed, but as an example, one of the options is to send the picture via e-mail. If you chose that, your e-mail app would come to the foreground with the picture already attached to a blank message. Just fill in the address and subject, then tap Send!
You will also see the HotKnot button next to Share. HotKnot allows you to send photos directly, and is covered separately later in this manual.
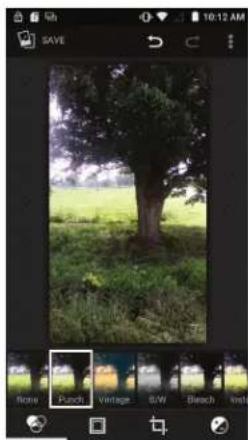
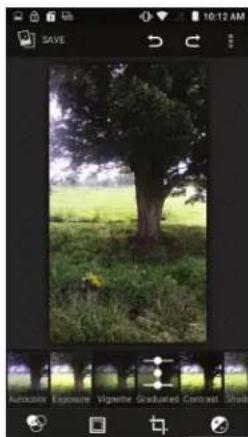
And what are photos without the ability to edit them? When you view a photo, you can press Overflow > Edit to get at the numerous options for photo-editing. Across the bottom from left to right, the edit categories are...
natural_image
Photo of a tree in a grassy field with trees and shrubs, captured within an app interface (no text or symbols on the image itself)Filter: Apply photo filters, like B&W, Sepia, "Vintage", and so on.

natural_image
Black-and-white photo of a tree in a grassy field, captured within a photo editing interface (no text or symbols on the image itself)Borders: Add frames and borders.

natural_image
Photo of a tree in a grassy field with no visible text or symbolsTransform: Crop, flip, rotate, straighten, and mirror.
natural_image
Photo of a tree in a grassy field with no visible text or symbolsAdjustments: Exposure, color balance, contrast, etc.
Note that effects and edits are not permanent until you choose to save them with the Save button in the upper-left. Before you save, you can review effects and edits by using the Overflow button. You'll see the picture and a film-strip of effects applied running across the bottom of the screen. Swipe up on a listed effect to remove it. You can also use the Undo and Redo arrows at the top to step back and forth through the effects you've applied in order. Once you have everything to your liking, just hit Save!

Contacts
The Contacts app lets you keep all your friends and family in one spot. Once someone has been added here, you can find them easily and choose to message, e-mail, phone, or video chat with them. Open the Contacts app by locating it in All Apps.

If you signed into the phone with a pre-existing Google account, your Google contacts will automatically sync with the Contacts app the first time you run it.
If not, you can add a new contact with the Add Contact button +. Just fill out the form and tap Done when finished.
To edit a contact, tap the contact to bring it up, then press the Overflow button and choose Edit.
You can make groups by tapping Overflow > Groups. You can use the New Group button to make a new group. To add a person to a group, select the group, then choose Overflow > Edit. You can also assign a contact to an existing group when you are creating that contact. Groups make for an easy way to keep your contacts organized and easy to use.
Tap the Favorites button FAVORITES to view your most-used contacts. To add a contact to your Favorites list, tap the contact and then tap the star button when the contact's details page comes up.
The Overflow button: lets you adjust display settings, change or add accounts, import, explore, and otherwise manage your contacts list.
Tap the Search button 🔒 to search through your contacts. Just start typing to search by name, e-mail, and so on.
Bluetooth
Your smartphone is equipped with Bluetooth, which allows it to connect to all kinds of useful things: wireless speakers, headsets, and in-car sound systems just to name a few. While each Bluetooth device may differ in how it's used, they all connect in a similar way. Here's the general steps for making that kind of connection, known as "pairing" your phone with the Bluetooth device.
Available devices
Voyager_CCB00_SN2T13040920
FAAL-CORUM
MetroBT Module
NU2S is visible to nearby devices while Bluetooth Settings is open.
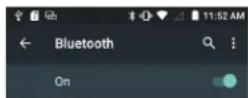
Open Settings and you'll find Bluetooth near the top of the list. Now, tap directly on the word Bluetooth to open the Bluetooth menu. Use the ON/OFF switch to make sure it's ON. You should see a little swirling circle indicator under the ON/OFF switch—this means your phone is searching for new Bluetooth devices. If you don't see the indicator, tap the Overflow button and then tap Refresh.
At this point, your phone is actively searching for nearby Bluetooth devices and will continue to do so for about two minutes. Now you must turn on your device's “Pair” function, sometimes known as
"pairing mode". This usually has a button dedicated to it, but be sure to read your device's instructions for specific steps!
Soon your phone will find the Bluetooth device, and all that's usually necessary is to tap on the device when it shows up in the list. Sometimes you might get asked to enter a code, but again, this should be covered by your device's instructions.
Once the pairing is complete, there's a configure icon ⚙ for each device. Tap this to get at the options for your device, if any. This is also where you go to “forget” the device, which is a step used when troubleshooting Bluetooth connections.
HotKnot
HotKnot is a new way to transfer items from one phone to another without needing to set up a complex connection. All that's necessary is to touch two HotKnot-compatible phones together, screens facing.

Allow data exchange when the screen touches another device

HOTKNOT
In order to use HotKnot, you must first turn it on. Go into Settings and tap on HotKnot. Then flip the switch to ON.
After that, you can use the HotKnot icon (in apps that have it) to send contacts, web pages, photos, and more to another HotKnot-using phone. Here's an example scenario:

To transfer a contact from the Contacts app, first open Contacts and tap on the contact in question. You'll see the HotKnot icon near the top of the screen. Tap the HotKnot icon. Now, take your phone and the other phone and place them screens together. The transfer is complete when you hear a beep.

Your NUU Mobile smartphone comes with a custom music app which you can find in All Apps, titled Music. Once you run it, you'll see all the music you've added to your phone or placed on your microSD card. This app's custom equalizer helps your music sound better.

- You can use the buttons across the top to select what to play, by Artist, Album, individual songs, or playlists you’ve created. The song currently playing is listed across the bottom of this screen.

During playback, you can use the buttons under the album cover to select new songs, change the shuffle mode, change the repeat mode. You can access the equalizer through the Overflow menu; just select Sound Effects.
Use the button in the upper right to toggle the equalizer on or off. Use the drop-down list in the upper-left to change through pre-sets. Use the User pre-set to set your own values. When you plug in head phones, you will also be able to modify the bass boost and surround-sound settings via the dials at the bottom. Lastly, you can modify the reverb settings through the Preset Reverb drop-down at the bottom of the screen.

The Settings Menu
The settings menu is a complex but necessary part of your smartphone. It allows you to connect to wireless networks, manage the apps stored on your phone, and change your security settings just to name a few among many options.
You can find the settings menu ☐ either on one of your Home screens or in All Apps.
Read on for an item-by-item breakdown of each part!
WIRELESS & NETWORKS
Wi-Fi: Tap Wi-Fi to enter the sub-menu. Tapping the word "Wi-Fi" enters the sub-menu. Tapping the ON/OFF switch turns Wi-Fi on or off. There you may scan for new networks, add one manually, use the Wi-Fi Protected Setup option, and change advanced network options with the Overflow button.
Connecting to a new Wi-Fi network is a matter of scanning for networks (tap Overflow > Refresh), tapping the name of the desired network, and entering the password for the network when prompted.
Forgetting a network is likewise easily accomplished: tap the name of the connected network and choose “Forget”. This is a useful troubleshooting step for network problems, so keep it in mind.
NOTE: Exercise caution when choosing a Wi-Fi network. When in doubt, only connect to networks owned by operators you trust!
Bluetooth: See the previous section on Bluetooth connections.
HotKnot: See the previous section on HotKnot for the details.
SIM Cards: This shows you the status of your installed SIM cards. Each SIM card has an ON/OFF switch you can toggle independently. If you tap the SIM card's name, you can change the color assigned to it as well as view its phone number and change its name.
If you have two SIM cards installed, this menu lets you choose which card is used for calls, data, and SMS messages.
Data Usage: This menu shows you detailed data statistics, including which app is using how much data. Each SIM card has its own button up top which lets you see statistics
for just that card as well as toggle cellular data usage with the ON/OFF switch.
Take note of the Overflow button, as it holds the menu option that controls whether or not you use cellular data while roaming! Just go to Overflow > Cellular Networks and set the switch. Note that allowing roaming can get VERY expensive, very quickly!
If you ever need to alter your APN settings, this is also the place to do it, through the Cellular Networks sub-menu. Your carrier may request that you do this to improve performance.
More: Brings up the following...
Airplane Mode: Use the ON/OFF switch to toggle Airplane Mode, which turns off all communication with your phone, including calls, Wi-Fi, and cellular data. You can also access the Airplane Mode toggle by holding down the Power Button as if you were going to reboot your phone.
Default SMS App: If you have more than one SMS app installed, you may select which one is used by default here.
Tethering & Portable Hotspot: Allows you to turn your phone into a portable Wi-Fi hotspot as well as tether its Internet connection directly to another Wi-Fi or Bluetooth device.
NOTE: Some carriers disallow these practices, so check your documentation carefully! Also be aware that tethering and hotspot usage can eat up your monthly allotment of data very quickly!
VPN: Cellular Networks: You can configure data roaming preferences and APNs here. Your carrier may have you adjust APN settings to improve performance.
DEVICE
Display: Adjust your brightness and wallpaper, as well as toggling whether your display rotates automatically when your phone is tilted. The Sleep sub-menu determines how soon your phone goes to sleep, while the Daydream sub-menu lets you configure what your phone displays while it is plugged in and charging. The Font Size sub-menu changes the system font size--this is particularly useful to make the many items in Settings more readable!
You may also control what the phone does when rotated, and, if you have access to a Chromecast, how that connection is made.
Sound & Notifications: You can choose between four sound profiles here (General,
Silent, Meeting, and Outdoor). Each one has its own settings, which you can access by first tapping on the profile you want to adjust and then tapping the gear that will appear on the right. Once there, you can change the volume for alarms and the ringer, as well as the notification sound used and how the phone should vibrate and when it should vibrate.
The Notification sub-menu lets you control how notifications are seen when the phone is locked as well as let you configure notifications on a per-app basis.
The Interruptions sub-menu changes what level of interruption you allow calls and notifications to have when you are doing other things. Particularly useful is the Downtime section, which lets you assign a block of time during which your NU2S will be quiet unless a priority interruption comes in. If you set this to “Don’t Interrupt”, none of your alarms or timers will sound.
Lastly, the Sound Enhancement menu lets you optimize the phone's sound for its speaker or for your headphones.
Storage: This sub-menu displays the status of your smartphone's internal storage as well as that of any microSD card you have installed. The information is sorted by type of content, and you also have options to un-mount or erase microSD cards. You can also change the Default Write Disk, which is where the NU2S chooses to store things; we highly recommend using a microSD card and assigning it as that default write disk!
Battery: Shows you the current battery status and breaks down battery usage by app and hardware. Now you can find out if it's your screen or a particular app eating up all your battery! There is also a Battery Saver option you can turn on and adjust via the Overflow menu. This lets you reduce the phone's performance to save battery power.
Apps: One of the largest sub-menus you'll encounter, Apps has many functions. First, it will show you exactly what apps are installed on your phone and the amount of space each one takes up. Secondly, you can see the space used on both the smartphone's internal storage and its microSD card here. Lastly, tapping on an app lets you stop it from running, disable it completely (not all apps allow that), uninstall it (again, not all apps allow uninstallation), clear its data, and view the permissions the app uses.
Users: This lets you add additional users to your phone. Each user gets their own customizable set of Home screens, apps, wallpapers, and so on. Useful if you have the one phone to share, but want to have it personalized for each person. Tapping the “New User” button will walk you through the process (which may change as Google updates their software!). You should only share the phone with people you trust!
You can switch users from the Settings > Users menu by long-pressing the name of the user you want to switch to.
PERSONAL
Location: This sub-menu controls the location services available to your smartphone. Turning location off completely prevents the phone and any apps from calculating your position. Tapping on the “Mode” button changes how your position is calculated and how much battery is consumed in the process. Note that apps like Google Maps work best with the highest-level mode.
Security: Another complex sub-menu that allows you to adjust how your phone and its data are secured. We highly recommend double-checking Google documentation before adjusting the more advanced options here, as updates from Google may change how these settings work in the future. That said, here's a selection of settings you'll want to pay attention to:
Screen Lock: This allows you to change how the phone is unlocked when you wake it up. You can slide to unlock, have the phone try and match your face, enter a PIN, touch a pattern on the screen, or use the tried-and-true password option.
Encrypt Phone: When encrypted, your phone's data is encrypted and cannot be accessed without using a PIN or password of some kind. Note that your phone cannot be unlocked without a password or PIN if you encrypt everything! Also note that losing your password will lock you, Google, and NUU out of your phone! Neither Google or NUU has the means to decrypt a phone. If you enable this option, keep a safe backup of your password somewhere!
Unknown Sources: Turning this on this allows you to install apps from places other than Google Play. NOT recommended, as unknown apps can steal your data or worse!
Accounts: If you made or entered a Google account during the initial configuration of your phone, it will show up here. The Accounts section serves to put all of your accounts in a single place for easy configuration. Tapping on an account lets you change its options, though these will of course vary by service.
The Add Account button lets you add a new account to the phone. What kind of account it can add depends on what apps you have installed. As an example, if you have the Facebook app installed, tapping Add Account takes you to the Facebook app and prompts you to log in, at which point the account is added.
Language & Input: Generally you don't have to mess with this, as the first-run
configuration of your phone asked you which language you wanted to use. However, you can come here to change around your software keyboard language, personal dictionary settings, voice search configuration, spell-checker, and text-to-speech settings.
Backup & Reset: The backup options here concern backing up your phone's configuration data to Google's servers, and it's all tied to your Google credentials. The really important item in this menu, though, is the "factory reset" option. Activating (and confirming) this destroys all data on your phone and returns it to "out of the box" configuration. Don't worry about accidentally activating this, as there several screens of confirmation prompts to get through before the reset occurs.
SYSTEM
Date & Time: The two automatic settings, for time and time-zone, if left checked, will handle everything for you. If you prefer to configure things manually, you can set the time, time-zone, clock type, and date format with the other controls.
Schedule Power On & Off: This lets you set your phone to power on and off on a schedule you define. To use, check the boxes for the ON and OFF settings, then tap the displayed time to change it. By default the phone is set to power on a 7:00AM and power off at 8:30PM—all you need to do is check both boxes to enable that.
You can also set it so that this behavior only happens on certain days of the week. Auto power on/off is a very handy feature and lets you save a lot of battery!
Accessibility: There are many tools in this menu, but the most commonly used ones are the Large Text and Auto-Rotate Screen checkboxes. The first greatly enlarges the system text, making menus easier to read. The second toggles rotation of the screen on and off.
The rest of the features in Accessibility come with on-screen explanations, and you should consult those for operation instructions.
If you accidentally turn on Google Talkback, you can turn it off easily enough by navigating back to Accessibility. The trick is that while Talkback is on, you must scroll and swipe with TWO fingers instead of one, and you must also tap twice to select and then use a button on the screen. So, for example, to open the Settings app, you’d tap it once to select it (putting an outline around it) then tap again to actually open it. Then you’d two-finger scroll down to get at Accessibility.
Printing: If you've signed up for Google Cloud Print, you may configure it here.
About Phone: This is where all the numbers live; Android version information, firmware revision, baseband version, to name just a few. Generally you won't need this unless a system software update becomes available or if Technical Support needs to know a
USB Connections
Your phone will charge when plugged into any USB port, be it a computer USB port or that of an AC-to-USB adapter.
When plugged into a computer's USB port, you may access your phone's storage through that connection. Pull down the Notifications window and tap on the "USB Connected" notification to get options.

Charging Mode: In this mode, the phone will only charge on a computer USB port, not communicate with the computer. This is the default setting.
Camera Mode: When connected in this mode, the phone appears to the computer as a camera.
Media Device Mode: When connected in this mode, the phone appears to the computer as a regular flash drive. You will have more access to folders and data on the phone.

- NU2S
- User Manual
- Contents
- Welcome to the NUU Mobile NU2S!
- First of all, do not text and drive!
- Installing the SIM Card and Powering Up
- You must insert your SIM card before using your phone!
- Installation:
- Controls & Using The Touchscreen
- Important!:
- non-conductive gloves), the screen may not "hear" you or register your touches properly. In that case, try a different fingertip or a patch of bare skin.
- Those Three Buttons
- Common Onscreen Buttons
- How Do I...?
- Initial Configuration
- FINISH
- Find An App, Move Apps, Add Widgets
- WIDGETS:
- Power On/Off, Wake Up, Unlock, Go To Sleep
- Make A Phone Call
- Browse The Web
- Send Text Messages
- We very strongly recommend installing an microSD card before using the camera! Use the microSD card so that your photos are easily transferable.
- Quick Settings
- Notification
- Dismiss all
- Clock
- Gallery
- Contacts
- Bluetooth
- HotKnot
- The Settings Menu
- WIRELESS & NETWORKS
- NOTE: Exercise caution when choosing a Wi-Fi network. When in doubt, only connect to networks owned by operators you trust!
- DEVICE
- PERSONAL
- SYSTEM
- USB Connections
Brand : NUU Mobile
Model : NU2S
Category : Smartphone