TEL68 - Phone AUDIOLINE - Free user manual and instructions
Find the device manual for free TEL68 AUDIOLINE in PDF.


User questions about TEL68 AUDIOLINE
0 question about this device. Answer the ones you know or ask your own.
Ask a new question about this device
Download the instructions for your Phone in PDF format for free! Find your manual TEL68 - AUDIOLINE and take your electronic device back in hand. On this page are published all the documents necessary for the use of your device. TEL68 by AUDIOLINE.
USER MANUAL TEL68 AUDIOLINE
Operating Instructions 37
VOLLVERANTWORTLICH, DASS DAS PRODUKT
MODELL: TEL68
BESCHREIBUNG:
Schnurgebundenes
Telefon
Name: MANFRED ZINNOW
1 General Information....39
2 User controls....41
3 Setting up....42
3.1 General Information....42
3.2 Check contents of pack 42
3.3 Connecting the receiver....42
3.4 Insert batteries....42
3.5 Connect Mains Power Supply 43
3.6 Connecting the telephone cable 43
3.7 Fitting the desk support 43
3.8 Wall mounting....44
3.9 Modem Connection 44
3.10 T-NET Set-up 44
3.11 Indication of Charges in the Display 44
3.12 Setting the Time / Date....44
3.13 Entering Local Dialling Code 45
3.14 Access Number for International Numbers....46
3.15 Outside Line Code on Private Exchanges 46
4 Operation....47
4.1 Making a call using the receiver or handsfree feature ....47
4.2 Dialling from the Phone Book....48
4.3 Receiving Calls....48
4.4 Selecting different telephone network providers....48
4.5 Muting....49
4.6 Adjustable Call Tone 49
4.7 Redial 50
4.8 Automatic Redial 50
4.9 Entering the Phone Book....51
4.9.1 Changing stored telephone numbers or names ......52
4.9.2 Deleting a number in the phone book 53
4.10 Use of the SIM card....53
4.10.1 Synchronising the phone book in your GSM mobile phone with the internal phone book (Update) 53
4.10.2 Copying the phone book from GSM mobile phones to the internal phone book and vice versa....54
4.11 Interrogating call charges....56
4.11.1 Resetting charge display to zero....56
4.12 Finding out the charges for the last call....57
- Contents -
5 Caller Display (CLIP)....58
5.1 Viewing the Caller List....58
5.2 Dialling a telephone number directly from the Caller List....59
5.3 Saving a number from the Caller List to the Phone Book....60
5.4 Deleting individual numbers from the caller list 60
5.5 Deleting the entire caller list 60
6 The "R" Signal Button....61
6.1 “R” Button on private exchanges 61
6.2 "R" Button and the DEUTSCHE TELEKOM T-Net....61
6.3 Setting the FLASH time....61
6.4 Storing Telephone numbers on private exchanges ....62
7 Other Settings....63
7.1 Adjusting Display Contrast 63
7.2 Set Clock Display Format....63
7.3 Setting Tariff 64
7.4 Entering Access Numbers for different Telephone Network Providers.....64
7.5 Setting the PIN Code....66
8 Important information....67
8.1 Fault Finding....67
8.2 Hearing aid compatible....67
8.3 Replacing the telephone cable 67
8.4 Warranty....68
8.5 Declaration of conformity....69
1 General Information
Please read these operating instructions carefully. If you should have any questions, please contact our Service Department on the Hotline number 01805 00 13 88. Under no circumstances open the unit yourself and do not try to carry out your own repairs. For any claims under the warranty, please refer to your dealer.
Intended use
This telephone is designed for use connected to an analogue telephone line (PSTN) in Germany. However, due to differences in the services provided by the various telecommunications providers, we cannot guarantee that the telephone will work properly when connected to all telecommunications terminal lines. The telephone is prepared for connection to a TAE phone jack with F/N coding and can be used together with other equipment such as a fax, answering machine, or a modem. Plug the connecting phone cable only into the telephone plug socket provided for this purpose. Do not replace the plug of the connecting phone cable.
Private exchanges
The telephone can also be connected to a private exchange. You can find out from the dealer from whom the equipment was purchased whether your telephone will work on your private exchange without any problems. Due to the large number of different private exchanges, it is not possible to guarantee this function.
Location
Do not set up the telephone in the immediate vicinity of other electrical equipment such as microwaves or hi-fi systems, as this may result in mutual interference. The location has a decisive influence on the trouble-free operation of the telephone.
Place the telephone on a flat and non-slip surface. The feet do not normally leave any marks on the surface. However, due to the large number of varnishes and surfaces in use, it may not be possible to prevent marks occurring on the surface due to the feet of the unit.
Do not use the telephone in areas where there is a risk of an explosion. Excessive exposure to smoke, dust, vibrations, chemicals, moisture, heat or the direct rays of the sun must be avoided.
- General Information -
Disposal
If the useful life of the complete equipment has expired, please dispose of it carefully in accordance with the statutory requirements and in a manner friendly to the environment.
Temperature and ambient conditions
The telephone is designed for use in protected rooms with a temperature range of 10 °C to 30 °C . The telephone must not be installed in damp rooms such as a bathroom or laundry room. Avoid proximity to sources of heat such as radiators and do not expose the unit to direct sunlight.
Cleaning and care
The surface of the case can be cleaned with a soft, dry, lint-free cloth. Never use cleaning agents, particularly aggressive solvents. No attention is necessary apart from cleaning the housing occasionally. The rubber feet of the telephone are not resistant to all cleaning agents. The manufacturer can therefore not accept any liability for possible damage to furniture or the like.
CE mark
The telephone complies with the basic requirements of the R&TTE Directive This is confirmed by the CE mark.
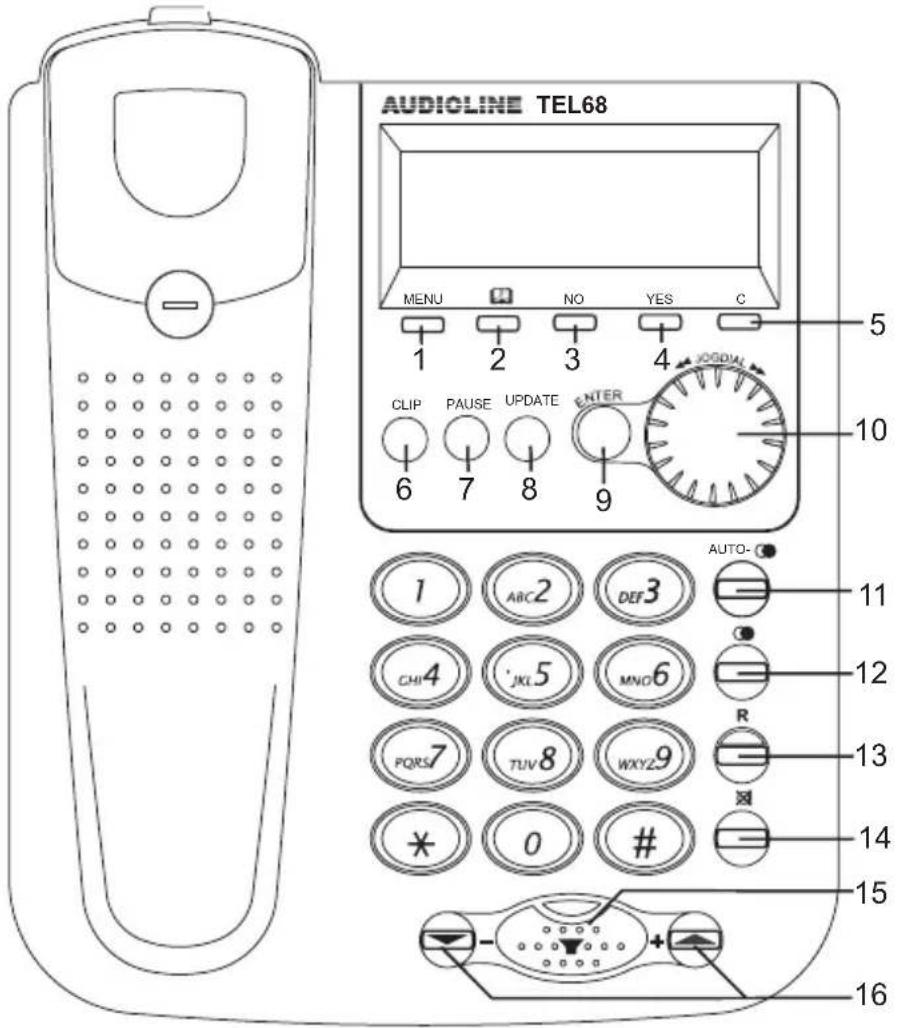
2 User controls
text_image
AUDICLINE TEL68 MENU NO YES C 1 2 3 4 5 CLIP PAUSE UPDATE ENTER 6 7 8 9 AUTO- 1 ABC2 DEF3 CHI4 JKL5 MNO6 R PQRS TUV 8 WXYZ 9 * 0 # 14 15 + - 161 MENU button
2 Phonebook
3 NO
4 YES
5 C (Clear)
6 CLIP Button (Caller list)
7 Pause
8 SIM-Update
9 ENTER (Dial)
10 Jogdial
11 AUTO-Redial
12 Redial
13 R Signal button
14 Mute button
15 Receiver/handfree
16 Volume handsfree button
Right side
SIM-card compartment
Connection Modem
Underside
Ring volume


Connection telephone cable
Connection receiver
Connection main power supply
Battery
compartment
- Setting up -
3 Setting up
3.1 General Information
NOTE! Before setting up, it is essential that you read the General Information at the beginning of this operating manual.
3.2 Check contents of pack
The following items are supplied:
| one telephone one telephone connecting cable | |
| one instruction manual one receiver | |
| one spiral cable one desk adapter | |
| one power supply four batteries Type | AAA 1.5V |
3.3 Connecting the receiver
After unpacking your new telephone, you must first connect the telephone receiver to the base unit. First take short end of the spiral cable and plug it into the socket at the bottom of the receiver. Now plug the other end into the socket on the underside of the base unit. Feed the cable through the side opening to the outside.
3.4 Insert batteries
Before connecting your new telephone to the telephone network, the supplied batteries should be installed. Please always use four type AAA 1.5V batteries. The batteries are required for the display and other features of the telephone. Before installing or changing the batteries make sure that the telephone is not connected to the telephone network. The battery compartment is to be found on the underside of your telephone.
- Open the battery compartment with a small screwdriver or a pointed object.
- Insert the batteries. Ensure that the polarity is correct. Push the “-” pole onto the small spring and then press the “+” pole downwards.
- Close the battery compartment.
The battery must be changed when the display shows
- Setting up -
3.5 Connect Mains Power Supply
In order to enjoy maximum convenience, we recommend the use of the mains power supply provided. The telephone can also be used without the power supply however if connection is not possible. You will need the batteries even when using the mains power supply to protect against power cuts. Connect the main power supply to the power socket and the jack marked DC 9V on the underside of the telephone.
Note: You can also use your telephone without the mains power supply provided. Please note that the batteries must then be changed after about 6 months.
3.6 Connecting the telephone cable
Connect the telephone cable supplied to the telephone socket and the telephone jack 📞 on the underside of the telephone. Feed the cable out of the telephone housing either upwards or downwards through the cable guide, if you are using the telephone fitted to the wall.
3.7 Fitting the desk support
If you intend to use your telephone on a desk, then the desk support supplied must be fitted. To do this, turn the telephone over. Now insert the two upper hooks into the openings provided and push the desk support firmly home.
If you ever need to remove the support, press gently on the middle clips on the upper edge and then pull the desk support off.
In the receiver rest there is a small hanging device, which is used when the telephone is wall mounted. This hanging device is not required when the telephone is used on a desk, as it impedes the lifting of the receiver. Using a small screwdriver, turn this hanging device until the screw is completely flush and its upper end does not protrude at all.
- Setting up -
3.8 Wall mounting
Your telephone is also suitable for wall mounting. Use two screws for fixing. Drill two holes in the distance from 70mm horizontally next to each other, and leave the screws protruding from the wall by 5mm. Now place the telephone without the desk support over the screws and push it slightly downwards.
There is a small hanging device in the receiver rest to prevent the receiver from falling when it is placed on the rest with the telephone mounted on the wall.
Using a small screwdriver, turn this hanging device until a small hook appears at the upper end.
If you are using the telephone fitted to the wall, you can hang the receiver on the telephone without hanging up. You will find a small hook for this purpose at the upper end of the receiver rest.
3.9 Modem Connection
The telephone has a “MODEM” connection socket for a modem or fax machine on the right side of the unit. Please note that this connection uses the same telephone line as the telephone itself. The connected device cannot be used at the same time as the telephone.
3.10 T-NET Set-up
Your AUDIOLINE telephone supports the most important DEUTSCHE TELEKOM added value functions (e.g. brokering, call waiting, three-way conference, etc.). For these, you will need the “FLASH” setting on your telephone. More information can be found in item 6. Please contact DEUTSCHE TELEKOM to gain access to these functions (some of which are subject to charge).
3.11 Indication of Charges in the Display
Call charge information can be transmitted from the german telephone network. Your telephone will show the charges incurred in the display. Moreover, the cost of the last call and the total charges can be interrogated at any time. For more information, see Chapters 4.11 and 4.12. The charge for one unit is preset to € 0.06. If this value should ever change, you can find out from Chapter 7.3 how you can set the new value
You can find out from the appropriate network operator whether charge information can be transmitted.
3.12 Setting the Time / Date
If you want to reset the current time and date or change a value already entered, proceed as follows:
Note: All entries must be made as two digits. If you want to enter the date 8^th of October, press the numbers 08 for the day and 10 for the month.
- Setting up -
PLEASE FOLLOW THE INSTRUCTIONS: Display shows:
| Press the MENU button. | Hinzufügen |
| Turn the Jog dial until the “Einstellungen” message appears in the display. | Einstellungen |
| Now press the YES button twice. | Date and time. The first figure of the date flashes. |
| Now enter the current day, the month, the hour and the minutes one after the other using the keypad. | If you want to set the 24 ^th October and the time 15.05, enter the numbers “24 10 15 05” using the keypad. |
| The date and time are saved by pressing the YES button. | |
| To exit programming mode, press the NO button twice. |
3.13 Entering Local Dialling Code
Telephone numbers must always be stored in mobile phones with the dialling code. If these numbers are then transferred to your telephone via the SIM card, the dialling code can of course be omitted when making local calls. For this purpose the telephone must know your local dialling code.
| A. Please follow the instructions: Display shows: | |
| Press the MENU button once. | Hinzufügen |
| Turn the Jog dial as far as the “Einstellungen” message Einstellungen | |
| Confirm with YES. | Uhr |
| Turn the Jog dial until the “Ortsvorwahl” message appears in the display. | Ortsvorwahl |
| Confirm with YES.Note:A local dialling code already entered will not be shown in the display. | Nummer: |
| Now enter your own local dialling code without the zero. e.g. | 6747 |
| Confirm with YES. | Gespeichert =>Ortsvorwahl |
| To exit programming mode, press the NO button twice. |
- Setting up -
3.14 Access Number for International Numbers
For international numbers, your telephone automatically replaces the “+” sign with the access number 0 0 for international calls. If this number should ever change, you can find the “Auslandsvorwahl (international dialling code)” in the menu.
3.15 Outside Line Code on Private Exchanges
If you have connected your telephone to a private exchange, you may need to dial a particular number (e.g. “9” or “0”) in order to get a dialling tone for an outside line on your extension. If you have transferred the telephone numbers from your mobile phone to your telephone via the SIM card, these telephone numbers must be automatically supplemented by the outside line code when dialling. Therefore, now enter the outside line code necessary for your private exchange.
| A. Please follow the instructions: Display shows: | |
| Press the MENU button once. | Hinzufügen |
| Turn the Jog dial until the “Einstellungen” message appears in the display | Einstellungen |
| Confirm with YES. | Uhr |
| Turn the Jog dial until the “Amtskennzahl” message appears in the display. | Amtskennzahl |
| Confirm with YES.Note: codes already entered will not be shown in the display. | Nummer: |
| Now enter your own outside line code. e.g. “0” | |
| Confirm with YES. | Gespeichert – Amtskennzahl |
| To exit programming mode, press the NO button twice. |
Note: If you want to delete an outside line code already stored, do not enter a number when programming and confirm the blank display.
4 Operation
4.1 Making a call using the receiver or handsfree feature
You have three ways of making a call:
A. Please follow the instructions: Display shows:
| Lift the receiver. "ON LINE" | |
| Now dial the required telephone number. | The number dialled; after ca. 10 seconds the cost of the call and the duration of the call. |
If you want to change from the receiver to the handsfree feature, press the button and replace the receiver.
B. Please follow the instructions: Display shows:
| Dial the required telephone number. With this method of entry, you can first check the telephone number and change it again if necessary. Use the Jog dial and the C button for this purpose. | Number dialled. |
| Press the ENTER button. | "ON LINE" and the number dialled; after ca. 10 seconds the cost of the call and the duration of the call. |
After the number has been dialled, the telephone switches immediately to the handsfree facility. To end the call, press the 📋 button. By lifting the receiver, the call can be continued via the receiver.
C. Please follow the instructions: Display shows:
| Press the button. | "ON LINE" |
| Dial the required number. The number | dialled; after ca. 10 seconds the cost of the call and the duration of the call. |
If the other party accepts the call, his voice will be heard over the in-built loudspeaker. The volume can be adjusted using the two buttons VOL „▲+“ and „▼-“ on your telephone. If you want to change from the handsfree facility to the receiver, simply lift the receiver.
- Operation -
4.2 Dialling from the Phone Book
A. Please follow the instructions: Display shows:
| Press the button. | Name: |
| Press the buttons with the appropriate letters to select the number alphabetically and/or search for the right number using the Jog dial. | Stored phone number with name. |
| Press the ENTER button to call the selected number. | "ON LINE" and the number dialled. |
When the other party answers, you can speak using the handsfree facility or by lifting the receiver.
If the other party does not answer, cancel the attempt using the 📄 button.
Note: You can find out in Chapter 4.9 how to store telephone numbers in the phone book.
4.3 Receiving Calls
As soon as you receive a call, the caller's number appears in the display. Further information on caller display is given in Chapter 5 "Caller Display" (CLID).
The call can now be accepted using the receiver or the handsfree facility. Lift the receiver or use the handsfree facility by pressing the handsfree button.
To end the call, replace the receiver or press the handsfree button.
4.4 Selecting different telephone network providers
With your telephone you can make calling by way of the private telephone network providers considerably easier. You can store 3 different Call-By-Call numbers to these private telephone network providers in your telephone. When making calls using the phone book you can then choose which provider you wish to use to make the call. You will find out how to enter the Call-By-Call numbers in Chapter 7.4.
- Operation -
A. Please follow the instructions: Display shows:
| Press the ENTER button. | Call-by-call Nr: |
| Now press one of the previously entered access numbers by pressing the numbers 1, 2 or 3. | Selected call-by-call number. |
| Confirm the selection with YES. | |
| Now press the buttons with the appropriate letters to select the number from the phone book and/or search for the right number using the Jog dial. | Stored phone number with name. |
| Press the ENTER button to call the selected number. | "ON LINE" and the selected access number and telephone number. |
4.5 Muting
You can switch off the microphone during a call using the mute button. It is thus possible to speak without the other party hearing you. The loudspeaker remains switched on and you can continue to hear the other party. You can use the mute button during a call both with the receiver and with the handsfree facility.
If you want to switch the microphone off, press the button. The indicator light shows that mute has been selected.
To switch the microphone on again, press the button once more.
4.6 Adjustable Call Tone
You can use the "RING" slide switch on the under side of your telephone to select the settings 📋 (soft) or 📋 (loud) to adapt the ringer volume to your requirements. If you ever do not want to be disturbed, use the ✗ (off) position.
- Operation -
4.7 Redial
If a connection that you have dialled is engaged or you were unable to get through to anybody, simply replace the receiver. The last three numbers dialled remain stored in the telephone automatically. To call one of the last three numbers dialled, proceed as follows:
Select one of the last three numbers by repeatedly pressing the button.
Press the ENTER button. After the number has been dialled, the telephone switches immediately to the handsfree facility. By lifting the receiver, the call can be continued via the receiver.
You can also delete a particular number from the redial memory. Select the required telephone number with the receiver on the hook by using the button and press the C button.
4.8 Automatic Redial
The automatic redial is a useful aid to make telephoning easier for you. If a number is engaged, the number will be repeated automatically up to ten times.
Attempt to make a call to the required party.
If the line is engaged, press the AUTO- button. The display shows "BITTE AUFLEGEN" and then "AUTO WAHL". The LED next to the handsfree button flashes. If you made the call using the handsfree facility, the call is ended automatically.
Now, after about 30 seconds your telephone will try to call the number again. The handsfree facility is switched on and the number is dialled. If the number is still engaged, the handsfree facility automatically switches itself off again after a short time and your telephone waits for a further 30 seconds before another attempt is made.
If the call is answered, you can press button to carry out the call using the handsfree facility. By lifting the receiver, the call can be continued via the receiver.
Note: By lifting and replacing the receiver once, the automatic redial is automatically cancelled.
- Operation -
4.9 Entering the Phone Book
Using your telephone, you can store 150 telephone numbers, each with 20 digits, in the phone book. In addition, a name can be stored with each telephone number, each name having 16 letters. For direct dialling, the direct dial buttons can be allocated numbers from the phone book.
| A. Please follow the instructions: Display shows: | |
| Press the MENU button. | "Hinzufügen" |
| Confirm with the YES button. | Name: |
| Before saving the telephone number, first enter the name. The numbers are also inscribed with letters for entering the name. By repeatedly pressing the appropriate button, upper and lower case letters as well as numbers and special characters can be entered.Example: You wish to enter the name "Peter".Press: 1 x button 7, 5 x button 3, 4 x button 8, 5 x button 3, 7 x button 7To enter a space, turn the Jog dial to the right. To enter the same letter twice, press the appropriate letter and then turn the Jog dial to the right before entering the second letter. To correct a mistake, move the cursor to the required position by turning the Jog dial and change the entry. You can delete the selected letter (cursor flashes) with the C button. The special characters (. , ? ! - &) can be entered using the "1" and "*" buttons. | |
| Confirm with the YES button. | Nummer: |
| Enter the complete telephone number. You can delete numbers again using the C button (cursor flashes).In order to be able to use numbers later in your mobile phone, always enter the country code +49 and the local dialling code without the zero. To get the "+" sign, press and hold the *button for one second. To delete the "+" sign, press the *button again for one second. | Number dialled e.g. 1234 56789 |
| Confirm with the YES button. | Gespeichert |
| After a few seconds, the display shows "Hinzufügen" HinzufügenTo enter more numbers, press the YES button and start again by entering the name | Name: |
| Exit the menu with the NO button. | |
- Operation -
To prevent your own local dialling code, which is entered in the phone book as is common with mobile phones, from being dialled along with the number, your telephone can automatically filter this out. For more information, see Chapter 3.12. If you have also entered the numbers with the German country code +49, this will be recognised by the telephone and the country code will not be dialled along with the number. With international calls, your telephone automatically replaces the “+” sign with the code for abroad “0 0”.
4.9.1 Changing stored telephone numbers or names
Stored telephone numbers can be changed at any time. Please proceed as follows:
| A. Please follow the instructions: Display shows: | |
| Press the button once. Name: | |
| Press the appropriate initial letter on the keypad or use the Jog dial to select the telephone numbers. | Telephone number with name. |
| Confirm with the YES button. | Bearbeiten |
| Confirm with the YES button. | Selected name |
| Now enter the new name. By repeatedly pressing the C button, you can delete the name letter by letter. Alternatively, use the Jog dial to make changes within the name. | |
| Confirm with the YES button. | Telephone number. |
| Now enter the new number. By repeatedly pressing the C button, you can delete the individual digits. Alternatively, use the Jog dial to make changes within the number. | |
| The changes are saved by pressing the YES button | Gespeichert – Name: |
| Now select another number for changing if required or exit the menu with the NO button. |
- Operation -
4.9.2 Deleting a number in the phone book
| A. Please follow the instructions: Display shows: | |
| Press the button once. Name: | |
| Press the appropriate initial letter on the keypad or use the Jog dial to select the telephone number. | Telephone number with name. |
| Confirm with the YES button. | Bearbeiten |
| Now turn the Jog dial once to the right. Löschen | |
| Confirm with the YES button. | Bestätigt (j/n) |
| Now press YES to delete the entry or cancel the process with NO. | Gelöscht with yesLöschen with no |
| Exit the menu with the NO button. |
4.10 Use of the SIM card
With your telephone you can copy the telephone numbers stored in the phone book of your GSM mobile phone into the phone book of your telephone. You can keep both phone books at the same level using the "Synchronisation" function. The telephone book contains 150 memory locations.
WARNING! When you want to transfer the telephone numbers in your mobile phone to the telephone for the first time or vice versa, please always use synchronisation (item 4.10,1) so that the numbers already stored both in the mobile phone and in the telephone are not lost. If you should ever change your SIM card at a later date (e.g. change of provider), do not use synchronisation the first time but copy the data as described under item 4.10.2 instead. After this you can use synchronisation again for realignment.
Please handle the SIM card carefully and do not touch the contact surfaces. Always place the card in the cardholder with the contact surfaces uppermost. The card is slightly bevelled at the bottom right so that it cannot be inserted incorrectly.
4.10.1 Synchronising the phone book in your GSM mobile phone with the internal phone book (Update)
Please use synchronisation to keep both phone books up to the same status at all times. Numbers, which in the meantime have been stored either in the mobile phone or in the telephone are thus copied from the mobile phone to the telephone and vice versa.
- Operation -
| A. Please follow the instructions: Display shows: | |
| Press the UPDATE button. | Karte einlegen |
| Now open the compartment for the SIM card and insert the card into the holder. | Karte einlegen |
| Now slide the cardholder back into the telephone and press the YES button. | Warte ... => Pin:_ |
| Enter your mobile phone's four-digit PIN code. Pin: **** | |
| Synchronisation is now started immediately by pressing YES. After the synchronisation the display shows “Fertig” and you can remove the SIM card. | Warte .... => FertigAbgelehnt => Pin:_ |
| If the PIN code was not entered correctly, you can enter the PIN code again after a few seconds.WARNING! Please note that there are only three attempts available. After this, the SIM card must be revalidated with the “master PIN” (PUK). |
Note: If the message “Karte entfernen” appears in the display, remove the card from the telephone and confirm with YES.
4.10.2 Copying the phone book from GSM mobile phones to the internal phone book and vice versa
You will not normally need this function if you use synchronisation regularly. Bear in mind that copying deletes the current phone book in the target device.
Copying should therefore only be used when you want to transfer the entire phone book to the SIM card or vice versa. Two functions “Karte an Telefon” and “Telefon an Karte” are available.
Example 1 for “Telefon an Karte”. You have a new mobile phone with a new SIM card and want to transfer the entire phone book from your telephone to the SIM card.
Example 2 for “Karte an Telefon”. You have not yet entered any telephone numbers into your telephone’s phone book and want to transfer the entire phone book from the SIM card to the telephone.
- Operation -
| A. Please follow the instructions: Display shows: | |
| Press the MENU button. | Hinzufügen |
| Turn the Jog dial until the message “SIM Eingabe” appears in the display. | SIM Eingabe |
| Confirm with YES. | Karte einlegen |
| Now open the compartment for the SIM card and insert the card into the holder. | Karte einlegen |
| Now slide the cardholder back into the telephone and press the YES button. | Warte ... => Pin:_ |
| Enter your mobile phone's four-digit PIN code. Pin: **** | |
| Confirm the PIN code with YES. If the PIN code was not entered correctly, you can enter the PIN code again after a few seconds.WARNING! Please note that there are only three attempts available. After this, the SIM card must be revalidated with the “master PIN” (PUK). | Alles kopieren |
| Press YES once more. | Karte an Telefon |
| Now choose whether you want to copy the telephone numbers from the telephone to the SIM card or from the SIM card to the telephone by using the Jog dial.Karte an Telefon => Telephone numbers on the card are copied to the telephoneTelefon an Karte => Telephone numbers in the telephone are copied to the SIM cardWarning: No synchronisation takes place. Any existing data are deleted when copying. | Karte an Telefon or Telefon an Karte |
| Confirm with the YES button. | Bestätigt (j/n)? |
| Start copying with YES or cancel the function with NO.Warning: When copying from the telephone to the SIM card, an additional safety query is incorporated. Confirm the message “Overwrite?” with YES. | with yes: Warte with no: Alles kopieren |
| The completion of the copying process is confirmed in the display. | Fertig and then Alles kopieren |
| Press NO and remove the SIM card. | Karte entfernen |
| After removing, confirm with YES. | SIM Eingabe |
| Exit programming with the NO button. |
- Operation -
4.11 Interrogating call charges
In addition to the display of the current call charge during a call, the total charges incurred for all calls are added together and stored. This value can be interrogated at any time using the menu.
| A. Please follow the instructions: Display shows: | ||
| Press the MENU button. | Hinzufügen | |
| Turn the Jog dial until the message “Gebührenkonto” appears in the display. | Gebührenkonto | |
| Confirm twice with YES. | The length of all calls in minutes and the total charges. | |
| Example: 33 Minutes | 0000_60 charges in € | |
| Press the NO button three times to exit programming | ||
As a maximum, 9999 minutes and charges to the value of € 9999.99 can be displayed. If these values are exceeded, an “E” also appears in the display.
4.11.1 Resetting charge display to zero
If you want to restart the addition of charges, you can reset the charge counter to zero. Deleting the charge counter is only possible using a PIN code. The PIN code is preset to "0 0 0 0". You can find out how to change the PIN code under item 7.5.
| A. Please follow the instructions: Display shows: | ||
| Press the MENU button. | Hinzufügen | |
| Turn the Jog dial until the message “Gebührenkonto” appears in the display. | Gebührenkonto | |
| Confirm twice with YES. Example: 33 0000_60 Minutes charges in € | The length of all calls in minutes and the total charges. | |
| Press the C button. | Löschen (j/n)? | |
| Start deleting with YES or cancel the function by pressing NO three times. | with yes: Code: | |
| Enter the PIN code and confirm with YES. If the PIN code is incorrect, the display shows “Abgelehnt”. | Leeres Konto | |
| Press the NO button twice to exit programming | ||
- Operation -
4.12 Finding out the charges for the last call
If you want to look again at the charges incurred and the duration of the last call, proceed as follows:
| A. Please follow the instructions: Display shows: | |
| Press the MENU button. | Hinzufügen |
| Turn the Jog dial until the message “Gebührenkonto” appears in the display. | Gebührenkonto |
| Confirm with YES. | Gesamtgebühr |
| Turn the Jog dial until the message “Letzter Ruf” appears in the display. | Letzter Ruf |
| Initiate the display of the duration and charge with YES. | Duration / Charges. |
| Press the NO button three times to exit programming |
5 Caller Display (CLIP)
Using caller display, you can see with incoming calls who is calling you. If this function is available on your line, the display shows you the caller's telephone number as soon as the telephone rings. If you have stored this telephone number in your phone book, the name is also shown in addition to the number. All calls are saved in a caller list with date and time so that you will not miss any calls even in your absence. Up to 99 numbers are saved in the caller list. When the list is full, the oldest number is always deleted from the list.
If calls are registered during your absence, this is shown in the display.
TOTAL: 34 NEU:05
This indication in the display shows that there is a total of 34 calls in the caller list. There are 5 new calls in the caller list that have not yet been checked. In addition, when there are new calls, the CLIP button flashes.
Warning! Caller display is an optional service from your telephone provider. Your telephone will show the number in the display if your telephone provider offers this service. Please ask your telephone provider for further information. If this service is not available, incoming calls will not be shown in the display.
5.1 Viewing the Caller List
Press the CLIP button. The first storage location in the caller list appears in the display. This is at the same time the last call received.
Name Telefonnummer
If the number is stored in the phone book, the appropriate name appears in the first line. The telephone number can then be seen in the second line.
The first figure in the bottom row “#001” shows the storage location in the caller list. After this come the date and time of storing. If the symbol “NEW” appears, then the call has not yet been checked in the list. The symbol “RPT” (Repeat) tells you that this number has already called several times. The time and date of the latest call is always displayed.
- Caller Display (CLIP) -
You can now look through the caller list using the Jog dial. When you reach the last storage location in the list, the display shows the message “Ende der Liste”.
When all newly recorded numbers have been checked, the CLIP button no longer flashes.
If the message “Not available” appears in the display, the number is not available for showing in the display. The caller has either suppressed the transmission of his number or the number could not be transferred.
5.2 Dialling a telephone number directly from the Caller List
You can dial telephone numbers directly from the caller list.
| A. Please follow the instructions: Display shows: | |
| Press the CLIP button once. | First number from the caller list |
| Turn the Jog dial until the required telephone number appears in the display. | Telephone number / name |
| Now press the ENTER button and the number will be dialled directly using the handsfree facility. Lift the receiver if you want to call using the receiver. |
Note!
Before dialling, your telephone compares the country and local dialling codes of the number dialled with your location (local dialling code). If you have entered your local dialling code during installation, the appropriate numbers will not be dialled if this is a number from within your local network.
- Caller Display (CLIP) -
5.3 Saving a number from the Caller List to the Phone Book
A telephone number stored in the caller list can be saved directly to the phone book.
| A. Please follow the instructions: Display shows: | |
| Press the CLIP button once. | First number from the caller list |
| Turn the Jog dial until the required telephone number appears in the display. | Telephone number / name |
| Now press the YES button. | Speichern |
| Confirm the display with YES once more. | — |
| Now enter the name. The numbers are inscribed with letters for entering the name. By repeatedly pressing the appropriate button, upper and lower case letters as well as numbers and special characters can be entered. | |
| Confirm with the YES button. The number from the caller list appears in the display. | Nummer: XXXXXX |
| Now save with the YES button. | Gespeichert |
5.4 Deleting individual numbers from the caller list
| A. Please follow the instructions: Display shows: | |
| Press the CLIP button once. | First number from the caller list |
| Turn the Jog dial until the required telephone number appears in the display. | Telephone number / name |
| Now press the C button and the number will be deleted from the caller list. |
5.5 Deleting the entire caller list
Please note that the list can only be deleted if you have previously viewed the complete caller list. The CLIP button must not be flashing. For more information see section 5.1.
| A. Please follow the instructions: Display shows: | |
| Press the CLIP button once. | First number from the caller list |
| Now press the C button for one second. | Bestätigt (j/n)? |
| Confirm deletion with YES or cancel the process with NO. | Gelöscht |
6 The "R" Signal Button
You can use the “R” signal button on your telephone on private exchanges and when using DEUTSCHE TELEKOM’s T-Net functions.
6.1 "R" Button on private exchanges
If you have connected your telephone to a private exchange, you can use all the facilities such as call transfer, automatic recall, etc. The “R” signal button gives you access to these facilities. The FLASH time “100ms” will be required on a private exchange. (Adjustment, see 6.3). You can find out from the dealer from whom the equipment was purchased whether your telephone will work on your private exchange without any problems.
6.2 "R" Button and the DEUTSCHE TELEKOM T-Net
Your AUDIOLINE telephone supports the most important DEUTSCHE TELEKOM added value functions (e.g. brokering, call waiting, three-way conference, etc.). The T-Net works using the "FLASH 300ms" setting (adjustment, see 6.3). Please contact DEUTSCHE TELEKOM to gain access to T-Net functions.
6.3 Setting the FLASH time
| A. Please follow the instructions: Display shows: | |
| Press the MENU button once. | Hinzufügen |
| Turn the Jog dial until the “Einstellungen” message appears in the display | Einstellungen |
| Confirm with YES. | Uhr |
| Turn the Jog dial until the “Flash Zeit” message appears in the display. | Flash Zeit |
| Confirm with YES. | Current flash time |
| Use the Jog dial to set the required flash time. 100 - 300- 600 ms | |
| Confirm with YES. | Flash Zeit |
| Press the NO button twice to exit programming | |
- R Signal Button -
6.4 Storing Telephone numbers on private exchanges
With some private exchanges, there is a short pause between the code for the outside line and the dialling tone. When dialling from the telephone, this pause can be stored along with the number so that the following digits are not dialled too quickly. When storing, simply press the button before the actual number. The insertion of a pause will be shown by a “-”in the display. When dialling using the phone book, a pause will then be inserted automatically following the exchange code
- Other Settings-
7 Other Settings
Note: The DIAGNOSTICS item on the menu is intended for test purposes and should only be used by a trained specialist.
7.1 Adjusting Display Contrast
To adjust the display to suit the local lighting conditions, please proceed as follows:
| A. Please follow the instructions: Display shows: | |
| Press the MENU button once. | Hinzufügen |
| Turn the Jog dial as far as the “Eingaben” message. Eingaben | |
| Confirm with YES. | Uhr |
| Turn the Jog dial as far as the “Kontrast” message. Kontrast | |
| Confirm with YES. | Current contrast |
| Now select the desired contrast between 1 (light) and 4 (dark) using the Jog dial. | 1 to 4 |
| Confirm with YES. | Kontrast |
| Press the NO button twice to exit programming |
7.2 Set Clock Display Format
The clock can be set to 24-hour format (standard) or 12-hour format (AM/PM).
| A. Please follow the instructions: Display shows: | |
| Press the MENU button once. | Hinzufügen |
| Turn the Jog dial as far as the “Eingaben” message. Eingaben | |
| Confirm with YES. | Uhr |
| Turn the Jog dial as far as the “Zeitformat” message. Zeitformat | |
| Confirm with YES. | Current setting |
| Now select the required format using the Jog dial 24 Stunden - AM/PM | |
| Confirm with YES. | Zeitformat |
| Press the NO button twice to exit programming |
- Other Settings-
7.3 Setting Tariff
Call charge information can be transmitted from the german telephone network.
You can find out from the appropriate network operator whether charge information can be transmitted.
The charge for one unit is preset to € 00.06. If this value should ever change, you can make the necessary adjustment in your telephone.
| A. Please follow the instructions: Display shows: | |
| Press the MENU button once. | Hinzufügen |
| Turn the Jog dial until the “Gebührenkonto” message appears in the display. | Gebührenkonto |
| Confirm with YES. | Gesamtgebühr |
| Turn the Jog dial until the “Tarif eingeben” message appears in the display and confirm with YES. | Code |
| Enter the PIN code (factory setting 0 0 0 0) and confirm with YES. If the PIN code is incorrect, the display shows “Abgelehnt”. You can find out how to change the PIN code in chapter 7.5. | Gebühr: 00.06 |
| Now enter the tariff. Example: You want to enter a tariff of 8 Cents. Press the numbers 0 0 0 8 one after the other. | Gebühr: 00.08 |
| Press YES to save. | Gespeichert=> Tarif eingeben |
| Press the NO button twice to exit programming |
7.4 Entering Access Numbers for different Telephone Network Providers
With your telephone you can make calling by way of the private telephone network providers considerably easier. You can store 3 different access numbers to these private telephone network providers in your telephone. When making calls using the phone book you can then choose which provider you wish to use to make the call. You can find out how to call up the access numbers before dialling in Chapter 4.4.
- Other Settings-
| A. Please follow the instructions: Display shows: | |
| Press the MENU button once. | Hinzufügen |
| Turn the Jog dial until the “Eingaben” message appears in the display | Eingaben |
| Confirm with YES. | Uhr |
| Turn the Jog dial until the “Call-by-Call Nr.” message appears in the display. | Call-by-Call Nr. |
| Confirm with YES. | Code 1: |
| Select one of the three memory locations “Code 1”, “Code 2” or “Code 3” using the Jog dial. | Code x: |
| Confirm with YES. | Nummer: |
| Now enter the required access number e.g. 01013 | |
| Confirm with YES. | Gespeichert=>Call-by-Call Nr. |
| Now press YES to start further programming or press the NO button twice to exit programming. |
- Other Settings-
7.5 Setting the PIN Code
The PIN code is used for resetting the tariff and is set in the factory to the value "0 0 0 0".
If you ever want to change the preset PIN code, proceed as follows:
| A. Please follow the instructions: Display shows: | |
| Press the MENU button once. | Hinzufügen |
| Turn the Jog dial until the “Gebührenkonto” message appears in the display. | Gebührenkonto |
| Confirm with YES. | Gesamtgebühr |
| Turn the Jog dial until the “Code eingeben:” message appears in the display and confirm with YES. | Code eingeben: |
| Now enter the old PIN code (factory setting 0 0 0 0) and confirm with YES. If the PIN code is incorrect, the display shows “Abgelehnt”. | Neuer Code: |
| Now enter the new four-digit code. Neuer Code: **** | |
| Confirm with the YES button. | Wiederholen: |
| Enter the new four-digit code once more as a check. Wiederholen:**** | |
| Press the YES button to save. | Gespeichert => Code eingeben: |
| Press the NO button twice to exit programming |
WARNING! Please make a note of the PIN code you have entered.
If you ever forget the code, this can be reset to the factory setting "0 0 0 0" by a trained specialist. In this case, please contact our Service Hotline 0180 5 00 13 88.
8 Important information
8.1 Fault Finding
Remove all extra telephone equipment and connect only the telephone directly to the telephone socket. If the fault is still there, connect a different telephone (if available) to the telephone socket. The results will show you whether the fault lies with the unit or with the telephone line. Of course, you can always ring your telephone network provider's service department, which will give you more advice on checking your installation.
In the case of technical problems you can also contact our Service Department on the Hotline number 0180 5 00 13 88.
8.2 Hearing aid compatible
The telephone has a special circuit working on the basis of induction for transmitting speech to hearing aids. Please set your hearing aid to "T".
8.3 Replacing the telephone cable
If you have to replace your telephone cable, you can locate the appropriate cable at your dealer's with the help of the diagram below.

text_image
Modular Stecker Type RJ 11 6/4 TAE Stecker Codierung "F" a => TAE Stecker Pin 1 b => TAE Stecker Pin 2- Important information -
8.4 Warranty
AUDIOLINE equipment is manufactured and tested in accordance with the most up to date production methods. Selected materials and highly developed technology ensure trouble-free operation and long life. If your unit should develop a fault within the guarantee period, however, please contact the shop where you bought your AUDIOLINE equipment exclusively and have your purchase receipt available for inspection. The guarantee period is 24 months from the day of purchase under the following conditions: within the guarantee period, all defects due to material or manufacturing faults will be repaired free of charge. The guarantee is invalidated if the equipment has been tampered with by the purchaser or third parties. Any damage caused by improper handling or operation, by incorrect positioning or storage, by improper connection or installation or by excessive force or other external influences is not covered by the guarantee. In the case of complaint, we reserve the right to repair or replace defective parts or to exchange the equipment. Exchanged parts or exchanged equipment become our property. Claims for compensation are excluded insofar as they do not relate to criminal intent or gross negligence on the part of the manufacturer. All guarantee claims according to these conditions must be raised exclusively with your dealer. Rights under the guarantee can no longer be enforced after the expiry of 24 months from purchase and delivery of our products. In the case of unnecessary or unjustified demands on the customer service department, we will levy our usual service charges for materials, time, postage and packing. Any complaints must be reported as soon as a problem is found. The guarantee is valid within the German Federal Republic.
- Important information -
8.5 Declaration of conformity
WE AUDIOLINE GmbH
OF HELLERSBERGSTR. 2a
D-41460 NEUSS
GERMANY
DECLARE UNDER OUR SOLE RESPONSIBILITY AS EU DISTRIBUTOR THAT THE PRODUCT
MODEL: TEL68
DESCRIPTION:
Cord-connected
telephone
IS IN CONFORMITY WITH THE BASIC REQUIREMENTS OF DIRECTIVE: 1999/5/EC
AUTHORISED SIGNATORY:
text_image
MudanSignature:
Name: MANFRED ZINNOW
Position in the company: MANAGING DIRECTOR:
Date of issue: 14.01.2003
A copy of this declaration will be retained for 10 years after cessation of production.

IER: AUDIOLINE GmbH, HELLERSBERGSTR. 2a,
D-41460
NEUSS
PRODUCT:
TEL68
This product has been developed for use on a analog telephone line (PSTN) within Germany. However, no guarantee can be accepted for trouble-free operation on all telecommunications terminal equipment connections due to the differences between the different telecommunications network operators.
AUDIOLINE GmbH
Neuss
Service Hotline 0180 5 00 13 88