TEL7 - Phone AUDIOLINE - Free user manual and instructions
Find the device manual for free TEL7 AUDIOLINE in PDF.


User questions about TEL7 AUDIOLINE
0 question about this device. Answer the ones you know or ask your own.
Ask a new question about this device
Download the instructions for your Phone in PDF format for free! Find your manual TEL7 - AUDIOLINE and take your electronic device back in hand. On this page are published all the documents necessary for the use of your device. TEL7 by AUDIOLINE.
USER MANUAL TEL7 AUDIOLINE
natural_image
Black TELT phone with attached cord and keypad, no visible text or symbols on device bodyOperating Instructions \_\_\_\_ 13
Name: MANFRED ZINNOW
1 General Information......14
2 Operating elements......15
3 Commissioning....16
3.1 Safety Information......16
3.2 Check contents of pack......16
3.3 Connecting the receiver....16
3.4 Connecting the telephone .....16
3.5 Wall mounting .....16
3.6 R Signal button - Setting up for T-NET 17
3.7 Hearing aid compatible .....17
4 Operation ....18
4.1 Making a call ......18
4.2 Receiving calls....18
4.3 Adjusting the receiver volume .....18
4.4 Redial.... 18
4.5 Muting the microphone .....19
4.6 Adjustable Call Tone......19
5 Important Information......20
5.1 Fault finding....20
5.2 Replacing the telephone cable .....20
5.3 Guarantee....21
5.4 Declaration of Conformity .....22
1 General Information
Location
Do not position the telephone in the immediate vicinity of other electronic equipment such as microwave or hi-fi units as this can lead to mutual interference. The location has a deciding influence on the trouble-free operation of the telephone.
Stand the telephone on a flat, non-slip surface. The telephone feet do not normally leave any marks on the surface. However, on account of the multitude of varnishes and surface finishes used, surface marks caused by the feet of the unit cannot be ruled out.
Do not use the telephone in areas where there is the risk of an explosion. Excessive exposure to smoke, dust, vibrations, chemicals, moisture, heat or the direct rays of the sun must be avoided.
Temperature and Ambient Conditions
The AUDIOLINE TEL7 is designed for use in protected rooms with a temperature range of 5 °C to 50 °C. The telephone must not be installed in damp rooms such as a bathroom or laundry room. Avoid proximity to sources of heat such as radiators and do not expose the unit to direct sunlight.
Cleaning and Care
The surface of the case can be cleaned with a dry, soft, lint-free cloth. Never use cleaning agents, particularly aggressive solvents. Apart from occasional cleaning of the case, no other care is necessary. The rubber feet of the base station are not resistant to all cleaning agents. The manufacturer can therefore not be held responsible for possible damage to furniture or the like.
- Operating elements -
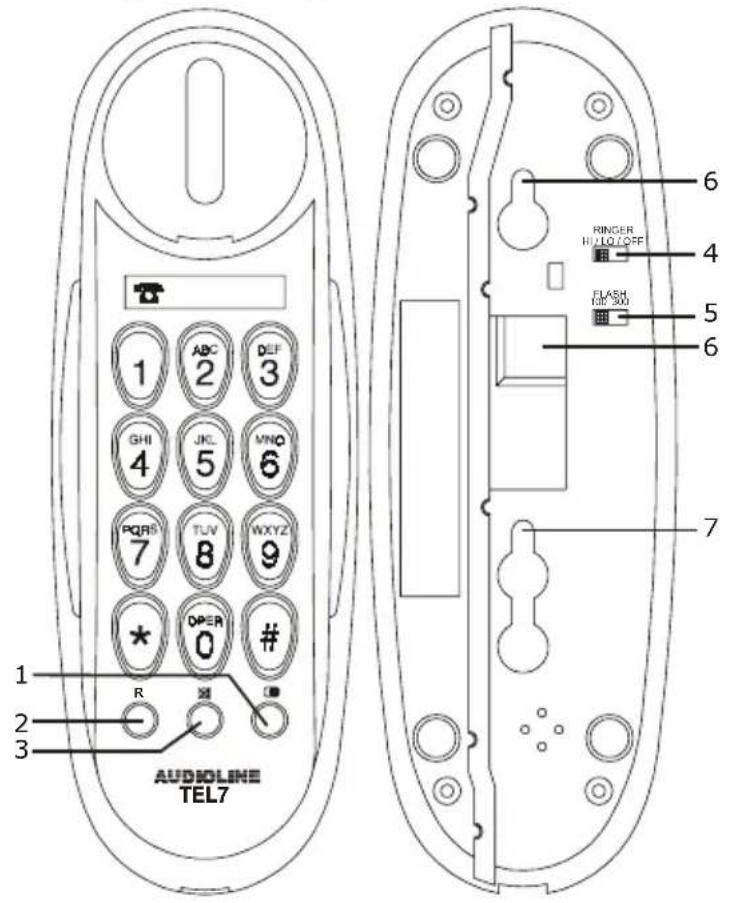
2 Operating elements
text_image
AUDIOLINE TEL7 1 ABC DEF 2 3 GHI JKL VNO 4 5 6 PQRS TUV WXYZ 7 8 9 * OPER # 0 # R RINGER HULO/Off FLASH 300 6 4 5 6 7 1 2 31 Redial 5 FLASH switch
2 R Signal button 6 Telephone jack
3 Mute button 7 Wall mounting
4 Ringer volume

text_image
Technical diagram showing a mechanical component with labeled parts and a numbered annotation '8'8 Receiver volume
- Commissioning -
3 Commissioning
3.1 Safety Information
NOTE! Before commissioning, it is essential that you read the general information at the beginning of this manual.
3.2 Check contents of pack
The following items are supplied:
| one telephone base one telephonerceiver | |
| one telephone connection cable | one spiral cable |
| one operating manual | |
3.3 Connecting the receiver
After unpacking your telephone, you must first connect the telephone receiver to the base unit. To do this, take the short end of the spiral cable and plug it into the socket at the bottom of the receiver. Plug the long end into the socket provided for the purpose on the underside of the base unit and feed the cable through the cable channel to the outside.
3.4 Connecting the telephone
Connect the telephone cable supplied to the telephone socket and the telephone jack on the underside of the telephone. Then feed the cable out of the telephone housing either upwards or downwards through the cable guide. Clip the cable firmly in the cable channel. The telephone works using the tone dialling system (MFV).
3.5 Wall mounting
Your telephone is also suitable for wall mounting. Use the two screws for fixing (not included). Drill two holes 83 mm apart and leave the screws protruding from the wall by 5mm. Now place the telephone over the screws and push it slightly downwards. If you are using the telephone fitted to the wall, you can hang the receiver on the telephone without hanging up. You will find a small hook for this purpose above the receiver rest.
- Commissioning -
3.6 R Signal button -Setting up for T-NET
You can use the "R" signal button on your telephone on private exchanges and when using DEUTSCHE TELEKOM's T-Net functions.
Private exchanges
If you have connected your telephone to a private exchange, you can use all the facilities such as call transfer, automatic recall, etc. The "R" signal button gives you access to these facilities.
The FLASH time "100ms" will be required on a private exchange. To make this setting, move the slide switch on the underside to the "100ms" position.
You can find out from the dealer from whom the equipment was purchased whether your telephone will work on your private exchange without any problems and which other facilities you will have access to.
T-NET functions
Your telephone supports the most important DEUTSCHE TELEKOM added value services (e.g. brokering, call waiting, three-way conferencing, etc.). Please contact DEUTSCHE TELEKOM to gain access to these functions (some of which are subject to charge). When using T-NET functions, move the slide switch on the underside to the "300ms" position.
3.7 Hearing aid compatible
The telephone has a special circuit working on the basis of induction for transmitting speech to hearing aids. Please set your hearing aid to "T".
- Operation -
4 Operation
4.1 Making a call
The AUDIOLINE TEL 7 can be used like any conventional telephone.
| Please follow the instructions: |
| Lift the receiver and wait for a dialling tone. |
| Now dial the required telephone number. |
| To end the call, replace the receiver. |
4.2 Receiving calls
As soon as you receive a call, you will hear the ringing tone. The call can now be accepted by lifting the receiver.
4.3 Adjusting the receiver volume
If the receiver volume is too quiet or too loud for you, you can change this to suit your requirements.
You can use the slide switch 📋 on the receiver to adjust the volume from soft to loud.
4.4 Redial
If a connection that you have dialled is engaged or you were unable to get through to anybody, simply replace the receiver. The last number dialled remains stored in the telephone automatically. To use the redial facility, proceed as follows:
Lift the receiver and press the redial button Ⓞ. The number stored by the redialling facility will now be dialled.
- Operation -
4.5 Muting the microphone
You can switch off the microphone during a call using the ✗ button. It is thus possible to speak without the other party hearing you. The loudspeaker remains switched on and you can continue to hear the other party.
To mute the microphone, press and hold down the ✗ button during a call.
To switch the microphone on again, release the ✗ button.
4.6 Adjustable Call Tone
You can use the RINGER slide switch underneath the telephone to select the settings HI (loud) or LO (soft) to adapt the ringer volume to your requirements. Should you not want to be disturbed, use the OFF position.
- Important Information -
5 Important Information
5.1 Fault finding
Remove all extra telephone equipment and connect only the telephone directly to the telephone socket.
If the fault is still present, connect another telephone (if available) to the telephone socket. The results will show you whether the fault lies with the unit or with the telephone line.
Of course, you can always ring your network operator's service department, which will give you more advice on checking your installation.
5.2 Replacing the telephone cable
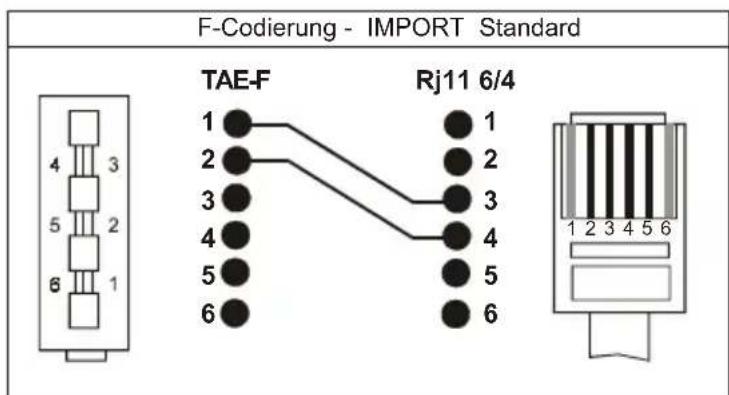
If you have to replace your telephone cable, you can locate the appropriate cable at your dealer's with the help of the following diagram.
text_image
F-Codierung - IMPORT Standard TAE-F Rj11 6/4- Important Information -
5.3 Guarantee
AUDIOLINE equipment is manufactured and tested in accordance with the most up to date production methods. Selected materials and highly developed technology ensure trouble-free operation and long life. If your unit should develop a fault within the guarantee period, however, please contact the shop where you bought your AUDIOLINE equipment exclusively and have your purchase receipt available for inspection. The guarantee period is 24 months from the day of purchase under the following conditions: within the guarantee period, all defects due to material or manufacturing faults will be repaired free of charge. The guarantee is invalidated if the equipment has been tampered with by the purchaser or third parties. Any damage caused by improper handling or operation, by incorrect positioning or storage, by improper connection or installation or by excessive force or other external influences is not covered by the guarantee. In the case of complaint, we reserve the right to repair or replace defective parts or to exchange the equipment. Exchanged parts or exchanged equipment become our property. Claims for compensation are excluded insofar as they do not relate to criminal intent or gross negligence on the part of the manufacturer. All guarantee claims according to these conditions must be raised exclusively with your dealer. Rights under the guarantee can no longer be enforced after the expiry of 24 months from purchase and delivery of our products. In the case of unnecessary or unjustified demands on the customer service department, we will levy our usual service charges for materials, time, postage and packing. Any complaints must be reported as soon as a problem is found. The guarantee is valid within the German Federal Republic.
- Important Information -
5.4 Declaration of Conformity
WE AUDIOLINE GmbH
OF PROMENADENSTR. 1
D-41460 NEUSS
GERMANY
DECLARE UNDER OUR SOLE RESPONSIBILITY AS EU DISTRIBUTOR THAT THE PRODUCT
MODEL: TEL 7
DESCRIPTION: Cord connected telephone
IS IN CONFORMITY WITH THE BASIC
REQUIREMENTS OF DIRECTIVE: 1999/5/EC.
AUTHORISED SIGNATORY:
Signature:
text_image
MYPICALName: MANFRED
Position in the company: MANAGING DIRECTOR
Date of issue: 10.12.2001
ZINNOW
A copy of this declaration will be retained for 10 years after cessation of production.

SUPPLIER: AUDIOLINE GmbH
PROMENADENSTR. 1
D-41460
PRODUCT: TEL 7
NEUSS
This product has been developed for use with an analogue telephone line (PSTN) within Germany. However, no guarantee can be accepted for trouble-free operation on all telecommunications terminal equipment connections due to the differences between the different telecommunications network operators.