Terminal 2 - Phone AUDIOLINE - Free user manual and instructions
Find the device manual for free Terminal 2 AUDIOLINE in PDF.


| Product Type | ISDN Telephone (Digital) |
| Model | Terminal 2 |
| Brand | Audioline |
| Standards | ISDN DSS1, multiple device connection |
| Power Supply | Via ISDN line; emergency switch for power failure |
| Display | LCD showing date, time, caller info, menu |
| Phone Book | 50 entries with names, 10 direct dial buttons |
| Caller List | 50 entries with date, time, number |
| Redial | Last 3 numbers |
| Call Functions | Handsfree, mute, call waiting, consultation, conference (3-way), parking |
| Call Diversion | CFU, CFB, CFNR for each MSN |
| Dialling Block | Global block (free numbers) and partial block (blocked numbers) |
| Room Monitoring | Baby sitting function via MSN 3 |
| MSN Support | Up to 3 MSNs with individual ring tones and indicators |
| Wall Mounting | Yes, with included support |
| Safety | Do not open; use in dry rooms 10-30°C; avoid heat/sun/moisture |
| Cleaning | Soft dry cloth; no solvents or cleaning agents |
| Spare Parts | Telephone cable available from dealer |
| Warranty | 24 months from purchase; contact dealer |
| Declaration of Conformity | Complies with 1999/5/EC (R&TTE) |
Frequently Asked Questions - Terminal 2 AUDIOLINE
User questions about Terminal 2 AUDIOLINE
0 question about this device. Answer the ones you know or ask your own.
Ask a new question about this device
Download the instructions for your Phone in PDF format for free! Find your manual Terminal 2 - AUDIOLINE and take your electronic device back in hand. On this page are published all the documents necessary for the use of your device. Terminal 2 by AUDIOLINE.
USER MANUAL Terminal 2 AUDIOLINE
Operating Instructions 33
3.6 Wandmontage....8
*9996 = PIN-Code 0 0 0 0 0
Name: MANFRED ZINNOW
3.2 Check contents of pack.... 38
3.3 Connecting the receiver.... 38
3.4 Connecting the telephone cable 38
3.5 Line information 38
3.6 Wall mounting 38
3.7 Emergency operation in the event of power failure 39
3.8 Setting the time and date 39
3.9 Assigning MSN phone numbers.... 40
3.10 Assigning ring tones to MSN phone numbers 40
3.11 MSN - Transmit phone number? 41
4 Operation 42
4.1 Dialling a number 42
4.1.1 Dialling using the number buttons 42
4.1.2 Dialling using the redial facility 42
4.1.3 Dialling using the direct dial buttons 42
4.1.4 Dialling from the phone book 42
4.1.5 Finding a number in the phone book 42
4.2 Receiving calls.... 43
4.3 Call waiting 43
4.4 Switching over between the receiver and the handsfree facility 43
4.5 Adjusting the volume 44
4.6 Muting.... 44
4.7 Consultation.... 44
4.8 Holding two conversations simultaneously - brokering 44
4.9 Setting up a conference.... 45
4.10 Parking 45
4.11 Storing, deleting or changing numbers in the phone book...... 46
4.11.1 Entering new telephone numbers 46
4.11.2 Changing telephone numbers...... 47
4.11.3 Deleting telephone numbers from the phone book...... 47
4.12 Caller list 48
5 Programming 50
5.1 Call diversion 50
5.1.1 Diverting phone numbers (MSNs) 50
5.1.2 Deactivating call diversion 51
5.1.3 Checking call diversion 51
5.2 Call counter 52
5.3 Dialling block 52
5.4 Call waiting 54
5.5 Changing the PIN code 54
5.6 Restoring the factory settings.... 55
5.7 Setting the language.... 55
5.8 Room monitoring.... 56
- Contents -
6 Using with private exchanges....57
6.1 Consultation....57
6.2 Consultation and forwarding 57
6.3 Direct forwarding....57
6.4 Forwarding via the menu 58
7 Troubleshooting ....59
8 Important information....60
8.1 Changing the telephone cable 60
8.2 Dialling code for international and national calls 60
8.3 DTMF transmission or keypad protocol 60
8.4 Technical data 60
8.5 Warranty 60
8.6 Declaration of conformity.... 61
1 General Information
Please read these operating instructions carefully. If you should have any questions, please contact our Service Department on the Hotline number 0180 5 00 13 88. Under no circumstances open the unit yourself and do not try to carry out your own repairs. For any claims under the warranty, please refer to your dealer.
Intended use
This telephone has been designed for use on a digital telephone line (ISDN) within Germany. The AUDIOLINE TERMINAL 2 telephone must be connected to an ISDN multiple device connection. However, no guarantee can be accepted for trouble-free operation on all telecommunications terminal equipment connections due to the differences between the different telecommunications network operators. Connect the telephone cable to the phone socket intended for the purpose only. Do not change the plug on the connecting cable.
Private exchanges
The telephone can also be connected to a private exchange. You can find out from the dealer from whom the equipment was purchased whether your telephone will work on your private exchange without any problems. Due to the large number of different private exchanges, it is not possible to guarantee this function.
Location
Do not set up the telephone in the immediate vicinity of other electrical equipment such as microwaves or hi-fi systems, as this may result in mutual interference. The location has a decisive influence on the trouble-free operation of the telephone.
Place the telephone on a flat and non-slip surface. The feet do not normally leave any marks on the surface. However, due to the large number of varnishes and surfaces in use, it may not be possible to prevent marks occurring on the surface due to the feet of the unit.
Do not use the telephone in areas where there is a risk of an explosion.
Excessive exposure to smoke, dust, vibrations, chemicals, moisture, heat or the direct rays of the sun must be avoided.
Disposal
If the useful life of the complete equipment has expired, please dispose of it carefully in accordance with the statutory requirements and in a manner friendly to the environment.
Temperature and ambient conditions
The telephone is designed for use in protected rooms with a temperature range of 10 °C to 30 °C . The telephone must not be installed in damp rooms such as a bathroom or laundry room. Avoid proximity to sources of heat such as radiators and do not expose the unit to direct sunlight.
- General Information -
Cleaning and care
The surface of the case can be cleaned with a soft, dry, lint-free cloth. Never use cleaning agents, particularly aggressive solvents. No attention is necessary apart from cleaning the housing occasionally. The rubber feet of the telephone are not resistant to all cleaning agents. The manufacturer can therefore not accept any liability for possible damage to furniture or the like.
CE mark
The telephone complies with the basic requirements of the R&TTE Directive This is confirmed by the CE mark.
2 User controls
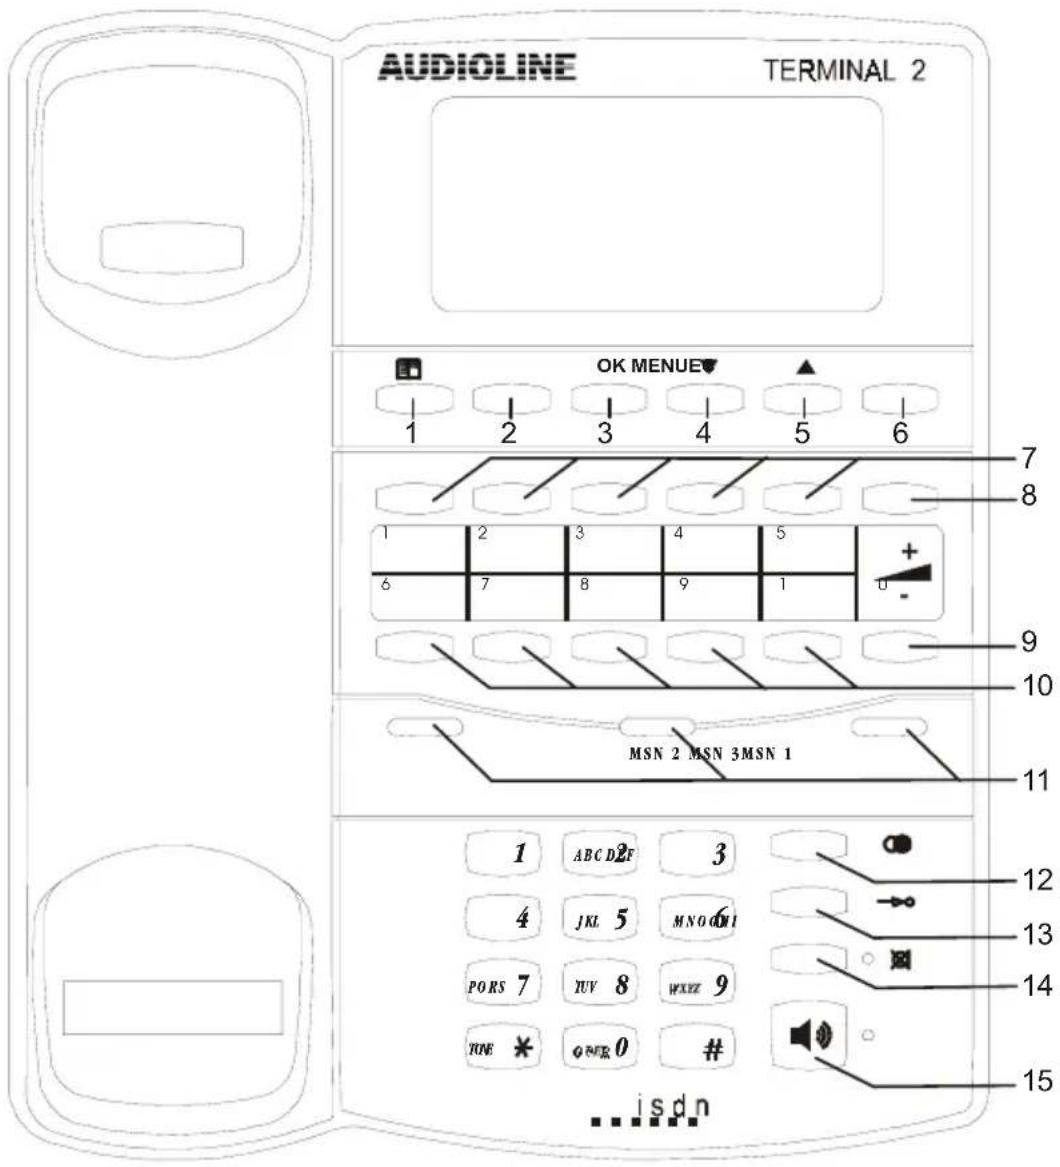
text_image
AUDIOLINE TERMINAL 2 OK MENUE 1 2 3 4 5 6 7 8 1 2 3 4 5 6 7 8 9 1 0 9 10 MSN 2 MSN 3 MSN 1 1 ABCD2F 3 4 JKL 5 MNO01 PORS 7 TUV 8 WXZ 9 TUE * OFF 0 # ... isdn1 Find phone number
2 C button (delete/end)
3 OK button (confirm)
4 Selection button minus
5 Selection button plus
6 Menu button
7 Direct dial buttons 1 to 5
8 Increase volume
9 Decrease volume
10 Direct dial buttons 6 to 10
11 Indicators for the three MSN phone numbers
12 Redial
13 Speed dial button
14 Mute button
15 Handsfree button
- Setting up -
3 Setting up
3.1 Safety Information
NOTE! Before setting up, it is essential that you read the Safety Information at the beginning of this operating manual.
3.2 Check contents of pack
The following items are supplied:
| one ISDN telephone one telephone connecting cable |
| one instruction manual receiver |
| spiral cable |
3.3 Connecting the receiver
After unpacking your new telephone, you must first connect the telephone receiver to the base unit. The spiral cable needed for this has two identical connections so that there can be no confusion. First take one end of the spiral cable and plug it into the socket at the bottom of the receiver. Now plug the other end into the socket on the left-hand side of the base unit.
3.4 Connecting the telephone cable
Connect the ISDN telephone cable provided to the telephone jack and the socket on the rear of your telephone. Check that the plug is properly engaged by pulling gently on the cable. If you do not have the right connection socket, please refer to your local network office.
Important Note: The current supply at the NTBA (ISDN house connection of the network provider) must be always put in. Otherwise the telephone works only in the emergency power mode correctly.
3.5 Line information
Your TERMINAL 2 is approved for connecting to so-called multiple device connections. When you use the telephone for the first time, you can immediately make telephone calls yourself without making any adjustments and can be reached directly on the three MSNs (Multiple Subscriber Numbers).
It is only possible to discriminate between the three available phone numbers MSN1, MSN2 and MSN3 if you program these into the telephone. In addition to the three displays, you can also assign a different ring tone to each MSN. You can find out how to enter the three MSNs in Chapter 3.9.
3.6 Wall mounting
Your telephone is also suitable for wall mounting. Remove the desk support on the rear by pressing the tab on the right-hand side of the support inwards slightly and tilting the support to the left. Then turn the support through 180^ . Now fix the support to the bottom end of the telephone by engaging the support on the right-hand side and pushing firmly to the left.
Use two screws for fixing to the wall. Drill two holes 76 mm apart, vertically one above the other, and leave the screws protruding 5 mm from the wall. Now place the telephone over the screws and push down slightly.
- Setting up -
3.7 Emergency operation in the event of power failure
Your ISDN telephone has a switch on the rear, with which you can change the phone over to emergency mode. Emergency mode means that can continue to use the phone if there should happen to be a power failure. Hence, if there should be a power failure, move the switch from the "NORMAL" position to the "NOTSTROM" setting. Not all the functions of the telephone are available in emergency mode. Remember to return the switch to the "Normal" position once more as soon as the power is restored.
3.8 Setting the time and date
Your TERMINAL 2 shows the current date, day of the week and time in the display.
Note: The date and time adjusts itself automatically while you are speaking to another ISDN subscriber and does not need to be set up separately. Not possible with all providers and private exchanges.
- Press the MENUE button.
- Press the ▼ button as many times as necessary until the message "SERVICE" appears in the display.
- Press the OK button. The message "Pin Code >>" will appear in the display.
- Now enter the five-digit PIN code using the keypad (factory setting 0 0 0 0 0) and confirm the entry with OK. The message "MSN ?" will appear in the display.
- Now press the ▼ button as many times as necessary until the message "Date/Clock?" appears in the display.
- Confirm with the OK button. The message "Date Set?" will appear in the display.
- Confirm with the OK button. The message "Year>>(1999-2098)" will appear in the display.
- Now enter the current year as a four-digit number using the number pad and confirm with OK. The display will show "Month >> (1-12)".
- Now enter the current month using the number pad and confirm with OK. The display will show "Date >> (1-31).
- Now enter the current day using the number pad and confirm with OK. The display will show "Confirm ?" and will show the complete date once more.
- Confirm with OK and the display will show "Clock Set ?".
- Confirm with the OK button. The message "Hour >> (00-23)" will appear in the display.
- Now enter the current hour using the number pad and confirm with OK. The display will show "MIN >> ?".
- Now enter the current minute using the number pad and confirm with OK. The display will show "Confirm ?" and the complete time once more.
- Confirm with OK and exit programming with the MENUE button.
- Setting up -
3.9 Assigning MSN phone numbers
For a multiple device connection, your network provider offers you several MSNs (Multiple Subscriber Numbers) that you can be called on. You can assign up to 3 MSNs to your TERMINAL 2, i.e. your phone will only signal a call when a call is made using these assigned MSN phone numbers. If only MSN 1 is assigned to the telephone, it will only respond to this telephone number when a call is received. The country code (49) and the local dialling code are not part of the MSN. To differentiate between the three MSN phone numbers, there are three indicators MSN1, MSN2 and MSN3 on your telephone. In addition, you can also allocate each MSN its own ring tone. In this way, calls can also be differentiated acoustically.
Note: No MSN phone numbers are assigned when the phone is supplied. In this case, your TERMINAL 2 will respond to all MSN phone numbers that are allocated to you by your network provider.
To assign the three MSN phone numbers, please proceed as follows:
- Press the MENUE button.
- Press the ▼ button as many times as necessary until the message "SERVICE" appears in the display.
- Press the OK button. The message "Pin Code >>" will appear in the display.
- Now enter the five-digit PIN code using the keypad (factory setting 0 0 0 0 0) and confirm the entry with OK. The message "MSN ?" will appear in the display.
- Confirm with OK. The display will show "MSN 1 ?". If an MSN has already been entered, this MSN phone number will also appear.
- Now press the OK button and enter the required MSN phone number for MSN 1 using the number pad.
- Confirm the entry with the OK button. The MSN 1 entered has now been saved and the display will show MSN 2.
- Then press the OK button and enter the MSN phone number for MSN 2 using the number pad.
- Confirm the entry with the OK button. The MSN 2 entered has now been saved and the display will show MSN 3.
- Then press the OK button and enter the MSN phone number for MSN 3 using the number pad.
- Confirm the entry with the OK button. The MSN 3 entered has now been saved and the display will again show MSN 1.
- You can check the three MSN phone numbers again using the ▼ and ▲ buttons.
- Exit the programming mode by pressing the MENUE button.
3.10 Assigning ring tones to MSN phone numbers
When you have entered the MSN phone numbers, calls will be assigned to the three indicators MSN1, MSN2 and MSN3. So that you can now also differentiate between the three phone numbers acoustically, each MSN phone number can be assigned a different ring tone.
- Press the MENUE button.
- Press the button as many times as necessary until the message "SERVICE" appears in the display.
- Setting up -
- Press the OK button. The message "Pin Code >>" will appear in the display.
- Now enter the five-digit PIN code using the keypad (factory setting 0 0 0 0 0) and confirm the entry with OK. The message "MSN ?" will appear in the display.
- Now press the ▼ button as many times as necessary until the message "Audio?" appears in the display.
- Confirm with the OK button. The message "Ring For MSN 1?" will appear in the display.
- Now select the MSN for which you want to change the ring tone using the ▼ or ▲ buttons.
- Confirm with OK and the display will show "+ - Vol. *# - Pitch".
- Now select the required volume between 00 (off) and 08 using the ▼ or ▲ buttons. A choice can be made between 8 ring tones at the same time using the " * " and " # " buttons.
- Confirm your selection with the C button.
- Now select the next MSN using the ▼ or ▲ buttons and confirm with OK.
- Confirm with OK and the display will show "+ - Vol. *# - Pitch".
- Now select the required volume between 00 (off) and 08 using the ▼ or ▼ buttons. A choice can be made between 8 ring tones at the same time using the " * " and " # " buttons.
- Confirm your selection with the C button.
- Now select the next MSN using the ▼ or ▲ buttons and confirm with OK.
- Confirm with OK and the display will show "+ - Vol. *# - Pitch".
- Now select the required volume between 00 (off) and 08 using the ▼ or ▲ buttons. A choice can be made between 8 ring tones at the same time using the " * " and " # " buttons.
- Confirm your selection with the C and MENUE button.
Note: If the volume of an MSN is set to 0 (off), the symbol

MSN
will appear in the display.
3.11 MSN - Transmit phone number?
The ISDN telephone network provides the option of transmitting your own telephone number to the person you are calling. If the phone of the person you are calling meets the technical requirements, your phone number will be shown in the display. You yourself can decide whether the phone number is transmitted or not.
- Press the MENUE button.
- Press the button as many times as necessary until the message "CID Send/Not Send?" appears in the display.
- Press the OK button. "CID Send ?" will appear in the display.
- Now select whether you want to send the MSN phone numbers or not by using the ▼ and ▲ buttons.
- Then press the OK button to confirm the setting. If the phone number is transmitted, the symbol —CID→ will appear in the display.
- Exit the programming mode by pressing the MENUE button.
4 Operation
4.1 Dialling a number
The AUDIOLINE TERMINAL 2 can be used like any conventional telephone and, in addition, has some useful special features, which make phoning considerably easier for you. You have various ways of making a call:
4.1.1 Dialling using the number buttons
- Enter the phone number using the number buttons. The phone number will be shown in the display.
- Lift the receiver or press the handsfree button 📄.
- While the call is being made, the display will show the duration of the call.
- To end the call, replace the receiver or press the handsfree button
4.1.2 Dialling using the redial facility
The redial button automatically stores the last three telephone numbers dialled.
- Press the button as often as necessary until you see the required telephone number in the display.
- Press the handsfree button or lift the telephone receiver and the phone number will be dialled automatically.
- If you do not wish to dial a number, you can exit this function with the MENUE button.
4.1.3 Dialling using the direct dial buttons
Simply press the required direct dial button 1 to 10 and the stored telephone number will be dialled immediately using the handsfree facility. The display will either show the telephone number or the stored name. Lift the receiver if you do not want to make a call using the handsfree facility.
4.1.4 Dialling from the phone book
- Press the ➞ button. The display will show "Location >> 1-50".
- Now enter the storage location as a two-digit number between 11 and 50. The direct dial buttons can also be dialled as numbers 1 to 10.
- The display will either show the telephone number or the stored name and the telephone number will be dialled directly.
- Lift the receiver if you do not want to make a call using the handsfree facility.
4.1.5 Finding a number in the phone book
- Operation -
You can quickly find a number in the phone book with the setting "Find phone number".
- Press the button. The message "Input Name / Quit?" will appear in the display.
- Confirm with OK or cancel the process with the MENUE button.
- Use the ▼ and ▲ buttons to page forwards and backwards through the phone book.
You can also enter the required initial letter of the subscriber you are looking for by means of the buttons "2" to "9" and confirm with OK. When you enter an initial letter, the display will show the first entry found with the letter entered. If no phone number is found with this initial letter, the display will show "No Matched Record!". In this case, press the C button and start the search again.
-
When you have found the required subscriber, simply lift the receiver or press the handsfree button. The telephone number will then be dialled automatically.
-
To cancel the process, press the MENUE button.
4.2 Receiving calls
Incoming calls can be accepted in two different ways.
A. By lifting the receiver or
B. By pressing the handsfree button and speaking via the built-in microphone.
4.3 Call waiting
The ISDN network provides you with the option of being called by a second subscriber while you are making a call. During a call, the display and a call signal will draw your attention to the second call. The "call waiting" function is activated in the factory and can be deactivated as described in Chapter 5.4. In this case, you can proceed as follows:
A. Finish the current call and accept the new call.
B. If you want to take the new call in addition to your current call, confirm the display message "Accept?" with the OK button. You will then be holding two conversations simultaneously. See also Item 4.8.
C. If you do not wish to take the call, select the message "Reject?" with the ▲ button and confirm with the OK button.
4.4 Switching over between the receiver and the handsfree facility
A. If you want to change from the receiver to the handsfree facility during a call, press the handsfree button 🔔 and replace the receiver on the rest. The red indicator light in the handsfree button will come on.
B. If you want to change from handsfree mode to the receiver, simply lift the receiver. The red indicator light will go out.
4.5 Adjusting the volume
The receiver volume and the volume of the loudspeaker in handsfree mode can be adjusted during a call with the buttons + -.
A. If you are making a call using the receiver, the volume can be adjusted in 5 steps.
B. If you are making a call using the handsfree facility, you can adjust the volume in 8 steps.
4.6 Muting
The microphone can be turned off during a call by using the mute button. It is thus possible to speak without the other person hearing you. The loudspeaker remains switched on and you can continue to hear the other person. You can use the mute button both during a call with the receiver and with the handsfree facility.
If you want to switch off the microphone, press the ✗ button. To switch the microphone on again, press the ✗ button once more.
4.7 Consultation
The ISDN network provides the option of speaking alternately with two parties without breaking off the individual calls. While you are already speaking to one party, you can speak to a second party and then return to the first call once more.
- While the first call is being made, the display will show the message "2. Call?". Now press the OK button.
- You will now hear the dialling tone and can enter the required phone number. The first call will be put on hold.
- If you want to end the second call, press the ▲ button until the message "Disconnect" will appear in the display.
- Confirm with the OK button. The second call will be ended and you will return to the first call.
4.8 Holding two conversations simultaneously - brokering
If you have initiated a consultation, you can speak to the two parties alternately.
- While the first call is being made, the display will show the message "2. Call ?". Now press the OK button.
- You will hear the dialling tone and can enter the required phone number. The first call will be put on hold. While the second call is being made, the message "Toggle?" will appear in the display.
- If you want to return to the first call, press the OK button once. The second call will be put on hold and you will return to the first call.
- By pressing again, you can change to the second call once more.
- To end the call that is currently active, select the setting "Disconnect ?" with the button and confirm with the OK button. The call will be ended and you will automatically return to the other call.
- This call is then ended normally by replacing the receiver.
- Operation -
4.9 Setting up a conference
A further option with the ISDN network is the conference facility, which provides you with the possibility of bringing together two external parties to make a three-way call.
- While the first call is being made, the display will show the message "2. Call ?". Now press the OK button.
- You will now hear the dialling tone and can enter the required second phone number. The first call will be put on hold.
- If you want to carry on both conversations, press the ▼ button once. The message "3-Party?" will appear in the display.
- Confirm with the OK button. You will now be able to speak to both parties at the same time.
- You can now choose several ways of ending the conference call using the ▼ and ▲ buttons:
| "Quit held ?" | => The first call will be ended and you will stay connected to the second party. |
| "Quit Active?" | => The second call will be ended and you will stay connected to the first party. |
| "Held only?" => | The second call will be put on hold and you will be speaking to the first party only. |
| "Active only?" | => The first call will be put on hold and you will be speaking to the second party only. |
- Confirm the required setting with the OK button.
Note: Both calls will be ended by replacing the receiver.
4.10 Parking
With this function, you have the possibility of interrupting an existing call for a maximum of 3 minutes in order to continue it from another extension. You can even disconnect the telephone from the ISDN socket and then continue the call from another ISDN socket on the same line.
- Select the "Suspend ?" setting with the button during a call.
- Confirm the selection with the OK button. The display will show "Suspend Digit >>".
- Now enter an identification number between 1 and 9. Warning! You will only be able to get the call back later by means of this number.
- The call will be interrupted automatically.
Getting the call back
- Press the MENUE button.
- Press the button as many times as necessary until the message "Resume?" appears in the display.
- Confirm with OK. The display will show the message "Resume Digit >>".
- Enter the identification number between 1 and 9.
- Lift the receiver and you will be connected to the call once more.
Note: The call can be parked for a maximum of three minutes. After this, the held call will be automatically disconnected from the exchange.
- Operation -
4.11 Storing, deleting or changing numbers in the phone book
A total of 50 telephone numbers with associated names can be stored in the TERMINAL 2 phone book. 10 of these numbers can be dialled via the direct dial buttons.
Note: If a phone number is stored in the phone book and you are called by this subscriber, then the name stored in the phone book will appear in the display and not the caller's phone number. The caller's phone line must, of course, be capable of transmitting the phone number.
4.11.1 Entering new telephone numbers
- Press the MENUE button.
- Press the button as many times as necessary until the "Phone Book?" setting appears in the display.
- Confirm with the OK button.
- Select the "Program Phone Book ?" setting using the ▼ or ▲ button and confirm with OK. The message "Phone book >> (1-50)" will appear in the display.
- Your telephone will now indicate a free storage location in the phone book. If you want to use the suggested location, confirm with the OK button and go to Step 8. Remember that you will later be able to call up the first 10 storage locations using the direct dial buttons. If you want to use a particular storage location, press the C button and continue with the next step. If there is no longer a free storage location available, a storage location will not be suggested by the TERMINAL 2. In this case, continue with the next step.
- Now select the required storage location in which the telephone number is to be stored. To do this, either press one of the 10 direct dial storage locations or enter a storage location between 11 and 50 and confirm with OK.
- If the selected storage location is already occupied, the display will show "Overwrite ?". Confirm overwriting with OK or press the C button and go to Step 6.
- Now enter the required name by repeatedly pressing the appropriate numbers.
- Example: You want to enter the name "Peter".
Press: 1 x button 7, 2 x button 3, 1 x button 8, 2 x button 3, 3 x button 7
- To enter a space, press the "1" button once.
- Letters can be deleted with the ▼ button.
-
If you want to enter the same letter twice in succession or two letters which are on the same button one after the other, wait ca. 1 second before pressing the button again.
-
Confirm the name with OK.
-
Now enter the full telephone number and confirm with OK. Incorrect numbers can be deleted with the ▼ button.
- The message "Location >> (1-50)" will appear in the display once more and you can store further telephone numbers by continuing with the entry from Step 5. If you do not wish to store any more telephone numbers, exit programming with the MENUE button.
- Operation -
4.11.2 Changing telephone numbers
- Press the MENUE button.
- Press the ▲ button as many times as necessary until the "Phone Book?" setting appears in the display.
- Confirm with the OK button.
- Select the "Edit Phone Book ?" setting using the ▼ or ▲ button and confirm with OK. The message "Input Name / Quit ?" will appear in the display.
- Now select the required telephone number which is to be changed. To do this, enter the required initial letter of the name by pressing the appropriate number and confirm with OK. If you want to look through the whole phone book, do not enter a letter but confirm directly with OK.
Note: If no phone number with the initial letter entered has been stored, the display will show the error message "No Matched Record!" and a new letter can be re-entered after about 4 seconds.
- The display shows a telephone number with the required initial letter. If several names with the same initial letter have been stored, you can page through the phone book using the ▼ and ▲ buttons. If you have not entered an initial letter, page through the phone book using the ▼ and ▲ buttons until you have found the required number.
- Confirm with OK. "Input New Name/Quit" will appear in the display and you will see the stored name.
- Delete the name with the ▼ button and enter a new name.
- Confirm with OK. The display will show "Input New No./Quit" and you will see the stored telephone number.
- Delete the number with the ▼ button and enter the new telephone number.
- Confirm with OK. The display will again show the message "Input Name/Quit" and you can change further telephone numbers by continuing with the entry from step 6. If you do not wish to change any more telephone numbers, exit programming with the MENUE button.
4.11.3 Deleting telephone numbers from the phone book
- Press the MENUE button.
- Press the button as many times as necessary until the "Phone Book?" setting appears in the display.
- Confirm with the OK button.
- Select the "Delete Phone Book ?" setting using the ▼ or ▲ button and confirm with OK. The message "Input Name / Quit ?" will appear in the display.
- Now select the required telephone number which is to be changed. To do this, enter the required initial letter of the name by pressing the appropriate number and confirm with OK. If you want to look through the whole phone book, do not enter a letter but confirm directly with OK.
Note: If no phone number with the initial letter entered has been stored, the display will show the error message "No Matched Record!" and a new letter can be re-entered after about 4 seconds.
- Operation -
- The display shows a telephone number with the required initial letter. If several names with the same initial letter have been stored, you can page through the phone book using the ▼ and ▲ button. If you have not entered an initial letter, page through the phone book using the ▼ and ▲ buttons until you have found the required number.
- Confirm with OK. "Delete Confirm?" will appear in the display.
- Confirm with OK and the number will be deleted. The display will again show the message "Input Name/Quit" and you can delete further telephone numbers by continuing with the entry from Step 5. If you do not wish to delete any more telephone numbers, exit programming with the MENUE button.
4.12 Caller list
Every call is automatically saved in a caller list with telephone number, date and time. In this way, you can tell whether and by whom you have been called, even after you have been away. If the caller is not able to transmit his telephone number, only the date and time will appear. Your telephone can store up to 50 calls in the caller list. You can also save the phone numbers in this list in your phone book.
- If you were not able to take a call in your absence, a message will automatically appear in the display. You can bring the message up in the display at any time using the MENUE button.
"Total: XX New: XX"
The number following "Total:" shows the total number of calls that have been counted. The number following "New:" shows the new calls that have not yet been checked.
- Press the OK button.
- In the bottom line, the display now shows the storage location and the telephone number of the last incoming call (not transmitted by all callers). It is also shown, at the end of the bottom line, whether this is a new call (indicated by N). The date and the time of the call are shown in the top line.
- You can select each entry in the caller list with the ▼ and ▲ buttons.
- After you have selected an entry you can decide whether you want to call the number, save it in the phone book or delete it from the list.
Calling a telephone number directly
Press the handsfree button or lift the receiver.
- Operation -
Saving a telephone number in the phone book
A1. Press the OK button twice. The message "Input Name / Quit" will appear in the display.
A2. Now enter the required name by repeatedly pressing the appropriate numbers.
A3. Confirm the name with OK. The message "Location >> (1-50)" will appear in the display.
A4. Your telephone will now indicate a free storage location in the phone book. If you want to use the suggested location, confirm with the OK button and the phone number will be stored. Remember that you will later be able to call up the first 10 storage locations using the direct dial buttons. If you want to use a particular storage location, press the C button and continue with the next step. If there is no longer a free storage location available, a storage location will not be suggested by the TERMINAL 2. In this case too, continue with the next step.
A5. Now select the required storage location in which the telephone number is to be stored. To do this, either press one of the 10 direct dial storage locations or enter a storage location number between 11 and 50 and confirm with OK. The phone number will be shown again in the display.
A6. Confirm with OK. The number has now been stored and the display will again show the message "CID Store ?". You should now delete the saved number from the caller list. To do this, go to Step B2.
Deleting telephone numbers from the Caller List
B1. Press the OK button once. The message "CID Store?" will appear in the display.
B2. Select the "CID Delete ?" setting using the ▲ button.
B3. Confirm with OK. The message "Delete Confirm?" will appear in the display.
B4. Confirm with OK and the display will again show the caller list.
B5. You can exit programming with the MENUE button.
Deleting the caller list completely
C1. Go to the end of the caller list by repeatedly pressing the ▲ button. The display will show "End of CID list!".
C2. Confirm with OK. The message "Delete ALL CID ?" will appear in the display.
C3. Confirm with OK and the display will again show the current date and time.
5 Programming
Note: You can exit programming mode at any time with the MENUE button.
5.1 Call diversion
This is a convenient feature of the installation. Using this feature, you can divert all calls to another number specified by you individually.
Three different alternatives are available for when the call is to be diverted.
Activate CFU = The call is diverted directly to the specified phone number.
Activate CFNR= If the call is not accepted on your extension within 15 seconds, the call will be diverted to the specified phone number.
Activate CFB = If the extension is engaged, the call will be diverted immediately to the specified phone number.
5.1.1 Diverting phone numbers (MSNs)
- Press the MENUE button.
- Press the button as often as necessary until you see the message "Forwarding?" in the display.
- Confirm your setting with OK. The first MSN with the associated phone number will appear in the display.
- You can now select which of the three MSNs you would like to forward to a different connection using the ▼ and ▲ buttons. Using the "Other No." setting, you can enter and divert any MSN assigned to you.
- After you have selected the required MSN, confirm with the OK button. "CF Activate?" will appear in the display.
- Confirm your setting with OK and "Forward To >>" will appear in the display.
- Now enter the phone number to which the selected MSN is to be diverted.
- Confirm your setting with OK. The display will show the message "Activate CFU ?".
- You can choose between the three possible settings "Activate CFU", "Activate CFB" or "Activate CFNR" using the ▼ and buttons.
- Confirm your choice with OK. After a few seconds, the display will tell you whether the call diversion has been activated successfully.
- You can exit programming with the MENÜE button.
Note: When a call has been diverted, the symbol will appear in the display.
- Programming -
5.1.2 Deactivating call diversion
- Press the MENUE button.
- Press the ▲ button as often as necessary until you see the message "Forwarding?" in the display.
- Confirm your setting with OK. The first MSN with the associated phone number will appear in the display.
- You can now select for which MSN call diversion is to be deactivated using the ▼ and ▲ buttons. Using the "Other No." setting, you can enter any MSN assigned to you and deactivate the call diversion.
- After you have selected the required MSN, confirm with the OK button. "CF Activate ?" will appear in the display.
- Select the "CF Deactivate ?" setting using the ▼ and ▲ buttons.
- Confirm with OK and "Deact CFU?" will appear in the display.
- You can choose between the three possible settings "Deact CFU", "Deact CFB" or "Deact CFNR" using the ▼ and ▲ buttons. Here, choose the setting with which you have diverted the phone number.
- Confirm your choice with OK. After a few seconds, the display will tell you whether the call diversion has been deactivated successfully.
- You can exit programming with the MENUÉ button.
5.1.3 Checking call diversion
If you are not sure whether you have diverted a phone number, you can check each of the three MSN phone numbers individually.
- Press the MENUE button.
- Press the button as often as necessary until you see the message "Forwarding?" in the display.
- Confirm with OK. The first MSN with the associated phone number will appear in the display.
- You can now select for which MSN call diversion is to be checked using the ▼ and ▲ buttons. Using the "Other No." setting, you can enter and check any MSN assigned to you.
-
After you have selected the required MSN, confirm with the OK button. "CF Activate?" will appear in the display.
-
Select the "Check CF Status ?" setting using the ▼ and ▲ buttons.
-
Confirm with OK and "Check CFU?" will appear in the display.
-
You can choose between the three possible settings "Check CFU", "Check CFB" or "Check CFNR" using the ▼ and ▲ buttons. Here, choose the setting for which type of call diversion you would like to check.
-
Confirm your choice with OK. After a few seconds, the display will tell you whether the appropriate call diversion has been activated.
-
You can now select another one with the ▼ and buttons.
-
Confirm your choice with OK. After a few seconds, the display will tell you whether the appropriate call diversion has been activated.
-
You can check all MSN phone numbers using this process. You can exit programming with the MENUE button.
5.2 Call counter
The integral call counter individually counts all incoming and outgoing calls made from your telephone. The display can be deleted at any time.
- Press the MENUE button.
- Press the ▲ button as often as necessary until you see the message "Call Counter?" in the display.
- Confirm the selection with OK. The following message will appear in the display:
MSN1-XX (I) -XX (O)
The display will show the results for the three MSN phone numbers, one after the other, for two seconds in each case. After the indication MSN, the MSN number is shown first, then the incoming calls "I" and then the outgoing calls "O".
- If you want to reset the call counter for a particular MSN to zero once more, wait until the right MSN appears in the display and press the OK button. The display will show "Reset MSNX Counter?".
- Confirm with OK and the display will be reset.
- You can exit programming with the MENUE button.
5.3 Dialling block
With your ISDN telephone, you can activate various dialling blocks in order to prevent unauthorised use of telephone numbers. With dialling blocks, there is basically a differentiation between two possible methods:
Global Block: If this dialling block is activated, it is not possible to make any calls apart from the so-called free numbers. Certain emergency numbers, for instance, can be re-enabled as free numbers. Five such free numbers can be specified.
Partial Block: With these dialling blocks, you can block quite specific telephone numbers (e.g. 0190, 00 or 0172). Five blocked numbers can be specified.
Phone Silent: "Ringer off" can also be set in this menu if at any time you do not wish to be disturbed. The visual display of incoming calls is not affected by this.
- Press the MENUE button.
- Press the button as many times as necessary until the message "SERVICE" appears in the display.
- Press the OK button. The message "Pin Code >>" will appear in the display.
- Now enter the five-digit PIN code using the keypad (factory setting 0 0 0 0 0) and confirm the entry with OK. The message "MSN ?" will appear in the display.
- Now press the ▼ button as many times as necessary until the message "Call Blocking" appears in the display.
- Confirm with the OK button. The message "Phone Silent?" will appear in the display.
- Now choose between the three possible settings using the ▼ and ▲ buttons.
Phone Silent => continue with step A.
Global Block => continue with step B.
Partial Block => continue with step C.
- Programming -
Phone silent
A1. Confirm with the OK button.
A2. Choose between the options "Ringer OFF ?" and "Ringer ON" using the ▼ and ▲ buttons.
A3. Confirm with the OK button. If the ringer is switched off, the symbol ⚙ will appear in the display.
A4. You can exit programming with the MENUE button.
Global block
B1. Confirm with the OK button.
B2. Using the ▼ and ▲ buttons, choose between the options
"G-Block Enable?" = Dialling block will be activated
"G-Block Disable ?" = Dialling block will be deactivated
"G-Block Setting ?" = Enter the free numbers
B3. Confirm with the OK button. If you have activated the dialling block, you should now enter any numbers that are still free and the message -123 will appear in the display. If you have deactivated the dialling block or if you have already entered the required free numbers, you can exit programming with the MENUE button.
B4. To store the free numbers, press the OK button again and the ▲ button as many times as necessary until the setting "G-Block Setting ?" appears in the display.
B5. Confirm with the OK button and the message "G-Block NR 1 >" will appear in the display.
B6. Now enter the first of the five free numbers using the number pad. Incorrect numbers can be deleted with the ▼ button. Note: Only complete phone numbers can be enabled. It is not possible to enable a particular dialling code.
B7. Confirm the free number with the OK button. The next free number will appear in the display.
B8. Now enter the next free numbers and confirm in each case with OK. After the fifth free number, the display will again show the message "G-Block Setting?". If you do not want to make an entry for a free number, simply confirm the blank display with OK.
B9. You can exit programming with the MENUE button.
Partial block
C1. Confirm with the OK button.
C2. Using the ▼ and ▲ buttons, choose between the options
"P-Block Enable ?" = Number block will be activated
"P-Block Disable?" = Number block will be deactivated
"P-Block Setting ?" = Enter the blocked numbers
C3. Confirm with the OK button. If you have activated the dialling block, you must now still enter the phone numbers that you wish to block. The symbol —123×→ will appear in the display. If you have deactivated the dialling block or if you have already entered the required blocked numbers, you can exit programming with the MENUE button.
C4. To store the blocked numbers, press the OK button again and the ▲ button as many times as necessary until the setting "P-Block Setting ?" appears in the display.
C5. Confirm with the OK button and the message "P-Block NR1 >" will appear in the display.
- Programming -
C6. Now enter the first of the five blocked numbers using the number pad. Incorrect numbers can be deleted with the ▼ button. Note: Individual dialling codes can also be blocked.
C7. Confirm the blocked number with the OK button. The next blocked number will appear in the display.
C8. Now enter the next blocked numbers and confirm in each case with OK. After the fifth blocked number, the display will again show the message "P-Block Setting?". If you do not want to make an entry for a blocked number, simply confirm the blank display with OK.
C9. You can exit programming with the MENUE button.
5.4 Call waiting
The ISDN network provides you with the option of being called by a second subscriber while you are making a call. During a call, the display and a call signal will draw your attention to the second call. You can then either reject or accept this second call. The "Call waiting" function can be activated or deactivated.
- Press the MENUE button.
- Press the ▲ button as many times as necessary until the message "SERVICE" appears in the display.
- Press the OK button. The message "Pin Code >>" will appear in the display.
- Now enter the five-digit PIN code using the keypad (factory setting 0 0 0 0 0) and confirm the entry with OK. The message "MSN ?" will appear in the display.
- Now press the ▲ button as many times as necessary until the message "Call Waiting?" appears in the display.
- Confirm with the OK button. The message "CW" Enable?" will appear in the display.
- Now choose between the two options using the ▼ and ▲ buttons.
CW. Enable ? = The second call will be signalled in the display and with a tone. You can reject or accept the second call.
CW. Disable ? = The second caller will get the engaged tone and you will not be informed of the second call.
- Confirm with OK and the selected language will be set.
- You can exit programming with the MENUE button.
5.5 Changing the PIN code
- Programming -
The PIN code provides the option of protecting your settings against unauthorised access. This PIN code is requested before every programming operation.
In the as-supplied state, please use the PIN code 0 0 0 0 0. If you should ever forget your PIN code, you can restore the factory settings as described under Item 4.7.
- Press the MENUE button.
- Press the button as many times as necessary until the message "SERVICE" appears in the display.
- Press the OK button. The message "Pin Code >>" will appear in the display.
- Now enter the five-digit PIN code using the keypad (factory setting 0 0 0 0 0) and confirm the entry with OK. The message "MSN ?" will appear in the display.
- Now press the ▼ button as many times as necessary until the message "Pin Modify?" appears in the display.
- Confirm with the OK button. The message "New Pin >>" will appear in the display.
- Now enter the new five-digit PIN number using the number pad and confirm with OK. The display will now show "Confirm New Pin".
- Now enter the new PIN code once more for confirmation and confirm with OK. The new PIN code will be stored.
- You can exit programming with the MENUE button.
5.6 Restoring the factory settings
With this function, your telephone can be reset to the as-supplied state once more. If you should ever have forgotten your PIN code, this too can be reset to the factory setting "0 0 0 0 0".
- Remove the telephone cable from the phone socket for 2 seconds.
- After you have reinserted the cable, press the MENUE button.
- Press the button as many times as necessary until the message "SERVICE" appears in the display.
- Press the OK button. The message "Pin Code >>" will appear in the display.
- Now enter one of the two five-digit service numbers using the number pad.
*9999 = The telephone will be reset to the factory settings.
MSN numbers deleted
Call waiting on
Room monitoring off
All dialling blocks deactivated and deleted
Call counter deleted
Call diversion deactivated
Your own phone number will be transmitted to the other party.
PIN code 0 0 0 0 0
*9996 = The PIN code will be reset to "0 0 0 0 0". All other settings will remain unaltered.
- Confirm with OK. The display will jump back to the normal display and the selected command will be carried out.
5.7 Setting the language
- Programming -
Your TERMINAL 2 is preset to the German language in the factory. If you want to change over to English, please proceed as follows:
- Press the MENUE button.
- Press the button as many times as necessary until the message "SERVICE" appears in the display.
- Press the OK button. The message "Pin Code >>" will appear in the display.
- Now enter the five-digit PIN code using the keypad (factory setting 0 0 0 0 0) and confirm the entry with OK. The message "MSN ?" will appear in the display.
- Now press the ▲ button as many times as necessary until the message "Sprache ?/Language ?" appears in the display.
- Confirm with the OK button. The message "ENGLISCH?" will appear in the display.
- Now choose between the two languages "DEUTSCH" and "ENGLISCH" using the ▼ and ▲ buttons.
- Confirm with OK and the selected language will be set.
- You can exit programming with the MENUE button.
5.8 Room monitoring
You can also listen in to your home or office using your TERMINAL 2. To do this, it will be necessary to programme MSN 3 with the associated phone number (see 3.9, "Assigning MSN phone numbers") If room monitoring is switched on, you can then listen in to the room from an external connection using the phone number MSN3. If you want to use room monitoring, you should not pass on your MSN3 phone number to other people.
- Press the MENUE button.
- Press the button as many times as necessary until the message "SERVICE" appears in the display.
- Press the OK button. The message "Pin Code >>" will appear in the display.
- Now enter the five-digit PIN code using the keypad (factory setting 0 0 0 0 0) and confirm the entry with OK. The message "MSN ?" will appear in the display.
- Now press the ▲ button as many times as necessary until the message "Baby Sitting ?" appears in the display and confirm with OK.
- Select the required setting "Baby Sit Enable ?" or "Baby Sit Disable ?" with the ▲ buttons.
- Confirm the entry with the OK button and the message "Baby Sitting?" will appear in the display once more.
- You can exit programming with the MENUE button.
- Private exchanges -
6 Using with private exchanges
The AUDIOLINE TERMINAL 2 does not have an R signal button as this function is implemented via the menu control.
Warning! We recommend that the private exchange is always set up without automatically obtaining an outside line, as otherwise it will be impossible to make internal calls.
6.1 Consultation
If you want to consult another party while a call is being made, proceed as follows:
- While the first call is being made, the display will show the message "2. Call ?". Now press the OK button.
- You will hear a dialling tone and can enter the required internal phone number. The first call will be put on hold and you will be able to talk to the second party. While the second call is being made, the message "Toggle ?" will appear in the display.
- If you now want to end the call and return to the first party, select the "Disconnect" function by pressing the ▲ button twice.
- The current call will be ended by pressing the OK button and you will return to the first call.
6.2 Consultation and forwarding
If you want to forward a call with previous consultation to another internal party, proceed as follows:
- While the first call is being made, the display will show the message "2. Call ?". Now press the OK button.
- You will hear a dialling tone and can enter the required internal phone number. The first call will be put on hold and you will be able to talk to the second party.
- Now replace the receiver or press the handsfree button and the call will be forwarded.
6.3 Direct forwarding
If you want to forward a call directly to another internal party, proceed as follows:
- While the first call is being made, the display will show the message "2. Call ?". Now press the OK button.
- You will hear a dialling tone and can enter the required internal phone number.
- Now replace the receiver or press the handsfree button and the call will be forwarded.
WARNING! If this method of forwarding a call does not work with your private exchange, please use the "Forward" function via the menu.
- Private exchanges -
6.4 Forwarding via the menu
- While the first call is being made, the display will show the message "2. Call ?". Now press the OK button.
- You will hear the dialling tone and can enter the required internal phone number. The first call will be put on hold and you will be able to talk to the second party. While the second call is being made, the message "Toggle?" will appear in the display.
- If you now want to connect the first party with the second party, select the "Transfer" function with the ▲button.
- The two parties will be connected by pressing the OK button.
- Now replace the receiver or press the handsfree button.
- Troubleshooting -
7 Troubleshooting
If you have problems with your telephone, please check the following information. For any claims under the warranty, please refer to your dealer. The warranty period is 2 years.
For technical problems, you can also contact our Service Department on the hotline number 0180 5 00 13 88.
| No calls possible - no dialling tone | The telephone line is not correctly connected or is faulty.There is a complete power failure. Switch the telephone to emergency mode and then unplug and replace the phone cable. |
| Only engaged tone audible | Both ISDN channels are occupied by other devices (ISDN PC card).You have connected the TERMINAL 2 to a telephone installation. Unplug and replace the phone cable. |
| Dialling not possible | A dialling block has been activated. |
| The person you are speaking to does not hear you | You have pressed the "MUTE" button during the call. |
| No second call or conference call possible | The second ISDN channel is occupied by another device (PC card). |
| You do not receive any more calls | A call diversion has been programmed for an MSN. Deactivate diversion.There is a complete power failure. Switch the telephone to emergency mode and then unplug and replace the phone cable. |
8 Important information
8.1 Changing the telephone cable
If you have to replace your telephone cable, you will find the appropriate cable at your dealer's.
8.2 Dialling code for international and national calls
You will find the setting "INT./NAT. Prefix" in the Service menu. Here, the first two digits of the international dialling code "0 0" and the first digit of the national dialling codes "0" are preset. This setting should not be changed.
8.3 DTMF transmission or keypad protocol
Using DTMF transmission, answering machines, for example, can be remotely controlled by means of the numbers 0 to 9, # and *. Some European network operators require the keypad protocol to set up features (e.g. a call diversion) (not in Germany). You can switch between DTMF transmission (display symbol D) and the keypad protocol (display symbol K) by means of the MENUE button while a call is being made.
8.4 Technical data
| Standard ISDN protocol DSS1 | |
| Power supply via ISDN | emergency changeover in the event of a power failure |
| Permissible ambient temperature | 10°C to 30°C |
| Permissible relative humidity 20 to 75% | |
8.5 Warranty
AUDIOLINE equipment is manufactured and tested in accordance with the most up to date production methods. Selected materials and highly developed technology ensure trouble-free operation and long life. If your unit should develop a fault within the guarantee period, however, please contact the shop where you bought your AUDIOLINE equipment exclusively and have your purchase receipt available for inspection. The guarantee period is 24 months from the day of purchase under the following conditions: within the guarantee period, all defects due to material or manufacturing faults will be repaired free of charge. The guarantee is invalidated if the equipment has been tampered with by the purchaser or third parties. Any damage caused by improper handling or operation, by incorrect positioning or storage, by improper connection or installation or by excessive force or other external influences is not covered by the guarantee. In the case of complaint, we reserve the right to repair or replace defective parts or to exchange the equipment. Exchanged parts or exchanged equipment become our property. Claims for compensation are excluded insofar as they do not relate to criminal intent or gross negligence on the part of the manufacturer. All guarantee claims according to these conditions must be raised exclusively with your dealer. Rights under the guarantee can no longer be enforced after the expiry of 24 months from purchase and delivery of our products. In the case of unnecessary or unjustified demands on the customer service department, we will levy our usual service charges for materials, time, postage and packing. Any complaints must be reported as soon as a problem is found. The guarantee is valid within the German Federal Republic.
- Important information -
8.6 Declaration of conformity
WE AUDIOLINE GmbH
OF HELLERSBERGSTR. 2a
D-41460 NEUSS
GERMANY
DECLARE UNDER OUR SOLE RESPONSIBILITY AS EU DISTRIBUTOR THAT THE PRODUCT
MODEL: Terminal 2
DESCRIPTION: Cord-connected ISDN telephone
IS IN CONFORMITY WITH THE BASIC REQUIREMENTS OF DIRECTIVE: 1999/5/EC
AUTHORISED SIGNATORY:
Signature:
Name: MANFRED ZINNOW
Position in the company: MANAGING
Date of issue: 23.09.2002

text_image
DIRECTOR:A copy of this declaration will be retained for 10 years after cessation of production.

SUPPLIER: AUDIOLINE GmbH, HELLERSBERGSTR. 2a, D-41460 NEUSS
PRODUCT: Terminal 2
This product has been developed for use on a digital telephone line (ISDN) within Germany. However, no guarantee can be accepted for trouble-free operation on all telecommunications terminal equipment connections due to the differences between the different telecommunications network operators.
- Important information -
AUDIOLINE GmbH
Neuss
Service Hotline 0180 5 00 13 88