
BGL40 - Glucometer BEURER - Free user manual and instructions
Find the device manual for free BGL40 BEURER in PDF.

| Type de produit | Glucometer |
| Marque | Beurer |
| Modèle | BGL40 |
| Dimensions (L x l x H) | 85 x 55 x 20 mm |
| Poids avec piles | Environ 50 g |
| Alimentation | 2 piles lithium CR2032 (3 V) |
| Méthode de mesure | Électrochimique, bandelette réactive |
| Plage de mesure | 20 – 600 mg/dL (1,1 – 33,3 mmol/L) |
| Temps de mesure | Environ 5 secondes |
| Capacité mémoire | 480 résultats avec date et heure |
| Calcul de la moyenne | 7, 14, 30 et 90 jours |
| Étalonnage | Automatique par code de bandelette ou puce code |
| Prélèvement alternatif | Oui (paume, avant-bras, etc.) |
| Affichage | Écran LCD rétroéclairé |
| Interface de données | USB pour transfert vers PC (câble non fourni) |
| Bandelettes compatibles | Beurer BGL40 Test Strips |
| Piles incluses | Oui (2 piles CR2032) |
| Entretien et nettoyage | Essuyer avec un chiffon doux légèrement humide ; ne pas immerger |
| Sécurité | Arrêt automatique après 2 minutes, contrôle de température de fonctionnement |
| Pièces détachées et réparabilité | Piles et bandelettes disponibles ; appareil non réparable par l'utilisateur |
| Informations générales | Pour usage domestique uniquement ; stockage à 10-30°C |
Frequently Asked Questions - BGL40 BEURER
User questions about BGL40 BEURER
0 question about this device. Answer the ones you know or ask your own.
Ask a new question about this device
Download the instructions for your Glucometer in PDF format for free! Find your manual BGL40 - BEURER and take your electronic device back in hand. On this page are published all the documents necessary for the use of your device. BGL40 by BEURER.
USER MANUAL BGL40 BEURER
Contents of BGL40 mg/dL Blood Pressure and Blood Glucose Monitor
1 Getting to know your instrument....2
1.1 Contents and purchasing supplies 2
1.2 Monitor functions....4
1.3 Health information....5
1.4 Explanation of symbols ...... 6
2 Warning and safety information 8
3 Description of monitor and accessories....13
3.1 Lancing device and lancets.... 13
3.2 Blood pressure and blood glucose monitor 13
3.3 Test strips 16
4 Operation and Basic Settings....18
4.1 Inserting and replacing batteries 18
4.2 Making basic settings....19
5 Measuring blood pressure 20
5.1 Positioning the cuff....21
5.2 Correct posture 22
5.3 The measurement....22
5.4 Evaluating blood pressure results 23
6 Ensuring blood glucose measurability 24
6.1 Checking code number (coding).... 24
6.2 Checking test strips with control solution 25
7 Measuring blood glucose....29
7.1 Taking a blood sample 29
7.2 Measuring blood glucose 34
7.3 Evaluating blood glucose results 35
8 Memory 37
8.1 Displaying single values....38
8.2 Displaying average blood glucose values....38
8.3 Deleting stored values.... 39
9 Storage and maintenance of the monitor 40
10 In the event of problems....41
11 BGL40 mg/dL technical Specifications: 44
12 Customer Service....47
Beurer BGL40 mg/dL
1 GETTING TO KNOW YOUR INSTRUMENT
Before your first blood pressure and blood glucose test read the Instructions for Use and all accompanying information carefully and completely. Keep these instructions in a safe place where they can also be read by other persons using the device.
1.1 Contents and purchasing supplies
Check that the external packaging of the Beurer BGL40 mg/dL monitor is undamaged and that all components are included.

natural_image
Illustration of medical or dental tools including a box, pen-like devices, and a monitor (no text or symbols)| A | 1 blood pressure and blood glucose monitor BGL40 mg/dL REF 162.546 |
| B | 10 test strips REF 162.511 |
| C | 1 lancing device with AST cap for taking blood samples at different parts of the body |
| D | 10 sterile lancets REF 162.513 |
| E | 1 vial of MEDIUM control solution REF 457.02 |
| F | 1 handy bag REF 162.503 |
| G | 2 alkaline batteries 1.5 V AAA (in bag) |
| Instructions for Use, additional information | |
Beurer BGL40 mg/dL
If the packaging is seriously damaged or the contents are incomplete, please return the monitor to your dealer.
The blood pressure and blood glucose monitor, the test strips, and the control solution are specially designed to work together. Use only test strips and control solutions that are designed for this monitor.

Note
Use only original accessories supplied by the manufacturer.
Purchasing supplies
You can obtain test strips, control solution, lancets and lancing device without a prescription.
| Article REF | |
| 50 test strips REF 457.00 | |
| control solution MEDIUM REF 457.02 | |
| control solution HIGH REF 457.03 | |
| control solution LOW REF 457.04 | |
| 100 lancets REF 457.01 |
1.2 Monitor functions
This monitor combines two functions in one unit. This device is intended for blood-pressure/pulse measurement at the wrist on adults and also for measurement of the blood glucose content. It is suitable for private use.
The monitor can perform the following functions quickly and easily:
• measure your blood pressure and blood glucose (mg/dL)
• display and store your readings
- display the average values of your blood glucose readings for 7, 14, 21, 28, 60 and 90 days
- setting date and time
- setting the blood pressure unit (mmHg or KPa) and temperature unit (°C or °F)
- coding the monitor
The monitor also has the following control functions:
• display of the ambient temperature and warning of unsuitable temperatures
- 'change battery' display when batteries are low

Note
- Do not use the monitor to diagnose diabetes but for regular blood glucose monitoring only.
- Consult your doctor to set insulin dosages.
1.3 Health information
Blood pressure
Classification of blood pressure values for adults (mmHg)
| Range of blood pressure values | Systole | Diastole | Measure |
| Hypotonia(low blood pressure) < 105 < 60 Have it checked by your doctor | |||
| Normal pressure 105-120 60-80 Check it yourself | |||
| Prehypertensive blood pressure (transition to high pressure) | 120-140 80-90 Have it checked by your doctor | ||
| Hypertonia, grade I high blood pressure | 140-160 | 90-100 | Seek medical advice |
| Hypertonia, grade II high blood pressure | >160 > 100 | Seek medical advice | |
Source: Adapted from JNC 2003
Blood glucose
The table below shows blood glucose values for persons without diabetes for comparison with your own readings.
| Time of day Blood glucose range without diabetes | |
| Before breakfast 70 to 105 mg/dL | |
| Before lunch 70 to 110 mg/dL | |
| 1 hour after meals Below 160 mg/dL | |
| 2 hours after meals | Below 120 mg/dL |
| Between 2 and 4 a.m. | Over 70 mg/dL |
Source: Krall, L.P., and Beaser, R.S : Joslin Diabetes Manual. Philadelphia: Lea and Febiger (1989), 18
1.4 Explanation of symbols
The following symbols can be found on the packaging, the nameplate of the monitor and the accessories:
 | In-vitro diagnostics |
 | Serial number |
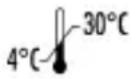 | Temperature range +4°C to +30°C |
 | Not for reuse / single use only |
| [OX68] | Use by |
 | Maximum storage time in months after opening |
 | Batch |
 | Sterilised by irradiation (lancets) |
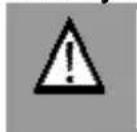
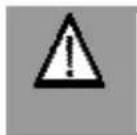
 | Attention! Read accompanying documentation |
 | Application part type BF |
 | Manufacturer |
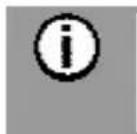
 | Observe the Instructions for Use. |
 | PCT: Certification symbol for products that are exported to the Russian Federation and CIS countries |
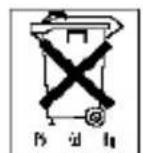
 | Green Dot: German dual waste disposal system |
 | Contents sufficient fortests |
 /Art.-Nr. /Art.-Nr. | Order number |
 | Biohazard, danger of infection |
 | When measuring blood pressure hold monitor at heart level. |
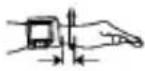 | When measuring blood pressure keep monitor and wrist about 1 cm apart. |
 | For wrist circumference of 5-9 in (13.5 to 22 cm) |
| [YSTH] | When measuring blood pressure do not stand or walk around. |
 | When measuring blood pressure do not talk. |
 | Blood glucose measurement unit |
The symbols in the Instructions for Use denote the following:
WARNING
Warning of risk of injury or health hazards
CAUTION
Safety information about possible damage to monitor and accessories
Note
Important information
2 WARNING AND SAFETY INFORMATION
Infection hazard
All components of the monitor and accessories may come into contact with human blood and may therefore be sources of infection.


WARNING
- This monitor must show the blood glucose level in mg/dL. The unit mg/dL is always shown with the blood glucose level. Contact Customer Service immediately if your monitor does not display mg/dL. You will endanger your health if you measure your blood glucose content in a different unit, interpret the results incorrectly and take incorrect action.
- This monitor must be used by one person only. Use of the same monitor by more than one person may cause infection.
- The lancing device is suitable for private use. Never use the lancing device and lancet with other persons (danger of infection).
- Use a new sterile lancet for every blood sample (single-use only).
Measuring blood pressure

WARNING
- If circulation on the lower arm is restricted as a result of chronic or acute vascular disease (including vasoconstriction), the precision of any wrist measurement is impaired. In this case, use a blood pressure monitor for the upper arm.
- The readings that you take may only be used for information purposes – they are not a substitute for a medical examination! Discuss your results with the doctor. Never use them to make medical decisions independently (e.g. regarding medication and dosage).
- Incorrect measurements may result where there is cardiocirculatory disease, very low blood pressure, circulatory disorders, cardiac arrhythmias and other preexisting diseases.
Measuring blood glucose

WARNING
- The readings that you take may only be used for information purposes – they are not a substitute for a medical examination! Discuss your readings with a doctor regularly. Never change your doctor's instructions without discussing your changes with the doctor.
- Accurate readings are only possible if the code number on the display is identical to the code number on the test strip container. Check code numbers before every reading.
- Dehydration or excessive fluid loss, such as by sweating, may result in incorrect readings.
- A very high or very low haematocrit value (proportion of red blood cells) may cause inaccurate readings. If the haematocrit value is very high (over 60%), the blood glucose reading may be too low; if the haematocrit value is very low (under 20%), it may be too high. If you do not know your haematocrit value, ask your doctor.
- Do not use test strips to monitor the blood glucose of newborns.
- Metabolites such as uric acid, ascorbic acid, acetominophen, dopa, methyl dopa, L dopa, and tolbutamide do not influence the results if they are in the physiological value range.
- Lipaemia effects: Elevated blood triglycerides up to 2000 mg/dL have virtually no influence on the results. However, triglycerides above this level may influence the blood glucose test results.
-
Use only fresh whole capillary blood. Do not use serum or plasma.
-
Take capillary blood without squeezing the puncture site. If the site is squeezed the blood will be diluted with tissue fluid and the test result will be inaccurate.
- Do not use the test strips at altitudes above 3275 m.

Note
The Beurer BGL40 mg/dL monitor is suitable for measuring whole capillary blood.
Storage and care

WARNING
- Keep monitor and accessories out of reach of small children. Small parts, such as lancets, batteries or test strips, may cause fatal injuries if swallowed. If a part has been swallowed, seek medical help immediately.
- The container with the test strips includes a desiccating agent that could cause skin and eye irritation if inhaled or swallowed. Keep the container away from small children.
Batteries/saving readings

WARNING
- Batteries can be fatal if swallowed. You should store the batteries out of reach of small children. If a battery has been swallowed, seek medical help immediately.
- Never throw batteries into the fire. Danger of explosion!

CAUTION
- Remove the batteries if they are flat or if the monitor is not going to be used for a longer period. This prevents any damage as a result of leakage.
- Batteries should not be recharged or reactivated in any other way. Batteries must not be dismantled or short-circuited.
- Do not use rechargeable batteries.

Note
- When the batteries are changed, the stored readings are retained. The date and time are retained when batteries are replaced and when the batteries are flat.
- When changing the batteries, always use two batteries of the same type, brand and capacity. You should preferably use alkaline batteries.
Repairs

Note
- Never open the monitor. If these instructions are not heeded, the warranty becomes null and void.
- Never attempt to repair the monitor yourself. We can no longer guarantee perfect functioning if you do.
- If the monitor requires repair, please send it to our Customer Service.
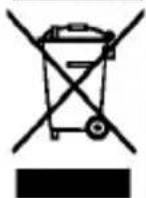
Disposal

WARNING
- When disposing of monitor components, strictly observe the generally applicable precautions for working with blood. Dispose of all blood samples and materials that you come into contact with correctly to prevent injury and infection of other persons.
- Dispose of test strips and lancets in a sharps container after use.

Note
- Used, completely discharged batteries must be disposed of in specially marked collection containers, at toxic waste collection points, or electrical product retailers. You are legally required to dispose of the batteries.
Batteries containing pollutants are marked with the following symbols:
Pb = battery contains lead, Cd = battery contains cadmium, Hg = battery contains mercury.
- The monitor should be disposed of according to Regulation 2002/96/EC-WEEE (Waste Electrical and Electronic Equipment). In case of queries, please contact the municipal authorities responsible for waste disposal in your area.
3 DESCRIPTION OF MONITOR AND ACCESSORIES
3.1 Lancing device and lancets
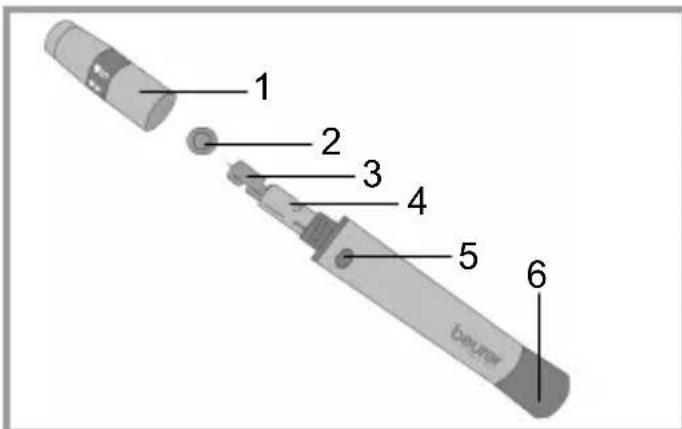
1: Cap
2: Safety shield of lancet
3: Sterile lancet
4: Lancet holder
5: Trigger button
6: Trigger setting mechanism
3.2 Blood pressure and blood glucose monitor

1: Wrist cuff
2: LCD display
3: ON/OFF button ⏻
(Do not press button until the cuff is in position.)
4: Save button 'M'
5: Slot for test strips
6: Code button 'C'
7: 'SET' button
8: Battery compartment
Display symbols for blood pressure and blood glucose readings:
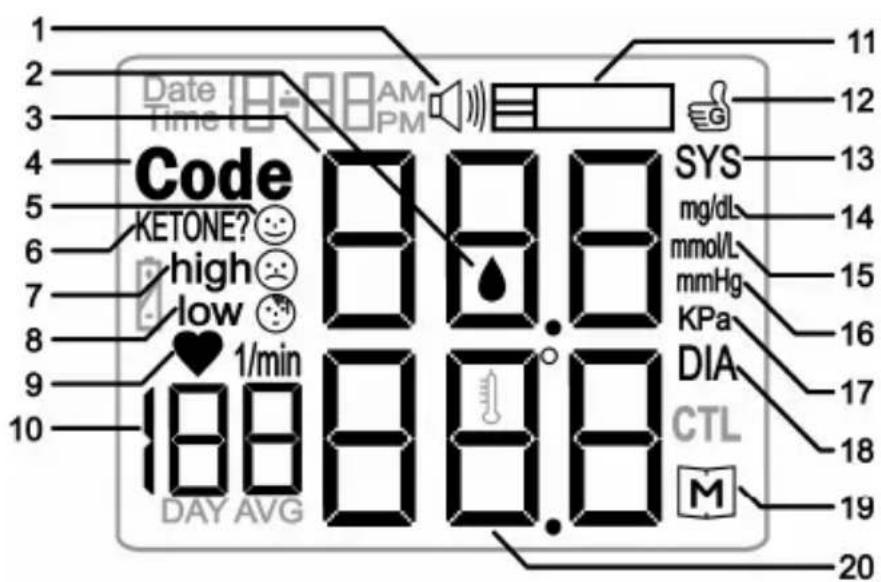
1: Speaker (non-functional)
2: Blood drop symbol ♠
3: SYS / blood glucose display
4: Code
5: Normal value 😊
6: Ketone test recommended
7: High value (high)
8: Low value (low)
9: Heart beat symbol ♥
10: Pulse display,
average blood glucose
11: Test strip symbol
12: Confirmation symbol
13: Systolic blood pressure (SYS)
14: Blood glucose unit mg/dL
15: Blood glucose unit mmol/L (non-functional)
16: Blood pressure unit mmHg
17: Blood pressure unit kPa
18: Diastolic blood pressure (DIA)
19: Memory symbol M
20: Display DIA
Other display symbols:
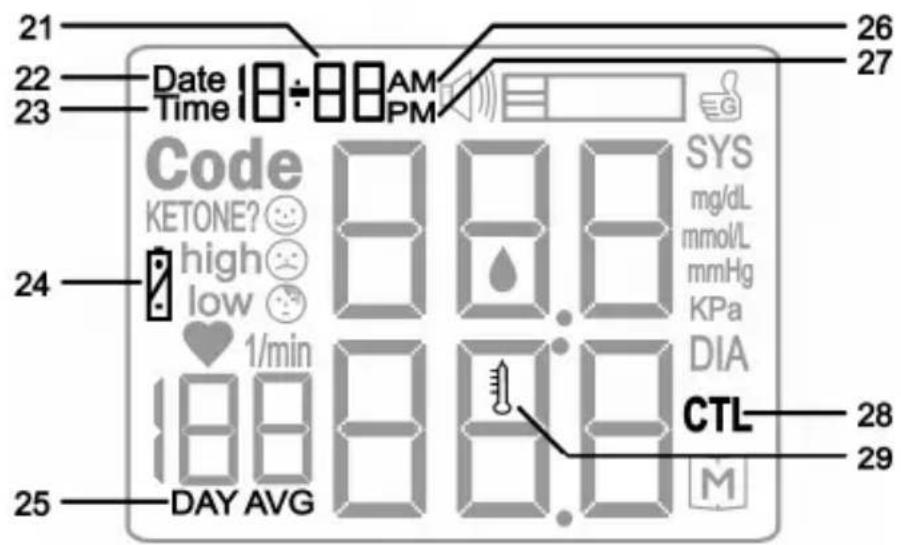
21: Date or time display
22: Date: month-day
23: Time: hour-minute
24: Replace battery symbol
25: DAY AVG for average reading 7,14,21,28,60,90 days
26: AM (morning)
27: PM (afternoon)
28: CTL for control solution
29: Temperature symbol

Note
The monitor is supplied with the following basic settings:
• Blood pressure unit: mmHg
• Blood glucose unit: mg/dL
• Temperature unit: °C
3.3 Test strips
| Front Back | |
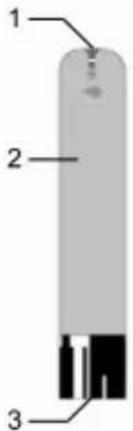 | 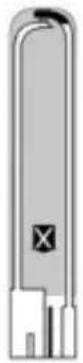 |
| 1: Slot for taking blood2: Handling area3: Contacts | The back is indicated by the X symbol. |
| Insert the test strip into the unit with the contacts first. Make sure that the front of the test strip is facing you. | 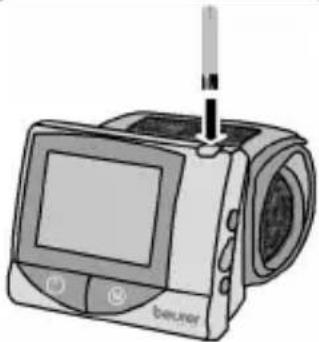 |
Read carefully the following information on the handling and storage of your test strips. All instructions must be followed to ensure that the test strips will give accurate test results.
WARNING
A test strip must be used only once and on only one patient.
Beurer BGL40 mg/dL
Handling test strips

Note
- Before using the strips for the first time check that the seal on the container is intact. If a container seal is damaged, do not use the test strips.
- Close container tightly immediately after removing a test strip.
- Do not use test strips after the use-by date. If expired test strips are used, test results may be inaccurate. The use-by date can be found on the container beside the hourglass icon ☐.
- The test strips can be stored for up to three months after opening the container. Write this use-by date (date of opening + 3 months 📄) on the label. The storage time is reduced if it extends beyond the use-by date (see date beside the hourglass icon 📋).
- Do not use the test strips if one of the use-by dates (1/6) has expired.
- The test strips can be touched anywhere with clean, dry hands.
- Use the test strip for measurement immediately on removal from the container.
- Do not bend, cut or alter test strips in any way.
- Do not use test strips for measurements if they have come into contact with liquids.
Storing test strips

Note
- Store test strips in a cool, dry place above +4°C and below +40°C. Keep test strips away from direct sunlight or heat. Do not store in a refrigerator.
- The relative humidity must be between 10% and 85%.
- Store test strips in their original container – never place them in a different container.
4 OPERATION AND BASIC SETTINGS
4.1 Inserting and replacing batteries

Note
Two batteries are included with your blood glucose and blood pressure monitor. The batteries are in the bag.
| 1 | Remove the battery cover from the base of the instrument |
| 2 | When you replace batteries, always replace both batteries. The monitor retains the date and time while the batteries are replaced. Reset the date and time if the battery replacement takes longer than usual (see "4.2 Making basic settings" page 18). |
| 3 | Insert two new AAA 1.5 V alkaline batteries. Make absolutely sure that you insert them with the correct polarity as marked. Do not use rechargeable batteries. |
| 4 | Replace the battery cover carefully |

If the 'change battery' symbol 📋 appears, the battery is almost flat. Replace all batteries as soon as possible.
The display shows E-b if the batteries are so flat that readings cannot be taken.
4.2 Making basic settings
| 1 | The monitor must be switched off.Press the 'SET' button.The year display starts blinking. | 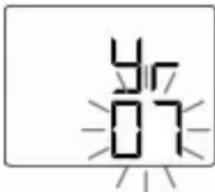 |
| 2 | Setting date and timeNoteIt is vital to set the date and time. Only in this way is it possible to save and subsequently retrieve your measured values with the right date and time.Time is shown in 12 hour format. Times before 12 midday are AM. Times after 12 midday are PM. Example: 'PM 1:00' for13:00 hours.Set the year (calendar up to 2049) by pressing the 'M' button.Press the 'SET' button.The month display starts blinking.Proceed in the same way for month, day, hour and minute. | 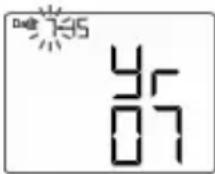 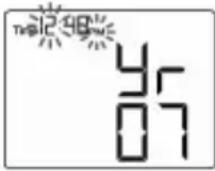 |
| 3 | Setting blood pressure unitPress the 'M' button to switch between mmHg and kPa. Press the 'SET' button. The temperature unit starts blinking. |  |
| 4 | Setting temperature unitPress the 'M' button to switch between °C and °F. Press the 'SET' button. |  |
5
The Memory symbol 📂 starts blinking and dEL is displayed. (Caution: all previously stored results will be deleted if you press 'M' now.) Press the 'SET' button. OFF is displayed briefly and the monitor automatically switches off.
dEL

5 MEASURING BLOOD PRESSURE

WARNING
Do not use the blood pressure monitor on persons under 16 years, because the results may be incorrect.

Note
- Always measure your blood pressure at the same time of day, in order to ensure that values are comparable. Rest for approx. 10 minutes before each measurement. You should wait five minutes before measuring a second time.
- Avoid coffee, tea, alcohol and cigarettes for at least 30 minutes before testing your blood pressure.
- Wait about 30 minutes before testing after exercise and swimming.
- Blood pressure will naturally vary slightly between your two hands. Always measure your blood pressure on the same wrist.
5.1 Positioning the cuff
| 1 | We recommend placing the cuff on your left wrist. Bare your left wrist. Make sure that the circulation in the arm is not restricted by any clothes etc. that are too tight. Position cuff so the short section is on top of the wrist and the display faces you. | 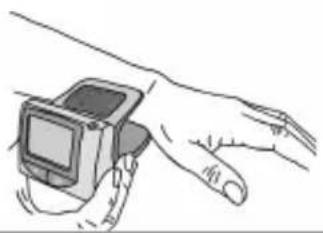 |
| 2 | Fasten the cuff with the Velcro fastening so that the edge of the monitor closest to the wrist is positioned approx. 1 cm below the ball of your thumb. | 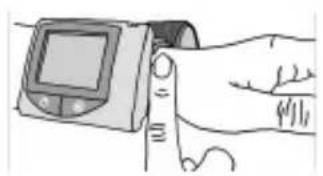 |
| 3 | The cuff has to be fitted tightly around the wrist but should not constrict it. | 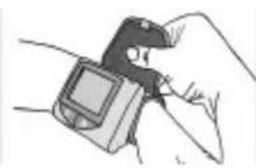 |
CAUTION
Always position the cuff before you start the test. Otherwise the monitor may be damaged.
5.2 Correct posture
| You can perform the measurement either sitting or lying down. It is essential to support your arm and hold it at an angle. Always make sure that the cuff is level with your heart. Keep your fingers relaxed, do not make a fist. | 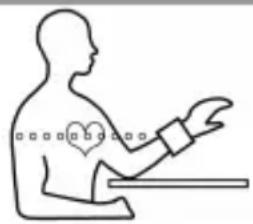 |
In order not to distort the result, it is important to keep still during the measurement and not talk.
5.3 The measurement
| 1 | Start the test by pressing the ON/OFF button ⏻ |
| 2 | The cuff inflates automatically. The monitor counts upward and the display continuously shows the current cuff pressure. |
| 3 | Once the cuff pressure is adequate, the air is automatically released slowly. The monitor continuously shows the current cuff pressure. The heart beat symbol ♥ blinks at the same time accompanied by a beeping sound. As soon as the heart beat symbol ♥ stops blinking read the blood pressure and pulse values.For explanations and actions required for the results see the next section “5.4 Evaluating blood pressure results” page 23. If an error message appears, read section “10 In the event of problems” page 41. |
| 4 | Press the ON/OFF button ⏻ If you forget to switch off the monitor, it switches off automatically after approx. three minutes. |

CAUTION
- If a higher air pressure is required for the measurement, the monitor stops releasing air and pumps up again.
- You can interrupt or stop the test at any time by pressing the ON/OFF button ⏻. The monitor releases the remaining pressure and switches off.
5.4 Evaluating blood pressure results
Your monitor can process test results between 50-270 mmHg systolic, 20-200 mmHg diastolic and 40-199 beats/min.
| Display Blood pressure | Measures | ||
 | low 😊Systolic:below 105 mmHgDiastolic:below 60 mmHg | Have it checked by your doctor | |
 | 😊 = normalSystolic:105-140 mmHgDiastolic:60-90 mmHg | Regular self-monitoring | |
 | high 😊Systolic:over 140 mmHgDiastolic:over 90 mmHg | Have it checked by your doctor | |
6 ENSURING BLOOD GLUCOSE MEASURABILITY
6.1 Checking code number (coding)
Test strips are classified into different code ranges because of variations in production conditions. This is why coding is required when you
- open a new container of test strips
- find that the code numbers of the monitor and the test strip container do not match when about to conduct a test.
Coding the monitor
| 1 | There are no test strips in the monitor and it is switched off. |
| 2 | Hold the monitor with the display facing you. |
| 3 | Press the Code button. The initial display is shown briefly and then SEL is displayed. The current code number flashes. |
| 4 | The new, valid code number is printed on the test strip container. Press the Code button repeatedly to set the new code number. The number is increased by one every time the button is pressed. Press and hold the button to make the process faster. After code 75 the monitor continues to count from code 51. |
| 5 | Save the new code number with the 'M' button. The monitor switches off automatically. |
6.2 Checking test strips with control solution
The control solution is used to test the complete blood glucose monitoring system. It is used to check that the monitor and test strips operate together correctly and whether the test is conducted correctly. It is very important to test with the control solution to be sure that the monitor returns accurate readings.

CAUTION
Never use control solution from other manufacturers. It will be impossible to check that your Beurer blood glucose monitor operates correctly with other control solutions.
When is a test with control solution recommended?
- You should have conducted three consecutive tests successfully with the control solution before testing your blood glucose level for the first time. This will ensure that you have mastered the testing procedure.
- Once a week to ensure that the monitor and test strips work together correctly.
• After opening a new test strip container. - If you think the monitoring system or the test strips may be faulty.
- If you feel that the blood glucose monitor readings do not reflect how you feel.
- If you have dropped the monitor or it has been subjected to any mechanical stress.
- At any time if you suspect that the glucose test results are incorrect.
One single test with control solution with a result within the results range is sufficient.

WARNING
Not for internal use. It is intended for function tests outside the body only.

Note
- Store the control solution tightly closed at room temperature below 30^ C. Do not store under refrigeration.
- Store the control solution out of reach of small children.
- Do not store the control solution in the medicine cabinet. It may be confused with medications for internal use.
Preparation
- Do not use control solution after the use-by date. If expired control solution is used, function test results may be inaccurate. The use-by date can be found on the vial beside the hourglass icon.
- The control solution can be stored for three months after opening the vial. Write this use-by date (date of opening + 3 months ≈) on the label. The storage time is reduced if it extends beyond the use-by date (see date beside the hourglass icon ≈).
- Do not continue to use the control solution if one of the use-by dates (☐/☐) has expired.
- Monitor, test strips, and control solution must be at room temperature (+20°C to +25°C).
Testing with control solution
| 1 | Hold the monitor with the display facing you. |
| 2 | Insert a test strip into the monitor with the contacts first. Make sure that the front of the test strip is facing you (see "3.3 Test strips" page 16). |
| 3 | The monitor switches on automatically and shows consecutively the initial display, the ambient temperature, and the code number. The monitor is ready for a test as soon as the flashing blood drop symbol ♦ is displayed. |
| 4 | Check the code number. If the numbers are different remove the test strip and code the monitor (see "6.1 Checking code number (coding)" page 24). |
| 5 | Press the 'M' button to switch to control mode. In control mode test results are not saved and your statistics are not skewed. |
| 6 | CTL is shown on the display. |
| 7 | Shake the control solution well before use. Unscrew the cap and squeeze out one drop. Wipe the first drop away and squeeze out another drop. |
| 8 | Do not apply the drop directly to the test strip, otherwise the control solution remaining in the vial tip may be contaminated by contact with the test strip. First place the drop on your fingertip or on a clean surface. Then hold the drop to the slot for taking blood on the test strip. The solution is sucked into the slot. Wipe the tip of the vial with a clean, dry paper towel. |
| 9 | When the slot is filled with solution, the monitor carries out the test. The monitor counts back for approximately six seconds. The result is shown in the display. |
| 10 | Check that the test result is within the specified range of the control solution. The result range is printed on the test strip container. |
Expected results
At room temperature the test results with the control solution should be within the range printed on the test strip container for approximately 95% of all tests.

WARNING
The results range printed on the test strip container is only applicable to the control solution. It is not a recommended value for your blood glucose level.
If the results are outside the specified range, check the following possible causes:
| Cause Measure | |
| The code number on the display is not the same as that of the test strip container. | Code the monitor (see "6.1 Checking code number (coding)" page 24). |
| You did not dispose of the first drop of control solutionThe vial tip was not wiped clean.The vial was not shaken sufficiently. | Correct the cause and repeat the test. |
| Control solution has expired or is contaminated. | Repeat the test with a new vial of control solution. |
| Control solution or monitor is too warm or too cold. | Bring control solution and monitor to room temperature (+20°C to +25°C) and repeat test. |
| Damaged test strips Repeat the test with a new test strip. | |
| Old test strips Open a new test strip container.Repeat the test. | |
| A problem with the monitor Contact our | Customer Service department. |

WARNING
If you receive repeated results outside the specified range with the control solution, do not continue using the system to measure your blood glucose level. Contact our Customer Service department.
7 MEASURING BLOOD GLUCOSE

WARNING
If you drop the lancing device with a lancet inserted, pick it up carefully and dispose of the lancet.

CAUTION
- Use the lancing device with lancets from the manufacturer only. Using different lancets may affect the function of the lancing device.
- If the lancing device is from a different manufacturer, read its Instructions for Use.
7.1 Taking a blood sample
Preparing to take the blood sample
1
Select part of body for blood sample. You can take blood samples with the lancing device from the fingerprints or other parts of the body such as palm of the hand, lower arm, upper arm, thigh or shin. We recommend taking blood samples from the fingerprints. Apply the lancing device slightly off-centre on the fingerprint, not the centre, for a less painful puncture.

WARNING
- If hypoglycaemia is suspected: always take blood from the fingerprint. Reason: changes in the blood glucose level can be measured quickly in blood samples taken from the fingerprints.
- Blood samples from the fingerprints and samples from other parts of the body (AST) may have significantly different results. Always consult your doctor before starting testing at other parts of the body.
| 2 | Have the following at hand: monitor, container with test strips, lancing device, sterile lancet. You will also need the AST cap if you are taking samples from other parts of the body. | |
| 3 | Wash your hands with soap and warm water before taking the sample. In addition to optimum hygiene this will also give you good circulation in the finger tips. Dry your hands carefully. Make sure that the puncture site is clean if you take the blood sample at a different part of the body (AST). | |
 | WARNINGIf you have cleaned the puncture site with alcohol, make sure that the site is completely dry before taking the reading. | |
Taking a blood sample

WARNING
- Take the sample at a different puncture site for every test, for example use a different finger or the other hand. Repeated puncture wounds at one puncture site may cause inflammation, loss of feeling or scarring.
- Do not use the AST cap for taking a blood sample from the finger.
- Never compress the finger to increase the size of the drop of blood. Under compression the blood will be diluted with tissue fluid and the test result may be inaccurate.
- Note that poor circulation at the puncture site, which may be the result of cold or disease, may lead to inaccurate results.
| 1 | Unscrew the cap from the lancing device. | 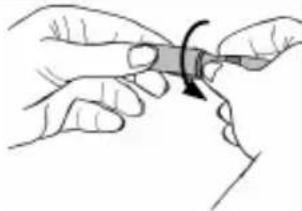 |
| 2 | Insert a sterile lancet into the lancing device and press the lancet into position. | 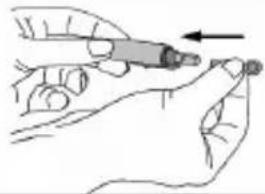 |
| 3 | Unscrew the safety shield from the lancet while holding the lancet shaft firmly. Keep the safety shield so the used lancet can be safely discarded after taking the blood sample. |  |
| 4 | Different caps are required depending where you take the blood sample.Fingerprints: cap (grey).Other parts of the body: AST cap (transparent).Place the selected cap on the lancing device and screw it on tightly. | 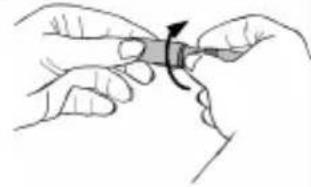 |
| 5 | Five different puncture depths can be set on the lancing device.1 to 2: soft or thin skin3: normal skin4 to 5: thick or calloused skinRotate the cap in the appropriate direction until the arrow indicates the desired puncture depth. | 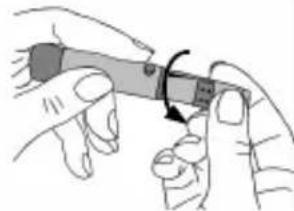 |
| 6 | Pull the trigger setting mechanism back until it clicks audibly. If it does not click, it is possible that the lancing device was already accidentally set when the lancet was inserted. | 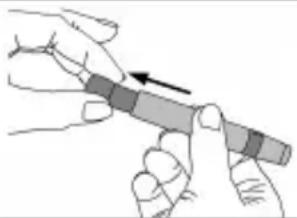 |
| 7 | The lancing device is now ready to take a blood sample. Make sure that the blood remains in drop form and is not smeared.Blood sample from the fingerprintPosition the lancing device firmly and slightly off-centre on the fingerprint. Press the trigger button. Remove the lancing device from the finger. A rounded drop of blood at least 0.5 microlitre in volume (approx. 1.2 mm, original size: ●) must be formed.Blood sample from other parts of the body (AST)Find a soft position away from a bone with no visible veins and little hair. Warm the puncture site for good circulation by massaging the area gently. Press and hold the lancing device against the puncture site for a few seconds and then press the trigger button. Continue to hold the lancing device against the skin until a rounded drop of blood has formed under the cap. Maintain the pressure until the drop has a volume of at least 0.5 microlitre in volume (approx. 1.2 mm, original size: ●). Carefully remove the lancing device from the skin. | 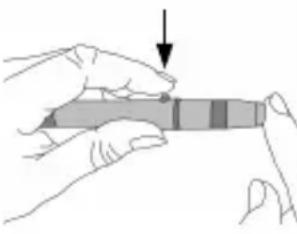 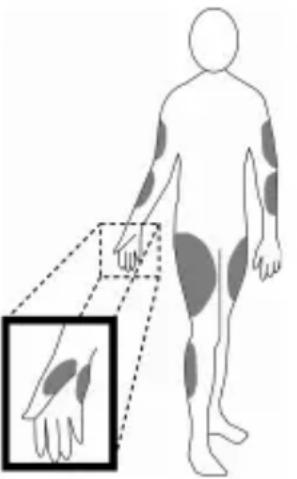 |
Beurer BGL40 mg/dL
| 8 | If there is insufficient blood, repeat steps 5 to 7 with the device set to a greater puncture depth. | |
| 9 | Unscrew the cap carefully from the lancing device and pull it off. | 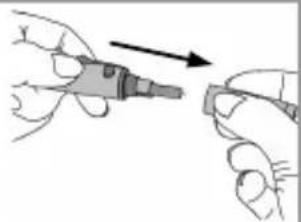 |
| 10 | Place the safety shield flat on a hard surface. Press the tip of the lancet into the safety shield so the lancet no longer projects. | 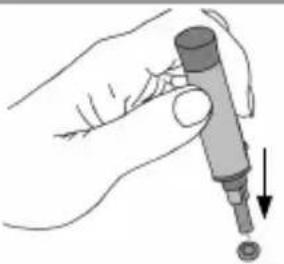 |
| 11 | Pull the lancet carefully out of the lancing device and dispose of the lancet in a sharps container. Carefully dispose of all blood samples and materials that have come into contact with them. This will prevent injury and infection of other people. | 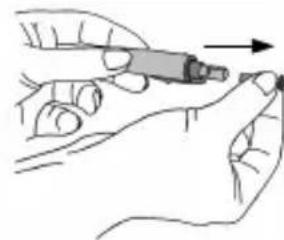 |
| 12 | Screw the cap (grey) on again. | 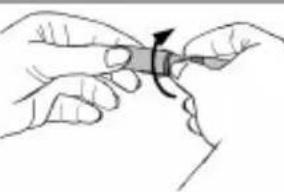 |
7.2 Measuring blood glucose
| 1 | Hold the monitor with the display facing you. | |
| 2 | Insert a test strip into the monitor with the contacts first. Make sure that the front of the test strip is facing you. The test strips can be touched anywhere with clean, dry hands. | |
| 3 | The monitor switches on automatically and shows consecutively the initial display, the ambient temperature, and the code number. The monitor is ready for a test as soon as the flashing blood drop symbol ♦ is displayed. | |
| 4 | Check the code number. If the numbers are different remove the test strip and code the monitor (see "6.1 Checking code number (coding)" page 24). | |
| 5 | Hold the drop of blood to the slot for taking blood on the test strip. Do not press the puncture site (fingerprint or other part of the body) to the test strip. The blood must not be smeared. The blood is sucked into the slot. | 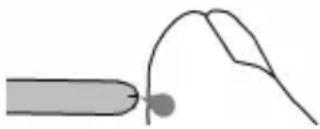 |
| 6 | When the slot is filled with blood, the monitor carries out the test. The monitor counts down for about six seconds. The result is shown in the display. Read the value. For explanations and actions required for the results see the next section "7.3 Evaluating blood glucose results" page 35. If an error message appears, read section "10 In the event of problems" page 41. | |
| 7 | Remove the test strip from the monitor and dispose of it as directed to prevent infection of other persons. | |

Note
- Do not apply more blood if the monitor does not start the measurement. Remove the test strip and stop the test. Use a new test strip.
- If the test strip is already in the monitor and you do not apply blood to the strip within three minutes, the monitor will switch itself off. Remove the test strip briefly and reinsert it so the monitor switches on automatically.
- If you are unable to fill the test strip correctly with blood, please contact our Customer Service.
7.3 Evaluating blood glucose results
Your monitor can measure glucose values from 20 to 600 mg/dL. The "Lo" warning message is shown if the glucose value is less than 20 mg/dL. The "Hi" warning message is shown if the glucose value is greater than 600 mg/dL.

Note
If you suspect that the results are incorrect, first repeat the test and if necessary carry out a function test with control solution. If the questionable results continue, ask your doctor.
| Display Blood glucose Measures | ||
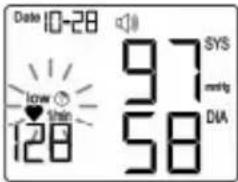
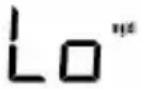 | Lo = severe hypoglycaemia(low blood glucose)Below 20 mg/dL | Seek medical treatment immediately. |
 low [IMAGE] low [IMAGE] | low [IMAGE]Between 20 and 69 mg/dL | Have a suitable snack. Follow your doctor's instructions. |
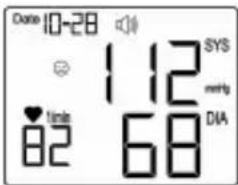
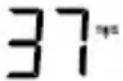
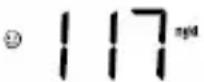 | 😊 = normalBetween 70 and 120 mg/dL | Regular self-monitoring |
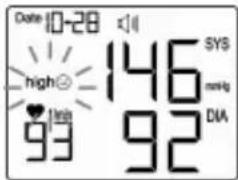
high 😊 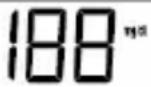 | high 😊121 mg/dL and above | If this value still remains high two hours after your last meal, it may indicate hyperglycaemia (high blood sugar). Talk to your doctor about any required action. |
 | KETONE? high 😊, possible ketones240 mg/dL and above | Test ketones.Ask your doctor. |
 | Hi = severe hyperglycaemia (very high blood sugar).Over 600 mg/dL | Repeat test with a new test strip. If it is the same as before, seek medical treatment immediately. |
8 MEMORY
Your blood pressure and blood glucose results are automatically stored at every test. Exception: CTL was activated during a blood glucose test with control solution.
The memory has a maximum capacity of 480 results. After that number is reached, the oldest values are progressively replaced by the latest result. You can display every single blood pressure and blood glucose test result. You can also calculate and display the average values of your blood glucose readings for 7, 14, 21, 28, 60 and 90 days.

Note
- If values are already stored and you reset the date, the averages will be calculated by the new date.
- "---" shows that the memory is empty. OFF is displayed briefly and the monitor automatically switches off.
8.1 Displaying single values
The single values of the last 480 tests are displayed. The monitor displays blood pressure and blood glucose values in a mixed sequence. The time of the test decides the sequence. The most recent result is displayed first and the oldest last. The monitor shows the date and time of the test alternately with the test result.
| 1 | The monitor must be switched off. Press 'M'. | ||
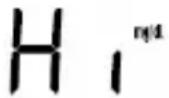
| 2 | The initial display is shown briefly.01 is displayed briefly (Figure 1) and then the result of the last blood pressure or blood glucose test (Figure 2).The date and time are displayed alternately. (Figure 3)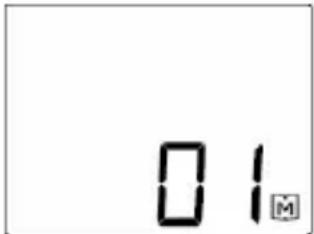 Fig. 1 Fig. 2 Fig. 3 Fig. 1 Fig. 2 Fig. 3 | 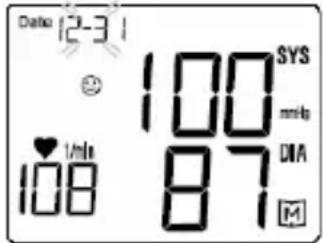 | 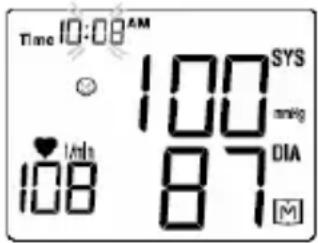 |
| 3 | Every time the 'M' button is pressed the previous result is displayed. A maximum of 480 earlier results can be viewed. After the last available result the most recent result is shown again. | ||
| 4 | You can cancel the procedure at any time. Press the ON/OFF button or wait until the monitor switches off automatically after three minutes. | ||
8.2 Displaying average blood glucose values
You can display the average values of your blood glucose readings for the last 7, 14, 21, 28, 60 and 90 days. At the same time the monitor shows how frequently you have conducted tests over this period.
Beurer BGL40 mg/dL
| 1 | The monitor must be switched off. Press and hold 'M' for three seconds. |
| 2 | The initial display is shown briefly. The average value for seven days is displayed. Press 'M' again several times to display the averages for 14, 21, 28, 60 and 90 days. |
| 3 | If you press 'M' again after the average for 90 days, the monitor will show the average for seven days again. |
| 4 | You can cancel the procedure at any time. Press the ON/OFF button or wait until the monitor switches off automatically after three minutes. |
| 1: Result symbol 😊2: Number of days, e.g. 73: Average value4: Number of blood glucose tests during the period, e.g. 28 tests5: Memory symbol 📂 | 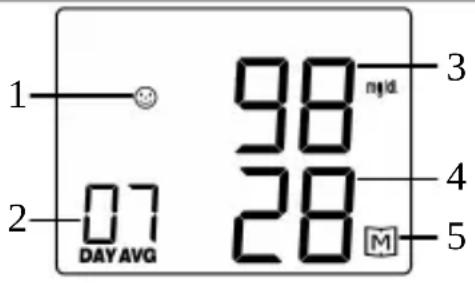 |
8.3 Deleting stored values
| 1 | The monitor must be switched off. |
| 2 | Press the 'SET' button eight times slowly. |
| 3 | Press ‘M’. dEL and the memory symbol blink on the display. |
| 4 | Press 'M' again. |
| 5 | CLr ALL is displayed briefly, then OFF and the monitor automatically switches off. |
9 STORAGE AND MAINTENANCE OF THE MONITOR
Storage
Keep the monitor in the bag between readings.

Note
- Keep these Instructions for Use.
- If the monitor is not used for a long period, we recommend removing the batteries.
Care
The surface of the monitor can be cleaned with a moist cloth (use water or a mild detergent). Dry the monitor with a lint-free cloth.

Note
The monitor is made of precision components. Accuracy of readings and the monitor's service life depend on careful handling.
- Never let the monitor drop and protect it against any impact.
- You should protect the monitor from moisture, dirt, dust, blood, control solution or water, major temperature fluctuations and direct sunlight.
- Do not use the monitor in the vicinity of strong electromagnetic fields and keep it away from two-way radios and mobile telephones.
10 IN THE EVENT OF PROBLEMS
Messages on the display concerning batteries and blood glucose testing
| No. Cause Remedy | ||
| E-b Low batteries Replace all batteries. | ||
| E-t | Temperature of environment, monitor or test strip outside approved range | Repeat test with new test strip once environment, monitor and test strip are at room temperature (+20 to +25°C). |
| E-U Used or contaminated test strip was inserted | Insert an unused and unexpired test stripRepeat blood glucose test | |
Messages on the display concerning blood pressure testing
| No. Cause Remedy | ||
| Err 01 | Cuff leaks or pressure too low | Position the cuff correctly (see "5.1 Positioning the cuff", page 21) and repeat the test |
| Err 02 | Systolic pressure cannot be measured | Repeat test and do not move or talk during the test. |
| Err 03 | Cuff pressure is too high (greater than 300 mmHg) | Do not crimp the cuff. |
| Err 04 | Diastolic pressure cannot be measured | Repeat test and do not move or talk during the test. |
| Err 07 | Systolic pressure out of range | Repeat test and do not move or talk during the test. |
Beurer BGL40 mg/dL
| No. Cause Remedy | ||
| Err 08 | Cuff pressure out of range Repeat test and do not move or talk during the test. | |
| Err 09 | Cuff pressure is insufficient even at maximum pump pressure | The blood pressure exceeds the measurement range. Repeat measurement. if the problem persists, seek medical advice. |
| Err 17 | No pulse detectable Repeat measurement. if the problem persists, seek medical advice. | |
| Err 32 | Error! Too much movement during measurement | Do not move or speak during measurement. |
Problem: The monitor does not switch on.
| Cause Remedy | |
| Low batteries Replace batteries. | |
| Battery missing or not installed correctly | Check that the batteries are correctly installed (see "4.1 Inserting and replacing batteries" page 18). |
| Test strip is incompletely inserted or wrong way around | Insert a test strip into the monitor with the contacts first. Make sure that the front of the test strip is facing you (see "3.3 Test strips" page 16). |
| Faulty monitor Contact Customer Service. | |
Problem: The test does not start after inserting the test strip into the monitor and applying the blood.
| Cause Remedy | |
| Blood volume too low Repeat test with new test strip and greater volume of blood. | |
| Faulty test strip Repeat test with a new test strip. | |
| Blood was applied with the monitor switched off | Repeat test, apply blood when ◆ flashes. |
| Faulty coding Repeat coding (see "6.1 Checking code number (coding)" page 24). | |
| Basic settings of monitor have been changed and the change was not completed (see "4.2 Making basic settings" page 18). | Press 'SET' button until OFF is displayed.Repeat test. |
| Faulty monitor Contact Customer Service. | |
Problem: The blood pressure value is unusually high or low
| Cause Remedy | |
| You moved or talked during the measurement. | You should wait five minutes before measuring a second time.Repeat the test.Repeat test and do not move or talk during the test. Make sure your body position is correct during the test. |
| You are not yet relaxed enough. | Rest for approx. 10 minutes.Repeat the test. |
11 BGL40 mg/dL TECHNICAL SPECIFICATIONS:
| Dimensions | 74 x 100 x 61 mm |
| Weight | 150 g (with batteries) |
| Power supply | 2 x 1.5V AAA alkaline batteries |
| Battery life | More than 350 blood pressure tests |
| Storage capacity | 480 stored results with date/timeData retained when batteries are replaced |
| Averages | Blood glucose for 7, 14, 21, 28, 60, 90 days |
| Automatic shutoff | Three minutes after last activity |
| Storage and transport temperature | Temperature: +4°C - +30°CRelative humidity: 10 - 85% |
| Operating ranges | Temperature: +10°C - +40°CRelative humidity: 10 - 85% (non-condensing) |
| Optional units | Temperature: °C or °FBlood pressure: mmHg or kPa (1 mmHg equals 0.133 kPa) |
| Blood pressure measurement range | Systolic: 50-270 mmHgDiastolic: 20-200 mmHgPulse: 40-199 beats/min |
| Glucose measurement range | Glucose: 20 - 600 mg/dL |
| Accuracy | Blood pressure measurement: ± 3 mmHg or ± 2% of the display; heart rate: ± 4% of the display |
| Blood sample | Capillary whole blood |
| Blood volume | 0.5 microlitre |
| Time for blood glucose measurement | approx. 6 seconds |
| Calibration | Whole blood |
| Test method | Amperometric biosensor |
| Application | Suitable for private use |
| Monitor function test | Every time it is switched on |
Beurer BGL40 mg/dL
EMC
This unit conforms to European Standards EN 61326 and EN 60601-1-2 and is subject to particular precautions with regard to electromagnetic compatibility (EMC). Please note that portable and mobile HF communication systems may interfere with this instrument. For more details, please contact Customer Service at the address indicated.
Function of the test strips
The test strips provide a quantitative measurement of the glucose content of the capillary whole blood. When the slot for blood taking comes into contact with a drop of blood, it is automatically filled by simple capillary action. The blood is drawn into the absorption slot in the test strip and the monitor measures the glucose content of the blood.
The test is based on the measurement of an electric current that is generated by the chemical reaction of the glucose with the reagent on the strip. The monitor analyses the current. The current depends on the glucose content of the blood sample. The results are shown on the display of the blood glucose monitor. Only a very small volume of blood is required (0.5 microlitre) and the actual measurement takes about six seconds. The test strips can measure glucose values from 20 to 600 mg/dL.
Chemical constituents of the test strip sensor
- Glucose oxidase 10%
• Electron shuttle 50% - Enzyme protection 8%
• Non-reactive constituents 32%
Function of the control solution
The control solution contains a specific proportion of glucose, which reacts with the test strip. A test with control solution is similar to a blood test. The difference is that a drop of control solution is used instead of a drop of blood. The test result with the control solution must be within the result range. The result range is printed on every test strip container.
Beurer BGL40 mg/dL
Chemical composition of the control solution
The control solution is a red solution with a D-glucose content of less than 0.2%.
Ingredients
Percentage
D-glucose 0.05 - 0.19%
Salts
1.4%
Substance for regulating viscosity 15.0%
Controls
The Beurer BGL40 mg/dL monitor system for private use conforms to the EU Medical Devices Directive, the German medical devices act (MPG) and European standards EN1060-1 (non-invasive blood pressure monitors, Part 1: general requirements) and EN1060-3 (non-invasive blood pressure monitors, Part 3: supplementary requirements for electro-mechanical blood pressure measuring systems), EN 60601-1, IVD (98/79/EC), EN 61010-1, EN 61010-2-101, EN 13640, EN ISO 14971, EN ISO 15197, MDD (93/42/EC). In accordance with the German Ordinance on the Installation, Operation and Use of Medical Devices, regular measurement accuracy controls must be carried out if the machine is used for commercial or business purposes. We also recommend testing the measurement accuracy of devices in private use at two-yearly intervals by the manufacturer.
Comparing test results with laboratory results
Performance characteristics: accuracy and precision
Whole blood glucose test results have been compared with the YSI 2300 laboratory analyzer. At a concentration <75 mg/dL ≥95% were +/-15 mg/dL, while at a glucose concentration ≥75 mg/dL >98% were within 20% of the reference values. The CV (coefficient of variation) (%) is <5%. The blood glucose monitor is therefore comparable with a laboratory system.
12 CUSTOMER SERVICE
Please contact our Customer Service department if you have any questions:
Customer Service address
OUR OBLIGATIONS TO YOU: Our mission is to supply you with high-quality health products and the best customer service. If you are not completely satisfied with this product, please contact our Customer Service department.
Beurer BGL40 mg/dL

natural_image
Grid of grayscale gradient squares with no text, numbers, or symbolsBGL40_mg-dL_1207_GB Subject to error and change
- Contents of BGL40 mg/dL Blood Pressure and Blood Glucose Monitor
- Getting to know your instrument....2
- Warning and safety information 8
- Description of monitor and accessories....13
- Operation and Basic Settings....18
- Measuring blood pressure 20
- Ensuring blood glucose measurability 24
- Measuring blood glucose....29
- Memory 37
- Storage and maintenance of the monitor 40
- In the event of problems....41
- BGL40 mg/dL technical Specifications: 44
- Customer Service....47
- GETTING TO KNOW YOUR INSTRUMENT
- Contents and purchasing supplies
- Note
- Purchasing supplies
- Monitor functions
- Health information
- Blood pressure
- Blood glucose
- Explanation of symbols
- WARNING
- CAUTION
- WARNING AND SAFETY INFORMATION
- Infection hazard
- Measuring blood pressure
- Measuring blood glucose
- Storage and care
- Batteries/saving readings
- Repairs
- Disposal
- DESCRIPTION OF MONITOR AND ACCESSORIES
- Lancing device and lancets
- Blood pressure and blood glucose monitor
- Test strips
- Handling test strips
- Storing test strips
- OPERATION AND BASIC SETTINGS
- Inserting and replacing batteries
- Making basic settings
- 5
- MEASURING BLOOD PRESSURE
- Positioning the cuff
- Correct posture
- The measurement
- Evaluating blood pressure results
- ENSURING BLOOD GLUCOSE MEASURABILITY
- Checking code number (coding)
- Checking test strips with control solution
- When is a test with control solution recommended?
- Preparation
- Testing with control solution
- Expected results
- MEASURING BLOOD GLUCOSE
- Taking a blood sample
- Preparing to take the blood sample
- Taking a blood sample
- Measuring blood glucose
- Evaluating blood glucose results
- MEMORY
- Displaying single values
- Displaying average blood glucose values
- Deleting stored values
- STORAGE AND MAINTENANCE OF THE MONITOR
- Storage
- Care
- IN THE EVENT OF PROBLEMS
- EMC
- Function of the test strips
- Chemical constituents of the test strip sensor
- Function of the control solution
- Chemical composition of the control solution
- Controls
- Comparing test results with laboratory results
- CUSTOMER SERVICE
- Customer Service address
Brand : BEURER
Model : BGL40
Category : Glucometer