
3310002 - Hidden camera BRESSER - Free user manual and instructions
Find the device manual for free 3310002 BRESSER in PDF.


| Product Type | Digital Scouting Camera (Hidden Camera) |
| Brand / Model | Bresser / 3310002 |
| Dimensions | 140 x 104 x 76 mm |
| Weight | 0.320 kg |
| Power Supply | 8 x AA batteries (1.5V) or external 12V DC power supply |
| Image Sensor | 2 MP Color CMOS |
| Image Resolution | 8MP (3840x2160), 5MP (3072x1928), 2MP (1920x1080) |
| Video Resolution | 1280x720 (30fps) and 720x480 (30fps) |
| Infrared Illumination | Range 12-15 meters (best at 12m) |
| Motion Sensor | Multi-zone PIR, range >12m, angle 72° |
| Trigger Time | Photo: 0.5s, Video: 1.5s |
| Storage Media | SD card (up to 32 GB, not included) |
| Display | Text display, 2 lines x 16 characters |
| Mounting | Adjustable belt or tripod socket (1/4" 20 thread) |
| Weather Resistance | IP65 |
| Standby Current | < 0.25 mA |
| Operating Temperature | -20°C to +60°C |
| Humidity Range | 5% - 90% |
| Certifications | CE, RoHS |
| Warranty | 2 years (extendable via registration) |
| Maintenance | Clean lens with soft, lint-free cloth; use only recommended batteries; format SD card in camera if issues occur |
| Safety Instructions | Keep batteries away from children; do not disassemble; avoid high temperatures; dispose of electronics properly |
| Spare Parts / Repairability | Contact dealer for defects; no user-serviceable parts; professional repair only |
Frequently Asked Questions - 3310002 BRESSER
User questions about 3310002 BRESSER
0 question about this device. Answer the ones you know or ask your own.
Ask a new question about this device
Download the instructions for your Hidden camera in PDF format for free! Find your manual 3310002 - BRESSER and take your electronic device back in hand. On this page are published all the documents necessary for the use of your device. 3310002 by BRESSER.
USER MANUAL 3310002 BRESSER
natural_image
Close-up of a camouflage-based video camera with hexagonal lens and camera module (no visible text or symbols)GB Visit our website via the following QR Code or web link to find further information on this product or the available translations of these instructions.
natural_image
Three types of digital surveillance cameras shown: a camouflage camera, a rolled-up cable, and a USB cable (no text or symbols visible)natural_image
Two open battery packs with labeled components, showing internal compartments and battery bodies (no text or symbols visible)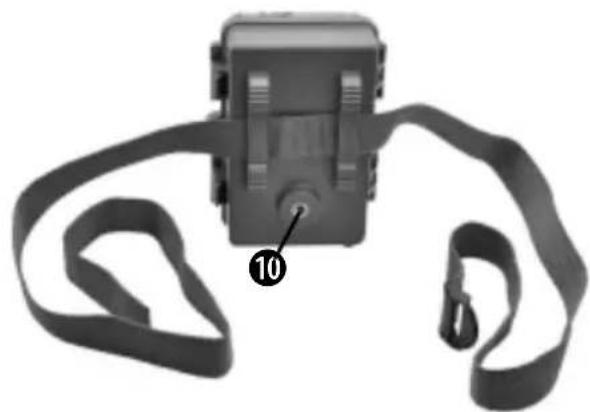
natural_image
Close-up of a black handheld device with attached strap and connector (no visible text or symbols)1.5 Bedienelemente
About this Instruction Manual
Please read the safety instructions in this manual carefully. To avoid damage to the unit and the risk of injury, only use this product as described in the manual. Keep the instruction manual handy so that you can easily look up information on all the functions.

DANGER!
You will find this symbol before every section of text that deals with the risk of minor to severe injuries resulting from improper use.

ATTENTION!
You will find this symbol in front of every section of text which deals with the risk of damage to property or the environment.
General Warnings
! DANGER!
This device contains electronic components which operate via a power source (power supply and/or batteries). Only use the device as described in the manual, or you run the risk of an electric shock.
Keep batteries out of the reach of children! Make sure you insert the batteries correctly. Empty or damaged batteries could cause burns if they come into contact with the skin. If necessary, wear adequate gloves for protection.
! ATTENTION!
Do not disassemble the device. In the event of a defect, please contact your dealer. The dealer will contact the Service Centre and can send the device in to be repaired, if necessary.
Use only the recommended batteries. Always replace weak or empty batteries with a new, complete set of batteries at full capacity. Do not use batteries from
different brands or with different capacities. The batteries should be removed from the unit if it has not been used for a long time.
Do not expose the device to high temperatures. Do not short-circuit the device or batteries or throw them into a fi re! Excessive heat or improper handling could trigger a short-circuit, a fi re or an explosion.
EC Declaration of Conformity

Bresser GmbH has issued a "Declaration of Conformity" in accordance with applicable guidelines and corresponding standards. This can be viewed any time upon request.
DISPOSAL

Dispose of the packaging materials properly, according to their type, such as paper or cardboard. Contact your local waste-disposal service or environmental authority for information on the proper disposal.

Do not dispose of electronic devices in the household garbage! As per Directive 2002/96/EC of the European Parliament on waste electrical and electronic equipment and its adaptation into German law, used electronic devices must be collected separately and recycled in an environmentally friendly manner.
In accordance with the regulations concerning batteries and rechargeable batteries, disposing of them in the normal household waste is explicitly forbidden. Please make sure to dispose of your used batteries as required by law — at a local collection point or in the retail market. Disposal in domestic waste violates the Battery Directive.
Batteries that contain toxins are marked with a sign and a chemical symbol. "Cd" = cadmium, "Hg" = mercury, "Pb" = lead.

Cd ^1

Hg²

Pb ^3
^1 battery contains cadmium
^2 battery contains mercury
^3 battery contains lead
1. Instructions
1.1 General Description
This camera, a digital scouting camera, is a surveillance camera working automatically. It can be triggered at once by any movement of human (or animals) in a certain region of interested (ROI) monitored by a high sensitive Passive Infrared (PIR) motion sensor, and then automatically captures high quality pictures (up to 8 MP interpolated) or records HD 720P (1280*720) video clips according to default settings or preset customer settings.
It takes color pictures or videos in suffi cient daylight. While at dark night, the built-in infrared LEDs function as fl ash light, the camera then takes clear pictures or videos (mo-nochrome).
The camera consumes very little power (less than 250uA) in standby mode. If the machine is operated with lithium AA batteries, an operating time of up to 12 month can be achieved in the standby mode.
It is resistant against water and snow for outside uses. Furthermore, the camera can be used as a portable digital camera. Pictures or videos can be taken manually by pressing OK. (an SD-card* must be inserted.)
1.1 Scope of delivery
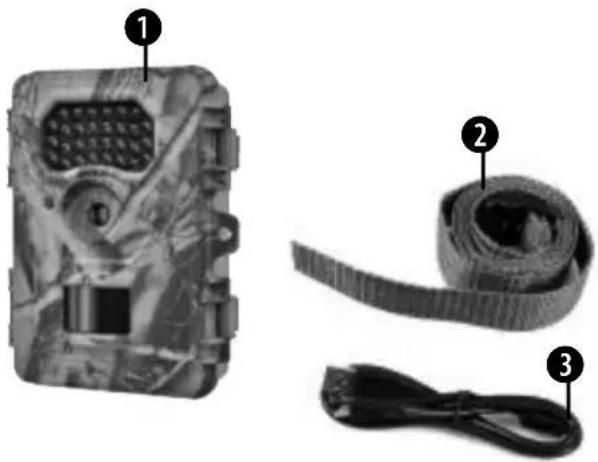
① Digital camera, ② Belt, ③ USB cable, Instruction manual
natural_image
Three labeled images of a camouflage video camera module: a hexagonal grid, a rolled-up cable, and a USB cable (no text or symbols visible)*not included with your purchase
1.3 Camera I/O Interfaces
The camera has the following I/O interfaces: Mini USB connector, SD-card slot and external DC power connector. On the head of camera, there is a lock hole for theft-protection.
1.4 External components
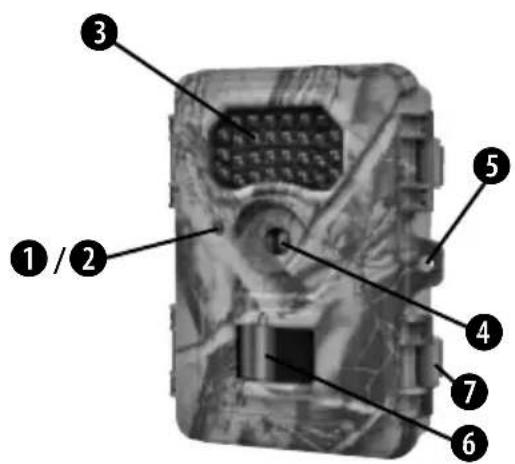
1. Light sensor for the infrared lighting function
This sensor determines the exposure values for the shot. Hence, in order to guarantee the optimum images, this sensor should not be covered.
2. Red LED power indicator
This LED blinks for approximately 10 seconds when the camera is in switched on. When the blinking stops, the wildlife camera has completed its standby time and will now take photographs or videos according to the camera settings.
3. Infrared Lighting
The infrared diodes, arranged in arrays, allow images and videos to be taken at night (black and white images). Hence, if night-time operation is envisaged, the wildlife camera should be positioned such that these are not obscured by branches or similar when setting up the camera. When setting up the camera, it should be ensured that no objects are positioned too close to the camera, as the reflection created at short distances by the infrared lighting can cause overexposure.
As a rule, the game will not notice the infrared lighting. The spots illuminated around the camera are also invisible to the naked human eye.
4. Objective lens
The wildlife camera's images / video are recorded through the lens. Ensure that this area of the camera is always kept clean.
Clean the lenses only with a soft, lint-free cloth, (e.g. microfi bre cloth). To avoid scratching the lenses, use only gentle pressure with the cleaning cloth.
To remove more stubborn dirt, moisten the cleaning cloth with an eyeglass-cleaning solution and wipe the lenses gently.
5. Padlock\* eyelet\*
A padlock* can be inserted through this eyelet for additional security.
6. Motion Sensor
The motion sensor is attached to the front of the camera, such that any movements in front of the camera within an angle of 60^ can be recorded. When setting up the wildlife camera, it should be positioned such that this angle is not obscured by branches or similar, in order to guarantee the operation of the camera. The motion sensor has a range of approximately 12 metres.
7. Casing latch
The casing of the wildlife camera can be opened at the casing latch with its metal staple, in order to gain access to the operator controls and the battery compartment inside.

BRESSER
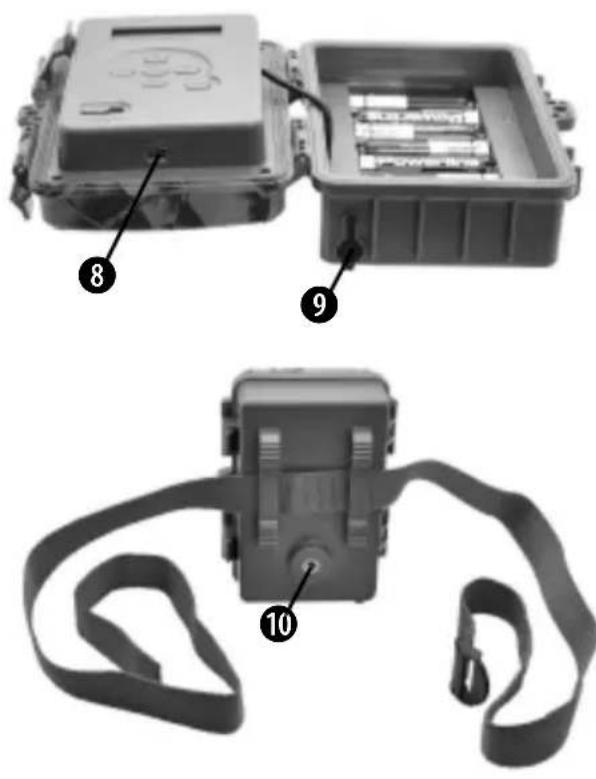
- USB connector
- Connection socket for external 12V DC power supply (power supply unit and mains adapter not supplied)
- Tripod connection socket; Standard 6.35 mm (0.25") tripod thread
- SD-Card slot
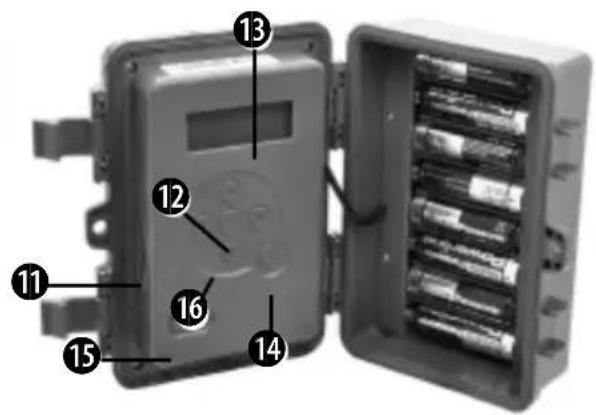
1.5 Operator controls
The following operator controls are located inside the wildlife camera:
12 „OK“-Key
13 Display
14 „MENU“-Key
15 Main key
16 Arrow keys ▲ ▼ ▶ ▶
The main key is used to select the 3 operating modes: OFF, Setup and ON (see Figure 2).
A keypad with six control buttons are used in the SETUP mode to select functions and parameters.
As shown in Figure 2, these are the keys: Up, Down, Left, Right, OK and Menu.
The Menu button is used to enter the setup mode or to exit the setup mode.
With the OK button you can manually take test photos or videos in the setup mode. (The recording time of the video is 30 seconds and can not be changed)
1.6 Supported formats
Here are some important notices. You don't need to worry about the fi le system format of the camera unless you have problems with reading the SD-card with your other equipment. If this happenes, please format the SD-card in the camera or in a computer fi rst and then reinsert the card into your camera to make a try.
| Item | Format |
| Image JPG | |
| Video AVI | |
| File format FAT32 |
2. Caution!
- The working voltage of the camera is 12V. The camera is supplied by 8 AA batteries*.
- Please install batteries according to shown polarity.
- For camera operation an SD-card* (up to 32 GB) is needed.
- Please unlock the write-protect before inserting the SD-card.
- Please insert the SD-card when the power switch is at OFF position before testing the camera. The camera has no internal memory for saving images or videos.
- Please do not insert or take out the SD-card when the power switch is at ON position.
- It is recommended to use the camera to format the SD-card when used for the first time.
- The camera will be in USB mode when connected to a USB port of a computer. In this case, the SD-card functions as a removable disk.
- In the TEST mode, the camera will shut down automatically after 3 minutes if no operation is done. Please turn on the power again if you want to continue to work with the camera.
- Please ensure sufficient power when having firmware upgrade, otherwise the upgrade process could be
*not included with your purchase
interrupted incorrectly. If any fault occurs after improper upgrading process, the camera may stop function properly.
3. Main operations
3.1 Power supply
To supply power for the camera, 8 AA size batteries* are needed. Optionally, the device may be powered through an external power supply (optional accessory).
This manual only describes the power supply by using batteries.
ATTENTION: The manufacturer does not take any liability for any damages caused by wrong insertion of batteries or by the use of a non-compatible power supply!
Open the camera.
ATTENTION: Make sure that the power switch is at the OFF position.
Install batteries into the depot according to the polarities shown below.
(Note: we do not recommend NiMH batteries, because the available capacity at low temperature is marginal) Fur-
*not included with your purchase
thermore, it is also possible to use an external mains adapter with 12V output.
We recommend High-density and high-performance alkaline batteries with 1.5V output.
When in low-battery state, the camera will automatically shut down. Please change the batteries in time. Remove used batteries from the device immediately!
NOTE:
A: If voltage drops below 10.5 V, the camera shoots images and video only during the day.
During night time, the camera does not work.
B: When voltage drops below 8.5 V, you can turn the camera on, but you can not take pictures and videos.
C: If voltage drops below 7.5V, the camera will not work.
3.2 Insert the SD-card\*
Insert an SD card into the camera before you start operating the camera. (Camera's power switch is in the OFF position). Open the camera. Insert SD-card into the card slot with the unmarked side facing upwards. Please note that the SD-card can only be plugged in in one direction. Make sure that the write-protect switch of the SD-card is in the "write" position; otherwise the camera can not take images or videos.
3.3 Power on the Camera
Before switching on, please pay attention to the following:
- Avoid temperature and motion disturbances in front of the camera such as big leaf, curtain, air-conditioner, air outlet of a chimney or other heat sources to prevent false triggering.
- The height from ground for placing the camera should vary with the object size appropriately. In general, one to two meters are preferred.
- Slide the power switch to the ON position to power on the camera.
After switching on the camera, the indicator LED (red) will blink for about 10s. The 10s is a buffering time before autonomic capturing of photos or videos, e.g. for closing and locking the bottom cover, fixing the camera on a tree and walk away.
3.4 Enter into the TEST Mode
In order to use custom settings, the camera of the TEST mode must be activated. Slide to the main switch on the position "OFF" in the "SETUP" position.
Various functions such as user-specific settings or manual recording can then be controlled via the six button keypad.
The camera does not turn on when there is no SD card is inserted.
3.4.1 Manual capturing
In TEST mode it is easily possible to capture pictures or videos manually by pressing the "OK" button.
3.4.2 View images or videos
In ON mode connect the camera with a computer using the supplied USB cable. The device will be shown as a fl ash drive and you can easily start viewing images on the computer's screen.
3.5 Power off
Switch the ON/OFF lever to OFF position to power off the camera. Please note that even in the OFF mode, the camera still consumes certain power at A level. Therefore, please remove the battery if the camera will not be used for a long time.
4. Advanced operations
From the basic operations of the camera in the previous chapter, we know that the camera has three basic operation modes:
- OFF Mode: Power switch is in OFF position.
- ON Mode: Power switch is in ON position.
- TEST Mode: Power switch is in "SETUP" position
The OFF mode is the specified safe mode for replacing the SD-card or batteries and transporting the camera.
ATTENTION: Replace SD-card only in OFF mode!
4.1 Settings
To make any specific settings, an SD-card must be inserted. Then, change into the TEST mode explained before.
Below the display are the function keys with the following functions:
- Press the menu key to switch between status mode or Setup mode.
- In Status mode, the OK button is used to manually take photos or videos, in the setup mode, confirm the setting by pressing the OK button.
- In the setup mode the keys ▲ or ▼ used to select sub-menus, set values for date / time value and to check the MCU / DSP fi rmware version
- The keys ▼ or ▶ can be used to Date / Time Select the Setup menu.
4.1.1 Default Settings
List of menu items and their settings:
| Menu items Setting (bold = default setting) | Description: | |
| Operation Mode | Photo, Video or Time Lapse | Select weather to take pictures, record video or time lapse. |
| Photo Size | 2MP Pixel, 5MP Pixel, 8MP Pixel | Set the resolution of photos. |
| Capture Number 1 | photo, 3 photo Specifices the number of images made when triggered. | |
| Video Size 1280*720720*480 | Set the resolution of videos, e.g. 720x480 or 1280x720. All videos are in 16:9 format. | |
| Video Length 30s, | 1Min Adjust the recording time of the video. | |
| Photo Delay 5s, 15s, 30s1min, 5min, 15min | The interval for the triggering of the camera can be adjusted.This adjusts how quickly an image is captured consecutively. The motion sensor of the camera is then turned off for the specified period in between. | |
| Video Delay | 1min, 5min, 10min | The interval for the triggering of the camera can be adjusted.This adjusts how quickly an image is captured consecutively. The motion sensor of the camera is then turned off for the specified period in between. |

BRESSER
| Time lapse Delay | 30s, 1Min, 5Min | With this setting, the camera will automatically take pictures at a set interval. This function can work together with the timer function.(Note: In this mode, the PIR sensor is disabled, the camera will not record video). |
| SD Card Erase ALL | Save All Formats the sd card. All data on | the card will be deleted. |
| SET Date/Time 01 | /01/14 Here you can set the date and time. | |
| Timer S: E: Here, a specific period can be specified, in which the camera is active. Outside of the specified period, the camera is then inactive. | ||
| TEMP UNIT F/C Select the preferred Temperature unit. Is visible on images. | ||
| Camera Name 0-9, A-Z (up to 10 letters or numbers possible.) | Camera name adjustable, visible on images. This way, pictures can be associated to locations or different cameras. | |
| Reset YES/NO Resets all the settings of the user and resets to default settings (factory settings). | ||
| DSP Version | Shows the DSP version number. | |
| MCU Version | Shows the MCU version number. Useful for repair or upgrades. | |
| SW Upgrade | Copy the fi rmware to the root directory of a formatted SD Memory card and navigate to the upgrade menu.(Caution: Do NOT disconnect the camera from the power supply during the fi rmware update). | |
4.1.2 Set camera mode
The following steps explain how to change the camera to "Video" mode. Provided the previous setting is the "camera" mode:
a) Drücken Sie MENU to display the settings menu.
b) Press for tvselect Operation Mode and press OK.
c) Press ▲ or ▼ select VIDEO.
d) Press OK to save the current setting.
e) Press MENU to cancel setting and return to info display.
4.1.3 Set photo resolution
The following steps explain how to set the picture resolution to 5MP, provided the previous setting is 8MP:
a) Press MENU to display the settings menu.
b) Press ☑r to select Operation Mode and press OK.
c) Press ▲ or ▼ to select PHOTO and press OK.
d) Press ▲br ▼ select Photo Quality and press OK.
e) Press ▲pr ▼ select 5 MP and press OK.
f) Press OK to save the current setting.
g) Press MENU to exit the selection screen.
4.1.4 Set the number of direct image capture sequence
The following steps explain the setting of an image capture sequence, (the number of images to be taken directly in succession when the shutter is released). Up to 3 images in a row can be recorded.
a) Press MENU to bring up the settings menu.
b) Press ▲br ▼ select Operation Mode and confirm your selection by pressing the OK button
c) Press ▲br ▼ select Photo and confirm your selection by pressing the OK button
d) Press ▶ or to select Cont. shot and confirm your selection by pressing the OK button
e) Press ▲ or ▼ select "3 photos".
f) Press OK to save the changes made.
g) Press MENU to exit the selection screen
4.1.5 Set video resolution
The following steps explain how to set the video resolution to 720 x 480, provided the previous setting is 1280 x 720:
a) Press MENU to display the settings menu.
b) Press for to select Operation Mode and press OK.
c) Press ▲br ▼ select VIDEO and press OK.
d) Press ▶ or ▽ select Video Quality and press OK.
e) Press ▲ or Ⓥ select 720 x 480.
f) Press OK to save the current setting.
g) Press MENU to exit the selection screen.
4.1.6 Set video length
The following steps explain how to set the video length to 1 minute, provided the previous setting is set to 30 seconds:
a) Press MENU to display the settings menu.
b) Press ☑ to select Operation Mode and press OK.
c) Press ▲ or ▼ to select VIDEO and press OK.
d) Press ▲ or ▼ to select Video length and press OK.
e) Press ▲ or ▼o select 1 min.
f) Press OK to save the current setting.
g) Press MENU to exit the selection screen.
4.1.7 Set photo trigger interval
The following steps explain how to set the photo trigger interval to 5 minutes, provided the previous setting is set to 1 minute:
a) Press MENU to display the settings menu.
b) Press ☑ to select Operation Mode and press OK.
c) Press ▲ or ▼ to select PHOTO and press OK.
d) Press ▲ or ▼ to select Photo delay and press OK.
e) Press ▲ or ▶ select 5 min.
f) Press OK to save the current setting.
g) Press MENU to exit the selection screen.
4.1.8 Set video trigger interval
The following steps explain how to set the video trigger interval to 5 minutes, provided the previous setting is set to 1 minute:
a) Press MENU to display the settings menu.
b) Press ☐ or ☑ select Operation Mode and press OK.
c) Press ▲ or ▶ select VIDEO and press OK.
d) Press ▲ or □ to select Video delay and press OK.
e) Press ▲ or ▼ to select 5 min.
f) Press OK to save the current setting.
g) Press MENU to exit the selection screen.
4.1.9 Set time lapse interval
This camera provides the ability to take time lapse recordings. The following steps describe how the time lapse recording is activated. The interval is displayed in hour / minute format.
a) Press MENU to display the settings menu.
b) Press ☐ or to select Operation Mode and press OK.
c) Press ▲ or ▶ to select Time Lapse and press OK.
d) Press ▲ or ▼ to select T.L. Quality and press OK.
e) Press or to select "5.0 MP" (Medium) or "2.0 MP" (Low) and press OK.
f) Press ☐ or ☑ select 30 sec, 1 min or 5 min and press OK.
g) Press OK to save the current setting.
h) Press MENU to exit the selection screen.
4.1.10 Format SD card
NOTE: When executing this action, all data on the card will be erased irrevocably! Perform a backup of your data first.
a) Press MENU to display the settings menu.
b) Press ▲ or ▼ select SD CARD and press OK.
c) Press ▲br ▼ to select ERASE ALL and press OK.
d) Press ▲ or ▶ select T.L. Quality.
e) Press OK to start formatting your SD card. During formatting the message "Deleting ..." appears on the screen.
f) Press MENU to exit the selection screen.
4.1.11 Set date format and date
The valid value for years is between 2009 and 2035. Default setting may vary from the current date. Provided that date and time settings need to be changed, the steps are as follows:
a) Press MENU to display the settings menu.
b) Press ▲ or ▼ select Setting and press OK.
c) Press ▲ or ▼ to select Date format and press OK.
d) Press for to select the desired date format and press OK.
e) Press ▲br ▼ select Setup Date and press OK.
f) Press ▶r ▶ change the current value or ▶ to ▶ switch the input fi eld.
g) Press OK to save the current setting.
h) Press MENU to exit the selection screen.
4.1.12 Set time
The time is displayed in hours / minutes / seconds (12 or 24-hour mode) format.
a) Press MENU to display the settings menu.
b) Press ▲ or ▼ to select Setting and press OK.
c) Press ▲ or ▼ to select SETUP Time and press OK.
d) Press ▲ or ▶ to select 12 or 24-hour mode.
e) Press ▶ to select hours
f) Press ▲ or ▼ change the value.
g) Press ▶ to select minutes.
h) Press ▲ or ▼ change the value.
i) Press OK to save the current setting.
j) Press MENU to exit the selection screen.
4.1.13 Setting the timer (timer function)
Please note that the start and stop time (24-hour mode) for the activity window only works if the timer is set to ON.
a) Press MENU to display the settings menu.
b) Press ▲ or Ⓞ select SETTING and press OK.
c) Press ▲br ▼ select TIMER and press OK.
d) Press ☐ or ☑ activate or deactivate the timer function and press OK.
e) Press ▲ or ▼ change the hour value (activation time)
f) Press ▶to select the minute value (activation time)
g) Press ▲ or ▽ change the value.
h) Press ▶o select the hour value (deactivation time)
i) Press ▲ or ▼ change the value.
j) Press ▶o select the minute value (deactivation time)
k) Press OK to save the current setting.
I) Press MENU to exit the selection screen.
4.1.14 Setting the temperature unit
The following steps explain how to select the preferred temperature unit.
a) Press MENU to display the settings menu.
b) Press ▲ or ▶ select Setting and press OK.
c) Press ▲ or ▼ to select Temp Unit and press OK.
d) Press or to select °C (Celsius) or °F (Fahrenheit).
e) Press OK to save the current setting.
f) Press MENU to exit the selection screen.
4.1.15 Setting the Camera name
The following steps explain how to set the camera name (The camera name will be displayed on each image).
a) Press MENU to display the settings menu.
b) Press ▲br ▼ select Setting and press OK.
c) Press ▲ or ▼ select Camera Name.
d) Press OK to get to the sub menu.
e) Press ▶or ▶b select and ▶t tochange the value.
f) Press OK to save the current setting.
g) Press MENU to exit the selection screen.
4.1.16 Restoring Factory Default Settings
The following steps explains how to delete the individual settings and how to restore to the factory settings.
a) Press MENU to display the settings menu.
b) Press ▲ or ▶ select Setting and press OK.
c) Press ▲ or ☐ select Reset and press OK.
d) Press ▲ or ▼ to select Yes.
e) Press OK to perform the reset and to return to the selection menu.
f) Press MENU to exit the selection screen.
a) Press MENU to display the settings menu.
b) Press ▶ or ▶ select MCU Version to view the MCU Version.
f) Press MENU or OK to exit the selection screen.
4.1.19 How to delete images or videos
CAUTION: Performing this action will erase all data irrevocably on the card! Perform a backup of your data first.
a) Press MENU to display the settings menu.
b) Press ▲ or Ⓥ select "SD Card"
c) Press OK to confirm your selection.
c) Press or to choose between SAVE ALL or ERASE ALL.
4.1.20 Format SD card
Connect the camera via the supplied USB cable to your computer. The content of the memory card is displayed as an external hard disk on the computer.
The camera supports 3 kinds of file formats, FAT12, FAT16 and FAT32.
The default value is FAT16 to save pictures and videos.
Here are some related notes:
- Normally, there is no reason to change the file format. Unless your equipment has problems reading the SD card. When this happens, reformat the SD card directly on the camera or on your computer. Then insert the card into your camera and try again.
- The default fi le format of the camera is FAT16, which can be read by most computers. When you format an SD card for your camera with your computer, you should choose the FAT16 fi le format. Normally FAT16 is recommended unless you use a image viewer that demands FAT12 or FAT32.
4.2 Save Photos or Videos to your computer
Make sure that the main power switch is in the OFF position to back up your photos or videos on a computer. Connect the camera via the supplied USB cable to your computer. The contents of the memory card is displayed as an external hard disk on the computer. Look for the "DCIM" folder. In the menu that appears, there is another folder "100SIMOS". You can copy or cut selected files and transfer them to your hard disk.
4.3 Mounting and positioning of the camera
Once you have set the camera parameters, you can mount the camera at a suitable position. In order to obtain optimal image quality, the camera should be placed about 5 meters (16-17ft) away from the subject at a height of 1.5-2 m (5 to 6.5 ft). The best results at night can be achieved if the subject is within the flash range of the camera, ideally between 3 m (10') and 14 m (45').
There are 2 ways to mount the camera: with the included adjustable belt or with the tripod thread.
Using the adjustable belt:
Slide one end of the belt through the two brackets on the back of the camera. Fasten the belt securely around the tree trunk with a diameter of about 15 cm (6 in.).
Using the tripod mount:
The camera is equipped with a threaded socket on the rear for mounting on a tripod or other mounting accessories with a 1/4 "tripod thread
Privacy PROTECTION!
The device is intended for private use.
Please heed the privacy of other people. Do not use the camera to look into apartments, public spaces, along walking or hiking trails or heavy frequented locations.
5. Troubleshooting
5.1 USB device is not recognized by the computer
This circumstance occasionally occurs in some OEM versions of Windows. It is not caused by a defect device. An update of the USB drivers on the notebook or PC in most cases solves the problem.
In case an update of the driver does not result in a satisfactorily solution it is recommended to proceed as described below (the manufacturer takes no liability for any loss or damage caused by running this process!).
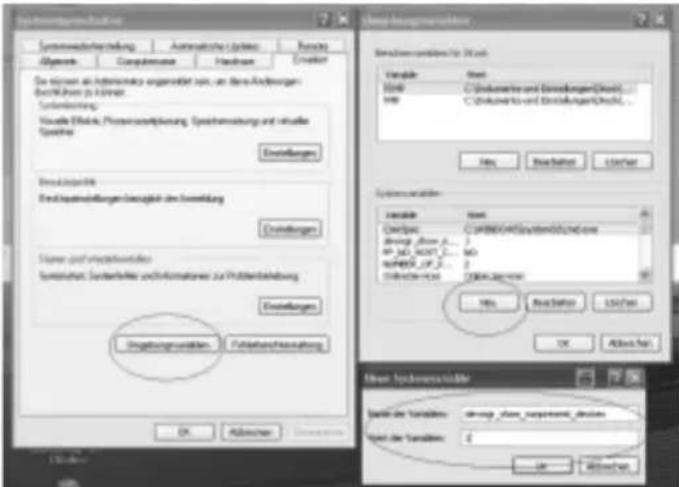
Delete the so-called 'Ghost Devices' (devices that are not currently connected to the computer). Background information: Windows generates an entry in its system preferences for each new USB device (e.g. USB stick) for each USB drive it is plugged into. At every start of the computer Windows will search for this unit. This delays detection of USB devices as well as the launch of Windows itself and is responsible for the failure to recognize the USB port!
Therefore, you may ‘clear up’ your system environment and remove unused devices. To do this, right-klick on ‘My Computer’ or ‘Computer’ and open the ‘Properties’ item in the context menu. Then klick in the window on the tab ‘ADVANCED /ADVANCED SYSTEM SETTINGS’ and klick on ‘ENVIRONMENT VARIABLES’. Now select the lower part (NEW ENVIRONMENT VARIABLE). At ‘NAME OF VARIABLES’ enter the following text:
devmgr\_show\_nonpresent\_devices
Enter the value '1' in 'Value of Variables'
Confirm the entry with 'OK' and restart the computer. After rebooting open the Device Manager. Select the menu item VIEW and activate the option 'Show Hidden Devices'. The 'Ghost Devices' previously hidden are now displayed in grey. Check for entries in the different categories such as USB, storage volumes, etc. Only delete the entries of devices you no longer use from the 'Device Manager'.
^1 Source: Microsoft knowledge base http://support.microsoft.com/kb/315539/en

BRESSER
Appendix: Technical specifications
| Image Sensor 2 MP Color CMOS | |
| Lens F = 7.45 mm | Field of View =60° |
| Infrared Illumination | 12-15m (12m is best) |
| Memory Card* SD-Card, up to 32 GB | |
| Image Resolution 8MP=3840×2160;5MP=3072×1928;2MP=1920×1080 | |
| Videoauflösung 1280*720/30 fps (16:9);720×480/30 fps | |
| Motion Sensor Multi Zone | |
| Motion Sensor sensitivity | >12m, 72° |
| Trigger Time Photo: 0.5s Video:1.5s | |
| Weight 0.320 kg | |
| Operation/Storage Temp. | -20 - +60°C / -30 - +70°C |
*not included with your purchase
| Interval Photo: 5s/15s | /30s,1 min/5 min/15 minVideo: 1 min/5 min/10 min |
| Photo Burst 1, 3 | |
| Video length | 1 min,5 min,10 min |
| Power Supply | 8×AA, 12V |
| Stand-by current | < 0.25 mA |
| Power consumption | 120 mA (+320mA when IR-LED is active) |
| Low Battery alert | Battery indicator status on the display |
| Display | Text Display, 2 lines x 16 characters |
| Ports | USB; SD-Karte; 12V DC external |
| Mount | Belt, Tripod thread (1/4" 20 gear) |
| Weatherproofed | IP65 |
| Dimensions 140 x 104 | x 76 mm |
| Humidity operating range | 5% - 90% |
| Safety Label | CE, RoHS |

BRESSER
WARRANTY & SERVICE
The regular guarantee period is 2 years and begins on the day of purchase. To benefit from an extended voluntary guarantee period as stated on the gift box, registration on our website is required.
You can consult the full guarantee terms as well as information on extending the guarantee period and details of our services at www.bresser.de/warranty_terms.
Would you like detailed instructions for this product in a particular language? Then visit our website via the link below (QR code) for available versions. Alternatively you can also send an email to manuals@bresser.de or leave a message on +49 (0) 28 72 - 80 74-220*. Please always state your name, precise address, a valid phone number and email address, as well as the article number and name.
*Number charged at local rates in Germany (the amount you will be charged per phone call will depend on the tariff of your phone provider); calls from abroad will involve higher costs.
or visit us at www.bresser.de

BRESSER®
Bresser GmbH
Gutenbergstr. 2 · DE-46414 Rhode Germany
Errors and technical changes reserved.
ANL3340002DEGB0915BRESSER

- Bedienelemente
- About this Instruction Manual
- DANGER!
- ATTENTION!
- General Warnings
- ! DANGER!
- ! ATTENTION!
- EC Declaration of Conformity
- DISPOSAL
- Instructions
- General Description
- Scope of delivery
- Camera I/O Interfaces
- External components
- Light sensor for the infrared lighting function
- Red LED power indicator
- Infrared Lighting
- Objective lens
- Padlock\* eyelet\*
- Motion Sensor
- Casing latch
- Operator controls
- Supported formats
- Caution!
- Main operations
- Power supply
- NOTE:
- Insert the SD-card\*
- Power on the Camera
- Enter into the TEST Mode
- Manual capturing
- View images or videos
- Power off
- Advanced operations
- Settings
- Default Settings
- BRESSER
- Set camera mode
- Set photo resolution
- Set the number of direct image capture sequence
- Set video resolution
- Set video length
- Set photo trigger interval
- Set video trigger interval
- Set time lapse interval
- Format SD card
- Set date format and date
- Set time
- Setting the timer (timer function)
- Setting the temperature unit
- Setting the Camera name
- Restoring Factory Default Settings
- How to delete images or videos
- Format SD card
- Save Photos or Videos to your computer
- Mounting and positioning of the camera
- Privacy PROTECTION!
- Troubleshooting
- USB device is not recognized by the computer
- devmgr\_show\_nonpresent\_devices
- WARRANTY & SERVICE
- BRESSER®
Brand : BRESSER
Model : 3310002
Category : Hidden camera