12921 - Frying Pan Lakeland - Free user manual and instructions
Find the device manual for free 12921 Lakeland in PDF.


| Product Type | Slow Cooker |
| Brand | Lakeland |
| Model | 12921 |
| Capacity | 3.5 litres (maximum working capacity 2.5 litres) |
| Material | Stainless steel base, ceramic pot, tempered glass lid with handle |
| Control Type | Rotary dial with OFF, AUTO, LOW, HIGH settings |
| Temperature Settings | 3: AUTO (standard), LOW (extended cook), HIGH (shorter cook) |
| Power Indicator Light | Yes, shows when unit is on |
| Voltage | 220-240V AC (UK plug, earthed) |
| Power Consumption | Approximately 240W (estimated) |
| Dimensions (approx.) | 30 x 25 x 20 cm (WxDxH) |
| Weight (approx.) | 4 kg |
| Cord Length | Approximately 1 m |
| Safety Features | Earthed plug, automatic shut-off by turning dial to OFF, non-slip feet (assumed), overheat protection (not specified) |
| Cleaning | Hand wash ceramic pot and lid with hot soapy water; wipe base with damp cloth; do not immerse base or use abrasives |
| Accessories Included | Ceramic pot, tempered glass lid, instruction booklet |
| Spare Parts | Contact Lakeland customer care (015394 88100); pot and lid may be available |
| Reparability | Contact Lakeland for service; do not attempt DIY repairs |
| Warranty | Standard Lakeland guarantee (details in manual) |
| Additional Features | Side handles for carrying, cool-touch handles on lid, suitable for families or batch cooking |
Frequently Asked Questions - 12921 Lakeland
User questions about 12921 Lakeland
0 question about this device. Answer the ones you know or ask your own.
Ask a new question about this device
Download the instructions for your Frying Pan in PDF format for free! Find your manual 12921 - Lakeland and take your electronic device back in hand. On this page are published all the documents necessary for the use of your device. 12921 by Lakeland.
USER MANUAL 12921 Lakeland
natural_image
Exterior view of a modern stainless steel cooking pot with lid and side handles (no text or symbols visible)LAKELAND 3.5 LITRE SLOW COOKER
Thank you for choosing the Lakeland Slow Cooker.
Please take a little time to read this booklet before you use your machine and then keep it in a safe place for future reference.
The slow cooker has a 3.5L bowl capacity making it ideal for cooking for families or making larger batches of recipes and freezing some portions for later. The slow cooking method gives great results on cheaper cuts of meat that often need to cook for longer to be at their best, making this a very economical cooking method.
An award winning family-owned business, here at Lakeland we still have the same values of excellent quality, value for money and exceptional customer care as we did when we first set up the company in the 1960s. Our products are carefully selected and rigorously tested to meet our high standards, so you can be assured that any product you purchase will be easy-to-use and highly durable.
CONTENTS
Product Features 4
Safety Cautions 4
How to assemble the Slow Cooker and using for the first time 6
The Control Panel and Programmes 7
Instructions for use 7
A guide to ingredients 8
Adapting your own recipes 8
Recipes 10
Troubleshooting 14
Care and cleaning 14
Recycling your electricals 14
Electrical connections 15
PRODUCT FEATURES
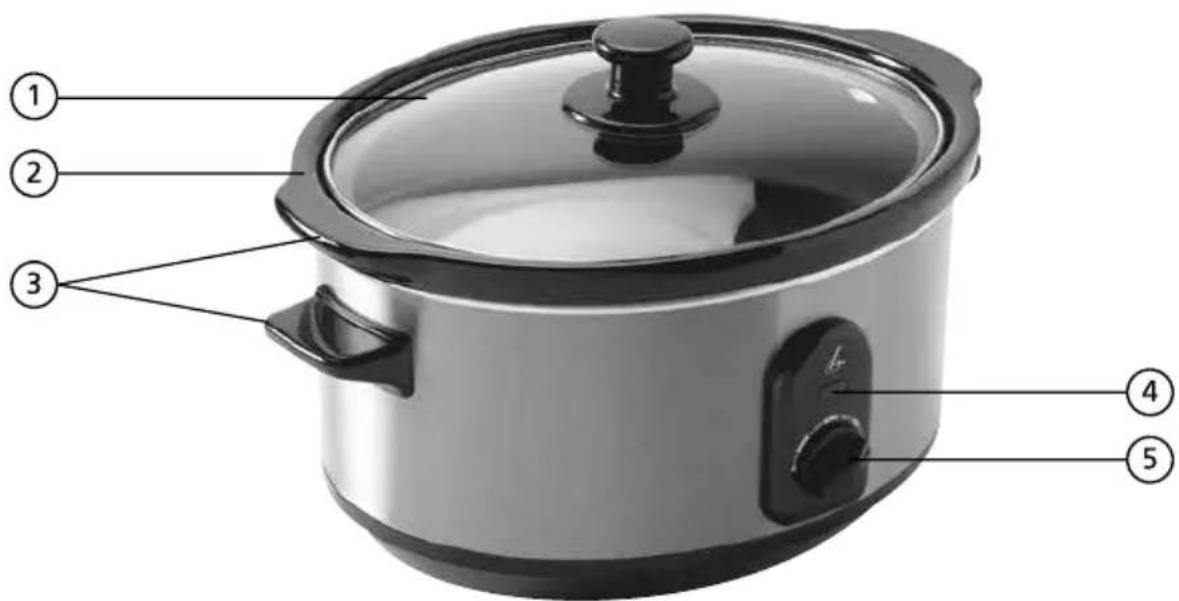
- Tempered glass lid with handle
- Ceramic pot
- Handles
- Power indicator light
- Control dial
SAFETY CAUTIONS
Carefully read all the instructions before using the appliance and keep in a safe place for future reference. Always follow these safety cautions when using the appliance to avoid personal injury or damage to the appliance. This appliance should be used only as described in this instruction book.
• Make sure your electricity supply matches the voltage shown on the appliance.
- Ensure all packaging materials and any promotional labels or stickers are removed from the appliance before the first use.
• Always inspect the appliance before use for noticeable signs of damage. Do not use if damaged or has been dropped. In the event of damage, or if the appliance develops a fault, contact the Lakeland customer care team on 015394 88100.
- Do not use this appliance if the lead is damaged. If the lead is damaged it must be replaced with a special lead, please contact Lakeland customer care team on 015394 88100.
• Always use the appliance on a dry, level, heat resistant surface.
- Unplug from the mains when not in use and before cleaning. Allow to cool before cleaning the appliance. To disconnect, turn the socket to 'off' and remove the plug from the mains socket.
- This appliance is not intended for use by persons (including children) with reduced physical, sensory or mental capabilities, or lack of experience and knowledge, unless they have been given supervision or instruction concerning the use of the appliance by a person responsible for their safety.
• Children should always be supervised to ensure they do not play with this product.
- Do not use any accessories or attachments with this appliance other than those recommended by Lakeland.
- To protect against fire, electric shock or personal injury, do not immerse cord, plug or outer unit in water or other liquids.
- Do not leave the lead hanging over the edge of a kitchen table or worktop. Avoid contact between the lead and hot surfaces.
- For indoor use only.
- For domestic use only.
- This appliance should be used for preparation of food as described within the instructions for use that accompany it.
• Always ensure that your hands are dry before removing the plug from the mains socket. Never pull the plug out of the mains socket by its lead.
- To avoid injury or possible fire, do not cover the appliance when in use.
- Do not connect this appliance to an external timer or remote control system.
- An extension cable may be used with care. The electrical rating of the cable should be at least as great as the appliance. Do not allow the cable to hang over the edge of the worktop or touch any hot surfaces.
• This appliance complies with the basic requirements of Directives 04/108/EC (Electromagnetic Compatibility) and 06/95/EC (Safety of Domestic Electrical Appliances).
- WARNING; A cut off plug inserted into a 13amp socket is a serious safety (shock) hazard. Ensure the cut off plug is disposed of safely.
- The slow cooker surfaces will be very hot when the appliance is in use. DO NOT touch these as possible injury could occur. Allow to cool completely before handling this appliance and always use the handles to move appliance or lift lid. Always wear oven gloves. Take great care when lifting out the crock with hot food inside.
• CAUTION; The plastic bags used to wrap this appliance or the packaging may be dangerous. To avoid risk of suffocation, keep these bags out of reach of babies and children. These bags are not toys.
- The ceramic pot in the slow cooker gets hot during cooking, use oven gloves to lift it out of the slow cooker.
- The slow cooker should be unplugged from the mains supply before filling or emptying the ceramic pot.
- Do not heat the slow cooker when the ceramic pot is empty.
- Do not place the slow cooker or the ceramic pot directly on a gas or electric hob or other heat source.
- When removing the lid, tilt it so that the opening faces away from you to avoid being burned by steam.
- Do not place the slow cooker on or near a hot gas or electric burner, or in or near a heated oven.
- To avoid electric shock or damage, never put food directly into the slow cooker base. Always use the ceramic crock.
- To switch off the slow cooker, turn the dial to OFF and unplug from the socket. Always unplug before lifting out the crock, when not in use and before cleaning. Let the slow cooker cool down before cleaning.
- Please handle the crock and lid with care, and avoid extremes of temperature. Once the crock is warm, do not add further chilled ingredients. Allow the crock and lid to cool before washing.
- Using accessories that are not recommended by the manufacturer may cause fire, electric shock or injury.
HOW TO ASSEMBLE THE SLOW COOKER AND USING FOR THE FIRST TIME
- The first time the appliance is used there may be a slight smoke smell, this is normal and is not a concern. It should disappear after initial use.
- Before first use, wash the lid and ceramic pot in hot, soapy water, rinse and dry thoroughly. Do not ever immerse the base in water.
- Prepare the recipe according to the instructions. Place the food in the ceramic pot and then place the lid on top of the pot.
- Connect the plug of the slow cooker to power socket and switch on socket.
- Select temperature setting.
- When you have finished cooking in the slow cooker, turn the control dial to the off setting, switch off the mains supply at the socket and unplug.
- Let ceramic pot and the lid cool before washing.
THE CONTROL PANEL AND PROGRAMMES
- When not being used to cook, the control dial on the slow cooker should be turned to off and the mains plug should also be switched off and removed from the socket.
- The final temperature of the food is about 120^ C whether it has been cooked on the low or high setting. The only difference between these settings is the amount of time the cooking process takes.
- The slow cooker has three temperature settings so cooking times can be easily adapted. Meals can be slowly simmered all day long, or can be ready in just a few hours. Over time you will develop a feel for how long your favourite recipes take, and this cooking guide offers a helpful starting point.
- AUTO: the standard setting, with an average cooking time of 6-8 hours. Food is cooked on HIGH until the correct temperature is reached then kept warm until you are ready to serve.
- LOW: if you wish to extend the cooking time.
• HIGH: if you wish to shorten the cooking time.
Cook on auto Cook on low Cook on high
4-6 hours 6-8 hours 3-4 hours
6-8 hours 8-10 hours 5-6 hours
8-10 hours 10-12 hours 7-8 hours
Please note: all cooking times are approximate, and will vary according to your recipe and choice of ingredients.
INSTRUCTIONS FOR USE
- The beauty of slow cooking is that you can add the ingredients, turn on the slow cooker and enjoy a tender, moist and flavourful meal hours later, with little work required.
- This 3.5 litre slow cooker has a maximum working capacity of 2.5 litres, allowing for bubbling and simmering.
- Lifting the lid of the slow cooker results in temperature loss and adds about 25 minutes to the cooking time. Avoid having to lift lid if at all possible.
- Ideally the slow cooker should be at least 1/3 full when cooking food for it to perform at its best.
A GUIDE TO INGREDIENTS
- To ensure uniform cooking, prepare meat and vegetables so they are in similar sized pieces and will cook evenly. Root vegetables often take longer to cook than meat, so they should be more finely diced or chopped.
- You may need to reduce liquids in recipes to around half, because the slow cooker is covered by a lid. If you find there is too much liquid at the end of cooking time, you can remove the lid and cook on high for about 30 minutes until the liquid reduces.
- The slow cooking method gives great results when cooking cheaper cuts of meat which require longer cooking in order to become tender, but often have more flavour.
- Brown the meat before adding it to the slow cooker. This adds flavour to the final dish and the meat often looks more attractive.
- If you wish to use frozen meats, defrost thoroughly before adding to the slow cooker, never cook from frozen.
- If you don't have time to get your ingredients ready in the morning, they can be prepared the night before and stored in the fridge. In the morning, transfer the food to the crock. Add enough boiling liquid e.g. stock, to cover the ingredients, before switching on the slow cooker.
- As a general guide, most meat-and-vegetable recipes require 5-7 hours on auto warm, 4-5 hours on high and 7-9 hours on low.
- Slow cooking requires very little in the way of stirring, but you may like to give your food an occasional stir if cooking on HIGH.
ADAPTING YOUR OWN RECIPES
After you have made some of the recipes supplied you may wish to adapt a few of your own recipes.
- Start by selecting one of the recipes in this booklet, which is similar to your own and use this as a guide.
- Adapt your recipes by chopping everything in uniform sized pieces so it will all cook evenly and be ready at once.
- Place items which may need longer to cook near the base of the pan. This means they are nearer the heat source and are likely to sit in any liquid which will also help them to cook.
- Fish and seafood tend to dry out quickly so are best added to dishes near the end of cooking time.
- Recipes will require far less liquid than their equivalents cooked on the hob: reduce the liquid by half, you can always top up during cooking if it seems too dry.
-
Reduce salt in recipes as the long slow cook and reduced liquid means flavours are more enhanced and less salt is required.
-
Recipes often say, 'Bring to boil, and then turndown'. In slow cookers this is not necessary. Simply set the cooker on low.
- Fresh herbs are best added near the end of cooking; dried herbs can be added along with the main ingredients.
Approximate cooking times for recipe conversions
- If recipe suggests to cook for 15-30 minutes, it will need up to 2 hours on the high setting in the slow cooker.
- If recipe suggests to cook for 30-45 minutes, it will need up to 4 hours on the high setting in the slow cooker.
- If recipe suggests to cook for 2-3 hours, it will need up to 6 hours on the high setting in the slow cooker (see the cooking times chart on page 6).
RECIPES
Chilli Con Carne
Serves 2 to 4 people
| Ingredient Quantity |
| Oil 30ml / 2 tbsp |
| Large onion, peeled and chopped 1 |
| Clove garlic, peeled and crushed 1 |
| Green pepper, deseeded and chopped 1 |
| Button mushrooms, sliced 100g / 4oz |
| Lean minced beef 450g / 1lb |
| Can chopped tomatoes 400g / 14oz |
| Salt and freshly ground black pepper |
| Tomato puree 30ml / 2 tbsp |
| Beef stock 450ml / 34 pint |
| Chilli powder 3 tsp |
| Can red kidney beans, drained and rinsed 420g / 15oz |
AUTO WARM: 5 to 7 hours
- Heat the oil in a saucepan, add the onion, garlic and green pepper and cook for 2 to 3 minutes.
- Add the mushrooms and minced beef and cook for 3 to 4 minutes until browned.
- Stir in the tomatoes, tomato puree, stock, chilli powder, salt and pepper.
- Bring to the boil, then transfer to the crock insert and cook as recommended.
- Stir in the beans 30 to 45 minutes before the end of cooking.
Hawaiian Pork Casserole
Serves 2 to 4 people
| Ingredient Quantity |
| Oil 15ml / 1 tbsp |
| Onion, peeled and chopped 1 |
| Clove garlic, peeled and crushed 1 |
| Green pepper, deseeded and sliced 1 |
| Button mushrooms, sliced 100g / 4oz |
| Pork fillet, cubed 750g / 112 lb |
| Plain flour 25g / 1oz |
| Pork or chicken stock 600ml / 1 pint |
| Dry sherry 30ml / 2 tbsp |
| Can pineapple chunks 432g / 1514 oz |
| Salt and freshly ground pepper |
AUTO WARM (if you pre-cook the ingredients, as below): 6 to 9 hours AUTO WARM (without pre-cooking): 8 to 10 hours
- Heat the oil in a saucepan, add the onion and garlic and cook for 2 to 3 minutes.
- Add the green pepper and mushrooms and cook for 1 to 2 minutes.
- Toss the pork in the flour, add to the pan and cook until browned.
- Add the remaining ingredients and bring to the boil.
- Transfer to the crock insert and cook as recommended.
Coq Au Vin
Serves 2 to 4 people
| Ingredient Quantity |
| Oil 15ml / 1 tbsp |
| Butter 15g / 12oz |
| Bacon, chopped 100g / 4oz |
| Shallots, peeled 175g / 6oz |
| Clove garlic, peeled and crushed 1 |
| Button mushrooms, sliced 225g / 8oz |
| Chicken breasts, boneless and skinned 4 |
| Plain flour 25g / 1oz |
| Red wine 300ml / 12 pint |
| Chicken stock 450ml / 34 pint |
| Bay leaf 1 |
| Bouquet garni 1 |
| Dried thyme 12 tsp |
| Salt and freshly ground pepper |
AUTO WARM (if you pre-cook the ingredients, as below): 4 to 6 hours AUTO WARM (without pre-cooking): 6 to 9 hours
- Place the oil and butter in a saucepan and heat until melted.
- Add the bacon, shallots, garlic and mushrooms and cook for 3 to 4 minutes.
- Remove and place in a bowl.
- Coat the chicken in the flour, add to the pan and cook for 3 to 4 minutes.
- Return the bacon and vegetables to the pan.
- Stir in the remaining ingredients and bring to the boil.
- Transfer to the crock insert and cook as recommended.
Poached Pears with Caramel Sauce
Serves 2 to 4 people
| Ingredient Quantity |
| Medium sized ripe pears 4 |
| Caster sugar 75g / 3oz |
| Cold water 1.5 litre / 3 pints |
| Lemon juice 15ml / 1 tbsp |
| For the sauce: |
| Butter 50g / 2oz |
| Soft light brown sugar 75g / 3oz |
| Granulated sugar 50g / 2oz |
| Golden syrup 150g / 5oz |
| Single cream 124ml / 5fl oz |
| Vanilla extract Few drops |
LOW: 312 to 512 hours
AUTO WARM: 3 to 5 hours
- Peel the pears, leaving the stalk intact.
- Cut a small slice off the base of each pear so it sits upright.
- Switch on the slow cooker.
- Place the caster sugar, water and lemon juice in the crock insert and stir until the sugar dissolves.
- Add the pears, cover with the lid and cook as recommended.
- Drain and remove the pears.
For the sauce:
- Place the butter, sugar and syrup in a saucepan and heat gently until the sugar dissolves.
- Boil for 4 to 5 minutes.
- Stir in the cream and vanilla extract and serve with the pears.
TROUBLESHOOTING
Here are some common problems that can occur when using the slow cooker. Please review the problems, their possible cause and any corrective action that should be taken to ensure successful slow cooking
| Problem Possible cause Solution | ||
| Finished recipe seems wet. Too | much liquid in recipe. | Remove lid from slow cooker and cook on the high setting for 30 minutes (next time reduce liquid by half). |
| Vegetables seem crunchy but meat is well cooked. | The vegetable pieces are too large. | Next time cut the vegetables into smaller pieces. Place them on the bottom of the slow cooker and the meat on top. |
| Meat seems colourless. | Meat has been cooked from raw with the other ingredients in the slow cooker. | Brown meat before adding to the slow cooker to enhance appearance and flavour of final dish. |
| A favourite hob top recipe seems very salty when cooked in slow cooker. | Reduced liquid and the long slow cooking time can make dish flavours develop more and seem saltier. | Reduce the amount of salt used in the recipe. |
| Herb flavours do not come through in recipe. | Fresh herbs can get overcooked in the slow cooker because of the long cooking time. | Use dried herbs at the beginning of the cooking process. Add fresh herbs near end of cooking to retain their flavours. |
CARE AND CLEANING
- Unplug the slow cooker-and allow to cool completely before cleaning.
- Before the first use and after every use, clean each part thoroughly.
• Periodically check all parts before reassembly. - Never immerse the base unit in water or any other liquid.
- To clean the base unit and control panel, when cold, wipe with a clean damp cloth and dry before storing.
- Do not use abrasive cleaners, steel wool or abrasive materials or cleansers.
- When cold, wash the ceramic pot and the lid in hot, soapy water, rinse and dry thoroughly.
- Store the slow cooker with the power cable loosely coiled. Never wrap it tightly around the unit.
RECYCLING YOUR ELECTRICALS
Along with many other high street retailers, Lakeland has joined a scheme whereby customers can take their unwanted electricals to recycling points set up around the country. Visit www.recycle-more.co.uk to find your nearest recycling point.
ELECTRICAL CONNECTIONS
THIS APPLIANCE MUST BE EARTHED
This appliance is fitted with a fused three-pin plug to BS1363 which is suitable for use in all homes fitted with sockets to current specifications. If the fitted plug is not suitable for your socket outlets, it should be cut off and carefully disposed of. To avoid an electric shock, do not insert the discarded plug into a socket.
FITTING A NEW PLUG
If for any reason you need to fit a new plug, the flexible mains lead must be connected as shown here. The wires in the mains lead fitted to this appliance are coloured in accordance with the following code:
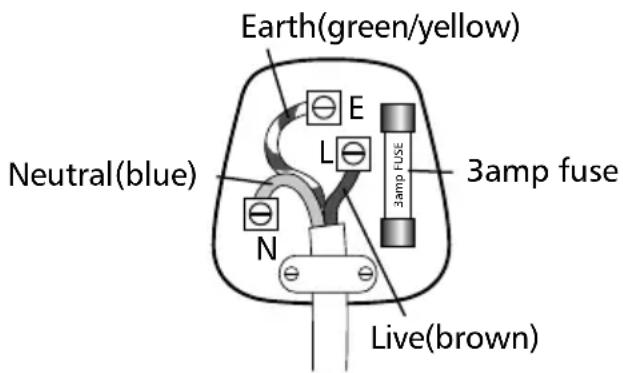
Connect BLUE to Neutral (N)
Connect GREEN & YELLOW to Earth (E)
Connect BROWN to Live (L)
3 amp fuse to be used
If the colours of the wires in the mains lead of this appliance do not correspond with the coloured markings identifying the terminals in your plug, proceed as follows. The wire which is coloured green and yellow MUST be connected to the terminal which is marked with the letter E (Earth) or coloured green. The wire which is coloured blue MUST be connected to the terminal which is marked with the letter N (Neutral) or coloured black. The wire which is coloured brown MUST be connected to the terminal which is marked with the letter L (Live) or coloured red.
Before refitting the plug cover, check that there are no cut or stray strands of wire inside the plug. Use a 3 amp BS1362 fuse. Only BSI or ASTA approved fuses should be used. If you are at all unsure which plug or fuse to use, always refer to a qualified electrician.
Note: after replacing or changing a fuse on a moulded plug which has a fuse cover, the cover must be refitted to the plug; the appliance must not be used without a fuse cover. If lost, replacement fuse covers can be obtained from an electrical shop. This appliance complies with the following EC Directives: 2006/95/EC (Low Voltage Directive) and 2004/108/EC (EMC Directive).
natural_image
Exterior view of a modern stainless steel cooking pot with lid and side handles (no text or symbols visible)3,5 Liter-SCHMORTOPF VON LAKELAND
- LAKELAND 3.5 LITRE SLOW COOKER
- CONTENTS
- PRODUCT FEATURES
- SAFETY CAUTIONS
- HOW TO ASSEMBLE THE SLOW COOKER AND USING FOR THE FIRST TIME
- THE CONTROL PANEL AND PROGRAMMES
- INSTRUCTIONS FOR USE
- A GUIDE TO INGREDIENTS
- ADAPTING YOUR OWN RECIPES
- Approximate cooking times for recipe conversions
- RECIPES
- Chilli Con Carne
- AUTO WARM: 5 to 7 hours
- Hawaiian Pork Casserole
- Coq Au Vin
- Poached Pears with Caramel Sauce
- For the sauce:
- TROUBLESHOOTING
- CARE AND CLEANING
- RECYCLING YOUR ELECTRICALS
- ELECTRICAL CONNECTIONS
- THIS APPLIANCE MUST BE EARTHED
- FITTING A NEW PLUG
- 3,5 Liter-SCHMORTOPF VON LAKELAND
Brand : Lakeland
Model : 12921
Category : Frying Pan