321 - Receiver Wadia - Free user manual and instructions
Find the device manual for free 321 Wadia in PDF.


| Type | Digital Preamplifier / DAC / Receiver (Decoding Computer) |
| Model | 321 |
| Brand | Wadia |
| Dimensions (W x H x D) | 17-7/8 in x 3-3/8 in x 20 in (45.4 cm x 8.6 cm x 50.8 cm) including feet and front panel |
| Weight (net) | 25 lb (11.4 kg) |
| Power Requirements | Factory configured: 100V, 110V, 120V, 220V, 230V, or 240V; 50/60 Hz; 30W |
| Standby Power | < 0.25W |
| Digital Inputs | 2x Coaxial (RCA), 2x Optical (TOSLINK), 1x USB (Type B) |
| Digital Input Sample Rate | Coaxial/Optical: up to 192 kHz, 24-bit; USB: up to 192 kHz, 32-bit |
| Analog Outputs | Balanced XLR (1 pair), Unbalanced RCA (1 pair) |
| Output Level (variable) | 0–4 Vrms unbalanced, 0–8 Vrms balanced |
| Output Impedance | 600 ohms (balanced and unbalanced) |
| Frequency Response | +/-0.5 dB from 4 Hz to 20 kHz; +0.5/-3 dB from 4 Hz to 68 kHz |
| Total Harmonic Distortion | 0.002% |
| Signal-to-Noise Ratio (A-weighted) | 110 dB |
| Dynamic Range | 100 dB |
| DAC Architecture | Quad balanced 8-channel 32-bit/192 kHz DAC |
| Volume Control | Digitally controlled attenuator, precision tracking |
| Display | Alphanumeric fluorescent display, adjustable brightness |
| Remote Control | Infrared, includes Mode, Input, Display, Phase, Mute, Volume, and Enter buttons |
| Remote Battery | CR2032 lithium coin cell |
| Chassis Material | Die-cast aluminum |
| Connector Plating | Gold-plated |
| Special Features | DigiMaster™ filter, ClockLink™ jitter reduction, SwiftCurrent™ I/V conversion |
| Setup Modes | Auto Power Off (enable/disable), Firmware version display |
Frequently Asked Questions - 321 Wadia
User questions about 321 Wadia
0 question about this device. Answer the ones you know or ask your own.
Ask a new question about this device
Download the instructions for your Receiver in PDF format for free! Find your manual 321 - Wadia and take your electronic device back in hand. On this page are published all the documents necessary for the use of your device. 321 by Wadia.
USER MANUAL 321 Wadia
natural_image
Abstract black-and-white graphic symbol resembling a stylized human figure or logo (no text or symbols present)Phone: 607-723-3539 Fax: 607-724-0549 www.wadia.com
Wadia
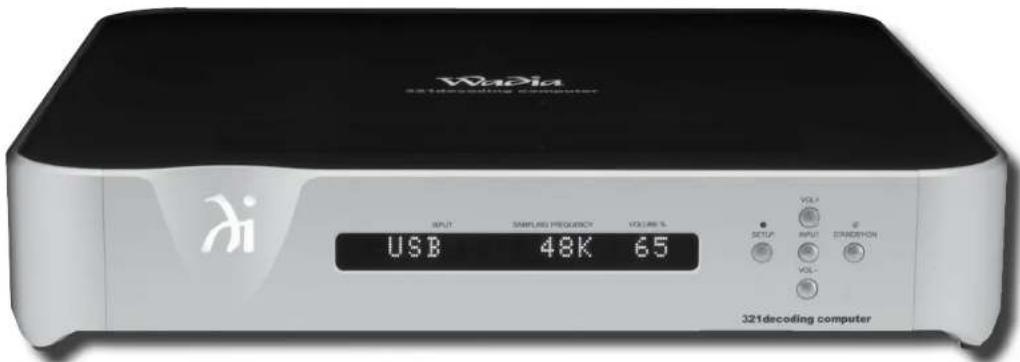
321decoding computer
Owner's Manual
The lightning flash with arrowhead, within an equilateral triangle, is intended to alert the user to the presence of uninsulated "dangerous voltage" within the product's enclosure that may be of sufficient magnitude to constitute a risk of electric shock to persons.
WARNING - TO REDUCE RISK OF FIRE OR ELECTRICAL SHOCK, DO NOT EXPOSE THIS EQUIPMENT TO RAIN OR MOISTURE.
IMPORTANT SAFETY INSTRUCTIONS!
PLEASE READ THEM BEFORE OPERATING THIS EQUIPMENT.
- Read these instructions.
- Keep these instructions.
- Heed all warnings.
- Follow all instructions.
- Do not use this apparatus near water.
- Clean only with a dry cloth.
- Do not block any ventilation openings. Install in accordance with the manufacturer's instructions.
- Do not install near any heat sources such as radiators, heat registers, stoves, or other apparatus (including amplifiers) that produce heat.
- Do not defeat the safety purpose of the polarized or grounding-type plug. A polarized plug has two blades with one wider than the other. A grounding type plug has two blades and a third grounding prong. The wide blade or the third prong are provided for your safety. If the provided plug does

AVIS RISQUE DE CHOC ELECTRIQUE - NE PAS OUVRIR.
NO USER-SERVICEABLE PARTS INSIDE. REFER SERVICING TO QUALIFIED PERSONNEL.
not fit into your outlet, consult an electrician for replacement of the obsolete outlet.
10. Protect the power cord from being walked on or pinched particularly at plugs, convenience receptacles, and the point where they exit from the apparatus.
11. Only use attachments/accessories specified by the manufacturer.
12. Use only with the cart, stand, tripod, bracket, or
table specified by the manufacturer, or sold with the apparatus. When a cart is used, use caution when moving the cart/apparatus combination to avoid injury from tip-over.
13. Unplug this apparatus during lightning storms or when unused for long periods of time.
14. Refer all servicing to qualified service personnel. Servicing is required when the apparatus has been damaged in any way, such as power-supply cord or plug is damaged, liquid has been spilled or objects have fallen into the apparatus, the apparatus has been exposed to rain or moisture, does not operate normally, or has been dropped.
15. Do not expose this equipment to dripping or
The exclamation point within an equilateral triangle is intended to alert the user to the presence of important operating and maintenance (servicing) instructions in the literature accompanying the appliance.
To prevent the risk of electric shock, do not remove cover or back. No user-serviceable parts inside.
splashing and ensure that no objects filled with liquids, such as vases, are placed on the equipment.
16. To completely disconnect this equipment from the a.c. mains, disconnect the power supply cord plug from the a.c. receptacle.
17. The mains plug of the power supply cord shall remain readily operable.
18. Do not expose batteries to excessive heat such as sunshine, fire or the like.
19. Connect mains power supply cord only to a mains socket outlet with a protective carthing connection.

WARNING
DO NOT INGEST BATTERY, CHEMICAL BURN HAZARD
This product contains a coin/button cell battery. If the coin/button cell battery is swallowed, it can cause severe internal burns in just 2 hours and can lead to death. Keep new and used batteries away from children. If the battery compartment does not close securely, stop using the product and keep it away from children. If you think batteries might have been swallowed or placed inside of the body, seek immediate medical attention.
CAUTION:
Danger of explosion if the battery is incorrectly installed. Only install one of the approved Lithium Batteries listed below.
Battery Installation
The Wadia 321 Remote Control uses a long life Lithium Coin Cell type battery. The 321 may be supplied with a battery depending on the country where the 321 is purchased. When purchasing a battery for use in the 321 refer to the following list:
| Approved Lithium Batteries | |
| Brand IEC No. ANSI/NEDA No. | |
| Ienergizer CR20321 | 5004LC1 |
| Panasonic CR2032(PA/1B)1 | 5004LC1 |
CR Lithium Coin Cells contain Perchlorate Material - special handling may apply. For additional information go to www.dtsc.ca.gov/hazaedous waste/perchlorate/index.cfm
Access to the recessed battery compartment is located on the Rear of the Remote Control.
Refer to figure 1.
Perform the following steps to install the battery:
- Press the tab towards the bottom edge of the Remote Control and lift up on the Battery Cover and temporarily place it aside. Refer to figures 2 and 3.

Figure 2
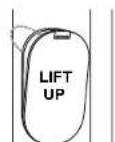
Figure 3
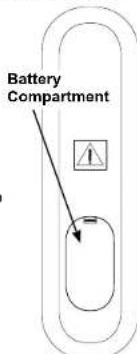
Figure 1
- Remove the CR2032 Battery from its packaging.
- Orient the battery so the + symbol (engraved into one side of the battery) is facing up.
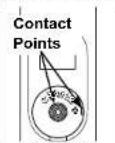
Figure 4
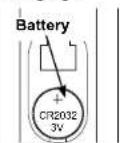
Figure 5
- Referring to figures 4 and 5, insert the battery into the socket. Make sure the battery is touching both contact points and is seated in the socket.
- Reinstall the Battery Cover.
- The Remote Control is now ready for operation.
Battery Removal
The life of the Lithium Battery used in the Wadia Remote Control is dependent on the actual amount of use. It is advisable to remove the battery from the Remote Control when it is not to be used for an extended period of time. This will help to extend battery life and avoid possible damage to the Remote Control. Perform the following steps to remove the battery from the Remote Control:
- Press the tab and lift up on the Battery Cover and temporarily place it aside. Refer to figures 2 and 3.
- Referring to figure 6, press on the bottom edge of the battery to release the battery from the molded battery socket. Then remove the battery from inside of the Remote Control.
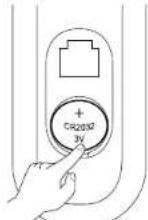
Figure 6
- Reinstall the Battery Cover.
- Store the battery in a cool dry place for future use or dispose of the battery in accordance with the local regulations for lithium battery disposal. Batteries should never be thrown away or incinerated.

WARNING
DO NOT INGEST BATTERY, CHEMICAL BURN HAZARD
This product contains a coin/button cell battery. If the coin/button cell battery is swallowed, it can cause severe internal burns in just 2 hours and can lead to death. Keep new and used batteries away from children. If the battery compartment does not close securely, stop using the product and keep it away from children. If you think batteries might have been swallowed or placed inside of the body, seek immediate medical attention.

All of us at Wadia Digital would like to say thank you, and congratulations for deciding to own this Wadia 321 decoding computer. We sincerely believe this Wadia product will bring you many years of musical enjoyment and satisfaction. Please take a short time to read the information in this manual. We want you to be as familiar as possible with all the features and functions of your new Wadia Product.
About Wadia ....
Wadia Digital, founded in 1988, is one of the original companies dedicated to high performance digital audio reproduction. Wadia is based on the philosophy of applying advanced technology to improve the performance of digital audio components.
Wadia has consistently raised the standard for performance of Digital Audio playback. Some of the technological innovations pioneered by Wadia include:
- DigiMaster™ patented algorithm (filter optimized for reproducing music)
- ClockLink™ proprietary jitter reduction technology
- SwiftCurrent™ current to voltage conversion technology
- First outboard Digital-to-Analog converter
- First to apply glass fiber-optics to home audio Our designs are born of a delicate balance of technology shaped by a passion for music. Wadia continues to re-define the limits of digital music playback.
Please Take A Moment
The serial number, purchase date and Wadia Dealer name are important to you for possible insurance claim or future service. The spaces below have been provided for you to record that information:
Serial Number: ____
Purchase Date: ____
Dealer Name: ____
Technical Assistance
If at any time you have questions about your Wadia product, contact your Wadia Dealer who is familiar with your Wadia equipment and any other brands that may be part of your system. If you or your Dealer wish additional help concerning a suspected problem, you can receive technical assistance for all Wadia products at:
Wadia Digital, LLC.
2 Chambers Street Binghamton, New York 13903
Phone: 607-723-3539
Fax: 607-724-0549
Customer Service
If it is determined that your Wadia product is in need of repair, you can return it to your Dealer. You can also return it to the Wadia Service Department. For assistance on factory repair return procedure, contact the Wadia Service Department at:
Wadia Digital, LLC.
2 Chambers Street Binghamton, New York 13903
Phone: 607-723-3539
Fax: 607-724-0549
Table of Contents Thank You
Safety Instructions....2
Battery Installation and Replacement....3
Thank You and Please Take a Moment....4
Technical Assistance and Customer Service......4
Table of Contents 4
General Information 5
Connector and Cable Information 5
Introduction....6
Performance Features 6
Dimensions 7
Installation 8
Connections:
Rear Panel Connections....9
Connecting to a Preamplifier.... 10
Connecting to a Power Amplifier....11
Remote Control:
Remote Control Push-buttons.... 12
Front Panel:
Front Panel Displays, Push-buttons 13
Setup:
How to Operate Setup Mode .... 14
Operation:
How to Operate the 321 .... 15-18
Additional Information:
Photos....19-21
Specifications....22
Packing Instruction 23
Copyright 2014 © by Wadia Digital, LLC.
General Information
-
For additional connection information, refer to the owner's manual(s) for any component(s) connected to the 321 decoding computer.
-
The Main AC Power going to the 321 and any other Wadia Component(s) should not be applied until all the system components are connected together. Failure to do so could result in malfunctioning of some or all of the system's normal operations. When the 321 and other Wadia Components are in their Standby Power Off Mode, the Microprocessor's Circuitry inside each component is active.
-
The Unbalanced Outputs and Balanced Outputs can be used simultaneously.
-
The 321's internal Digital to Analog Converter Circuitry is designed to decode 2-channel PCM (Pulse Code Modulation) Digital Signal present at the Coaxial, Optical and USB Digital Inputs. Other Digital Audio Signal Format Types will cause the Audio Outputs of the 321 to be muted.
-
The term "Absolute Phase" relative to reproduction of sound by Loudspeakers (or headphone) refers to the phase of the reproduced signal relative to the original signal, retaining the original polarity. This applies regardless of the number of audio channels. A positive pressure on the microphone is reproduced as a positive pressure by the Loudspeaker. This would be referred to as "In Phase" reproduction and is normal. When positive pressure on the microphone is reproduced as a negative pressure by the Loudspeaker, this would be referred to as "Out of Phase" reproduction and is not normal. The vast majority of recordings are made with all channels in "Absolute Phase".
The term "Absolute Phase" is not the same as "Phase Reversal" where there is a polarity reversal between the Amplifier and Loudspeaker positive
and negative terminal connections on any given channel.
-
When discarding the unit, comply with local rules or regulations. Batteries should never be thrown away or incinerated but disposed of in accordance with the local regulations concerning battery disposal.
-
For additional information on the 321 and other Wadia Products please visit the Wadia Web Site at www.wadia.com.
Connector and Cable Information
XLR Connectors
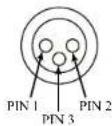
Below is the Pin configuration for the XLR Balanced Output Connectors on the 321. Refer to the diagram
for connections:
PIN 1: Shield/Ground
PIN 2: + Output
PIN 3: - Output
Introduction
The Wadia 321 Decoding Computer is one of the finest Digital to Analog Processors ever created with connections for digital sources including USB. The 321 Outputs have the ability to drive multiple components. The 321 reproduction is sonically transparent and absolutely accurate. The Wadia Sound is “The Sound of the Music Itself.”
Performance Features
- Dual Function
Use the Wadia 321 as the Digital Preamplifier together with Digital Source Components and Power Amplifier ^1 to form a complete Audio System. Connect the Wadia 321 to an existing Analog Audio System to provide the latest in Digital-to-Analog Conversion from digital audio sources.
• Electronic Input Switching
Electronic Input Switching on all Inputs provides reliable, noiseless, distortion free switching.
• Digital Audio Inputs
The 321 has Coaxial, Optical and USB Digital Inputs to Decode PCM Signals from an external source. The Coaxial and Optical Inputs process Digital Signals up to 192kHz with 24Bit resolution. The USB Input process Digital Signals up to 192kHz with 32Bit resolution.
Note: The Wadia 321 is designed to be compatible with the majority of Audio Power Amplifiers. However, do to a wide range of Power Amplifier Designs it is important the input sensitivity of the amplifier be at least 2 Volts. This will assure the playback of most music recordings are reproduced with adequate dynamic range.
• Quad Balanced Digital to Analog Converter
The 8 channel 32-bit, 192kHz Digital to Analog Converter is used in a Stereo Quad Balanced Mode, assuring the music is reproduced with a wide dynamic range and extremely low distortion, for both Disc and external sources.
• Balanced Outputs
The Balanced Outputs allow the connection of long cable lengths without a loss in sound quality.
• Precision Tracking Volume Control
Volume levels are controlled by a Digitally Controlled Attenuator System.
• Alphanumeric Fluorescent Display
The Front Panel Information Display indicates the Source Selection, Sampling Frequency, Volume Level, Output Phase and Setup Mode Selections. The display intensity is adjustable.
- Remote Control
The Remote Control provides control of the 321 operating functions.
• Special Power Supply
Fully regulated Power Supplies and a special R-Core Power Transformer ensure stable noise free operation even though the power line varies.
• Gold Plated Connectors
The Input and Output Connectors Contacts are gold plated for superior corrosion resistance and high electrical conductivity.
• LED Front Panel Indicators
Long life Light Emitting Diodes (LEDs) are used to indicate when the Setup Mode is active and when the 321 is in the Standby Mode.
• Die Cast Aluminium Chasiss
The ensures the durability and functional design of the 321 will be retained for many years.
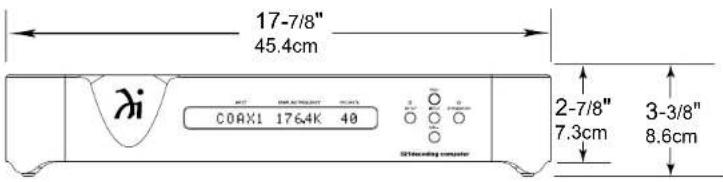
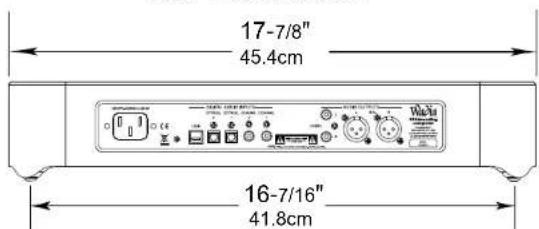
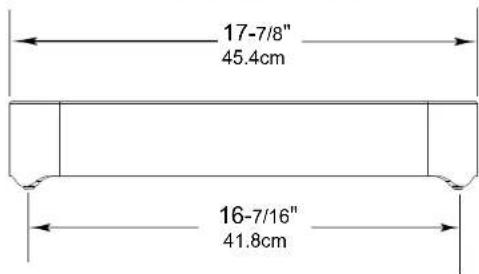
Dimensions
The following dimensions can assist in determining the best location for your 321. There is additional information on the next page pertaining to installing the 321 into cabinets.
Front View of the 321
Rear View of the 321
Side View of the 321
Installation
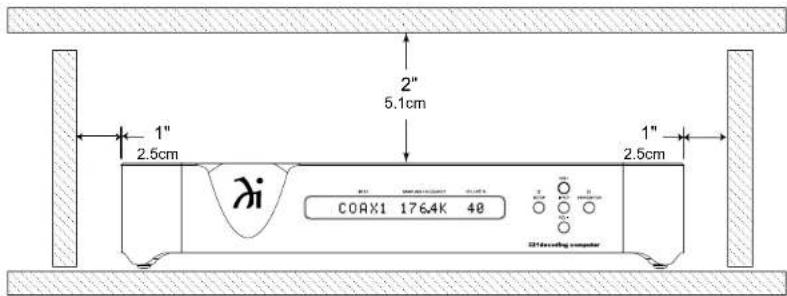
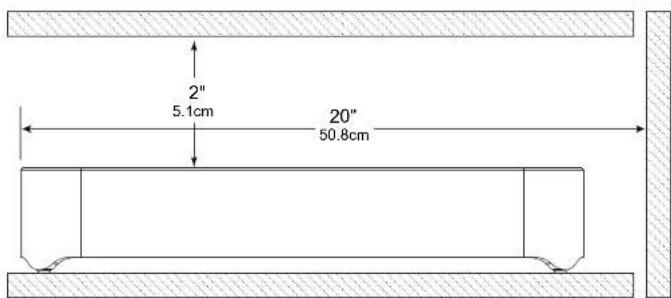
The 321 is designed to be placed upright on a table or shelf, standing on its feet. The required ventilation requirements are shown.
Always provide adequate ventilation for your 321. Cool operation ensures the longest possible operating life for any electronic instrument. Do not install the 321 directly above a heat generating device, such as a Power Amplifier. Allow at least 2 inches (5.1cm) above the top, 5/8 inches (1.6cm) below the bottom and 1 inch (2.5cm) on each side of the 321, so that airflow is not obstructed. Allow 20 inches (50.8cm) of depth for airflow and cable connections.
321 Front View
321 Side View
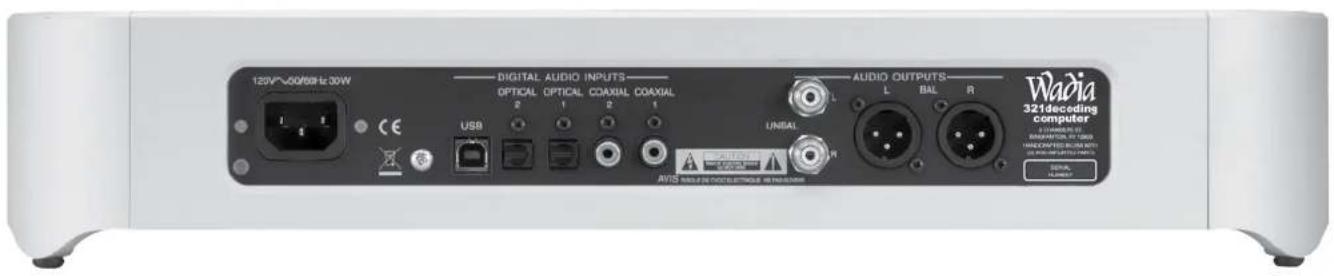
Rear Panel Connections
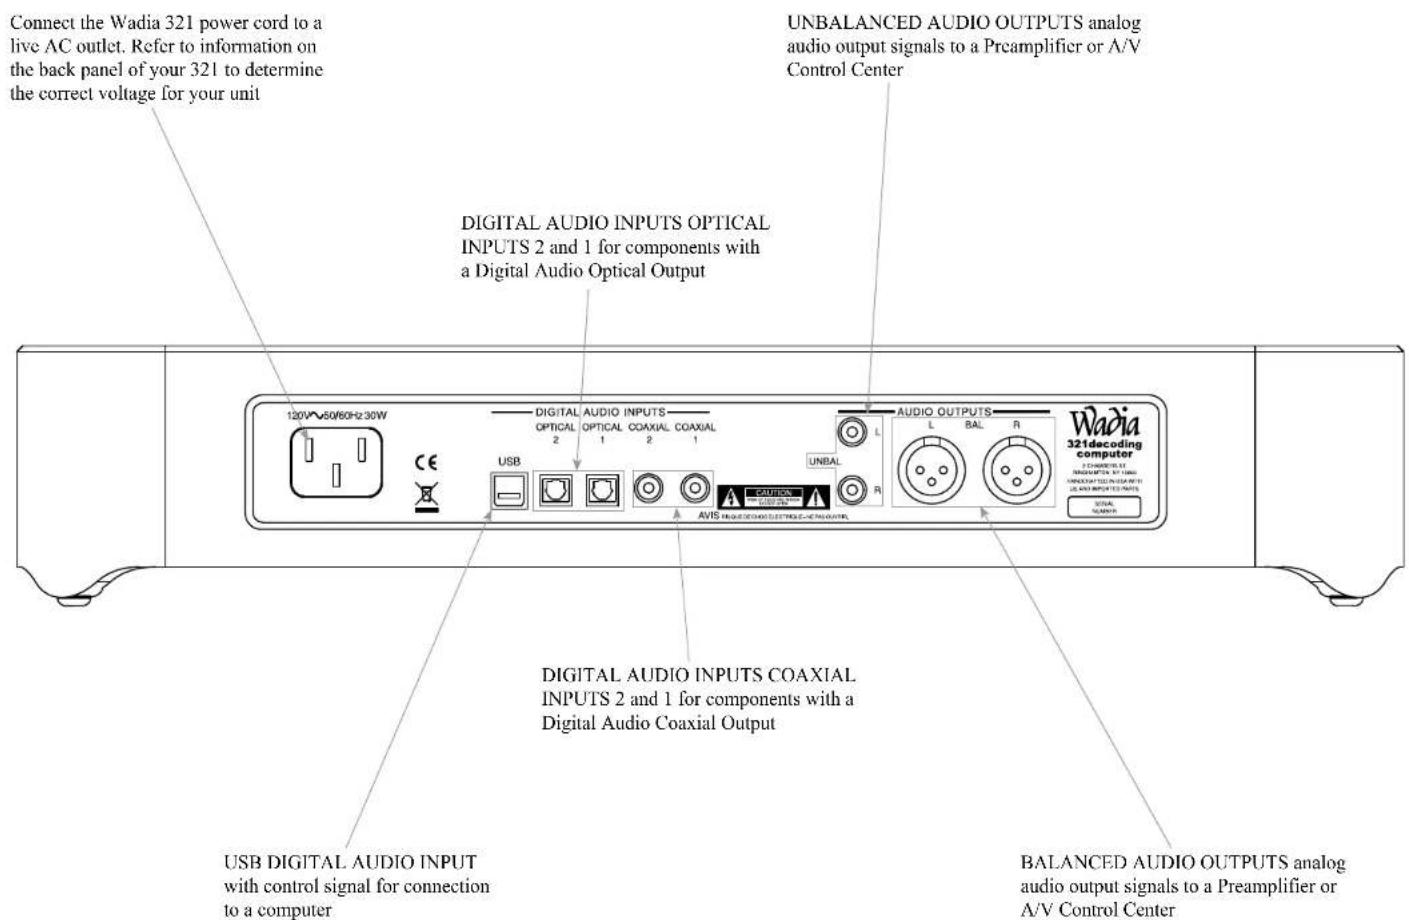
Connecting to a Preamplifier
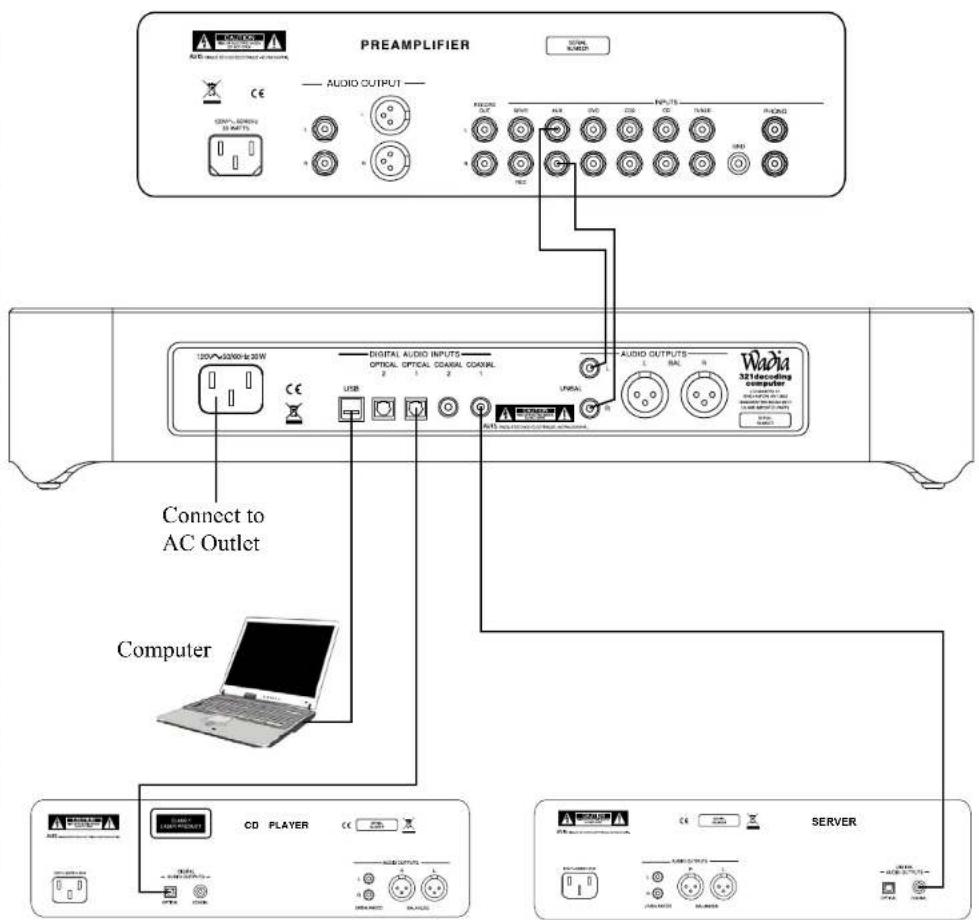
There are two different ways the 321 may be operated in an audio system. The first way is as a Digital to Analog Converter with Input Switching. The Audio Output of the 321 is connected to an Analog Input on the Preamplifier (Integrated Amplifier or Receiver). Follow the instructions and diagram on this page. The second way is as the Main Audio Preamplifier connected directly to a Power Amplifier, follow instructions on the next page.
On this page is an example of a typical audio system. Your system may vary from this, however the actual components would be connected in a similar manner. For additional information refer to "Connector and Cable Information" on page 5.
Note: 1. The Output Connection Balanced or Unbalanced may be used simultaneously.
Analog Audio Connections:
- Connect audio cables from the 321 UNBALanced AUDIO OUTPUTS R & L (Right and Left) connectors to the unbalanced Aux Input Connectors on the Preamplifier (A/V Control Center, Integrated Amplifier or Receiver). Note: 1. The Balanced Outputs may be used instead of the Unbalanced Outputs.
Digital Audio Connections:
- Connect a Digital Optical Cable from the 321 DIGITAL AUDIO INPUTS OPTICAL 1 connector to the CD Player Digital Optical Output connector.
- Connect a Digital Coaxial Cable from the 321 DIGITAL AUDIO INPUTS COAXIAL 1 connector to the Server Digital Coaxial Output connector.
- Connect a USB cable with (type A to type B) connectors from the 321 DIGITAL AUDIO INPUT USB connector to the Computer USB connector.
AC Power Cords Connections:
- Connect the 321 AC Power Cord to a live AC outlet.
Connecting to a Power Amplifier
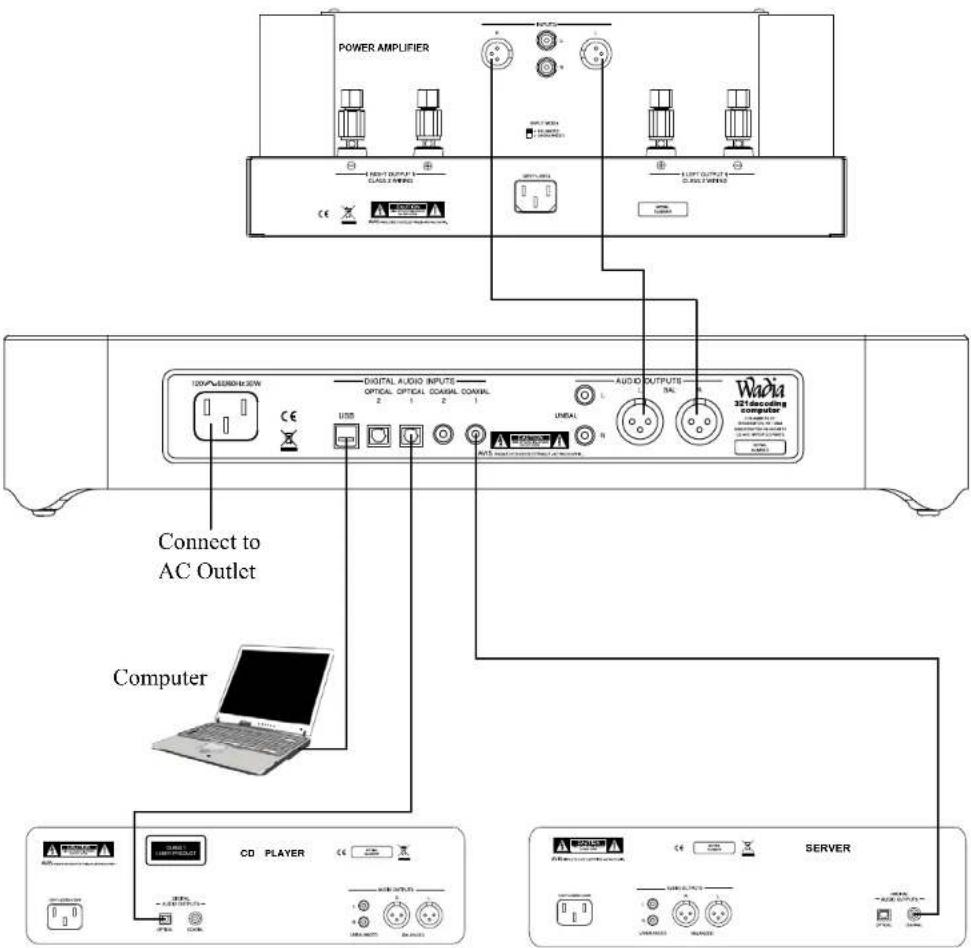
The 321 may also be used as the Main Audio Preamplifier connected directly to a Power Amplifier. Follow the connection instructions below and diagram on this page.
This is an example of a typical audio system. Your system may vary from this, however the actual components would be connected in a similar manner. For additional information refer to "Connector and Cable Information" on page 5.
Notes: 1. The Output Connection Balanced or Unbalanced may be used simultaneously.
- For additional information on Power Amplifier requirements when the Wadia 321 is connected directly to a Power Amplifier, refer to page 6, ^1 Note.
Audio Connections:
- Connect balanced audio cables from the 321 AUDIO OUTPUTS (Right and Left) connectors to the balanced Input connectors on the Power Amplifier. Note: If two Power Amplifiers are used, connect the unbalanced AUDIO OUTPUTS (I&R) to the unbalanced Inputs on the second Amplifier.
Digital Audio Connections:
-
Connect a Digital Optical Cable from the 321 DIGITAL AUDIO INPUTS OPTICAL 1 connector to the CD Player Digital Optical Output connector.
-
Connect a Digital Coaxial Cable from the 321 DIGITAL AUDIO INPUTS COAXIAL 1 connector to the Server Digital Coaxial Output connector.
-
Connect a USB cable with (type A to type B) connectors from the 321 DIGITAL AUDIO INPUT USB connector to the Computer USB connector.
AC Power Cords Connections:
- Connect the 321 AC Power Cord to a live AC outlet.
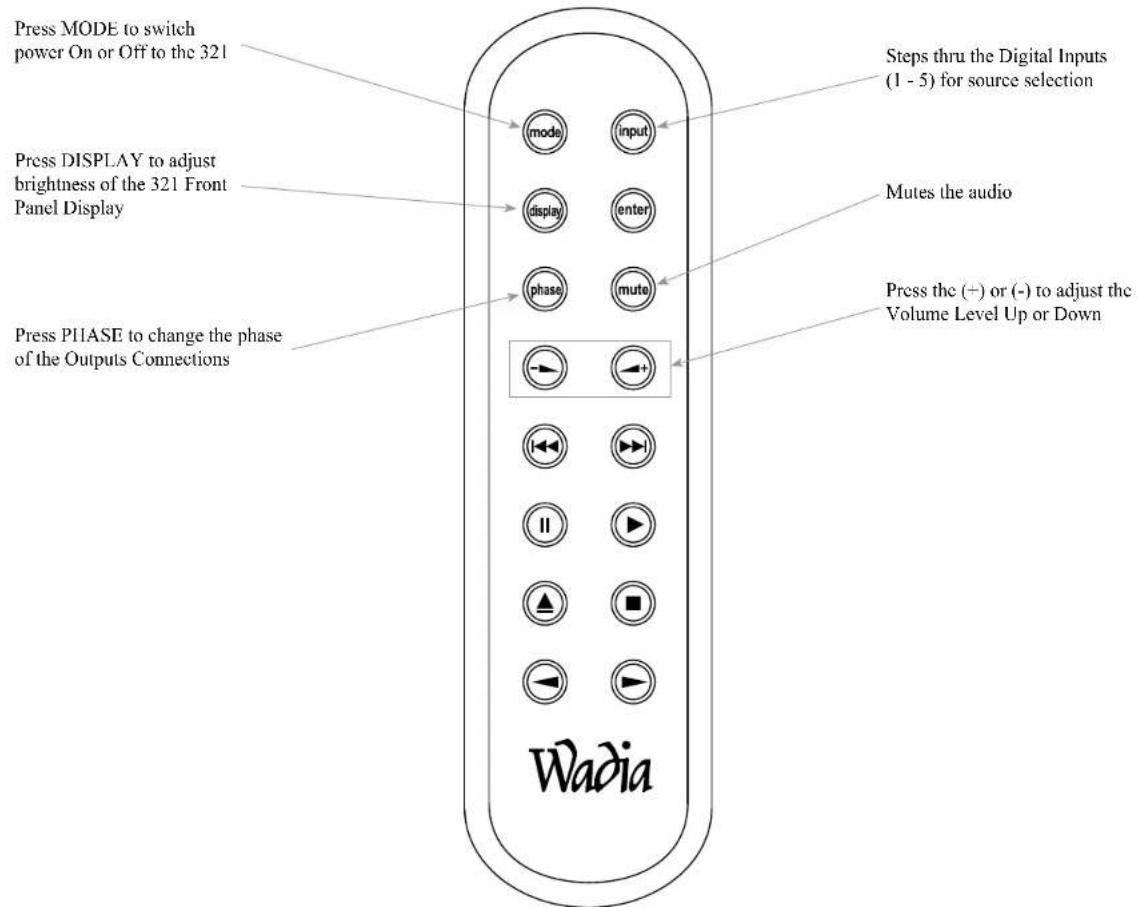
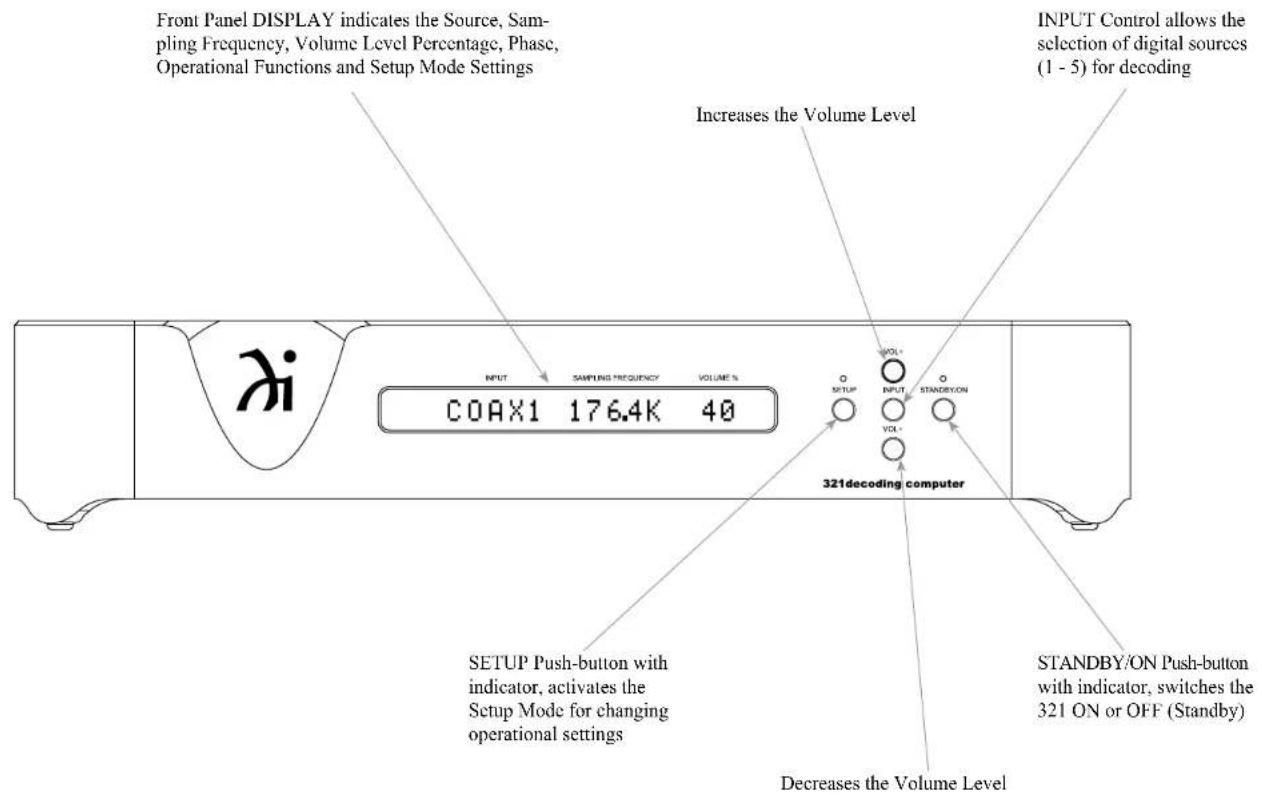
Note: Push-buttons whose function is not identified above are for use with other Wadia Products.
How to Operate the Setup Mode
Your Wadia 321 has been factory configured allowing for immediate enjoyment of superb audio. If you wish to make changes to the factory default settings, a Setup Feature is provided to customize the operation by using the Front Panel Information Display. Refer to the 321 Front Panel Illustration on the previous page while performing the following steps.
Note: If the 321 is currently On, proceed to step 2.
- Press the STANDBY/ON Push-button on the Front Panel or press the MODE (Power) Push-button on the Remote Control to switch On the 321. The 321 will go through a brief startup initialization with the Front Panel Display indicating the last used Input Source and volume setting. Refer to figure 1.
| INPUT | SAMPLING FREQUENCY | VOLUME % |
| COAX1 | 192K | 75 |
Figure 1
- Press the SETUP Push-button repeatedly until the Front Panel Information Display indicates "Firmware V1.00" or higher. Refer to figure 2.
| FIRMWARE | V1.00 |
| Figure 2 | |
- Press the SETUP Push-button to exit from the Setup Mode. The LED above the SETUP Push-button will extinguish and the Front Panel Display will revert back to its display of Input, Sampling Frequency and Volume %. Refer to figure 1.
Default Settings
The Default Settings Chart that follows indicates the Function Name, Default Setting and the Page Number for additional information.
| Default Settings | |
| Function Name Setting Page No. | |
| AUTO POWER OFF ENABLED 14 | |
| FIRMWAREV__._14 | |
Auto Power Off
The 321 incorporates an Auto Power Off Feature, which can automatically place the Digital Preamplifier into the Power Saving Standby/Off Mode. This occurs approximately 30 minutes after there has been an absence of a Digital Audio Signal on the currently selected 321 Input. If it is desirable to change the default Auto Off Setting of Enabled to Disabled, perform the following steps:
- Press the SETUP Push-button.
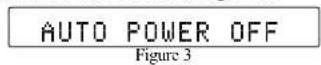
- The Front Panel Display will momentarily indicate "Auto Power Off". Refer to figure 3.
- The display will then indicate the current setting, either Disabled or Enabled. Refer to figures 4 and 5.
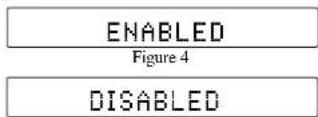
Figure 5
-
Press the INPUT Push-button to change the current setting.
-
Press the SETUP Push-button repeatedly until the LED above the SETUP Push-button is extinguished, the Front Panel Display indicates the currently selected Input Source. Refer to figure 1.
Firmware Version
The 321 functionality is controlled by internal software know as "Firmware". The current Version of the Firmware can be identified by utilizing the Setup Mode.
- Repeatedly press the SETUP Push-button until "FIRMWARE V__._" is indicated on the Front Panel Display. Refer to figure 2.
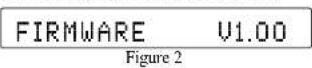
- Press the SETUP Push-button until the LED above the SETUP Push-button is extinguished.
How to Operate the 321
Power On and Off
The Red LED above the STANDBY/ON Push-button lights to indicate the 321 is in Standby mode. To switch ON the 321, press the STANDBY/ON Push-button on the Front Panel or the MODE (Power On) Push-button on the Remote Control. The 321 will go through a brief startup initialization with the Front Panel Display indicating the last used Input Source and Volume Level Setting. Refer to figures 50, 53, and 56. To switch OFF the 321 press the STANDBY/ON Push-button on the Front Panel or the MODE (Power Off) Push-button on the Remote Control.
| MUT | SAMPLINED INQUENCY | POLDING % |
| COAX1 | 192K | 75 |
Source Selection
Press the INPUT Push-button on the Front Panel or the INPUT Push-button on the Remote Control to select the desired source. Refer to figures 53 and 56. When the selected Input Source stops sending a Digital Audio signal to the Wadia 321, the Front Panel Display will display a series of dashes where the Sampling Frequency is normally displayed. Refer to figure 51.
| COAX1 | ---- | 75 |

Volume Level
To change the Volume Level of the Wadia 321, press the Front Panel VOLume + Push-button to increase the Volume or the VOLume - Push-button to decrease the Volume. The Volume Level may also be changed by using the Remote Control ▲+ (Volume Up) Push-button or the ▼ (Volume Down) Push-button for the desired listening level. Refer to figures 53 and 56.
Note: A Volume Setting of 88% on the Wadia 321 will provide optimum performance when it is connected to a Preamplifier (Integrated Amplifier or Receiver).
Mute
Press the Remote Control MUTE Push-button to mute the Audio Outputs. Refer to figure 56. When the Wa-dia 321 is muted, the Front Panel Display will display a series of dashes where the Volume % is normally displayed. Refer to figure 52. Pressing the MUTE Push-button a second time to un-mute the 321.
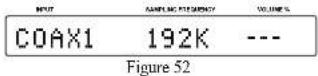
Display Brightness
The Front Panel Display Brightness may be changed from the default setting. The 321 will remember the
brightness preference, High (default setting) or Low Illumination. To change the Brightness Setting, repeatedly press the DISPLAY Push-button on the Remote Control for the desired Brightness. Refer to figure 56.
Output Phase
Normally, the "Absolute Phase" of recorded music is "In Phase". Occasionally the music may be "Out of Phase" and the 321 can correct this out of phase condition by pressing the PHASE Push-button on the Remote Control. On the Front Panel Display an "i" will appear to the right of the Volume Percentage. Refer to figure 54.
| MUT | NAMFUSI HIGHANCE | VOLUME % |
| COAX1 | 192K | 751 |
Note: For additional information on "Absolute Phase" and "Phase Reversal", refer to note 5 on page 5.
USB Input Operation and Driver Installation
The 321 USB Input provides the capability to playback music from a computer when the 321 Rear Panel USB Connector is connected to a computer USB Connector. Refer to figure 55.
| USB | 192K | 75 |
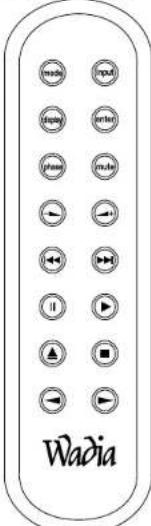
Figure 56
Note: The USB Input is for direct connection to a computer only. To playback music from a USB Drive, connect the USB Drive to another USB Port on
the computer and select the USB Drive with the Media Playback Program.
The 321 USB Input is compatible with PC Computers using Microsoft® Windows® Vista (SP2), Windows 7 (SP1) and Windows 8 (SP1). It is also compatible with Apple® Macintosh® Computers using OS-10.9 Mavericks or later.
When using a PC Computer with Windows, a special Wadia USB Audio Software Driver needs to be installed on the PC Computer. The driver needs to be installed before connecting the 321 USB Input to the USB Port on the computer.
Note: If an Apple Macintosh computer is used with the 321, no additional driver is required.
The Wadia USB Audio Windows Driver is available for download from the Wadia Web Site: http://www.Wadia.com/en-us/products/321
Under "Products" select "Wadia 321" then scroll down to the bottom of the Wadia 321 to the "DOWNLOAD AREA". Select the "WADIA 321 PC DRIVER SETUP" and download the PC Windows Driver. Follow the instructions below to install the Wadia 321 Driver;
Purpose: To Install the Wadia USB Audio Windows Driver for use with Wadia Products with an USB-Digital Audio Input.
Requirements: 1. A functioning Wadia Product with an USB-Digital Audio Input.
-
A PC Computer with a genuine Intel Main Processor and a functioning USB Port.
-
Windows Vista (SP2), Windows 7 (SP1 or greater) or Windows 8.1 Operating System.
-
An USB Cable with Type A to Type B Connectors.
Installing the Software
It is important to first install the downloaded software on your computer before connecting the Wadia Product to the computer. The USB Driver is included in the downloaded software package.
Note: Before installing this software, please check to see if the Wadia Product(s) with the USB-Digital Audio Input has the latest firmware version, if not update the firmware first.
-
Unzip the downloaded Wadia Windows USB Driver Software Package.
-
Run "Wadia_USB_driver_.exe". Refer to figures 1 and 2.

Figure 1
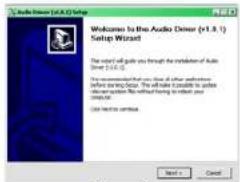
Figure 2
3. Referring to figure 3,
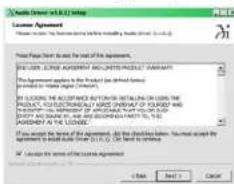
Figure 3
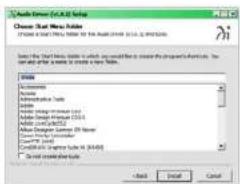
Figure 4
read and then check the "I accept the terms of the License Agreement" box and then the Next > button. If desired, choose a Start Menu Folder. Refer to figure 4.
- When the Windows Security window appears click on the "Install" button. Refer to figures 5 thru 7.
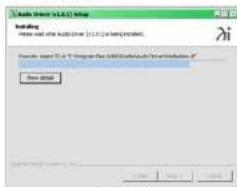
Figure 5
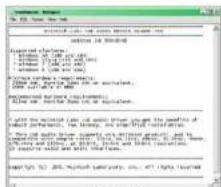
Figure 6
USB Connection
Connect the USB Cable with Type A to Type B connectors between the PC Computer and the Wadia Product with the USB-Digital Audio Input. An Icon

Figure 7
will appear On-Screen indicating Windows has found new hardware. Refer to figure 8.
Referring to figure 9, check the Always trust software from "CEentrance, Inc."
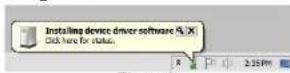
Figure 8
box and then the Install button. Upon completion of installing the driver, figure 10 will appear.
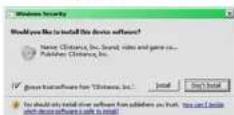
Figure 9
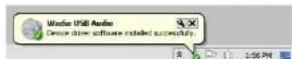
Figure 10
Windows Sound Settings
For proper operation of the McIntosh Product via the Computer USB Connection, it is required to make changes to Windows Sound Settings:
- Click on the "WADIA ICON" (located in the Windows notification area on the right side of the taskbar) or click on the Wiondows "Show hidden icons", then select the "WADIA ICON". Refer to figures 11, 12 and 13.
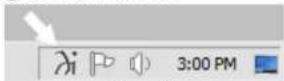
Figure 11
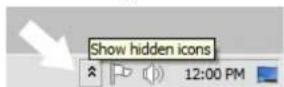
Figure 12
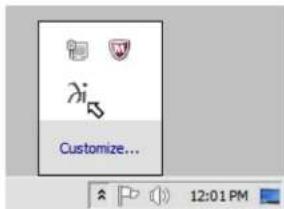
Figure 13
Note: Some version(s) of Windows might not show the Wadia Icon. Click on the "Start" button, select "Control Panel", then "Sound". Proceed to step 3.
- Right mouse button click to bring up the menu and then select the "Sound and Audio...". Refer to figures 14 and 15.
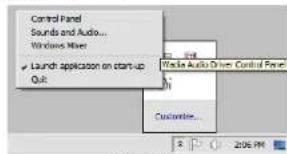
Figure 14

Figure 15
- Select the "Speakers Wadia USB Audio" and then click on the SET DEFAULT button. Refer to figures 16 and 17.
Notes: 1. When the Wadia USB Audio Product is not connected to your computer, the previous default Audio Device will be selected.
2. If other Wadia Products with USB Audio Connections are also connected to the computer, an additional "Wadia USB Audio" playback device will appear in the listing. Make sure to select the "Wadia USB Audio Device" from available playback devices listed when using this Wadia Product for USB Audio.
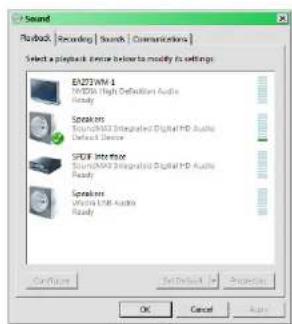
Figure 16
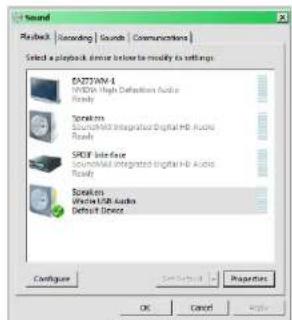
Figure 17
Wadia USB Audio Driver Operation
Control Panel Settings
The 321 USB Control Panel allows changes to be made from the default settings. These include Latency, Sample Rate and Audio Stream Input Output (ASIO) Control. Refer to figure 18.
Note: It is not necessary for the Wadia USB Control Panel to be running, unless it is desired to make changes to the default settings.
LATENCY:
The default Latency Setting is chosen for contemporary computers and their performance capabilities. When the Wadia USB Audio Driver is installed on a legacy computer with slower processing speed, it may occasionally produce clicks/pops in the music. To resolve this if it occurs, increase the Latency Setting (increase buffer size).
SAMPLE RATE:
The Sample Rate pull down Window indicates the Sample Rate choices of the connected Wadia USB Digital Audio Product. It also communicates the selected choice of Sampling Rate to the active Windows Playback Program.
Note: In general, when the original music is recorded at a higher Sampling Rate, the result is usually more detail in the music. However, this higher rate results in consuming larger amounts of storage space. The Sample Rate usually should be set to match the Sample Rate of the music recording being played back.
ASIO HOSTS CAN CHANGE:
There are two choices. When the box is not checked (default setting), the Sample Rate is determined by the Sample Rate Setting in the Wadia USB Control Panel.
It would be an appropriate choice when using a play-back program like Windows Media Player.
If a third party program for music playback is ASIO compliant then check the box. These programs allow changing the Sample Rate Setting directly “on the fly” according to the format of the music being played back. An example of just one of the available programs is “JRiver Media Center”.
ABOUT:
Displays the Driver Version and Control Panel Version of the current Wadia USB Audio Driver. Refer to figure 19.
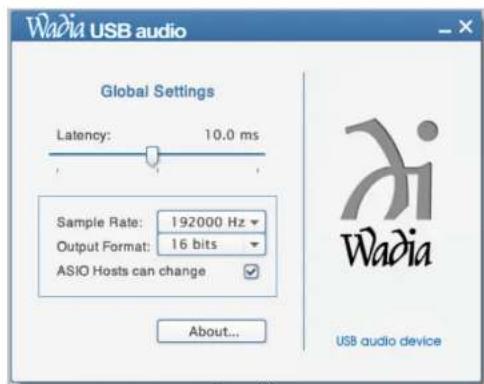
Figure 18
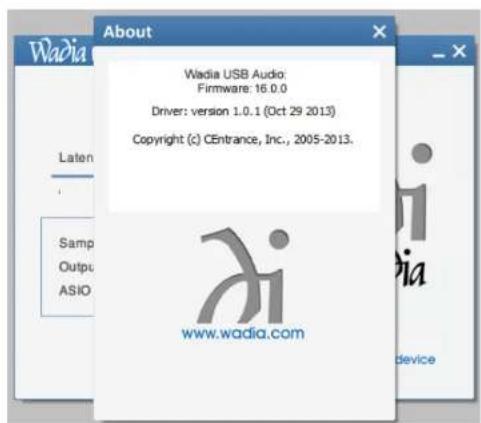
Figure 19
Photos
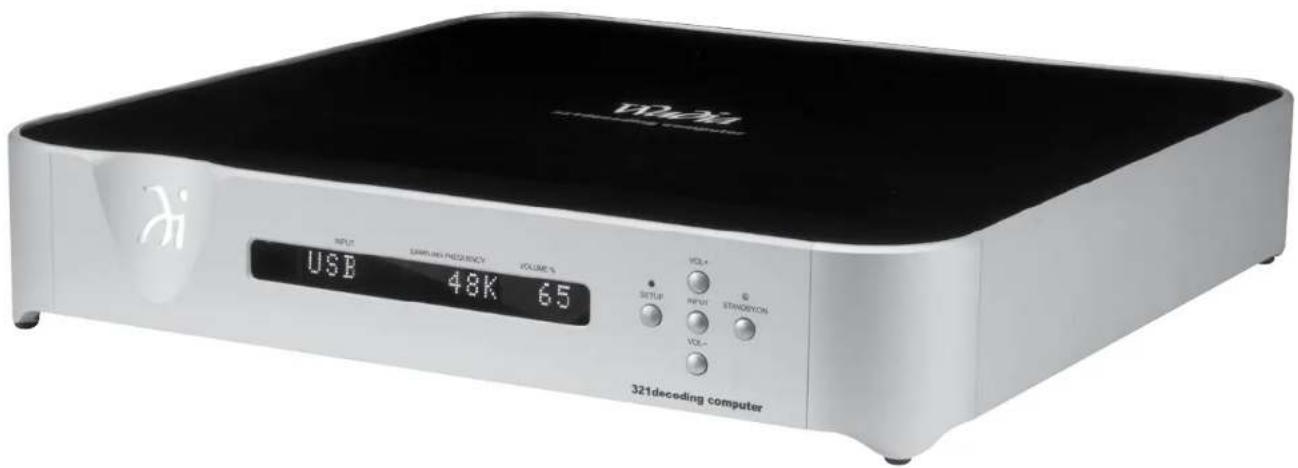

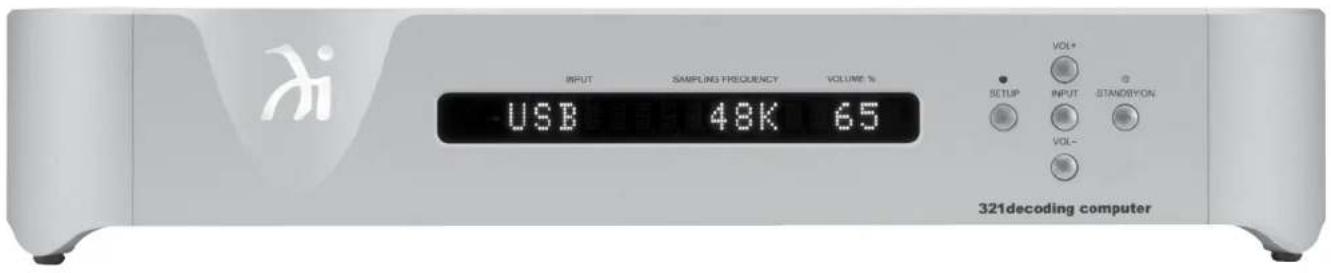
Photos, con't
Audio Specifications Digital Audio Specifications General Specifications
Frequency Response
+/-0.5dB from 4Hz to 20,000Hz
+0.5/-3dB from 4Hz to 68,000Hz (Source dependent)
Total Harmonic Distortion
0.002%
Variable Output level
0 - 4.0Vrms Unbalanced
0-8.0Vrms Balanced
Signal To Noise Ratio (A-Weighted)
110dB
Dynamic Range
100dB
Output Impedance
600 ohms Unbalanced and Balanced
Digital Input Format
SPDIF (PCM ^1 )
Digital Input Sample Rate
Coaxial and Optical: Up to 192KHz, 24-Bit
USB: Up to 192KHz, 32-Bit
Digital Inputs
Coaxial 1 and 2: 0.5V p-p/75 ohms
Optical 1 and 2: -15dbm to -21dbm (TOS Link)
USB: USB Type B Connector
^1 PCM (Pulse Code Modulation) Digital Signal type used for CD Discs, etc.
Power Requirements
Field AC Voltage conversion of the 321 is not possible. The 321 is factory configured for one of the following AC Voltages:
100 Volts, 50/60Hz at 30 watts
110 Volts, 50/60Hz at 30 watts
120 Volts, 50/60Hz at 30 watts
220 Volts, 50/60Hz at 30 watts
230 Volts, 50/60Hz at 30 watts
240 Volts, 50/60Hz at 30 watts
Standby Power, less than 0.25 watts
Note: Refer to the rear panel of the 321 for the correct voltage.
Overall Dimensions
Width is 17-7/8 inches (45.4cm)
Height is 3-3/8 inches (8.6cm) including feet
Depth is 20 inches (50.8cm) including the Front Panel, and Cables
Weight
25 pounds (11.4 kg) net, 29.5 pounds (13.4 kg) in shipping carton
Shipping Carton Dimensions
Width is 22-1/2 inches (57.2cm)
Height is 8-1/8 inches (20.6cm)
Depth is 22-1/2 inches (57.2cm)
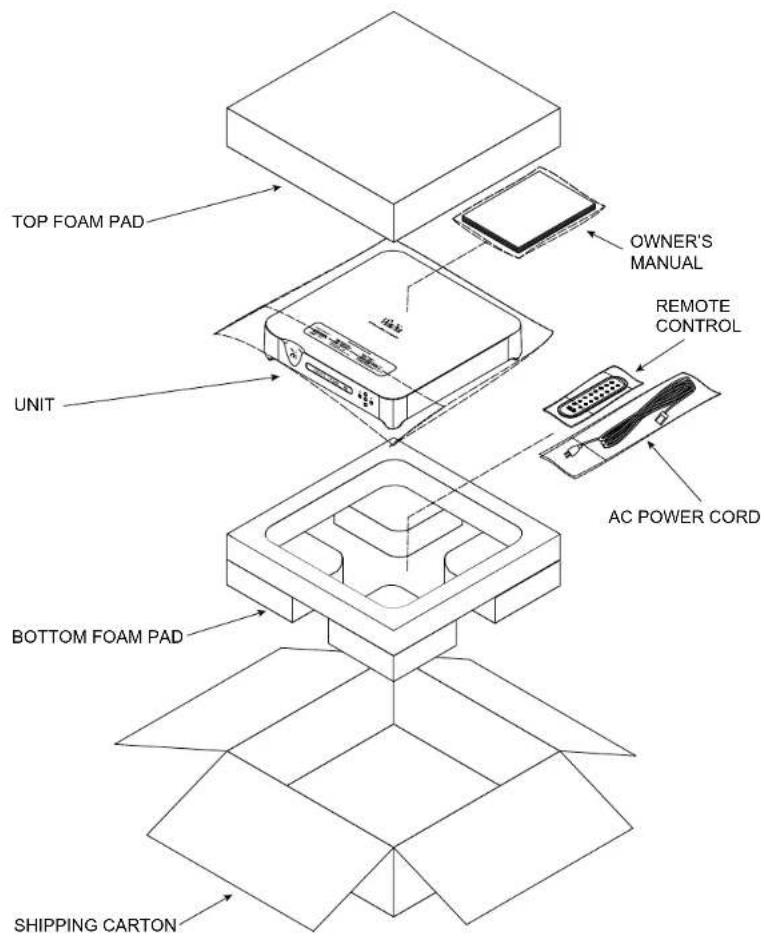
Packing Instructions
In the event it is necessary to repack the equipment for shipment, the equipment must be packed exactly as shown below. It is very important to ensure the proper equipment location between the bottom and top foam pads. Failure to do this will result in shipping damage.
Use the original shipping carton and interior parts only if they are all in good serviceable condition. If a shipping carton or any of the interior part(s) are needed, please call or write Customer Service Department of Wadia. Refer to page 4. Please see the Part List for the correct part numbers.
Quantity Part Number Description
1 034555 Shipping carton only
1 034556 Top foam pad
1 034554 Bottom foam pad

natural_image
Abstract black geometric logo or symbol on white background, no text or symbols presentWadia Digital, LLC
2 Chambers Street
Binghamton, NY 13903
www.wadia.com
The continuous improvement of its products is the policy of Wadia Digital who reserve the right to improve design without notice. Printed in the U.S.A.



- Wadia
- WARNING - TO REDUCE RISK OF FIRE OR ELECTRICAL SHOCK, DO NOT EXPOSE THIS EQUIPMENT TO RAIN OR MOISTURE.
- IMPORTANT SAFETY INSTRUCTIONS!
- PLEASE READ THEM BEFORE OPERATING THIS EQUIPMENT.
- NO USER-SERVICEABLE PARTS INSIDE. REFER SERVICING TO QUALIFIED PERSONNEL.
- To prevent the risk of electric shock, do not remove cover or back. No user-serviceable parts inside.
- WARNING
- DO NOT INGEST BATTERY, CHEMICAL BURN HAZARD
- CAUTION:
- Battery Installation
- Battery Removal
- About Wadia ....
- Please Take A Moment
- Technical Assistance
- Customer Service
- Table of Contents Thank You
- Connections:
- Remote Control:
- Front Panel:
- Setup:
- Operation:
- Additional Information:
- General Information
- Connector and Cable Information
- XLR Connectors
- Introduction
- Performance Features
- - Dual Function
- • Electronic Input Switching
- • Digital Audio Inputs
- • Quad Balanced Digital to Analog Converter
- • Balanced Outputs
- • Precision Tracking Volume Control
- • Alphanumeric Fluorescent Display
- - Remote Control
- • Special Power Supply
- • Gold Plated Connectors
- • LED Front Panel Indicators
- • Die Cast Aluminium Chasiss
- Dimensions
- Installation
- Rear Panel Connections
- Connecting to a Preamplifier
- Analog Audio Connections:
- Digital Audio Connections:
- AC Power Cords Connections:
- Connecting to a Power Amplifier
- Audio Connections:
- How to Operate the Setup Mode
- Default Settings
- Auto Power Off
- Firmware Version
- How to Operate the 321
- Power On and Off
- Source Selection
- Volume Level
- Mute
- Display Brightness
- Output Phase
- USB Input Operation and Driver Installation
- Installing the Software
- Referring to figure 3,
- USB Connection
- Windows Sound Settings
- Wadia USB Audio Driver Operation
- Control Panel Settings
- LATENCY:
- SAMPLE RATE:
- ASIO HOSTS CAN CHANGE:
- ABOUT:
- Audio Specifications Digital Audio Specifications General Specifications
- Packing Instructions
Brand : Wadia
Model : 321
Category : Receiver