16906 - Contact grill Lakeland - Free user manual and instructions
Find the device manual for free 16906 Lakeland in PDF.


| Product Type | Contact Grill / Griddle |
| Brand | Lakeland |
| Model | 16906 |
| Cooking Surface | Interchangeable ribbed grill plates and flat griddle plates |
| Number of Cooking Plates | 2 (upper and lower) |
| Cooking Positions | Closed, Open, Flat (180° open) |
| Temperature Control | Adjustable from 150°C to 220°C (4 settings: 150, 180, 200, 220) |
| Timer | 1 to 30 minutes with automatic shut-off |
| Automatic Shut-Off | After timer completion or 2 hours if left on |
| Display | LCD screen showing temperature and timer |
| Material | Stainless steel body, non-stick coated plates |
| Drip Tray | Removable, collects excess fat and juices |
| Capacity | Suitable for family of 4 |
| Voltage | 230V (UK mains) |
| Power | Approx. 2000W (estimated) |
| Weight | Approx. 5 kg (estimated) |
| Dimensions | Approx. 40 x 30 x 15 cm (estimated) |
| Safety Features | Auto shut-off, warning buzzer, cool-touch handle, non-slip feet |
| Cleaning | Grill plates and drip tray dishwasher safe (top rack), hand wash recommended |
| Spare Parts | Grill plates, griddle plates, and drip tray available from manufacturer |
| Warranty | Standard manufacturer warranty (contact Lakeland) |
| User Manual | Included (48 pages) |
Frequently Asked Questions - 16906 Lakeland
User questions about 16906 Lakeland
0 question about this device. Answer the ones you know or ask your own.
Ask a new question about this device
Download the instructions for your Contact grill in PDF format for free! Find your manual 16906 - Lakeland and take your electronic device back in hand. On this page are published all the documents necessary for the use of your device. 16906 by Lakeland.
USER MANUAL 16906 Lakeland
natural_image
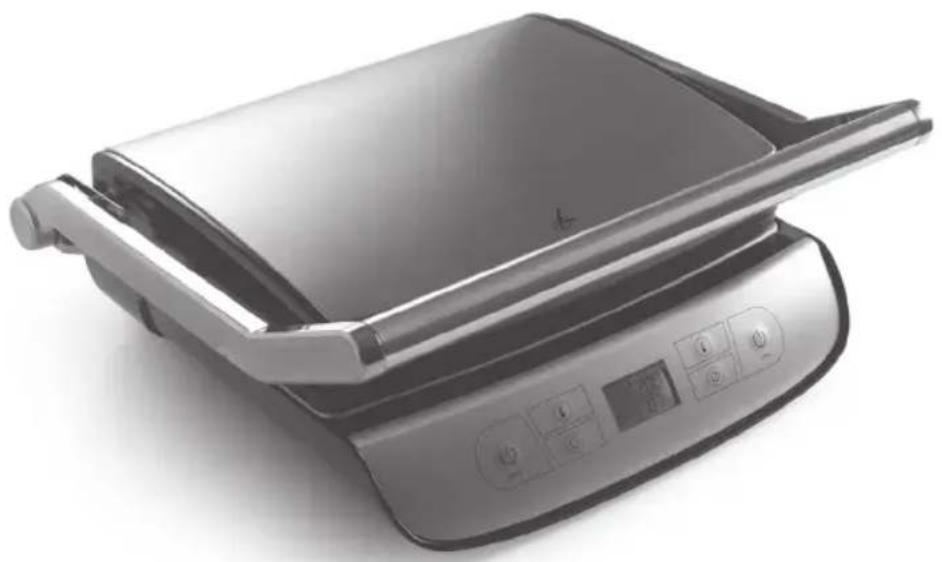
Modern stainless steel grater with a flat-screen lid and control panel (no visible text or symbols)LAKELAND INSTRUCTION BOOKLET
Thank you for choosing the Lakeland Griddle and Grill (16906)
We are sure you will be delighted with the performance and will enjoy many years of your electric griddle. An award winning family-owned business we have the same strong values of excellent quality, value for money and exceptional customer care as we did when we first set up the Lakeland Company in the 1960's.
Our products are carefully selected by our highly experienced team of experts and are thoroughly and rigorously tested to meet our consistently high standards so you can be assured that any product you purchase will be functional, durable and easy to use. It is this level of commitment to our customers that sets us apart.
Please take a little time to read this booklet before you use your griddle and then keep it in a safe place for future reference.
This electric griddle will comfortably cook for a family of 4. It comes complete with interchangeable grill (ridged) and griddle (flat) plates making it extremely versatile for cooking meats, fish, Panini's, toasties and even pancakes and drop scones too.
CONTENTS
Product features and cooking positions 4
Safety Cautions 6
The Control Panel and Programmes 8
How to assemble the Griddle and using for the very first time 9
Instructions for use 11
A guide to ingredients 12
A guide to cooking times 13
Adapting your own recipes 13
Hints and tips 14
Recipes 15
Troubleshooting 21
Care and cleaning 22
After sales service 22
Recycling your electricals 22
Electrical connections 23
PRODUCT FEATURES
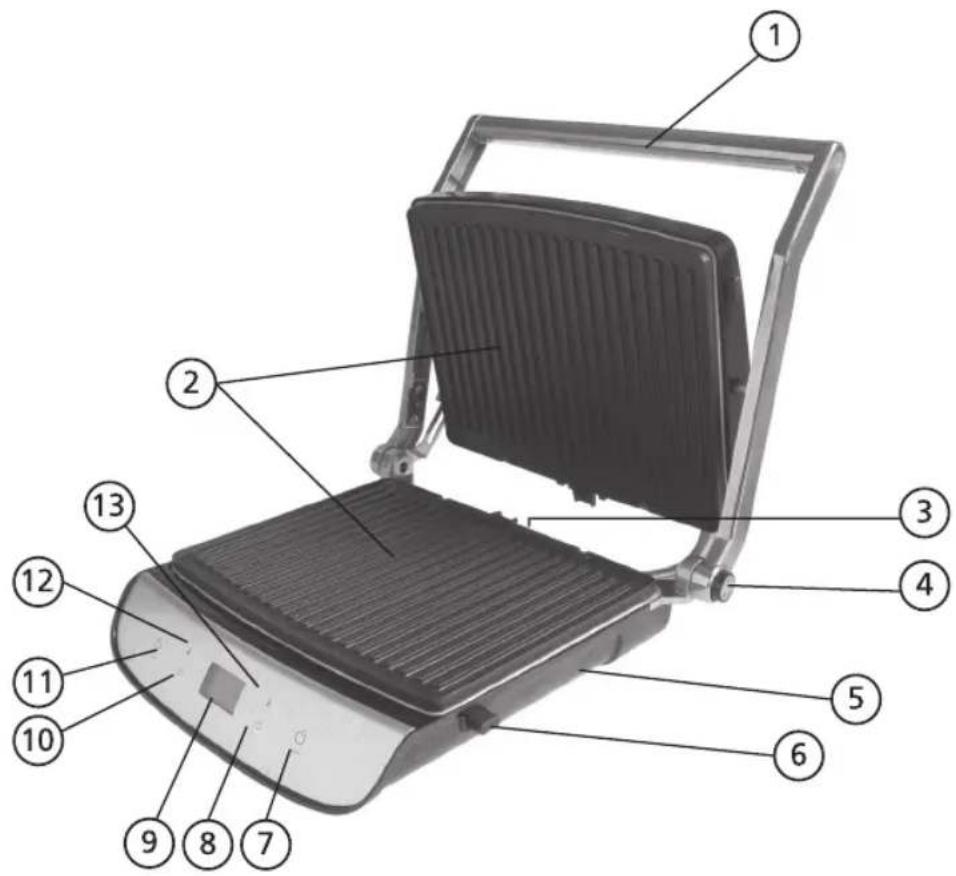
Your Lakeland Griddle explained
- Handle
- Upper and lower grill plates (Ribbed)
- Drip Tray
- Upper plate angle button
- Bottom housing
- Grill plates release buttons
- Lower grill plate power button
- Lower grill plate timer button
- LCD screen
- Upper grill plate timer button
- Upper grill plate power button
- Upper grill plate temperature button
- Lower grill plate temperature button
- Flat grill plates
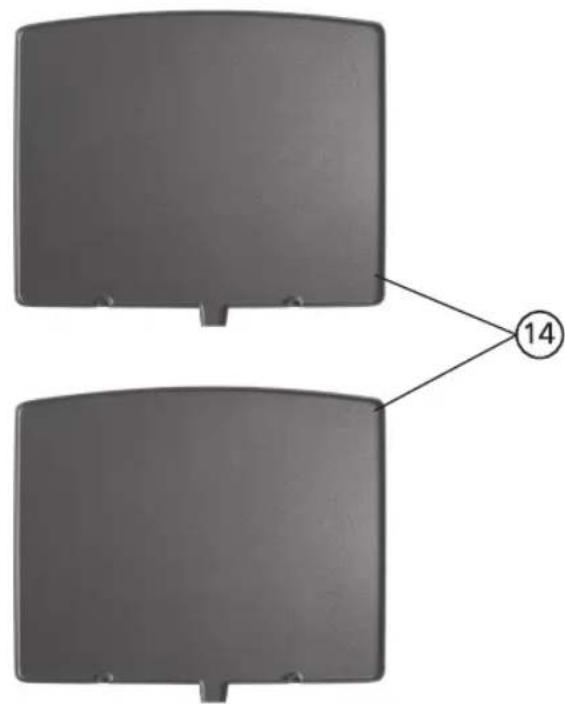
natural_image
Two gray rectangular panels with a small protrusion and a circled number 14 pointing to the top panel (no text or symbols on the panels themselves)COOKING POSITIONS
Your griddle has 3 cooking positions that you can use which are explained below.
Closed position
This is as the name suggests, when the griddle is closed and the upper grill plates rest on the lower grill plates. This is the position always used for preheating the griddle and cooking foods such as chicken breasts, kebabs, fish fillets, paninis and toasted sandwiches. This can be adjusted using the upper grill plate angle button to allow for cooking foods which are thicker.
Open position
To use the griddle in this position simply open up the griddle using the handle until the upper grill plate locks into an upright position. This is also the position to use when adding or removing foods to be cooked. For best browning results when cooking meat use the griddle in the open position.
Flat position
To open it out into the flat position, as shown below, for either fitting the grill plates or for cooking on both grill plates, simply open the griddle up to the open position and then press the upper grill plate angle button which allows you to open the upper grill plate out completely flat. This allows you to cook different foods on the separate grill plates at the same time, or to cook large amounts of the same food.
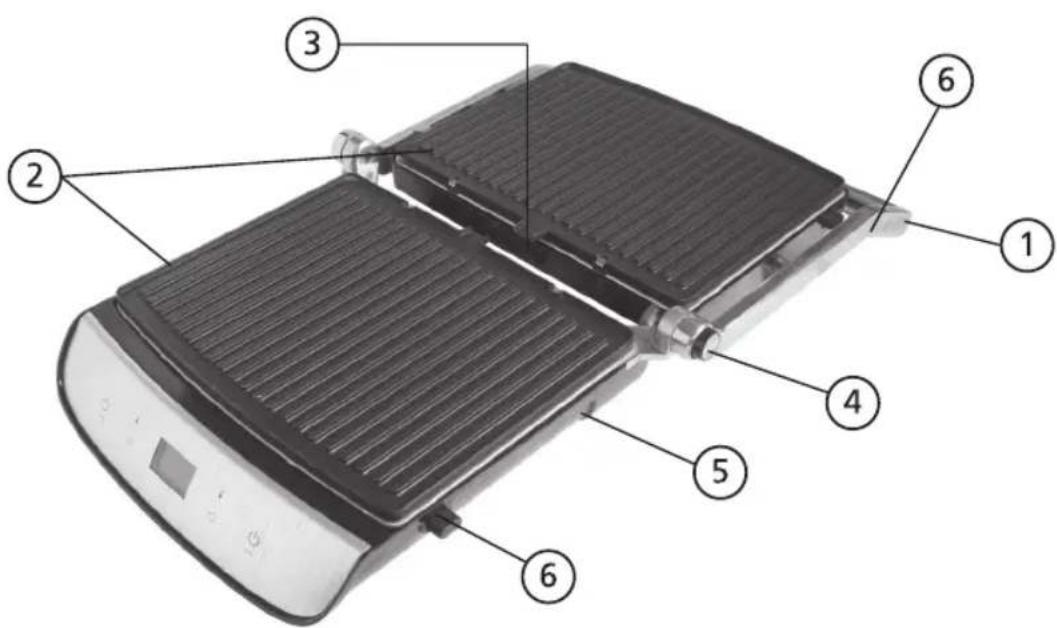
SAFETY CAUTIONS
Carefully read all the instructions before using the appliance and keep in a safe place for future reference. Always follow these safety cautions when using the appliance to avoid personal injury or damage to the appliance. This appliance should be used only as described in this instruction book.
- Make sure your electricity supply matches the voltage shown on the appliance.
- To avoid a potential circuit overload when using the griddle, do not operate any other high wattage product on the same electrical circuit at the same time.
- Ensure all packaging materials and any promotional labels or stickers are removed from the appliance before the first use.
- Always inspect the appliance before use for noticeable signs of damage. Do not use if damaged or has been dropped. In the event of damage, or if the appliance develops a fault contact the Lakeland Customer Care Team on 015394 88100.
- Do not use this appliance if the lead is damaged. If the lead is damaged it must be replaced by the manufacturer or a service agent as recommended by the manufacturer.
• Always use the appliance on a dry, level, heat resistant surface. - This appliance is not intended for use by persons (including children) with reduced physical, sensory or mental capabilities, or lack of experience and knowledge, unless they have been given supervision or instruction concerning the use of the appliance by a person responsible for their safety.
• Children should always be supervised to ensure they do not play with this product. - Do not use any accessories or attachments with this appliance other than those recommended by Lakeland.
- To protect against fire, electric shock or personal injury, do not immerse cord, plug or unit in water or other liquids. If the griddle should happen to fall into water, unplug it immediately from the mains socket and do not touch or reach into the water.
- Do not leave the lead hanging over the edge of a kitchen table or worktop. Avoid contact between the lead and hot surfaces.
- For indoor use only.
- For domestic use only.
- This appliance should be used for preparation of food as described within the instructions for use that accompany it.
- To avoid injury or possible fire, do not cover the appliance when in use.
-
Do not connect this appliance to an external timer or remote control system.
-
An extension cable may be used with care. The electrical rating of the cable should be at least as great as the appliance. Do not allow the cable to hang over the edge of the worktop or touch any hot surfaces.
- This appliance complies with the basic requirements of Directives 04/108/EC (Electromagnetic Compatibility) and 06/95/EC (Safety of Domestic Electrical Appliances)
- WARNING; A cut off plug inserted into a 13amp socket is a serious safety (shock) hazard. Ensure the cut off plug is disposed of safely before using the griddle.
- The temperature of all surfaces marked with this symbol will be very hot when the appliance is in use. DO NOT TOUCH these surfaces as possible injury could occur. Allow to cool completely before handling this appliance.
- CAUTION; the plastic bags used to wrap this appliance or the packaging may be dangerous. To avoid risk of suffocation, keep these bags out of reach of babies and children. These bags are not toys.
- Do not use the griddle and its cord on or near a gas or electric hob, or inside or on top of a heated oven or any other heat source.
- Use the griddle in a well ventilated area, ensuring you keep at least 10cm of space around each side of the griddle to allow for sufficient air circulation.
- Do not allow the griddle to come into contact with any curtains, tea towels, items of clothing or any other flammable materials whilst in use.
- Do not use the griddle unless both grill plates are properly installed.
- Never line the drip tray with foil or any other materials.
- Do not leave unattended during preheating or cooking at any time.
- Always ensure the griddle is preheated according to manufacturer's guidelines prior to use.
- Do not touch the hot surfaces of the griddle when in use.
- Do take care when opening the preheated griddle as the grill plates will be very hot. For safety use heat resistant gloves when handling the griddle.
- Do not lift or move the griddle whilst in use.
- Do not leave any wooden or plastic cooking utensils in or in contact with the griddle during cooking.
- Always ensure that your hands are dry before removing the plug from the mains socket. Never pull the plug out of the mains socket by its lead, as this could cause damage to the lead rendering it unsafe to use.
- Unplug from the mains when not in use and before cleaning. Allow to cool before cleaning the appliance. To disconnect, turn the upper and lower grill plate power switches to "off" and remove the plug from the mains socket.
THE CONTROL PANEL AND PROGRAMMES
Your Lakeland Griddle Control Panel Explained
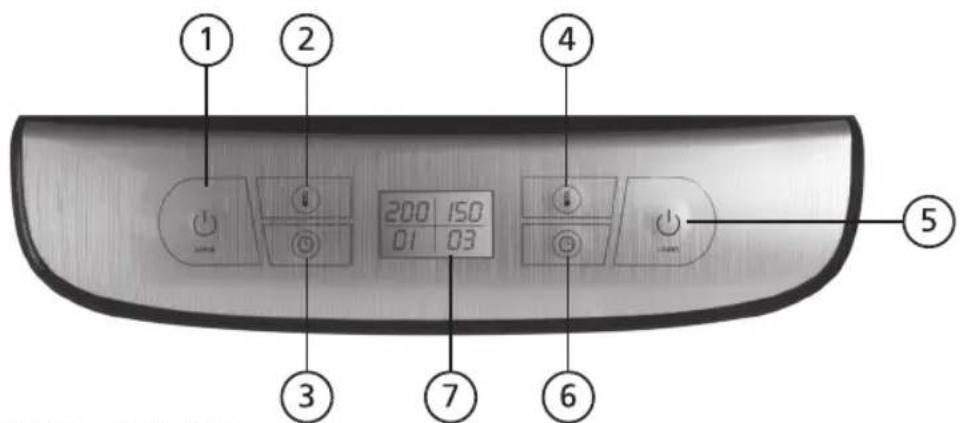
- Upper grill plate power button
- Upper grill plate temperature control
- Upper grill timer power button
- Lower grill plate temperature control
- Lower grill plate power button
- Lower grill plate timer button
- LCD Screen
Your Lakeland griddle has both upper and lower cooking grill plates which can be used together or on their own. The control panel is very straightforward to use and consists of a large LCD screen in the centre, which will display the cooking temperatures clearly for both grill plates. On either side of this are identical controls for which the left side controls the upper grill plates and the right side control the lower grill plates. Once the griddle is plugged in at the mains socket, you will see the LCD screen flash blue once and beep once, both of which are a sign that the griddle is plugged in.
Upper and Lower Grill Plate Power Button
The upper and lower grill plate power buttons simply turn the upper or lower grill plates on. Once they are turned on the LCD screen will turn blue and constantly display a flashing 150 which is the default heat setting and so this will show every time you turn the griddle on.
Upper and Lower Grill Plate Temperature Control
The upper and lower grill plate temperature control buttons allow you to choose a heat setting from 150c to 180c, 200c, or 220c. You can use either upper and lower grills at the same temperature, or if cooking different foods, you can select different temperatures for the upper and lower grill plates. Simply press the button until you reach the desired temperature and the chosen temperature will flash constantly whilst preheating. The screen will then stop flashing and beep once when the grill plates have reached the desired temperature.
Upper and Lower Grill Plate Timer Button
The upper and lower grill plate timer buttons allow you to set the timer for either or both of the upper and lower grill plates from 1 minute to 30 minutes and at the end of that time, the griddle will automatically turn itself off. The griddle can also be used without the timer being set if preferred. Simply press the button until you have the number of minutes displayed that you want to cook for and the griddle will do the rest.
OTHER FEATURES
Automatic Power Off
Your griddle will automatically power itself off at the end of cooking if using the timer setting and also, after 2 hours if accidentally left turned on.
Warning Buzzer
Should a problem occur within the griddle, the buzzer will sound constantly. Should this happen, simply turn off the griddle from the mains socket and do not use it until it has been checked over by the manufacturer or a service agent as recommended by the manufacturer.
HOW TO ASSEMBLE THE LAKELAND GRIDDLE AND USING FOR THE VERY FIRST TIME
Fitting the drip tray
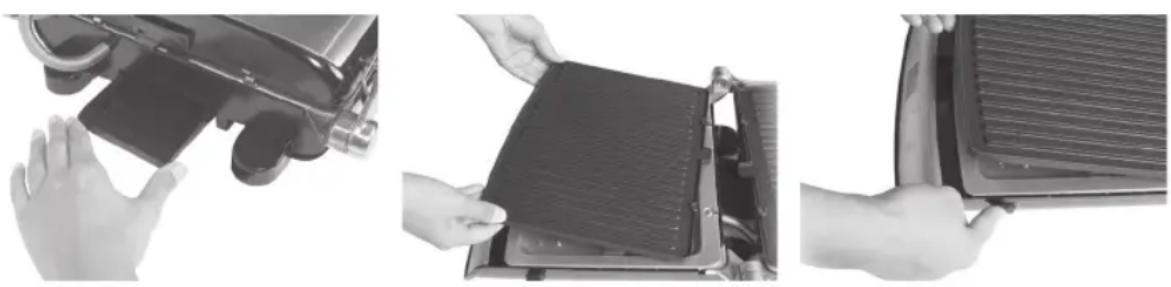
- With the griddle closed, carefully line up the drip tray at the back of the griddle ensuring it is sitting snuggly in its runners. Part of the drip tray will protrude from the back of the griddle but this is normal. See pic 1.
Fitting the grill or griddle plates
- To fit the grill plates ensure your griddle is in the flat and open position by using the upper grill plate angle button to open out the griddle so it is completely flat. See pic 2.
- Each grill plate is clearly labelled underneath with 'upper plate' and 'lower plate'. Starting with the upper grill plate, position it with the grease spout pointing towards the drip tray. Line up the 2 notches on the base of the grill plate with the catches on the griddle base and then press the plate securely into position. When fitted properly the grill plate will not be able to be removed unless the grill plate release button is pressed.
- Repeat with the lower grill plate as above.
Removing the grill or griddle plates
Always ensure the griddle is completely cold before removing the grill plates.
- To remove the grill plates ensure your griddle is in the flat and open position.
- Press the upper grill plate release button and the plate will pop out. See pic 3.
- Repeat by pressing the lower grill plate release button and the lower grill plate will pop out.
- Then wash and dry the grill plates before reattaching to the griddle.
natural_image
Three-panel image showing hands installing or adjusting a black panel on a grater, no text or symbols visiblePic 1.
Pic 2.
Pic 3.
Preheating the griddle empty before use.
Once you have familiarised yourself with your griddle it is advisable to prepare the griddle and heat the griddle up empty for the very first use. This is because it is common for the griddle to produce some smoke on its first use which then disappears with future use.
To do this;
- Open the griddle up by pulling the handle upwards. Remove and then wash the grill plates and drip tray thoroughly in hot soapy water, either by hand or on the top rack of the dishwasher.
- Ensure grill plates and drip tray are totally dry before refitting to the griddle.
- Wipe over the outside of the griddle using a soft dry and clean cloth.
- Close the griddle shut and turn it on by plugging it into a mains socket. You will then hear the griddle beep once and see the LCD screen flash blue once, both of which indicate that the griddle is plugged in. Then the LCD screen will go out.
- Press the upper grill plate and lower grill plate power buttons on (see control panel diagram) and the LCD screen will light up blue and automatically flash 150, which is the default heat setting.
- Adjust the heat levels on both the upper and lower grill plates to 220 and leave the griddle to preheat, during which time the number 220 will flash constantly on either side to indicate it is preheating.
- NOTE: During the initial use of this griddle it may produce some smoke which is perfectly normal. There is nothing to worry about and this will disappear with future use.
- Leave the griddle to preheat for approximately 3-4 minutes and once it has reached 220 the LCD screen will beep and the number 220 will stop flashing and remain fixed on the screen for both upper and lower grill plates. Your preheating of the griddle empty is now complete.
- Press the upper and lower grill plate power buttons off and unplug the griddle from the mains socket and leave to cool completely before using.
You are now ready to use your griddle.
INSTRUCTIONS FOR USE
Here are some important points to remember before using your griddle.
• This griddle will comfortably cook for a family of 4.
- If grilling smaller portions than your recipe suggests, always position the food in the centre of the grill plates for best results.
- Always ensure your foods to be cooked are of an even thickness. If cooking meats such as chicken breasts, you can flatten the meat slightly with a meat mallet to ensure even cooking throughout.
- When cooking on the full size of the griddle, ensure you space the food out evenly leaving a small gap in between foods to allow for uniform cooking.
- When grilling more than one type of food, choose foods of an even thickness, wherever possible, for an even cook.
- Try to use tender meat cuts for grilling and if you have to use tougher cuts, always try to marinate them first.
• Always use the cooking times given as a guide and if the food is thicker than suggested you will need to allow a little extra cooking time to ensure it is cooked through properly.
• Always preheat the griddle according to guidelines before beginning to cook.
- When using the griddle as a Panini maker, always use the grill plates for those authentic grill marks.
How to use the Griddle
- Make sure the griddle is shut and then connect it to the electricity supply by plugging it into a mains socket. You will then see the LCD screen flash blue once and also beep once before going out, both of which indicate that the griddle is plugged in.
- Press the upper grill plate or lower grill plate (or both) power buttons on (see control panel diagram) and the LCD screen will light up blue and flash 150. This indicates that the grill plates are switched on and they will begin to heat up to 150C automatically.
- To vary the cooking temperature, which ranges from 150c, 180c, 200c to 220C, and then back down again, simply adjust the upper and lower grill plate's temperature control button accordingly (see control panel diagram). Whilst preheating, the temperature selected will constantly flash on the LCD screen until it is reached.
-
When the correct temperature is reached, the flashing will stop and that temperature will appear as a fixed number on the LCD screen to indicate that the griddle is preheated and ready for use.
-
If you do not want to use the timer facility your griddle is now ready for cooking on.
- If you want to use the timer, once the griddle has reached the desired temperature, the timer can be set on both the upper and lower plates. Set the timer from 1-30 minutes, as required, and after cooking, the griddle will automatically power itself off.
- Use the handle to carefully lift up the upper grill plate to the open position, remembering that they will become very hot and place your food to be cooked on the grill plate using wooden or plastic heat resistant cooking utensils. Alternatively, open the griddle up to the flat position and place food to be cooked on both grill plates. CAUTION: Never use metal cooking utensils with your griddle as they will damage the non-stick coating of the griddle.
- Lower the upper grill plates over the food using the handle or alternatively, keep the griddle open to cook on both grill plates and cook according to recipe. NOTE: Never use the griddle to cook or defrost frozen food. All food must be completely defrosted before cooking. NOTE: All cooking times are given as a guide only and will vary depending upon thickness and cut of meat, vegetable or sandwich cooked. NOTE: Always ensure foods are thoroughly cooked before serving.
- If cooking in the closed position, carefully lift the handle to open up the griddle, taking care of the hot grill plates and also of any steam that may be released. Heat resistant gloves are recommended for safety at this stage.
- Carefully remove the cooked food using the recommended cooking utensils and if cooking is complete, unplug the power cord from the mains socket and leave the griddle until completely cool before cleaning.
A GUIDE TO INGREDIENTS
Your Lakeland griddle is the perfect piece of kitchen equipment to cook a huge selection of foods on. Because it comes with grill and griddle plates, the variety of foods that the griddle can cook is vast. You can cook any of the following on your griddle: chicken breasts, sausages, burgers, steaks, bacon, gammon steaks, pork fillet or chops, meat kebabs, fish fillets, grilled vegetables, eggs, Panini's, toasted sandwiches, quesadillas, grilled fruits and even French toast, waffles, drop scones or pancakes to name but a few. Below is a guide to preparing ingredients prior to cooking on the griddle.
- Always ensure foods to be cooked on the griddle are of an even thickness for consistent cooking.
- Don't worry about the overall thickness of a food to be cooked, as the griddle has an adjustable upper grill plate angle button which means the griddle can cook foods that are also quite thick. Just remember to keep the thickness of the food to be cooked, constant throughout.
- Meats can be flattened slightly using a meat mallet or rolling pin to ensure they are of an even thickness.
- When preparing vegetables ensure these are also of an even thickness.
- When preparing vegetables to be griddled in slices, do not slice them too thinly.
- You do not need to add additional oil to any foods unless you want to or if the food to be cooked is in a marinade.
A GUIDE TO COOKING TIMES
Do note that these will vary depending upon the thickness of food to be cooked and in the instance of the steak, will vary depending upon your cooking preference.
| Sausages - pricked with a fork first | Open position 6-8 minutes | |
| Burgers – raw not frozen quarter pounder weight | Open position 6-8 minutes | |
| Boneless Chicken Breast – flattened to an even thickness | Open position 5-6 minutes | |
| Boneless Pork Loin Steak approx 2cm thickness | Open position 6-8 minutes | |
| Sirloin Steak approx 2cm thickness | ||
| Rare | Open position | 2-3 minutes |
| Medium | Open position | 3-4 minutes |
| Well done | Open position | 5-6 minutes |
| Salmon Fillet Open Position 8-10 minutes | ||
| Bacon Open position 3-4 minutes | ||
| Fried Egg Open position 3-4 minutes | ||
ADAPTING YOUR OWN RECIPES
After you have made some of the recipes supplied you may wish to adapt a few of your own recipes. Start by selecting one of the recipes in this booklet, which is similar to your own and use this as a guide. Below are a few pointers that will help you when adapting your own recipes.
- This griddle will comfortably cook for 4 people so if you are using a recipe to serve 6 or above you will need to scale down the recipe.
• Always ensure the food to be cooked is of an even thickness, wherever possible. - It is not necessary to add any extra oil to meats, fish, vegetables or sandwiches prior to cooking because of the non-stick grill plates, unless you choose to do so or your food is being marinated.
- If you do choose to grease the grill plates do so sparingly otherwise the griddle may smoke.
- Do remember that if cooking in the closed position, once preheated, your griddle will cook foods such as chicken, burgers and other meats and fish quicker than they would cook under a standard grill because they are being cooked from both sides at once. Therefore, do keep an eye on the food cooking at all times, until you are confidant of cooking times.
- You will not need to lift the lid during cooking unless a recipe advises you otherwise.
- If you are cooking foods that have been in a marinade, make sure that most of the excess marinade is shaken from the food before cooking to prevent a build - up of burnt marinade from accumulating on the grill plates.
HINTS AND TIPS
- Do ensure your grill plates are fixed securely in position before preheating otherwise they won't heat up properly and the temperature you are trying to preheat to, will remain as a flashing number on the LCD screen. If this happens, press the upper and lower grill plate power buttons off, leave the griddle to cool completely and then reattach the grill plate so it is firmly in position before preheating again.
- If extra greasing is required, it is advisable to wash the grill plates and ensure they are completely dry before brushing or wiping over very lightly with a brush or piece of clean kitchen towel coated with a little butter or oil.
- When preheating the griddle it is advisable to do so with the lid shut.
- Always ensure your griddle is preheated properly before cooking on it otherwise your food may stick and not cook through properly.
- When cooking cuts of meat such as chicken breasts, pork fillet or even steaks, flatten each slightly to ensure they are of the same thickness before cooking.
- If preparing a recipe whereby you need to cook more than one food on the griddle before cleaning it, it may be helpful to lightly brush any residue from the cooked foods from the grill plates by using a pastry style brush which has heat resistant bristles or a sheet of kitchen towel.
- Do make sure you empty and wash out the drip tray after each use of the griddle.
- Do keep an eye on the drip tray during cooking foods such as marinated chicken and meats to make sure it does not overflow with drained juices.
- If cooking in the flat/open position, do remember that you will need to turn the food over during cooking.
- When cooking in the closed position, you will not need to turn foods during cooking because they are being cooked on both sides already.
- However, if you are cooking meats which are cut into strips, the meat will benefit from being moved around halfway during cooking to ensure the slices don't stick together.
RECIPES
All recipes serve 4 unless otherwise stated. Do not attempt to cook more than advised in the recipe on your griddle at one time.
CHAR GRILLED CHICKEN AND BACON CLUB SANDWICH
Serves 4
| Ingredient Quantity |
| Boneless and skinless chicken breasts 2 |
| Olive oil 2 teaspoon |
| Lemon juice 2 teaspoon |
| Salt and freshly ground black pepper |
| Rindless rashers smoked back bacon 8 |
| White bread, crusts removed 12 Slices |
| Tomatoes 2 sliced |
| Little gem lettuce, roughly torn 8 leaves |
| Mayonnaise 8 tablespoons |
| Cocktail sticks to serve |
- Flatten each chicken breast slightly by using a meat tenderizer or rolling pin to ensure it is an even thickness. Arrange chicken in a shallow dish, whisk the oil, lemon juice and seasoning together then brush over the chicken breasts.
- Preheat the griddle fitted with the grill plates to 220. Open up the griddle, add the chicken and cook in the open position for 5 minutes or until cooked through. Carefully remove the chicken from the griddle and when cool enough to handle, cut into slices. Wipe over the grill plates with some kitchen towel.
- Add the bacon rashers to the griddle and cook in the open position for 3-4 minutes or until crisp. Carefully remove from the griddle and keep warm. Wipe over the grill plates with some kitchen towel.
- Place 4 of the bread slices on the griddle and toast in the closed position for 3-4 minutes or until lightly browned. Carefully remove the toast slices and keep warm wrapped in a clean tea towel, whilst repeating with other bread slices.
- Place 4 slices of toast on a chopping board and lightly spread each with a little of the mayonnaise then top with some tomato slices, a little torn lettuce and the grilled chicken slices.
- Top each with another slice of toast spread with a little more mayonnaise, a little more lettuce, tomato and crispy bacon and a final layer of toast which has been spread with remaining mayonnaise and placed mayonnaise side down.
- Then cut the sandwiches diagonally in half and then in half again to form triangles, inserting a cocktail stick in the centre of each sandwich quarter to keep in place and serve immediately.
TANDOORI CHICKEN KEBABS WITH MANGO CHILLI AND LIME SALSA
Serves 4
| Ingredient Quantity |
| Natural yogurt 200g |
| Lemon juice 1 tablespoon |
| Fresh root ginger, peeled and finely grated 1" |
| Clove garlic, peeled and crushed 1 |
| Garam masala 1 teaspoon |
| Sweet paprika 2 teaspoon |
| Generous pinch sea salt |
| Skinless and boneless chicken breasts, diced into 1" pieces 450g |
| Cocktail sticks to serve |
For the mango chilli and lime salsa:
| Ingredient Quantity | |
| Medium ripe mangoes, stones removed and finely diced | 2 |
| Spring onions, trimmed and finely sliced 4 | |
| Finely chopped red chilli, optional 1 | |
| Freshly chopped coriander 3 tablespoons | |
| Juice of a lime 1 | |
| Salt and freshly ground black pepper 2 teaspoon | |
| Wooden skewers 8 | |
| Skinless and boneless chicken breasts, diced into 1" pieces | 450g |
| Cocktail sticks to serve | |
- In a bowl mix together the yogurt, lemon juice, ginger, garlic, garam masala, paprika and salt. Add the diced chicken to the bowl and stir until well coated. Cover and leave to marinate for at least 2 hours, or ideally overnight for best results, in a fridge.
- In a bowl combine all of the salsa ingredients until well mixed, then season to taste and set aside.
- Preheat the griddle fitted with the grill plates to 220c. Thread the marinated chicken onto 8 wooden skewers. When the griddle is preheated, open up the griddle, add the chicken skewers to the grill plates and cook in the open position for 8-10 or until cooked through.
- Serve the tandoori chicken kebabs in pitta breads or wraps with the mango chilli and lime salsa to accompany them.
Cooks tip – For an even quicker marinade, why not stir 2 tbsp readymade tandoori paste into the natural yogurt.
FAMILY FUN FAJITAS
Serves 4
| Ingredient Quantity | |
| skinless and boneless chicken breasts, cut into strips | 450g |
| Olive oil 2 tablespoons | |
| Small clove garlic, peeled and crushed 1 | |
| Freshly squeezed juice of a lime 1 | |
| Smoked paprika 2 teaspoons | |
| Generous pinch of ground cumin | |
| Pinch of mild chilli powder | |
| Onion, peeled, halved and sliced 1 medium size | |
| Red pepper, cored, deseeded and cut into slices 1 | |
| Yellow pepper, cored, deseeded and cut into slices | 1 |
| 8 flour tortillas | |
To serve
Guacamole, soured cream and salsa
- Place the strips of chicken in a freezer bag, add the oil, garlic, lime juice, paprika, cumin and chilli and mix together until well coated. Leave to marinate for at least 1 hour, or ideally overnight for best results, in a fridge.
- Preheat the griddle fitted with the grill plates to 220c. Open the griddle up to the upright position and then using the upper plate angle button, open the griddle out completely flat.
- Add the onion to one half of the griddle and spread out to ensure they are in an even layer then add the pepper slices to the other half, also spreading out to an even layer. Grill the onions for approximately 6-8 minutes and the pepper slices for approximately 10-12 minutes, turning both over halfway through cooking until softened and char grilled. Carefully remove the cooked onions and then the pepper slices and keep warm whilst cooking the chicken.
- Divide the chicken between both sides of the griddle, ensuring you spread it out to an even layer. Cook the chicken for 10 minutes, carefully turning the chicken strips over about half way through and cook until char grilled and cooked through.
- Toss together the cooked chicken and onion and pepper mix with the remaining lime juice and serve wrapped in warmed tortillas with guacamole, soured cream and salsa to accompany.
Cooks tip – instead of chicken why not try using turkey or beef strips.
ASIAN STYLE SALMON FILLETS WITH STIR FRIED VEGETABLES
Serves 4
| Ingredient Quantity |
| Sesame oil 2 teaspoons |
| Olive oil 1 tablespoon |
| Soy sauce 2 tablespoons |
| Juice of 12 a lime |
| Runny honey 1 tablespoon |
| Finely grated fresh ginger 1 teaspoon |
| Clove garlic, peeled and crushed 1 |
| Finely chopped fresh red chilli, optional 1 teaspoon |
| Salmon fillets, skin on 4 |
| Large carrot, peeled and cut into thin strips 1 |
| Yellow pepper, cored, deseeded and cut into slices 1 |
| Fine asparagus spears, trimmed 125g |
- Combine the sesame and olive oil, soy sauce, lime juice, honey, ginger, garlic and chilli, if using, and pour into a shallow dish large enough to hold the salmon fillets in one layer. Add the salmon fillets, skin side uppermost, cover and leave to marinate for at least 1 hour, or ideally overnight for best results, in a fridge.
- Preheat the griddle fitted with the grill plates to 220c. Open up the griddle, arrange the carrot strips in one even layer on the griddle and cook in the closed position for 4-5 minutes until tender and char grilled. Carefully remove to a serving dish to keep warm.
- Add the pepper slices to the griddle in one even layer and cook in the closed position for 4-5 minutes or until softened and char grilled. Carefully remove the pepper strips to the serving dish and keep warm with the carrot.
- Add the asparagus to the griddle in one even layer and cook in the closed position for 4-5 minutes or until softened and char grilled. Carefully remove the asparagus from the griddle and add to the carrots and peppers and keep warm whilst cooking the salmon.
- Shake off any excess marinade and add the marinated salmon to the griddle. Cook in the open position for 8-10 minutes, or until cooked through. Serve the salmon on a bed of the stir fried vegetables immediately.
DROP SCONES WITH STRAWBERRIES
Serves 4/makes 8
| Ingredient Quantity |
| Ripe strawberries, hulled 225g |
| Icing sugar 1 tablespoon |
| Self-raising flour 75g |
| Pinch salt |
| Caster sugar 1 tablespoon |
| Egg 1 |
| Milk 75g |
| Butter, melted 15g |
| Dash of vanilla extract |
| Caster sugar for sprinkling 1 |
- Cut half of the strawberries into slices and set aside. Transfer the remaining strawberries to a jug and using a handheld blender, blend until you have a puree. Stir in icing sugar to taste then sieve to remove the pips and set aside.
- Sift the flour into a bowl with the salt and sugar and make a well in the centre. Mix together the egg, milk, melted butter and vanilla then slowly add this to the well in the bowl, gradually whisking the flour into the milk mixture to form a smooth slightly thick batter.
- Using the griddle fitted with the griddle plates, preheat the griddle to 220c. Open the griddle to the upright position and then using the upper plate angle button, open griddle out completely flat.
- Drop tablespoons of the batter onto the preheated griddle plates, carefully spreading each out into a round measuring approx 10cm and cook for 1-2 minutes or until bubbles appear on the top surface of the drop scones. Then flip over and cook for a further 1-2 minutes until golden.
- Carefully remove the drop scones from the griddle and keep warm in a clean serviette or tea towel whilst cooking the remaining batter to make 8 drop scones.
- Serve the drop scones drizzled with a little strawberry puree, topped with strawberry slices and a final dusting of caster sugar.
Cooks tip – If preferred, apple slices could be cooked on the griddle and sprinkled with a pinch of ground cinnamon for an alternative topping.
TROUBLESHOOTING
Following are some common problems that can occur when using the griddle. Please revue the problems, their possible cause and any corrective action that should be taken to ensure successful cooking.
| Problem Possible cause Solution | ||
| Fat or cooking juices are spilling out onto the work surface. | Incorrect assembly of the drip tray.Or, drip tray not emptied from last use. | Remove drip tray and ensure it is properly fitted into the back of the griddle.Remember to empty and wash the drip tray after each use of the griddle. |
| Severe smoking from griddle. | Too much extra greasing applied to grill plates.Or, grill plates have not been cleaned after last use. | Next time reduce amount of butter or oil used or try using without greasing.Ensure you wash or wipe the grill plates after EVERY use. |
| Food sticking to the grill plates. | Insufficient preheating of the griddle.Or, grill plates have not been cleaned after last use. | Always ensure you preheat the griddle according to manufacturer's guidelines before beginning to cook on it.Ensure you wash or wipe the grill plates after EVERY use. |
| Food taking too long to cook and char grill. | The temperature you have selected may not be hot enough. | Next time cook at a higher temperature. |
| Food is getting burnt on the outside before being cooked through in the centre. | The temperature you have selected may be too hot. | Next time cook at a lower temperature. |
| Constant buzzing emitted from griddle | The griddle has developed a serious electrical fault. | Turn griddle off at the mains immediately and contact Lakeland Customer Services for assistance. |
CARE AND CLEANING
Here are some care and cleaning hints to help you look after your griddle.
- Before the first use and after every use, clean each part thoroughly.
• Periodically check all parts before reassembly. - Unplug the griddle and allow to cool completely before cleaning.
- Always use plastic, nylon or silicone spatulas etc. – metal tools will damage non-stick coatings.
- Never immerse the unit in water or any other liquid.
- If there are any large food deposits or residue from cooked food on the grill plates, carefully scrape these off using a plastic or wooden scraper before soaking and washing.
- To clean the unit and control panel, wipe with a clean, soft, damp cloth and dry before storing.
- Do not use abrasive cleaners, steel wool or abrasive materials or cleansers either on the inside or outside of the griddle.
- The grill plates and drip tray are top shelf dishwasher safe. However, to preserve the life of the non-stick coating on the grill plates, it is advisable to wash these in hot soapy water by hand.
- For very stubborn deposits on the grill plates it is advisable to soak the grill plates in hot soapy water before cleaning.
- Always ensure the cleaned grill plates and drip tray are completely dry before re attaching to the griddle.
- Store the griddle with the power cable loosely coiled. Never wrap it tightly around the griddle.
AFTER SALES SERVICE
For any problems or advise on repairs for the griddle please contact Lakeland Customer Services on 015394 88100.
RECYCLING YOUR ELECTRICALS
Along with many other high street retailers, Lakeland has joined a scheme whereby customers can take their unwanted electrical s to recycling points set up around the country.
Visit www.recycle-more.co.uk to find your nearest recycling point.
ELECTRICAL CONNECTIONS
THIS APPLIANCE MUST BE EARTHED
This appliance is fitted with a fused three-pin plug to BS1363 which is suitable for use in all homes fitted with sockets to current specifications. If the fitted plug is not suitable for your socket outlets, it should be cut off and carefully disposed of. To avoid an electric shock, do not insert the discarded plug into a socket.
Fitting a new plug
If for any reason you need to fit a new plug, the flexible mains lead must be connected as shown here. The wires in the mains lead fitted to this appliance are coloured in accordance with the following code:
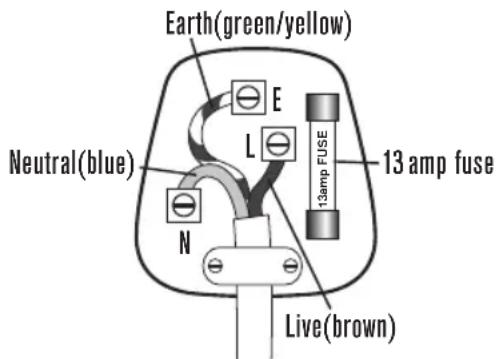
Connect BLUE to Neutral (N)
Connect GREEN & YELLOW to Earth (E)
Connect BROWN to Live (L)
13 amp fuse to be used
If the colours of the wires in the mains lead of this appliance do not correspond with the coloured markings identifying the terminals in your plug, proceed as follows. The wire which is coloured green and yellow MUST be connected to the terminal which is marked with the letter E (Earth) or coloured green. The wire which is coloured blue MUST be connected to the terminal which is marked with the letter N (Neutral) or coloured black. The wire which is coloured brown MUST be connected to the terminal which is marked with the letter L (Live) or coloured red.
Before refitting the plug cover, check that there are no cut or stray strands of wire inside the plug. Use a 13 amp BS1362 fuse. Only BSI or ASTA approved fuses should be used. If you are at all unsure which plug or fuse to use, always refer to a qualified electrician.
Note: after replacing or changing a fuse on a moulded plug which has a fuse cover, the cover must be refitted to the plug; the appliance must not be used without a fuse cover. If lost, replacement fuse covers can be obtained from an electrical shop. This appliance complies with the following EC Directives: 2006/95/EC (Low Voltage Directive) and 2004/108/EC (EMC Directive)



GEBRAUCHS-
ANWEISUNG
Kontaktgrill
MODELL 16906/17849
natural_image
Modern stainless steel grater with a flat-screen lid and control panel (no visible text or symbols)natural_image
Two gray rectangular panels with a small protrusion and a numbered label '14' pointing to the top panel (no text or symbols on the panels themselves)GARPOSITIONEN
SICHERHEITSHINWEISE
natural_image
Three-panel black-and-white photo showing hands installing or adjusting a flat panel on a device, no visible text or symbols.Abb. 1. Abb. 2. Abb. 3.
Web: www.lakeland.co.uk
www.lakeland.de
- LAKELAND INSTRUCTION BOOKLET
- CONTENTS
- PRODUCT FEATURES
- Your Lakeland Griddle explained
- COOKING POSITIONS
- Closed position
- Open position
- Flat position
- SAFETY CAUTIONS
- THE CONTROL PANEL AND PROGRAMMES
- Your Lakeland Griddle Control Panel Explained
- Upper and Lower Grill Plate Power Button
- Upper and Lower Grill Plate Temperature Control
- Upper and Lower Grill Plate Timer Button
- OTHER FEATURES
- Automatic Power Off
- Warning Buzzer
- HOW TO ASSEMBLE THE LAKELAND GRIDDLE AND USING FOR THE VERY FIRST TIME
- Fitting the drip tray
- Fitting the grill or griddle plates
- Removing the grill or griddle plates
- Preheating the griddle empty before use.
- To do this;
- INSTRUCTIONS FOR USE
- How to use the Griddle
- A GUIDE TO INGREDIENTS
- A GUIDE TO COOKING TIMES
- ADAPTING YOUR OWN RECIPES
- HINTS AND TIPS
- RECIPES
- CHAR GRILLED CHICKEN AND BACON CLUB SANDWICH
- TANDOORI CHICKEN KEBABS WITH MANGO CHILLI AND LIME SALSA
- For the mango chilli and lime salsa:
- FAMILY FUN FAJITAS
- To serve
- ASIAN STYLE SALMON FILLETS WITH STIR FRIED VEGETABLES
- DROP SCONES WITH STRAWBERRIES
- TROUBLESHOOTING
- CARE AND CLEANING
- AFTER SALES SERVICE
- RECYCLING YOUR ELECTRICALS
- ELECTRICAL CONNECTIONS
- THIS APPLIANCE MUST BE EARTHED
- Fitting a new plug
- GEBRAUCHS-
- ANWEISUNG
- Kontaktgrill
- MODELL 16906/17849
- GARPOSITIONEN
- SICHERHEITSHINWEISE
Brand : Lakeland
Model : 16906
Category : Contact grill