8000CDE - CD Player Audiolab - Free user manual and instructions
Find the device manual for free 8000CDE Audiolab in PDF.


User questions about 8000CDE Audiolab
0 question about this device. Answer the ones you know or ask your own.
Ask a new question about this device
Download the instructions for your CD Player in PDF format for free! Find your manual 8000CDE - Audiolab and take your electronic device back in hand. On this page are published all the documents necessary for the use of your device. 8000CDE by Audiolab.
USER MANUAL 8000CDE Audiolab
This symbol indicates that there are important operating and maintenance instructions in the literature accompanying this unit.

This symbol indicates that dangerous voltage constituting a risk of electric shock is present within this unit.
Read these instructions.
Keep these instructions. In the event that you pass the product to a third party this instruction manual should be provided along with the product. Heed all warnings.
Follow all instructions.
Do not use this apparatus near water.
Clean only with dry cloth.
Do not block any ventilation openings.
Install in accordance with the manufacturer's instructions.
Do not install near any heat sources such as radiators, heat registers, sleeves, or other apparatus (including amplifiers) that produce heat.
Do not defeat the safety purpose of the polarized or grounding type plug. A polarized plug has two blades with one wider than the other. A grounding type plug has two blades and a third grounding prang. The wider blade or the third prang are provided for your safety. If the provided plug does not fit into your outlet, consult an electrician for replacement of the absolera outlet.
Protect the power cord from being walked on or pinched, particularly at plugs, convenience receptacles, and the point where they exit from the apparatus.
Use only attachments/accessories specified by the manufacturer.

Use only with a cart, stand, tripod, bracket, or table specified by the manufacturer, or sold with the apparatus. When a cart is used, use caution when moving the cart/opparatus combination to avoid injury from tip-over.
Unplug this apparatus during lightning storms or when unused for long periods of time.
Refer all servicing to qualified service personnel. Servicing is required when the apparatus has been damaged in any way, such as power-supply cord or plug is damaged, liquid has been spilled or objects have fallen into the apparatus, the apparatus has been exposed to rain or moisture, does not operate normally, or has been dropped.
Warning: To reduce the risk of fire or electrical shock, do not expose this product to rain or moisture. The product must not be exposed to dripping and splashing and no object filled with liquids such as a vase of flowers should be placed on the product.
No naked frame sources such as candles should be placed on the product. Caution: Changes or modifications not expressly approved by the manufacturer could void the user's authority to operate this device.
This equipment has been tested and found to comply with the limits for a Class B digital devices, pursuant to part 15 of the FCC rules. These limits are designed to provide reasonable protection against harmful interference in a residential installation. This equipment generates, uses and can radiate radio frequency energy end, if not installed and used in accordance with the instructions, may cause harmful interference to radio or television reception, which can be determined by turning the equipment off and on, the user is encouraged to try to correct the interference by one or more of the following measures:
Re-orientate or re-locate the receiving antenna. Increase the separation between the equipment and the receiver. Connect the equipment into an outlet on a circuit different from that to which the receiver is connected. Consult the dealer or an experienced radio/TV technician for help.
Important Note: The batteries supplied with this unit should be treated with care and not punctured or damaged. Used batteries should be disposed of in full conformity with recycling regulations in your area. NEVER dispose of batteries in a fire or in the general rubbish.

This label tells you that the unit contains a Laser component. Opening the unit will expose the user to radiation from the laser beam.
Mains supply and safety
Mains Supply: The mains operating voltage of all Audiolob units is shown on the rear panel. If this does not match the voltage in your area, consult your dealer.
The mains supply fuse is located on the rear panel of the unit. If it has broken, check for any obvious course before replacing the fuse with one of the correct rating and type. The fuse values are:
220 - 240V (UK, Korea, etc.) T1AL 20mm Slow Blow 100 - 120V (USA, Japan, etc) T1.6AL 20mm Slow Blow
Fuse Carrier
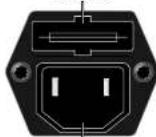
IEC Mains Connector
The fuse is located in a slide-in carrier which also contains a spare fuse. The fuse carrier can only be pulled out after the IEC power cord is unplugged. When the carrier is opened the first fuse to be seen is the spare fuse. Remove and safely dispose of the fuse with the blown link before replacing it.
Power Cord: An AC power cord is normally supplied with a mains plug suitable for your area. If you have any doubts, consult your dealer about obtaining a suitable power cord.

Class II construction double insulated. This product must not be connected to earth.
Important notice to UK users
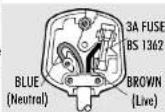
The appliance cord is terminated with a UK approved mains plug fitted with a A fusa. If 3 the fusa needs to be replaced, an ASTA or BSI approved BS1362 fuse rated at 5A must be used. If you need to change the mains plug, remove the fusa and dispose of this plug safely immediately after cutting it from the cord.
Connecting a Mains Plug
The wires in the mains lead are coloured in accordance with the code. Blue: NEUTRAL; Brown: LIVE. As these colours may not correspond to the coloured markings identifying the terminals in your plug, proceed as follows: The BLUE wire must be connected to the terminal marked with the letter N or coloured BLUE or BLACK. The BROWN wire must be connected to the terminal marked with the letter L or coloured BROWN or RED.
6: Advanced Settings
SPDIF Output Settings
The default factory setting of the 8000CDE player is with the SPDIF output enabled, if you are not using this output, there is a marginal improvement by switching the SPDIF output off. The SPDIF output can be re-enabled at any time. Procedure
- Switch the player off using the ON/OFF switch on the front panel.
- Wait a few moments
Hold down PLAY & STOP keys on the front panel and switch the power on.
The display reads
After a few seconds...
Setup 8000CDE
SPDIF Filter →ON SLOW
- Now use the PLAY key on the handset to toggle the SPDIF filter ON and OFF
To exit & store the setting: Press the OPEN/CLOSE key on the front panel or the handset.
Digital Filter Selection
This setting is purely a matter of personal preference.
It is possible to select two different filter characteristics. The "Fast" filter has the finest technical performance and best attenuation of spurious signals. The "Slow" filter has improved group delay characteristics and is the default setting. Group delay is the technical term used to describe how signals, with different frequencies, generally have different transit times through an electrical system. But there is a price to pay for a digital filter with lower group delay; the attenuation of spurious signals is reduced. Procedure
- Navigate to the Filter Setting menu as described above
- Use the INDEX keys on the handset to toggle between the Filter choices. The arrow moves to indicate which is the current choice.
SPDIF Filter ON → SLOW
- Toggle 'FAST' and 'SLOW' settings using the PLAY key on the handset
To exit & store the setting: Press the OPEN/CLOSE key on the front panel or the handset.


7: Specifications
Analogue Specifications
Connectors: RCA phono
Output Level:
2.4V rms
Frequency Response:
Better than ± 0.5dB @ 1 kHz
Channel Separation:
Better than 100dB @ 1 kHz
THD+N (at 1kHz):
Less than 0.003%
(> -90dB/2.4V)
Digital Specifications
DAC:
24bit 192kHz, 5th order Sigma Delta
Output Format:
SPDIF
Connector:
RCA phono
Output Level:
General Specifications
Operating Temperature Range: 10°C-40 °C (ambient)
Power Requirements: (Depending on Region)
50-60Hz 100 V, 110-120 V, and 220-240 V models available
Power Consumption:
Less than 25W
Dimensions (W x H x D):
445 x 74 x 335 mm - including feet, terminals and controls
Weight
Net: 6 kg
Shipping: 7.4kg
Colour:
Silver & Black
Accessories Supplied:
AC Power Cord
Analogue Stereo RCA 2 Phono-2Phono interconnect
Instruction Manual
Remote Control with 2 x AA batteries
Audiolab reserves the right to alter design and specification without notice.
Specification may vary for different countries.
Audiolab is a member of the International Audio Group.
4: Operation
Front Panel Controls Inserting a CD Navigating a CD
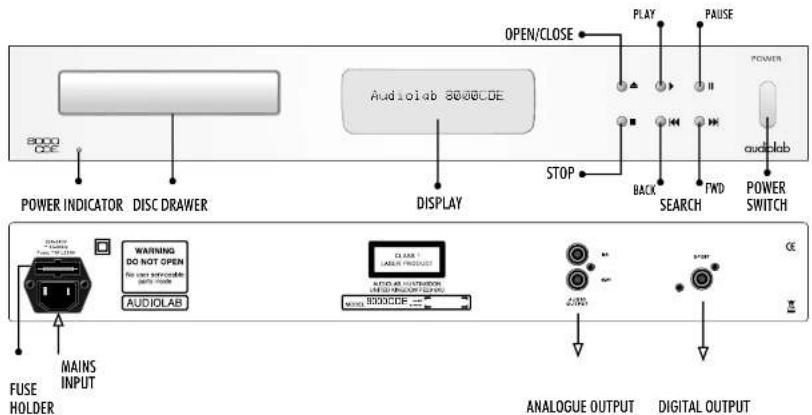
The front panel controls permit basic operation; full access to the Press the POWER Switch.
advanced operating modes is via the handset.
Power Switch
Press to switch the power on. Press again to switch the power off. Whenever the power is switched on the 8000CE initialises and performs a self test. The pilot light on the front panel is lit whenever the power to the unit is switched on.
The display briefly indicates... Audiolab 8000CDE When the message fades out the player is ready for use.
Open/Close

Press this button to open and close the disc drawer Play
Press to play a disc.

Pressing PLAY a second time while the disc is playing will send the player back to the start of the current track.
When a disc is playing:

Press once to pause the disc. Press again to resume play.
Stop
Press STOP to stop the disc.
Next Track: Previous Track
Press▶ to move to the next track

Press◀◀ to go to the start of the previous track.
Press NEXT or PREVIOUS keys repeatedly to move through the tracks on the disc forward or back one track at a time.
IMPORTANT NOTE
In the section which follows:
Operations which can be carried out from the front panel and the handset are indicated by: Operations carried out only from the handset, or which logically should only be carried out from the handset are indicated by:


Wait for the self test routine to finish
Press Open/Close to open the drawer.
Place a CD in the tray with the label side up
Close the drawer
The player will spin briefly, read and display the Table of Contents on the disc and then stop.
Tr indicates total number of tracks,
Time is the total playing time of the disc.
If the disc is faulty or in an incorrect format...
If no disc has been inserted ...
If the tray gets jammed: After 2 sec the motor stops and the display will read...
Playing a CD
Press PLAY
Play will commence from Track 1
To start from a selected track:
Select a track, Press PLAY
Time Displays
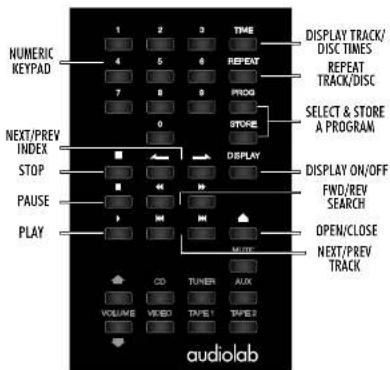
Repeatedly press the TIME key on the handset to cycle through the display as shown.
When playing a disc the player remembers the last TIME display mode set even if you switch the power off and on again.
To pause a disc while playing
Press PAUSE.
To resume playing:
Press PAUSE again.


Reading
√
Tr 01
Ti
No
Tray Blocked


T100
Tr
T103
Tr
Ti 02
Tr
Ti 53
Tr
Ti

Tr
Pq 03
Tr
Ti

(2)
Changing tracks:
Press once to jump to the start of the previous track.
Press repeatedly to go back several tracks.
Press once to jump to the start of the next track.
Press repeatedly to go forward several tracks.


'Next Track': If you exceed the number of tracks on the disc, the player will 'wrap round' and go forward again from Track 1.
'Previous Track': If you go past Track 1, the player will 'wrap round' and reverse search from the final track on the disc.
Next/ Previous can be used when a CD is playing or stopped. You can use this facility when the CD drawer is open, but as the player cannot read the CD, if you select a number greater than the number of tracks on the disc, when you close the drawer, the disc will play from track 1.
Direct selection of tracks from the handset
Select the wanted track directly from the keypad:
The disc will play forward from the chosen track.
Tr
x 1
Time
20:01
If you choose a single digit track (e.g. 1) in a disc which contains several tracks, the player will pause briefly, waiting for you to enter a second digit. If none is entered, play will commence from the entered single-digit track.
If the choice is invalid the display reverts to the state before any key presses were made.
Search:
Search starts at 2X speed, speeding up to 4X after 5 seconds.
Press and hold to search forward through a track or tracks If you keep the button pressed, the player will search the entire disc. When the end of the disc is reached the player will cycle around a point 5 seconds before the end of the disc. On releasing the SEARCH key the player will play to the end of the disc and stop.
Press and hold to search back through a track or tracks. If you keep the button pressed, the player will search back through the disc. When the start of the disc is reached, nothing further will happen.
On releasing the SEARCH key the player will play from track 1.


Index Scan
Some CDs have tracks that are sub-divided into sections called index points. There can be several index points within a track. As an example, each of the verses in a song may be allocated an index point. The Index display will appear only when a track contains index information.
When a track containing index points is
playing, the display increments these
index points as they occur.
To scan the index forward press
- 10.
To reverse scan the index press
Tr In Time
10 03 24:00
Tr. In. Time
10 04 24:50
Tr In Time
10 02 21:30
When an index key is pressed the CD goes to the start of the next or previous index.
Searching within an index is not possible though the normal search facility remains operational at all times.
Note: The Index display appears only when a track contains an index. Notes on Scan and Search
When Scanning, the output momentarily mutes as tracks change.
When searching a disc, the output is reduced to a safe low level to prevent damage to the loudspeakers and amplifier.
When the procedure is completed the normal sound level is restored.
Repeat Play
Press REPEAT to repeat a track, the disc, or a
stored program of tracks. The display cycles
through the choices as the key is pressed.

Repeat Track
Repeat Disc or Program
Repeat OFF
| Tr | In | Time | Repeat |
| 10 | 03 | 24:00 | TRACK |
| Tr | In | Time | Repeat |
| 10 | 03 | 24:00 | ALL |
| Tr | In | Time | |
| 10 | 03 | 24:00 |
When repeat is engaged the selection will play continuously until the repeat facility is turned off or the CD Drawer is opened and closed.
To Stop the Disc
Press STOP OR
Open and close the drawer

Program Play Altering the Display
Using the Program function you can create a custom program of up to 60 chosen tracks from a CD in any order, repeating the same track several times if you wish
Example: To enter a program of 3 tracks:
Press PROGRAM
Pr
Ti
120
The display registers Program mode
Choose a track, press STORE.

Choose another track, press STORE

Choose a third track, press STORE

Ti
18
[NO TEXT]
5
The display registers the number of tracks in the program and the total time
To play the program, press PLAY
To stop Program play, press STOP
The program will remain stored in the player's memory until erased.
To erase a program from memory:
Press STOP twice OR
Open and close the drawer

In program mode:
- REPEAT, SEARCH and TRACK SCAN functions are all available
- The time display can also be changed to TOTAL, REMAINING and CURRENT as required.
OPENING AND CLOSING THE DRAWER
- OVERRIDES ALL PLAYING OR USER-SET PROGRAMS
- DISPLAYS THE TABLE OF CONTENTS IF A CD IS IN THE DRAWER
① RESETS THE DISPLAY TO 'ON' - DOES NOT RESET A USER-SET TIME DISPLAY - WHEN A DISC IS PLAYED THE TIME DISPLAY REVERTS TO ANY USER-SET VALUE.
To switch the display on or off:
Press the DISPLAY key on the handset once.
This function is available in Normal and Program modes.
When the Display is OFF:
- Operations which involving changing the track number and/or the time will bring the display briefly on while these operations are being carried out. The display will then switch off again.
- Pressing STOP, PAUSE or opening the drawer will trigger the display on.
- When the player reaches the end of a session, whether in Normal or Program mode, the display will be triggered on.
After these last two events, the display can again be manually switched off.


5: Service and Warranty
Servicing
Servicing of Audiolab products should only be carried out by authorised service agents. If service is required the equipment should be returned, securely packaged, preferably using original packaging, to your dealer.
In the UK equipment may be returned to the IAG Service Centre. In the USA equipment may be returned to the Service address shown on this page.
Always telephone before returning any equipment.
A note should be endorsed giving your name, address, telephone number, and a brief description of the reason for return.
If you require Service outside the Warranty period, do not hesitate to contact your dealer.
While cleaning is in progress the AC power cord must be unplugged from the AC power supply socket.
Any grease or dirt on the equipment may be removed with a soft, lint-free cloth slightly moistened with a mild solution of warm water and detergent or washing-up liquid. Do not use any other solutions or solvents.
Retain original packaging for transporting equipment.
If you have any queries regarding the use of Audiolab equipment, consult your dealer.
Service Addresses, UK & USA
UK
IAG Service Centre
Unit 4
St Margaret's Way
Stukeley Meadows Industrial Estate
Huntingdon
Cambs
PE29 6EB
England
Tel: +44 (0)1480 452561
Fax: +44 (0)1480 13403
USA
IAG America, Inc.
B440 154th Avenue NE
Redmond,
Washington 98052
USA
Tel: +1 425 861 3909
Fox: +1 425 861 3906
Audiolab limited warranty
Audiolab Ltd. warrants this product, subject to the terms and conditions below, to be free from defects in materials and workmanship. During the warranty period Audiolab will repair or replace (at Audiolab's option) this product, or any defective part in this product, if it is found to be defective due to faulty materials, workmanship or function. The warranty period may vary from country to country.
Terms and conditions:
The warranty starts on the date of purchase (or the date of delivery if this is later).
You must provide proof of purchase / delivery before work can be carried out. Without this proof, any work carried out will be chargeable to you.
All work will be carried out by Audiolab or its authorised agents or distributors. Any unauthorised repair or modification will void this warranty.
If any part is no longer available it will replaced with a functional replacement part.
Any parts that are replaced will become the property of Audiolab.
Any repair or replacement under this warranty will not extend the period of warranty.
This warranty is valid only in the country of purchase, applies only to the first purchaser and is not transferable.
The following are not covered:
- Products on which the serial number has been removed, altered or otherwise made illegible.
• Normal wear and tear and cosmetic damage.
• Transportation or installation of the product. - Accidental damage, faults caused by commercial use, acts of God, incorrect installation, connection or packaging, misuse, neglect or careless operation or handling of the product which is not in accordance with Audiolab's user instructions.
- Equipment that has been operated in conjunction with unsuitable, inappropriate or faulty apparatus.
• Repairs or alterations carried out by parties other than
Audiolab or its authorised agents or distributors.
• Products not purchased from an Audiolab authorised dealer.
• Products that were not new at the time of original purchase.
- Products sold 'as is', 'as seen' or 'with all faults'.
Repairs or replacements as provided under this warranty are the exclusive remedy of the consumer. Audiolab shall not be liable for any incidental or consequential damages for breach of any express or implied warranty in this product. Except to the extent prohibited by law, this warranty is exclusive and in lieu of all other warranties whatsoever, both express and implied, including, but not limited to, the warranty of merchantability and fitness for a practical purpose.
This warranty provides benefits that are additional to and do not affect your statutory rights as a consumer.
Some countries and US states do not allow the exclusion or limitation of incidental or consequential damages or implied warranties so the exclusions in the paragraph above may not apply to you. This warranty gives you specific legal rights, and you may have other statutory rights, which vary from state to state or country to country.
How to claim:
To obtain warranty service contact the Audiolab authorised dealer from which you purchased this product. Do not despatch goods without the prior agreement of the dealer, Audiolab or their authorised distributors.
If asked to return products for inspection and/or repair, pack carefully, preferably in the original cartons or packaging affording an equal degree of protection, and return prepaid. If unsuitable packaging is used, Audiolab may make a charge for the supply of new packaging.
Insurance is recommended as goods are returned at owner's risk. Audiolab or their authorised distributors cannot be held liable for loss or damage in transit.
Packing, insurance and freight on the return journey will be paid by Audiolab or their authorised agents or distributor if corrective work proves to be necessary.
2: Preparation 3: Handset
Unpacking
Unpack the product fully. The carton should contain
The Audiolab 8000CDE player
※ One IEC power cord suitable for your area
One Stereo twin RCA Phono-Phono signal cable
One Remote Handset with two AA batteries
This instruction manual.
Report any missing or damaged item to your dealer as soon as possible.
Retain the packing for future safe transport of your player. If you dispose of the packing, do so with regard to any recycling regulations in your area.
Signal Connections
Before making any connections switch all system units off!
ANALOGUE OUTPUT
Connect a high quality R800GDB lead from the output of the suitable LINE INPUT (CD, AUX, TAPE) of the amplifier. Ensure you connect
the right and left channels correctly. RCA plugs and sockets coded white or black usually indicate the LEFT channel and those coded red the RIGHT channel.
DIGITAL (SPDIF) OUTPUT
The SPDIF is provided for connecting the to800GDEnal D/A
convertor (DAC). Connect a suitable RCA phono cable from this output to the input of your DAC.
Power Connections
Connect the supplied power cord between the IEC connector on the rear of the 8000CDE and the mains power point.
Set the system volume control to minimum.
Switch on the 8000CDE at the mains followed by the amplifier. The 8000CDE will initialise and is now ready for use.
Inserting Batteries in the Handset
The battery compartment is on the rear of the handset. Unwrap the batteries, open the compartment cover and insert the batteries. Follow the polarity indications in the battery compartment.
Always replace batteries in pairs. Use new batteries of the same type and rating, ideally from the same manufacturer. Used batteries should be disposed of in compliance with the recycling regulations in your area. Never throw batteries in the fire or in the general rubbish. Never immerse batteries in water.
Handset Operation
Buttons shown in white control the 8000CDE. The buttons in the lower section operate Audiolab amplifiers and have no effect on the player.
To operate, point the handset at the centre of the display. Ensure there is a clear line of sight between the handset and the player. The operating range of the handset is ideally within 8m of the player.