HPKT1472D - Washing machine Helkama - Free user manual and instructions
Find the device manual for free HPKT1472D Helkama in PDF.


| Product Type | Washing machine |
| Brand | Helkama |
| Model | HPKT1472D |
| Water Pressure | 0.05 MPa - 0.8 MPa |
| Maximum Load Capacity | Up to 7 kg (depending on model) |
| Spin Speed | See rating plate (typical 1400 rpm) |
| Programs | Cottons, Mixed, Wool, Hand, Rinse, Spin, Drain, Eco 20°C, Rapid 44 Min, Rapid 30 Min |
| Options | Delay Start (3/6/9 h), Spin Selection, AquaPlus, Cold Wash |
| Installation | Remove transport screws A and B; level front feet; connect water hose and drain hose |
| Electrical Supply | 220-240 V, 50 Hz (see rating plate) |
| Energy Efficiency | Compliant with EU Directives (ErP, RoHS) |
| Safety Features | Door lock, child supervision warning, automatic shut-off (OFF position) |
| Filter | Clean regularly; located behind front panel |
| Detergent Drawer | Three compartments: I (pre-wash), II (main wash), ✿ (fabric softener) |
| Noise Level | Not specified |
| Dimensions (Approx.) | 60 cm width, 85 cm height, 55 cm depth |
Frequently Asked Questions - HPKT1472D Helkama
User questions about HPKT1472D Helkama
0 question about this device. Answer the ones you know or ask your own.
Ask a new question about this device
Download the instructions for your Washing machine in PDF format for free! Find your manual HPKT1472D - Helkama and take your electronic device back in hand. On this page are published all the documents necessary for the use of your device. HPKT1472D by Helkama.
USER MANUAL HPKT1472D Helkama
正
ÄLÄ AVAA HANAA ASENNUKSEN AIKANA!!
3. KÄYTÄNNÖLLISIÄ VINKKEJÄ
Täyttövinkkejä
natural_image
Diagram showing a hand holding a mechanical component with directional arrows indicating motion (no text or symbols present)natural_image
Close-up of a white electrical outlet with two vertical slots and a grid pattern (no visible text or symbols)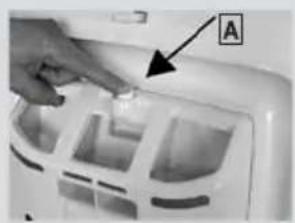
natural_image
Close-up of a hand placing a small object into a plastic waste bin (no text or symbols visible)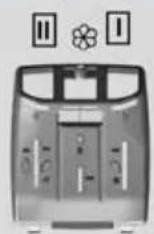
natural_image
Close-up of a pipe fitting with a black arrow pointing to a component labeled 'B' (no text or symbols beyond label)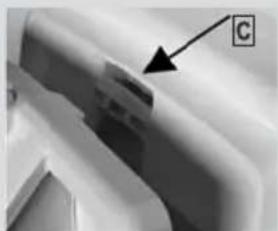
natural_image
Close-up of a mechanical component with a labeled arrow pointing to a feature (no text or symbols visible)natural_image
Close-up of a hand holding a white object on a surface (no visible text or symbols)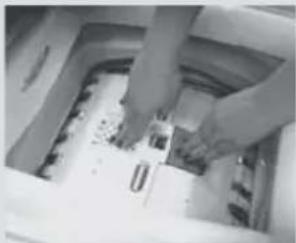
natural_image
Close-up of hands operating a kitchen sink with a tool, no visible text or symbols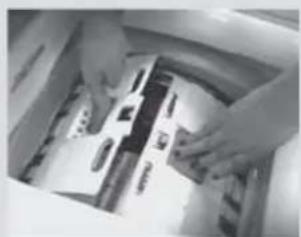
natural_image
Close-up of hands handling a packaged food item in a drawer (no visible text or symbols)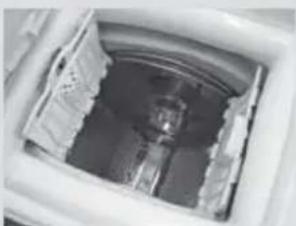
natural_image
Interior view of a plastic waste bin with internal compartments and a central chamber (no visible text or symbols)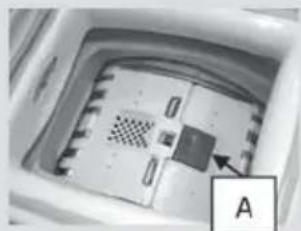
natural_image
Interior view of a microwave oven with a small component labeled 'A' (no visible text or symbols on the device itself)Pesuaineen annostus
Thank-you for choosing a Helkama washing machine. We are confident it will loyally assist you in safely washing your clothes, even delicates, day after day.
Carefully read this manual for correct and safe appliance use and for helpful tips on efficient maintenance.

Only use the washing machine after carefully reading these instructions. We recommend you always keep this manual on hand and in good conditions for any future owners.
Please check that the appliance is delivered with this instruction manual, warranty certificate, service centre address and energy efficiency label. Also check that plugs, curve for drain hose and liquid detergent or bleach tray (only on some models) are included. We recommend you keep all these components.
Environmental conditions
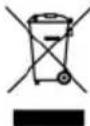
This appliance is marked according to the European directive 2012/19/EU on Waste Electrical and Electronic Equipment (WEEE).
WEEE contains both polluting substances (which can cause negative consequences for the environment) and basic components (which can be re-used). It is important to have WEEE subjected to specific treatments, in order to remove and dispose properly all pollutants, and recover and recycle all materials. Individuals can play an important role in ensuring that WEEE does not become an environmental issue; it is essential to follow some basic rules:
● WEEE should not be treated as household waste;
● WEEE should be handed over to the relevant collection points managed by the municipality or by registered companies. In many countries, for large WEEE, home collection could be present.
In many countries, when you buy a new appliance, the old one may be returned to the retailer who has to collect it free of charge on a one-to-one basis, as long as the equipment is of equivalent type and has the same functions as the supplied equipment.
Contents
- GENERAL SAFETY RULES
- INSTALLATION
- PRACTICAL TIPS
- MAINTENANCE AND CLEANING
- QUICK USER GUIDE
- CONTROLS AND PROGRAMS
1. GENERAL SAFETY RULES
● This appliances is intended to be used in household and similar applications such as:
- Staff kitchen areas in shops, offices and other working environments;
- Farm houses;
- By clients in hotels, motels and other residential type environments;
- Bed and breakfast type environments. A different use of this appliance from household environment or from typical housekeeping functions, as commercial use by expert or trained users, is excluded even in the above applications. If the appliance is used in a manner inconsistent with this it may reduce the life of the appliance and may void the manufacturer's warranty. Any damage to the appliance or other damage or loss arising through use that is not consistent with domestic or household use (even if located in a domestic or household environment) shall not be accepted by the manufacturer to the fullest extent permitted by law.
● This appliance can be used by children aged from 8 years and above and persons with reduced physical, sensory or mental capabilities or lack of experience and knowledge if they have been given supervision or instruction concerning use of the appliance
in a safe way and understand the hazards involved.
Children shall not play with the appliance. Cleaning and user maintenance shall not be made by children without supervision.
● Children should be supervised to ensure that they do not play with the appliance.
● Children of less than 3 years should be kept away unless continuously supervised.
- If the supply cord is damaged, it must be replaced by the manufacturer, its service agent or similarly qualified persons in order to avoid a hazard.
- Only use the hose-sets supplied with the appliance for the water supply connection (do not reuse old hose-sets).
●●Water pressure must be between 0,05 MPa and 0,8 MPa.
●Make sure that a carpet do not obstruct the base of the machine and ventilation openings.
- The OFF condition is reached by placing the reference mark on the programmes control/knob in the vertical position. Any other different position of such control sets the machine in ON condition (only for models with programmes knob).
●●After installation, the appliance must be positioned so that the plug is accessible.
● The maximum load capacity of dry clothes depends on the model used (see control panel).
- To consult the product fiche please refer to the manufacturer website.
Safety instructions
- Before cleaning or maintaining the washing machine, unplug the appliance and turn off the water faucet.
● Make sure the electrical system is grounded. Otherwise, seek qualified professional assistance. - Please do not use converters, multiple sockets or extension cords.

WARNING:
water may reach very high temperatures during the wash cycle.
- Do not pull on the power cord or appliance to unplug the machine.
-
Do not expose the washing machine to rain, direct sunlight or other weather elements.
-
In the event of fault and/or malfunction, turn off the washing machine, close the water faucet and do not tamper with the appliance.
Immediately contact the Customer Service Centre and only use original spare parts. Failure to observe these instruction may jeopardise appliance safety.
CE Appliance complies with European Directives:
●● 2006/95/EC (LVD);
●● 2004/108/EC (EMC);
●● 2009/125/EC (ErP);
●● 2011/65/EU (RoHS)
and subsequent amendments.
2. INSTALLATION
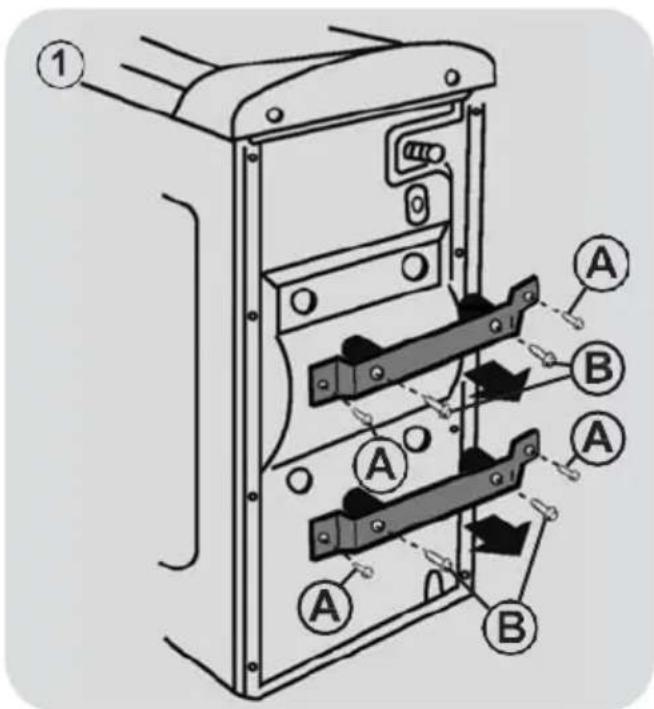
- Remove the 4 screws "A" from both clamps and the 4 screws "B" (fig. 1).
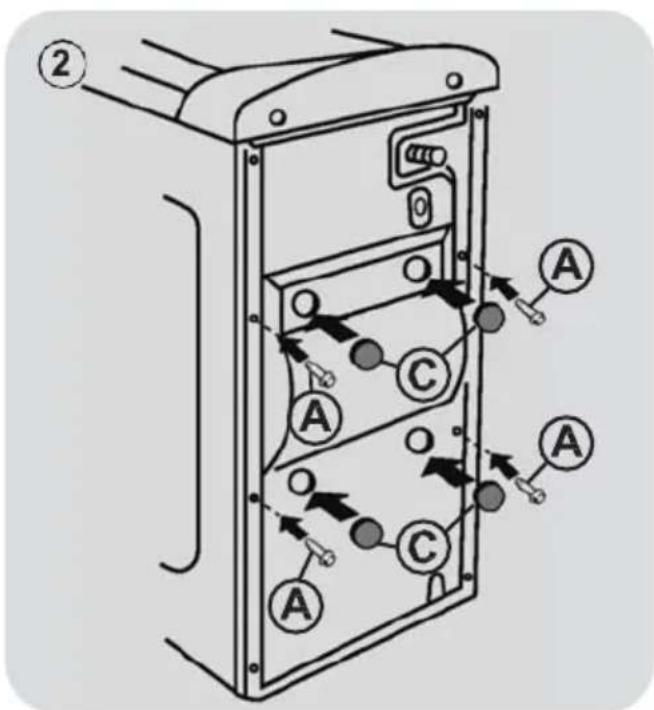
- Replace the 4 screws "A" and fit the trims provided "C" (fig. 2).
● The washing machine should be connected to the water mains via the new tube supplied with the appliance (inside the drum). Do not use the old tube for this purpose.
- Connect one end of the water inlet pipe with the elbow bend to the electrovalve (top rear part of the machine) and the other end to a tap or a plumbed-in 3/4" gas threaded connection.
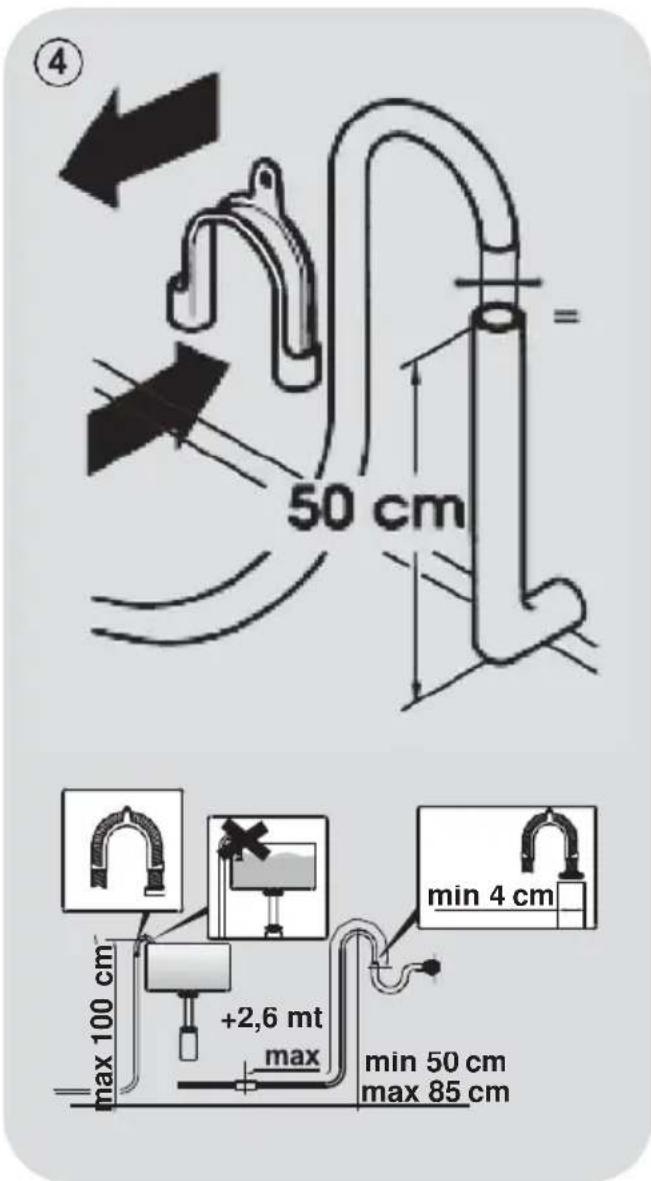
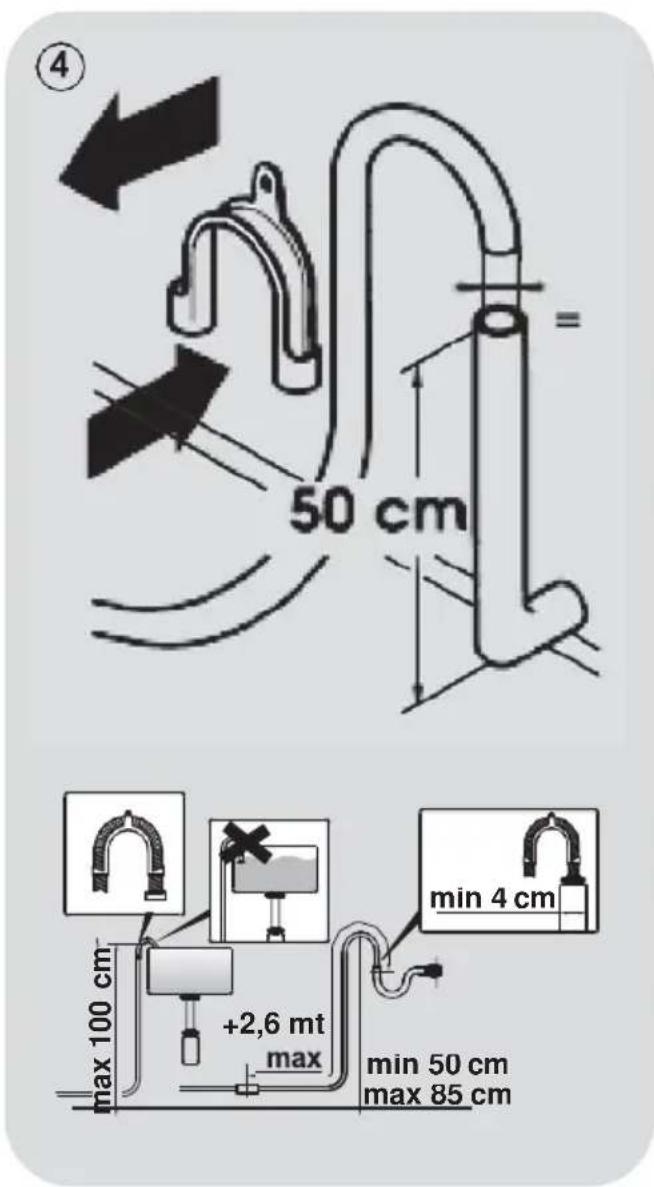
- Place the washing machine close to the wall, ensuring that there are no bends or kinks anywhere in the tube. Hook the outlet pipe to the edge of the sink or preferably to a fixed drainage outlet of a diameter greater
than that of the outlet pipe and at a height of min. 50 cm. and a maximum of 75 cm. from the floor (fig.4).
- If necessary, use the curved accessory to attach and support the outlet pipe more securely.
If your model offers this function:
- To move the washing machine easily, turn the trolley lever to the right. Once you have finished moving the machine, return the lever to its original position.
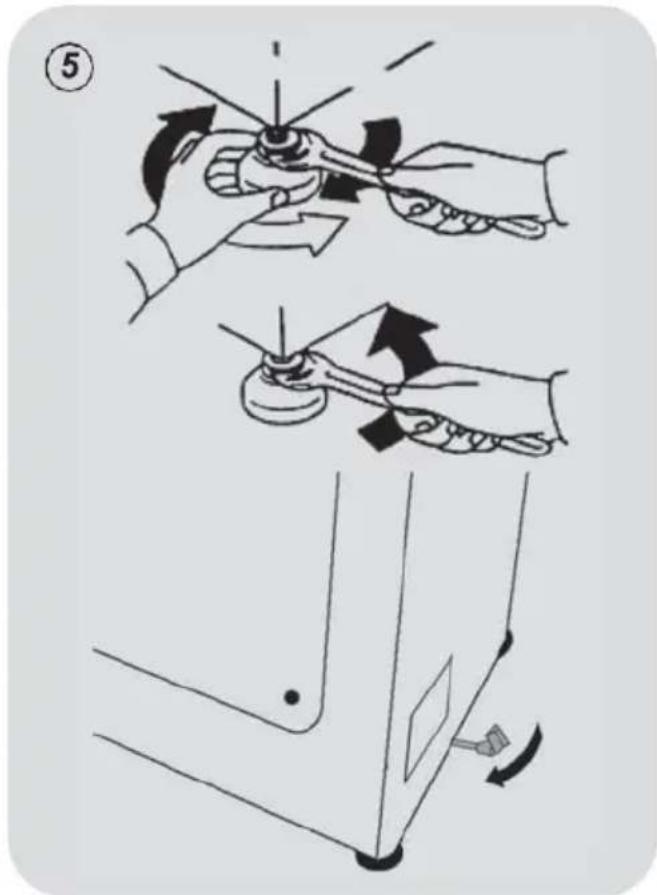
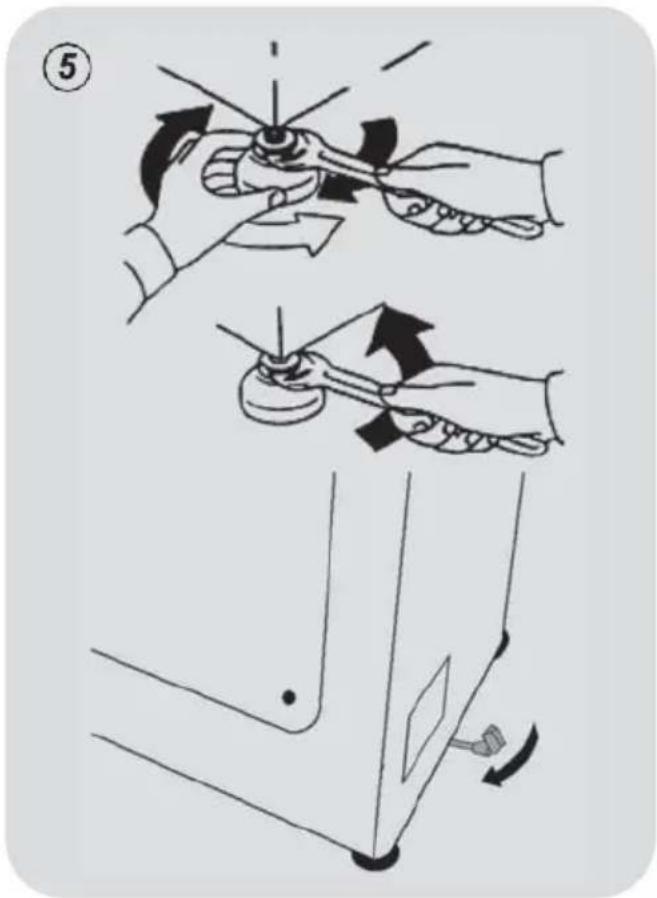
● Level the machine by adjusting the front feet (fig. 5).
a) Turn the nut clockwise to release the screw on the foot.
b) Raise or lower the foot by rotating it until it stands firmly on the floor.
c) Lock the foot in position by turning the nut anticlockwise until it comes up against the bottom of the washing machine.
- Check that the appliance is properly levelled.
- Check that the washing machine does not rock by trying to move two diagonally opposite top corners at the same time.
- If you move the washing machine from one place to another, you must level the feet again afterwards.
Hydraulic connections
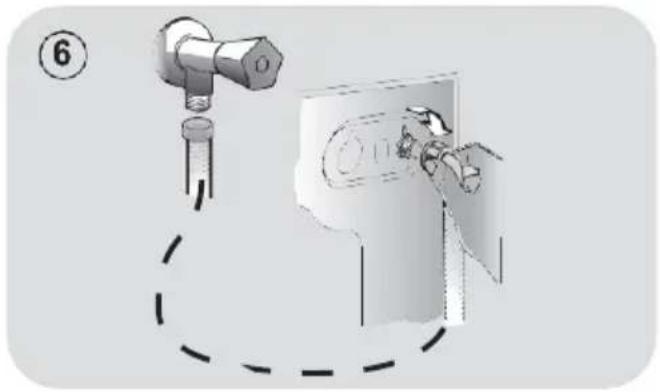
- Connect the water tube to the faucet, only using the drain tube supplied with the washing machine (fig. 6).
DO NOT OPEN THE FAUCET.
● Some models may include one or more of the following features:
●●HOT&COLD (fig. 7):
water mains connection settings with hot and cold water for higher energy savings. Connect the grey tube to the cold water faucet and the red one to the hot water faucet. The machine can be connected to the cold water faucet only: in this case, some programs may start a few minutes later.
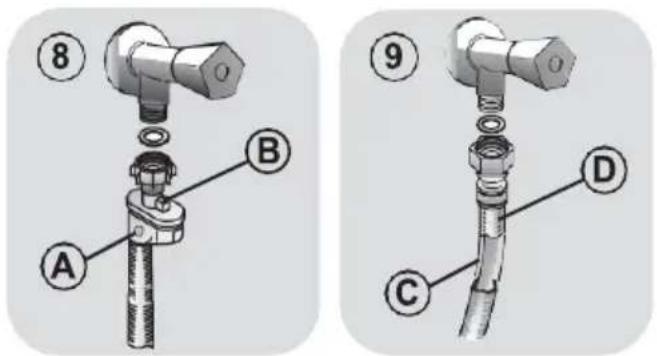
●● AQUASTOP (fig. 8):
a device located on the supply tube that stops water flow if the tube deteriorates; in this case, a red mark will appear in the window "A" and the tube must be replaced. To unscrew the nut, press the one-way lock device "B".
●● AQUAPROTECT – SUPPLY TUBE WITH GUARD (fig. 9):
Should water leak from the primary internal tube "C", the transparent containment sheath "D" will contain water to permit the washing cycle to complete. At the end of the cycle, contact the Customer Service Centre to replace the supply tube.
natural_image
Diagram showing a mechanical assembly with a bolt and dashed outline, no text or symbols present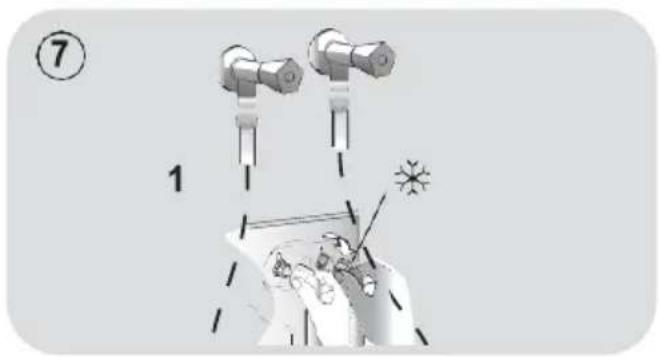
3. PRACTICAL TIPS
Load tips
WARNING: when sorting laundry, make sure:
- have eliminated metallic objects such as barrettes, pins, coins, from laundry;
- to have buttoned pillow cases, closed zips, tied loose belts and long robe ribbons;
- to have removed rollers from curtains;
- to have carefully read clothing washing labels;
-
to have removed any persistent stains using specific detergents.
-
When washing rugs, bedcovers or other heavy clothing, we recommend you avoid centrifuging.
●●To wash wool, make sure the item can be machine washed and marked by the "Pure virgin wool" symbol with the "Does not mat" or "Machine washable" label.
Helpful suggestions for the user
A guide environmentally friendly and economic use of your appliance.
Maximise The Load Size
- Achieve the best use of energy, water, detergent and time by using the recommended maximum load size.
Save up to 50% energy by washing a full load instead of 2 half loads.
Do you need to pre-wash?
● For heavily soiled laundry only! SAVE detergent, time, water and between 5 to 15% energy consumption by NOT selecting Prewash for slight to normally soiled laundry.
Is a hot wash required?
- Pretreat stains with stain remover or soak dried in stains in water before washing to reduce the necessity of a hot wash programme.
Save up to 50% energy by using a 60°C wash programme.
Following is a quick guide with tips and recommendations on detergent use at the various temperatures. In any case, always read the instructions on the detergent for correct use and doses.
When washing heavily soiled whites, we recommend using cotton programs of 60°C or above and a normal washing powder (heavy duty) that contains bleaching agents that at medium/high temperatures provide excellent results.
For washes between 40°C and 60°C the type of detergent used needs to be appropriate for the type of fabric and level of soiling.
Normal powders are suitable for “white” or colour fast fabrics with high soiling, while liquid detergents or “colour protecting” powders are suitable for coloured fabrics with light levels of soiling.
For washing at temperatures below 40°C we recommend the use of liquid detergents or detergents specifically labeled as suitable for low temperature washing.
For washing wool or silk, only use detergents specifically formulated for these fabrics.
4. MAINTENANCE AND CLEANING
To clean the washing machine exterior, use a damp cloth, avoiding abrasives, alcohol and/or solvents. The washing machine does not require any special care for ordinary cleaning: clean drawer compartments and the filter; some tips on how to move the machine or on long periods of disuse are provided below.
● The washing machine comes with a special filter able to trap large residue, such as buttons or coins, which could clog the drain.
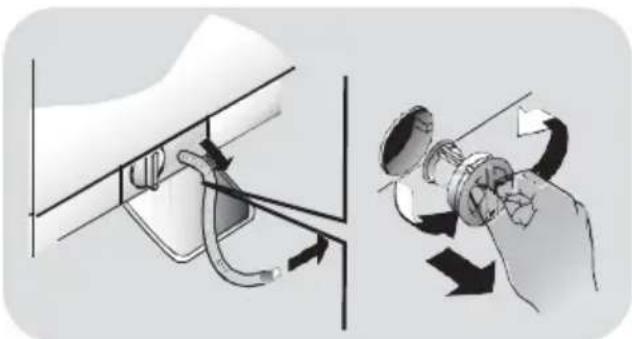
● Only available on certain models: pull out the corrugated hose, remove the stopper and drain the water into a container.
● Before unscrewing the filter, we recommend you place an absorbent cloth under it to keep the floor dry.
● Turn the filter counter-clockwise to the limit stop in the vertical position.
- Remove and clean the filter; when finished, replace it turning it clockwise.
- Repeat the previous steps in reverse order to reassemble all parts.
natural_image
Diagram showing a hand holding a mechanical component with directional arrows indicating rotation or adjustment (no text or symbols present)Suggestions for moves or prolonged disuse
● Should the washing machine be stored in an unheated room for a long period of time, drain all water from tubes.
●● Unplug the washing machine.
- Detach the tube from the strap and lower it, fully draining water into a bowl.
- Secure the drain tube with the strap when finished.
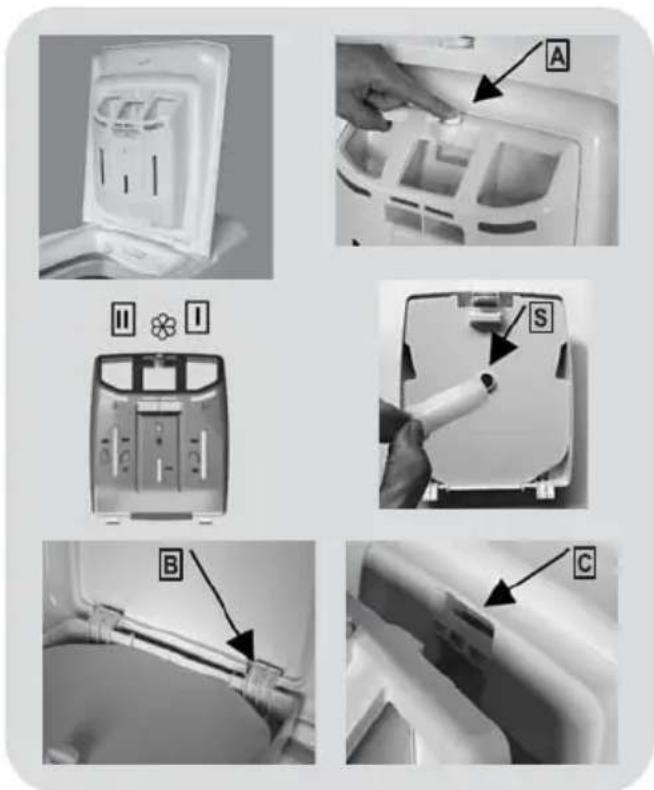
- Press button (A).
●● Hold down the button and turn the detergent dispenser outwards.
- Remove the dispenser and clean it.
● In the case of the pre-wash (I) and wash (II) compartments, it is advisable to remove any dried-in remains of detergent which obstruct the flow of the detergent to the drum.
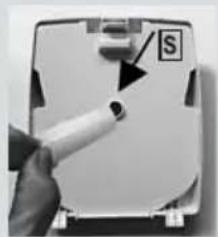
- In the case of the fabric conditioner compartment, the trap (S) located at the rear part of the dispenser should be removed by pulling them out.
- Remove any solid residue which could block the holes in the compartments.
Fitting
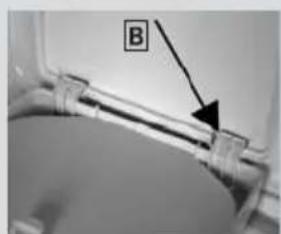
Fit in the tabs as shown (B).
Turn the detergent dispenser towards the housing (C) in the door until the tab clicks into place.
5. QUICK USER GUIDE
This washing machine automatically adapts the level of the water to the type and quantity of washing. This system gives a decrease in energy consumption and a sensible reduction in washing times.
● Turn on the washing machine and select the required program.
- Adjust the washing temperature if necessary and press the required "option" buttons.
- Press the START/PAUSE button to start washing.
Should power go out when the washing machine is running, a special memory saves the settings and, when power returns, the machine resumes the cycle from where it left off.
● The message "end" will appear on the display or the corresponding led will turn on at the end of the program.
●● Turn off the washing machine.
For any type of wash, see the program table and follow the operating sequence as indicated.
Technical data
Water pressure:
min 0,05 Mpa
max 0,8 Mpa
Spin r.p.m.:
See rating plate.
Power input / Power current fuse amp /
Supply voltage:
See rating plate.
6. CONTROLS AND PROGRAMS
z
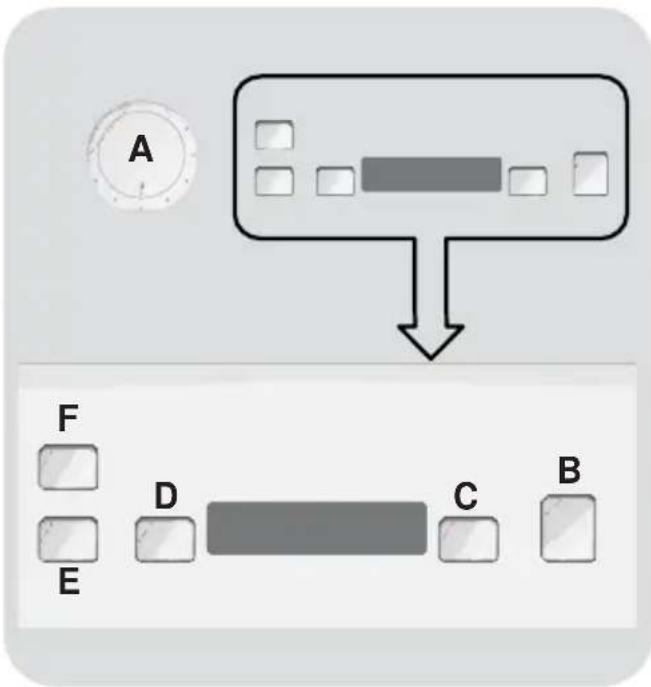
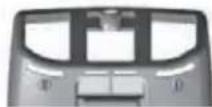
A Programme selector with OFF position
B START/PAUSE button
C DELAY START button
D SPIN SELECTION button
E AQUAPLUS button
F COLD WASH button

WARNING:
Don't touch the display while inserting the plug because the machines calibrates the systems during the first seconds: touching the display, the machine couldn't work property. In this case, remove the plug and repeat the operation.
The programme selector must be returned to the OFF position at the end of each cycle or when starting a subsequent wash cycle prior to the next programme being selected and started.
START/PAUSE button
Opening the door
A special safety device prevents the door from being opened immediately after the end of the cycle.
Wait for 2 minutes after the wash cycle has finished and the "Door Security" light has gone out before opening the door.
Close the door BEFORE selecting the button START/PAUSE.
●● Press to start the selected cycle.
When the START/PAUSE button has been pressed, the appliance can take few seconds before it starts working.
PROGRAMME selector with OFF position
When the programme selector is turned the display lights up to show the settings for the programme selected.
For energy saving, at the end of the cycle or with an inactivity period, the display level contrast will decrease.
N.B.: To switch the machine off, turn the programme selector to the OFF position.
ADD OR REMOVE ITEMS AFTER THE PROGRAMMES HAS STARTED (PAUSE)
- Press and hold the START/PAUSE button for about 2 seconds (some indicator light and the time remaining indicator will flash, showing that the machine has been paused).
●● Wait 2 minutes until the safety device unlocks the door.
●● After you have added or removed items, close the door and press the START/PAUSE button (the programme will start from where it left off).
CANCELLING THE PROGRAMME
●● Press the START/PAUSE button to start the selected cycle.
● Once a programme is selected the programme selector remains stationary on the selected programme till cycle ends.
●● Switch off the washing machine by turning the selector to OFF.
●● To cancel the programme, set the selector to the OFF position.
- Select a different programme.
●● Re-set the programme selector to the OFF position.
The option buttons should be selected before pressing the START/PAUSE button.
If an option is selected that is not compatible with the selected programme then the option indicator first flashes and then goes off.
DELAY START button
● The washing machine can be set to start the program selected 3, 6, or 9 hours after setting.
●● To do this, proceed as follows:
- Select the desired program via the program selector A.
- Press the delayed start key until the desired delay indicator lamp lights up.
- Press the start/pause key B.
- The washing machine will start up after the time selected.
- If you prefer to cancel the programmed start-up time, press the C key again until all the delay lights have switched off.
SPIN SELECTION button
●● You can use this key to select final spin speed, but only within the range of speeds of the program selected.
●● These speeds are displayed via the corresponding lamp.
●● Press the button and keep pressed until the three speed indicator lights go out.
●● You can select the desired speed at any time during the program.
AQUAPLUS button
● Thanks to the new SENSOR ACTIVA SYSTEM, by pressing the key it is possible to run a special washing cycle applicable to all programs and types of fabric, caring for their fibers and the delicate skin of the users who use them.
● Taking on much more water, together with the new combined action of drum rotation cycles and taking on and discharging water allow you to obtain perfectly clean, rinsed clothes.
● More water is used in the wash to dissolve the detergent completely, ensuring an effective washing action.
● The water in the rinses has also been increased to eliminate all trace of detergent in the fibers.
●● This function has been specifically studied for people with delicate, sensitive skin, who can suffer irritation or allergy from the slightest detergent residue.
- It is also advisable to use this function for children's clothes and delicate fabrics in general, especially for washing bathrobes, whose fibers tend to retain detergent.
●● This option is not available for the wool program.
COLD WASH button
- By pressing this button it is possible to transform every program into a cold washing one, without modify other characteristics (water level, times, rhythm, etc..).
●● Curtains, small carpets, handmade delicate fabrics, non colour fast garments can be safely washed thanks to this new device.
Table of programmes

| PROGRAM | kg * (MAX.) | TEMP.°C | DETERGENT | ||||||||
| Recommended | Max. | II | I | ||||||||
| Cottons | 90°C + Pre | 5 | 5.5 | 6 | 6.5 | 7 | 60° | 90° | (●) | ||
 | **Cottons | 5 | 5.5 | 6 | 6.5 | 7 | 30° | 60° | |||
 | Mixed | 3 | 3 | 3 | 3 | 30° | 50° | ||||
 | Wool | 1 | 1 | 1 | 1 | 1 | 30° | 30° | |||
 | Hand | 1 | 1 | 1 | 1 | 40° | 40° | ||||
 | Rinse | - | - | - | - | - | - | - | |||
 | Spin | - - | - - - | - | - | ||||||
 | Drain | - | - | - | - | - | - | - | |||
| Eco 20°C | Eco 20°C | 5 | 5.5 | 6 | 6.5 | 7 | 20° | 20° | |||
 | Rapid 44 Min | 3 | 3 | 3 | 3 | 3 | 30° | 40° | |||
 | Rapid 30 Min | 2 | 2 | 2 | 2 | 30° | 30° | ||||
Please read these notes:
* Maximum load capacity of dry clothes, according to the model used (see control panel).
** STANDARD COTTON PROGRAMMES ACCORDING TO (EU) No 1015/2010 and No 1061/2010.
COTTON PROGRAMME WITH A TEMPERATURE OF 60°C.
COTTON PROGRAMME WITH A TEMPERATURE OF 40°C.
These programmes are suitable to clean normally soiled cotton laundry and they are the most efficient programmes in terms of combined energy and water consumptions for washing cotton laundry.
These programmes have been developed to be compliant with the temperature on the wash label on the garments and the actual water temperature may slightly differ from the declared temperature of the cycle.
The spin speed may also be reduced, to match any guidelines suggested on the fabric label, or for very delicate fabrics cancel the spin completely this option is available with a spin speed button. This function can be activated with the button SPIN SELECTION.
If the label does not indicate specific information, it is possible to use the maximum spin expected in the program.
An over dosing of detergent can cause excessive foaming.
If the appliance detects the presence of excessive foam, it may exclude the spinning phase or extend the duration of the program and increase water consumption.
(●) Only with PREWASH option selected (programmes with PREWASH option available).
1) For the programmes shown you can adjust the duration and intensity of the wash using the STAIN LEVEL button.
IMPORTANT: Do not use liquid detergent for programs with a prewash cycle and/or timed start.
Programmes selection
To clean different types of fabrics and various levels of dirt, the washing machine has specific programs to meet every need of washing (see table of programmes).
$$ 9 0 ^ {\circ} \mathrm{C} + \text { Pre } $$
Made to have a perfect washing. The final spin at maximum speed gives more efficient removal.
Cottons 30/40/60°C
This program is suitable to clean normally soiled cotton laundry and it is the most efficient program in terms of combined energy and water consumptions for washing cotton laundry.
Mixed 30/40/50°C
The washing and rinsing are optimized in the rhythms of rotation of the drum and to the water levels. The gentle spin, ensures a reduced formation of creases in the fabric.
Wool
This program performs a wash cycle dedicated to the wool fabrics that can be washed in a washing machine, or the articles to be washed by hand.
Hand
Program for hand wash only clothes, the program ends with 3 rinses and a slow spin.
Rinse
This program performs 3 rinses with an intermediate spin (which can be reduced or excluded by using the appropriate button). It is used for rinsing any type of fabric, for example after a wash carried out by hand.
Drain + Spin
The program completes the drain and a maximum spin. It is possible to delete or reduce the spin with the SPIN SELECTION button.
Eco 20^
This innovative programme, allows you to wash different fabrics and colours together, such as cottons, synthetics and mixed fabrics at only 20°C and provides an excellent cleaning performance. Consumption on this program is about 40% of a conventional 40°C. cottons wash.
Rapid 30 Min / 44 Min
A complete washing cycle (wash, rinse and spin). This programme is particularly suited to slightly dirty cottons and mixed fabrics. With this programme it is recommended to use only 20% of the detergent normally used to avoid waste.
Preparing the wash
Opening/ closing the drum
●● Open the washing machine lid.
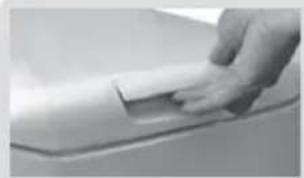
- Open the drum by pressing the (A) button with one hand while pressing down on the opposite door with the other.
- Place clothes in the drum one item at a time, and without squashing. Do not exceed the load limits recommended in the “programme table”. An overloaded washing machine will not wash properly, and will leave clothing wrinkled.
●● To close the drum, place the doors so that the one with the (A) button is below the other and they fit together perfectly.
natural_image
Close-up of a hand holding a white rectangular object on a surface (no visible text or symbols)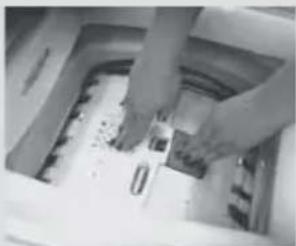
natural_image
Interior view of a kitchen appliance with hands operating a sink (no visible text or symbols)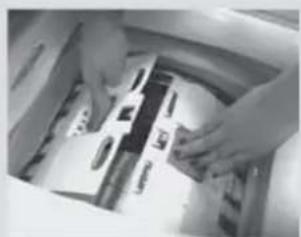
natural_image
Close-up of hands handling a packaged food item in a storage or packaging container (no visible text or symbols)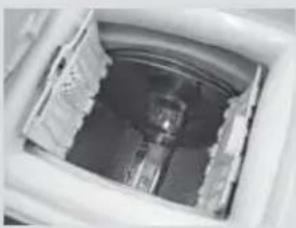
natural_image
Interior view of a mechanical device with internal components (no visible text or symbols)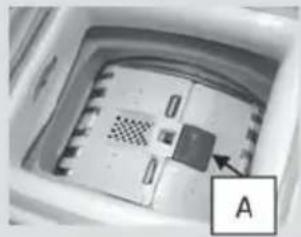
natural_image
Interior view of a microwave oven with a labeled component (A), showing no visible text or symbols on the main subject.Detergent load
The detergent dispenser is divided into 3 compartments:
●● Compartment I is for the pre-wash detergent.
●● Compartment II is for the main wash detergent.
● The compartment ✿ is for fabric conditioners, scenting agents and special additives such as starch, blueing, etc.
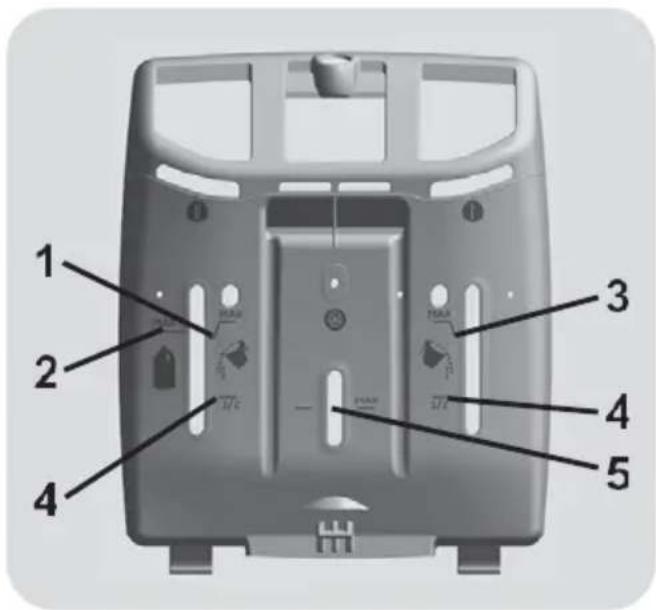
The detergent dispenser has two reference marks:
- Recommended (lower reference mark). This indicates the recommended level for the pre-wash and main wash compartments.
●● Max. This indicates the maximum level, which should never be exceeded.
Important:
● Do not use liquid detergent for programs with a prewash cycle and/or timed start.
When the clothes present stains that need treatment with bleaches liquids products, you can proceed to their preliminary cleaning in the washing machine. For that: Introduce the bleach product in the "compartment II", and set the rinse program Once finished the treatment set the programmer to the OFF position, add the rest of the laundry, and proceed to the normal washing with the wanted program.
1) Maximum Main wash washing powder
2) Maximum Main wash washing liquid
3) Maximum pre-wash washing powder
4) Recommended
5) Maximum scenting agent
If you believe the washing machine is not working correctly, consult the quick guide provided below with some practical tips on how to fix the most common problems.
| Problem | Possible causes and practical solutions |
| The washing machine does not work/start | Make sure it is correctly plugged in. |
| Make sure power is on. | |
| Check whether the required program was correctly selected and to have correctly started the machine. | |
| Make sure the fuse has not blown and that the wall socket is working, testing it with another appliance such as alamp. | |
| The porthole may not be correctly closed: open and close it again. | |
| The washing machine does not fill with water | Make sure the water faucet is open. |
| Make sure the timer is correct set. | |
| The washing machine does not drain water | Make sure the filter is not clogged. |
| Make sure the drain hose is not bent. | |
| Make sure there are no foreign objects in thefilter. | |
| Water leaked on the floor near the washing machine | This may be due to a leak in the gasket between the faucet and supply tube; in this case, replace it and tighten the tube and faucet. |
| The washing machine does not centrifuge | This could be due to the fact that water has not been completely drained: wait a few minutes. Some models include a "no centrifuge" function: make sure it is not on. |
| An excessive amount of detergent could prevent centrifuge: reduce the amount at the next wash. | |
| Strong vibrations are heard during centrifuge | The washing machine may not be fully levelled: if necessary, adjust the feet as indicated in the specificsection. |
| Make sure transport brackets were removed. | |
| Make sure the load is evenly distributed. | |
| If a specific ERROR appears of blinks | If error no. 0, 1, 5, 7 or 8 appears or blinks, contact the Customer Service Centre directly. |
| If error no. 2 appears or blinks, the machine does not load water. Make sure the water faucet is open. | |
| If error no. 3 appears or blinks, the machine does not correctly drain. Make sure the drain is free and that the drain hose is not bent. | |
| If error no. 4 appears or blinks, the machine is too full. Close the water faucet and contact the Customer ServiceCentre. | |
| If error no. 9 appears or blinks, turn off the washing machine, wait 10 – 15 seconds and restart the program. |
- KÄYTÄNNÖLLISIÄ VINKKEJÄ
- Täyttövinkkejä
- Pesuaineen annostus
- Environmental conditions
- Contents
- GENERAL SAFETY RULES
- Safety instructions
- WARNING:
- CE Appliance complies with European Directives:
- INSTALLATION
- If your model offers this function:
- Hydraulic connections
- DO NOT OPEN THE FAUCET.
- PRACTICAL TIPS
- Load tips
- WARNING: when sorting laundry, make sure:
- Helpful suggestions for the user
- Maximise The Load Size
- Do you need to pre-wash?
- Is a hot wash required?
- MAINTENANCE AND CLEANING
- Suggestions for moves or prolonged disuse
- Fitting
- QUICK USER GUIDE
- Technical data
- Water pressure:
- CONTROLS AND PROGRAMS
- START/PAUSE button
- Opening the door
- PROGRAMME selector with OFF position
- ADD OR REMOVE ITEMS AFTER THE PROGRAMMES HAS STARTED (PAUSE)
- CANCELLING THE PROGRAMME
- DELAY START button
- SPIN SELECTION button
- AQUAPLUS button
- COLD WASH button
- Please read these notes:
- Programmes selection
- Cottons 30/40/60°C
- Mixed 30/40/50°C
- Wool
- Hand
- Rinse
- Drain + Spin
- Eco 20°C
- Rapid 30 Min / 44 Min
- Preparing the wash
- Opening/ closing the drum
- Detergent load
- Important:
Brand : Helkama
Model : HPKT1472D
Category : Washing machine