Q Clean C140 - Vacuum Cleaner Canvac - Free user manual and instructions
Find the device manual for free Q Clean C140 Canvac in PDF.


| Product Type | Central Vacuum System |
| Brand | Canvac |
| Model | Q Clean C140 |
| Power Consumption | 1750 W |
| Voltage | 230-240 V~ |
| Frequency | 50 Hz |
| Motor Type | Flow-thru, maintenance-free |
| Filtration | Optional HEPA filter |
| Dust Collection | Press & Release dirt bucket |
| Disposable Bag Compatible | Yes (optional) |
| Control | LCD screen and hose handle with variable speed |
| Automatic Shut-off | After 30 minutes of continuous operation |
| Empty Bucket Indicator | Every 25 hours of use (flashing icon) |
| Minimum Mounting Distance | 30 cm (12 in) from floor, ceiling, and corner sidewall |
| Recommended Mounting Height | Center of bracket 122 cm (48 in) from floor |
| Intake Flange | Reversible for left or right pipe connection |
| Exhaust | Must be vented away from wall; requires elbow if no HEPA |
| Error Codes | Er1-Er5 for electrical faults |
| Warranty | See canvac.se for details |
| WEEE Disposal | Do not dispose as household waste; recycle appropriately |
Frequently Asked Questions - Q Clean C140 Canvac
User questions about Q Clean C140 Canvac
0 question about this device. Answer the ones you know or ask your own.
Ask a new question about this device
Download the instructions for your Vacuum Cleaner in PDF format for free! Find your manual Q Clean C140 - Canvac and take your electronic device back in hand. On this page are published all the documents necessary for the use of your device. Q Clean C140 by Canvac.
USER MANUAL Q Clean C140 Canvac
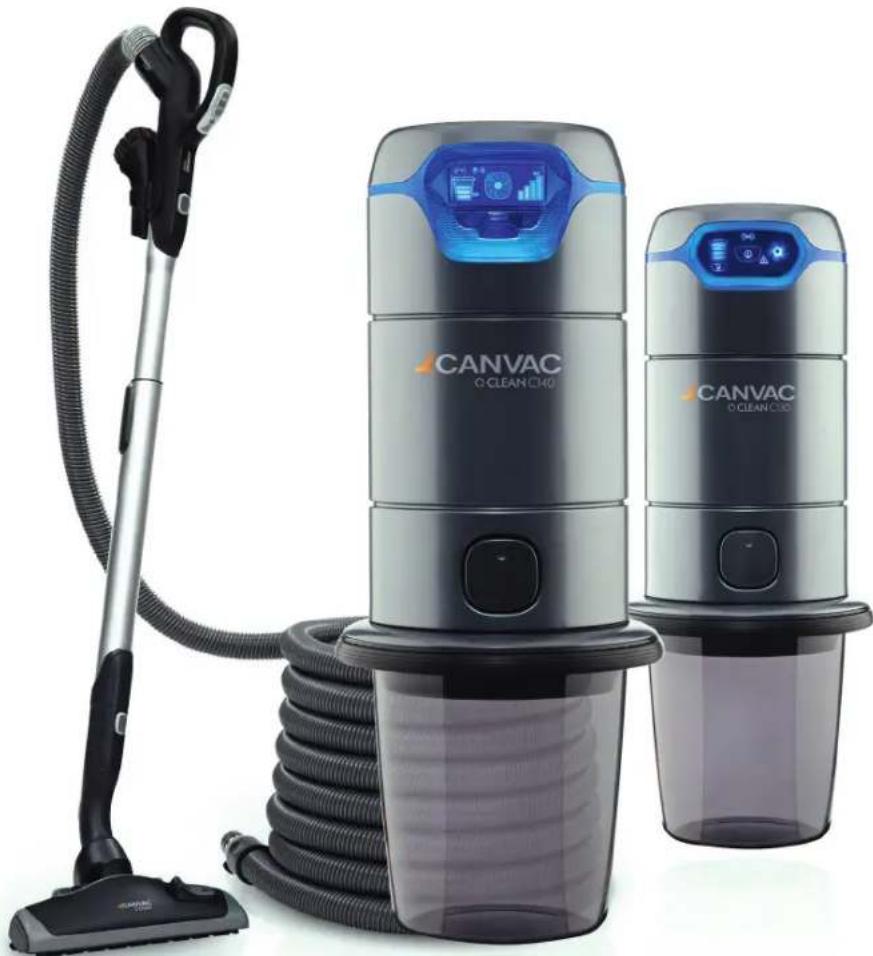
CANVAC Q CLEAN C130 & CANVAC Q CLEAN C140
Centraldammsugare
Central vacuum system
Bruksanvisning s 2
User manual s 14
Läs bruksanvisningen noga innan du använder produkten. Spara bruksanvisningen för framtida bruk. Before using this product, please read the user manual carefully. Save the user manual for future reference.
GRATULERAR!
INNEHÅLLSFÖRTECKNING
Figur 3
OBS!

Figur 4
1.5 Installation av HEPA-filter (tillval)
=

Figur 5A
CANVAC
Q CLEAN
1.6 Utblås

1.8 Systemtest/drift
Figur 6
Figur 7
3.0 FELSÖKNING
CONGRATULATIONS!
You are now the proud owner of a Canvac Central Vacuum System the ultimate in cleaning equipment.
Your Canvac QCLEAN Central Vacuum System will change your cleaning routine. From its ease of use and versatility, to its quiet and dust-free operation, your QCLEAN will help eliminate the drudgery of vacuuming and give you a cleaner, healthier indoor environment. Before using your QCLEAN Central Vacuum System, read this manual to learn the proper way to use this cleaning system. It will help give you years of trouble-free cleaning performance.
TABLE OF CONTENTS
Important safeguards 14
General information 15
1.0 Installation 16
1.1 Planning 16
1.2 Central vacuum location 16
1.3 Central vacuum installation 16
1.4 Intake flange 17
1.5 Optional HEPA filter installation 17
1.6 Exhaust 18
1.7 Bag adapter 18
1.8 System test/operation 18
2.0 Maintenance 19
2.1 Motor 19
2.2 Dirt bucket and bag adapter 19
2.3 Optional disposable bag 19
2.4 HEPA filter maintenance 19
3.0 Trouble-Shooting 20
3.1 Automatic shut-off 20
3.2 Partial loss of suction 20
3.3 Total loss of suction 20
3.4 Motor refuses to start 20
4.0 Instructions: Canvac QCLEAN LCD screens 20
4.1 Power button 20
4.2 Communication link 20
4.3 Screen saver 20
4.4 Variable speed indicator 21
4.5 Empty bucket indicator 21
4.6 Performance bars 21
4.7 Empty/flashing performance bars 21
4.8 Motor fault indicators 22
4.9 Error codes 22
4.10 Set clock on power unit 22
4.11 Navigation buttons 22
5.0 Instructions: Canvac QCLEAN hose handle 22
5.1 Power button 23
5.2 Variable speed control 23
5.3 System indicator 23
5.4 Variable speed indicator 23
6.0 Service information 23
6.1 Service warranty 23
IMPORTANT SAFEGUARDS
When using an electronic appliance, basic safety precautions should always be followed, including those listed below.
READ ALL INSTRUCTIONS BEFORE USING THIS VACUUM SYSTEM.
WARNING
To reduce the risk of fire, electric shock or injury:
- This vacuum cleaner is intended for dry pick up only. Do not use on wet surfaces or pick up any liquids, hot debris or any flammable items that would cause harm to the vacuum cleaner.
- Keep cord away from heated surfaces.
- Do not allow vacuum to be used as a toy. Close supervision is necessary when this vacuum is used by or near children.
- Use this vacuum only for its intended use as described in this manual. (Use of attachments not recommended by manufacturer may cause fire, electric shock, injury or damage to system components.)
- Connect to a properly grounded (earthed) outlet only.
- Mount unit at least 30cm (12 inches) from the floor, ceiling and corner sidewall to insure adequate ventilation for motor.
- Never operate this vacuum if it has a damaged cord or plug, if it is not working properly, or if it has been dropped or damaged. Return to authorized dealer for repair.
- Never disconnect plug by pulling cord. To disconnect from outlet, grasp the plug, not the cord.
- Do not put any object into openings. Do not use with any opening blocked. Keep free of dust, lint, hair and anything that may reduce air flow/suction. Lack of air flow will cause the motor to overheat.
- This vacuum cleaner creates suction. Keep hair, face, fingers, all body parts and loose clothing away from any openings.
- Never operate without dust bag and/or filter in place.
- Turn off all controls before unplugging.
- Never handle plug, cord or power unit with wet hands.
- Use extra care when cleaning on stairs.
- Do not locate the power unit in a high temperature area or where it is inaccessible.
- Do not use extension cords or outlets with inadequate current carry capacity.
- Do not pick up anything that is burning or smoking, such as cigarettes, matches or hot ashes.
- Do not use on wet surfaces.
- Do not vacuum drywall dust or baking flour as it may cause damage to your vacuum.
- If the power cord is damaged, it must be replaced by a special cord available from the authorized local dealer.
- Keep your work area well lighted.
- Unplug electrical appliances before vacuuming them.
- Do not pick up flammable or combustible liquids such as gasoline, or use in areas where they may be present.
SAVE THESE INSTRUCTIONS
GENERAL INFORMATION
The central vacuum system is designed for dry pick up of household dirt and dust and is not intended to pick up liquids. Avoid picking up hard or sharp objects with the system to prevent hose and plastic pipe damage or clogs. This central vacuum system is intended for household use only.
Service information
The instructions in this booklet serve as a guide to routine maintenance. For additional information, contact your local authorized dealer.
Rating plate
The style, model and serial numbers are indicated on the rating plate located on back left side of power unit. For prompt and complete service information, always refer to these numbers when inquiring about service (refer to Figure 1).
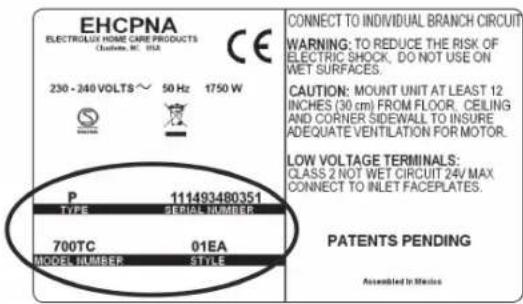
Figure 1
1.0 Installation
1.1 Planning
If your home already has a system of plastic pipes and inlet valves, you are ready to install the power unit, (refer to Install Central Vacuum section 1.3). Contact your local authorized dealer if you have any questions.
1.2 Central vacuum location
The central vacuum should be located away from the general living area, yet accessible so you can remove the dirt bucket and inspect the vacuum. A typical location would be in a garage or utility area where emptying the dirt bucket would be more convenient. Other suitable locations are in the basement, laundry room or a ventilated storage room.
1.3 Central vacuum installation
The vacuum hangs on the mounting bracket which is screwed to the wall. The center of the mounting bracket should be about 122 cm (48 inches) from the floor to allow convenient removal of the dirt bucket. Mount unit at least 30 cm (12 inches) from the floor, ceiling and corner sidewall to insure adequate ventilation for motor. If mounting on plaster or panel walls, ensure screws enter studs. If mounting on concrete wall, drill the wall with a masonry bit and insert the appropriate wall anchors (refer to Figure 2).

Figure 2
WARNING!
- Do not block the exhaust pipe. Lack of ventilation will cause the motor to overheat.
- Do not locate the power unit in a high temperature area where it is inaccessible for example.
Before hanging the power unit on the wall ensure the intake flange on the power unit is positioned in the correct direction (see section 1.4); optional HEPA filter is installed correctly (see section 1.5); and optional bag adaptor is installed correctly (see section 1.7).
Strip the low-voltage wires that were installed with the main trunk line. Connect the wires to the spring-loaded connectors on the back of the power unit (refer to Figure 3). Hang the power unit on the bracket. Connect the main tube line to the intake flange of the vacuum with the connector and clamp provided.
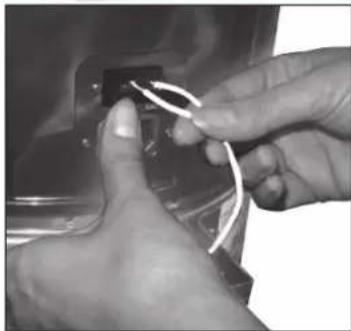
Figure 3
NOTE:
DO NOT glue the main tube line to the power unit so that the power unit may be removed for future maintenance or service.
1.4 Intake flange
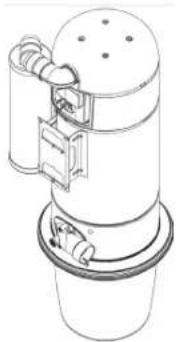
Your power unit has been designed for either a left or right pipe intake. If the pipe from your house is located on the right side of the power unit, you will need to change the direction of the intake flange. To do this, remove the two Torx 20 screws located on the intake flange and turn the intake flange 180° . Secure the intake flange with the same two Torx 20 screws previously removed (refer to Figure 4).
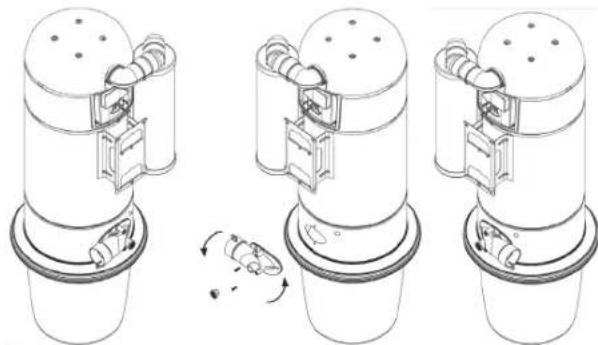
Figure 4
1.5 Optional HEPA filter installation
- To properly install the optional HEPA filter, secure the 90° elbow to the body of the HEPA filter with the Torx 20 screw provided.
- Secure both the 90° elbow and HEPA filter to the back of the power unit using the second Torx 20 screw provided.
- Insert the HEPA filter with its two plastic tabs on the bottom of filter cartridge into the cavity of the HEPA filter and snap into place. Close the HEPA door gently. If the door does not close easily, remove and re-insert filter. The HEPA filter can only be installed on the right side of the power unit and will not interfere with the intake pipe on either side of the unit (refer to Figure 5A).
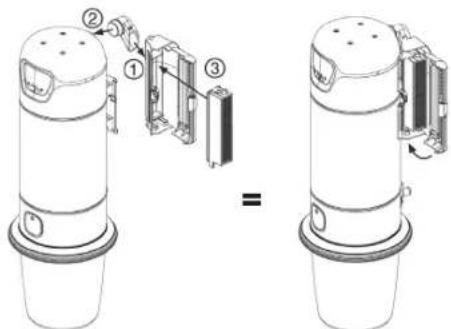
Figure 5A
CANVAC
Q CLEAN
1.6 Exhaust
Do not operate the vacuum vented directly into the wall as it could cause damage to the wall and/or vacuum. See Section 1.5 for adaptor instructions.

Figure 5B
NOTE:
One elbow must be installed if the HEPA filter is not used (refer to Figure 5B).
1.7 Bag adaptor
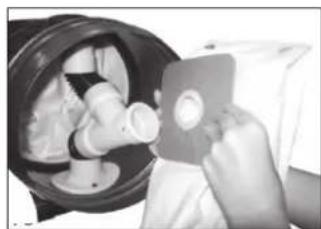
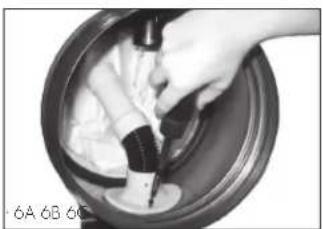
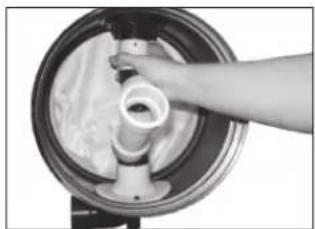
The bag adaptor is easy to install prior to placing the central vacuum unit on the wall with the dirt bucket removed. The bag adaptor has three unique ends, each connecting to a specific component.
- Using the two Torx 20 screws, secure end "A" to the intake flange on the back inside body of the central vacuum unit (refer to Figure 6A).
- Secure end "B" to the Quick Clean Valve from the inside of the central vacuum unit by aligning and locking the tabs into place (refer to Figure 6B).
- Push the cardboard collar from the filter bag on to the open hanging end "C" of the bag adaptor (refer to Figure 6C).
- Reconnect the dirt bucket to the central vacuum unit and ensure the filter bag is completely sealed in both the central vacuum unit and dirt bucket.
Figure

1.8 System test/operation
Be certain to comply with local electrical codes and regulations. Plug the unit into an electrical outlet. You are now ready to check the vacuum installation:
- Be sure the dirt bucket is properly secured to the vacuum.
- Plug the hose into each inlet valve and turn on the central vacuum system with the power button on the handle ensuring the electrical contacts operate properly.
- The central vacuum system can also be turned on/tested by pressing the power button on the power unit.
- Check each inlet valve for air leaks.
- Check each pipe connection for air leaks.
WARNING!
Do not use extension cords or outlets with inadequate current carrying capacity. Connect the power cord to a dedicated branch circuit. Before hanging the power unit on the wall, install the HEPA filter supplied with the unit.
2.0 MAINTENANCE
Instructions in this manual serve as a guide to routine maintenance. Proper airflow and suction are maintained by keeping the dirt bucket and filter clean, plastic tubing and hose free from clogs.
2.1 Motor
The Canvac QCLEAN central vacuum system is equipped with a flow-thru motor and will never need lubrication. Should you experience any motor problems, please contact your local authorized dealer.
2.2 Dirt bucket and bag adaptor
Reduced airflow or suction indicates the central vacuum system is not operating at maximum efficiency. If the dirt bucket is full and the filter is clogged, air cannot pass through the unit limiting performance.
To remove the Press & Release Bucket, clasp opposing positions on the bucket ring, press with thumbs and pull down to remove bucket and empty contents. (refer to Figure 7).
To re-install dirt bucket, lift the bucket back in to place until you hear a "click". The central vacuum system will not operate properly if the dirt bucket is not installed correctly.

Figure 7
2.3 Optional disposable bag
Your vacuum may be equipped with a disposable filter bag, which can be discarded when full. A full filter bag will reduce vacuum and minimize performance. Empty the filter bag 2-3 times a year depending, on how much dirt is collected. Replacement filter bags may be purchased from a local authorized dealer
How to change the filter bag:
- Remove the dirt bucket.
- Remove the filter bag from the bag adaptor.
- Put new filter bag in place.
- Turn the filter bag's opening to secure filter bag.
- Re-install the dirt bucket.
2.4 HEPA filter maintenance
We recommend changing the HEPA filter after the dirt bucket has been emptied three times, or after being used for one year, whichever comes first. To replace your HEPA filter:
- Open the HEPA filter door with button located on the side, center of door.
- Press down on tab at top of filter and discard the entire filter.
- Insert the HEPA filter by inserting the two plastic tabs at bottom of filter cartridge into the cavity of the HEPA filter. Snap into place (refer to Figure 8).
- Close HEPA door gently, without force. If the door does not close easily, re-insert filter.
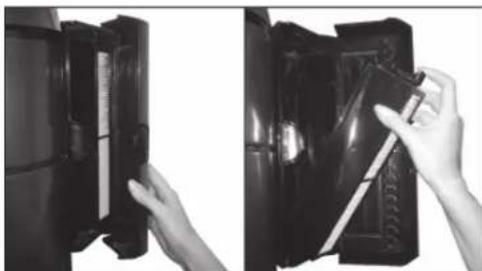
Figure 8
3.0 TROUBLE-SHOOTING
3.1 Automatic shut-off
If the central vacuum power unit is unintentionally left ON for a prolonged period, the operating system has an automatic 30-minute shut-off timer. The shut-off timer will automatically reset when the system is turned on by the hose or power unit. To protect the power unit from over heating, the operating system has a thermal protection shutoff and will automatically turn OFF the vacuum. In the event an automatic shut-off occurs, a motor fault icon will appear on the power unit screen and a red fan blade will flash on the hose handle. Please allow the unit to cool for approximately 5 minutes so it can reset itself. After 5-minutes, turn the power unit on. If the power unit does not turn ON, let the unit cool down for an additional 5 minutes. If the power unit still does not operate, please contact your authorized dealer.
3.2 Loss of suction
- Empty dirt bucket. Inspect filter.
- Turn ON vacuum and check the suction at each inlet. If suction is not the same at each inlet, the line is partially clogged. To locate the clog, start with the inlet closest to the vacuum and check the suction. Continue checking each successive inlet until you locate the inlet where a suction loss is occurring. The clog will be between that inlet and the previous one checked. To remove the clog, call your local authorized dealer.
3.3 Total loss of suction
- Check for power light on screen.
- If you have good suction at the unit, but no suction in the hose then there is a clog in the pipes or hose. To remove the clog, call your local authorized dealer.
3.4 Motor refuses to start
- Ensure central vacuum is plugged into an electrical outlet.
- Check for power.
- Short circuit the low voltage power cable.
- Start the unit.
- If the problem remain, contact you local authorized dealer.
4.0 INSTRUCTIONS: CANVAC QCLEAN LCD SCREENS
4.1 Power button
The Power symbol on the power unit screen or button can turn the unit ON/OFF. The unit can also be activated by the hose handle from an inlet valve inside the home, Quick Clean Valve on the power unit or through other cleaning tools through a low volt system.

4.2 Communication link (optional feature on select units)
When the Canvac QCLEAN hose is connected to an inlet valve, the Communication Link icon will appear at the top of the power unit screen. The fan blade on the Canvac QCLEAN hose handle will pulsate with a glowing blue light to indicate communication between power unit and hose handle when the hose is in standby mode or OFF position.


4.3 Screen saver (optional feature on select units)
When the power unit wakes from sleep mode, screen saver mode appears for 2-3 seconds before other icons appear on screen.

4.4 Variable speed indicator (optional feature on select units)
When the power unit is ON, the fan blade will spin at a rate based on the speed indicated by the hose handle. When the motor speed is reduced, the motion of the fan blade is also reduced. When the motor speed increases, the motion of the fan blade also increases.
4.5 Empty bucket indicator (optional feature on select units)
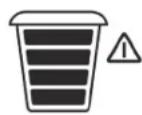
For every 25 hours of use (approximately 6 months) the empty bucket indicator icon will flash on the power unit screen. The power unit also communicates to empty the dirt bucket to the Canvac QCLEAN hose handle with a RED flashing fan blade. As this notice is time based, you may find the dirt bucket partially full or too full. If you have pets, a workshop or vacuum frequently, you should check the dirt bucket more frequently.
Once the bucket is emptied, simply push one of the two reset buttons located on the power unit and hold for 5 seconds. If the power supply is interrupted or unplugged, the empty bucket indicator memory keeps track of its previous time status.




4.6 Performance bars (optional feature on select units)
Three to four performance bars indicates the system is performing at the optimal level. Performance levels will change depending on variable speed settings and when specialty cleaning attachments are used. When the unit is OFF, performance bars will display as empty.

NOTE:
It is normal to see performance changes when specialty attachments are used causing a restriction in airflow.
4.7 Empty/flashing performance bars (optional feature on select units)
The Performance Bar icon is displayed on the power unit when the motor is unable to operate at optimal system performance. When 2 bars or less are illuminated, the air flow is restricted, meaning the vacuum's cleaning performance has decreased. The power unit will communicate the error message to the QCLEAN hose handle showing a flashing RED fan blade.


Air flow can be restricted by several factors:
• Overloaded Dirt Bucket
- System Blockage
- Motor Wear
The most common cause is an overloaded dirt bucket, that needs emptying. Alternatively, there may be a system blockage, and the hose and piping system should be checked for blockage. If you continue to receive low system performance, please contact your authorized dealer.

CANVAC
Q CLEAN
4.8 Motor fault indicators
If there is a system fault or malfunction with your power unit, the fan blade icon will flash with an exclamation icon. If these symbols appear on the power unit screen, turn the power unit OFF and call for service. The power unit communicates the system fault to the QCLEAN hose handle with a RED flashing fan blade.

These symbols may appear due to the following faults:
• Maximum system run time
• Electronic problem
• Voltage or current/power surge
• Power unit not responding to electronics
- Motor failure
- Mechanical failure of bag & clogged motor
4.9 Error codes (optional feature on select units)
An error code will appear if your unit requires service from an authorized service technician. The power unit communicates the system fault to the QCLEAN hose handle with a RED flashing fan blade. Turn OFF the power unit and call for service to resolve the system alert/error code.


Error Codes:
Er 1: Under current
Er 2: Over current short
Er 3: 30-minute time out
Er 4: Over current long
Er 5: Line error or off current
4.10 Navigation buttons (optional feature on select units)
Below the display screen, are buttons for are Left (<); Right (>); Enter (☐); and Power (①). To modify the Time or reset the Empty Bucket indicator, scroll to the appropriate screen icon and press the Enter button for 5 seconds. Follow the screen prompts.

4.11 Set Clock on power unit (optional feature on select units)
To set the time, use the left (<) or right (>) toggle buttons on the power unit to select the clock and hold the Enter Button (☐) for 5 seconds. Select either 12-hour or 24-hour time format and set the time using the left (<) or right (>) toggle buttons, and press Enter (☐) to complete the sequence.

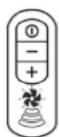
5.0 INSTRUCTIONS FOR CANVAC QCLEAN HOSE HANDLE
NOTE:
The Canvac QCLEAN hose and hose handle will only function with a QCLEAN central vacuum system. If you received an QCLEAN hose and do not have a QCLEAN power unit, please contact your local authorized Canvac dealer to obtain the proper hose for your central vacuum system.
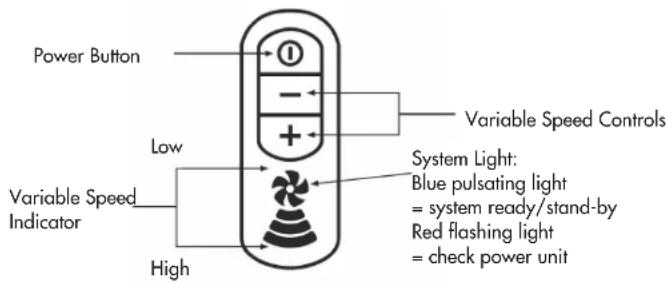
5.1 Power button
The Power button on the top of QCLEAN hose handle will turn the unit ON/OFF when the hose is plugged in to an inlet valve inside the home or Quick Clean Valve located on the front of power unit. The unit can be activated by the Power button on the power unit screen.
5.2 Variable speed control
To decrease the suction, press the (-) button. To increase suction press the (+) button.
5.3 System indicator
When the QCLEAN hose is connected to an inlet valve in your home or Quick Clean Valve on the front of the power unit, the hose handle fan blade icon pulsates with a glowing BLUE light that indicates communication between the hose handle and power unit. When the unit is turned ON from the hose handle, the fan blade icon turns to a solid BLUE colour. When it is time to empty the bucket, or the system indicates a performance problem, the fan blade will turn RED. If you see a RED flashing fan blade, turn the system OFF immediately. Check the power unit to identify the cause. To learn more about what can cause the hose handle fan blade to flash RED, please read sections 4.5 to 4.9.
5.4 Variable speed indicator
The QCLEAN hose handle will indicate system performance and strength of suction with the Variable Speed Indicator. When the system turns ON, all four lights of the Variable Speed Indicator will light, indicating high speed/suction. The lowest speed/suction is indicated with a single lighted fan blade. To adjust the speed/suction, press either the (-) or (+) buttons.
6.0 SERVICE INFORMATION
The instructions in this booklet serve as a guide for routine operation and maintenance. For more information, contact your local authorized dealer.
6.1 Service warranty
Warranty information is available on canvas.se.
Waste of Electrical and Electrical Equipment (WEEE). The symbol on the product or on its packaging indicates that this product may not be treated as household waste. Instead it should be handed over to applicable collection point for the recycling of electrical and electrical equipment. By ensuring this product is disposed of correctly, you will help prevent potential negative consequences for the environment and human health, which could otherwise be caused by inappropriate waste handling of this product. For more detailed information about this product, please contact your local waste disposal service or the local authorized dealer where you purchased the product.
CANVAC AB
FÖRRÅDSGATAN 32
SE 542 35 MARIESTAD
SWEDEN
+46 (0)501 39 90 00
+46 (0)501 39 90 90
www.canvac.se
info@canvac.se

CANVAC
INDOOR AIR QUALITY
- CANVAC Q CLEAN C130 & CANVAC Q CLEAN C140
- GRATULERAR
- INNEHÅLLSFÖRTECKNING
- OBS
- 1.5 INSTALLATION AV HEPA-FILTER (TILLVAL)
- CANVAC
- Q CLEAN
- 1.6 UTBLÅS
- 1.8 SYSTEMTEST/DRIFT
- 3.0 FELSÖKNING
- CONGRATULATIONS
- YOU ARE NOW THE PROUD OWNER OF A CANVAC CENTRAL VACUUM SYSTEM THE ULTIMATE IN CLEANING EQUIPMENT
- TABLE OF CONTENTS
- IMPORTANT SAFEGUARDS 14
- GENERAL INFORMATION 15
- 1.0 INSTALLATION 16
- 2.0 MAINTENANCE 19
- 4.0 INSTRUCTIONS: CANVAC QCLEAN LCD SCREENS 20
- 5.0 INSTRUCTIONS: CANVAC QCLEAN HOSE HANDLE 22
- 6.0 SERVICE INFORMATION 23
- IMPORTANT SAFEGUARDS
- WARNING
- TO REDUCE THE RISK OF FIRE, ELECTRIC SHOCK OR INJURY
- GENERAL INFORMATION
- SERVICE INFORMATION
- RATING PLATE
- 1.0 INSTALLATION
- 1.1 PLANNING
- 1.2 CENTRAL VACUUM LOCATION
- 1.3 CENTRAL VACUUM INSTALLATION
- NOTE
- 1.4 INTAKE FLANGE
- 1.5 OPTIONAL HEPA FILTER INSTALLATION
- 1.6 EXHAUST
- 1.7 BAG ADAPTOR
- 1.8 SYSTEM TEST/OPERATION
- 2.0 MAINTENANCE
- 2.1 MOTOR
- 2.2 DIRT BUCKET AND BAG ADAPTOR
- 2.3 OPTIONAL DISPOSABLE BAG
- HOW TO CHANGE THE FILTER BAG
- 2.4 HEPA FILTER MAINTENANCE
- 3.0 TROUBLE-SHOOTING
- 3.1 AUTOMATIC SHUT-OFF
- 3.2 LOSS OF SUCTION
- 3.3 TOTAL LOSS OF SUCTION
- 3.4 MOTOR REFUSES TO START
- 4.0 INSTRUCTIONS: CANVAC QCLEAN LCD SCREENS
- 4.1 POWER BUTTON
- 4.2 COMMUNICATION LINK (OPTIONAL FEATURE ON SELECT UNITS)
- 4.3 SCREEN SAVER (OPTIONAL FEATURE ON SELECT UNITS)
- 4.4 VARIABLE SPEED INDICATOR (OPTIONAL FEATURE ON SELECT UNITS)
- 4.5 EMPTY BUCKET INDICATOR (OPTIONAL FEATURE ON SELECT UNITS)
- 4.6 PERFORMANCE BARS (OPTIONAL FEATURE ON SELECT UNITS)
- 4.7 EMPTY/FLASHING PERFORMANCE BARS (OPTIONAL FEATURE ON SELECT UNITS)
- 4.8 MOTOR FAULT INDICATORS
- 4.9 ERROR CODES (OPTIONAL FEATURE ON SELECT UNITS)
- 4.10 NAVIGATION BUTTONS (OPTIONAL FEATURE ON SELECT UNITS)
- 4.11 SET CLOCK ON POWER UNIT (OPTIONAL FEATURE ON SELECT UNITS)
- 5.0 INSTRUCTIONS FOR CANVAC QCLEAN HOSE HANDLE
- 5.1 POWER BUTTON
- 5.2 VARIABLE SPEED CONTROL
- 5.3 SYSTEM INDICATOR
- 5.4 VARIABLE SPEED INDICATOR
- 6.0 SERVICE INFORMATION
- 6.1 SERVICE WARRANTY
Brand : Canvac
Model : Q Clean C140
Category : Vacuum Cleaner