SLM-2400HD - Monitor Santec - Free user manual and instructions
Find the device manual for free SLM-2400HD Santec in PDF.


User questions about SLM-2400HD Santec
0 question about this device. Answer the ones you know or ask your own.
Ask a new question about this device
Download the instructions for your Monitor in PDF format for free! Find your manual SLM-2400HD - Santec and take your electronic device back in hand. On this page are published all the documents necessary for the use of your device. SLM-2400HD by Santec.
USER MANUAL SLM-2400HD Santec
natural_image
Interior view of a modern airport terminal with check-in counters and travelers (no visible text or signage)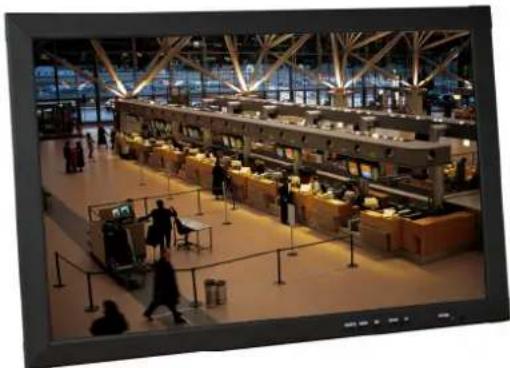
natural_image
Interior view of a modern library or data center with bookshelves, service counters, and people walking (no visible text or signage)© Copyright by SANTEC BW AG, Ahrensburg (Germany)
Dear customer,
Thank you for purchasing a high quality SANTEC device.
We recommend that you read this manual thoroughly before operating your new system for the first time. Please follow all instructions and observe the warnings contained in this manual.
Please contact your local dealer or us if you have any questions or if you wish to claim for a service or warranty.
You will find further information on our website: www.santec-video.com
All rights reserved. This publication may not be reproduced, stored in a retrieval system or transmitted, in any form or by any means (electronic, mechanical, photocopying, recording or otherwise), without the written prior permission of SANTEC BW AG.
No reproduction of any part or excerpts thereof are permitted.
Errors excepted. Specifications are subject to change without notice for quality improvement.
SANTEC is a registered trademark of SANTEC BW AG. All other companies or products mentioned in this publication are trademarks, registered trademarks or brands of the respective company.
© Copyright b SANTEC BW AG, Ahrensburg (Germany)
DEUTSCH
Inhaltsverzeichnis
Safety instructions 33
About this user manual 34
Items included in the delivery 34
-
IR-remote control 35
-
LCD monitor mounting 37
-
Monitor controls 39
-
Connections 40
-
Monitor settings via OSD menu 41
5.1 Picture 42
5.2 Sound 43
5.3 OSD setup 44
5.4 Advance 45
5.5 PIP 46
5.6 PC OSD display (only at PC input signal) 47
-
Special features 48
-
Technical specifications 49
-
Technical drawings 52
natural_image
Two simple line drawings of a tilted rectangular object with an arrow indicating rotation, no text or symbols present.natural_image
Technical line drawing of a mechanical component with two vertical supports and a central U-shaped housing, enclosed in a rectangular frame (no text or symbols)SLM-1040N, SLM-1210N, SLM-1500N, SLM-1710N, SLM-1910N:
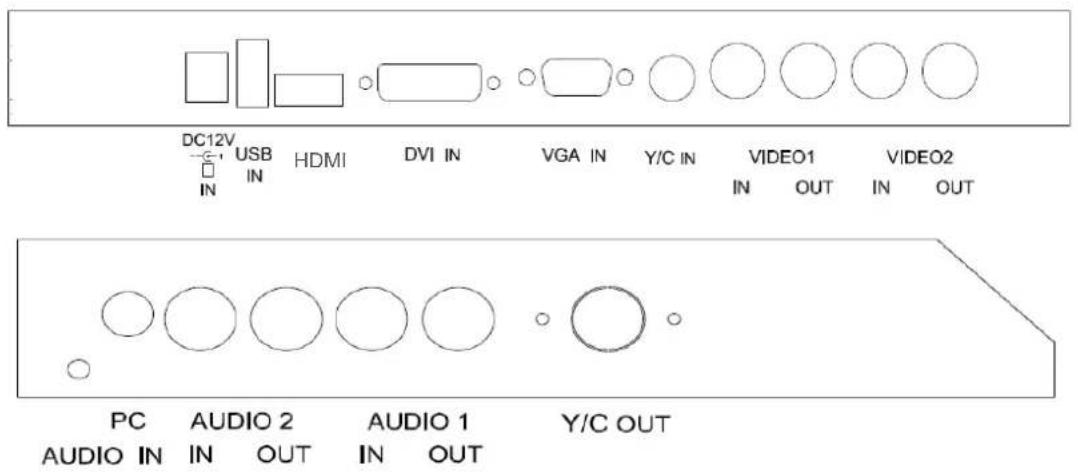
text_image
DC12V USB HDMI DVI IN VGA IN Y/C IN VIDEO1 IN OUT IN OUT PC AUDIO 2 AUDIO 1 Y/C OUT AUDIO IN IN OUT IN OUTSLM-2400HD:
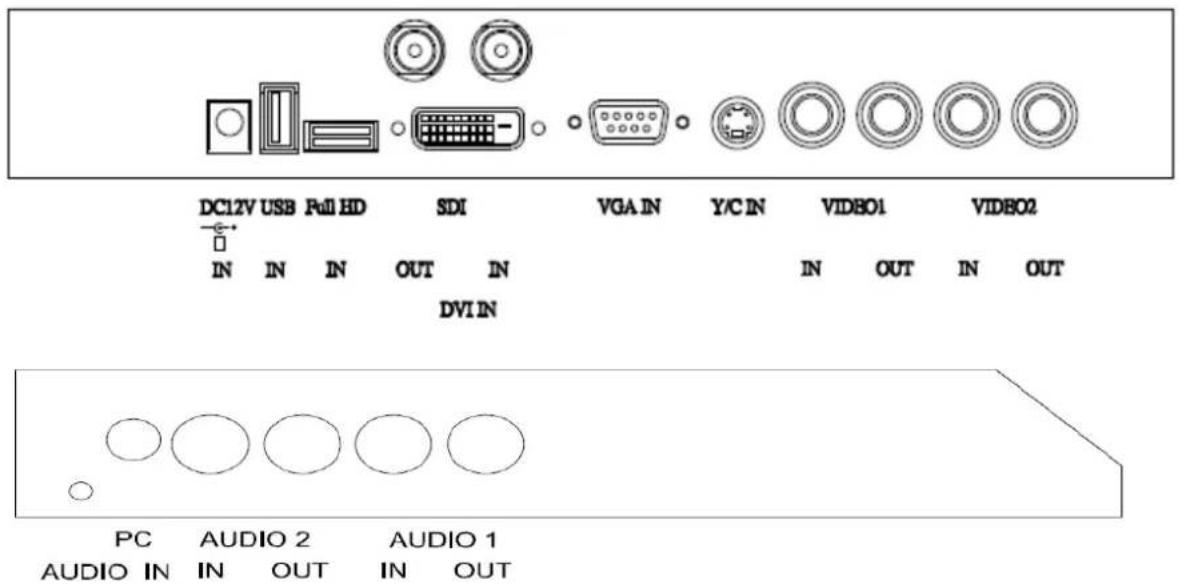
text_image
DC12V USB Full HD SDI VGA IN Y/C IN VIDBO1 VIDBO2 IN IN IN OUT IN IN OUT IN OUT DVIN PC AUDIO 2 AUDIO 1 AUDIO IN IN OUT IN OUTAudio:
| Audio 1 | Audio 2 | PC | Audio | |
| AV1 | V | |||
| AV2 | V | |||
| S-Video | V | |||
| PC | V | |||
| DVI | V |
• SLM-1040N, SLM-1210N, SLM-2400HD: Video/PC
- SLM-1500N, SLM-1710N. SLM-1910N Video/PC und Video/Video
natural_image
Technical line drawing of a vertical panel with circular elements and a curved line, labeled '61' at the bottom (no text or symbols on the diagram itself)Vorderansicht:
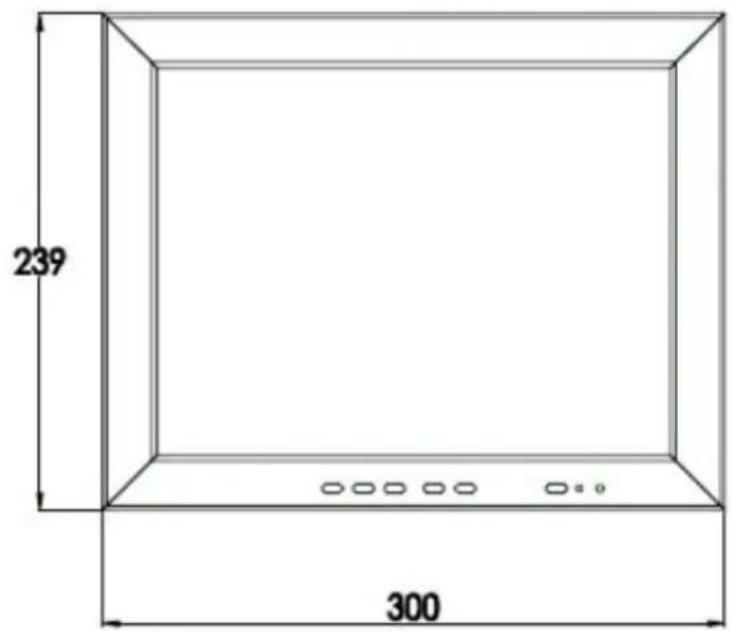
text_image
239 300Seitenansicht:
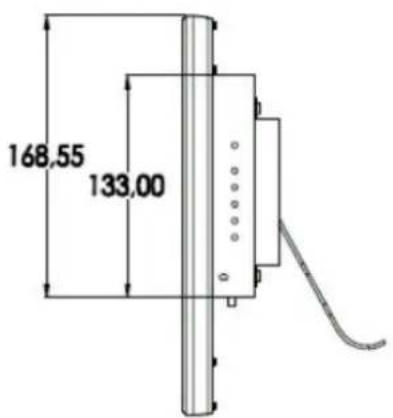
text_image
168,55 133,00Rückansicht:
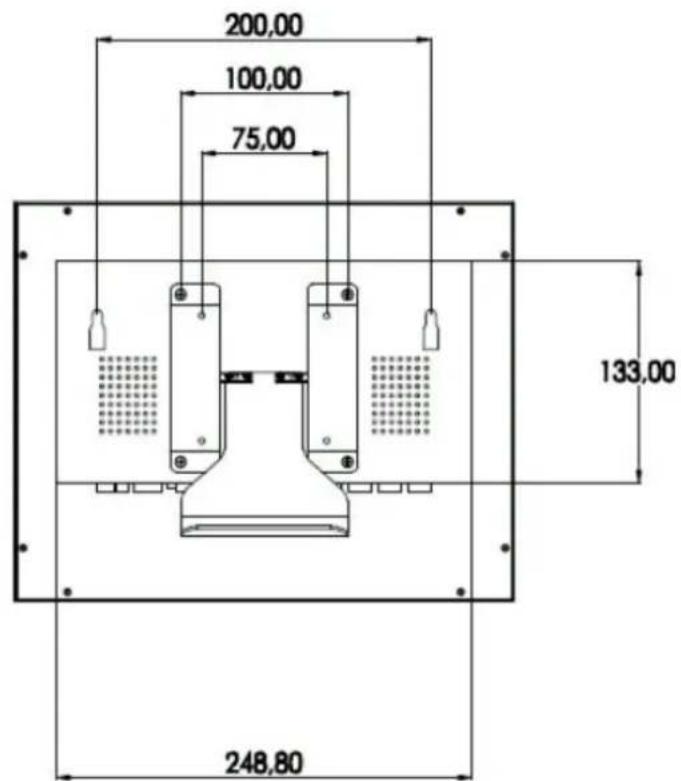
text_image
200,00 100,00 75,00 133,00 248,80natural_image
Technical line drawing of a mechanical component with dimension标注 (no text or symbols)Vorderansicht:
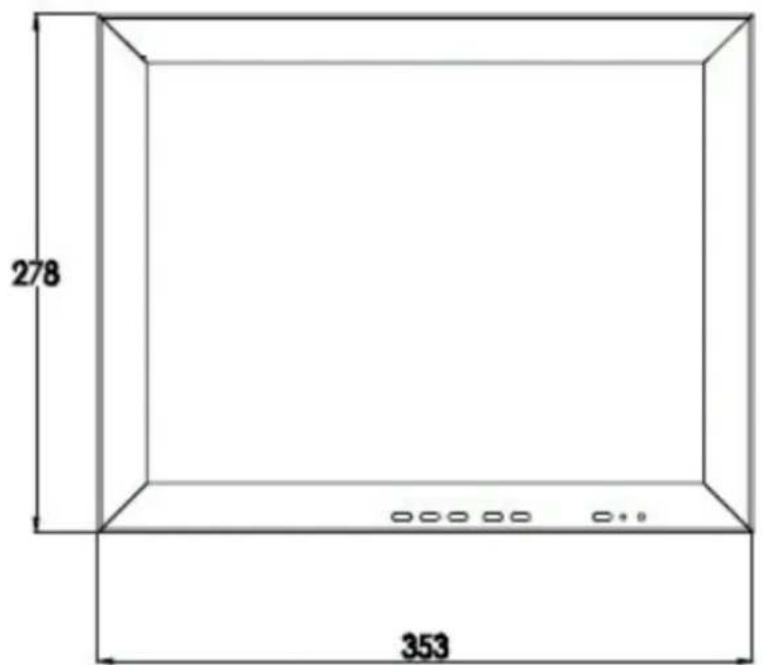
text_image
278 353Seitenansicht:
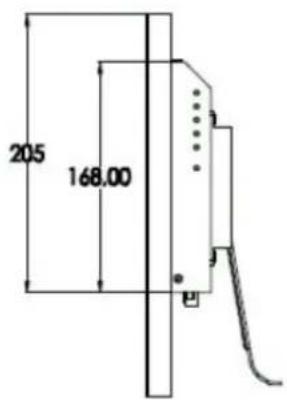
text_image
205 168.00Rückansicht:
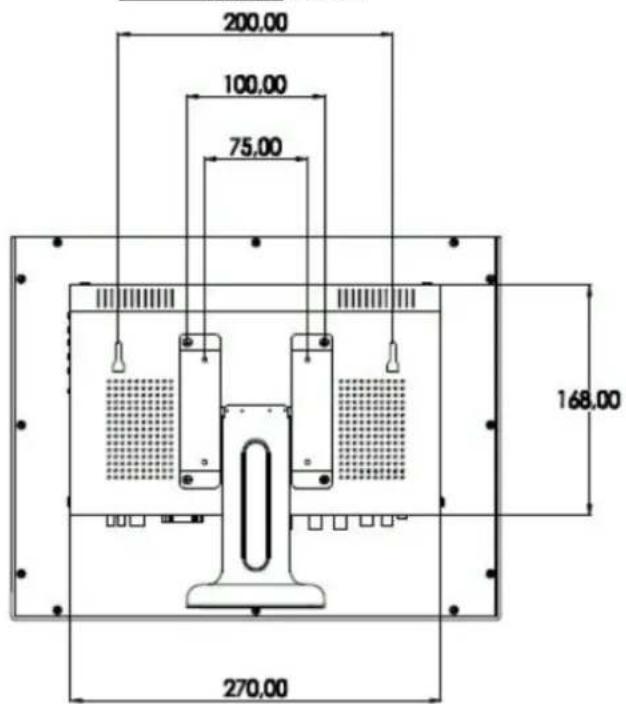
text_image
200.00 100.00 75.00 168.00 270.00natural_image
Technical line drawing of a mechanical component with dimension标注 (no text or symbols)Vorderansicht:
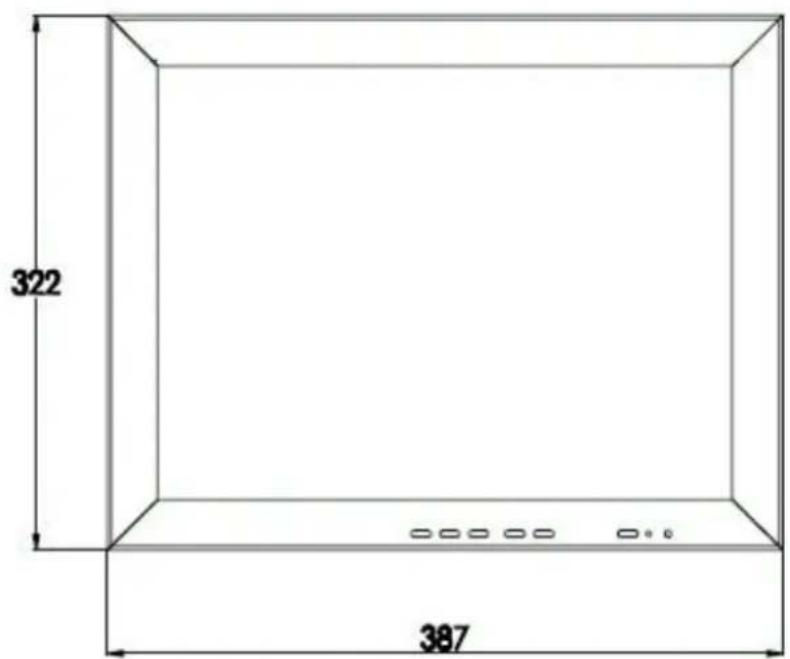
text_image
322 387Seitenansicht:
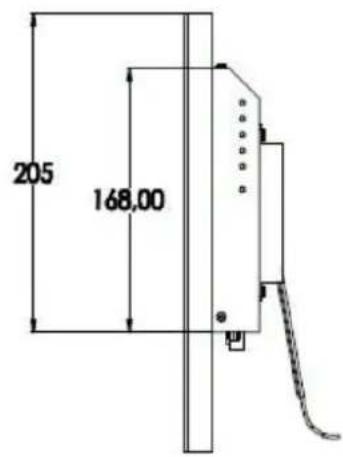
text_image
205 168,00Rückansicht:
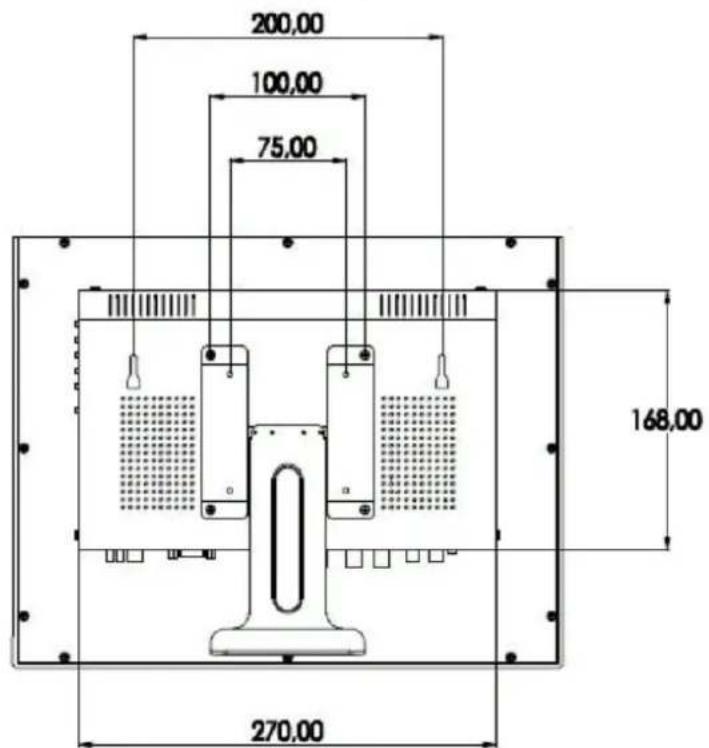
text_image
200,00 100,00 75,00 168,00 270,00natural_image
Technical line drawing of a vertical panel with circular components and a dimension label (69), no readable text or symbols present.Vorderansicht:
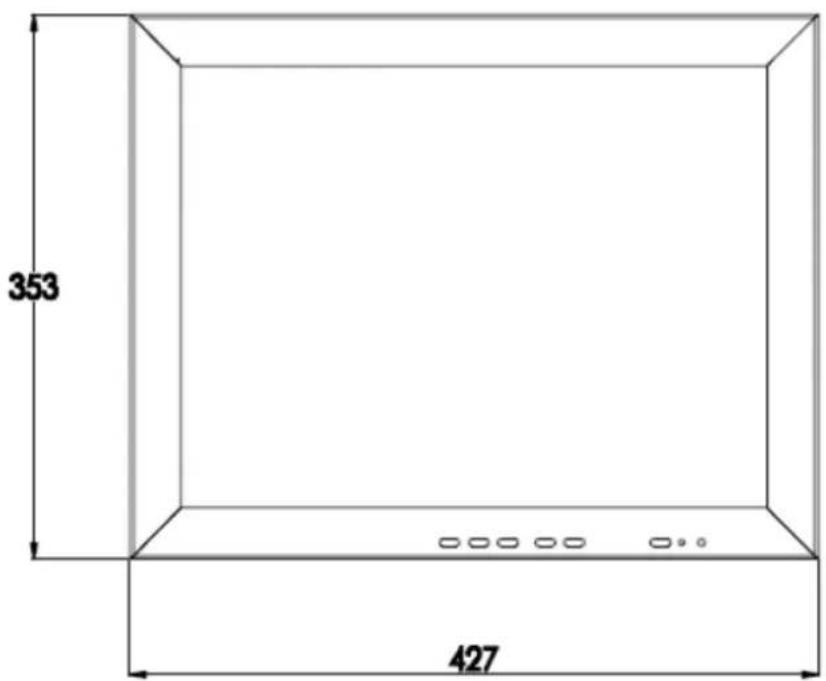
text_image
353 427Seitenansicht:
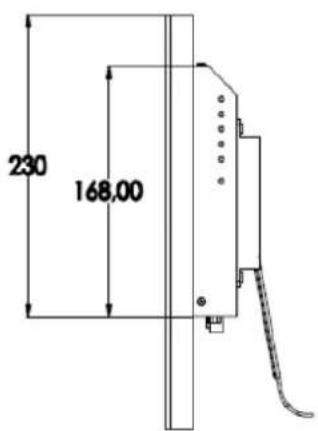
text_image
230 168.00Rückansicht:
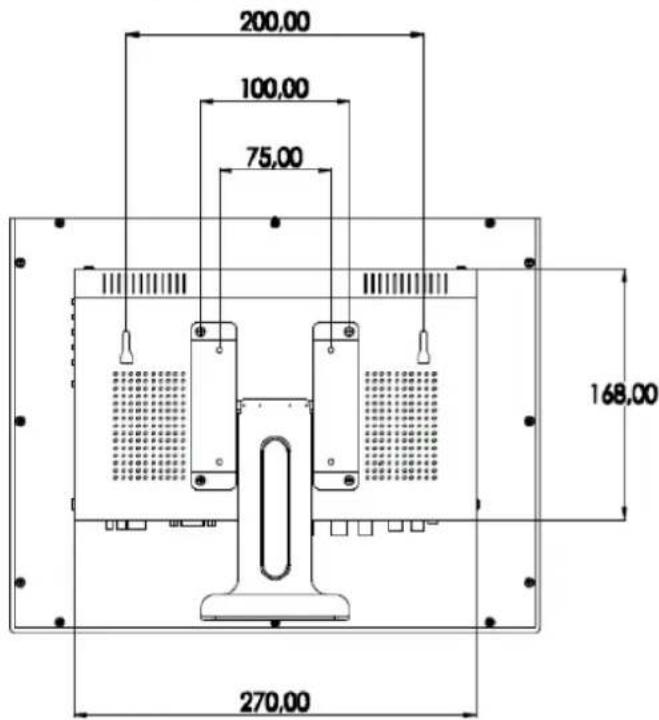
text_image
200,00 100,00 75,00 168,00 270,00natural_image
Pure mechanical assembly diagram without any text, numbers, or symbolsVorderansicht:
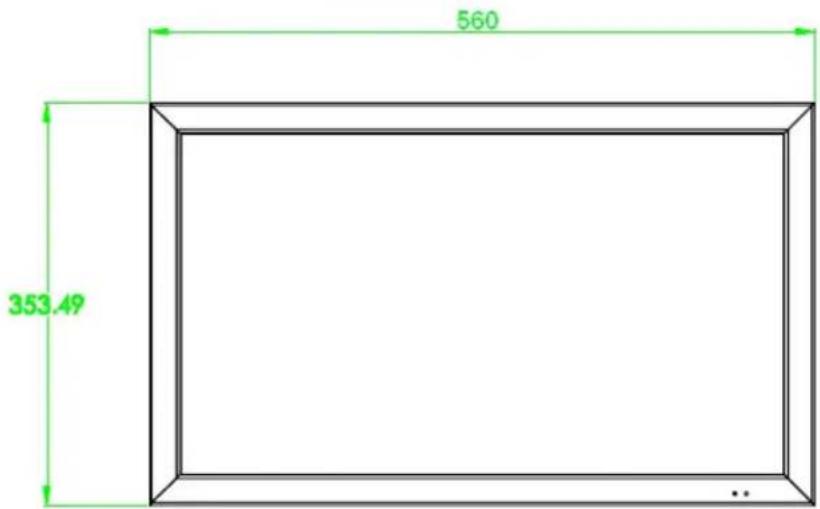
text_image
560 353.49Seitenansicht:
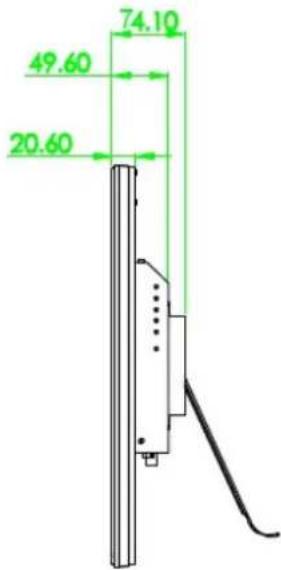
text_image
74.10 49.60 20.60Rückansicht:
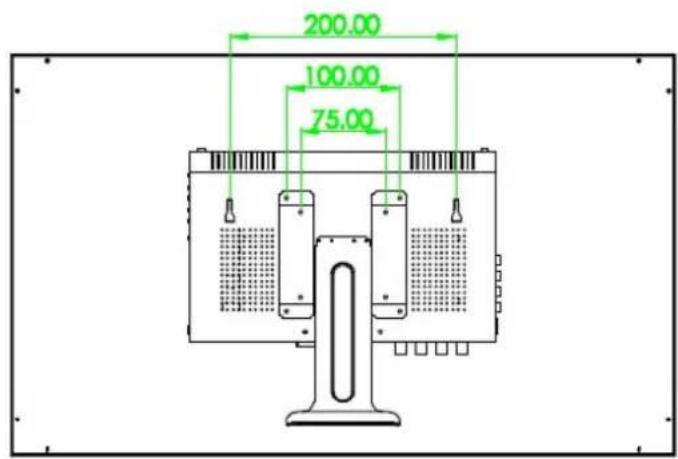
text_image
200.00 100.00 75.00Description of symbols
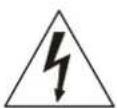
Danger: This symbol is intended to alert the user to the presence of un-insulated "dangerous voltage" within the product's enclosure that may be of sufficient magnitude to constitute a risk of electric shock to a person.

Warning: This symbol is intended to alert the user to the presence of important operating and maintenance (servicing) instructions in the literature accompanying the appliance.
CE compliance
Attention: Any changes or modifications to this appliance which have not been explicitly approved of by the respective regulatory authority, may lead to a prohibition of usage of this appliance.
This appliance complies with the CE guidelines.
Safety instructions
- Before operating the appliance, please read this manual carefully and retain it for further reference.
- Before cleaning the appliance, it has to be switched off and unplugged from the power outlet. Wipe the appliance with a soft damp cloth.
Do not use harsh cleansers or aerosols for cleaning. The type label may not be replaced. - Do not use attachments unless recommended by the manufacturer as they may affect the functionality of the appliance and result in the risk of fire, electric shock or injury.
- Never install the appliance in areas exposed to water or other liquids.
- The appliance has to be installed in a safe and stable location which is able to carry the weight of the appliance. Quick stops, excessive force, and uneven surfaces may cause the appliance to fall causing serious injury to persons and damage to objects.
- Openings in the appliance, if any, are provided for ventilation to ensure reliable operation of the appliance and to protect if from overheating. These openings must not be covered or blocked. Please make sure that the appliance does not overheat.
- The appliance should only be operated from the type of power source indicated on the marking label. If you are not sure of the type of power supplied at the installation location, please contact your local dealer.
- An appliance which is powered through a polarized plug (a plug with one blade wider than the other) will fit into the power outlet only one way. This is a safety feature. If you are unable to insert the plug into the outlet, try reversing the plug. Do not defeat the safety purpose of the polarized plug.
- If the appliance is powered through a grounding-type plug, the plug will only fit into a grounding-type power outlet. This is a safety feature. If your outlet does not have the grounding plug receptacle, contact your local electrician.
- Route power cords and cables in a manner to protect them from damage by being walked on or pinched by items places upon or against them.
- For protection of the appliance during a lightning storm or when it is left unattended and unused for a longer period, unplug the appliance from the wall outlet. Disconnect any antennas or cable systems that may be connected to the appliance. This will prevent damage to the appliance due to lightning or power-line surges.
- Do not overload wall outlets and extension cords as this can result in a risk of fire or electric shock.
- Never insert items into the openings of the appliance. They may touch parts under electric current which may cause an electric shock.
-
Never pour any liquids over the appliance.
-
In case of any operating interruption or a complete operating failure please switch off the appliance and disconnect it from the wall outlet. Never attempt to service or repair the appliance yourself, as opening or removing covers may expose you to dangerous voltage or other hazards. Refer all servicing to qualified service personnel.
- When replacement parts are required, be sure that the service technician uses replacements parts specified by the manufacturer or that have the same characteristics as the original part. Unauthorized substitutions may result in fire, electric shock or other hazards.
- Upon completion of any service or repairs to the appliance, ask the service technician to perform safety checks to verify that the appliance is in proper operating condition.
- The appliance should only be installed by qualified service personnel and has to comply with local specifications and regulations.
- Please respect the local legal regulations on waste if you need to dispose of discarded appliances.
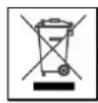
This symbol means that electrical appliances need to be disposed of properly and not simply with unsorted household refuse. Please respect local regulations on waste disposal.
About this user manual
This manual aims at assisting the user on how to operate the monitors described in this manual.
This manual is subject to rigid quality control. However, no guarantee can be given that mistakes are not present. We reserve the right to make changes to the manual without prior notice.
Before operating the appliance, please read this manual carefully and retain it for further reference. Verify that all appliance items are included in the delivery. Should items be missing, do not operate the appliance and contact your local dealer.
Never attempt to repair the appliance yourself. This should only be done by qualified service personnel.
Improper handling of the appliance will invalidate the warranty.
Items included in the delivery
1 x LCD monitor
1 x Power supply unit 12 V DC
1 x Power cord
1 x VGA cable
1 x Audio cable
1 x IR remote control
1 x User manual
1. IR remote control
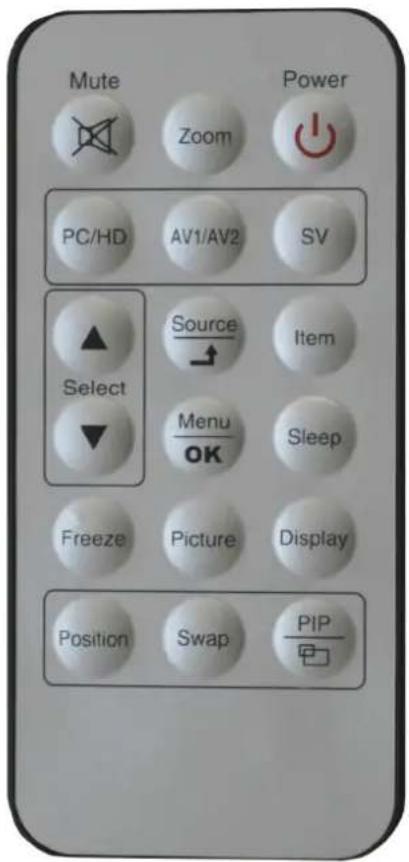
text_image
Mute Power Zoom Power PC/HD AV1/AV2 SV Select Source Item Menu OK Sleep Freeze Picture Display Position Swap PIP1. Power:
Press this button to turn the monitor on/off.
2. Zoom:
Press this button to toggle between the different picture formats: Full, Zoom, Subtitle, Regular, Panorama
3. Mute:
Press this button to disable the sound. Press this button again to turn the sound on again.
4. Freeze:
Press this button to freeze the picture. Press this button again to disable the freeze picture and to re-establish the normal picture.
5. PC/HD, AV1/AV2, SV:
You can select the appropriate signal source directly: PC = VGA and DVI, HDMI, HD-CCTV (SDI).
6. Item:
Hot key for OSD adjustments of volume, contrast, brightness, hue, saturation, sharpness and RGB gain.
7. Source:
To switch the video inputs, please use the IR remote control included in the delivery (please also see page 36).
This button is also used as „OK“ and „Confirm“ function in the OSD menu.
Note:
If you need to press the source button several times, please make sure not to do this too fast but to wait approx. 3 seconds between each button pressing. Otherwise, the source button may not work properly.
8. OK / Menu (not used for SLM-1040N and SLM-1210N):
Press this button to call-up the OSD menu.
This button is also used to exit the OSD menu.
This button can also be used to return to the previous menu item.
9. Select ▲/▼:
Directional buttons up/down.
10. Display:
Press this button to call-up screen information such as resolution, signal source, etc.
11. Picture:
Press this button to toggle between the different picture modes:
User, Standard, Movie, Vivid.
12. PIP:
Press this button to select the picture-in-picture function. Define the size of the sub-picture:
Small, Medium, Large, POP full, POP 4:3, Off.
13. Swap:
When in PIP mode, press the swap button to switch the main picture and the sub-picture. The swap button is only active if you have defined a sub-picture before (see above).
14. Position:
When in PIP mode, press the position button to define the position of the sub-picture: Either in one of the four screen corners or centered.
15. Sleep:
No function.
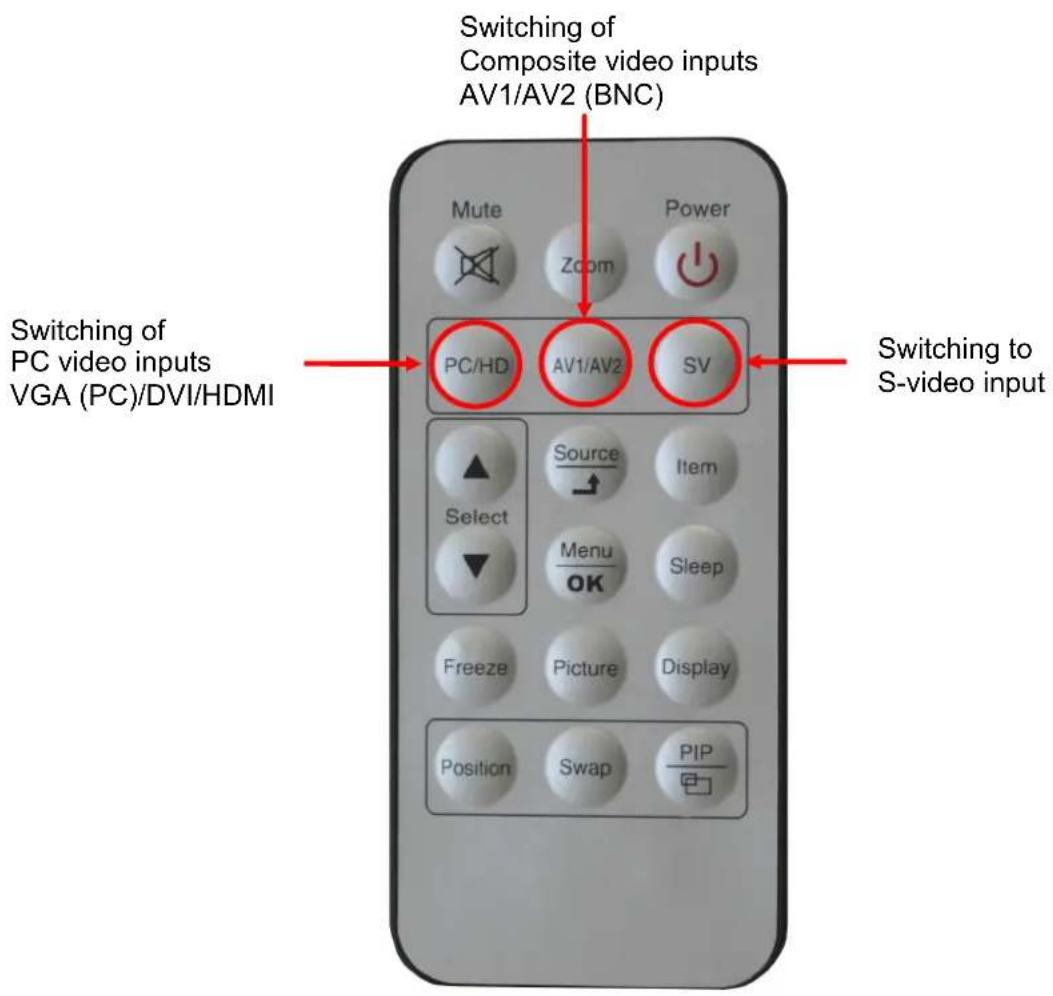
Important note on video input switching:
Please use the IR remote control (included in the delivery) to select the appropriate video input. The buttons highlighted below enable you to quickly switch between the video inputs.
Note:
Please connect the appropriate video source to the monitor prior to selecting a video input.
text_image
Switching of Composite video inputs AV1/AV2 (BNC) Switching of PC video inputs VGA (PC)/DVI/HDMI PC/HD AV1/AV2 SV Switching to S-video input Mute Power Zoom Select Source Item Menu OK Sleep Freeze Picture Display Position Swap PIP2. LCD monitor mounting
The monitor has been developed for indoor video surveillance applications.
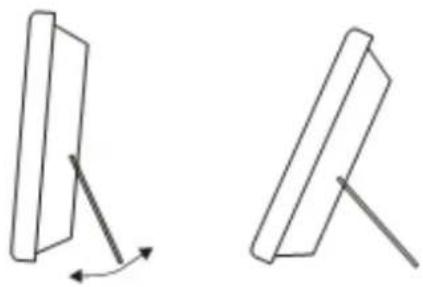
Desktop mount using the already installed monitor stand:
natural_image
Two simple line drawings of a tilted rectangular object with an arrow indicating rotation, no text or symbols present.Put the monitor onto a solid ground.
Adjust the viewing angle of the monitor so that it provides a comfortable viewing position.
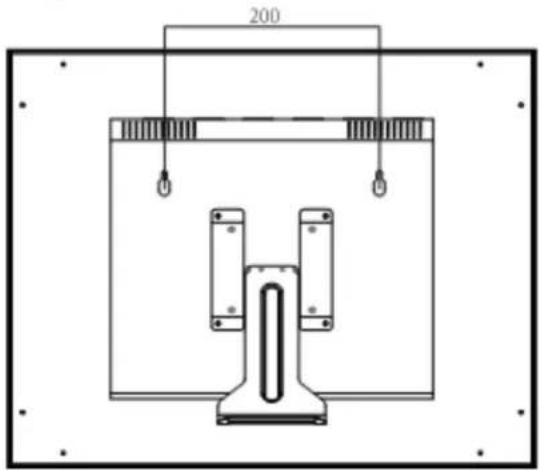
Wall mount:
natural_image
Technical line drawing of a mechanical component with two vertical supports and a central U-shaped housing, enclosed in a rectangular frame (no text or symbols)For wall mounting, please use the marked holes at the back of the monitor.
Please make sure the monitor is installed on a ground or at a wall which is able to carry the weight of the monitor.
For wall mounting, the pre-installed monitor stand has to be removed.
VESA mounting:

text_image
100 75 100 100 100 100 100 100 100 100 100 100 100 100 100 100 100 100 100 100 100 100 100 100 100 100 100 10 10 10 10 10 10 10 10 10 10 10 10 10 10 10 10 10 10 10 10 10 10 10 10 10 10 10 10 10 10 10 10 10 12 12 12 12 12 12 12 12 12 12 12 12 12 12 12 12 12All dimensions in mm.
3. Monitor controls
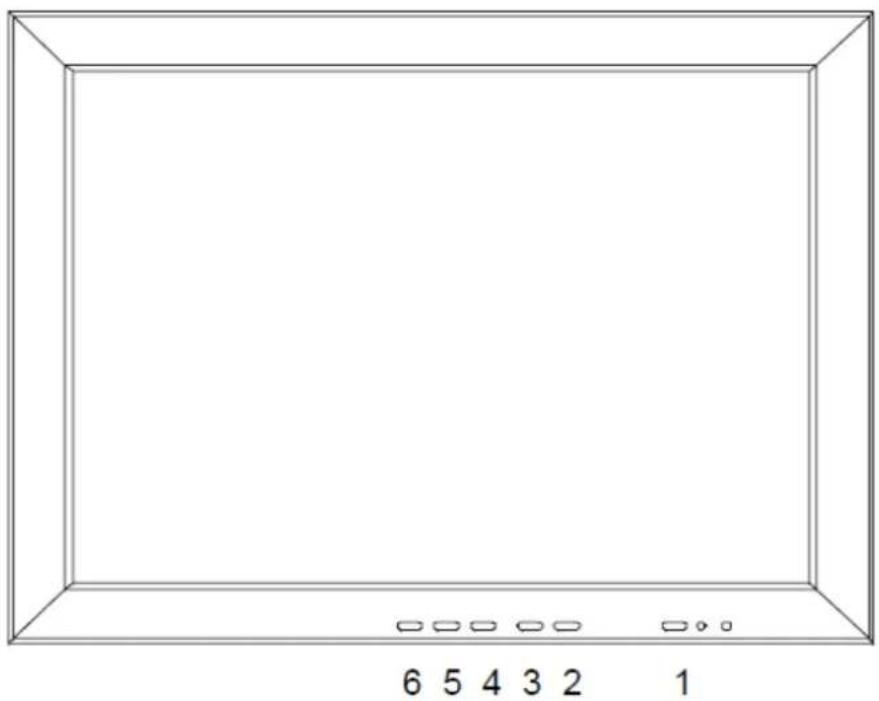
text_image
6 5 4 3 2 11. Power
Turn the monitor on/off.
LED: Green: Monitor on
Red: Standby mode (no input signal)
2./3. Adjust Up / Down ▲/▼
Increase or decrease the values in the OSD menu:
Up: Increase the values.
Down: Decrease the values.
4. Item:
Hot key for OSD adjustments of contrast, brightness, saturation, hue, sharpness, volume and RGB gain.
5. Menu/Function (not used for SLM-1040N and SLM-1210N):
Press this button to call-up the OSD menu.
This button is also used to exit the OSD menu.
6. Source:
To switch the video inputs, please use the IR remote control included in the delivery (please also see page 36).
This button is also used as "OK" and "Confirm" function in the OSD menu.
Note: If you need to press the source button several times, please make sure not to do this too fast but to wait approx. 3 seconds between each button pressing.
Otherwise, the source button may not work properly.
4. Connections
SLM-1040N, SLM-1210N, SLM-1500N, SLM-1710N, SLM-1910N:
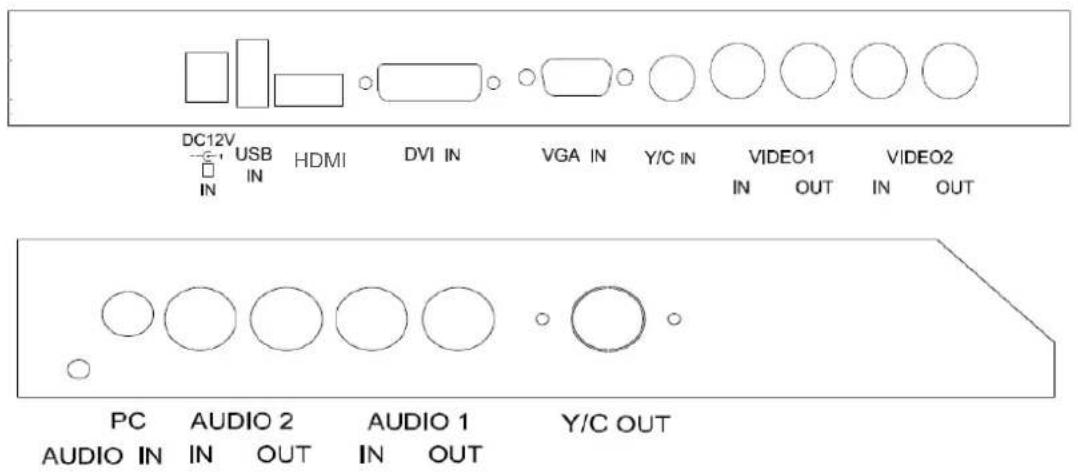
text_image
DC12V USB HDMI DVI IN VGA IN Y/C IN VIDEO1 IN OUT IN OUT PC AUDIO 2 AUDIO 1 Y/C OUT AUDIO IN IN OUT IN OUTSLM-2400HD:

text_image
DC12V USB Full HD SDI VGA IN Y/C IN VIDBO1 VIDBO2 IN IN IN OUT IN IN OUT IN OUT DVIN PC AUDIO 2 AUDIO 1 AUDIO IN IN OUT IN OUTAudio:
| Audio 1 | Audio 2 | PC | Audio | |
| AV1 | V | |||
| AV2 | V | |||
| S-Video | V | |||
| PC | V | |||
| DVI | V |
5. Monitor settings via OSD menu
Various monitor settings can be made using the OSD menu (On Screen Display).
Press the Menu/OK button to call-up the OSD main menu. Here you can make adjustments to the following items:
Picture
- Sound
- OSD setup
- Advance
- PIP
• PC (at PC input signal)
Use the ▲/▼ buttons to toggle between the different items.
Press the Source button again to select the appropriate item.
If you don't make any adjustments to the OSD menu for some time, it will automatically close.
5.1 Picture
Once you have selected the item „Picture“, use the ▲▼ buttons to navigate through the sub-items.
Press the source button to confirm your selection.
Use the ▲▼ buttons to increase/decrease the values.
Press the Menu/OK button to return to the previous menu item.
| Item Description | |
| Contrast | Use the ▲▼ buttons to increase/decrease the screen contrast. |
| Brightness | Use the ▲▼ buttons to increase/decrease the screen brightness. |
| Hue | Use the ▲▼ buttons to increase/decrease the hue. |
| Saturation | Use the ▲▼ buttons to increase/decrease the saturation. |
| Sharpness | Use the ▲▼ buttons to increase/decrease the sharpness. |
| Color temperature | Use the Source button to select the colour temperature: Normal, Warm, Cool, User. |
| Picture mode | Use the Source button to select the picture mode: User, Standard, Medium, High. |
| DNR | User the Source button to select the level of noise reduction: Off, Low, Medium, High. |
| DLC User | the Source button to change the black level extension (on/off). |
5.2 Sound
Once you have selected the item „Sound“, use the ▲▼ buttons to navigate through the sub-items.
Press the source button to confirm your selection.
Use the ▲▼ buttons to increase/decrease the values.
Press the Menu/OK button to return to the previous menu item.
| Item Description | |
| Volume | Use the ▲▼ buttons to adjust the volume. |
| Mute | Use the ▲▼ buttons to set the monitor to mute (on/off). |
| Sound mode | Use the source button to adjust the sound effect:User, Standard, Movie, Vivid. |
| Bass | Use the ▲▼ buttons to adjust the bass (left/right). |
| Treble | Use the ▲▼ buttons to adjust the treble (left/right). |
| Balance | Use the ▲▼ buttons to adjust the balance (left/right). |
5.3 OSD setup
Once you have selected the item „OSD setup“, use the ▲▼ buttons to navigate through the sub-items.
Press the source button to confirm your selection.
Use the ▲▼ buttons to increase/decrease the values.
Press the Menu/OK button to return to the previous menu item.
| Item Description | |
| Language | Use the Source button to select the language. |
| Gamma | Use the Source button to set the gamma values (0, 1, 2). |
| Freeze | Use the Source button to freeze the picture. Press the Source button again to unfreeze the picture and to return to the normal pictureNote:For SLM-2400HD the “freeze” function is not supported at the HD-CCTV (SDI) input. |
| OSD time | Use the ▲▼ buttons to set the OSD menu display time. |
| OSD halftone | Use the ▲▼ buttons to set the OSD menu halftone (transparency). |
| Recall | Use the Source button to restore the factory settings.Wait for approx. 5 seconds. |
| Obiter Use | the Source button to activate the screen saver (on/off). |
| Version | Firmware version. |
5.4 Advance
Once you have selected the item „Advance“, use the ▲▼ buttons to navigate through the sub-items.
Press the source button to confirm your selection.
Use the ▲▼ buttons to increase/decrease the values.
Press the Menu/OK button to return to the previous menu item.
| Item Description | |
| Scale | Use the Source button to select the picture size:Full, Zoom, Subtitle, Regular, Panorama. |
| Scan size | Use the Source button to select the real image size:Normal, Native. |
| Horizontal position | Use the ▲▼ buttons to position the picture horizontally. |
| Vertical position | Use the ▲▼ buttons to position the picture vertically. |
5.5 PIP
Once you have selected the item „PIP“, use the ▲▼ buttons to navigate through the sub-items.
Press the source button to confirm your selection.
Use the ▲▼ buttons to increase/decrease the values.
Press the Menu/OK button to return to the previous menu item.
| Item Description | |
| Multi window | Use the Source button to select the picture-in-picture function: PIP, POP Full, POP4:3, Off. |
| Sub source Use | the Source button to select the source of the PIP sub-picture. |
| Size | Use the Source button to define the size of the sub-picture: Small, Medium, Large. |
| Position | Use the Source button to define the position of the sub-picture.Note: This function is only active if you have previously defined a sub-picture. |
| Border colour | Use the Source button to select the border colour of the sub-picture: Black, Blue. |
| Sound source Use | the Source button to select the sound source: Main, Sub. |
| Swap | Use the Source button to swap the main picture and the sub-picture.Note: This function is only active if you have previously defined a sub-picture. |
Picture-in-Picture (PIP) function:
• SLM-1040N, SLM-1210N, SLM-2400HD: Video/PC
• SLM-1500N, SLM-1710N. SLM-1910N Video/PC and video/video
5.6 PC OSD display (only at PC input signal)
Once you have selected the item „PC“, use the ▲▼ buttons to navigate through the sub-items.
Press the source button to confirm your selection.
Use the ▲▼ buttons to increase/decrease the values.
Press the Menu/OK button to return to the previous menu item.
| Item Description | |
| Contrast | Use the ▲▼ buttons to increase/decrease the screen contrast. |
| Brightness | Use the ▲▼ buttons to increase/decrease the screen brightness. |
| Color temperature | Use the Source button to select the colour temperature: Normal, Warm, Cool, SRGB, User. |
| Scale | Use the Source button to define the picture format: Normal, Centered. |
| Auto adjust | Use the Source button to automatically adjust the best possible picture. |
PC timing:
| Mode Resolution | |
| 1 800 | x 600 @ 60 |
| 2 800 | x 600 @ 72 |
| 3 800 | x 600 @ 75 |
| 4 1024 | x 768 @ 60 |
| 5 1280 | x 1024 @ 60 |
| 6 1360 | x 768 @ 60 |
| 7 1440 | x 900 @ 60 |
| 8 1920 | x 1080 @ 60 |
6. Special features
• Picture-in-Picture (PIP) function:
- SLM-1040N, SLM-1210N, SLM-2400HD: Video/PC
- SLM-1500N, SLM-1710N, SLM-1910N: Video/PC and video/video
• 3D De-Interlace
- 3D Comb Filter
• Non-reflecting protective front glass
• Monitor stand already installed - IR remote control included in the delivery
- Attractive black metal housing
- Screen saver
-
Integrated speaker (2 watt)
-
Technical specifications
| Monitor model SLM-1040N SLM-1210N | ||
| System PAL / NTSC | ||
| LCD panel 10.4" (26 cm) 12.1" (31 cm) | ||
| Visible area (H/V) mm 211.2 x 158.4 mm 246 x 184.5 | ||
| Picture format 4:3 | ||
| Max. resolution 800 x 600 | ||
| Pixel dot pitch (mm) 0.264 x 0.264 0.3075 x 0.3075 | ||
| Colours | 262 | |
| Brightness | 400 cd/m2 | 450 cd/m2 |
| Contrast | 700 :1 | |
| Response time | 30 ms | 35 ms |
| View angle (U/D/L/R) | 60° / 80° / 80° / 80° | 65° / 75° / 80° / 80° |
| Video input/output | 2x / 2x Composite (BNC) | |
| S-Video input | 1x 4 Pin Mini Dim | |
| HDMI input | 1x | |
| Audio input/output | 2x / 2x cinch | |
| PC input | 1x VGA input (D-Sub 15 pin)1x DVI-D input1x audio input | |
| Speaker | 1x built-in speaker (2 watt) | |
| 3D Comb Filter | Yes | |
| 3D De-Interlace function | Yes | |
| Picture-in-Picture (PIP) | Yes (video/PC) | |
| OSD setting | Yes | |
| Voltage | 12 V DC via external power supply unit (included) | |
| Power consumption | Approx. 11 watt | Approx. 12 watt |
| Housing | Black, aluminium | |
| Dimensions (WxHxD) without stand | 266 x 214 x 60 mm | 300 x 239 x 61 mm |
| Weight | 2.3 kg | 2.6 kg |
| Protective front glass | Yes | |
| Operating temperature | 0° to 40°C | |
| Mounting / installation | VESA 75/75, 100/100 standard and already installed monitor stand (can be taken off) | |
| Items included in the delivery | Power supply unit 12 V DC, power cord, VGA cable, audio cable, IR remote control | |
Subject to technical changes without prior notice. Error excepted.
Technical specifications
| Monitor model SLM-1500N SLM-1710N | ||
| System PAL / NTSC | ||
| LCD panel 15" (38 cm) 17" (43 cm) | ||
| Visible area (H/V) mm 304 x 228 mm 338 x 270 mm | ||
| Picture format 4:3 5:4 | ||
| Max. resolution 1024 x 768 1280 x 1024 | ||
| Pixel dot pitch (mm) 0.297 x 0.297 0.264 x 0.264 | ||
| Colours | 16.7 | |
| Brightness | 400 cd/m2 | |
| Contrast | 600:1 | 1000:1 |
| Response time | 4 ms | 2.5 ms |
| View angle (U/D/L/R) | 80°/80°/80°/80° | |
| Video input/output | 2x/2x Composite (BNC) | |
| S-Video input | 1x 4 Pin Mini Dim | |
| HDMI input | 1x | |
| Audio input/output | 2x/2x cinch | |
| PC input | 1x VGA input (D-Sub 15 pin)1x DVI-D input1x audio input | |
| Speaker | 1x built-in speaker (2 watt) | |
| 3D Comb Filter | Yes | |
| 3D De-Interlace function | Yes | |
| Picture-in-Picture (PIP) | Yes (video/PC, video/video) | |
| OSD setting | Yes | |
| Voltage | 12 V DC via external power supply unit (included) | |
| Power consumption | Approx. 21 watt | Approx. 30 watt |
| Housing | Black, aluminium | |
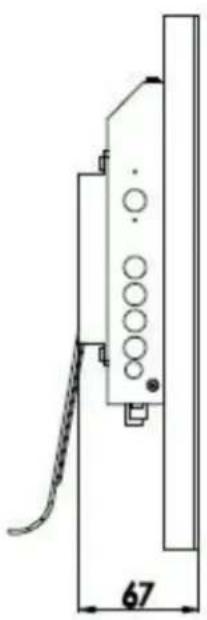
| Dimensions (WxHxD) without stand | 353 x 278 x 67 mm | 387 x 322 x 67 mm |
| Weight | 3.8 kg | 3.9 kg |
| Protective front glass | Yes | |
| Operating temperature | 0° to 40°C | |
| Mounting / installation | VESA 75/75, 100/100 standard and already installed monitor stand (can be taken off) | |
| Items included in the delivery | Power supply unit 12 V DC, power cord, VGA cable, audio cable, IR remote control | |
Subject to technical changes without prior notice. Error excepted.
Technical specifications
| Monitor model SLM-1910N SLM-2400HD | |
| System PAL / NTSC HD-CCTV, PAL / NTSC | |
| LCD panel 19" (48 cm) 24" (61 cm) | |
| Visible area (H/V) mm 376 x 301 531 x 299 | |
| Picture format 5:4 16:9 | |
| Max. resolution 1280 x 1024 | 1920 x 1080 |
| Pixel dot pitch (mm) | 0.098 x 0.294 |
| Colours | 16.7 M |
| Brightness | 250 cd/m2 |
| Contrast | 1000:1 |
| Response time | 2.5 ms |
| View angle (U/D/L/R) 80°/80°/85°/85° | |
| Video input/output | 2x / 2x Composite (BNC) |
| S-Video input | 1x 4 Pin Mini Dim |
| HDMI input | 1x |
| Audio input/output | 2x / 2x Cinch |
| PC input | 1x VGA input (D-Sub 15 pin)1x DVI-D input1x audio input |
| Speaker | 1x built-in speaker (2 watt) |
| 3D Comb Filter | Yes |
| 3D De-Interlace function | Yes |
| Picture-in-Picture (PIP) | Yes (Video/PC, video/video) |
| OSD setting | Yes |
| Voltage | 12 V DC via external power supply (included) |
| Power consumption | Approx. 25 watt |
| Housing | Black, aluminium |
| Dimensions (WxHxD) without stand | 427 x 353 x 69 mm |
| Weight | 5.0 kg |
| Protective front glass | Yes |
| Operating temperature | 0° to 40°C |
| Mounting / installation | VESA 75/75, 100/100 standard and already installed monitor stand (can be taken off) |
| Items included in the delivery | Power supply unit 12 V DC, power cord, VGA cable, audio cable, IR remote control |
Subject to technical changes without prior notice. Error excepted.
8. Technical drawings
SLM-1040N:
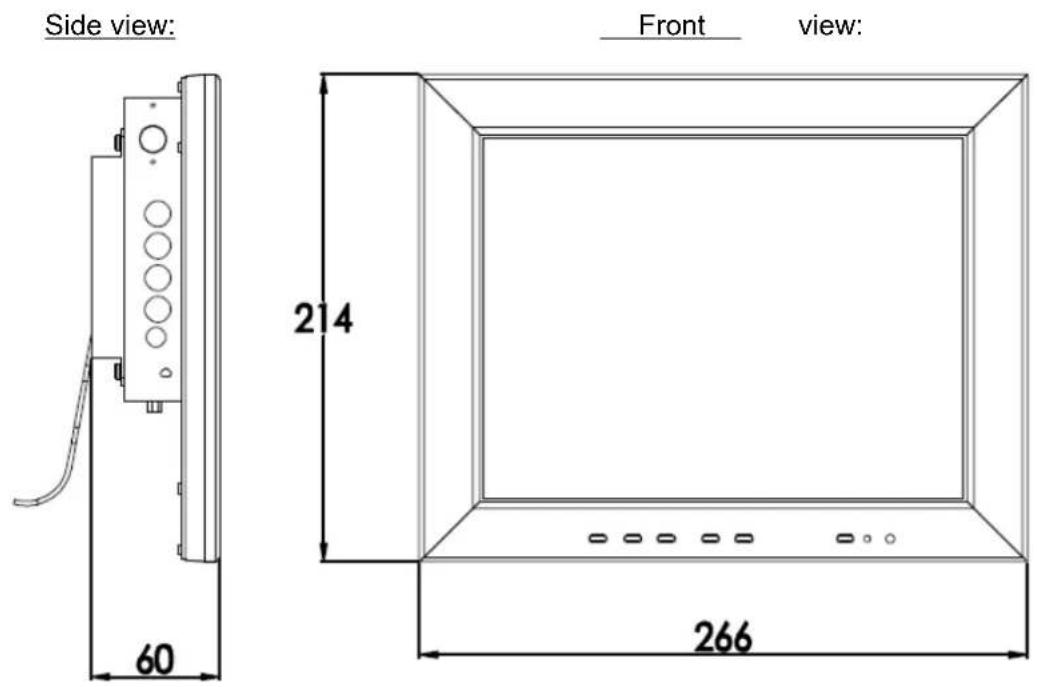
text_image
Side view: 60 214 Front view: 266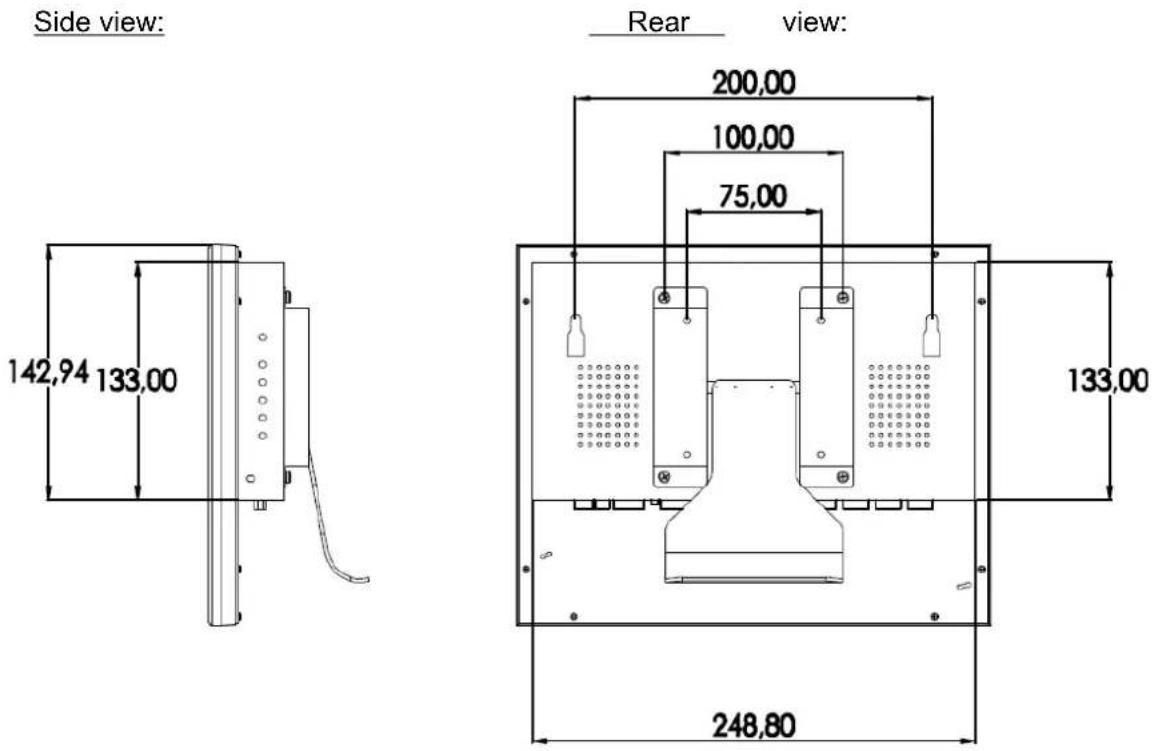
text_image
Side view: 142,94 133.00 Rear view: 200,00 100,00 75,00 133,00 248,80All dimensions in mm. Drawings not true to scale. Subject to technical changes without prior notice. Errors excepted.
SLM-1210N:
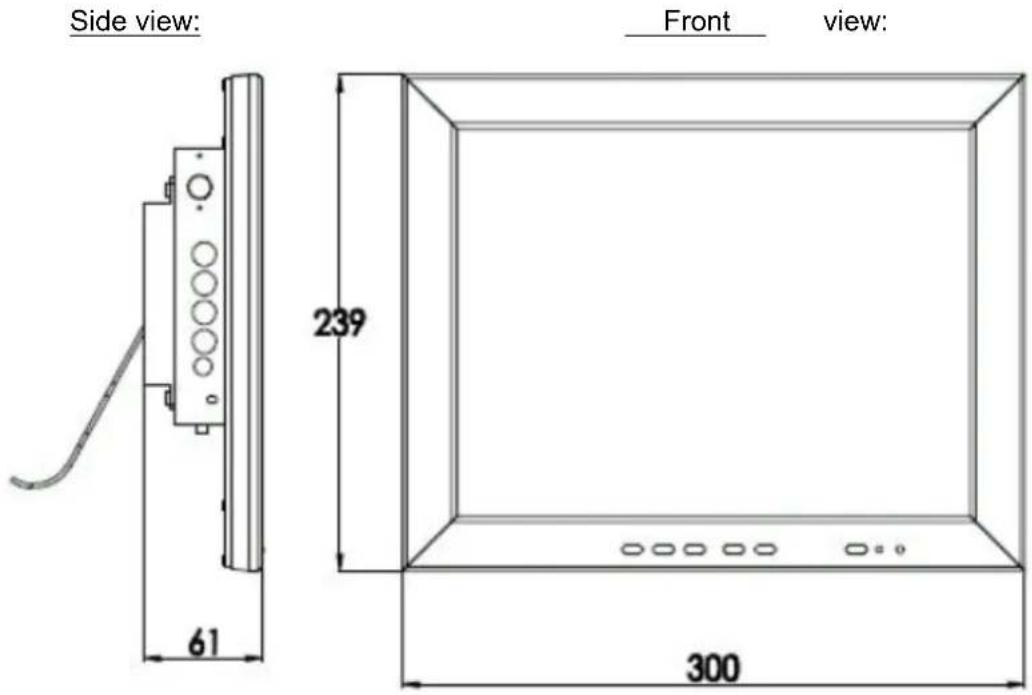
text_image
Side view: 61 239 Front view: 300Side view:
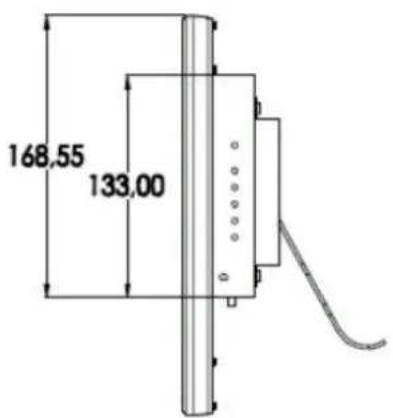
text_image
168,55 133,00Rear view:
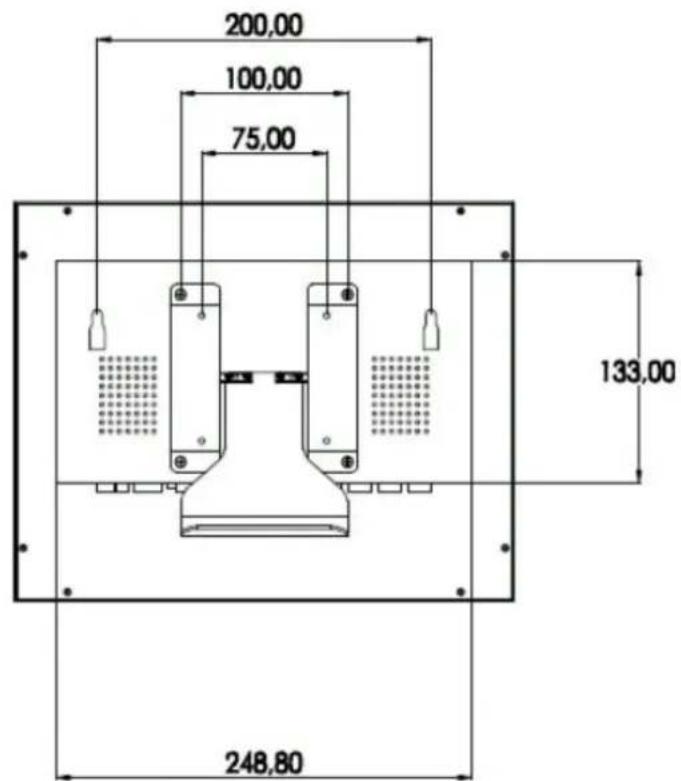
text_image
200,00 100,00 75,00 133,00 248,80All dimensions in mm. Drawings not true to scale. Subject to technical changes without prior notice. Errors excepted.
SLM-1500N:
Side view:
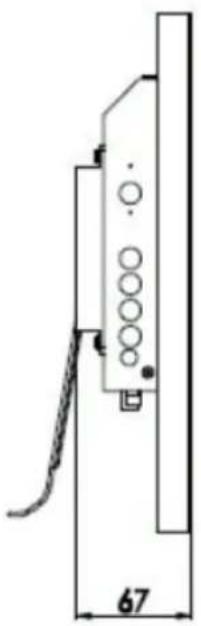
natural_image
Technical line drawing of a vertical panel with circular elements and a dimension label (67), no readable text or symbols present.Front view:
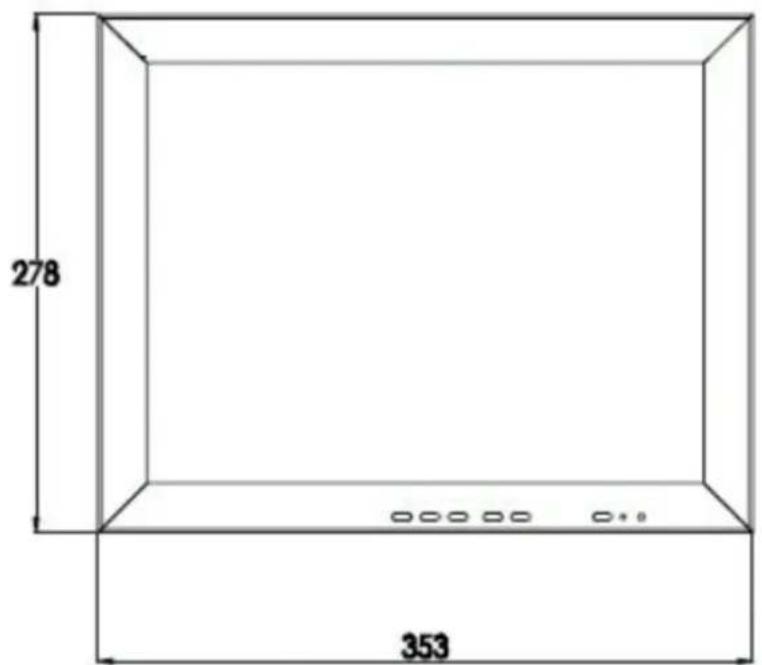
text_image
278 353Side view:
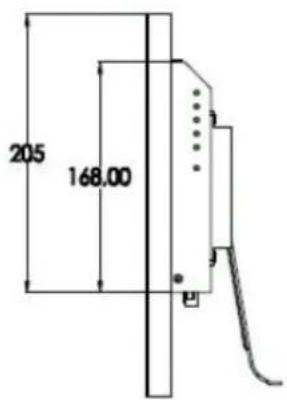
text_image
205 168.00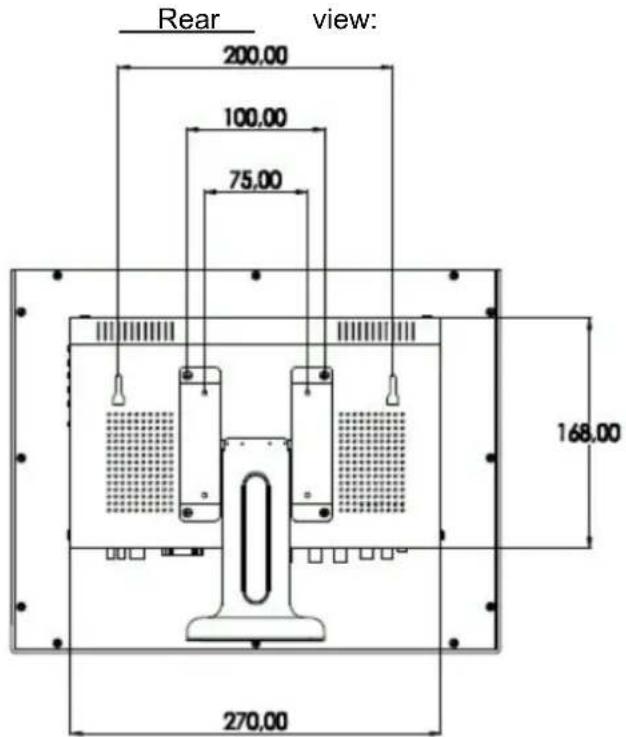
text_image
Rear view: 200,00 100,00 75,00 168,00 270,00All dimensions in mm. Drawings not true to scale. Subject to technical changes without prior notice. Errors excepted.
SLM-1710N:
Side view:
natural_image
Technical line drawing of a vertical mechanical component with circular holes and a dimension label (67), no readable text or symbols present.Front view:
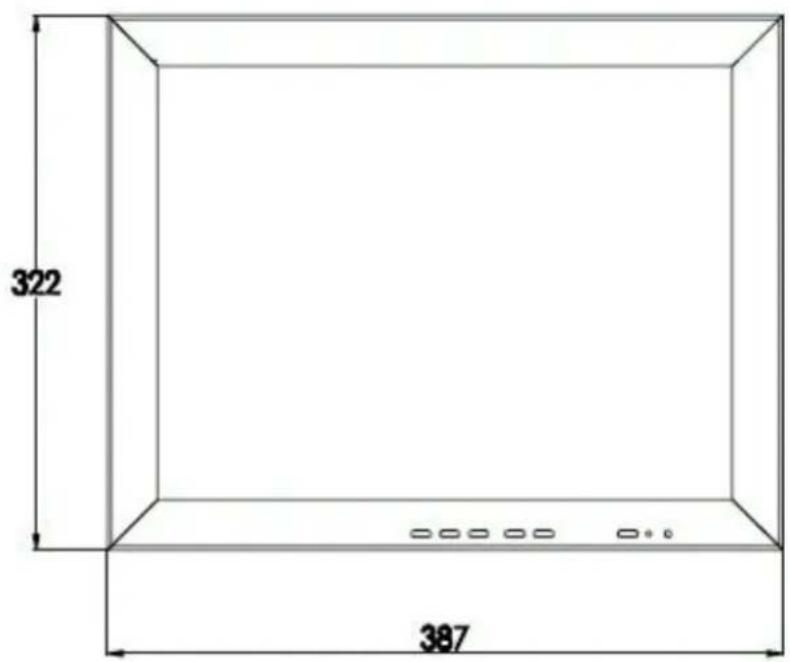
text_image
322 387Side view:
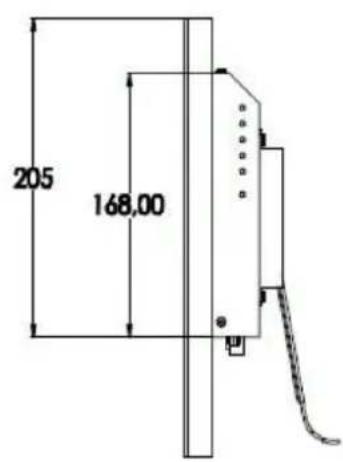
text_image
205 168,00Rear view:
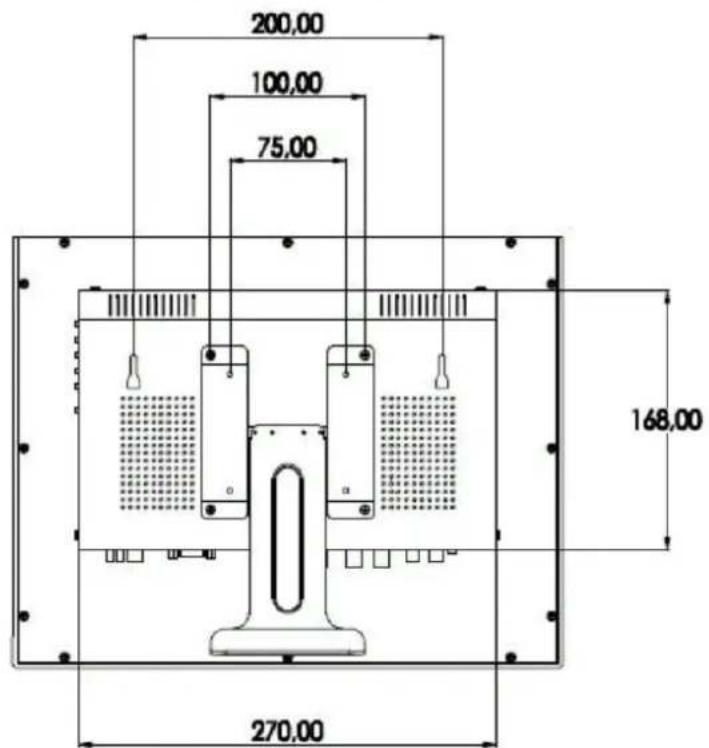
text_image
200,00 100,00 75,00 168,00 270,00All dimensions in mm. Drawings not true to scale. Subject to technical changes without prior notice. Errors excepted.
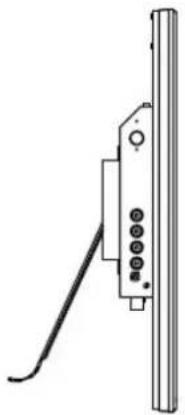
SLM-1910N:
Side view::
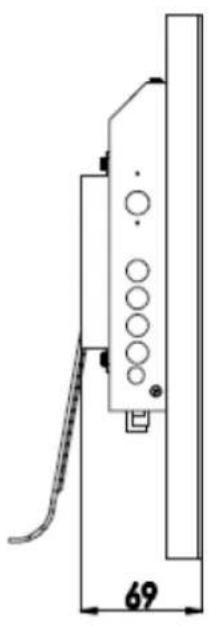
natural_image
Technical line drawing of a vertical panel with circular components and a dimension label (69), no readable text or symbols present.Front view:
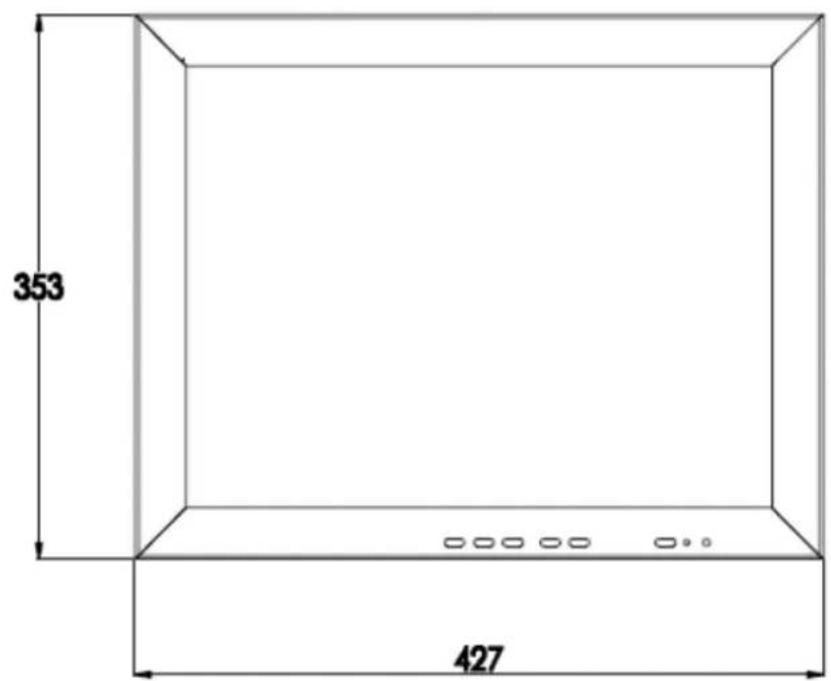
text_image
353 427Side view:
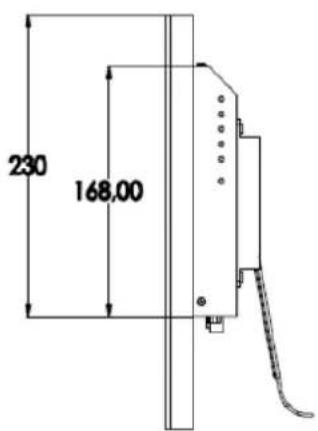
text_image
230 168.00Rear view:
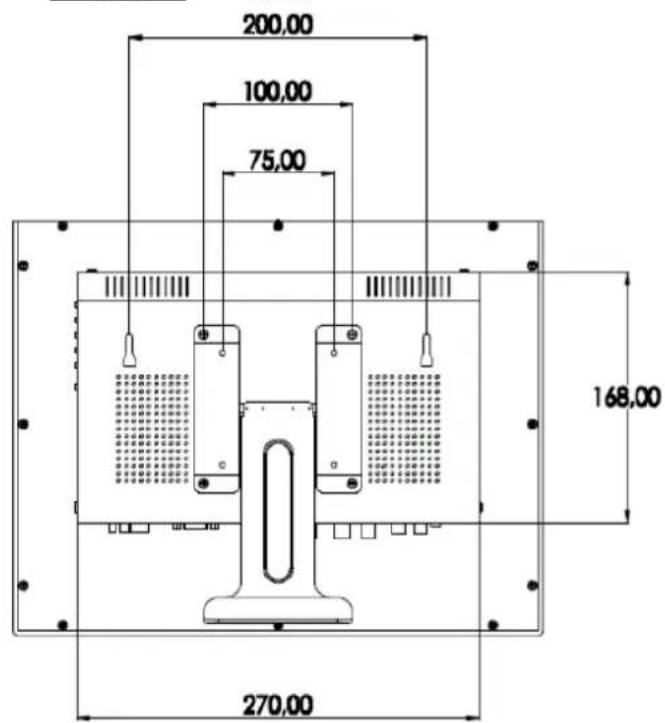
text_image
200,00 100,00 75,00 168,00 270,00All dimensions in mm. Drawings not true to scale. Subject to technical changes without prior notice. Errors excepted.
SLM-2400HD:
Side view:
natural_image
Pure mechanical component diagram without any text, numbers, or symbolsFront view:
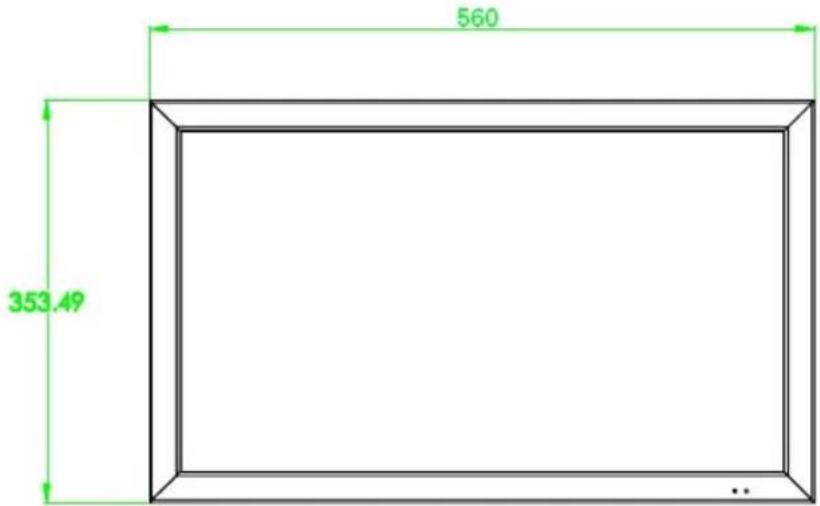
text_image
560 353.49Side view:
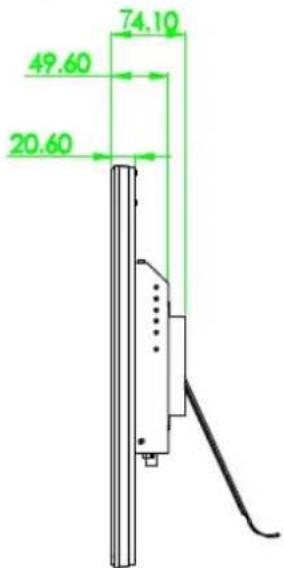
text_image
74.10 49.60 20.60Rear view:
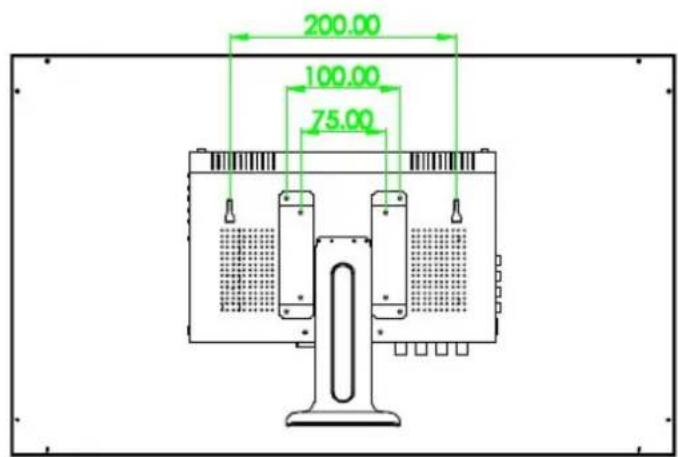
text_image
200.00 100.00 75.00All dimensions in mm. Drawings not true to scale. Subject to technical changes without prior notice. Errors excepted.
Notizen / Notes:
Notizen / Notes: