
P6 Qmax - Smartphone Allview - Free user manual and instructions
Find the device manual for free P6 Qmax Allview in PDF.


| Product Type | Smartphone |
| Brand | Allview |
| Model | P6 Qmax |
| SAR Value | 0.699 W/kg |
| Dual SIM | Yes |
| Operating System | Android |
| Rear Camera | Yes |
| Front Camera | Yes |
| LED Flash | Yes |
| Display Type | Touchscreen |
| Connectivity | Wi-Fi, Bluetooth, GPS |
| Micro USB | Yes |
| Earphone Jack | 3.5mm |
| Speaker | Yes |
| Sensors | Light sensor |
| Power Button | Yes |
| Volume Buttons | Yes |
| Battery Type | Lithium-ion |
| 3G Service | Yes (enable/disable) |
| Airplane Mode | Yes (scheduled) |
Frequently Asked Questions - P6 Qmax Allview
User questions about P6 Qmax Allview
0 question about this device. Answer the ones you know or ask your own.
Ask a new question about this device
Download the instructions for your Smartphone in PDF format for free! Find your manual P6 Qmax - Allview and take your electronic device back in hand. On this page are published all the documents necessary for the use of your device. P6 Qmax by Allview.
USER MANUAL P6 Qmax Allview
natural_image
Front view of a black smartphone with no visible text, numbers, or symbols on the screen or body.ALLVIEW®
P6 Qmax
EN USER MANUAL....4
BG РЪКОВОДСТВО ЗА УПОТРЕБА.....15
CZ UŽIVATELSKÁ PŘÍRUČKA....24
DE BETRIEBSANLEITUNG......36
HU FELHASZNALOI KEZIKONYV....48
NL GEBRUIKERSHANDLEIDING....56
PL PODREÇZNIK DLA UŻYTKOWNIKA....68
RO MANUAL DE UTILIZARE....80
SR PRIRUČNIK ZA KORIŠĆENJE....93
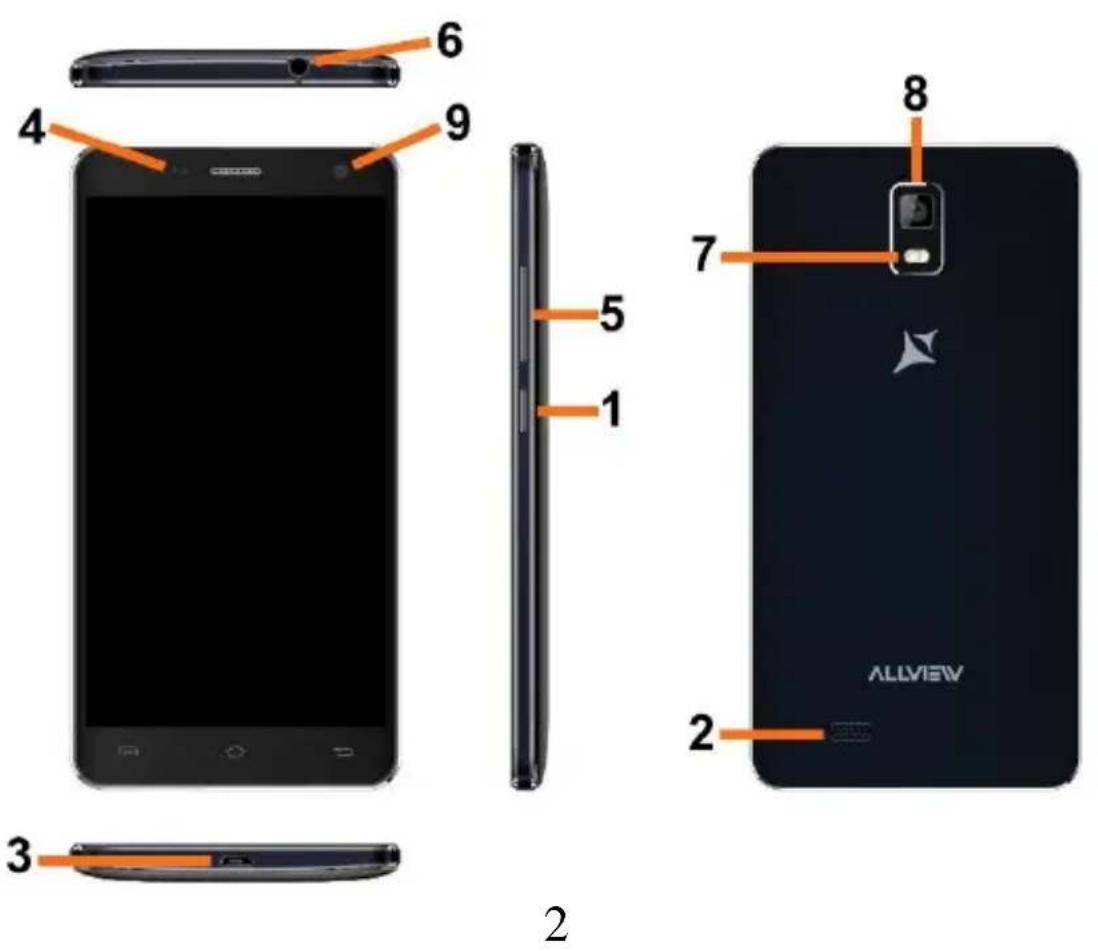
| EN | BG | CZ | DE | HU |
| 1 Power button | 1 Бутонът за захранване | 1 Tlačitko napájení | 1 Power-Taste | 1 gomb |
| 2 Speaker | 2 говорител | 2 Reproduktor | 2 Lautsprecher | 2 Hangszóró |
| 3 Micro USB plug | 3 Micro USB щепсел | 3 Micro USB | 3 Micro-USB | 3 Micro USB |
| 4 Light sensor | 4 светлинен сензор | 4 Světelný senzor | 4 Lichtsensor | 4 Fényérzékelő Hangerő |
| 5 Volume buttons | 5 сила на звука | 5 Tlačitka hlasitosti | 5 Lautstärketasten | 5 gombok |
| 6 Earphones jack | 6 слушалки жак | 6 Sluchátka jack | 6 Kopfhörerbuchse | 6 Fülhallgató jack |
| 7 Led Flash | 7 Led Flash | 7 Led Flash | 7 LED-Blitz | 7 LED vaku |
| 8 Main camera | 8 Назад камера | 8 Zpět fotoaparát | 8 Zurück Kamera | 8 Hátulsó kamera |
| 9 Front camera | 9 Предна камера | 9 Přední fotoaparát | 9 zweite Kamera | 9 Elülső kamera |
| NL | PL | RO | SR | |
| 1 Uit-knop | 1 Przycisk zasilania | 1 Buton pornire | 1 Dugme za uključivanje | |
| 2 Spreker | 2 Głośnik | 2 Difuzor | 2 Mikrofon | |
| 3 Micro-USB-stekker | 3 Micro USB plug | 3 Mufa Micro USB | 3 Utičnica USB | |
| 4 Lichtsensor | 4 Czujnik światła | 4 Senzor lumina | 4 svetlosni senzorDugme za jačinu | |
| 5 Volumeknoppen Oortelefoon-aansluiting | 5 Przyciski głośności | 5 Butoane volum | 5 zvuka | |
| 6 LED-flitser | 6 Słuchawki jack | 6 Mufa casti | 6 Utičnica za zvučnike | |
| 7 Terug camera | 7 Led Flash | 7 Led Flash | 7 Led Flash | |
| 8 Camera vooraan | 8 Tylna kamera | 8 Camera principala | 8 Kamera pozadi | |
| 9 Aparat z przodu | 9 Camera frontala | 9 Kamera spreda |
Notices for the use of phone
CAUTION! Please read carefully this instructions and follow them, in the case of dagerous situations.
Driving safety: It is recommended not to use the phone while driving. If you use it however, turn on the Handsfree mode.
Turn off your phone while in an aircraft.
Interference caused by mobile phones affects aviation safety, and thus is illegal to use it on the plane. Please make sure that your mobile phone is turned off when you are on the plane.
In hospital: When using the phone in a hospital must submit to the relevant rules specified by the hospital. Any interference caused by wireless devices may affect the performance of the phone.
Approved service: Only approved repair shops can repair mobile phones. If you open the phone and try to fix it yourself you will void the warranty of the product.
Accesories and batteries: Only accessories and batteries approved by the producer can be used.
Emergency calls: Make sure the phone is turned on and enabled if you wish to make an emergency call, press the call key and confirm the location, explain what happened and do not close the call.
The battery and charging the battery: It is recommended to fully charge before first use of the device. Do not expose the battery to temperatures above 40 °C . Do not dispose the battery in fire or drop anywhere. Return defective batteries in special centers or to the supplier center.
Warning: We take no responsibility for situations where the phone is used other than as provided in the manual. Our company reserves the right to make changes in the content of the manual without making this public. These changes will be posted on the company website to the product it amends.
The contents of this manual may be different from that in the product. In this last case will be considered.
To avoid the problems that might occur with the service shops approved by Visual Fan Ltd. (because Visual Fan
4 En
reserves the right to stop the collaboration with any service shop which was previously approved and mentioned in the warranty card on the date on which the product batch was sold on the market), before taking a product to the service shop, please check the updated list of approved service shops on Allview website at the section:
"Support&Service – Approved service".
For more product details visit www.allviewmobile.com. Do not cover the antenna with your hand or other objects. Failure to comply resulting in connectivity issues and rapid discharge of the battery.
All applications provided by third parties and installed in this device, may be modified and/or stopped at any moment. Visual Fan Ltd will not be responsible in any way for modifications of the services or content of these applications. Any request or question regarding third party applications may be addressed to owners of these applications.
Device power on/off and standby
After inserting the SIM card, memory card and battery, start the phone by holding down the Power button for 3 seconds. To power off, press and hold the same button and confirm. If you press the Power button you will set phone in standby mode, to return shortly press the same button.
Unlocking, idle screen and applications menu
To unlock the screen when resuming from standby, press and hold the lock icon and drag to right. The main screen will be displayed.
Home screen pages can be customized with shortcuts and widgets. At the top of the screen is placed the notification bar that contains information about the mobile network signal, WiFi, Bluetooth, battery level, time and events.
To display the applications menu, touch the Menu 📁 icon from the bottom of the main screen. Slide the screen to left to scroll main menu. Touch the desired application icon to access it. Use the Back button to return to the main screen.
5 En
Dialing
To call a number, from the main screen open the dialer, dial the number and press the call key.
To answer a call drag the icon to right, and to reject the call drag the icon to left.
You can call numbers directly from Call log, touch the dial symbol from the right side of the desired number.
Messaging
To create and send an SMS, proceed as follows:
- Open the applications menu;
- Open the Messaging application;
- From the bottom-right side of the screen touch Compose new message symbol;
- Write the message;
Note: You create an MMS by touching the attach symbol and adding media content: images, sound or movies.
- In the top text box add the number or the name of the recipient;
- Tap the arrow -> symbol from the right side of the text box to send the message.
Contacts
Access the Contacts from menu applications.
Add new contact:
- Open Contacts from main menu;
6 En
- Tap the + symbol from the bottom-right side of the screen;
- Select the memory where you will store: account or phone entry;
- Enter contact information;
- Finally, tap Save.
Add new contact from call log:
- From the applications menu, open the Dialer;
- Tap the phone number you want to save;
- Tap New contact button;
- Select the memory where you will store: account or phone entry;
- Enter contact information;
- Finally, tap Save.
Import/export contacts
You can import or export contacts between memories and accounts available, as follows:
- Open Contacts;
- Press the Options button and select Import / Export;
- Choose memory from which to copy contacts;
- Choose in which memory to copy the contacts;
- Select contacts to copy;
- Press the Copy button;
Synchronize contacts with an account
Note: If you don't have an account, you can create one which is also necessary for the Google Play™ store.
You can synchronize the contacts of an account by following the next steps:
- Open the applications menu -> Settings -> Applications -> ACCOUNTS;
- Touch the desired account; if you don't have allready set, you can add a new one by touching the button Add new account;
- Tick the option Sync contact;
Customize contacts with photo
Note: The contacts from SIM card cannot be customized with photo.
To add a photo to one contacts follow the steps:
- Open Contacts;
- Touch the desired contact name;
- On the top-right of the screen touch the contact editing symbol;
- In the left corner of the screen touch the symbol to add image;
- Select the input method of image: photo shoot or from gallery.
Google Play store
Google Play store provides a multitude of applications from various categories: games, business, communication, shopping, travel, entertainment, books, education, finance, photography, tools, media, social, sports, news.
The first time you open the Google Play store, you will be prompted to authenticate. If you already have a Google ^TM account, enter the data. If not, click the Create button to create a new account and follow the steps on the screen.
8 En
Settings
Your service provider may default some device settings, so you may not be able to change these settings.
Dual SIM setting
You can choose the default SIM card for Voice call, Data call, Messaging.
Note: the Gemini is a built-in technology that allows you to receive a phone call on a SIM card when you are making data transfer from the other SIM card.
WLAN
Touch Wi-Fi switch to activate. Open Wi-Fi to search for available networks automatically. Networks without password can be used directly, for others you need to enter the password first.
Bluetooth
Touch Bluetooth switch to activate. Touch Bluetooth to enter the device searching screen. You can modify settings by pressing the Menu button.
Data usage
Here you can activate or deactivate the data connection and see a chart of data usage status. You can also set the data mobile limit for each SIM.
More
Airplane mode
9 En
Virtual Private Networks(VPN) Settings.
Tethering & portable hotspot
Wifi Direct
Mobile network
3G service: here you can enable/disable the 3G service.
Preffered networks
Access point names: add or modify the access points.
Network operators.
Sounds
This option allows you to set audio tones for incoming calls, e-mail alerts and SMS notifications. Settings include: Vibration, Volume, Tone Audio, Reviews
Select General / Silent / Meeting / Outdoor profile by touching the right side circle.
Power Saving
You can choose one of the three power schemes:
-Closed
-Normal: calling and messaging are available; data connection remains the same state
-Super-long standby: calling and messaging services remains in the same state.
Display
a. Brightness: adjust the brightness
b. Wallpaper: change the wallpaper picture for idle screen, lock screen and main menu
c. Auto rotating screen: rotate phone to change direction
d. Alert missed call & sms: blink screen backlight on missed call or unread sms. You will also receive
notifications about missed calls and unread messages in the form of animated icons in the lock screen;
e. Sleep: adjust the delay before the screen automatically locks
f. Font size
Storage
1) View SD Card and Phone Memory.
2) Uninstall or Format SD Card.
Battery
Displays information about the charging status and usage of the battery.
Applications
Shows the list of the installed and downloaded applications, which of them are installed on SD CARD.
Location
Access to my location: enable applications to use your location information.
GPS satellites: switch on/off the GPS receiver.
Google Location Service™: let applications to use the WiFi or mobile network connection to get localization.
Security
1) Set up screen locks: you can choose slide, pattern, PIN or password to unlock the screen.
2) Set up SIM card lock: enter 4-8numbers PIN to set the lock of SIM.
If you enter 10 times wrong PUK code, the SIM card will be permanently locked.
3) Password visible: password visible when enter it
4) Select device administration: add or delete device manager.
5) Unknown sources: install apps from unknown sources
6) Trusted credentials: show the trusted credentials
7) Install from SD card: install the encrypted certificate from SD card.
Languages and input
1) Selecting Language: include all the languages on the phone and totally amount of 12 kinds.
2) Spell checker
3) Personal Dictionary: add words to custom dictionary or delete.
4) Input method : you can select Android™ keyboard or MultiLing keyboard input method.
5) Text to speech settings
6) Pointer speed
Reset to factory settings
Backup my data: backup my settings and data of other applications.
Factory data reset: clear all data stored on the phone.
Accounts
Add, manage and change synchronization options for the used accounts.
Date and Time
1) Automatic date & time: use date and time provided by network or by GPS
2) Automatic time zone: check to use network-provided time zone
3) Set Date / Set time: touch to set date / time.
4) Selecting time zone Select Time Zone according to where you are.
4) Use 24 hour time format : ON/OFF
5) Select date format.
Schedule power on/off
You can set time of boot or shutdown the phone.
Schedule airplane on/off
You can set the time of activating or deactivating the plane mode.
Accessibility
- Power button end call
- Touch and hold delay
- Install web scripts
Developer options
Set options dedicated to the Android software developers
About phone
You can check the information about: phone status, legal informations, software version.
DECLARATION OF CONFORMITY
No 1351
We, S.C. Visual Fan S.R.L, with the social headquarters in Brasov, 61st Brazilor Street, post code 500313 Romania, registered at the Register of Commerce Brasov under nr. J08/818/2002, CUI RO14724950, as importer, ensure, guarantee and declare on own responsibility according to Art. 4 HG nr.1.022/2002 regarding the products and services regime, which could put in danger the life and health, security and labour protection, that the ALLVIEW product P6 Qmax does not put in danger the life, safety of labour, does cause adverse environmental impacts and is according to:
-The 2011/65/UE Directive regarding the usage restrictions of some dangerous substances in the electronic and electrical equipments.
-The Directive regarding the radio and telecommunications equipments R&TTE 1999/5/CEE (HG 88/2003)
-The Directive regarding the assurance of low voltage equipment users 73/32/CEE, modified by the 93/68/CEE (HG457/2003)
Directive.
-The Directive regarding the electromagnetic compatibility 89/336/CEE, modified by the 92/31/CEE si 93/68/CEE (HG982/2007);
RoHS Directive: EN50581:2012
-The safety requirements of the European Directive 2001/95/EC and of the EN 60065:2002/A12:2011 si EN 60950-1:2006/ A1:2010 /A11:2009/A12:2011 standards, regarding the decibel level limit of the commercialized devices.
The product had been evaluated according to the following standards:
-Health: EN 50360:2001, EN 50361; EN 62209-1 : 2006
-Safety: EN 60950-1:2001+A11:2004; EMC EN 301 489-01 V1.6.1 (09-2005)
EN 301 489-07 V1.3.1 (11-2005); EN 301 489-17 V1.2.1 (08-2002)
-Radio spectrum: EN 301 511 V9.0.2 (03-2003); EN 300 328 V1.7.1 (10-2006)
The conformity assessment procedure was done according to the 1999/5/CEE Directive (of the Annex II of HG nr. 88/2003) the documentation being at S.C. Visual Fan S.R.L., Brasov, 61st Brazilor Street, post code 500313, Romania at it will be put at disposal on demand. The products conformity assessment procedure was fulfilled with the participation of the following institutions: Phoenix Testlab GmbH
The product has the CE mark applied. The conformity declaration is available at www.allviewmobile.com.
CE0700
SAR: 0,699 W/kg
Brasov
25.03.2015
Director
COTUNA GHEORGHE

Schedule airplane on/off
Director Cotuna Gheorghe
SIGURNOSNE MERE
VAŽNO! Molimo vas da pažljivo pročitate ova uputstva da ih sledite u opasnim slučajevima.
Google, Android, Google Play and other marks are trademarks of Google Inc.
Bulgarian (bg)
- ALLVIEW®
- P6 Qmax
- Notices for the use of phone
- En
- Device power on/off and standby
- Unlocking, idle screen and applications menu
- En
- Dialing
- Messaging
- Contacts
- En
- Add new contact from call log:
- Import/export contacts
- Synchronize contacts with an account
- Customize contacts with photo
- Google Play store
- En
- Settings
- Dual SIM setting
- WLAN
- Bluetooth
- Data usage
- More
- En
- Sounds
- Power Saving
- Display
- Storage
- Battery
- Applications
- Location
- Security
- Languages and input
- Reset to factory settings
- Accounts
- Date and Time
- Schedule power on/off
- Schedule airplane on/off
- Accessibility
- Developer options
- About phone
- DECLARATION OF CONFORMITY
- SIGURNOSNE MERE
- Bulgarian (bg)
Brand : Allview
Model : P6 Qmax
Category : Smartphone