
ES 800 - Juicer Rommelsbacher - Free user manual and instructions
Find the device manual for free ES 800 Rommelsbacher in PDF.


| Product Type | Juicer |
| Brand | Rommelsbacher |
| Model | ES 800 / ES 800/E |
| Power Consumption | Approx. 800 W |
| Rated Voltage | 230 V ~ 50 Hz |
| Protection Class | II |
| Speed Control | Infinitely variable, 5 speed levels |
| Max Continuous Operation (soft food) | 5 minutes |
| Max Continuous Operation (hard food) | 2 minutes |
| Cooling Down Period | At least 2 minutes |
| Grater Material | Stainless steel |
| Filter Type | Micro-mesh filter |
| Safety Features | Double micro switch system: top cover and locking clamp interlocks |
| Soft-Start Function | Yes |
| Dishwasher Safe Parts | Pulp container, top cover, grater with filter, foam separator, juice jug and its cover, juice container with spout |
| Non-Dishwasher Safe Parts | Base unit, pusher, cleaning brush |
| Accessories Included | Pulp container, juice jug with foam separator and lid, pusher, cleaning brush |
| Intended Use | Domestic juicing of fruit and vegetables |
| Not Suitable For | Bananas, avocados, eggplants, figs, coffee beans, nuts, cereals, meat, soup pureeing |
| Cleaning Method | Base unit wipe with damp cloth; other parts wash with hot water and detergent or in dishwasher |
Frequently Asked Questions - ES 800 Rommelsbacher
User questions about ES 800 Rommelsbacher
0 question about this device. Answer the ones you know or ask your own.
Ask a new question about this device
Download the instructions for your Juicer in PDF format for free! Find your manual ES 800 - Rommelsbacher and take your electronic device back in hand. On this page are published all the documents necessary for the use of your device. ES 800 by Rommelsbacher.
USER MANUAL ES 800 Rommelsbacher
natural_image
Black-and-white photo of a modern juicer with a glass pitcher and fruit in the foreground (no visible text or symbols)ES 800/E
Edelstahl Entsafter
Stainless steel juicer
Produktbeschreibung - Product description
natural_image
Four-panel sequence showing a hand using a brush to press or adjust a small electronic device, no text or symbols visible.natural_image
Sequence of five grayscale images showing a hand pouring liquid into a small container, illustrating a step-by-step process (no text or symbols)natural_image
Sequence of five photos showing hands using a cooking pot to press or feed a cup, with no visible text or symbols.natural_image
Four-panel sequence showing a hand using a brush to clean a small glass in a container, with no visible text or symbols.Prior to initial use 17
Functionality of the juicer 17
Integrated safety system 18
Description of the control panel 18
How to disassemble your appliance 18
How to assemble your appliance 19
Operating the appliance 20
Preparing the appliance for use 20
Switching the appliance on or off 21
Emptying the pulp container during use 21
Easing congestions of the grater during use 21
Cleaning and maintenance 22
Tips for extracting juice 23
Introduction

We are pleased you decided in favour of this superior juicer and would like to thank you for your confidence. Its easy operation and wide range of applications will certainly fill you with enthusiasm as well. To make sure you can enjoy using this app-
liance for a long time, please read through the following notes carefully and observe them. Keep this instruction manual safely. Hand out all documents to third persons when passing on the appliance. Thank you very much.
Intended use
The appliance is designed for extracting the juice from fruit and different kinds of vegetables (domestic use only). Other uses or modifications of the appliance are not intended and harbour considerable risks. For damage arising from not intended use, the manufacturer does not assume liability. The appliance is not designed for commercial use.
Technical Data
Only connect the appliance to an isolated ground receptacle installed according to regulations. The rated voltage must comply with the details on the rating label. Only connect to alternating current.
Nominal voltage: 230 V\~ 50 Hz
Nominal power: ca. 800 W
Protection class: II
Max. continuous operation time: soft food: 5 minutes
hard food: 2 minutes
Scope of supply
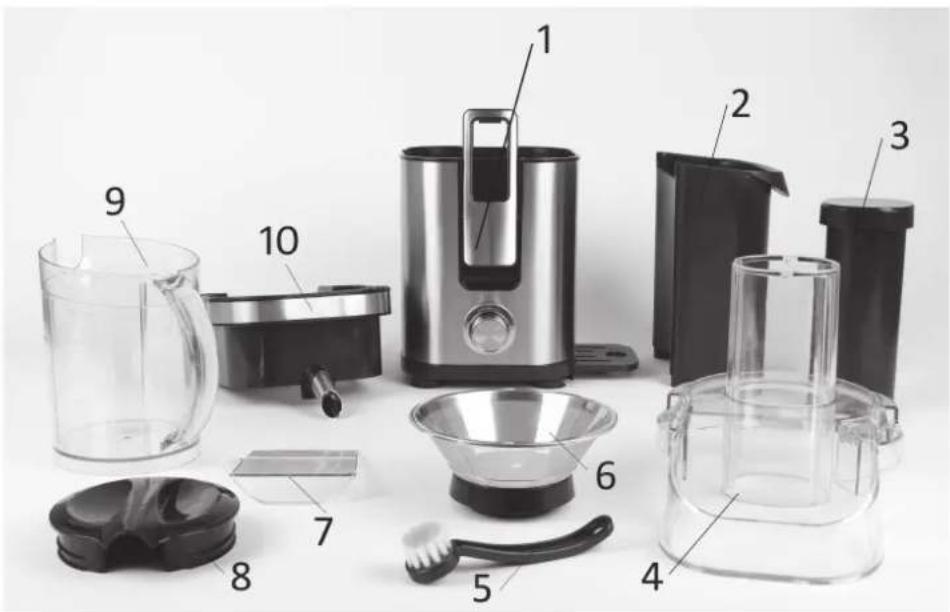
Check the scope of supply for completeness as well as the soundness of the product and all components (see product description page 2) immediately after unpacking.
Packing material
Do not simply throw the packing material away but recycle it.
Deliver paper, cardboard and corrugated cardboard packing to collecting facilities. Also put plastic packing material and foils into the intended collecting basins.


In the examples for the plastic marking PE stands for polyethylene, the code figure 02 for PE-HD, 04 for PE-LD, PP for polypropylene, PS for polystyrene.
For your safety

WARNING: Read all safety advices and instructions. Non-observance of the safety advices and instructions may cause electric shock, fi re and/or bad injuries.
General safety advices
• Always keep children away from the product and the power cord.
• Children must not use this appliance.
- Persons not having the knowledge or experience in operating the appliance or having handicaps of physical, sensorial or mental nature must not operate the appliance without supervision or instruction by a person, responsible for their safety. Never leave the appliance unattended during operation.
- Children should be supervised in order to ensure that they do not play with the appliance.
- Packing material like e. g. foil bags should be kept away from children.
- Do not operate this unit with an external timer or a separate telecontrol system.
- Prior to each use, check the appliance and the attachments for soundness, it must not be operated if it has been dropped or shows visible damage. In these cases, the power supply must be disconnected and the appliance has to be checked by a specialist.
- When laying the power cord, make sure that no one can get entangled or stumble over it in order to avoid that the appliance is pulled down accidentally.
- Keep the power cord away from hot surfaces, sharp edges and mechanical forces. Check the power cord regularly for damage and deteriorations. Damaged or entangled cords increase the risk of an electric shock.
- Do not misuse the power cord for unplugging the appliance!
- Never immerse base unit, power cord and power plug in water for cleaning.
- Do not store the appliance outside or in wet rooms.
- This electrical appliance complies with the relevant safety standards. In case of signs of damage to the appliance or the power cord, unplug the appliance immediately. Repairs may be affected by authorised specialist shops only. Improper repairs may result in considerable dangers for the user.
- Improper use and disregard of the instruction manual void all warranty claims.
Safety advices for using the appliance

WARNING: Risk of injuries.
During operation, do not use your fingers or other objects to stir in the filling hole or the grater. Only use the provided pusher for pressing down the food!
Thus act with caution:
- The grater is very sharp; therefore handle it with care to avoid injuries!
- It is imperative to keep your hair, hands and clothes away from the filling hole and the grater to prevent getting hurt.
- Avoid any no-load operation and do not handle the appliance with hands wet.
- The appliance keeps running for ca. 10 – 15 seconds after it has been switched off – therefore please wait until it has stopped before opening the top cover.
- Never operate the appliance when the grater is defective.
- Empty the pulp container regularly so that the pulp can be thrown out any time and does not block the grater.
- Observe the following when setting up the appliance:
- Place the appliance on a heat-resistant, stable and even working surface.
- Do not operate the unit in the vicinity of sources of heat (oven, gas flame etc.) or in explosive environments, where infl ammable liquids or gases are located.
- Place it beyond children's reach.
- Leave a sufficient space around the appliance to ensure an unobstructed working area. See to a free air circulation.
- Pull the mains plug after each use for safe switch-off.
Prior to initial use
For a start, please clean the appliance as well as all attachments. For more detailed information please refer to “Cleaning and maintenance”.
Functionality of the juicer

Attention hazard of injury: The grater is very sharp, handle the grater with care to avoid injuries!
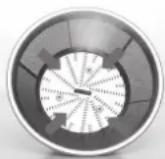
The food is filled in through the filling hole and pressed down with the pusher. The food gets on the quickly rotating grater and is grated finely. Due to the centrifugal force, the grated food is pressed on the aslant surfaces of the micro-mesh filter. There, the juice is extracted. The pulp is thrown out, the gained juice gets in the juice container and in a vessel via the spout.
Integrated safety system
The appliance has a double protection. Together with the observance of the advices of this instruction manual, the safety system ensures a safe operation of the appliance.
- Safety lock of the top cover.
The base unit has a micro switch at the upside. The appliance will only work if the top cover is attached correctly and the locking clamps are firmly engaged. - Safety lock of one locking clamp.
The locking clamp above the rotary knob has a micro switch. The appliance will only work if the locking clamp is engaged correctly.
Description of the control panel
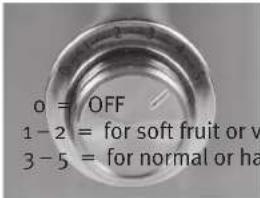
The juicer has an infinitely variable speed control which can be regulated via the rotary knob. The higher the setting of the speed the higher the drive. The speed influences the juice result. Please choose the setting individually according to your taste.
How to disassemble your appliance

Attention hazard of injury: The grater keeps running for ca. 10 – 15 seconds after it has been switched off – therefore disassemble the juicer only at stillstand! Attention hazard of injury: Do not grasp in the fi lling hole and the grater! The grater is very sharp, handle the grater with care to avoid injuries!
- Switch the appliance off - pull the mains plug!
natural_image
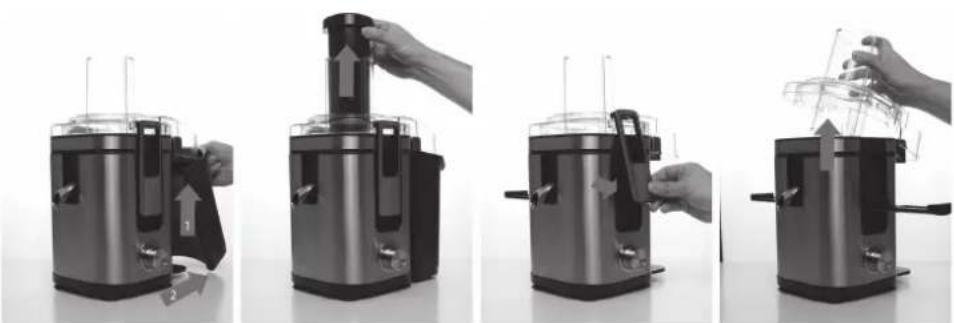
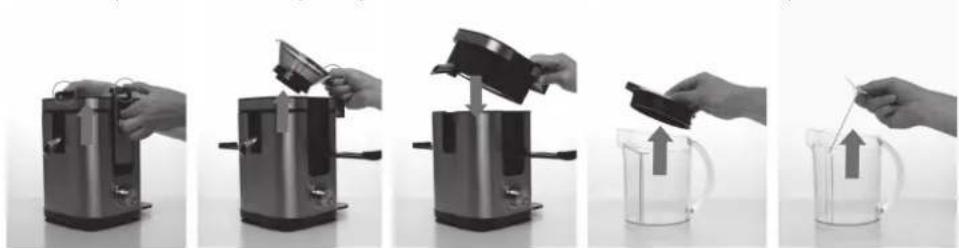
Four-panel sequence showing a hand using a digital brush to press or adjust a small electronic device, with no visible text or symbols.- Remove the pulp container. For this, take the pulp container at the recessed grips and lift the container slightly until it comes off the base lock. Afterwards tilt the container slightly and remove it.
- Remove the pusher.
Remove the pusher from the filling hole. - Remove the top cover.
For this, open the two locking clamps and fold them aside. Now, remove the top cover.
natural_image
Sequence of five steps showing a hand pouring liquid into a small container using a stand mixer (no text or symbols visible)- Remove the juice container and the grater.
For this, fold the two locking clamps up. Grasp in the recesses of the clamps at both sides and push the juice container up. Tilt the two locking clamps to the side again. Firstly remove the grater with the micro-mesh fi liter carefully. For this, take the grater carefully at the rim of the fi liter and lift it. Remove the juice container next.
• Disassemble the juice jug.
For this, remove the top cover of the juice jug. Afterwards pull the foam separator out.
How to assemble your appliance

Attention hazard of injury: Do not grasp in the grater! The grater is very sharp, handle the grater with care to avoid injuries! Only assemble the appliance at stillstand!
- Switch the appliance off – pull the mains plug!

natural_image
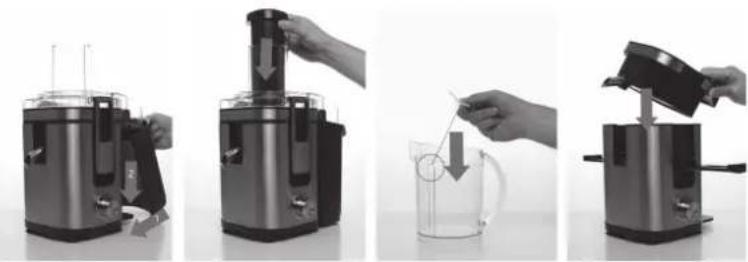
Sequence of five-step cooking process showing a pot, lid, and fan with a 'CLICK!' button (no text or symbols on objects)- Attach the juice container.
Please take the juice container and place it on the intended bulge on the base unit.
- Attach grater with micro-mesh filter.
Take the grater carefully at the rim of the micro-mesh filter and place the grater on the gear. Press against the rim of the grater with both thumbs until the grater engages. You will hear a clear "click" when the parts engage.
Check the correct seat of the grater by turning!
- Attach and lock the top cover.
Please take the top cover and place it on the juice container. The filling hole must be centrally
above the grater. Fold the two locking clamps up and hook the clamps into the intended bulges of the top cover. Now, push the locking clamps inwards until they engage. You will hear a clear "click" when the parts engage. Check the fi rm locking of the clamps!
natural_image
Four-panel sequence showing a hand pouring liquid into a glass container using a juicer, illustrating the process (no text or symbols visible)- Attach the pulp container.
Take the pulp container at the recessed grip and position it slightly aslant below the top cover. Then tilt the container to the back and push it downwards until it engages in the base lock.
- Insert the pusher.
Take the pusher and insert it in the filling hole of the top cover. The guiding of the pusher is made easier by a bar.
- Assemble the juice jug.
Take the foam separator and insert it in front of the two bars and push it downwards as far as it will go.
Then attach the top cover.
Operating the appliance

The appliance is designed for a max. continuous operation time of 5 minutes when processing soft food and 2 minutes when processing hard food. If this time has been reached, the appliance has to cool down for at least 2 minutes. If this is not observed, the motor might be damaged!
- The juicer is not qualified for chopping and grating coffee beans, nuts, nutmegs, cereals, meat etc. as well as for puréeing soup.
- Clean the grater and the filter regularly so that the micro-mesh filter does not congest.
• Empty the pulp container regularly. - We recommend coating the pulp container with a suitable plastic bag where the pulp is collected. This will make the cleaning easier.
Preparing the appliance for use
- Assemble the appliance (see "How to assemble your appliance").
- Make sure the juicer has been correctly and properly assembled and that the grater does not show any damage.
- Please place the provided juice jug or any other suitable vessel below the spout.
Switching the appliance on or off

Attention hazard of injury: Do not grasp in the filling hole and the grater! The grater is very sharp, handle the grater with care to avoid injuries!
- Before plugging the appliance in make sure that you have not accidentally switched it on!
- Remove the pusher from the filling hole.
- Switch the appliance on.
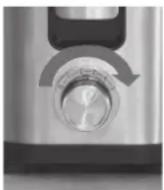
For starting the appliance, turn the rotary knob to the right to the desired speed level.
For a better orientation, the speed is classified in 5 levels.
The appliance has a "soft-start", i. e. the appliance starts slowly and increases the speed evenly to the level you set.
- Pour the food in the filling hole and press it down with the pusher. This can be repeated according to requirements. Make sure that you do not fill too much food in and that you do not apply too much pressure with the pusher.
The best results will be achieved if you press down the pusher slowly.
Please make sure that the vessel below the spout does not spill and that the pulp container is not too full.
- Switch the appliance off.
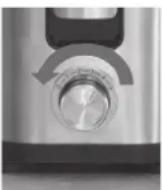
For switching off, turn the rotary knob to the left to the position "o".
Always pull the mains plug after the extracting procedure has been finished!
Emptying the pulp container during use
When extracting larger quantities, the pulp container should be emptied regularly to ensure a trouble-free operation of the appliance.
- Switch the appliance off – pull the mains plug!
- Remove the pulp container (see "How to disassemble your appliance").
- Clean the pulp container.
- Attach the pulp container (see "How to assemble your appliance").
- Before plugging the appliance in make sure that you have not accidentally switched it on!
- Switch the appliance on and start working again.
Easing congestions of the grater during use
During use, it might happen that the pulp accumulates below the fllling hole and congests the grater. This can happen if you process very hard and fi brous food too quickly and with too much pressure on the pusher. Then, it is necessary to ease this congestion.

Attention hazard of injury: The grater keeps running for ca. 10 – 15 seconds after it has been switched off – therefore disassemble the juicer only at stillstand! Attention! Hazard of injury: Do not grasp in the filling hole and the grater! The grater is very sharp, handle the grater with care to avoid injuries!
- Switch the appliance off – pull the mains plug!
- Remove the top cover (see "How to disassemble your appliance").
- Now, carefully ease the congestion in the grater with a spoon made of wood or plastic.
- Attach and lock the top cover (see "How to assemble your appliance").
- Before plugging the appliance in make sure that you have not accidentally switched it on!
- Switch the appliance on and start working again.
Cleaning and maintenance

WARNING: Risk of injuries! Always unplug the appliance before cleaning! Never immerse base unit and mains plug in water or clean them under running water!
- Clean the appliance immediately after use so that residues will not dry up.
- Highly pigmented foods (e. g. carrots) may stain the appliance's plastic parts or accessories. Wipe those parts with some cooking oil before cleaning them.
- The following parts are suitable for cleaning in the dishwasher:
- pulp container (2)
- top cover with filling hole (4)
- grater with micro-mesh filter (6) [after a previous manual cleaning – see below]
- foam separator for juice jug (7)
- top cover for juice jug (8)
- juice jug (9)
- juice container with spout (10)
- The following parts are not suitable for cleaning in the dishwasher:
- base unit (1)
- pusher (3)
- cleaning brush (5)
- Remove all detachable parts from the base unit.
- Clean the base unit with a moist cloth and wipe it dry.
- Clean all other parts in hot water with some dishwashing detergent or if suitable in the dishwasher.
- Clean grater with micro-mesh filter.

Attention hazard of injury: Do not grasp in the filling hole and the grater! The grater is very sharp, handle the grater with care to avoid injuries!
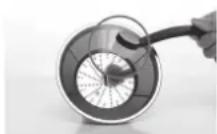
Clean the grater with the micro-mesh fi liter in hot water with some dish-washing detergent and the provided cleaning brush. The grater is very sharp-edged. Therefore, only touch the grater at the rim of the fi liter. Make sure that especially the micro-mesh fi liter is cleaned thoroughly.
- Do not use any abrasives or solvents or sharp-edged objects!
- Never use a steam jet appliance for cleaning!
Tips for extracting juice
• Prepare the food before extracting:
- Clean fruit and vegetables thoroughly with water, scrub with a brush if necessary.
- Peaches, apricots, plums, cherries etc. must be pitted.
- Melons, pomelos, oranges, tangerines, citrons, grapefruits, kiwis, onions etc. must be peeled.
- Celery, cucumbers or other large food which does not fit in the filling hole has to be cut in suitable pieces.
- Apples, pears, strawberries, raspberries, carrots, salad, radish, cabbage, spinach, parsley, tomatoes etc. must not be prepared.
- Bananas, avocados, aubergines, figs etc. are not suitable for extracting.
- Fill fruit juice in ice cube trays and make tasty ice cubes which will certainly not water any drink down.
- The pulp which remains after extracting, contains many nutritive substances and dietary fibres and can be used for cooking and baking. Use it for e. g. vegetable soups, casseroles or cakes (e. g. carrot cake) and fruit desserts.
- The stated data in the below chart are approximate values and mainly depend on the freshness and quality of the food as well as on the personal taste.
| Food to be extracted | Processing | Setting |
| Melons | without paring | 1 |
| Tomatoes | without stalk | 1 |
| Peaches | without pit | 2 |
| Apricots | without pit | 2 |
| Plums | without pit | 2 |
| Strawberries | without stalk | 2 |
| Kiwis | without paring | 2 |
| Pomelos | without paring | 3 |
| Oranges | without paring | 3 |
| Tangerines | without paring | 3 |
| Citrons | without paring | 3 |
| Grapefruits | without paring | 3 |
| Cucumbers | --- | 3 |
| Pears – soft | without stalk | 3 |
| Parsley | --- | 3 |
| Onions | without paring | 3 |
| Cherries | without pit | 3 |
| Cauliflower | --- | 4 |
| Spinach | --- | 4 |
| Broccoli | --- | 4 |
| Celery | --- | 5 |
| Apples | without stalk | 5 |
| Pears – hard | without stalk | 5 |
| Carrots | --- | 5 |
| Radish | --- | 5 |
| Brussels sprouts | --- | 5 |
| Fennel | --- | 5 |

- ES 800/E
- Introduction
- Intended use
- Technical Data
- Scope of supply
- Packing material
- For your safety
- General safety advices
- Safety advices for using the appliance
- Thus act with caution:
- Prior to initial use
- Functionality of the juicer
- Integrated safety system
- Description of the control panel
- How to disassemble your appliance
- How to assemble your appliance
- Operating the appliance
- Preparing the appliance for use
- Switching the appliance on or off
- Attention hazard of injury: Do not grasp in the filling hole and the grater! The grater is very sharp, handle the grater with care to avoid injuries!
- Emptying the pulp container during use
- Easing congestions of the grater during use
- Cleaning and maintenance
- Tips for extracting juice
Brand : Rommelsbacher
Model : ES 800
Category : Juicer